

Tempur-Pedic EASE User Manual
OWNER’S MANUAL
MANUEL DU PROPRIÉTAIRE
MANUAL DEL PROPIETARIO
Customer Service U.S.: 1-800-499-1965 | Canada : 1-800-268-4414
Service Client au É-U. : 1-800-499-1965 | Canada : 1-800-268-4414

table of contents / table des
ENGLISH FRANÇAIS
Safety Precautions and Usage Statements .................... 1–2
Parts List .................................................. 3
Base and Remote Overview ................................... 4
Quick Reference Guide ....................................... 5
Installation Guide ......................................... 6–7
King/Cal King Installation Guide ............................. 8–9
Remote Control ......................................... 10–11
Connecting Strap ........................................... 12
Syncing Two Bases ......................................... 13
Headboard Brackets (not included) .............................14
King/Cal King Headboard Brackets (not included) ................ 15
Emergency Battery Backup Box ............................... 16
Troubleshooting ............................................ 17
Warranty ............................................... 18–19
Consignes de sécurité et directives d’utilisation .............. 20–22
Liste des pièces ............................................ 23
Aperçu de la base et de la télécommande ...................... 24
Guide de référence rapide .................................... 25
Guide d’installation ...................................... 26–27
Guide d’installation pour format très grand/très grand CAL .... 28–29
Télécommande ......................................... 30-31
Bandes de connexion . . . . . . . . . . . . . . . . . . . . . . . . . . . . . . . . . . . . . . . 32
Synchronisation des deux bases .............................. 33
Fixations de la tête de lit .................................... 34
Fixations de tête de lit pour format très grand/très grand CAL ........ 35
Boîtier de piles de secours ................................... 36
Dépannage ................................................ 37
Garantie ............................................... 38-39

safety precautions and usage statements
Attention: Important Safety Disclaimers
Read all instructions before using your EASE®.
SAVE THESE INSTRUCTIONS.
To reduce the risk of shock, burns, fire or injury:
Always unplug the base from the electrical outlet before servicing any
part of the base. To reduce risk of electric shock, unplug the base before
cleaning. To safely disconnect, ensure the base is in a flat position with
all motors off, and unplug from power source.
Keep the power cord away from heated surfaces. Never operate the base
when the air openings are blocked. Keep air openings free of lint, hair
and the like. Do not drop or insert any object into any opening.
Discontinue use of the bed base and contact a qualified service center
if: it has a damaged cord or plug, is not working properly, or has been
dropped into water.
Only use this bed base for its intended use as described in this manual.
Do not use accessories/attachments that are not recommended by the
manufacturer.
Close supervision is required when the bed base is used by or near
children, convalescents or disabled persons.
Outlet Safety:
For optimal safety and operation, plug bed base into a surge protector
(not included).
The bed base should only be plugged directly into a wall outlet or surge
protector (recommended). Improper connection of the equipment can
result in the risk of electrical shock, electrical fire or faulty operation
of this bed base. If the plug does not fit your outlet, contact a qualified
electrician to install a suitable outlet. Unauthorized modification or
failure to use a wall outlet or surge protector could void the electrical
portion of your warranty.
Warranty Warning:
Do not open or tamper with control box, motors, or remote (with the
exception of battery compartments). The warranty will be void if the
internal workings of these components are tampered with. For complete
warranty information refer to the warranty information section on pages
18-19.
In-Home Use and Hospital Disclaimer:
The EASE® are designed solely for in-home use. This base was not
designed as a hospital bed and is not designed to meet hospital
standards. Do not use this base with TENT TYPE oxygen therapy
equipment or near explosive gases.
Pets and Small Children:
Immediately dispose of all packing materials as they may pose a
smothering risk to small children and pets. To avoid injury, it is not
advised to allow children and small pets to play on or under the bed.
Children should not operate the bed base without adult supervision.
Safety Features:
Free-release head and foot motors are designed to lower the mattress
by retracting only with gravity, never pulling downwards, which
minimizes pinch points.
Power Ratings:
INPUT: AC 100–240V 50/60 HZ 1.5A
OUTPUT: DC 29V 1.8A
WATTS: 52.2W
1

safety precautions and usage statements
Product Ratings:
The lift motors are not designed to operate continuously for more than
two [2] minutes in an eighteen [18] minute time period or approximately
10% duty cycle. Attempting to circumvent or exceed this rating will
shorten the life expectancy of the product and may void the warranty.
Weight Limits:
The recommended weight limits on the EASE® are: Twin / Twin Long /
Full / Queen / King / Cal King / Cal King Split: 650 pounds
Maximum weight the bed can support per person is 250 pounds with
the weight evenly distributed across the head and foot sections. This
product is not designed to support or lift this amount of weight in the
head or foot sections alone. NOTE: Exceeding the recommended weight
restrictions could damage your EASE® and void your warranty. For best
performance, you should enter and exit the EASE® while it is in the flat
or fully lowered position.
EASE® fits easily inside bed frames, furniture beds and platform
beds that are certified to hold a minimum of 850 pounds. If using this
adjustable base without the legs and placing directly on a bed frame or
platform bed, cross-bed supports (slats) are strongly recommended to
ensure EASE® maintains stability during operation.
Exceeding this weight restriction could damage the bed
and/or cause injury and will void the warranty.
Acoustics:
In normal base operation the wheels, which allow the bed to maintain
its distance from the wall, will make contact with the steel platform
supports of the base creating a contact noise. When entering, exiting
or shifting weight on the base, this contact noise may be audible as the
wheels make contact. This is normal.
Fabric Care:
To prolong the life of your fabric, protect from direct sunlight whenever
possible. For spot cleaning, wipe area with a light damp sponge or
vacuum with a soft brush attachment to remove particles. Keep at a
minimum of 30cm (12 inches) away from direct heat sources.
For deeper cleaning, blot liquid spills with a clean dry cloth. Wipe with
a clean cloth dampened with warm water. Do not wet excessively. A soft
bristle brush may be used to remove ingrained soil. Avoid scratching by
gentle brushing. Wipe with a clean cloth dampened with warm water to
remove residues after brushing. Dry in shade away from direct heat.
If persistent marks remain visible after cleaning, seek professional
advice.
SAVE THESE INSTRUCTIONS.
FCC Compliance:
This device complies with part 15 of the FCC Rules. Operation is
subject to the following two conditions: (1) This device may not cause
harmful interference and (2) this device must accept any interference
received, including interference that may cause undesired operation.
To comply with the FCC RF exposure compliance requirements, no
change to the antenna or the device is permitted. Any change to the
antenna or the device could result in the device exceeding the RF
exposure requirements and void user’s authority to operate the device.
Radio Frequency: 2.4 GHz
CAN ICES-3 (B)/NMB-3(B)
2
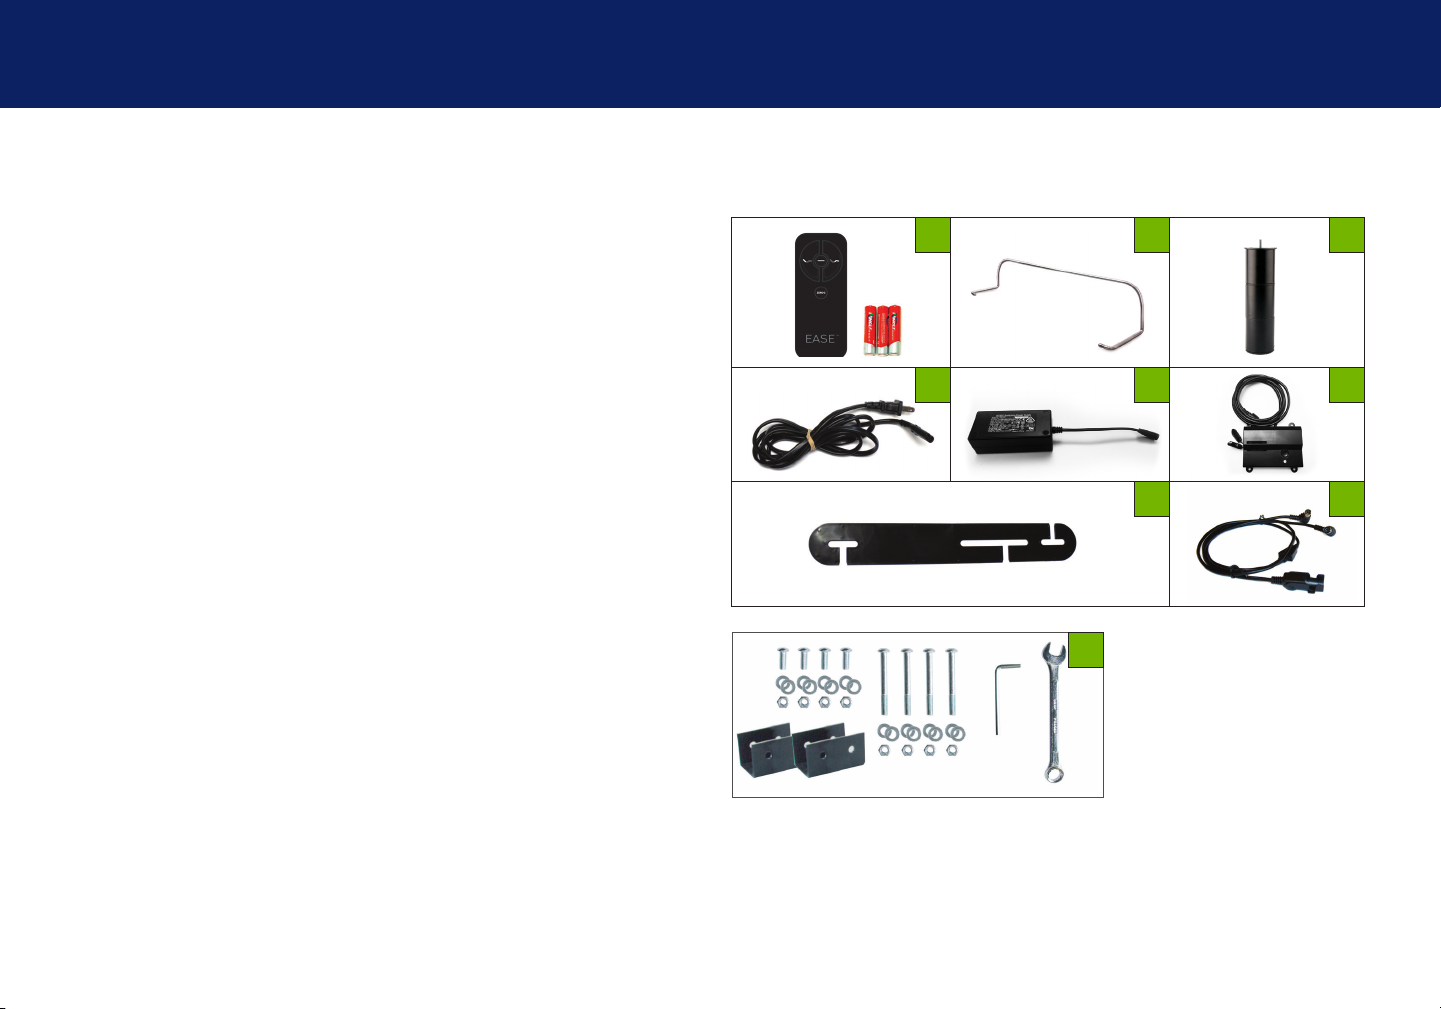
parts list
Before discarding the packing materials, ensure all the parts are accounted for.
All electronics and components that need to be installed are located in
boxes under the base or attached to the frame.
A) Wireless Remote Control (1)
AAA Batteries (3)
B) Mattress Retainer Bar (1)*
C) Legs (4)
(6 Legs included with King/Cal King)
D) Power Cord (1)
E) Power Supply (1)
F) Battery Backup Box
(9 Volt batteries not included)
G) Connecting Strap ‡*
H) Sync Cord ‡
Additional Parts included with King/Cal King:
I) C-Clamps (2)
Long and Short Bolts (4 of each)
Nuts (8) and Washers (16)
5mm Hex Wrench (1)
13mm Wrench (1)
Miscellaneous Parts (not included):
J) Surge Protector (1)
K) 9 Volt Batteries (2)
A) B)* C)
D) E) F)
G)‡* H)‡
A
D
B
E
G
C
F
H
I
* These items are attached to the base for shipping purposes.
Carefully remove from base and set aside.
‡ Only included in Twin, Twin Long and Cal King Split bases.
3
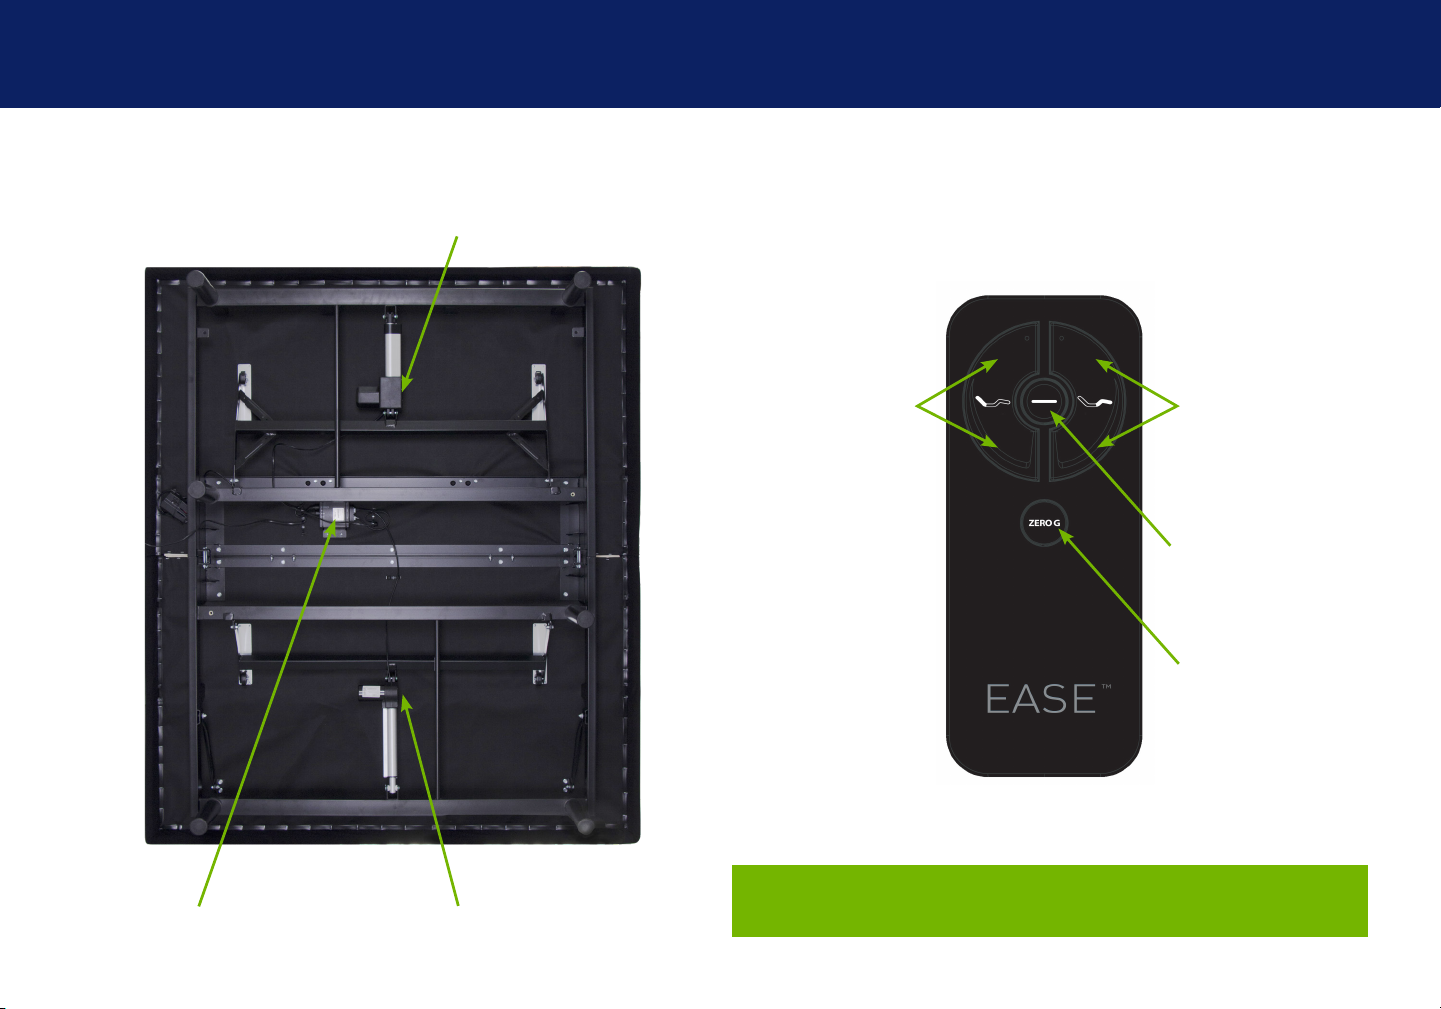
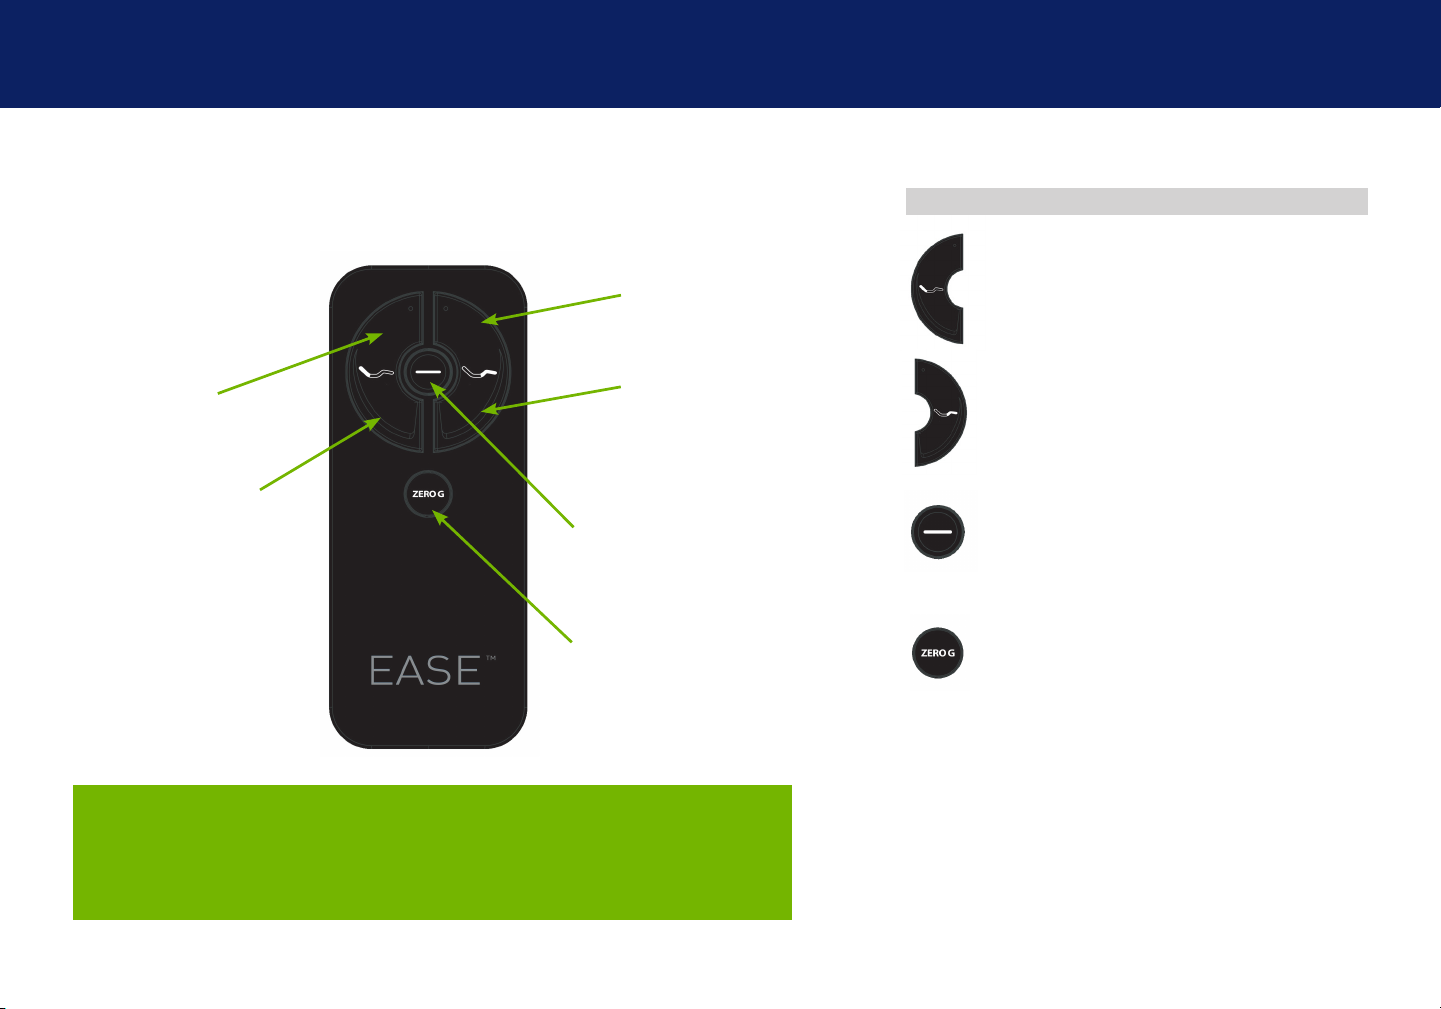
base and remote overview
Actual product design may vary.
Head Motor
Lifts and lowers
Head portion of
the base
Lifts and lowers
Foot portion of
the base
Lowers head and
foot portions of
the base to FLAT
preset position
Zero G adjusts your
legs to relieve pressure off the lower
back
See pages 10–11 for complete Remote Control details
Control Box
Foot Motor
including Child Lock function.
4
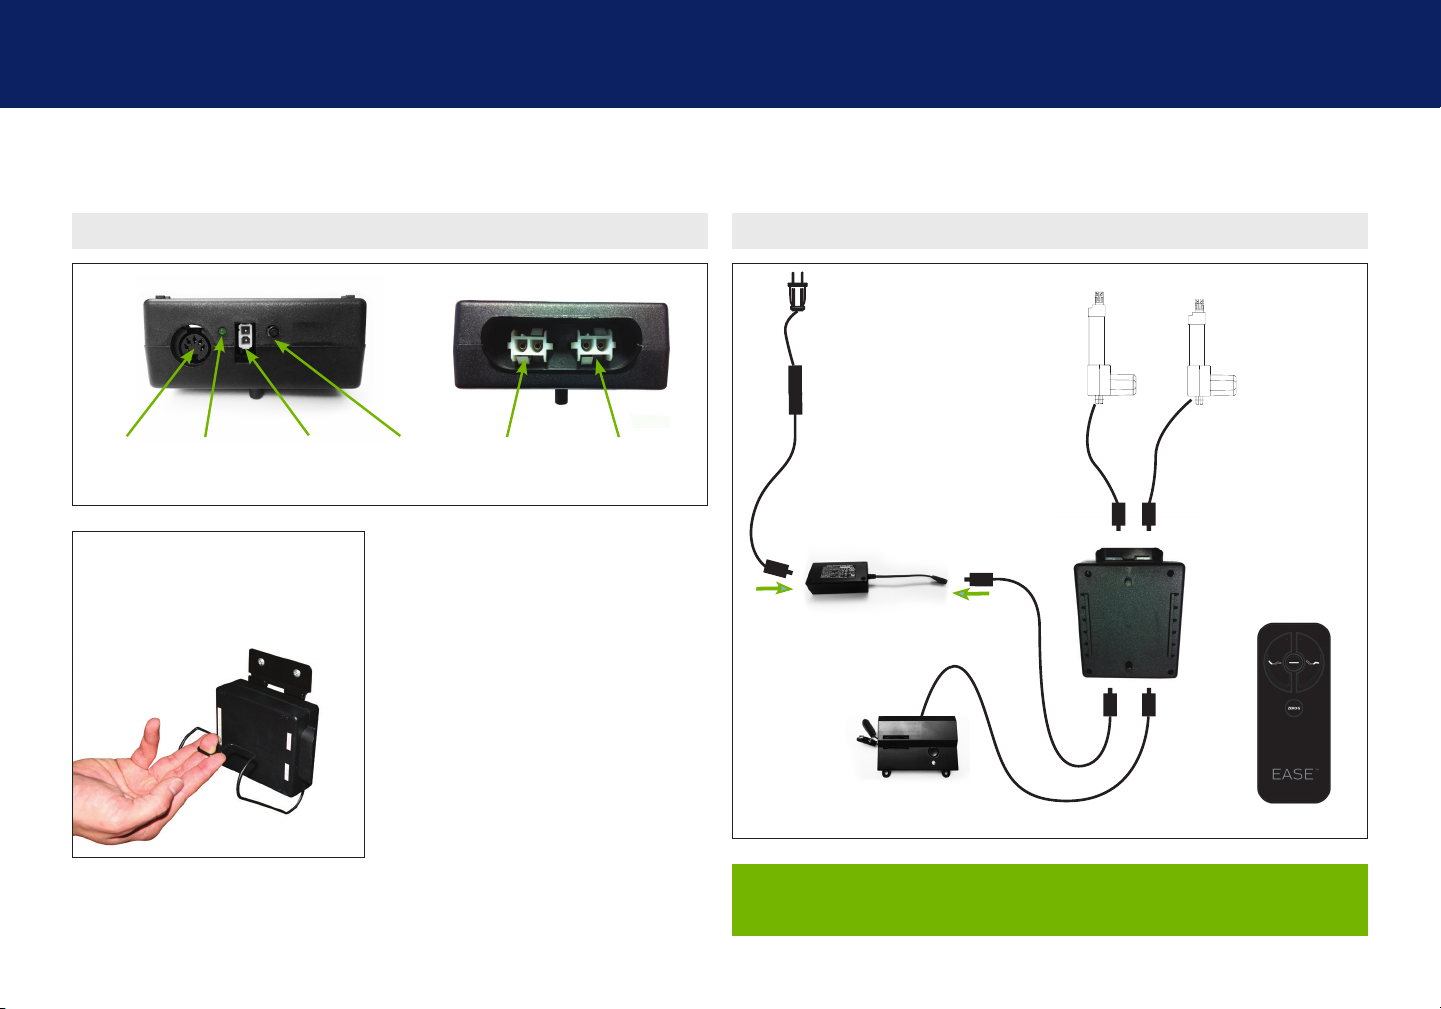
quick reference guide
Not to scale. For illustration purposes only. Read all instructions before beginning installation.
ELECTRONICS OVERVIEWCONTROL BOX OVERVIEW
Head Motor Foot Motor
Power Cord
Port Button Head Motor
To remove Control Box, release
metal clip and unplug cords.
Power
LED Light
Input Cord
Connection
Foot Motor
Port
Port
Input
Power Cord
Power Supply
Battery Backup Box
If installing a split unit, see pages 12–13.
Control Box
Wireless
Remote
5
installation guide
Always use two people when setting up the base.
STEP 1 STEP 4
Place the bed base box in a desired location with the bottom of the box
facing up.
Remove the binding straps and packing materials, making sure not to
puncture the box with any sharp objects.
STEP 2*
Remove the bed base from the box keeping the bottom of the base
facing upwards.
*If installing a King/Cal King base please refer to page 8
STEP 3
To install Headboard Brackets (sold separately)
see instructions on page 14.
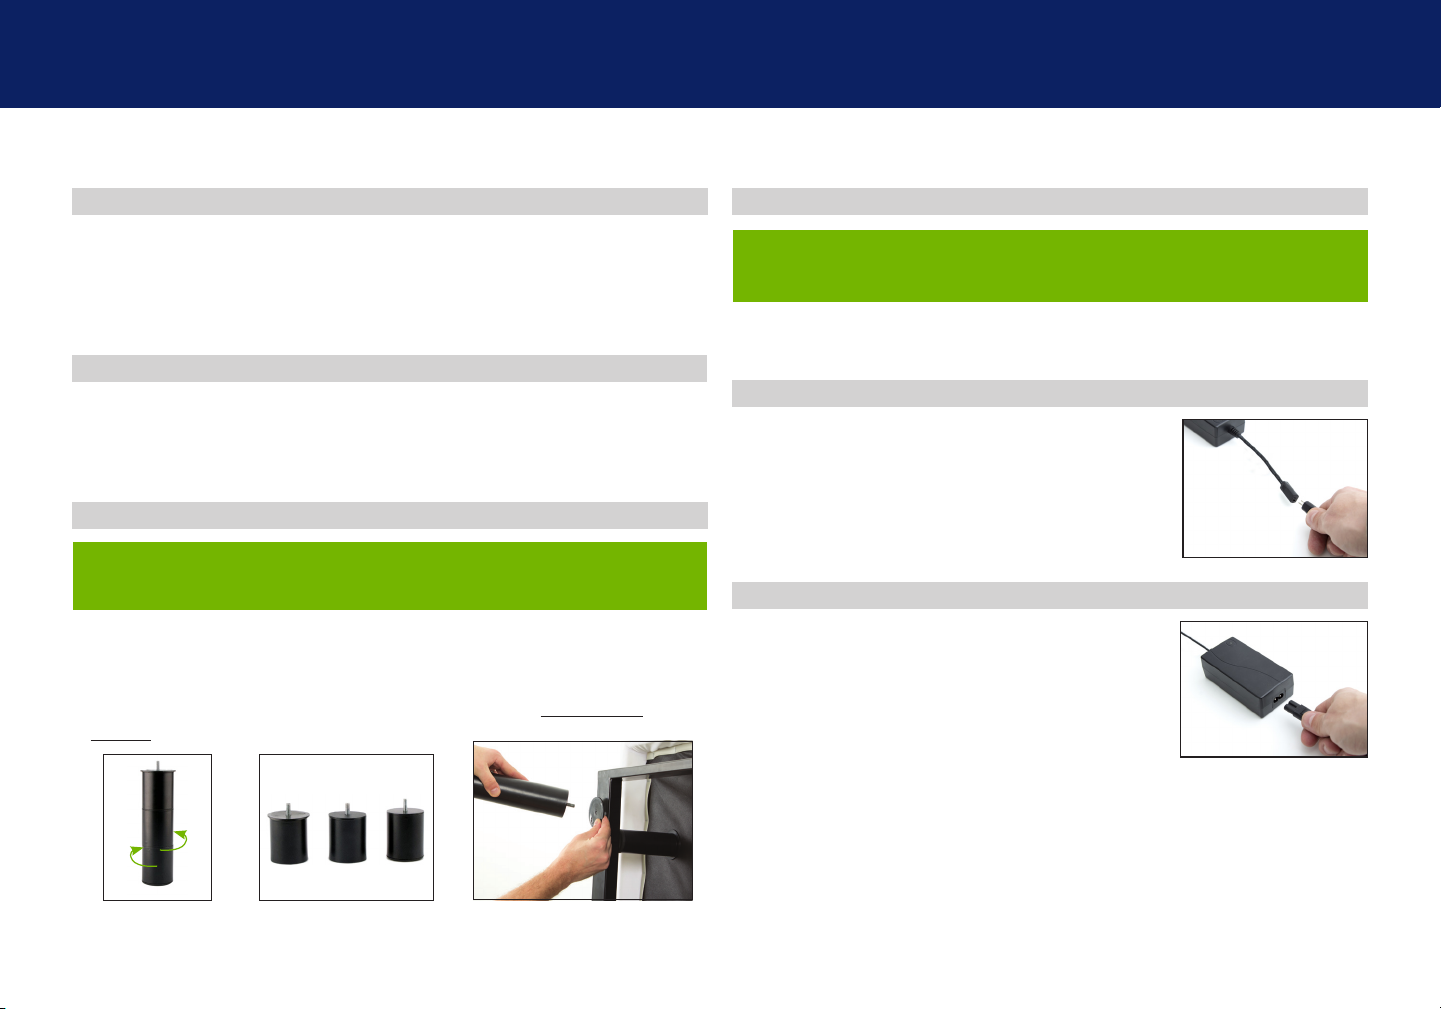
Legs are shipped fully assembled. Alternative heights in 3"
increments can be achieved by removing leg segments.
To install the legs, thread the washer over the bolt of the leg with
the recessed side facing the leg, and tighten by hand. Do not over
tighten.
Locate the Backup Battery Box and install (2) 9 Volt batteries
(not included).
STEP 5
Uncoil input Power Cord (connected to Control
Box’s power port) and plug into Power Supply.
STEP 6
Uncoil the Power Cord and connect to the
Power Supply. Place Power Supply on the
ground and extend from the base. Ensure that
the Power Supply and all attached cords are
directed toward the desired surge protector.
To sync two bases see detailed installation
instructions on pages 12-13.
6
For customer support, call Customer Service: U.S. 1-800-499-1965 | Canada 1-800-268-4414
installation guide
STEP 7
Carefully flip the base over on to its legs. Important: Two people are
required to move the bed base. Do not drag across the floor. Do not rest
frame on its side, excessive pressure may damage the legs.
STEP 8
Plug the Power Cord into a power source.
A surge protector is recommended.
STEP 9
Ensure that batteries are correctly installed. Quickly test remote
functions to verify proper setup before placing mattress on base. Return
the base to a FLAT position before placing the mattress on top.
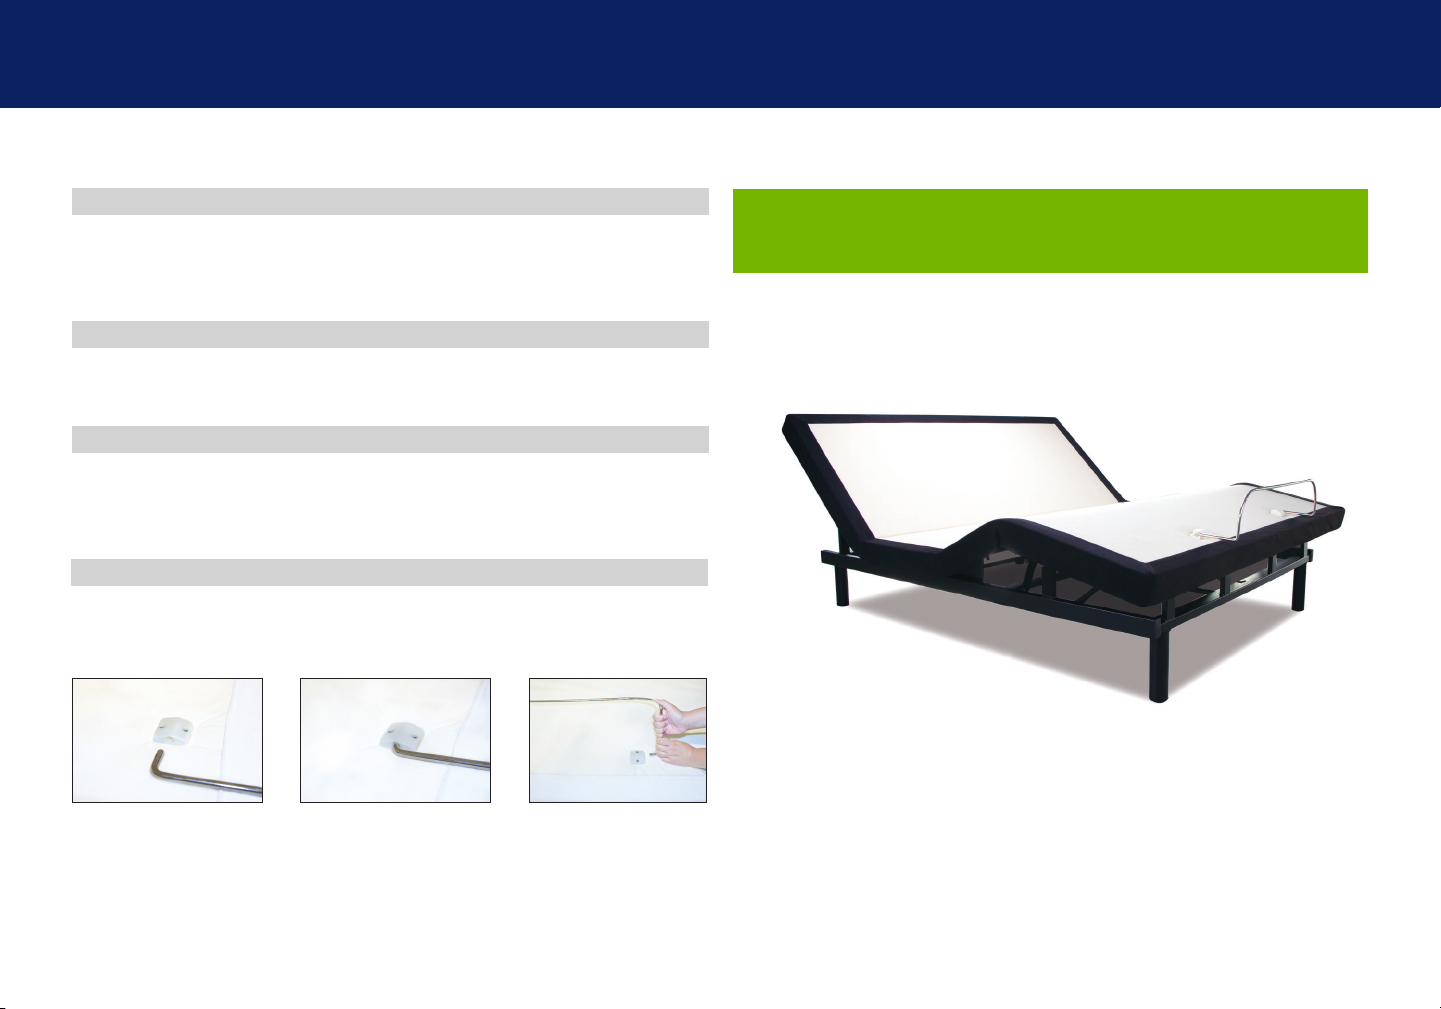
STEP 10
Slide the left side of the Mattress Retainer Bar into the bracket.
Pull the retainer bar to the opposite bracket and secure the right
side.
Setup is now complete!
Test all functions on remote.
For customer support, call Customer Service: U.S. 1-800-499-1965 | Canada 1-800-268-4414
7
king/cal king installation
Always use two people when setting up the base.
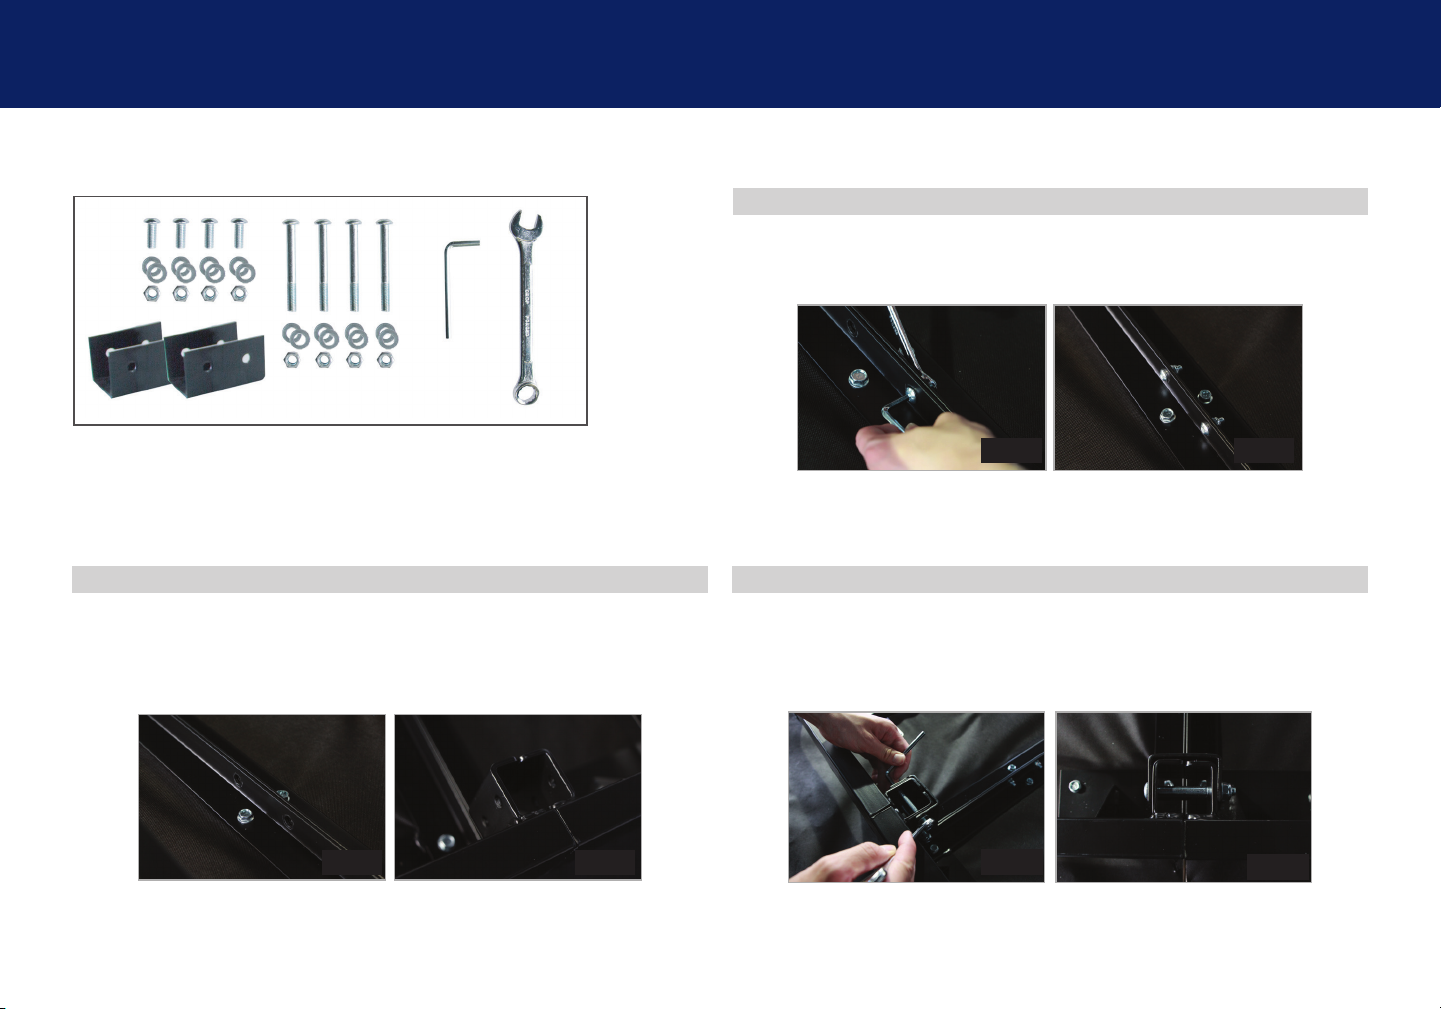
STEP 2
Once aligned, locate 4 bolts in the middle frame. Secure bolts with
nuts and washers as seen in Fig. C and D.
C-Clamps (2)
Long and Short Bolts (4 of each)
Nuts (8) and Washers (16)
5mm Hex Wrench (1)
13mm Wrench (1)
STEP 1 STEP 3
Push and align the head and foot sections together. Make sure to align
the bolt holes as seen in Fig. A. The frames also need to be aligned as
seen in Fig. B.
Fig. A Fig. B
8
For customer support, call Customer Service: U.S. 1-800-499-1965 | Canada 1-800-268-4414
Fig. C Fig. D
Slide C-Clamp over frame connections from Fig. B. Use 2 long
bolts, washers and nuts to secure frames together using provided
wrenches. Repeat this step for the other side of the base.
Fig. E
Fig. F
king/cal king installation
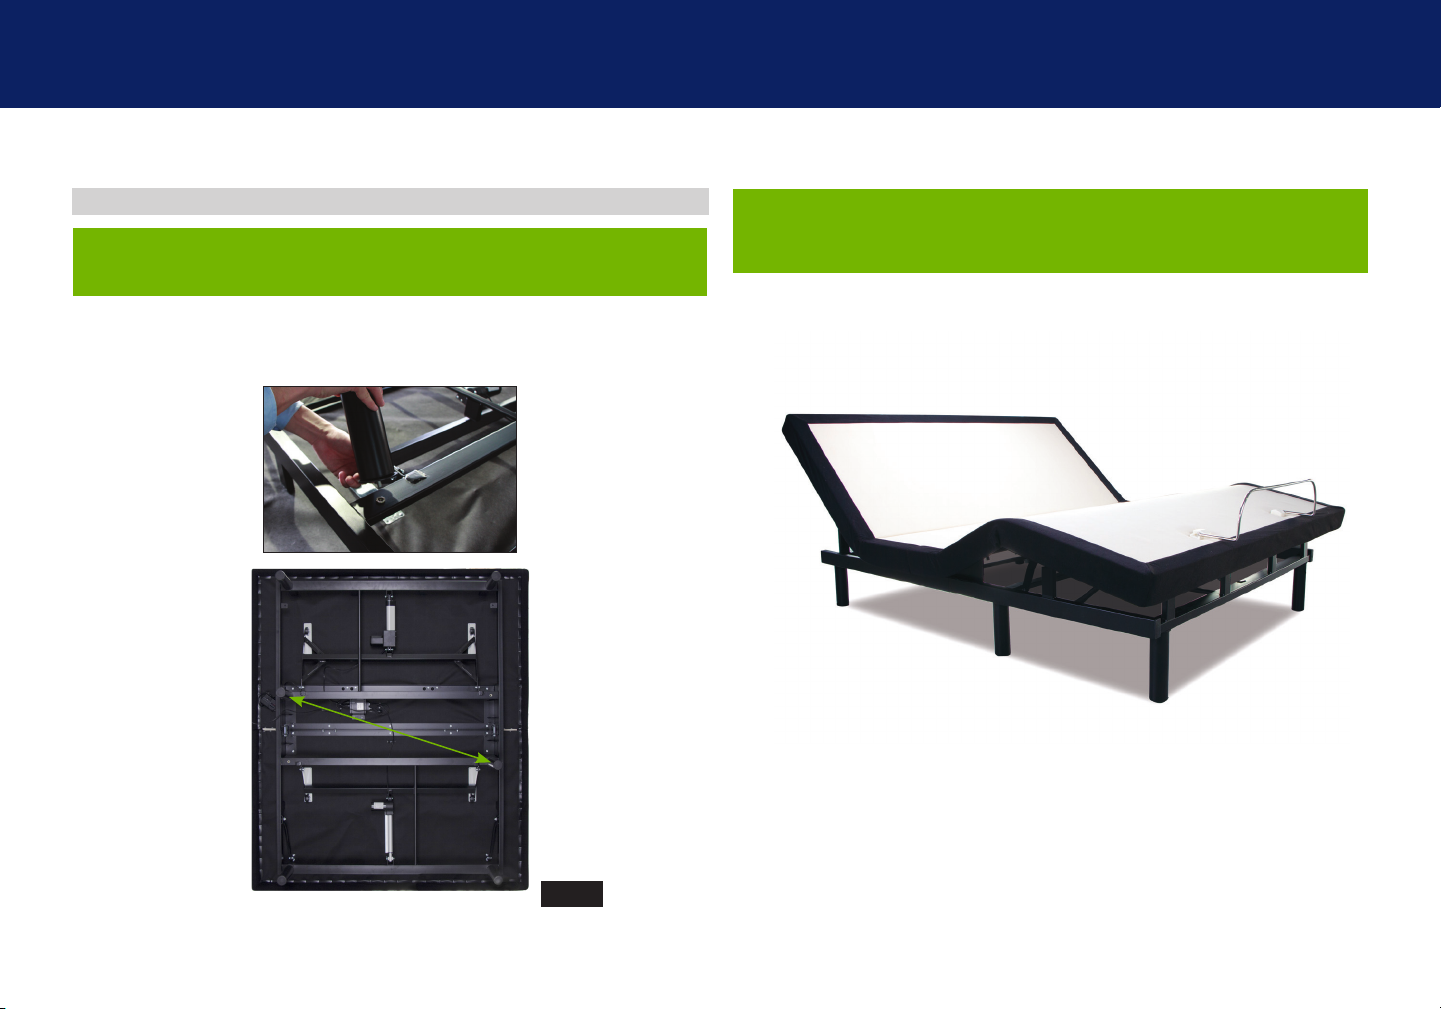
STEP 4
To install King/Cal King Headboard Brackets (sold separately)
see instructions on page 15.
Plug the foot motor into control box. Attach the legs by screwing
them into the leg threads. Do this on all four corners and on the
diagonal sides in the middle. Refer to Fig. G.
The King/Cal King Setup is now complete.
Return to page 6 Step 4 of Owner's Manual.
Fig. G
For customer support, call Customer Service: U.S. 1-800-499-1965 | Canada 1-800-268-4414
9
remote control
Remote Control arrives paired to the adjustable base.
Three (3) AAA batteries are required to operate the remote.
ADJUST
Head Position Adjustments (A, B)
C) FOOT UP
button
A) HEAD UP
button
B) HEAD DOWN
button
I M P O R T A N T !
For your safety, read the owner’s manual carefully and completely before
operating this product. Electric shock may occur if electrical components
are not installed or operated according to these guidelines.
D) FOOT DOWN
button
E) Bed FLAT
button
F) Zero G
Use to raise and lower the head section
of your adjustable base.
Foot Position Adjustments (C, D)
Use to raise and lower the foot section
of your adjustable base.
Bed FLAT Button (E)
Press down and hold for three (3)
seconds to return bed to flat position.
Zero Gravity (F)
Use to adjust your legs to relieve
pressure off the lower back.
For optimal performance, please
return the bed to the flat position prior
to selecting the Zero Gravity preset
position.
10
For customer support, call Customer Service: U.S. 1-800-499-1965 | Canada 1-800-268-4414
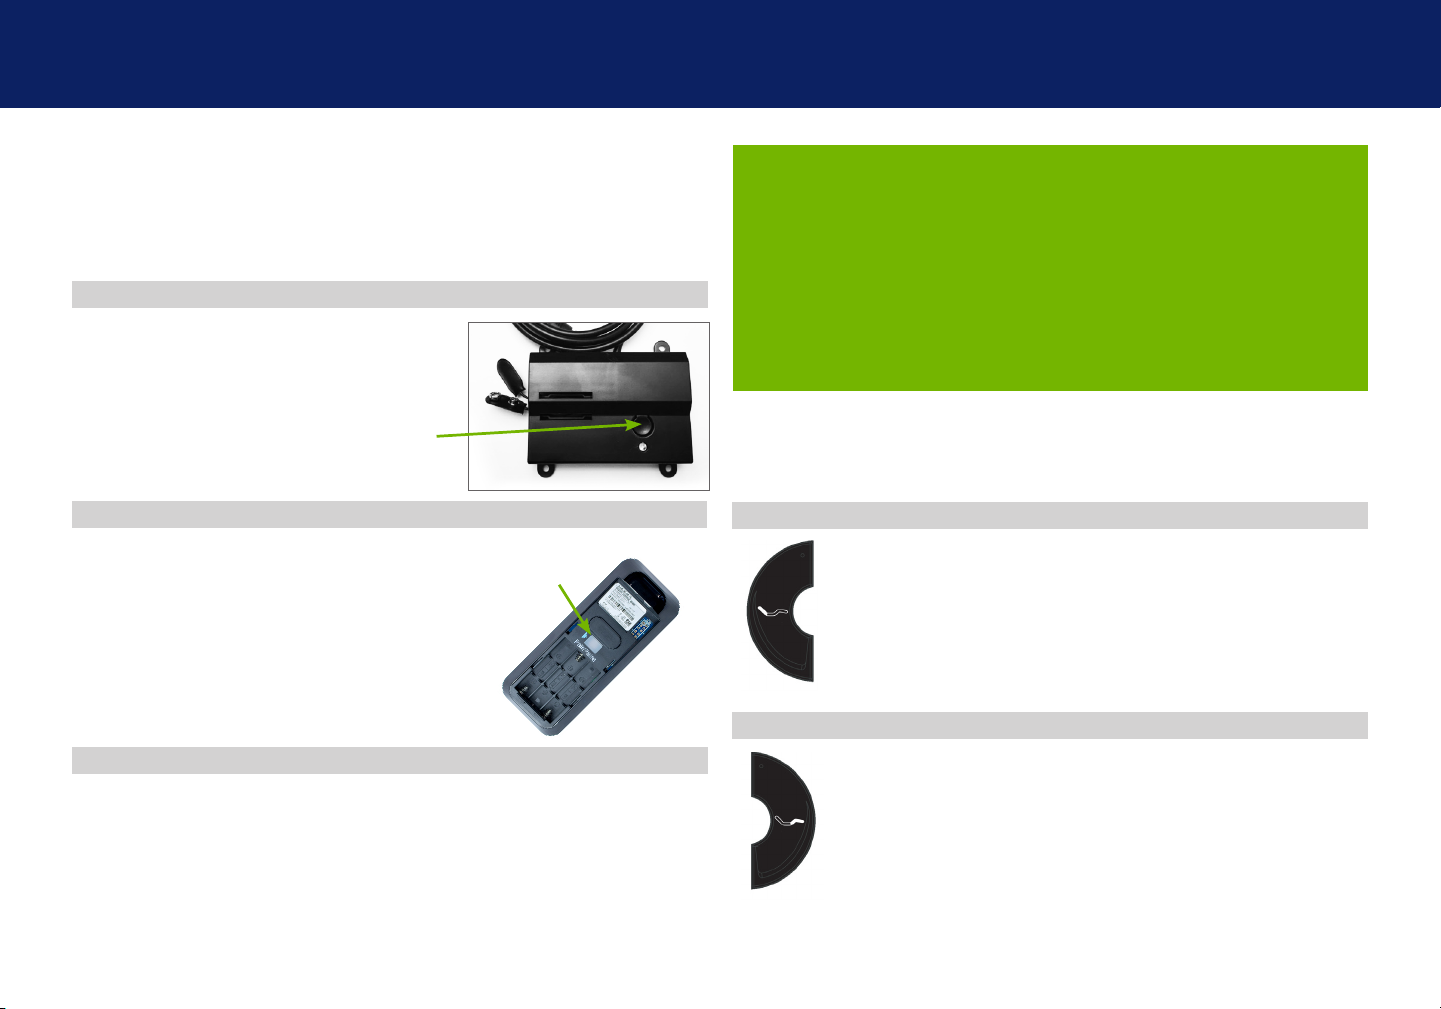
remote control
Remote Pairing
The original remote that comes in the box is already paired to the
adjustable base. No further action is required. In the event that the
remote is not paired with the base, follow the steps below.*
STEP 1
Locate the Battery Backup Box and
press the button TWICE. A light on the
Battery Back Up Box will illuminate.
POWER DOWN
Button
*ALTERNATE REMOTE PAIRING PROCESS!
Locate the Control Box (see parts list on page 4) and press the
reset button twice. A green LED light will illuminate on the Control
Box. On the back of the remote, press and hold the PAIR button.
The PAIR button will illuminate blue and start flashing. When the
PAIR button stops flashing, the green LED light on the Control Box
will go out. Release the PAIR button. The remote is now paired to
the adjustable base.
Child Lock Feature
STEP 2
On the back of the remote, press and hold
down the PAIR button. The PAIR button will
illuminate blue and start flashing. When the
PAIR button stops flashing, the illuminated
light on the Battery Backup Box will go out.
Release the PAIR button. The remote is now
paired to the adjustable base.
PAIR
Button
STEP 3
Test all remote functions. If the remote buttons do not impact the
adjustable base movements, please repeat the process again or call
customer service: U.S. 1-800-499-1965 | Canada 1-800-268-4414
Activate Child Lock
Press and hold the HEAD UP and HEAD DOWN buttons
together for approximately six (6) seconds. The remote
backlight will flash twice. When the backlight goes away the
remote is now in Child Lock. Pressing any buttons while in
Child Lock will yield no movement to your adjustable base.
Deactivate Child Lock
Press and hold the FOOT UP and FOOT DOWN buttons
together for approximately six (6) seconds. The remote
backlight will flash twice. When the backlight goes away the
remote is no longer in Child Lock. The remote and adjustable
base will work normally.
11
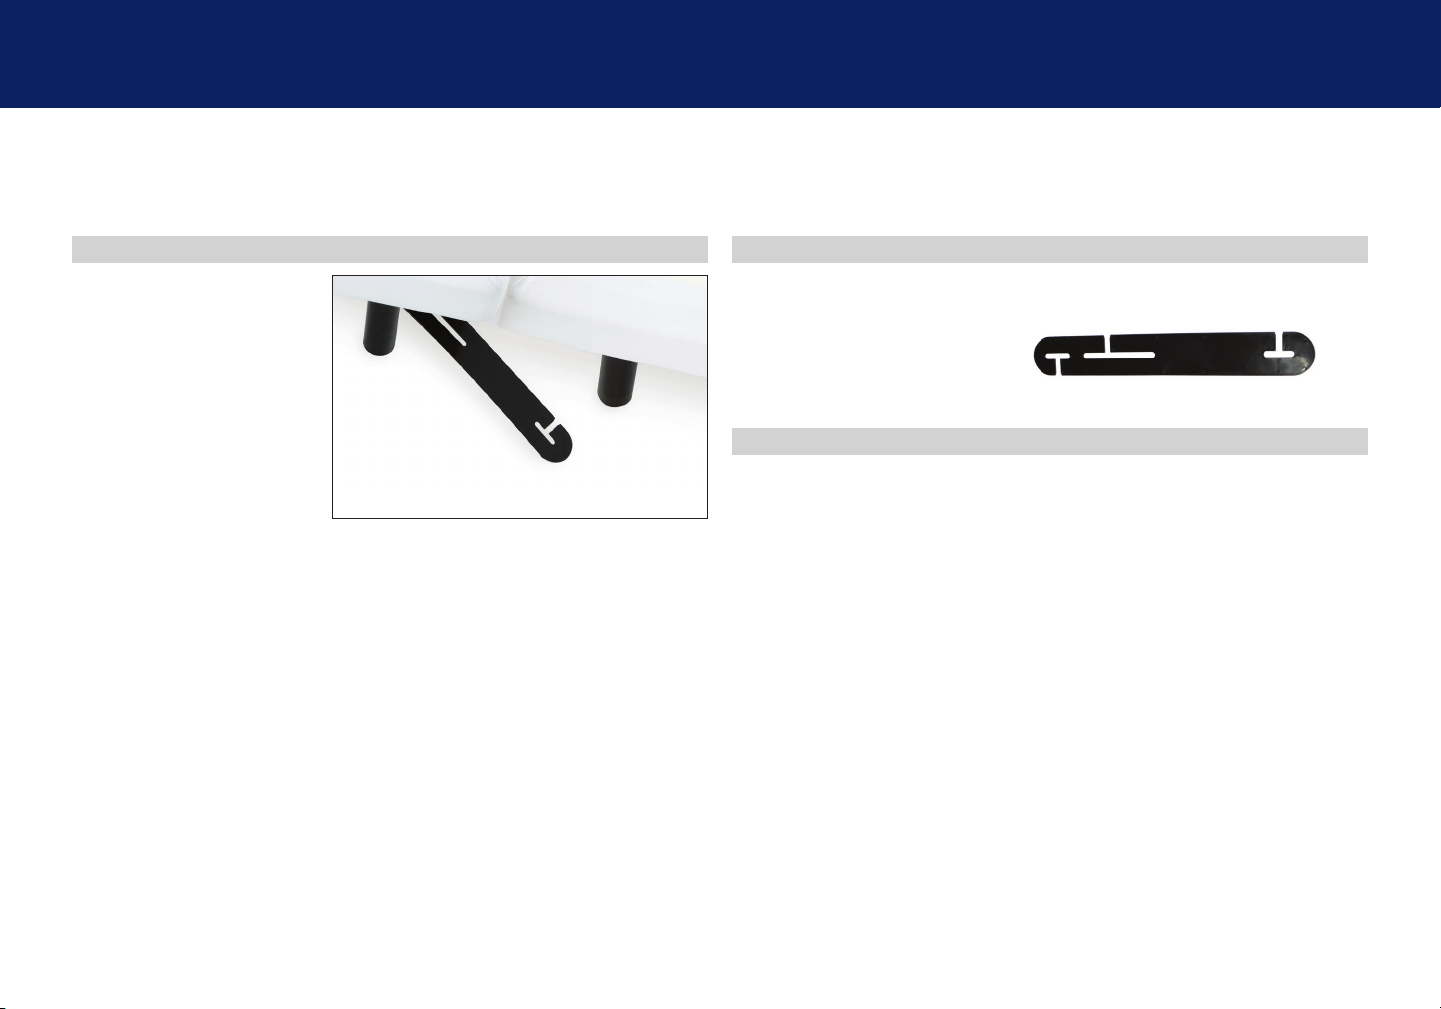
connecting strap (optional)
If any split setup is being installed, plastic Connecting Straps are provided (one per base)
to secure the bases together.
STEP 1
With the bases in their
desired location, slightly
loosen both legs to allow
the strap to fit on the leg
bolt, between the leg
washer and frame.
STEP 2
Slide side (a) of the Connecting Strap onto leg bolt. Swing the strap and
connect side (b) to the leg bolt. Secure the strap by shifting to the left.
a
STEP 3
Re-tighten legs. Do not over tighten. Use the remaining strap and repeat
on other end of the base.
b
12
 Loading...