

Temptech COL150SD-BUR, COL190SD-BUR, TCON150SYBR, TCON196SYBL, TCON196SYBR Installation instructions
...Page 1
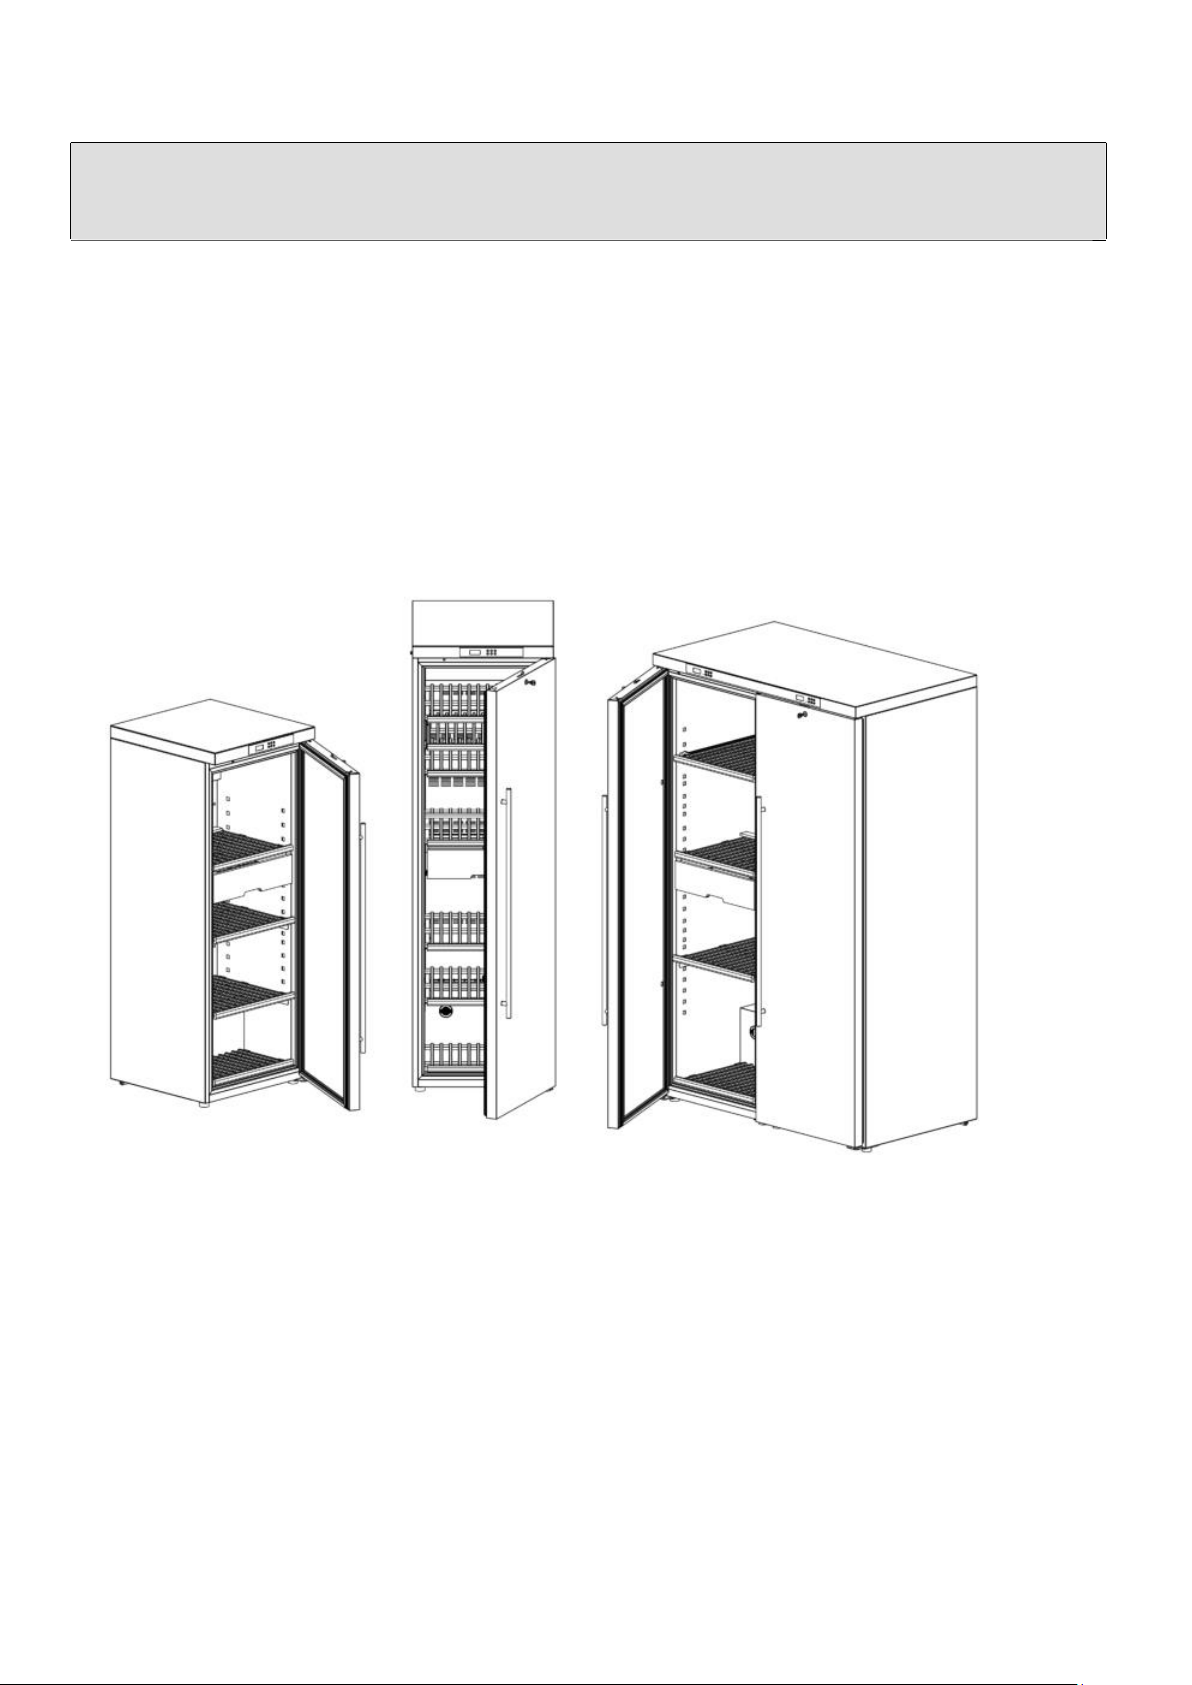
INSTRUCTION MANUAL
Wine cellar
Includes Model
COL150SD-BUR COL190SD-BUR
TCON150SYBR TCON196SYBL
TCON196SYBR TCON5000SY
TCON82SYBR
Page 2

2
Page 3

EN
Congratulations
You have purchased a wine cellar carefully developed for long-term storage of your wine.
You can also use it to bring wine to serving temperature. All you have to do is to change temperature set point.
This appliance is intended to be used exclusively for the storage of wine.
Please read this manual carefully and keep it for future reference.
It contains important information for the installation, use and maintenance of your
appliance.
Maturing Wine
Successful long-term storage of wine is a delicate process. Any sudden temperature change, cork sealing quality
damage due to low humidity, exposure to light (particularly UV radiation) or abnormal vibration can change wine
qualities.
Recommended maturing temperature is in the range of 10 to 14ºC.
Relative humidity should be above 50%, lower than this cork sealing will be at risk.
High humidity will damage your bottle labels.
As you will see later in this manual, the controller is pre-set to 12ºC and 65% relative humidity. However, you will be
able to adjust these conditions according to your needs.
Serving Wine
Recommended serving temperature for white wine is 6 to 10ºC. Red wine is normally served between 15 and 18ºC.
Please consult a good manual or use wine label information in order to set the correct temperature for the specific wine
you want to serve.
Bottle Capacity
The number of bottles you are able to put in your wine cellar has been calculated using the standard number and
layout of shelves and bottle dimension according to EN 62552:2013.
In chapter “Shelves layout”, you have an overview of how this loading plan was made and also some other options if
you want to increase the number or change the position of the shelves.
3
Page 4

SAFETY
ATTENTION: Read this manual
carefully because it contains
instructions which will ensure safe
installation, use and maintenance of
your appliance.
-Your wine cellar has been built according to the
International Safety Standards (2014/35/EU).
It also meets the standards on the prevention and
elimination of radio interference (2014/30/EU).
-The manufacturer reserves the right to modify the
characteristics of the models without prior notice.
Warning: This appliance must be earthed.
-Some models may not have all the accessories
indicated.
1. This appliance has been designed to be used
indoors and under no circumstances should it be
installed outside, even if protected by a roof.
Leaving the appliance exposed to rain and other
weather conditions is extremely dangerous.
2. This appliance can be used by children over 8
years old, individuals with reduced physical,
sensorial or mental capabilities and anyone with lack
of experience or knowledge, as long as they are
given supervision or instruction concerning the safe
use of the appliance and understand the dangers
involved. Children should not play with the
appliance.
3. Do not attempt to operate or handle the wine cellar
when barefoot, or with wet hands or feet.
4. It is highly recommended that you do not operate
this appliance by connecting it to the power supply
with extensions or multiple socket plugs.
If the appliance has been installed between two
cabinets, make sure that the supply cord is not
dangerously crimped or trapped beneath a heavy
object.
5. Never pull the cable or the appliance to remove
the plug from the socket. This is extremely
dangerous.
6. Do not touch the internal cooling elements,
especially if your hands are wet, because you can get
burnt or hurt yourself.
7. Before doing any cleaning, disconnect the
appliance from the electricity (by pulling out the
plug or turning off the general switch in your home).
8. Before disposing of your old appliance, remember
to break or remove the lock as a safety measure to
protect children from locking themselves inside it
when playing. In addition, if the appliance is a new
one with a lock, keep the key out of the reach of
small children.
9. If your appliance is not operating properly, read
the chapter entitled, “Troubleshooting”, which
might help you resolve the problem.
Do not attempt to repair the appliance by tampering
with the internal components.
10. If the power supply cord needs to be replaced,
please note that in some cases, the connections are
made using special terminals and in other cases, a
special tool must be used to access the connections.
This operation should only be performed by an
authorized agent.
11. Do not use electric appliances inside the storage
compartments of your wine cellar, unless they are
recommended by the manufacturer.
Do not use mechanical devices or other means to
accelerate the defrosting process, other than those
recommended by the manufacturer.
12. Do not store explosive substances such as
aerosols containing flammable propellants in this
device.
13. This wine cellar is intended to be used in
household and similar applications such as:
- Kitchen staff areas in shops, offices and other
working environments;
- Farmhouses and by clients in hotels, motels and
other residential type environments;
- Bed and breakfast type environments;
- Catering and similar non-retail applications.
14. At the end of the functional life of your
appliance -containing cyclopentane gas in the
insulation foam and perhaps R600a gas (isobutane)
in the refrigeration circuit - it should be made safe
before being sent to the trash. For this operation,
please contact your dealer or the Local Organisation
in charge of waste disposal in accordance with the
rules in force (WEEE).
15. Do not damage the refrigeration circuit.
16. Keep ventilation openings in the appliance
enclosure, or in the built-in structure clear of
obstruction.
Fuse replacement
If the mains lead of this appliance is fitted with a BS
1363A 13 amp fused plug, to change a fuse in this
4
Page 5
Symbol
Class
Ambient range
SN
Extended temperate
+10 to +32ºC
N
Temperate
+16 to +32ºC
ST
Subtropical
+16 to +38ºC
T
Tropical
+16 to +43ºC
SN-T
Extended temperate to
tropical
+10 to +43ºC
type of plug use an A.S.T.A. approved fuse to BS
1362 type and proceed as follows:
1. Remove the fuse cover and fuse.
2. Fit replacement 13A fuse into fuse cover.
3. Refit both into plug.
Important: The fuse cover must be refitted when
changing a fuse and if the fuse cover is lost the plug
must not be used until a correct replacement is fitted.
Correct replacement is identified by the colour insert
or the colour embossed in words on the base of the
plug. Replacement fuse covers are available in your
local electrical store.
INSTALLATION
To ensure that the appliance operates properly and to
reduce energy consumption, it is important that the
appliance is installed correctly.
General conditions
Do not place your appliance in a room liable to flood.
Avoid water splashes in the control panel and in the back
of the appliance.
Ventilation
The compressor and condenser generate heat and need to
be ventilated properly. Rooms with no ventilation are not
suited for the installation of this appliance. Therefore, it
should be installed in a room with an opening (window
or French window) that provides the appropriate amount
of air re-circulation.
For proper ventilation of the appliance, leave a space of
at least 10cm around it and any adjacent cabinets/walls.
Room temperature and humidity
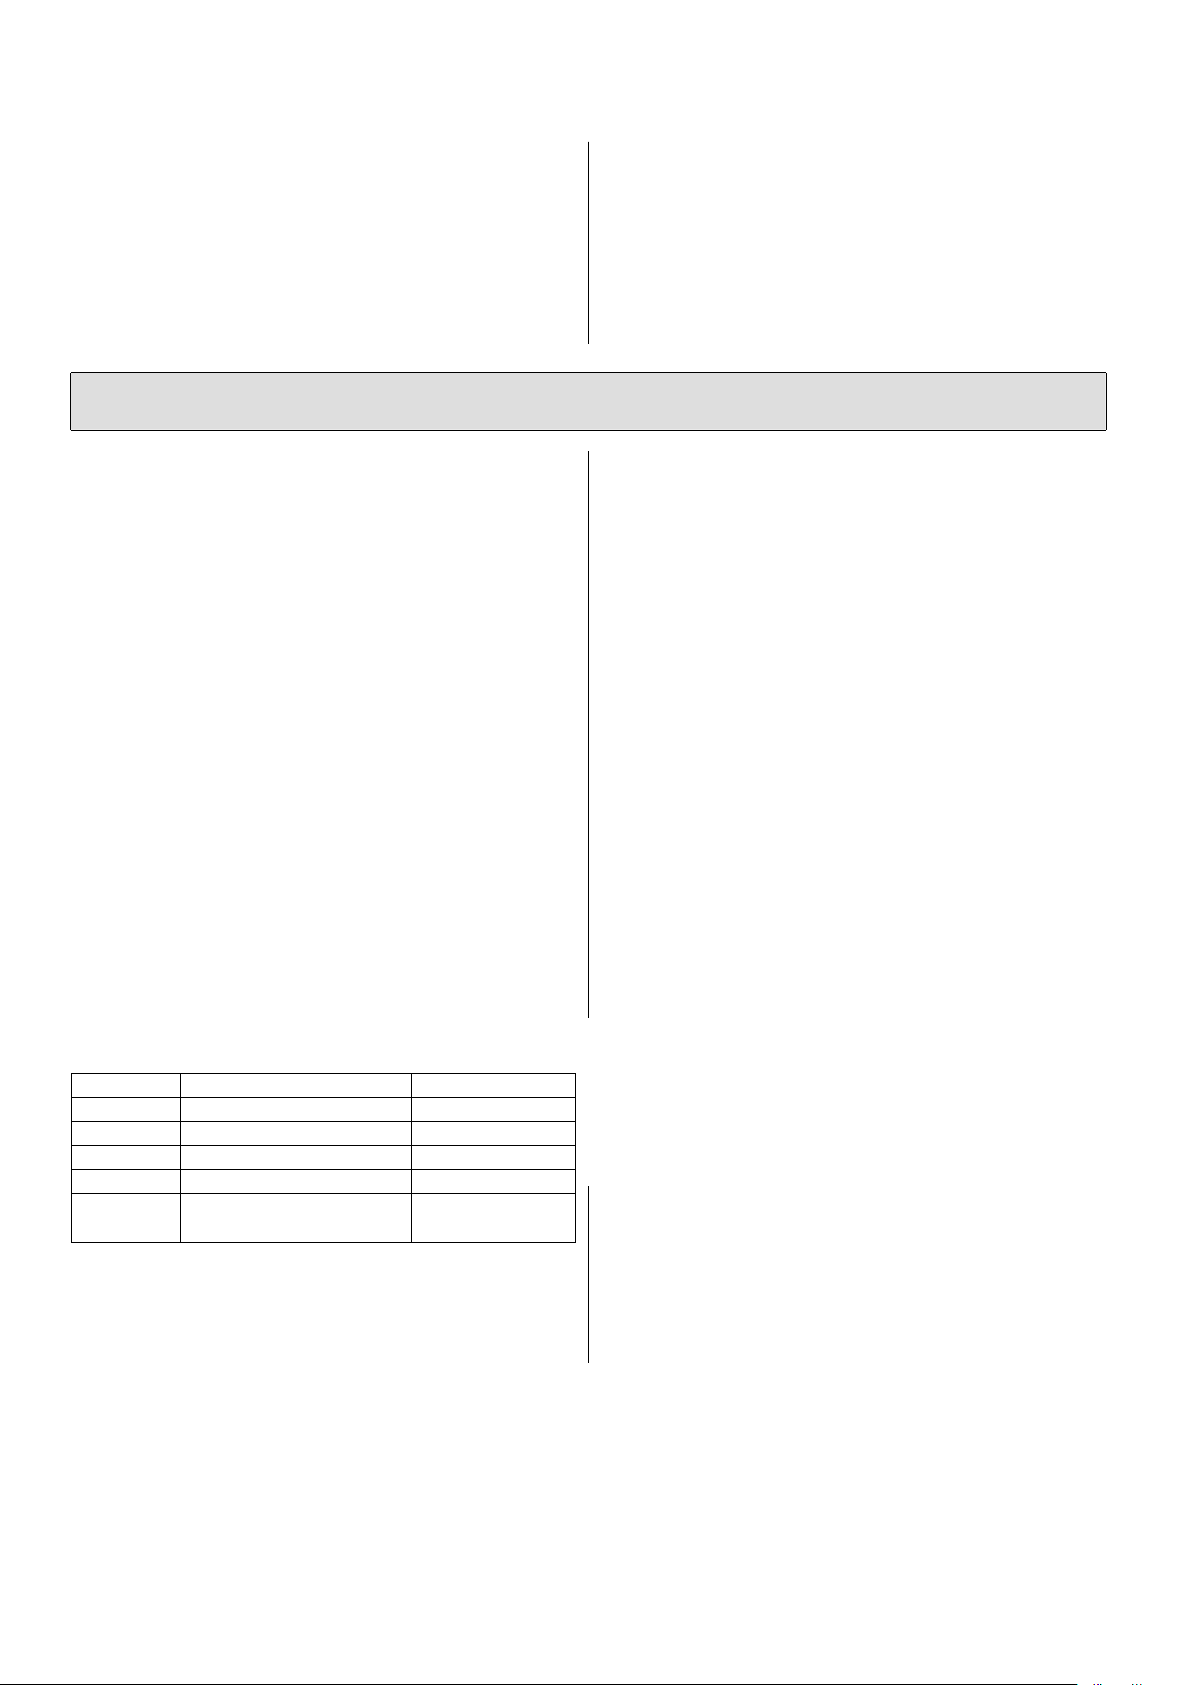
Room temperature should be according to the climate
class of the appliance. Please look at the rating plate
(inside the appliance) to see the climate class of your
wine cellar and compare it with the following ranges:
Away from heat
Avoid positioning the appliance in a place where it is
directly exposed to sunlight, nor near an oven, cook top
or other similar equipments.
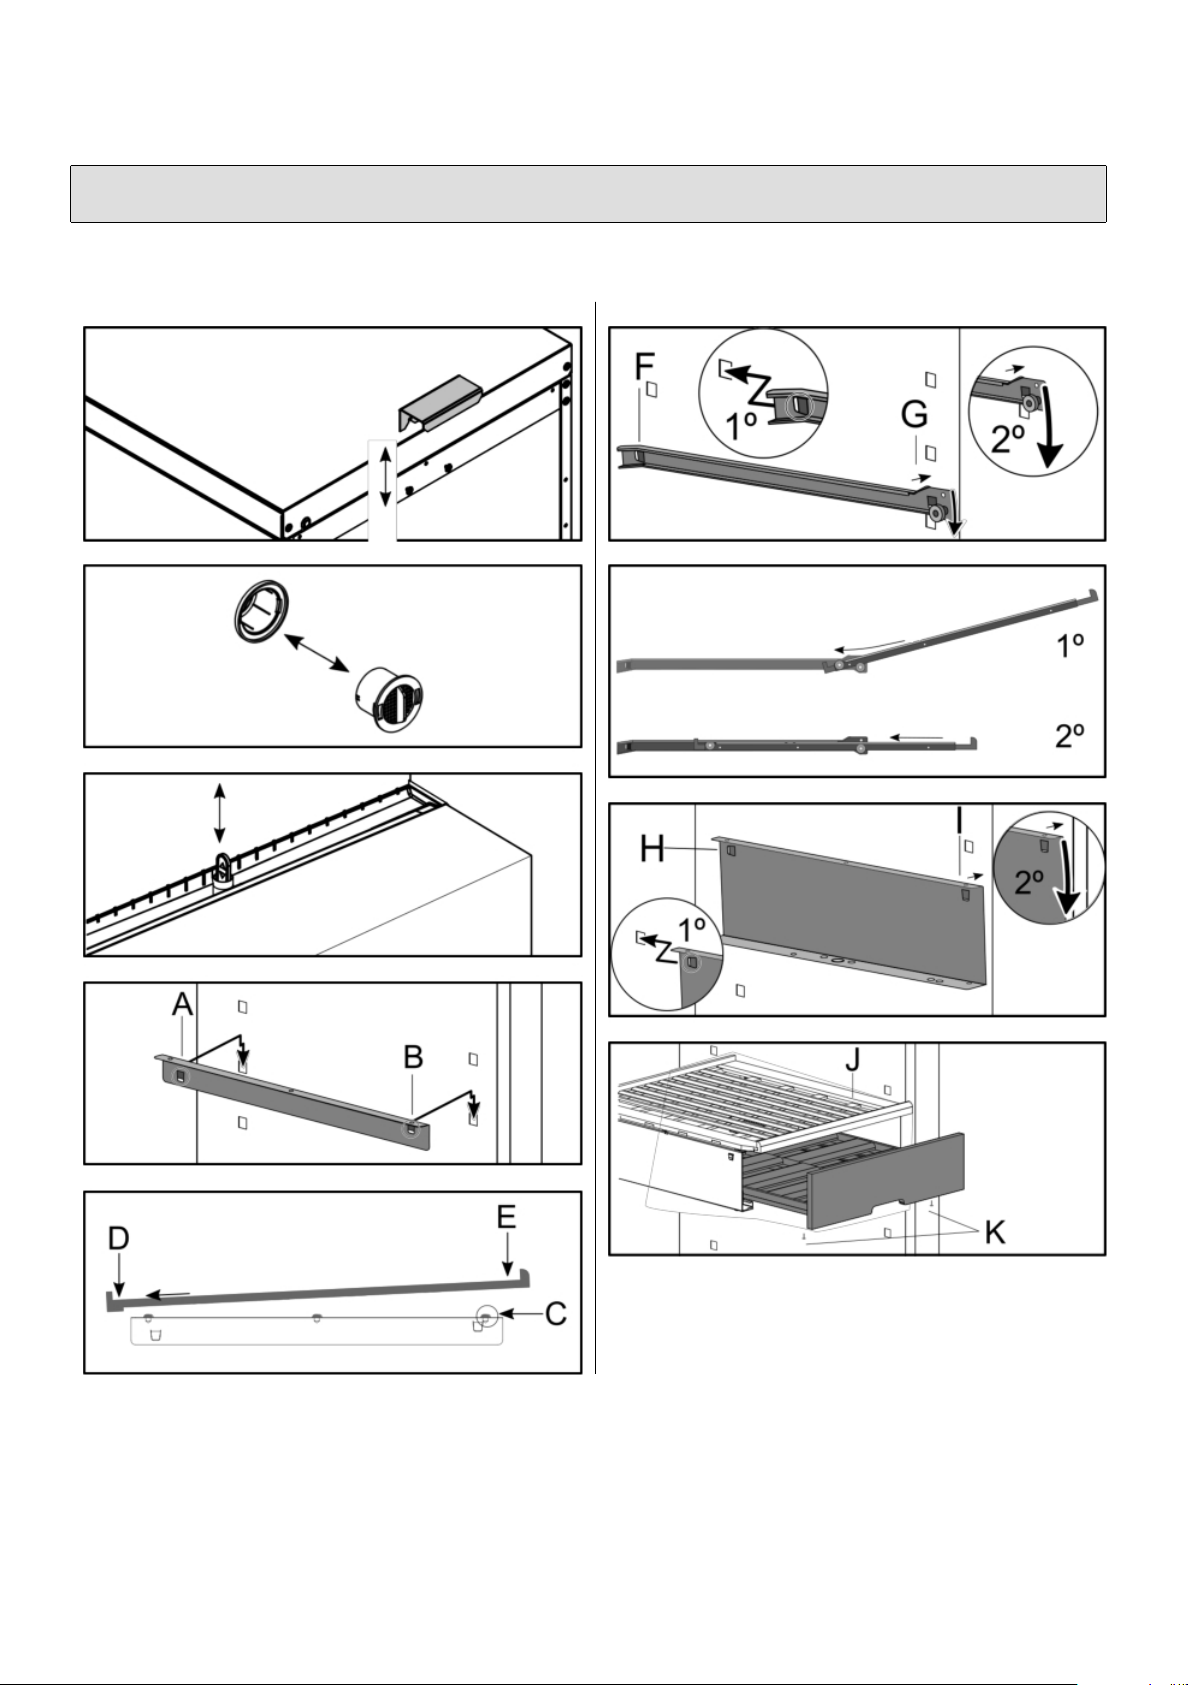
Wall Spacer (pag.31 / IMG 1)
Before putting the appliance in position, you should
install the supplied wall spacer in the top back of the
appliance. Slightly lose the two screws, slide the space
and then tighten completely.
Levelling the appliance
Your appliance should be installed in a flat, stable and
vibration free surface.
Put your wine cellar in position and then adjust the front
feet (screwing or unscrewing them) in order to bring it to
level. The use of a spirit level is recommended.
Cleaning
Before connecting the power cord, clean the
compartments and accessories with water and a mild
detergent solution.
Earth electrical connections
Before proceeding with the electrical connection, make
sure that the voltage indicated on the rating plate, located
Despite this standard range, your appliance will work
correctly even in a room with temperature starting from
0ºC.
Room relative humidity should be in the range of 50% to
75%. Outside this range the appliance will do his best to
bring internal humidity to set point but, depending on the
load and temperature set point, this cannot be guaranteed.
inside the appliance, corresponds to the mains voltage in
your home and that the socket is fitted with a standard
earth wire in accordance with safety standards. If the
socket is not fitted with an earth wire, the manufacturer
will not assume liability for any damages and/ or injuries
arising out of the use of the appliance. Do not use
multiple sockets or adapters.
Position the appliance in such a way that you can access
the socket where it is plugged in.
Insufficient Power
The electrical socket must be able to handle the maximum
power load of the appliance, which is indicated on the
rating plate located inside the wine cellar.
5
Page 6
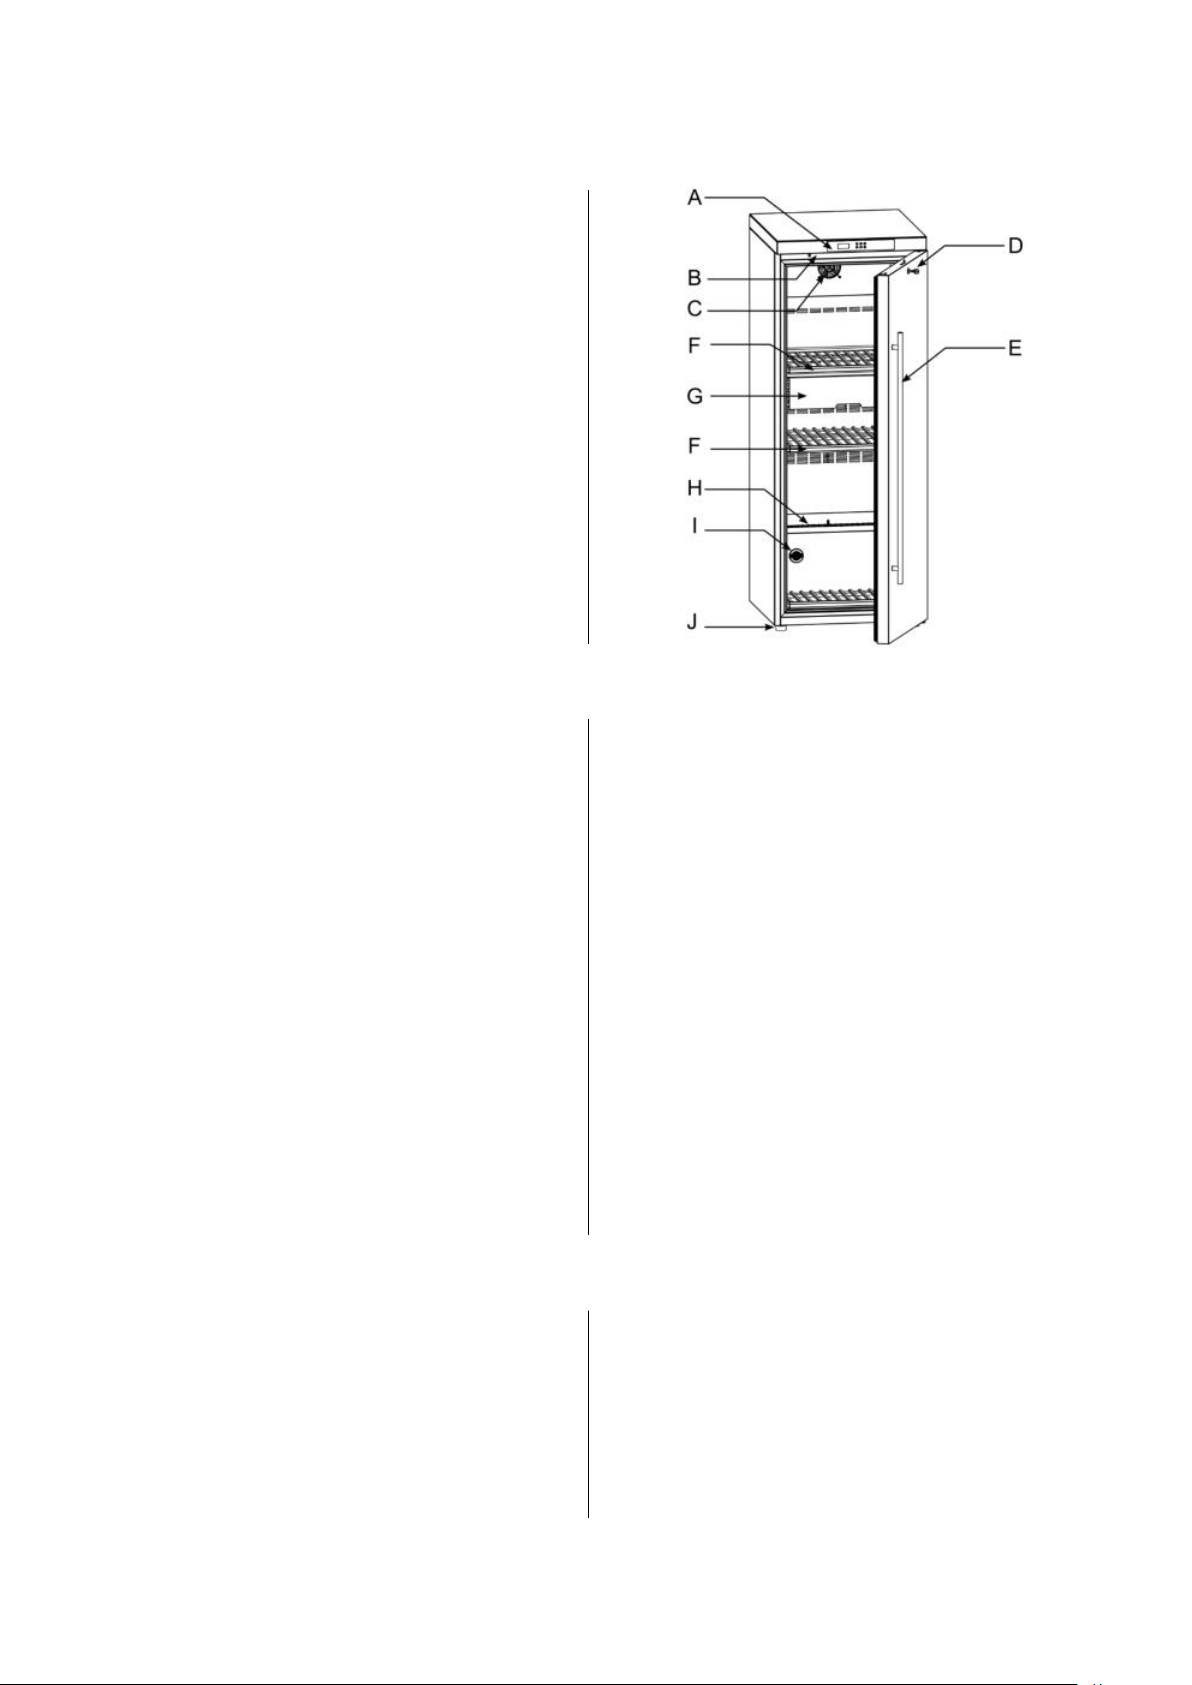
THE APPLIANCE
A - Temperature and Humidity Controller
B - LED Light
C - Internal Fan
D - Door Key (*)
E - Door Handle
F - Bottle Shelves
G - Selection Drawer
H - Drain and Discharge Hole
I - Active Charcoal Filter
J - Adjustable Feet and Wheels
(*) not present in all models
STARTING UP THE APPLIANCE
Before starting the appliance, follow the installation
instructions (see “Safety” and “Installation”).
This appliance should not be turned on right after
transportation
Two hours is the minimum advised time so that the oil
from the motor-compressor gets back to its original
position.
Installing or moving shelves
Remove any packing materials, check if the racks are
completely inserted and if the shelves are well supported.
If you need to move or add new shelves, please read how
to do so in chapter “Moving or adding shelves”.
Checking filter installation (pag.31 / IMG 2)
Check if the charcoal filter is aligned and completely
inserted in its position and remove any packing materials.
Checking discharge hole wiper (pag.31 / IMG
2)
Drain hole is fitted with a cleaning wiper. Please check if
it is in position.
Starting your appliance
Connect the power cord and wait a few seconds for the
controller to start (the display will show a line of scores).
After start-up, it will show actual internal temperature
and humidity or a dot at the bottom, in this case press the
On/Off key (18) to bring it to ON status.
Set the controller to the desired temperature if different
from default set point 12ºC. See “Controller adjustment”.
Loading your bottles
Layout must respect the maximum weight allowable per
shelf. Bottles must not touch the cabinet rear wall nor the
door liner. Weight should be loaded as uniformly as
possible, by spreading the bottles and avoiding
concentration of the load on the top or the bottom of the
appliance.
Sliding shelves should not be loaded with more than two
rows of bottles. Top row should be loaded in such a way
that sliding the shelf forward will not result in bottle
collapse.
Never pull out more than one sliding shelf at a time.
ENERGY SAVING AND ENVIRONMENT
Install the appliance correctly
This means that the appliance should be installed away
from sources of heat or direct sunlight, in a well
ventilated room.
Shut the door
Open your appliance only when strictly necessary. Every
time you open the door, most of the cold air will be lost.
In order to restore the correct temperature, the motor will
have to run and consume energy.
Check the door seal
Keep the seal clean and pliable so that it fits closely
against the door to ensure that no cold air is lost.
Setting temperature and humidity
Observe the recommended ranges, extreme temperature
or humidity set points will increase power consumption.
6
Page 7
Environment caring
Your appliance does not use any CFC or HCFC. Foaming
agent and refrigerant gas are harmless to the ozone layer
and have zero impact on the greenhouse effect.
Unpacking
Packing material is completely made from recyclable
materials. After unpacking, please take the unnecessary
materials to a recycling point.
Electric and electronic equipment disposal
Electric and electronic equipment must be disposed in a
proper manner. If you need to trash your old appliance,
please contact your dealer or the local organisation in
charge of waste disposal.
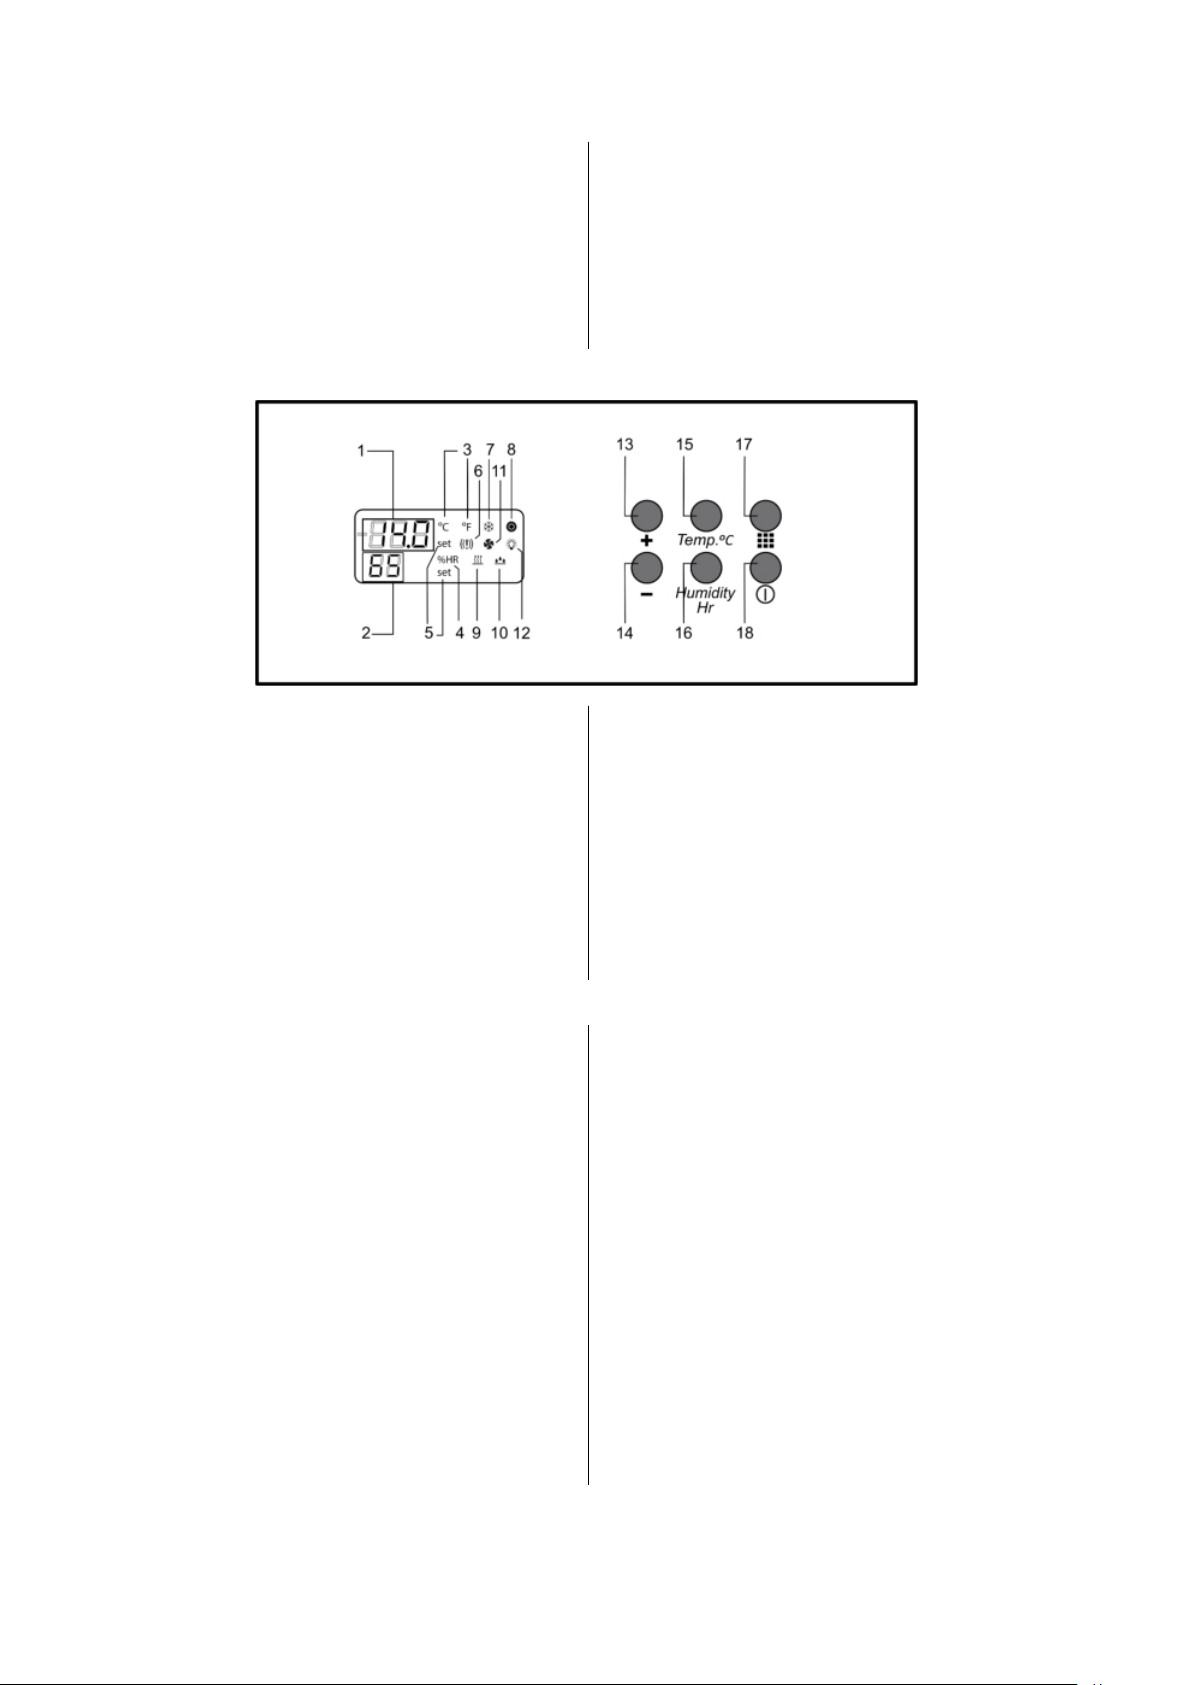
CONTROLLER ADJUSTMENT
1 - Internal temperature display
2 - Internal relative humidity display
3 - Temperature units
4 - Humidity units
5 - Setting warning light (temperature / humidity)
6 - Fault Alarm – will show if an alarm is present
7 - Compressor signal light – on if the compressor is
working, blinking if the anti-short cycle delay is enabled
8 - Heater signal light – on if the heater is working
10 - Humidifying action in progress
11 - Fan signal light – on if the fan is working
12 - LED signal light - on if the light is working
13 - Adjustment key to increase
14 - Adjustment key to reduce
15 - Temperature setting key
16 - Humidity setting key
17 - Charcoal filter key
18 - ON / OFF key – press to stop or restart appliance
9 - Dehumidifying action in progress
Temperature setting
Default temperature set point is 12ºC, this is the usual
maturing temperature. However, you can adjust your
cellar between 5 and 20ºC.
Press the temperature setting key (15), actual temperature
set point and signalling light (5) will start blinking.
Adjust to the desired internal temperature using setting
keys UP (13) or DOWN (14), confirm your choice
pressing again the temperature setting key (15).
It is not possible to adjust temperature outside the
appliance working range.
If set point is not changed within 30 seconds, the
controller will return to the default temperature and the
signalling light (5) will switch off.
If the set point is changed but not confirmed, after 30
seconds, the controller will assume the new set point and
return to the display mode.
Humidity setting (not for model COL150SD-BUR
-COL190SD-BUR)
Default humidity set point is 65%. In order to keep the
sealing quality of the corks and avoid bottle label
damage, internal level of humidity should be ideally
between 60 and 75%. You can however adjust this set
point between 50% and 75%. The appliance will take the
necessary actions to adjust internal humidity to set point.
Please consider that according to the load and the room
conditions, a tolerance of 10% around set point must be
considered.
Press the humidity setting key (16), actual humidity set
point and signalling light (5) will start blinking.
Adjust to the desired internal humidity using setting keys
UP (13) or DOWN (14). Confirm your choice pressing
again the humidity setting key (16).
It is not possible to adjust relative humidity outside the
working range.
7
Page 8
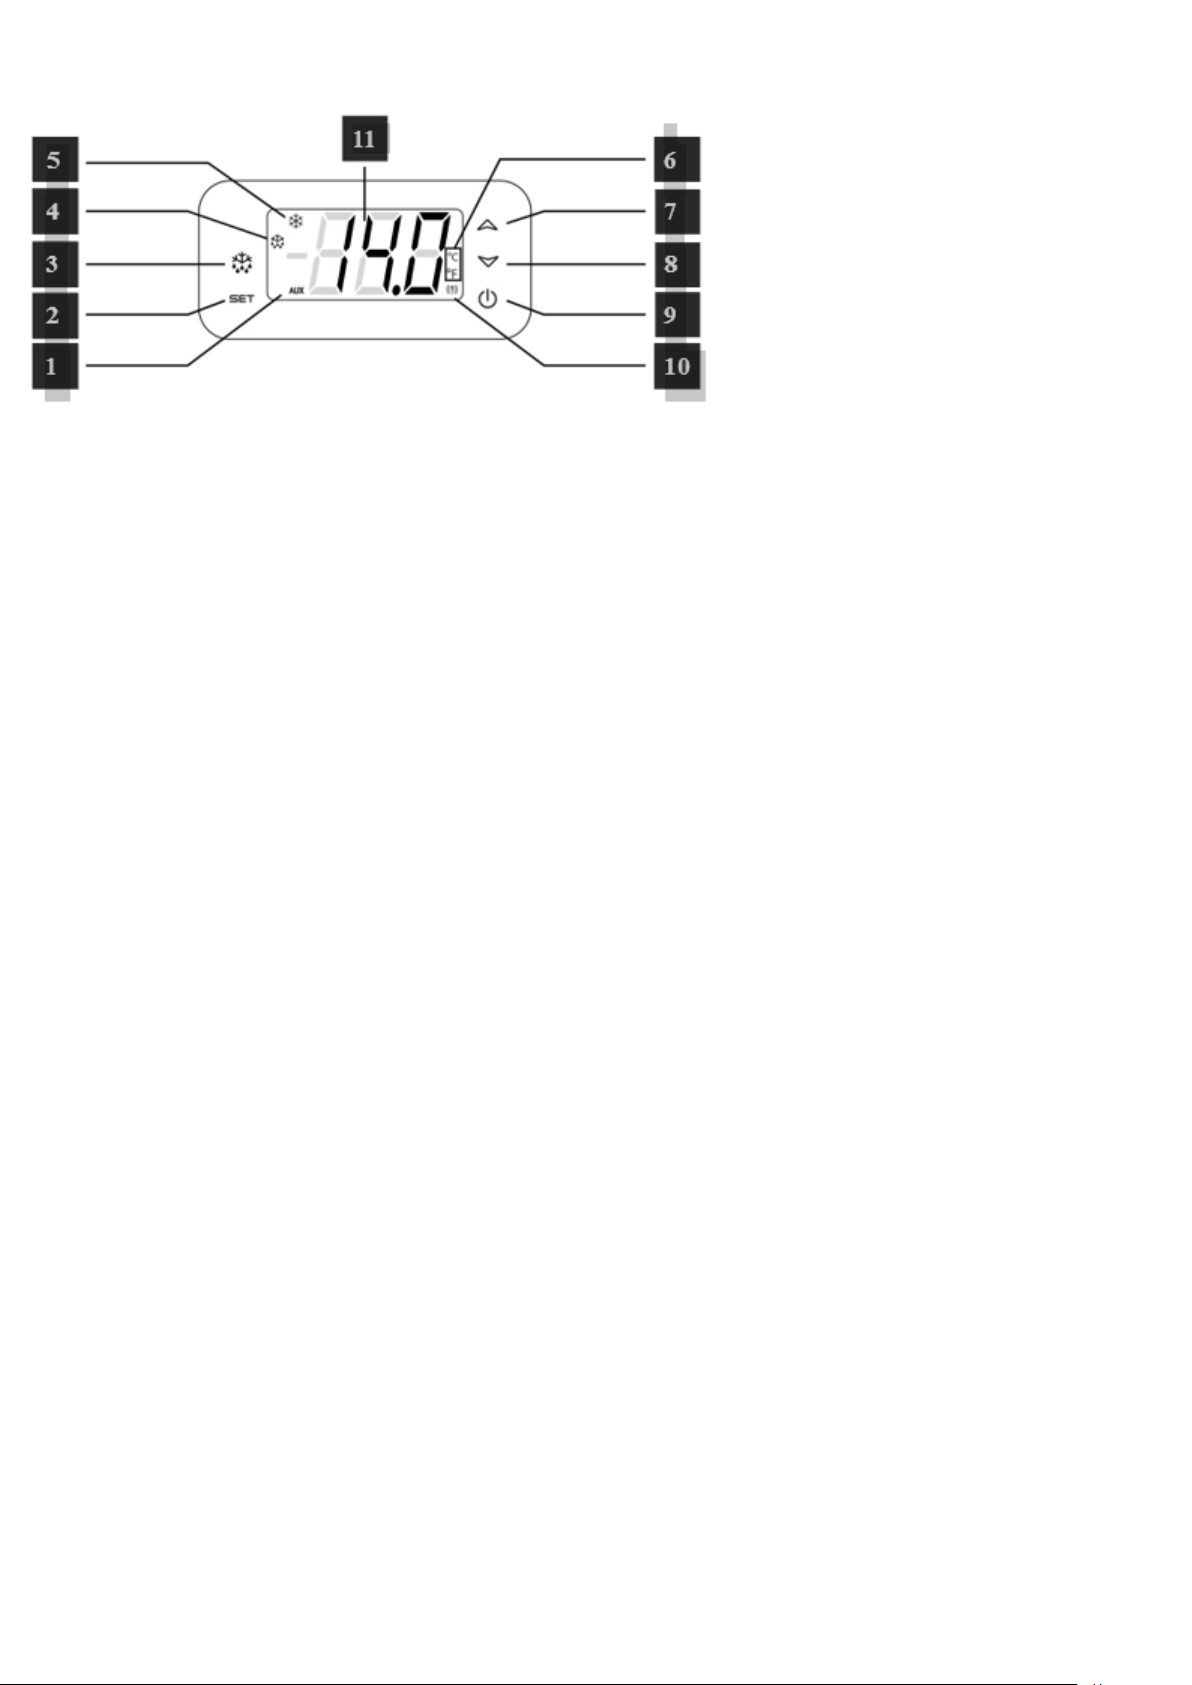
SOME MODELS HAS THE NEW DISPLAY DIXELL XR30CH
CONTROL PANEL EN
1 - Resistor
Displayed if the resistor is heating
2 - Adjusts the internal temperature
3 - Manual defrost
4 - Defrost active
5 - Compressor indicator
Lights up if the compressor is running, flashes if the "short cycle" delay is active.
6 - Temperature unit
7 - Increase button
8 - Decrease button
9 - On/Off button
Press to start or stop the appliance
10 - Error/alarm indicator Lights up if an alarm sounds
11 - Internal temperature display
To display the set point
1. Press and immediately release the SET key (5): the set point value is displayed.
2. By pressing the SET button (5) again or by waiting 10
seconds, the normal display returns. To change the set point
1. Press the SET button (5) for more than 2 seconds.
2. The set point value is displayed and the ° C or ° F led
flashes.
3. Change the set point value with keys (11) or (12) within 10s.
4. To store the new set point value, press the SET key again or wait 10s.
Page 9
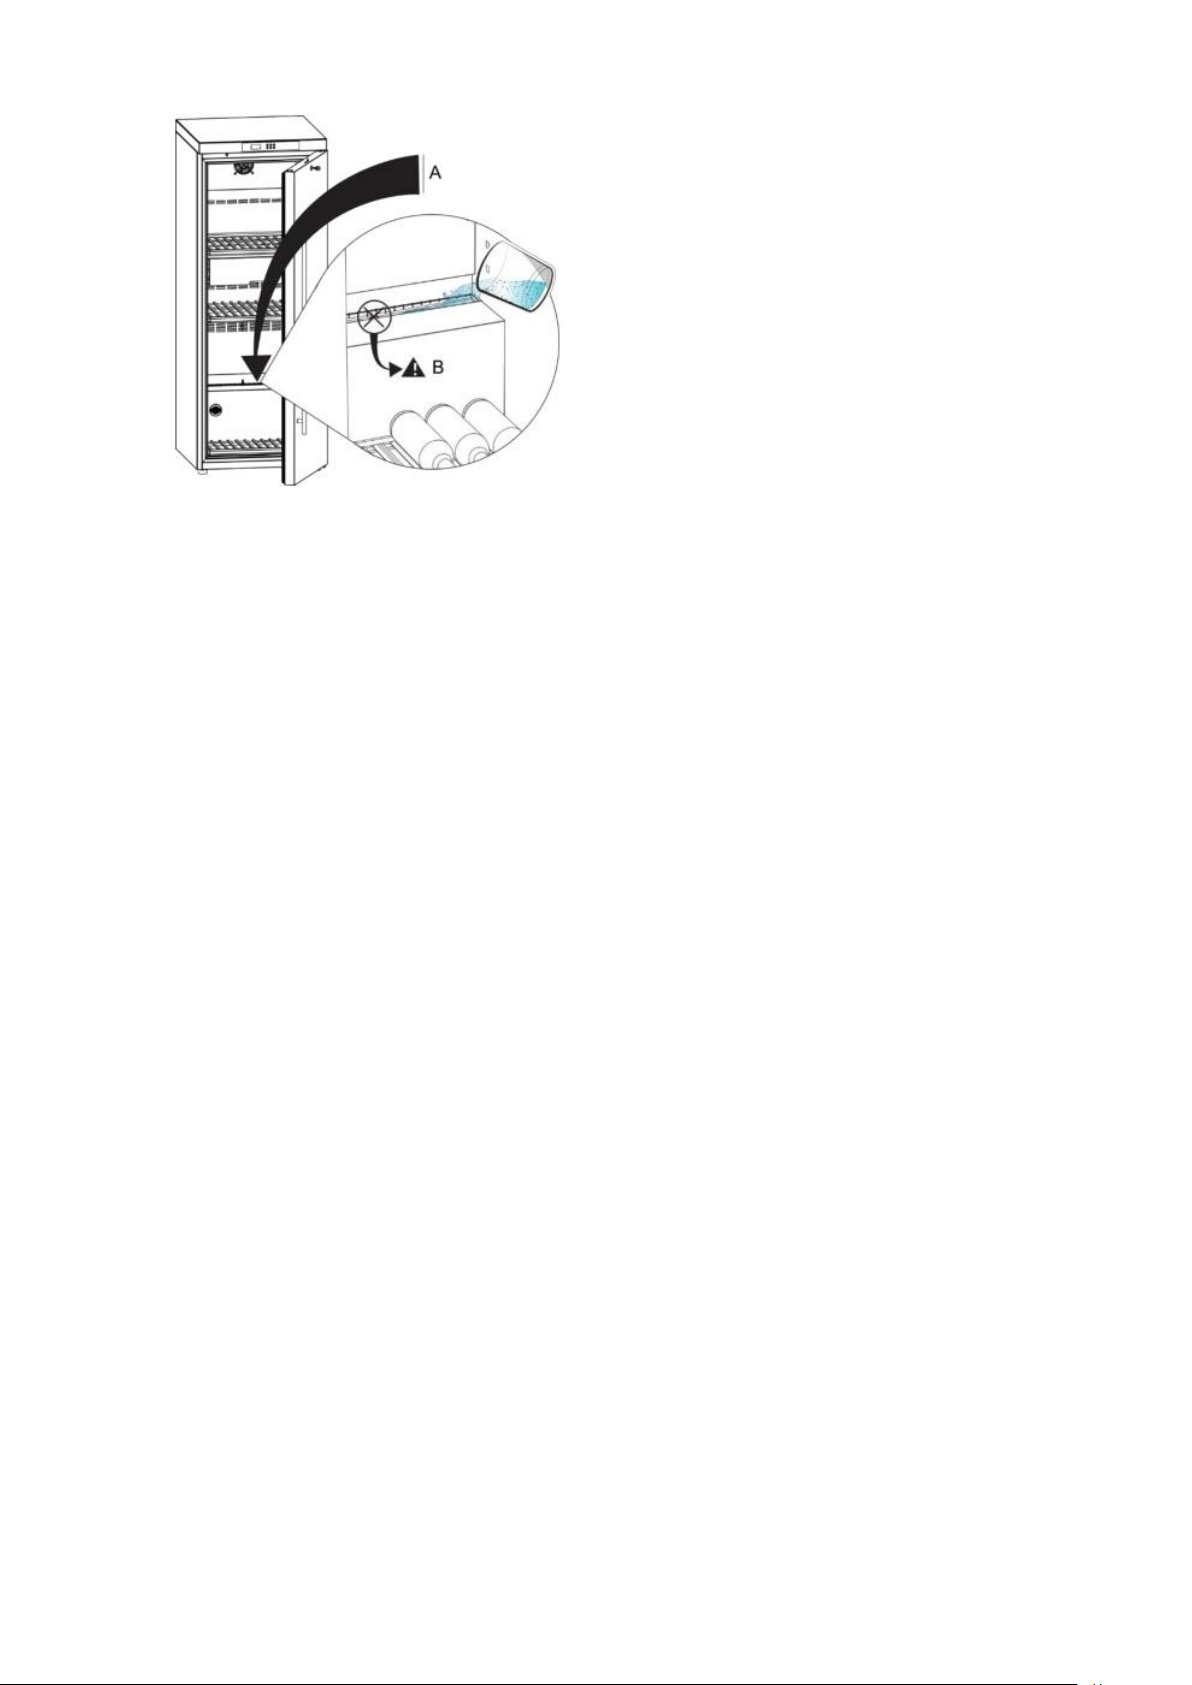
A – Water around 150 ml
B – Do not place in the drainpipe
In case, you are facing a low humidity inside the cabinet
(mainly in the initial phase of the installation), adjust it
with small amount of water as shown in the illustration.
Note: The values shown in the display are actual temperature and humidity inside the appliance.
New set point effects will depend on internal load and environmental conditions. It is therefore necessary to
wait until new internal conditions are stable.
This appliance has been designed as a maturing cabinet.
It can also be used as a serving appliance. All you need to do is to adjust internal temperature according to your
needs. As a general rule, white wine should be served between 6 and 10ºC and red wine between 15 and 18ºC.
Please consider that being born as a maturing cabinet, the internal temperature raising and dropping rate is
slow. The time needed to achieve serving temperatures, depending on internal load and climate conditions, can
be large.
MAINTAINING THE APPLIANCE
Before doing any cleaning, disconnect the appliance from
the electricity (by pulling out the plug or turning off the
general switch in your home).
Unload any bottles for internal cleaning or if you need to
move your appliance.
WARNING: Do not damage the refrigeration circuit.
Cleaning and Maintenance
The inside of the appliance should be cleaned on a
periodic basis. Use only a soft cloth, water and a mild
detergent solution to clean the appliance. Do not use
abrasive, acetone, spirit or alcohol based cleaning
products.
After cleaning the inside, rinse it well with clean water
and dry carefully.
Once the appliance is cleaned, turn it on, following the
instructions in Chapter “Starting up the appliance”.
Charcoal filter replacement (pag.31 / IMG 2)
In order to keep adequate air quality, the charcoal filter
(I) must be replaced once a year. Pull the old filter from
its support and push the new one, being careful while
aligning it.
You can purchase original filters at your retailer.
The controller will show a “FIL” message when it is time
to change the filter. In face of that message, just press any
key to stop the buzzer, change the filter and press release
filter key (17) to reset counter and message. Default time
is 365 days but you will be able to change it pressing filter
key for 3 seconds and then increasing or decreasing the
number of days with the UP and DOWN keys (13/14),
press again (17) to exit setting mode.
Imputing zero days will disable the filter function.
Condenser cleaning
Once a year it is advisable to clean the rear grid
(condenser). You can vacuum clean it or use a soft brush.
Doing so will maintain a low energy consumption level.
When not in use
Should the unit not be used for a long period of time,
disconnect the plug from the mains and leave the door
open to avoid the formation of mould and unpleasant
odours.
Check if the drain (H) is clean. If necessary, remove all
water with a sponge and clean the water discharge hole
with the supplied wiper
8
Page 10
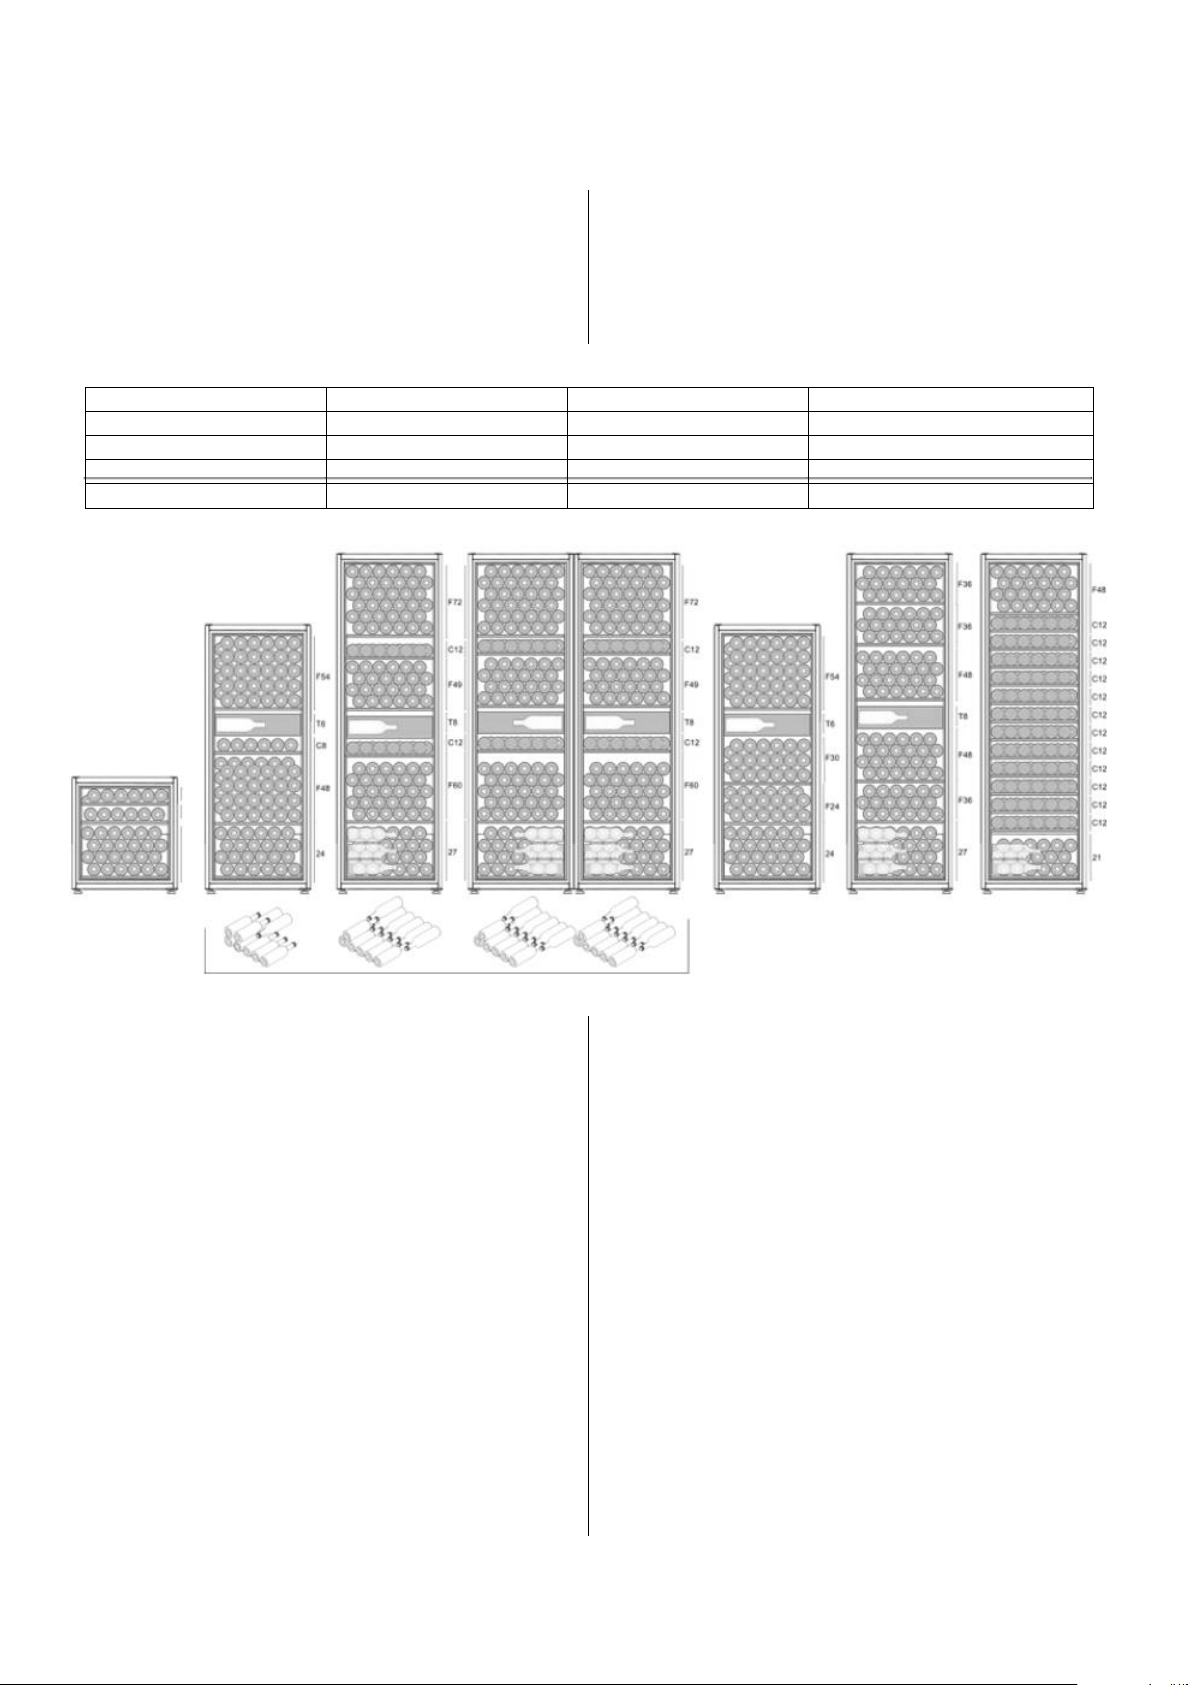
Model 082 (A)
Model 150 (B)
Model 190 (C)
Model 190 side by side (D)
Capacity - 46 Bottles
Capacity - 138 Bottles
Capacity - 237 Bottles
Capacity - 237+237 Bottles
N/A
2 Fixed shelves
3 Fixed shelves
3+3 Fixed shelves
2 Sliding shelves
1 Sliding shelf
2 Sliding shelves
2+2 Sliding shelves
N/A
1 Selection drawer
1 Selection drawer
1+1 Selection drawer
SHELVES LAYOUT
Standard layout
In the following drawings you will find an example of a
rack arrangement that will permit you, with the shelves
supplied and the standard bottle dimension
(EN62552:2013), achieve the declared capacity of your
cellar.
Alternative layout
You can also buy additional shelves from your retailer
and increase the flexibility of your appliance. Here you
have some exemples.
C D
B
A
F- Fixed | T- Drawer | C- Sliding
Inserting a rack fixed shelf (pag.31 / IMG 4)
Note: pay attention to positioning to the right or left of
the supports.
Align rack clips with the desired wall fittings, press the
back of the rack (A) down in order to completely fit the
clip in the slot. Repeat in the front clip (B).
Make sure the rack is completely secure to side wall.
Removing fixed racks
Pull up front rack (B) until the clip is loose from the side
wall, repeat on the back of the rack (A).
Installing fixed shelves (pag.31 / IMG 5)
Make sure the racks have the vibration dampers installed
(C), put the shelf above the dampers, slide it back so that
it fits and cannot move forward.
Inserting a sliding shelf rack (pag.31 / IMG 6)
Align the back clip with the desired wall fitting, push
back in order to completely fit the clip in the slot (F).
Align the front clip with the slot pressing it down in order
to completely fit the clip in the slot (G).
Make sure the rack is completely secure to the side wall.
Removing sliding shelf racks
Pull up the front rack until (G) the clip is lose from the
side wall, pull back clip out (F) of the slot in your
direction.
Inserting a sliding shelf (pag.31 / IMG 7)
Insert the sliding shelf above the rack rollers (1º),
allowing it to slide into the guides (2º).
Inserting a “Selection” drawer rack (pag.31 /
IMG 8)
Note: pay attention to positioning to the right or left of
the supports.
Align the back clip with the desired wall fitting, push
back in order to completely fit the clip in the slot (H).
Align the front clip with the slot, pressing it down in order
to completely fit the clip in the slot (I). Make sure that the
rack is completely secure to the side wall.
Inserting a drawer in the rails (pag.31 / IMG 9)
Position the drawer above the rails and push it.
Pull the drawer together with the sliding parts of the rail
and assemble the two fixing screws (K).
9
Page 11
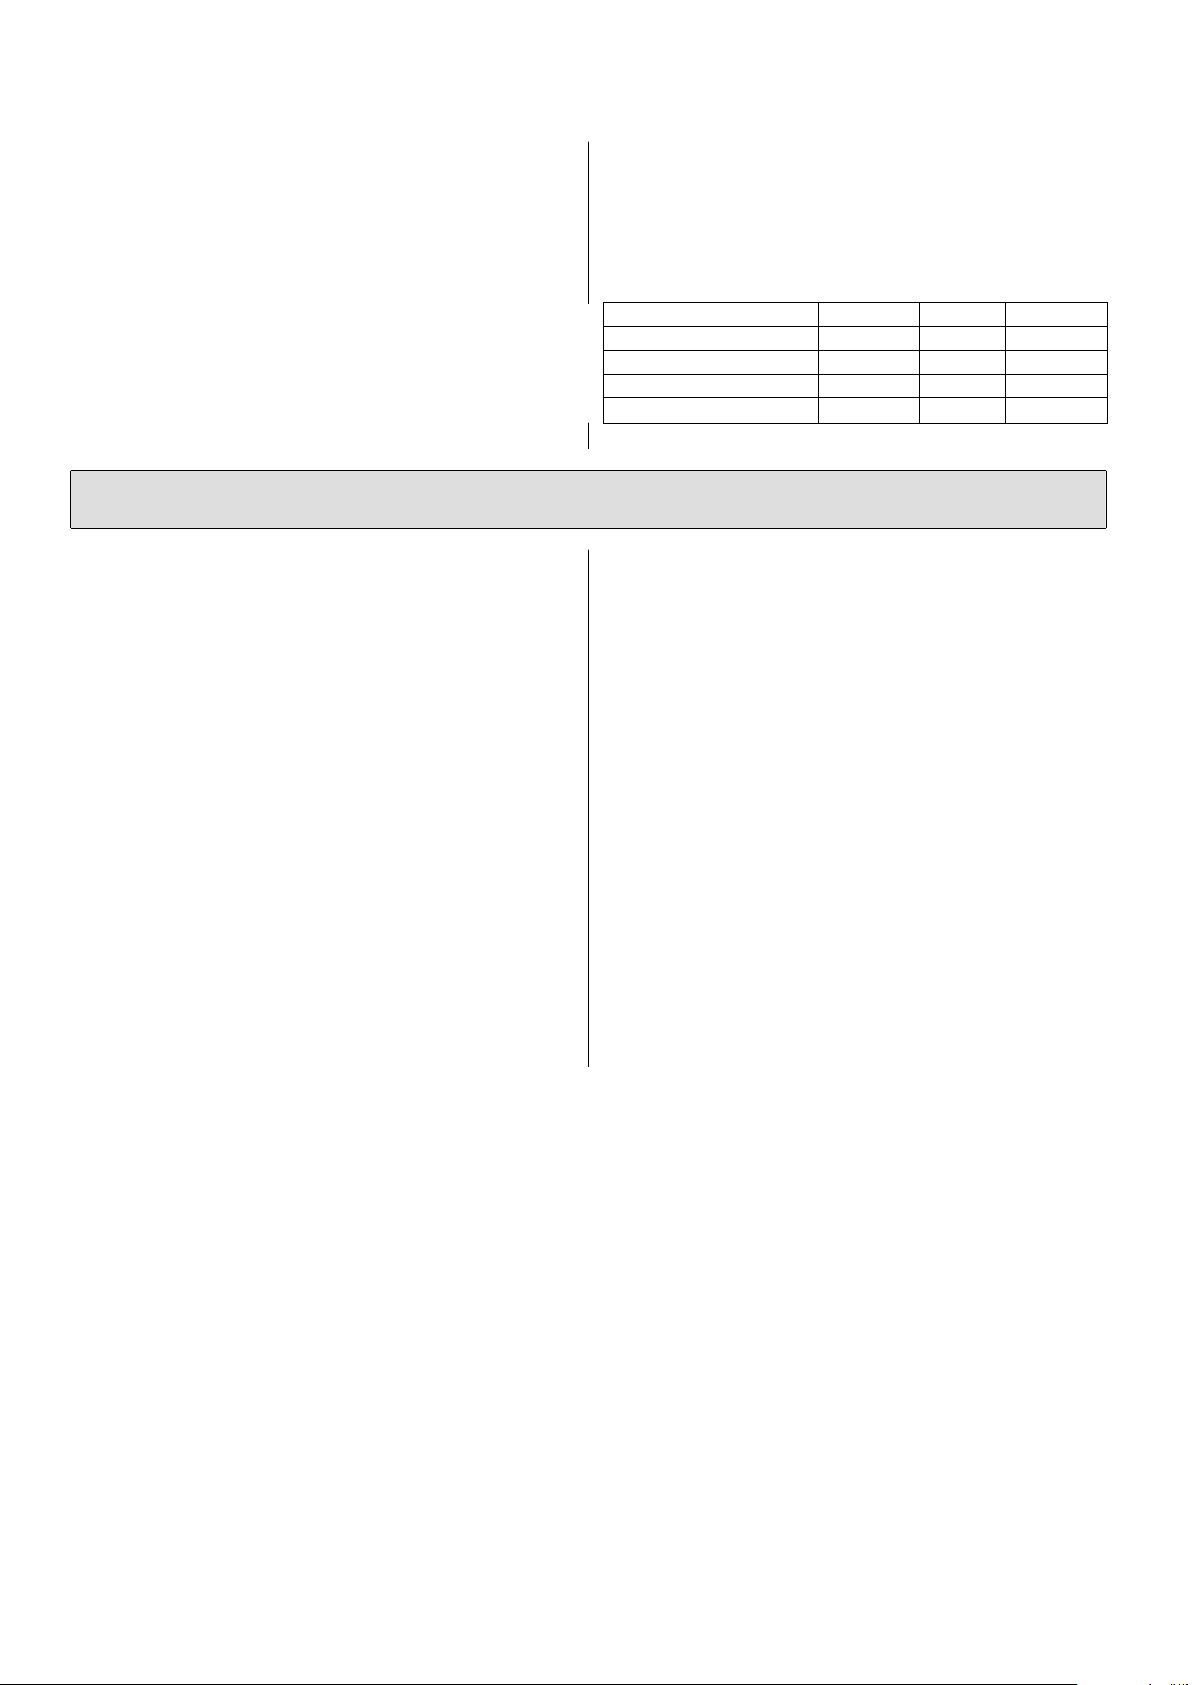
Shelf type
Fixed
Sliding
Drawer
Model 082
-
15 kg
-
Model 150
86 kg
15 kg
12 kg
Model 190
95 kg
30 kg
12 kg
Model 190 side by side
95 kg
30 kg
12 kg
Make sure the racks have the vibration dampers installed,
put the fixed shelf (J) above the dampers, slide it back so
that it fits and cannot move forward.
Removing a “Selection” drawer
Remove all the bottles from the drawer and the top shelf
Removing a “Selection” drawer rack
Pull up the front rack until the clip is loose from the side
wall (I), pull the back clip out of the slot in your direction
(H).
Repeat this operation on the other side.
(J).
Remove shelf (J) from the drawer racks.
Completely open the drawer and remove the two bottom
screws (K).
Pull the drawer in order to disengage it from the rails.
Maximum weight above a shelf
TROUBLESHOOTING
The LED light does not turn on when
opening the door
Check if:
- The plug has been installed correctly in the electrical
socket and if the distance is adequate;
- There is no electricity in the house.
The wine cellar does not cool well or the
compressor runs constantly
Check if:
- The door does not close properly or if the seal is
damaged;
- The door is frequently being opened;
- The installation conditions are respected.
The appliance makes too much noise
Check if:
- The appliance is levelled;
- The appliance has been installed between cabinets that
vibrate and make noise;
- The installation conditions are respected;
- The internal fan is not obstructed and free to run;
- It is the noise made by the refrigerant, which occurs
even when the compressor is off (this is not a fault).
The internal back wall of the appliance unit
is covered in frost or droplets of water
- This shows that the appliance is operating normally.
There is water in the internal bottom of the
appliance
- The drain hole is not obstructed.
A certain amount of water is normally present in the
drain. This ensures a good humidity control in the
appliance.
If, after checking the above situations, the wine cellar
does not work or the problem persists, please contact the
nearest Service Centre communicating: the type of
malfunction, the appliance model (Mod) and serial
number (SN). This information can be found on the data
plate located inside the appliance.
Never call unauthorized technicians and always refuse spare parts that are not originals.
10
Page 12
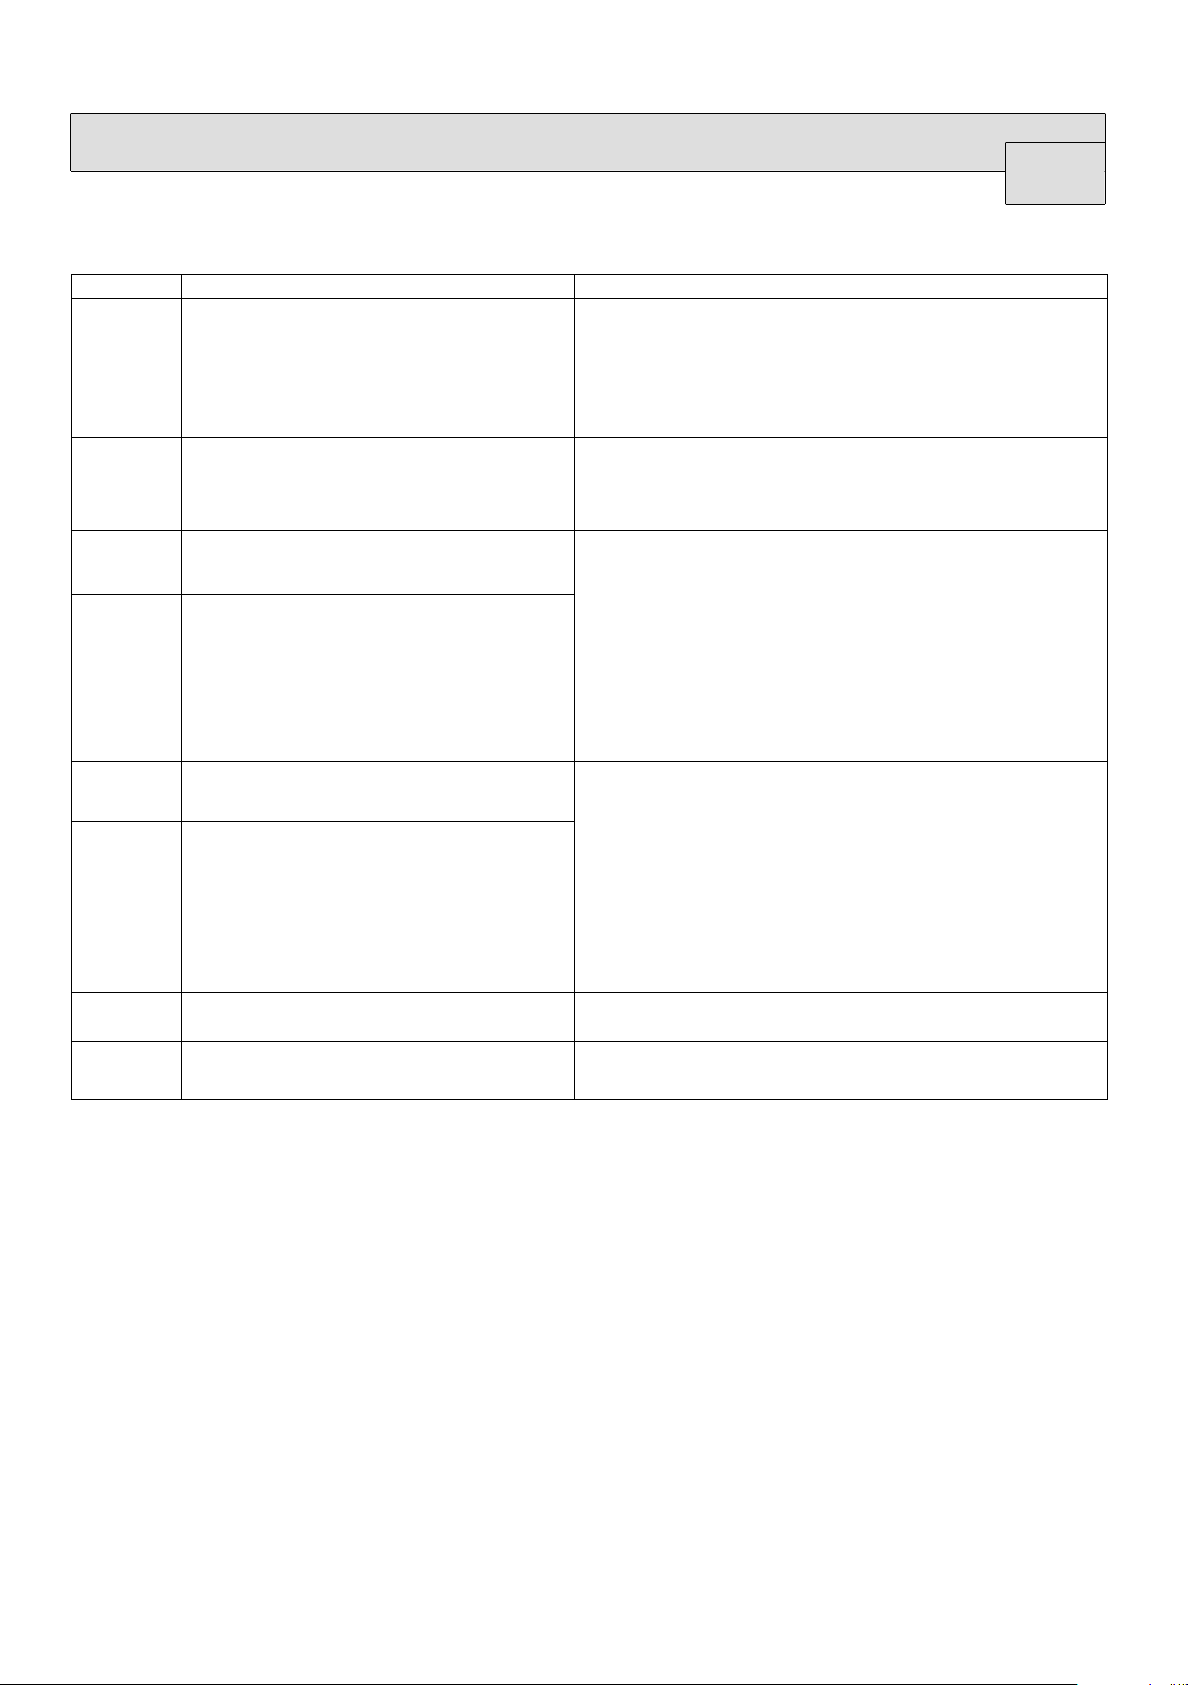
Code
Cause
Action
dA
Open Door Warning
Close the door unless you need it opened for a loading
/unloading operation. In this case, you can stop the buzzer by
pressing any key. When finished, make sure to close the door,
the LED light should go off.
Until this fault is recovered, the appliance will stop all cooling
and heating actions.
FIL
Charcoal Filter Change
Change the charcoal filter and reset the message pressing the
filter key (17). See chapter “Maintaining the appliance” for
details.Even if this message is present, the appliance will
continue his normal operation.
HA
High Temperature Alarm
This message will appear if the controller is not able to bring
internal temperature to set point threshold.
Check if the appliance is installed correctly and if the climate
conditions of the room are according to specifications (refer to
chapter “Installation”).
If there has been a change in temperature or humidity set point,
a major load change or a long open door status, press any key to
stop the buzzer and wait some hours for the appliance to
stabilise.
If you are not able to sort the problem, contact your retailer.
LA
Low Temperature Alarm
HHA
High Humidity Alarm
This message will appear if the controller is not able to bring
internal humidity to safe range.
Check if the appliance is installed correctly and if the climate
conditions of the room are according to specifications (refer to
chapter “Installation”).
If there has been a change in temperature or humidity set point,
a major load change or a long open door status, press any key to
stop the buzzer and wait a few hours for the appliance to
stabilise.
If you are not able to sort the problem, contact your retailer.
HLA
Low Humidity Alarm
P1
Thermostat Probe Failure
Contact your retailer, with this fault your appliance will stop
working.
P3
Humidity Probe Failure
Contact your retailer, with this fault your appliance will stop
humidity control.
The controller will display an alarm or a warning code if something is not according to expectations. This message is
displayed alternating with internal temperature until alarm condition recovers.
The Buzzer can be silenced by Pressing any Key. Please refer to the following table to understand the meaning and
what should be done to overcome alarm or warning situations.
ALARMS AND WARNING MESSEGES
11
Page 13
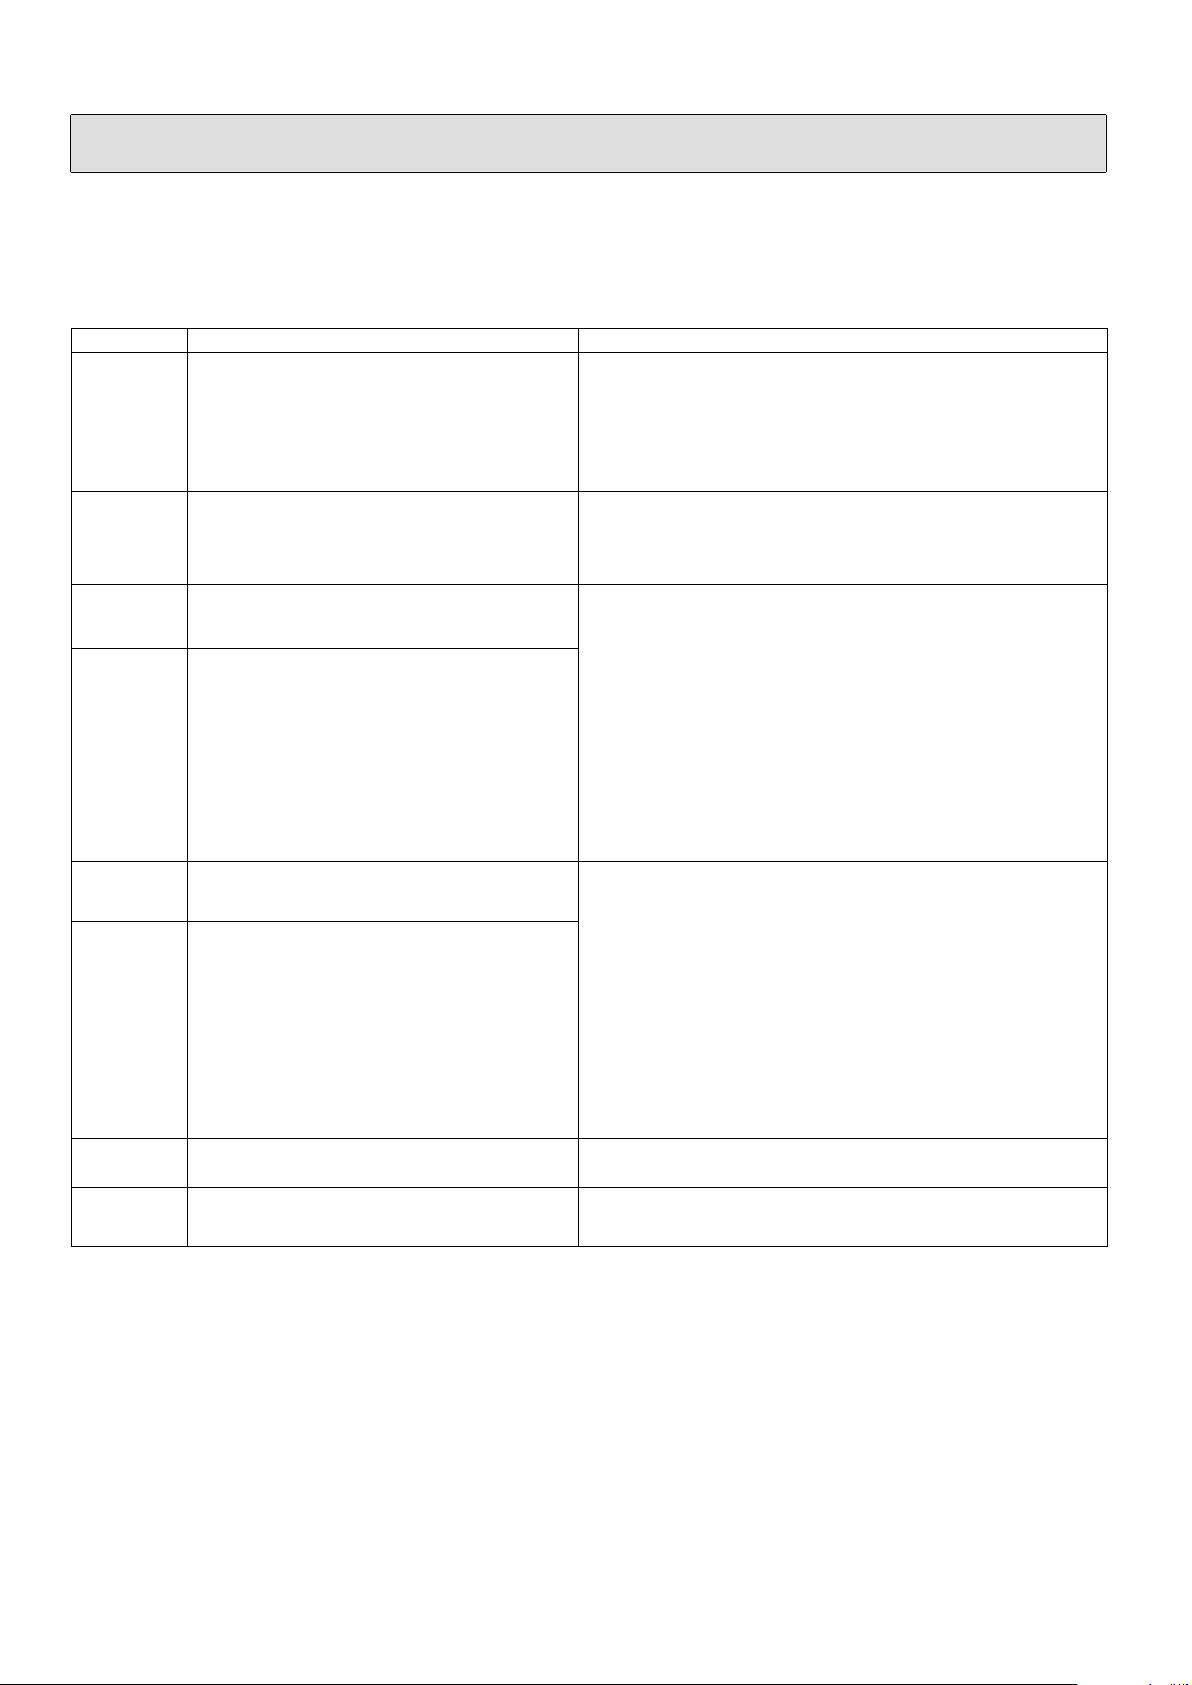
Indicación
Causa
Acciones
dA
Alarma de puerta abierta
Cierre la puerta, a menos que tenga que mantenerla abierta para
la operación de carga / descarga. En este caso, puede detener la
señal acústica presionando cualquier tecla. Cuando termine,
asegúrese de cerrar la puerta y la luz LED se apague.
Hasta que esta causa sea corregida, el aparato detendrá todas las
acciones de enfriamiento y calefacción.
FIL
Cambio de filtro de carbón
Cambie el filtro de carbón y reinicie el contador de días con la
tecla (17). Consulte el capítulo "Mantenimiento del aparato"
para más detalles.
Aunque este mensaje, el aparato seguirá siendo normal.
HA
Alarma de temperatura alta
Este mensaje aparece si el aparato no es capaz de alcanzar la
temperatura configurada al cabo de un cierto tiempo.
Asegúrese de que el aparato está instalado correctamente y de
que las condiciones climáticas del sitio cumplen las
especificaciones (según el capítulo "Instalación").
Si ha cambiado la configuración de temperatura, humedad, un
cambio significativo de la carga del aparato o un largo período
de puerta abierta, silenciar la alarma sonora presionando
cualquier tecla y espere unas horas para que la temperatura y /
o la humedad en el interior se estabilicen.
Si no puede resolver el problema, póngase en contacto con su
distribuidor.
LA
Alarma de temperatura baja
HHA
Alarma de humedad alta
Este mensaje aparece si el aparato no es capaz de alcanzar la
humedad a un valor seguro.
Asegúrese de que el aparato está instalado correctamente y de
que las condiciones climáticas del sitio cumplen las
especificaciones (según el capítulo "Instalación").
Si ha cambiado la configuración de temperatura, humedad, un
cambio significativo de la carga del aparato o un largo período
de puerta abierta, silenciar la alarma sonora presionando
cualquier tecla y espere unas horas para que la temperatura y /
o la humedad en el interior se estabilicen.
Si no puede resolver el problema, póngase en contacto con su
distribuidor.
HLA
Alarma de humedad baja
P1
Alarma sonda temperatura
En presencia de esta indicación, el aparato deja de funcionar.
En este caso, póngase en contacto con su distribuidor.
P3
Alarma sonda humedad
En presencia de esta indicación, el aparato deja de funcionar.
En este caso, póngase en contacto con su distribuidor.
MENSAJE DE ALARMA Y ADVERTENCIA
El controlador mostrará un mensaje de alarma o una advertencia si algo no está de acuerdo con lo previsto. Este
mensaje se visualiza alternativamente con la temperatura interna hasta que las condiciones de alarma se estabilicen.
La señal acústica se puede silenciar presionando cualquier tecla del controlador.
La siguiente tabla permite relacionar la indicación mostrada con la causa y las acciones a tomar para resolver la
situación.
30
Page 14
IMG
IMG 1
IMG 2
IMG 3
IMG 4
IMG 5
IMG 6
IMG 7
IMG 8
IMG 9
31
Page 15

32
MPPAPMAN6100500
 Loading...