

Page 1

OWNER'S MANUAL
R-410A Duct Free Split System
Air Conditioner and Heat Pump
Product Family: DFS4(A/H)-System, DFC4(A/H)3-Outdoor, DFF4(A/H)H-Indoor
Please read the operating instructions and safety precautions carefully and thoroughly before installing and
operating your room air conditioner or heat pump.
TABLE OF CONTENTS
PAGE
SAFETY PRECAUTIONS 2. . . . . . . . . . . . . . . . . . . . . . . . . . . . . . . . . . . . . . . . . . . . . . . . . . . . . . . . . . . . . . . . . . . . . . . . . . . . . . . . . . .
GENERAL 2. . . . . . . . . . . . . . . . . . . . . . . . . . . . . . . . . . . . . . . . . . . . . . . . . . . . . . . . . . . . . . . . . . . . . . . . . . . . . . . . . . . . . . . . . . . . . . . .
PART NAMES 3. . . . . . . . . . . . . . . . . . . . . . . . . . . . . . . . . . . . . . . . . . . . . . . . . . . . . . . . . . . . . . . . . . . . . . . . . . . . . . . . . . . . . . . . . . . .
DISPLAY PANELS 4. . . . . . . . . . . . . . . . . . . . . . . . . . . . . . . . . . . . . . . . . . . . . . . . . . . . . . . . . . . . . . . . . . . . . . . . . . . . . . . . . . . . . . . . .
REMOTE CONTROL 5-6. . . . . . . . . . . . . . . . . . . . . . . . . . . . . . . . . . . . . . . . . . . . . . . . . . . . . . . . . . . . . . . . . . . . . . . . . . . . . . . . . . . .
REMOTE CONTROL FUNCTIONS 7-8. . . . . . . . . . . . . . . . . . . . . . . . . . . . . . . . . . . . . . . . . . . . . . . . . . . . . . . . . . . . . . . . . . . . . . . .
CLEANING, MAINTENANCE AND TROUBLESHOOTING 9-10. . . . . . . . . . . . . . . . . . . . . . . . . . . . . . . . . . . . . . . . . . . . . . . . . . . .
NOTE TO EQUIPMENT OWNER:
Thank you for your purchase. Please read this Owner's Information Manual carefully
before installing and using this appliance and keep this manual for future reference.
For your convenience, please record the model and serial numbers of your new
equipment in the spaces provided. This information, along with the installation data and
dealer contact information, will be helpful should your system require maintenance or
service.
UNIT INFORMATION
Model # _________________________________
Serial # _________________________________
INSTALLATION INFORMATION
Date Installed ____________________________
DEALERSHIP CONTACT INFORMATION
Company Name: ______________________________
Address:_____________________________________
____________________________________________
Phone Number:______________________________
Technician Name:_____________________________
421 02 9301 00 Feb 2008
Page 2
OWNER'S MANUAL Duct Free Split System - High Wall: DFS4(A/H), DFC4(A/H)3, DFF4(A/H)H
SAFETY PRECAUTIONS
NOTE is used to highlight suggestions which will result in
!
WARNING
PERSONAL INJURY, DEATH, OR PROPERTY
DAMAGE HAZARD
Failure to follow this warning could result in personal
injury, death, or property damage.
Read and follow all instructions and warnings,
including labels shipped with or attached to unit
before operating your new air conditioner.
Any time you see this symbol in manuals, instructions
and on the unit, be aware of the potential for personal injury.
There are three levels of precaution:
DANGER identifies the most serious hazards which will
result in severe personal injury or death.
WARNING signifies hazards that could result in personal
injury or death.
CAUTION is used to identify unsafe practices which would
result in minor personal injury or product and property
damage.
enhanced installation, reliability, or operation.
!
PERSONAL INJURY, DEATH AND / OR PROPERTY
DAMAGE HAZARD
Failure to follow this warning could result in personal
injury, death or property damage.
Improper installation, adjustment, alteration, service,
maintenance, or use can cause explosion, fire,
electrical shock, or other conditions which may cause
personal injury or property damage.
Consult a qualified installer, service agency, your
distributor or branch for information or assistance.
The qualified installer or service agency must use
factory-authorized kits or accessories when
modifying this product.
WARNING
GENERAL
The high wall fan coil unit provides quiet, maximum comfort.
In addition to cooling and/or heating, the high wall fan coil
unit matched with an outdoor condensing unit will filter and
dehumidify the air in the room to provide maximum comfort.
IMPORTANT: The high wall fan coil unit should be installed
by authorized personnel only; using approved tubing and
accessories. If technical assistance, service or repair is
needed, contact the installer or local dealer.
The high wall fan coil unit can be set up and operated from
the remote control (provided). If the remote is misplaced,
the system can be operated from the “Auto” setting on
the unit.
Operating Modes:
The high wall fan coil unit has five operating modes.
Fan only
Auto (heat pump models only)
Heating (heat pump models only)
Cooling
Dehumidification (DRY)
Fan Only
In Fan Only mode, the system filters and circulates room air
without changing room air temperature.
Auto
In Auto mode, the system will automatically cool or heat the
room according to the user-selected set point.
Heating
In Heating mode, the system heats and filters room air.
Cooling
In Cooling mode, the system cools, dries and filters room air.
Dehumidification (DRY)
In Dehumidification mode, the system dries, filters and
slightly cools room air temperature. This mode does not
take the place of a dehumidifier.
Remote Control
The remote control transmits commands to set up and
operate the system. The controller has a window display
panel that shows the current system status. The controller
can be secured to a surface when used with the mounting
rack provided.
2 421 02 9301 00
Page 3
OWNER'S MANUAL Duct Free Split System - High Wall: DFS4(A/H), DFC4(A/H)3, DFF4(A/H)H
r
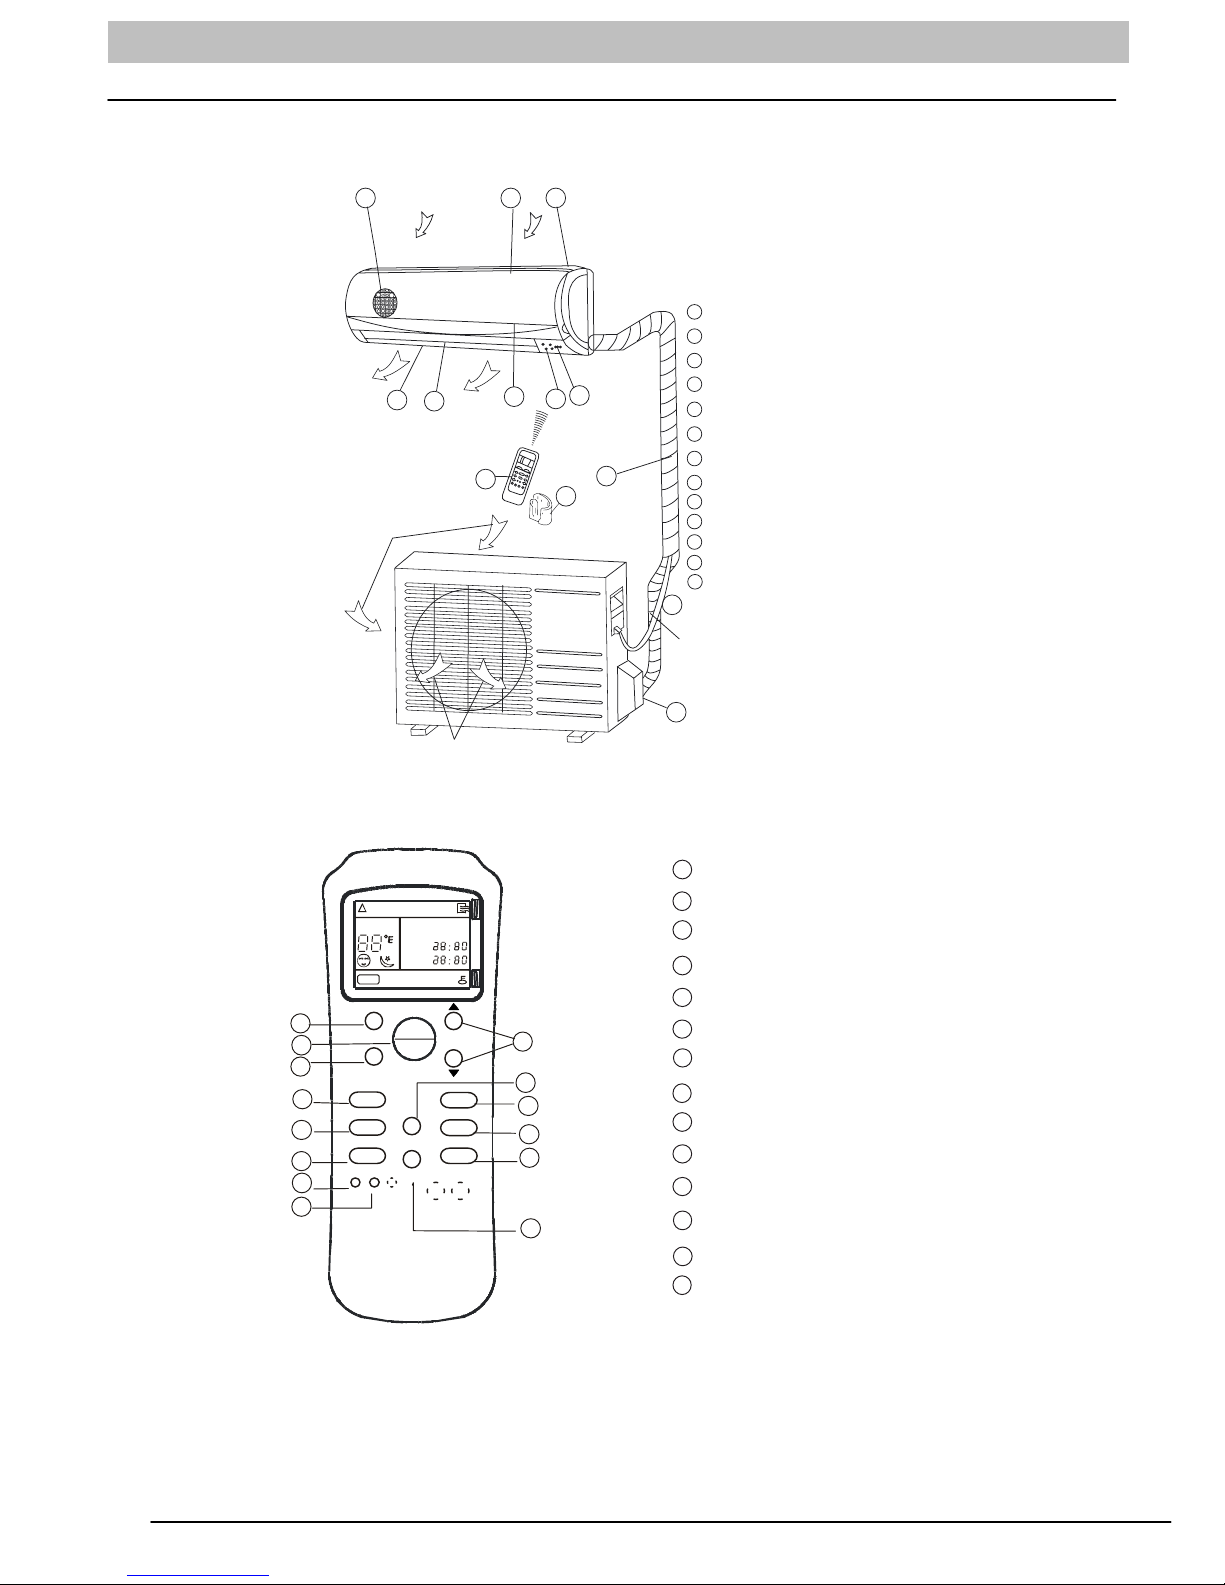
PART NAMES
INDOOR
UNIT
3
Air inlet
4
5
OUTDOOR
UNIT
Air inlet
Air outlet
21
6
7
9
10
1
Front panel frame
2
Front panel
3
Air filter
4
8
11
Horizontal air flow grille
5
Vertical air flow louver
6
Room temperature senso
7
Display panel
8
Infrared signal receiver
9
Remote controller
10
Remote controller holder
11
Interconnecting tubing
12
Connective cable
13
Service valve
12
Indoor/Outdoor Unit
AUTO C OOL DRY HEAT FAN
SET TE MP.
TIMER ON
TIMER OFF
SPEED
AUTO LOW MED HIGH
1
2
3
4
5
6
7
8
MODE
FAN SPEED
AIR DIRECTION
SWING
LED
RESET F/C
ON
OFF
SLEE P
TURBO
Air outlet
CLOCK
TEMP.
CLOC K
TIMER
CANCEL
13
MODE Button
1
ON/OFF Button
2
3
FAN SPEED Button
AIR DIRECTION Button
4
SWING Button
5
6
9
10
11
12
13
14
LED Button
7
RESET Button
8
F/C Button
9
TEMP Button
10
SLEEP Button
11
CLOCK Button
12
TIMER Button
CANCEL Button
13
14
TURBO Button
Remote Control
421 02 9301 00 3
Page 4
OWNER'S MANUAL Duct Free Split System - High Wall: DFS4(A/H), DFC4(A/H)3, DFF4(A/H)H
r
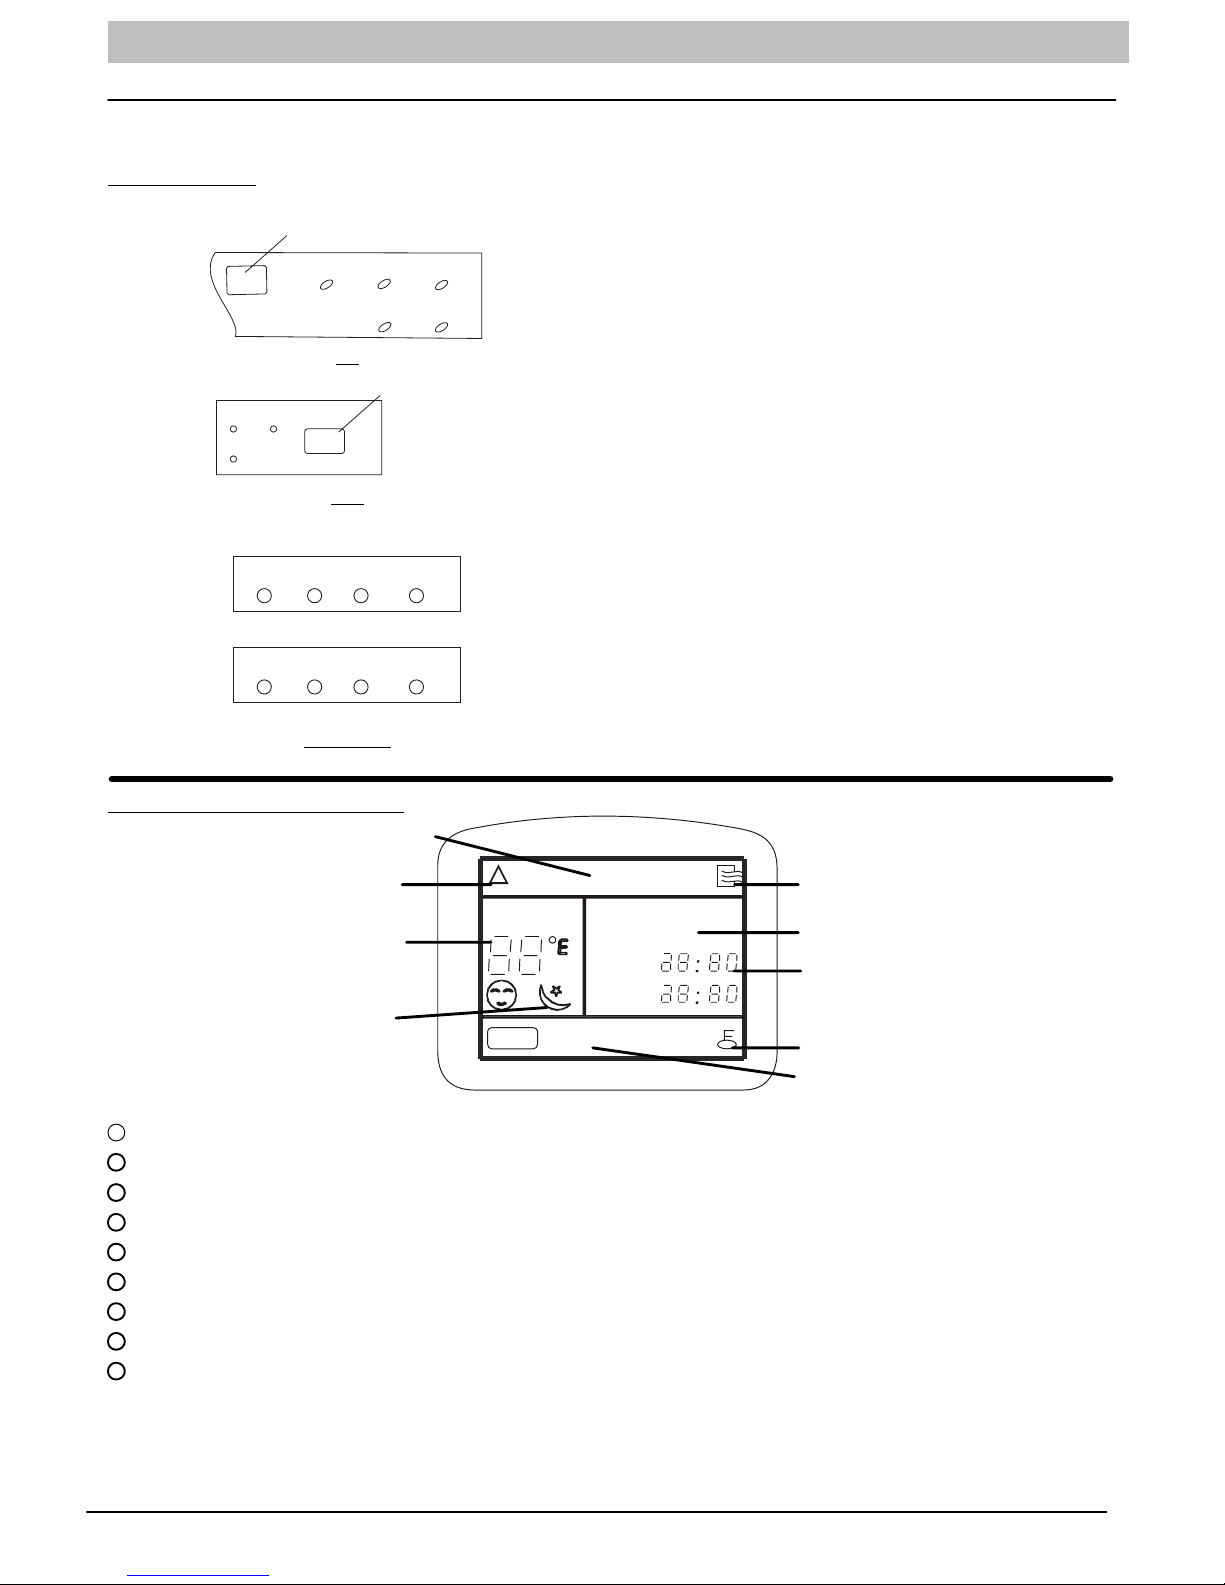
UNIT DISPLAY PANELS
NOTE: The display panel on the indoor unit will look like one of the following. Some of the functions will appear on
either the display panel, remote control, or both.
On the Unit:
TIMER
PRE-DEF
Cooling/ Heating
Infrared signal receptor
OPERATION
OPERATION
OPERATION
9K
12K
AUTO
AUTO
TIMER
ECON
PRE-DEF
Infrared signal recepto
TIMER
PRE.-DEF.
OPERATION:
This indicator flashes once per second after power is on and
illuminates when the unit is in operation.
TIMER:
This indicator illuminates when TIMER is set ON or OFF.
PRE.-DEF indicator (heat pump units only):
Pre-Def indicator illuminates when the coil is warming up to
prevent cold blow or when unit goes into defrost mode.
AUTO indicator:
When air conditioner is set to AUTO mode, the indicator
illuminates.
FAN ONLY indicator:
When air conditioner is set to FAN ONLY mode, this
indicator illuminates.
NOTE: All the pictures in this manual are for
demonstration purposes only. The actual shape of your
air conditioner may be slightly different, but the
operation instructions are the same.
Cooling Only
TIMER
OPERATION
AUTO
FAN ONLY
18K - 24K
Remote Control Display
Mode Display
Transmission Indicator
Temperature Setting
Sleep Display
1
TRANSMISSION Indicator Lights when remote control transmits signals to the indoor unit.
2
MODE Display Indicates the current operation mode - “AUTO”, “COOL”, “DRY”, “HEAT” (Heat Pump Only), or “FAN”.
3
ON/OFF Indicator Symbol appears when unit is turned on by the remote control, and disappears when unit is turned off.
4
TEMPERATURE Setting From 62°F(17°C) to 88°F(30°C) will be displayed. If Fan Mode is selected there will be no display.
5
CLOCK Display Indicates the current time (0 to 24 hours).
6
TIMER Display Indicates the set times for the Timer operation (0 to 24 hours).
7
LOCK Display Appears when settings are Locked.
8
SLEEP Display Indicates unit is running in Sleep mode.
9
FAN SPEED Display Indicates the set fan speed. “Auto” is displayed when unit is running in Auto or Dry mode.
A UT OC OOL DRY H E A T FA N
S ET T EMP.
TIMER ON
TIMER OFF
SPEED
AUTO LOW MED HIGH
CLOCK
ON/OFF Indicator
Clock Display
Timer Display
Lock Display
Fan Speed Indicator
NOTE: Symbols shown in this manual are for the purpose of demonstration. During actual operation, only the
relevant symbols are displayed.
4 421 02 9301 00
Page 5
OWNER'S MANUAL Duct Free Split System - High Wall: DFS4(A/H), DFC4(A/H)3, DFF4(A/H)H
REMOTE CONTROL
AUTOC OOLDR YHE ATFAN
SETTE MP.
CL OC K
TIMERON
TIMER OF F
O
SETTEMPERATURE(F)
SPEED
AUTO LOW MED HIGH
ON
O
SLEEP
TURBO
TEMP
ON/OFF
SLEEP
RESETLOCK
FAN
HIGH
MED
LOW
TEMP.
FF
CLOCK
FAN SPEED
TIMER
TIMER ON
CANCEL
TIMER OFF
LED
DISPLAY
TURBO
AUTO
COOL
DRY
HEAT
FAN SPEED
AIR DIRECTION
SWING
LED
RESET F/C
DIRECTION
MODE
MODE
SWING
AIR
!
CAUTION
EQUIPMENT DAMAGE HAZARD
Failure to follow this caution may result in equipment
damage.
Handle the controller with care and avoid getting the
controller wet.
IMPORTANT: The remote control can operate the unit from
a distance of up to 25 ft. (7.6 m) as long as there are no
obstructions. This is one-way communication only (from
remote control to fan coil).
When the Timer function is used, the remote control should
be kept within 25 ft. of the indoor unit.
The remote control can perform the following basic
functions:
Turn the system ON and OFF
Select operating mode
Adjust room air temperature set point and fan speed
Adjust airflow direction
Refer to the Remote Control Function section for detailed
description of all the capabilities of the remote control.
Battery Installation
Two AAA 1.5 v alkaline batteries (included) are required for
operation of the remote control.
To install or replace batteries:
1. Slide the back cover off the control to open the battery
compartment.
2. Insert batteries. Follow the polarity markings inside
the battery compartment.
3. Replace battery compartment cover.
NOTE:
1. When replacing batteries, do not use old batteries or a
different type battery. This may cause the remote control to
malfunction.
2.If the remote is not going to be used for several weeks,
remove the batteries. Otherwise battery leakage may
damage the remotecontroller.
3. The average battery life under normal use is about 6
months.
4. Replace the batteries when there is no audible beep from
the indoor unit or if the Transmission Indicator fails to light.
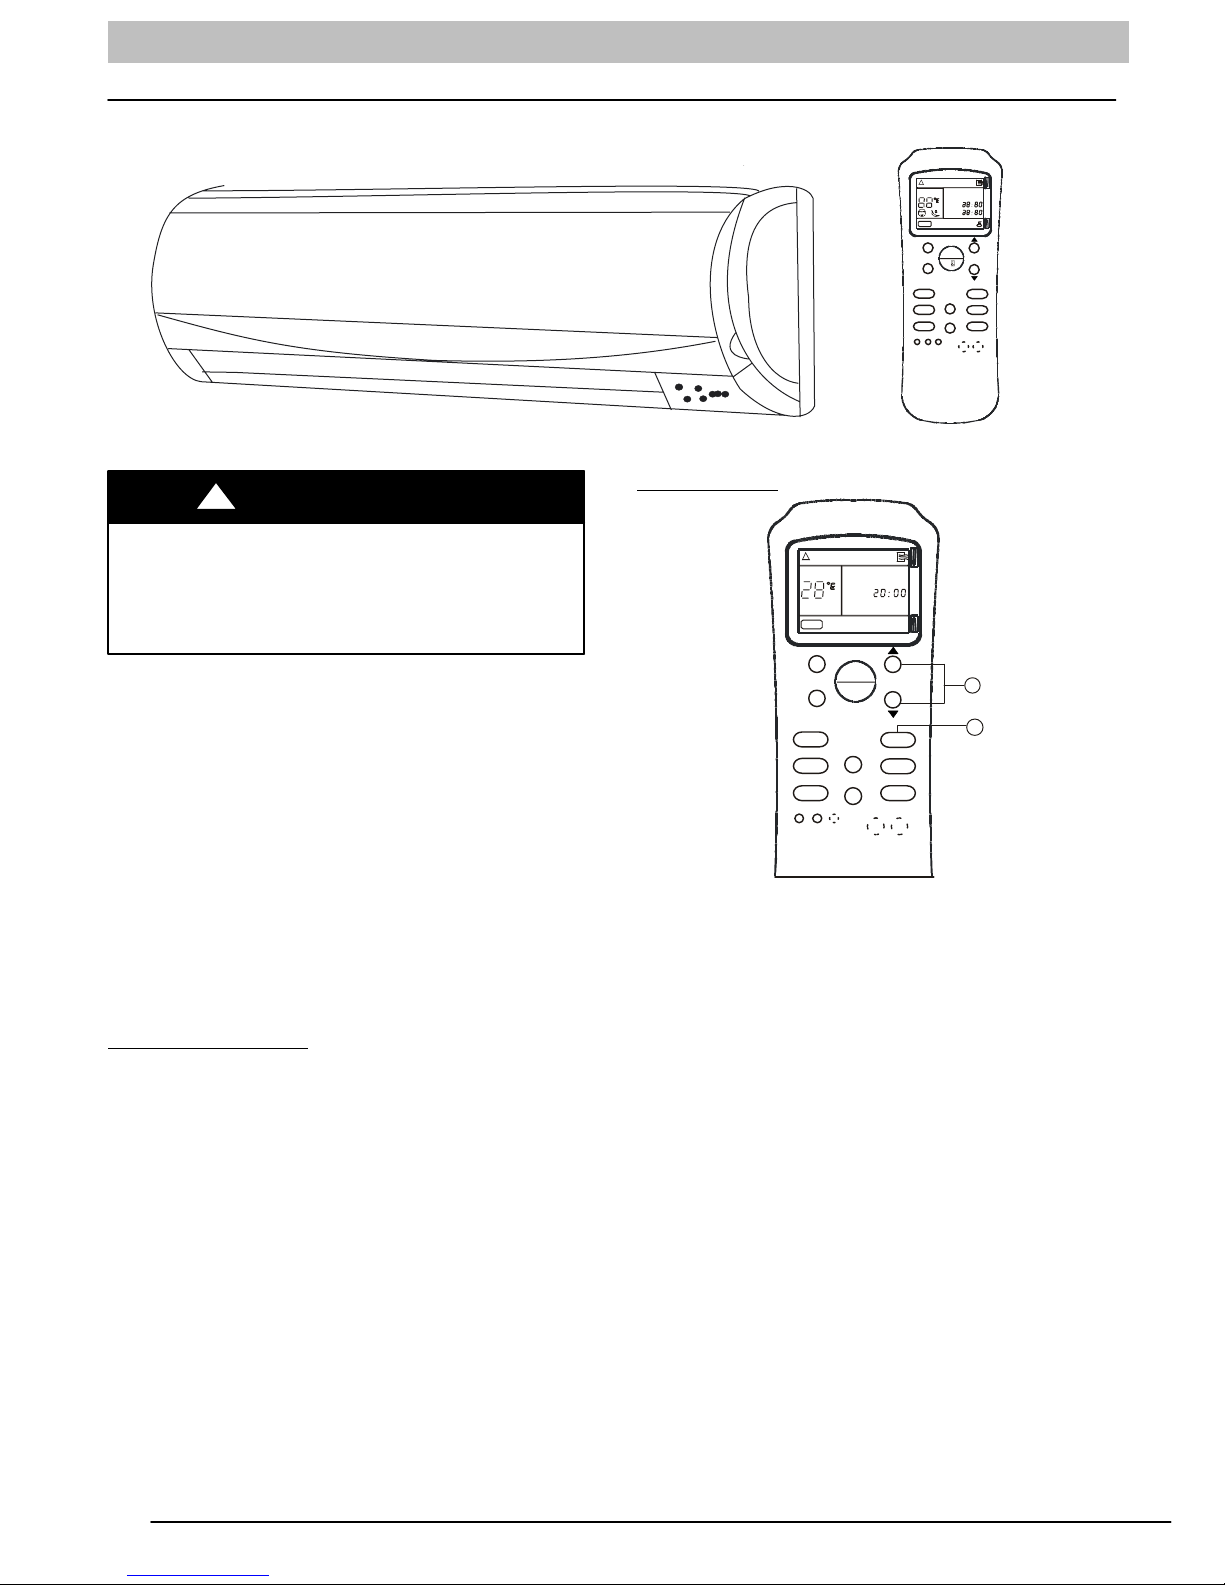
Set the Clock
AUTO
SETTEMP.
SPEED
MODE
FAN SPEED
AIR DIRECTION
SWING
LED
RESET F/C
AUTO
ON
OFF
SLEEP
TURBO
CLOCK
TEMP.
1
2
CLOC K
TIMER
CANCEL
Before you start operating the unit, set the clock on the
remote control as outlined below. The clock panel on the
remote control will display the time whether the unit is in use
or not.
Initial Setting of the Clock
After batteries are installed in the remote control, the clock
panel will display “12:00” and begin to flash.
1. TEMP button
Press these buttons to set time
Forward
Backward
Each time you press the button, the time moves forward or
backward by one minute. If you press and hold the
Temperature button, the time adjusts in increments of 10
minutes.
2. CLOCK button
When the correct time is selected, press the CLOCK
button or release
the clock time will then stop flashing and the clock starts
operating normally.
3. Readjusting the CLOCK
buttons and wait for 3 seconds,
Press and hold the CLOCK button for approximately 3
seconds, the time on the clock display will start to flash. To
set the new time, repeat steps 1 and 2 above.
NOTE: The time on the clock must be set before the
Auto-Timer function will operate.
Clock accuracy is within 15 seconds per day.
421 02 9301 00 5
Page 6
OWNER'S MANUAL Duct Free Split System - High Wall: DFS4(A/H), DFC4(A/H)3, DFF4(A/H)H
!
CAUTION
Static electricity or other factors (Voltage fluctuation)
can cause the remote control clock to reset. If remote
control is reset (with “12:00” flashing) reset the clock
before starting unit.
Remote Control Operation - Quick Start
NOTE: When transmitting a command from the remote
control to the unit, be sure to point the controller toward the
right side of the unit. the unit will confirm receipt of a
command by sounding an audible beep.
1. Turn the unit on by pushing the ON/OFF button.
2. For temperatures settings to be displayed in degrees °F,
push the recessed F/C button once using a paper clip.
3. Select the desired mode by pushing the mode button.
AUTO
NOTE: Cool only units have no heat mode.
4. Select the temperature set point by pointing the
controller toward the unit and pressing the
increase/decrease temperature set point buttons until
the desired temperature appears on screen.
5. Select the desired fan speed by pressing the FAN
SPEED button to select desired fan speed.
NOTE: If unit is operating in Dry mode, the auto fan speed
will be displayed.
6. Set the airflow direction. When the unit is turned on,
the louvers default to the cooling or heating position.
The user can adjust louver position by pushing the air
direction button or have continuous louver movement
by pushing the swing button.
COOL
DRY
HEAT
FAN
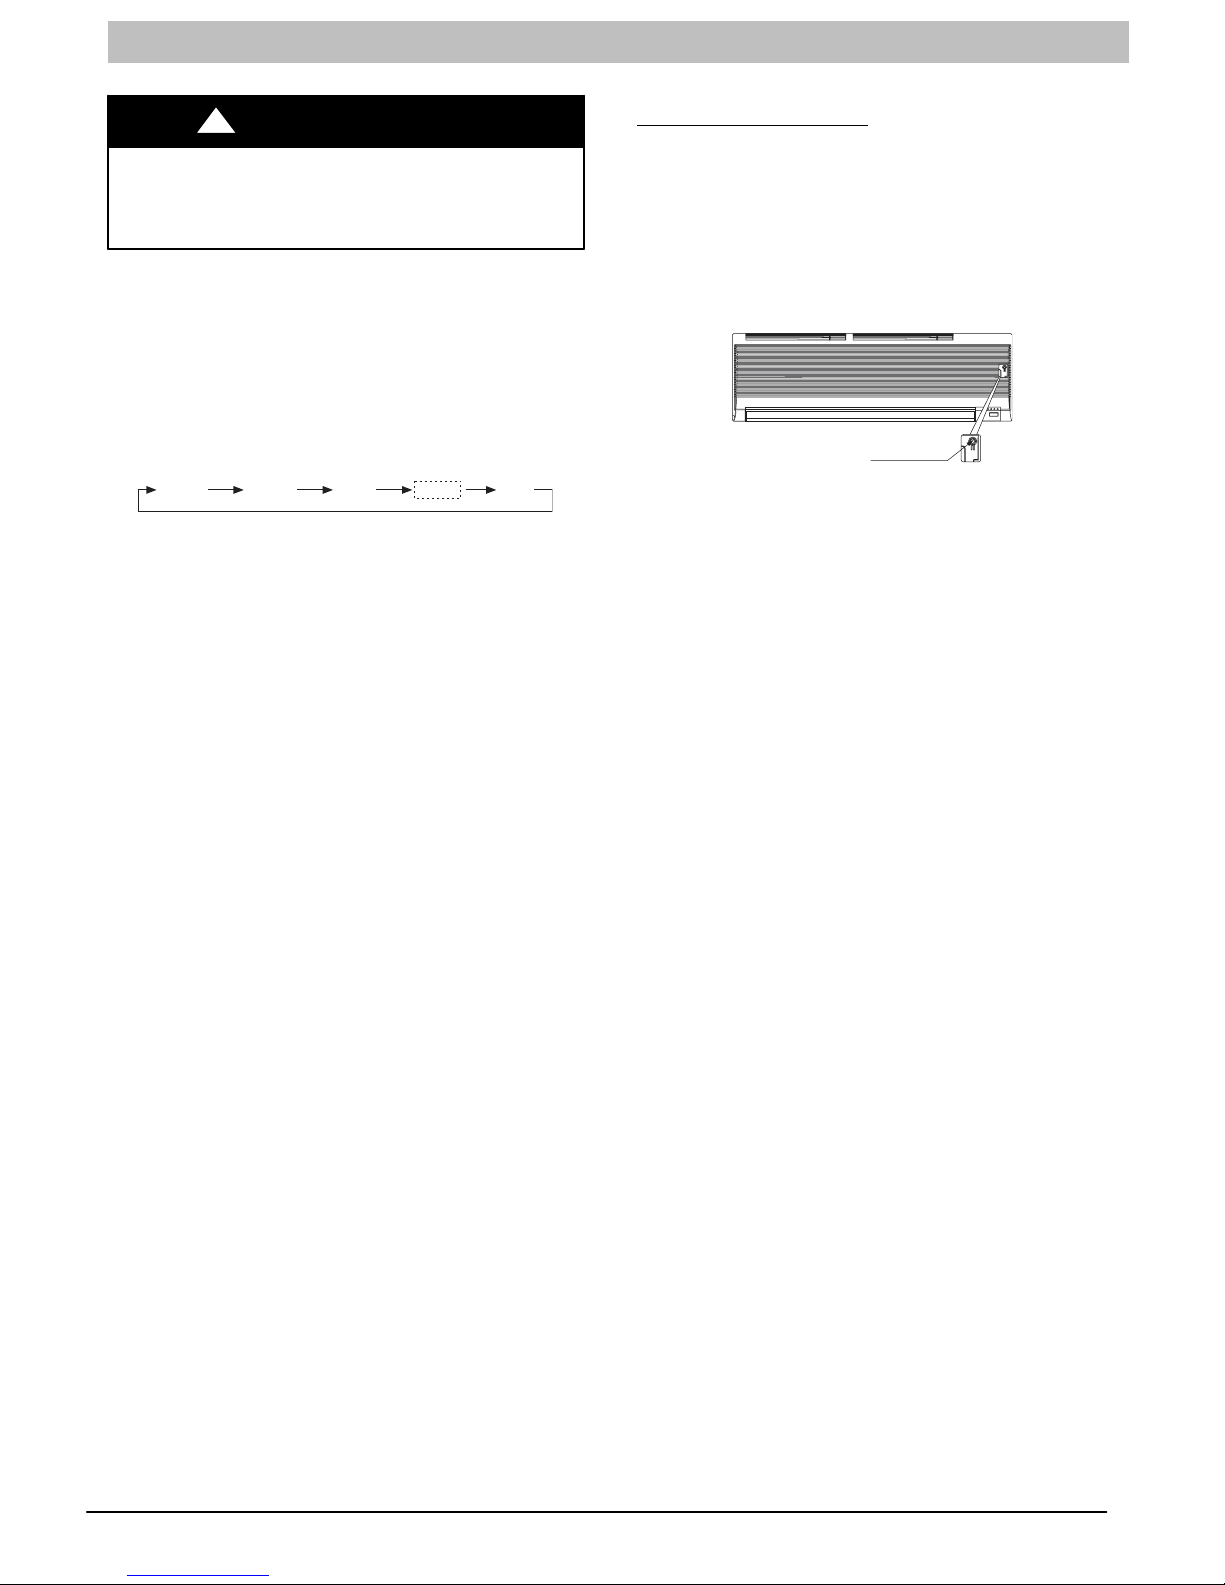
Emergency Operation
If the remote control is lost, damaged, or the batteries are
exhausted, the MANUAL button can be used to run the unit.
Open the front cover panel and press the MANUAL button
once briefly when the system is off.
To stop emergency operation, push the MANUAL button
twice or operate the remote control. If the MANUAL button
is only pushed once, the system will enter TEST mode and
run for 30 minutes.
Manual button
A07364
The set conditions of emergency operation are as follows:
Preset set point: 76F (24C)
Fan speed: AUTO
Discharge air direction: Pre-set position based on
operation in “Cool”or “Heat” mode.
6 421 02 9301 00
Page 7
OWNER'S MANUAL Duct Free Split System - High Wall: DFS4(A/H), DFC4(A/H)3, DFF4(A/H)H
REMOTE CONTROL FUNCTIONS
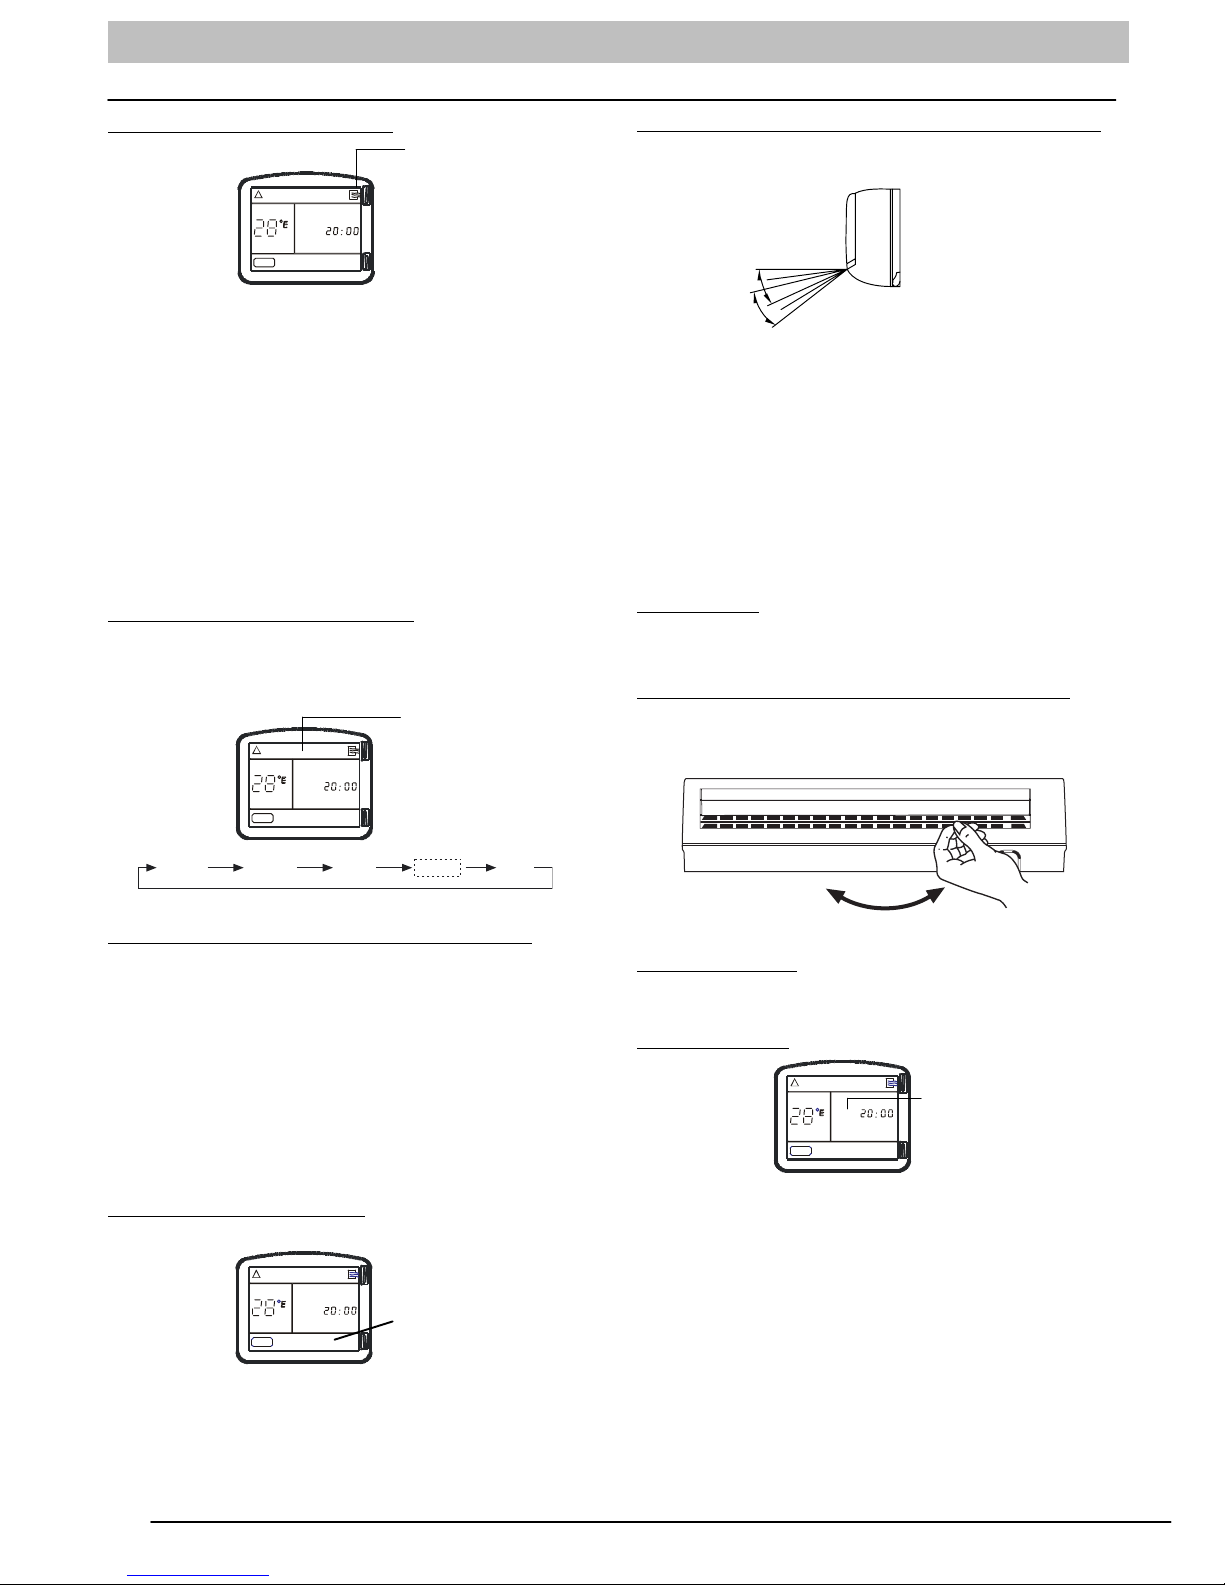
Pressing the On/Off Button
ON/OFF
Indicator
AUTO
SET TEMP.
SPEED
CLOCK
AUTO
When the air conditioner is not in operation, the remote
control will display the last set point, mode, and time.
Press the On/Off button to start the unit.
- The unit will start in the last operating mode and
set point. The ON/OFF indicator will appear.
Press button On/Off to stop the unit.
- All indicator lights on the unit will go out, and the
remote control will display the set point, mode, and time.
NOTE: If the On/Off button is pressed too soon after a stop,
the compressor will not start for 3 minutes due to the
inherent protection against frequent compressor cycling.
The unit will only emit an audible beep when the signals are
received correctly.
Selecting an Operating Mode
Use the Operating Mode button to select one of the
available modes.
Operating
Mode
AUTO
SET TEMP.
C OOL DR Y
HE AT
FAN
CLOCK
Selecting the Horizontal Direction Louver Position
In order to optimize comfort, the horizontal louvers can
operate in a preset range as shown below.
Cooling
Heating
The horizontal louvers can be adjusted using the remote
control. The horizontal louvers can be either stationary or
moving continuously.
Press the AIR DIRECTION button repeatedly to choose one
of the louver positions. Every time the Air Direction button is
pushed, the louver will swing by 6 degrees.
In the Cooling, Dehumidification, and Fan Only mode, the
louver will swing in the cooling range. In the Heating mode,
the louver will swing in the heating range.
NOTE: Always use the remote control to adjust the louver
position, otherwise abnormal operation may occur. If the
louver is manually adjusted out of its range, turn the unit off
and then on again.
Auto Swing
To have the louver moving continuously, push the SWING button.
Push again to stop the louver.
Selecting Vertical Direction of the Louver
The vertical louvers can be adjusted manually to direct the
airflow to achieve the optimal comfort in the space.
SPEED
AUTO
AUTO
COOL
DRY
HEAT
FAN
A07548
Setting the Room Temperature Set Point
Pressing the increase temperature set point and
decrease
buttons will raise or lower the temperature.
The unit will confirm signal receipt with a beep and the value of
the set temperature on the display will change accordingly.
The temperature can be set between 62F (17C) and 88F
(31C).
NOTE: In Cooling mode, if the temperate selected is higher
than the room temperature, the unit will not start. The same
applies for the Heating mode if the selected temperature is
lower than the room temperature.
Selecting the Fan Speed
AUTO
SET TEMP.
SPEED
The fan speed can be selected by pressing the FAN
SPEED button.
NOTE: When the unit is on, the fan will run continuously in
cooling or heating. When in heating, there might be situations
where the fan will slow down or shut off to prevent cold blow.
CLOCK
Fan Speed
AUTO LOW MED HIGH
A07543
Timer Function
TIMER ON (to start the unit) and TIMER OFF (to stop the
unit) can be used separately or together.
Timer ON only
AUTO
SET TEMP.
TIMER ON
SPEED
AUTO
This function will allow the unit to start automatically after a
set number of hours. The TIMER ON can be set while the
unit is on or off.
UNIT ON
-Press the TIMER button once. The current time flashes
next to the TIMER ON. Press the Temp
set the desired “Time On”. Every time the or button is
pushed, the time increases or decreases by 10 minutes.
- When the TIMER ON is set, the TIMER light on unit
illuminates. The unit will shut off and it will start at the set
time.
UNIT OFF
- Set the timer described in the UNIT ON section.
- The unit will start at the set time.
To cancel Timer setting, press the Cancel button.
Timer ON
or button to
421 02 9301 00 7
Page 8
OWNER'S MANUAL Duct Free Split System - High Wall: DFS4(A/H), DFC4(A/H)3, DFF4(A/H)H
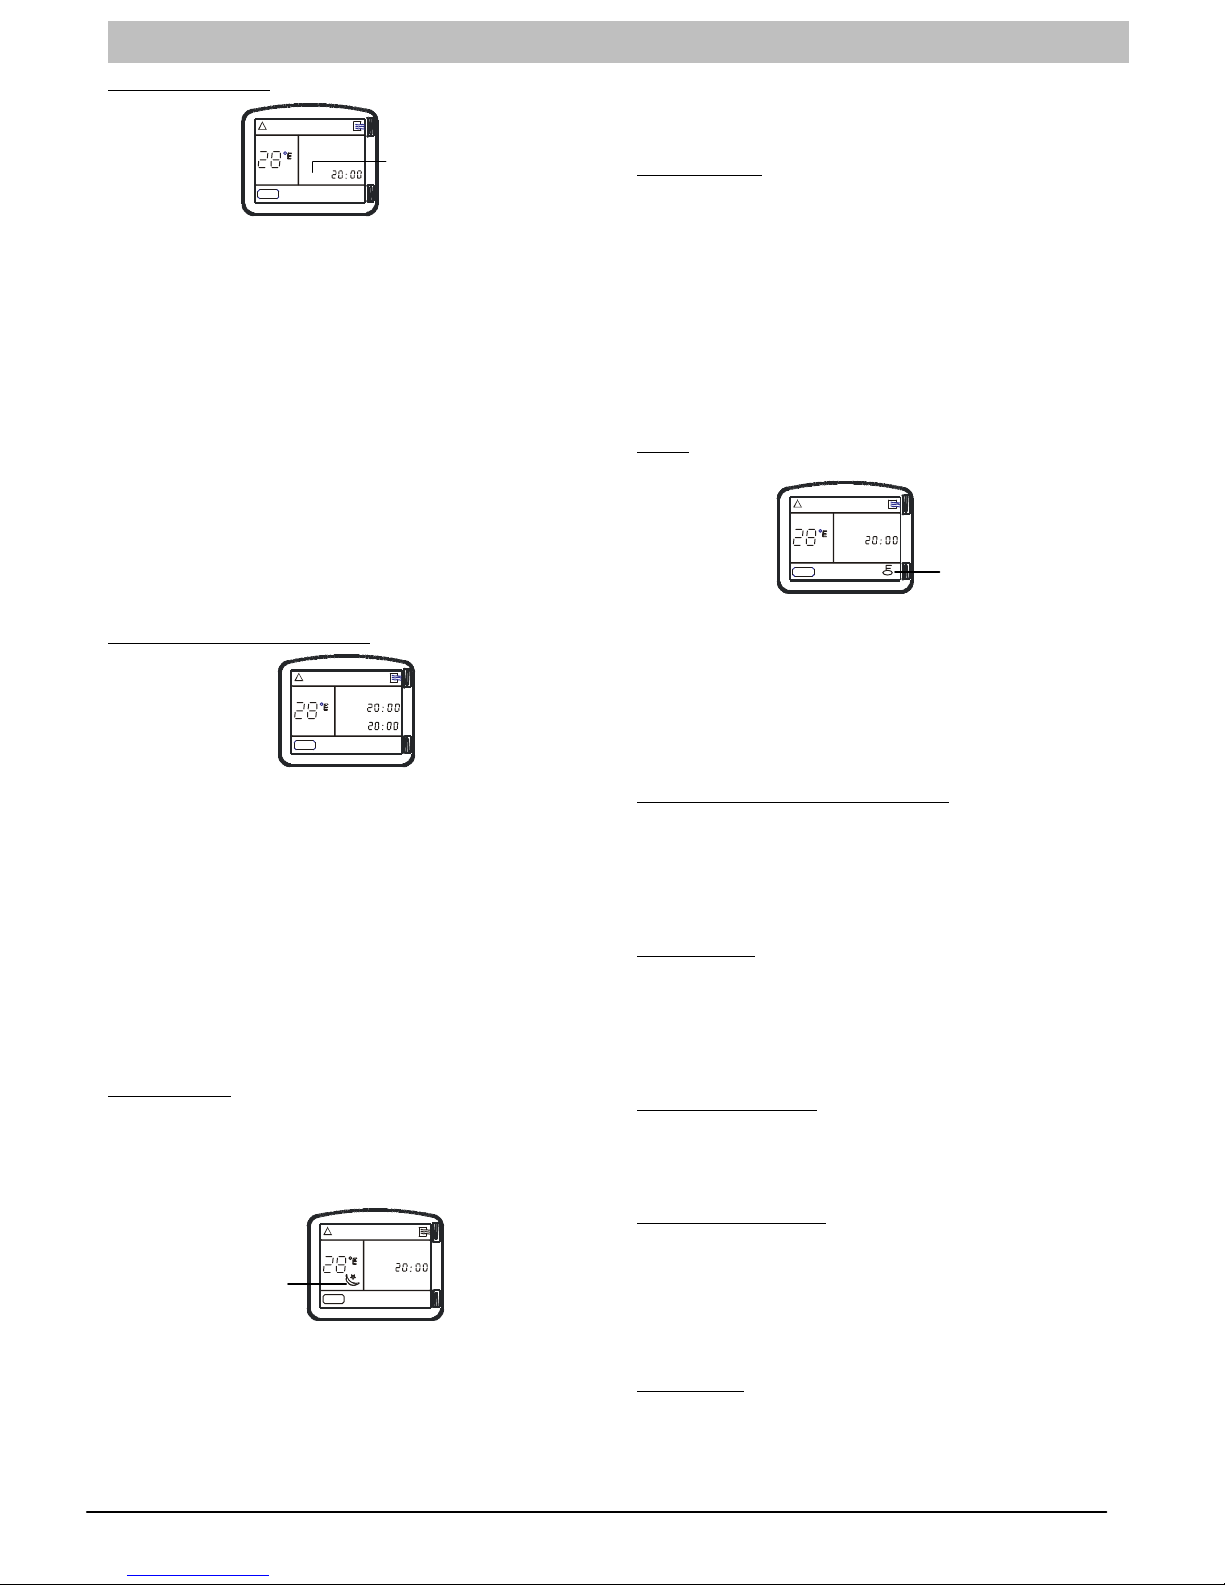
Timer OFF only
AUTO
SET TEMP.
SPEED
TIMER OFF
AUTO
Timer OFF
This function will allow the unit to stop automatically after a
set number of hours. The timer can be set while the unit is
on or while it is off.
UNIT ON
-Press the TIMER button twice. The current time flashes
next to the TIMER OFF. Press the Temp
or Temp
button to set the desired “Time Off”. Every time the or
button is pushed, the time increases or decreases by 10
minutes.
-When the TIMER OFF is set, the timer light on the unit
illuminates and the unit turns off automatically at the set
time.
UNIT OFF
-Set the TIMER off as described in the UNIT ON section.
- The unit will turn on and will turn off at the set time.
-If TIMER OFF is canceled (by pushing Cancel button)
before the set time elapses, the unit will continue running.
Timer ON and Timer OFF
AUTO
SET TEMP.
TIMER ON
TIMER OFF
SPEED
AUTO
Heat Mode
-Same as cooling mode but set points will be lowered by
1.8F (1C).
Turbo Mode
This function is available in COOL mode on 9k and 12k
cooling only units. Use the TURBO mode to cool the room
rapidly.
-Press the TURBO button. An audible “beep” will be heard.
-The fan will run on high speed.
-The TURBO mode terminates automatically 20 minutes
after pushing the TURBO button. It can also be terminated
by pushing the TURBO button again. When the TURBO
mode is terminated, the unit will go back to original settings.
Lock
AUTO
SETTEMP.
SPEED
Use this function to lock the settings on the remote control
and to prevent the settings being changed.
To Lock and Unlock the remote control, press and hold the
and (Temp buttons) at the same time for approximately
3 seconds.
AUTO
CLOCK
Lock
Use both functions to program the unit to turn on and shut
off at specified times.
UNIT OFF
-Set TIMER ON as previously described.
-Set TIMER OFF as previously described.
-The unit will start automatically at the set TIME ON and will
turn off at the set TIME OFF.
UNIT ON
-Set TIME OFF as previously described.
-Set TIME ON as previously described.
-The unit will turn off automatically at the set TIME OFF and
will turn on at the set TIME ON.
Sleep Mode
This mode is used to conserve energy and can be used
when the unit is in the COOL, HEAT or AUTO mode only.
Cool Mode
-Push the SLEEP button. The SLEEP display will appear.
C OOL
AUTO
SET TEMP.
Sleep
SPEED
-After 1 hour the set point will be raised by 1.8F (1C).
-After another hour, the set point will be raised by another
1.8F (1C) and the fan will run in low speed.
-The unit will shut off 7 hours after setting the SLEEP
mode.
-The SLEEP mode will be cancelled if any button on the
remote control is pressed.
CLOCK
AUTO
Resetting the Remote Control
If the remote control is not functioning properly, it can be
reset by pressing the reset button with a paper clip or tip of a
pen. Current settings will be cancelled and the controller will
return to the initial settings and will be in standby mode.
Push the ON/OFF button to activate it.
Time Delay
If the On/Off button is pressed too soon after a stop, the
compressor will not start for 3 minutes due to the inherent
protection against frequent compressor cycling. The unit will
only emit an audible beep when the signals are received
correctly.
Heating Features
If the unit is in the heating mode, there will be a delay when
the fan starts. The fan will start only after the coil is warmed
up to prevent cold blow.
Defrost Operation
In heating mode, if the outdoor coil is frosted, the indoor fan
and outdoor fan will turn off while system removes the frost
on the outdoor coil.
The system will automatically revert to normal operation
when frost is removed from the outdoor unit.
Auto Start
If the power fails while the unit is operating, the unit stores
the operating condition, and it will start operation
automatically under those conditions when the power is
restored.
8 421 02 9301 00
Page 9
OWNER'S MANUAL Duct Free Split System - High Wall: DFS4(A/H), DFC4(A/H)3, DFF4(A/H)H
CLEANING, MAINTENANCE, AND TROUBLESHOOTING
!
CAUTION
ELECTRICAL SHOCK HAZARD
Failure to follow this caution may result in personal
injury or death.
Always turn off power to the system before
performing any cleaning or maintenance to the
system. Turn off the outdoor disconnect switch
located near outdoor unit. Be sure to disconnect
indoor unit if on a separate switch.
!
CAUTION
EQUIPMENT DAMAGE/OPERATION HAZARD
Failure to follow this caution may result in equipment
damage or improper unit operation.
Operating the system with dirty air filters may damage
the indoor unit and could cause reduced cooling
performance, intermittent system operation, frost
build-up on indoor coil or blown fuses.
Periodic Maintenance
Periodic maintenance is recommended to ensure proper
operation of the unit. Recommended maintenance intervals
may vary depending on the installation environment, e.g.,
dusty zones, etc. Refer to Table 1.
!
CAUTION
CUT HAZARD
Failure to follow this caution may result in personal
injury. The coil fins are very sharp. Use caution when
cleaning.
Cleaning the Coil
Clean the coil at the beginning of each cooling season, or
when necessary. Use a vacuum cleaner or a long-bristle
brush to avoid damage to the coil fins.
Air Filters
Remove and clean the air filters once a month.
NOTE: If air filters show signs of excessive wear or are torn,
they must be replaced. Contact your local dealer for
replacement filters.
1. Open front panel on unit.
2. Pull filters down to remove.
3. Vacuum filters.
4. Clean with warm water.
5. Shake filter to remove excess water and dry
thoroughly.
6. Replace filter by sliding filter behind front grille until
filter snaps in place.
7. Close front panel on unit.
!
CAUTION
EQUIPMENT DAMAGE HAZARD
Failure to follow this caution may result in equipment
damage.
When cleaning the front panel, do not use water
hotter than 105F (40.56C) and do not pour water
onto the fan coil. Do not use abrasive or petroleum
based cleaners as they may damage the front panel.
Indoor Unit Front Panel
To clean the front panel on the indoor unit, wipe the outside
with a soft, dry cloth. If necessary, a mild liquid detergent
can be applied and wiped off with a dry cloth.
Preparing for Extended Shutdown Period
Clean the filters and reposition them in the unit. Operate the
unit in Fan only mode for 12 hours to dry all internal parts.
Turn main power supply off and remove batteries from the
remote control.
System Operation Recommendations
The items outlined in the following list will help to assure
proper system operation:
Replace both remote control batteries at the same time.
Point the remote control toward the unit display panel
when transmitting a command.
Keep doors and windows closed while unit is operating.
Contact an authorized service representative if a
problem arises that cannot be easily resolved.
Do not perform cleaning or maintenance activities while
unit is on.
Keep display panel on unit away from direct sunlight and
heat as this may interfere with remote control
transmissions.
Do not block air intakes and outlets on the indoor or
outdoor units.
Energy Saving Recommendations
The following recommendations will add greater efficiency to
the ductfree system:
Select a comfortable thermostat setting and leave it at
chosen setting. Avoid continually raising and lowering
the setting.
Keep unit filter clean. Frequent cleaning may be
necessary depending on indoor air quality.
Use drapes, curtains or shades to keep direct sunlight
from heating room on very hot days.
Do not obstruct air intake on front panel.
Turn on air conditioning before indoor air becomes too
uncomfortable.
Troubleshooting
Refer to Table 2 before contacting your local dealer.
421 02 9301 00 9
Page 10

OWNER'S MANUAL Duct Free Split System - High Wall: DFS4(A/H), DFC4(A/H)3, DFF4(A/H)H
Table 1—Periodic Maintenance
INDOOR UNIT EVERY MONTH EVERY 6 MONTHS EVERY YEAR
Clean Air Filter*
Change Remote Control Batteries
OUTDOOR UNIT EVERY MONTH EVERY 6 MONTHS EVERY YEAR
Clean Outdoor Coil from Outside
Clean Outdoor Coil from Inside†
Blow Air Over Electric Parts†
Check Electric Connection Tightening†
Clean Fan Wheel†
Check Fan Tightening†
Clean Drain Pans†
* Increase frequency in dusty zones.
Maintenance to be carried out by qualified service personnel. Refer to the Installation Manual
PROBLEM POSSIBLE CAUSE SOLUTION
Unit/System Does Not Work • The circuit breaker has tripped or a fuse
Cooling is Not Working
Properly
Heating is Not Working
Properly
Unit Stops During Operation • The Off timer is not operating correctly.
* Diagnostic lights are a combination of lights that will illuminate in the display area on the unit. They are a combination of the lights you see during normal
operation.
has blown.
• Power failure.
• Diagnostic lights illuminate.*
• Voltage is too low.
• The filter is blocked with dust.
• Temperature is not set properly.
• A window or door is open.
• The outdoor unit is obstructed.
• The fan speed is too low.
• The operation mode is in Fan instead of
Cool.
• The filter is blocked with dust.
• Temperature is set too low.
• A window or door is open.
• The outdoor unit is obstructed.
• Diagnostic lights illuminate.*
Table 2—Troubleshooting
• Reset the circuit breaker or replace the fuse with
the specified replacement fuse.
• Restart operation when the power is restored.
• Call your service representative.
• Call your service representative.
• Clean the air filter.
• Check the temperature and reset if necessary.
• Close the window or door.
• Remove the obstruction.
• Change the fan speed selection.
• Change the operating mode to Cool or reset the
unit.
• Clean the air filter.
• Check the temperature and reset if necessary.
• Close the window or door.
• Remove the obstruction.
• Restart the operating mode.
• Call your service representative.
10 421 02 9301 00
International Comfort Products, LLC
Lewisburg, TN 37091
 Loading...