

Page 1
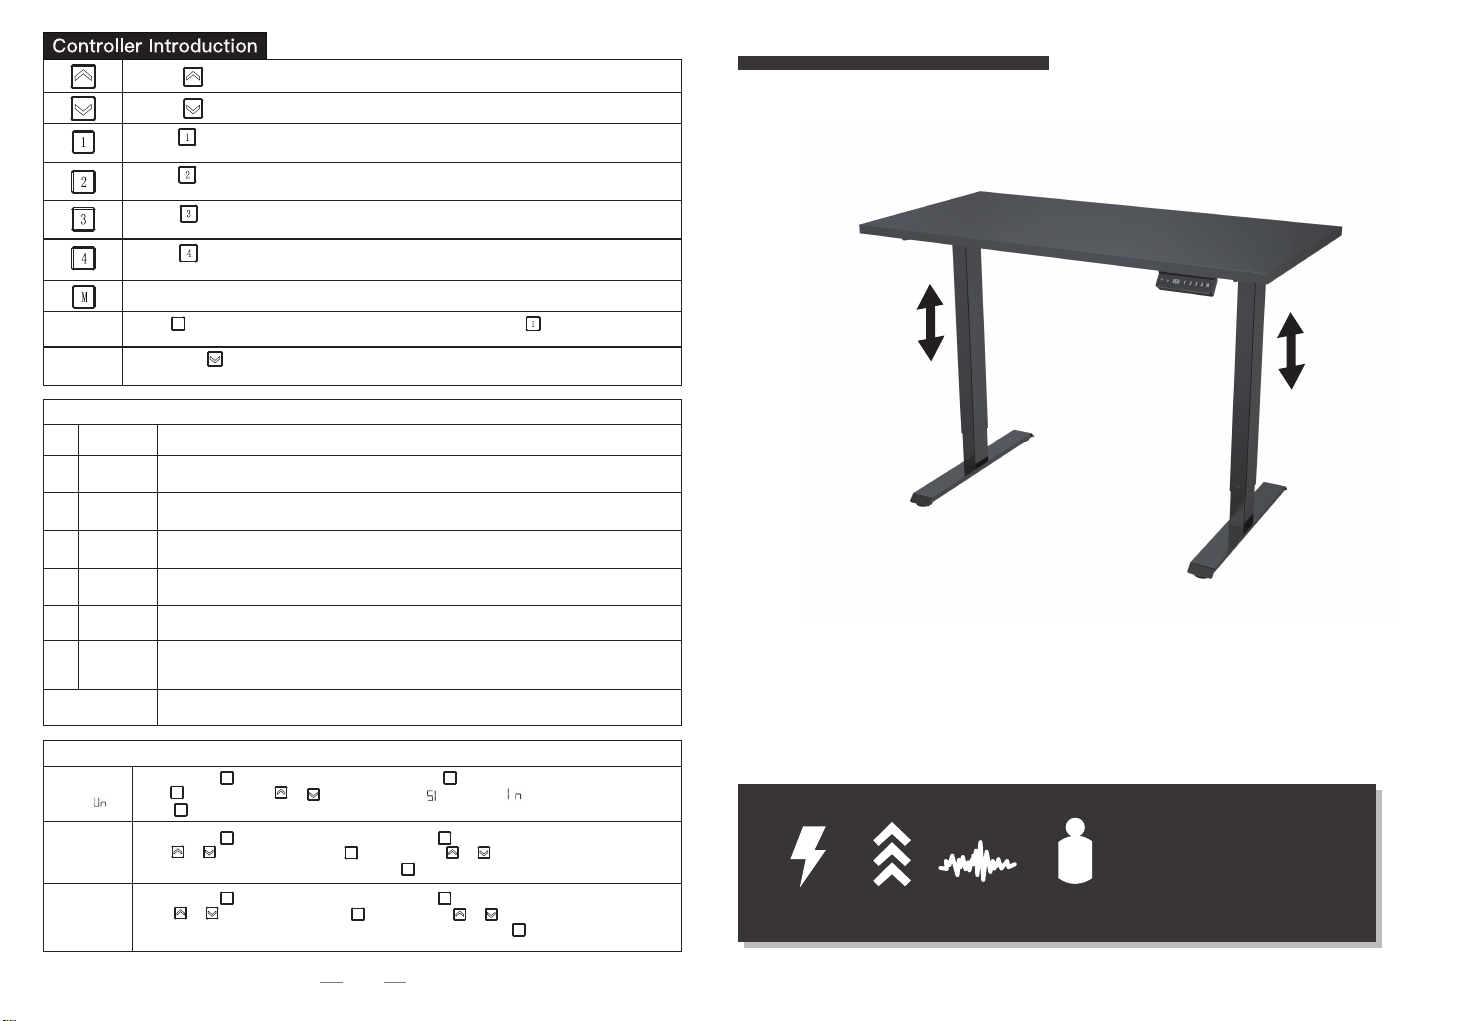
Memory
Position
Reset
Over-heating
Hot
protection
Sensorless
E10
alarm
Overload
E20
protection
Rebound
E02
protection
Overvoltage
E32
alarm
Undervoltage
E31
alarm
Step out
E60
alarm
Breaking
protection
Change Displayed
Unit ( )
Change
Brightness (br)
Collision Force
Detection (CF)
Press and display real height
Press and display real height
Press until 1 appears, release the button, it runs to corresponding height and displays
current position.
Press until 2 appears, release the button, it runs to corresponding height and displays
current position.
Press until 3 appears, release the button, it runs to corresponding height and displays
current position.
Press until 4 appears, release the button, it runs to corresponding height and displays
current position.
Save button,used to enter the save height function
M
After press , the interface flashes and set memory position, press until H1 appears,
release button and it displays current height.
Long press for 5 seconds, display RES and press still, it goes down to the lowest and
rebound certain height, reset finish and show basic height.
Protection mode (auto lock screen mode)
It alarms when continuously working for 2 minutes.
Re-powered on and waiting for at least 18 minutes before height adjustment.
It alarms when motor sensor can’t be detected.
Power off first. Check the connecting of motor and control box,and then re-power on.
Overload alarm. If alarming when desk going up, remove the stuff on the desk and try again.
If alarming when desk going down, power off first, remove the stuff on the desk and re-power on.
It alarms when vibrated, collided or inclined in desk moving. Check if there is vibrating,
obstacles or incline. If no issues above, do the reset process and use it again.
It alarms when voltage is higher than required value. Power off first.
Check whether the connection between power and control box is OK. Power on again.
It alarms when voltage is lower than required value. Power off first.
Check whether the connection between power and control box is OK. Power on again.
It alarms when height difference between left leg and right leg exceeds the set value.
Power off first. Check whether the left leg and the right leg are in the same height. If not, re-redo
process 4 to make them in same height. Power on again.
It stops and enters protection state when motor lines or manual control lines are removed
or disconnected accidentally; back to normal after reconnected and alarm cleared.
Engineering Mode
Long press the button, “M--”shows and flashes. Press
Press to select. Press
Press to save your choice.
Long press the button, “S--”shows and flashes. Press
Press or to switch to
Low (L), Normal (n) or High (H) brightness.
Long press the button,“M--”shows and flashes. Press
Press or to switch to
“OFF”, Low (L), Normal (n) or Heavy (H) collision force detection.
M
M
M
M
M
or to switch between“ ”(metric) or “ ” (imperial).
“br”. Press to select. Press or to switch between
“CF”. Press to select. Press or to switch between
M
Press to save your choice.
M
M
again and the display shows “Un”.
M
again and the display shows “Un”.
M
M
again and the display shows “Un”.
M
Press to save your choice.
Power Input
110V-240V
Speed
25 mm/s
Motion Noise
<55dB
Sit and Stand Desk Assembly Instruction
● Desk top Dimensions: 120cm
● 4 Height Position Memory
● Vertical Range: 72-120cm
CAUTION: DO NOT EXCEED
RATED
Load Capability
176 lbs / 80 kg
MAXIMUM LISTED WEIGHT
CAPACITY.SERIOUS INJURY
OR PROPERTY DAMAGE MAY
OCCUR!
07
Page 2
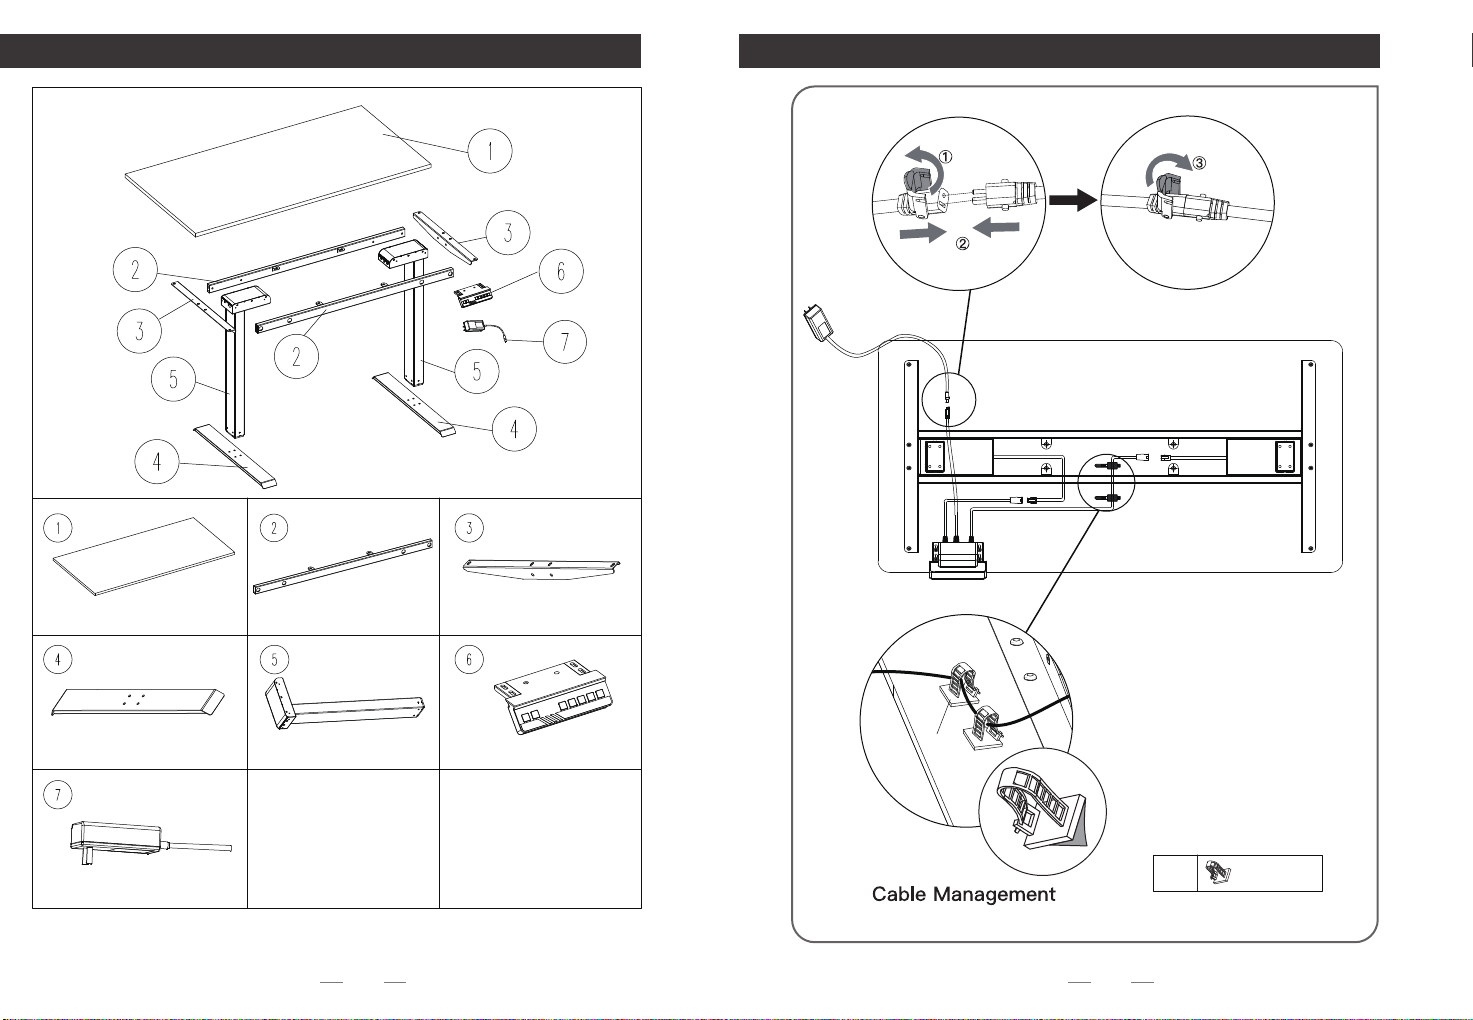
COMPONENT LIST
Step 4
Assemble the controller
Connect cables
Desktop (x1)
Leg Base (x2)
Power (x1)
Crossbar (x2)
Table Leg (x2)
01 06
Side Plates (x2)
Controller (x1)
E
E
Cable Clip (x4)
Page 3
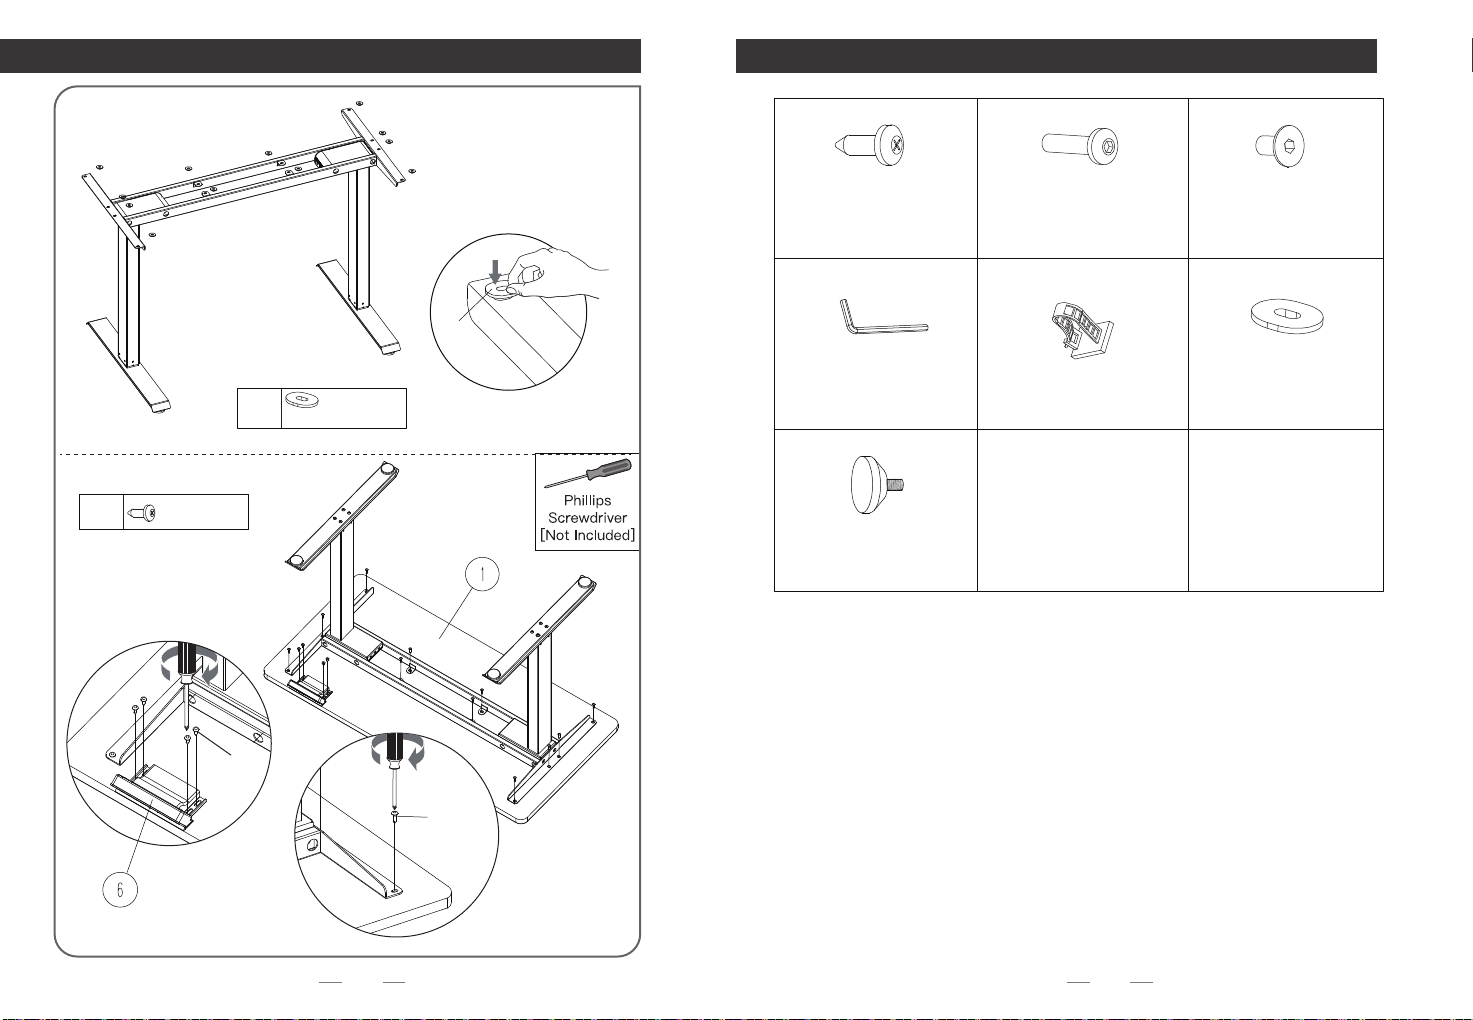
Step 3
Assemble the desktop
HARDWARE LIST
Install the Rubber Pads
A B
Screws
M5×16mm (x20)
(Include 4pcs extra screws)
D
Screws
M6×35mm (x9)
(Include 1pc extra screws)
E F
C
Screws
M6×12mm (x14)
(Include 2pcs extra screws)
F
F
Rubber Pad(x12)
Allen Key
S=4mm (x1)
Cable Clip (x5)
Rubber Pad (x14)
(Include 2pcs extra pads)
G
A
M5×16mm(x16)
Foot (x5)
(Include 1pc extra foot)
A
A
05 02
Page 4
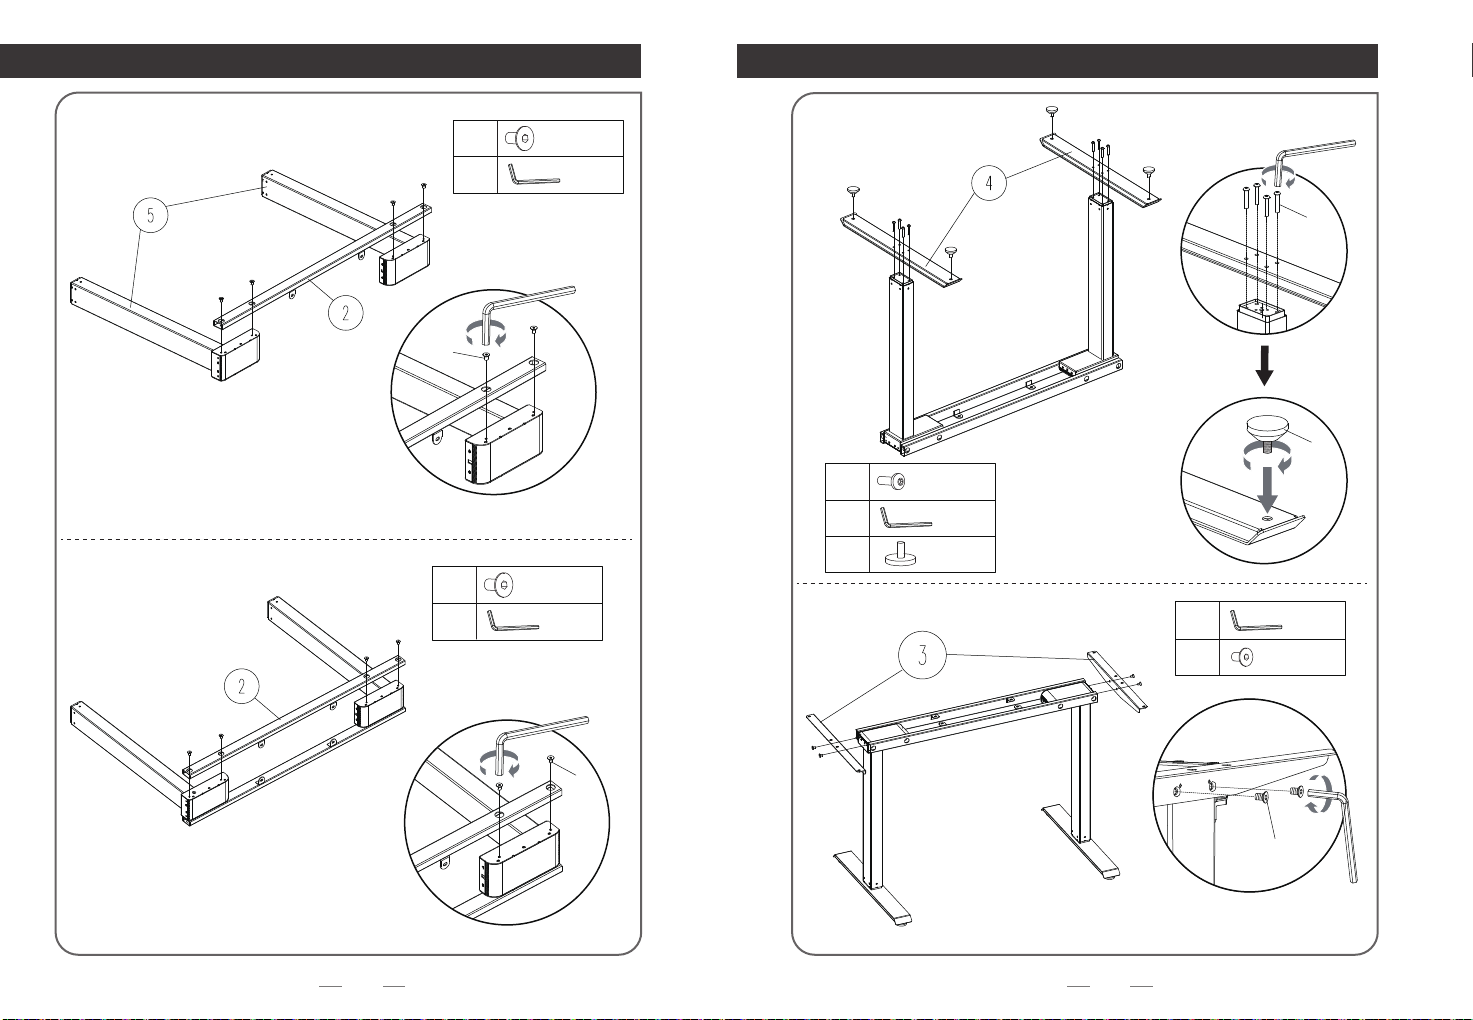
Step 1
Assemble the table legs
Step 2
Assemble the side plates
C
C
D
M6×12mm(x4)
S=4mm
S=4mm
B
S=4mm
G
B
D
G
C
D
M6×12mm(x4)
S=4mm
S=4mm
M6×35mm (x8)
S=4mm
Foot (x4)
D
C
S=4mm
M6×12mm(x4)
C
03 04
C
S=4mm
 Loading...