

Page 1

USER MANUAL
UM-PDUB-160217 REV.D Page 1 / 42
USER MANUAL
TempSen® Tempod® USB Data Loggers
TempSen® Tempod® Bluetooth (BLE4.0) USB Data
Loggers
TempSen® Go APP [IOS / Android]
UM-TT-170922 REV.A
TEMPSEN ELECTRONICS COMPANY
www.tempsen.com
Page 2
USER MANUAL
UM-PDUB-160217 REV.D Page 2 / 42
Tempod Data Loggers
TempSen Go APP
Page 3

USER MANUAL
UM-PDUB-160217 REV.D Page 3 / 42
Quick Link
CONTENTS
TEMPOD DATA LOGGERS ...................................................................................................................................................................... 4
Product Overview .............................................................................................................................................................................. 4
Configure Tempod ................................................................................................................................ ............................................. 9
Start Recording ............................................................................................................................................................................... 13
LCD Screens ................................................................................................................................................................................... 14
Download Data ................................................................................................................................................................................ 16
Stop Recording ............................................................................................................................................................................... 17
Time Mark ....................................................................................................................................................................................... 17
Battery ............................................................................................................................................................................................. 18
Data Results Explanation ................................................................................................................................................................ 19
Additional Information ............................................................................................................................................................................. 21
TEMPSEN GO APP (IOS / ANDRIOD) ................................................................................................................................................... 22
Overview ......................................................................................................................................................................................... 22
How to Use? .................................................................................................................................................................................... 23
Data Files ........................................................................................................................................................................................ 30
Settings ................................ ................................................................ ........................................................................................... 37
TempCentre Data Management Softare ................................................................................................................................................. 38
Appendix ................................................................................................................................................................................................ 39
Error Codes ..................................................................................................................................................................................... 39
Glossary ................................................................................................................................................................................................. 40
Warranty ................................................................................................................................................................................................. 41
Revision History ..................................................................................................................................................................................... 42
Page 4
USER MANUAL
UM-PDUB-160217 REV.D Page 4 / 42
TEMPOD DATA LOGGERS
Product Overview
Overview
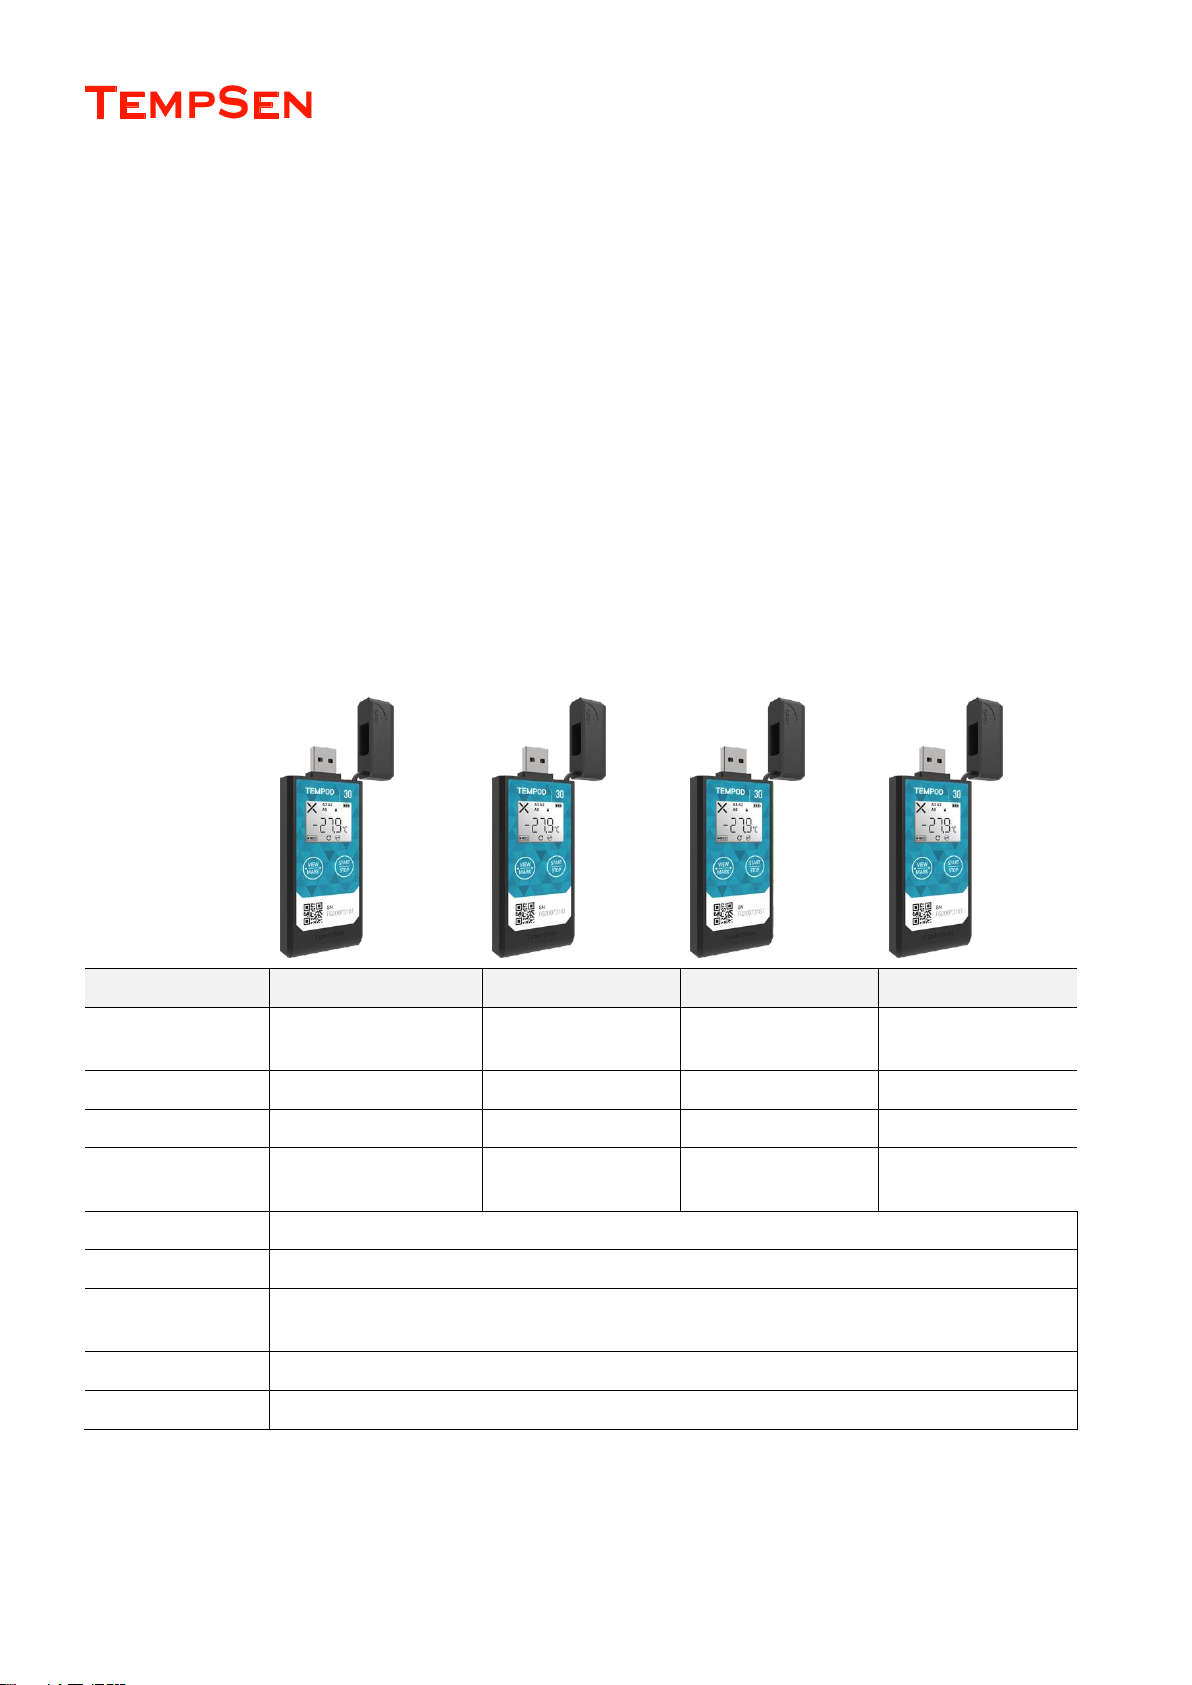
Tempod Data Loggers are innovative environment monitoring devices designed for cold chain logistics, storage monitoring, in terms of different
data communication technology used, Tempod data loggers could be divided in to Tempod USB loggers and Tempod USB + Bluetooth (BLE 4.0)
loggers.
Specifications - Tempod USB Data Loggers
Model
Tempod 30
Tempod 50X
Tempod 100X
Tempod 200X
Sensor
Temperature: Internal NTC
sensor
Temperature: External
NTC sensor probe (1m)
Temperature: External
RTD sensor (1m)
Temperature: External
RTD sensor (1m)
Memory Capacity
28800 readings
28800 readings
28800 readings
28800 readings
Measurement Range
-30°C...70°C
-50°C...70°C
-100°C…70°C
-200°C…70°C
Accuracy
±0.3°C (-20°C…20°C),
±0.5°C (other range)
±0.3°C (-20°C…20°C),
±0.5°C (other range)
±0.5°C
±0.5°C (-100°C…70°C)
±1.0°C (-200°C…-100°C)
Resolution
0.1°C
Battery Life
18 months
Connection
USB 2.0 Connector
Automatic Data File
Encrypted PDF report with embedded raw data
Protection Class
IP65
Page 5
USER MANUAL
UM-PDUB-160217 REV.D Page 5 / 42
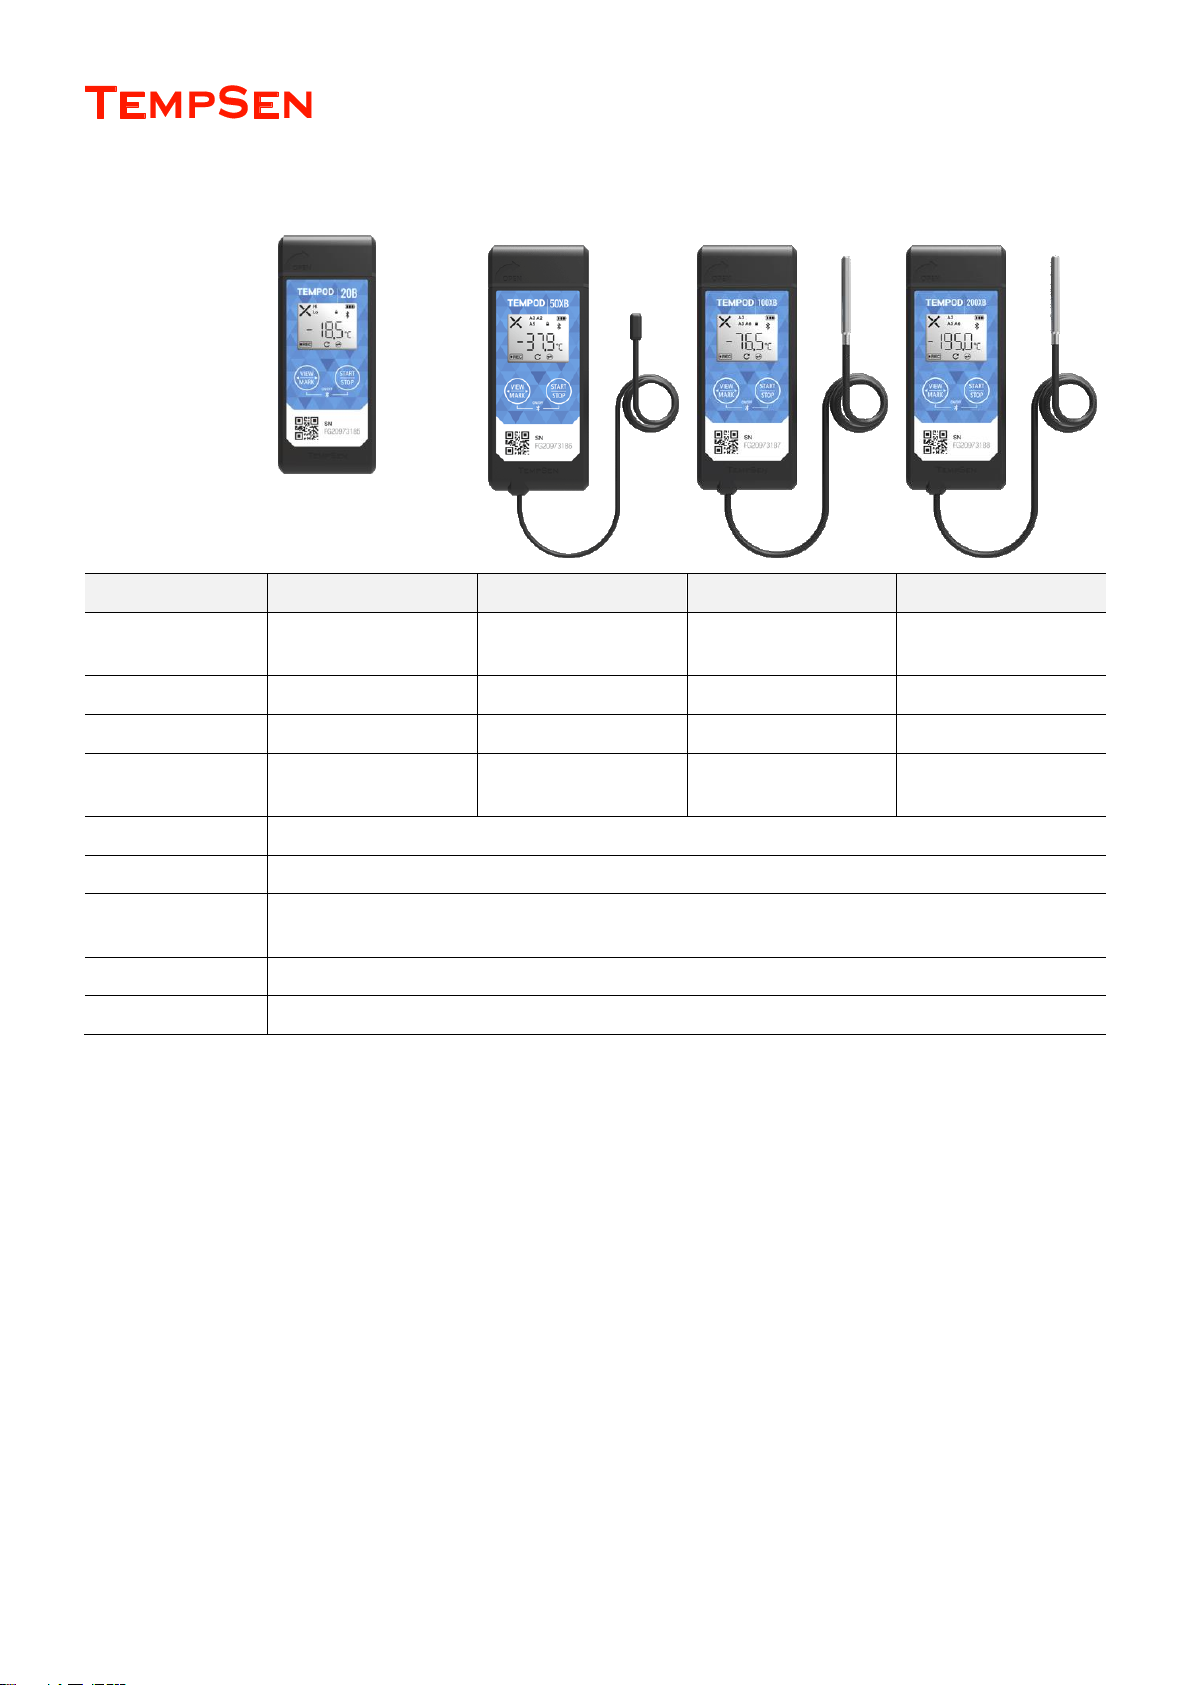
Specifications - Tempod Bluetooth Data Loggers
Model
Tempod 20B
Tempod 50XB
Tempod 100XB
Tempod 200XB
Sensor
Temperature: Internal
NTC sensor
Temperature: External
NTC sensor probe (1m)
Temperature: External
RTD sensor (1m)
Temperature: External
RTD sensor (1m)
Memory Capacity
28800 readings
28800 readings
28800 readings
28800 readings
Measurement Range
-30°C...70°C
-50°C...70°C
-100°C…70°C
-200°C…70°C
Accuracy
±0.3°C (-20°C…20°C),
±0.5°C (other range)
±0.3°C (-20°C…20°C),
±0.5°C (other range)
±0.5°C
±0.5°C (-100°C…70°C)
±1.0°C (-200°C…-100°C)
Resolution
0.1°C
Battery Life
18 months
Connection
USB 2.0 Connector
Automatic Data File
Encrypted PDF report with embedded raw data
Protection Class
IP65
Page 6
USER MANUAL
UM-PDUB-160217 REV.D Page 6 / 42
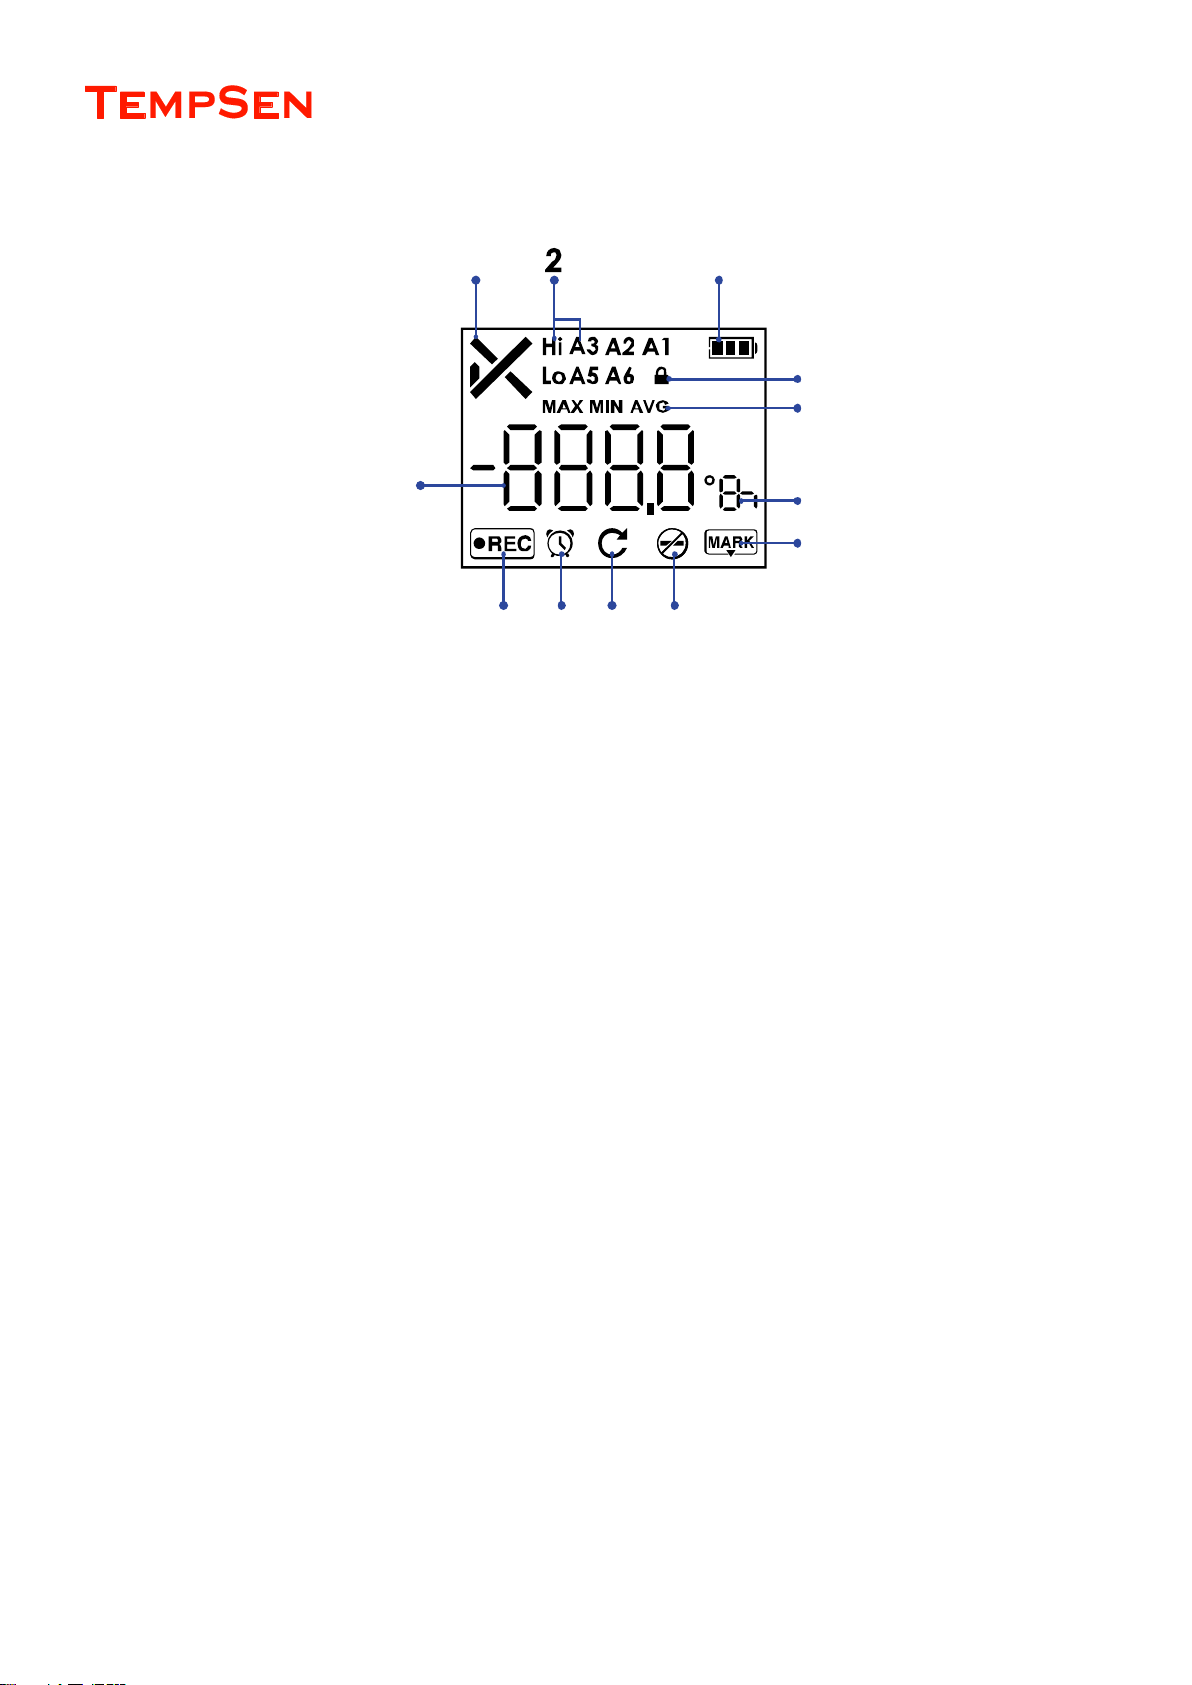
LCD Overview - Tempod USB Data Loggers
1. Overall alarm status
√ Ok
× Alarm
Empty, no alarm setting
2. Triggered Alarm Zones
Hi High
Lo Low
A1
A2
…
3. Remaining Battery Indicator
4. AccessKey (Password) protected
5. Statistics
6. Unit °C / °F / d (day) / h (hour) / m (minute) / s (second)
7. Time Mark
8. Stop button disabled
9. Repeat start enabled
10. Clock
11. Recording
12. Reading (Max, Min, Avg)
1
3
4
5
6
7
8910
11
12
Page 7
USER MANUAL
UM-PDUB-160217 REV.D Page 7 / 42
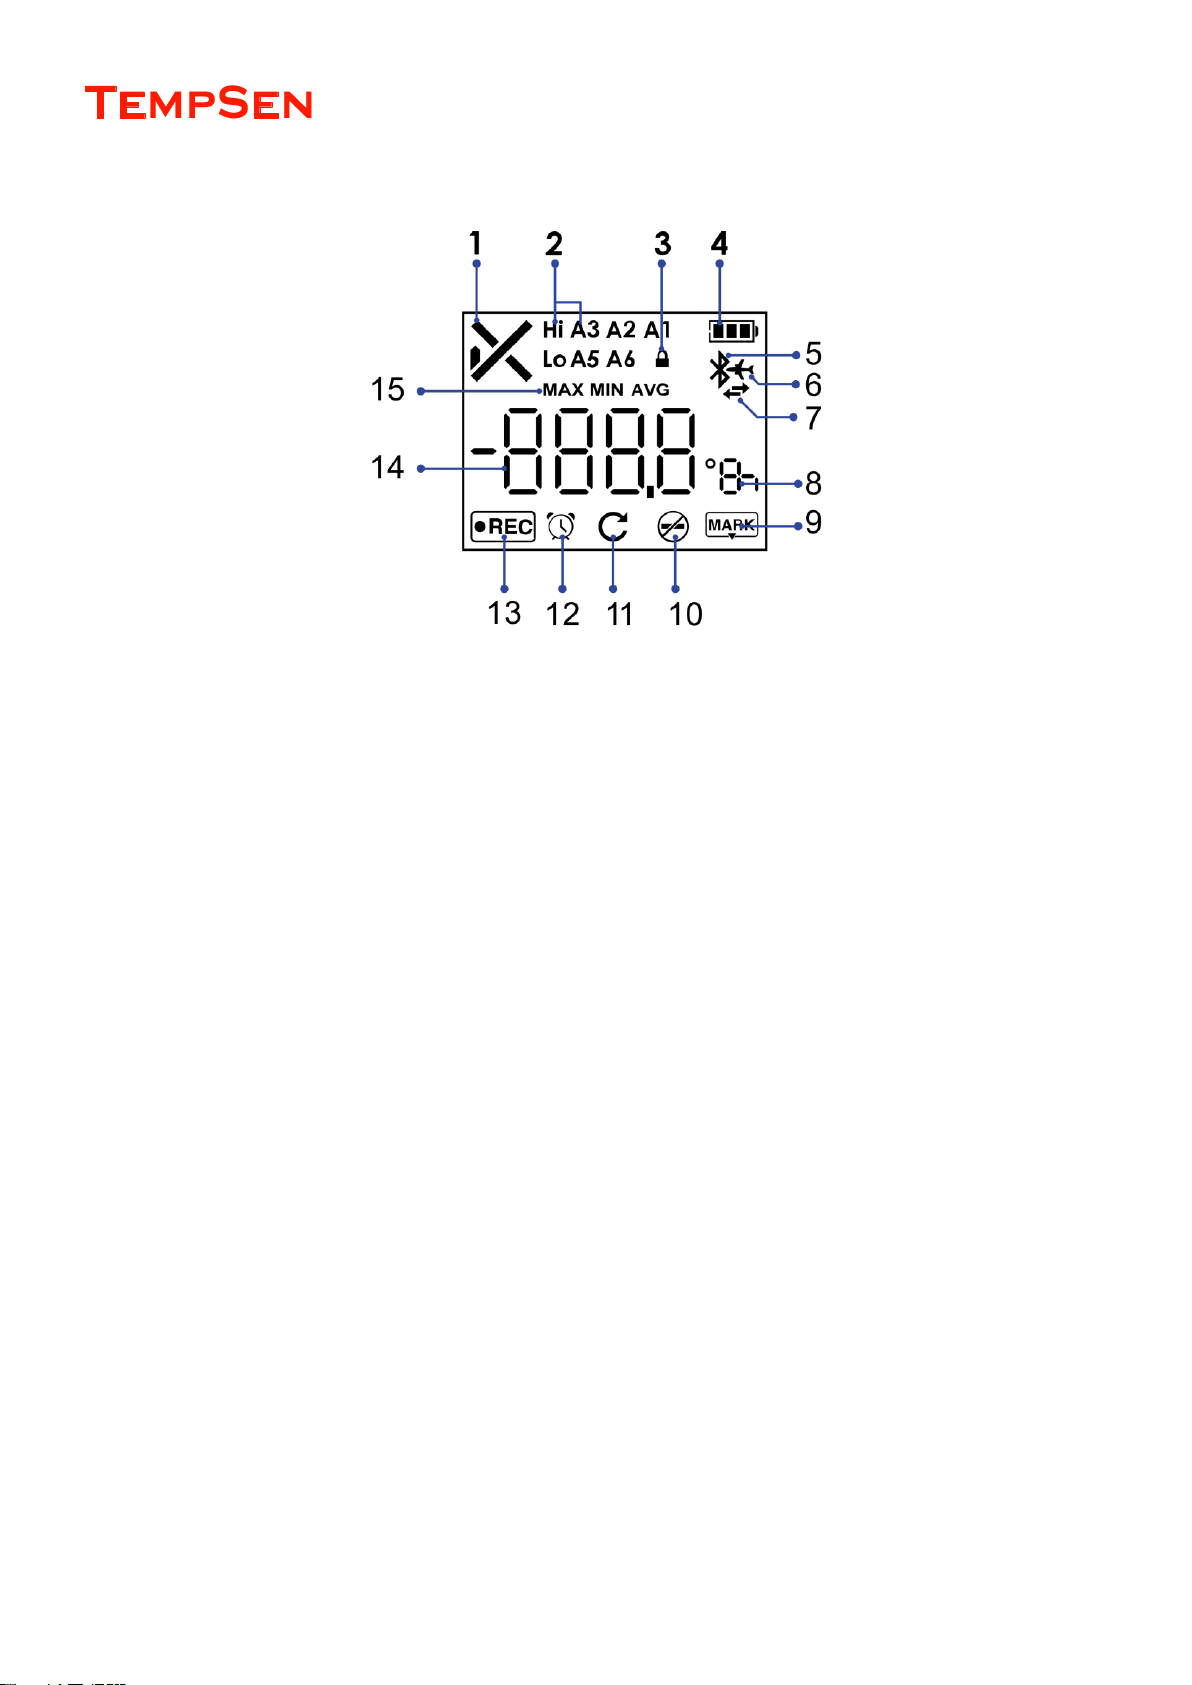
LCD Overview - Tempod Bluetooth USB Data Loggers
1. Overall alarm status
√ Ok
× Alarm
Empty, no alarm setting
2. Triggered Alarm Zones
Hi High
Lo Low
A1
A2
…
3. AccessKey (Password) protected
4. Remaining Battery Indicator
5. Bluetooth*
6. Flight mode*
7. Bluetooth connecting…*
8. Unit °C / °F / d (day) / h (hour) / m (minute) / s (second)
9. Time Mark
10. Stop button disabled
11. Repeat start enabled
12. Clock
13. Recording
14. Reading
15. Statistics (Max, Min, Avg)
Only available on Tempod Bluetooth data loggers.
Page 8

USER MANUAL
UM-PDUB-160217 REV.D Page 8 / 42
Certifications & Standards
CE
FCC
This device complies with Part 15 of the FCC Rules. Operation is subject to the following two conditions:
(1) This device may not cause harmful interference, and
(2) This device must accept any interference received, including interference that may cause undesired operation.
Note: This product has been tested and found to comply with the limits for a Class B digital device, pursuant to Part 15 of the FCC Rules. T
hese limits are designed to provide reasonable protection against harmful interference in a residential installation. This product generates, u
ses, and can radiate radio frequency energy and, if not installed and used in accordance with the instructions, may cause harmful interferen
ce to radio communications. However, there is no guarantee that interference will not occur in a particular installation. If this product does c
ause harmful interference to radio or television reception, which can be determined by turning the equipment off and on, the user is encoura
ged to try to correct the interference by one or more of the following measures:
—Reorient or relocate the receiving antenna.
—Increase the separation between the equipment and receiver.
—Connect the equipment into an outlet on a circuit different from that to which the receiver is connected.
—Consult the dealer or an experienced radio/TV technician for help.
Please take attention that changes or modification not expressly approved by the party responsible for compliance could void the user’s aut
hority to operate the equipment.
RoHS
EN12830
Page 9
USER MANUAL
UM-PDUB-160217 REV.D Page 9 / 42
Configure Tempod
Configure Tempod with TempSen Go APP
See TempSen Go APP > Configure Data Logger, please make sure Bluetooth function on Tempod data logger is turned on before
configuration.
Configure Tempod with TempCentre Software
Connect Tempod data logger to USB port of PC, open TempCentre software, select Configure Device in tool bar, software would
automatically start searching and connecting devices, then user could start programming of this data logger.
See TempCentre Data Management Software about download, installation and operartion of TempCentre software.
Configure Tempod with Online Utility
Connect ITAG4 logger to USB port of PC, open Internet Browser, go to www.tempodlogger.com, the online utility of Tempod data logger, input
and select configuration parameters you need, then download the configuration profile (.cfg format file), save it into the logger created
removable storage device “TempSenDisk”, configuration is done.
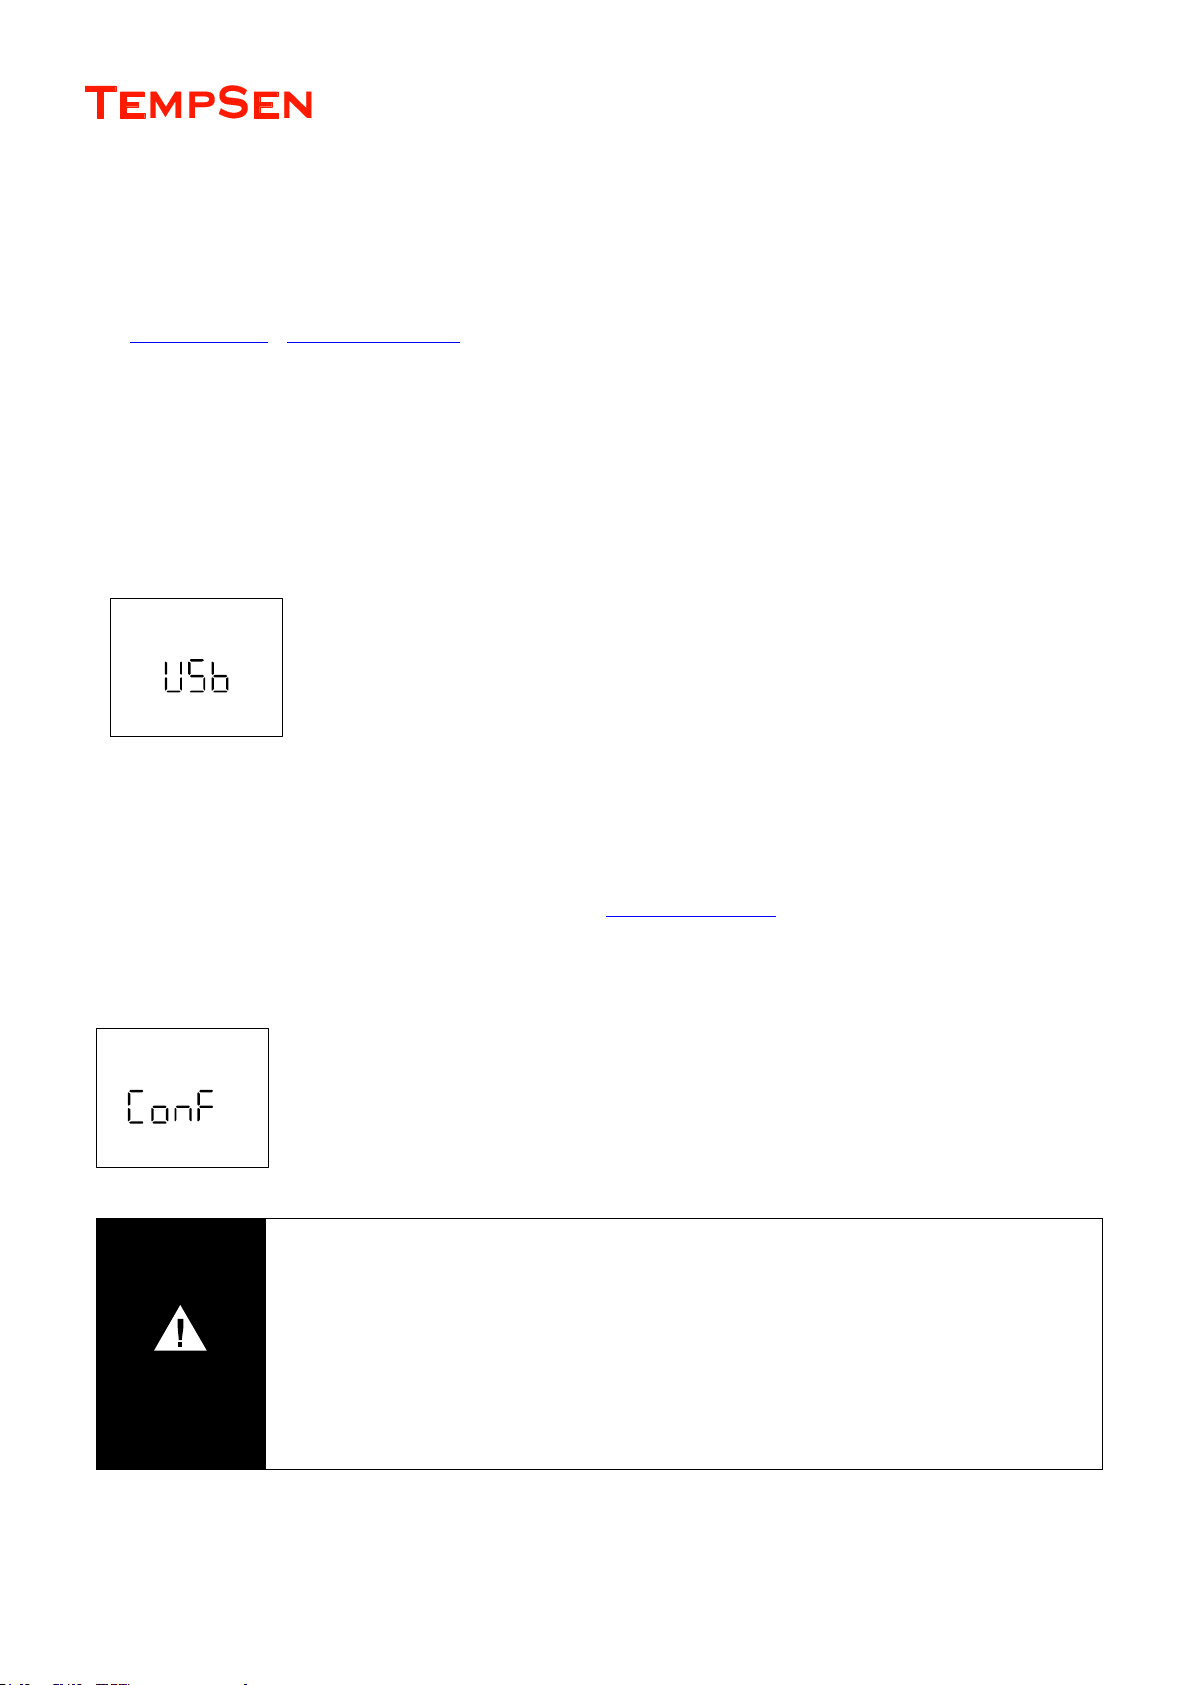
LCD displays “USB” when logger connected to PC.
LCD displays “ConF” for configuration success when connection with PC remains. (Only applicable to non-
software configuration).
IMPORTANT
Please only apply configuration profile to the same product model on which configuration file is created
based.
Do not alter the configuration profile downloaded to avoid configuration error.
Configuration profile contains time zone information, so please do not use this file in areas of different time
zones, or it will result in incorrect time base.
Configuration to data logger would erase all data recorded, so please make sure you have save the data before
configuration.
Do not remove data logger from PC before you are prompted of configuration success.
Page 10

USER MANUAL
UM-PDUB-160217 REV.D Page 10 / 42
Configuration Parameters & Options
Trip Number
A unique 10 digits alphanumeric number automatically created for identifying each monitoring task.
Trip Description (Note)
A brief note entered by user for describing monitoring task an it will be shown on data report.
Logging Interval
The sampling and recording interval, optional from 1 minute to 2 hours.
Startup Mode
Manual Start
Device needs to be started by pressing Start/Stop button for 3 seconds.
Start Delay
Option of manual start, time to wait before recording begins after logger was manually activated, optional from 1 minute to 10 days.
Temperature Conditions
Option of manual start, pre-set temperature conditions for triggering recording after logger was manually activated, recording begins
when actual temperature meets previously determined temperature conditionS.
Auto Start
Device automatically starts recording on the specific date/time preset, no need to press Start/Stop button after configuration to device.
Alarm Settings
Alarm Mode
No alarm setting
High & Low alarm, 2 alarm ranges determined by 2 alarm limits.
Multiple Alarm ranges, 5 alarm ranges determined by 5 alarm limits.
High alarm zones: A1 (H3), A2 (H2), A3 (H1)
Ideal range: A4 (No alarm will be triggered when data falls within this range )
Low alarm zone: A5 (L1), A6 (L2)
Alarm Type
Alarm type is to define the way to calculate violation durations.
Page 11

USER MANUAL
UM-PDUB-160217 REV.D Page 11 / 42
Single Event
Alarm could only be triggered when data out of one specific limit continuously for time not less than the pre-set alarm delay time.
Cumulative Event
Alarm could be triggered once the cumulative total time that data out of one specific limit is not less than the pre-set alarm delay
time.
PDF Report Settings
PDF Report Title
This report title would be used for PDF report created automatically by data logger.
Time Base
Select Time Zone and enable/disable Day Light Saving time (DST) for PDF report.
Show Data List
Data list (tabular data) will be included in PDF report is this option was enabled, please note it will take up to around 1 minute to create a
PDF report with tabular data pages.
Language
Select language for PDF report.
Button Settings
Disable Stop Button
This option is used to avoid mistaken Stop Button action, once enabled, device could not be stopped by pressing Start/Stop button,
recording stops when logging cycle completes, however, you are still allowed to stop recording through TempCentre or TempSen Go APP.
appears on LCD after Stop Button was disabled on current data logger.
Advanced Options
Repeat Start
Once enabled, user could press Start/Stop button to start logger recording again after last recording task ended, no need to re-configure
data logger. The new recording all use the same configuration as last one.
appears on LCD after Repeat Start was enabled.
Page 12
USER MANUAL
UM-PDUB-160217 REV.D Page 12 / 42
AccessKey
AccessKey is a 6-digit password used to protect data logger from manipulation, once applied, user needs to provide (enter) correct
AccessKey before programing data logger.
appears on LCD indicates AccessKey was applied to current device.
TempSen Go APP
Protection level is an important option when setting AccessKey through TempSen Go App, which defines the protection scope when
accessing Tempod Bluetooth data logger through TempSen Go App.
Level 1 (Normal), AccessKey is not required when connecting to or downloading data logger using TempSen Go App, but user will
be prompted to enter correct AccessKey if further actions is to be conducted, including configuring, starting / stopping and time
marking data logger.
Level 2 (High), user will be prompted to enter correct AccessKey when connecting to data logger using TempSen Go App, if
AccessKey does not match,
Online Configuration
If you are going to program an AccessKey protected data logger using .cfg format file downloaded from online utility (see Configure
Tempod with Online Utility), please make sure enter correct AccessKey for Varification during selecting configuration options, otherwise
configuration will fail, LCD will show “E005” if AccessKey is incorrect or not included in .cfg format file applied to AccessKey protected
data logger,
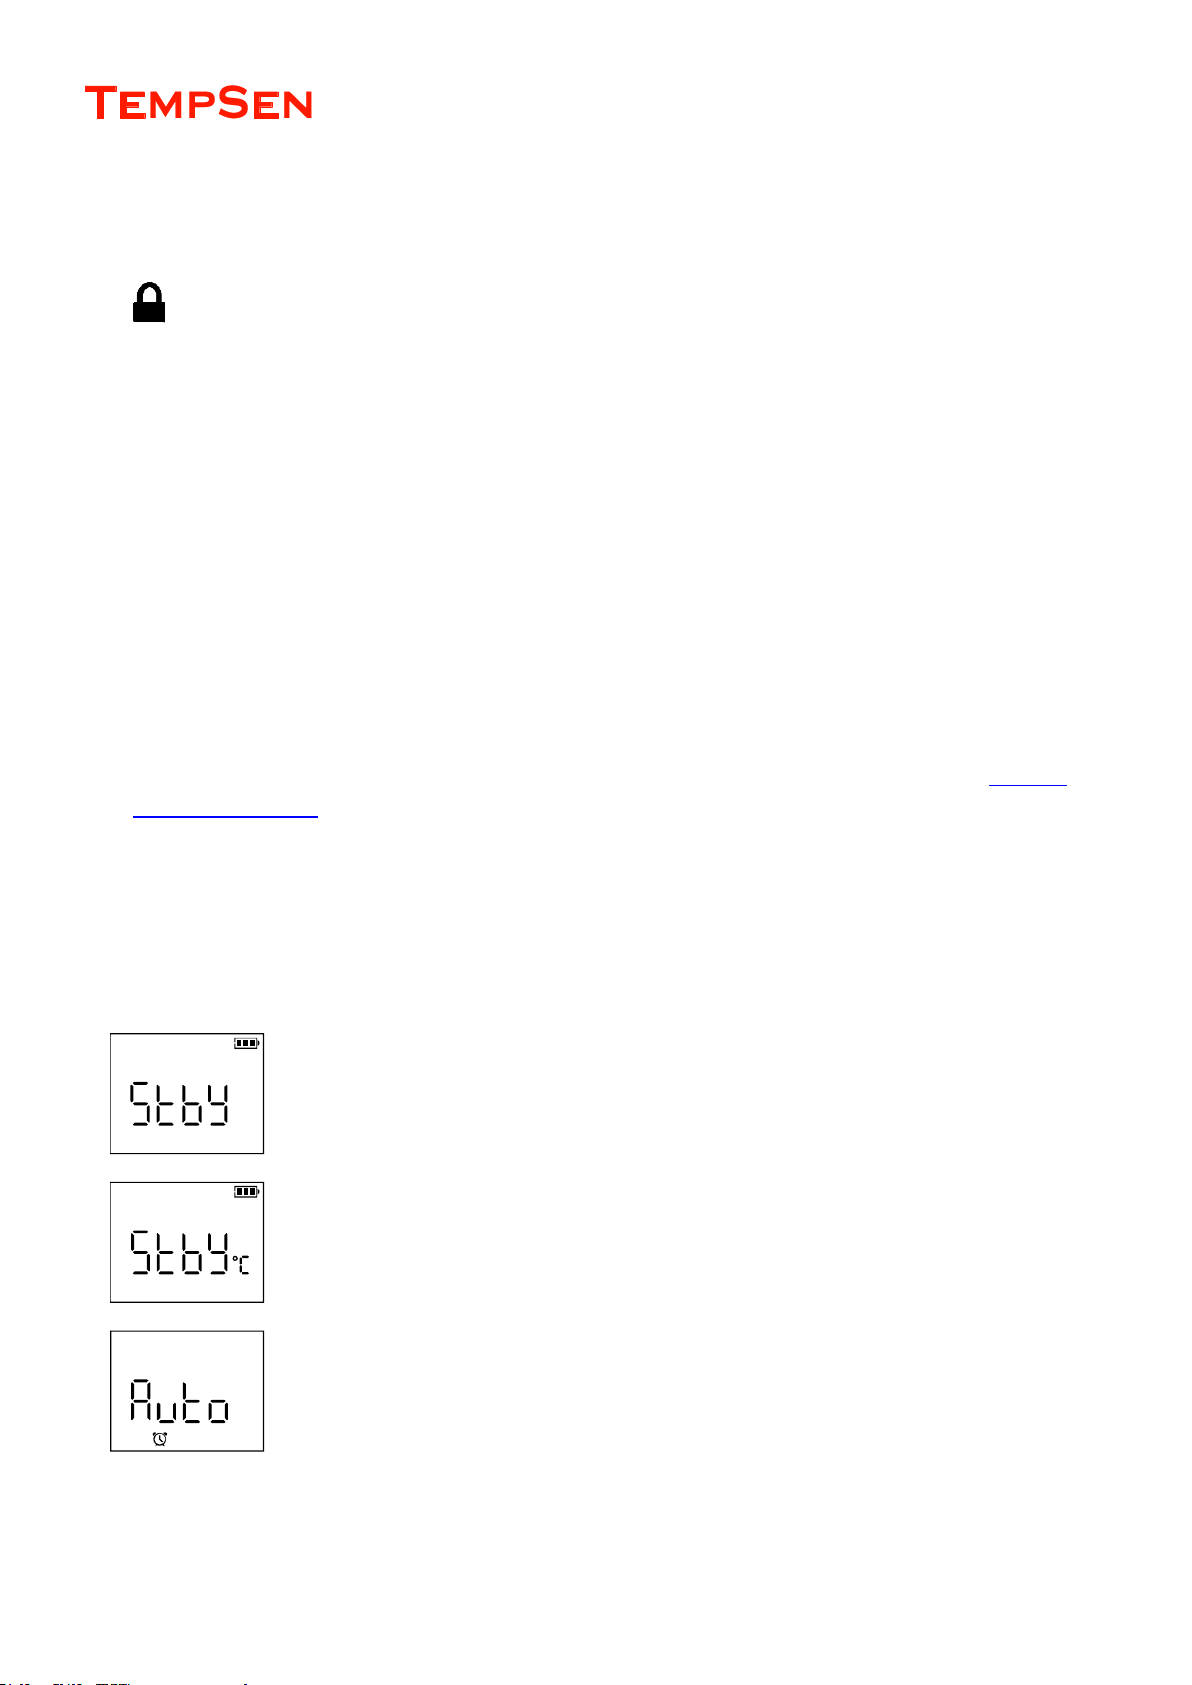
LCD Screens after Configured
Manual Start –Start Delay
LCD displays “Stby” after configured. Logger was set to start option of start deley.
Manual Start – Temperature Conditions
LCD displays “Stby” and Temperature Unit after configured. Logger was set to start option
of Temperature Conditions.
Auto Start
LCD displays “Auto” and a Clock after configured, logger is waiting for automatic start on
pre-set time.
Page 13
USER MANUAL
UM-PDUB-160217 REV.D Page 13 / 42
Start Recording
Manual Start & Stop
Press and hold Start/Stop button for 3 seconds to manually activate data logger and start recording, if logger was set to start option of Start
Delay, then recording would only begin after Start Delay time passes.
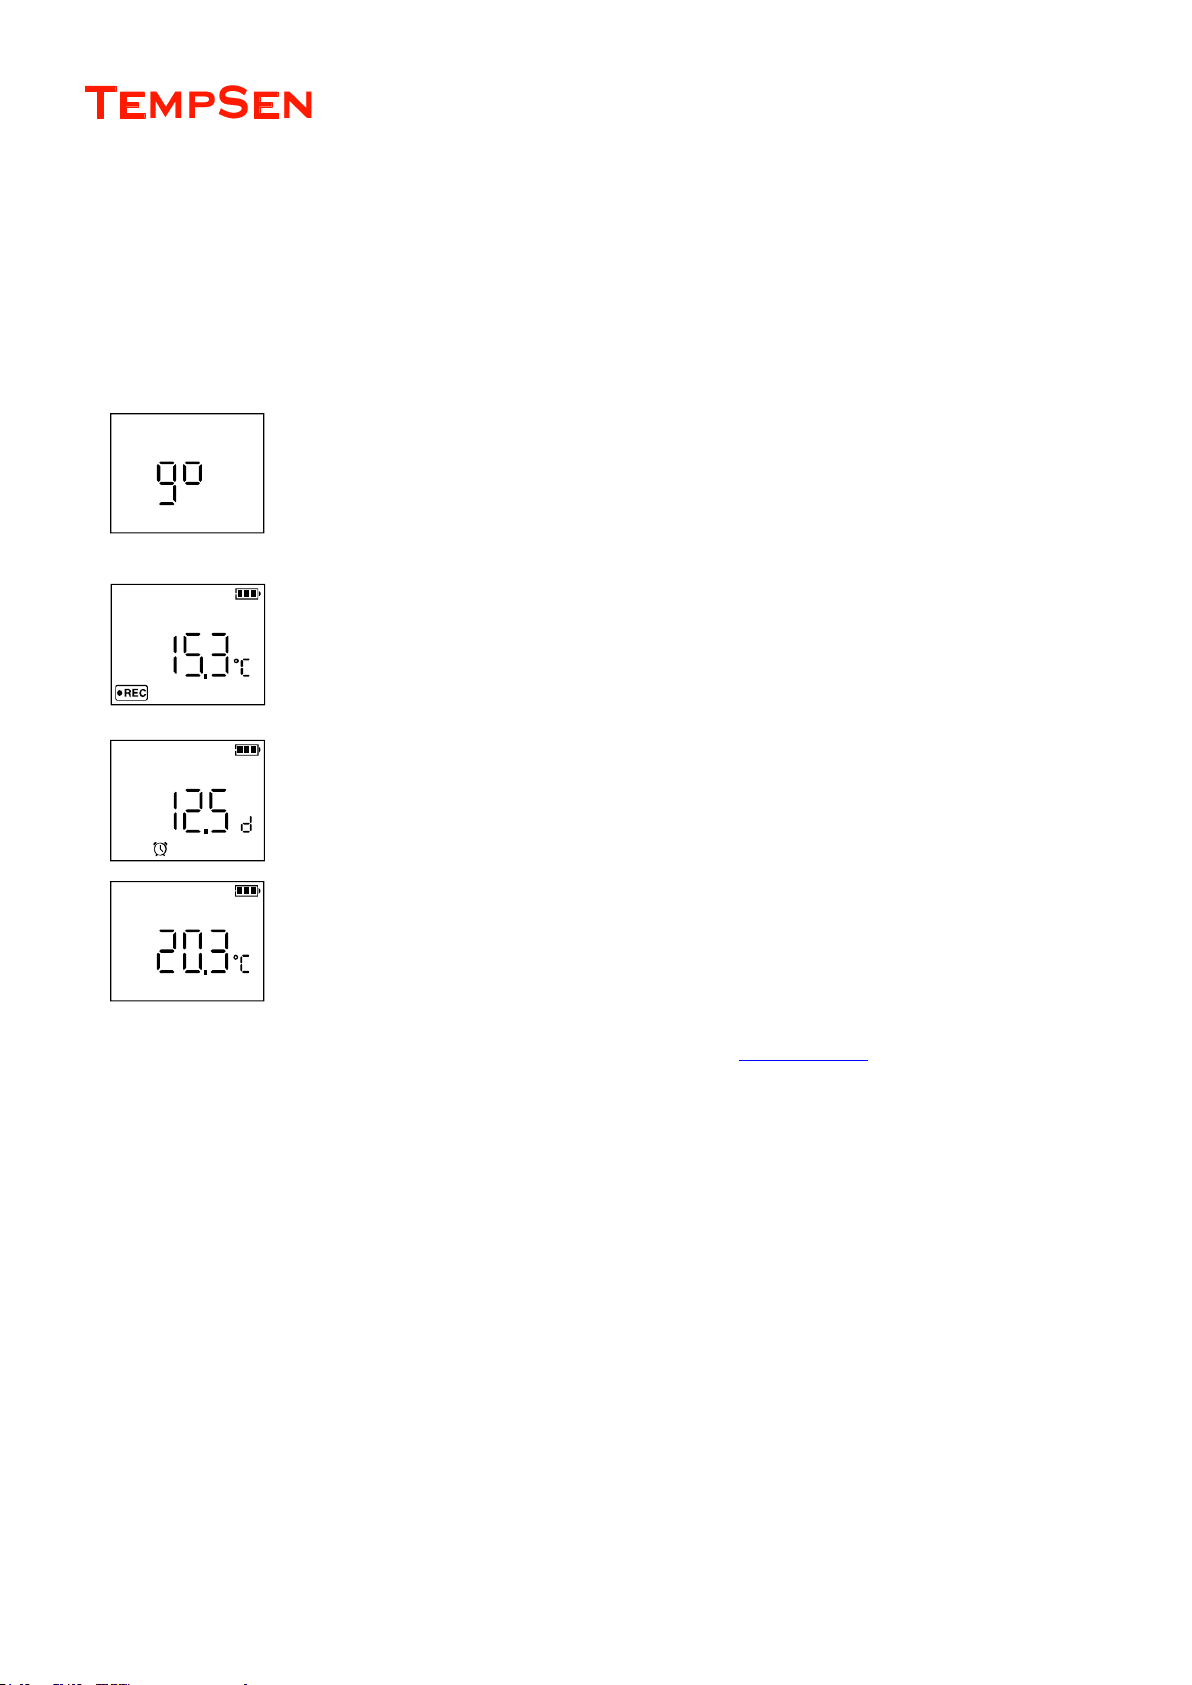
“go” flashes on LCD reminding you to keep current button action.
“REC” appears on down left corner of LCD indicating recording already begins.
Manual Start with Start Delay
Start delay time and a Clock appear on LCD and logger begins countdown after logger was manually
activated, recording begins after start delay time passed.
Manual Start with Temperature Conditions
Logger begins to measure temperature and returns readings to LCD after logger was manually activated,
recording begins when temperature meets pre-set temperature condition(s).
You could also start data logger to record using TempSen Go APP and Smart Device, see TempSen Go APP >
Auto Start
If logger was set to Start Mode > Auto Start, then logger would start recording automatically on pre-set date & time.
Page 14
USER MANUAL
UM-PDUB-160217 REV.D Page 14 / 42
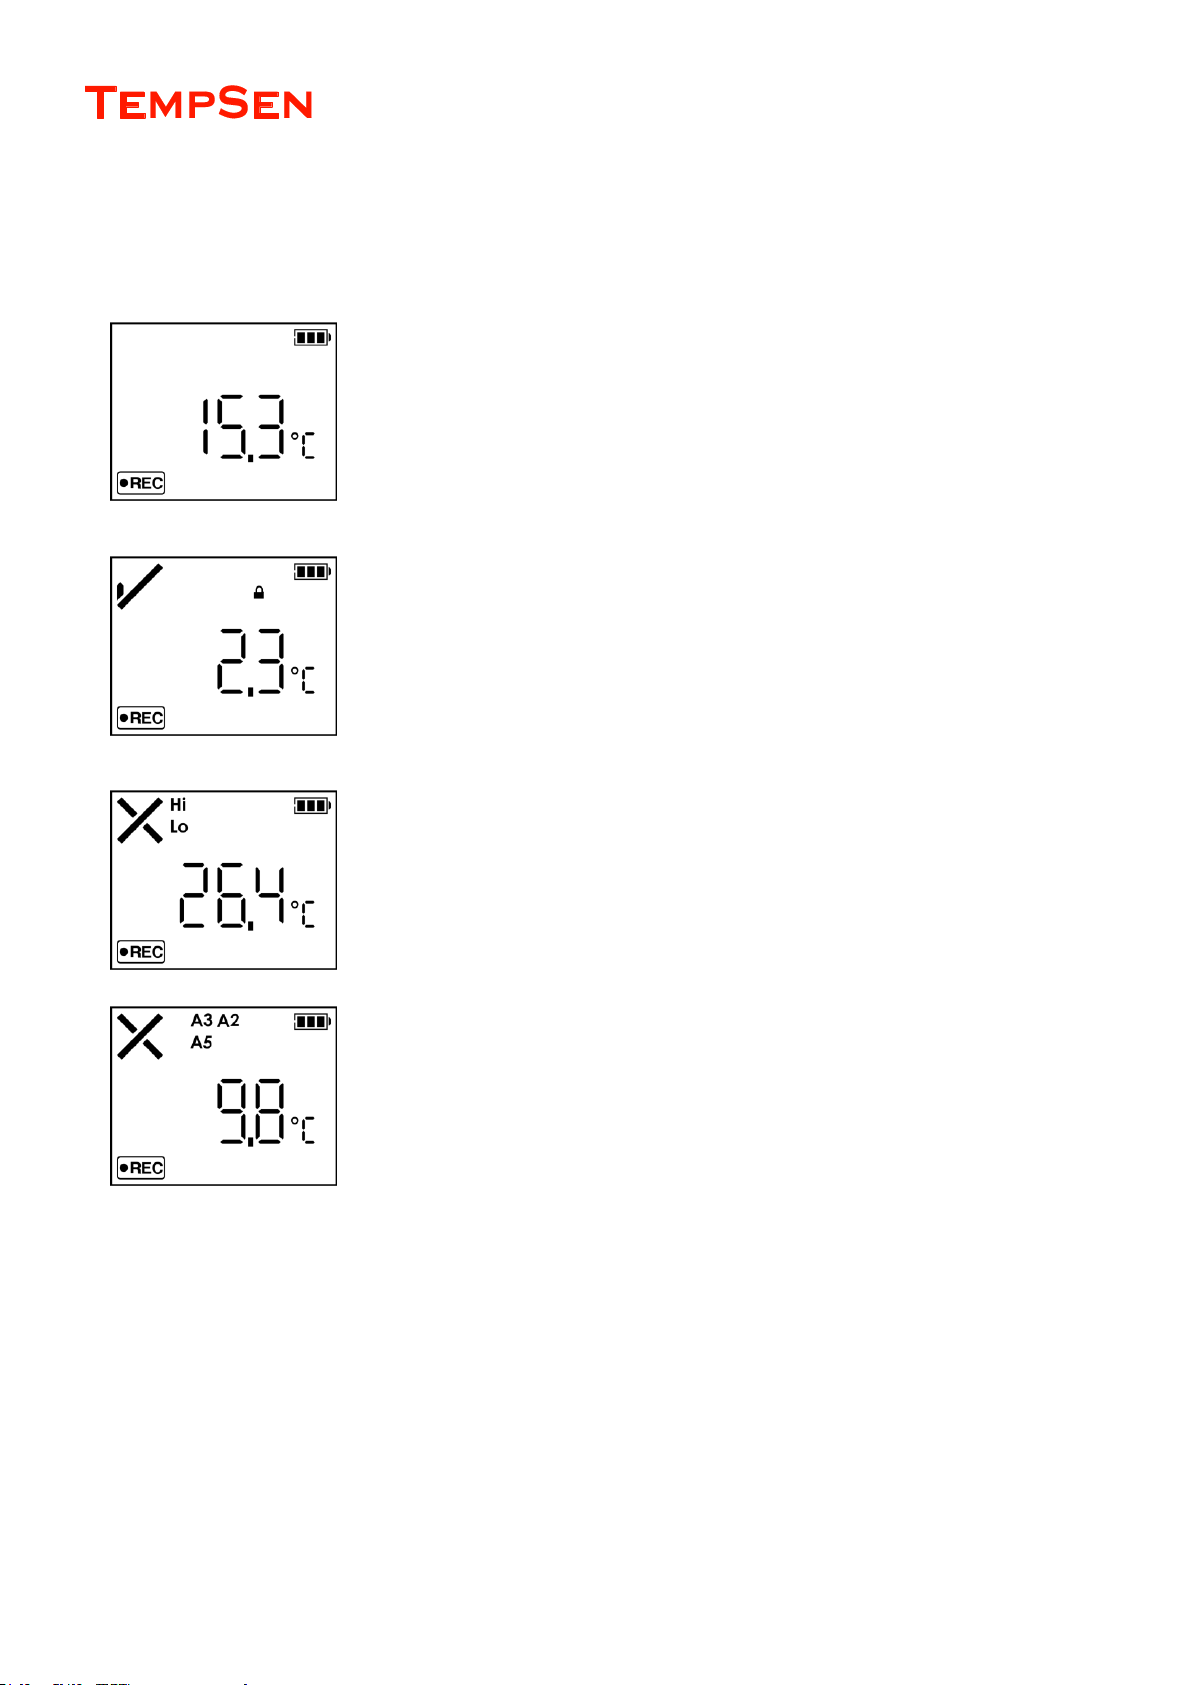
LCD Screens
Home Screens
No Alarm Setting
Current Reading: 15.3°C
Status: Recording
No Alarm triggered
Current Reading: 15.3°C
AccessKey enabled
Status: Recording
Alarm triggered at alarm zones: Hi, Lo
Current Reading: 26.4°C
Status: Recording
Alarmed triggered at alarm zones: A3, A2, A5
Current Reading: 9.8°C
Status: Recording
Page 15
USER MANUAL
UM-PDUB-160217 REV.D Page 15 / 42
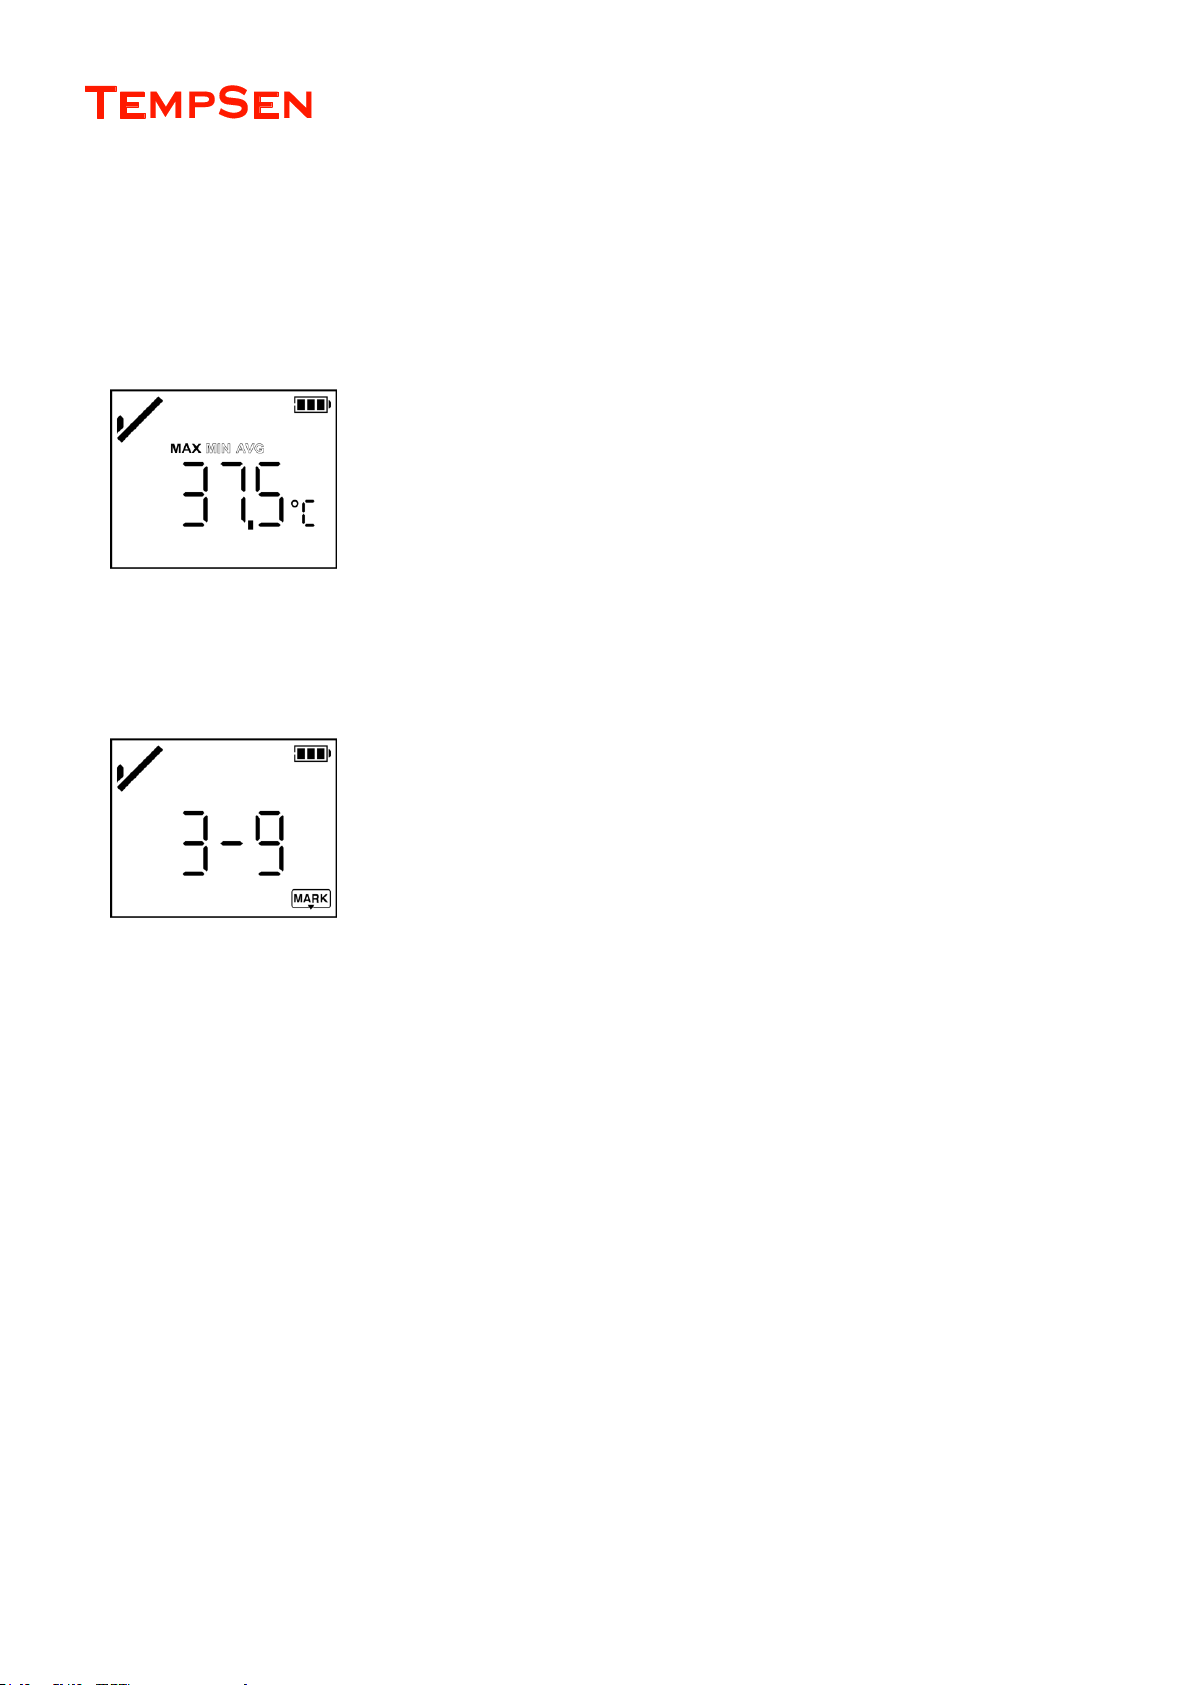
Statistics
Press View/Mark button on data logger to view recording statistics.
Max: Maximum value
Min: Minimum value
Avg: Average value
Max Value: 37.5°C
Time Marks
3 of 9 marks placed.
Page 16
USER MANUAL
UM-PDUB-160217 REV.D Page 16 / 42
Download Data
Download Auto PDF Report
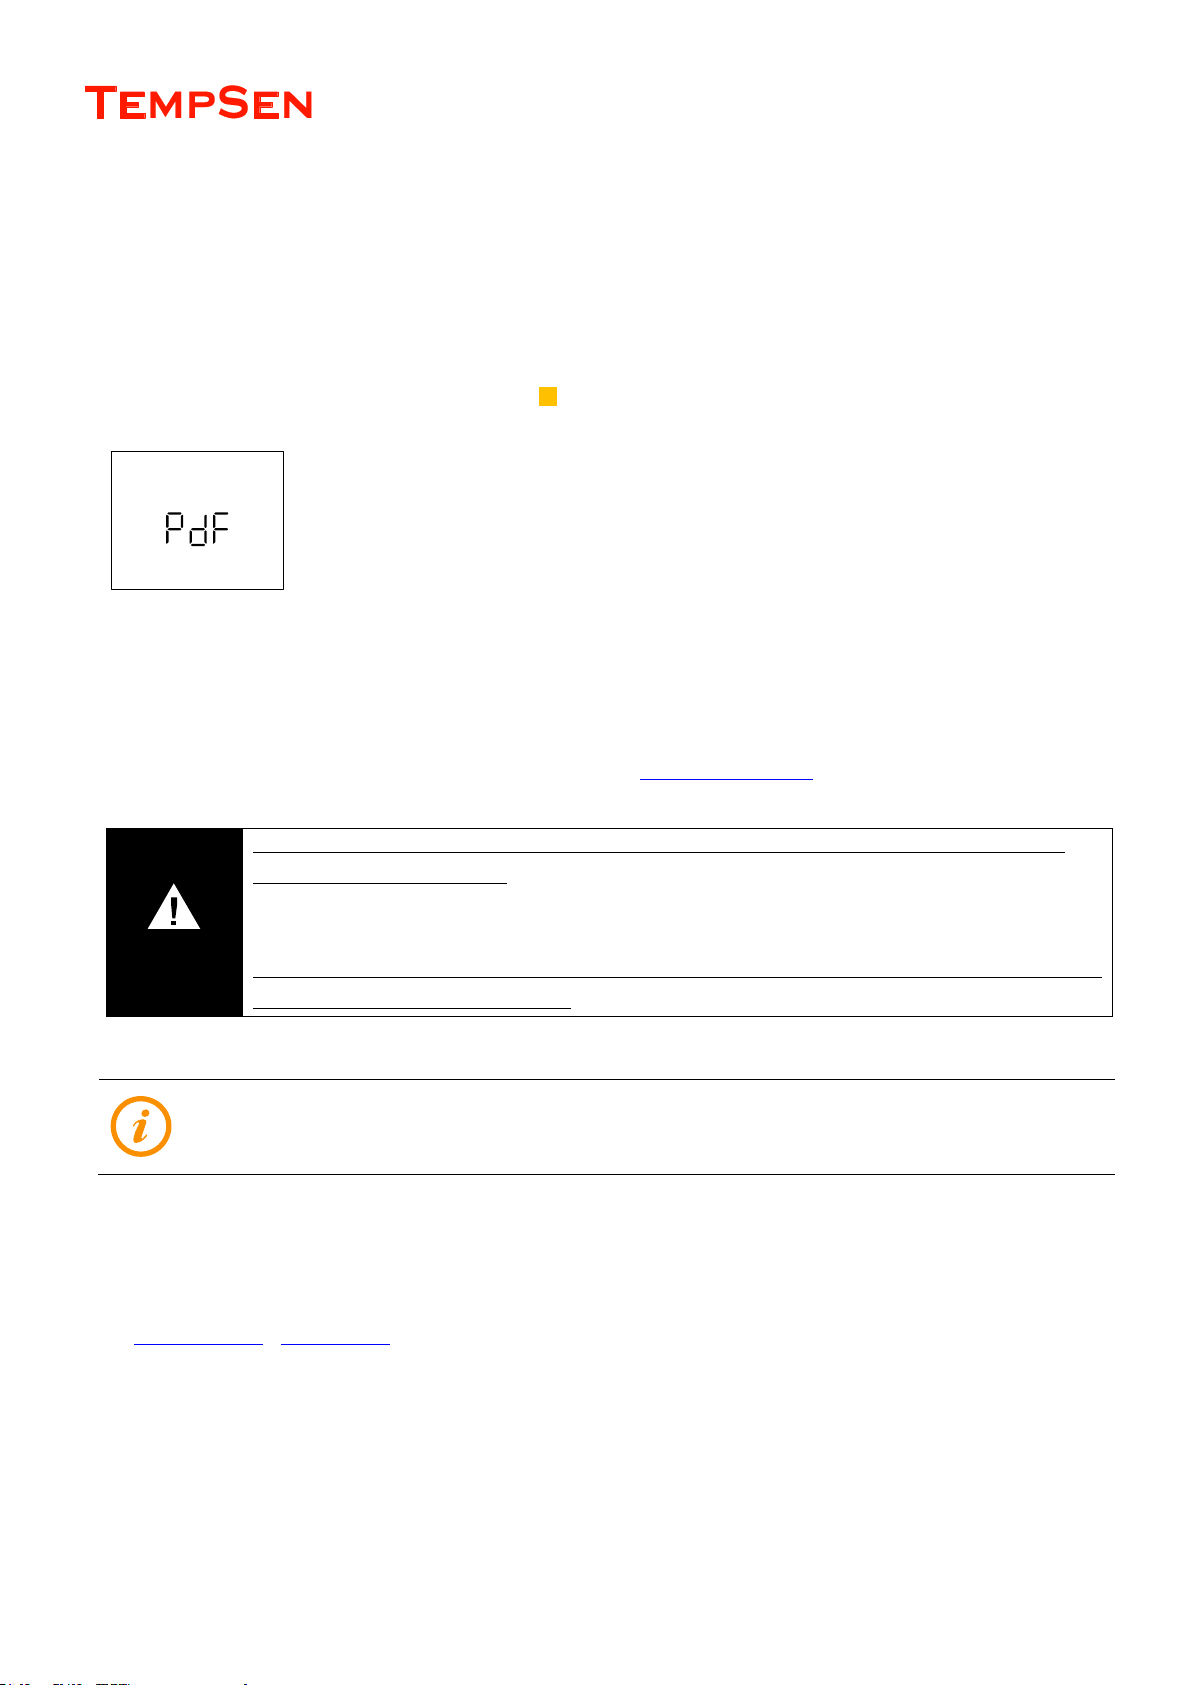
Connect Tempod logger to USB port of computer, LCD on logger shows “ USB” after data logger was successfully connected and then
changes to “PdF” later, which means logger is currently creating the PDF report inside logger, it may take a couple of seconds to complete, a
report with tabular data pages and of 2880 readings will need 40 seconds to complete.
LCD displays “PdF” indicating logger is currently generating PDF report, then changes to “USb”
after PDF report is successfully created.
After PDF report is created, find and open the removable storage device “TempSenDisk” in computer, copy the PDF report to your computer,
then open and view it with PDF reader software.
The PDF report automatically created in logger is protected and encrypted from tamper, with the embedded raw data embedded, user could
upload it to TempSen Cloud
TM
online cold chain data management platform, www.tempsencloud.com for further analysis.
Logger would be ready for communication with TempCentre software only after PDF report is completely created.
Download Data via TempSen Go APP
See TempSen Go APP > Download Data
Download Data via TempCentre Software
Connect Tempod logger to USB port of computer, open TempCentre program, TempSen will start searching USB ports and find device in
couple of seconds, once device was found, TempCentre will begin to download data automatically, you could click on Save button to save
IMPORTANT
Please DO NOT save the PDF report that you copied from logger as a new file. Please do not perform any “Save”
action through PDF reader software. Otherwise, content inside PDF file will be reorganized by PDF reader software and
cause raw data embedded unrecognizable.
Please DO NOT remove data logger from USB port while it’s still in the process of creating PDF report (“PDF” on LCD
indicates that logger is creating PDF report), Otherwise logger would be seriously damaged.
Page 17
USER MANUAL
UM-PDUB-160217 REV.D Page 17 / 42
data to your local data base.
Stop Recording
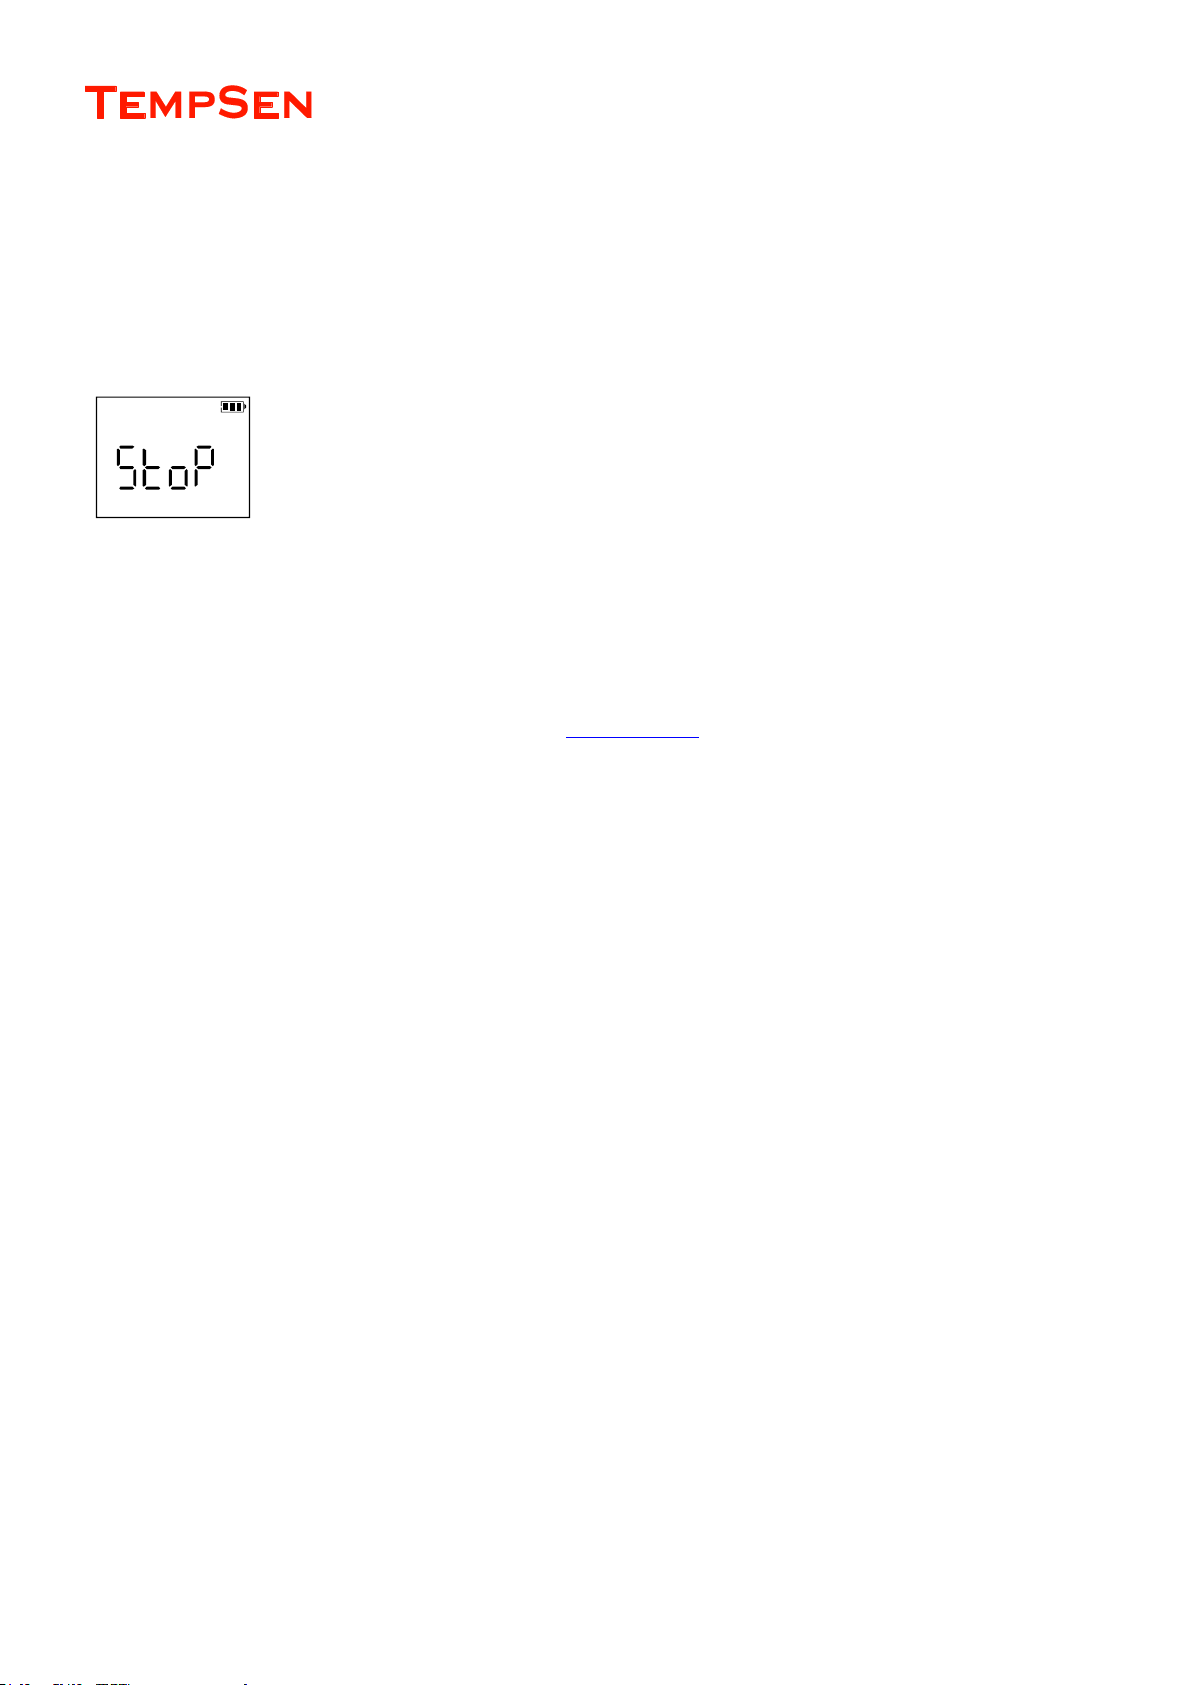
Press Start/Stop button and hold for at least 3 seconds to stop recording. Logger would stop recording either after logging cycle completes
(memory full). “StoP” flashes on LCD reminding user that current button action is effective and please keep unit recording stops.
Recording Stops
“StoP” displays after recording stopped.
Time Mark
Press View/Mark button on data logger to place a time stamped mark , up to 9 time marks available.
You could also place time mark using TempSen Go APP, please see TempSen Go APP > Time Mark
Page 18
USER MANUAL
UM-PDUB-160217 REV.D Page 18 / 42
Battery
Tempod data logger uses one user replaceable Panasonic CR2450 lithium battery,
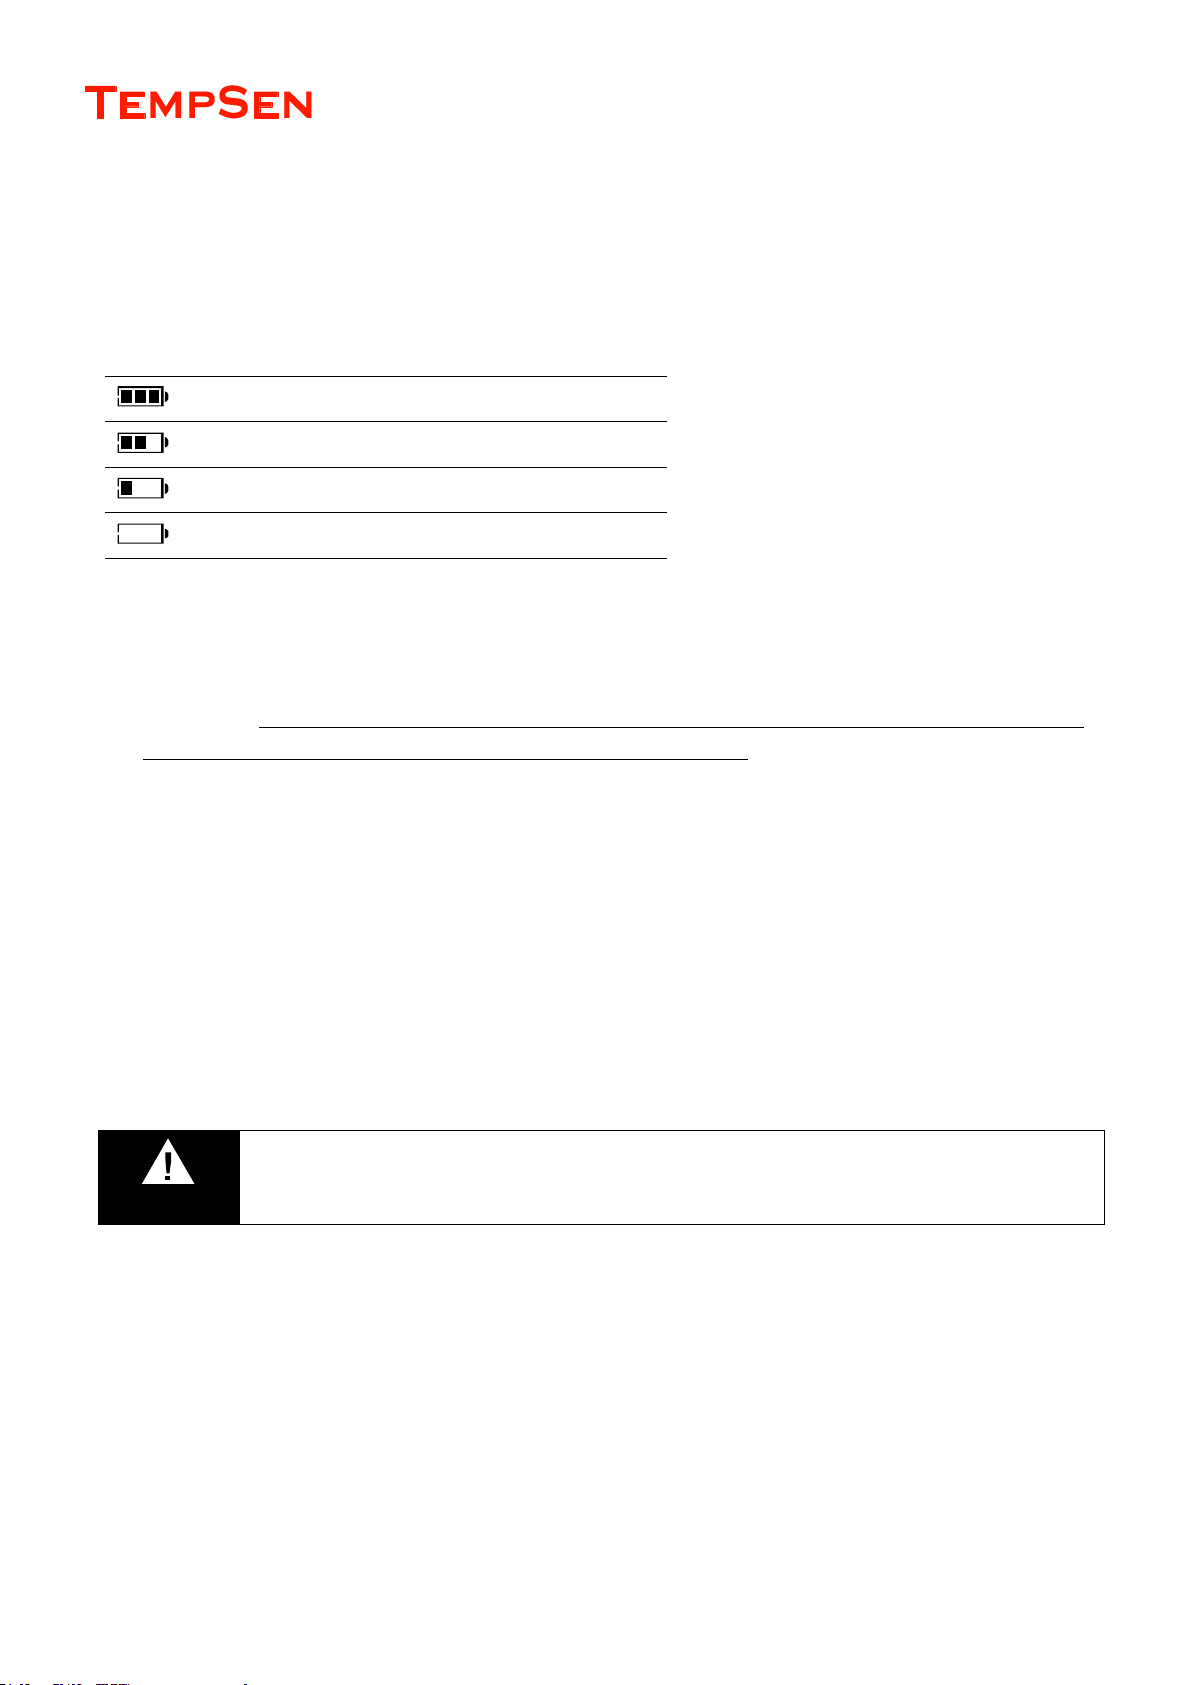
Remaining Battery Indicator
3 bars - Full
2 bars - Good
1 bar – Medium
0 bar – Low, please replace battery NOW
Replace Battery
Please insert a coin in the groove on battery compartment cover to spin it in the direction of OPEN to open battery cover, and take
battery out, then press “View/Mark” or “Start/stop” button several times until LCD changes to blank, otherwise volume of new battery
would probably not be correctly recognized within one hour after battery replacement.
Place a new Panasonic CR2450 battery into battery compartment with positive side upward.
Put cover back to compartment in the position where triangle on cover points to the triangle on logger, then spin cover in the direction of
CLOSE to close battery cover
IATA Compliance
Battery supplied with Tempod passed the Part III, SubSection 38.3 of the UN Manual of Tests and Criteria. Tempod® data logger is also
certified to meet requirements in General Requirements and Section II of Packaging Instruction 970, IATA Dangerous Goods Regulations 58th
Edition. Tempod® complies with RTCA-DO160G Environmental Conditions and Test Procedures for Airborne Equipment, it's allowed to used
in air freight in active status.
WARNING
Please DO NOT try to recharge or heat the battery
Please DO NOT use data logger (excluding external probe) in environment outside of -30.70 to avoid damage to
battery.
Page 19

USER MANUAL
UM-PDUB-160217 REV.D Page 19 / 42
Data Results Explanation
Device Information
Current Status
Running status of logger (when downloading data).
Logging Summary
Start Time
The time the first data point is recorded at.
Stop Time
The time the last data point is recorded at or recording is manually stopped at
Trip Length
Total recording duration time, which is calculated from the first point to the last point.
MKT
MKT (Mean Kinetic Temperature) is a simplified way of expressing the overall effect of temperature fluctuations during storage or transit of
perishable goods. Calculation,
ΔE = activation energy (standard value: 83.144 kJ/mol)
R = 8.314472 J/mol (universal gas constant)
T = temperature in degrees K
n = the number of sample periods over which data is collected
Note: ln is the natural log and ex is the natural log base.
Page 20
USER MANUAL
UM-PDUB-160217 REV.D Page 20 / 42
Violations and Alarms
Violation
Any readings out of alarm limit is a deemed as violation to alarm limit.
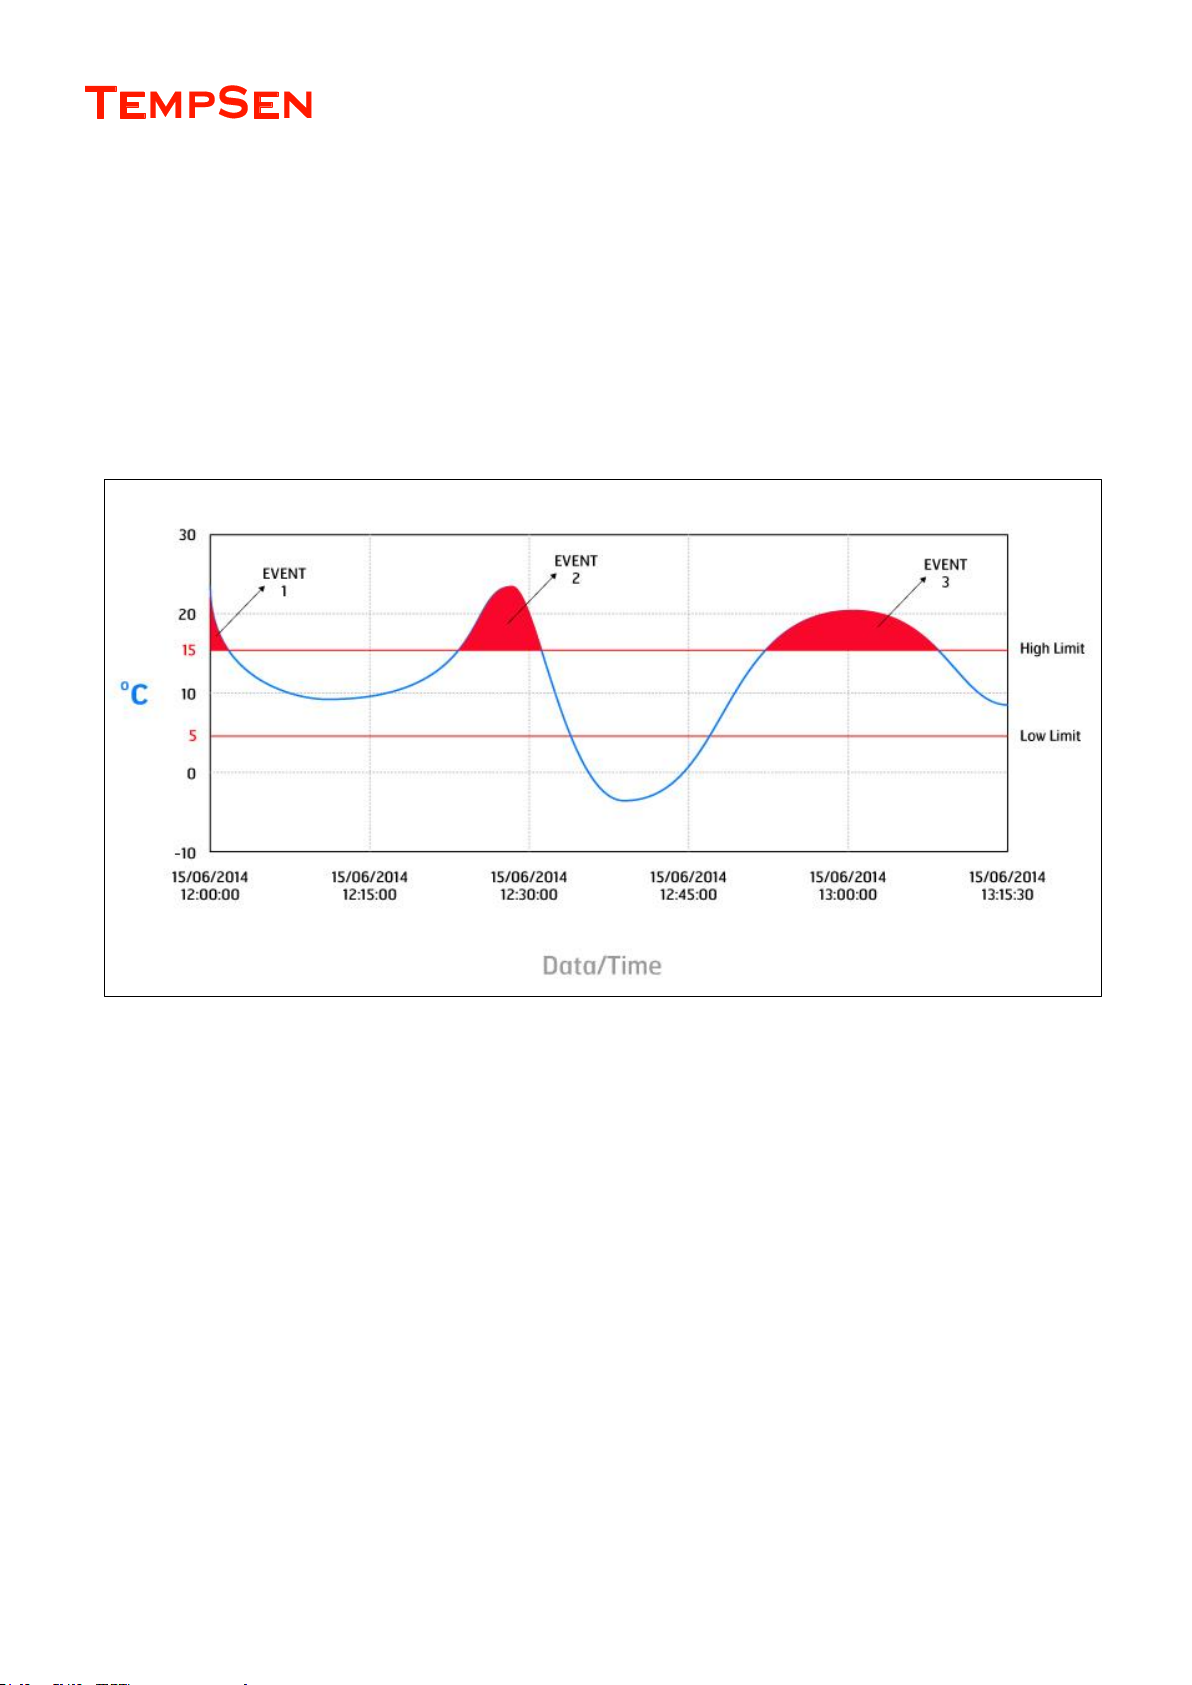
Violation Events
A consecutive series of data points out of limit would be deemed as one violation event. In example below, high alarm zone has three limit
violation events.
Number of violation event for each alarm zone shows in “Events” column of alarm statistics in data report.
Violation Time (Duration)
The total time that readings out of each alarm limit, which equals to number of points out of each limit x logging interval.
Alarm First Triggered Time (First Triggered@)
The time an alarm is first triggered at.
For example, logger is set to logging interval of 1 minute, alarm delay is 5 minutes, logger is started at 09:00, and readings are all over high
limit after recording begins, so first alarm will be triggered at 09:05, and this is the Alarm First Triggered Time.
Page 21

USER MANUAL
UM-PDUB-160217 REV.D Page 21 / 42
ADDITIONAL INFORMATION
LCD may function abnormally after taken out from environment down to -20°C to room temperature, please wait for few minutes for it to
restore to normal status.
To avoid damaging your data logger, please do not disconnect it from USB port while it is communicating with the computer.
Do not use any aggressive cleaning agents or solvents to clean device.
Data stored in data logger is retrievable even battery runs out.
Please do not heat, microwave or recharge battery.
Please follow local regulations when recycling or disposing of data data logger.
Page 22

USER MANUAL
UM-PDUB-160217 REV.D Page 22 / 42
TEMPSEN GO APP (IOS / ANDRIOD)
Overview
TempSen Go is a mobile App developed for accessing, managing TempSen Bluetooth Low Energy data loggers and data collected by data
loggers from supply chain, this documents describes the basic operation instruction of TempSen Go APP.
Download TempSen Go APP
You could download and install TempSen Go APP by visiting following links or scanning the QR codes.
Functions
Click on icon on title bar (left top on screen) to expand main menu, and you could choose to move to any functions you want by
tapping on the specific menu item.
Devices
Scan, search and connect to nearby Tempod Bluetooth data loggers
Data Files
Search, view, and export all data files saved in local database on your smart device
Settings
Basic setting OF TempSen Go APP, including time zone, user preferences and export settings.
Page 23
USER MANUAL
UM-PDUB-160217 REV.D Page 23 / 42
How to Use?
Scan and Search Data Loggers
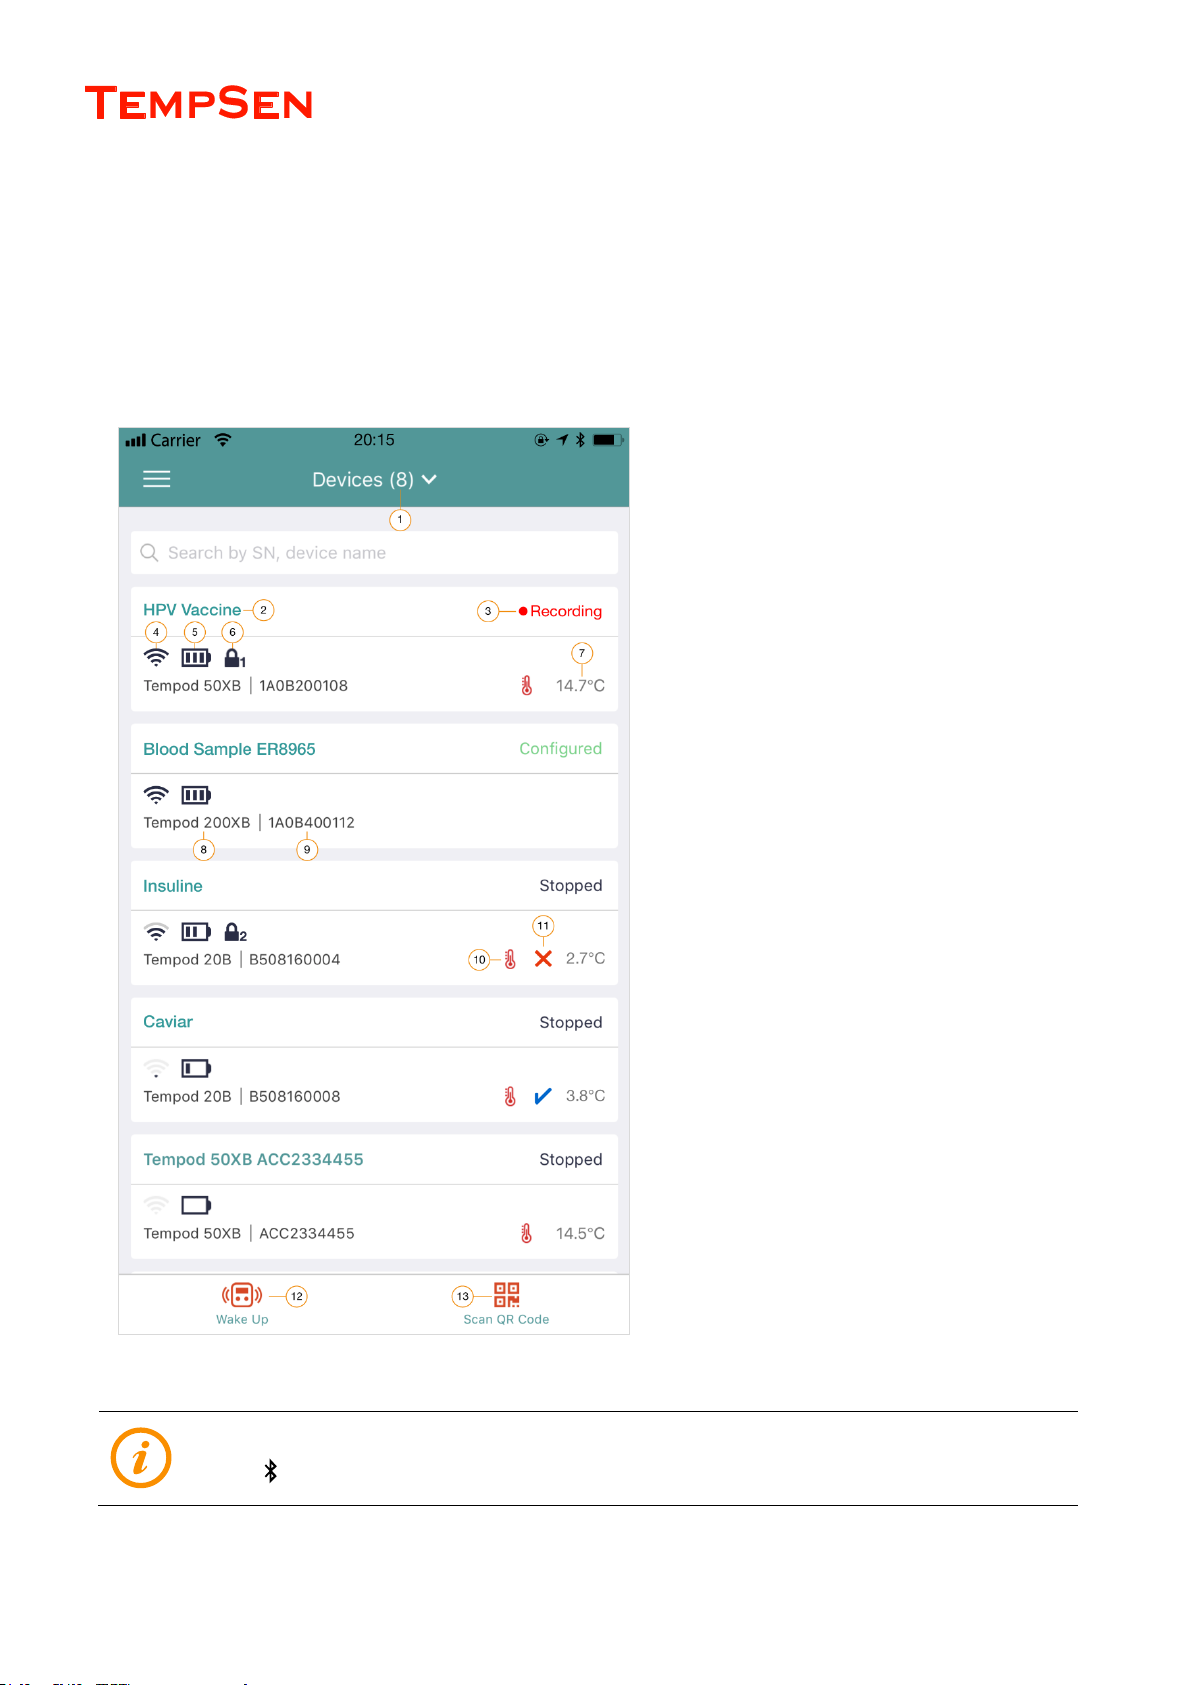
Go to Device page, in this page your smart phone will automatically scan all Tempod Bluetooth data loggers within Bluetooth communication
range every 1 minutes, and all loggers discovered will be displayed on this page
Devices
1. Number of devices found
2. Device name, it shows device model and serial is device
name was not set
3. Device running status
4. Bluetooth signal strength received, more bars show here,
the stronger the signal.
5. Remaining battery level
6. AccessKey protected, number to the left of lock icon
represents protection level applied to current device.
7. Last reading
8. Device model number
9. Serial number
10. Temperature sensor icon
11. Alarm status
12. Wake up button
13. Scan QR code button
Please make use Bluetooth service has been turned on your smart phone, and Bluetooth on Tempod logger is also
enabled, appears on LCD of data logger means Bluetooth broadcasting is already turned on this device.
Page 24
USER MANUAL
UM-PDUB-160217 REV.D Page 24 / 42
Wake Up
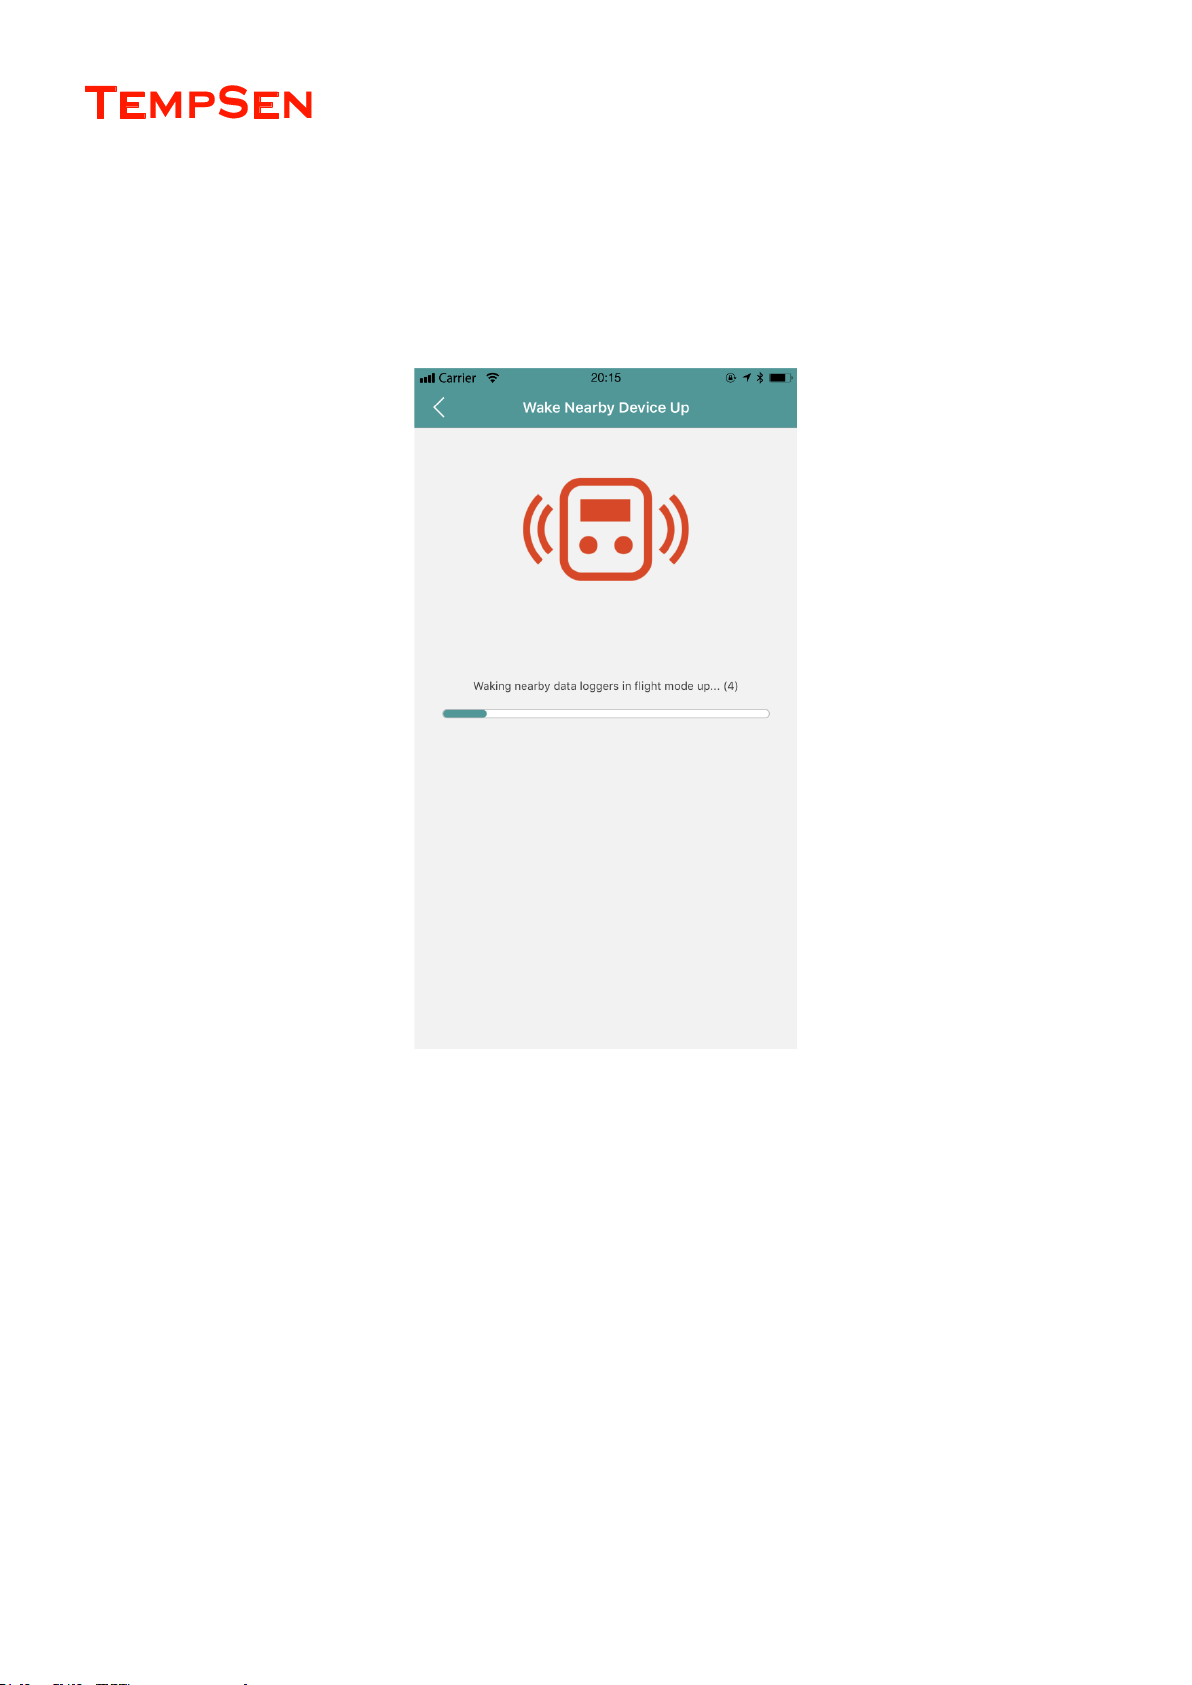
TempSen Go in Wake Up mode begins to wake all nearly loggers in flight mode up, loggers waken up will turn on Bluetooth broadcasting
and it will be found in seconds when scanning nearby loggers.
Waking up process will last for 15 seconds every time, and no success message will be returned during the course.
Scan QR Code
Scan QR code on front face of logger to search and then connect to this logger if there are many loggers nearby. Please make sure
TempSen Go could access camera service of your smart phone.
Page 25
USER MANUAL
UM-PDUB-160217 REV.D Page 25 / 42
Connect to Data Logger
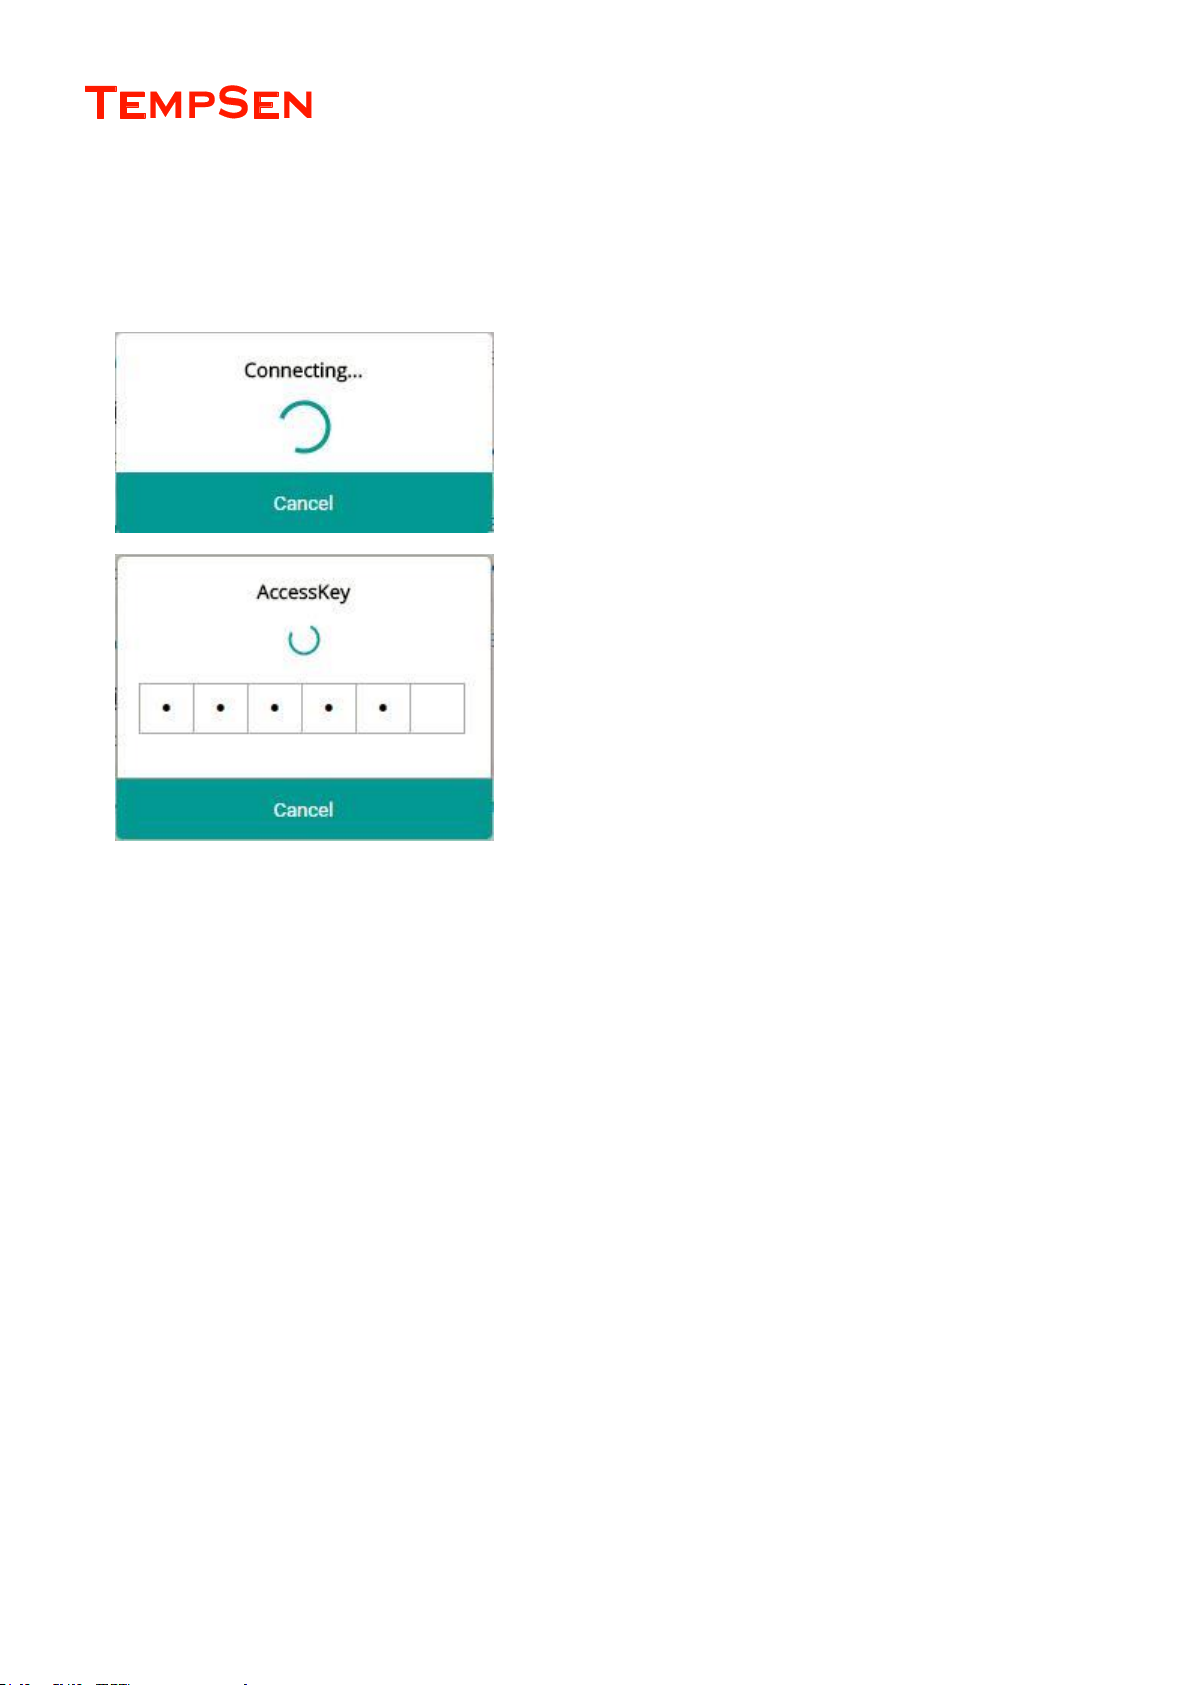
Tap on specific data logger listed in Device page to connect to this device. You will be required to be enter 6-digit AccessKey if the device was
protected.
Connecting
Connection will take few seconds, and you could tap Cancel to cancel
connecting attempt anytime.
Enter AccessKey
If data logger was protected by AccessKey (Protection level 2), you will
be prompted to enter correct AccessKey when connecting to data
logger.
Share AccessKey
If you already logged into TempSen Cloud account, TempSen Go will
check with TempSen Cloud service if AccessKey of current data logger
exists and if current user has relevant permission, if yes, AccessKey
will be pushed to TempSen Go App and fill in the requested fileds
automatically.
AccessKey from TempSen Cloud may not match the AccessKey in
data logger, which is resulted from new AccesKey applied to data
logger was not successfully sync to TempSen Cloud after changes
amde, in that case, user still needs to enter correct AccessKey
manually.
Page 26
USER MANUAL
UM-PDUB-160217 REV.D Page 26 / 42
Control Data Logger
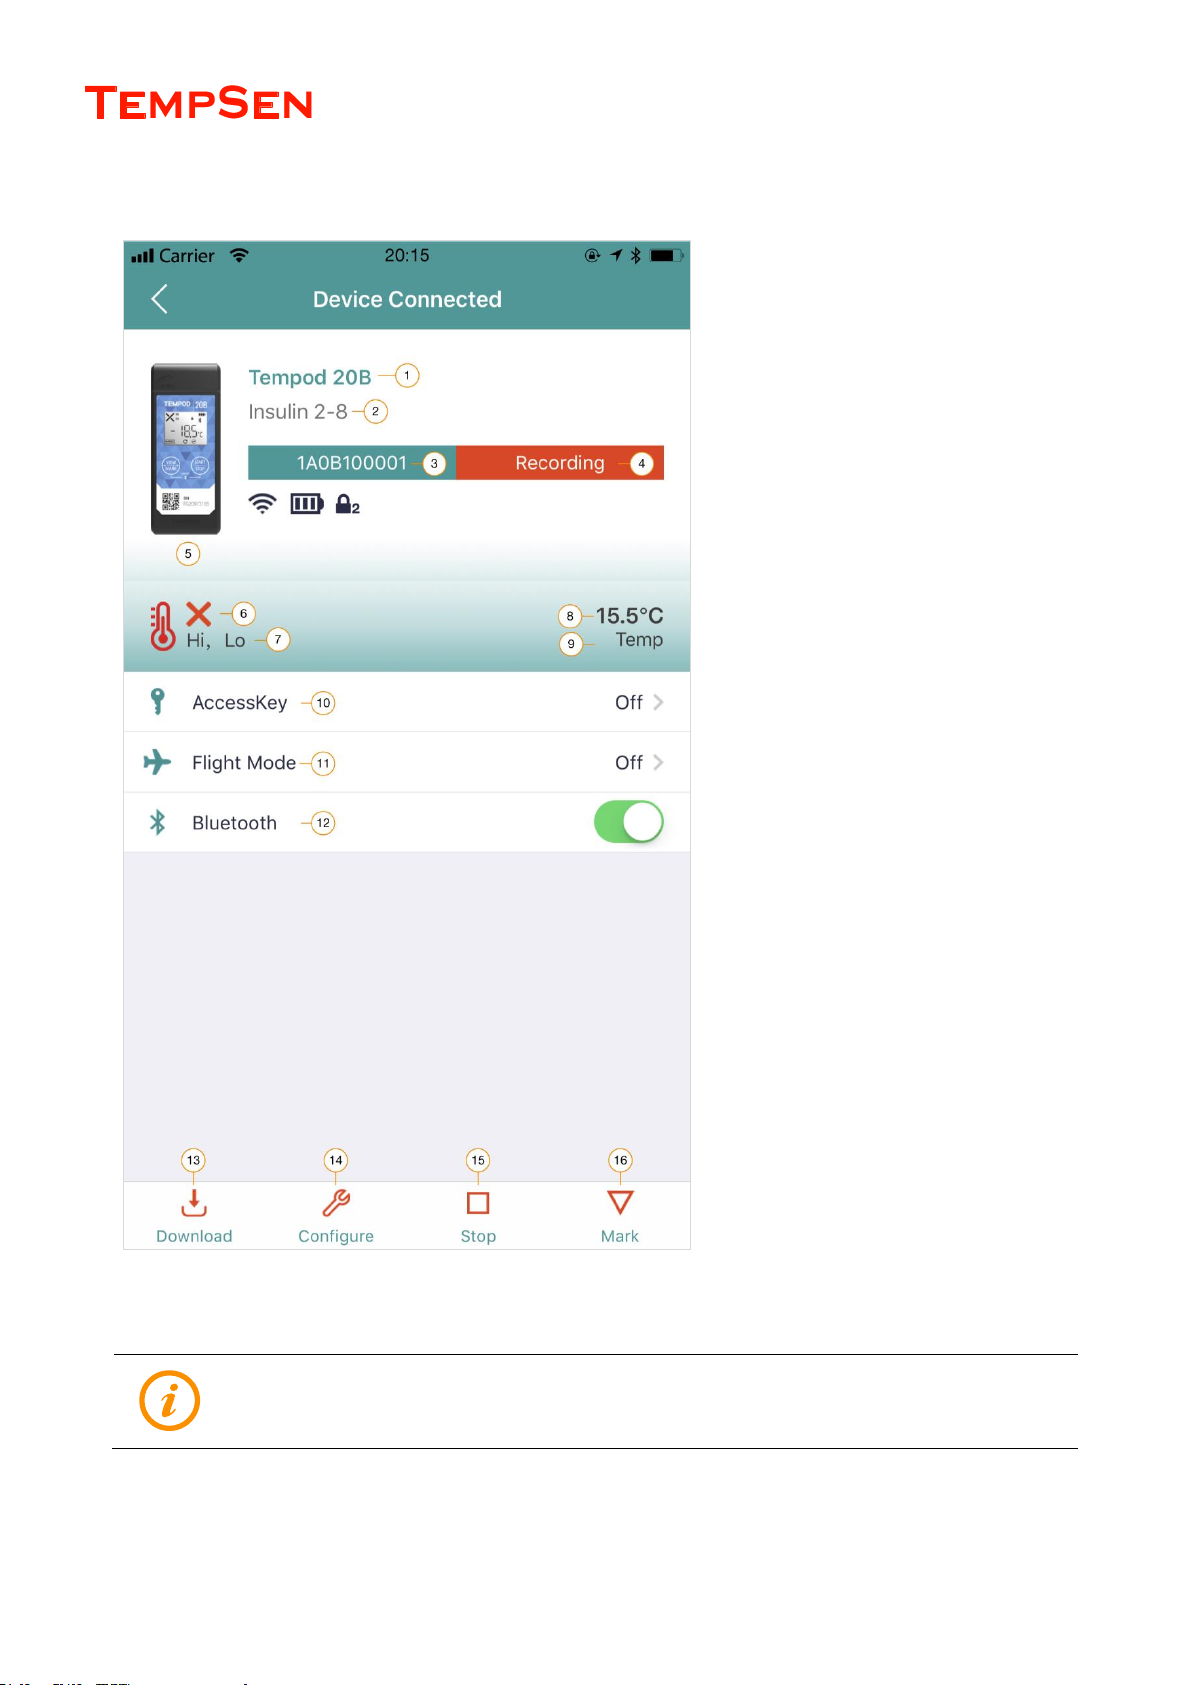
Device Connected Screen
1. Device model number
2. Device name
3. Serial number
4. Running status
5. Image of device
6. Alarm status
7. Name of alarm triggered zones
8. Current reading
9. Sensor name
10. AccessKey setting
11. Flight Mode setting
12. Bluetooth setting
13. Download button
14. Configure button
15. Stop button
16. Mark button
After connected, Bluetooth connection session with close after 3 minutes if no action was implemented.
Page 27
USER MANUAL
UM-PDUB-160217 REV.D Page 27 / 42
AccessKey Settings
AccessKey is device password, after applying AccessKey to data logger, user needs to enter correct AccessKey when trying to connect to
or control data logger through TempSen Go App or TempCentre software.
Tap AccessKey to set, change and remove AccessKey from current data logger, or change protection level.
Protection Levels
Protection level determines what actions could be taken when connecting to an AccessKey protected data logger through Bluetooth
communication.
Level 1 (Normal)
User could connect to and download an AccessKey protected data logger without need to provide AccessKey, but AccessKey is required
if user wants perform further control actions, i.e. programming, start/stop recording…
After connecting to data logger, user needs to tap on “More Actions” button in device connected page, and then enter correct AccessKey
to show all control functions.
Level 2 (High)
User needs to provide AccessKey when connecting to data logger through Bluetooth connection.
AccessKey of applied to device will be automatically synced to TempSen Cloud if you already logged into TempSen
Cloud on TempSen Go App, so users under the same organization with the permission of Share AccessKey will
automatically receive AccessKey from cloud when connecting to this protected device.
Page 28
USER MANUAL
UM-PDUB-160217 REV.D Page 28 / 42
Flight Mode
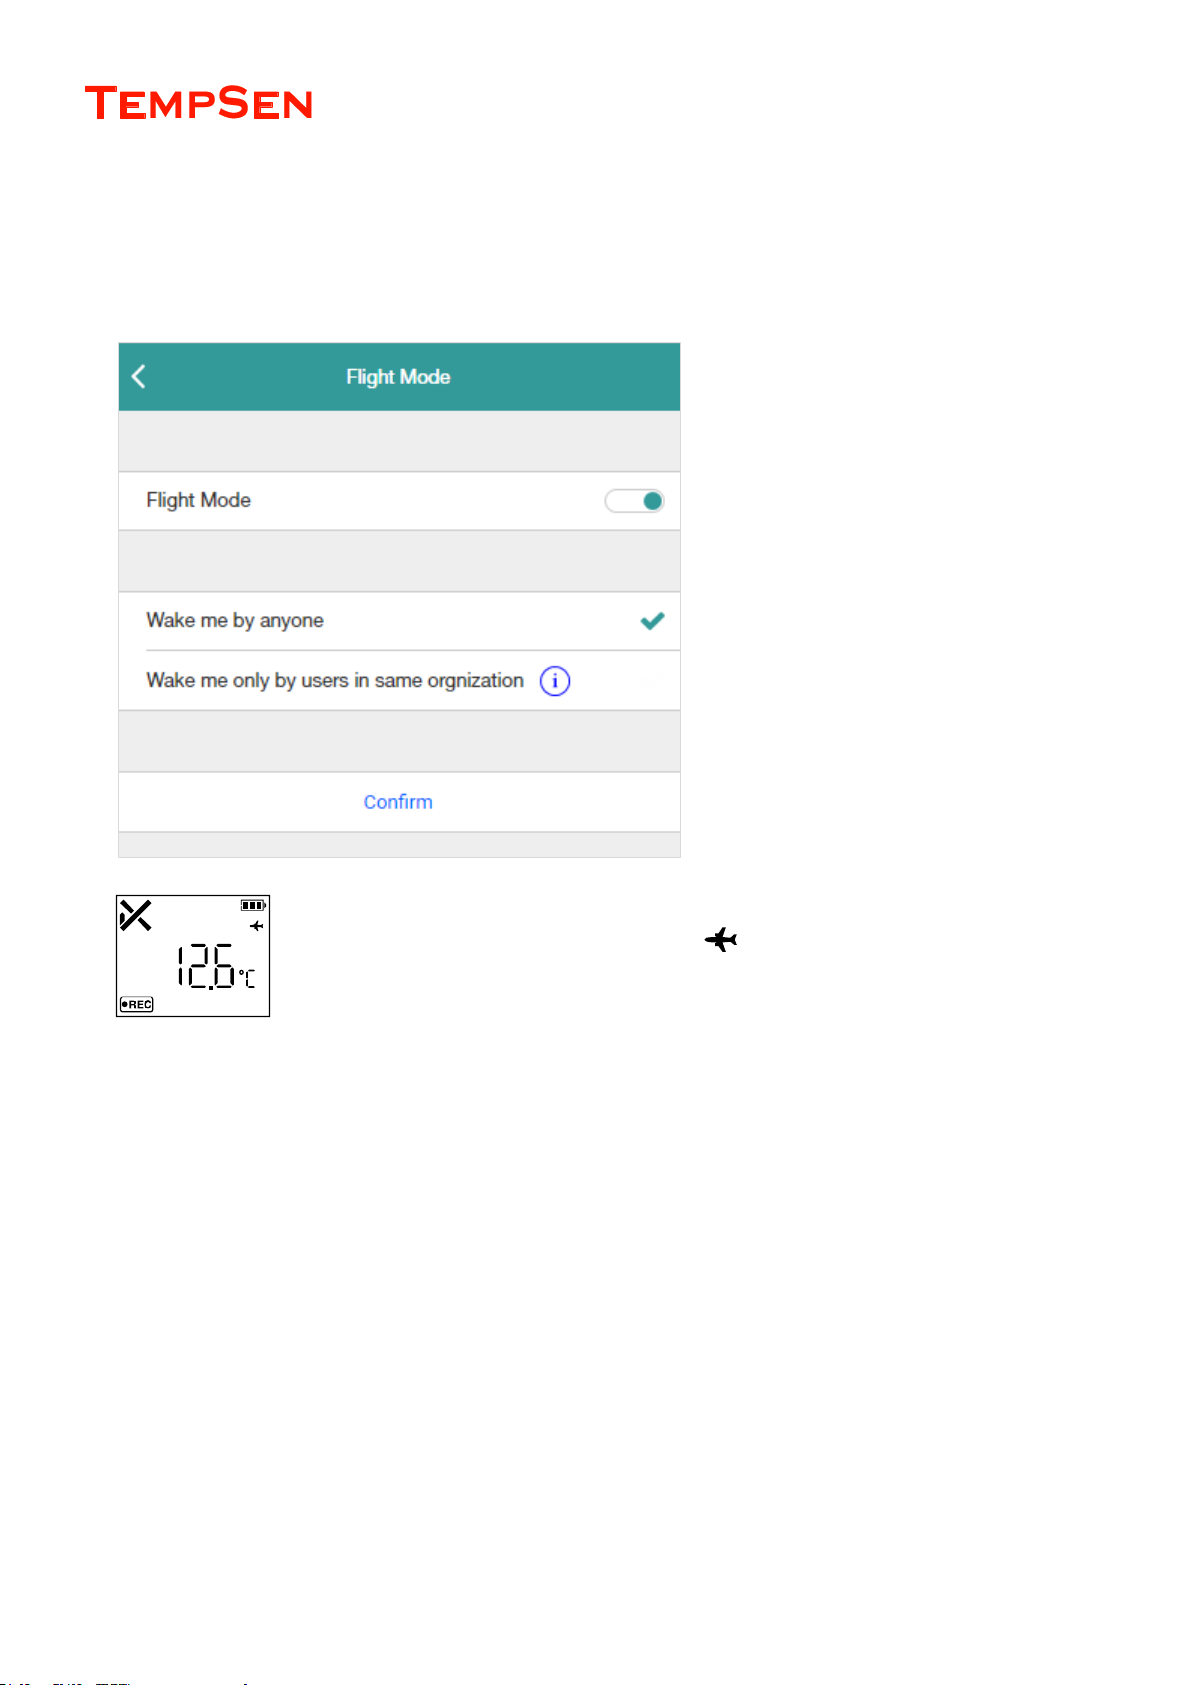
Flight Mode allows logger to keep recording with Bluetooth signal transmission turned off, so no electromagnetic radiation from logger in
this mode. It is very useful when deploying loggers in air cargo where electromagnetic radiation is strictly prohibited. Furthermore, Bluetooth
signal of data logger could be turned back on remotely through Wake Up function on TempSen Go App.
Flight Mode Options
Wake me by anyone
Anyone could wake logger in flight mode up
using TempSen Go APP
Wake me only by users in same organization
Only users in the same organization (company
account) on TempSen Cloud could wake this
logger in flight mode up.
This option is not available until user signed into
TempSen Cloud on TempSen Go App.
on LCD of logger indicates logger is currently in
flight mode.
Turn Off Bluetooth on Device
Turn off Bluetooth broadcasting on connected device remotely. Once Bluetooth was turned off, connection to device will be closed.
Page 29
USER MANUAL
UM-PDUB-160217 REV.D Page 29 / 42
Configure Data Logger
Tap at bottom bar of screen to enter into Configure Device page, in this page you could enter and select specific configuration
options and apply them to data logger.
Configuration Profile
Configuration profile is record of a collection of pre-defined configurations, it’s more time saving to apply configurations to data logger by
loading and applying a previously saved configuration profile to data logger, and you also could save current configurations as a
configuration profile for future use, please click on + on top left corner of Configure Device screen to save current configurations as
configuration profile.
Please note Sync requires internet connection and user to login to TempSen Cloud at first.
Device Name
A customized nickname for data logger for better identification, up to 10 ASICII characters.
Configuration Options
Please refer to Configuration Options for explanations of other general configuration options.
Download Data
Tap in bottom bar of device connected screen to start downloading data from data logger to your smart phone
Page 30
USER MANUAL
UM-PDUB-160217 REV.D Page 30 / 42
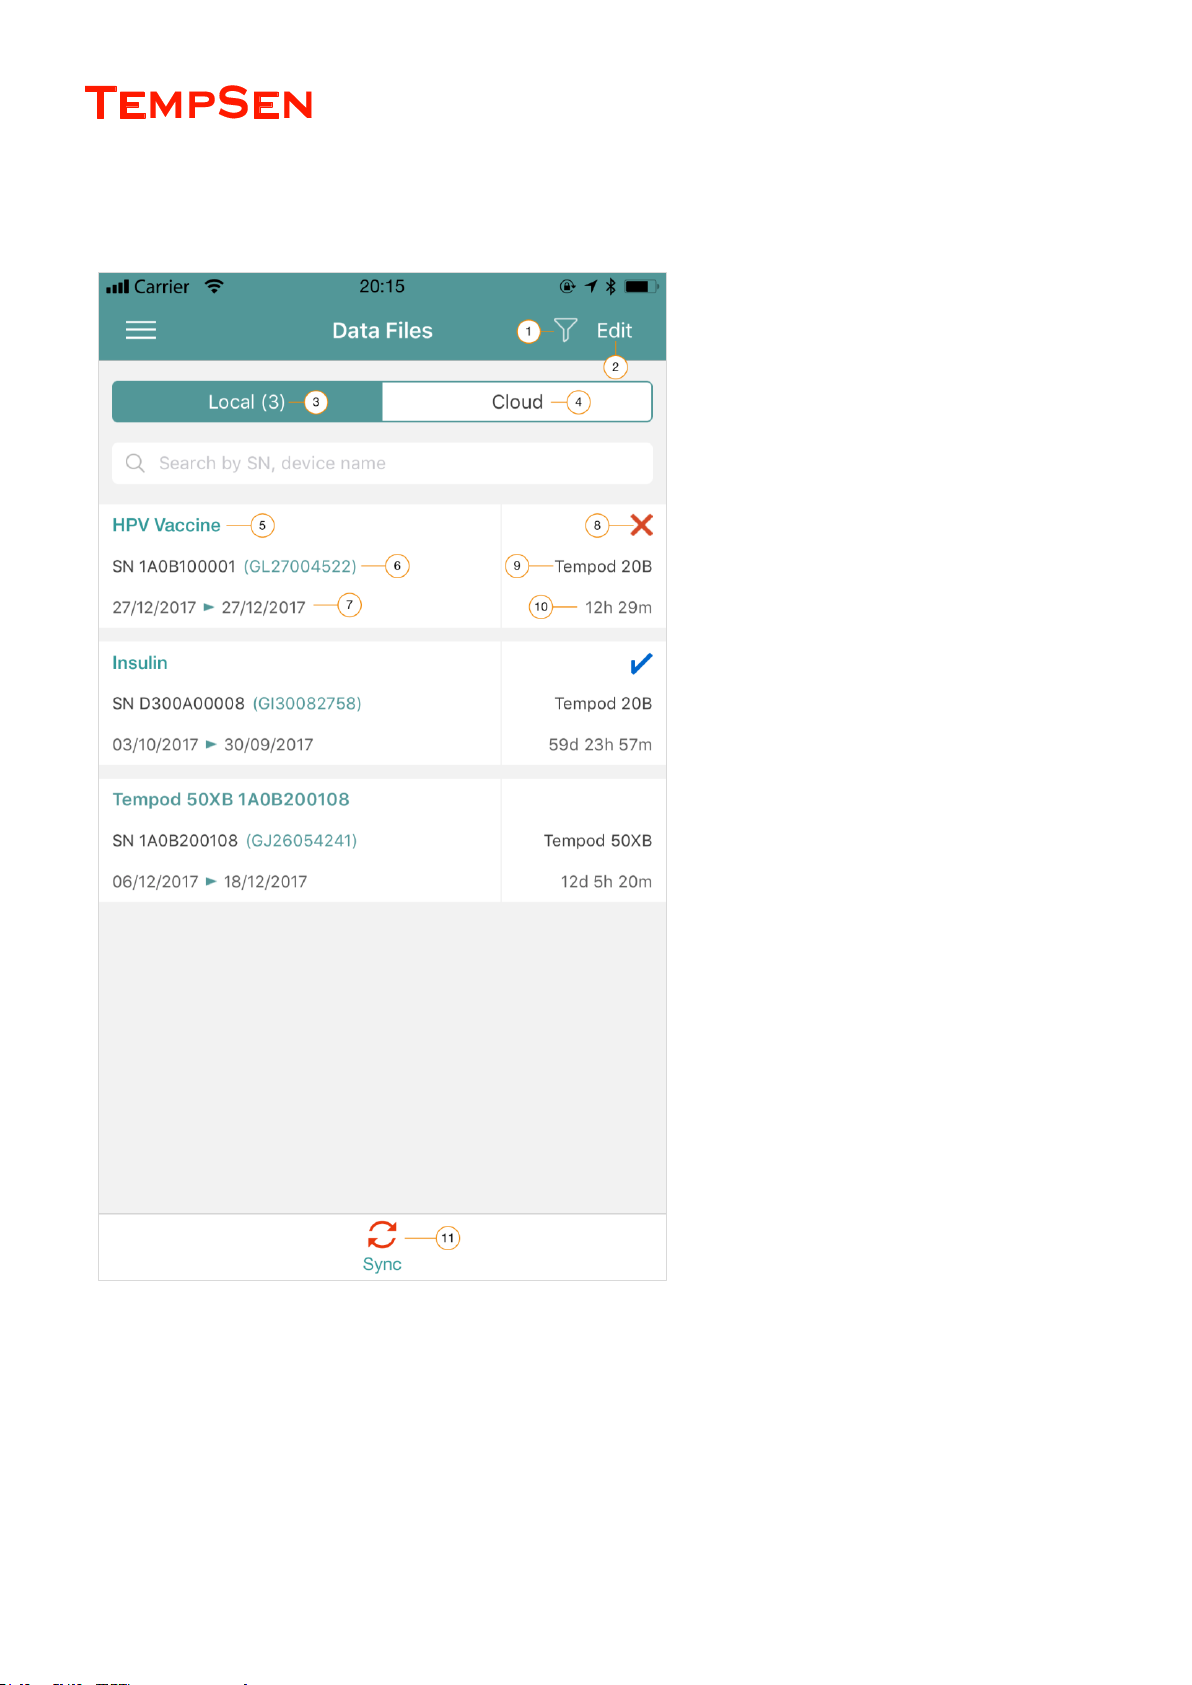
Data Files
Data Files page presents all data files downloaded from Tempod Bluetooth data loggers and saved in the local data base on your smart phone.
1. Filter
2. Edit, tap to delete multiple data files or export
specific data file.
3. Data files stored in local data base
4. Data files on TempSen Cloud
5. Data file name
6. Serial number (trip number)
7. Recording start date > stop date
8. Alarm status
9. Device model
10. Recording duration
11. Sync button, available after signed in TempSen
Cloud
Search and Filter
Enter serial number or device name as search keyword in search bar to search specific data file, and you also could tap Filter icon on top
of screen to apply filter conditions to filter data files in database.
Page 31
USER MANUAL
UM-PDUB-160217 REV.D Page 31 / 42
Delete Data
Tap Edit on top right corner of data files screen to enter into edit mode, and then you could select data file(s) to delete.
Tap on bottom bar in Data View screen to delete this data file.
Export Data
Tap Edit on top right corner of data files screen to enter into edit mode, then you could select specific data file to export.
Tap on bottom bar in Data View screen to export this data file.
You could export data file as PDF or Excel format, and choose to include tabular data page in these files in Settings > Export
Sync to TempSen
Tap Sync button on bottom bar of data files screen to sync all data files to TempSen cloud immediately.
Sync requires internet connection and user already logged into TempSen Cloud, Sync button is hidden if user not
logged in to TempSen Cloud.
Page 32
USER MANUAL
UM-PDUB-160217 REV.D Page 32 / 42
View Data
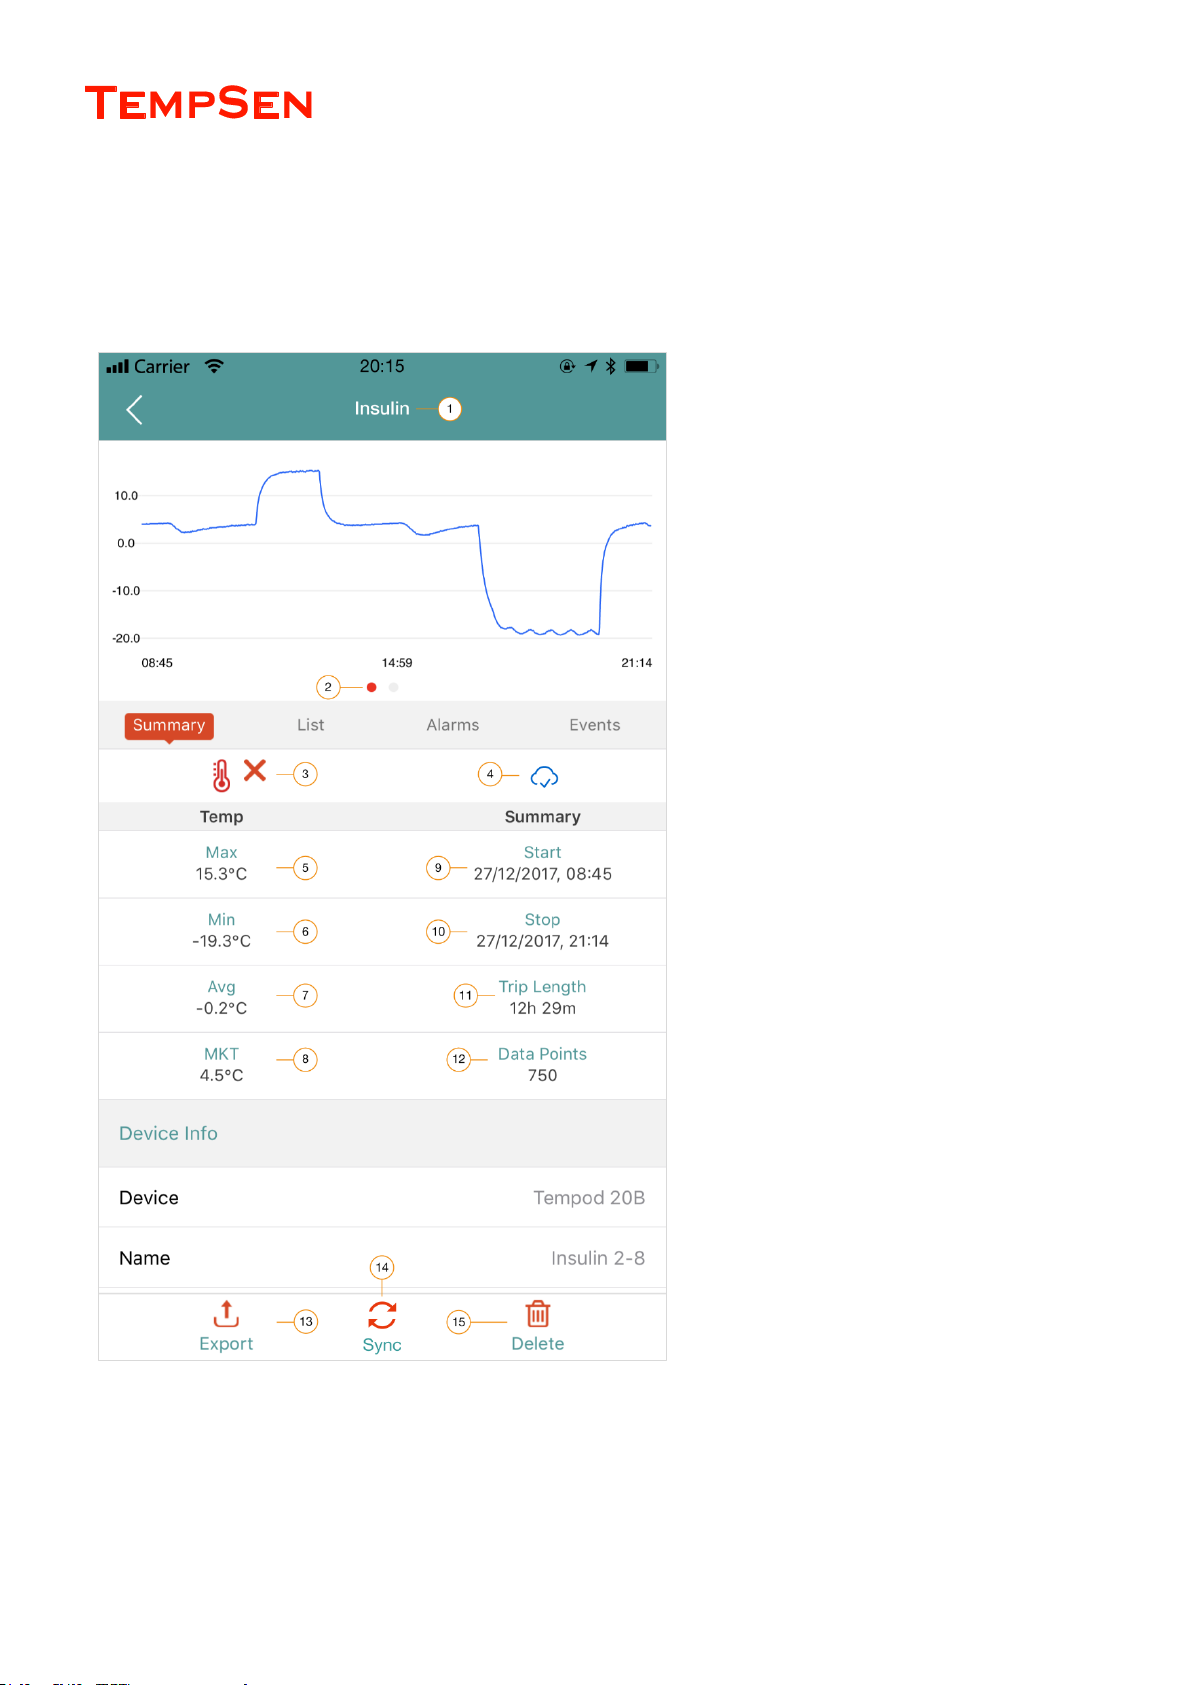
Tap specific data file to view data through different detailed views.
Summary
1. Data file name
2. Slide to change between thumbs of graph and
map
3. Sensor Temperature + Alarm status
4. Sync status
5. Maximum value
6. Minimum value
7. Average value
8. MTK
9. Recording start time (time of first point)
10. Recording stop time (time of last point or time of
manual stop )
11. Trip length, duration of recording
12. Number of total data points recorded
13. Export button, tap to export current data file
14. Sync button, tap to sync current data file to
TempSen Cloud (only available after logged into
TempSen Cloud)
15. Delete button, tap to delete current data file
Map
Page 33
USER MANUAL
UM-PDUB-160217 REV.D Page 33 / 42
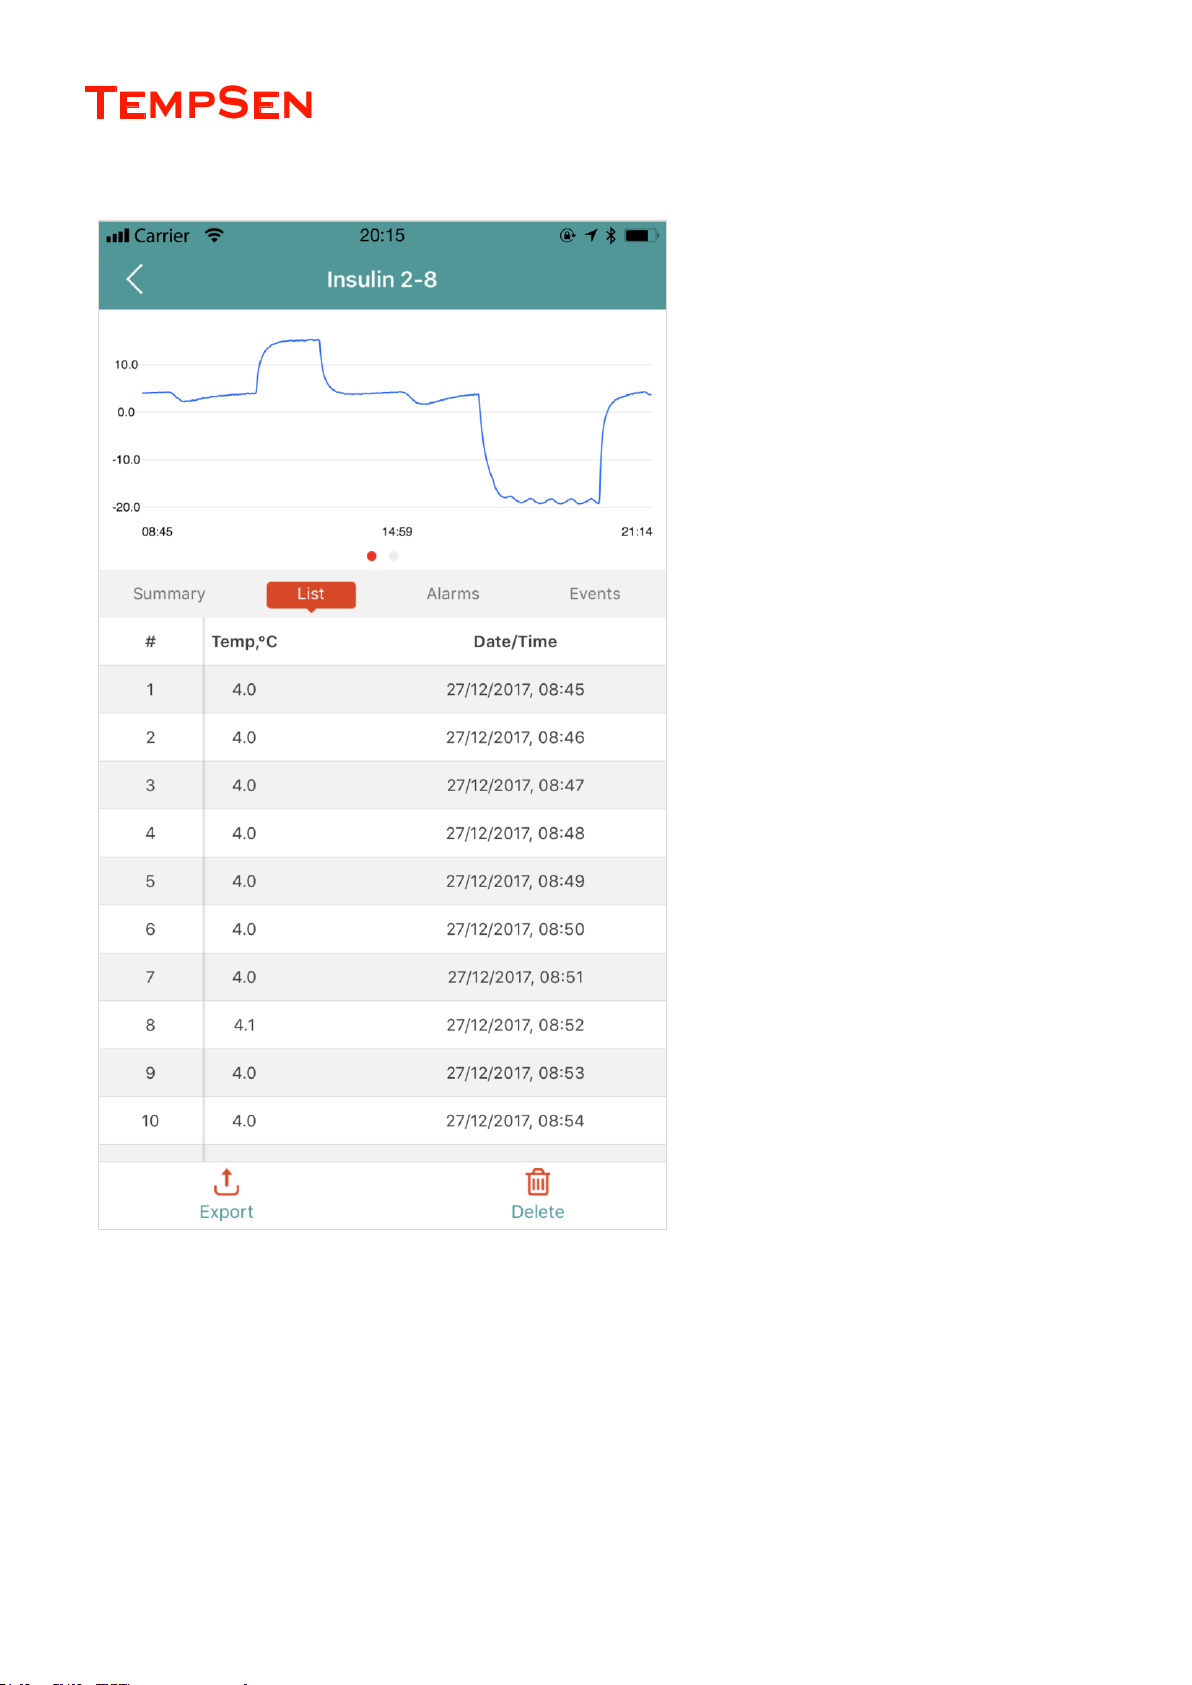
List
List view presents all value and data/time of each data
point.
Page 34
USER MANUAL
UM-PDUB-160217 REV.D Page 34 / 42
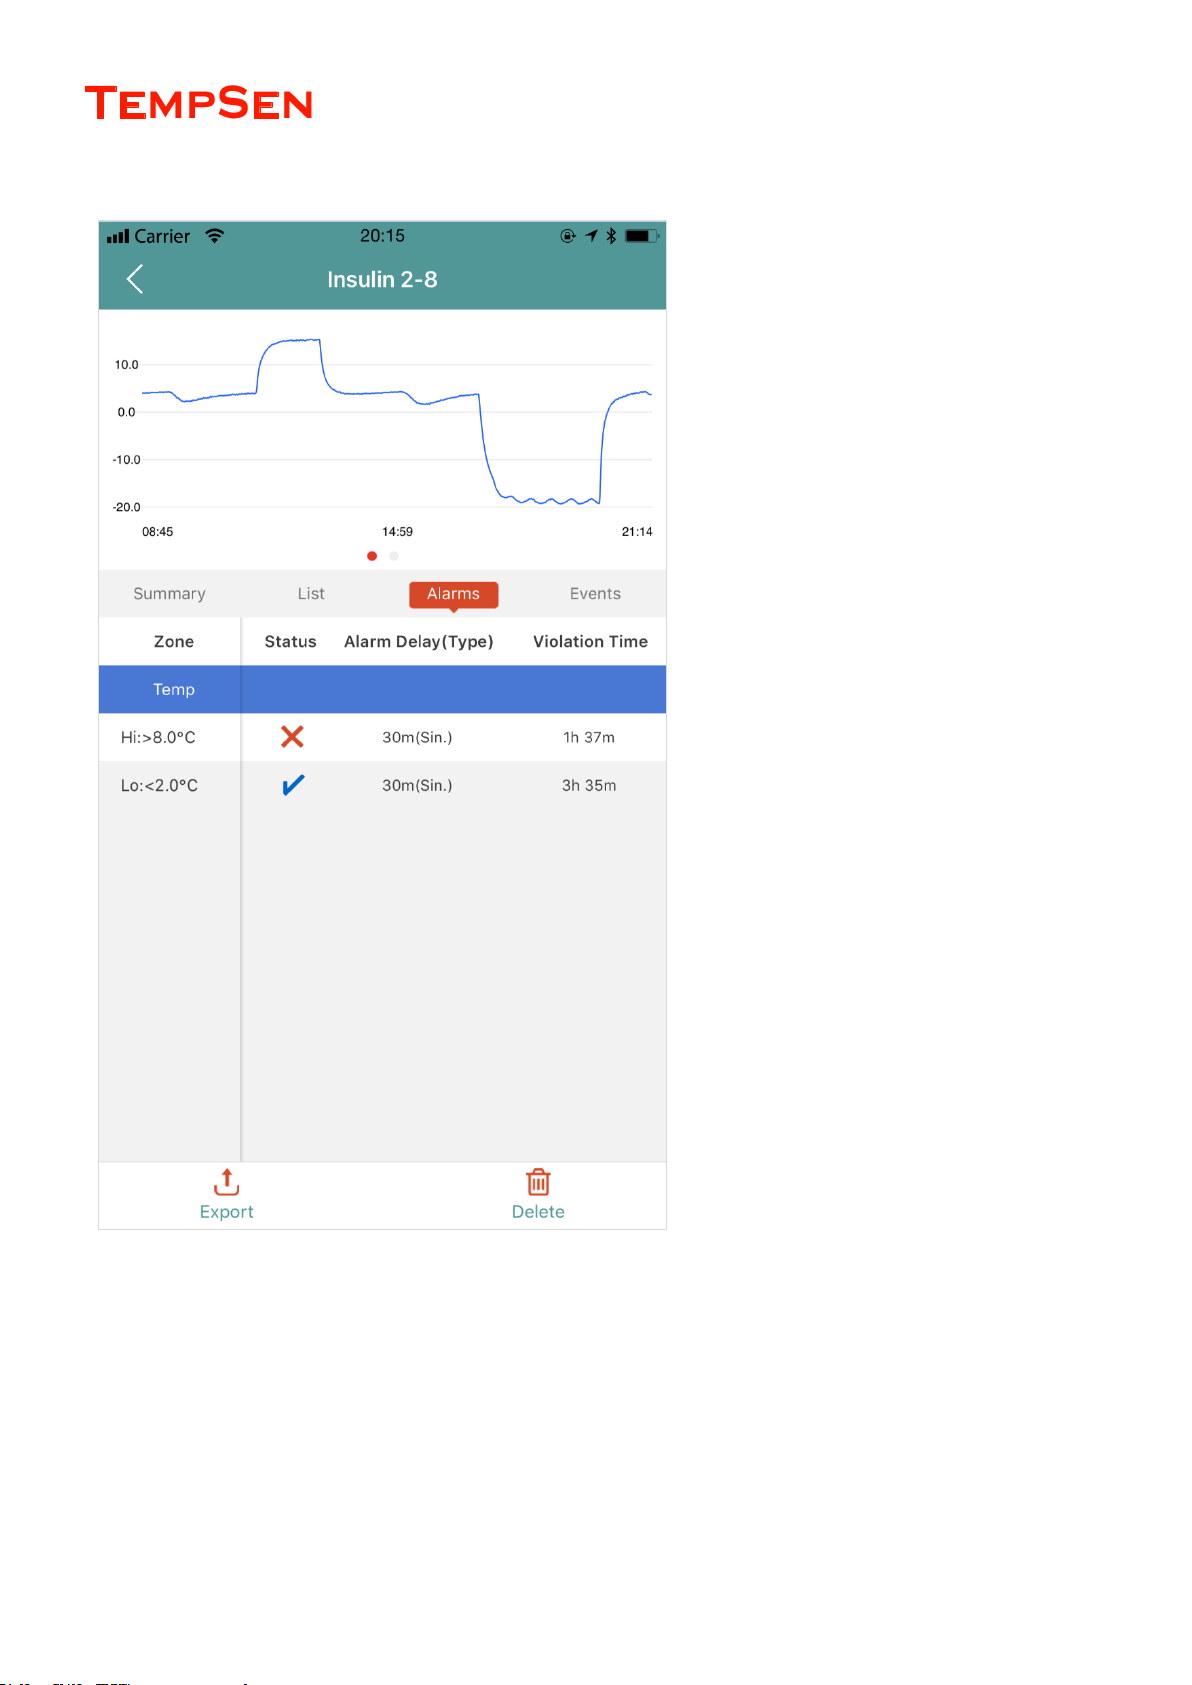
Alarms
Alarms view presents statistics of each alarm zone, slide
right to view more columns.
Page 35
USER MANUAL
UM-PDUB-160217 REV.D Page 35 / 42
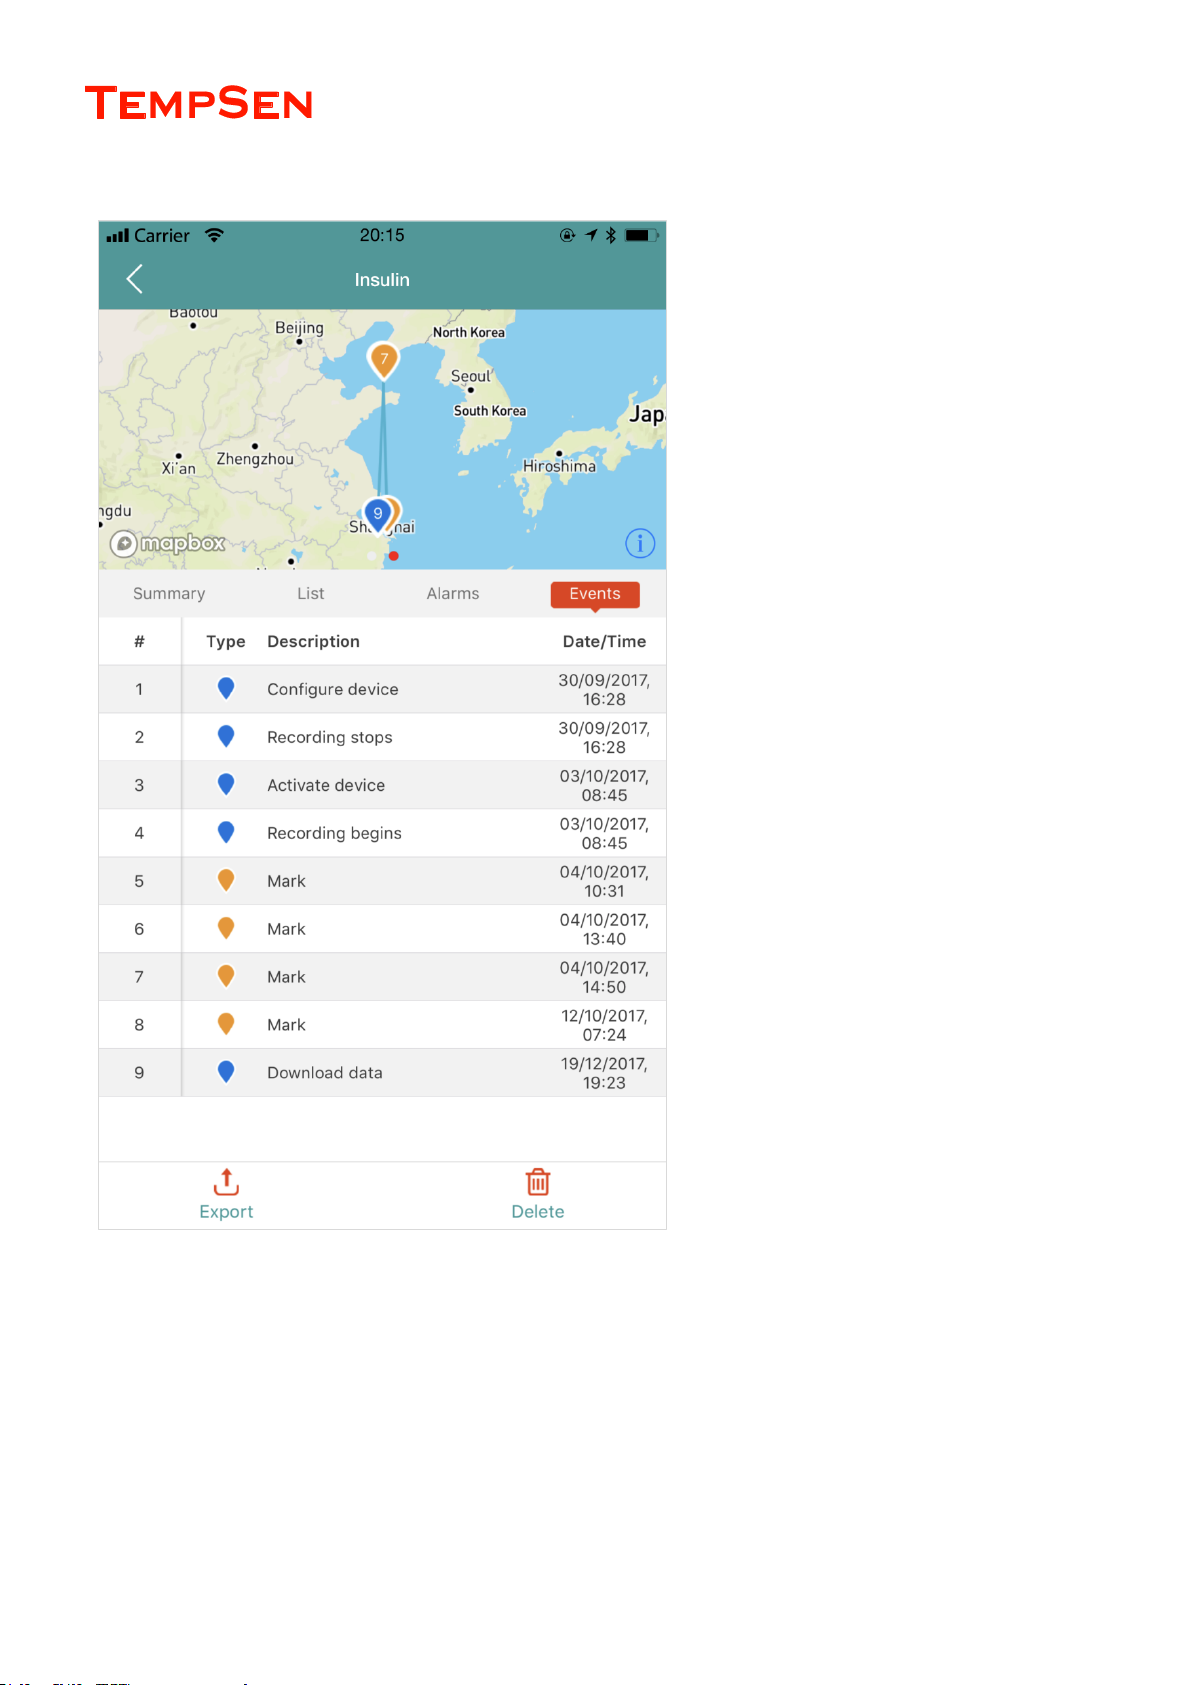
Events
Events view presents all the date/time and location of
each device action event.
Please note location information is only available when
action was performed through smart phone with location
service enabled.
Page 36
USER MANUAL
UM-PDUB-160217 REV.D Page 36 / 42
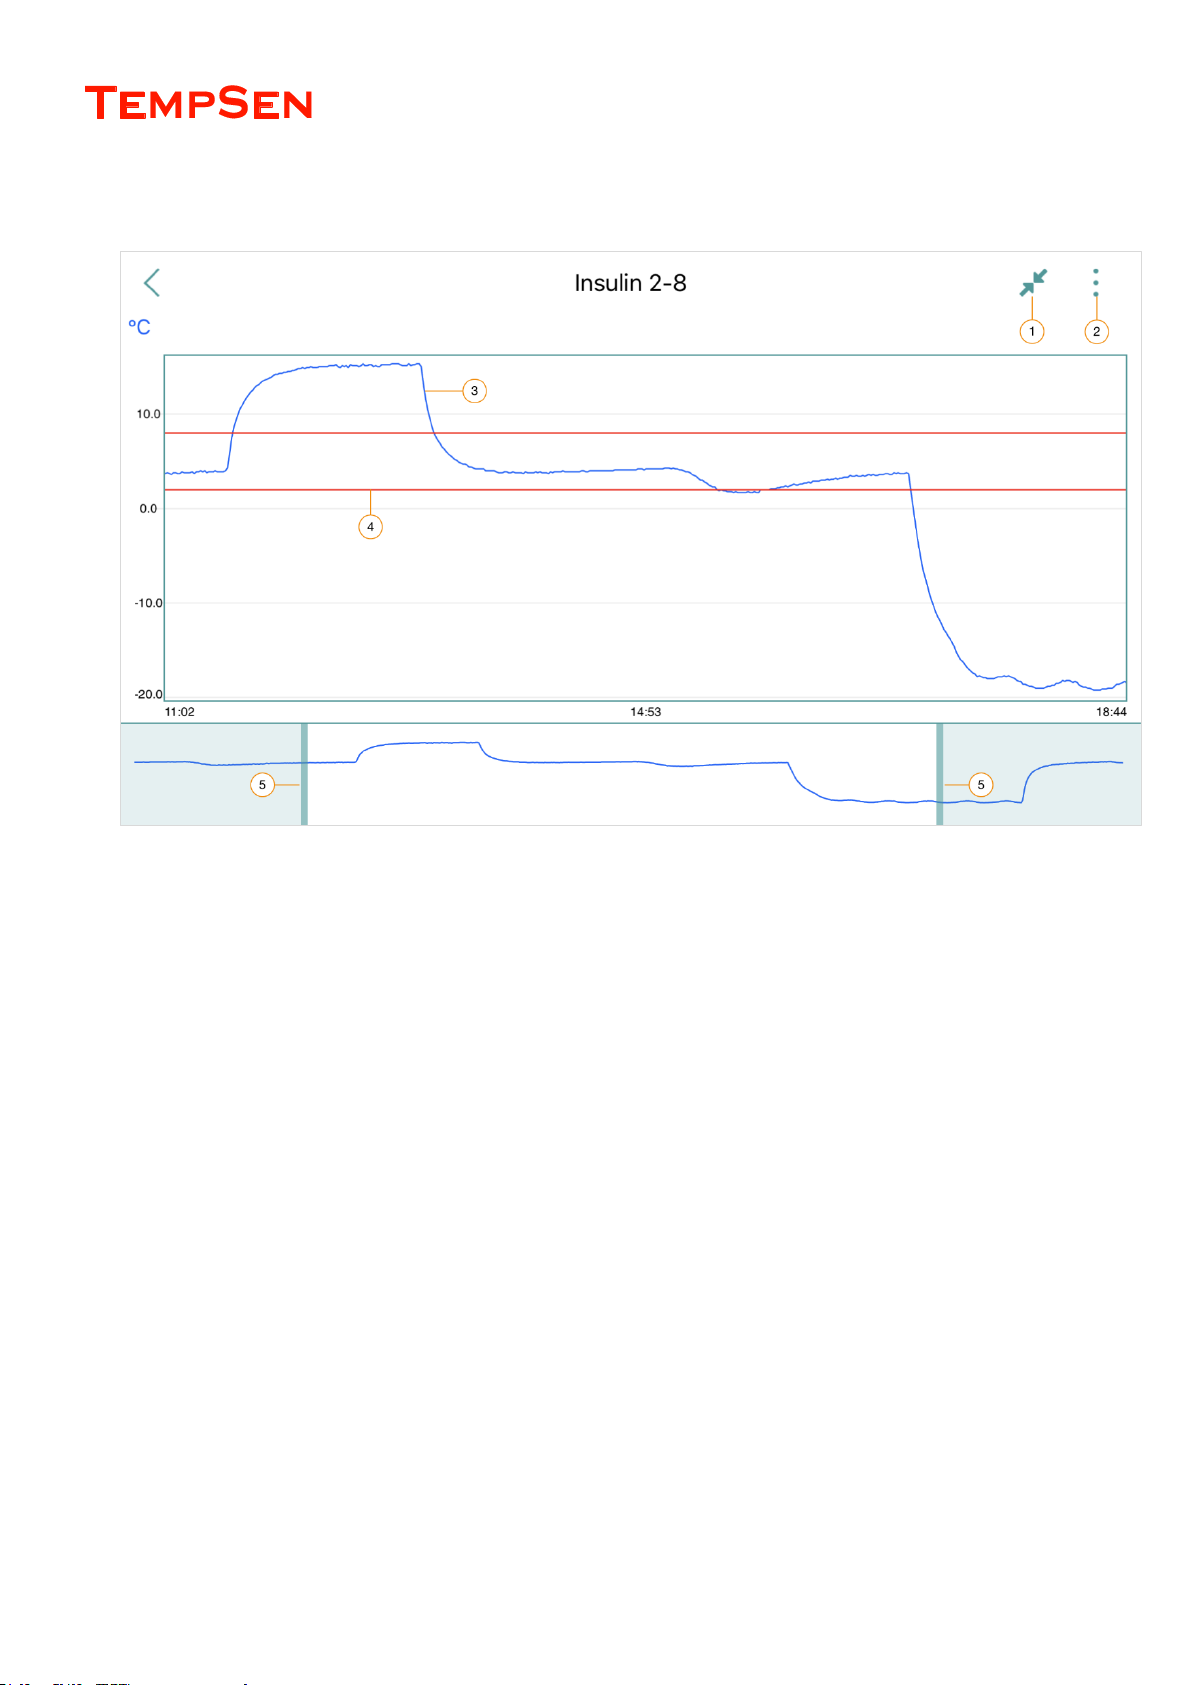
Graph
Tap mini graph to enter into complete graph page.
1. Back to normal view
2. Graph options, tap to select to show/hide data curves and alarm limit lines.
3. Temperature data curve
4. Alarm limit lines
5. Dragging bars, drag to narrow down time range and zoom in a specific graph area
Page 37

USER MANUAL
UM-PDUB-160217 REV.D Page 37 / 42
Settings
Generally settings of TempSen Go APP.
TempSen Cloud
User could login to TempSen Cloud account to sync data saved on the smart device to TempSen Cloud database.
Devices
Configuration Profiles
View / Delete all configuration profiles saved.
Time Zone
Time zone for TempSen Go APP, all time data In TempSen Go APP will be rendered based on Time Zone selected here. You could enable
System Default to use time zone of your local system, or you could choose to select time zone manually.
User Preferences
Temperature Unit
Set default temperature unit for temperature data presented in TempSen Go APP.
Report Settings
Including Tabular Data in PDF report
Including Tabular Data in Excel report
Auto Sync
If enabled, data files saved in local database on your smart device will be sync to TempSen Cloud automatically, pre-requisite is user need to
log into TempSen cloud at first. Sync function require internet connection on your smart device.
Page 38

USER MANUAL
UM-PDUB-160217 REV.D Page 38 / 42
TEMPCENTRE DATA MANAGEMENT
SOFTARE
Please download and install the latest version of TempCentre software from www.tempsen.com/software/tempcentre
How to download TempCentre software?
If it’s your first time to download software from www.tempsen.com, please sign up with the information required prior to downloading, then
an email containing download link would be sent to the mail address you left in couple of minutes.
If you want to download the software from www.tempsen.com again after your successful registration last time, please click “I already
signed up, download now” button in dialog box, then software would begin to download in couple of minutes.
Installing and using TempCentre software
Please refer to TempCentre User Manual for installation and operation instructions of TempCentre software.
Page 39
USER MANUAL
UM-PDUB-160217 REV.D Page 39 / 42
APPENDIX
Error Codes
Error code shows on LCD (or PDF report) when ant of the following errors occurred.
LCD
PDF Report
Error Code
Description
E004
Error 0004
Error 004
Device Rest
E006
Error 006
Start time error
E009
Error 009
Start failure resulted from low battery
E101
Error 101
CFG file checksum error
E102
Error 102
CFG file error, incorrect device model
E104
Error 104
CFG file error, incompatible device version
E105
Error 105
CFG file error, missing or incorrect AccessKey
E106
Error 106
CFG file error, incorrect auto start time
Page 40
USER MANUAL
UM-PDUB-160217 REV.D Page 40 / 42
GLOSSARY
Terms
Explanation
Logging Interval
Unit time required to record one data point.
Start Delay
The time device needs to wait before starting recording after manually activated.
Alarm Delay
Time threshold required for triggering an alarm
Limit Violation
Measurement value goes above high limit or drops below low limit.
Violation Event
A consecutive series of data points over a high limit (or under a low limit) is deemed as a violation
event.
Alarm Zone
Measurement ranges defined by alarm limits.
Trip Number
A unique 10 digits alphanumeric number automatically created for identifying each monitoring task.
Trip Description
A brief note entered by user for describing a monitoring task and shows on data report.
Temperature Start
After logger is manually activated, device starts recording when temperature meets the preset
temperature conditions.
Repeat Start
Repeat Start is an independent option of Startup, if enabled, you could restart Alpha data logger for
next round of monitoring with the same recording parameters of previous recording by pressing
Start/Stop button, no need to program the logger again.
Auto Start
Device automatically starts recording on the specific date/time preset, no need to press Start/Stop
button after configuration.
Page 41

USER MANUAL
UM-PDUB-160217 REV.D Page 41 / 42
WARRANTY
TempSen warrants this TempSen-branded hardware product against defects in materials and workmanship under normal use for a
period of ONE (1) YEAR from shipment date. If a hardware defect arises and a valid claim within the Warranty Period, as its option and
to the extent permitted by law, TempSen will either (1) repair the hardware defect at no charge, using new parts or parts equivalent to
new in performance and reliability, (2) exchange the new product with a product is new or equivalent to new in performance and
reliability and is at least functionally equivalent to the original product, or (3) refund the purchase price of this product. TempSen may
request that you replace defective parts with new or refurbished user-installable parts that TempSen provides in fulfillment of its warranty
obligation. A replacement product or parts, including a user-installable part that has been installed in accordance with instructions
provided by TempSen, assumes the remaining warranty of the original product or ninety (90) days from the date of replacement or
repair, whichever provides longer coverage for you. When a product or part is exchanged, any replacement item becomes your property
and the replaced item becomes TempSen’s property. Parts provided by TempSen in fulfillment it’s warranty obligation must be used in
products for which warranty service is claimed. When a refund is given, the product for which the refund is provided must be returned to
TempSen and becomes TempSen’s property.
EXCLUSIONS AND LIMITATIONS
This Limited Warranty applies only to the hardware product manufactured by or for TempSen that can be identified by the “TempSen”
trademark, trade name, or logo affixed to it. The Limited Warranty does not apply to any non-TempSen hardware product or any
software, even if packaged or sold with the TempSen hardware. Manufacturers, suppliers, publishers, other than TempSen, may provide
their own warranties to the end user purchaser, but TempSen, in so far as permitted by law, provides their products “as is”. Software
distributed by TempSen with or without the TempSen brand name (including, but not limited to system software) is not covered under
this Limited Warranty. Refer to the licensing agreement accompanying the software for details of your rights with respect to its use.
TempSen does not warrant that the operation of product will be uninterrupted or error-free. TempSen is not responsible for the damage
arising from failure to follow instructions relating to the product’s use.
This warranty does not apply: (a) to consumable parts, such as batteries, unless damage has occurred due to a defect in materials or
workmanship; (b) to cosmetic damage, including but not limited to scratches, dents, and broken plastic on ports; (c) to damage caused
with non-TempSen products; (d) to damage caused by accident, abuse, misuse, flood, fire, earthquake, or other external causes; (e) to
damage caused by operating the product outside the permitted or intended uses described by TempSen; (f) to damage caused by
service (including upgrades and expansions) performed by anyone who is not a representative of TempSen or TempSen Authorized
Service Provider; (g) to a product or part that has been modified to alter functionality or capability without the written permission of
TempSen; or (h) if any TempSen serial number has been removed or defaced.
IMPORTANT: DO NOT OPEN THE HARDWARE PRODUCT. OPENING THE HARDWARE PRODUCT MAY CAUSE DAMAGE THAT IS
NOT COVERED BY THIS WARRANTY. ONLY TEMPSEN OR AN AUTHORIZED SERVICE PROVIDER SHOULD PERFORM SERVICE
ON THIS HARDWARE PRODUCT.
Page 42
USER MANUAL
UM-PDUB-160217 REV.D Page 42 / 42
REVISION HISTORY
Revision
Date
Details A 2017-09-29
First version
TempSen Electronics Company
T: +86 21 6768 5210
F: +86 21 6768 5232
E: [email protected]
www.tempsen.com
Technical Support
[email protected]
Copyright© 2017-2018, TempSen Electronics Company
 Loading...