

Page 1
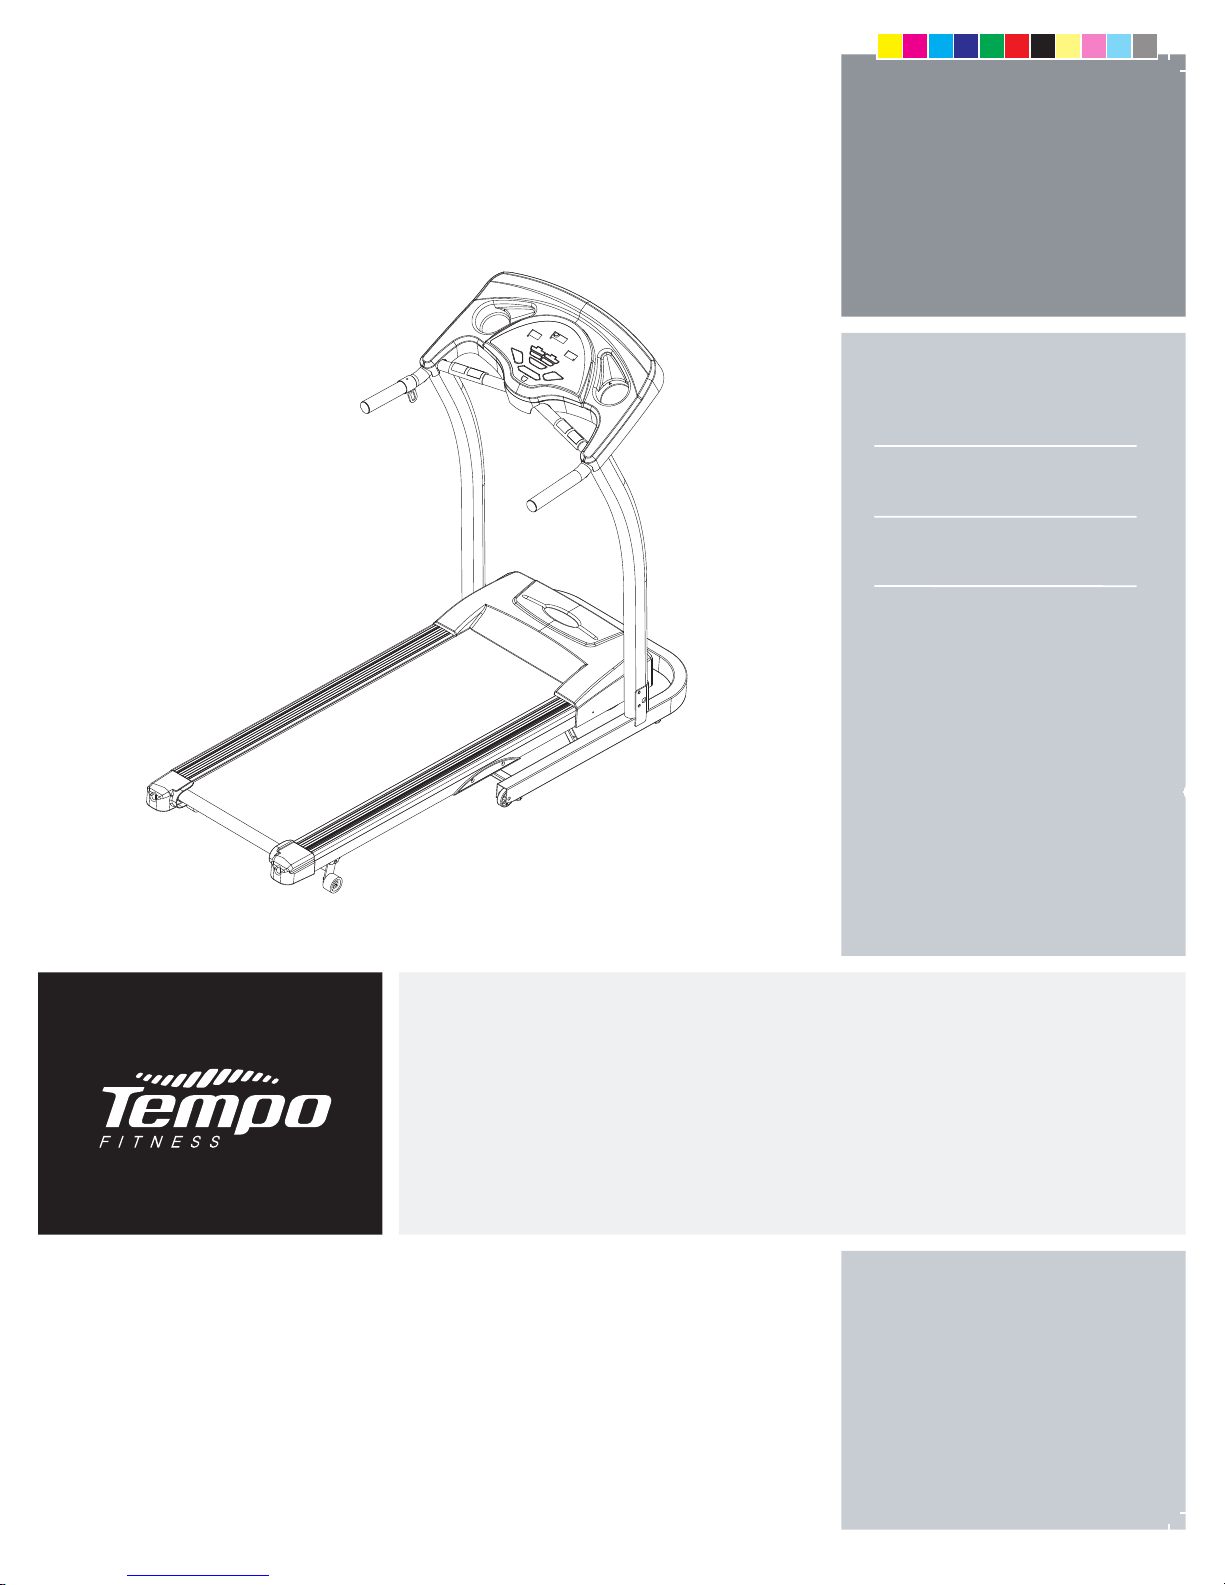
TREADMILL U S E R ’ S GUIDE
FOR MODEL :
T921
T931
T920 & T930 OM.indd 1 2006/6/5 3:37:22 PM
Page 2

T920 & T930 OM.indd 2 2006/6/5 3:37:23 PM
Page 3
3
INTRODUCTION
IMPORTANT
PRECAUTIONS
BEFORE
YOU BEGIN
TREADMILL
OPERATION
CONDITIONING
GUIDELINES
TROUBLESHOOTING
& MAINTENANCE
LIMITED
WARRANTY
CONGRATULATIONS! on choosing your treadmill. You’ve taken an important step in developing and
sustaining an exercise program! Your treadmill is a tremendously effective tool for achieving your personal
fitness goals. Regular use of your treadmill can improve the quality of your life in so many ways.
Whether your goal is to win races or simply enjoy a fuller, healthier lifestyle. This treadmill can help
you attain it – adding club-quality performance to your at-home workouts, with the ergonomics and
innovative features you need to get stronger and healthier, faster. Because we're committed to designing
fitness equipment from the inside out, we use only the highest quality components.
You want exercise equipment that offers the most comfort, the best reliability and the highest quality
in its class.
IN TRODU CT IO N
Important Precautions
Before You Begin
Treadmill Operation
Conditioning Guidelines
Troubleshooting & Maintenance
Limited Warranty
4
6
9
13
17
20
TA B LE OF CO NT E N TS
T920 & T930 OM.indd 3 2006/6/5 3:37:23 PM
Page 4
4
NOI
TCUDOR
TNI
TNATROP
M
I
SNOI
TU
ACERP
EROFEB
NIGEB UOY
LL
I
MDAERT
NOI
TAREPO
DETIMIL
YTNARRA
W
GNITOOHSELBUORT
ECNANETNIAM
&
GNINOITIDNOC
S
EN
ILEDIUG
SAVE THESE INSTRUCTIONS
Connect this exercise product to a properly grounded outlet only. See grounding
instructions.
GROUNDING INSTRUCTIONS
This product must be grounded. If a treadmill should malfunction or breakdown, grounding provides a path
of
least resistance for electrical current to reduce the risk of electrical shock. This product is equipped with
a cord having an equipment-grounding conductor and a grounding plug. The plug must be plugged into an
appropriate
outlet that is properly installed and grounded in accordance with local codes and ordinances.
Improper
connection of the equipment-grounding conductor can result in a risk of
electric shock. Check with a qualified electrician or serviceman if you are in doubt
as
to whether the product is properly grounded. Do not modify the plug provided
with
the product. If it will not fit the outlet, have a proper outlet installed by a
qualified
electrician.
This
product is for use on a normal circuit and has a grounding plug. This product must be used on a
dedicated
circuit. To determine if you are on a dedicated circuit, shut off the power to that circuit and
observe
if any other devices lose power. If so, move devices to a different circuit.
Note: There are usually multiple outlets on one circuit. It is recommended that the treadmill be used with a
minimum 15
amp (100V & 110V) and 10 amp (220V & 240V) circuit for optimal performance.
IM PORTA NT PRECA UT IO NS
WARNING
WARNING
T920 & T930 OM.indd 4 2006/6/5 3:37:24 PM
When using an electrical product, basic precautions should always be followed, including the following:
Read
all instructions before using this treadmill. It is the responsibility of the owner to ensure that all users
of
this treadmill are adequately informed of all warnings and precautions.
Page 5
5
NOITCUDORTNI
TNATROP
M
I
SNOITUACERP
EROF
EB
NIGEB UOY
LL
I
MD
AERT
NOITAREPO
GNINOIT
IDNOC
SENILEDIUG
GNITOOHSELBUORT
ECNANETNIA
M
&
DET
I
MI
L
YTNARR
A
W
To reduce the risk of burns, fire, electrical shock or injury to persons:
• Never use the treadmill before securing the safety tether clip to your clothing.
• If you experience any kind of pain, including but not limited to chest pains, nausea, dizziness, or shortness
of
breath, stop exercising immediately and consult your physician before continuing.
• Do not wear clothes that might catch on any part of the treadmill.
• Always wear athletic shoes while using this equipment.
• Do not jump on the treadmill.
• Keep power cord away from heated surfaces.
• Do not insert or drop any object into any opening.
• Unplug treadmill before moving or cleaning it. To clean, wipe surfaces down with soap and slightly damp
cloth only; never use solvents. (See MAINTENANCE)
• At no time should more than one person be on treadmill while in operation.
• The treadmills should not be used by persons weighing more than 250 lbs / 113 kg. Failure to comply
will
void the warranty.
• The treadmills are intended for in-home use only. Do not use this treadmill in any commercial, rental,
school
or institutional setting. Failure to comply will void the warranty.
• Do not use treadmill in any location that is not temperature controlled, such as but not limited to garages,
porches,
pool rooms, bathrooms, car ports or outdoors. Failure to comply may void the warranty.
• Use the treadmill only as described in this manual.
OTHER SAFETY TIPS FOR YOUR TREADMILL
OPERATION
IMPOR
TANT:
It is essential that your treadmill is used only indoors, in a climate controlled room. If your treadmill has been
exposed to colder temperatures or high moisture climates, it is strongly recommended that the treadmill is
warmed
up to room temperature before first time use. Failure to do so may cause premature electronic failure.
At NO time should pets or children under the age of 12 be closer to the treadmill than 10 feet
(3
meter).
At
NO time should children under the age of 12 use the treadmill.
Children over 12 should recieve adult supervision and guidance.
WARNING
WARNING
T920 & T930 OM.indd 5 2006/6/5 3:37:25 PM
To reduce the risk of damaging important components on your treadmill, it is strongly
recommended
that your treadmill is plugged into a dedicated circuit, without the use
of an additional extension cord and/or power strip. Failure to comply may void the
warrant
y.
Page 6
6
NOI
TCUDOR
TNI
TNATROP
M
I
SNOI
TU
ACERP
ERO
FEB
NIGEB UOY
L
LI
MDAERT
NO
IT
AREPO
DETIMIL
Y
TN
ARRA
W
GNI
TOOH
SELBUOR
T
ECN
ANETNIAM
&
GNINOI
TIDNOC
S
EN
ILEDIUG
BEFOR E YO U BE G I N
HERE ARE JUST A FEW OF THE HEALTH BENEFITS OF EXERCISE:
• Weight Loss
• A Healthier Heart
• Improved Muscle Tone
• Increased Daily Energy Levels
The
key to reaping these benefits is to develop an exercise habit. Your new treadmill will help you eliminate
obstacles
that prevent you from exercising. Inclement weather and darkness won't interfere with your
workout
when you use your treadmill in the comfort of your home. This guide provides you with basic
information
for using and enjoying your new machine.
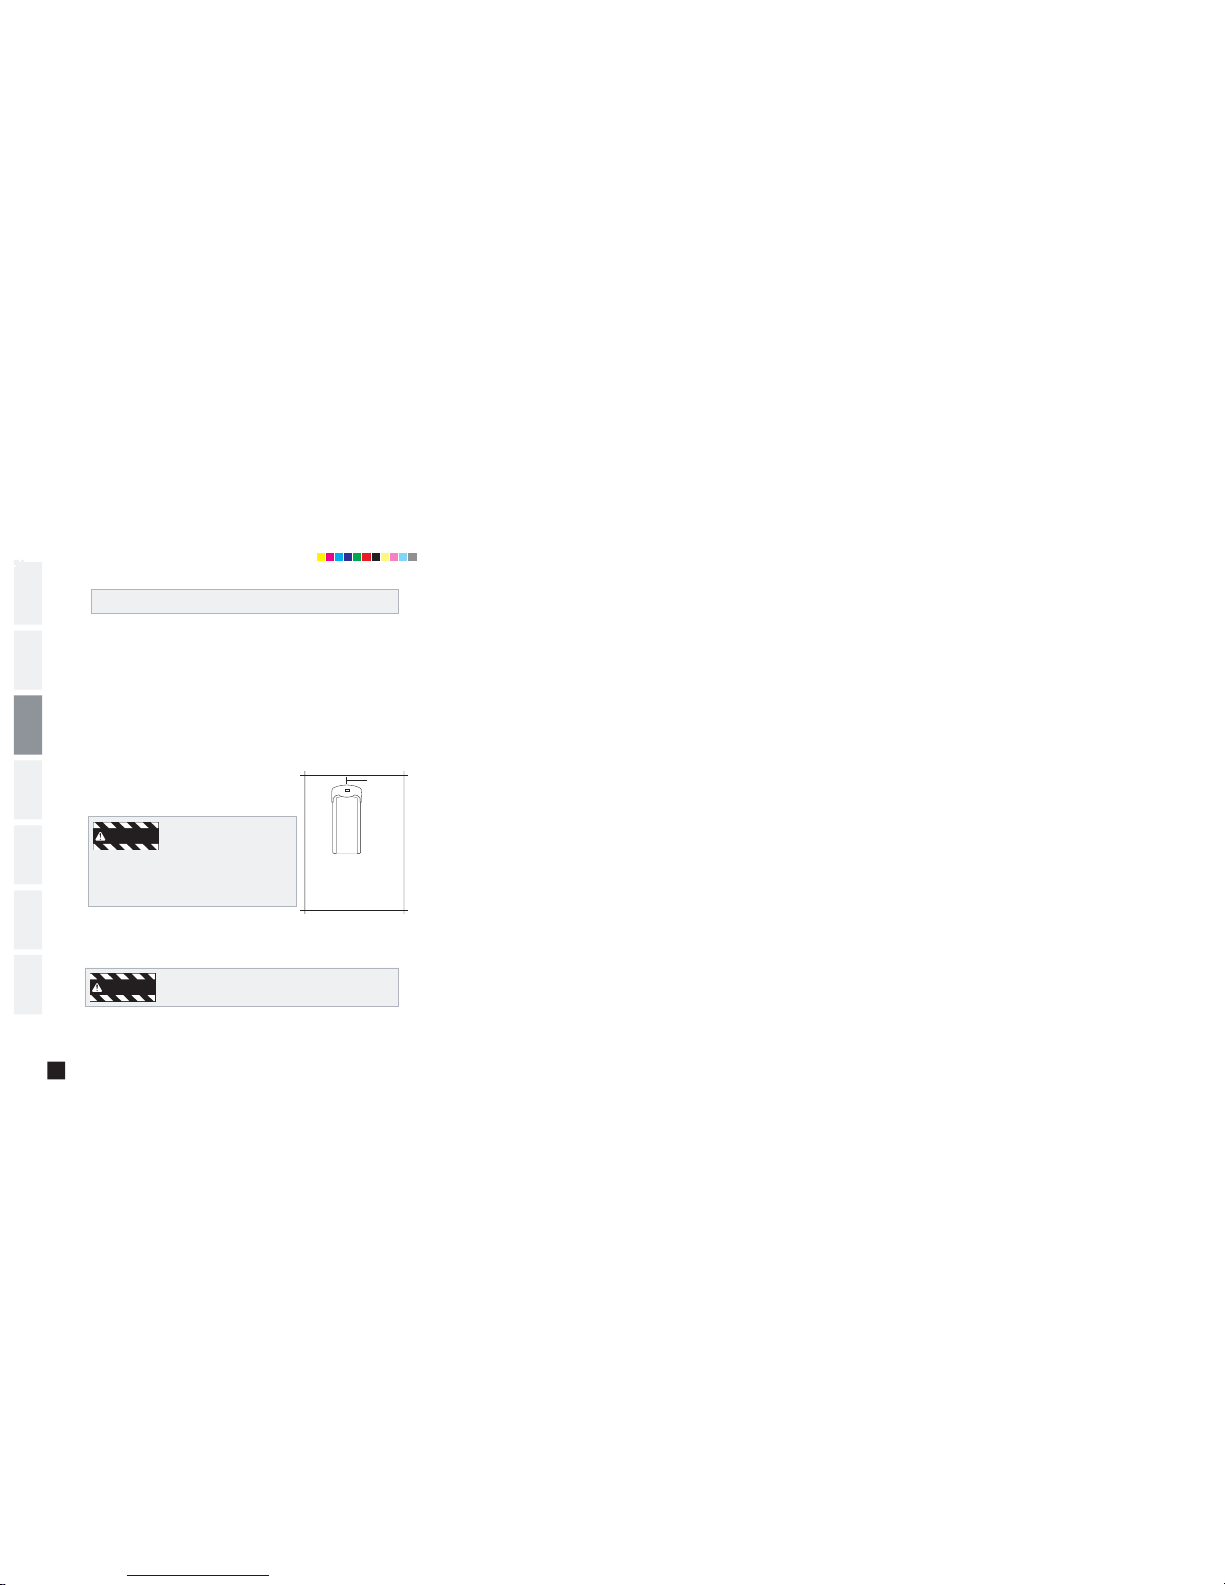
LOCATION OF THE TREADMILL
Place the treadmill on a level surface. There should be 6 feet of clearance
behind
the treadmill, 3 feet on each side and one foot in front for folding
and
the power cord. Do not place the treadmill in any area that will block
any
vent or air openings.
DO NOT STAND ON THE BELT
While you are preparing to use the treadmill, do not stand on the belt.
Place
your feet on the side rails before starting the treadmill. Start
walking
on the belt only after the belt has begun to move. Never start the
treadmill at a fast running speed and attempt to jump on!
SAFETY KEY
Your treadmill will not start unless the safety key is placed in position. Attach the clip end securely to your
clothing.
This safety key is designed to cut the power to the treadmill if you should fall. Check the operation
of
the safety key every 2 weeks.
NEVER
USE THE TREADMILL WITHOUT SECURING THE SAFETY KEY CLIP TO YOUR
CLOTHING.
PULL ON THE SAFETY KEY CLIP FIRST TO MAKE SURE IT WILL NOT
COME OFF YOUR CLOTHING.
WARNIN G
3 feet
6 feet
(183cm)
3 feet (91cm)
1 foot (30cm)
WARNIN G
T920 & T930 OM.indd 6 2006/6/5 3:37:25 PM
Page 7
7
NOITCUDORTNI
TNATROP
M
I
SNOITUACERP
EROF
EB
NIGEB UOY
LL
I
MD
AERT
NOITAREPO
GNINOIT
IDNOC
SENILEDIUG
GNITOOHSELBUORT
ECNANETNIA
M
&
DET
I
MI
L
YTNARR
A
W
WARNING
WARNING
PROPER USAGE
Your treadmill is capable of reaching high speeds. Always start off using a slower speed and adjust the speed in
small
increments to reach a higher speed level. Never leave the treadmill unattended while it is running. When
not
in use, remove the safety key, turn the on/off switch to off and unplug the power cord. Make sure to follow
the
MAINTENANCE schedule in this manual. Keep your body and head facing forward. Do not attempt to turn
around
or look backwards while the treadmill is running. Stop your workout immediately if you feel pain, faint,
dizzy
or are short of breath.
Do not operate the treadmill if the power cord or plug is damaged.
If
the treadmill appears to not be working properly, do not use the treadmill.
Our
Treadmills are heavy, use care and additional help if necessary when moving.
Do not attempt to move or transport treadmill unless it is in the upright, folded
position with the lock latch secured. Failure to follow these instructions could
result
in injury.
T920 & T930 OM.indd 7 2006/6/5 3:37:27 PM
FOLDING
Firmly grasp the back end of the treadmill. Carefully lift the end of the treadmill deck into the upright position
until
the lock latch is securely engaged. Make sure the deck is securely latched before letting go. To unfold,
firmly
grasp the back end of the treadmill. Gently release the lock latch with your hand until it disengages.
Carefully
lower the deck to the ground.
MOVING
Your treadmill has a pair of transport wheels built into the frame. To move, make sure the treadmill is folded
and
securely latched. Then firmly grasp the handlebars, tilt the treadmill back and roll.
Page 8
8
NOI
TCUDOR
TNI
TNATROP
M
I
SNOI
TU
ACERP
ERO
FEB
NIGEB UOY
L
LI
MDAERT
NO
IT
AREPO
DETIMIL
Y
TN
ARRA
W
GNI
TOOH
SELBUOR
T
ECN
ANETNIAM
&
GNINOI
TIDNOC
S
EN
ILEDIUG
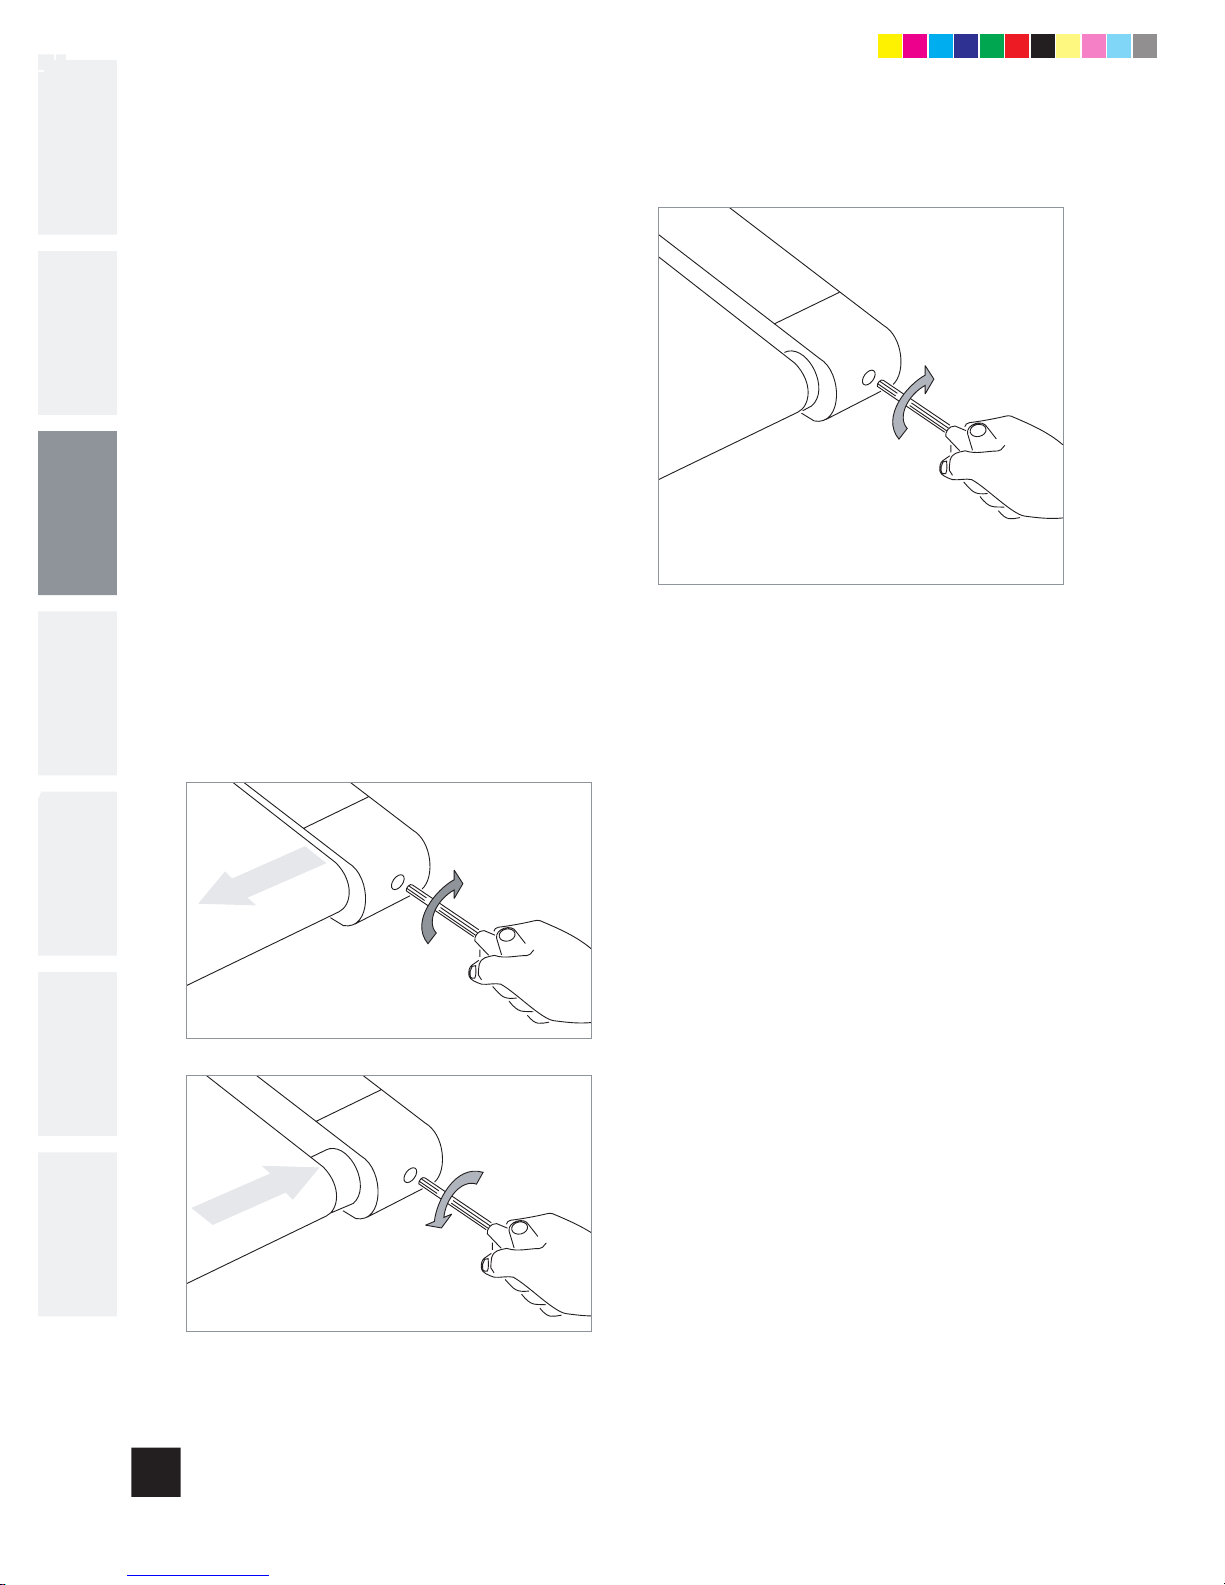
CENTERING THE RUNNING BELT
The running belt has been properly adjusted at the
factory
before it was shipped. At times the belt can
move
off-center during shipment. Before operating the
treadmill,
make sure the belt is centered and remains
centered
to maintain smooth operation.
CAUTION:
Do not run belt faster than
1 mph (1.5 km/h) while centering. Keep fingers, hair
and
clothing away from belt at all times.
If the running belt is too far to the right side:
With the treadmill running at 1 mph (1.5 km/h) ,
turn
the right adjustment bolt clockwise 1/4 TURN at
a time (using the supplied Allen wrench). Check the
belt
alignment. Allow belt to run a full cycle to gauge if
more adjustment is needed. Repeat if necessary, until
the
belt remains centered during use.
If the running belt is too far to the left side:
With the treadmill running at 1 mph (1.5 km/h), turn
the
right adjustment bolt counter-clockwise 1/4 TURN
at
a time (using the supplied Allen wrench). Check the
belt
alignment. Allow belt to run a full cycle to gauge if
more adjustment is needed. Repeat if necessary, until
the
belt remains centered during use.
Belt is too far to the right side
Belt is too far to the left side
TENSIONING THE RUNNING BELT
The running belt has been properly adjusted at the
factory
before it was shipped. At times the belt can
move
off-center during shipment.
CAUTION: Running
belt should NOT be moving during
tensioning.
Over-tightening the running belt can
cause
excessive wear on the treadmill as well as its
components. Never
over-tighten the belt.
If
you can feel a slipping sensation when running on the
treadmill,
the running belt must be tightened. In most
cases,
the belt has stretched from use, causing the
belt
to slip. This is a normal and common adjustment.
To eliminate this slipping, TURN THE TREADMILL OFF
and
tension BOTH THE REAR ROLLER BOLTS using the
supplied
Allen wrench, turning them 1/4 TURN to the
right
as shown. Turn the treadmill on and check for
slipping.
Repeat if necessary, but NEVER TURN the
roller
bolts more than 1/4 turn at a time. Belt is properly
tensioned
when the slipping sensation is gone.
T920 & T930 OM.indd 8 2006/6/5 3:37:29 PM
Page 9
9
NOITCUDORTNI
TNATROP
M
I
SNOITUACERP
EROF
EB
N
IG
EB
UOY
LLIMDAERT
NOITAREPO
GNINOI
TIDNOC
S
ENI
L
ED
IUG
GN
ITOOHS
E
LBU
OR
T
ECN
ANETN
I
A
M
&
DETIMIL
Y
TN
ARRA
W
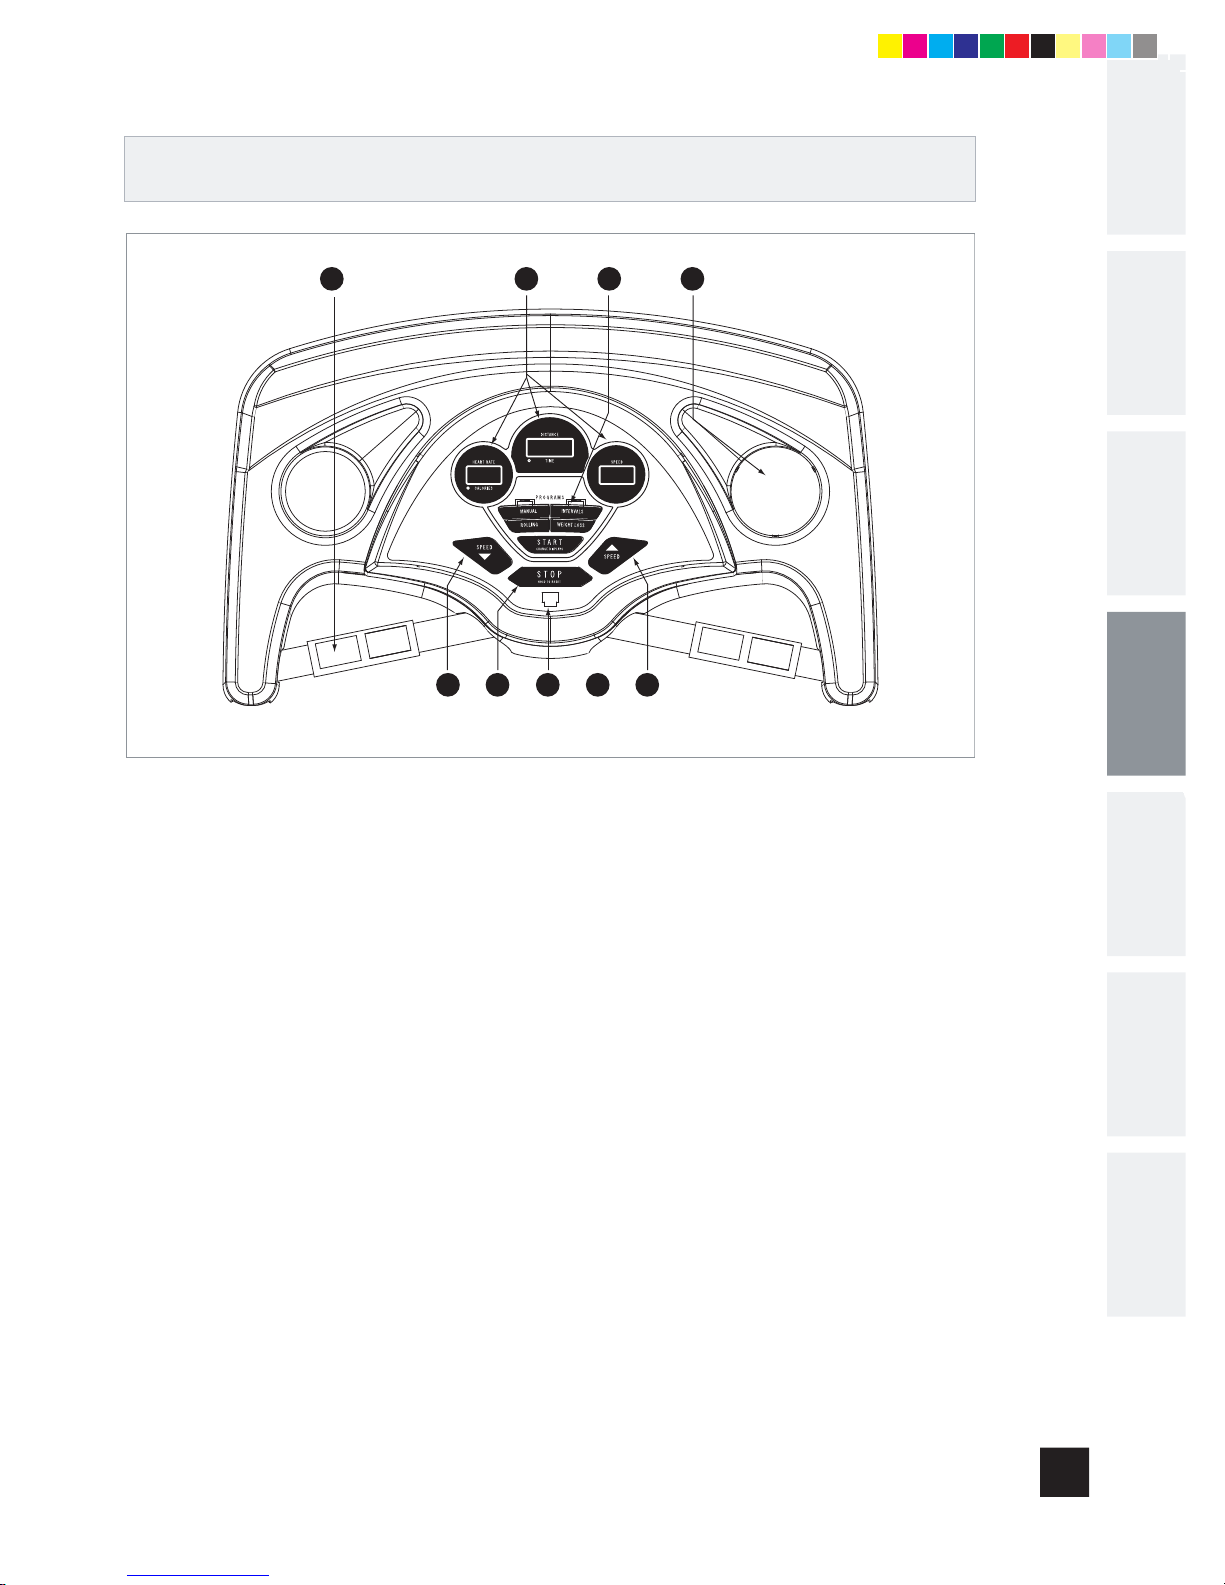
Note: There is a thin protective sheet of clear plastic on the overlay of the console and should be removed.
A)
MONITOR DISPLAY:
Speed, Time, Heart Rate, Calories, Distance and Incline (T931 Only).
B) STOP:
Press to pause/end your workout. Hold for 3 seconds to reset the treadmill.
C) START:
Simply press to begin exercising, start your program or change the display.
D) SPEED ARROW KEYS:
Used to adjust speed in small increments.
E) SAFETY KEY POSITION:
Enables treadmill when safety key is engaged.
F) QUICK PROGRAM KEYS:
Press key to select program.
H) WATER BOTTLE / CD / MP3 HOLDERS: Holds personal workout equipment.
G) HANDGRIP HEART RATE READING: The simple way to monitor your intensity as you exercise.
TR EADMI LL OP ER AT ION
A
B C D1E
F HG
D2
T920 & T930 OM.indd 9 2006/6/5 3:37:30 PM
* On T931, D2 is an incline botton
Page 10
10
NOI
TCUDOR
TNI
TNATROP
M
I
SNOI
TU
ACERP
EROF
EB
N
IG
EB
UOY
LLIMDAERT
N
OIT
AREPO
DETIMIL
YTNARRAW
GNITOOHSELBUORT
ECNAN
E
TNIA
M
&
GN
INOITIDNOC
SENILEDIUG
SPEED • Indicates how fast your walking or running surface is moving.
TIME • Shown as Minutes:Seconds. View the time remaining or the time elapsed in your workout.
HEART RATE • Shown as Beats Per Minute. Used to monitor your heart rate (displayed when contact is
made).
DISTANCE • Indicates distance traveled during your workout.
CALORIES • Total Calories burned during your workout.
MANUAL: Allows “On The Fly” manual speed and incline changes. Time-based goal.
INTERVALS: Walk or run a series of alternating paced speed levels. Time-based goal.
ROLLING: Creates the feel of walking or running over hills. Time-based goal.
WEIGHT LOSS: Keeps user in their optimal fat burning zone.
MO NI TO R DI SPL AY
HE AR T RA TE
AV AIL AB LE P RO GR AMS
T920 & T930 OM.indd 10 2006/6/5 3:37:30 PM
HAND GRIP SENSORS
How
to Use:
Place the palm of your hands directly on the grip pulse handlebars. Both hands must grip the bars for your
heart rate to register. It takes 5 consecutive heart beats (15-20 seconds) for your heart rate to register.
When gripping the pulse handlebars, do not grip tightly. Holding the grips tightly may elevate your blood
pressure. Keep a loose, cupping hold. You may experience an erratic readout if consistently holding the
grip pulse handlebars. Make sure to clean the pulse sensors to ensure proper contact can be maintained.
Page 11
11
NOITCUDORTNI
TNATROP
M
I
SNOITUACERP
EROF
EB
N
IG
EB
UOY
LLIMDAERT
NOITAREPO
GNINOI
TIDNOC
S
ENI
L
ED
IUG
GN
ITOOHS
E
LBU
OR
T
ECN
ANETN
I
A
M
&
DETIMIL
Y
TN
ARRA
W
Check to make sure no objects are placed on the belt that will hinder the movement of
the
treadmill.
Plug
in the power cord and turn the treadmill ON.
Stand
on the side rails of the treadmill.
Attach
the safety key clip to part of your clothing.
Insert
the safety key into the safety keyhole in the console.
You have two options to start your workout:
QUICK
START UP
Simply press the START key to begin working out. OR...
SELECT A PROGRAM
Select a PROGRAM using one of the QUICK PROGRAM keys (MANUAL, INTERVALS, ROLLING, or
WEIGHT
LOSS).
SELECT A TIME
Select a Time using the ARROW keys or use the default time.
Once
a TIME has been chosen, press START.
TO RESET CONSOLE:
Hold STOP key for 3 seconds.
FINISHING YOUR WORKOUT
When your workout is complete, the MONITOR DISPLAY will flash and beep. Your workout information will
stay
displayed on the console for 30 seconds and then reset.
TO CHANGE THE DATA DISPLAY
To read all function windows, press the CHANGE DISPLAY button. This scan the function display in each
windo
w, Speed and Time - Pulse Rate and Distance - Calories and incline (Please Note-Incline will only be
displayed
on T931 only, T921 has manual incline adjustment).
GE TT IN G ST ART ED / S EL EC TIN G A PR OG RA M
1)
2)
3)
4)
5)
6)
A)
B)
C)
T920 & T930 OM.indd 11 2006/6/5 3:37:30 PM
Page 12
12
NOI
TCUDOR
TNI
TNATROP
M
I
SNOI
TU
ACERP
EROF
EB
N
IG
EB
UOY
LLIMDAERT
N
OIT
AREPO
DETIMIL
YTNARRAW
GNITOOHSELBUORT
ECNAN
E
TNIA
M
&
GN
INOITIDNOC
SENILEDIUG
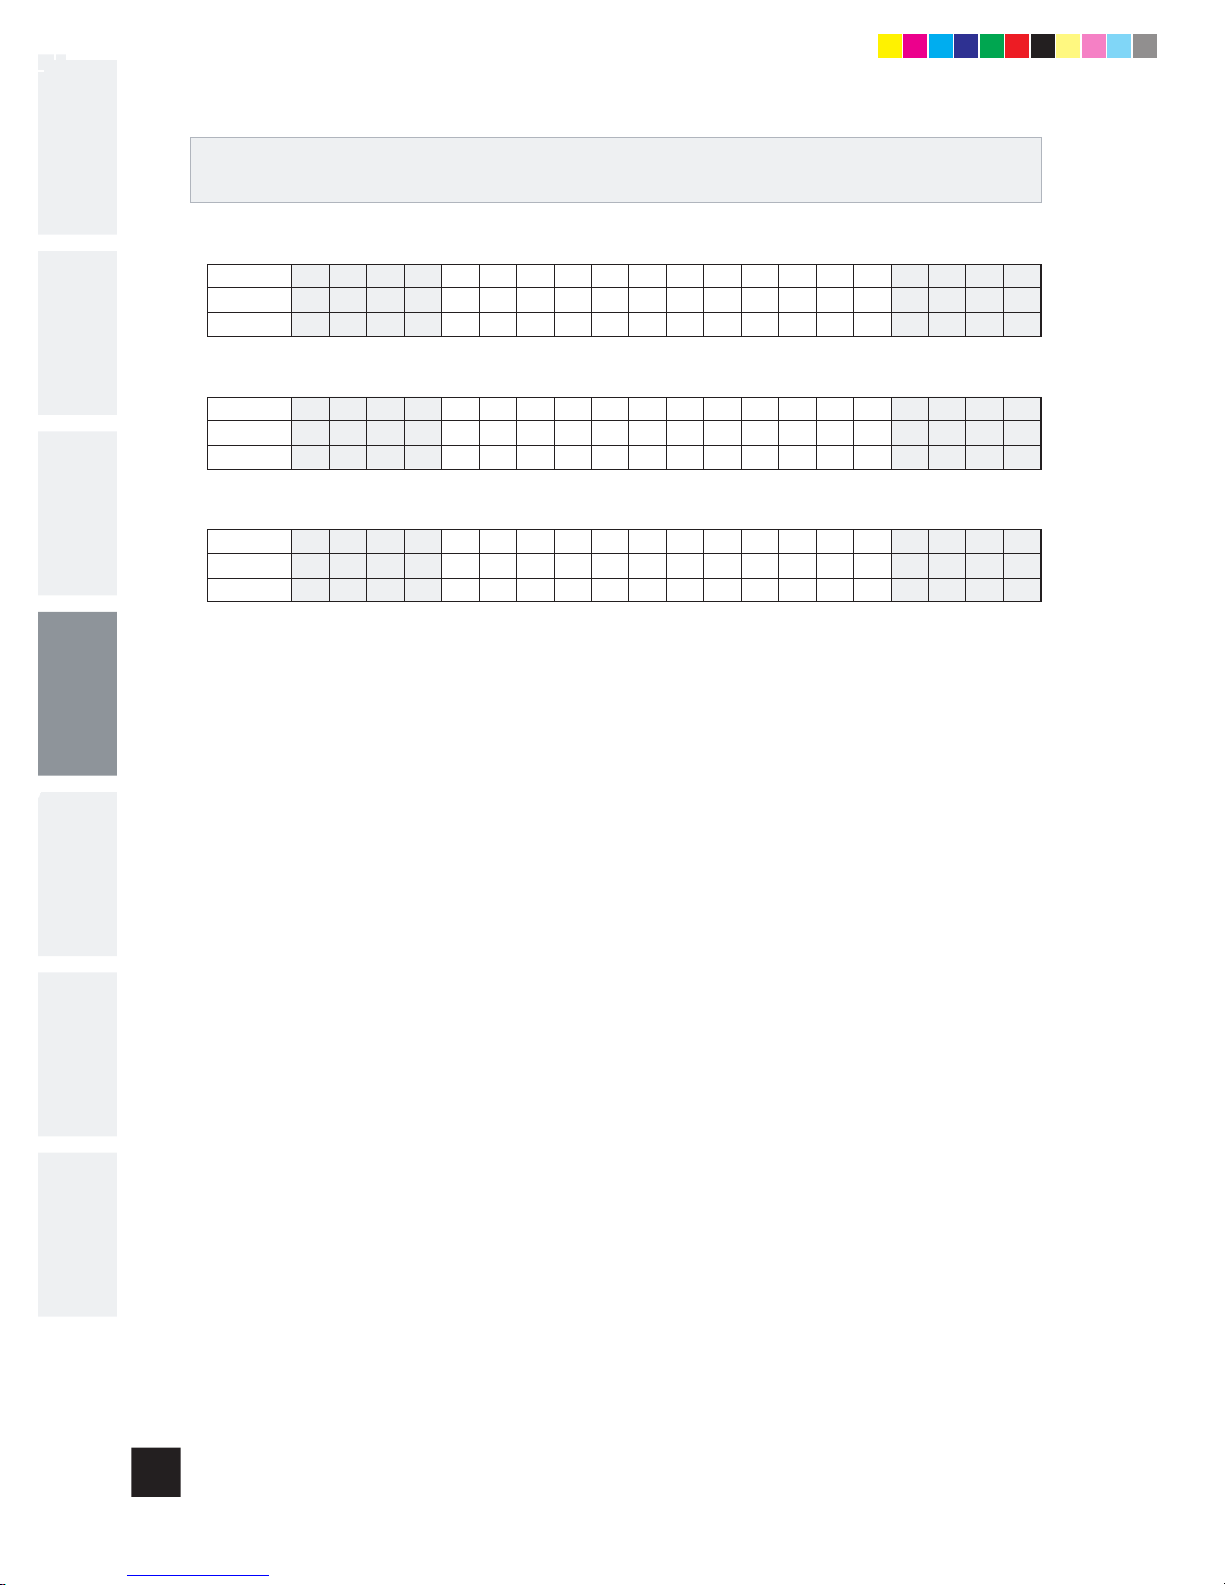
PR OGRAM PR OF IL ES
SEGMENT
SPEED(MPH)
SPEED(KMH)
INTERVALS (SPEED CHANGES, TIME DEFAULTS TO 20 MINUTES)
1 2 3 4 5 6 7 8 9 1 0 11 12 13 14 15 16 17 18 19 2 0
2 2 2 3 2 5 2 5 3 5 3 5 2 4 2 4 2 2 2
2
3 3 3 4. 5 3 7. 5 3 7.5 4. 5 7.5 4.5 7. 5 3 6 3 6 3 3 3
3
SEGMENT
SPEED(MPH)
SPEED(KMH)
ROLLING (SPEED CHANGES, TIME DEFAULTS TO 20 MINUTES)
1 2 3 4 5 6 7 8 9 1 0 11 12 13 14 15 16 17 18 19 2 0
2 2 2 2 2 3 4 5 4 3 2 3 4 5 4 3 3 2 2
2
3 3 3 3 3 4 .5 6 7. 5 6 4.5 3 4.5 6 7.5 6 4. 5 4.5 3 3
3
SEGMENT
SPEED(MPH)
SPEED(KMH)
WEIGHT LOSS (SPEED CHANGES, TIME DEFAULTS TO 20 MINUTES)
1 2 3 4 5 6 7 8 9 1 0 11 12 13 14 15 16 17 18 19 2 0
2 2 2 3 2 3 3 4 4 3 3 4 4 3 3 4 3 3 2
2
3 3 3 4. 5 3 4. 5 4 .5 6 6 4.5 4.5 6 6 4 .5 4.5 6 4.5 4.5 3
3
T920 & T930 OM.indd 12 2006/6/5 3:37:31 PM
Note:
All programs have 20 segments of time. The first 4 segments of any program you choose are of 1 minute each,
giving a 4 minutes “Warm-up”
The last 4 segments of any program you choose are of 1 minute each, giving a 4 minutes “Cool down”
The remaining segments are divided exactly into the remaining time to give 12 equally timed training segments.
Page 13
13
INTRODUCTION
IMPORTANT
PRECAUTIONS
BEFORE
YOU BEGIN
TREADMILL
OPERATION
CONDITIONING
GUIDELINES
TROUBLESHOOTING
& MAINTENANCE
LIMITED
WARRANTY
ALWAYS CONSULT YOUR PHYSICIAN BEFORE BEGINNING AN EXERCISE PROGRAM.
HOW OFTEN? (Frequency of Workouts)
The American Heart Association recommends that you exercise at least 3 to 4 days per week to maintain
cardiovascular fitness. If you have other goals such as weight or fat loss, you will achieve your goal faster with
more frequent exercise. Whether it’s 3 days or 6 days, remember that your ultimate goal should be to make
exercise a lifetime habit. Many people are successful staying with a fitness program if they set aside a specific
time of day to exercise. It doesn’t matter whether it’s in the morning before breakfast, during lunch hour or while
watching the evening news. What’s more important is that it’s a time that allows you to keep a schedule, and a
time when you won’t be interrupted. To be successful with your fitness program, you have to make it a priority in
your life. So decide on a time, pull out your day planner and pencil in your exercise times for the next month!
HOW LONG? (Duration of Workouts)
For aerobic exercise benefits, it’s recommended that you exercise from between 24 and 60 minutes per
session. But start slowly and gradually increase your exercise times. If you’ve been sedentary during the past
year, it may be a good idea to keep your exercise times to as little as five minutes initially. Your body will need
time to adjust to the new activity. If your goal is weight loss, a longer exercise session at lower intensities has
been found to be most effective. A workout time of 48 minutes or more is recommended for best weight loss
results.
HOW HARD? (Intensity of Workouts)
How hard you workout is also determined by your goals. If you use your treadmill to prepare for a 5K run, you will
probably work out at a higher intensity than if your goal is general fitness. Regardless of your long term goals,
always begin an exercise program at low intensity. Aerobic exercise does not have to be painful to be beneficial!
There are two ways to measure your exercise intensity. The first is by monitoring your heart rate (using the grip
pulse handlebars or a wireless chest transmitter - may be sold separately), and the second is by evaluating your
perceived exertion level (this is simpler than it sounds!).
PERCEIVED EXERTION LEVEL
A simple way to gauge your exercise intensity is to evaluate your perceived exertion level. While exercising, if you
are too winded to maintain a conversation without gasping, you are working out too hard. A good rule of thumb
is to work to the point of exhilaration, not exhaustion. If you cannot catch your breath, it’s time to slow down.
Always be aware of these warning signs of overexertion.
CO NDITI ON IN G G UIDELIN ES
T920 & T930 OM.indd 13 2006/6/5 3:37:31 PM
Page 14
14
INTRODUCTION
IMPORTANT
PRECAUTIONS
BEFORE
YOU BEGIN
TREADMILL
OPERATION
LIMITED
WARRANTY
TROUBLESHOOTING
& MAINTENANCE
CONDITIONING
GUIDELINES
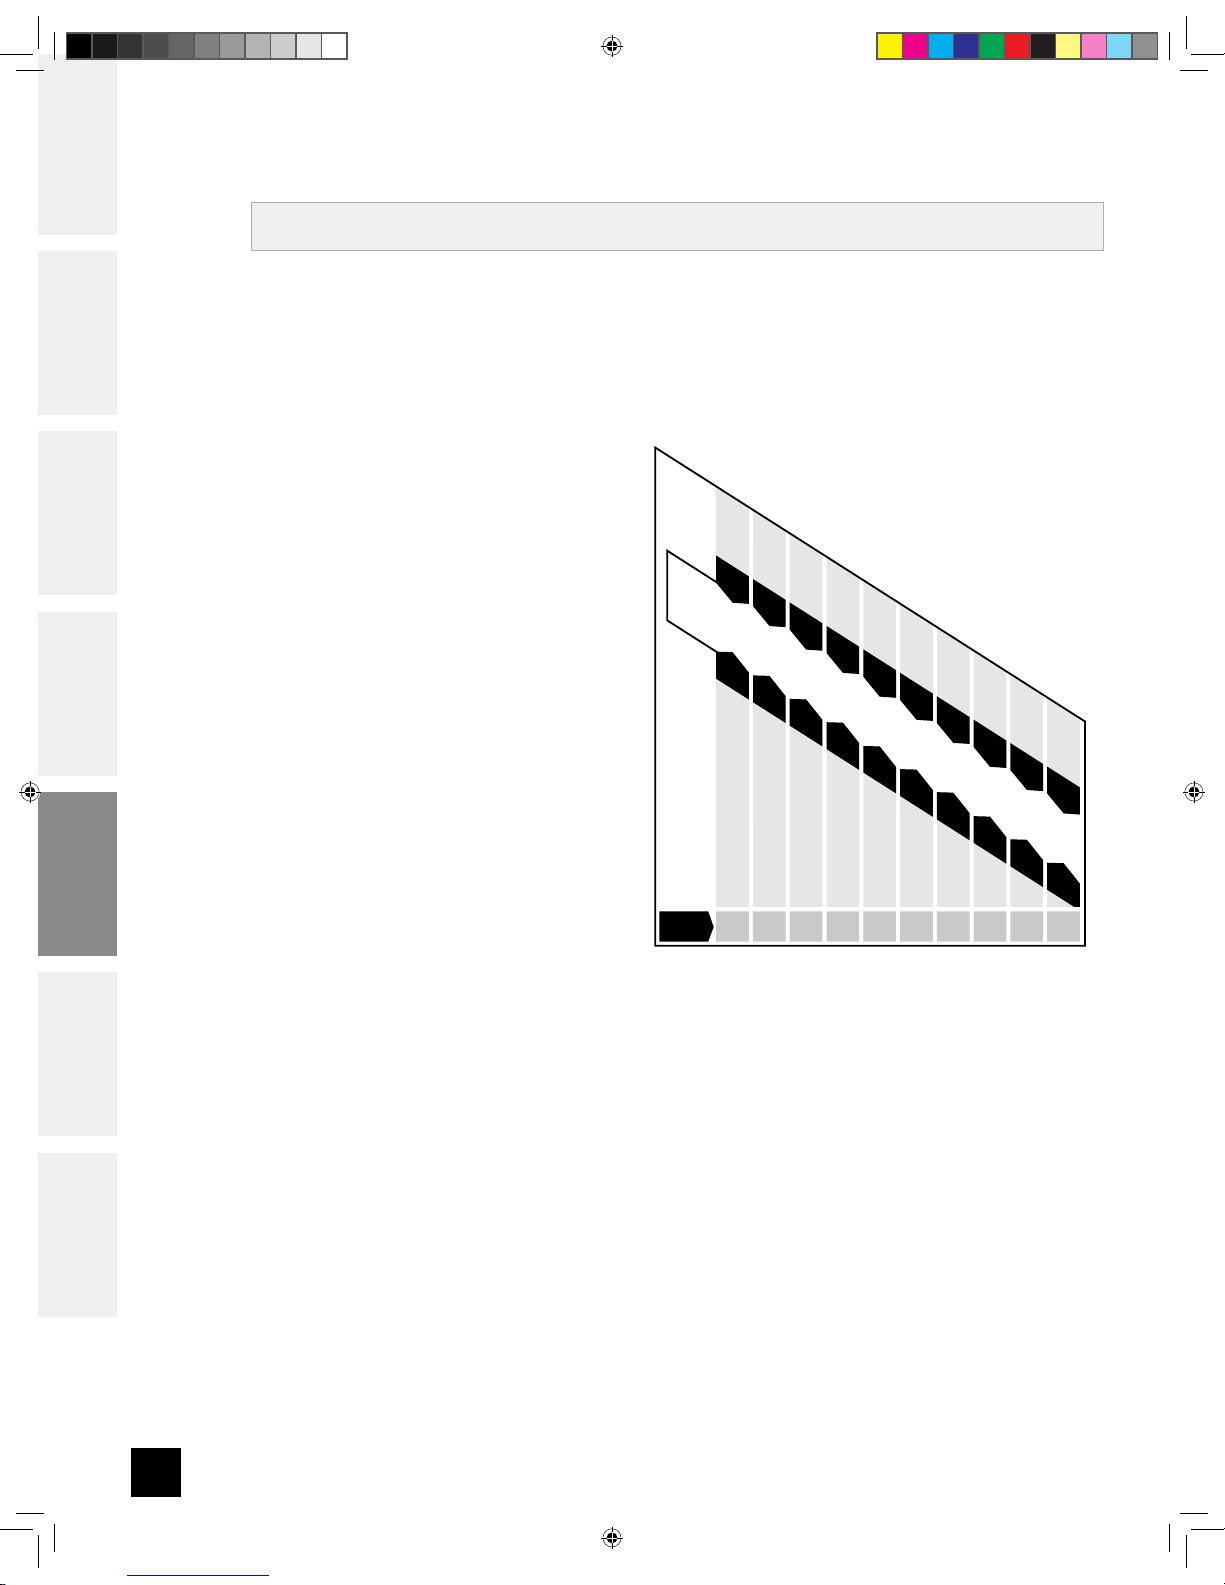
What is Target Heart Rate Zone?
Target Heart Rate Zone tells you
the number of times per minute
your heart needs to beat to
achieve a desired workout effect.
It is represented as a percentage
of the maximum number of times
your heart can beat per minute.
Target Zone will vary for each
individual, depending on age,
current level of conditioning,
and personal fitness goals. The
American Heart Association
recommends working-out at a
Target Heart Rate Zone of between
60% and 75% of your maximum
heart rate. A beginner will want to
workout in the 60% range while
a more experienced exerciser will
want to workout in the 70-75%
range. See chart for reference.
EXAMPLE:
For a 42-year-old user: Find age along the bottom of the chart (round to 40), follow age column up to
the target zone bar. Results: 60% of maximum Hear Rate = 108 Beats Per Minute, 75% of maximum
Heart Rate = 135 Beat Per Minute.
ALWAYS CONSULT YOUR PHYSICIAN BEFORE BEGINNING AN EXERCISE PROGRAM.
TA R GE T HE AR T RATE ZO N E C HA R T
100%
75%
60%
BE AT S P ER MI N UT E
20 25 30 35 40 45 50 55 60 65
AGE
T
A R G E T Z O N E
120
117
114
111
10
8
10
5
102
99
97
93
150
146
143
13
9
13
5
13
1
128
12
4
12
0
116
T920 & T930 OM.indd 14 2006/6/5 3:37:32 PM
Page 15
15
NOITCUDORTNI
TNATROP
M
I
SNOITUACERP
EROF
EB
NIGEB UOY
LL
I
MD
AERT
NOITAREPO
GNINOIT
IDNOC
SENILEDIUG
GNITOOHSELBUORT
ECNANETNIA
M
&
DET
I
MI
L
YTNARR
A
W
TIP S
STRETCH FIRST
Before using your product, it is best to take a few minutes doing a few gentle stretching exercises.
Stretching
prior to exercise will improve flexibility and reduce chances of exercise related injury. Ease into
each
of these stretches with a slow gentle motion. Do not stretch to the point of pain. Make sure not to
bounce
while doing these stretches.
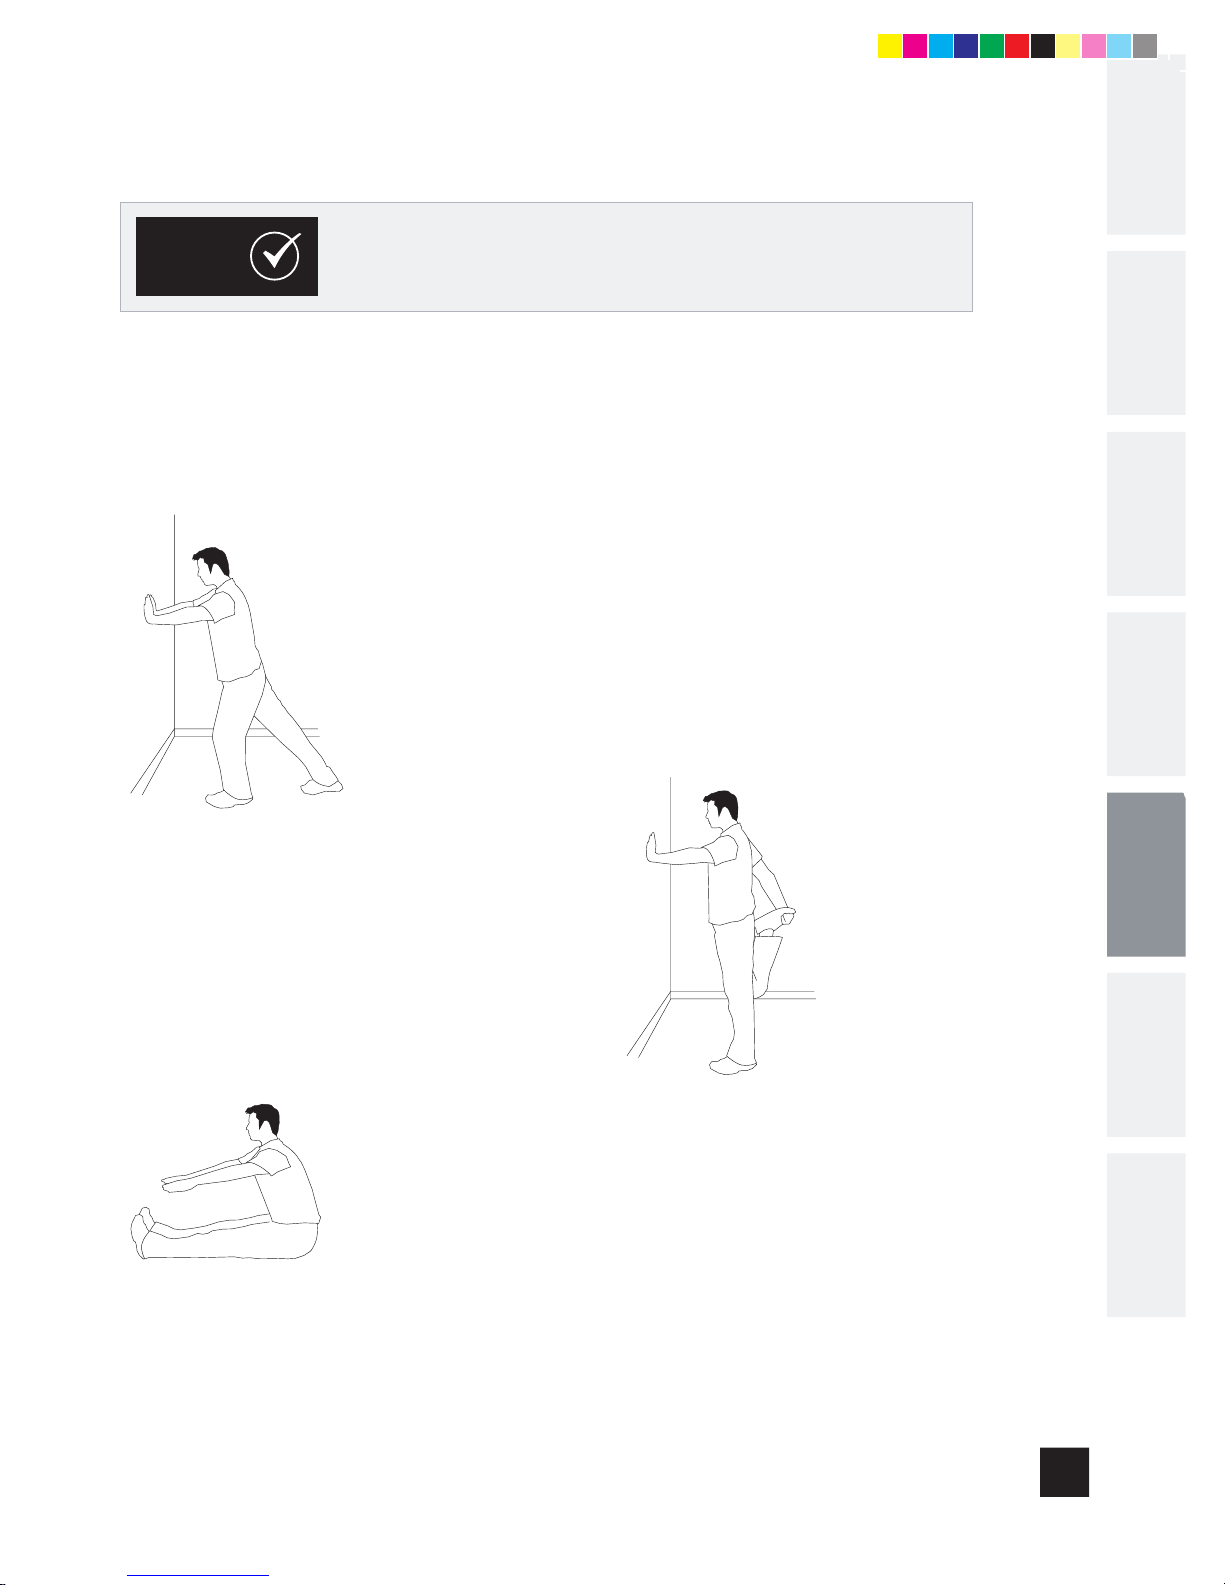
1. STANDING CALf MUSCLE STRETCH
Stand near a wall with the toes of your left foot about 18" from the wall, and
the
right foot about 12" behind the other foot. Lean forward, pushing against
the
wall with your palms. Keep your heels flat and hold this position for a
count
of 15 seconds. Make sure that you do not bounce while stretching.
Repeat
on the other side.
2. STANDING QUADRICEPS STRETCH
Using a wall to provide balance, grasp your left ankle
with
your left hand and hold your foot against the back
of
your thigh for 15 seconds. Repeat with your right
ankle
and hand.
3. SITTING HAMSTRING & LOWER BACK MUSCLE STRETCH
Sit on the floor with your legs together and straight out in front of you. Do
not lock your knees. Extend your fingers towards your toes and hold for a
count
of 15 seconds. Make sure that you do not bounce while stretching. Sit
upright again. Repeat one time.
STRETCHING
T920 & T930 OM.indd 15 2006/6/5 3:37:34 PM
Page 16
16
NOI
TCUDOR
TNI
TNATROP
M
I
SNOI
TU
ACERP
EROF
EB
N
IG
EB
UOY
LLIMDAERT
N
OIT
AREPO
DETIMIL
YTNARRAW
GNITOOHSELBUORT
ECNAN
E
TNIA
M
&
GN
INOITIDNOC
SENILEDIUG
WARM UP
The first 2 to 5 minutes of a workout should be devoted to warming up. The warm-up will limber your
muscles
and prepare them for more strenuous exercise. Make sure that you warm-up on your product at a
slow
pace. The warm up should gradually bring your heart rate into your Target Heart Rate Zone.
COOL DOWN
Never stop exercising suddenly! A cool-down period of 3-5 minutes allows your heart to readjust to the
decreased
demand. Make sure that your cool down period consists of a very slow pace to allow your heart
rate
to lower. After the cool-down, repeat the stretching exercises listed to loosen and relax your muscles.
An
important step in developing a long term fitness program is to determine your goals. Is your primary
goal for exercising to lose weight? Improve muscle? Reduce stress? Prepare for the spring racing schedule?
Knowing
what your goals are will help you develop a more successful exercise program. Below are some
common
exercise goals:
• Weight Loss - lower intensity, longer duration workouts
• Improve Body Shape and Tone - interval workouts, alternate between hi and low intensities
• Increased Energy Level - more frequent daily workouts
• Improved Sports Performance - high intensity workouts
• Improved Cardiovascular Endurance - moderate intensity, longer duration workouts
If
possible try to define your personal goals in precise, measurable terms, and then put your goals in writing.
The
more specific you can be, the easier it will be to track your progress. If your goals are long term, divide
them
up into monthly and weekly segments. Longer term goals can lose some of the immediate motivation
benefits.
Short term goals are easier to achieve. Your console provides you with several readouts that can
be used to record your progress. You can track Distance, Calories or Time.
THE IMPORTANCE OF WARM UP & COOL DOWN
ACHIEVING YOUR FITNESS GOALS
TIP S
TIP S
T920 & T930 OM.indd 16 2006/6/5 3:37:34 PM
Page 17
17
NOITCUDORTNI
TNATROP
M
I
SNOITUACERP
EROF
EB
NIGEB UOY
LL
I
MD
AERT
NOITAREPO
GNINOIT
IDNOC
SENILEDIUG
GNITOOHSELBUORT
ECNANETNIA
M
&
DET
I
MI
L
YTNARR
A
W
COMMON PRODUCT QUESTIONS
ARE THE SOUNDS MY TREADMILL MAKES NORMAL?
All treadmills make a certain type of thumping noise due to the belt riding over the rollers, especially new
treadmills.
This noise will diminish over time, although may not totally go away. Over time, the belt will
stretch,
causing the belt to ride smoother over the rollers.
WHY IS THE TREADMILL I PURCHASED LOUDER THAN THE ONE AT THE STORE?
All fitness products seem quieter in a large store showroom because there is generally more background noise
than
in your home. Also, there will be less reverberation on a carpeted concrete floor than on a wood overlay
floo
r. Sometimes a heavy rubber mat will help reduce reverberation through the floor. If a fitness product is
placed
close to a wall, there will be more reflected noise.
TROUBLESHOOTING - TREADMILL
Your treadmill is designed to be reliable and easy to use. However, if you experience a problem, please reference the
troubleshooting
guide listed below.
PROBLEM: The console does not light up and/or the belt does not move.
SOLUTION: Verify the following:
IF YES:
• Double check that all connections are secure, especially the console cable. Unplug and reconnect the console
cable
to verify.
• Make sure the console cable is not pinched or damaged in any way.
• Turn the power off, unplug the power cable and wait 60 seconds. Remove motor cover. Wait until all red LED
lights
have gone off on the motor control board before proceeding. Next, verify that no wires are loose or
disconnected.
IF NO:
• Verify that the outlet the machine is plugged into is functional. Double check that the breaker has not tripped,
it
is on a dedicated circuit, and it is not plugged into a power strip/surge protector or extension cord.
• The power cord is not pinched or damaged and is properly plugged into the outlet AND the machine.
• The power switch is turned to the ON position.
TR OUBLE SH OO TI NG
T920 & T930 OM.indd 17 2006/6/5 3:37:35 PM
Page 18

18
NOI
TCUDOR
TNI
TNATROP
M
I
SNOI
TU
ACERP
ERO
FEB
NIGEB UOY
L
LI
MDAERT
NO
IT
AREPO
DETIMIL
Y
TN
ARRA
W
GNI
TOOH
SELBUOR
T
ECN
ANETNIAM
&
GNINOI
TIDNOC
S
EN
ILEDIUG
PROBLEM: The treadmill circuit breaker trips during a workout.
SOLUTION: Verify the following:
• Make sure the treadmill is plugged into a dedicated circuit.
• Verify that you do not have the machine on an extension cord or surge protector.
PROBLEM: The running belt does not stay centered during a workout.
SOLUTION: Verify the following:
• Make sure the treadmill is on a level surface.
• Verify that the belt is properly tightened and centered (Refer to the Adjustment section for detailed directions).
TROUBLESHOOTING - HEART RATE
Check your exercise environment for sources of interference such as fluorescent lights, computers, underground fencing,
home
security systems or appliances containing large motors. These items may cause erratic heart rate readouts.
You may experience an erratic readout under the following conditions:
• Pressing too hard on the sensor. Try to maintain moderate pressure while pressing the sensor.
• When you are breathing heavily during a workout.
• When your hands are constricted by wearing a ring.
• When your hands are dry or cold. Try to moisten your palms by rubbing them together to warm.
• Anyone with heavy arrhythmia.
• Anyone with arteriosclerosis or peripheral circulation disorder.
• Anyone whose skin on the measuring palm is especially thick.
If the above troubleshooting section does not remedy the problem, discontinue use and turn the power off.
PLEASE CALL YOUR LOCAL DEALER FOR SUPPORT.
The following information may be asked of you when you call. Please have these items readily available:
• Model Name
• Serial Number
• Date of Purchase (receipt or credit card statement)
In
order for Customer Tech Support to service your treadmill they may need to ask detailed questions about the symptoms
that
are occurring. Some troubleshooting questions that may be asked are:
• How long has this problem been occurring?
• Does this problem occur with every use? With every user?
• If you are hearing a noise, does it come from the front or the back? What kind of noise is it (thumping, grinding,
squeaking,
chirping etc.)?
• Has the machine been lubricated and maintained per the maintenance schedule?
Answering
these and other questions will give the technicians the ability to send proper replacement parts and the service
necessary
to get you and your treadmill running again!
T920 & T930 OM.indd 18 2006/6/5 3:37:35 PM
Page 19
19
NOITCUDORTNI
TNATROP
M
I
SNOITUACERP
EROF
EB
NIGEB UOY
LL
I
MD
AERT
NOITAREPO
GNINOIT
IDNOC
SENILEDIUG
GNITOOHSELBUORT
ECNANETNIA
M
&
DET
I
MI
L
YTNARR
A
W
T920 & T930 OM.indd 19 2006/6/5 3:37:35 PM
Cleanliness of your treadmill and its operation environment will keep maintenance problems and service calls to a
minimum. For this reason, we recommend that the following preventive maintenance schedule be followed.
AFTER
EACH USE (DAILY)
Clean and inspect, following these steps:
• Turn off the treadmill with the on/off switch, then unplug the power cord at the wall outlet.
• Wipe down the running belt, deck, motor cover, and console casing with a damp cloth. Never use solvents, as
they can cause damage to the treadmill.
• Inspect the power cord.
• Make sure the power cord is not underneath the treadmill or in any other area where it can become pinched or
cut.
• Check the tension and alignment of the running belt. Make sure that the treadmill belt will not damage any other
components on the treadmill by being misaligned.
EVE
RY WEEK
Clean underneath the treadmill, following these steps:
• Turn off the treadmill with the on/off switch, then unplug the power cord at the wall outlet.
• Fold the treadmill into the upright position, making sure that the lock latch is secure.
• Move the treadmill to a remote location.
• Wipe or vacuum any dust particles or other objects that may have accumulated underneath the treadmill.
• Return the treadmill to its previous position.
EVE
RY MONTH - IMPORTANT!
• Turn off the treadmill with the on/off switch, then unplug the power cord at the wall outlet.
• Inspect all assembly bolts of the machine for proper tightness.
• Turn off the treadmill and wait 60 seconds.
• Remove the motor cover. Wait until ALL LED lights turn off.
• Clean the motor and lower board area to eliminate any lint or dust particles that may have accumulated. Failure
to do so may result in premature failure of key electrical components.
• Vacuum and wipe down the belt with a damp cloth. Vacuum any black/white particles that may accumulate
around the unit. These particles may accumulate from normal treadmill use.
EVE
RY 6 MONTHS OR 150 MILES
It is necessary to lubricate your treadmill running deck every six months or 150 miles to maintain optimal performance.
Once the treadmill reaches 150 miles, the console will display the message “LUBE” or LUBE BELT”. The treadmill will
not operate while the message is showing. Hold Stop for 5 seconds to suspend message for 5 miles. Your treadmill
came with a bottle of lubricant which can be used for two applications.
• Turn off the treadmill with the on/off switch, then unplug the
power cord at the wall outlet.
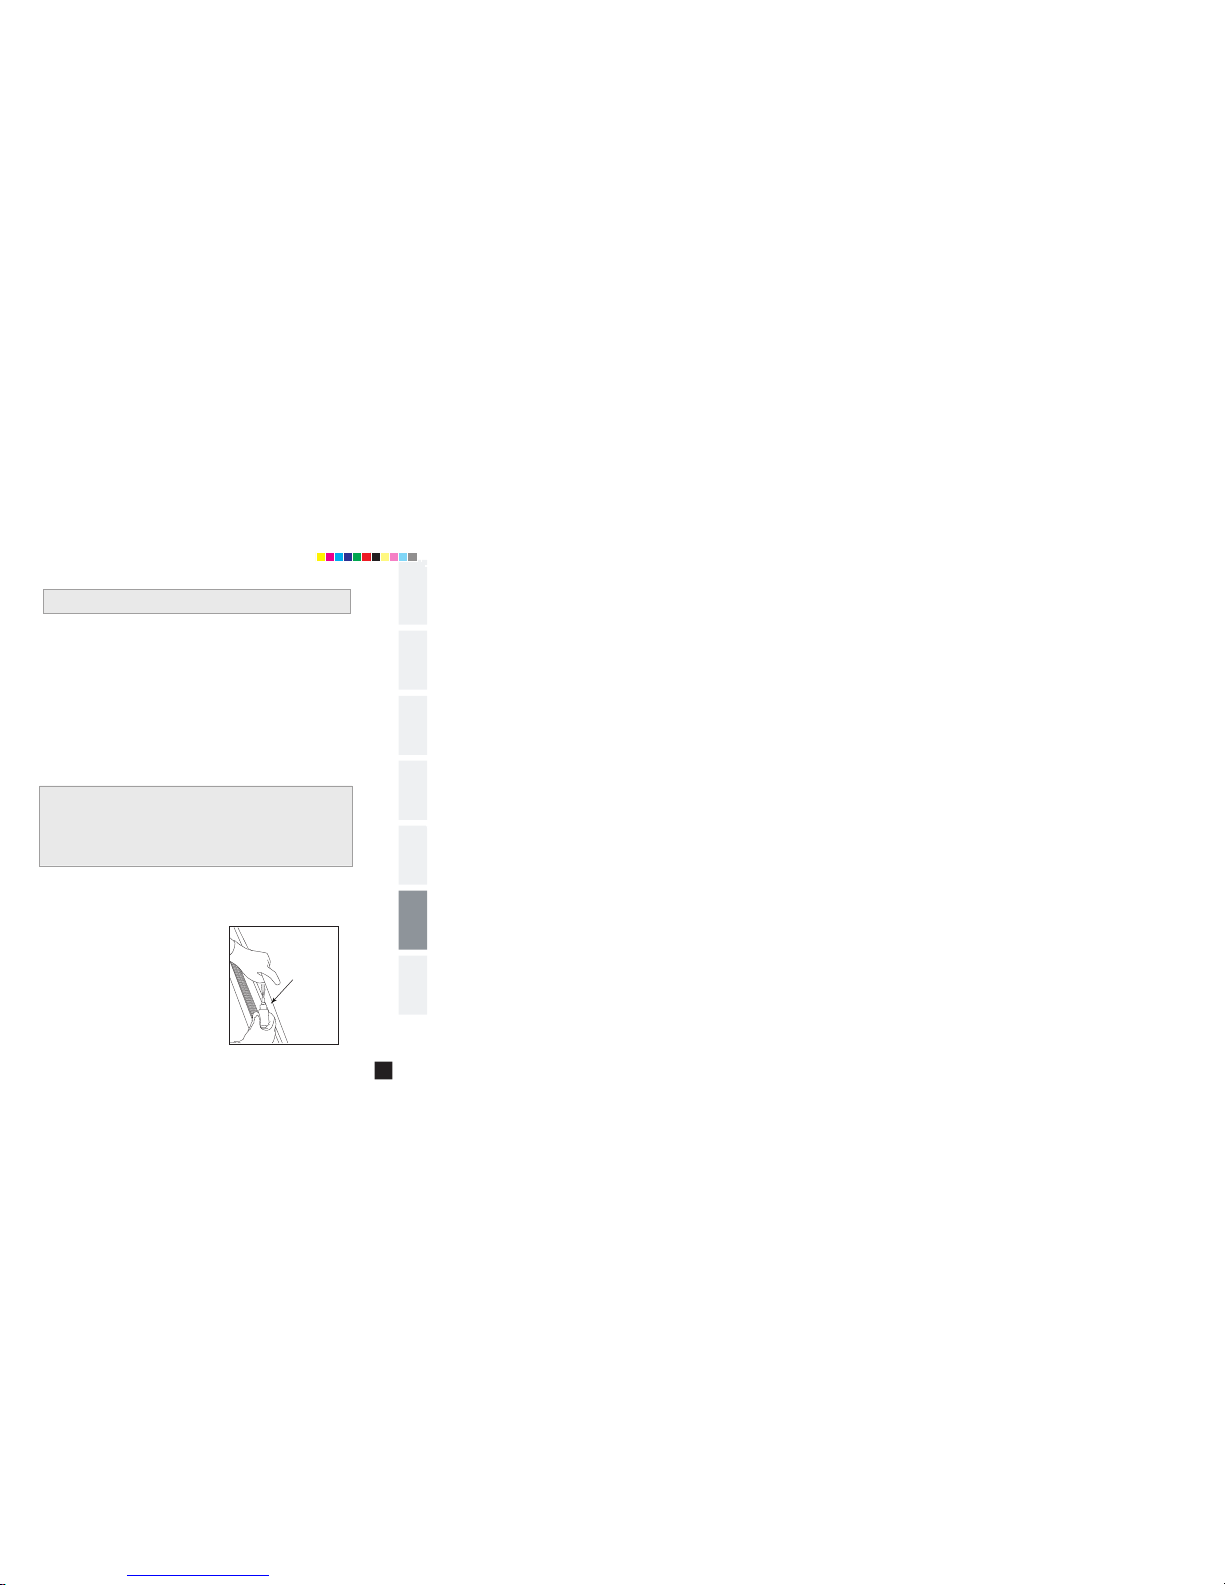
• Loosen both the rear roller bolts. (For best results, place two
removable marks on both sides of the frame and note roller
position). Once the belt is loosened, take the bottle of lubricant
and apply it to the entire top surface of the running deck. Tighten
both rear roller bolts (matching up the marks for proper position)
to original position. After you have applied lubricant, plug in the
power cord, insert the safety key, start the treadmill and walk on
the belt for two minutes to spread the lubricant.
• Lubricate the air shocks with Teflon based spray.
• Once lubrication is complete, reset the console by pressing and
holding ‘STOP’ and Speed ‘+’ buttons for 5 seconds.
MAINT EN AN C E
RUNNING BELT
RUNNING DECK
Page 20
20
NOI
TCUDOR
TNI
TNATROP
M
I
SNOI
TU
ACERP
ERO
FEB
NIGEB UOY
L
LI
MDAERT
NO
IT
AREPO
DETIMIL
Y
TN
ARRA
W
GNI
TOOH
SELBUOR
T
ECN
ANETNIAM
&
GNINOI
TIDNOC
S
EN
ILEDIUG
WEIGHT CAPACITY = 250 lbs / 113 kg.
EXCLUSIONS
AND LIMITATIONS
Who
IS covered:
• The original owner and is not transferable.
What
IS covered:
• Repair or replacement of a defective motor, electronic
component, or defective part and is the sole remedy of
the warranty.
What
IS NOT covered:
• Normal wear and tear, improper assembly or
maintenance, or installation of parts or accessories not
originally intended or compatible with the equipment as
sold.
• Damage or failure due to accident, abuse, corrosion,
discoloration of paint or plastic, neglect, theft,
vandalism, fire, flood, wind, lightning, freezing, or
other natural disasters of any kind, power reduction,
fluctuation or failure from whatever cause, unusual
atmospheric conditions, collision, introduction of foreign
objects into the covered unit, or modifications that are
unauthorized or not recommended by TEMPO Fitness.
LI MITED HO ME -U SE WA RRANT Y
• Incidental or consequential damages. TEMPO Fitness is not
responsible or liable for indirect, special or consequential damages,
economic loss, loss of property, or profits, loss of enjoyment or use,
or other consequential damages of whatsoever nature in connection
with the purchase, use, repair or maintenance of the equipment.
• Equipment used for commercial purposes or any use other than a
single family or Household, unless endorsed by TEMPO Fitness for
coverage.
• Equipment owned or operated outside the US and Canada.
• Delivery, assembly, installation, setup for original or replacement
units or labor or other costs associated with removal or replacement
of the covered unit.
• Any attempt to repair this equipment creates a risk of injury. TEMPO
Fitness is not responsible or liable for any damage, loss or liability
arising from any personal injury incurred during the course of, or as
a result of any repair or attempted repair of your fitness equipment
by other than an authorized service technician. All repairs attempted
by you on your fitness equipment are undertaken AT YOUR OWN RISK
and TEMPO Fitness shall have no liability for any injury to the person
or property arising from such repairs.
*Please consult your local dealer for more marranty details.
T920 & T930 OM.indd 20 2006/6/5 3:37:36 PM
Page 21
T920 & T930 OM.indd 21 2006/6/5 3:37:36 PM
D:
Entsorgungshinweis
Horizon Fitness/Vision Fitness - Produkte sind recyclebar. Führen Sie das Gerät am Ende der Nutzungsdauer
einer sachgerechten Entsorgung zu (örtliche Sammelstelle).
GB:
Waste Disposal
Horizon Fitness/Vision Fitness products are recyclable. At the end if its useful life please dispose of this article
correctly and safely ( local refuse sites).
F:
Remarque relative à la gestion des dèchets
Les produits Horizon Fitness/Vision Fitness sont recyclables. A la fin sa durrèe d`utilisation, remettez I´appareil
à un centre de gestion de dèchets correct (collecte locale).
NL:
Verwijderingsinstructie:Horizon Fitness/Vision Fitness producten zijn recycleerbaar. Breng het apparaat aan het
einde van de gebruiksduur voor recycling naar een vakkundig verzamelpunt.
E:
Informaciones para la evacuaciòn
Los productos de Horizon Fitness/Vision Fitness son riciclables. Cuando se termina la vida ùtil de un aparato o
una màquina, entrèguelos an una impresa local de eleiminaciòn de residuos para su reciclaje.
I:
Indicazione sullo smaltimento
I prodotti Horizon Fitness/Vision Fitness sono reciclabill. Quando I`apparecchio non servirà più, portatelo in un
apposito punto di raccolta della Vostra città (Punti di raccolta comunall).
PL:
Wskazòwka dotyczàca usuwania odpadòw.
Producty firmy Horizon Fitness/Vision Fitness podlegajà recyklingowi. Pod koniec okresu o`ywalnoÈcl pros`z oddac
urzàdzenie do wlaÈciwego punkto usuwania odpadòw (lokalny punkt zbiorczy).
Page 22

T921 / T931 092007’
T920 & T930 OM.indd 22 2006/6/5 3:37:36 PM
 Loading...