

Page 1
TEMPMINDER® MRI101AG
Instruction Manual
Thank you for purchasing this TempMinder® Model MRI-101AG. We hope you enjoy its many features and
benefits for years to come.
FEATURES:
Weather forecast (in 4 icons)
12/24hr time display
Calendar (date, week, year to 2099!!)
Alarm & Snooze
Indoor temperature & humidity
Outdoor temperature
Min/Max memory for indoor temperature & humidity
Min/Max memory for outdoor temperature
Outdoor temperature alert
Indoor temperature alert
Indoor humidity alert
DST (Daylight saving time)
Cable Sensor: 180cm
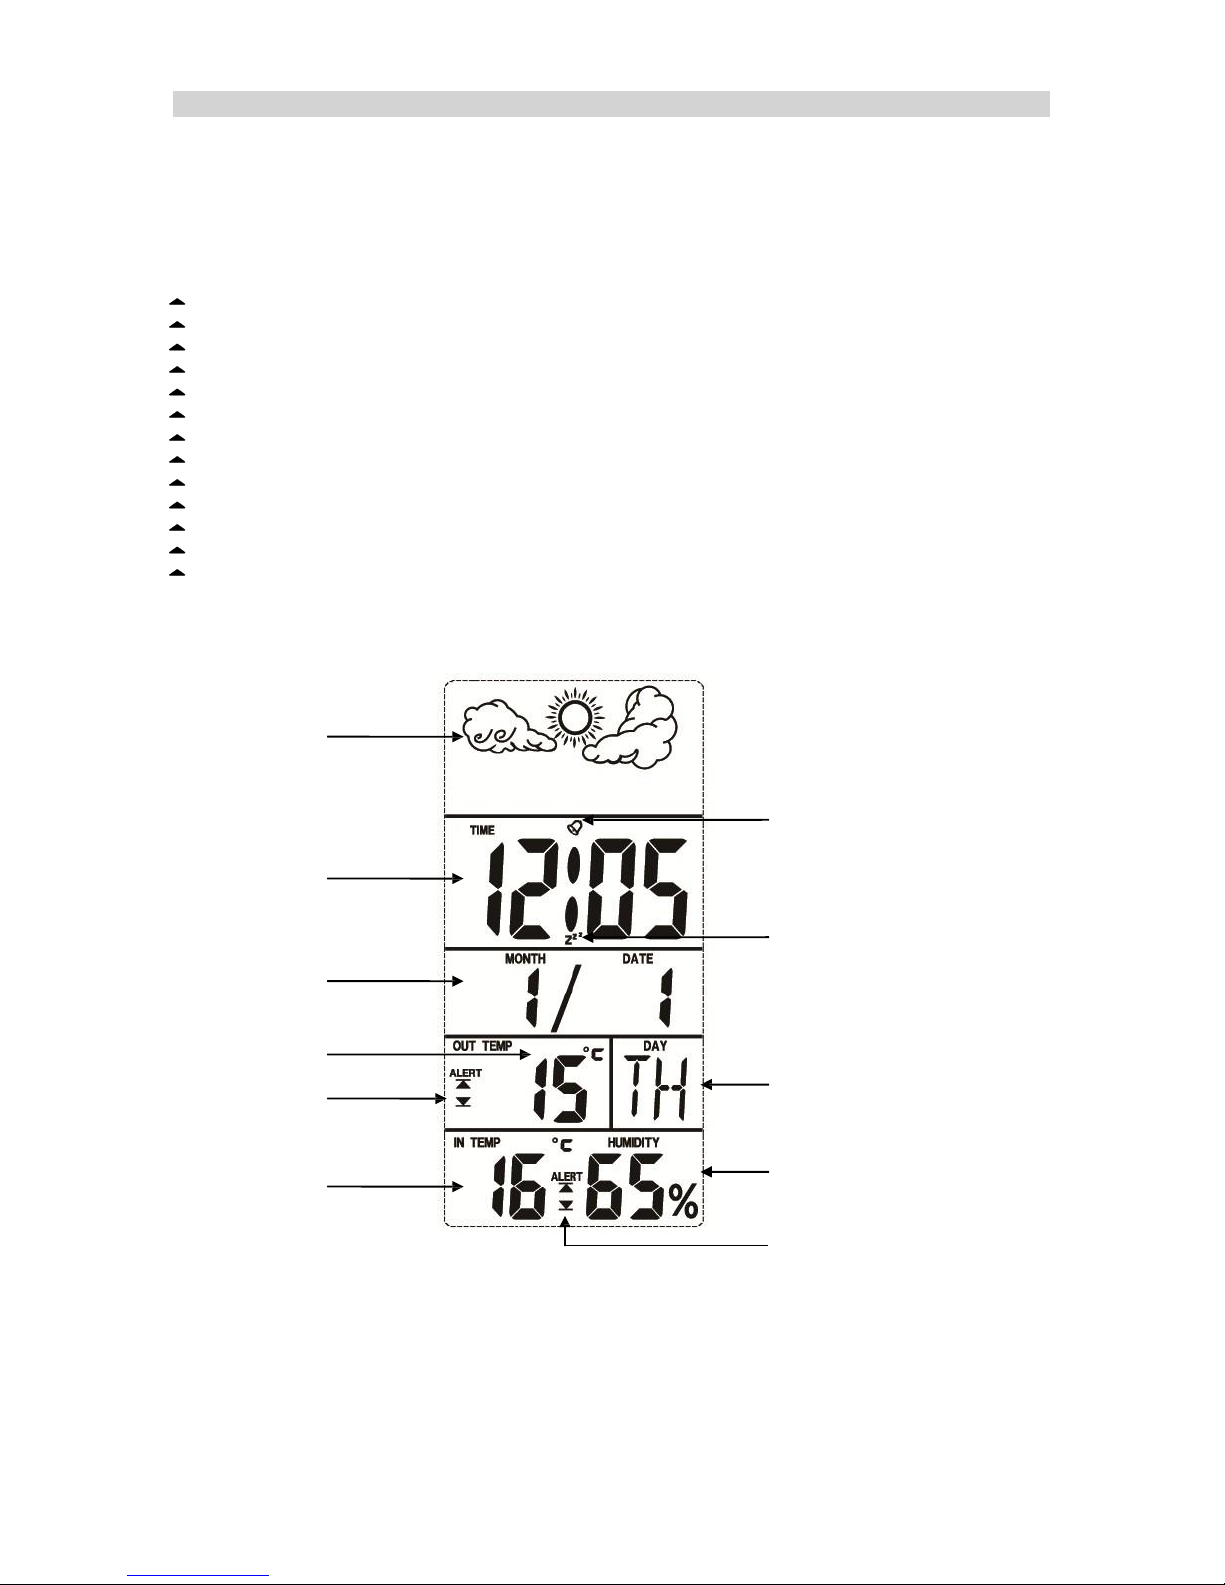
The Main Display
Weather forecast
Alarm icon
time
Snooze icon
date
Outdoor temperature
Alert icon of Outdoor
temperature
Indoor temperature
Day of week
Indoor humidity
Alert icon of indoor
temperature &humidity
Getting Started:
A) The numbers will not change unless you remove the static label covering the front display as
well as the clear plastic insulation strip sticking out the back of the unit. The insulation strip
was inserted so that the batteries did not drain prior to you taking it home!
B) So, remove the strip. If the unit does not immediately “BEEP”, remove the battery cover and
press on both batteries. This will confirm their proper installation and connection. Replace the
battery cover. In a year or so, you’ll need to replace the two LR1130/AG10 button cells. When
Page 2

you do, be sure the + side is up. To remove the batteries, use a small metal (pointed) tool like a
screw driver or straightened paper clip (sorry, not included).
C) At this point you should see the indoor temperature and humidity as well as the outdoor
temperature. Please note due to variances in electronic components, the two temperatures may
not be exactly the same (+/- 1C even though the probe is indoors at the moment). Showing as
well will be the clock (12:00), month (1), date (1) and day (TU).
D) Setting the Time;
Press & hold “set” button for 3 seconds
Press “up” button to select 12hr or 24hr mode
Press “set” to confirm
Hour will flash – press “up” or “down” to reach the desired hour
Press “set” to confirm
Minutes will flash – press “up” or “down” to reach the desired minute
Press “set” to confirm
Year (2008) will flash. Press “up” or “down” for current year
Press “set” to confirm
Month will flash – press “up” or “down” for current month
Date will flash – press “up” or “down” for current date
DST will flash “OFF”. Leave it there (more on DST below)
Press the “Mode” button or wait 30 seconds and you are done.
That’s it! If you did that on the first try, congratulations – you’re a programming expert.
At this point you may wish to place the unit where you plan to keep it on a regular basis.
Obviously in order to obtain an outdoor temperature the probe needs to be outside. It’s best to
hang it out a window that is not affected by direct sunlight. You may of course use it as well to
monitor the temperature of a refrigerator, freezer or even an aquarium.
Be sure to keep these instructions as you will need them again when you replace the batteries as
well as for all the other features/benefits of this HOME® brand TempMinder®.
Reading the Minimum and Maximum History:
After a certain period of time (overnight, a day, week, month, etc) you can see the highest and
lowest temperatures as well as the humidity attained during that period.
- Press the “UP” button to see the Maximum indoor and outdoor temperatures as well as the
indoor humidity for the period (since last cleared).
- Press it again and you will see the minimums
- Press it again to return to the normal display (or wait 30 seconds)
- To CLEAR the memories (and start a new period), press and hold the “UP” button when the unit
is displaying the Maximum and Minimum histories
Alarm Time & Alarm “Tune” Setting:
1) Press MODE button once to enter Alarm Time setting mode. The “ALARM” icon appears and the
time shows 12:00.
2) Press and hold SET key for 3 seconds. Press the UP /DOWN key to adjust the hour and minute
pressing the SET key to confirm each number.
3) Next, the number in right corner of the 4th LCD will flash. Press the UP/DOWN key to select the
“tune” you would like to hear (7 choices – FYI #6 is Happy B’day!!). Press SET key to confirm.
4) You will now see a “05” flashing. We suggest at this point you simply wait 30 seconds for the unit to
return to the normal display mode. If/when you actually use the alarm with snooze, the snooze will
function every 5 minutes and will repeat 3 times. This is the factory default setting for the snooze
function. If you would like to change these settings, read on. If you are happy with the 3 times every
5 minutes, then skip to “Alarm and Snooze Controls #4)” below.
Snooze Setting:
# of times the SNZ
alarm will repeat
Minutes between
SNZ alarms
1) In order to get to the Snooze setting mode, repeat steps 1 through 4 from above.
2) When you see the “05” flashing, use UP/DOWN to choose the time between snooze alarms. Press
SET key to confirm.
Page 3

3) Press UP/DOWN key to choose the number of times you want the snooze alarm to repeat. Press
SET to confirm. You have now programmed the number of times the snooze alarm will go off as well
as how long you have to actually snooze between alarms.
Alarm and Snooze Controls:
4) To turn on the alarm functions, press Mode key once. Then press the “UP” button. You will see a
“ ” appear above the time display. Press the “UP” button again and you will see a tiny “ZZ” below
the time display. At this point you have activated both the alarm and snooze functions.
5) To return to the normal display mode, press the MODE key twice or simply wait for 30 seconds.
6) When the alarm is active (going off), you may press any button to stop it. Pressing the SNZ button
will activate the previously programmed snooze times.
7) To turn off the alarm, press MODE once. Press UP button two times to turn off the alarm and the
snooze function. The “ “ & “ zz” will disappear.
The following functions allow you to set high and low alerts for indoor and outdoor temperatures
as well as high and low alerts for indoor humidity.
Temperature and Humidity Alert setting:
The following alert settings appear in this order: 1-Maximum outdoor Temp, 2-Minimum outdoor Temp,
3-Maximum indoor Humidity, 4-Minimum Indoor Humidity, 5-Maximum indoor Temp, 6-Minimum indoor
Temperature.
1) Press MODE key two times. Here’s what you should see.
2) Press and hold SET key for 3 seconds to enter the alert setting, the “90℃” (or “194℉”) will flash.
Outdoor temperature alert range is -50℃ to 90℃ (-58℉ to 194℉)
3) Press down button to set the HIGHEST OUTDOOR temperature alert you need. Press SET
button to confirm. The Minimum temperature will then flash (-50C). Press the up button to set
the LOWEST OUTDOOR temperature. Press SET to confirm. The unit will now go to the indoor
humidity alert setting.
4) Follow Step 3 above in setting the high and low INDOOR HUMIDITY levels and then the high
and low INDOOR TEMPERATURE levels.
5) Press and hold the “UP” button for two seconds to activate the alert system. “ “ will appear in
both the IN and OUT areas of the display. To de-activate the alerts, simply press and hold the
“DOWN” button.
6) When a temperature or humidity point has been exceeded, the TempMinder® will “Beep” for 5
seconds per minute until you press any button or the value being monitored returns to normal.
Page 4

DST (Daylight Savings Time) Function:
This function allows you to quickly change the time (up or down) by one hour.
Press and hold the “set” button for 3 seconds. When the 12hr is flashing, press and release the “set”
button SIX times.
If “ON” is flashing, pressing the “up” button will reduce the time by one hour.
If “OFF” is flashing, pressing the “up” button will increase the time by one hour.
Press “Mode” once to return to normal viewing mode.
The Dynamic weather forecast display :
There 4 dynamic weather forecast icons: sunny > semi-sunny > cloudy > rainy .
The unit will give you an “approximate” forecast for the coming 12 to 24 hours.
Humidity below 40% : sunny
Humidity between 40% & 60% : semi-sunny
Humidity between 60% & 80% : cloudy
Humidity above 80% : rainy
For better accuracy, the main unit should be placed near an open window (even for a short period of
time). It is difficult (actually impossible) for it to forecast the outdoor weather if it is always in a completely
closed environment (i.e. heated or air conditioned house).
key name
Functions
“MODE ”
1) Used to enter the set mode for the following functions: time ,alarm,alert display.
2) Stop the alarm
“SET”
1) Press one time to change the display icon between ℃ / ℉.
2) Hold it for 3 seconds to enter the time setting.
3) To confirm the setting.
4) Stop the alarm
“UP”
1) Used to increase the numbers when in the setting mode.
2) To check the Max/min temperature of indoor and outdoor. Or the Max/Min indoor humidity
3) Hold for “BEEP” sound to clear the Max/Min temperature and humidity Memory
4) Stop the alarm.
“DOWN”
1) Used to reduce the numbers when in the setting mode.
2) Press and hold to turn the alerts on or off “ ” .
3) Stop the alarm
“SNZ”
1) Used to turn on the snooze function when the alarm is activated.
SPECIFICATIONS:
TEMPERATURE & HUMIDITY:
TEMPERATURE
HUMIDITY
RECOMMENDED
OPERATING
CONDITIONS
INDOOR
0ºC to +50ºC or 32F to 122F
INDOOR
20% to 90%
OUTDOOR
-50ºC to 90ºC or -58F to 194F
ACTUAL
PROGRAM (IC)
LIMITS
INDOOR
-20ºC to +70ºC or -4F to 158F
INDOOR
15% to 90%
OUTDOOR
-50ºC to 90ºC or -58F to 194℉
UPDATES
every 10 seconds
every 10 seconds
Page 5

Please Note
- HOME® products are guaranteed against defects in material and workmanship. This guarantee does not include
batteries, wear or misuse. Contact your local Home Hardware Store for help or information.
- This unit is accurate to +/- 2.0 ºF/1.0ºC. Due to component tolerances plus other variables, the in and out
temperatures may not always be exactly the same.
- “HOME®” is a registered trademark of Home Hardware Stores Ltd.
- “TempMinder®” is a registered trademark of The Minder Research Incorporated
- © 2010 The Minder Research Inc
 Loading...