

Page 1
Tempest XYZ Mount – Assembly and Use
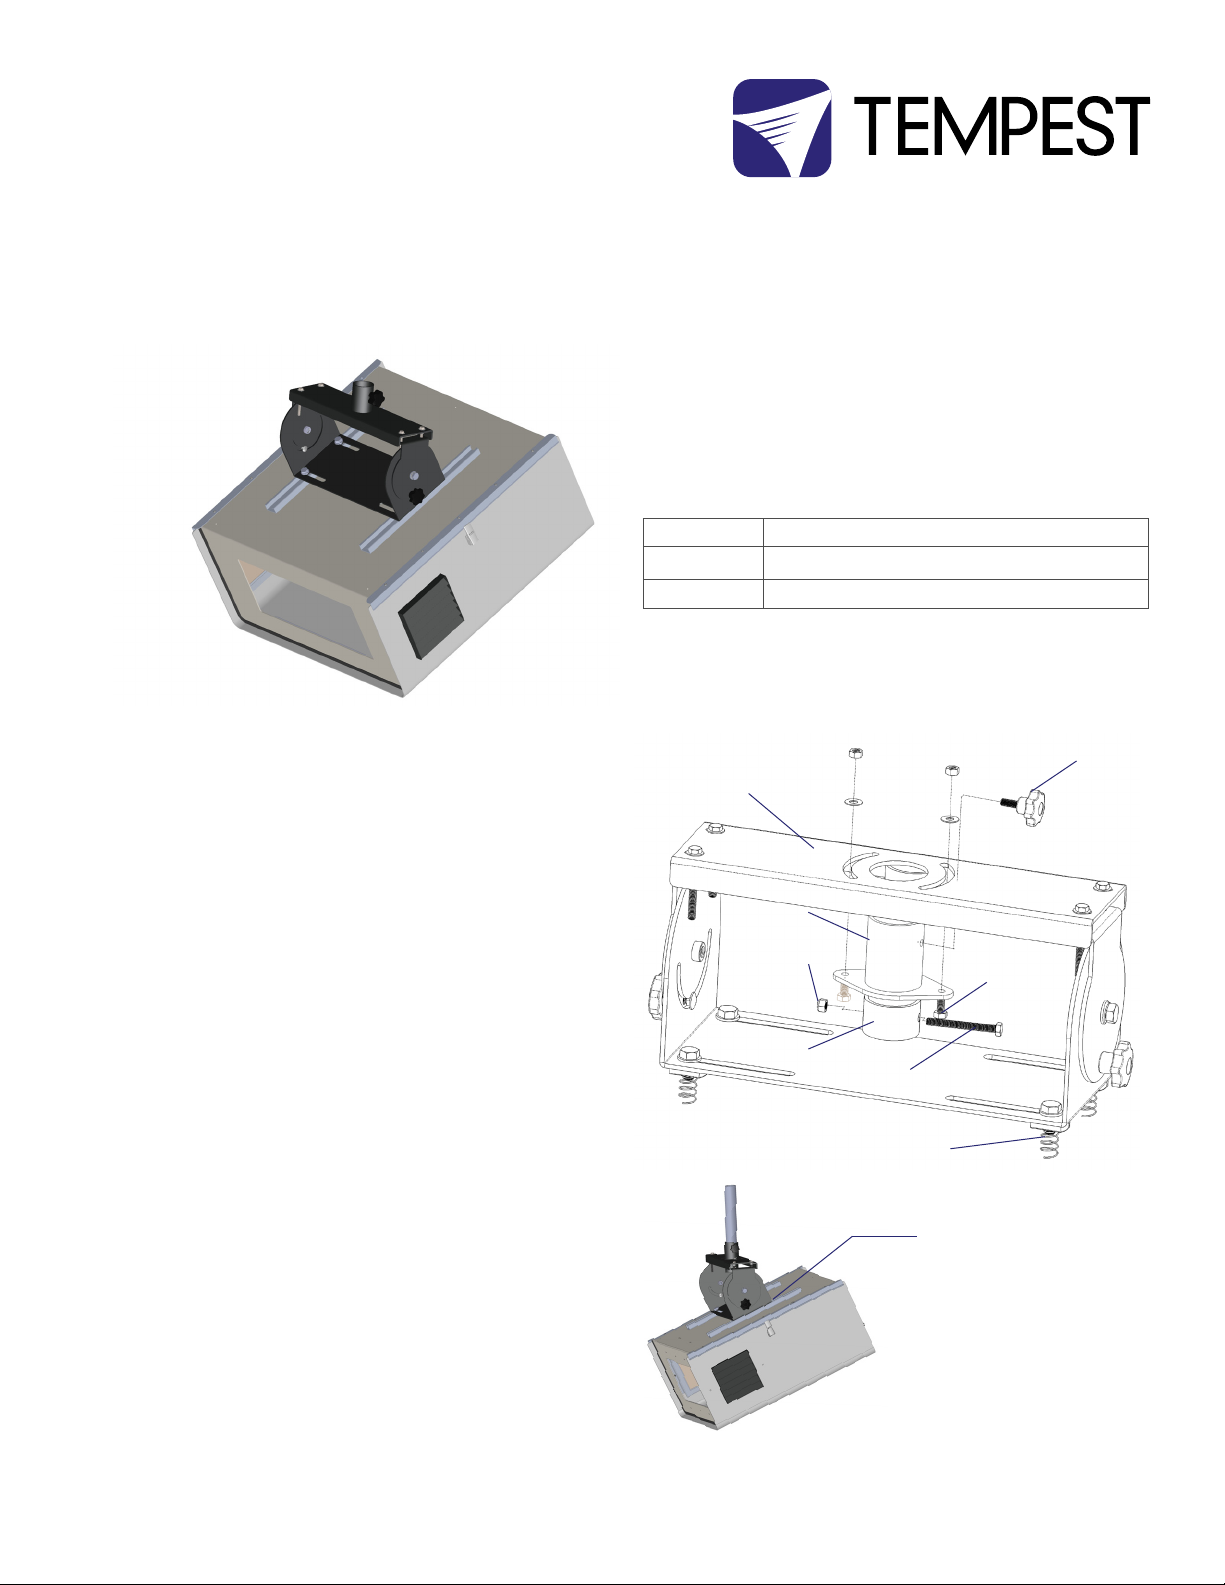
6500.XYZ Mount on
a Blizzard projector
enclosure
6500.XYZ – Vertical Pole Mounting
The 6500.XYZ Mount is designed to attach to the bottom of a
vertical pole with an outside diameter between 1.75-2” [4550mm]. The pole must be securely attached to the building
structure in accordance with local safety regulations.
1. Remove the nuts and washers from the two collar bolts.
2. Remove the pan locking knob
3. Insert the pipe collar through the hole in the yoke plate
from below
4. Re-attach the nuts and washers, and tighten with a suitable
wrench
5. Replace the pan locking knob
6. Remove the Safety bolt and locknut from the safety collar
7. Offer the collar up to the bottom of the mounting pole and
drill a 7/16”[11mm] hole through the bottom of the pipe
8. Assemble the XYZ Mount to the enclosure, using the four
bolts and spring nuts on the XYZ Mount cradle. Be sure to
twist the spring nuts into the Unistrut rails so that they grip
securely.
9. Adjust the position of the XYZ Mount along the Unistrut
channels to position as close as possible to the center of
gravity.
10. Lift the enclosure onto the bottom of the vertical pipe - THIS
REQUIRES TWO PEOPLE
11. Have a THIRD PERSON slide the safety collar onto the bottom of the pipe and insert the safety bolt through the hole
in the pipe drilled in step 7.
12. Rest the enclosure on top of the safety collar, and replace
the safety collar locknut. YOU MUST USE THE SAFETY COLLAR AS DESCRIBED IN STEPS 7-10. Tempest accepts no
liability for unsafe installation.
13. NOTE: For a steady projected image it is very important
that the vertical pole be secure and firmly braced, especially
when using larger enclosures with heavy projectors.
The XYZ Kit allows you to install any
Blizzard or Thunder enclosure at any angle
from either a vertical 2”/50mm OD pole or
on a horizontal pipe or truss.
Part Number
6500.XYZ Tempest XYZ Mount for Vertical Pole
6500.XYZ.T Tempest XYZ Mount for Pipe or Truss
Yoke Plate
Figure 1
Figure 2
Description
Pan Locking
Knob
Pipe Collar
Safety Bolt
Locknut
Collar Bolt
Safety Collar
Safety Bolt
Spring Nuts
Adjust the position of
the XYZ Mount on the
enclosure Unistrut Rails
as close as possible to
the center of gravity.
Page 2
6500.XYZ.T – Pipe/Truss Mounting
The 6500.XYZ.T mount is designed to attach to any horizontal pipe
or truss member with diameter 1.75-2”[45-50mm]. If you need to
attach to a larger diameter pipe you may do so by replacing the two
Proburger Clamps with any industry standard rigging clamp, with a
1/2”-13 bolt.
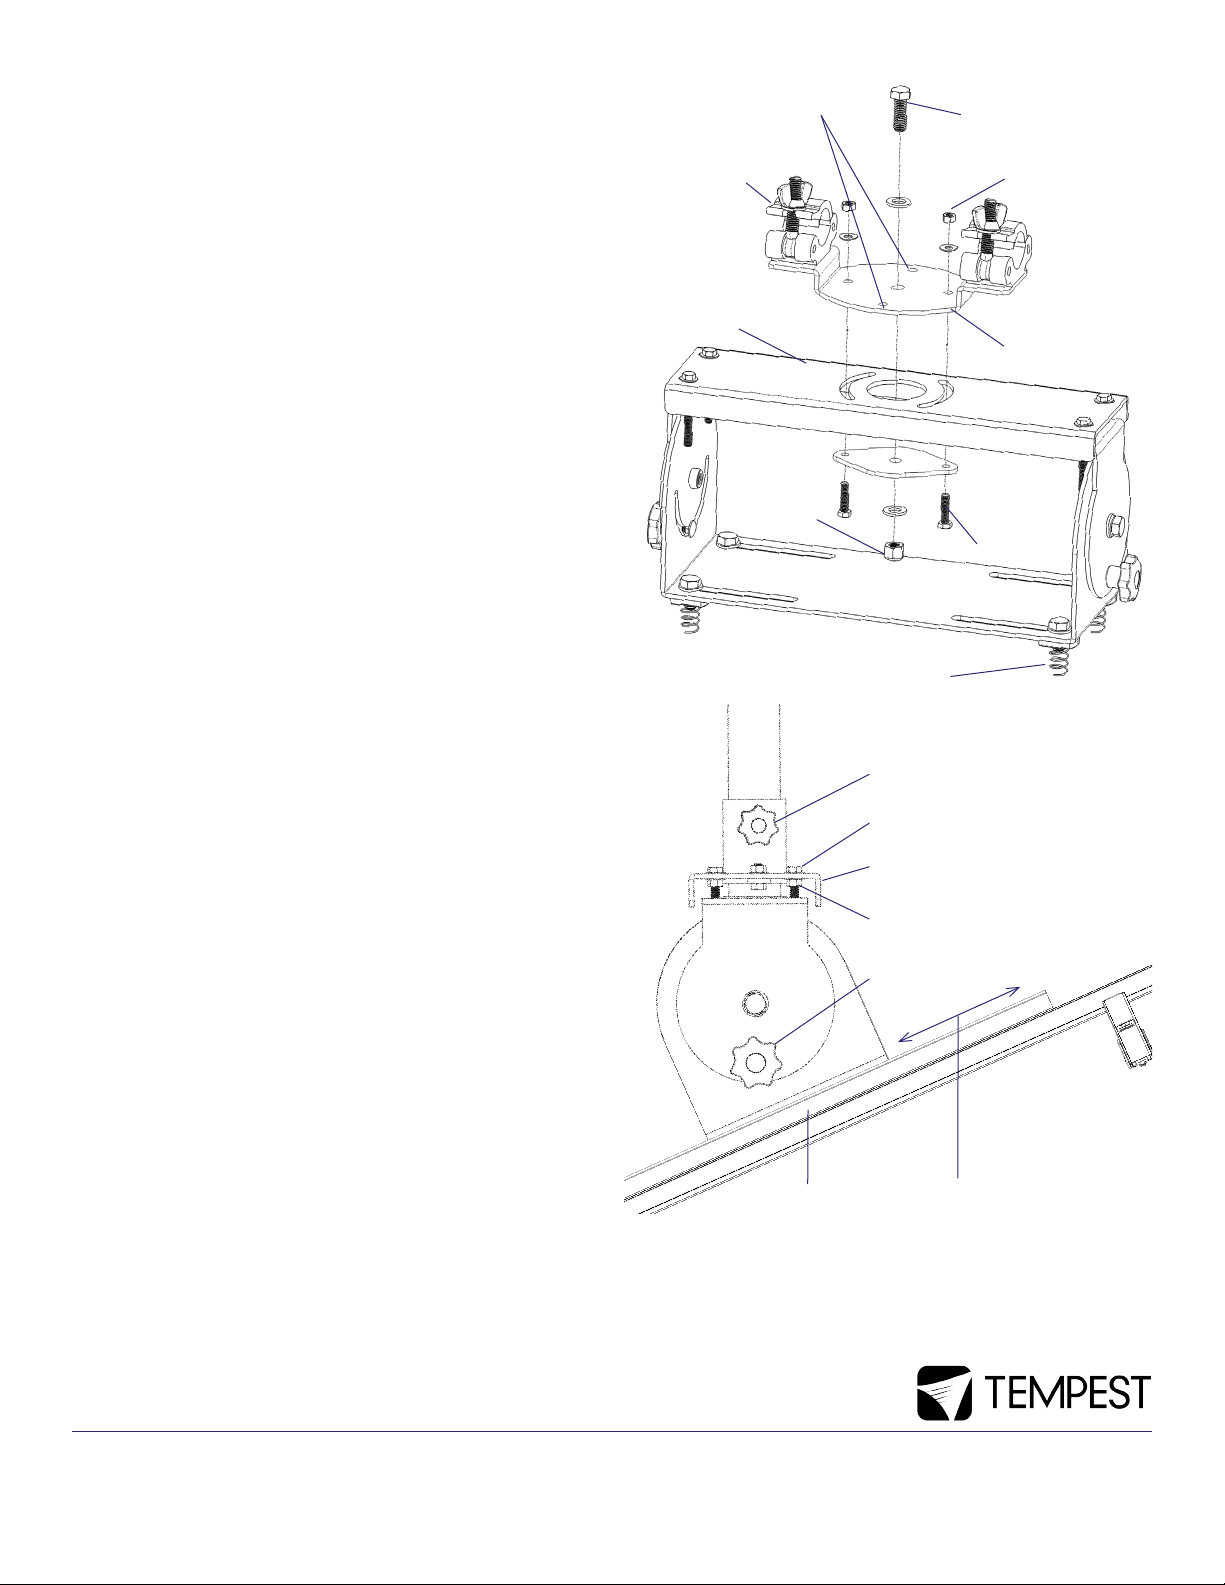
1. Remove the nuts and washers from the two collar bolts.
2. Remove the Safety Locknut from the Safety Bolt
3. Re-assemble the clamp assembly onto the yoke plate
4. Re-attach the nuts and washers, and tighten with a suitable
wrench.
NOTE: You can assemble either with the clamp plate parallel or
perpendicular to the yoke plate. In either case you can pan 45°
either side of center.
NOTE: DO NOT OVERTIGHTEN — you should be able to rotate
the clamp assembly on the yoke plate.
SAFETY WARNING: YOU MUST MAKE SURE THAT THE SAFETY
BOLT AND LOCKNUT ARE SECURELY FITTED.
5. Assemble the XYZ Mount to the enclosure, using the four bolts
and spring nuts on the XYZ Mount cradle. Be sure to twist the
spring nuts into the Unistrut rails so that they grip securely.
6. Adjust the position of the XYZ Mount along the Unistrut channels to position as close as possible to the center of gravity
(see figure 2).
7. Lift the enclosure onto the truss or horizontal pipe pipe - THIS
REQUIRES TWO PEOPLE - and secure the two Proburger clamps
to the pipe.
Adjusting Pan, Tilt and Roll
Pan Adjustment – Vertical Pole Mount
• You may rotate the enclosure 360° and lock in place by tightening the Pan Locking Knob
Pan Adjustment – Truss Mount
• Rotate the enclosure up to 45° either side of center axis, and
lock by tightening the two Collar Bolt Nuts.
• NOTE: you may rotate more than 45° by backing out the two
collar bolts, rotating the Clamp Assembly 90°, and replacing
the Collar Bolts in the perpendicular holes in the Clamp Assembly.
Tilt Adjustment
• Loosen the Tilt Knobs both sides and adjust tilt up to ±90°,
then tighten the Tilt Knobs to lock.
• NOTE: With larger enclosures it is important to check that the
XYZ Mount is located at the center of gravity of the enclosure
to ensure a positive lock.
Roll Adjustment
• You can adjust the roll of the enclosure ±10°.
• First, loosen the Roll Locknuts on all four Roll Screws (figure
4).
• USe a wrench to turn the Roll Screws to raise or lower each
side of the XYZ Mount Cradle to the desired position.
• Tighten the Roll Locknuts up onto the Yoke Plate to secure.
perpendicular
Collar Bolt holes
2”[50mm]
Proburger Clamp
Yoke Plate
Figure 3
Figure 4
Alternate
Safety
Locknut
Spring Nuts
Pan Locking
Knob
Roll Screw
Yoke Plate
Roll Locknut
Tilt Knob
Unistrut Rail
Safety Bolt
Collar Bolt Nut
Clamp Assembly
Collar Bolt
Adjust position of XYZ
Mount along the Unistrut
rail to balance the
enclosure for positive tilt
locking
Tempest Lighting, Inc
13110 Saticoy Street, Unit C, North Hollywood, CA 91605, USA
www.tempest.org [email protected]
t: +1 818 787 8984 f: +1 818 982 5510
 Loading...