

Page 1

OWNER’S MANUAL
Power Blowers
TM
Cone Air Flow (CAF) - Electric Driven
VSM Series
0216_01A
Page 2
INTRODUCTION
ABOUT TEMPEST
ank you for choosing Tempest Technology Corporation for
your ventilation needs. With this manual we hope to help you
operate your Tempest product safely and to its full potential.
Maintained according to the specications set in this manual it
is not uncommon to receive decades of use and operation out of
your Tempest equipment.
is manual is produced solely for the use of purchasers and
operators of Tempest Technology Corporation equipment. Any
reproduction, retransmission, or other use of the contents of
this manual without written consent of Tempest Technology
Corporation is strictly prohibited.
It is the intent of this manual to provide the owner/operator of
Tempest Technology Corporation products with both general and
specic information regarding the safe and proper operation and
maintenance of the equipment described within.
CONTACT
If aer careful review, any questions arise concerning any portion
of this manual, please contact Tempest Technology Corporation
for assistance:
TEMPEST TECHNOLOGY CORP.
4708 N. BLYTHE AVENUE
FRESNO, CA 93722
Tempest Technology Corporation is the leading manufacturer
of products and accessories for environmental management in
reghting and industrial applications.
Tempest began as a manufacturer of gasoline and electric powered
blowers for the re service. Fire departments use the Tempest
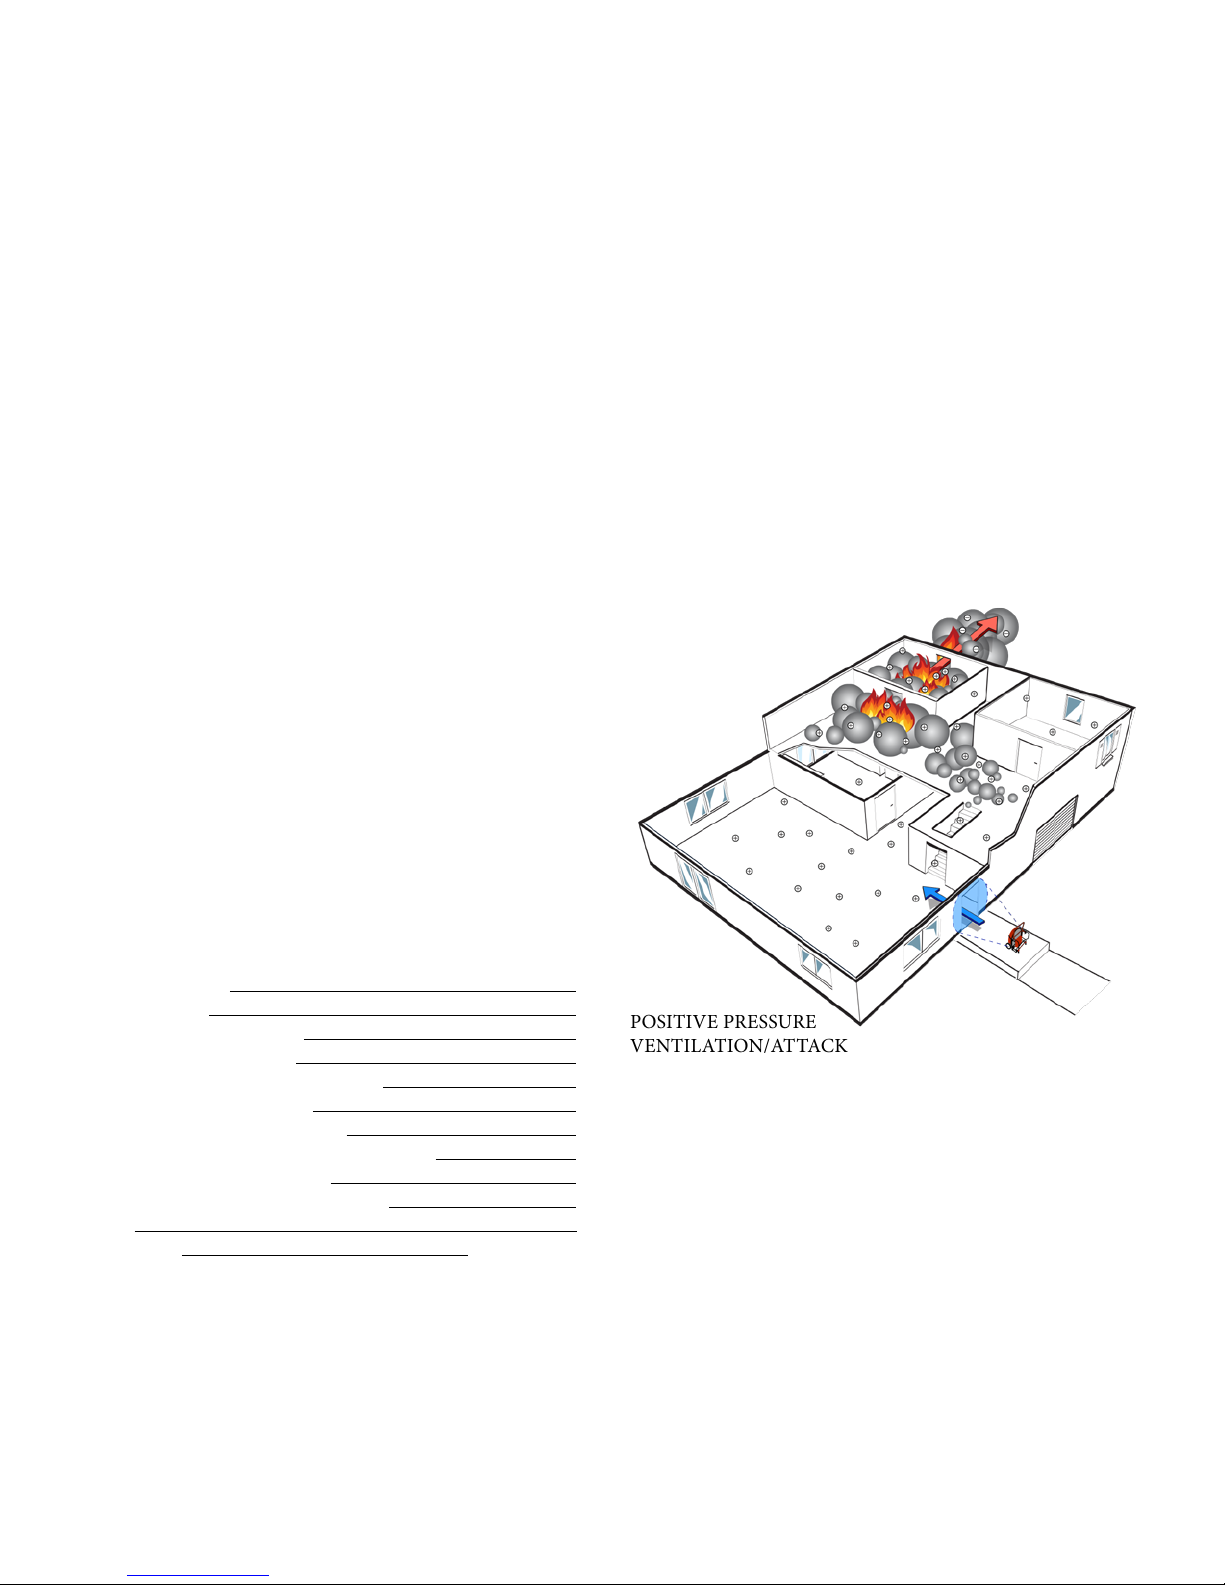
Power BlowerTM to provide “Positive Pressure Ventilation / Attack”
(PPV/PPA) to remove heat, gases and smoke from the interior of
a burning structure.
Tempest has expanded into other industries and found new
applications for its products. e Tempest Power BlowerTM and
PPV/PPA are used by industrial applications to control dust, fumes
and unhealthy gases like carbon monoxide, greatly improving
safety in conned spaces.
Tempest Technology Corporation has earned a reputation as a
leader and innovator in the air movement industry and continues
in that role today.
Toll Free: 800.346.2143
t: 559.277.7577
f: 559.277.7579
[email protected]
www.tempest.us.com
TABLE OF CONTENTS
ABOUT TEMPEST 2
SAFETY GUIDE 3
GENERAL INFORMATION 3
TM
POWER BLOWER
POWER BLOWER
DATA 4
TM
INFORMATION 5
OPERATING PROCEDURES 5
MAINTENANCE PROCEDURES 6
POWER BLOWER
TM
TROUBLESHOOTING 6
REPLACEMENT PARTS - VSM 7
REPLACEMENT PARTS - VSM BASIC 8
NOTES 9
WARRANTY BACK COVER
POSITIVE PRESSURE
VENTILATION/ATTACK
2
Page 3
SAFETY GUIDE
GENERAL INFORMATION
Failure to follow the operating, maintenance and lubrication
requirements set forth in this manual may result in serious
personal injury or death and/or damage to equipment or property.
e following WARNING statements indicate potentially
hazardous conditions for operators and equipment. Make certain
that anyone who works on or around the blower has read and fully
understands the safety precautions listed.
1. Carefully read this owner’s manual before attempting to
operate, service or disassemble any part of your Tempest
Power BlowerTM.
2. DO NOT operate the unit when mentally or physically
fatigued or impaired.
3. Stay away from rotating parts; avoid wearing loose jackets,
shirts, and ties. Keep hands and feet away from moving parts.
4. Keep all unauthorized personnel at a safe distance from the
blower.
5. Keep all guards in place. DO NOT make repairs while the
unit is running. DO NOT operate if any guard or grille is not
in place.
6. Always wear eye protection. Loose debris can be picked up in
the air stream and own in the air.
7. Hearing protection is required. Engine and air noise may
exceed safe dB levels.
8. Always ensure proper voltage and amperage is delivered to
your Tempest Power BlowerTM.
9. Only a qualied technician should perform repairs or
maintenance on electric components.
10. Never operate your Tempest Power BlowerTM with electric
components exposed.
11. Never operate your Tempest Power BlowerTM with damaged,
exposed or frayed wiring.
12. It is the sole responsibility of the owner/operator to develop
procedures for proper use of the Tempest Power BlowerTM in
accordance with generally accepted ventilation techniques as
well as the organization’s own operating procedures, before
placing the unit into service.
BLOWER IDENTIFICATION
Each Tempest Power BlowerTM has a part number as well as a serial
number. e part number identies the type of unit (size, drive,
etc.) while the serial number relates to information referencing the
date of manufacture. is information is useful should it become
necessary to contact the factory regarding your Power BlowerTM.
SERIAL NUMBER LOCATIONS
e serial number is typically located on the frame just right of the
engine mount (when viewed from behind).
Please write the Serial Number of your Tempest Power BlowerTM
in the spaces below. is will aid us in identifying which model
you have when assisting you.
Model (Part No.)
Date
Serial No.
WARRANTY
Warranty information on your unit can be found on the back page
of this manual. For further information, please contact Tempest
Technology Corp.
3
Page 4

POWER BLOWERTM DATA
TYPE:
DRIVE:
BLADE:
BUSHING:
SHROUD:
FRAME:
TILT MECHANISM:
GRILLE:
VIBRATION DAMPENERS:
WHEELS:
(NON BASIC)
Positive Pressure Ventilation Fan, Cone Air Flow (CAF)
Direct-Drive Variable Speed 110-120V, 60Hz Electric Motor, GFCI Compatible
AirFlex Fiberglass Reinforced Polyamide Blades
Keyed Sha and Set or Cap Screws
Turbo 2000 Tapered Aluminum w/ Durable Powder-Coat Finish
Rugged, Lightweight, Square-Steel Tubing with Powder-Coat Finish
Foot-Operated Tilt Mechanism
16” Models: Four Position Tilt, +10°, +5°, 0°, -5°
18”, 21” Models: Five Position Tilt, +15°, +10°, +5°, 0°, -5°
18”, 21” BASIC Models: ree Position Tilt, +15°, +10°, 0° (Hand-Operated)
Continuous Circular-Wound, External-Weld Steel Wire with 8 Tie Points for Additional Safety
Meets UL & European CE Safety Standards
Steel-Reinforced Rubber and Welded Steel Spring Feet
16” Models: 6” Non-Pneumatic w/ Steel Hubs
18“, 21” Models: 8” Non-Pneumatic w/ Steel Hubs
VSM SPECIFICATIONS:
VSM BASIC SPECIFICATIONS:
Model No. Part No. Size HP CFM Dimensions (WxDxH) Weig ht
VS-16-M-0.5 910-1500 16” 0.5 10,650
VS-18-M-0.8 910-1520 18” 0.8 8,465
VS-21-M-0.8 910-1540 21” 0.8 11,475
Model No. Part No. Size HP CFM Dimensions (WxDxH) Weig ht
VS-18-M-0.8 BASIC 910-1521 18” 0.8 8,465
VS-21-M-0.8 BASIC 910-1541 21” 0.8 11,475
21.00” x 19.75” x 21.75”
23.00” x 21.00” x 24.25”
26.00” x 21.00” x 26.25”
22.00” x 18.50” x 24.00”
25.00” x 18.50” x 25.50”
68 lbs.
82 lbs.
86 lbs.
58 lbs.
61 lbs.
4
Page 5
POWER BLOWERTM INFORMATION
OPERATING PROCEDURES
e Tempest Power BlowerTM is a high powered, portable
fan used for Positive Pressure Ventilation and Attack (PPV/
PPA), ventilation techniques that quickly and eciently replace
hazardous interior environments with clean, cool air.
PPV and PPA were pioneered in the reghting industry where
reghters use the Tempest Power BlowerTM to ventilate smoke,
heat, and harmful gases from buildings. is creates a safer
environment for them to work in and makes it easier for them to
nd victims and extinguish the re.
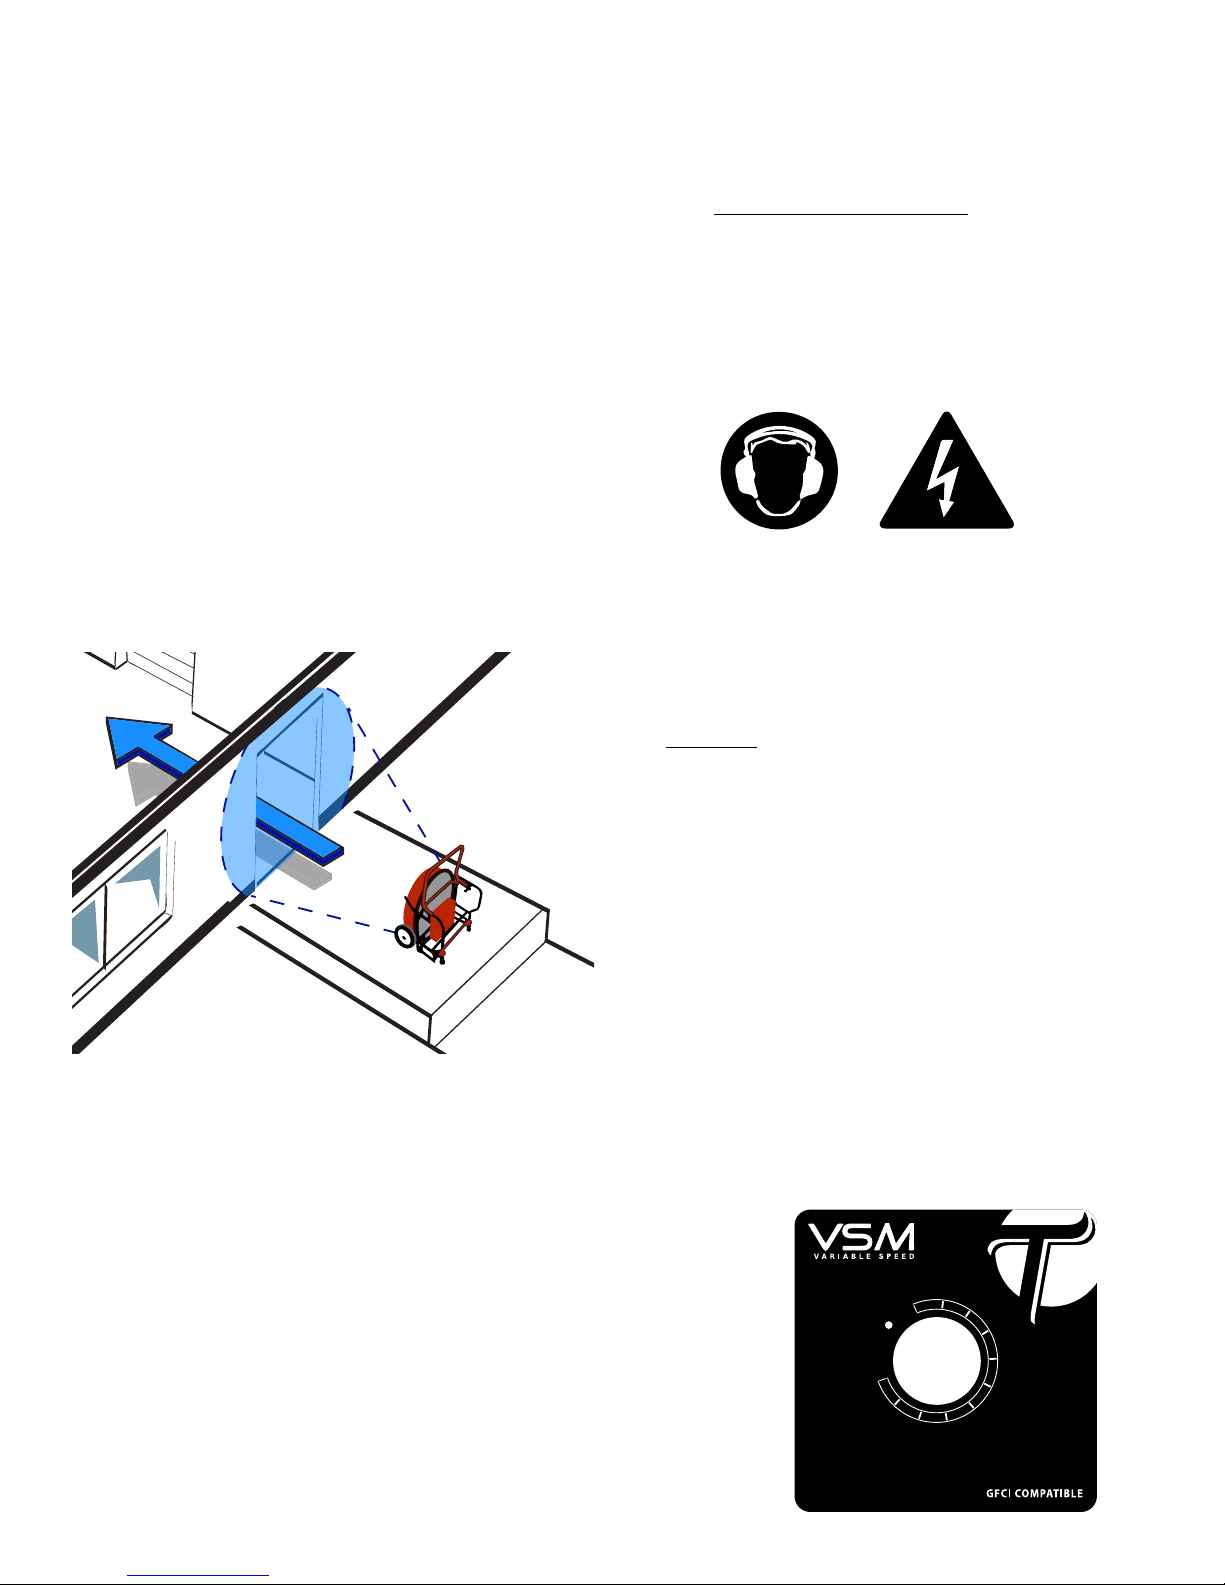
PPV and PPA rely on two principles, (1) an air pattern capable of
creating an eective door seal, and (2) pressure. To accomplish
Positive Pressure Ventilation or Attack, the blower is placed on
the outside of the structure. It is positioned so that the air pattern
created by the blower completely seals the entrance opening, or
at least 2/3 of it. When this seal is achieved, the air pressure is
increased equally at all points inside the structure. When an
exhaust opening is created, all of the interior air moves in one
mass towards it. e result is fast, ecient ventilation of the entire
structure.
PRE-OPERATION
Aer receiving and unpacking your blower, be sure to carefully
inspect it for any damage that might have occurred during
shipping. Should you nd any damage: PLEASE NOTIFY
TEMPEST TECHNOLOGY CORP. IMMEDIATELY AT
800.346.2143 OR [email protected].
OPERATION
SET-UP, STARTING AND STOPPING
Assuming the previous Pre-Operation and safety instructions
have been followed the blower is now ready to run.
WHEN USING A GENERATOR, IT IS IMPERATIVE
THAT THE GENERATOR BE RUNNING AT FULL
CAPACITY BEFORE PLUGGING IN ANY ELECTRIC
BLOWER. ALWAYS VERIFY SUFFICIENT GENERATOR
OUTPUT BEFORE USE. IMPROPER VOLTAGE SUPPLY
MAY DAMAGE UNIT AND VOID WARRANTY.
NOTE: e Tempest Power BlowerTM is the most ecient
tool for PPV and PPA for two reasons. First, the exclusive
Tempest Turbo 2000 aluminum shroud design creates a
broad, cone shaped air pattern. Second, the airex impeller
used on all Tempest blowers is designed to create high
pressure. ese two features working together make the
Tempest Power BlowerTM a highly eective and ecient
ventilation tool.
As with any new technique, Positive Pressure Ventilation requires
training and education in order to be implemented properly
and safely. Tempest oers access to a complete line of training
materials, which cover many applications for this powerful
ventilation technique. For more information visit www.tempest.
us.com, www.positivepressuretraining.com or contact us at
800.346.2143 or [email protected].
CAUTION: DO NOT MOVE THE BLOWER WHILE
IT IS IN OPERATION. SEVERE PERSONAL INJURY IS
POSSIBLE AS WELL AS DAMAGE TO THE BLOWER.
ALWAYS SHUT-DOWN THE BLOWER PRIOR TO
MOVING.
SET-UP
Position the blower in the desired location, making sure it is
placed on a at, hard and debris free surface.
STARTING
1. Set speed control knob to OFF.
2. Plug blower into power source.
3. Adjust speed control knob to desired load/speed.
STOPPING
1. Stop unit before unplugging from power source. Make sure
toggle is set to OFF.
ON
10
20
30
40
50
60
70
VSM DRIVE
OFF
100
90
80
5
Page 6

MAINTENANCE PROCEDURES
POWER BLOWER
TM
TROUBLESHOOTING
Although Tempest Variable Speed Power BlowersTM are designed
to eliminate most maintenance issues, it is imperative that the
blowers be inspected before startup on each use. Please review the
following list before using this product.
MAINTENANCE SCHEDULE
EVERY USE
• INSPECT BLOWER FOR DAMAGE AND FIX IF
ANY
• TIGHTEN/REPLACE ANY LOOSE OR MISSING
PARTS
EVERY MONTH OR 10 HOURS
• INSPECT & CLEAN SHROUD & GRILLES
IMPORTANT: Always operate the blower in an area free
of debris which may be pulled into the unit’s blades. If you
suspect the fan’s blade may have contacted a hard object,
thorough inspection of the blade assembly should be
conducted immediately to ensure safety. You may contact
Tempest Technology Corp. in order to nd out how to
properly inspect the blade assembly.
Various factors can contribute to or be the sole cause of problems
for electric power blowers. is section will identify some of these
problems and provide solutions to correct them.
BLOWER WILL NOT START WHEN RHEOSTAT TURNED
• Conrm that adequate power is being supplied to blower. If
power supply is adequate, DISCONNECT BLOWER FROM
POWER SOURCE and check for loose or faulty wiring on
blower electrical system and repair if needed.
• Connect blower to power source and attempt restarting. If
blower does not run, DISCONNECT BLOWER FROM
POWER SOURCE, remove the drive cover and check the
internal wiring connections.
• Check the internal fuse located on the circuit board of the
drive.
• If the blower will not start and all electrical connections
have been checked, the VSM drive may need to be replaced.
Contact Tempest at 800.346.2143 or response@tempest.
us.com for assistance.
BLOWER MOVEMENT OR “WALKING”
• Adjust the rubber footpads on the back of the blower by
turning them either in or out.
• Adjust the side that is walking. is will help to evenly
distribute the weight of the blower to all four points of the
frame.
• Most blowers will walk if not running at full speed, make sure
the blower is running at full speed.
• Ensure the blower is sitting at and not on small rocks or
other objects.
• If blower is still walking, contact Tempest at 800.346.2143 or
[email protected].
6
Page 7
12
7
1
3
2
9
13
6
10
16
4
18
20
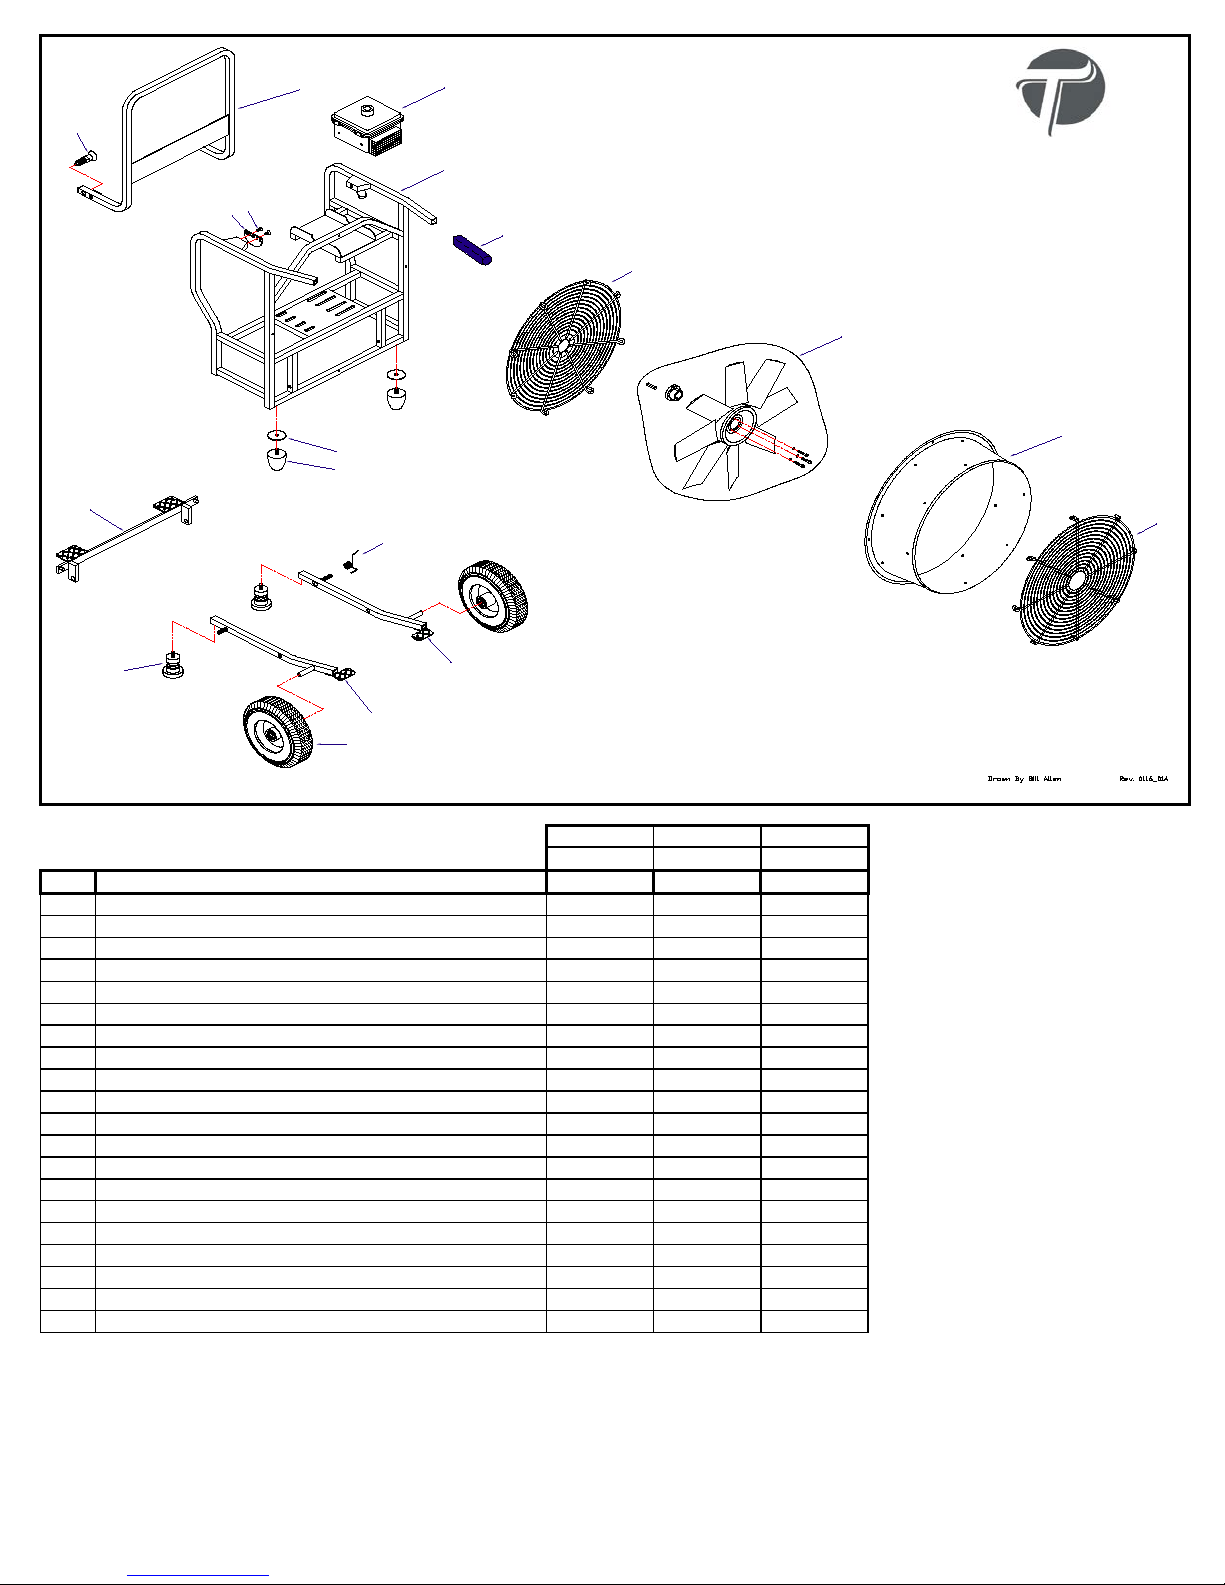
Replacement Parts
VSM Electric
Power Blowers
For Technical Support;
1-800-346-2143
Please specify part number and
serial number of blower when
ordering parts.
™
19
17
11
15
5
14
VS-16-M-0.5 VS-18-M-0.8 VS-21-M-0.8
910-1500 910-1520 910-1540
Item # Description Part No. Part No. Part No.
1 1/4 X 1/2 FLAT SOC C/S ZINC 100-079 100-079 100-079
2 WASHER 3/8 X 2 FENDER HVY Z 120-037 120-037 120-037
3 HANDLE BRACKET 220-069 220-069 220-069
4 GRIP BASIC BLOWER HANDLE 220-248 220-248 220-248
5 WHEEL FLAT FREE 240-008 240-012G 240-012G
6 SPRING TORSION 300-019 300-018 300-018
7 SPRING PLUNGER W/HANDLE 300-170 300-170 300-170
NI* ELECTRIC MOTOR ASSEMBLY STD 360-041 360-042 360-042
9 FOOT TAPERED 580-006 580-006 580-006
10* VSM DRIVE ASSEMBLY 581-098K 581-098K 581-098K
11 SPRING ASSEMBLY 600-001 600-001 600-001
12* HANDLE YELLOW 600-715K 600-716K 600-717K
13* WIN STEP YELLOW 600-719K 600-720K 600-721K
14* LEG ASSEMBLY LEFT DARK GREY 610-1001K 610-1020K 610-1020K
15* LEG ASSEMBLY RIGHT DARK GREY 610-1002K 610-1021K 610-1021K
16* FRAME DARK GREY 610-1302K 610-1322K 610-1342K
17 FRONT GRILLE DARK GREY 610-1400K 610-1420K 610-1440K
18 REAR GRILLE DARK GREY 610-1401 610-1421 610-1441
19* SHROUD, YELLOW
705-102
705-107 705-112
20* BLADE ASSEMBLY 260-074 705-285 705-266
* Item includes necessary hardware for installation.
NI Not Illustrated
This document contains proprietary information and intellectual property that cannot be reproduced or altered, in whole or in part, without the written consent of Tempest Technology Corp.
Copyright 2016 - All Rights Reserved
Information and Material Subject to Change Without Notice
7
Page 8
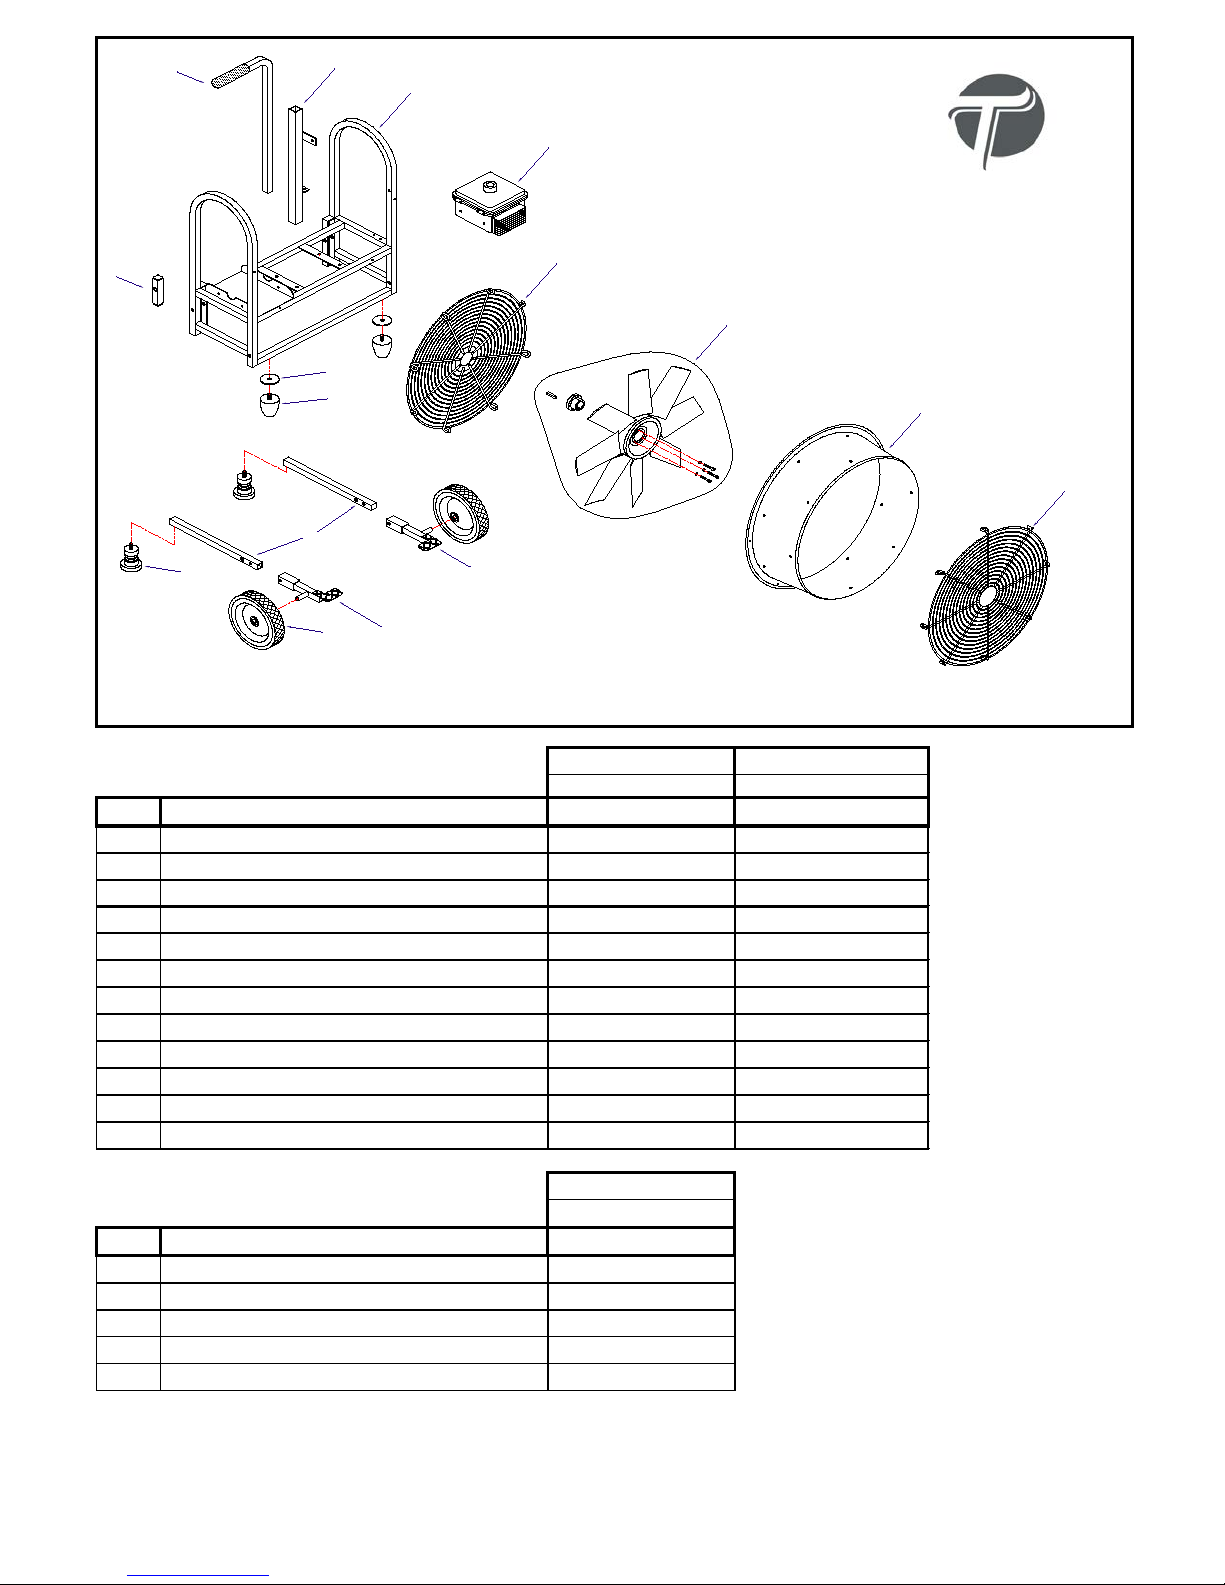
15
14
8
4
Replacement Parts
Variable Speed Basic Electric
Power Blowers
6
10
12
1
3
7
For Technical Support;
1-800-346-2143
Please specify part number and
serial number of blower when
ordering parts.
11
™
9
5
17
13
16
VS-18-M-0.8 BASIC VS-21-M-0.8 BASIC
910-1521 910-1541
Item # Description Part No. Part No.
1 WASHER 3/8 X 2 FENDER HVY Z 120-037 120-037
NI ELECTRIC MOTOR ASSEMBLY 360-042 600-131
3 FOOT TAPERED 580-006 580-006
4 VS-M DRIVE ASSEMBLY 581-098K 581-098K
5 SPRING & FOOT ASSY, COMPLETE 600-001 600-001
6 BASIC TILT CAM ASSEMBLY 600-345K 600-345K
7* LEG KIT LEFT/RIGHT DARK GREY 610-1027K 610-1027K
8* FRAME DARK GREY 610-1304K 610-1344K
9 FRONT GRILLE DARK GREY 610-1420K 610-1440K
10 REAR GRILLE DARK GREY 610-1421 610-1441
11* SHROUD, RED
705-105
705-110
12* BLADE ASSEMBLY 705-285 705-266
Drawn By Bill Allen Rev. 0116_01A
Item # Description Part No.
13 WHEEL 715-OF 7X1.50 OFFSET
14 HANDLE RECEIEVER ASSY 18 & 21 BASIC
15 PULL UP HANDLE FOR BASIC
16 BASIC WHEEL MOUNT LEFT
17 BASIC WHEEL MOUNT RIGHT
* denotes item includes necessary hardware for installation
NI Not Illustrated
This document contains proprietary information and intellectual property that cannot be reproduced or altered, in whole or in part, without the written consent of Tempest Technology Corp.
Copyright 2016 - All Rights Reserved
Information and Materi al Subject to Change Without Notice
8
Handle/Wheel Kit
610-1921
240-001
610-1659
600-286K
610-1657
610-1658
Page 9

NOTES
9
Page 10

NOTES
10
Page 11

NOTES
11
Page 12

WARRANTY INFORMATION
Except as otherwise set forth below, any claim by Customer with reference to the Goods sold shall be
deemed waived by the Customer unless submitted in writing to Tempest within the earlier of (i) ve
(5) business days following the date Customer discovered, or by reasonable inspection should have
discovered, any claimed breach of the foregoing warranty, or (ii) thirty (30) calendar days following the
date of shipment. Any cause of action for breach of the foregoing warranty shall be brought within one
(1) year from the date the alleged breach was discovered or should have been discovered, whichever
occurs rst.
Limited Power Blower Warranty
Tempest warrants to the original purchaser that all Tempest gasoline and electric powered blowers
(except the engine or motor and drive) will be free from original defects in workmanship and material,
under normal-use conditions, and Tempest will replace any defective power blower part (except the
engine or motor and drive) if returned during the applicable warranty period, for the time frame
indicated below:
Firefighting Industry:
Five (5) years from date of shipment
Industrial/Rental Industry:
One (1) year from date of shipment
Blower Engine / Motor & Drive Warranty
e engines manufactured by Honda® and Briggs & Stratton® are covered by a separate manufacturer’s
warranty for a period of two (2) years. Electric motors manufactured by Magnetek, Marathon, Baldor,
Franklin Electric and Multi-Fan are covered by a separate manufacturer’s warranty for a period of one
(1) year.
Note: Unauthorized repair or modication of the factory assembly or parts voids the warranty.
All information provided in this operations manual is subject to change without notice. Please refer to
our website for the most recent sales terms and conditions.
Tempest Technology Corporation
4708 N. Blythe Avenue, Fresno, CA 93722
t: 559.277.7577 • f: 559.277.7579 • [email protected]
www.tempest.us.com
 Loading...