

Page 1
User Manual and Installation Guide
Tornado Moving Light Enclosures
Featuring MiniDECTM Control Technology
Tempest Lighting, Inc.
13110 Saticoy Street, Unit C
N. Hollywood, CA 91605, USA
Tel +1 818 787 8984
Fax +1 818 982 5510
www.tempestlighting.com
For the following products,
manufactured after March 2012
Twister 1800
Twister 1850
Twister 1900
Twister 1950
In the interest of continuous product improvement, the information in this document is subject to change without
notice. Neither Tempest Lighting, Inc. nor its representatives or agents may be held liable for expense or injury
arising from it.
© Tempest Lighting Inc. All Rights Reserved October, 2012
User Manual
Twister Compact Moving
Light Enclosures
Twister Enclosure User Manual page 1
Page 2

Declaration of Conformity
This is to certify that the following products
1800.IN Twister 1800 Enclosure
1850.IN Twister 1850 Enclosure
1900.IN Twister 1900 Enclosure
1950.IN Twister 1950 Enclosure
are in Compliance with the following standards or specifications according to the Electro
Magnetic Compatibility Directive 2004/108/EC.
EN55015, Cispr 16
and are in compliance with the following standards or specifications according to the Low
Voltage Directive 2006/95/EC.
EN60598-1
This declaration is made by the manufacturer
Tempest Lighting, Inc.
5401 Bevis Avenue
Sherman Oaks, CA 91411, USA
This declaration is based on tests that were conducted on the submitted samples of the above
mentioned products. Detailed results can be referred to test reports C27963_03, C27963_04,
C27963_06, C27963_07
Dated: August 1st, 2012
Signature . . . . . . . . . . . . . .
Tempest Lighting Inc
Twister Enclosure User Manual page 2
Page 3

1 Introduction
Thank you for purchasing the Twister enclosure. It will serve you for many years, protecting your
stage spotlights and effects equipments from the elements.
Products Covered By this Manual:
1800.IN Twister 1800 Enclosure 230V
1800.US Twister 1800 Enclosure 120V
1850.IN Twister 1850 Enclosure 230V
1850.US Twister 1850 Enclosure 120V
1900.IN Twister 1900 Enclosure 230V
1900.US Twister 1900 Enclosure 120V
1950.IN Twister 1900 Enclosure 230V
1950.US Twister 1900 Enclosure 120V
Using This Manual
Please read this manual in its entirety before starting work. All the information contained is
important, and should be read carefully before proceeding. Heed all warnings and advisories.
Icon Key:
Valuable information
Electrical Warning
Safety Information
Twister Enclosure User Manual page 3
Page 4

2 Installation
2.1 Safety and Warnings
These warnings are for your protection. Failure to comply may result in serious injury or death.
Tempest Lighting, Inc. assumes no responsibility for damages or injury incurred by misuse or
mishandling of product.
Do not attempt to install or operate the enclosure before fully reading and understanding this
manual
Never allow anyone who has not read this manual to open the enclosure or perform
maintenance on the equipment within.
Never leave the enclosure unattended when open.
Always make sure all bolts and latches are tight and safety locks are in place after performing
any form of maintenance on the unit.
Do not open any electrical boxes until power has been shut off to all supply lines to the
enclosure (including the one powering the equipment).
Do not open the enclosure in wet weather.
2.2 Tools and Equipment
To install the enclosure, you will need the following items:
Crescent wrench
Phillips screwdriver
Terminal screwdriver
Proper wiring installation equipment (for line power and signal wiring)
Any equipment listed in the equipment manufacturer’s equipment-specific installation
directions
2.3 Mounting the Twister Enclosure
The Twister enclosure must be mounted on or under a solid structure rated for the weight of
the enclosure, the equipment inside it, and at least one person.
Snow – if installed outside in cold regions, the bottom of the Twister enclosure must be at
least 2’ (60cm) above maximum height of any snowfall or drifting snow, subject to local
conditions. If snow is not a consideration, then enclosure may sit on the ground as long as
proper drainage is provided.
Twister Enclosure User Manual page 4
Page 5
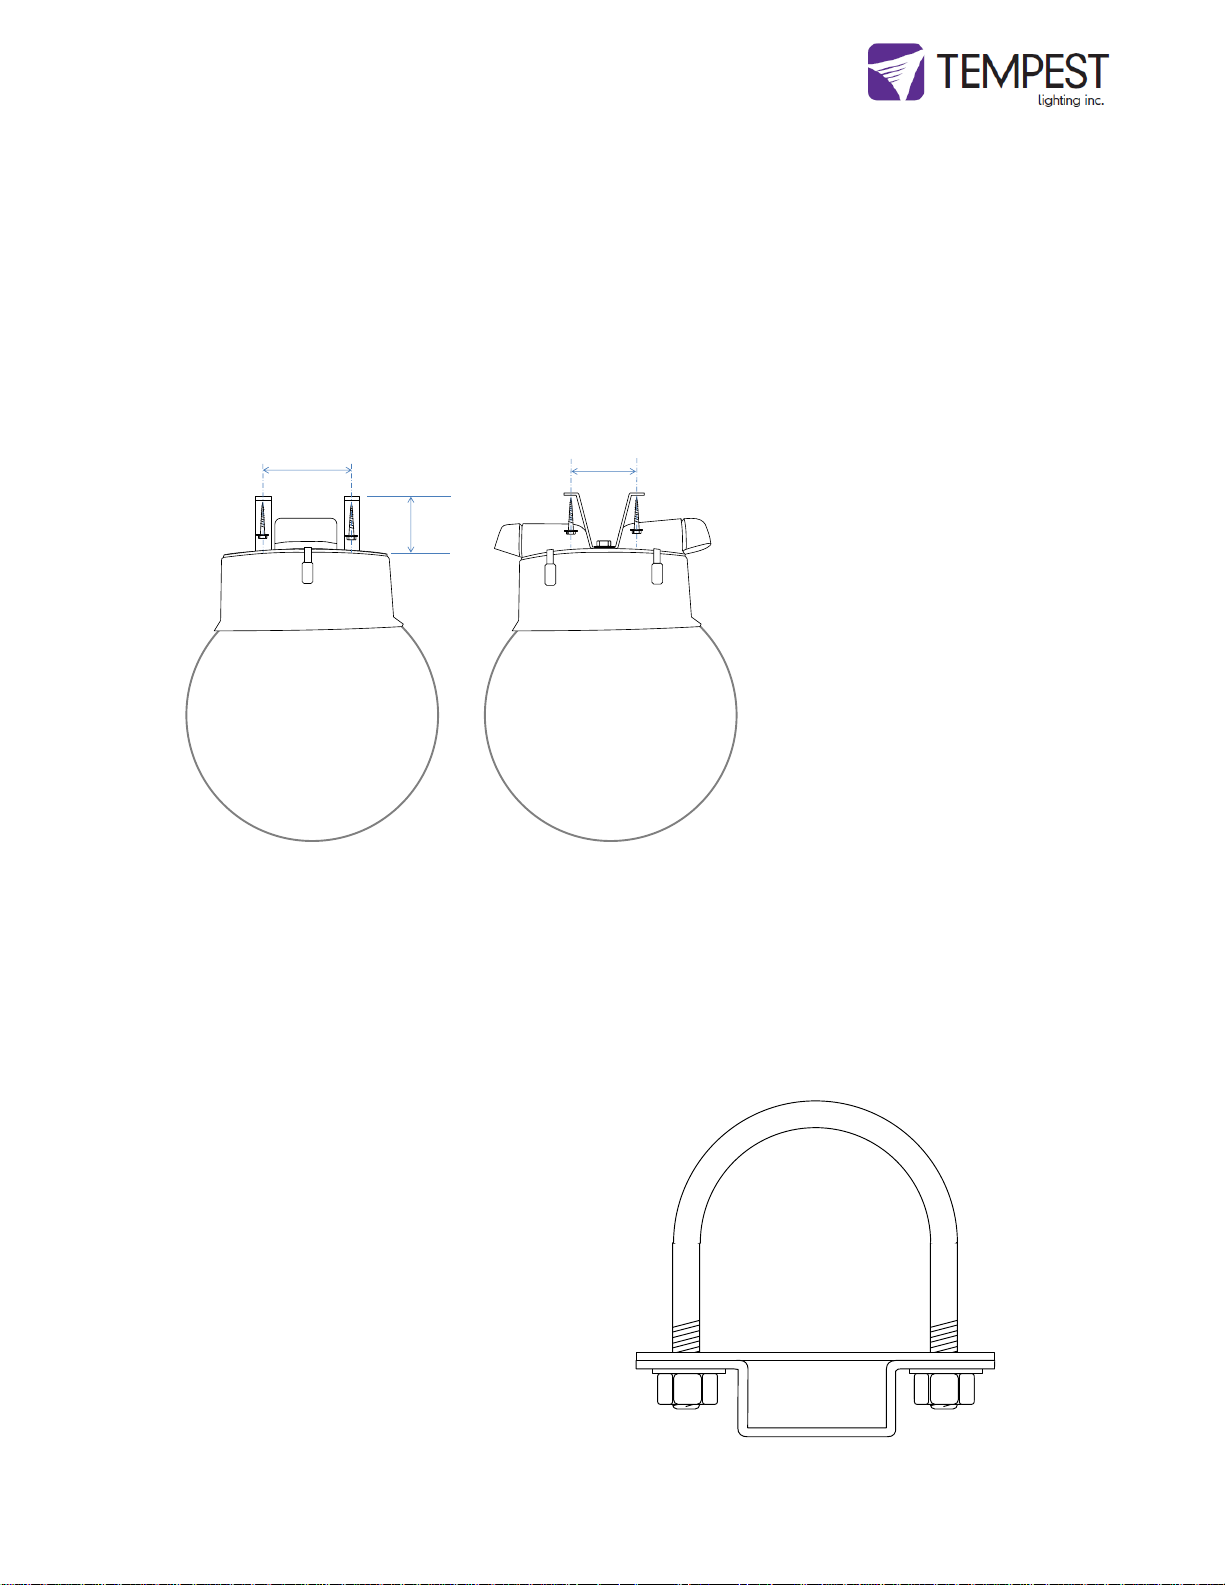
LEAVE ADEQUATE CLEARANCE BEHIND ENCLOSURE FOR WIRING AND VENTILATION COWLS
Tempest Lighting recommends the use of stainless steel mounting hardware.
The Twister enclosure is provided with two mounting brackets for wall, floor or ceiling mounting.
Wall anchors and screws are not provided and must comply with local building codes and safety
regulations.
Twister may also be installed using Tempest Pipe Clamps or conventional hanging clamps fitted to
the two holes in the base for either ½” US or M12 hardware.
Dimensions for Twister mounting Brackets
A B C
Twister 1800 8.25”/210 4.75”/121 3.0”/76
Twister 1850 15.5”/394 4.75”/121 6.0”/152
Twister 1900 15.5”/394 4.75”/121 6.0”/152
It is the responsibility of the installer to ensure that all mounting points are secure and conform to local
safety regulations. Tempest Lighting Inc. accepts no responsibility for damage or injury arising from
inappropriate or unsafe installation.
Mount Twister to a pipe or truss using two Tempest
stainless steel U-bolt kits:
4900.MCT Stainless Steel Unistrut channel nut, bolt
and pipe clamp, for pipes 1.5” (38mm) to 2” (50mm)
OD. Two required per enclosure.
4925.MCT Stainless Steel Unistrut channel nut, bolt
and pipe clamp, for pipes 2” (50mm) to 2.5” (64mm)
OD. Two required per enclosure.
A
B
C
Using the mounting
brackets provided,
secure with two screws
or bolts each to a solid
surface or structure.
Max screw size
3/8”/M10.
Twister Enclosure User Manual page 5
Page 6
2.4 Mounting Orientation
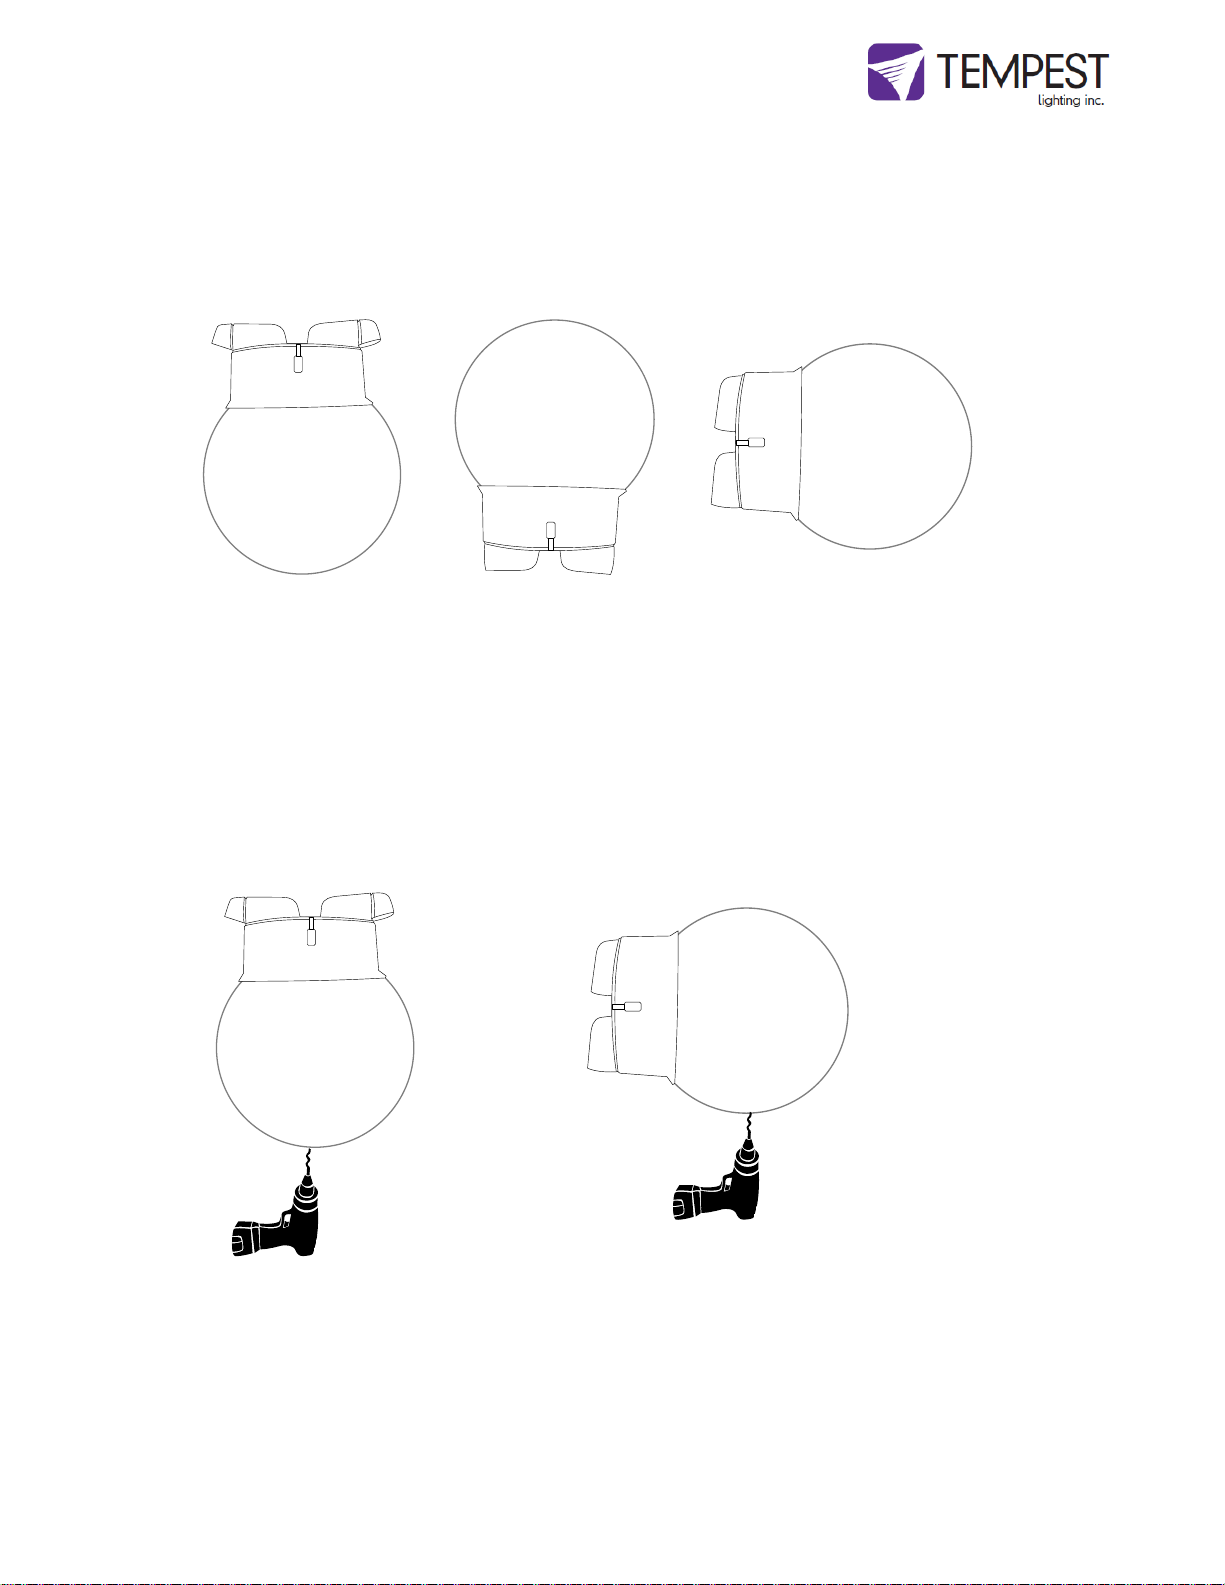
All Twister enclosures are designed to be mounted either base-down, base-up or horizontal, on a solid structure,
using the mounting hardware described above.
Base Up Base Down Horizontal
(see 2.5.1 below) (see 2.5.2 below) (see 2.5.3below)
Note that the air inlet and exhaust cowls are trimmed and oriented differently, depending on the mounting
orientation. See next section for detailed instructions.
2.4.1 Weep Holes
For Base up and horizontal installation, it is necessary to drill a drainage hole at the lowest point of the globe.
USE ONLY THE SPECIAL ACRYLIC TAPERED DRILL BIT SUPPLIED WITH YOUR TWISTER MANUAL. A regular
bit may crack the globe. Tempest Lighting Inc. accepts no responsibility for such damage.
NOTE:
Horizontal enclosures –
be sure to always
replace the globe with
the weep holes down.
Twister Enclosure User Manual page 6
Page 7
2.5 Air inlet and Exhaust Cowls
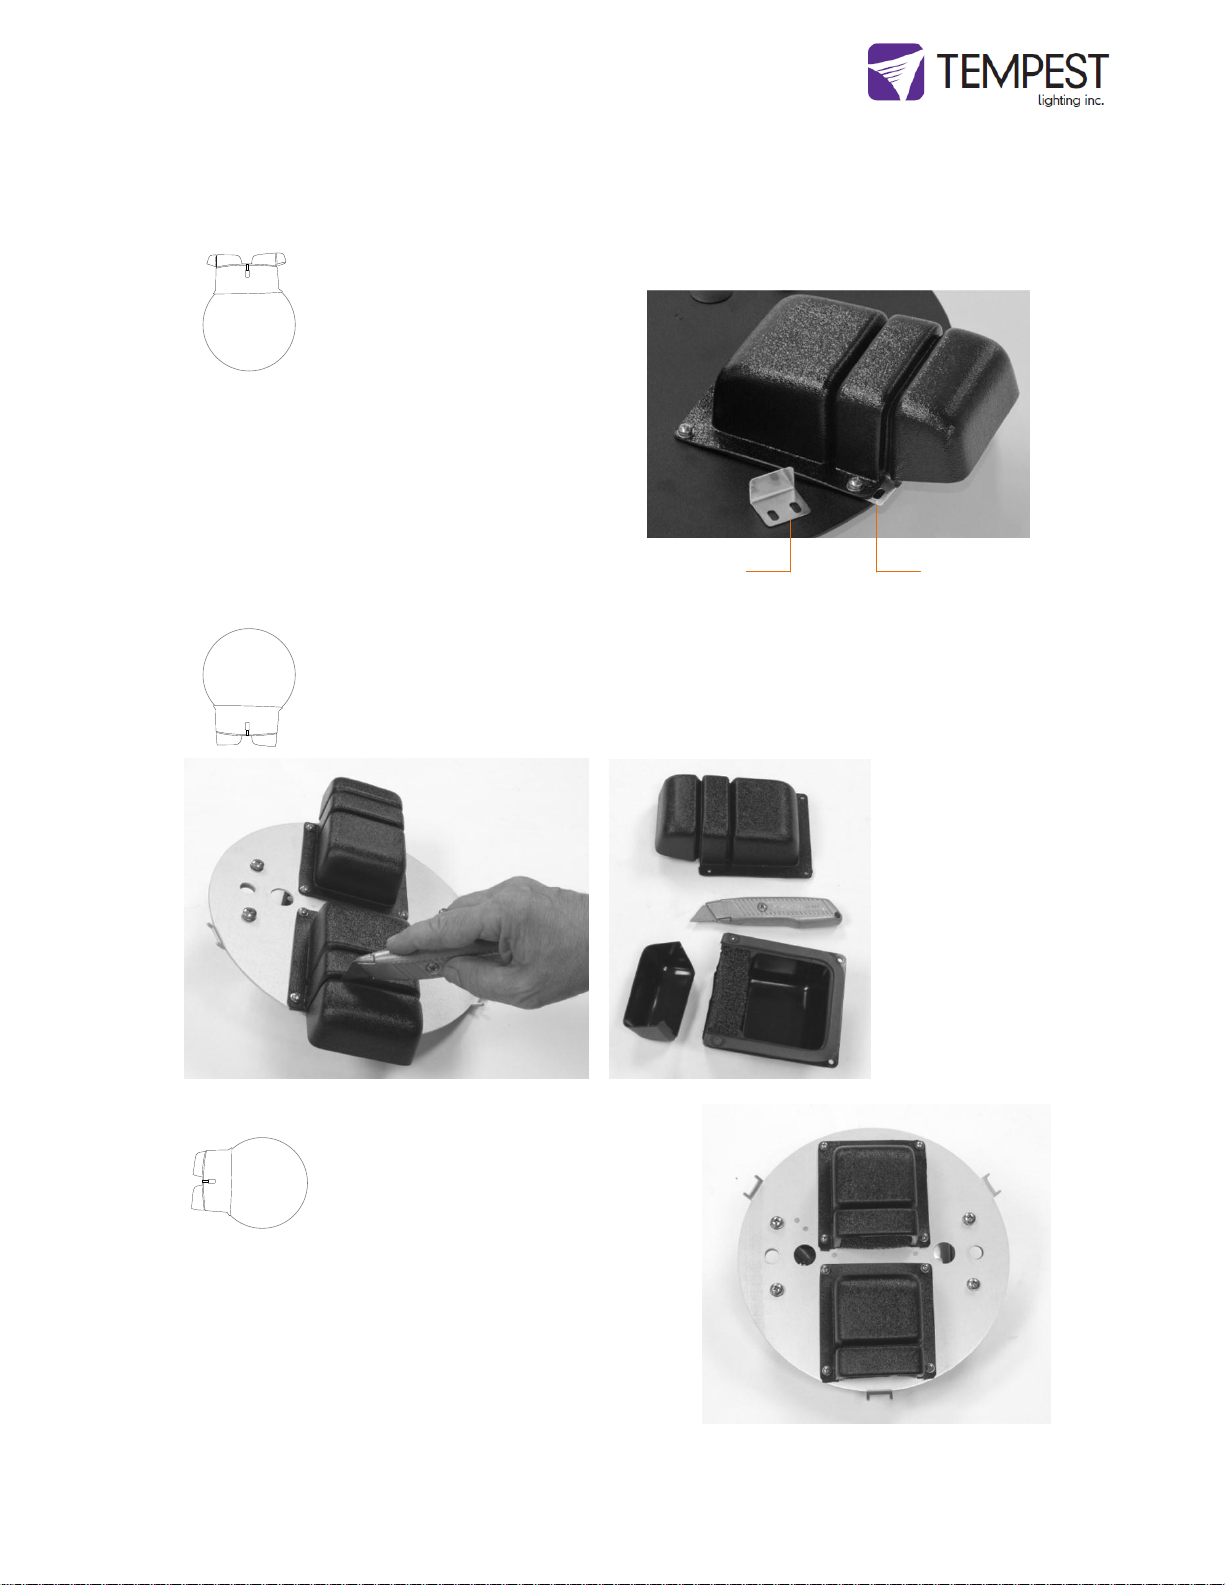
Twister enclosures are supplied with two plastic cowls and filters for the air inlet and exhaust vents. Use of the
cowls differs according to the orientation of the enclosures
2.5.1 Base-Up Installation
Insert the two filters into the cowl
slots.
Insert two rain guards between the
plastic cowl and the Twister base as
shown
Mount the cowls and rain guards onto
the Twister base plate, using the
screws provided
2.5.2 Base-Down Installation
Insert filters and mount as shown.
Using a sharp box-cutter knife, remove the outer chambers of the inlet and exhaust cowls.
2.5.3 Horizontal Installation
First, trim the outer chambers of the inlet
and exhaust cowls, using a sharp knife, as
described above for base-down installation.
Mount both cowls onto the Twister base plate, with the filter
end facing DOWN, as shown.
Rain guard
Rain guard location
Twister Enclosure User Manual page 7
Page 8
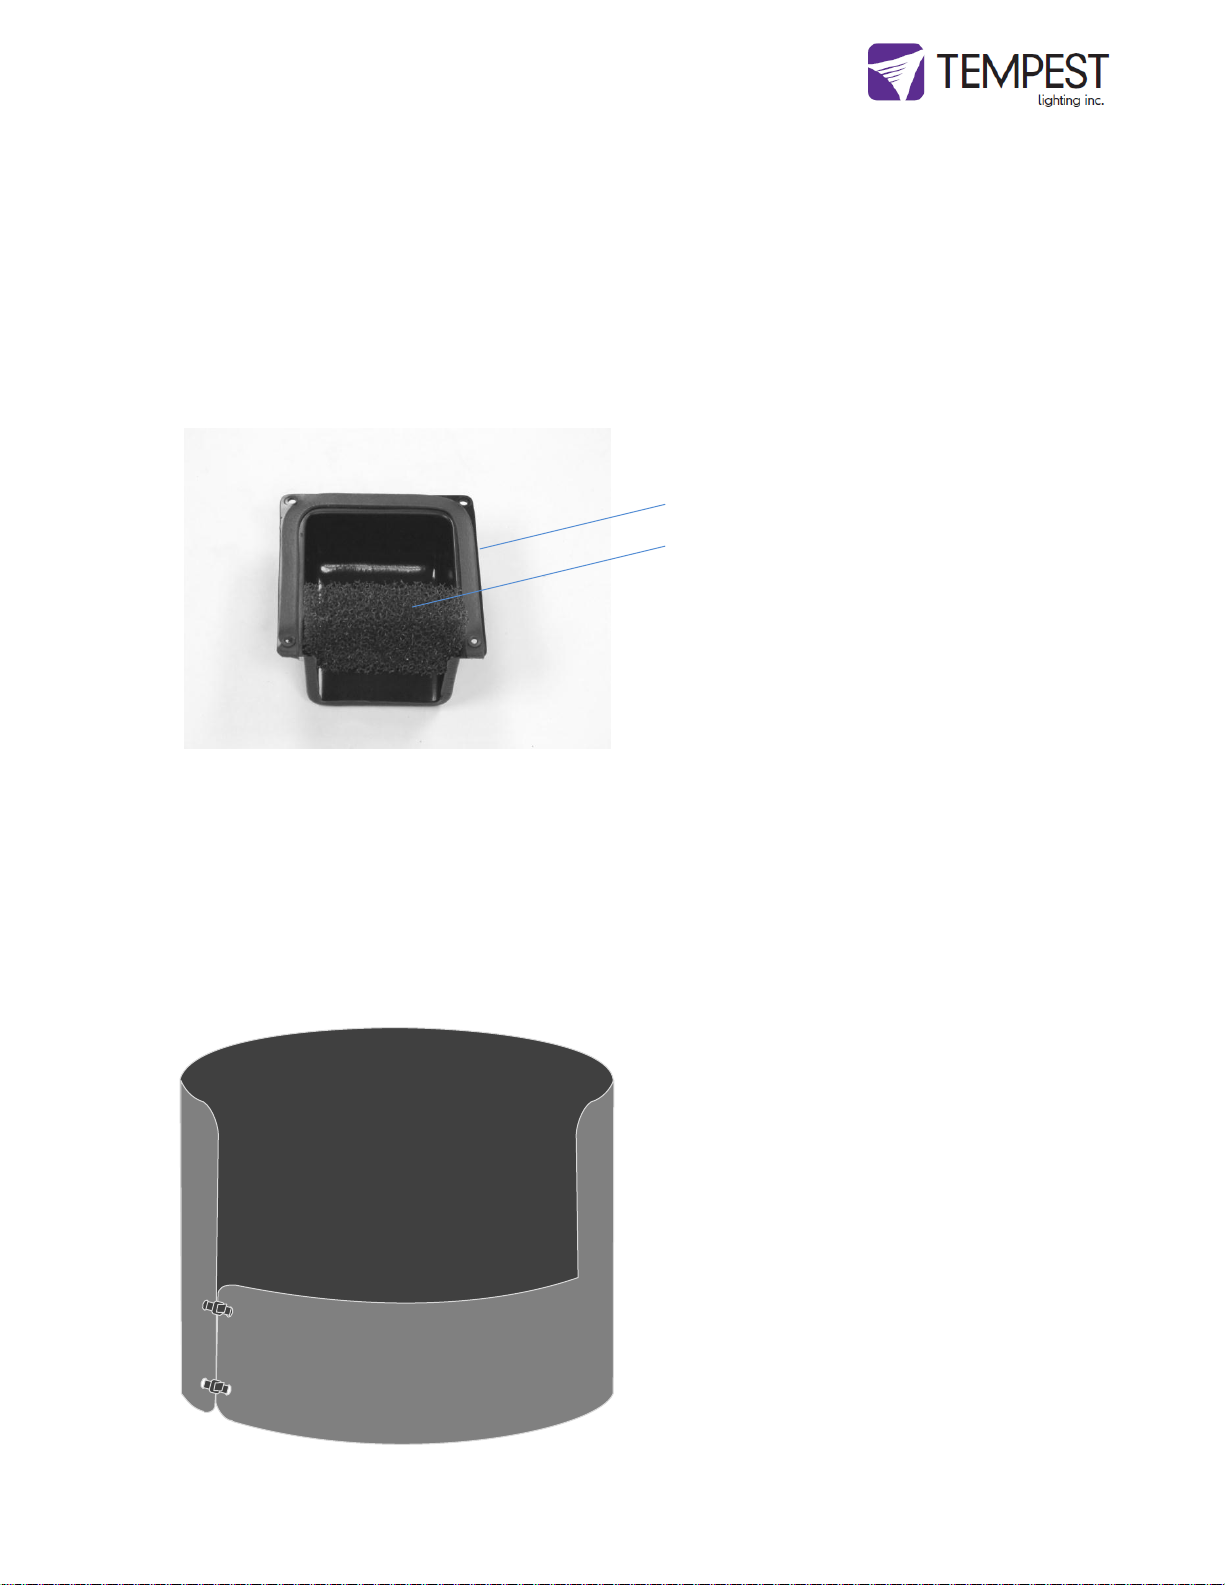
2.6 Air Filters
Note that both cowls are fitted with electrostatic air filters, to prevent ingress of dust and insects.
Both filters must always be in place.
You will need to remove the filters periodically for cleaning. How often will depend on local conditions. We
recommend checking every three months and then determining frequency of cleaning depending on what you
find.
To clean the filters, simply run them under a tap or water hose. Replace carefully between the ribs in the air
cowls. Cowls do not need to be removed – this picture is for illustration only.
Inlet/Exhaust Cowl
Filter
2.7 Fan Chimney (Twister 1900/1950)
The Fan Chimney is supplied with larger Twister enclosures and is required for use with luminaires using the
Philips 5R and 15R lamp, which is very sensitive to elevated temperatures. The fan chimney ducts the
incoming airflow from the fan into the top of the globe for more effective cooling.
Wrap the fan chimney around the fan, high side outside, and secure using the zip ties provided.
The fan chimney is soft, and will conform to the base of the luminaire as well as to the inside of the globe
assembly. It may be trimmed with sharp scissors if
needed.
Twister Enclosure User Manual page 8
Page 9

3 Wiring
3.1 Electrical Preparation
All electrical work must be carried out by a properly licensed electrician. Failure to observe this
point will void the factory warranty for the Tempest Enclosure and possibly the equipment housed
inside.
1 Before starting work, switch off power to the branch circuit, carefully following lockout and tag-out
procedures. Failure to do so could cause serious injury or death.
2 Two electrical junction boxes will be required within a short distance of the Twister enclosure for:
AC supply wiring
DMX control wiring
Your Twister enclosure is supplied fitted with two cable entry points, for Power and DMX signal cables.
The cable entries are suitable for use with standard conduit fittings. US size ½”, international 20mm.
Tempest recommends the use of flexible, outdoor-rated conduit for the last few feet (1m) to the enclosure.
All junction boxes must be installed in accordance with local electrical codes and should be located near the
permanent installation of the enclosure. Each junction box requires a length of flexible conduit, long
enough to reach from the junction box to the enclosure conduit fittings. Leave slack for positioning of
enclosure, and enough space behind the enclosure for ventilation.
The AC supply must be protected by a fuse or circuit breaker of a rating suitable for the equipment.
The user may connect the fan and the equipment to the same switched supply, or run them separately,
according to need (see below).
Note that for temporary installation, the conduit fittings may be replaced with outdoor-rated cable entry
glands, at the user’s discretion.
Twister Enclosure User Manual page 9
Page 10
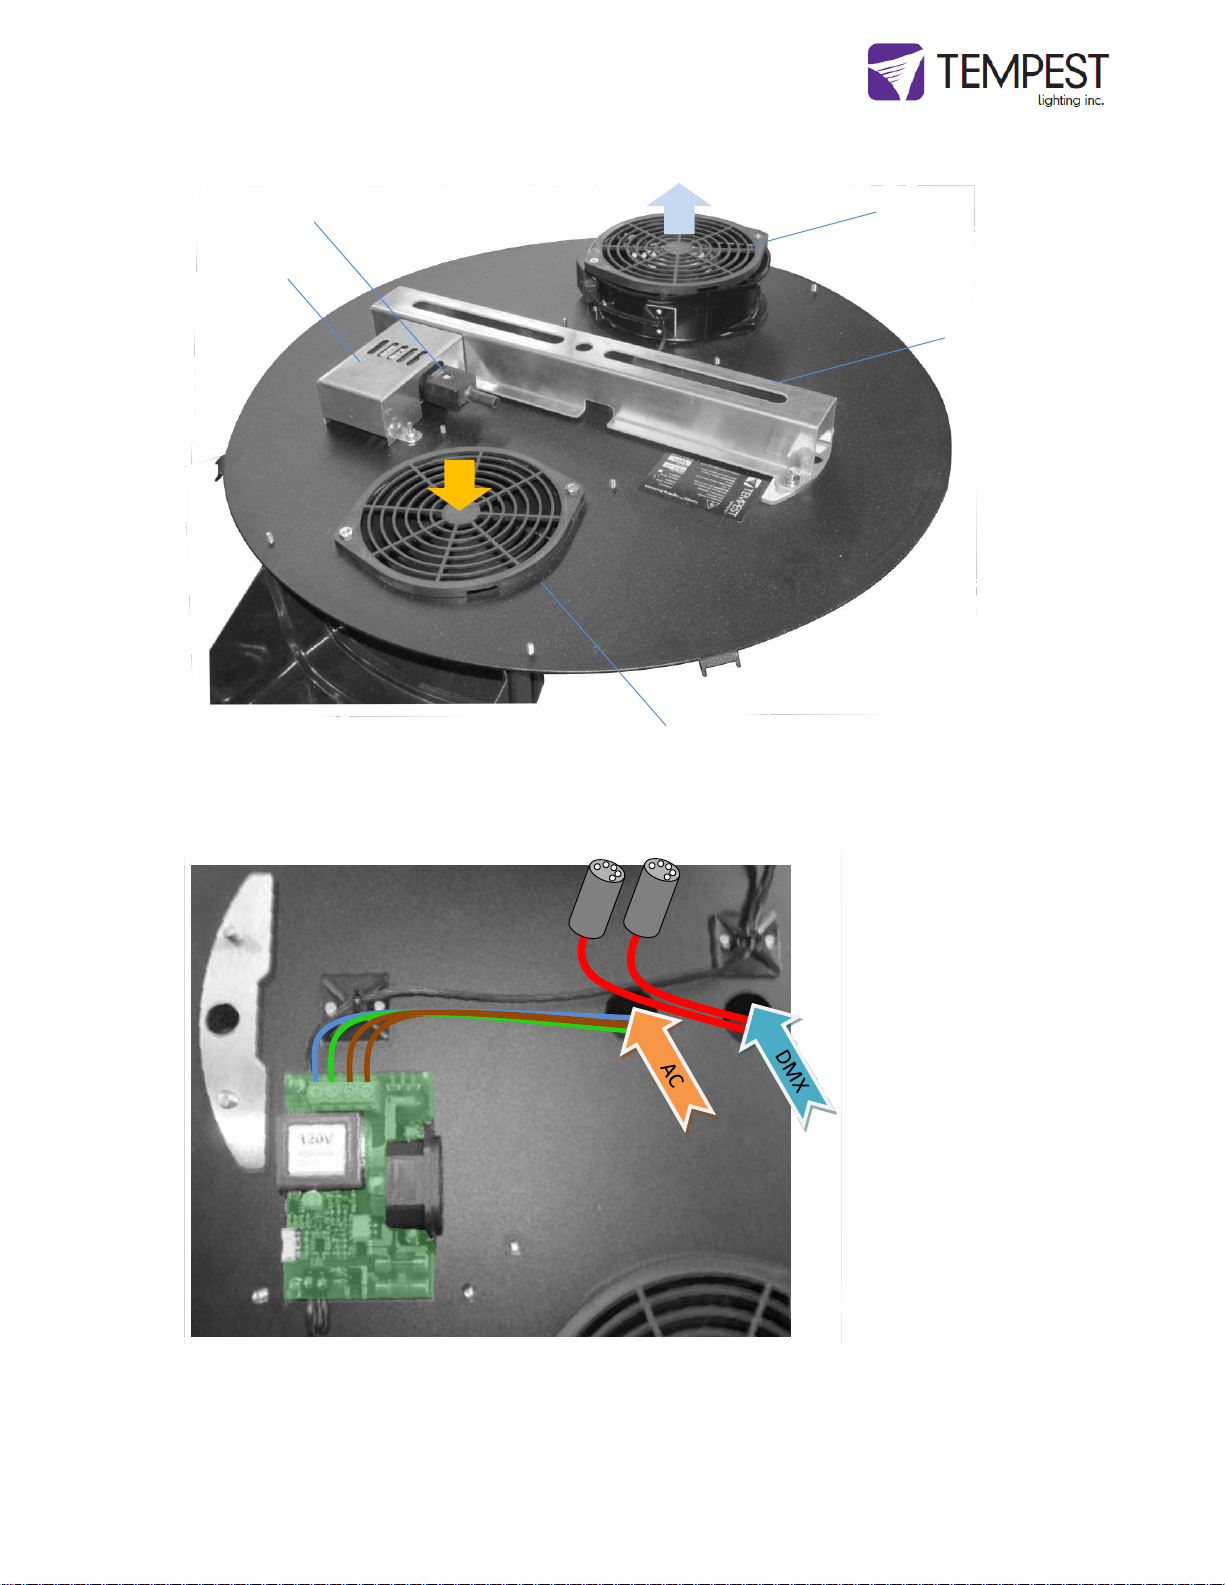
3.2 Remove the Globe Assembly.
3.3 Remove the Fixture Mount and the MiniDEC Cover, and pull AC and DMX control wires through
conduit entries, as shown here.
Fan
Fixture
Mount
Finger Guard
Rewireable
IEC Plug
MiniDEC
Controller
Cover
Airflow
AC Power
Twister Enclosure User Manual page 10
Page 11
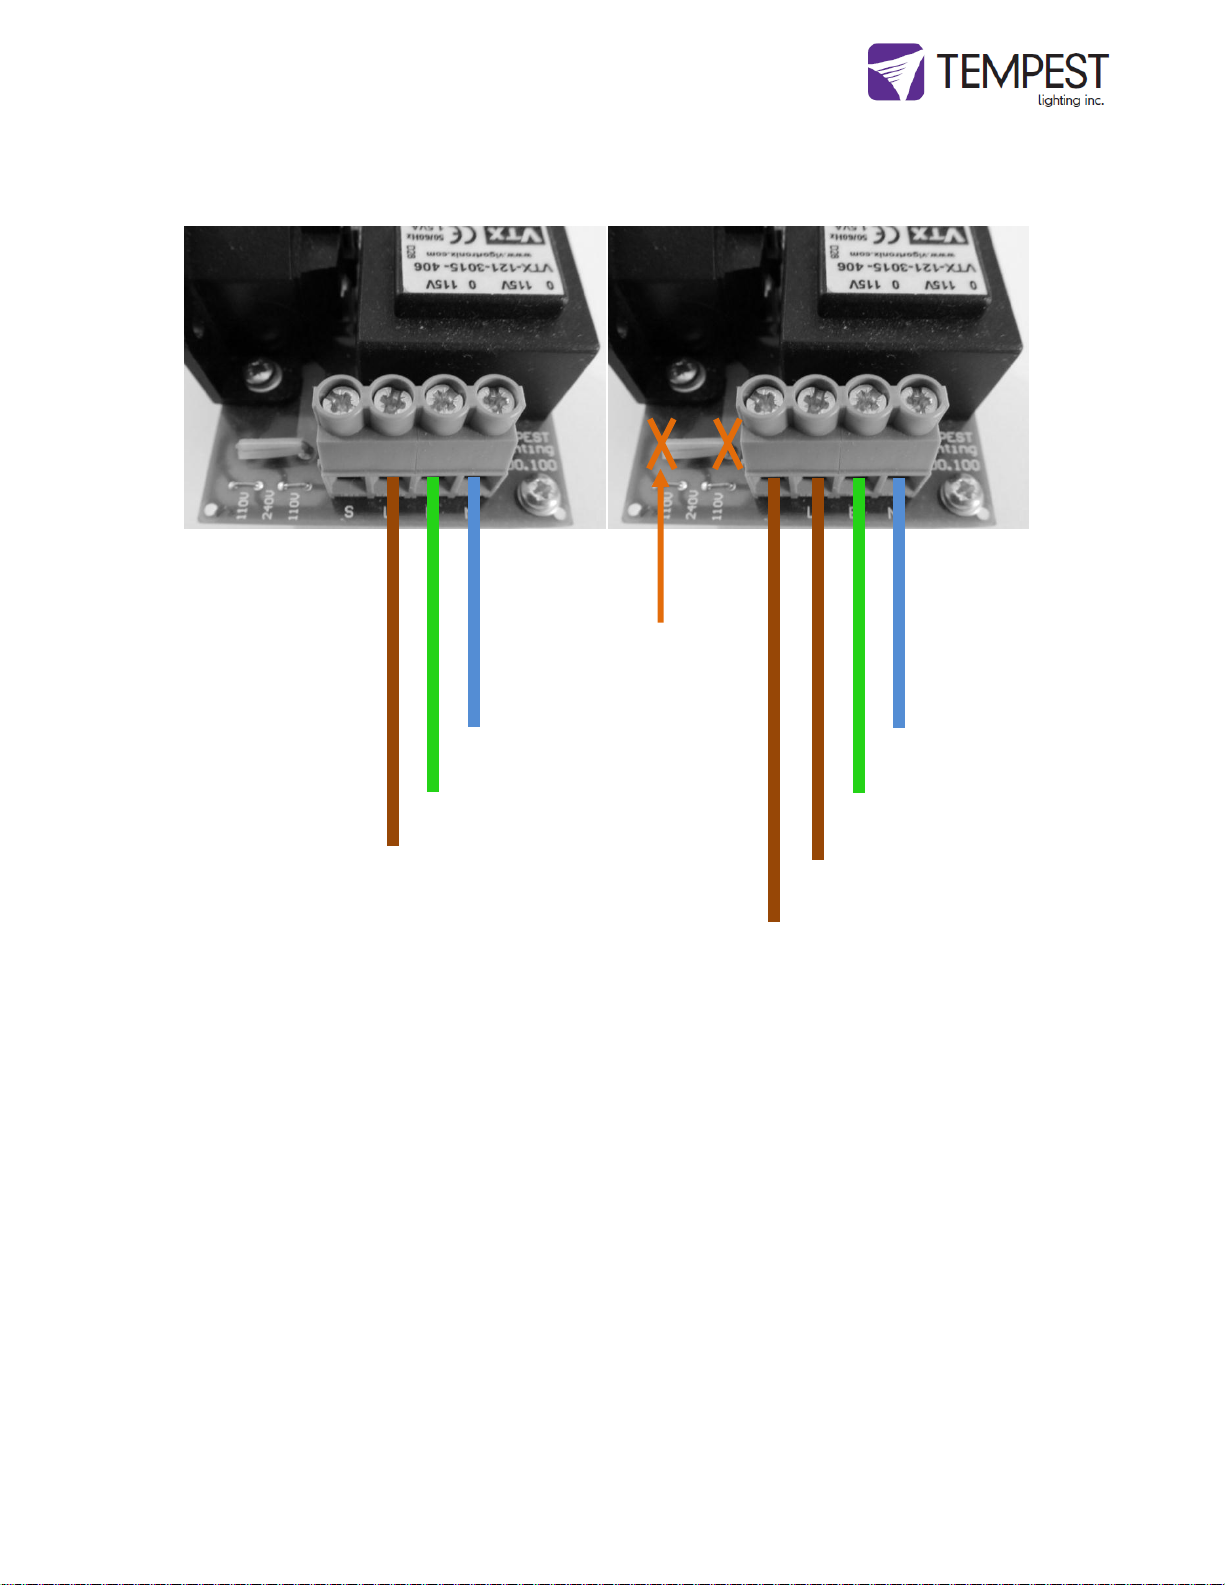
3.4 Connect AC Wiring to MiniDEC Controller
Single Feed Operation Split Feed Operation
NEUTRAL
Single Feed Wiring
Feed the controller with a single maintained supply. The enclosure should be powered 24/7. The light must be
switched off when needed using the lighting control system.
Twister ships configured for single feed wiring operation.
Dual Feed Wiring
You may switch off the supply to the light without interfering with the cooling fan operation. Connect feeder wires
as shown, AND CUT THE COPPER LINK ON THE MiniDEC BOARD IN TWO PLACES, AS SHOWN. Fan circuit should
be maintained 24/7.
3.5 Replace MiniDEC Cover
NEUTRAL
GROUND
LIVE (Fan)
LIVE (Light and Fan)
LIVE (Light)
CUT LINK 2
PLACES FOR
SPLIT FEED
OPERATION
NEUTRAL
GROUND
Twister Enclosure User Manual page 11
Page 12

MiniDEC Operation
The MiniDEC controller monitors current going to the light fixture inside the Twister enclosure, and also heat inside
the enclosure. When it detects that the light is on and/or the internal temperature is getting warm, MiniDEC runs
the enclosure fan. For best results, enclosures must be connected to live power at all times.
MiniDEC Operation is completely automatic.
Summary: MiniDEC detects current to light >1.5amps Fan on
MiniDEC detects current to light drop below 1amp 5-minute fan cool-down, then fan off
MiniDEC detects temperature 25-35°C (77-95°F) Pulse fan to change air every minute
MiniDEC detects temperature >35°C (95°F) Switch Fan on
MiniDEC LED Indicator
For information and Faultfinding there is an LED indicator on the MiniDEC control board. Function as follows:
LED OFF: MiniDEC is not powered, or power supply has failed.
LED ON: MiniDEC is functioning normally and luminaire power is < 1amp
LED blinking slowly: Luminaire Power > 1 amp, fan on
LED blinking rapidly: Luminaire power has dropped below 1amp. Fan is running for five minutes
for five-minute cool-down
Twister Enclosure User Manual page 12
Page 13
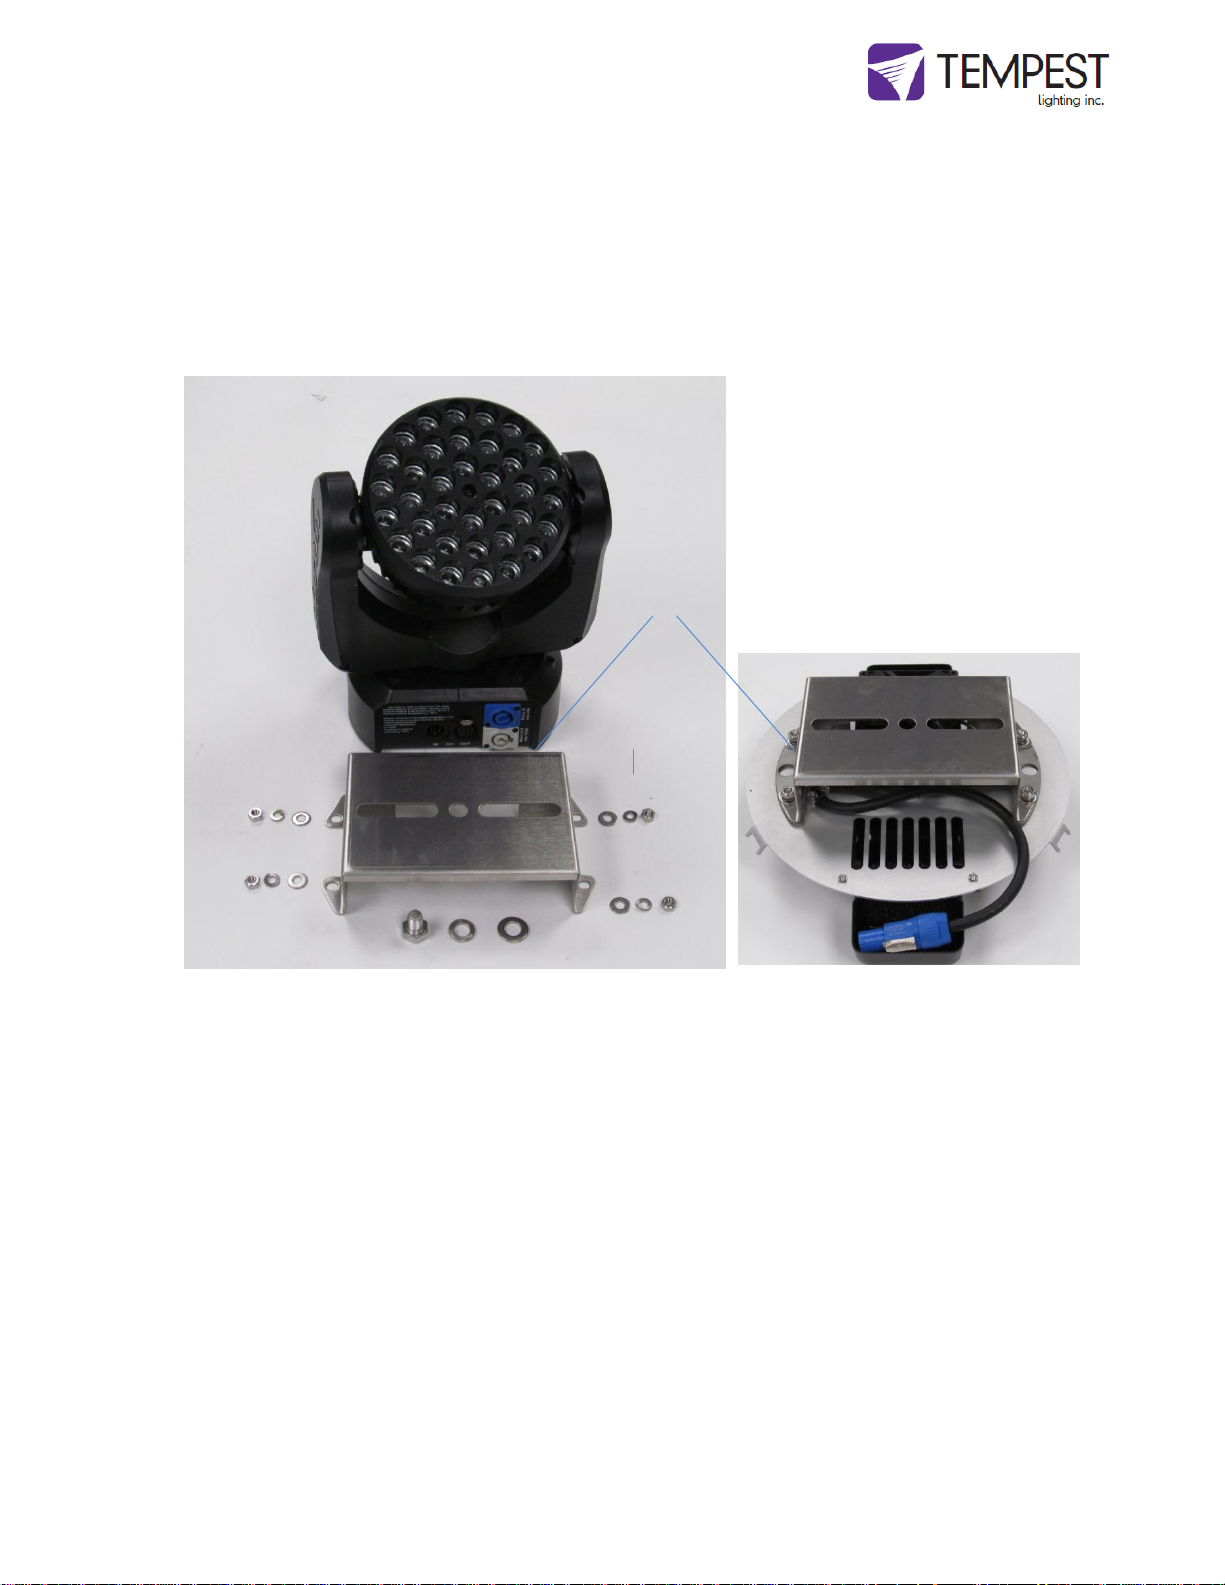
4 Mounting the Luminaire in the Twister Enclosure
If the Twister enclosure is suspended from a ceiling or overhang, this must be done by two people.
4.1 Mounting Smaller Luminaires without Omega Clamps
1. Remove the Fixture bracket from the enclosure base. Keep the fixture bracket mounting hardware safely for re-use.
2. Check that the open side of the Fixture bracket is facing you.
3. Using the fixture mounting hardware supplied with the luminaire, bolt through the underside of the bracket into the
threaded hole in the fixture base.
4. Replace the fixture bracket and the fixture on the Twister base, and tighten down the four fixing nuts.
Fixture Bracket
Fixture Bracket
mounting
hardware
Fixture mounting hardware
Twister Enclosure User Manual page 13
Page 14
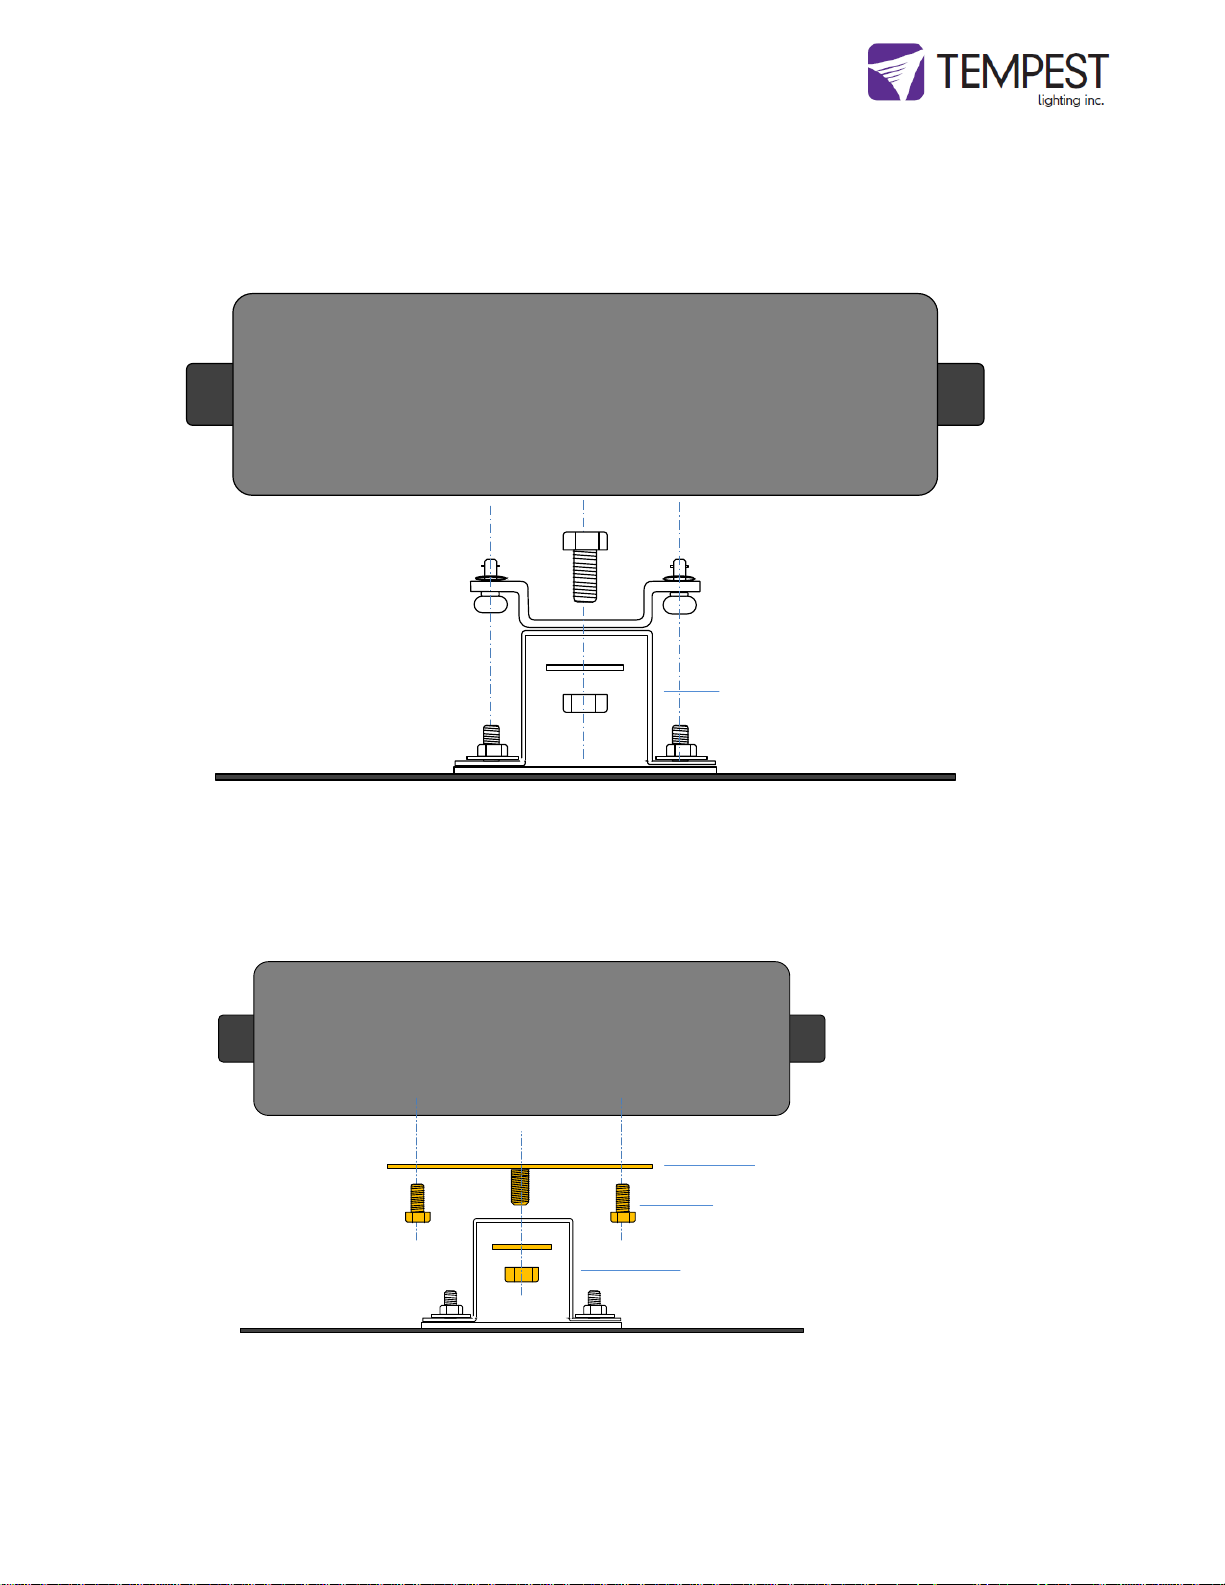
4.2 Mounting Luminaires using omega clamps
Many light fixtures are supplied with one or more omega clamps for mounting.
Mount the omega clamp(s) to the fixture base, following the manufacturer’s instructions, and bolt the omega
clamps to the Twister fixture bracket, before re-installing the fixture bracket to the fixture base.
4.3 – Chauvet Q-Spot 560 LED – Mounting in Twister 1900
This luminaire requires a special mounting kit available from Tempest Lighting or your Chauvet dealer.
Item # 1900.560K.
Omega Clamp
Fixture Bracket
Fixture Bracket
Flat Omega Adapter (x2)
M8 screws locate in
luminaire base (x 4)
Twister Enclosure User Manual page 14
Page 15
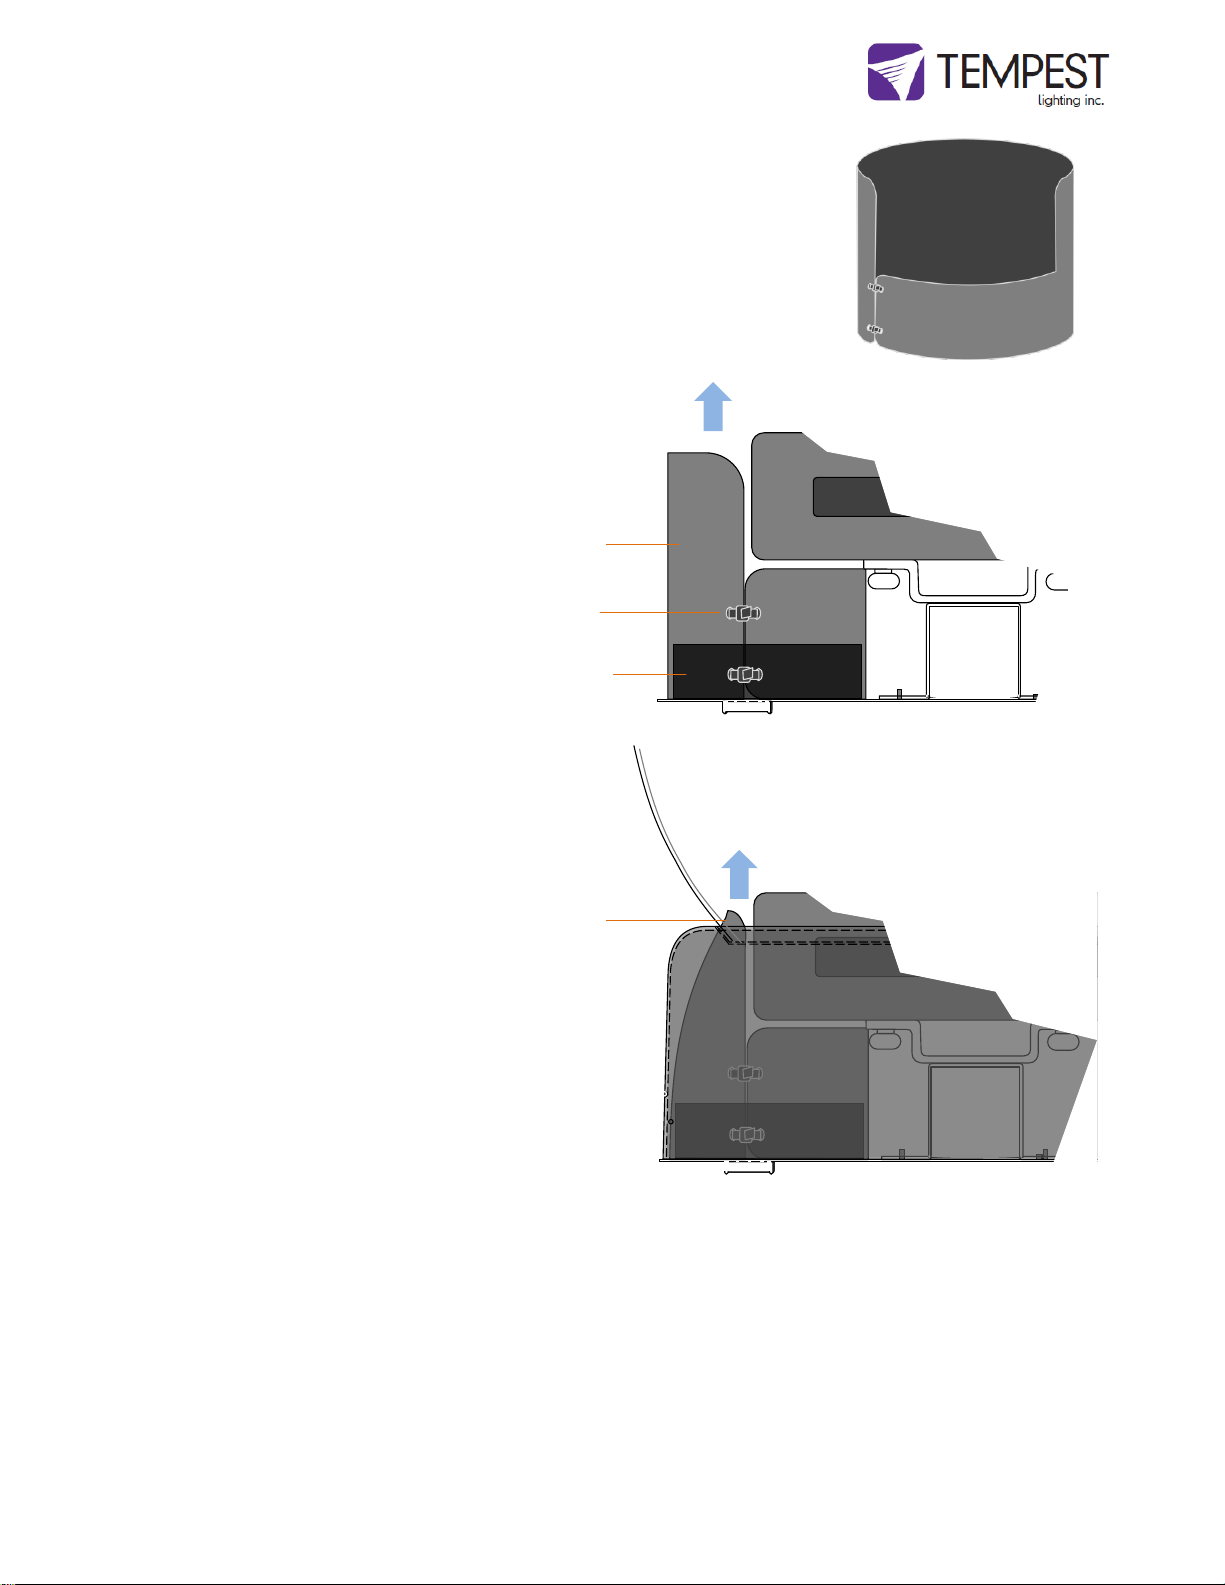
4.4 Use of Twister 1900 Fan Chimney
The fan chimney accessory is supplied with the Twister 1900 enclosure to assist air
circulation in cases where the luminaire base tends to obstruct airflow, or where
particularly temperature-sensitive lamps are used, such as the Philips Platinum
series. The chimney accessory is only needed if the luminaire is overheating, and is
not required for most luminaires.
The Chimney is a flexible duct that helps the incoming cool air from the fan blow
up to the top of the globe.
1 Wrap the chimney around the fan, and fasten with
the two plastic zip-ties supplied. You may trim the
chimney with sharp scissors as needed.
2 When placing the globe on the Twister base, take
care that the chimney is INSIDE the join between
the globe and the aluminum globe collar. The
chimney will spread out to conform to the space
available
Chimney (supplied flat)
Fan
Secure with two zip ties
Airflow
Pinch chimney
inside globe
Twister Enclosure User Manual page 15
Page 16
4.5 Connect Luminaire power and DMX
Connect the DMX IN and OUT luminaire connections as specified by the luminaire manufacturer
Connect the luminaire power cable to the IEC outlet provided on the MiniDEC controller. If necessary, shorten the
length of the luminaire power cord and install the rewireable IEC plug provided with your Twister enclosure.
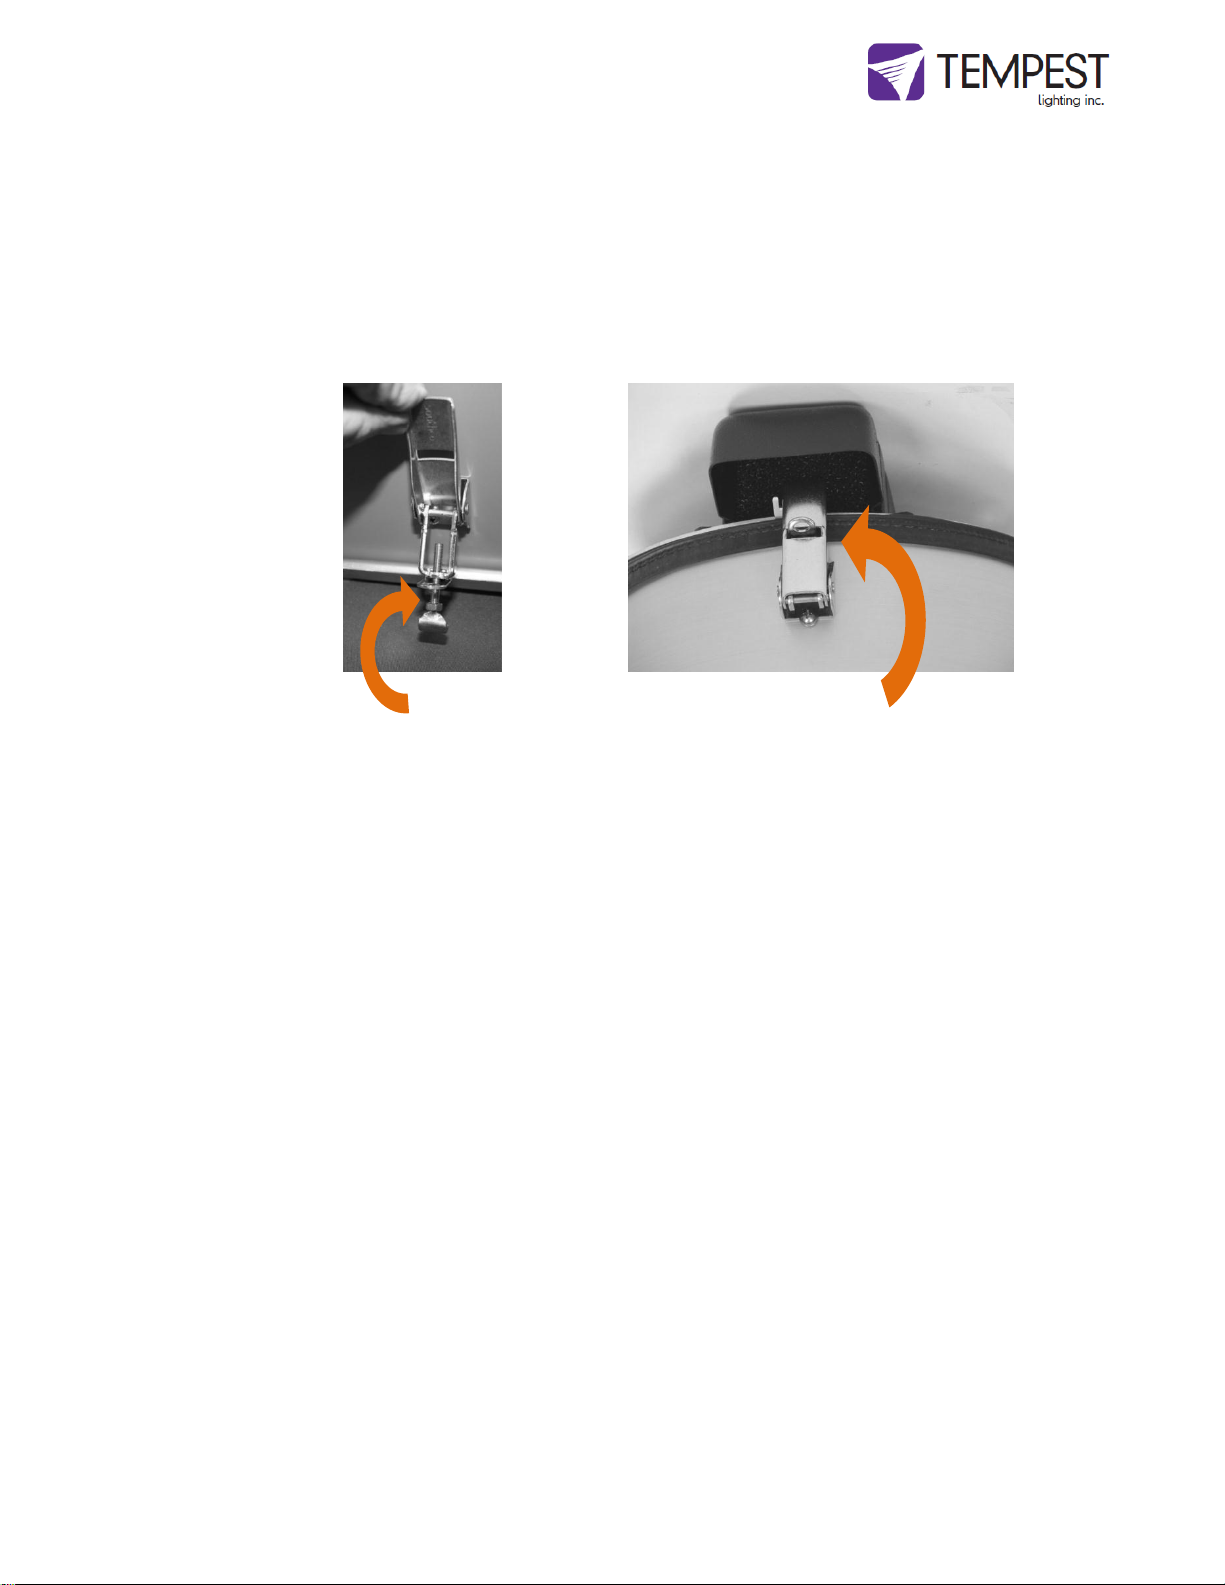
4.6 Latch Adjustment and Security
The latch tension is
adjusted by turning the
screw – clockwise to
tension, anti-clockwise to
loosen.
Insert a padlock in
one or more
security rings for
additional security.
Twister Enclosure User Manual page 16
Page 17

5 Operation
While there are no specific operational actions required for normal use, the following points should be kept in mind.
The enclosure should be connected to a live circuit at all times except when maintenance is being carried
out.
Unless the enclosure or equipment is undergoing routine maintenance, the enclosure should be closed and
securely latched at all times.
Only authorized personnel should open the enclosure (see maintenance warnings in the next chapter).
Twister Enclosure User Manual page 17
Page 18
6 Routine Maintenance
It is very important to perform routine maintenance on both the enclosure and the equipment
inside it. Failure to do so may reduce lifetime for both the enclosure and the equipment.
Note
Maintenance schedules depend on location and environment. The intervals given here are
general minimum guidelines. It is up to the user to judge whether maintenance should be carried
out more frequently. We recommend doing these tasks no less often than mentioned here.
Safety
As the enclosure is a powered unit with moving parts, it is necessary to keep safety in mind while
performing routine maintenance. Although maintenance can be performed while the enclosure is
powered, it is safer to carry it out with the power disconnected with proper lockout and tag out
procedures followed.
Be aware that once the enclosure has had power applied to it, the fan will start to turn. Make
sure that your hands are clear of the fan before applying power to the enclosure.
Only authorized personnel should perform maintenance on the enclosure or equipment
Do not service the unit in the rain or other adverse weather conditions (snow, sleet, high winds,
etc.).
Inspection Checklist: - Every Three (3) Months
Glass should be clean and free of cracks
Enclosure should be free of debris both inside and out
Bolts and tie-down straps should be tight
Rubber seals should be in good condition. Check seals inside and out for gaps.
Fan should be functioning and not making excessive noise
Filters should be clean
Drainage holes must be free of obstructions
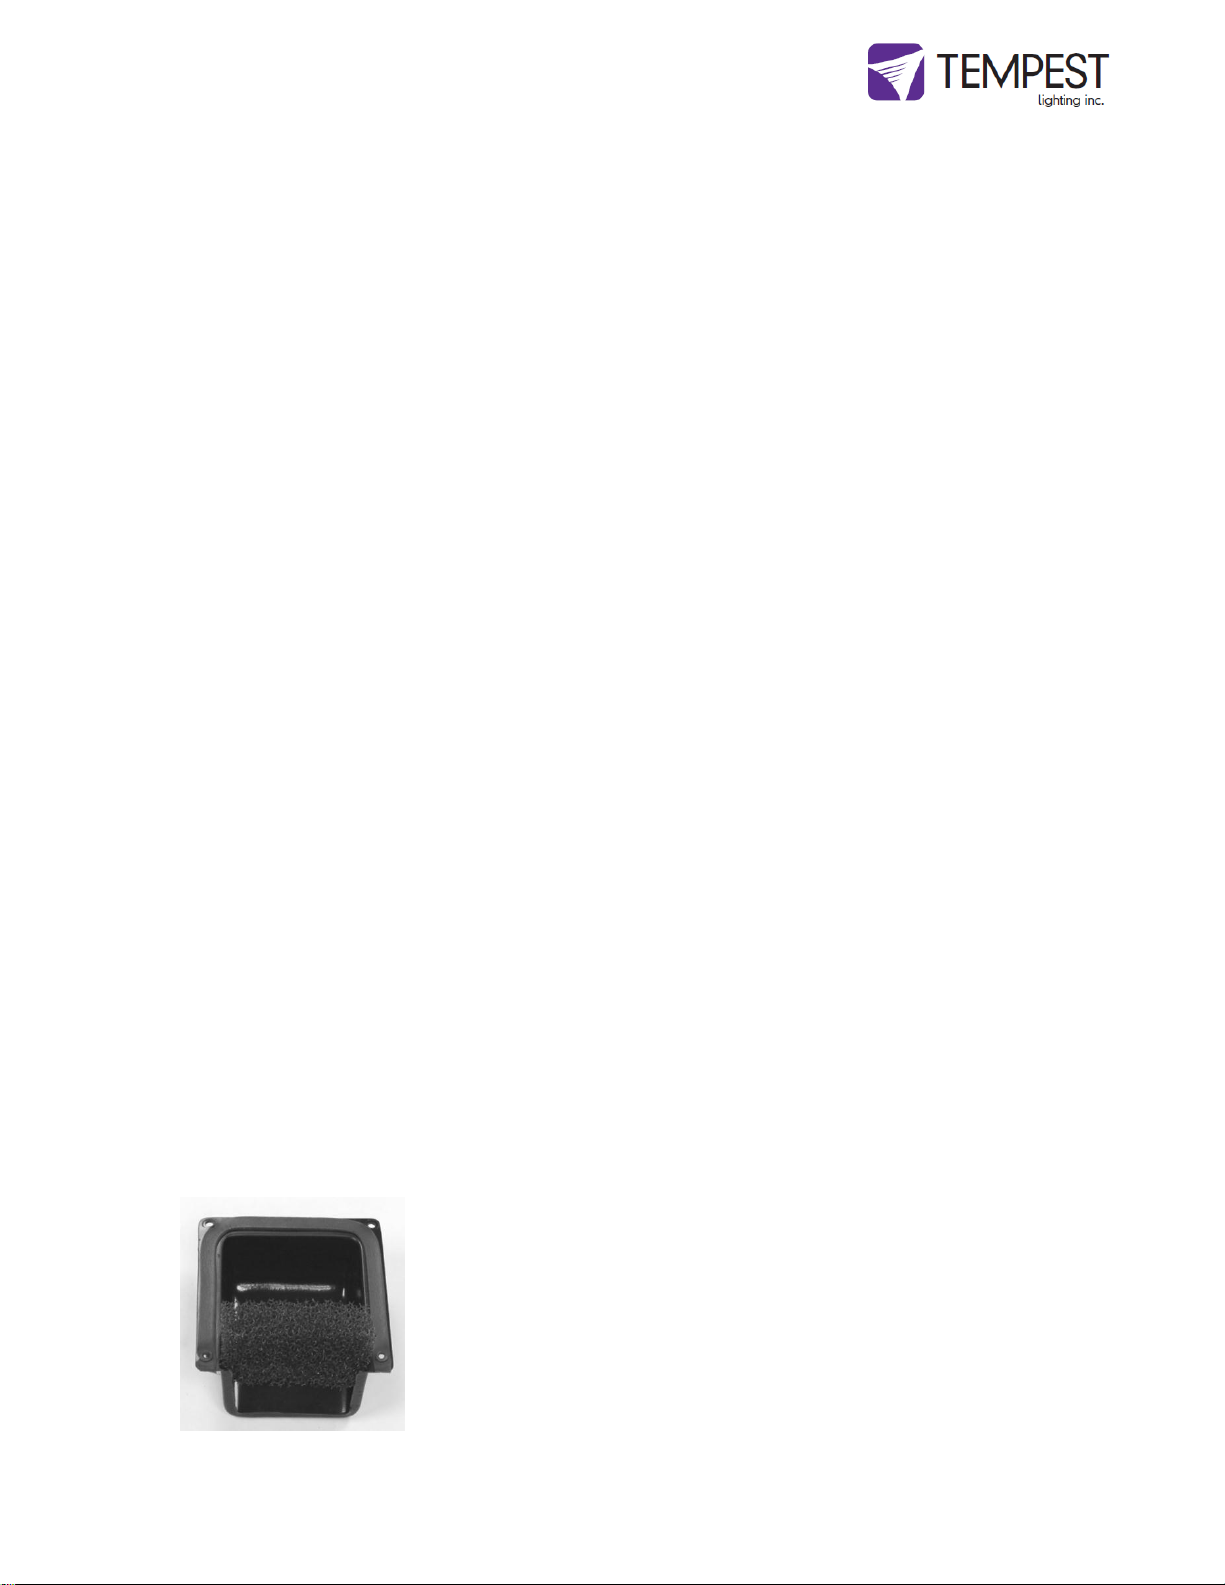
Air Filter - Every Three (3) Months
Both air filters should be removed and cleaned on a regular basis. To
remove filter, pull pull it directly out of the intake vent. The filters can be
cleaned by running water from a hose and do not require any special
solution.
To reinstall, carefully push filter back into the cowl molding. The filter
should sit snugly between the cowl ribs.
Twister Enclosure User Manual page 18
Page 19

Case - As Needed
The outside of the case should be cleaned as needed. The case should be cleaned with a wet
cloth and mild detergent (if necessary). Do not use a direct spray from a hose to clean the case.
Globe – As Needed
Clean using a proprietary acrylic cleaning solution or a mild detergent, and wipe dry. Use only
soft, lint-free cloths for globe cleaning. Never use an abrasive cleaner.
Equipment
Review the manufacturer's instructions for proper maintenance of your Luminaire. Remember,
the enclosure simply protects the equipment inside it and is not a substitute for regular
maintenance.
Twister Enclosure User Manual page 19
Page 20

7 Troubleshooting
This is a guide to the general symptoms, problems, and solutions that may occur during the
usage of your enclosure. However, it is important to remember that problems may occur within
the equipment itself and these must also be considered.
Equipment does not have power.
Check power supply wiring and voltage.
Fan is not spinning
Fan cord may have become disconnected. Check connections between fan and cord.
Fan may be obstructed. Shut off power to enclosure and check for obstructions. Turn power back
on to see if fan will start spinning. If fan does not turn then enclosure is not receiving power.
Turn off all power and check wiring. If the wiring is correct, contact technical support.
Equipment does not have power.
Check equipment power switch. If switch is on, check wiring and supply switch/circuit breaker.
Equipment turns on and off repeatedly over short span of time.
Check that vent areas and airways are clear. If so, ambient temperature may be too high, or
equipment may have internal problem.
Excessive water in enclosure.
Seal leak. Repair with silicone sealant, or replace seal.
Twister Enclosure User Manual page 20
Page 21

8 Limited Warranty
INSPECTION/WARRANTY/RETURNS.
A. Customer, at its sole expense, shall inspect all Goods promptly upon receipt and accept all Goods that conform
to the specifications or catalog. All claims for any alleged defect in or failure of the Goods or Seller's performance to
conform to the Contract, capable of discovery upon reasonable inspection, must be set forth in a written rejection
notice detailing the alleged non-conformity, and be received by Seller within thirty (30) calendar days of Customer's
receipt of the Goods. Failure by Customer to notify Seller of the alleged non-conformity within thirty (30) days will
be conclusive proof that the Goods have been received by Customer without defects or damage, and in the
quantities specified on the bill of lading and shall constitute an irrevocable acceptance of the Goods and a waiver of
any such claim in connection with the Goods.
B. Seller warrants to Customer only that the Goods will be free from defects in material and workmanship at the
time of delivery and, subject to the exceptions and conditions set forth below, for the following period (the
"Warranty Period"): twelve (12) months from the date of shipment by Seller. Seller may provide additional years of
warranty coverage beyond 12 month, at the rate of 2.5% of the net sale price per year, up to a total of four
additional years’ coverage beyond the standard 12 month warranty period. Seller will remedy a defect as set forth in
paragraph 7 D, below, (the "Warranty"). The Warranty is subject to each of the following exceptions and conditions:
1. Customer must promptly (and in all events within the Warranty Period) notify Seller of any alleged defect in a
written notice (the "Notice") which shall set forth the quantity, catalog number, finish, original purchase order
number, Seller's invoice number on which Goods were originally billed and a statement of the alleged defect, along
with digital photographs showing such defects where feasible.
2. The Warranty shall not apply: (i) to any claimed defect that was capable of discovery upon reasonable inspection
and deemed to be waived under paragraph A, above; (ii) to any Goods that have been subject to misuse, abnormal
service or handling, or altered or modified in design or construction; (iii) to any Goods repaired or serviced by any
person other than Seller's authorized service personnel or to Goods installed other than according to installation
instructions, or (iv) with respect to normal wear and tear.
3. Seller makes no Warranty with respect to parts or components that are not the product of Seller, and specifically
makes no warranty whatsoever for equipment housed inside enclosure products manufactured by Seller.
4. The Warranty is Seller's exclusive warranty with respect to the Goods. Seller makes no warranties, guarantees or
representations, express or implied, to Customer except as set forth in this section. ALL OTHER WARRANTIES,
EXPRESS OR IMPLIED, INCLUDING, WITHOUT LIMITATION ANY IMPLIED WARRANTY OF MERCHANTABILITY OR OF
FITNESS FOR USE OR FOR A PARTICULAR PURPOSE, ARE HEREBY EXCLUDED AND DISCLAIMED.
C. Seller will accept the return of Goods properly rejected under paragraph A, above, or as to which Notice of an
alleged breach of Warranty has been timely given and such Goods may be returned to Seller, freight prepaid, but
only upon Customer's receipt of Seller's written return material authorization ("RMA") and shipping instructions. The
RMA shall be void if the Goods are not received within 45 days after issuance of the RMA. No deduction or credit in
respect of any rejected or returned Goods shall be taken until Customer has received Seller's further written
deduction or credit/authorization following Seller's inspection to confirm nonconformity or defect. Seller will charge
to Customer any and all costs incurred by Seller in connection with the handling, shipping, inspection and
disposition of any returned Goods that are determined by Seller not to have been nonconforming upon Delivery or
as to which the warranty hereunder is not applicable.
D. UPON ANY PROPER RETURN PURSUANT TO PARAGRAPH C, ABOVE, WHETHER IN CONNECTION WITH A REJECTION
OF GOODS OR AN ALLEGED BREACH OF WARRANTY AND BASED UPON THE CONDITIONS SET FORTH IN THIS
PARAGRAPH 7, SELLER AGREES THAT IT WILL, AS THE SOLE AND EXCLUSIVE REMEDY UNDER THE CONTRACT OR
OTHERWISE, FOR ANY NONCONFORMITY OR BREACH OF WARRANTY, AND AT SELLER'S SOLE ELECTION: (i) REPAIR
SUCH GOODS; OR (ii) REPLACE SUCH GOODS.
Twister Enclosure User Manual page 21
Page 22

Tempest Product Support.
Step 1: First contact your local Dealer for support. Your dealer is best placed to respond
quickly to your needs.
Step 2: If your dealer is unable to answer your questions please contact our Sales Office:
Tempest Lighting, Inc.
13110 Saticoy Street, Unit C
North Hollywood, CA 91605, USA
Tel +1 818 787 8984
Fax +1 818 982 5582
Visit our web site for current information and specifications:
www.tempestlighting.com
Twister Enclosure User Manual page 22
 Loading...