

Tempest TEMP142/TEMP142CX(2HP), EMP143/TEMP143CC (3HP), TEMP142, TEMP142CX, TEMP143 Owner's Manual
...Page 1
Owner's Manual
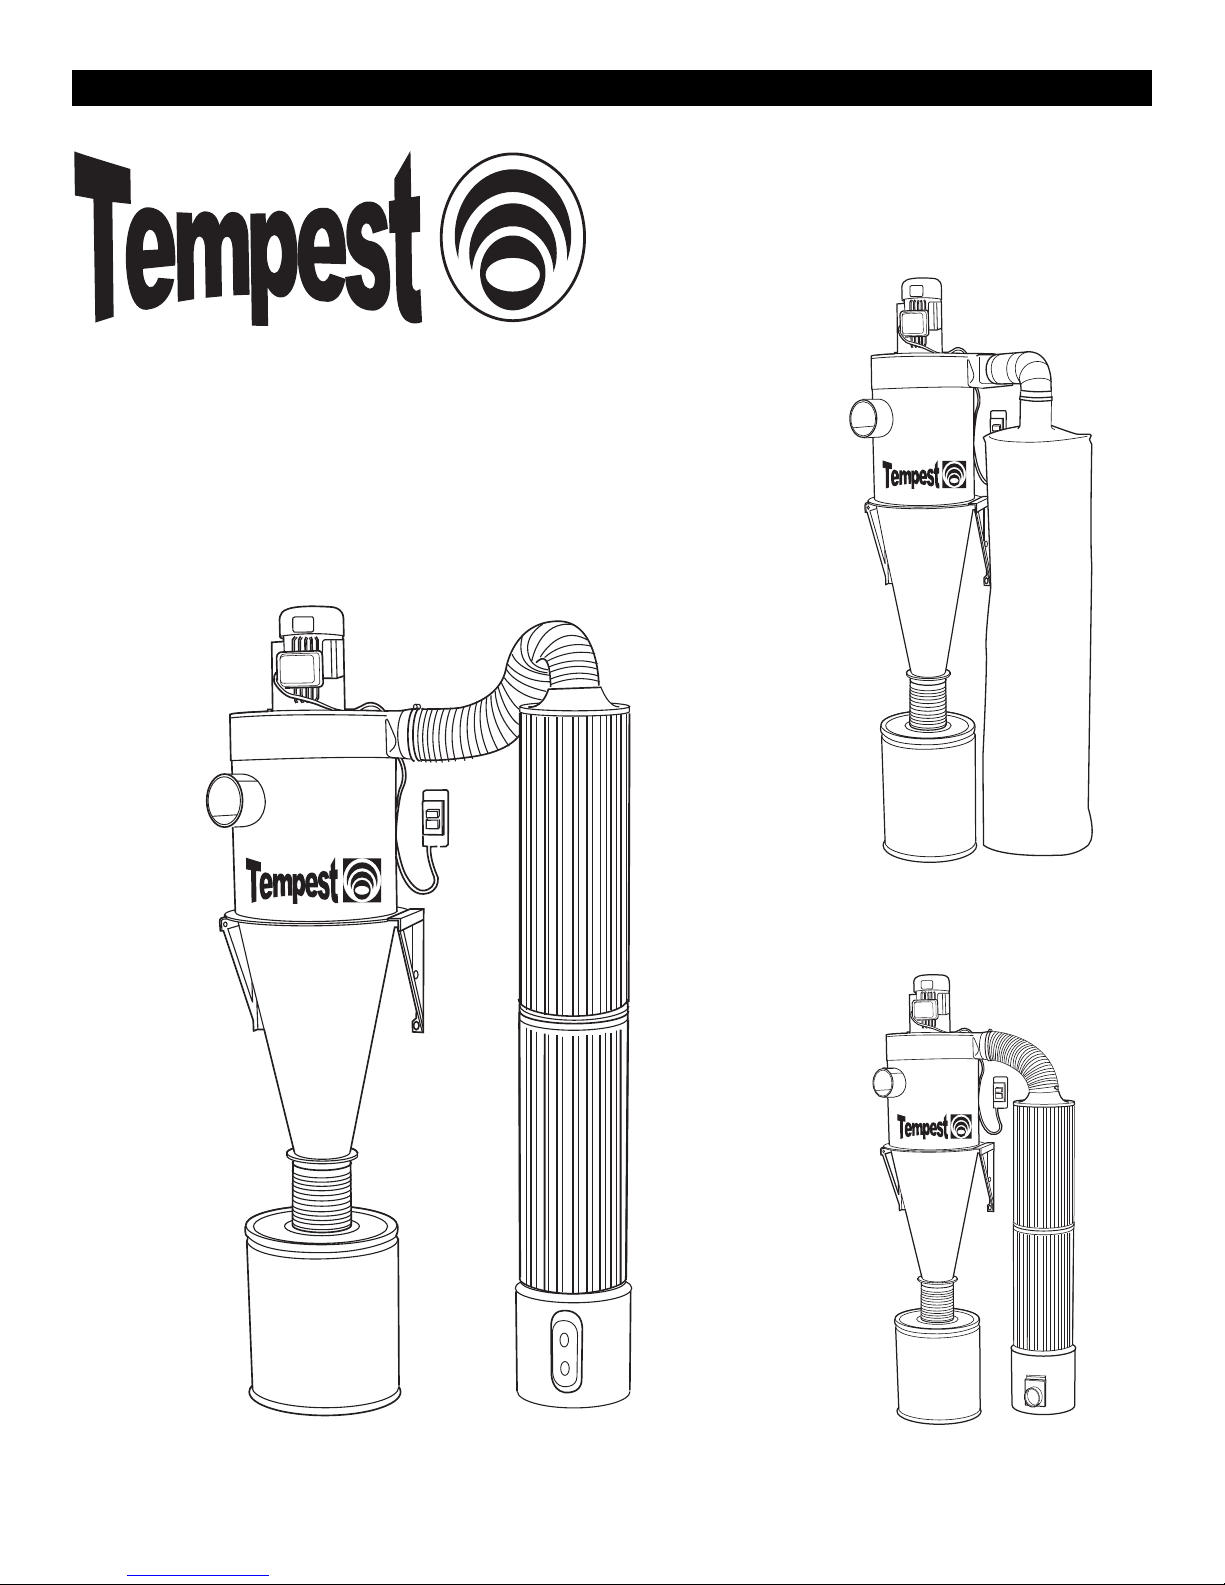
TEMP142 / TEMP142CX (2HP) &
TEMP143 / TEMP143CC (3HP)
TEMP143CC
TEMP142/143
TEMP142CX
PSI Tempest 14" Impeller Cyclone Dust Collection Systems
Page 2

PSI Woodworking Products
2
Thank you for purchasing one of PSI's growing family of woodworking products. Our Tempest cyclone systems
are engineered and manufactured to the highest standards of quality.You will find the Tempest to be a
remarkable dust collection machine.
Warranty
This product is warranted against defects in material and workmanship for a period of five years on the motor
and all other components. This warranty applies to the original purchaser of the product and is limited to the
repair or replacement of the product or its parts at the discretion of PSI Woodworking Products. Excluded are
parts which have been misused,abused,altered,or consumed by normal operation of the machine.Also
excluded are direct or consequential damages to persons, properties, or materials.Your invoice serves as proof
of purchase and must be referenced to authorize warranty repairs. Call your dealer for proper authorization.
Owner is responsible for returning warranty service parts at their expense. Defective parts will be repaired or
replaced at the manufacturer's discretion.
Safety
• Do not use this system near flammable or combustible liquids or gases including gasoline or other fuels,
cleaners, oil-based paints, natural gas or explosive dusts like coal dust, magnesium,grain dust,or gun powder.
• Do not vacuum anything that is burning or smoking such as cigarettes or hot ashes.
• Do not vacuum toxic materials or use near hazardous materials.
• Do not use outdoors or on wet surfaces.
• Do not operate with a full waste container.
• To avoid collapse,use 26 gauge steel or thicker for ductwork.
• Install on a stable level surface. Because the Tempest is top-heavy, be certain to secure the motor/blower unit to a wall. If assembled on a stand, make
sure the base and supporting structure is stable. Secure the upper portion of the unit with safety wire.
• Do not use without filter bag or canisters attached.
• Turn off controls before unplugging. Do not pull cord to unplug,grasp plug and remove from receptacle.
• Do not operate with the motor/blower off of the cyclone- this could cause severe overheating and/or motor burnout.
• Do not use with damaged cord, plug,or other parts.Only install to a properly grounded outlet.
• Do not wear loose clothing in the area of any inlets because high suction could pull and stretch garments into blower
• If your ductwork consists of only plastic hose or pipe, ground hose or pipe by wrapping bare copper wire around the exterior surface and ground the
wire at either end.
• Keep hands free from spinning impeller.
• The Tempest is only warranted and guaranteed for the collection of wood dust although it may be quite suitable for other applications.
Features
• Powerful motor blower unit has a proven flawless performance record
• Able to capture over 99% of all dust and debris before it passes through the motor blower
• 5-micron filter bag or 1/2- micron filter cartridge for fine filtration
• Includes wall support brackets
• Simple operation and easy cleaning of debris from the collection canister
• With nearly clean filters,system consistently runs at peak performance
• 14" aluminum impeller provides superior performance
• "Neutral vane" intake maximizes airflow.
• Longer cyclone funnel improves separation efficiency
• Includes convenient heavy-duty on/off switch on power cord
• Designed to fit under 8 ft. ceiling (with 21" fiber drum).
• 72" x 24" 5-micron filter bag
SPECIFICATIONS Tempest 14" 2HP Tempest 14" 3HP
Max CFM Free Air 1900 CFM 2200 CFM
VAC , M ax Amps (single phase) 220V, 10 amp 220V, 14 amp
HP 2 HP 3 HP
Max Static Pressure 10.6" 11.4"
Impeller Diameter 14" Aluminum 14" Aluminum
Sound 75-90 Db 78-93 Db
Gauge of Cyclone Body 17 ga 17 ga
Weig ht (motor & cyclone) 146 lbs 165 lbs
Contents
• Warranty ……..….......2
• Safety …...........……..2
• Features ……….........2
• Specifications ….........2
• Components …....…....3
• Assembling Cyclone .....4
• Assembling Filters…....5
• Filter Maintanence…....5
• Installation and
Operation......................6
• Accessories………......7
Page 3
TEMPEST Cyclone Manual
3
Components
1) Motor blower unit DC14MB2HP for TEMP142 / TEMP142CX
DC14MB3HP for TEMP143 / TEMP 143CC
2) Cyclone assembly consisting of:
• top cylinder
• center flange with 9 sets of nuts and bolts
• bottom cone
• gasket
• two screw-mount wall brackets
3) Drum kit consisting of:
• 2 ea. 7" hose clamps
• 1 ft. of 7" diameter hose
• 7" diameter flange
4) Outflow assembly consisting of:
• 2 each flexible 6" diameter elbows (TEMP142,TEMP143)
• one 6" hose clamp (TEMP142,TEMP143)
• 2 each 6" hose clamps (TEMP142CX,TEMP143CC)
• 4' clear flexible hose (TEMP142CX, TEMP143CC)
5) Filter Packs:
Bag Style Cartridge Style Cartridge Style
TEMP142/143 (bag filters) TEMP142CX TEMP143CC
• 1ea. 5 micron bag (BCYC6) • 2ea. 26" filter (CYFA) • 2ea. 36" filter (CYF36)
• 2ea. adjustable elbows • 1ea. fiber cleanout can • 1ea. metal cleanout can
(R-90E06) (CYFILCAN3) (CYFILCAN2)
• 2ea. 6" hose clamp (DBC6) • 2ea. 6" hose clamp (DBC6) • 2ea. 6" hose clamp (DBC6)
• 1ea. bell mouth (N-BELL06) • 1ea. bell mouth (N-BELL06)
• 4ft. clear plastic hose • 4ft.clear plastic hose
(CYH142CC) (CYH142CC)
94"
17 1/2"
6"
18"
22"
21"
12"
7 1/2"
6"
26-3/4"
7"
7"
(drum sold separately)
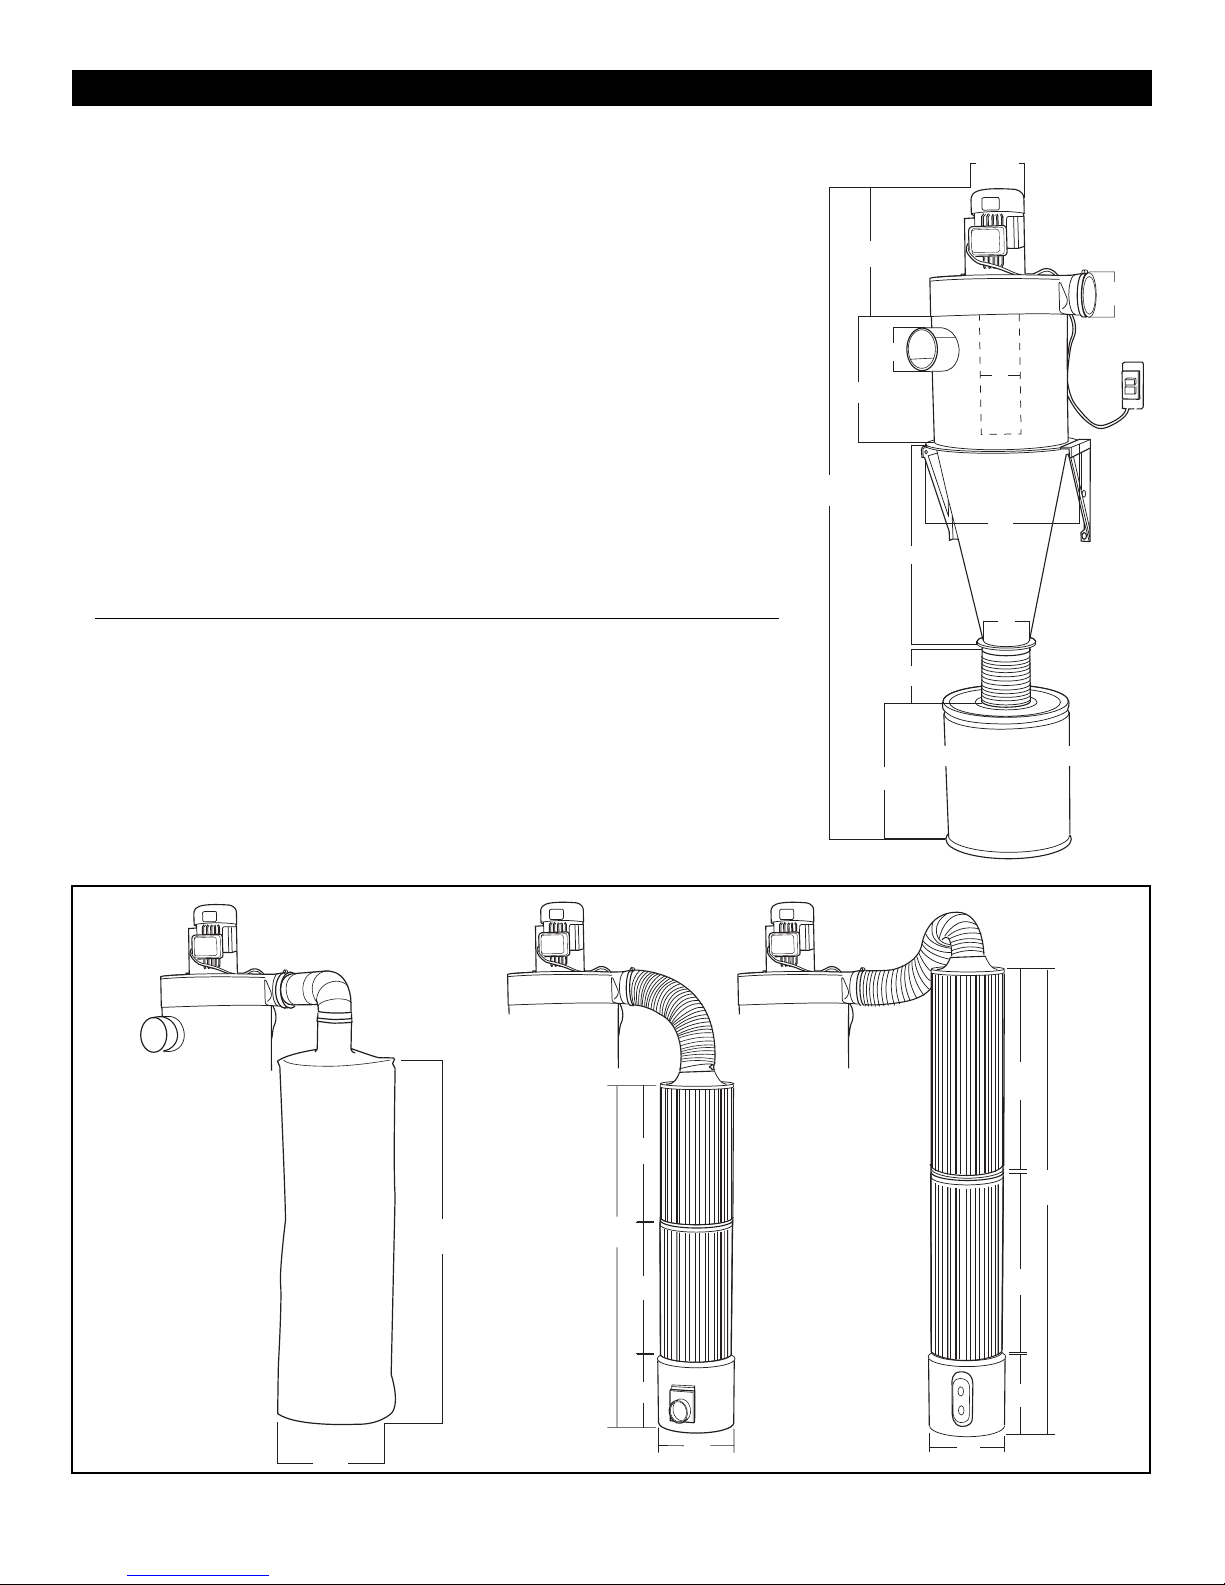
fig. 2 - Filter Dimensions
fig. 1 - Tempest Dimensions
5-micron Filter Bag BCYC6
Used with TEMP142 and
TEMP143
1/2-micron Filter Canisters
CYF36
Used with TEMP143CC
1/2-micron Filter Canisters
CYFA
Used with TEMP142CX
36"
26"
85"
72"
24"
65"
26"
13"
13"
36"
13"
14"
Page 4
PSI Woodworking Products
Assembly
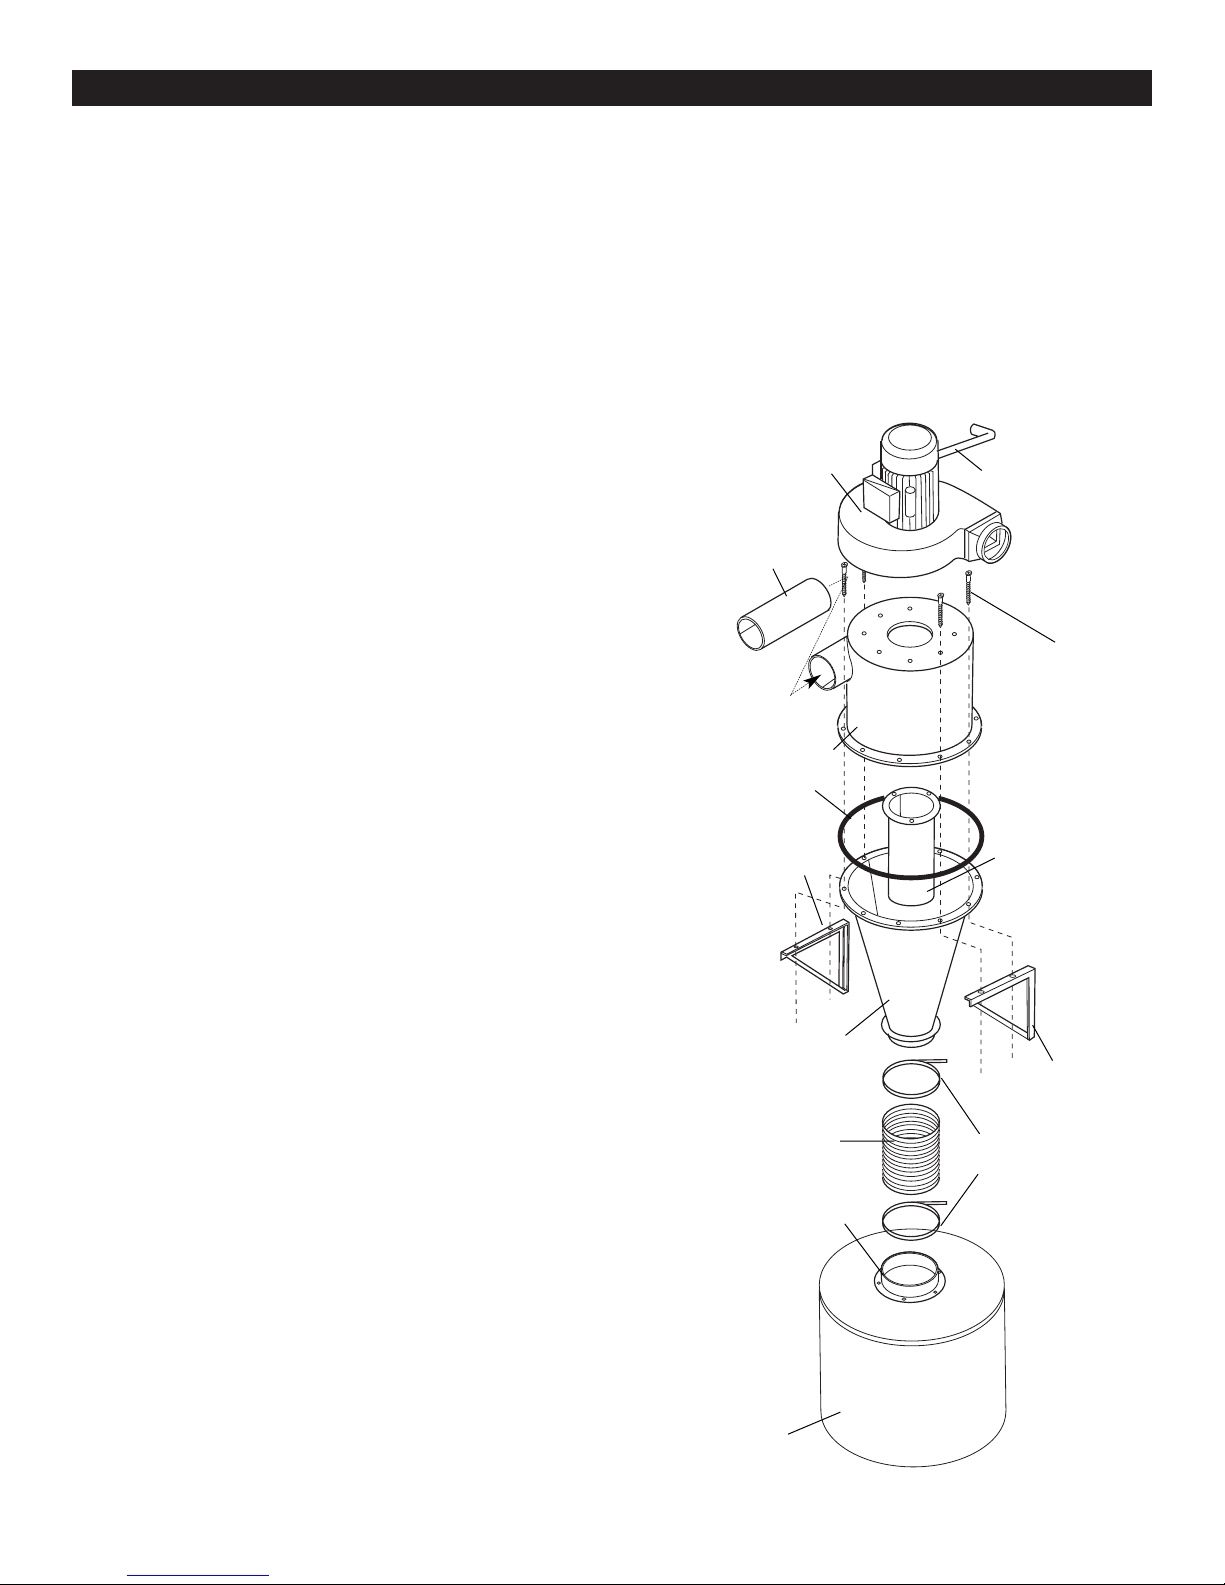
To m a ke t h e a s s em bly easier, it is suggested that the entire unit be
assembled, on the floor, to a sheet of 3/4" plywood and carefully lifted
into place.
1) Align the vortex pipe (D) with the screw holes at the top of the upper
cyclone body (B) and secure with three M8 x 16 bolts, washers, nuts,
and a bead of silicone caulk.Make sure the bolts are first positioned
from the top of the upward cyclone body downward.The washers and
nuts will be protruding below the three holes of the vortex pipe (D),
TIGHTEN. Failure to correctly orient these fasteners may result in
damages to the motor blower.
2) Carefully invert the motor blower assembly (A) onto a smooth soft
surface (e.g. carpet) and align (B) so that all (8) holes are matched.
Adjust the relationship of the inlet and exhaust ports of the cyclone to
match your floor plan. Firmly secure A to B with a bead of caulk and 8
pan-head flange bolts (M6 x 12).Carefully, lay the assembly aside at
this time.
3) Locate the neutral vane cylinder (C) and slip it into the suction intake
of the upper cyclone body (B). The neutral vane cylinder should
extend 5" out of the intake port.Secure it with silicon caulk or sheet
metal screws (not provided).
4) Locate the adhesive-backed foam strip (G) 64" x 3/8" x 1/16" and
carefully attach it to the large flange at the top of the cyclone cone (E).
This will assure an airtight seal between the body (B) and the cone
(E) sections. Put the cone section in place over the inverted body
aligning the 10 holes for the ten M8 x 30 hex head bolts, nuts, and
washers. Insert the ten bolts and washers through the bottom of the
box flange and secure with the appropriate nuts.(Use the four longer
bolts through the holes which will align with the mounting brackets
(F).) Do not tighten at this time. The unit is now ready to be fastened
to the wall.
5) Determine an appropriate location for your cyclone.Setting the
Temp e s t u p r ight in its final position will require the assistance of
another person.The two mounting brackets (F) should be mounted as
shown– 19-7/8" apart on the centerline of the bolt slots. Take into
consideration the height of your ceiling and the height of your barrel
and determine the proper height to mount the wall brackets.
Depending on the construction of the selected wall, use six best grade
1/4" lag bolts or concrete fasteners.Firmly attach the brackets to the
wall and test for strength.
6) Note: Of the 10 bolts holding the body (B) to the cone (E), the four
longer ones should be removed at this time.These four bolts,2 each,
located on either side of the unit will be used to connect the unit to its
wall brackets. Lift the entire system into position and fasten it to the
wall brackets using the four bolts (M8 x 30) taken from the upper
flange. Tighten all 10 bolts and nuts.
7) Screw the wall-mounted on/off switch to an appropriate location.
Keep in mind small children and your own convenience.Be sure to
connect to a 220V power service.
8) Using the 7" waste can flange (H) as a template cut a 7" hole in the lid
of your waste can and drill 8 each 3/8" holes for 3/8" hex bolts (not
provided). Bolt and seal the flange to the top of the can with a quality
silicone sealant (#CYSCAULK). Let this cure for 24 hours before
testing. Connect the waste can lid to the bottom cyclone flange with
the included 12" x 7" clear flex hose (I) and hose clamps (L).
9) Secure the motor to the wall with the supplied support bracket (K).
Carefully remove the two top bolts holding the motor to its support
motor blower assembly
motor support bracket
neutral vein cylinder
extends 5" out of intake
upper cyclone body
vortex pipe
cyclone cone
connection hose
7" hose clamps
drum connector flange
waste can (sold seperately)
adhesive foam
mounting bracket
mounting bracket
long screws
A
B
C
D
E
F
G
H
I
J
K
L
fig. 3 - Tempest Components
and attach the bracket to the support plate on the motor using these
same two bolts.The wall end of the bracket should be mounted to the
back wall with the same type of fasteners used for the wall brackets (F).
10) Install filter bag or cartridges as described on page 5.
11) Finally, with the unit operating,inspect all seams and connections
for pin-hole leaks. If any appear, they should be filled with a
premium silicone caulk and given enough time to fully cure before
re-testing.Failure to seal properly will result in excess dust in your
final stage filter bag or cartridges.
Congratulations,you are ready to use your new PSI Tempest!
4
Page 5
5
Assembling 5-micron Collection Bags
Models TEMP142 and TEMP143 with standard 5-mIcron felt bag (BCYC6)
This high filtration bag collects any super fine particles that may pass through the cyclone unit. It has a
zipper on the bottom for easy cleaning access. It may hang vertically from the motor blower or
positioned anywhere else in the shop, even along the ceiling.Remember, virtually no dust will collect in
this bag. It is primarily used to prevent super-fine dust from re-entering the air. Two 6" diameter metal
duct elbows connect to the bag from the motor blower. Used on models: TEMP142 and TEMP143
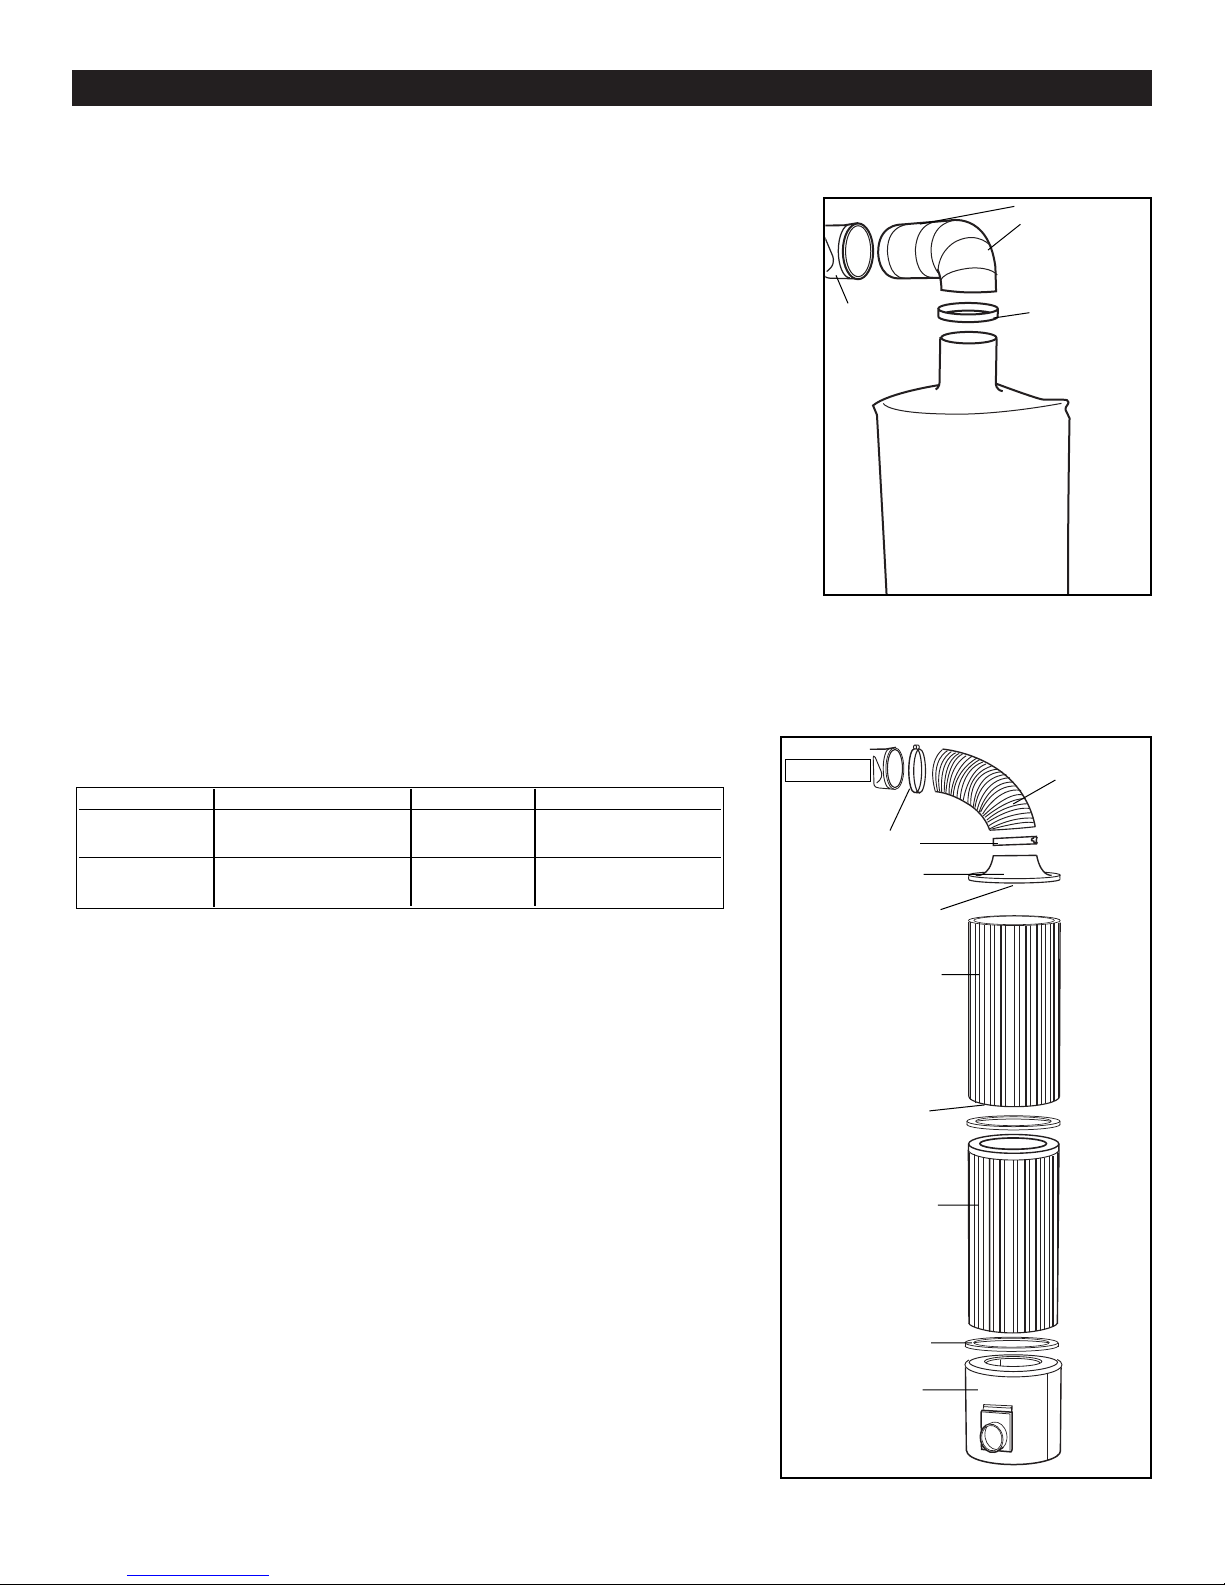
Connecting the 5-Micron bag to the motor blower exhaust port.
Fit together two 6-inch adjustable sheet metal elbows (included).Secure the two together with pop
rivets, small sheet metal screws, adhesive caulk,or duct tape.Insert corrugated end of elbow into the
exhaust port of the motor blower and seal. Now, connect the 72-inch bag to the adjustable elbow with
the 6-inch hose clamp provided.
Bag Positioning
Hang the 5-micron bag vertically, with the zipper on the floor. However, if needed the bag can be
suspended horizontally using two hangers (not provided) attached at either end of the bag at the
seams.
Bag Maintenance
Never wash the bag. Water will cause the material to lose its effectiveness.After using the bag for
approximately 6 hours, whack the outside of the bag with the equivalent of a wooden yard stick. This
will free up most of the fine dust attached to the inside walls. Periodically unzip the bottom and clean
out.
Assembling 1/2-micron Canister Filters
Models TEMP142CX and TEMP143CC with 1/2-micron cartridges
Refer to the chart below to determine the configuration of your cyclone system.
Model Cartridges Hose Cleanout Can
#TEMP142CX 2 ea. #CYFA #N-FH063 #CYFILCAN3 (fiber)
26" length x 13" dia.
#TEMP143CC 2 ea. #CYF36 #N-FH063 #CYFILCAN2 (steel)
36" length x 14" dia.
Assembly of the 1/2-micron Cartridges and Cleanout Can
Preparation of Cartridges
Apply a large amount of silicone adhesive to the top of the lower cartridge (A). Place the second
cartridge on top of the adhesive and firmly press down,making an airtight fit. This adhesive
needs a full 24 hours to cure.While curing, apply adhesive around the cartridge
neck connector (B).
Preparation of Cleanout Cans
For CYFILCAN3 (C),cut a 8" hole in the center of the can's lid. Next, use the blast gate to scribe a
4"cutout hole on the side of the can. Cut the hole and use a generous amount of caulk to seal the
gate into the hole. Set the cartridge filters on top of the cleanout can.Use a silicone adhesive to
seal the bottom of the lower filter to the top of the cleanout can.
Cartridge and Cleanout Can Maintenance
Keep filters dry at all times. Use compressed air or a shop vacuum to clean the cartridges. Set the
compressor to 40 psi and move the air source up and down the outside of the cartridge, aiming
towards the center. Take time to clean each pleat of the filter from top to bottom.Very fine dust
will fall into the cleanout can and accumulate.
Periodically,use your shop vacuum to remove dust from the cleanout can.For best results, insert
the suction end of the shop vac into the can via the mounted blast gate or access door and turn it
on. Blow the filters clean with the vacuum's exhaust while pulling the dust through the cleanout
port on the can. This will prevent fine dust from travelling back through the system. The can
should be checked about every six months.
connector hose
6" hose clamps
motor blower
neck connector
adhesive
A
C
B
adhesive
upper cartridge
lower cartridge
cleanout can
rubber gasket
(2) 6" diameter
elbows
motor blower
filter bag
6" diameter hose
clamp
fig. 4 - Bag Filter Diagram
fig. 5 - Canister Filter Assembly
TEMPEST Cyclone Manual
Page 6
PSI Woodworking Products
6
Tempest Cyclone Operation and Installation Suggestions
1) Try to maintain the largest possible diameter of ductwork throughout the shop leading up to connections with your machines. The air inlet to the
Temp e s t c yc lone is six inches in diameter. Therefore, use 6" ductwork throughout the shop if possible. Because 30ga. galvanized HVAC may collapse
under pressure from the vacuum,we suggest using strong (26ga. or heavier) spiral metal pipe as distributed by PSI.
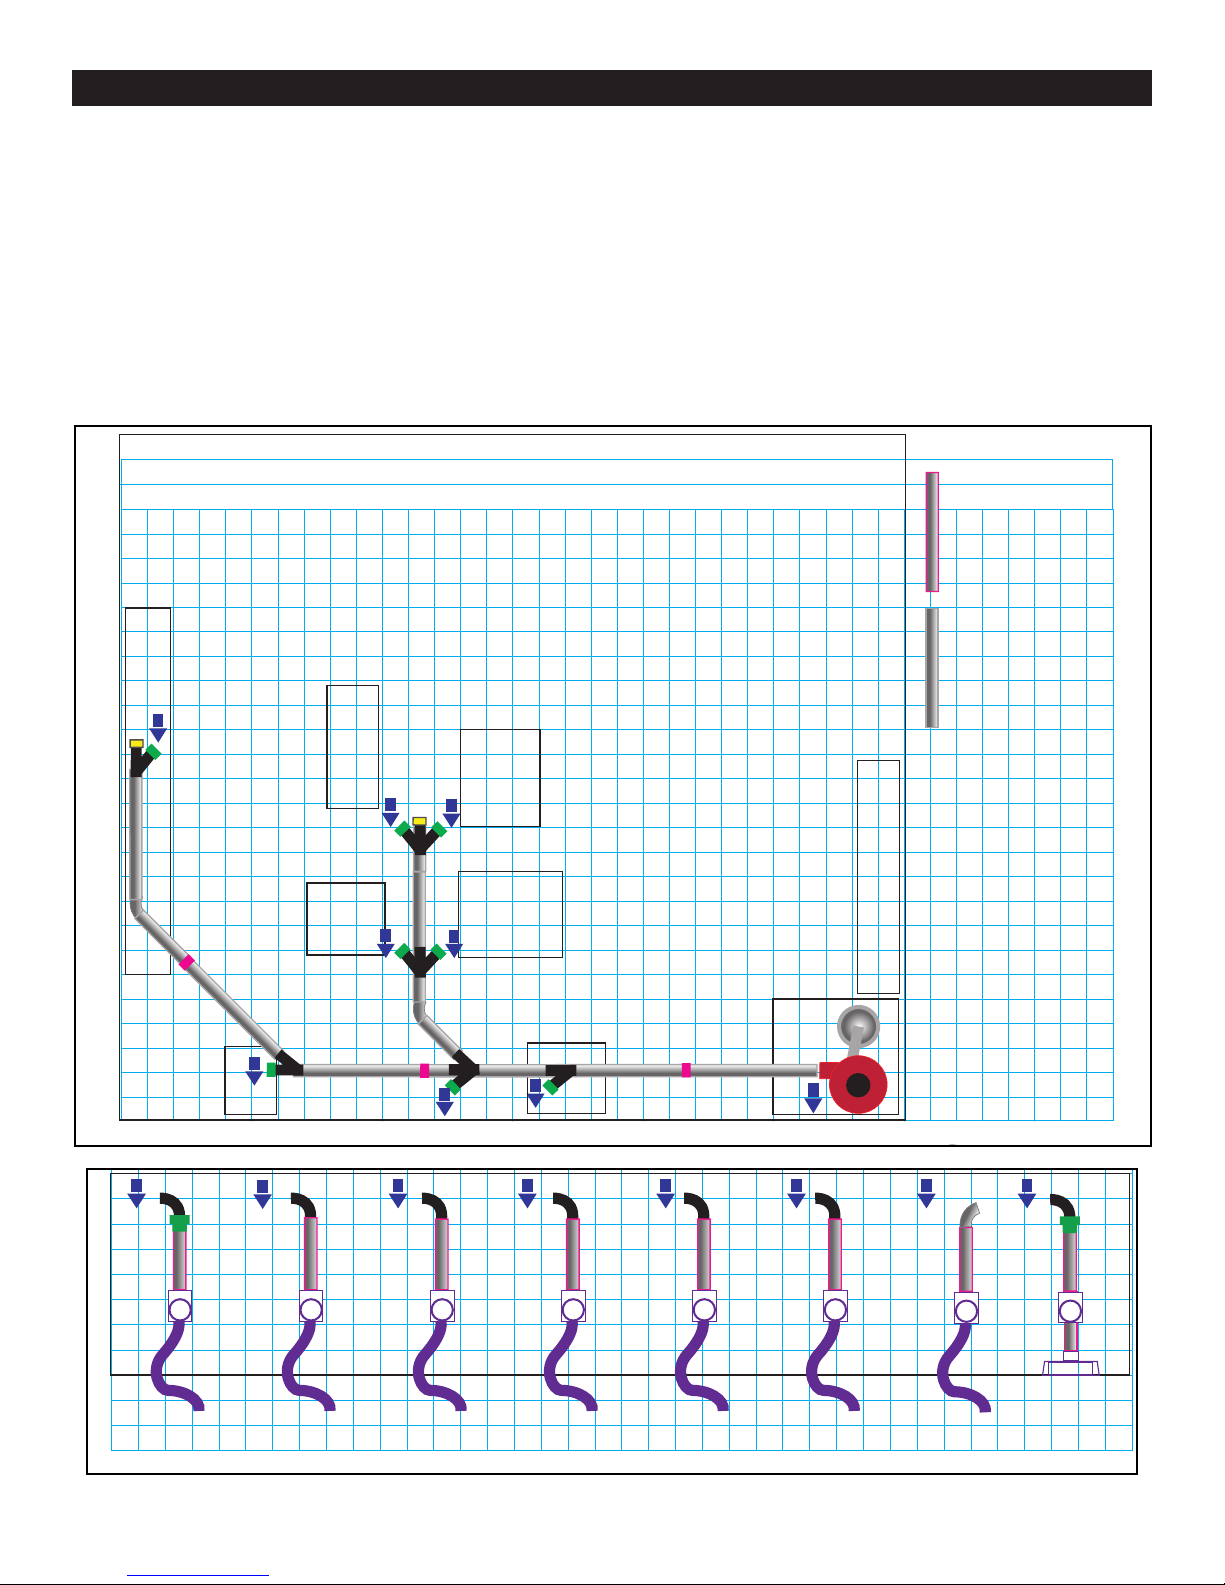
2) Use "Y" or lateral type bleed offs from the main (as opposed to a "T"). This will help to maintain more efficient airflow. The diagram below indicates
laterals that feed to 6" extension lines and then to 4" hookup drops for machine connections.
3) Use blast gates at every connection between machinery and ductwork in order to close branches when not in use.
4) Since it is conductive, no grounding is necessary when using galvanized metal ductwork.Check continuity to be sure the entire system is grounded.
5) To maximize airflow,avoid sharp 90˚ turns and excessive reductions in hose diameter.
6) Poor air flow or excessive dust in the filter bag may be a result of a poorly sealed system. The most common leak is at the drum lid. Check the lid and
all other connections at the cyclone to ensure the best performance.
fig. 6 - Ductwork Layout Diagram
25
N-BC04
4" SPIRAL DUCTWORK
20
N-CAP106
7
LAT664
45E06
LEC04
7. MITRE SAW
(ROTATED DOWNWARD)
SEC06
5. JOINTER
6. TABLE SAW
LEC04
LEC04
5
6
N-CAP106
N-CLAT64
N-CLAT64
45E06
15
10
5
4
LEC04
3
LEC04
4. PLANER
WORK TABLE
3. ROUTER TABLE
N-BC06
6" SPIRAL DUCTWORK
2. DRILL PRESS
LAT666
1
LEC06
1. BAND SAW
0
1
10
90E06
5101520253035
3
LEC06
RED-64
2
90E04
N-CLAT66
8
LEC06 LEC04
SEC06
90E04
LAT664
2
4 5
90E04
SEC06
90E04
R
6 7 8
90E04
45E04
90E06
LEC06
RED-64
N-BGA04
N-BGA04
N-BGA04
5
N-J13-04
0
5101520253035
N-J13-04
N-J13-04
N-BGA04
N-J13-04
N-BGA04
N-J13-04
N-BGA04
N-J13-04
N-BGA04
N-BGA04
N-J13-04
N-FSW04X
Page 7
7
TEMPEST Cyclone Manual
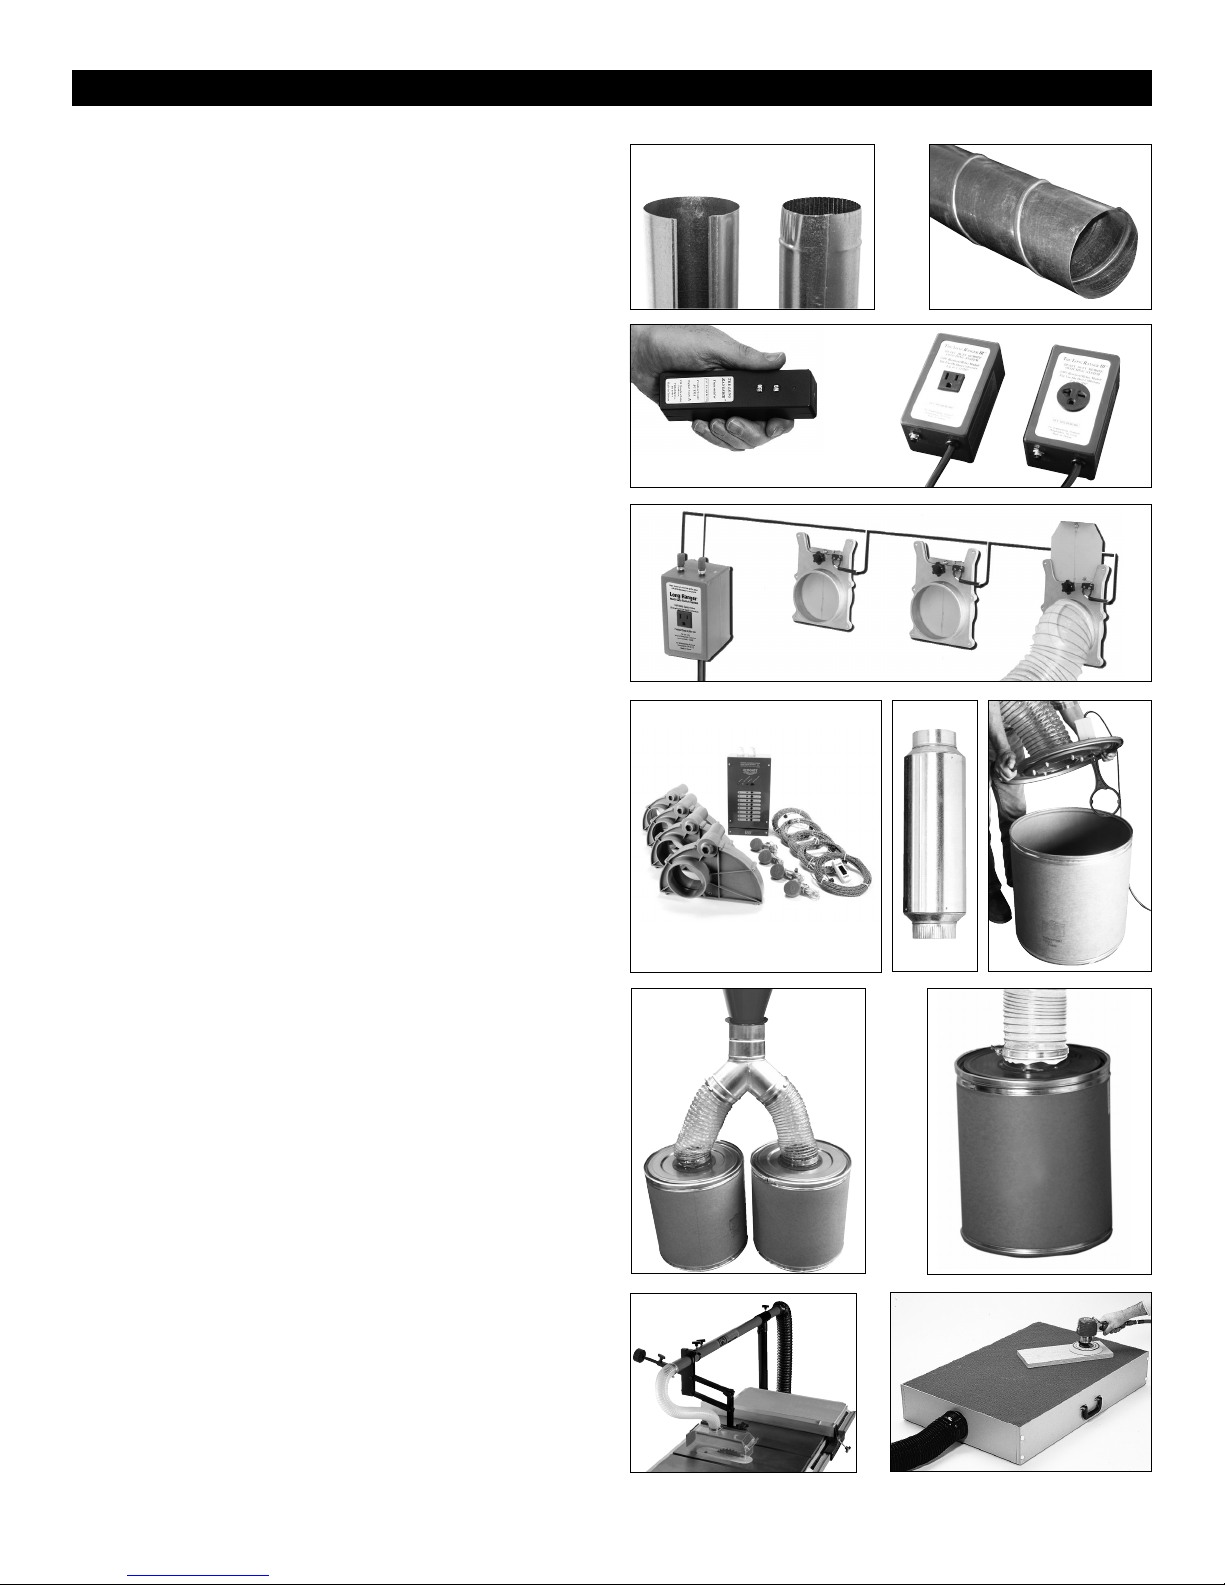
Available Accessories for TEMPEST Cyclones
5. Ecogate™ Automatic Dust Collector and Blast Gate Switch ECOGATE4
The ECOGATE™ system opens your blast gate and turns on your
cyclone when you turn on your woodworking machine,then shuts the
gate and turns off the cyclone when the machine is switched off. For
1HP @ 110V or 1-1/2HP and 2HP @ 220V collectors.
6. Cyclone Muffler - TEMUFF-6
Reduces cyclone sound by 50% (10db) without effecting machine
performance.Attaches between cyclone and filter. Requires hose to
connect. Length of muffler with flanges is 23-3/4" and has a 6"
diameter connection.
7. Dust Level Sensor - BINSENSOR
Sounds an alarm when your cyclone's bin is full
No more guessing about the dust levels in your cyclone's collection
drum.A rotating paddle mounts through the lid of your container and
activates the sensor when the paddle is stopped by a high sawdust level.
Includes a 110V power cord and a relay connection that can activate an
external devise such as a visible light bulb.
8. Dual Drum Kit - CYDDK
Double the amount of dust you can collect before you have to empty
your drums. Includes: 7" wye and cyclone connector, a 7" connection
hose, two flanges, & band clamps.Adds 12" height to cyclone.
9. 26 gal. Fiber Drum - CYDRUM26
A great low profile high capacity container. Lid removes easily with
clamp release.
10. Table Saw Dust Collection Guard - TSGUARD
This Guard is the ideal solution for table saw safety and dust control.
When connected to a dust collection system, the PSI Dust Collection
Guard captures the dust thrown up by your table saw blade. The
Guard can be used on any table saw with an extension table. It is
very easy to install and easily swings out of the way. A unique
counter-balance allows
for fast and easy positioning.
11. Dust Grabber Downdraft Table - DGTABLE2
The Dust-Grabber sanding table captures the dust before it enters
the air you breathe.
• Non-slip perforated, non-marring surface.
• Strong,laminated hard board construction. and ea
sy positioning.
4. Long Ranger MultiGate Switch System - LRMSET220
Turn on yo ur cy cl one when you open your blast gate.
Never forget to turn your dust collector on or off.Make it automatic
when your cyclone is wired to the MultiGate™ switch system.
2. Heavy Duty Spiral Pipe
(24 gauge) The inside of the pipe is very smooth while the continuous
outside seam provides superior support and strength. Large ends
adapts to small end coupling and fittings. Available in 5' lengths only.
1. 26ga Snaplock Pipe
Snaplock metal pipe is economical, smooth,and practical. It is
delivered open and flat–snap it together and lock it along the length of
the pipe’s seam to make your pipe. It is an easy cut to length with
shears. Available in 5' lengths only.
3. Long Ranger Remote Dust Collector Switch - LR220-3
Save yourself the inconvenience of walking over to turn on your
cyclone when you find you’re in the middle of a critical project. Simply
press the transmitter on/off button to easily switch your cyclone on or
off.
12
7
8
9
10
5
6
3
4
11
Accessories
Page 8

8
© 2005 PSI Woodworking 9900 Global Road, Philadelphia, PA 19115 V2-0305
PSI Woodworking Products
Notes
 Loading...