

Temperature Guard VM606, VM606E Installation Instructions Manual

Input Guard
Models
VM606 (dialer only)
VM606E (with Ethernet and dialer)
Manual and Installation Instructions
Made in the U.S.A.

Index Page
General Description 3
Installing the Input Guard 3
Wiring Diagrams 4
Setting up the Input Guard 5
Programming Input Parameters 5-6
Program Menu Items 7
Programming Telephone / Pager Numbers 7
Programming a Local Identification Number for Pager 8
Recording a Personal Identification Message 9
Programming Number of Rings 9
Programming the PIN Number 10
Programming Reminder Calls 10
Programming Warning Message Repetitions 10
Programming the Relay Option 11
Programming the Power Outage Alarm Time Delay 11
Programming Unit Callout Time Delay 12
Acknowledge Only Pin 12
Using the Input Guard 13
How does an input go into alarm condition 13
What happens when an input is in alarm condition 13
How do I activate and deactivate the relay? 13
What happens when the Input Guard calls a voice number? 14
What happens when the Input Guard calls a pager? 14
Calling to check inputs and power? 14
Connecting the Input Guard to a phone line with a fax 15
Trouble shooting 15-16
Your settings 17
FCC Part 68 Information 18
Warranty/Disclaimer 19
2

General Description
The Input Guard is a complete multi-input monitor and auto-dialer. The Input Guard monitors up to eight (8) inputs.
The Input Guard allows the user to program individual normal states and a time delay for
each input. When an input goes into an alarm condition, the Input Guard will call up to eight
programmable voice or pager numbers.
The Input Guard also monitors the power to which it is connected and will call its’ programmed numbers if a power outage exists.
The Input Guard will turn on its alarm relay and buzzer when any zone or input is in an
alarm condition. The alarm relay and buzzer is turned off by pressing the button on the top
of the dialer.
Installing the Input Guard
Select a location with access to power, telephone line, and Ethernet jack if the Input Guard
with Ethernet jack was purchased.
Connect the phone line to an active analog phone jack.
Plug in the wall mount transformer into a power socket of which you want monitored.
Connect the wall mount transformer power jack to the Input Guard on the top of the unit.
For ease of wiring, remove the terminal blocks. See wiring diagrams on page 4.
If desired, connect additional signaling devices to the alarm relay contacts at terminals 22,
23 and 24.
Alarm relay is dry contact rated at 1A 24VDC.
Software for the VM606E can be found at;
http://www.temperatureguard.com/datacapture.html
3
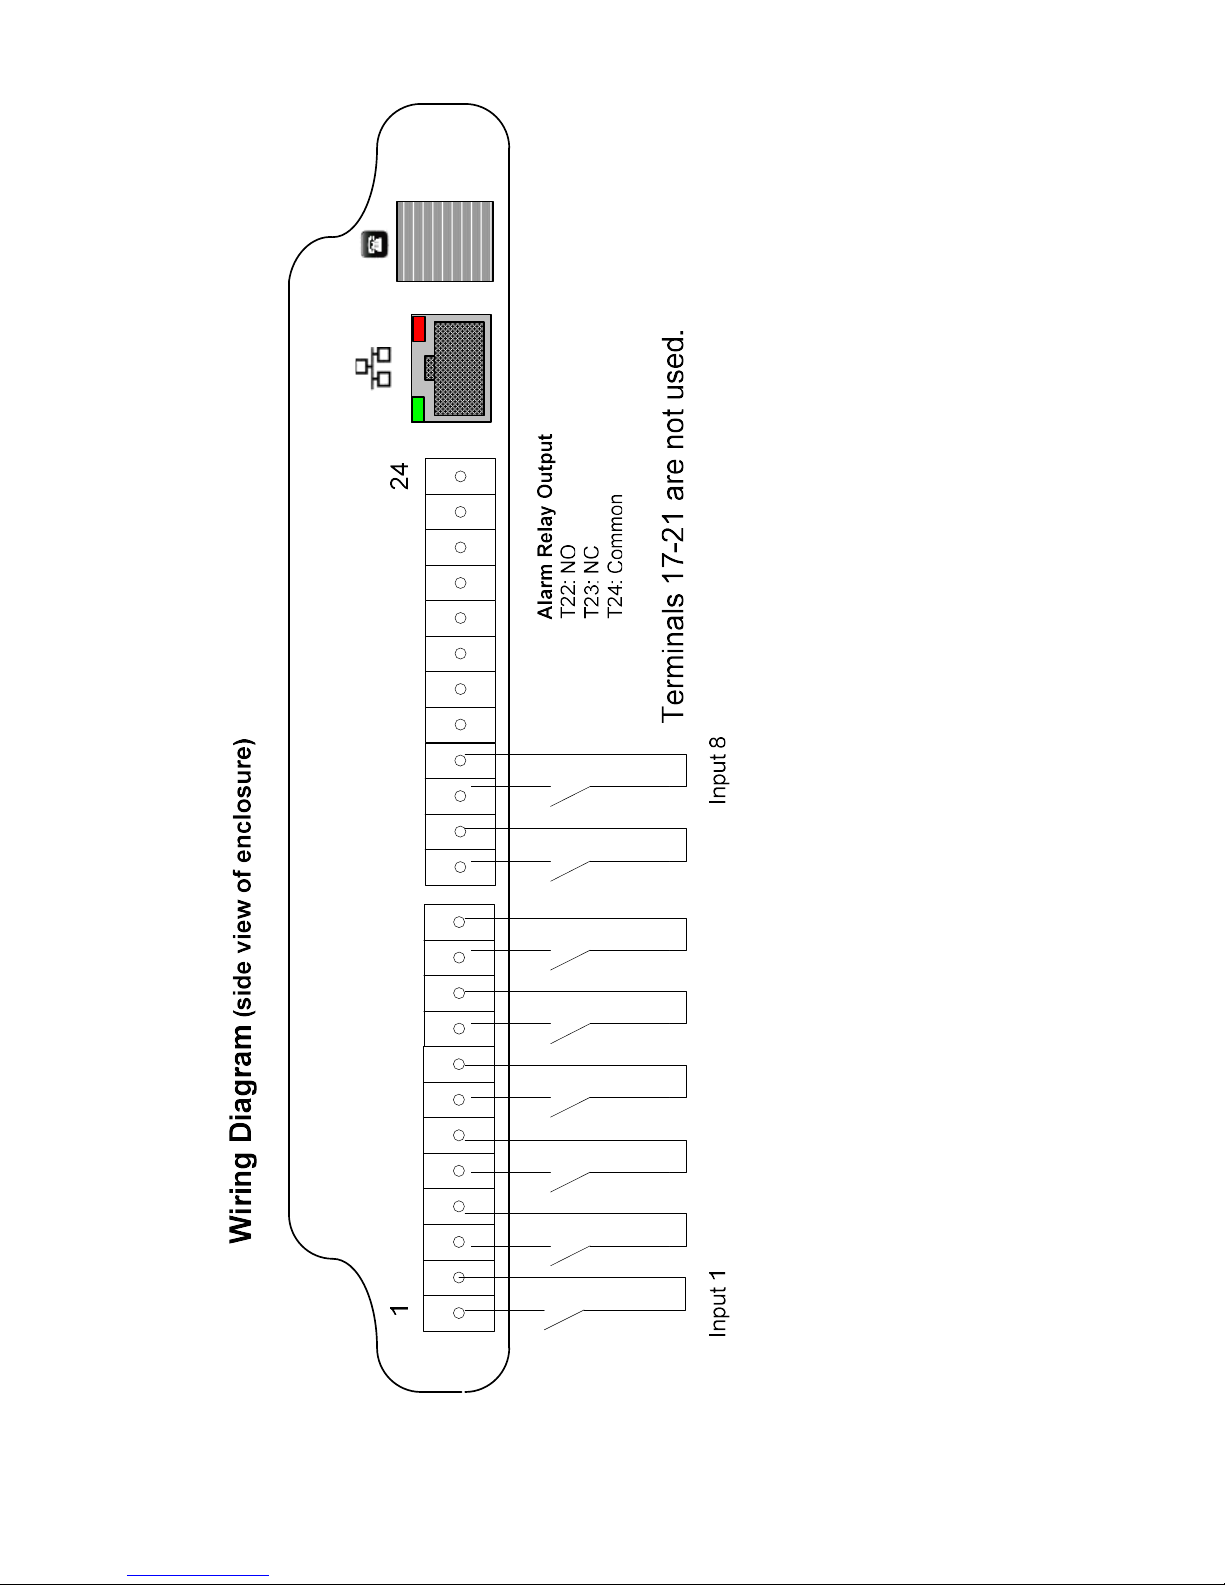
Dry Contact Inputs
Wire each dry contact
input to the terminal
block as shown.
4

Setting up the Input Guard
Programming is accomplished over the phone and only has to be done once, unless it is
necessary to make a change. Before programming, do the following:
1 Connect a phone line and power, and then turn on the Input Guard.
2 From another phone line dial the number where the Input Guard is located. The device
will pick up after the first ring.
3 When prompted, enter the 4-digit PIN number (Factory default PIN number is 0000).
4 You will hear the Main Menu options (you may enter your selection at any time):
Option Function
1 Status
2 To Set Limits (for inputs)
3 Program (telephone settings)
4 Turn On Relay (if relay option is enabled)
5 Turn Off Relay (if relay option is enabled)
0 Exit and Hang Up
Main Menu
Programming Input Parameters
Each input can be programmed to be either a normally closed or normally open input.
Each input has its own time delay for which the input must have changed state for, before
the Input Guard begins making emergency calls. The time delay is programmed in minutes.
Each input has a unique Input ID message that can be recorded to give further detail during
emergency calls.
5

1. From the Main Menu, press 2 to setup inputs
2. You will hear “Enter Input Number”
3. Enter the number of the input which you wish setup (i.e. 1)
4. You will hear "Input X is normally open, press 1 to change."
5. Enter your selection
6. Press 1 to change , or any other key to skip. If you press 1 you will hear “Enter 1
for normally closed, 2 for normally open.” Make your selection. Unit will state
your selection.
7. You will hear the programmed time delay for the input (i.e. 0 minutes)
8. You will hear "Input X callout time delay is X minutes, Press 1 to change"
9. Press 1 to change the delay or press any other button to not change the delay.
(If you do not press one, go to step 12)
10. You will hear “Enter number followed by the # key”
11. Enter the time delay in minutes (Valid times are 0 to 999 minutes), then press #.
12. You will hear the value you just entered (i.e. 5 minutes)
13. You will hear the programmed identification message for the selected input. You
will hear “Input X message is Empty” on a new unit.
14. You will hear “Press 1 to change”
15. Press 1 to make a change or press any other button to not change the message
(If you do not press one go to step 19)
16. You will hear a tone
17. Begin speaking after the tone. The Input Guard will record for about 4 seconds
18. After 4 seconds you will hear the tone again, marking the end of your message
19. You will hear the message you recorded
20. You will be returned to the Input Setup Menu. Repeat the above steps for each input
used. Press 0 to get back to the main menu.
6

Program Menu Items
To access the Program Menu:
1. From the Main Menu, press 3
2. You will hear the Program Menu options (you may enter your selection at
any time): 6 through # are unspoken.
Option Function
1 Program Telephone Numbers
2 Set Local ID (for pagers only)
Program Menu
3 Record a Unit Message
4 Set Number of Incoming Rings
5 Change the Pin Number
6 Alarm Reminder (unspoken)
7 Warning Repetition (unspoken)
8 Enable or Disable Relay Option (unspoken)
9 Power Outage Time Delay (unspoken)
* Unit Callout Time Delay (unspoken)
# Change Acknowledge Only Pin Number (unspoken)
0 Exit (Return to Main Menu)
Programming Telephone/Pager Numbers
The Input Guard stores up to eight (8) emergency telephone or pager numbers. The Input
Guard will call each phone number until the PIN number is entered. If Input Guard reaches
an answering machine, it will leave your personal identification message, and then the
alarm condition, but will continue calling.
First Time Number Programming:
1 From the Program Menu, Select 1 to set telephone numbers.
2 You will hear “Select contact.” Select #1-8.
3 You will hear “Contact X is empty. Press 1 to change.” After you enter 1 you will hear
“Enter number followed by the # key.”
7
 Loading...