

Page 1
Cellular Edition
TM-CELL400-Z
User Guide
Table of Contents
CELLULAR EDITION TM-CELL400-Z USER GUIDE 1
HARDWARE GUIDE 2
VERIFYING WIRELESS SIGNAL RECEPTION 2
SETTING UP YOUR FIRST ALERT 3
CELLULAR EDITION JACKS AND CONNECTORS 4
CHARGING THE BATTERY 4
BATTERY LIFE 5
TURNING ON THE DEVICE 5
TURNING OFF THE DEVICE 5
OPERATING GUIDELINES 6
PLACEMENT 6
WIRELESS RECEPTION 6
DEVICE CARE INSTRUCTIONS(FOR BOTH CELLULAR EDITION AND ZPOINT WIRELESS NODES) 6
BATTERY MAINTENANCE 6
ENVIRONMENT CONSIDERATIONS 7
AVOIDING PHYSICAL ROUGHNESS 7
TROUBLESHOOTING 7
STORE AND FORWARD 7
ZPOINT WIRELESS SENSOR 8
SETTING UP THE HARDWARE 8
VERIFYING WIRELESS SIGNAL RECEPTION 8
SIGNAL STRENGTH INDICATOR MODE 8
TURNING ON THE WIRELESS SENSOR 9
BATTERY LIFE 9
Page 1 of 9 user guide v 2.0
Page 2
CHANGING THE BATTERIES 10
TROUBLESHOOTING 10
Hardware Guide
Cellular Edition At a Glance
The Temperature@lert Cellular Edition is a remote environmental monitor that measures conditions
such as temperature and humidity at its location every few minutes. Each sensor reading is transmitted
via the mobile phone network to our 24/7 monitoring system and secure web site. If the temperature
goes too high or too low, the system will call, email or text message you. The Cellular Edition can use
either wired sensors (connected directly to the unit) or ZPoint wireless sensors. Each Cellular unit can be
linked to 15 ZPoint wireless sensors. Each ZPoint sensor has two additional jacks for external sensor addons. If the power ever goes out, the unit will continue to operate on the built-in battery backup. If the
monitoring website ever fails to hear from the unit, you will receive an alert to check the device. Either
way, we want you to know that we’ve got you covered. Temperature@lert Cellular Edition requires a
monthly or annual monitoring plan for operation. If you purchased your unit from a reseller, you may
need to call Temperature@lert at 866-524-3540 or email [email protected] to subscribe
to a plan.
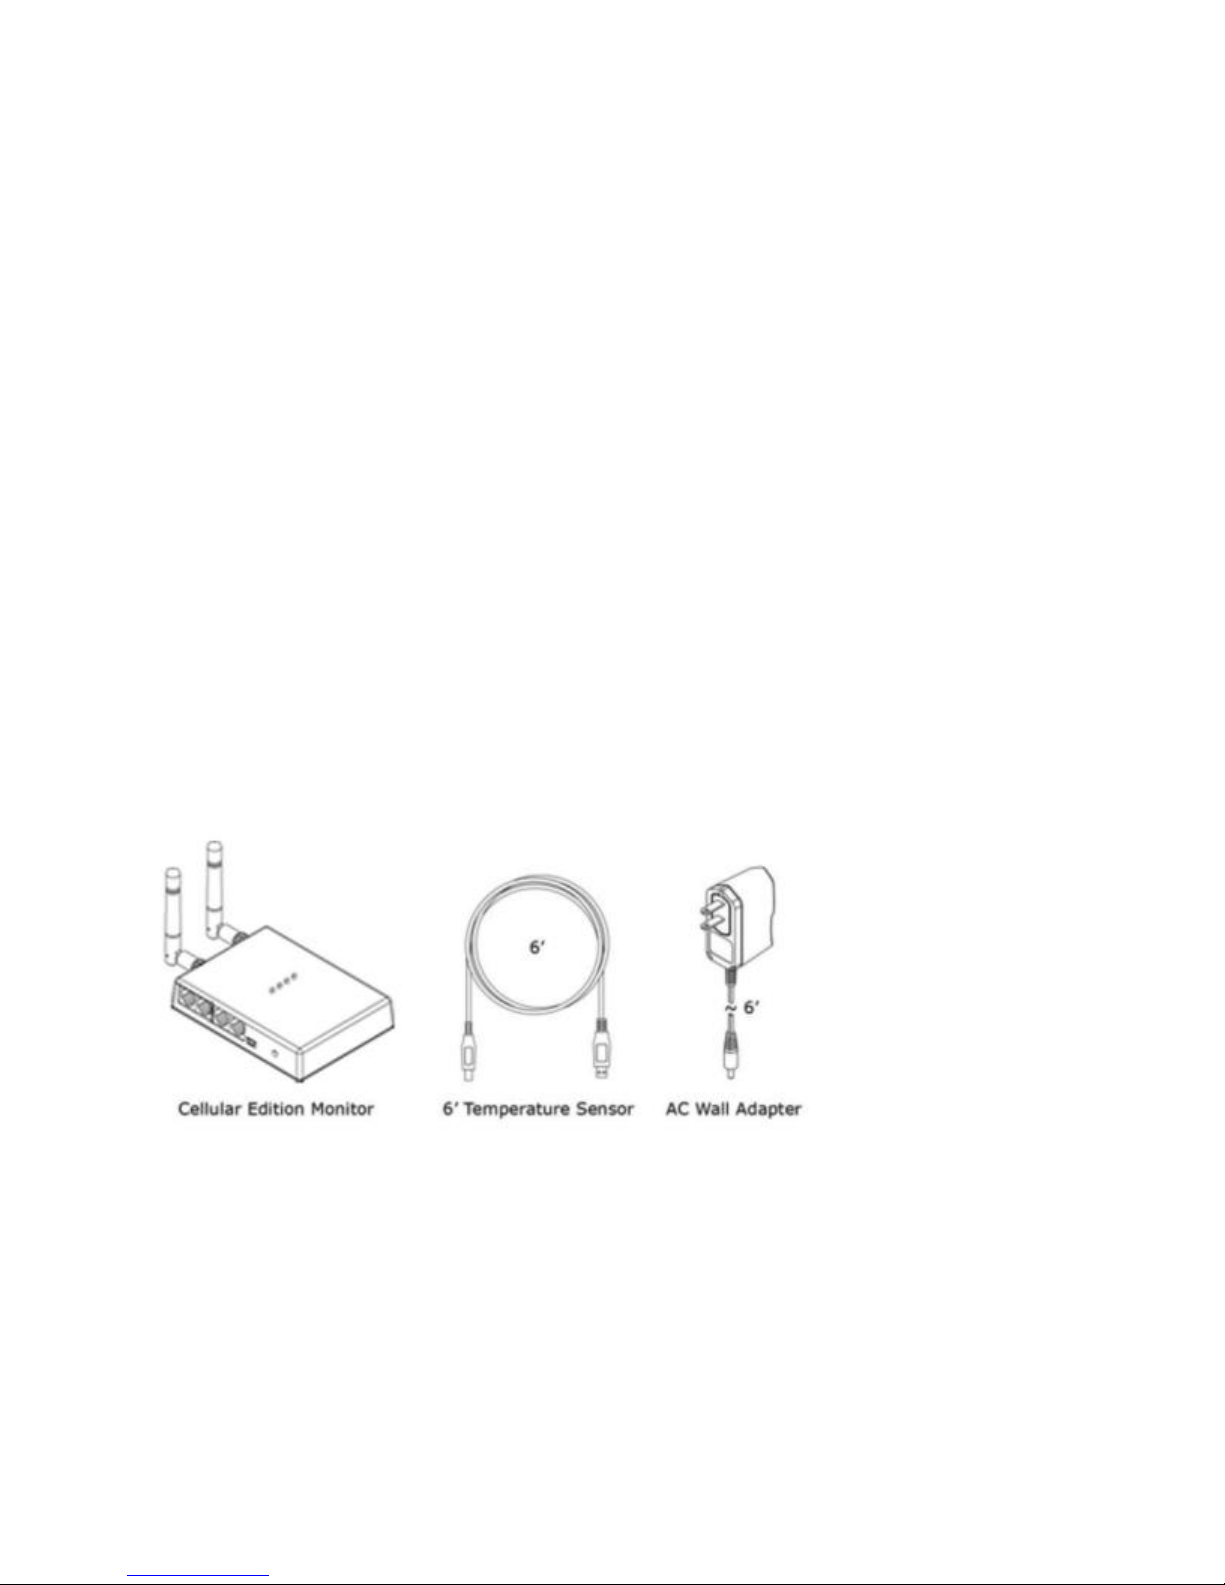
The Temperature@lert Cellular Edition includes the following items:
Setting Up the Hardware
Simply connect the unit to any AC outlet to power on the device and the unit will begin operating. After
ten seconds, temperature readings will automatically begin transmitting. The unit is operating correctly
if you do NOT see the red failure light blink.
Verifying Wireless Signal Reception
Your Temperature@lert Cellular Edition transmits temperature reading via the Verizon and Aeris(for
Page 2 of 9 user guide v 2.0
Page 3

international) mobile phone networks. In order for the unit to operate, you must be within range of
either the cell carrier’s (or one of their roaming partners) service area. If you notice one or two blinks
on the failure light it could be low signal. Please try signal strength mode to find a better location. Please
contact support if this does not help.
Setting Up Your First Alert
Temperature@lert Cellular Edition is primarily controlled via the Sensor Cloud website located at
www.myalertlist.com. Log into www.myalertlist.com using the username and password you created
when you purchased the device. To setup a temperature alert notification, follow these steps:
1. Click on the Devices tab and select Device List.
2. In the Device List table, click on the alert link for your device.
3. Click add Sensor Alert.
4. Enter a name for the alert.
5. Choose Temperature for the condition.
6. Set the alert for above or below the temperature reading.
7. Enter the temperature threshold in degrees that will trip the alert.
8. Click the Add Action link.
9. Select Email, Phone, or SMS and enter the email or phone number.
10. Click the Send on Clear Also box to be notified when the temperature
comes back in range.
11. Click the Save button.
Please read our sensor cloud manual or knowledge base for more detail on Sensor Cloud and alerts.
Temperature@lert Cellular Edition in Detail
Indicator Lights
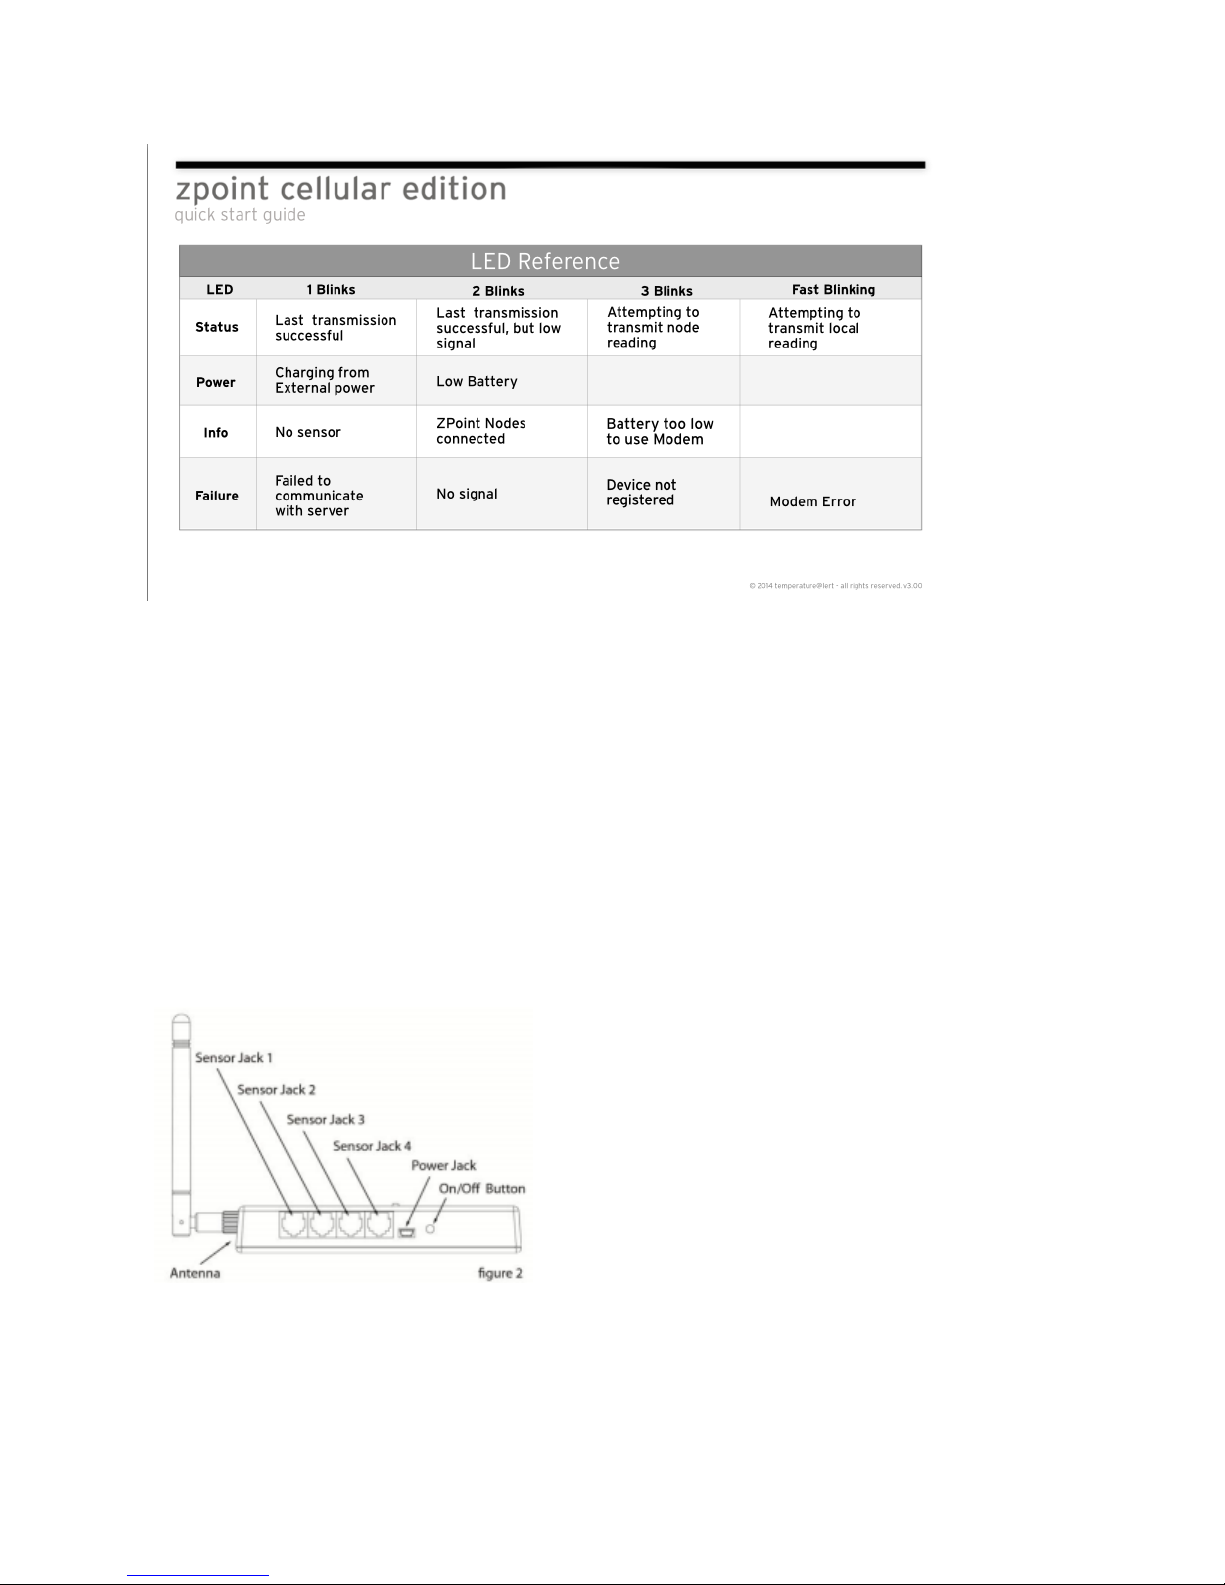
The unit has 4 indicator lights: Status, Battery, Info and Failure(see table).
Page 3 of 9 user guide v 2.0
Page 4
Cellular Edition Jacks and Connectors
On the side of the unit, you’ll find the majority of the connectors and jacks
(see figure 2):
Large Antenna – The GSM or CDMA swivel antenna is connected via a threaded SMA mount. Used to
connect to the cellular network.
Small Antenna – This swivel antenna is connected via a threaded SMA mount and is used to
communicate to the Zpoint wireless nodes.
Power – This jack accepts the DC power output from the wall transformer.
Power Switch – This switch is used to control the different operating modes of
the device (See operating modes).
RJ 12 Sensor Jacks 1, 2, 3 & 4 – The sensor jacks accept Temperature@lert
environmental sensors. The unit will monitor up to four sensors.
Charging the Battery
While the unit is connected to wall power, the battery charge is automatically maintained. When the
battery is charging the battery light will flash once every few seconds. The battery light will continue to
flash while the unit is connected to wall power.
Page 4 of 9 user guide v 2.0
Page 5

Battery Life
When disconnected from external power the battery is expected to last between one to two days.
Lower reading intervals will lower battery life. It’s recommend to set power alerts for AC power loss and
low battery.
Turning on the Device
Connecting a unit that has been powered off to wall power will turn on the
unit. Alternatively, a ball point pen or paper clip can be used to press and
immediately release the On/Off button. All lights will briefly light up and the
unit will be turned on.
Turning off the Device
The unit is shipped in the Off mode. To power off the device manually, use a ball point pen or paper clip
to press AND HOLD the On/Off button for 10 seconds. You will see all lights turn on and the status light
will flash. When the lights start going off in order one by one, you can release the On/Off button.
The unit is now powered off. While fully powered off, the unit will not send or record any temperature
readings at any time. All indicator lights will be off. Turning off the device is recommended when not in
use for extended periods of time to preserve battery life. Pausing your account does not power off a
device.
Signal Strength Indicator Mode
Use this mode to determine the wireless cellular signal strength where the device is installed.
To Enter Signal Strength Mode:
1. Press and hold the "on/off" button. All the lights will illuminate and after about 5 seconds the "status"
light will start flashing. When the "status" light begins flashing release the "on/off" button.(Hold the
button too long and the device will power off)
2. The "status" light will remain solid while the device searches for a cellular tower. If the device finds a
cellular tower, the lights will illuminate from bottom to top displaying the relative signal strength. For
example if the "failure" light is illuminated, the device is indicating it has about 25% signal strength, if all
four light are illuminated the device has 100% signal strength. A blinking light indicates half a "bar" of
signal strength. If the "status" light remains solid, and none of the other lights illuminate, the device is
indicating it can't find a cellular tower.
3. After about three minutes, the device will automatically exit signal strength mode and resume its
normal transmissions.
Here's a short video we put together displaying the procedure:
Page 5 of 9 user guide v 2.0
Page 6

http://www.youtube.com/watch?v=b3UhVPN4EGg
Operating Guidelines
Placement
The unit should be placed indoors on a flat and level surface. The unit can be mounted vertically on a
wall or other surface with screws or with industrial Velcro® tape.
Adding ZPoint Wireless Sensors
When you order your ZPoint wireless sensors from Temperature@lert, we will automatically associate
them with your account. The ZPoint wireless sensor will automatically find in range. If your ZPoint
wireless sensor is not showing up on Sensor Cloud, please try signal strength mode then contact
support.
Wireless Reception
The unit requires a cellular wireless signal in order to operate. If a signal is unavailable in the desired
installation area, the sensor cable can be increased to a length of up to 200 feet (61 meters). ZPoint
wireless sensors can be up to 1,000 feet (line of sight) from the Cellular Edition, or 300-400 feet with
obstructions. You can use a standard RJ12 six conductor extension cable or contact Temperature@lert
to purchase a longer cable. (Note, four conductor extension cables may not allow your device to operate
properly.) Alternatively, an external Quad or Dual band GSM antenna with an SMA mount can be
utilized. Note that antenna extension wire length degrades the signal as length increases. We do not
recommend using an antenna cable over 6-feet (1.8 meters) in length. Please contact Temperature@lert
support before connecting an antenna not supplied with the unit. Use of an incorrect antenna
can place the device out of FCC compliance. The antenna should be oriented in a vertical position
perpendicular to the horizon. The antenna must remain connected during operation. In order to
disconnect the antenna, complete the full power down instructions first.
Device Care Instructions(For both Cellular Edition and Zpoint Wireless Nodes)
Battery maintenance.
Allowing the battery to fully discharge can shorten the devices lifespan. Even when not in use please do
not leave the device disconnect from power for overly extended period of time. If you must store the
device hold down the power button until all lights turn on then go out one by one. This will power off
the device and preserve some of the charge.
Page 6 of 9 user guide v 2.0
Page 7

Environment considerations.
Device Operating Range: 5ºC to +45ºC (+41ºF to +113ºF)
If placing the device in a refrigerated environment it is highly recommend keeping in a sealed FDA bag
with desiccant. Otherwise condensation and build and damage the device. Ideally the device should be
placed outside the fridge or freezer environment and have a sensor probe on the inside. If operating in
high humidity it is recommend to keep the device in a sealed enclosure such as Pelican case or NEMA
enclosure.
Avoiding physical roughness.
You should never have to force any connection to power or sensors. Using too much force can break the
delicate connectors. Be careful not to over tighten the antenna connection. It should be snug but still be
able to be loosened by hand. If placing the device high up makes sure it is securely mounted to prevent
falling damage.
Troubleshooting
Common Problems
Failure Light is Flashing
If there are two blinks then signal may be too low. Please try signal strength mode and move the device
around until a better location is found. Any other blinking pattern, please contact support to resolve
your issue.
Info Light is Flashing
An info light does not always indicate a fault or failure. The device may still
be transmitting successfully as long as the red failure light is not flashing.
One blink is no sensors plugged in. Double check that your sensor are connected securely.
Two blinks mean one or more Z-point wireless sensors are connected.
Three blinks means that the battery is too low for the modem to turn on. Please make sure the device is
connected to a working power source and plugged in at least for an hour before contacting support.
Store and Forward
Store and Forward is an optional feature available in certain Sensor Cloud monitoring plans. When
Page 7 of 9 user guide v 2.0
Page 8

wireless communication is unavailable (for example if the ZPoint Cellular Edition is loses signal or a
wireless sensor goes out of wireless range of the cellular edition), turning on store and forward will
internally log the sensor readings on the regular interval. Once communication is restored, the logged
data will be forwarded to the cloud and available for reporting and compliance purposes. Each node and
gateway can store up to 5000 readings. Please make sure if it enabled on all your devices by clicking
“View” for the particular device in the device list. If you wish to turn it on, please contact support to
ensure you have a monitoring plan that supports it. *Note: Store and Forward data transmitted to
Sensor Cloud is not evaluated for alarms. Therefore, if you utilize this feature, you should setup a missed
report alert to notify you that a node or other device has been unable to transmit.
Zpoint Wireless Sensor
All information below here applies to the Zpoint Wireless Sensor(node).
Setting Up the Hardware
Ensure the ZPoint Cellular Edition is powered on. Once the gateway is powered on, it will attempt to
connect to the cloud. After a successful cloud connection is made, the ZPoint Cellular Edition will be
accessible by the battery powered ZPoint wireless sensors.
To use a battery powered ZPoint wireless sensor, simply press and release the power button to turn on
the unit. The device will turn on and begin searching for a ZPoint Cellular Edition within range and
transmit a reading to the cloud. The unit is operating correctly if you do NOT see the red failure light
blink.
Verifying Wireless Signal Reception
Your Temperature@lert ZPoint wireless sensor transmit sensor readings via 2.4GHz radio waves to the
ZPoint Cellular Edition. In order for the unit to operate, the nodes must be within range of a ZPoint
Cellular Edition. Range is 1000ft line of sight. A variable 300ft with obstructions.
Signal Strength Indicator Mode
This mode is used to find how strong the signal is between the Zpoint Wireless Sensor and the closest
Cellular Edition(gateway).
To Enter Signal Strength Mode:
Page 8 of 9 user guide v 2.0
Page 9
1. Press and hold the "on/off" button. All the lights will illuminate and after about 5 seconds the "status"
light will start flashing. When the "status" light begins flashing release the "on/off" button.(Hold the
button too long and the device will power off)
2. The "status" light will remain solid while the device searches for a gateway in range. If the device finds
a gateway, the lights will illuminate from bottom to top displaying the relative signal strength. For
example if the "failure" light is illuminated, the device is indicating it has about 30% signal strength, if all
3 light are illuminated the device has 100% signal strength. A blinking light indicates half a "bar" of signal
strength. If the "status" light remains solid, and none of the other lights illuminate, the device is
indicating it can't find a gateway.
3. After about three minutes, the device will automatically exit signal strength mode and resume its
normal transmissions.
Turning on the Wireless Sensor
A ball point pen or paper clip can be used to press and immediately release the On/Off button. All lights
will briefly light up and the unit will be turned on.
Turning off the Wireless Sensor
The unit is shipped in the Off mode. To power off the device manually, use a ball point pen or paper clip
to press AND HOLD the On/Off button for 5 seconds. You will see all lights turn on and the status light
will flash. When the lights start going off in order one by one, you can release the On/Off button.
The unit is now powered off. While fully powered off, the unit will not send or record any temperature
readings any time. All indicator lights will be off. Pausing your account does not power off the device.
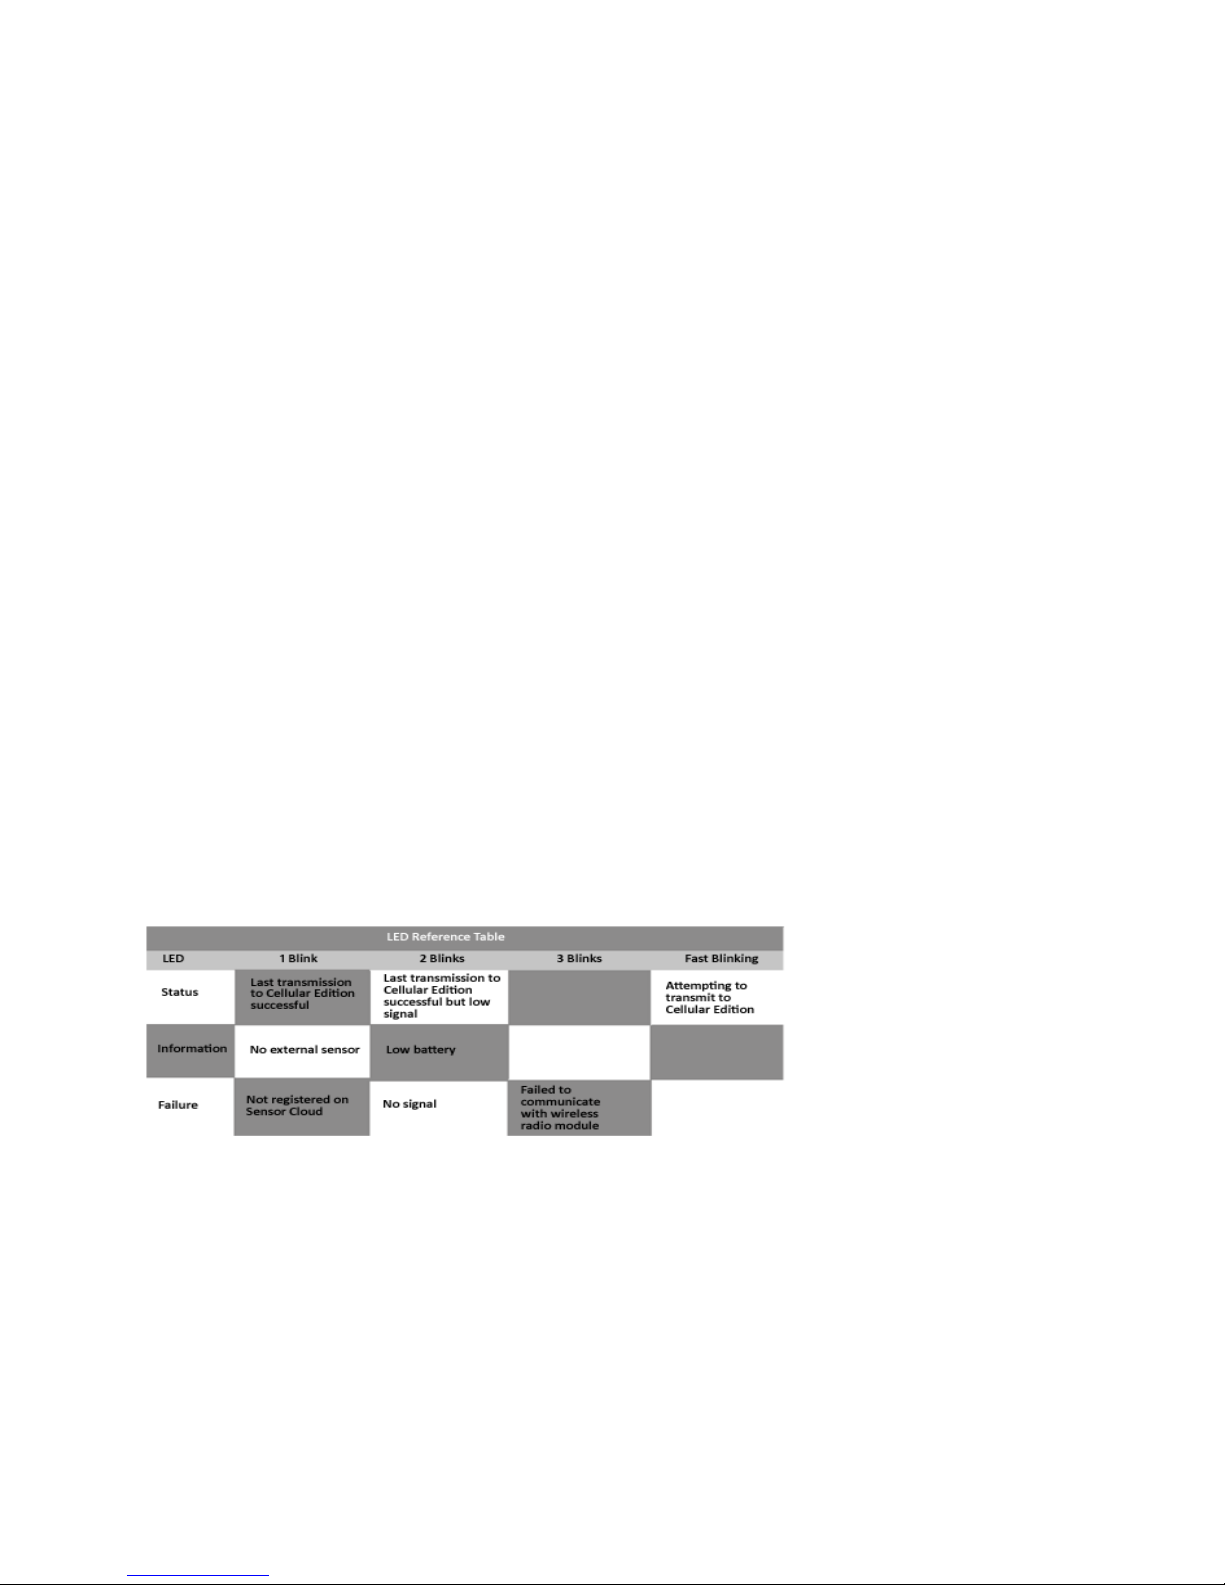
Light Table
Battery Life
ZPoint wireless sensors will run up to 5 years on the two included Energizer Advanced Lithium AA
batteries. The units can transmit as frequently as every 5 minutes and be in ambient temperatures down
to -40°C without shortening the battery life. There are several things that will shorten the battery life:
Sensor configurations that require the sensor to constantly remain powered such as rainfall and wind
speed will reduce the battery life. Standard sensors such as temperature, humidity, flood, and dry
contact will not reduce the battery life.
Page 9 of 9 user guide v 2.0
Page 10

ZPoint wireless sensors that are not within range of a ZPoint Cellular Edition for an extended period of
time will experience a decrease in battery life. If you are using the wireless sensors in those conditions,
make sure you have low battery alarms setup. ZPoint Wireless Repeaters operate on a built-in lithiumion rechargeable battery. The repeater must remain connected to external AC power for operation, but
will continue to operate on its built in battery for up to 24 hours in the event of a loss of external power.
Changing the Batteries
The status of the batteries can be seen from the device view page on the Sensor Cloud website. In
addition, you can setup a low battery alarm to notify you when the batteries are low on power. To
change the batteries, turn the unit over and unscrew the cover. Remove the two AA batteries and
replace them with the same type (2 Energizer Advanced Lithium AA Batteries). Standard alkaline cells
can be used, but they will not perform well in cold conditions and will provide a shorter lifetime.
Wireless Repeaters operate on a built-in lithium-ion rechargeable battery that can’t be removed.
IMPORTANT: After you change the batteries, you will need to press and release the on/off button to turn
the device back on.
Troubleshooting
Failure light blink/not reporting to cloud
First make sure the Cellular Edition is powered on and communicating. If it is try bringing the device near
the Cellular and pressing the On/Off button once to reboot. If it transmits after a few seconds then you
can use signal strength mode to find the ideal placement for it.
All three lights turn on and then off without pressing anything.
If you ever see this happen it could the result of condensation on the board. If inside a freezer please
remove the device to allow it to dry. This can be prevented by using a 100% sealed FDA bag with
desiccant. If the device still has issue after drying please contact support.
No lights turn on
The battery may have discharged. Try replacing them with 2AA batteries. Note* The repeater has a
soldered in battery that cannot be replaced. Please contact support.
Page 10 of 9 user guide v 2.0
 Loading...