

Page 1
TEMCO Vent-Free Gas Fireplaces
Click here to print
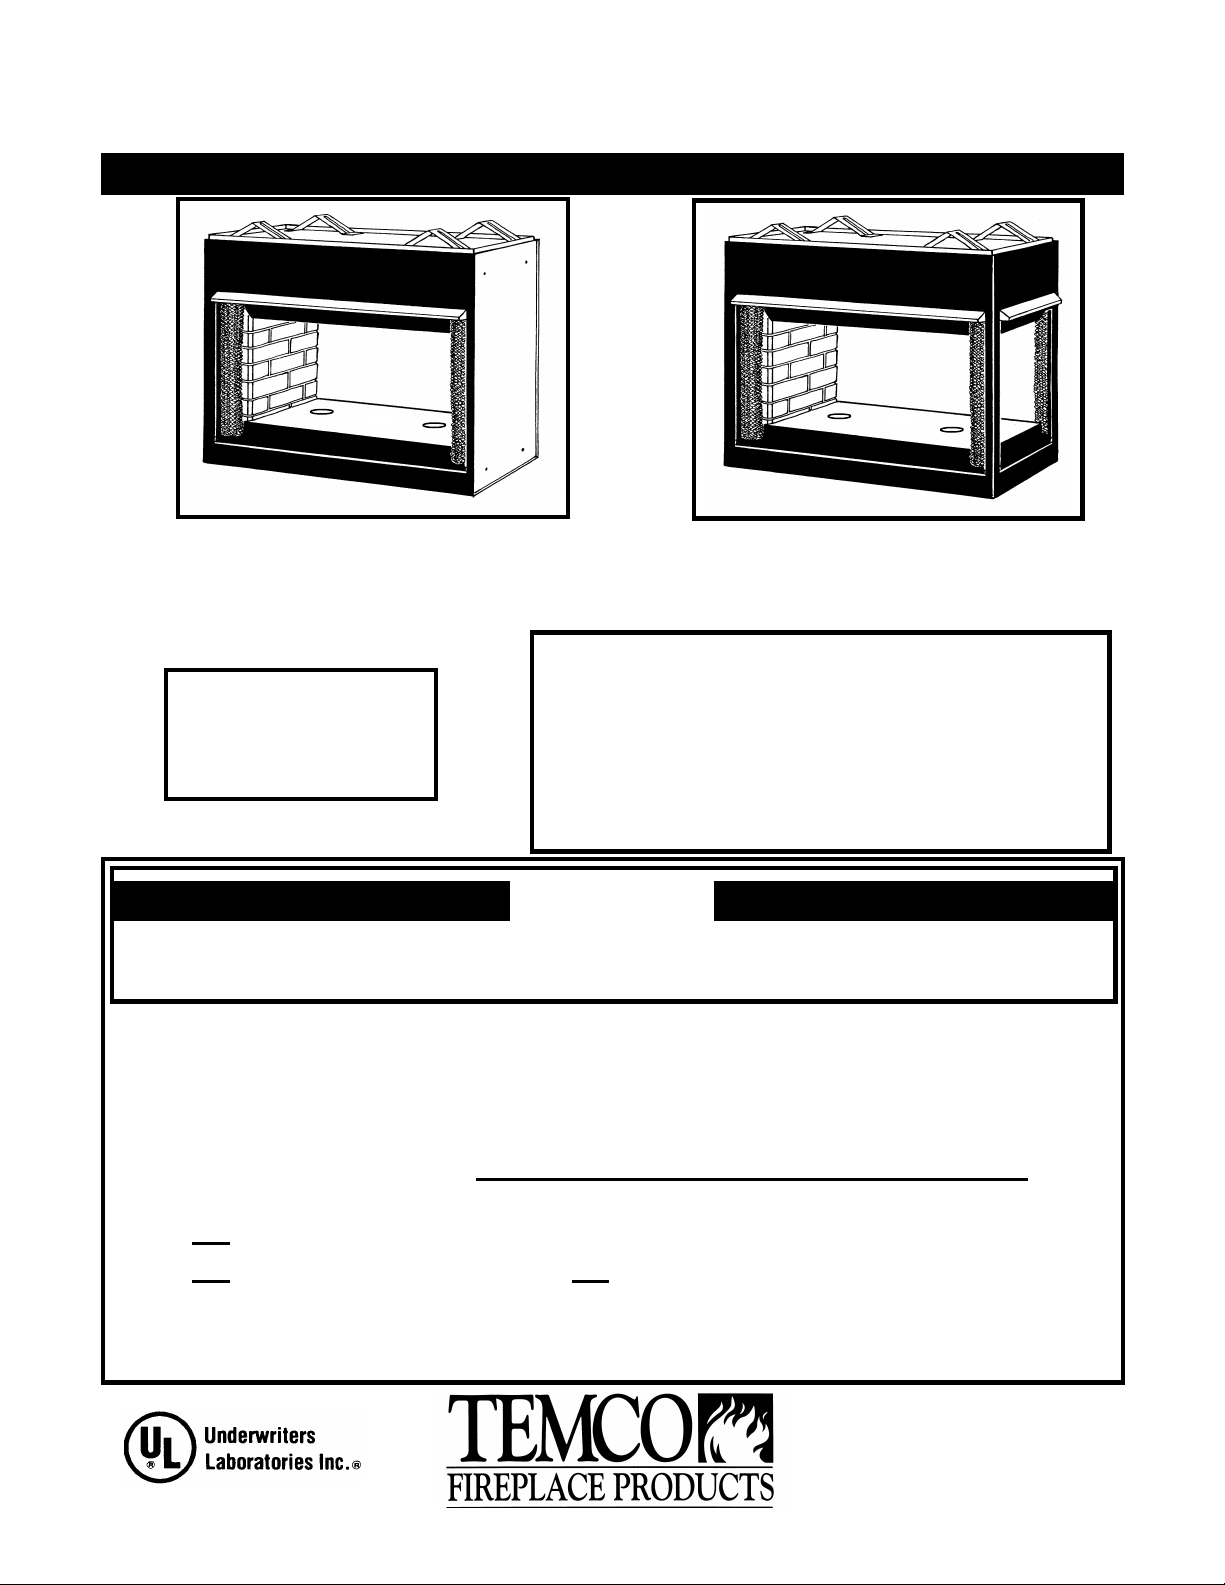
Installation Manual for ADF36-ST and ADF36-PN Fireplaces
See-Through Gas Fireplaces
ADF36-ST
UNIVERSALLY LISTED FOR USE WITH ANY LISTED 40,000 BTU/HR LP OR NAT GAS LOG APPLIANCE.
Peninsula Gas Fireplaces
ADF36-PN
Carefully review the instructions supplied with
FOR USE ONLY WITH
DECORATIVE TYPE
UNVENTED ROOM
HEATERS
the decorative type unvented room heater for the
minimum fireplace size requirement.
DO NOT INSTALL THE APPLIANCE IN THIS
FIREBOX, UNLESS THIS FIREBOX MEETS THE
MINIMUM DIMENSIONS REQUIRED
WARNING
If the information in this manual is not followed exactly, a fire or explosion may result
− Do not store or use gasoline or other flammable vapors and liquids in the vicinity
of this or any other appliance.
− Installation and service must be performed by a qualified gas installer, service
agency or the gas supplier. Do not attempt to install this appliance yourself!
• Do not light any appliance.
• Do not touch any electric switch; do not use any phone in your building.
• Immediately call your gas supplier from a neighbor's phone. Follow the gas
supplier’s instructions.
FOR YOUR SAFETY
WHAT TO DO IF YOU SMELL GAS
P.O. BOX 1349 Manchester, TN 37349
P.O. Box 1148 Perris, CA 92572
A subsidiary of Temtex Industries, Inc.
REV 9/9/02 10:05 AM 71875K
Page 2

CONTENTS
Important Information .................................................................................................................Page 3
Planning Ahead .......................................................................................................................................3
Location ................................................................................................................................................3
Drafts ....................................................................................................................................................4
Firebox clearances .............................................................................................................................4
Installation
Framing the firebox ............................................................................................................................5
Installing, leveling & securing the firebox .......................................................................................5
Finishing the fireplace ........................................................................................................................6
Cleaning & Servicing .............................................................................................................................7
Replacement Parts .................................................................................................................................7
Warranty Information ............................................................................................................................8
Installation and Startup Checklist ................................................................................................9,10
Warranty Registration .........................................................................................................................11
This book contains your installation
instructions and should be kept in a safe
place by the homeowner after installation is
complete. For you to realize all the
advantages and use of the reliable service
that has been engineered into your TEMCO
fireplace, you must carefully follow all of the
instructions contained in this book regarding
installation and operation of the fireplace.
These instructions should be read carefully
in their entirety before beginning installation
of the fireplace.
It is suggested that you wear work gloves
and safety glasses to protect your hands and
eyes when installing/servicing your fireplace.
No outside air kit is required inside firebox
area. Refer to the log-set manual for
combustion air requirements.
NOTE: Authorities having jurisdiction (i.e.
building inspectors, fire marshals, etc.)
should be consulted before installation to
determine the need to obtain a permit.
FAILURE TO FOLLOW THESE
INSTRUCTIONS WILL VOID YOUR
WARRANTY AND MAY PRESENT A FIRE
HAZARD.
2
Page 3
IMPORTANT INFORMATION
INSTALLER: Please leave these instructions with the owner.
OWNER: Please retain these instructions for future reference.
IMPORTANT: READ THESE INSTRUCTIONS
CAREFULLY BEFORE INSTALLING.
WARNING: ANY CHANGE TO THIS FIREPLACE OR
ITS CONTROLS CAN BE DANGEROUS.
• Due to high temperatures, the fireplace should be
located out of traffic and away from furniture and
draperies.
• Installation and repair should be done by a qualified
service person or gas fireplace installer.
• The fireplace area must be kept clear and free from
combustible materials, gasoline and other flammable
vapors and liquids.
• The fireplace must be inspected and cleaned before use
and at least annually by a professional service person.
More frequent cleaning may be required due to
excessive lint from carpeting, bedding material, dust, pet
hair, etc. It is important that control compartment,
burners, and circulating air passageways of the fireplace
be kept clear.
• Young children should be carefully supervised when
they are in the same room as the fireplace.
• Children and adults should be alerted to the hazard of
high surface temperatures and should stay away to avoid
burns or clothing ignition.
• DO NOT place clothing or other flammable material
on or near the fireplace.
• The fireplace design permits installation and framing
adjacent to combustible materials at the specified
minimum distance. Do not set the fireplace on vinyl
flooring or carpets. COMBUSTIBLE MATERIALS MAY
NOT BE PLACED ON THE BLACK FACE
SURROUNDING THE FIREPLACE.
• The minimum distance from the fireplace to adjacent
combustible walls is 2".
• A gas inlet is provided on the right and left side, but the
installer may pipe to the gas valve in any convenient
fashion.
• Check local, state or city codes to determine if
unvented heaters are permitted.
• The installation must conform with local codes or, in the
absence of local codes, with the NATIONAL FUEL GAS
CODE, ANSI Z223, latest edition.
• DO NOT use this heater in recreational vehicles.
• This heater shall not be installed in a confined space
unless provisions are made for adequate combustion
and ventilation air. See 'Provisions for Adequate
Combustion and Ventilation Air' in the log set manual.
• Provide adequate clearances around air openings into
the combustion chamber and adequate accessibility
clearance for servicing and proper operation. Never
obstruct the front openi ng of the fireplace.
• Any safety screen or guard removed for servicing the
fireplace must be replaced prior to operating the
fireplace.
• This fireplace may be installed in an after-market*
manufactured "mobile" home where not prohibited by
state or local codes.
? *After-market: Completion of sale, not fo r purpose of
re-sale from the manufacturer.
• DO NOT INSTALL GLASS DOORS ON THIS
FIREPLACE.
• No outside combustion air kit is to be installed on this
fireplace.
WARNING: If the area in which the fireplace may be
operated is smaller than that defined as an unconfined
space, provide adequate combustion and ventilation air
by one of the methods described in the National Fuel Gas
code, ANSI Z223.1, 1992, Section 5.3.
WARNING: Do not allow fans to blow directly into the
fireplace. Avoid any drafts that alter burner flame
patterns.
WARNING: Do not use a blower insert, heat exchanger
insert or other accessory not approved for use with this
fireplace.
WARNING: During manufacturing, fabricating and
shipping, various components of this appliance are
treated with certain oils, films or bonding agents. These
chemicals are not harmful but may produce annoying
smoke and smells as they are burned off during the initial
operation of the appliance, possibly causing headaches
and eye/lung irritation. This is a normal and temporary
occurrence.
PLANNING AHEAD
CHOOSING THE LOCATION FOR YOUR
FIREPLACE
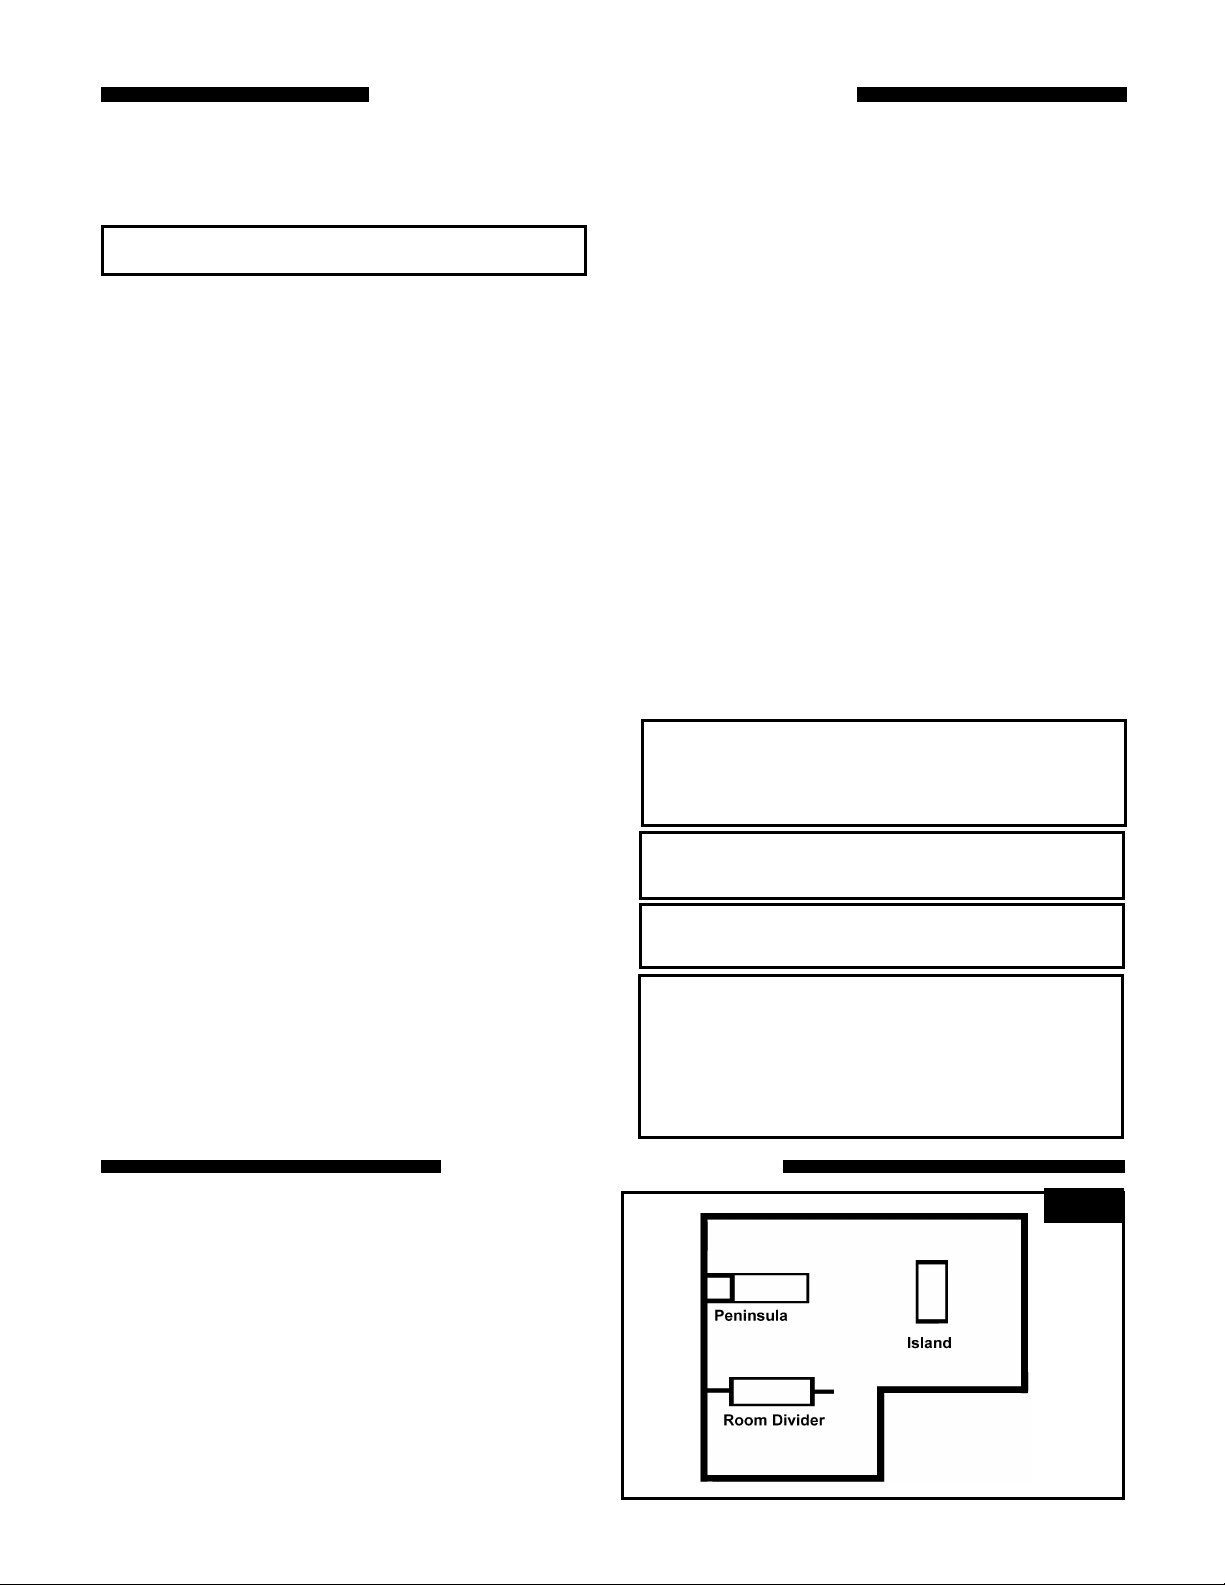
Figure 1 shows some of the many ways your fireplace may be
installed. Consider traffic patterns in your room and the location of
doors and windows. Moving air from ceiling fans, open doors and
hot air grills may cause the flames to soot. If a disturbance is found
that effects the flames, it must be eliminated by turning off the
ceiling fan, closing the door or closing/moving the hot air register.
Your fireplace weighs no more than some of your fine furniture. If
the fireplace is located near a load bearing wall, additional supports
to the foundation will not be necessary. Heavy facings such as brick,
stone, etc., may require additional foundation support. Although this unit
may be installed o ver combustible surfaces, it must not be installed on
carpet or vinyl.
Figure1
3
Page 4
DRAFTS
The location for the fireplace should be away from objects
that will create drafts and possibly hamper the normal flow
of air into the fire. Such objects are frequently opened
doors, ceiling fans and central heat air outlets and inlets.
GAS LINE
The gas line must be installed by a licensed gas installer
before the fireplace is framed in.
FIREPLACE CLEARANCES
The fireplace may be placed directly on a combustible floor,
against a combustible wall at marked clearances or on a
raised wooden platform.
If the fireplace is to be installed on a raised wooden
platform, the platform must be a continuous level surface.
The fireplace must be secured in place so it cannot shift
positions. The nailing flanges on the sides of the firebox
make securing it to the framing easy. They were designed
to allow the installation of 1/2" wallboard or plywood flush
with the face of the fireplace.
Figure 2
Only the header, (see figure 4), may rest on the standoffs
on top of the firebox.
When the fireplace is installed over carpeting, vinyl tile or
any combustible material other than wood flooring, it must
be installed on a metal or wood panel extending its full
width and depth. Alternatively the carpeting, vinyl tile, etc.,
may be removed beneath the fireplace before installing.
COMBUSTIBLE MATERIALS MUST NOT BE INSTALLED
OVER OR TOUCH ANY BLACK PAINTED SURFACE.
DO NOT BLOCK AIR OUTLETS AT SIDES OF FIREBOX
OPENING. DOING SO MAY RESULT IN A POTENTIAL
FIRE HAZARD.
The framing must rest on top of the standoffs.
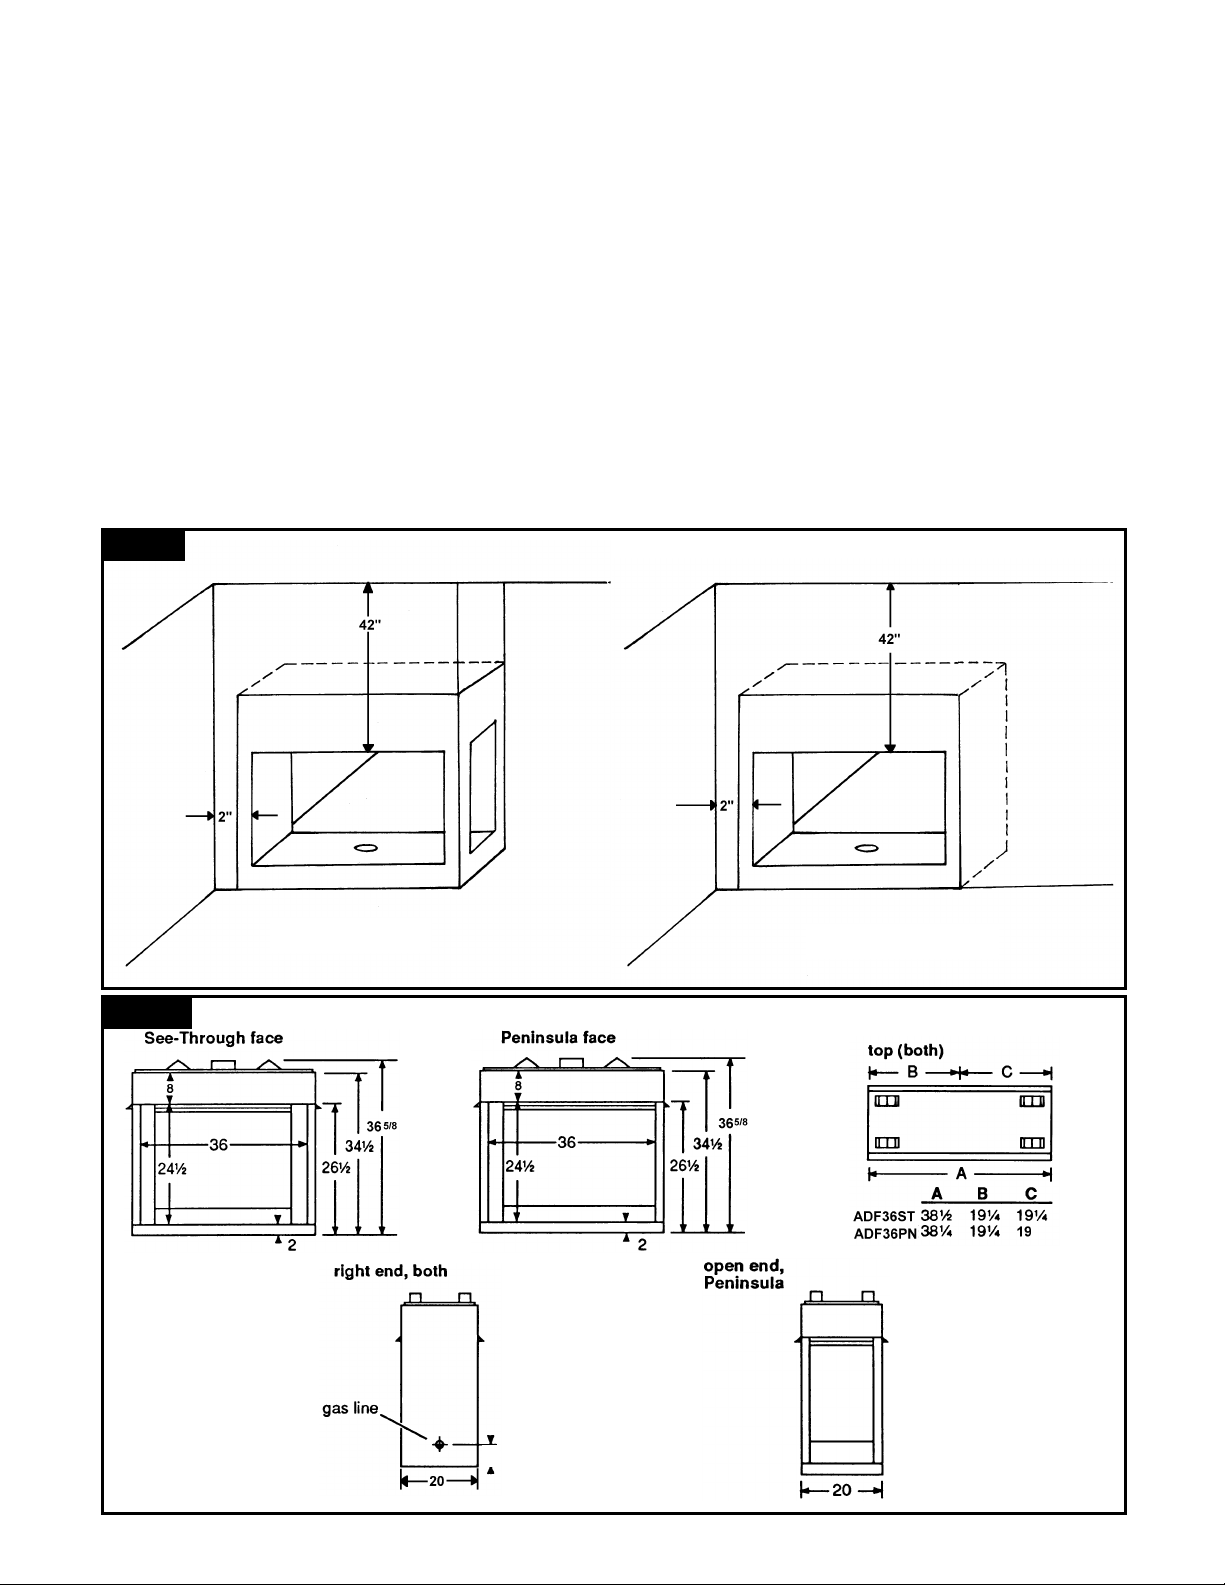
1. Sidewall Clearance: the clearance from the side of the
fireplace opening to any combustible wall should not be
less than 2", (see figure 2).
2. Ceiling Clearance: the ceiling height should not be less
than 42" from the top of the fireplace opening.
3. Floor Clearance: is 0" to a noncombustible floor and
must not be set on carpet or vinyl floor covering.
Figure 3
Peninsula model
Fireplace Dimensions (i ns.)
See-Through model
3
4
Page 5
INSTALLING THE FIREBOX
This list of specific instructions will help you make certain
that every installation operation is done correctly. Complete
the installation steps in the sequence shown. Local building
codes should be consulted in all cases as to the particular
requirements concerning the installation of factory built
vent-free fire places. Select the location for the fireplace by
taking into consideration the factors previously outlined in
the Planning Ahead section of the manual and framing
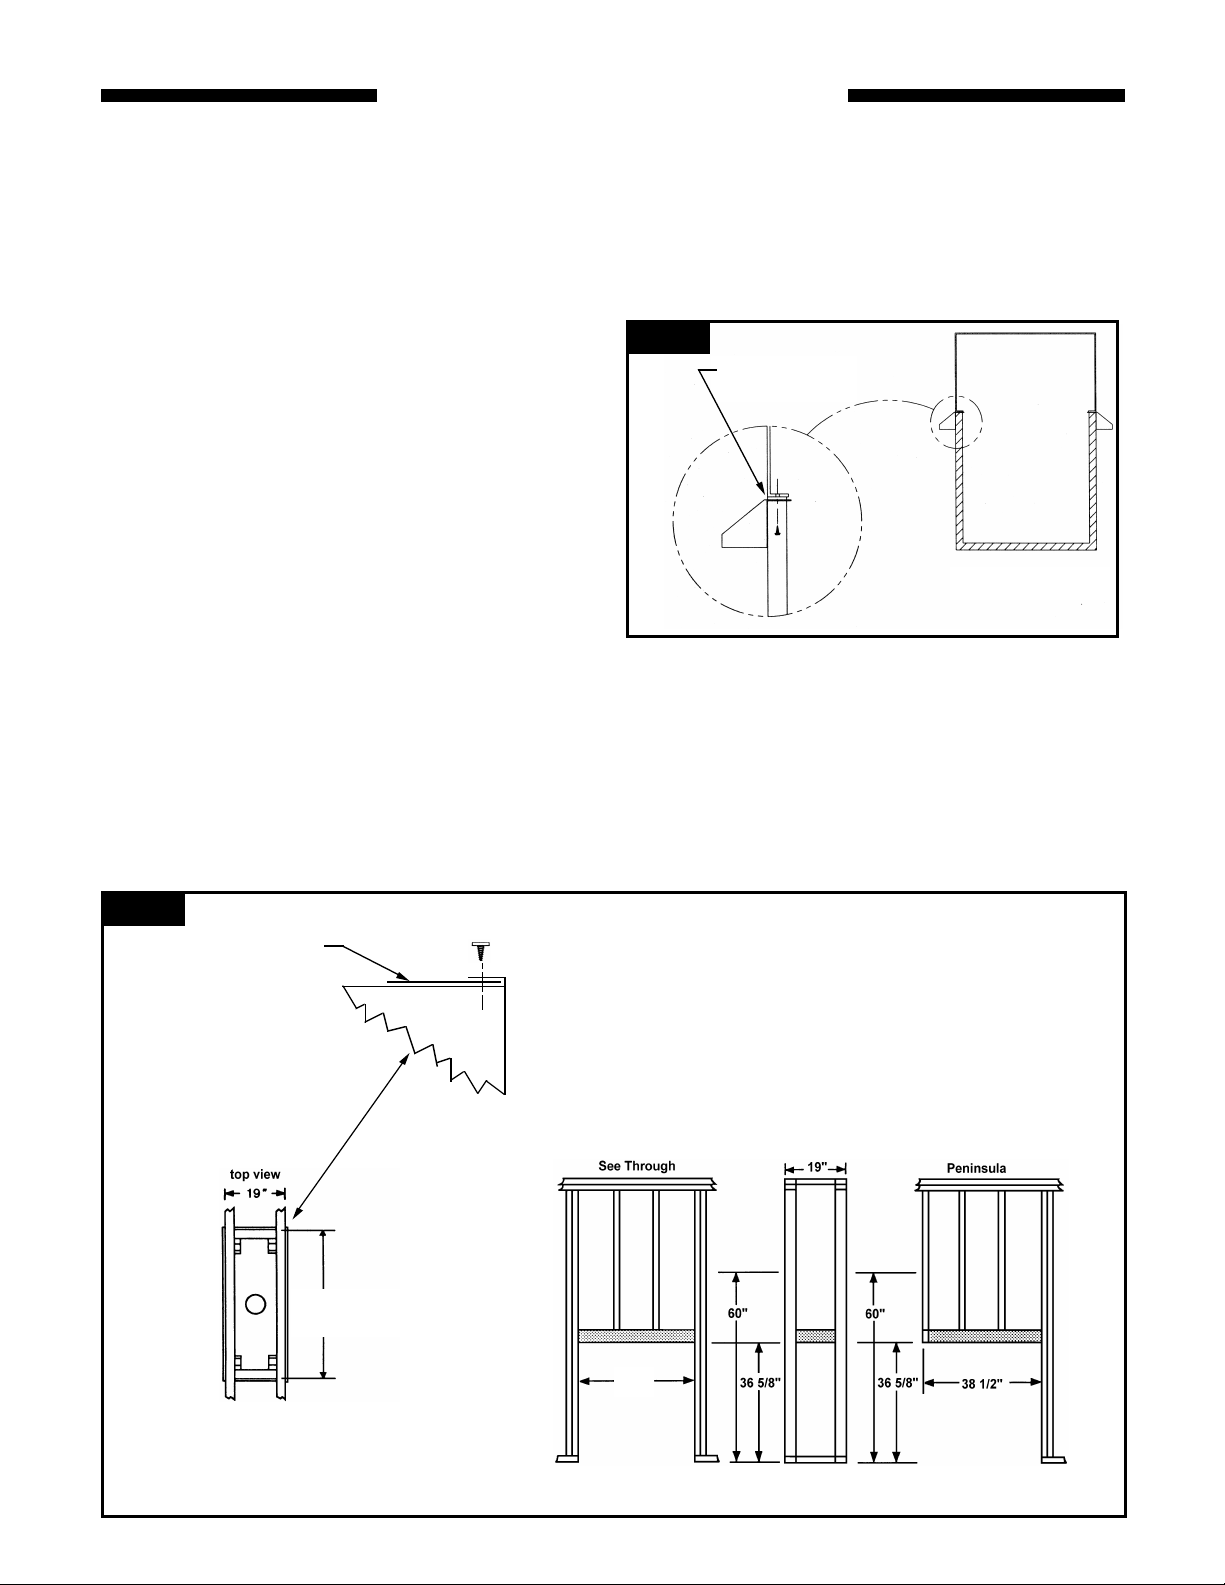
dimensions in figure 4.
STEP 1. FRAMING THE FIREBOX
When framing the opening for the fireplace, make certain
that the header is the correct distance above the surface
upon which the fireplace will sit. The header must be level
and located on or above the standoffs. The header and
framing may be installed as shown in figure 4 according to
the installer's preference. The width of the framed opening
must be no less than the dimensions shown in figure 4. The
entire fireplace can be elevated above the floor to achieve a
raised hearth. This can be done by adding a properly sized
platform to achieve the desired height.
STEP 2. INSTALL THE FIREBOX
Install the fireplace onto the framed opening by setting the
unit directly in front of the opening and then sliding it into
the proper position.
STEP 3. LEVEL THE FIREBOX
Check the level of the firebox by placing a level on the top
edge of your fireplace face. Shim with sheet metal if
necessary. Do not use wooden shims.
STEP 4. SECURE THE FIREBOX
Secure the fireplace to the framing. Nailing flanges on the
firebox will make securing it quick and easy. Use
appropriate size nails or screws to secure the firebox. Refer
to figure 4.
STEP 5. INSTALLING THE CANOPY.
After installing the firebox. Remove canopies from inside
firebox. Install canopies using the screws provided. (Two
on see through fireplaces and Three on peninsula
fireplaces)
NOTE: Canopies must be installed to maintain clearances
to combustible framing and mantle.
Figure 5
Top of
Firebox opening
SECTIONED VIEW
ON PENINSULA UNITS. Fasten plumbers tape to the front
standoff with at least two sheet metal screws across the
width of the unit. The plumbers tape should be one piece
and extend out from the sides of the unit at least six inches
and be attached to the unit before it is put into position.
When the unit is placed in position, the ends of the
plumbers tape can be bent up tightly over the framing sides
and screwed into position to the sides.
Figure 4
Framing dimensions
ADD NAIL TABS
AT CORNERS
ADF36ST: 40”
ADF36PN: 38-1/2”
BENDABLE NAIL TABS ARE PROVIDED
AND MAY BE USED AS NEEDED TO
SECURE TO FRAMING MEMBERS
40”
5
Page 6
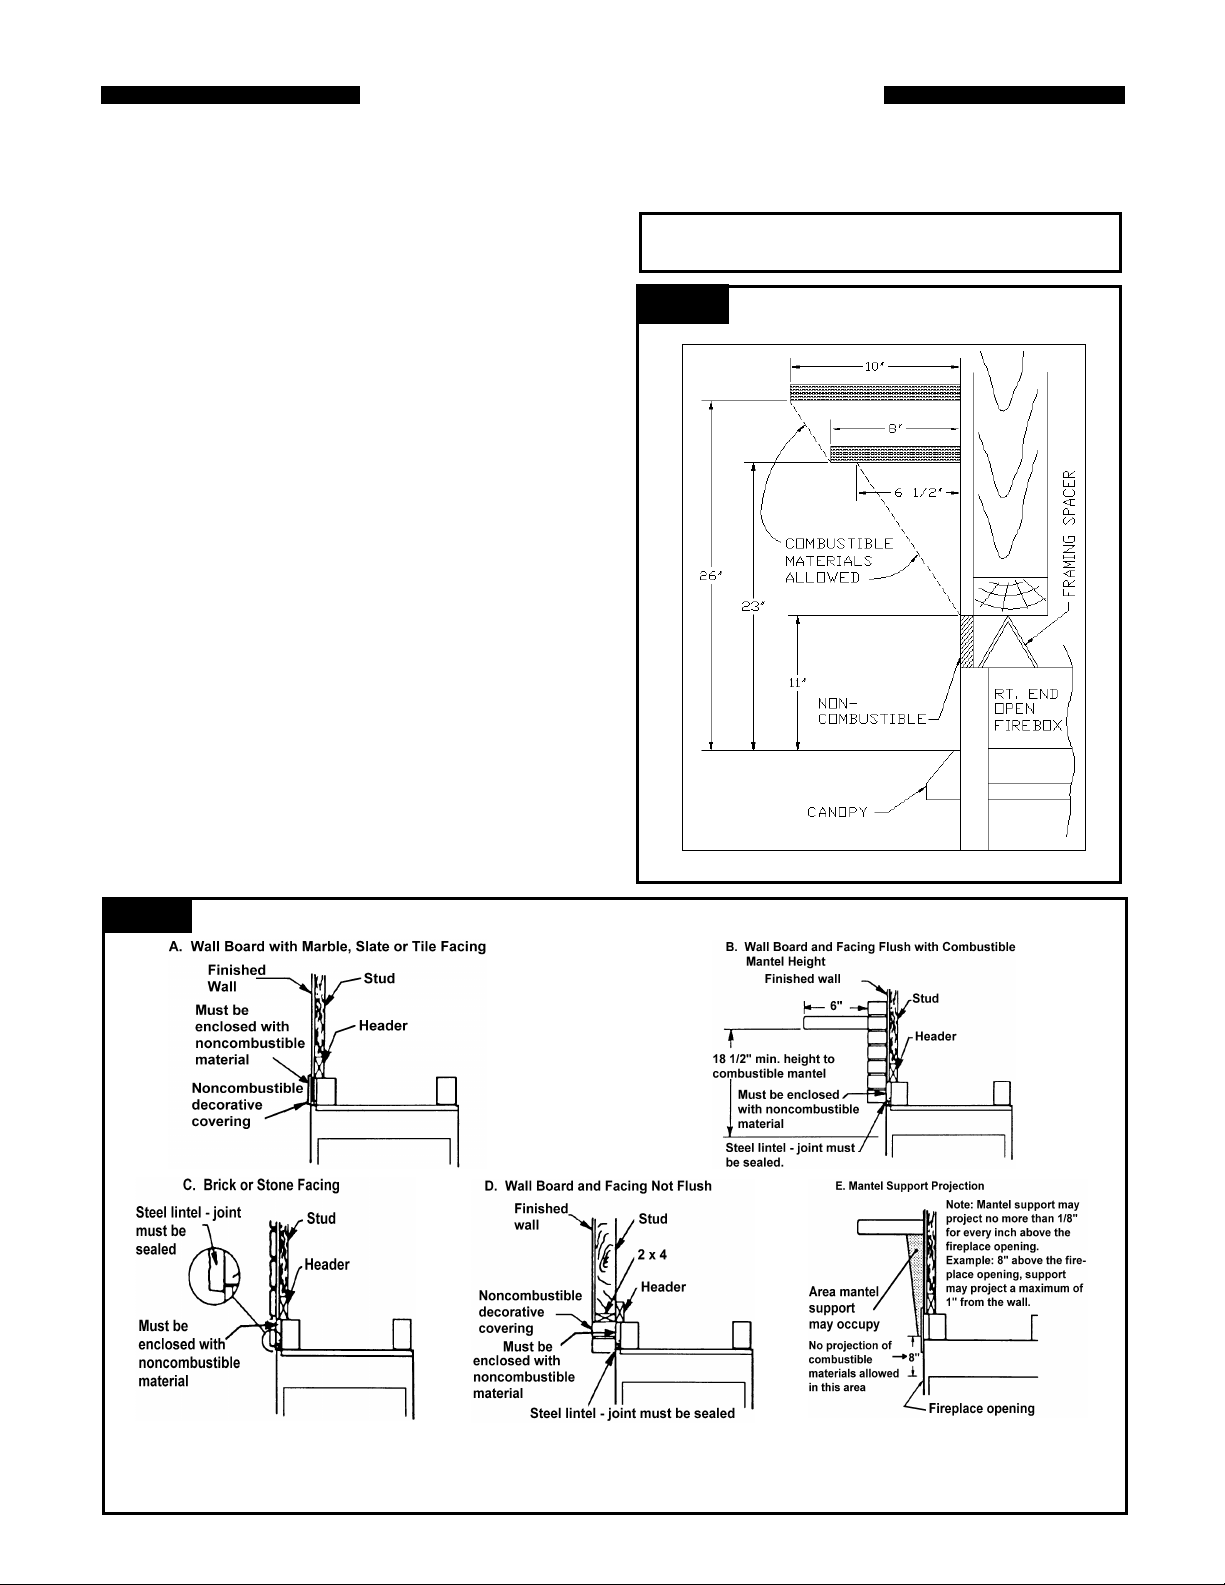
FINISHING YOUR FIREPLACE
A wide variety of finishing materials are available to finish
your TEMCO fireplace from formal wall treatments with
marble and mantels to rustic wood paneling, stone or brick.
Noncombustible facing material such as marble, brick or
ceramic tile may overlap the black face of the fireplace up to
the opening in either side of the fireplace.
Seal all joints between the black fireplace face and the wall
covering with a heat-resistant material such as rock wool
insulation or mortar. Be sure to use high temperature
adhesive or mortar when attaching brick, stone, marble or
tile to the face of the fireplace.
Check to see whether man-made brick and stone are made
of noncombustible materials before using them on the face
of the fireplace. Some of these products contain
combustible materials.
Noncombustible decorative facing materials may cover the
black painted metal faces of the fireplace.
Combustible wall coverings such as paneling or wallboard
may not overlap the black face of the fireplace. The space
between the wall covering and the fireplace should be
sealed with a heat-resistant material such as rock wool
insulation or mortar, (see figure 6 and 7).
MANTEL CLEARANCES: With the firebox installed, the
lower edge of the mantel piece must not be less than 11”
from the top edge of the fireplace opening. The mantel
piece profile must fall within the cross-section shown in
figure 6.
HEARTH EXTENSION: A hearth extension is not
required for this fireplace. A hearth extension may be used
Figure 7
if desired for aesthetic purposes only.
WARNING: THESE VENT FREE FIREPLACES ARE
NOT TO BE USED WITH GLASS DOORS.
Figure 6
NOTE: An L-shaped steel metal lintel must be installed across the top of the firebox opening where facing
material (such as brick or stone) is used on the face of the firebox. It acts as a support/firestop. It should be
attached to the face of the firep lace with screws and sealed to the fireplace with a heat-resistant sealer.
6
Page 7

CLEANING
All cleaning should be carried out when the fireplace is cold.
Only limited cleaning will be required under normal use.
Dusting may be required occasionally and at least annually to
avoid improper combustion and odors when the unit is in
SERVICING
operation.
Do not use any cleaning fluids to clean any part of the
fireplace. Use only mild soap and water to clean the
painted surface of the fireplace.
Repair and replacement work should only be done by a
qualified service person.
Always shut off the gas supply and make sure the fireplace
is cool before beginning any service operation.
Always check for gas leaks after servicing.
A list of available replacement parts follows. Always include
the correct name, part number and model number of the
fireplace when ordering service parts.
If you desire to communicate with the factory, write to:
TEMCO Fireplace Products
P.O. Box 1349, Manchester, TN 37349
or
TEMCO Fireplace Products
P.O. Box 1148, Perris, CA 92572
REPLACEMENT PARTS
See-Through Models Peninsula Models
Description _____________________ Part # ________________Qty. ___________________Part # Qty.
Refractory, side ..............................................71694 ........................................2 .................................................71694 ..............................1
Refractory bracket (top) ................................71695 ........................................2 .................................................71695 ..............................1
Refractory (bottom) ........................................71696 ........................................2 .................................................71696 ..............................1
Firescreen Assembly (side) ..........................72293 ........................................4 .................................................72293 ..............................4
Firescreen Assembly (end) ...........................------ .........................................---- ...............................................69929 ..............................2
Screen Retainer .............................................62222 ........................................8 .................................................62222 .............................12
Canopy (side) ................................................69928B .......................................2 ................................................69928B .............................2
Canopy (end) ....................................................----- ..........................................---- ..............................................70091B .............................1
7
Page 8

Limited Warranty
TEMCO Vent-Free Gas Fireplaces
This warranty is lim ited to TEMCO Vent-Free Gas Logs & Fireplaces (henceforth, Product) manufactured by TEMCO Fireplace
Products, Inc. (henceforth, TEMCO).
ONE YEAR WARRANTY
TEMCO warrants all components of the Product to be free of defects in materials and workmanship for a period of one year from the
date of installation, with the exception of the warranty on logs and ember base. If, by the sole determination of TEMCO, any
component covered under this warranty is found to be defective, TEMCO will, at its option, repair or replace the defective component
at no charge and will pay labor cost incurred as specified in the current TEMCO Labor Allowance Schedule, 71313. If TEMCO
determines replacement or repair is not economically practical, TEMCO will, at its option, refund the purchase price of the Product.
Date of installation and purchase price must be verified by acceptable proof of purchase prior to warranty action.
This warranty covers only parts and labor as provided above. In no case shall TEMCO be responsible for materials,
components or construction which are not manufactured or supplied by TEMCO, or the labor necessary to install, repair or remove
such materials, components or construction.
FIVE YEAR WARRANTY
TEMCO warrants the ceramic fiber and refractory components and burners originally packed with the product to be free of defects in
material and workmanship for a period of five (5) years from the date of installation, with the exception of breakage. If any ceramic
components or refractory components are broken, such breakage must be reported as a Warranty Claim at the time of installation.
Breakage claims arising after the initial installation will not be covered under any part of th is warranty. Periodic maintenance must
have been performed.
QUALIFICATIONS
For the above warranties to apply:
The Product must be installed by a qualified installer; strictly in accordance with TEMCO installation instructions,
and in compliance with local codes and ordinances. The logs must be placed strictly in accordance with the arrangement
described in the installation instructions.
The Product must be operated and maintained according to the instructions furnished. Alteration of the Product in any way
is prohibited and voids any and all warranties. Removal of the data plate alters the Product and voids the warranty.
The installer must have completed the Installation and Startup Checklist, a copy of which must be submitted along
with proof of purchase, to obtain prior approval for warranty repair or replacement and to affect a warranty claim. The
Checklist is fou nd on pages 11 and 12 of this manual.
The limited warranty applies only to the original owner of the Product or the original owner of the dwelling in which the Product
was installed. Use of any parts other than genuine factory provided replacement parts shall void this warranty.
Limitations
TEMCO is not responsible for any incidental or consequential damages caused by possible defects in the Product. The
duration of any implied warranty with respect to the Product is limited to the duration of the foregoing warranties.
Some states and provinces do not allow exclusion of incidental or consequential damages or limits on the duration of implied
warranties, so these limitations may not apply to you.
Warranty Fulfillment
Claims require specific agreement and consent from TEMCO Technical Services prior to performing any warranty
repair or replacement. TEMCO reserves the right to investigate any and all warranty claims. The appliance must not be
removed prior to such investigation other than on direction from TEMCO.
Please provide the following information when communicating with TEMCO Technical Services, its Dealers or Distributors
regarding service under this warranty.
Model Number:_______________________________ Serial Number:_____________________________________
Date of Installation:______/______/_______ Purchased From:_____________________________________________
TEMCO reserves the right to decide on the method of settlement (if any). This limited warranty is given in lieu of any other expresse d
or implied warranty, and supersedes all other TEMCO Product warranties.
Page 9

TEMCO GAS LOGS & FIREPLACES
INSTALLATION AND STARTUP CHECKLIST
Customer Copy
NOTE: TEMCO gas logs and fireplaces require installation by a qualified gas appliance installer. A copy of this checklist must be
submitted, along with proof of purchase, when applying to Technical Services for prior written approval of warranty repair or replacement.
All Vent-Free Gas Fireplaces and Logs
Read and understand installation instructions before attempting installation.
Assure that the model to be installed is of the CORRECT FUEL TYPE. Check markings on the shipping container (Model#s
ending in “N” are natural gas products; model#s ending in “P” are LP gas products.), tags on the burner assembly, and
color of the ODS safety pilot tube.
(Aluminum for natural gas; brass for LP gas)
Notes: REGULATORS ARE NOT FIELD-ADJUSTABLE. ANY ATTEMPT TO ADJUST VOIDS THIS WARRANTY.
In order to ensure adequate combustion air, make sure that the model being installed has the appropriate heating
capacity for the unconfined space available. Allow a minimum of 50 cubic feet of unconfined space per 1000 BTU’s for all
gas appliances.
Assure that gas line size is adequate for the model’s input rating (BTU’s per hour), the length of run form the meter or second
stage regulator to the farthest gas appliance, and other gas appliances on the system. A drip leg or sediment trap is required.
LP models requir e a minimum tank size of 120 gallons water capacity and two stage regulation.
Assure that installation meets local codes and ordinances.
Assure that there are no fans or blowers in the fireplace area.
Check for leaks before lighting.
Using a manometer, verify proper gas pressure at the manifold with unit at maximum setting and other appliances
operating.
inlet pressure:__________ (ins. wc) manifold pressure:__________ (ins. wc)
Verify proper ignition of ODS and front and rear burners, as well as proper appearance of flames.
Verify that ceramic fiber and refractory components are properly positioned and secure. (Rear burner must not contact
logs.)
Verify adequate clearance to mantels and other combustibles.
Demonstrate correct operation of the product to the consumer. Note: LP models must not be operated if fuel tank is less than
1/4 full.
Observe the consumer operating the product properly.
Explain and demonstrate proper periodic maintenance.
Explain that operation with logs positioned other than as described in the manual voids the warranty and will cause poor
combustion and sooting.
Verify the consumer’s understanding that warranty service work that is not pre-approved by the manufacturer’s Technical
Service Department (other than routine maintenance) may not qualify for reimbursement.
Answer any questions the consumer may have about TEMCO vent-free products.
Vent-Free Gas Logs Only
Verify that the fireplace in which the logs are to be installed is either a solid-fuel burning fireplace (either factory-built or
masonry) with a working flue system connected to it or an approved vent -free firebox.
Verify that the fireplace has been thoroughly cleaned by a professional chimney sweep. If solvents have been used to clean
the hearth, they must be allowed to evaporate before proceeding with installation.
Check firebox dimensions for adequate height, width, and depth.
Verify that the grate assembly is attached to the firebox floor.
Verify that any ash dump or outside air inlets are permanently sealed to avoid drafts within the firebox.
Verify that no additional logs, ornaments, or non-approved blower devices have been added.
Repair any broken or damaged logs prior to operation.
Check mantel clearances and verify installation of canopy if necessary.
Glass doors must be removed or opened completely during operation of logs.
Please sign below that checklist has been completed and understood. DATE INSTALLED ______/______/______
Installer Phone Consumer Phone
Page 10

TEMCO GAS LOGS & FIREPLACES
INSTALLATION AND STARTUP CHECKLIST
Installer’s Copy
NOTE: TEMCO gas logs and fireplaces require installation by a qualified gas appliance installer. A copy of this checklist must be
submitted, along with proof of purchase, when applying to Technical Services for prior written approval of warranty repair or replacement.
All Vent-Free Gas Fireplaces and Logs
Read and understand installation instructions before attempting installation.
Assure that the model to be installed is of the CORRECT FUEL TYPE. Check markings on the shipping container (Model#s
ending in “N” are natural gas products; model#s ending in “P” are LP gas products.), tags on the burner assembly, and
color of the ODS safety pilot tube.
(Aluminum for natural gas; brass for LP gas)
Notes: REGULATORS ARE NOT FIELD-ADJUSTABLE. ANY ATTEMPT TO ADJUST VOIDS THIS WARRANTY.
In order to ensure adequate combustion air, make sure that the model being installed has the appropriate heating
capacity for the unconfined space available. Allow a minimum of 50 cubic feet of unconfined space per 1000 BTU’s for all
gas appliances.
Assure that gas line size is adequate for the model’s input rating (BTU’s per hour), the length of run form the meter or second
stage regulator to the farthest gas appliance, and other gas appliances on the system. A drip leg or sediment trap is required.
LP models require a minimum tank size of 120 gallons water capacity and two stage regulation.
Assure that installation meets local codes and ordinances.
Assure that there are no fans or blowers in the fireplace area.
Check for leaks before lighting.
Using a manometer, verify proper gas pressure at the manifold with unit at maximum setting and other appliances
operating.
inlet pressure:__________ (ins. wc) manifold pressure:__________ (ins. wc)
Verify proper ignition of ODS and front and rear burners, as well as proper appearance of flames.
Verify that ceramic fiber and refractory components are properly positioned and secure. (Rear burner must not contact
logs.)
Verify adequate clearance to mantels and other combustibles.
Demonstrate correct operation of the product to the consumer. Note: LP models must not be operated if fuel tank is less than
1/4 full.
Observe the consumer operating the product properly.
Explain and demonstrate proper periodic maintenance.
Explain that operation with logs positioned other than as described in the manual voids the warranty and will cause poor
combustion and sooting.
Verify the consumer’s understanding that warranty service work that is not pre-approved by the manufacturer’s Technical
Service Department (other than routine maintenance) may not qualify for reimbursement.
Answer any questions the consumer may have about TEMCO vent-free products.
Vent-Free Gas Logs Only
Verify that the fireplace in which the logs are to be installed is either a solid-fuel burning fireplace (either factory-built or
masonry) with a working flue system connected to it or an approved vent -free firebox.
Verify that the fireplace has been thoroughly cleaned by a professional chimney sweep. If solvents have been used to clean
the hearth, they must be allowed to evaporate before proceeding with installation.
Check fireb ox dimensions for adequate height, width, and depth.
Verify that the grate assembly is attached to the firebox floor.
Verify that any ash dump or outside air inlets are permanently sealed to avoid drafts within the firebox.
Verify that no additional logs, ornaments, or non-approved blower devices have been added.
Repair any broken or damaged logs prior to operation.
Check mantel clearances and verify installation of canopy if necessary.
Glass doors must be removed or opened completely during operation of logs.
Please sign below that checklist has been completed and understood. DATE INSTALLED ______/______/______
Installer Phone Consumer Phone
Page 11
CUSTOMER COPY
Model # __________________________________________ Serial
#_________________________________________
I certify that I have followed all codes and regulations and adhered to the TEMCO installation instructions. I have
completed the proper installation and startup checklist.
Installers Signature Print Installer’s Name
Purchaser
Address
Phone
Retailer
Address
Phone
Date of Purchase
WARRANTY REGISTRATION
Please Answer the Following Questions (Check Box):
1. Type of Home Single Family Duplex Apt. Mobile Home
Cabin/Vacation
2. Installed in (Room) Living Family Great Rec Bedroom
Other
3. Other Choices Considered Vented Decorative Gas Logs/Fireplace
Woodburning Fireplace Gas Insert Woodburning Insert
Direct-Vent gas Fireplace/Logs
4. Why Did You Choose Vent-Free? (Rank in Order of Importance: 1-6)
___Efficiency ___Zone/supplemental heating ___Stand-by-heat
- - - - - - - - - - - - - - - - - - - - - - - - - - - - - - - - - - - - - - - - - - - - - - - - - - - - - - - - - - - - - - - - - - - - - - - - - - - - - - - - - - - - - - -
PLEASE CUT ALONG DOTTED LINE
To register your warranty, please provide the information indicated on this form and mail it to:
TEMCO Fireplace Products, Inc.
301 Perimeter Park Drive
Suite 227
Nashville, TN 37211
Model # __________________________________________ Serial
#_________________________________________
I certify that I have followed all codes and regulations and adhered to the TEMCO installation instructions. I have
completed the proper installation and startup checklist.
Installers Signature Print Installer’s Name
Purchaser
Address
Phone
Retailer
Address
Phone
Date of Purchase
WARRANTY REGISTRATION
Please Answer the Following Questions (Check Box):
1. Type of Home Single Family Duplex Apt. Mobile Home
Cabin/Vacation
2. Installed in (Room) Living Family Great Rec Bedroom
Other
3. Other Choices Considered Vented Decorative Gas Logs/Fireplace
Woodburning Fireplace Gas Insert Woodburning Insert
Direct-Vent gas Fireplace/Logs
4. Why Did You Choose Vent-Free? (Rank in Order of Importance: 1-6)
___Efficiency ___Zone/supplemental heating ___Stand-by-heat
 Loading...