

Page 1

Picture This.
Quick
Start
Guide
Page 2

1
Welcome to telyHD
telyHD brings Skype™ video calling to your
living room in stunning high definition. Get
ready to connect with family, friends and
business colleagues like never before!
This guide is divided into the following 4 sections:
What’s in the box?
Technical Support – online self service
For helpful tips and how-to videos, visit our
dedicated support web site.
Web tely.com/support
Technical Support – live agent
You can also reach us directly Monday
through Friday, 8am to 5pm Pacific time.
Email [email protected]
Toll free 1 (888) 787-
TELY (8359)
Direct 1 (650) 318-6866
Chat tely.com/support
telyHD unit
Remote control
(battery included)
Power adapter HDMI cable
Get ready Setup Make a call More info
Get ready
Setup
Make a call
More info
Section 1
PULL OUT
Menu
Picture This.
Page 3

2
Skype Account
If you don’t already have one, setting up
an account is quick, easy and free. You
can do this either on your computer or
as part of the telyHD setup process.
To setup a new account on a computer, please
visit http://login.skype.com
Network connection
For the highest quality experience,
connect your telyHD unit directly to
your network using an Ethernet cable.
You can also connect via a Wi-Fi network. To do this, you’ll
need to have your Wi-Fi network name (SSID) and password.
TV with an HDMI port
You’ll need an open HDMI
port on either your TV or
your AV receiver. The port
will look like this:
Broadband connection
For HD video, your telyHD requires
a minimum of 1Mbps of upstream/
downstream speed. However, telyHD
will dynamically adjust to lower speeds.
To check the speed of your connection
and for more information, see page 10.
HDMI
1 3
4
2
Before we begin
To use telyHD, you’ll need the following four things:
If you need help as you’re setting up your telyHD, please visit the help section of
our website at tely.com/support where you will find related tips, helpful videos,
and a troubleshooting guide.
Page 4
3
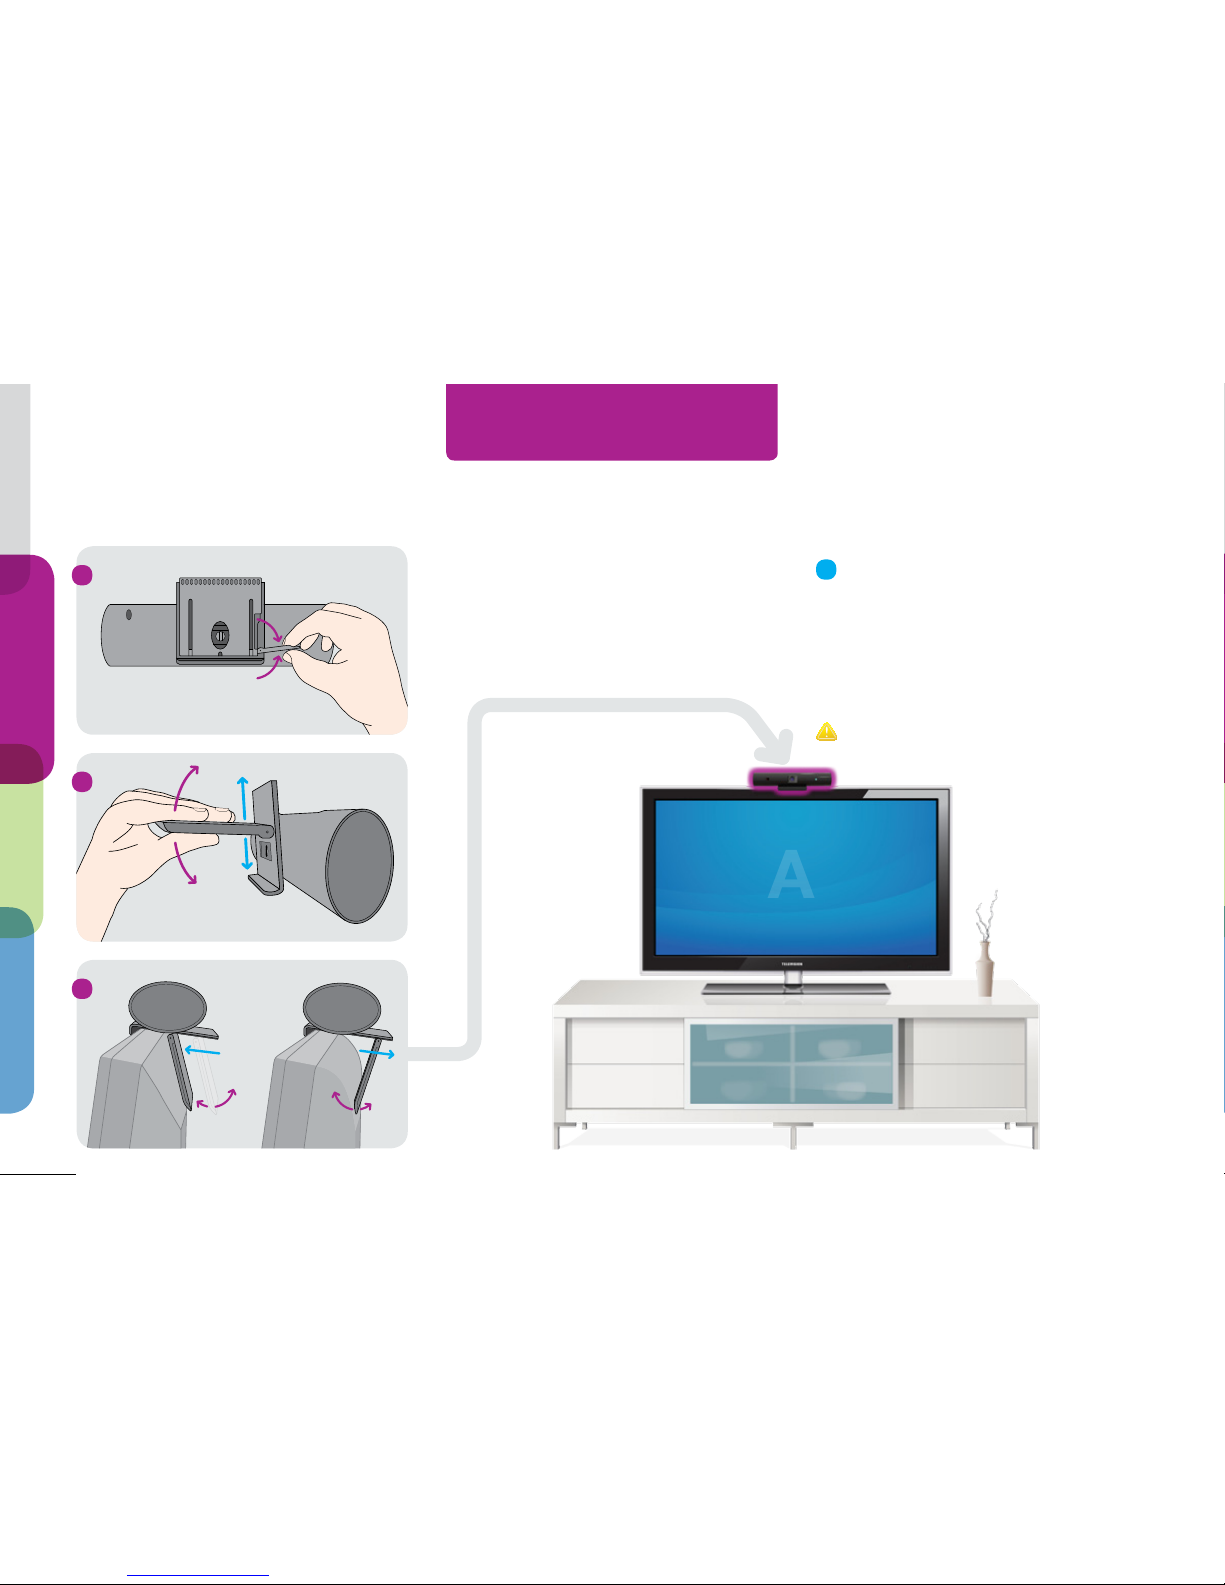
Adjusting the TV Clamp
1
2
A
Section 2
3
Get ready
Setup
Make a call
More info
Open Quick Release Lever to adjust.
Close to lock.
Slide/swing Foot to fit your TV.
Position your telyHD
We know everyone’s home is a little
different, so we’ve provided three different
options to position your telyHD. Option A
(below) will provide the best experience.
A
On top of your TV (recommended)
Open the Quick Release Lever to adjust
the TV Clamp. Slide and angle the Foot
to accommodate the width and profile of
your TV. Close the Quick Release Lever to
secure telyHD on top of your TV.
Always open the Quick Release Lever before sliding
or changing the angle of the Foot.
Page 5
4
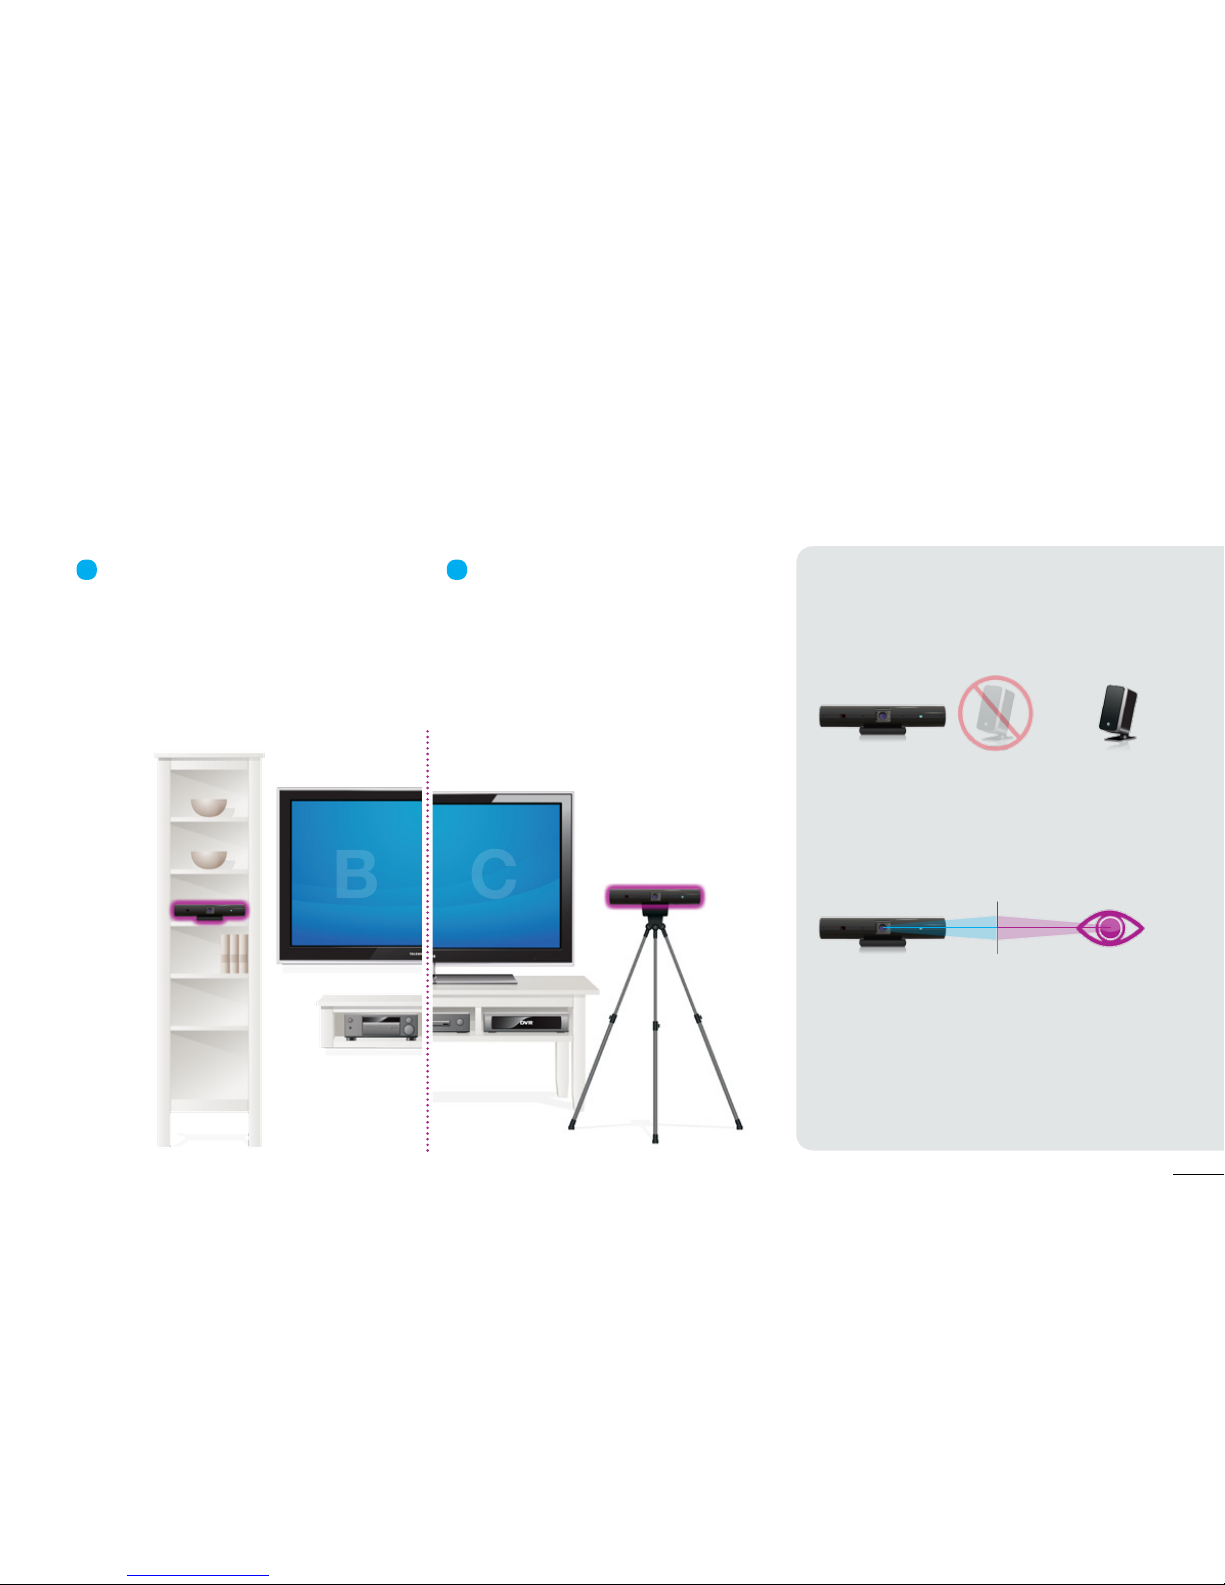
B
Place on a shelf
Optionally, you may position telyHD next
to your TV. The goal is to place telyHD in
a way that allows for natural face-to-face
video calling. See also Helpful hints
to the right.
C
Use a tripod
You can also mount telyHD to any
standard camera tripod (not included).
Simply unscrew and remove the TV Clamp
from your telyHD. Then screw the tripod
into telyHD just like you would a camera.
Helpful hints
Place telyHD away from speakers
Placing your telyHD close to your TV or AV
system’s speakers may cause feedback or
distortion, especially for the remote party.
Optimal placement
The goal is to provide a “face-to-face”
experience where you can look at the
telyHD camera and TV at the same time.
Good lighting is key
Let them see your smile! Cameras need
light to work well, and your telyHD is no
exception. Make sure that your face is
well lit to create a better experience
for your friends.
Alternative positions
B
C
Page 6
5
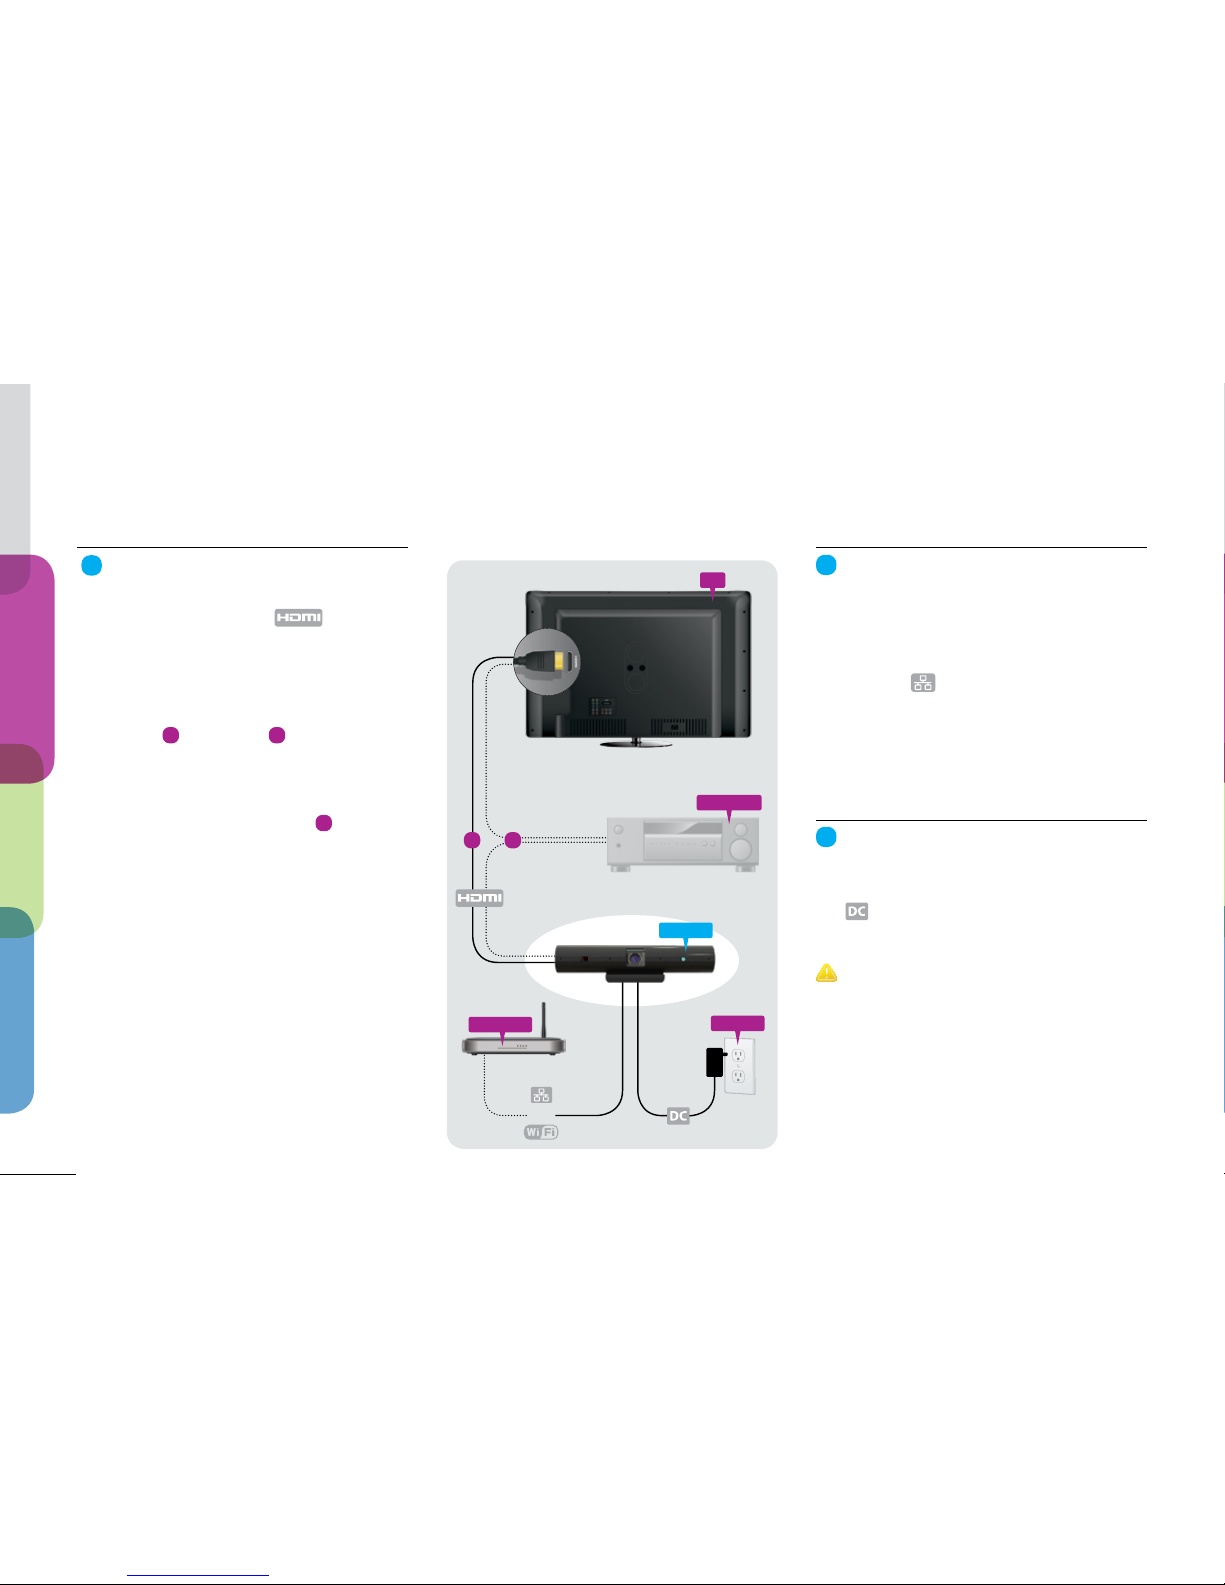
Plugging in your telyHD
1
Connect to the TV or AV receiver
First, plug the smaller end of the HDMI
cable into the port labeled
on your telyHD.
Next plug the larger end of the HDMI
cable into an open HDMI (IN) port on
either your
A
TV or your
B
AV receiver
as shown at right.
If in doubt, plug the HDMI cable directly
into your TV as shown in option
A
.
2
Connect to the Internet
Wired: (recommended)
Connect one end of an Ethernet cable (not
included) directly to your router and plug
the other end of the cable into the Ethernet
port labeled on your telyHD.
Wi-Fi: (alternate)
If you want to connect via Wi-Fi, skip this
step for now. You will be able to configure
your Wi-Fi settings later in the process.
3
Connect to power
Plug the included power adapter into a
power outlet, and plug the other end into
the
power port on your telyHD. This
will automatically start your telyHD.
International Use: Your telyHD’s power adapter will work
worldwide and can accommodate from 110 to 240 volt. If you
are outside the USA, you may need a plug adapter to t into the
power outlet used in your country.
or
Power
Broadband
Ethernet
AV receiver
telyHD
TV
BA
Get ready
Setup
Make a call
More info
Page 7
Get ready
Make a call
More info
4
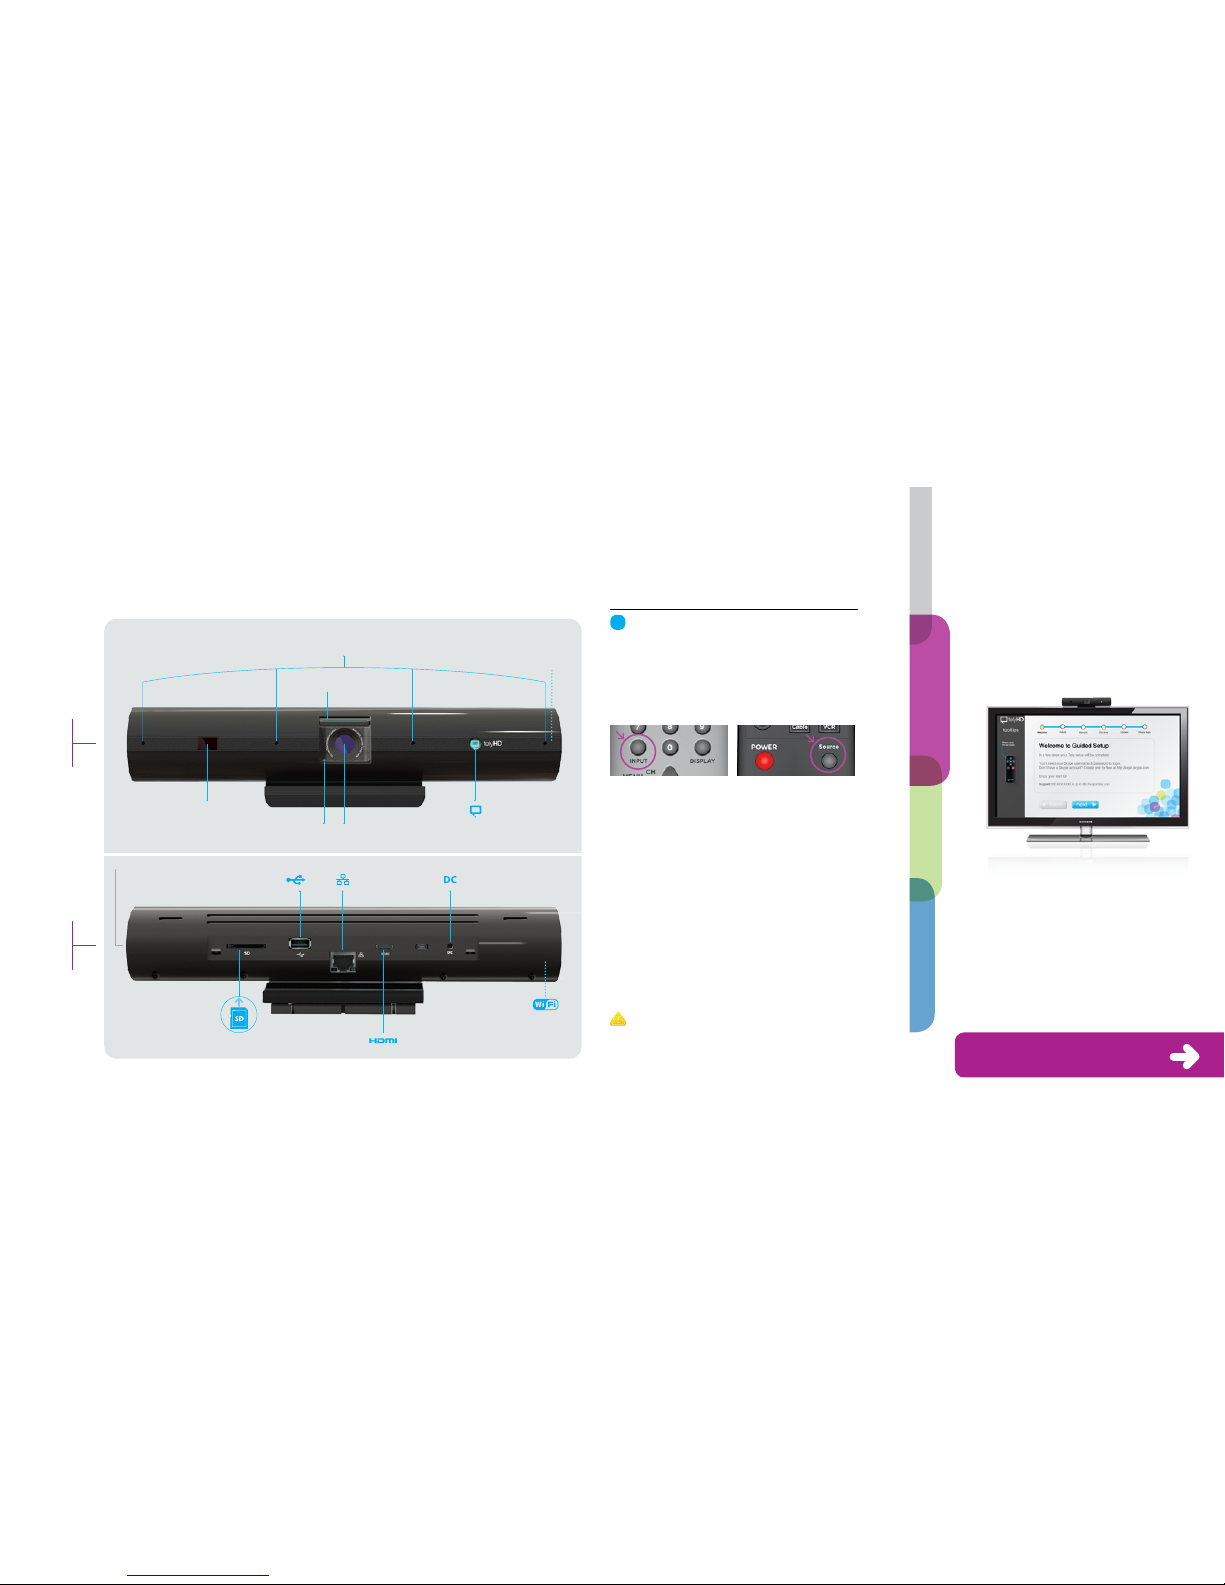
Change the Input/Source on your TV
To use telyHD, you will need to switch
your TV or AV receiver’s input to match
the HDMI input used by your telyHD in
the previous step.
To change inputs, look for the Input/Source
button on your TV remote or AV receiver.
Press this button to cycle through the
inputs until you get to the HDMI input used
by telyHD. You may need to wait a couple
of seconds between each button press to
allow your TV to adjust.
You should now see the telyHD logo or
the Welcome Screen for the Guided Setup
on your TV.
Note: To return to watching TV, repeat the same process
described above. Cycle through the Input or Source settings
until you reach the correct one.
HD camera
telyHD button
& indicator LED
Camera on LED
Privacy shutter
Infrared (IR)
remote receiver
4 Noise-canceling microphones
to enhance audio quality
Front view
Ringer
Back view
SD card reader
USB port
Built-in Wi-Fi
Ethernet port
Mini HDMI port
Power port
telyHD
Guided Setup
Note: For the remainder of the setup
process you’ll need your telyHD remote.
After a few moments you should see a
screen similar to the following:
Follow the onscreen instructions to
configure your telyHD.
Connect via Wi-Fi
If you did not connect your telyHD using
an Ethernet cable, follow the instructions
in Guided Setup to add telyHD to your
home Wi-Fi network.
For more information on how to
use your remote, flip open this flap.
Speaker
Examples may not match your remote.
Setup
Page 8
Menu
Picture This.
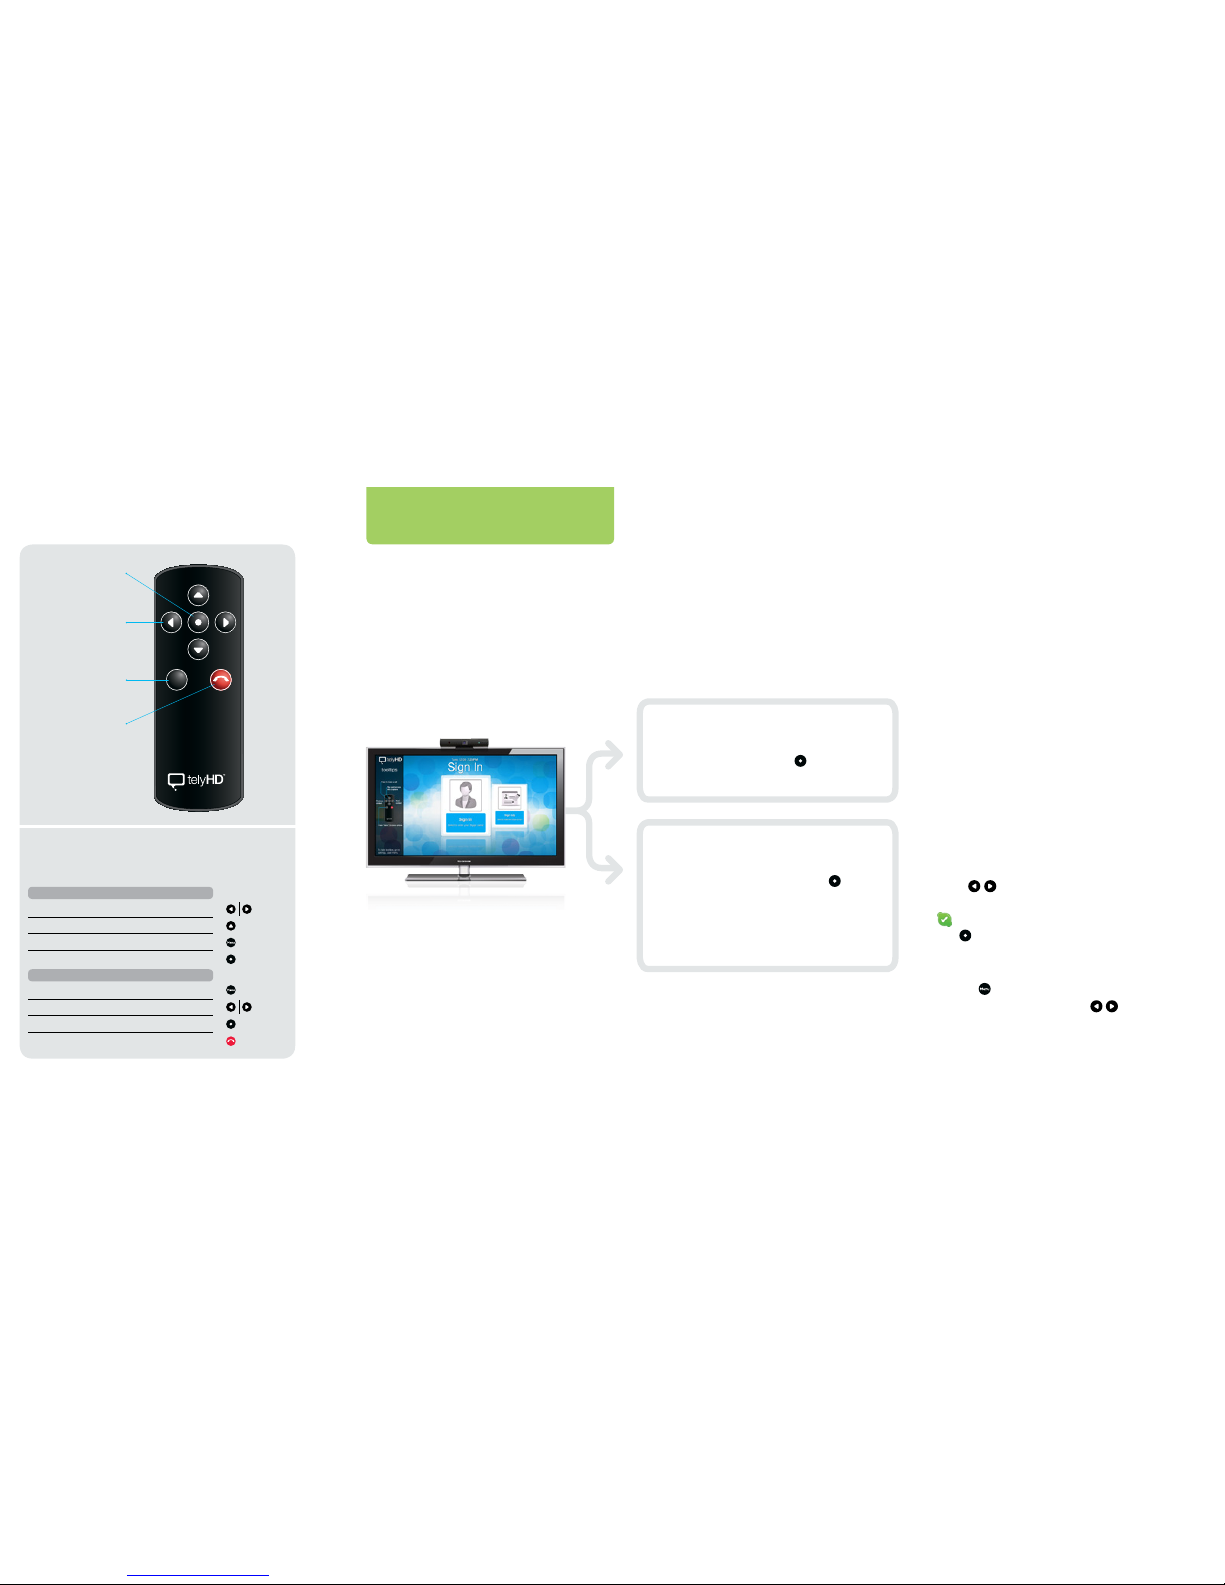
Menu button
Selection button
Navigation
buttons
End call button
telyHD remote
Basic remote functions
The following summarizes the key remote functions.
Contacts Screen Button actions
Move through the carousel
Turn over a card for more information
See or hide menu
Place calls or select the highlighted option
In-Call Screen
See or hide menu
Move through the menu
Select the highlighted option from the menu
End call
Section 3
or
Skype and telyHD
You need a Skype account to use telyHD.
You can either sign in to an existing Skype
account or create a new account. It’s easy
to add and manage multiple accounts
on your telyHD.
For the initial set up, we recommend signing
in with your current Skype account if you
have one. Using this method will give you
instant access to your existing contacts.
Sign In
To sign in to Skype, select the card titled
“Sign In” and press the
button on
your telyHD remote.
Sign Up
Create Skype account: Select the card
titled “Sign Up” and press the
button
on your telyHD remote. You will need
to create a unique Skype Name. It
may tak e several attempts to find an
available Skype Name.
The Contacts Screen
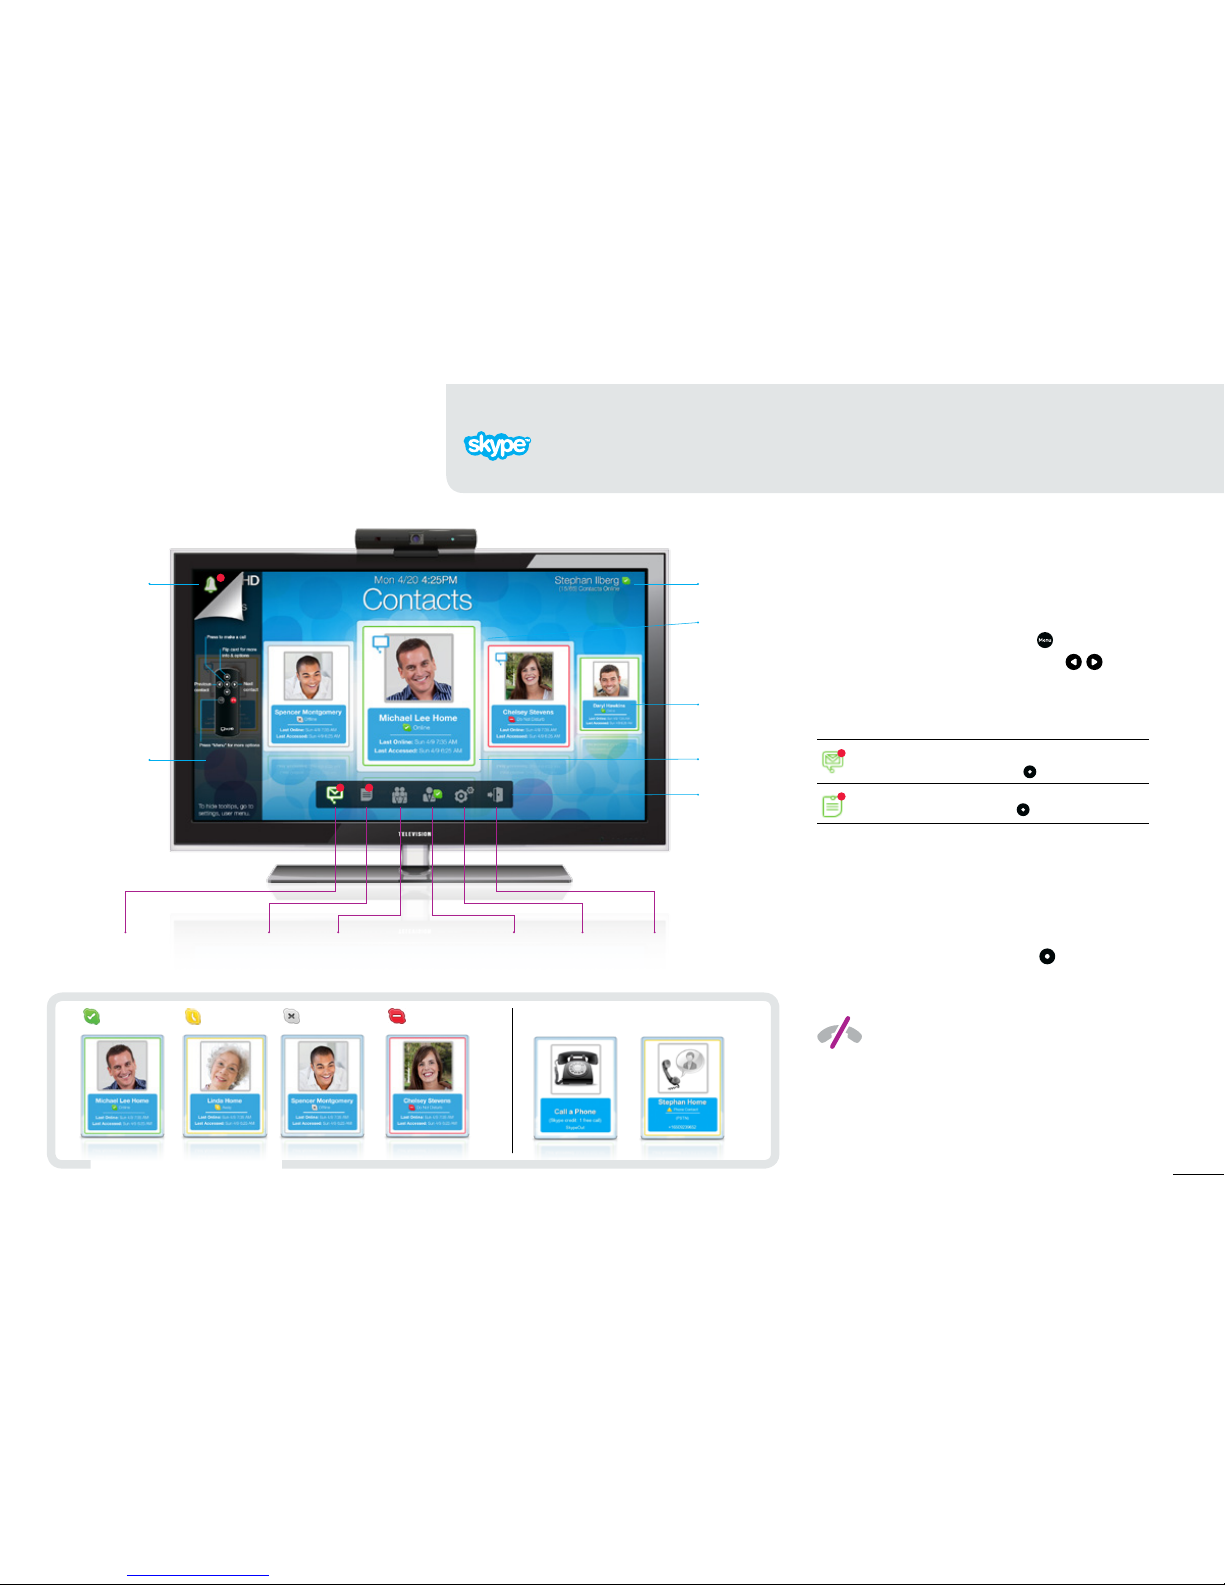
The Contacts Screen shows all of your
Skype contacts and their Skype status
(online, away, etc).
Adding a contact
If needed, select the Add Contact card,
then enter a full or partial Skype name to
search. You may also search by name,
and/or email address. Once you find the
person, invite them to be added to your
contacts. Typically, they will need to accept
your invitation before you can call them.
Selecting a contact
Use the
buttons on your telyHD
remote to browse your contacts. Select
an
online contact and press the select
button
to call.
The Menu Bar
Select the
button on your telyHD remote
to view the Menu Bar. Use the
buttons
on your telyHD remote to view the
different menu options.
Page 9
8
Notifications
Occasionally you might see a notification
in the top left corner of the Contacts
Screen. To access, press the
button
on the telyHD remote, then scroll
to
the icon that shows a number next to it.
Sample notifications
Accepting Skype contact requests
You will receive a notification when someone
on Skype wants to add you as a contact.
Simply follow the steps above to access
the Menu Bar and press the button to
view the request.
Online
Offline
Away
Do Not Disturb
Indicates 1 new voice mail*/video mail message
or Skype contact request. Press
to access.
Indicates 3 missed calls. Press
to access.
1
3
Call a Phone* Saved Phone Contact*
Your online
status
Selected
contact
Menu Bar
Settings Sign outCall log Change
online
status
Voice
* & video mail;
contact request
Switch between showing
only online contacts and
showing all contacts
User info
Contacts
carousel
Notication(s)
Tool tip
Contacts Screen
1 3
4
*
These features require Skype Premium Services using Skype Credit,
with some exceptions. Visit skype.com for details.
Using and buying Skype Credit (optional) Skype Credit is needed to call traditional landlines, mobiles, and to use other
Skype Premium Services. To buy Skype Credit, visit www.skype.com and click on the “Buy Credit” button in the upper right.
Status indicator icons
No emergency calls with Skype™ or telyHD
™
Skype is not a replacement for your ordinary telephone.
Please do not use telyHD for emergency calling.
Page 10
9
Get ready
Setup
Make a call
More info
Make your first call
Making a call
Using the telyHD remote, scroll through
your contacts and select one that is
online. Press the select button
to call.
When ready to end the call, press the end
call button
on the remote control or
select it on the In-call Menu.
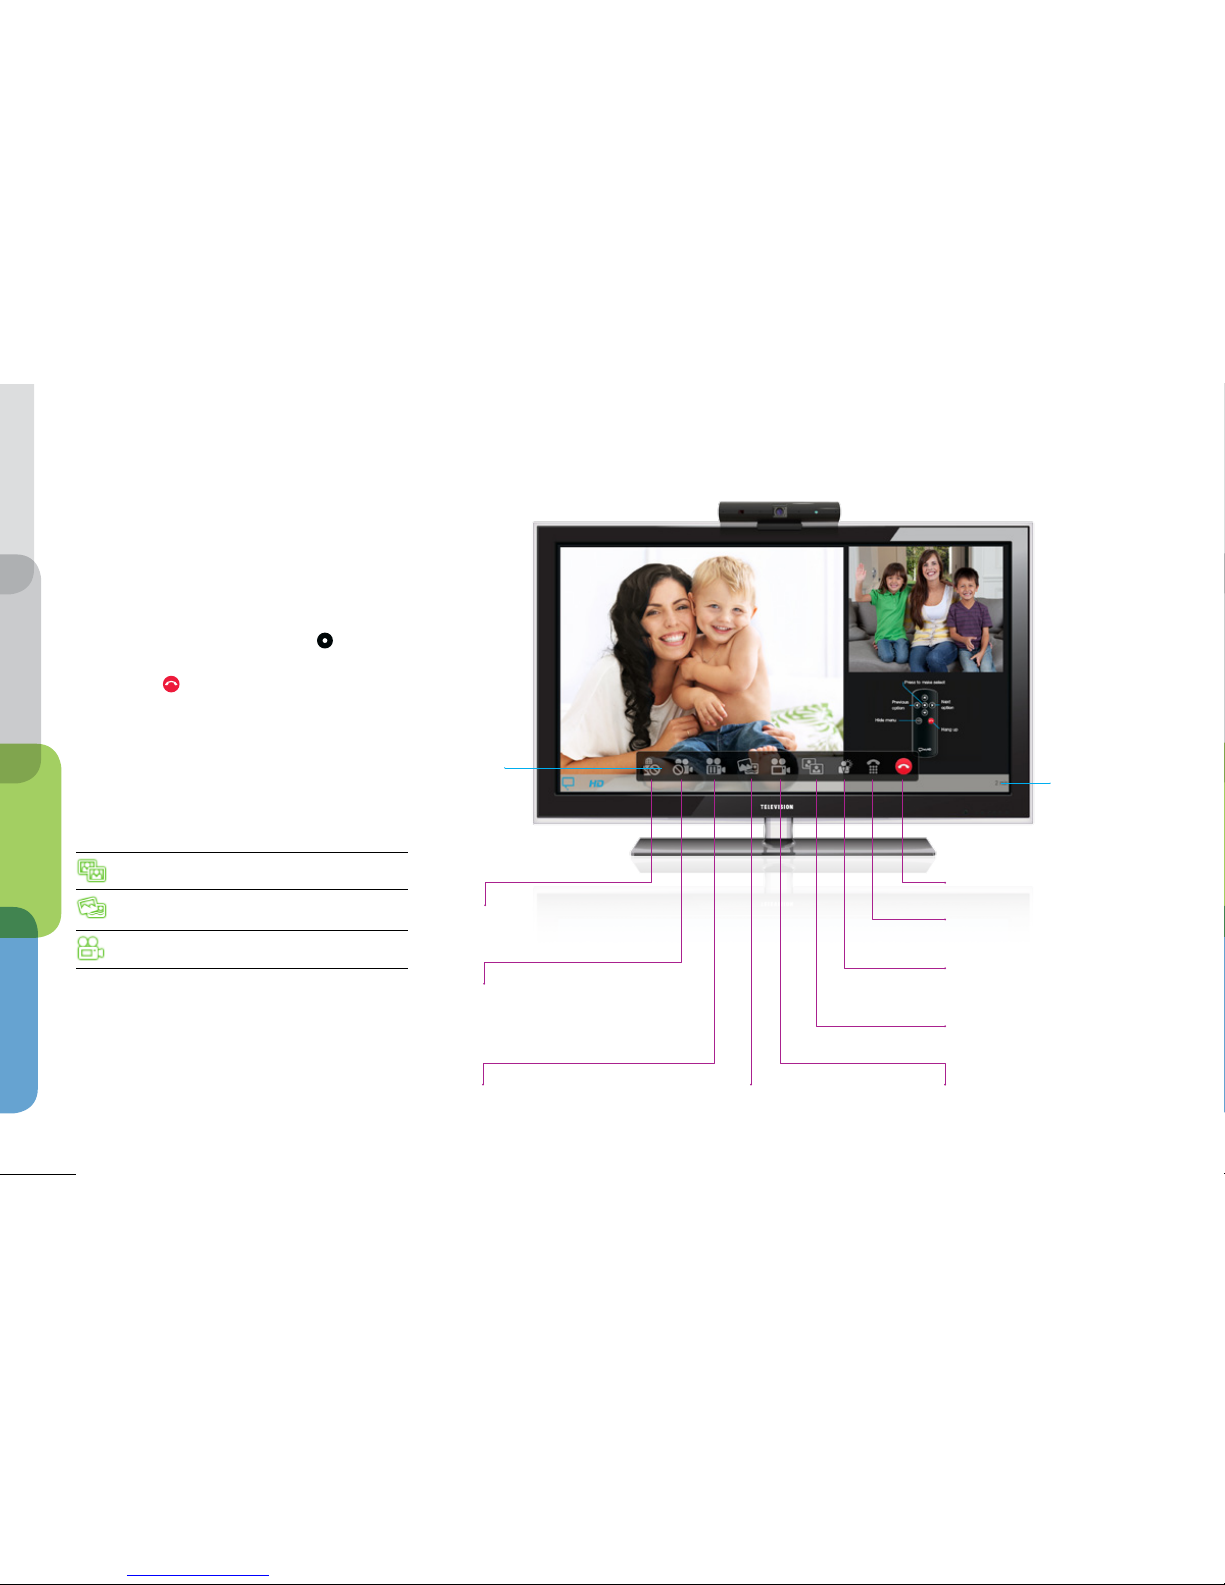
What can you do on a video call?
telyHD gives you lots of control over
your video call:
Cycle through the viewing options
Share photos from a party or trip!
Note: Available only between two telyHDs
Zoom/Pan/Tilt the camera pointing at you
Questions or comments?
We want your telyHD experience to be
truly amazing. If you have questions or
comments, please visit our website
tely.com/support, call our technical
support team at 1-888-787-8359, or send
us an email at [email protected].
Dial Pad
For in-call use
Lighting Adjustments
Adjust your camera for bright
backlighting or low light situations
Screen Layout
Cycles through the viewing options
Photo Sharing
Available only between
two telyHDs
Hold Call | Resume Call
Places the call on hold (video plus audio);
select again to resume the call
Audio Only | Resume Video
Turns your camera on and off
Mute | Unmute
Turns your microphone on and off
Adjust Camera: Zoom/ Pan /Tilt
Adjusts how you appear on camera;
includes pan and tilt when not
fully zoomed out
End Call
Call duration
Menu
In-call Screen
Page 11
10
Section 4
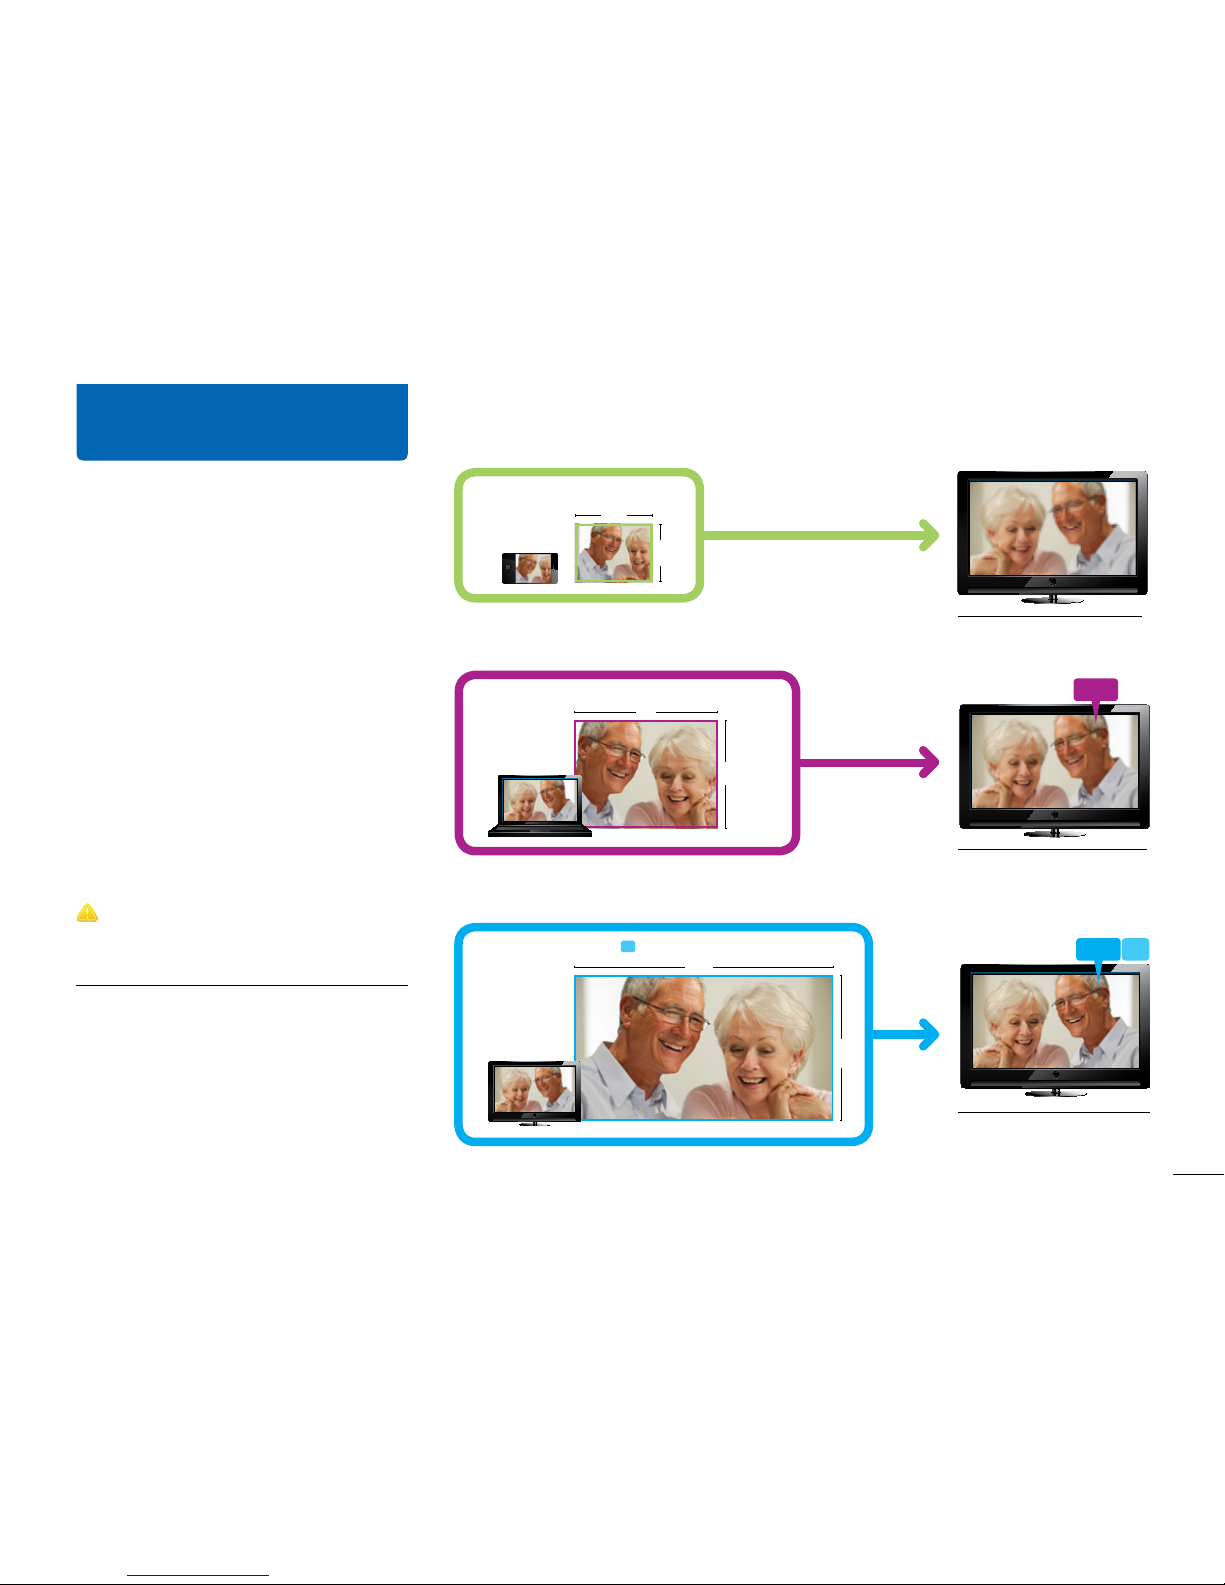
480p
Video from PC caller on your HDTV
Better quality
720p HD
Video from telyHD caller on your HDTV
Best quality
PC caller | 480p
640
480
320
240
Mobile caller
1280
720
telyHD caller | 720p
HD
Video from mobile caller on your HDTV
Low quality
Simple steps to dramatically
improve image quality
•
Make sure the Privacy shutter is open!
•
Add lighting towards the face
•
Pause network-intensive applications,
such as streaming music, backups,
large downloads, or other video, etc.
Additional hints
•
Switch your TV to Game Mode *
•
Go to tely.com/speedtest and follow
the online instructions
Note: While telyHD is designed to make the best of the
incoming video it receives, there are inherent technical limitations
from some sources. See images at right.
* Game Mode
Most TVs have an option called Game
Mode. Enabling this mode will generally
improve your telyHD experience. Refer
to your TV manufacturer’s guide for
instructions or search tely.com/support.
Page 12

 Loading...