

Telycam TLC-1000-U3-5 User Manual
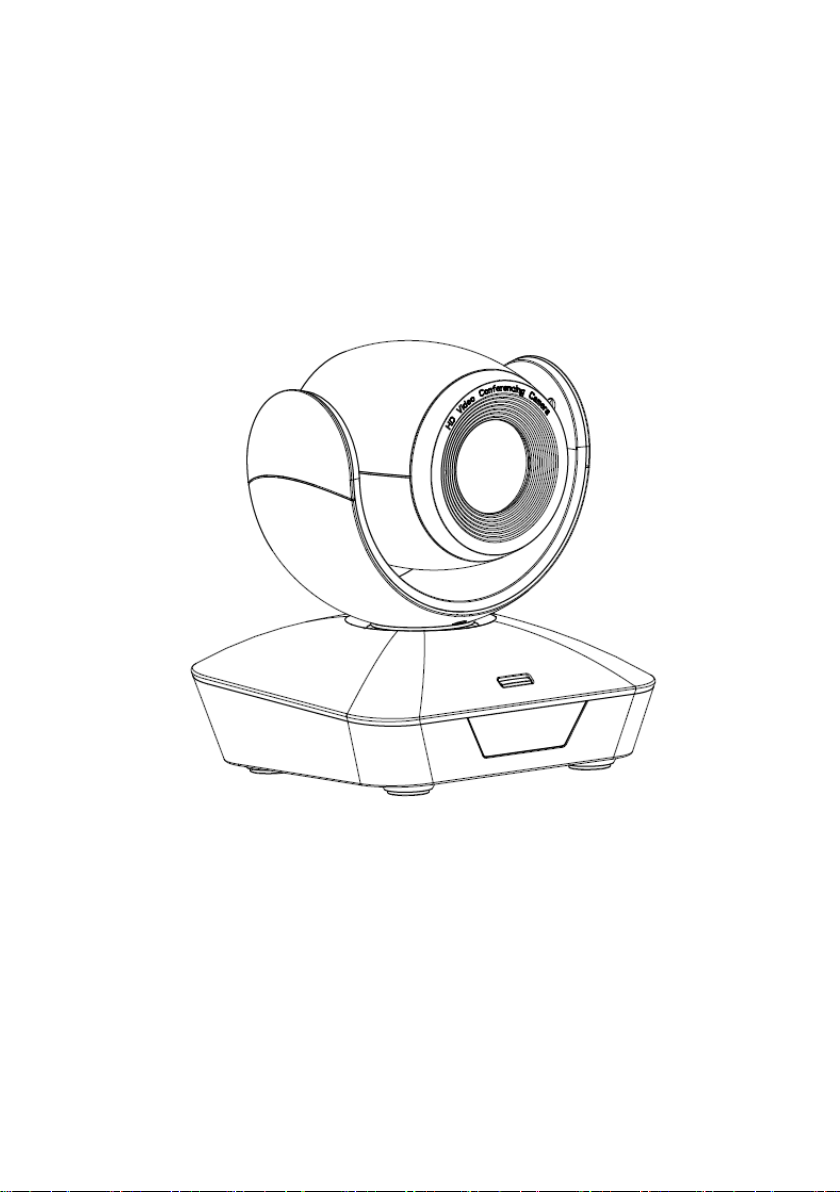
USB3.0 HD Video Camera
User Manual
Version V1.0
(English)

CONTENTS
SAFE GUIDES.…………………...………………………………….........…....…....................................…3
ACCESSORIES……………………………………………………………………....…...................................5
QUICK START...................................................................................................................................................5
PRODUCT HIGHLIGHTS....................................................................................................................................6
PRODUCT SPEC................................................................................................................................................7
CAMERA INTERFACE........................................................................................................................................8
CAMERA DIMENSION......................................................................................................................................8
IR REMOTE CONTROLLER................................................................................................................................9
VISCA IN(RS232) PORT....................................................................................................................................11
VISCA PROTPCOL............................................................................................................................................12
PELCO-D PROTOCOL.......................................................................................................................................19
PELCO-P PROTOCOL........................................................................................................................................20
OSD MENU.....................................................................................................................................................21
IR TRANSFER(IR PASS) & UVC CONTROL.........................................................................................................24
1
SAFETY GUIDES
1.Before operation, please fully read and follow all instructions in the manual. For your safety, always keep this
manual with the camera.
2.The camera power input range is 100-240V AC(50-60Hz),ensure the power supply input within this rate.
3.The camera can be powered via the factory supplied USB3.0 cable(3meters);We suggest you connect to the
power adapter(supplied by the factory) if the camera is connecting to USB2.0 port or USB3.0 extender cable.
4.Please keep the power cable, video cable and control cable in a safe place. Protect all cables especially the
connectors.
5.Operational environment: 0℃-50℃, humidity less than 90%.To avoid any danger, do not put anything inside the
camera, and keep away from the corrosive liquid.
6.Avoid stress, vibration and damp during transportation, storage and installation.
7.Do not detetch the camera housing and cover. For any service, please contact authorized technicians.
8.RF cable and control cable should be individually shielded, and cannot be substituted with other cables. Do not
direct the camera lens towards strong light, such as the sun or the intensive light.
9.Use a dry and soft cloth to clean the camera housing. Applied with neutral cleaning agent when there is need to
clean. To avoid damage on the camera lens, never use strong or abrasive cleaning agents on the camera housing.
10.Do not move the camera by holding the camera head. To avoid mechanical trouble, do not rotate the camera
head by hand.
11.Put the camera on fixed and smooth desk or platform, avoid leaned installation.
12. Power Supply Polarity(Drawing)
2
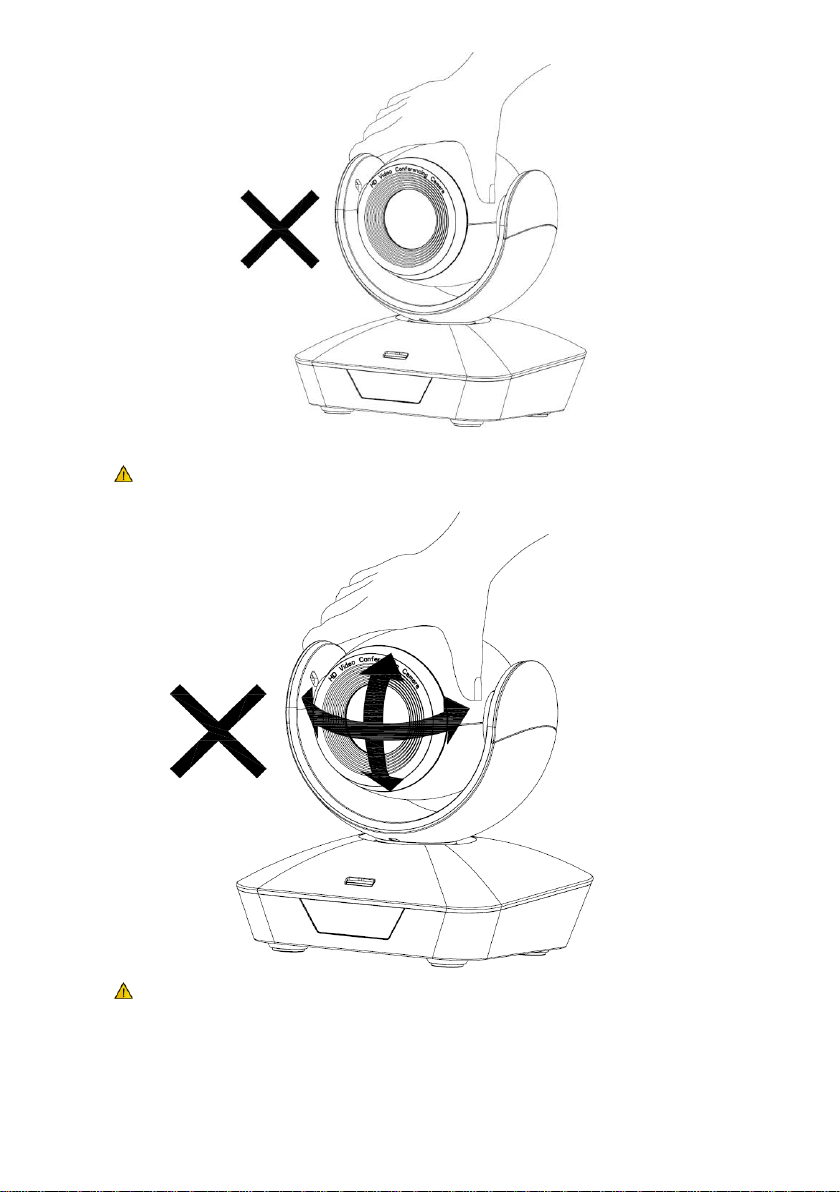
DO NOT use hands for catching or moving the camera barrel ,
otherwise it may damage the camera mechanical structure.
DO NOT use hands to quick rotate the camera barrel , otherwise it may
damage the camera mechanical structure, even break the motor driving.
3
ACCESSORIES
Function(ARM)
SW-1
SW-2
Instruction
1
OFF
OFF
Updating mode
2
ON
OFF
Debugging mode
3
ON
ON
Working mode
Function (USB)
SW-5
SW-6
Instruction
1
OFF
OFF
Working mode
2
ON
OFF
Updating mode
3
OFF
ON
Undefined
4
ON
ON
Undefined
Check all bellow items when open the package:
Camera ······································································· 1
Power Adapter ······························································ 1
Power Cable ································································· 1
RS232 Control Cable ······················································· 1
USB3.0 Cable………………………………………………………. 1
Remote Controller ·························································· 1
User Manual ································································· 1
Double-sided Adhesive……………………………………………… 1
Quality Certificate…………………………………………………… 1
QUICK START
1.Check all cable connections before power on.
02.DIP Switch Setting (at the bottom of the camera):
4

PRODUCT HIGHLIGHTS
Smart and fashion design, ideal for cloud-based conferencing
Adopts advanced Ambarella DSP,1/2.8 inch 5MP image sensor, and high quality 5X 85degree FOV
optical lens, provides fluent and crystal image quality
3 cables in 1 design: video,control & power can be transited via single USB3.0 cable.
(notice: to achieve stable power supply via USB3.0 cable, we suggest only use the 3m USB3.0 cable
supplied by the factory, and the PC’s USB3.0 port can supply more than 5V 1000mA power;
we suggest you connect to the power adapter(supplied by the factory) if the camera is connecting to a
USB2.0 port or USB3.0 extender cable.)
Fast switching between different video formats: less than 1 second
5X Optical Zoom + 2X Digital Zoom
Fast and accurate focus performance
Easy firmware upgrade-(field-upgradable)
USB3.0 super speed output, USB2.0 compatible
Effective RS232/485 serial control
Up to 128 presets
Compatible with the majority of videoconferencing software (UVC1.5 protocol standard)
With powerful functional remote controller
IR transfer/IR pass function: except receiving the camera remote controller signal, the camera can
also receive other codec’s IR remote control signal, and pass these IR control signal to the codec’s IR
receiver (via VISCA IN port).
Multi-language OSD menu: English, Chinese.
5

PRODUCT SPEC
Video Format
(YUY2)
USB3.0
1080P60/50/30/25,720P60/50/30/25,
1024x576@30, 960x540@30, 640x360@30, 352x288@30
USB2.0
1024x576@30, 960x540@30, 640x360@30, 352x288@30
Video Port
USB3.0, USB2.0
Sensor
1/2.8 inch high quality 5MP CMOS sensor
Lens
F3.1~15.5mm(5X), F1.8 ~2.8, Field of viewing: 85°(wide)-20°( tele)
Pan/tilt Rotation
Pan:±170°; Tilt:-30°~+90°, support up-side down installation
Pan/tilt Speed
Pan: 0.1°-120°/s; Tilt: 0.1°-80°/s
Preset
10 via IR remote setting, 128 via VISCA control, preset accuracy :0.2°
Control Port
RS232/RS485 , USB3.0/USB2.0
Min. Lux
0.01 Lux
White Balance
Auto/Manual/AutoTracking/OnePush/Indoor/Outdoor/Sodium Lamp/Flurescent Lamp
Focus
Auto/Manual
Iris
Auto/Manual
Shutter
Auto/Manual
WDR
Supported
BLC
Supported
2D Noise Reduction
Supported
3D Noise Reduction
Supported
Gamma Setting
Supported
Mirror Image
Supported
Anti Flicker
OFF/ 50Hz/60Hz
Input Voltage
5V 1000Ma (USB3.0) / 12VDC 1A (Power adapter)
Dimension
148mm×132mm×161mm
Net weight
0.9KGS(2LBS)
6
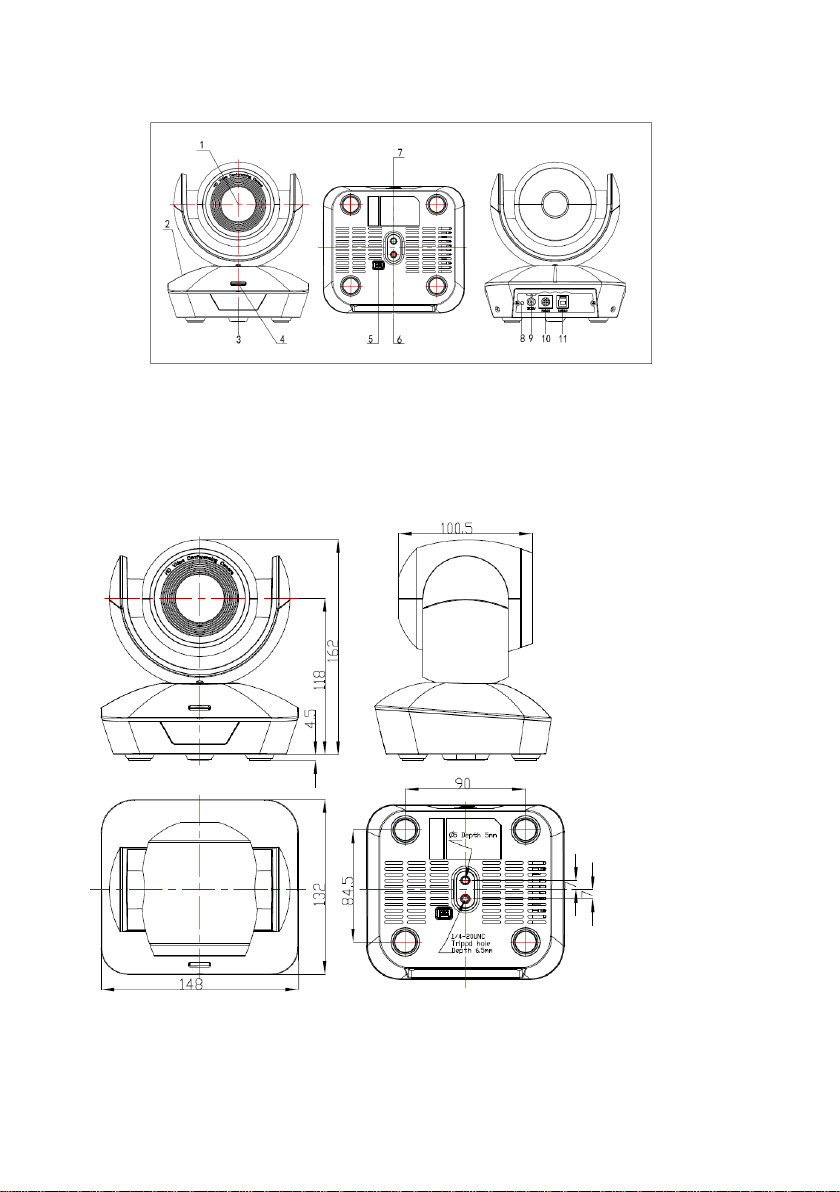
CAMERA INTERFACE
1.Camera Lens 5.Dial Switch 9. 12VDC Power Input
2.Camera Base 6. Tripod Screw Hole 10.RS232(VISCA IN) Port
3.IR Receiver Panel 7.Installation Hole 11. USB3.0 Port
4.Indicator Light 8. Power Indicator light(red)
CAMERA DIMENSION(MM)
7
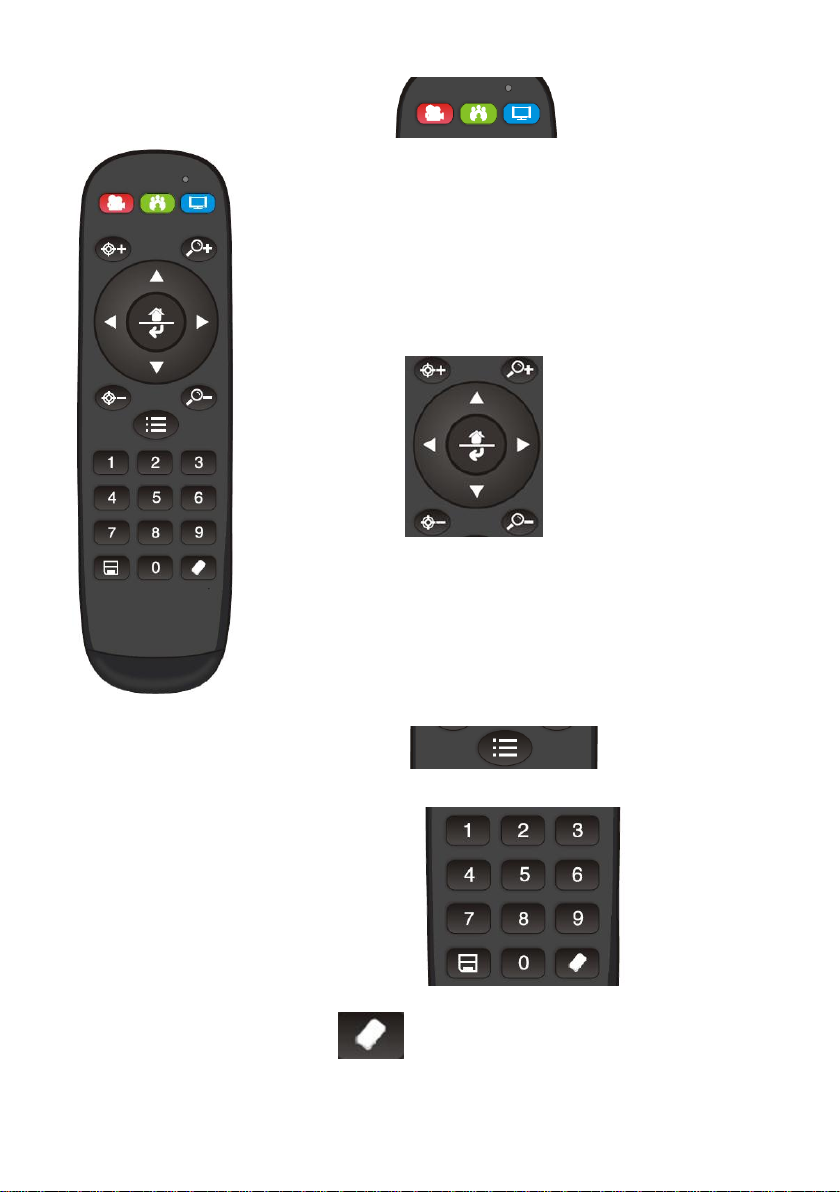
IR REMOTE CONTROLLER
LED Function Instruction
Press any button and shows in red color: Current selection is to control the camera;
Press any button and shows in green color: Current selection is to control the codec;
Press any button and shows in blue color: Current selection is to control the TV;
Power button
Red button: in normal work mode, short press one time, camera will enter standby
mode; short press again, the camera will start self-configuration and go to HOME
position; it will go to No.0 preset position if that was set;
Green button: Codec power button(need to learn the button coding);
Blue button: TV power button( need to learn the button coding);
Focus (Left): +/-
Manual focus, only valid under manual focus model;
Zoom (Right): +/-
Control the lens zoom rate;
Navigate : Up/Down/Left/Right
In normal working mode, use navigate key to control pan/tilt;
Confirm/Home button:
In normal working mode, short press to let the camera go back to Home position.
Menu button:
Enter the OSD menu
Number buttons
Set Preset: Long press(3seconds) the number button to save preset;
Clear Preset: +number button to clear the relative preset;
Long press(3seconds) the Clear button to clear all preset;
Run Preset: Short press the number button to run the relative preset.
8
 Loading...