

Page 1

HyperCaster®
User Manual
Page 2

TelVue HyperCaster® User Manual / v5.0 / October 2014
© 2014 TelVue Corporation 16000 Horizon Way, Suite 500, Mt. Laurel, NJ 08054
HyperCaster® is a registered trademark of TelVue Corporation 800-885-8886 / www.telvue.com
1
The TelVue HyperCaster® is an IP broadcast server with advanced features to adapt to the different
needs of individual broadcast operations. This manual covers basic set-up configurations, as well as
content management, scheduling, and workflow features, typical use cases, and some popular options
such as Traffic & Billing system integration. HyperCaster settings can be managed through a userfriendly browser interface, which is illustrated throughout the manual.
This manual applies to all three Generation II HyperCaster models:
• B1000: up to 20 HD/SD channels
• B100: up to 4 HD/SD channels
• Virtual HyperCaster
This manual is also available on the TelVue website: http://www.telvue.com/support/product-
documentation/telvue-hypercaster-user-manual/
You can access a series of online Training videos here:
http://www.telvue.com/support/training/
Table of Contents
Safety Requirements ..................................................................................................................... 3!
Network and Security ................................................................................................................... 4!
Preparing Content for the HyperCaster ..................................................................................... 6!
Organize and Add Content .......................................................................................................... 7!
Transmux!to!TS!and!Import!DVD!...............................................................................................................!12!
The Dashboard ............................................................................................................................ 13!
Server!Health!.............................................................................................................................................!14!
Field!Descriptions!......................................................................................................................................!15!
Content Management ................................................................................................................. 18!
Import!Content!..........................................................................................................................................!18!
Previews!....................................................................................................................................................!20!
Show!Content!Page!....................................................................................................................................!21!
Content!File!Actions!...................................................................................................................................!24!
Searching!and!Browsing!.............................................................................................................................!28!
Thumbnails!and!Table!Views!.....................................................................................................................!29!
Bulk!Actions!...............................................................................................................................................!30!
Add!Program!–!Using!TBD!..........................................................................................................................!31!
Playlists!......................................................................................................................................................!34!
Playlist(Actions(........................................................................................................................................(35!
Archiving!....................................................................................................................................................!37!
Export!........................................................................................................................................................!38!
Content!RSS!Feed!......................................................................................................................................!38!
Page 3

TelVue HyperCaster® User Manual / v5.0 / October 2014
© 2014 TelVue Corporation 16000 Horizon Way, Suite 500, Mt. Laurel, NJ 08054
HyperCaster® is a registered trademark of TelVue Corporation 800-885-8886 / www.telvue.com
2
Record .......................................................................................................................................... 39!
Tasks ............................................................................................................................................ 39!
Programming ............................................................................................................................... 40!
Classic!View!...............................................................................................................................................!40!
Field(Descriptions(and(Display(Options(...................................................................................................(41!
Search(Filters(and(Event(Functions(.........................................................................................................(42!
Programming(Functions:(Add(Switch(Event(............................................................................................(43!
Programming(Functions:(Add(Playout(Event(..........................................................................................(44!
Programming(Functions:(Add(Overlay(....................................................................................................(46!
Programming(Functions:(Add(Capture(Event(.........................................................................................(47!
Programming(Functions:(Add(Stream(Event(...........................................................................................(49!
Scheduling(Conflicts(and(Ripple(..............................................................................................................(50!
Programming(Functions:(Unschedule(an(Event(......................................................................................(51!
Programming(Functions:(Block(Copy(......................................................................................................(51!
Programming(Functions:(Import(and(Export(events(...............................................................................(52!
Native!CSV!Formatting!...............................................................................................................................!53!
Event!Actions!................................................................ .............................................................................!54!
Calendar!View!............................................................................................................................................!56!
Scheduling(..............................................................................................................................................(57!
Views(......................................................................................................................................................(57!
Reports Tab ................................................................................................................................. 59!
As(Run(Report(.........................................................................................................................................(59!
Missing(File(Report(.................................................................................................................................(61!
Program(Guide(Report(............................................................................................................................(61!
Config Tab ................................................................................................................................... 63!
Channel!Setup!............................................................................................................................................!65!
Continuity(...............................................................................................................................................(66!
Content!Management!...............................................................................................................................!67!
External!Devices!........................................................................................................................................!71!
Feed!Setup!.................................................................................................................................................!72!
Graphic!Overlays!........................................................................................................................................!74!
“Tickers”:(Creating(a(Text(Crawl(.............................................................................................................(74!
“Bugs”:(Inserting(a(logo(or(station(ID(.....................................................................................................(76!
Snipes(.....................................................................................................................................................(77!
Emergency(Notification(Console(.............................................................................................................(80!
ProVue!Integration!....................................................................................................................................!81!
Remote!Server!Configuration!....................................................................................................................!82!
Schedule!Configuration!.............................................................................................................................!83!
!Security!Configuration!..............................................................................................................................!84!
Server!Management!..................................................................................................................................!85!
SNMP(Support(........................................................................................................................................(90!
Switch!Configuration!.................................................................................................................................!91!
User!Management!.....................................................................................................................................!94!
Version!and!Configuration!.........................................................................................................................!95!
Page 4

TelVue HyperCaster® User Manual / v5.0 / October 2014
© 2014 TelVue Corporation 16000 Horizon Way, Suite 500, Mt. Laurel, NJ 08054
HyperCaster® is a registered trademark of TelVue Corporation 800-885-8886 / www.telvue.com
3
Backups ........................................................................................................................................ 96!
Typical Use Cases ........................................................................................................................ 96!
Controlling!What!Appears!in!the!Program!Guide!......................................................................................!96!
Extending!an!IP!Capture!without!ReXEntering!Metadata!..........................................................................!96!
Live!Streams!...............................................................................................................................................!97!
Publishing!Your!Schedule!to!Other!Media!.................................................................................................!97!
Scheduling!a!Live!Switch!Event!whose!Actual!Duration!Varies!.................................................................!98!
Using!ThirdXParty!Editing!Software!............................................................................................................!99!
Appendix: Guide to CCMS Plus .............................................................................................. 100!
Technical Support ..................................................................................................................... 104!
Safety Requirements
The following safety instructions apply to TelVue’s server products.
1. Read and follow all warning notices and instructions marked on the product or included in this manual.
Opening or removing covers and/or components may expose you to dangerous high voltage points or
other risks. Qualified personnel should perform all servicing.
2. The maximum ambient temperature for the server is 90 degrees Fahrenheit. Care should be given to
allow sufficient air circulation or space between units when the server is installed in a closed or multiunit rack assembly.
3. Installation of the server in a rack without sufficient airflow can be unsafe.
4. If the server is installed in a rack, the rack should safely support the combined weight of all equipment
it supports.
5. The server’s internal AC power supply input is intended for use with the three-wire grounding type
plug (a plug that has a grounding pin). This is a safety feature. Do not defeat the purpose of
grounding type plugs by modifying the plug or using an adapter.
6. Do not allow anything to rest on the power cord. Do not locate the product where persons can walk on
or come in contact with the power cord.
7. Determine that the cumulative power requirements of the server plus other equipment in the rack do
not overload the supply circuits and/or wiring.
8. If using a power strip or similar supply, make sure the power requirement of the chassis, plus the
cumulative power draw of any other equipment in the rack, do not overload the supply circuit.
9. There is danger of explosion if the motherboard battery is incorrectly replaced. A lithium battery on
the server motherboard provides backup power for its internal clock. The battery has an estimated
life expectancy of ten years.
Page 5
TelVue HyperCaster® User Manual / v5.0 / October 2014
© 2014 TelVue Corporation 16000 Horizon Way, Suite 500, Mt. Laurel, NJ 08054
HyperCaster® is a registered trademark of TelVue Corporation 800-885-8886 / www.telvue.com
4
Network and Security
The HyperCaster is a networked digital-video appliance with Ethernet connections and a number of
integrated IP-based services. Prior to powering on your server please read the Getting Started
document that contains information such as power requirements and instructions on how to set your
IP address.
TelVue HyperCaster Getting Started [PDF]
Core Networking Requirements
• IP Address – A static or Dynamic (DHCP) IP will work, but a Static IP is highly recommended.
• Subnet Mask
• Gateway Address – The IP address of your router.
• DNS Address – At least one Domain Name Server (DNS) address.
• NTP Address – Public or private Network Time Protocol (NTP) server address.
Optional Networking Configurations
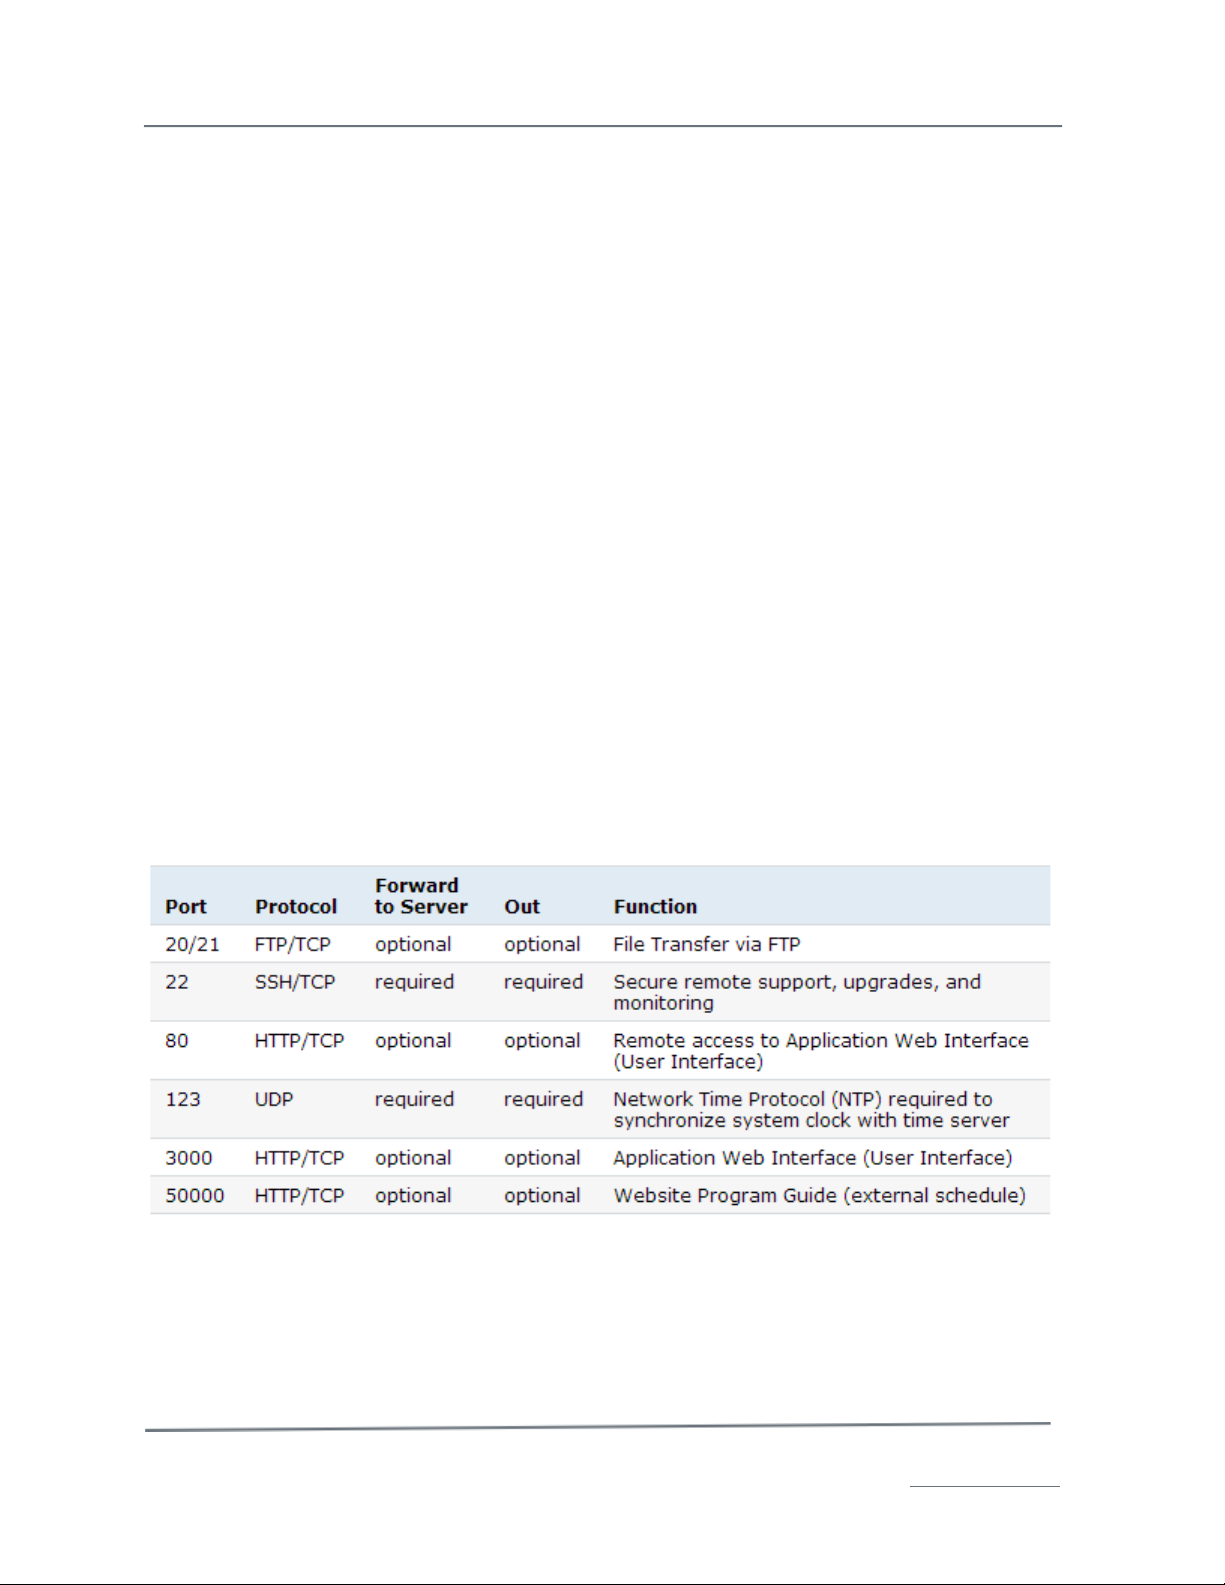
• Port Forwarding
If your HyperCaster will only be available on your Local-Area Network (LAN), then no ports need to be
opened on your hardware firewall (router). If your HyperCaster will be accessible from outside your
firewall, then certain ports will need to opened on your router. Exactly how to do that is different for
every router and is beyond the scope of this document, but looking up “Port Forwarding” online, for
your router brand and model, will help.
Ports marked “optional” mean the function is optional. If you want to use that function, you must
forward port access.
TelVue highly recommends that customers:
• Place the HyperCaster behind a firewall device to avoid Denial of Service (DoS)-type attacks or
brute force login attempts on the various services.
• Never enable Samba for external access.
Page 6
TelVue HyperCaster® User Manual / v5.0 / October 2014
© 2014 TelVue Corporation 16000 Horizon Way, Suite 500, Mt. Laurel, NJ 08054
HyperCaster® is a registered trademark of TelVue Corporation 800-885-8886 / www.telvue.com
5
Consider locking down remote access to service ports to known IP addresses. For example, if you
would like to access your HyperCaster from home and your flat in Paris, you could limit remote access
via your router firewall to IP sources coming only from those two locations.
Consult your IT department for standard networking security practices including establishing a firewall
and remote access.
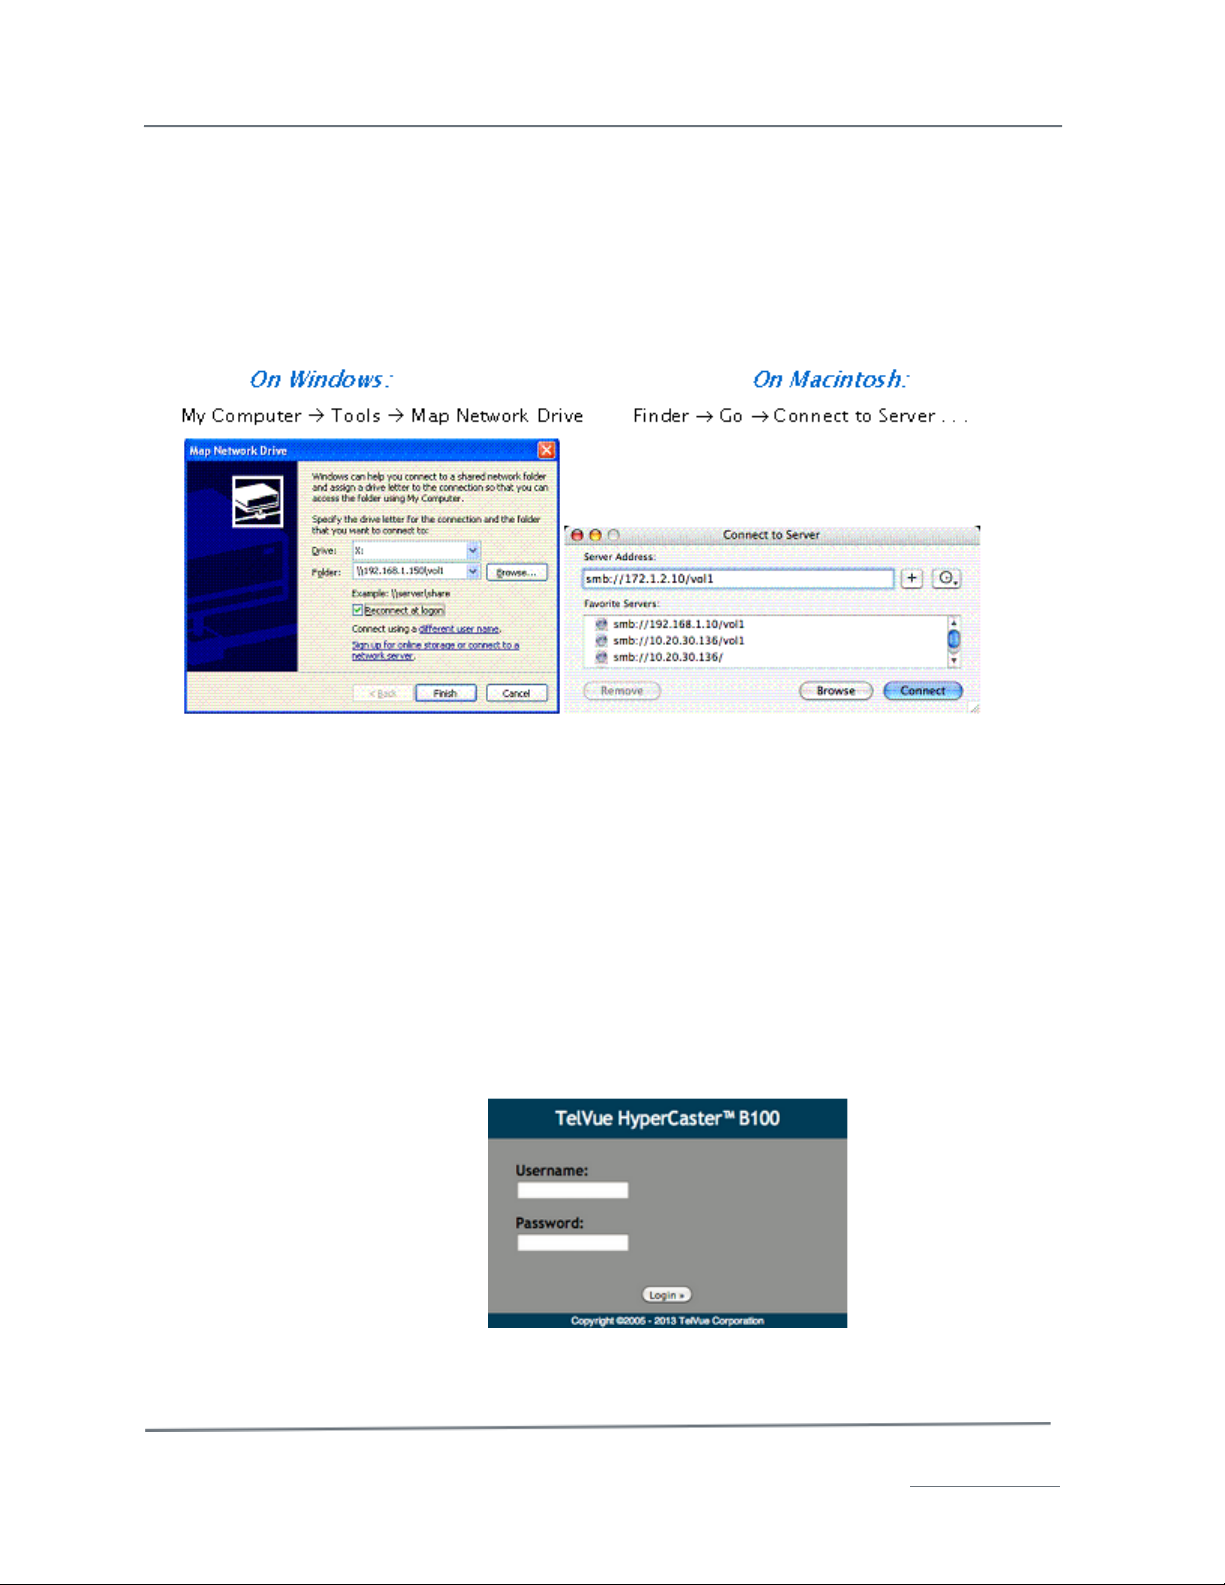
Map the Samba Network Drive
If your server will not be used on a network, skip to Configure the User Interface.
Configure the User Interface
Start the User Interface
TelVue recommends:
• Mozilla Firefox, version 14 or higher
• Microsoft Internet Explorer, versions 8 or higher
• Google Chrome, version 16 or higher
• Apple Safari, version 4.0 or higher
1. Using a PC or Mac on the same network as your HyperCaster, open a browser window.
2. Enter http://nnn.nnn.nnn.nnn:3000 where nnn.nnn.nnn.nnn is the IP address of your
HyperCaster. If your HyperCaster is not connected to a network, enter
http://1.1.1.1:3000. The login screen is displayed.
3. The first time you login, enter psgadmin for the username and password to display the
Dashboard.
Page 7
TelVue HyperCaster® User Manual / v5.0 / October 2014
© 2014 TelVue Corporation 16000 Horizon Way, Suite 500, Mt. Laurel, NJ 08054
HyperCaster® is a registered trademark of TelVue Corporation 800-885-8886 / www.telvue.com
6
4. Click on the Config tab to display the Configuration screen.
5. Configure the channel(s) for your HyperCaster by editing the channel configuration.
6. If this HyperCaster is connected to a switch, edit the switch configuration. You can
name the devices on the input and output ports.
7. If your HyperCaster is connected to an encoder or stream source, edit the feed setup.
8. If your HyperCaster is connected to a remote server, edit the remote server
configuration
The HyperCaster is now connected to your broadcast network and ready to receive content.
Preparing Content for the HyperCaster
The TelVue HyperCaster® transmits compressed video content over UDP packets. Content must be
already multiplexed into an MPEG-2 Transport Stream, and that transport stream often must have a
constant multiplex rate (note however that does not mean the video elementary stream must have a
constant bit rate). The 4.0 version of the TelVue HyperCaster software supports variable mux rate
Transport Streams, however other equipment in your setup may not, so you may need to investigate
whether your full playout chain can support variable mux rate content.
The equipment receiving these streams can and often will have more stringent requirements.
TelVue® servers can aid with these downstream requirements by changing Program ID values as the
MPEG-2 TS is transmitted. However, other requirements, such as bit rate, frame rate, profile and
level, GOP structure, and more, must be set at the time of file creation or by transcoding or
multiplexing.
CableLabs and ATSC
Two common standards that broadcast video equipment will adhere to are the CableLabs set
of specifications for VOD, and the ATSC broadcast specifications. If your downstream equipment
requires your files to adhere to either specification, you should select a program that the provider has
verified is compliant to these specifications. If your downstream equipment does not require these
Page 8

TelVue HyperCaster® User Manual / v5.0 / October 2014
© 2014 TelVue Corporation 16000 Horizon Way, Suite 500, Mt. Laurel, NJ 08054
HyperCaster® is a registered trademark of TelVue Corporation 800-885-8886 / www.telvue.com
7
particular specifications, you may be able to use any of the programs discussed in this section that are
listed as HyperCaster compatible.
H.264
The TelVue HyperCaster is optionally capable of sending Transport Streams that use the H.264 video
codec. However, no specific sub-standard similar to the CableLabs or ATSC standards has yet emerged
for H.264 settings. Most systems using H.264 will have specific requirements for things such as
profile, level and bit-rate. All of the transcoding and multiplexing programs mentioned below are
capable of working with Transport Streams that include H.264, though this sometimes requires an
upgraded version of the utility. If you are working with H.264 video, you should start from the
Transport Stream presets provided in the transcode programs below and then tailor it to your
system’s specific requirements. If you have any questions on H.264 presets for your HyperCaster,
please contact TelVue Support.
Programs for Creating Files for the TelVue HyperCaster
The simplest way to ensure that all files in your media library are compatible with the
TelVue HyperCaster is to use TelVue® Connect™ for ingest and transcoding. TelVue customizes your
TelVue Connect transcoding profile to your station’s requirements, and files can be distributed directly
from the TelVue Connect service to your HyperCaster.
There are other options. The following program can create files that are compatible with the
TelVue HyperCaster:
• Telestream Episode (Microsoft Windows or Apple Macintosh)
Many others will be capable of creating constant mux rate MPEG-2 TS. TelVue has not extensively
tested the following programs but they are known to create constant mux rate Transport Stream, or in
some cases CableLabs or ATSC compliant streams:
• PixelTools HDProQT (Microsoft Windows or Apple Macintosh) – HDProQT also supports
preserving Closed Captioning data captured using a Black Magic Designs input card and Apple
Final Cut Pro.
• Womble MPEG Video Wizard DVD 5.0 (Microsoft Windows)
You should always test some sample files with your broadcast server and downstream equipment prior
to committing to a workflow.
The following programs can not only create compatible content, but can also create or help create
CableLabs-compliant files (in all cases) or ATSC-compliant files (in some cases, see below).
• Harmonic ProMedia Carbon (formerly Rhozet Carbon Coder – Microsoft Windows)
• Manzanita Systems multiplexers (Microsoft Windows)
Many of the above systems, unless otherwise noted, include presets for ATSC or CableLabs compliant
streams, and you can just use those presets.
Organize and Add Content
The simplest way to add content to your HyperCaster is with a TelVue® Connect™ account. With
TelVue Connect you can upload content to your Media Library by dragging and dropping the video files
over any Internet connection, and then distribute these videos to your HyperCaster channels with a
single click.
If you do not have a TelVue® Connect™ account, the following instructions apply:
Page 9
TelVue HyperCaster® User Manual / v5.0 / October 2014
© 2014 TelVue Corporation 16000 Horizon Way, Suite 500, Mt. Laurel, NJ 08054
HyperCaster® is a registered trademark of TelVue Corporation 800-885-8886 / www.telvue.com
8
Organizing Content on the Server
The HyperCaster supports a folder (directory) structure with sub-folders for content management and
playout. The HyperCaster is configured with a primary media folder labeled vol1 (for Volume 1). If
your HyperCaster has been configured for multiple volumes, it might have vol2, vol3, etc. Many
servers have a shortcut to vol1 called upload, so \nnn.nnn.nnn.nnnupload will take you to
\nnn.nnn.nnn.nnnvol1.
TelVue recommends that you keep all media files in the primary media folder. Use the Web Application
content management tools to categorize the files and search them based on their
metadata. However, some installations opt to organize media files into sub-folders. If you do this,
adjust the instructions to import content into the correct subfolder.
Storing Files without Including Them on the Content Page
To store content on your TelVue server without tracking it via the UI, create a subfolder named
“hidden” in your media folder and move the content to that hidden folder. Anything stored in
/vol1/hidden, /vol2/hidden, etc. will not be displayed on the Content page but will still be on your
server.
Adding Content to the Server
There are several methods for adding content to the server.
• Drop MPEG2 Files into the Media Hot Folder
• Use Samba to Add Content via Drag and Drop
• Use FTP to Add Content
• A PBCore hot folder is also available. Please contact TelVue Technical Support to enable this
feature.
Drop MPEG2 Files into the Media Hot Folder
The Web Application includes a hot folder at \nnn.nnn.nnn.nnnvol1importmedia.
1. From a PC or Mac on your network, map the media hot folder as a network drive.
2. Open a local window with your content and a second window with the media hot folder.
3. Drag and drop content files into the media hot folder. They will be added to the Content page without
the need to import them.
Since the content is already available on the Content page, you can immediately program it.
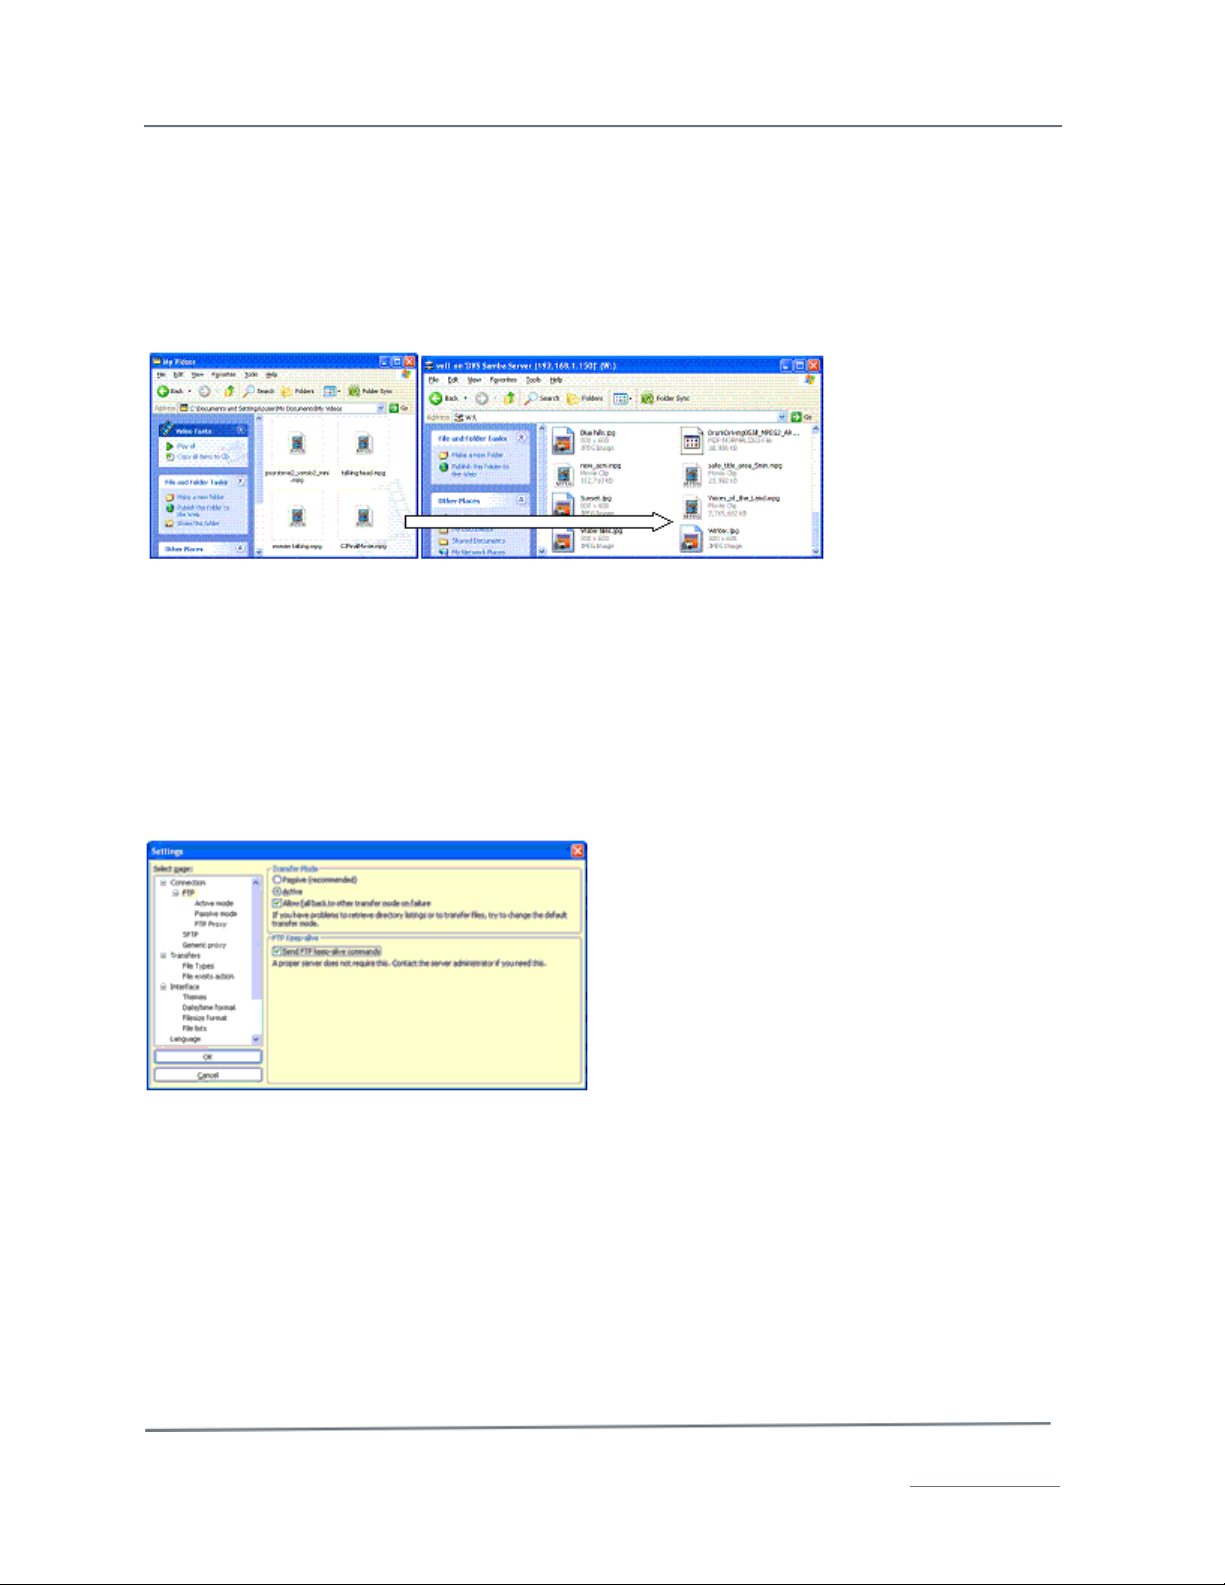
Use Samba to Add Content via Drag and Drop
Page 10
TelVue HyperCaster® User Manual / v5.0 / October 2014
© 2014 TelVue Corporation 16000 Horizon Way, Suite 500, Mt. Laurel, NJ 08054
HyperCaster® is a registered trademark of TelVue Corporation 800-885-8886 / www.telvue.com
9
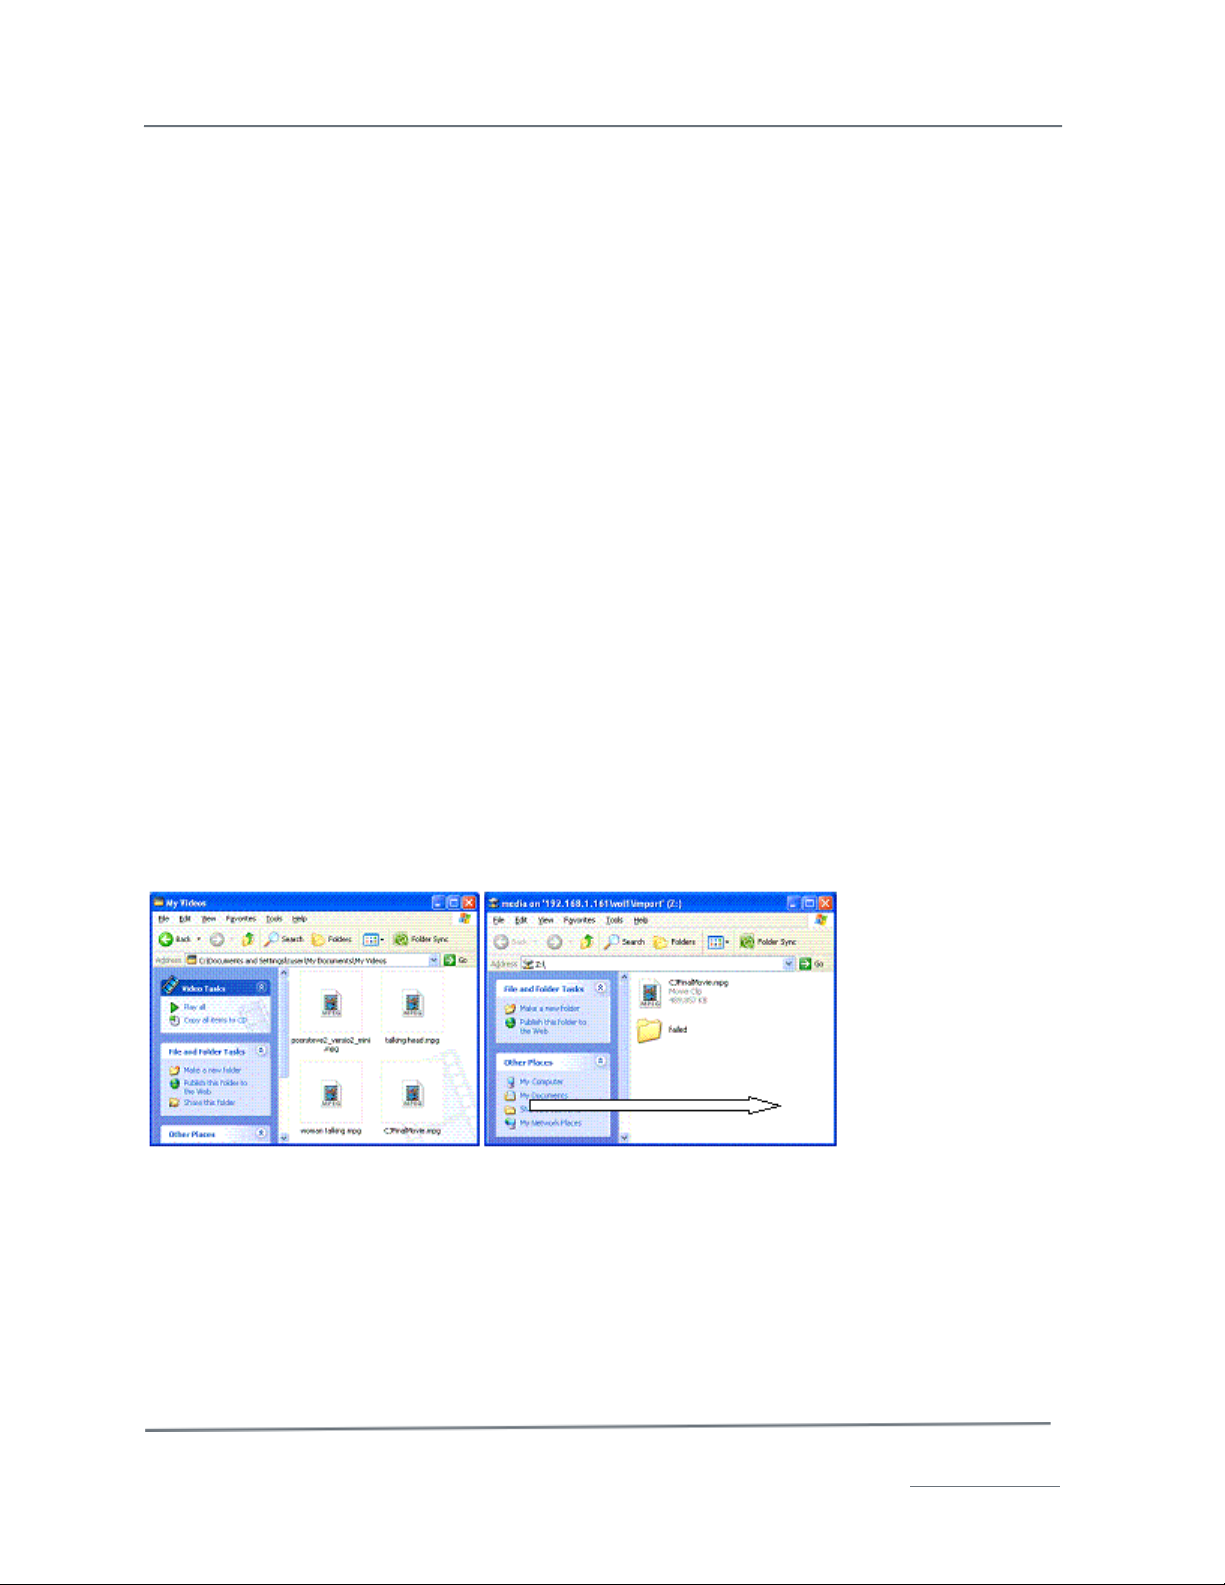
Your server must be on a network in order to use Samba. You should already have mapped a Samba
network drive on a PC or Mac on the same network as your HyperCaster.
1. Open a window on the PC or Mac and browse to the folder with the content you want to transfer to
your server.
2. Connect to the network drive you mapped for your server. You now have a second open window
showing the highest-level folder on your server, such as vol1.
3. Drag MPEG files from your local folder and drop them into your server’s import folder.
Once the content is in your import folder you will use the Import function to make the content
available for programming.
Use FTP to Add Content
FTP must be set to active mode for file sharing to work. The default FTP setting in most browsers is
passive mode. Passive mode opens too many ports so it is not as secure.
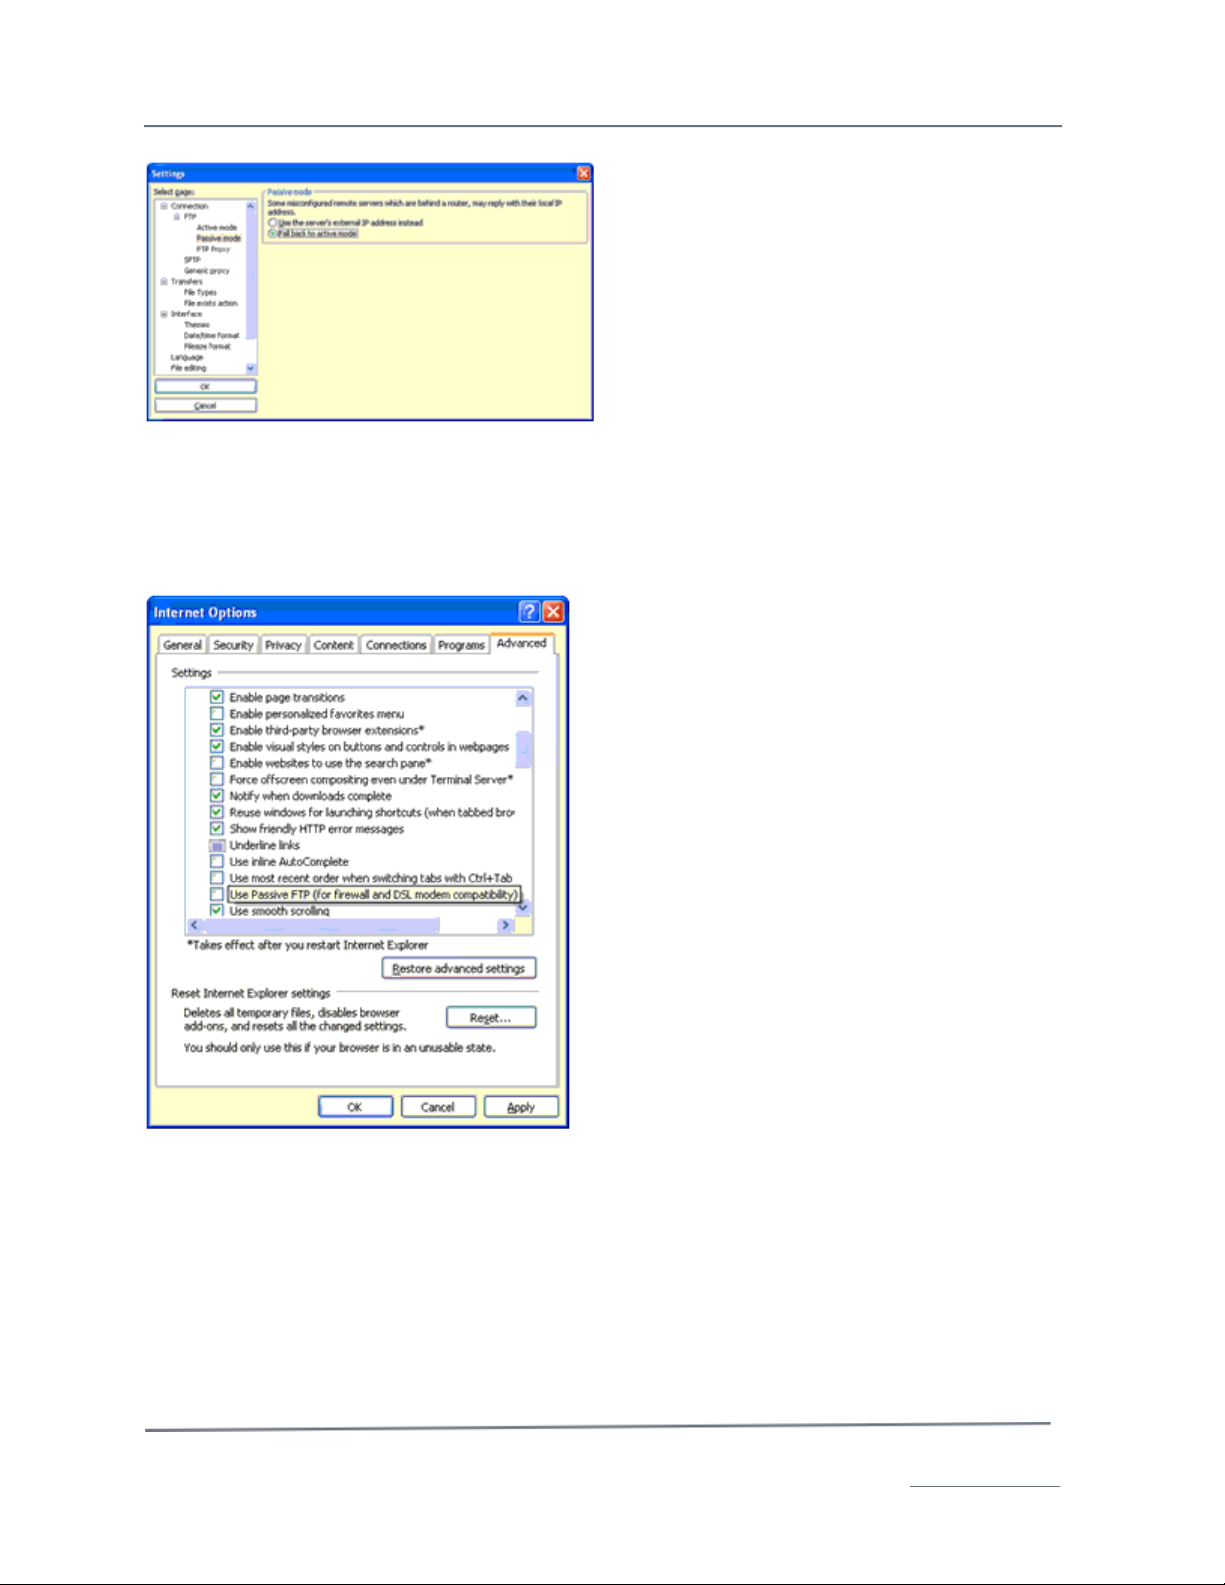
Setting FTP Mode to Active in FileZilla
1. Click on Edit → Settings to open the Settings window.
2. Expand the Connections portion of the tree so you can see Transfer Mode on the right.
3. Click on FTP and click the Active radio button to set FTP mode to Active.
4. Make sure the Allow Fall back to other transfer mode on failure box is checked.
5. In the FTP Keep-Alive section, make sure the Send FTP keep-alive commands box is checked.
Page 11
TelVue HyperCaster® User Manual / v5.0 / October 2014
© 2014 TelVue Corporation 16000 Horizon Way, Suite 500, Mt. Laurel, NJ 08054
HyperCaster® is a registered trademark of TelVue Corporation 800-885-8886 / www.telvue.com
10
6. In the Settings tree, click on the Passive mode page.
7. Make sure the Fall back to active mode box is checked.
8. Click OK to save the settings and exit.
Setting FTP Mode to Active in Internet Explorer
1. Click on Tools → Internet Options to open the Internet Options window.
2. Click on the Advanced tab.
3. In the Browsing section, scroll down to Use Passive FTP (for firewall and DSL modem
compatibility) and click in the box to uncheck it.
4. Click OK to save the settings and exit.
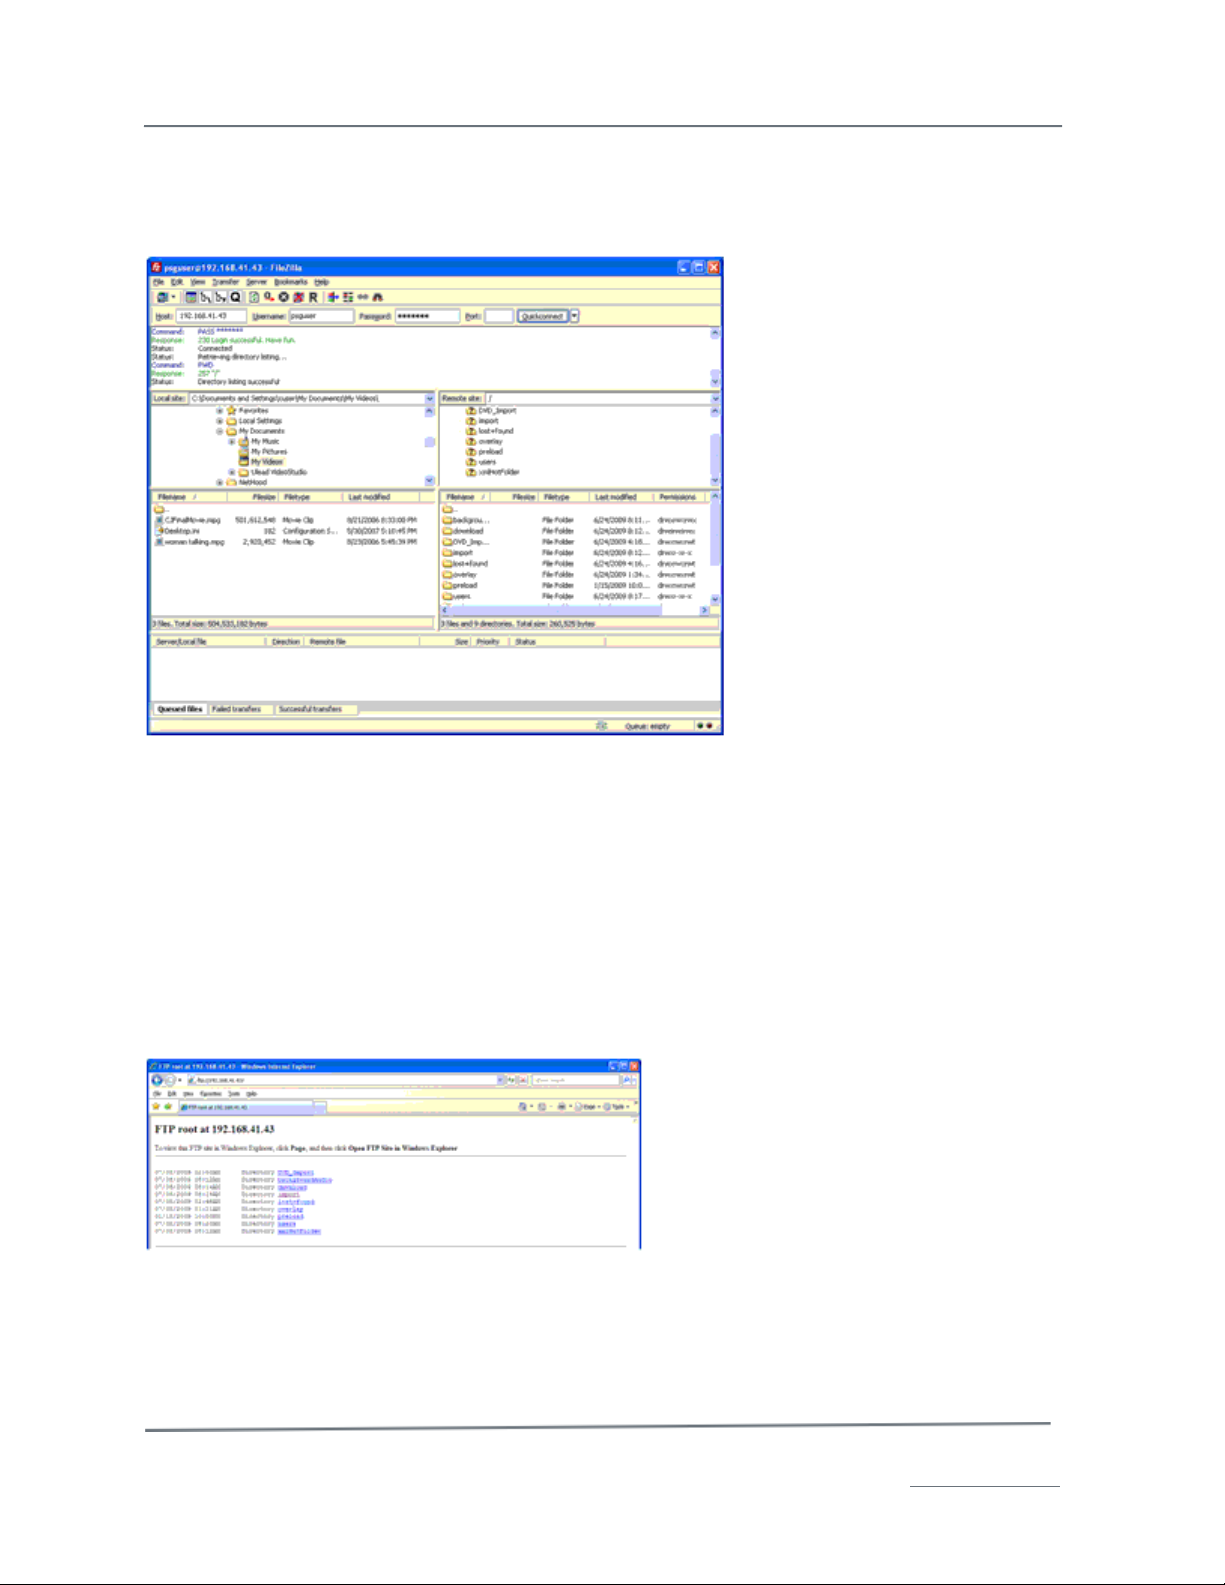
Running FTP with FileZilla
Before using FTP to transfer files, make sure it is set to Active Mode.
1. Open FileZilla.
2. In the Host box, enter the IP address of your server.
3. Enter the username and password. (The defaults are both psguser.)
Page 12
TelVue HyperCaster® User Manual / v5.0 / October 2014
© 2014 TelVue Corporation 16000 Horizon Way, Suite 500, Mt. Laurel, NJ 08054
HyperCaster® is a registered trademark of TelVue Corporation 800-885-8886 / www.telvue.com
11
4. Click the Quickconnect button. Your import folder (directory), which is usually vol1, is displayed in
the Remote site pane on the right. If your server has multiple volumes you will be taken to the
highest-level folder.
5. In the Local pane on the left, browse for the file you want to transfer to your server.
6. Drag the file into your import folder.
Once the content is in your import folder you will use the Import function to make the content
available for programming.
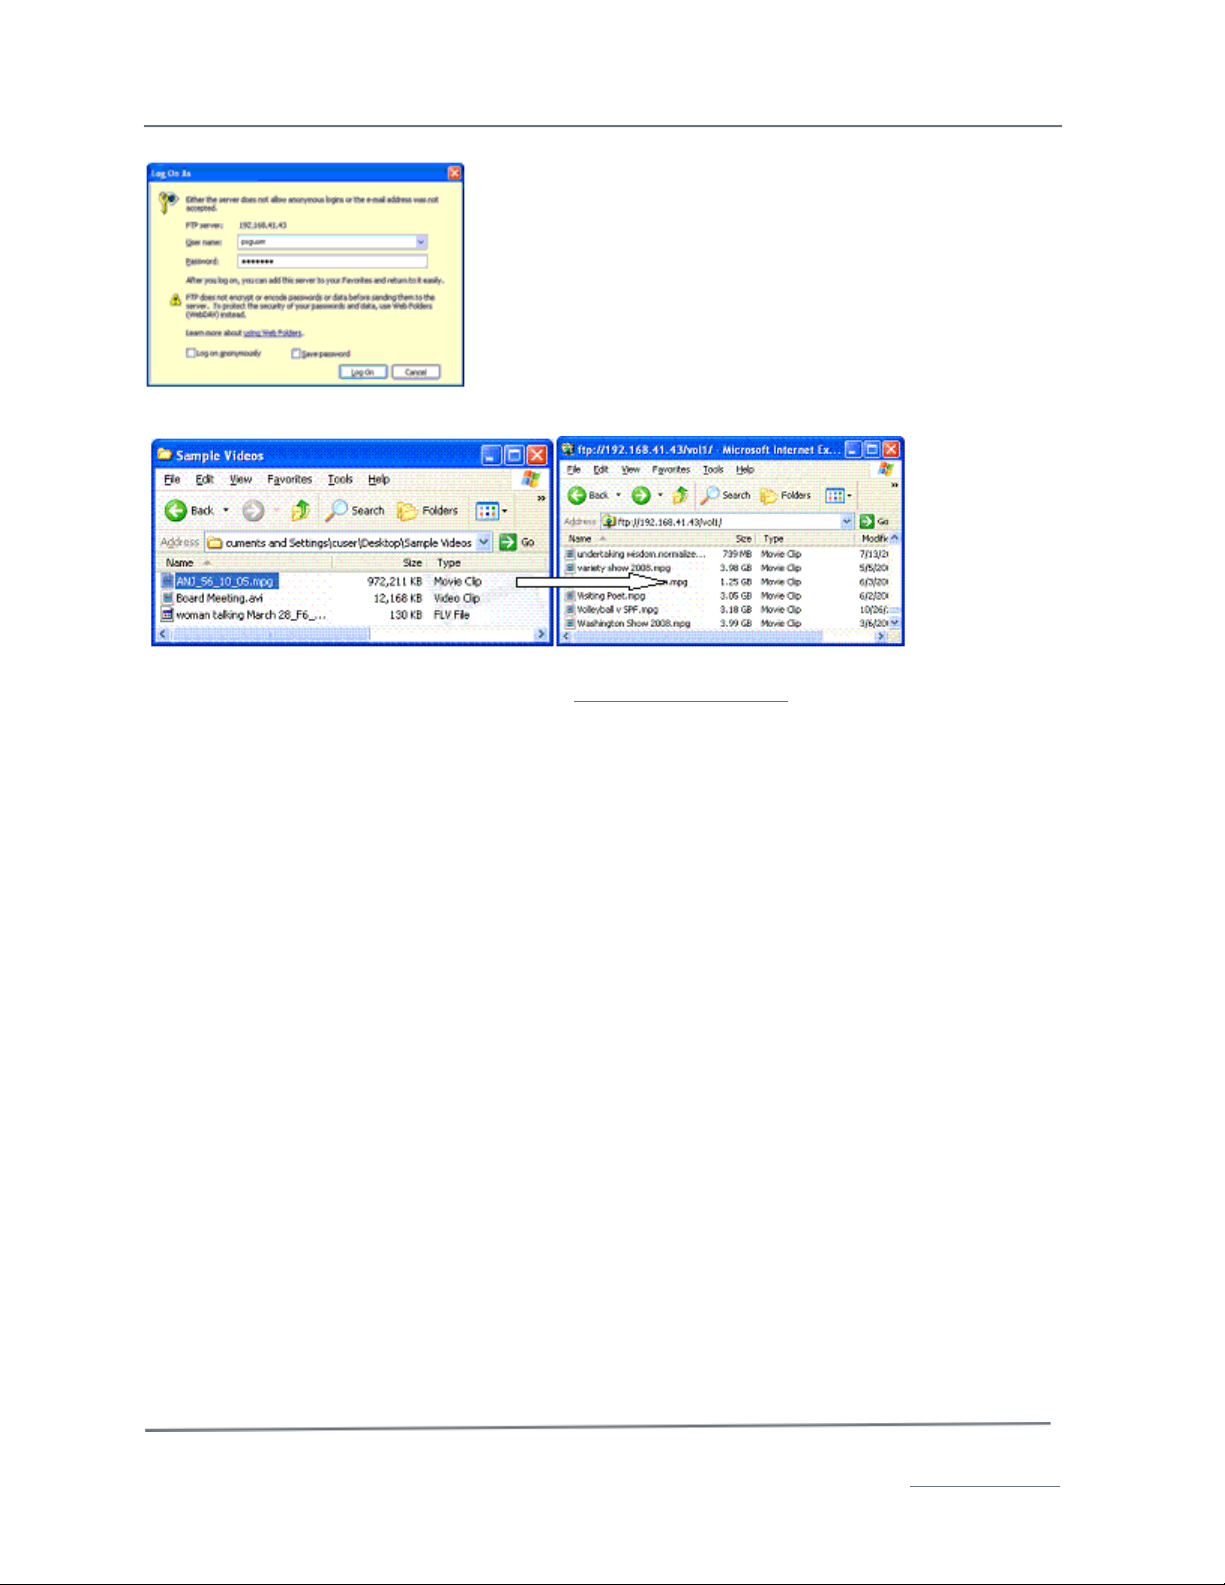
Running FTP with Internet Explorer
Before using FTP to transfer files, make sure it is set to Active Mode.
1. Open an Internet Explorer window and type ftp://nnn.nnn.nnn.nnn in the address window, where
nnn.nnn.nnn.nnn is the IP address of your TelVue HyperCaster.
2. In the upper right of the window, click on Page, then choose Open FTP Site in Windows Explorer.
3. In the Login As dialog box, enter your username and password. (The default username and password
are both psguser.) Click Log On to open the FTP folder, which is usually vol1. If your server has
multiple volumes you will be taken to the highest-level folder.
Page 13
TelVue HyperCaster® User Manual / v5.0 / October 2014
© 2014 TelVue Corporation 16000 Horizon Way, Suite 500, Mt. Laurel, NJ 08054
HyperCaster® is a registered trademark of TelVue Corporation 800-885-8886 / www.telvue.com
12
4. Open a new Windows Explorer window and browse to the folder with your content files.
5. Drag files from that folder and drop them into the folder FTP opened on your server.
Once the content is in your vol1 folder you will use the Import function to make the content available
for programming.
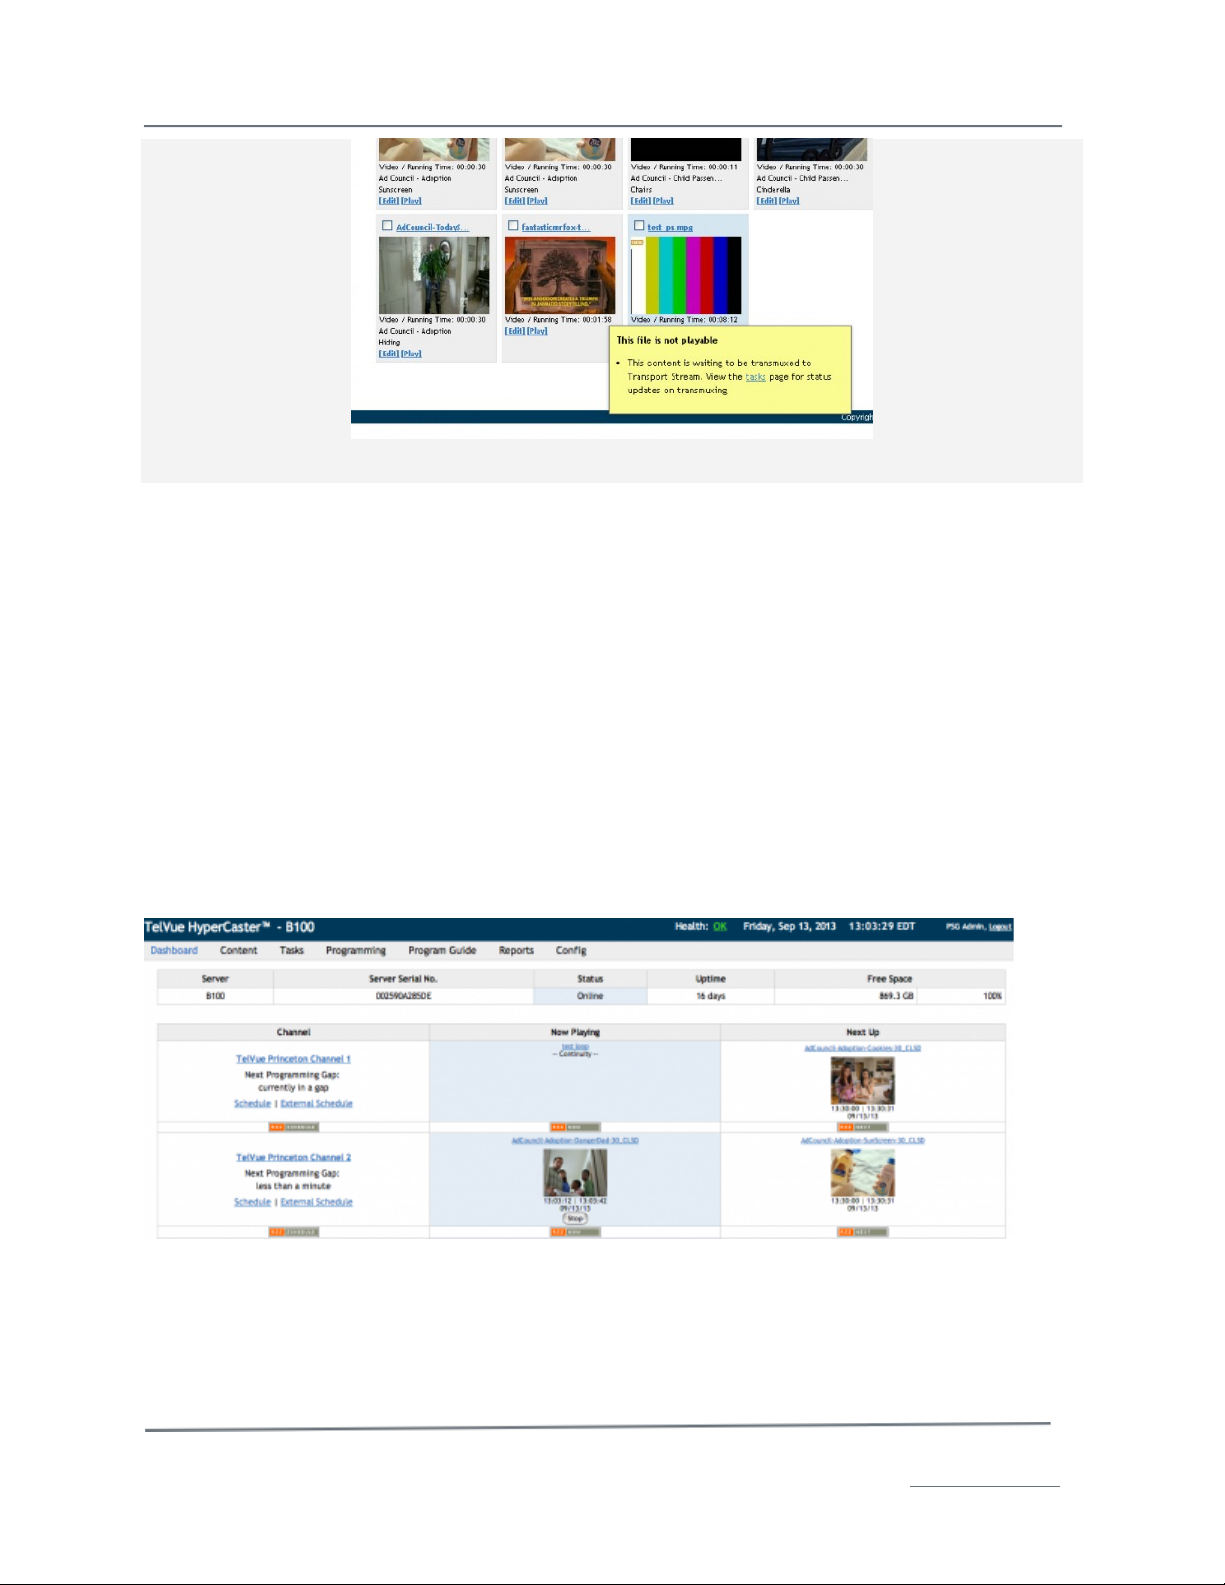
Transmux to TS and Import DVD
HyperCaster 4.0 and above includes a Transmux feature, which will look for any MPEG-2 Program
Stream or MP4 mux containing H.264 (including most .mov formats) video, and transmux those to the
MPEG-2 Transport Stream format required to play out on the HyperCaster.
The Transmux feature also makes it possible to import a DVD. Drag the VIDEO_TS content directly
from the DVD into the DVD Import hot folder in vol1. On import, the HyperCaster will re-multiplex
supported MPEG-2 Program and MP4 files on import to Transport Stream.
This produces a variable mux rate output. Video is preserved as-is from the original file including video
bit rate. Audio is preserved as-is from the original file including audio bit rate for AC-3, MPEG-1 Layer
II, and AAC audio. Other audio formats are converted to MPEG-1 Layer 2 for MPEG-2 video, and AAC
for H.264 video.
(NOTE: If utilizing the transmux feature of the HyperCaster, first please confirm that the audio
formats above are supported by the end decoding devices; IE: Set Top Boxes, TV Tuners, Other
Broadcast Decode Solutions. If these audio formats are not supported, you will need to use an
external file prep solution such as TeleStream Episode Pro or TelVue Connect.)
To enable the Transmux feature, go to Config –> Content –> Content Item. Check off the box
“Transmux to Transport Stream”.
If you do not have the Transmux feature enabled, the HyperCaster will still import MPEG-2 Program
and MP4, but will show the files as unplayable. The tool tip help with display the reason why, and note
that you need to enable the Transmux feature so that the file can be transmuxed to Transport Stream
for compatibility.
Page 14
TelVue HyperCaster® User Manual / v5.0 / October 2014
© 2014 TelVue Corporation 16000 Horizon Way, Suite 500, Mt. Laurel, NJ 08054
HyperCaster® is a registered trademark of TelVue Corporation 800-885-8886 / www.telvue.com
13
A tooltip alerts you that this file is in the process of being transmuxed and is not yet playable.
If you do have the Transmux feature enabled, MPEG-2 Program and MP4 files will still show as
unplayable when they are first imported, but the tool tip help will show that it is waiting to be
transmuxed.
The transmux operation itself is fast, and does not require re-encoding the video stream, and also
typically does not require re-encoding the audio stream. The original quality of your source video is
preserved, the file is just reformatted to Transport Stream.
You can see the progress of the transmux operation in the Tasks tab.
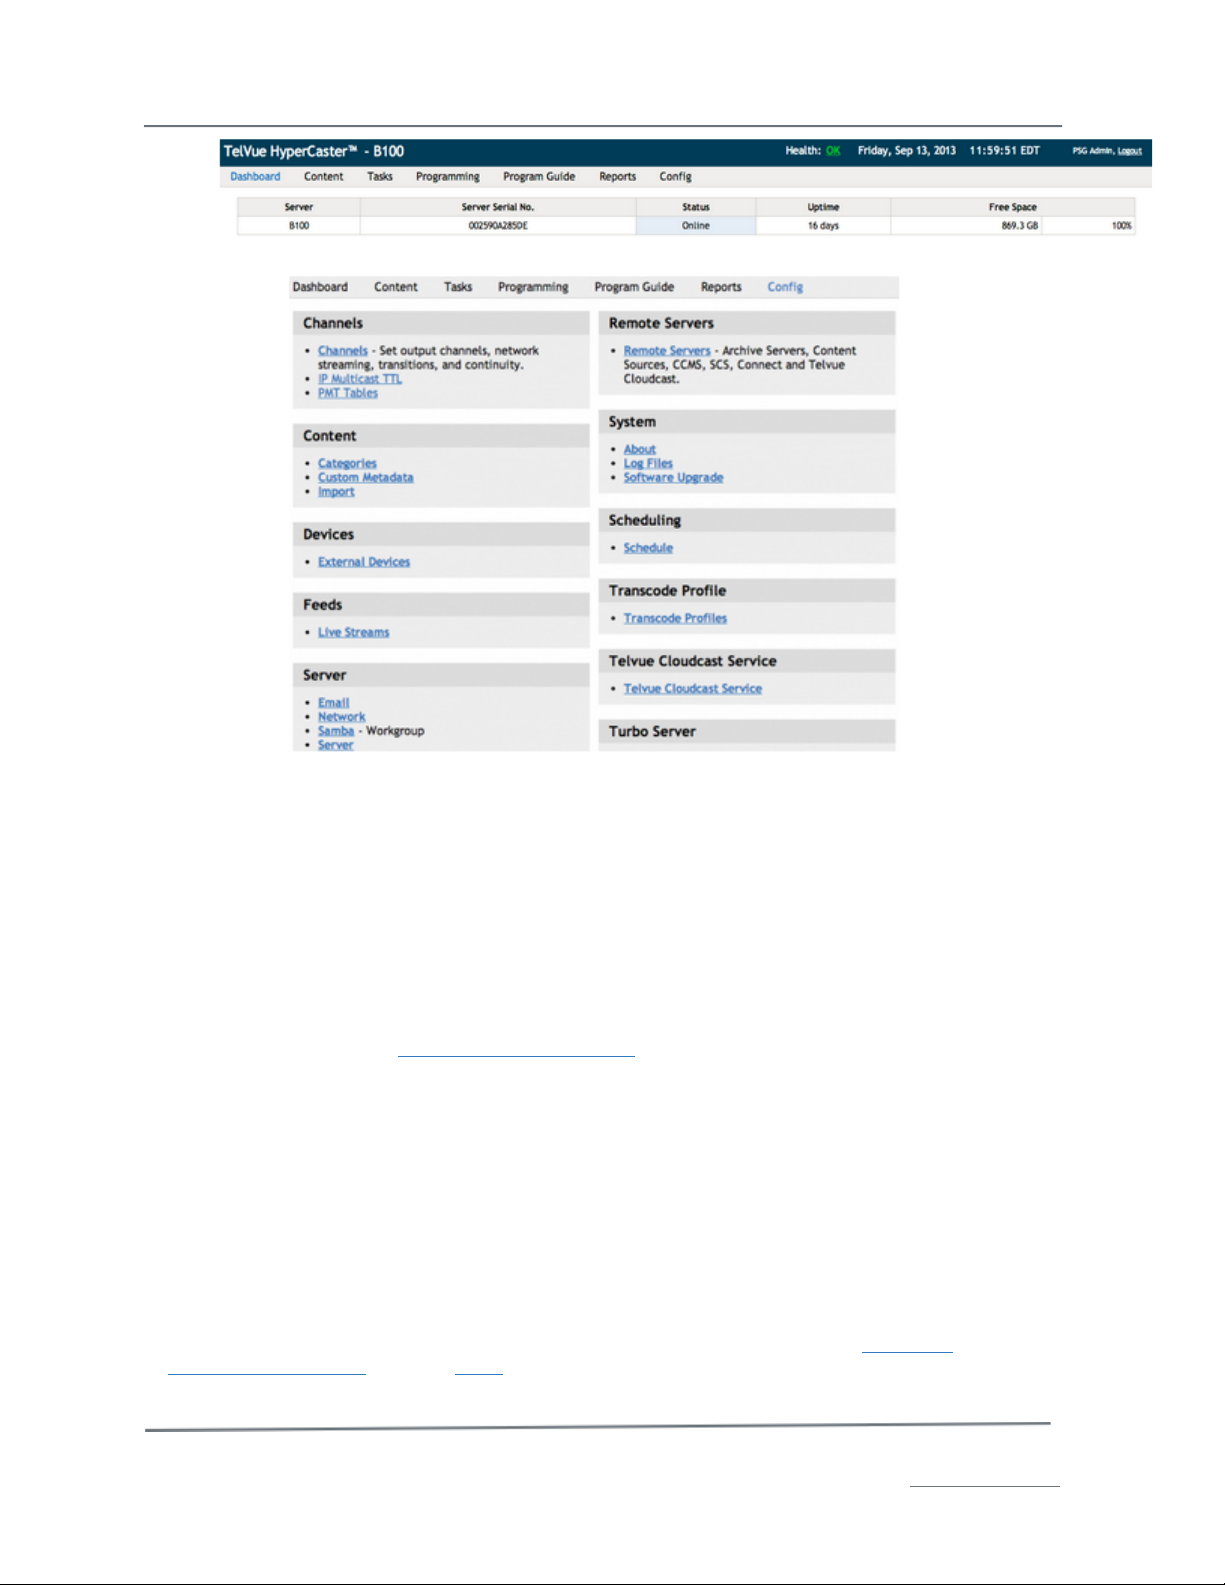
The Dashboard
The Dashboard shows what is happening on the HyperCaster, including what is currently playing. It
provides information about the HyperCaster’s status, file system, channel, and feed and switch status.
Many elements on the Dashboard have links to other pages that let you see more information or take
actions regarding that element. The current state is refreshed each time the Dashboard page is
refreshed in the browser.
HyperCasters with the IP Capture feature will see an additional “Feed” field on the right side of the
Dashboard, which shows at a glance what feeds are currently being captured, or scheduled for
capture.
Page 15
TelVue HyperCaster® User Manual / v5.0 / October 2014
© 2014 TelVue Corporation 16000 Horizon Way, Suite 500, Mt. Laurel, NJ 08054
HyperCaster® is a registered trademark of TelVue Corporation 800-885-8886 / www.telvue.com
14
Server Health
On the top bar of every UI screen is the Health Indicator. The server’s health can be:
• OK– All components are running normally, as shown in the illustration.
• Warning– A component is running but there is a problem such as a disk nearing capacity or
the lack of a spare disk drive that should be investigated and resolved. If any component has
a warning status, the Health Indicator will display Warning.
• Critical – One or more components is not running correctly. If any component is critical, the
Health Indicator will display Critical.
Click on the health indicator for more details. The Health Status screen is displayed.
• Hide – Admin-level users can click the Hide button to remove this component from the health
check. For example, if an almost-full media disk is normal at certain times for your
installation, you might hide it so the media-disk warning does not mask other health issues. If
you want to include a component again, select it from the drop-down list at the top of the
column and click the Show Health Item button. If you do not have admin privileges, the Hide
column is not displayed.
• Health Criteria – the name of the component.
• Status – how the component is doing. As with the overall health, it can be OK if it is running
normally, Warning if the component needs attention, or Critical if there is a problem that could
adversely impact server performance.
• Message – details on the component.
• More Information – link to the Config section where Admin-level users can view details and
sometimes change settings for this component, if applicable.
Page 16
TelVue HyperCaster® User Manual / v5.0 / October 2014
© 2014 TelVue Corporation 16000 Horizon Way, Suite 500, Mt. Laurel, NJ 08054
HyperCaster® is a registered trademark of TelVue Corporation 800-885-8886 / www.telvue.com
15
• Last Check – time the component was most recently checked, in HH:MM:SS format.
• Next Check – time the component will be checked again, in HH:MM:SS format.
• Refresh – Click the Refresh button to update the component health now. Components that
use considerable resources cannot be refreshed.
Field Descriptions
Field Descriptions – Server Section
• Server – shows the name and/or model number of the server.
• Server Serial No. – displays this server’s serial number.
• Status– shows the state of the real-time media server. Possible states include:
o Online – the media server is running normally.
o Resetting – the media server was manually or automatically reset and is still
coming online.
o Offline – the media server is not currently running.
• Uptime– how long the media server has been running.
• Free Space – how much of the media partition’s total capacity is currently available for more
files. Also expressed as the available percentage of the partition’s total capacity.
Field Descriptions – Channel Section
• Channel – information about each playout channel. If this installation supports more than one
channel, each channel is listed in its own section. Channel information includes:
• Channel Name – quick link to the Edit Channel page, which is described in the Config
section.
• Next Programming Gap – the amount of time remaining until the next
unprogrammed slot in the schedule, up to 24 hours from now. If the server is
currently in a programming gap, the application displays this. If you have enabled
continuity, it plays during programming gaps.
• Schedule – quick link to the Programming page for the channel, which is described at
the beginning.
• External Schedule – quick link to the searchable, per-day schedule for this
channel. The external schedule can be linked or frame-viewed on your webpage.
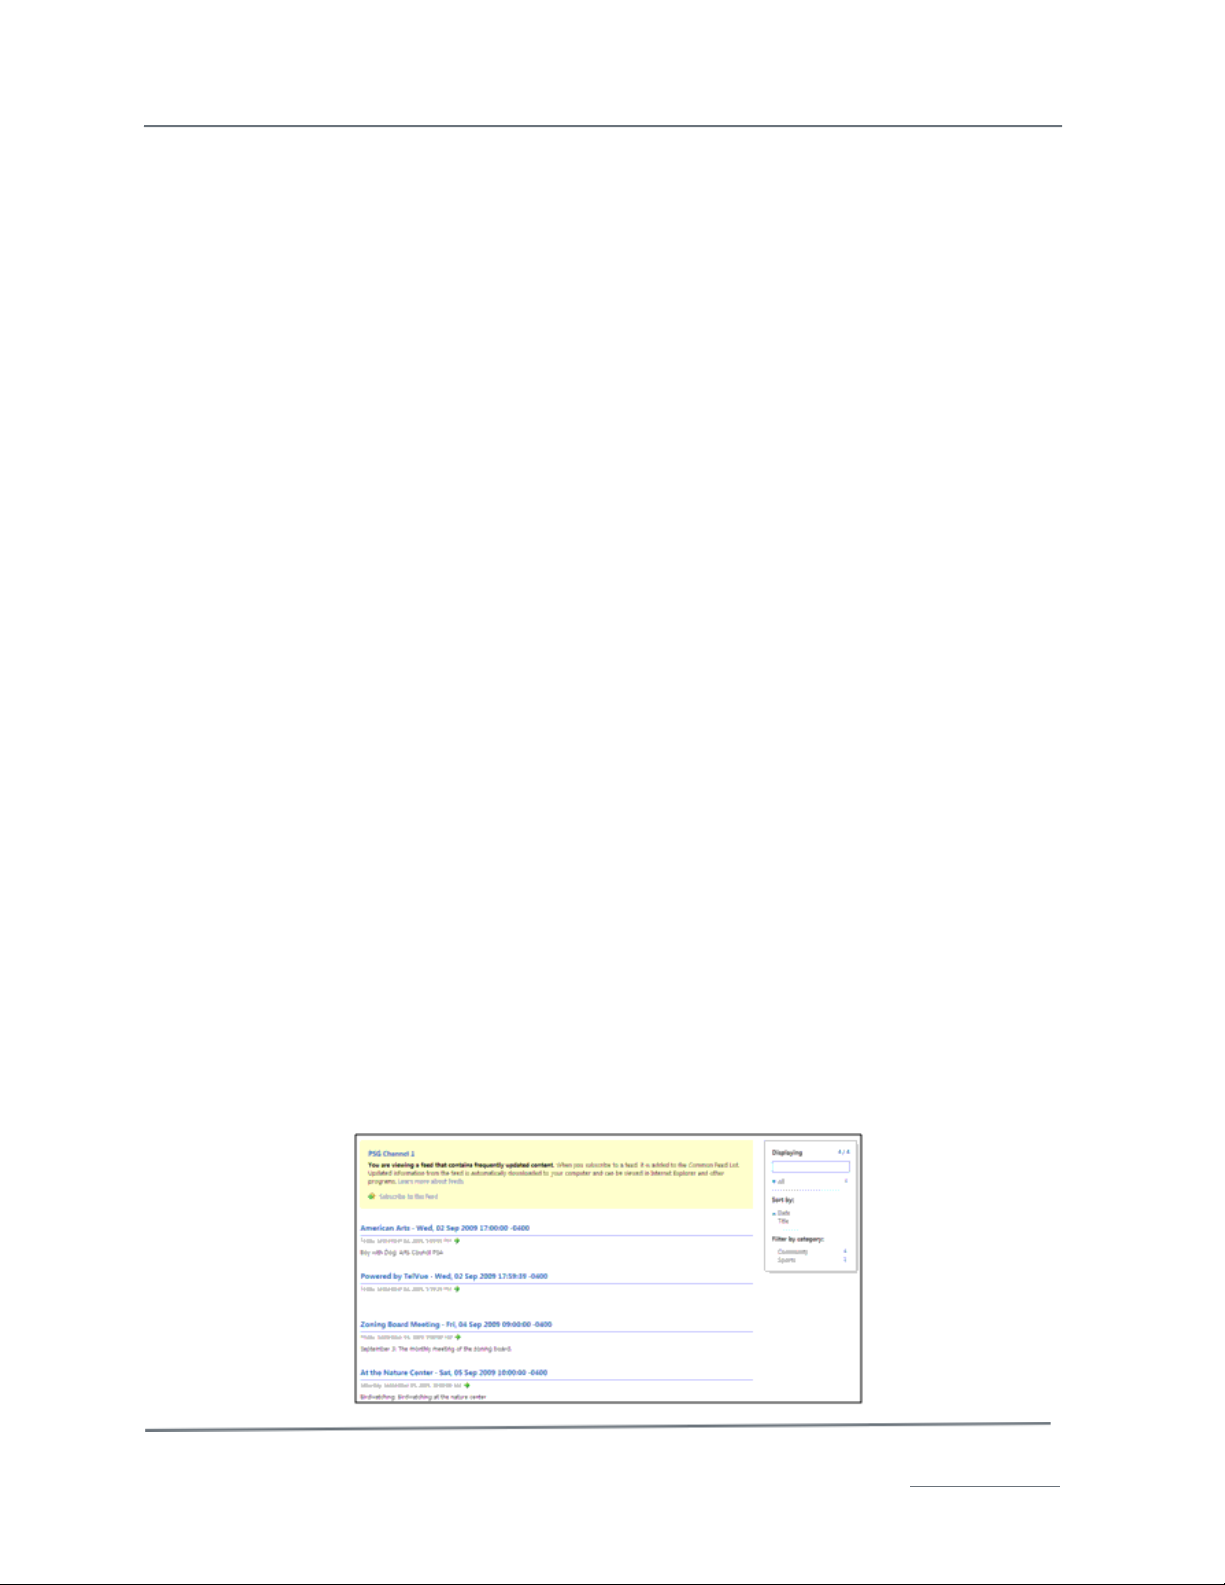
• RSS Schedule – quick link to the programming schedule for this channel for the
coming week in an RSS-like format. The listing depends on your browser, but typically
includes the program name and description from the content metadata. For example,
this browser displays:
• Program names or filenames.
• Date and time the content is scheduled for broadcast.
• A brief description of the content, if one is available in the content metadata.
Page 17
TelVue HyperCaster® User Manual / v5.0 / October 2014
© 2014 TelVue Corporation 16000 Horizon Way, Suite 500, Mt. Laurel, NJ 08054
HyperCaster® is a registered trademark of TelVue Corporation 800-885-8886 / www.telvue.com
16
In some browsers you can sort and filter the programming by:
• Date – the date the content is scheduled for broadcast. If you click on Date again, the order
is reversed.
• Title – sorts the list alphabetically. If you click on Title again, the order is reversed. This is
one way to see if a certain title has been scheduled.
• Filter by Category – displays only the titles in a particular category. For example, if you are
supposed to air five community events today, click on the Community category to see if at
least five are displayed.
• All – To see everything on the schedule again, click on All at the top of the box.
Click your browser’s Back button to return to the Dashboard. Your organization can optionally use the
RSS feed as an API to customize the integration programming information on your website or in other
applications.
• Now Playing – the name and thumbnail of the program currently being played on the server.
The time the program was scheduled to start and end are displayed below the thumbnail. Both
the start time and runtime are shown in hours, minutes, and seconds (HH:MM:SS).
• Stop – to stop playing the current program immediately, click the Stop button. A
confirmation dialog will pop up. If the current program is a zero-duration switch
event, there will be no Stop button.
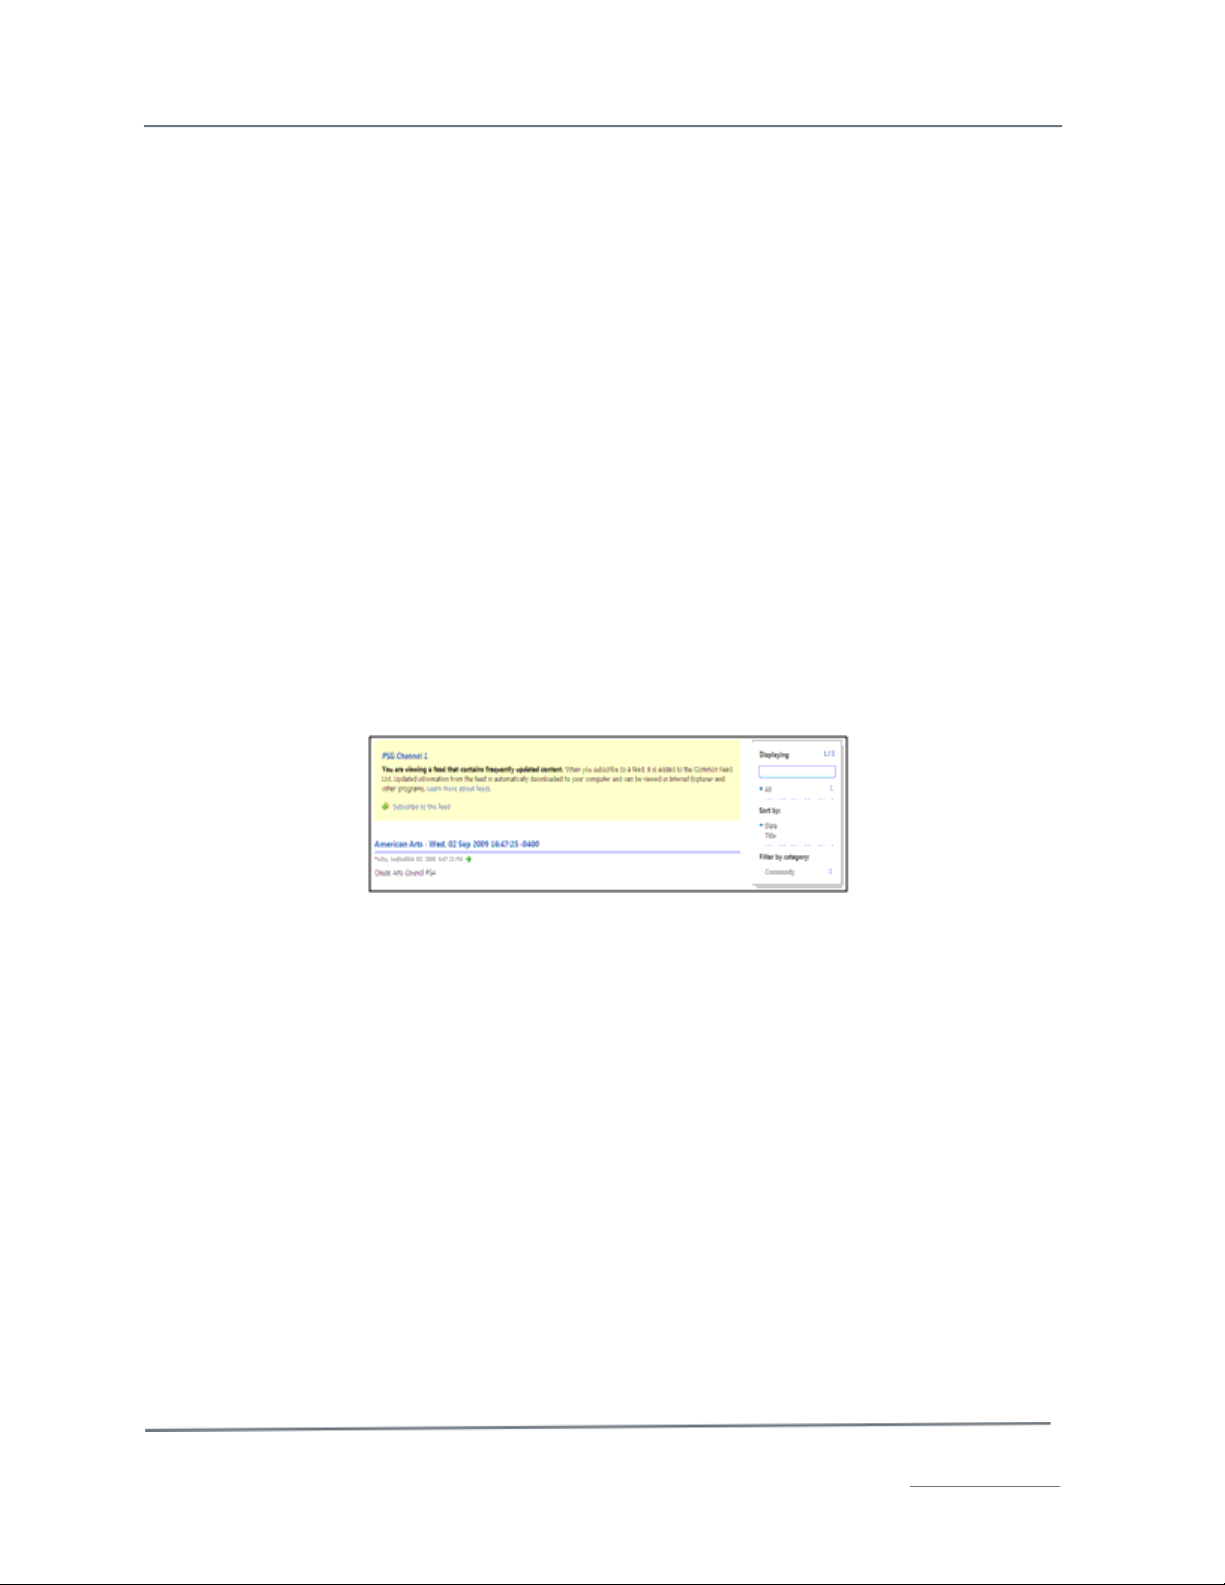
• RSS Now – quick link to a basic RSS 2.0-like feed that describes what is currently
playing on the channel. The listing depends on your browser, but typically includes
the program name, date and time of broadcast, and a description from the content
metadata as in this example.
Click your browser’s Back button to return to the Dashboard.
• Next Up – the name, thumbnail, start time, and end time of the next program scheduled to
run in the next 24 hours.
• RSS Next – quick link to a basic RSS 2.0-like feed that describes what is next playing
on the channel. The listing depends on your browser, but typically includes the
program name, date and time of scheduled broadcast, and a description from the
content metadata as in this example.
Click your browser’s Back button to return to the Dashboard.
Field Descriptions – Feed Section
• Feed – information about incoming feeds. If this installation supports more than one feed,
each feed is listed in its own section. Feed information includes the name of the IP stream as
used on your system.
• Now Capturing – the name and thumbnail of the content currently being captured. The time
the capture was scheduled to start and its runtime are displayed below the thumbnail. Both
the start time and runtime are shown in hours, minutes, and seconds (HH:MM:SS).
• Stop – to stop the current capture immediately, click the Stop button. A confirmation dialog
will pop up.
Page 18
TelVue HyperCaster® User Manual / v5.0 / October 2014
© 2014 TelVue Corporation 16000 Horizon Way, Suite 500, Mt. Laurel, NJ 08054
HyperCaster® is a registered trademark of TelVue Corporation 800-885-8886 / www.telvue.com
17
• Next Up – the name, thumbnail, start time, and runtime of the next program scheduled to
run in the next 24 hours.
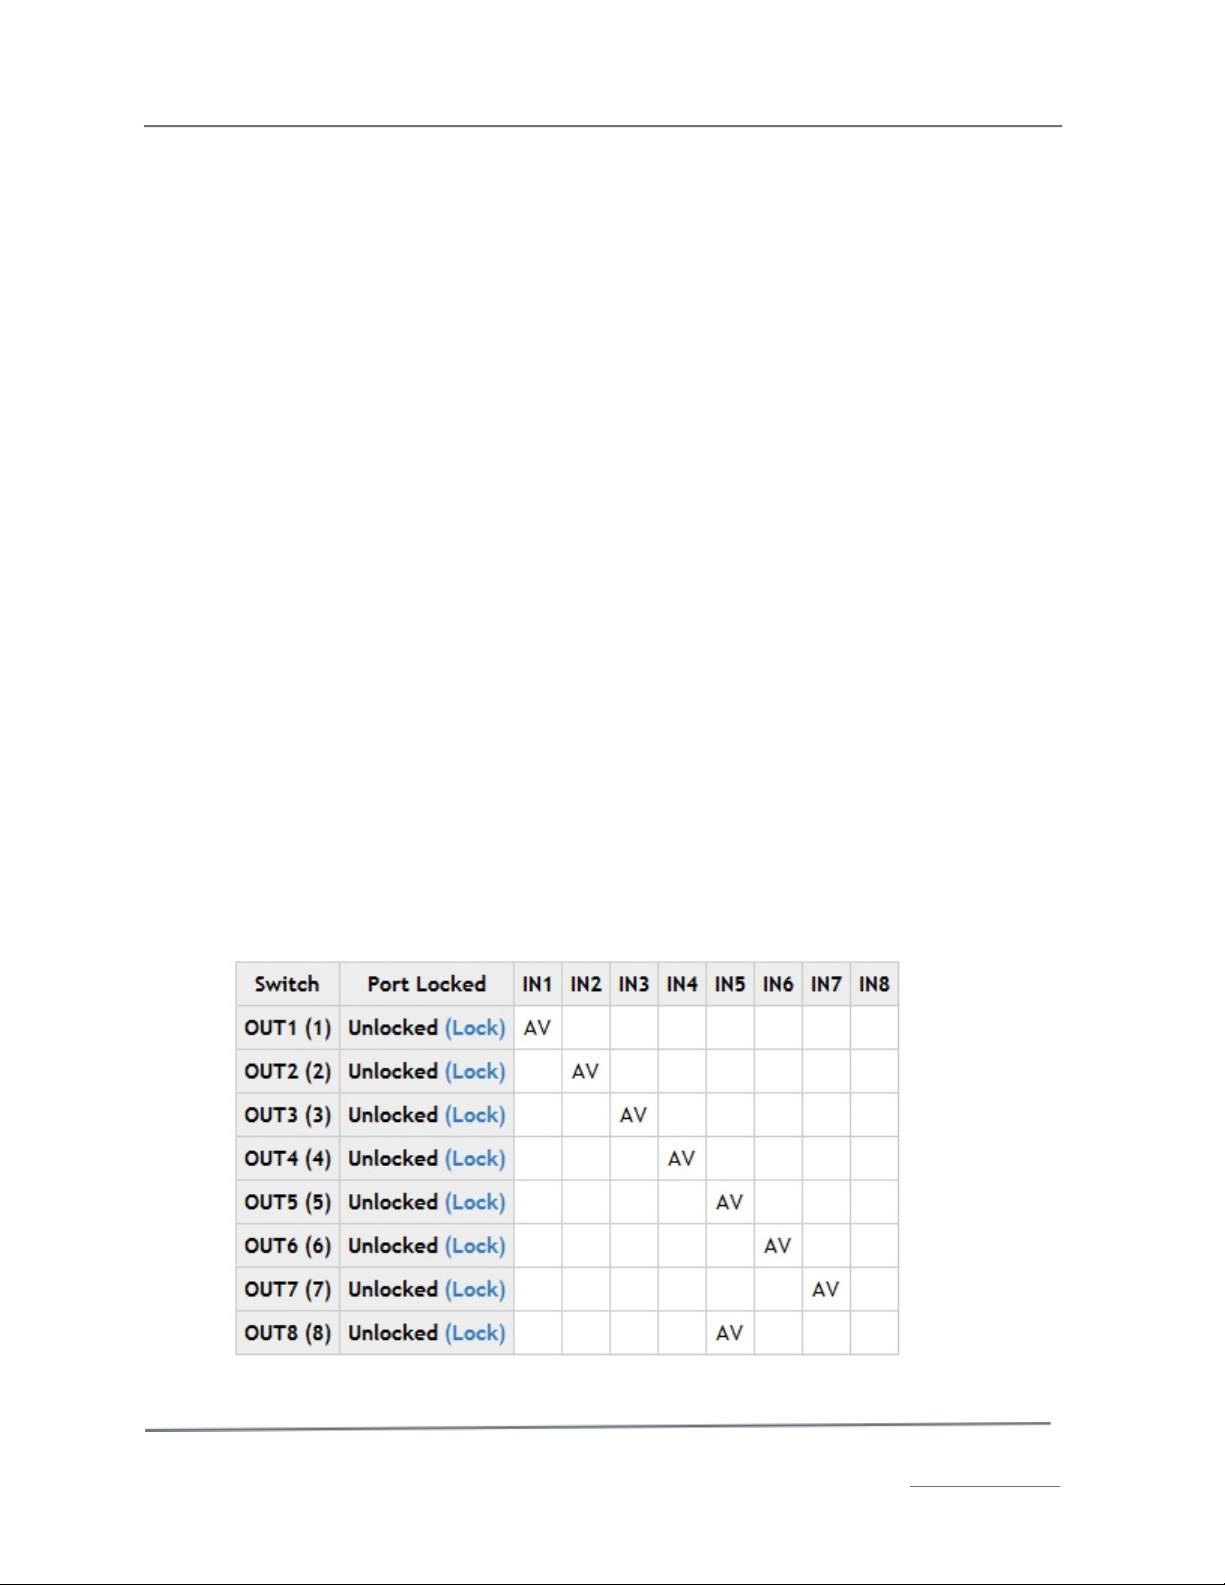
Field Descriptions – Switch Section
Switch information is displayed only in systems configured with the TelVue video switch control
module. A switch connected to a TelVue server controls the path of data from a feed, through the
server, to an output.
The table of switch audio/video inputs and outputs is displayed at the bottom of the Dashboard. If the
switch has more than 8 inputs and outputs, a table shows the input route for each output.
• Switch –The switch output ports are listed down the left side. Their default names are OUT1,
OUT2, etc. You can rename them via Switch Configuration.
• Port Locked – The Port Locked column shows whether a switch port is locked or unlocked. If
you lock a switch port it will hold that switch route until you unlock it manually. Although the
switch ignores switch events while it is locked, it keeps track of any scheduled switch events.
When you unlock the switch, it restores the switch route it would be using if you had not
locked the switch.
Input Columns – The switch input columns are headed with IN1, IN2, etc. You can rename
them via Switch Configuration.
If breakaway is enabled, the letter A is shown in the audio input columns and the letter V is shown in
the (video) input columns. If breakaway is disabled, there is one column per input with the letters AV
showing the input-output route.
• Switch Operation - The switch input/output configuration you set in Switch Configuration is
known as the home path. The input for each switch output is called the home port. During
everyday operation, programming comes from an input feed, passes through the switch, and
goes to an output channel. If you have switched off the home port and want to keep that path,
go to the Switch section of the Dashboard and click on Lock for the output port you want to
lock.
• Switch Continuity - Some installations use the switch for continuity programming. For
example when nothing is scheduled for a channel they might switch to IN8, which is that
user’s bulletin board feed. This changes the pattern on the display of switch inputs and
outputs.
Page 19

TelVue HyperCaster® User Manual / v5.0 / October 2014
© 2014 TelVue Corporation 16000 Horizon Way, Suite 500, Mt. Laurel, NJ 08054
HyperCaster® is a registered trademark of TelVue Corporation 800-885-8886 / www.telvue.com
18
Content Management
The Content page shows available content and manages content on the HyperCaster. Use this page to
see what content is currently available, to search for specific content, to import new content files, to
create continuity playlists of JPG and video files, to create placeholders for content you don’t have yet,
and to perform bulk actions on selected content such as normalizing, deleting or categorizing. Two
views are available; the default thumbnail view and the table view.
The top of the page shows how many titles appear on this page. To see more titles, use the dropdown list to select a larger display size. You may display up to 100 titles per page. The other dropdown box lets you switch between Thumbnail View and Table View. The Select All checkbox on the
right (Select All on Page if the content does not fit on one page) lets you check all titles displayed on
the page for bulk action. The Deselect All option (Deselect All on All Pages if the content does not fit
on one page) lets you uncheck all titles on all pages. You can use the Select All checkbox and check
or uncheck individual boxes across multiple pages.
Note: To select all content on the system, first choose Show 100 per page from the drop-
down box. Clear all advanced searches so all titles are displayed. Click the Select
All checkbox. Advance to the next page and click the Select All checkbox again. Repeat for
each page.
The HyperCaster comes preloaded with sample MPEG-2 clips. To make other files available for playout
scheduling, use the Import Content function to import them.
Import Content
Content that is on the server but has not yet been added to the database is considered readable,
writable, and deletable, i.e. the content file can be edited and resaved (written) using other software
on your network and can be deleted via standard file management tools. Once the content file has
been added to the Digital Broadcaster database, it is labeled as read-only. It cannot be edited or
resaved (written), and can be deleted only via the Web Application content management tools. This
fail-safe prevents accidental deletion of a file that is scheduled for playout.
Note: Any files in the hidden folder cannot be imported.
Page 20
TelVue HyperCaster® User Manual / v5.0 / October 2014
© 2014 TelVue Corporation 16000 Horizon Way, Suite 500, Mt. Laurel, NJ 08054
HyperCaster® is a registered trademark of TelVue Corporation 800-885-8886 / www.telvue.com
19
Import One File
To import one content file at a time, choose the file from the drop-down list and click the
Import button. The Import Log is displayed, stating whether or not the import was successful. The
application also displays the thumbnail or full row for the imported file.
To import more files, select another filename from the drop-down list and click Import again.
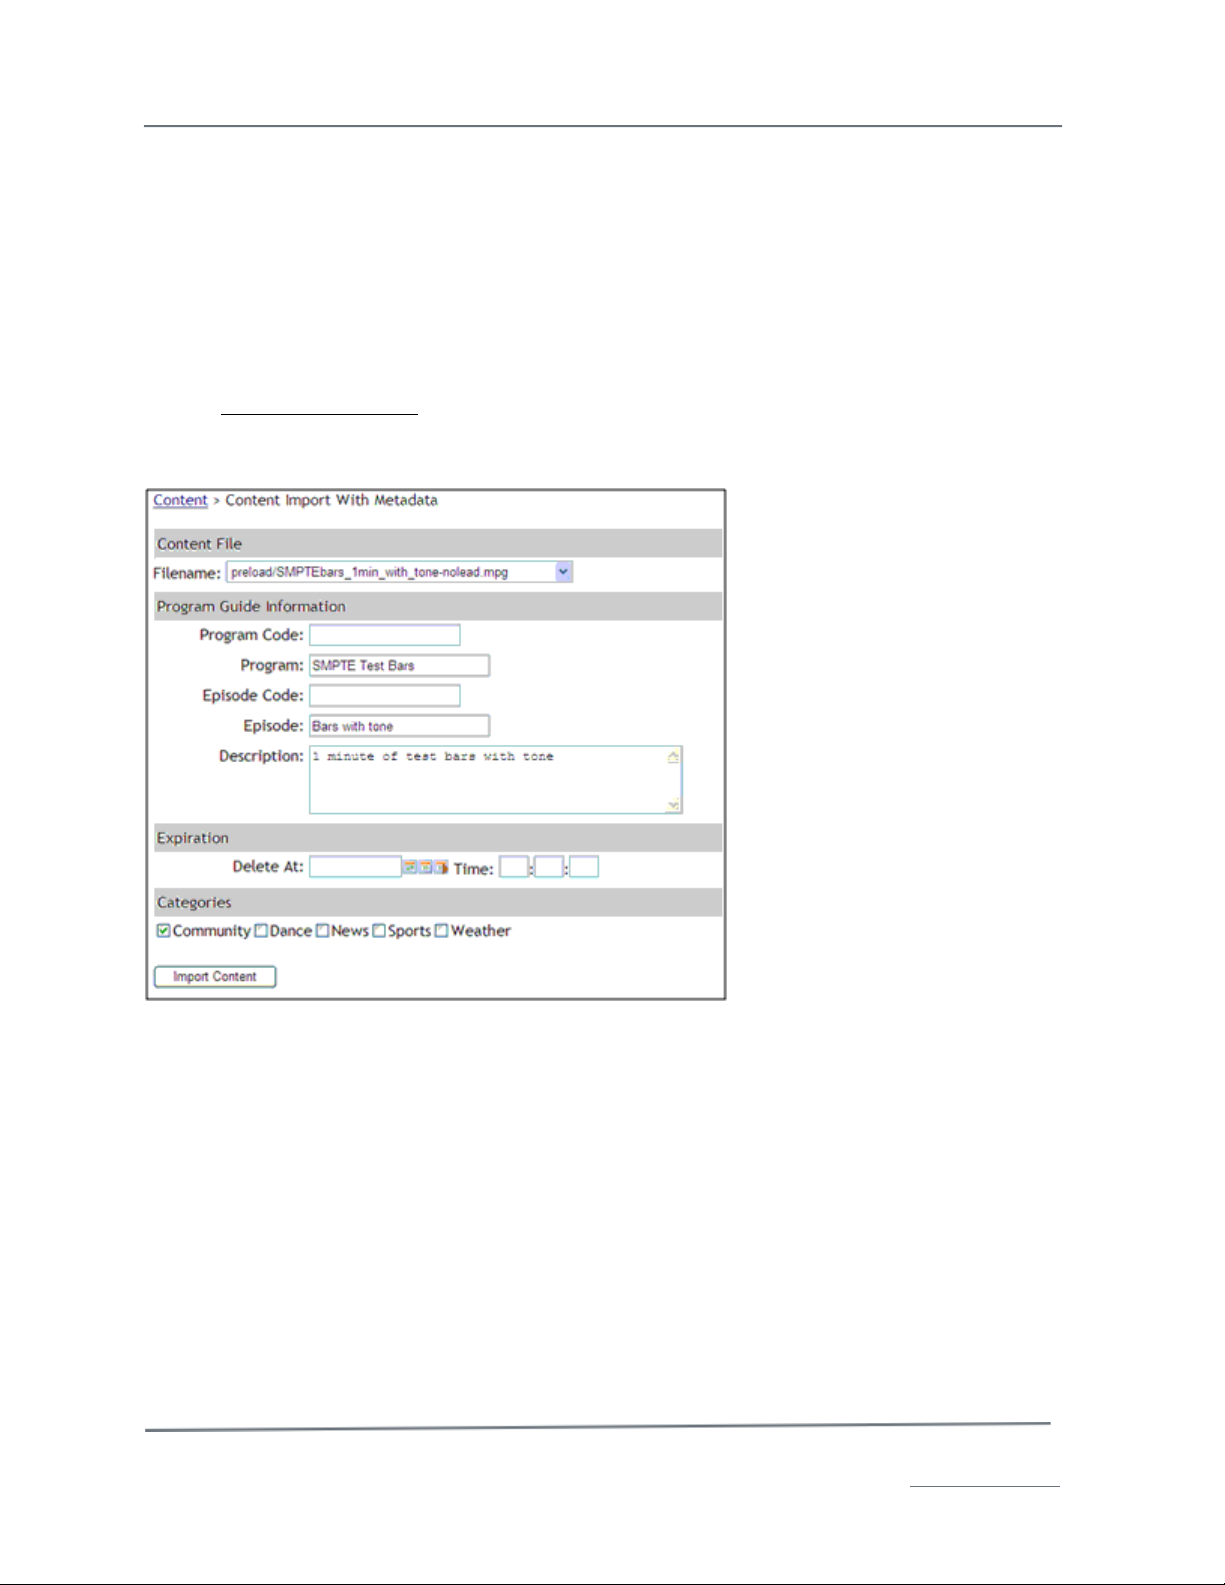
Import with Metadata
To import a content file and input its metadata at the same time:
1. Click on Import with Metadata on the left side of the Content page.
2. Select a filename from the drop-down list.
3. Fill in the metadata.
Program Guide Information
• Program Code – a code that distinguishes what type of program this is, if program codes are
used in this installation.
• Program –the name of the program as it would be displayed in the Program Guide.
• Episode Code – a code that distinguishes what episode of a series this is, if episode codes are
used in this installation.
• Episode – If the file is part of a series and each episode has a name, it is displayed here as it
would be in the Program Guide.
• Description – Type a detailed description of the content.
Expiration
If you want to remove the content from the application at a specific date and time, enter them in the
boxes. Otherwise the content will remain on the server until you schedule a deletion. For example,
when importing winter-themed content you might schedule its deletion for the first day of spring.
Page 21
TelVue HyperCaster® User Manual / v5.0 / October 2014
© 2014 TelVue Corporation 16000 Horizon Way, Suite 500, Mt. Laurel, NJ 08054
HyperCaster® is a registered trademark of TelVue Corporation 800-885-8886 / www.telvue.com
20
Categories
Select one or more event categories from the list.
Custom Attributes
If you created any custom attributes for your content metadata, fill them in.
Click on Import Content at the bottom of the window. The application displays the Import Log and
tells whether the content imported successfully.
To import more content with metadata, click on Back. To return to the Content screen, click on
Content at the top of the Content Import With Metadata screen or click on the Content tab.
To edit file information or schedule the file, click the [Edit] or [Play] links.
To locate recently imported content that might need updates to its metadata, use the Advanced
Search feature and filter for recently added content.
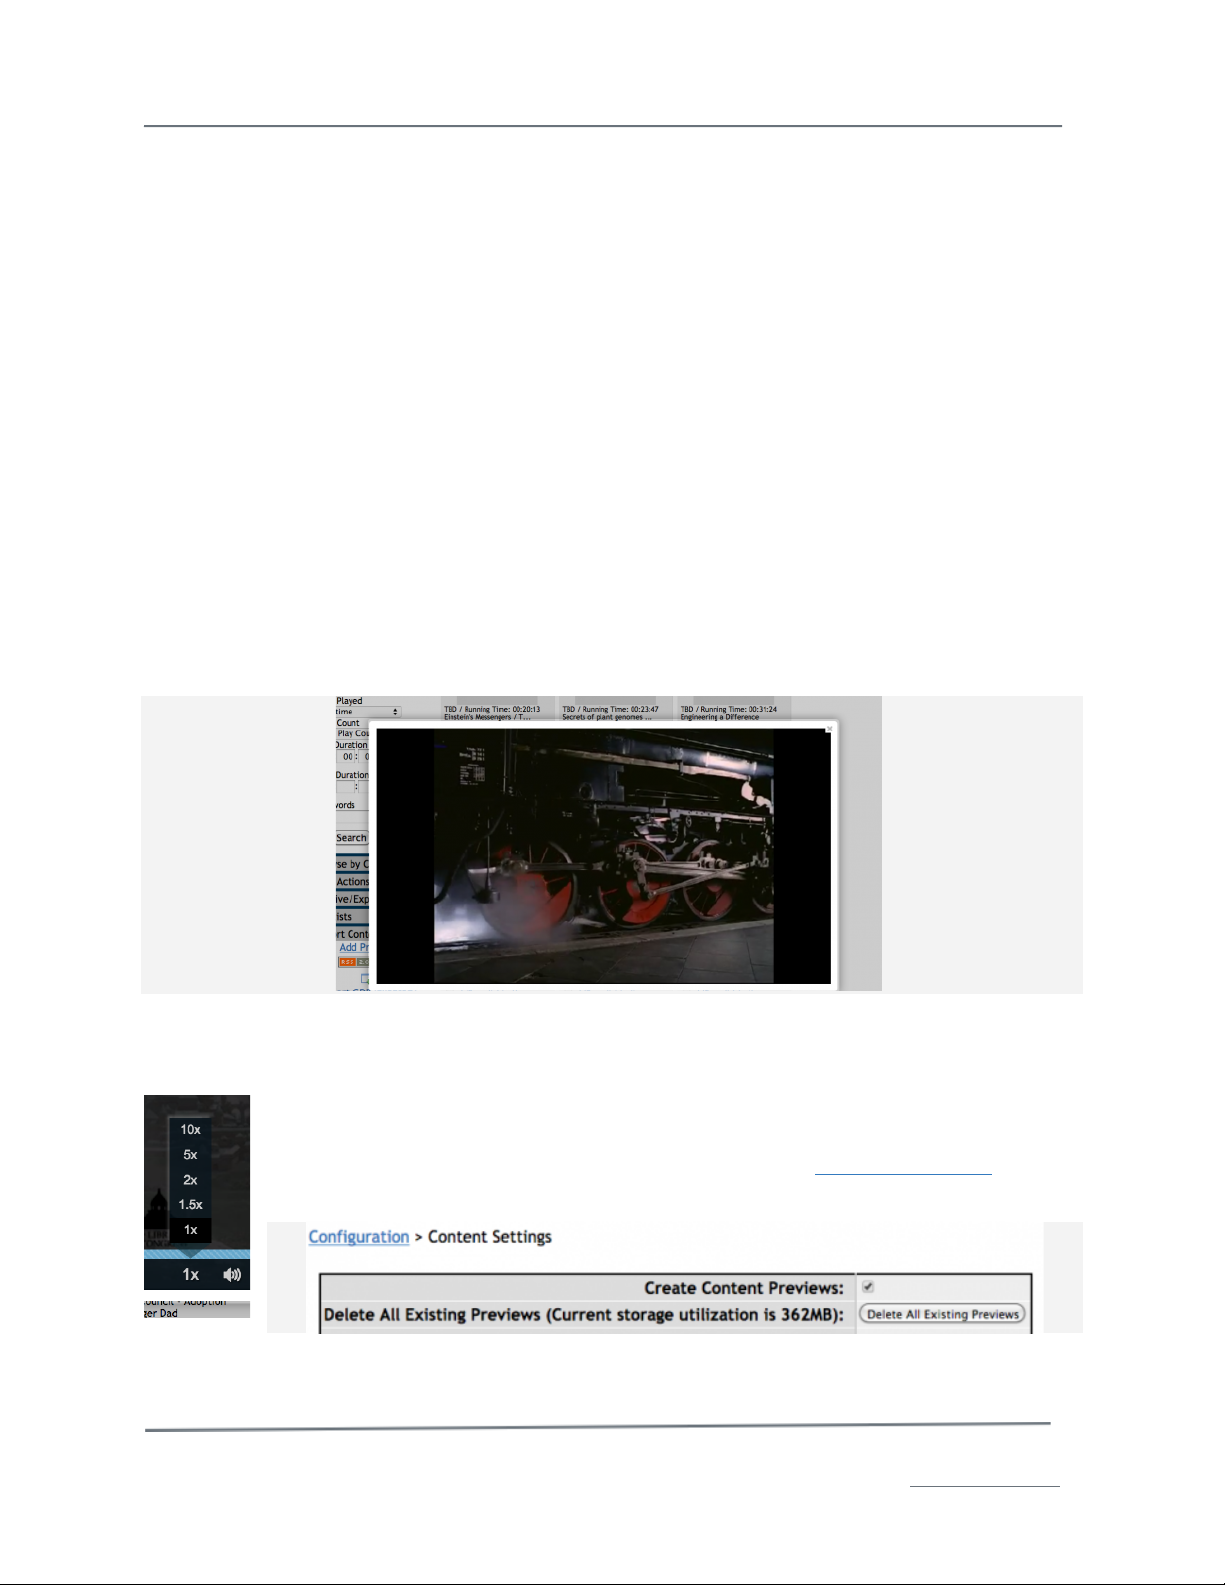
Previews
Preview video content directly in the HyperCaster UI.
You can launch the preview player from any thumbnail for content that has a preview, whether in the
Content tab, the Content page itself, or the Calendar Programming View. If a preview exists, the
thumbnail will show a Play icon in the upper left corner.
Clicking on the thumbnail will pop up a preview player in a lightbox right in the interface, which you
can choose to view full-screen.
In the player’s control bar you can also control the speed of the preview, up to 10x
faster than real time.
Manage your preview options from the Config → Content → Show Content Page, which
gives you the option to enable or disable the automatic creation of previews on import.
When enabled, all imported content will be queued for preview creation as a background task. You can
see the progress of preview creation including percent complete on the Task tab. You can also see
Page 22
TelVue HyperCaster® User Manual / v5.0 / October 2014
© 2014 TelVue Corporation 16000 Horizon Way, Suite 500, Mt. Laurel, NJ 08054
HyperCaster® is a registered trademark of TelVue Corporation 800-885-8886 / www.telvue.com
21
how much disk space your previews are taking, and if that is a concern, you can Delete All Existing
Previews. If you leave the Create Content Previews enabled after deleting existing preview, future
imported content will create previews.
Individual preview files can be created or deleted by an administrator from
the of any video in the system.
This is useful to free up disk space used by preview files manually on a
case by case basis, or if you do not have preview generation automatically
enabled, but would rather create previews on a case by case basis for
specific review. Preview generation does require system CPU cycles, but it
performed as a lower priority than other broadcast critical tasks.
It is important to note that when you archive content from the
HyperCaster, its preview file remains in the broadcast server (if it already
existed). This means you can still preview a video, even after it has been
archived. However, if you archived files BEFORE enabling content
previews, previews are only created at the time of local import, and so
would NOT be available. You could restore a file from archive to generate a
preview if needed, if one was not already created prior to archiving.
For the optimal preview experience including the ability to preview at faster speeds, a web browser
with HTML5 video support and H.264 video support is required. Otherwise, if you have the Flash plugin
installed, Flash will be used for the preview, but the fast preview modes will not be available.
Show Content Page
When you click on a filename or thumbnail on the Content page, the Show Content page is displayed.
This page shows the content’s properties, and upcoming and recent playout history.
Page 23

TelVue HyperCaster® User Manual / v5.0 / October 2014
© 2014 TelVue Corporation 16000 Horizon Way, Suite 500, Mt. Laurel, NJ 08054
HyperCaster® is a registered trademark of TelVue Corporation 800-885-8886 / www.telvue.com
22
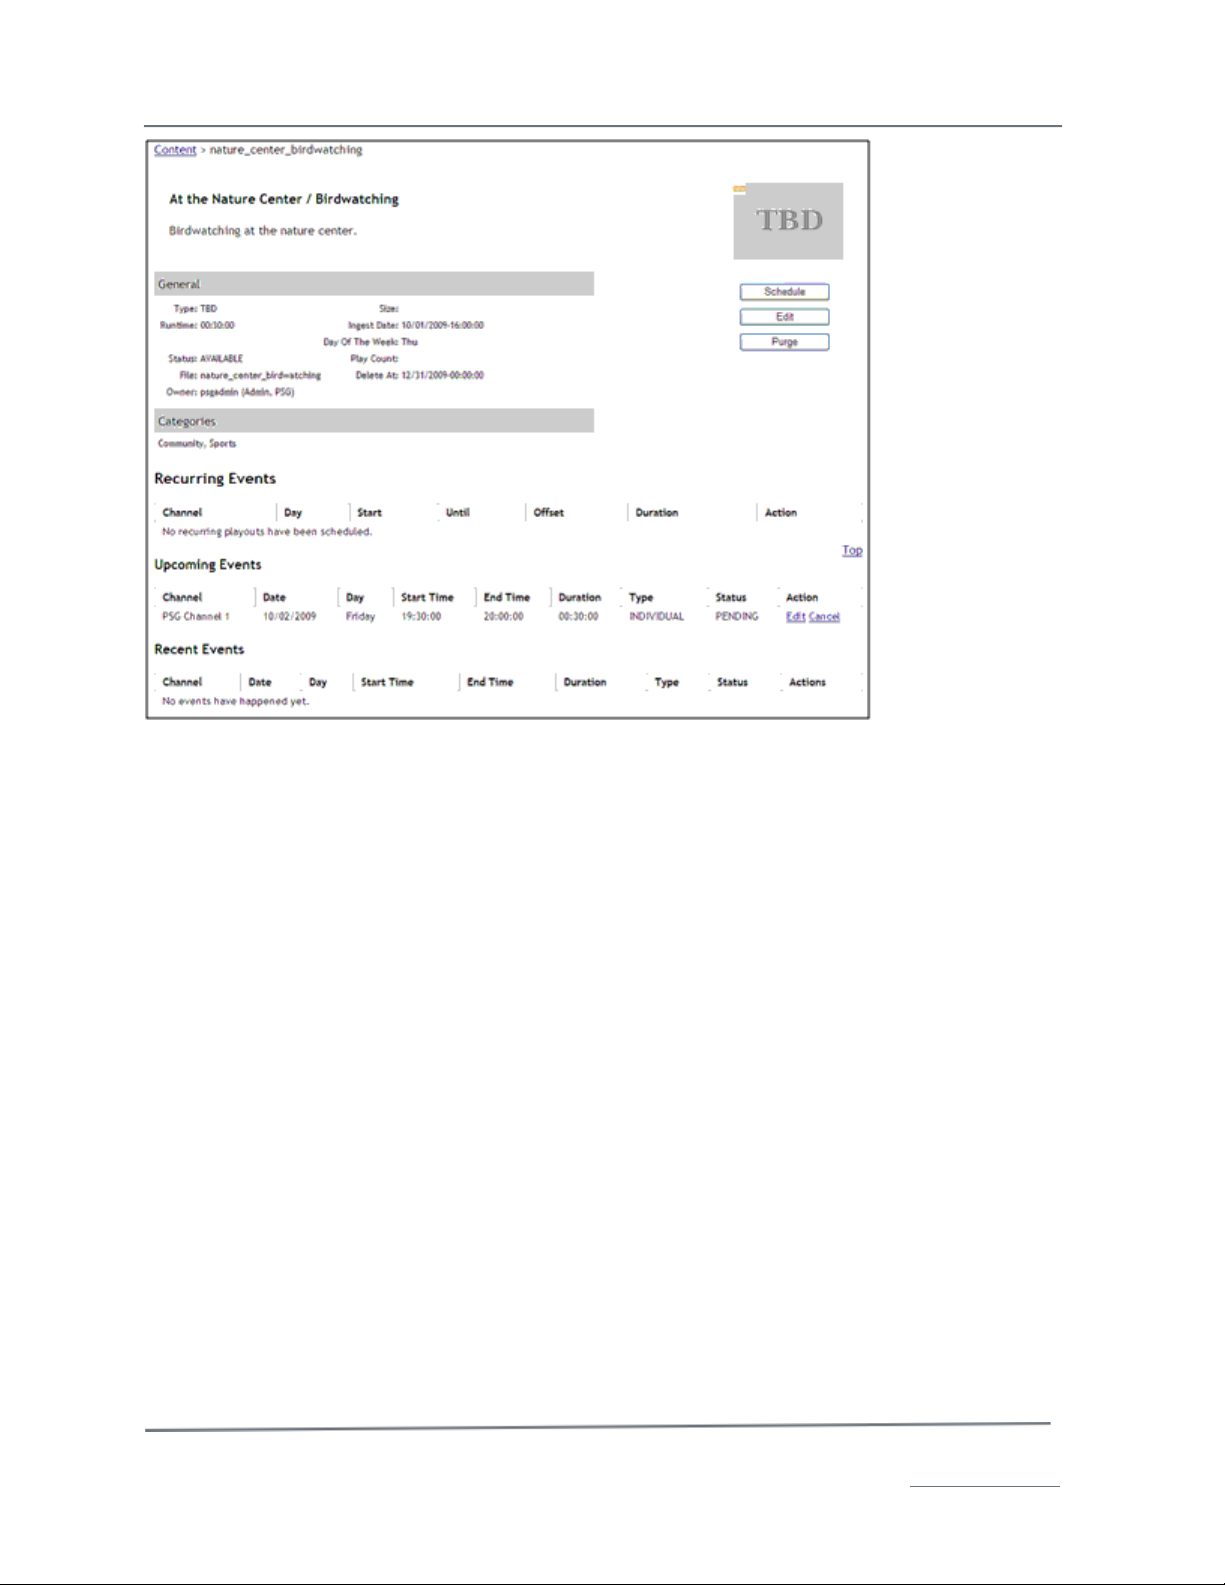
The fields displayed for the file are described briefly below.
• General – information about the file similar to what is displayed on the Content page, such as
filename, type, runtime, status, owner, size, creation date, play count, and delete date. To
change this information, click the Edit button at the right.
• Categories – any programming categories in which this file appears, as selected by the
operator. To put this file in a category, click the Edit button at the right. To set up categories,
use the Content Management section of the Config page.
• File Properties – the encoded video and audio properties of the file, including format, bitrate,
and type. The file properties cannot be edited.
• Recurring Events – recurring times at which the file is scheduled for playout, such as every
Thursday at 9:00 AM. To schedule recurring events, click the Schedule button at the right.
• Upcoming Events – the next few times the file is scheduled for playout, including both
recurring and single playouts. To schedule more events, click the Schedule button at the
right.
• Recent Events – the last five times the file was scheduled for content. To see more history,
click on View More Past Events at the bottom of the page. The Recent Events section includes
status information for the content, such as whether it was completed, started late, or ended
early.
The video can be previewed from the thumbnail at the top right of the page. When a preview file is
created, a “play” arrow shows up in the top left of the thumbnail.
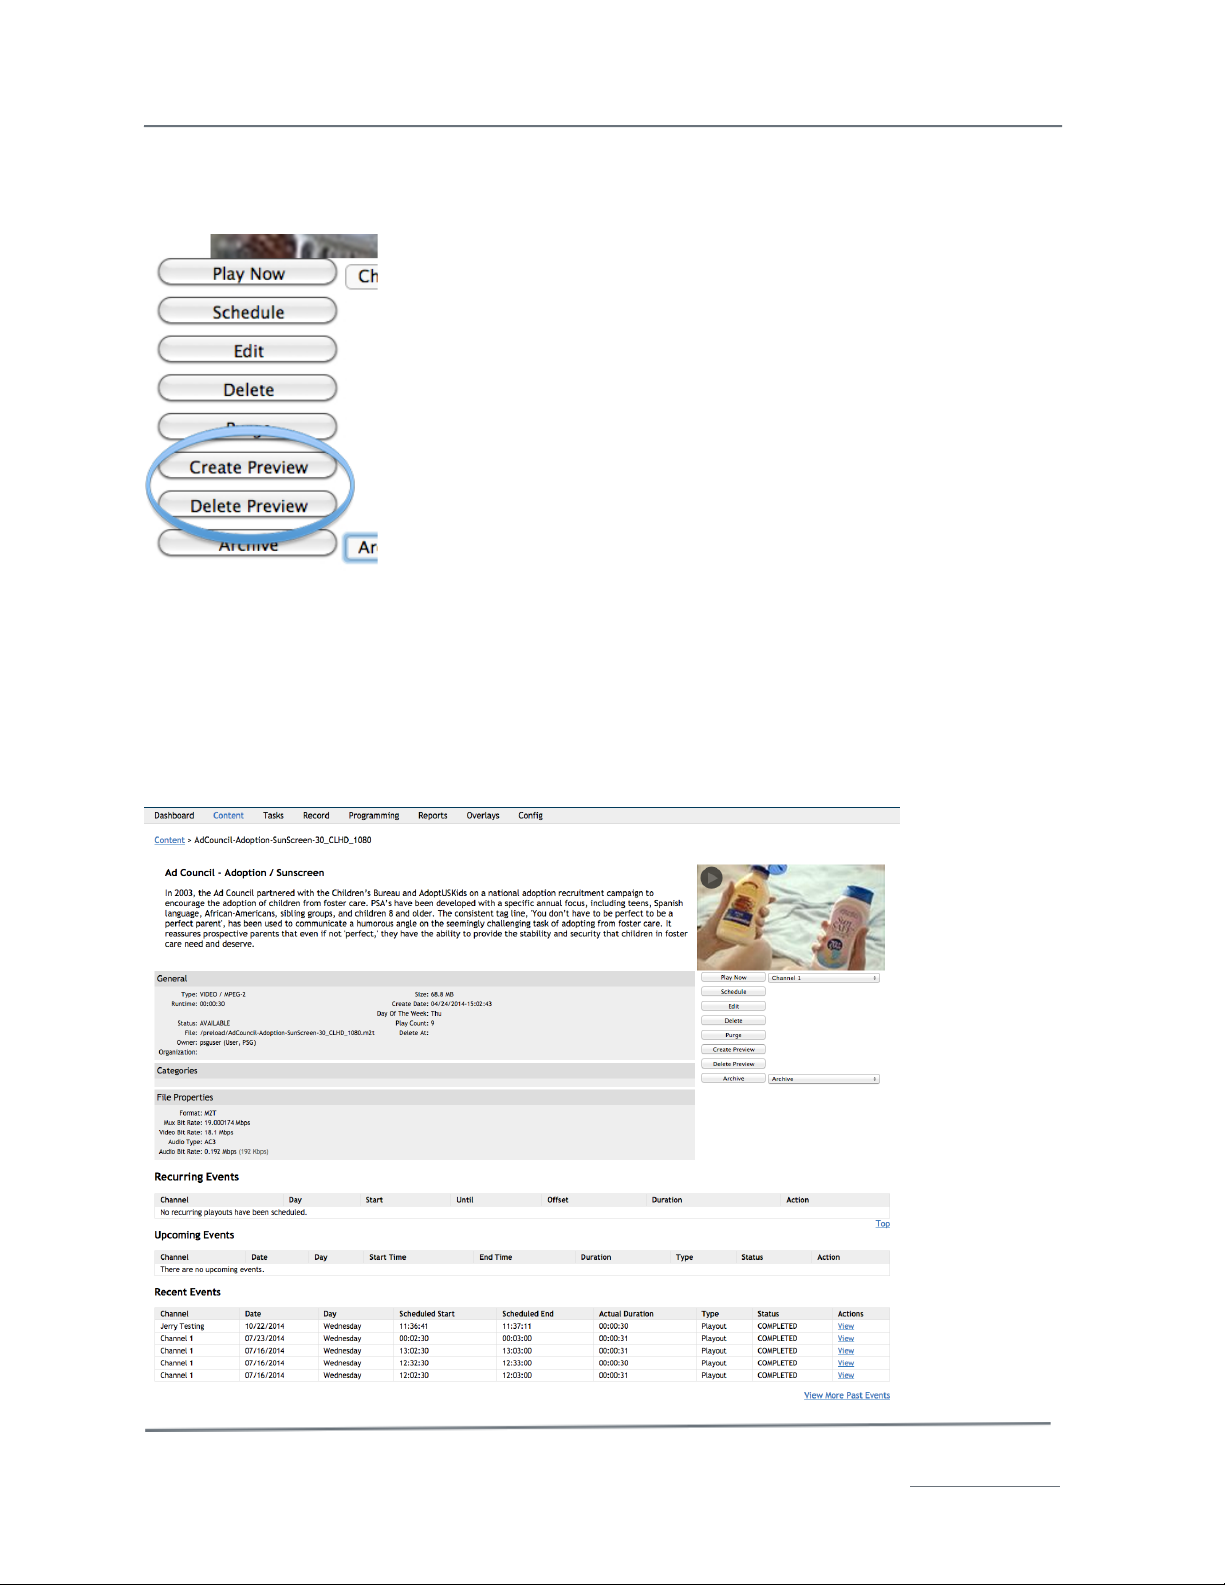
File actions for this content file are shown in the upper right of the page, below the thumbnail frame.
Not all actions are available for all content.
• Play Now – to begin playing the file immediately, select a channel from the drop-down list
and click on Play Now. If nothing is playing on the HyperCaster, this is one way to play a file
immediately. To play this content on another channel on your system, choose it from the
drop-down list.
• Schedule – takes you to the Schedule Playout page to schedule one or more times to play the
file. The Schedule Playout page is described in Content File Actions.
• Edit – to change the file information for the content, click the Edit button. This takes you to
the Edit Content page as described in Content File Actions.
Note: Use caution when deleting content, since this permanently removes the file from the file
system.
• Delete – to delete the content from the HyperCaster’s file system, click the Delete button.
This action is described more fully in Content File Actions.
• Purge – to remove the content from the Web Application’s list, but preserve it on the
HyperCaster’s file system, click the Purge button. This action is described more fully in Content
File Actions.
• Create Preview – if this content does not already have a preview, create one here.
• Delete Preview – to delete the preview video of this piece of content only.
• Archive – transfer this video to your integrated archive destination. The preview will remain
in the HyperCaster.
To return to the Content page from the Show Content page, click on the Content tab at the top of
the screen.
Show Content Page for Unattached Content
When you click on the filename or thumbnail for unattached content, which is programming that has
been scheduled but is not yet on the server, the information on the Show Content page is different
because the content is not yet on the server. The page shows the placeholder’s expected properties
and scheduled playouts, if allowed on this server.
Page 24
TelVue HyperCaster® User Manual / v5.0 / October 2014
© 2014 TelVue Corporation 16000 Horizon Way, Suite 500, Mt. Laurel, NJ 08054
HyperCaster® is a registered trademark of TelVue Corporation 800-885-8886 / www.telvue.com
23
The fields displayed for the placeholder are described briefly below.
• General – information about the placeholder similar to what is displayed on the Content page,
such as expected filename, expected runtime, ingest date, and day of week. If your
installation has custom metadata fields, they are displayed here as well. To change this
information, click the Edit button at the right.
• Program Series – If this placeholder is part of a series, this section will display its sequence
(order) in the series and whether the placeholder is out of order.
• Categories – any programming categories in which this file appears, as selected when the
program was added. To put this placeholder in a category, click the Edit button at the
right. To set up categories, use the Content Management section of the Config page.
• Recurring Events – If this placeholder has been scheduled for recurring playout, this section
displays them, such as every Thursday at 9:00 AM. To schedule recurring events, click the
Schedule button at the right.
• Upcoming Events – If this placeholder has been scheduled for playout, this section displays
the next few times, including both recurring and single playouts. To schedule more events,
click the Schedule button at the right.
• Recent Events – Generally there will be no recent events for placeholders unless the time for
a scheduled event has passed and the actual file was never imported.
File actions for this content file are shown in the upper right of the page, below the thumbnail frame.
Not all actions are available for all content.
• Schedule – takes you to the Schedule Playout page to schedule one or more times to play
the placeholder. The Schedule Playout page is described in the next section of this manual, on
Content File Actions. To schedule placeholders, this installation must allow scheduling of
unattached content. To change the configuration, go to the Configuration →Schedule
Configuration section of this manual.
Page 25
TelVue HyperCaster® User Manual / v5.0 / October 2014
© 2014 TelVue Corporation 16000 Horizon Way, Suite 500, Mt. Laurel, NJ 08054
HyperCaster® is a registered trademark of TelVue Corporation 800-885-8886 / www.telvue.com
24
• Edit – To change the file information for the placeholder, click the Edit button. This takes you
to the Edit Content page as described in the next section of this manual, on Content File
Actions.
• Purge and Bump – If this placeholder is part of a series, you can remove it from the Web
Application but preserve the series information. For example, a series on quilting might have
8 episodes. The producer decides to cancel the 3rd episode. You could purge and bump
Quilting_3. There will now be only 7 episodes in the series. The new Quilting_3 will inherit
the filename, ingest date, and other metadata from the old Quilting_4. Quilting_4 will inherit
the metadata from the old Quilting_5, etc.
• Purge – If you want to remove this placeholder from the Web Application and not preserve
any of its metadata, click the Purge button. This is a good choice if the event associated with
this placeholder is cancelled. To continue the example, if the entire quilting series were
cancelled, you would purge each placeholder.
Content File Actions
The following actions may be performed on content.
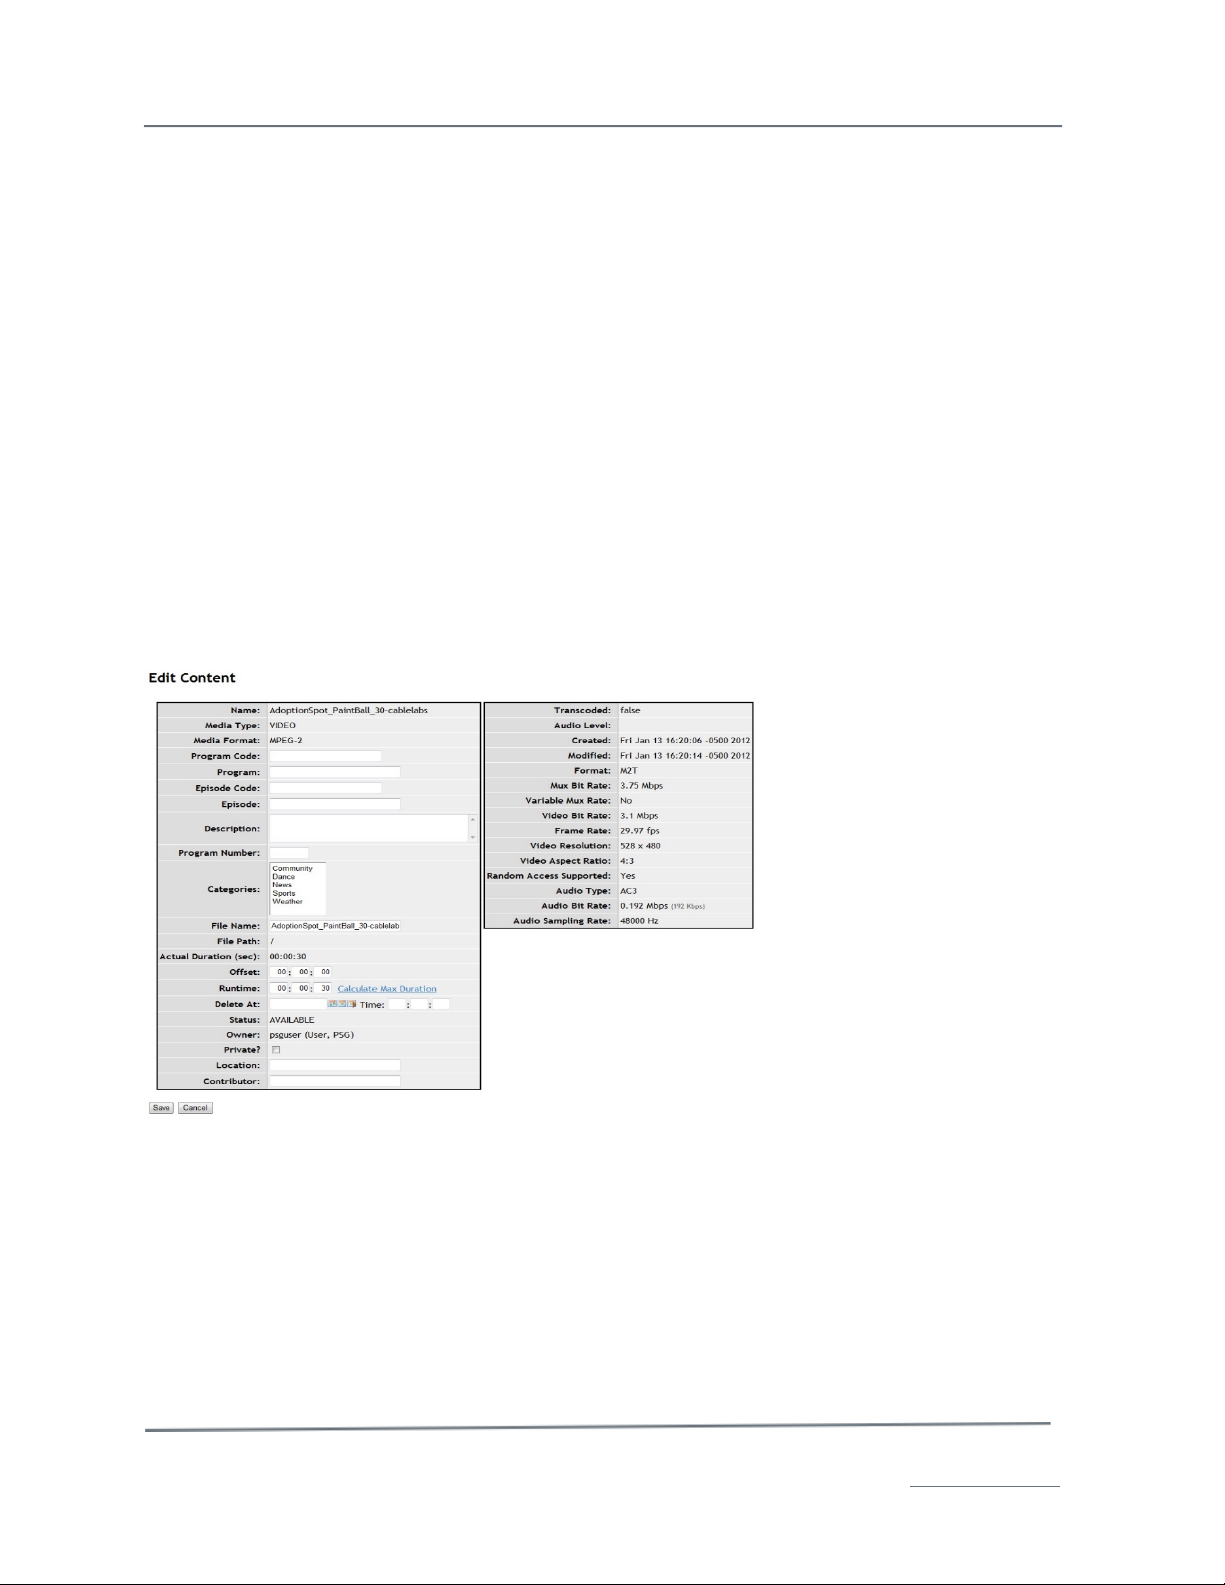
Edit
To change the file information for a content file or placeholder, click on its Edit action. The Edit
Content page is displayed.
The Edit Content page displays information about the content including its media type and format, and
encoding information. The following information can be edited.
• Program Code – If program codes are used in your workflow, enter a code that distinguishes
what program this is. You can search on program codes in combination with a keyword search.
• Program – If this installation does not use program codes, enter the name of the program as
it should appear in the Program Guide.
• Episode Code – If episode codes are used at your installation, enter a code that distinguishes
what episode of a program series this is. You can search on episode codes in combination with
a keyword search.
• Episode – If this installation does not use episode codes, enter the name of the episode as it
should appear in the Program Guide, if applicable.
Page 26
TelVue HyperCaster® User Manual / v5.0 / October 2014
© 2014 TelVue Corporation 16000 Horizon Way, Suite 500, Mt. Laurel, NJ 08054
HyperCaster® is a registered trademark of TelVue Corporation 800-885-8886 / www.telvue.com
25
• Description – (optional) Enter a detailed description of the content as well as any keywords
to be used to search for this content.
• Categories – Select one or more categories used on your HyperCaster, such as PSA (public
service announcements).
• Filename – the name of the content file, such as council_meeting_0425.mpg. If the content
is currently scheduled, you cannot change the filename.
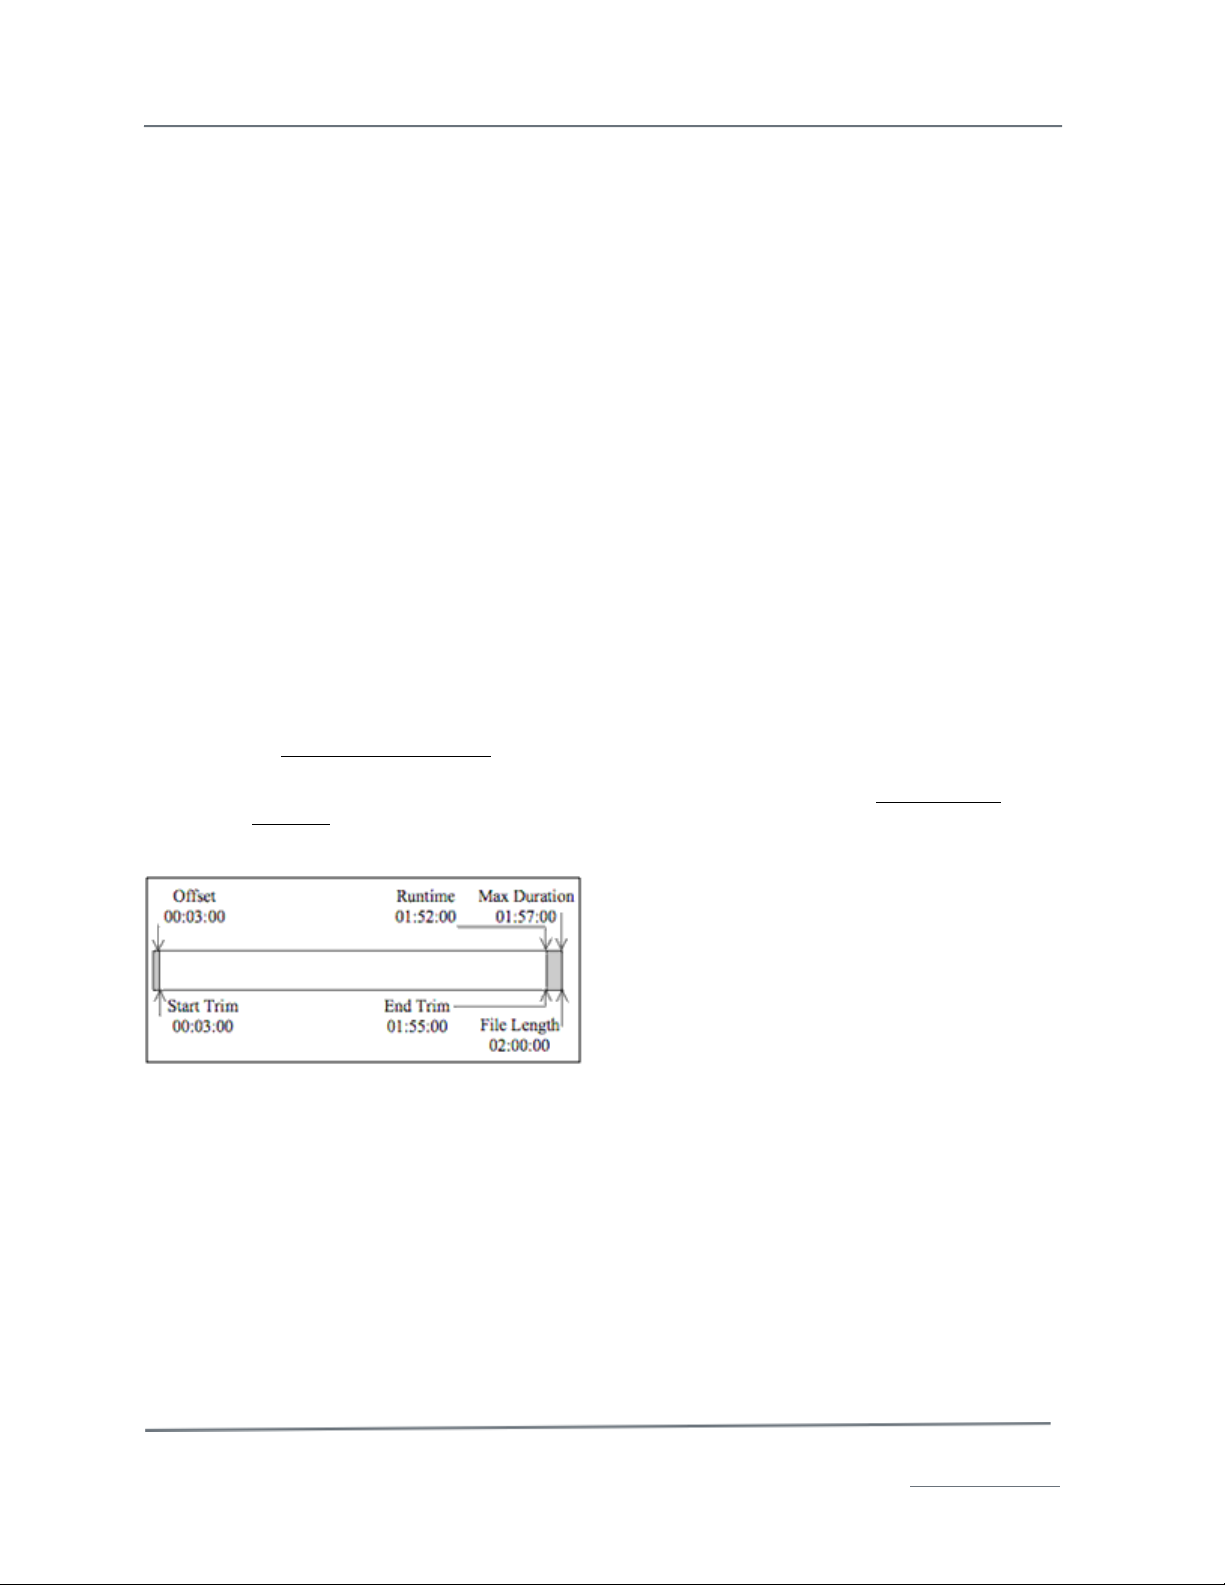
Offset – Runtime or Start Trim – End Trim
Depending on the schedule settings you chose in Config → Schedule Configuration your
TelVue server displays either Offset and Runtime (Duration) or Start Trim and End Trim to
determine where file playout should start and stop and how long the playout should be. If this
content was imported with trims or an offset and runtime already in the metadata, it is
advisable to use them. If needed, you can set a different trim or offset and runtime manually
when you schedule the content. Information on calculating the offset and runtime or start
trim and end trim is provided below.
• Offset – how far from the beginning of the file you want to start playing, in hours,
minutes, and seconds. For example, if the file begins with 3 minutes of announcements
prior to a soccer game, enter 00:03:00 to skip the announcements and begin the file when
the game begins. To play the file from its beginning, leave this field blank.
• Runtime – the length of time you want the playout to run, in hours, minutes, and
seconds. For example, suppose you captured a soccer game for 2 hours (2:00:00). The
game ends 1 hour and 55 minutes into the file and you want to skip the 3 minutes of
announcements at the beginning. To end each playout when the game ends, enter
1:52:00 for the runtime. To end the playout when the file ends, enter 1:57:00 or click
on Calculate Max Duration as described below.
• Calculate Max Duration – This utility subtracts the offset from the untrimmed length of
the file to get the runtime without any end trim. Click on the words Calculate Max
Duration to use it. If you want the runtime to be less than the max duration, change the
entry in the Runtime field after calculating the Max Duration.
• Start Trim – how far from the beginning of the file you want to start playing, in hours,
minutes, and seconds. For example, if the file begins with 3 minutes of announcements
prior to a soccer game, enter 00:03:00 to skip the announcements and begin the file when
the game begins. To play the file from its beginning, leave this field blank.
• End Trim – how far from the beginning of the file you want to stop playing, in hours,
minutes, and seconds. For example, suppose you captured a soccer game for 2 hours
(2:00:00). The game ends 1 hour and 55 minutes into the file. To end each playout
when the game ends, enter 1:55:00 for the end trim. To end the playout when the file
ends, enter 2:00:00.
• Virtual Trim – When you use the Start Trim and End Trim fields together the application
calculates the trimmed length of the file as:
Runtime = <original file length> – <start trim> – [<original file length > - <end trim >].
Page 27
TelVue HyperCaster® User Manual / v5.0 / October 2014
© 2014 TelVue Corporation 16000 Horizon Way, Suite 500, Mt. Laurel, NJ 08054
HyperCaster® is a registered trademark of TelVue Corporation 800-885-8886 / www.telvue.com
26
For example, if you want to trim the soccer game file from both ends, enter 00:03:00 for
the start trim and 1:55:00 for the end trim.
Runtime = 2:00:00 – 00:03:00 – [2:00:00 – 1:55:00]
= 2:00:00 – 00:03:00 – 00:05:00
= 1:52:00
• Delete At – To set a date and time for the content file to be automatically deleted from the
server, type a date in the form MM-DD-YYYY or use a Calendar icon to choose a date. If no
time is specified, then the content is deleted at midnight the next day. To keep the content on
the server indefinitely, leave the date and time blank.
• Private – To keep this content on your private list so it is visible only to users with Admin
privileges and yourself, check this box.
• Ingest Date – For a content placeholder pending the content’s arrival, enter the date and
time the content file is expected to be brought onto the serve in the form MM-DD-YYYY or use
a Calendar icon to choose a date up to one year from now. Enter the time in the form
HH:MM:SS using 24-hour time.
• Location – (optional) The location where the content was created.
• Contributor – (optional) the name of the person, company, or other entity that supplied this
content.
When you have finished editing the content file information, click the Save button. The application
saves the changes and returns you to the Content page. To return to the Content page without
changing anything about the content, click the Cancel button.
Note: This information becomes part of the content’s metadata and will always be associated with this
content unless and until you change it.
Play
If you clicked on the content filename to see the information about the content before playing it, click
the Schedule button to go to the Schedule Playout page. On the Content page in thumbnail view or in
the Action column of Table View, click on the Play action.
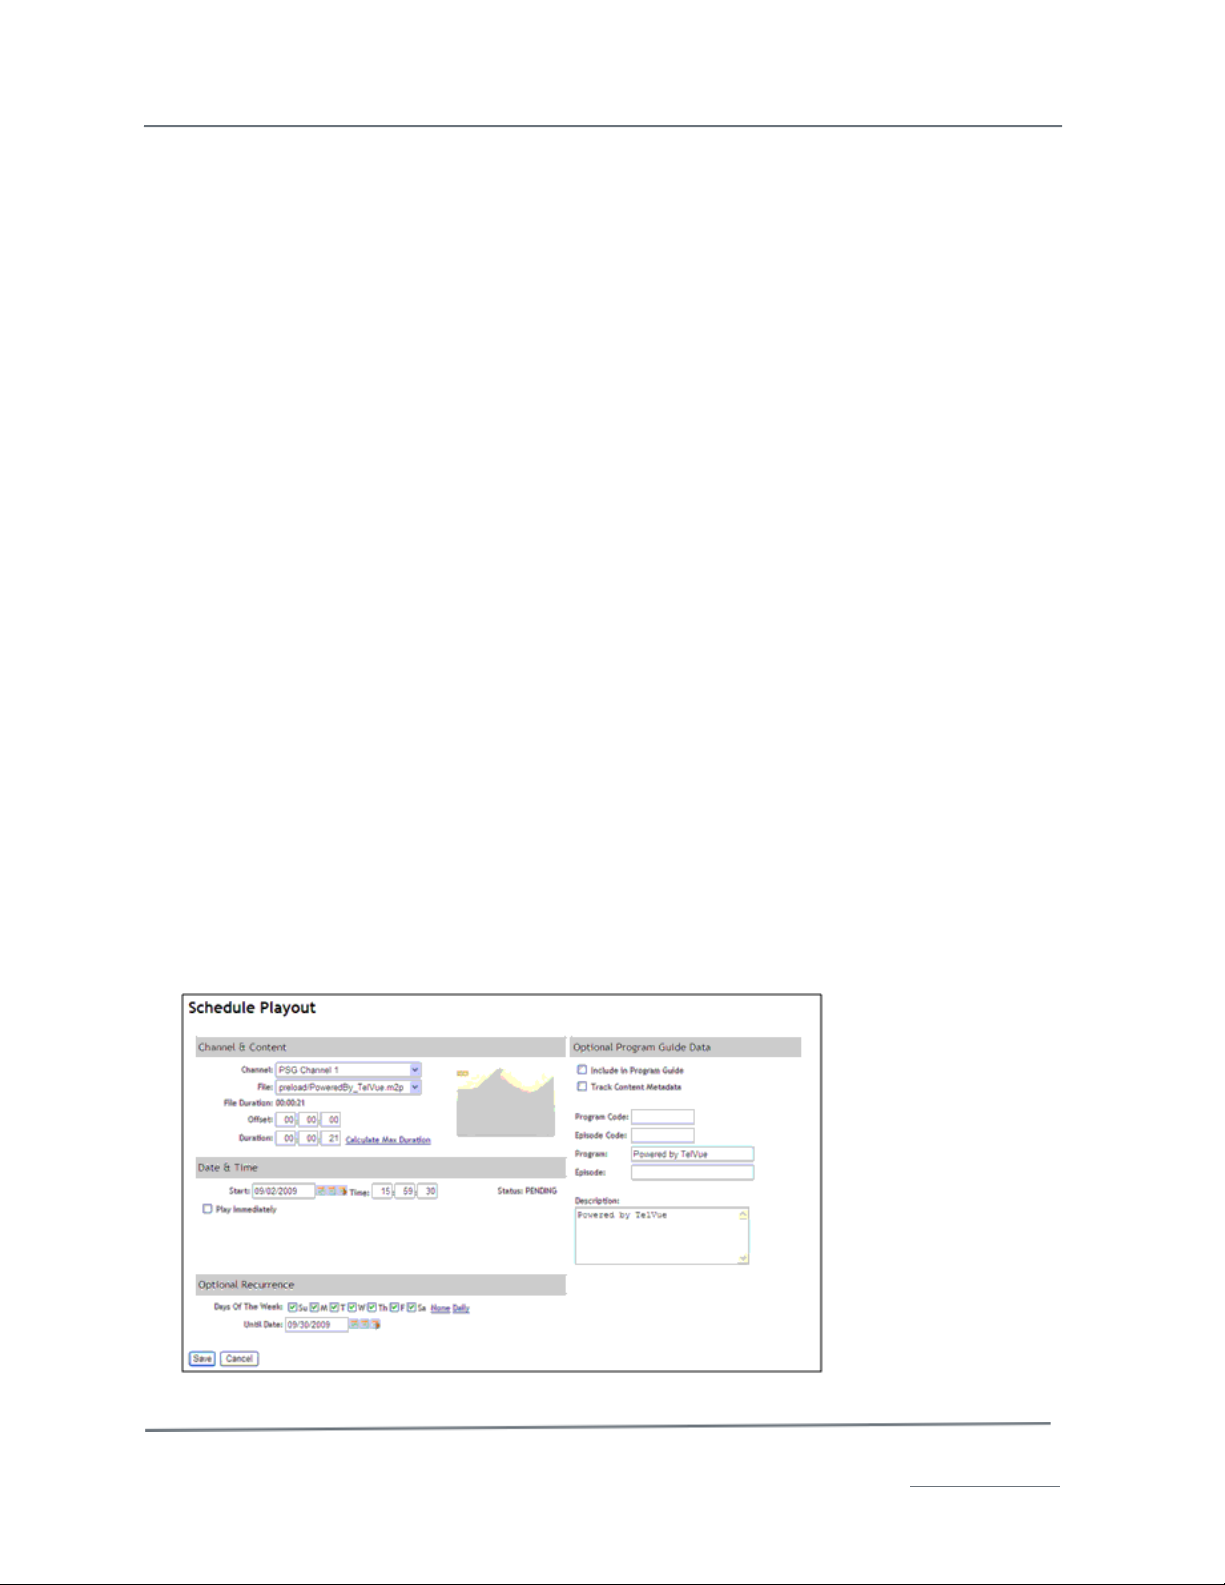
1. To schedule a playout for a content file, click on that file’s Play action. The Schedule Playout page
is displayed.
Page 28

TelVue HyperCaster® User Manual / v5.0 / October 2014
© 2014 TelVue Corporation 16000 Horizon Way, Suite 500, Mt. Laurel, NJ 08054
HyperCaster® is a registered trademark of TelVue Corporation 800-885-8886 / www.telvue.com
27
2. Fill in the fields on the screen as described below:
Channel – Select a channel from the drop-down list if this is a multi-channel installation or leave the
default channel selected.
File – the file defaults to the playout you selected to play, but you can also select any file from the
drop-down list. Metadata, or information about the file, is automatically displayed.
Offset – Duration or Start Trim – End Trim
Depending on the schedule settings you chose in Config ! Schedule Configuration your TelVue server
uses either Offset and Duration or Start Trim and End Trim to determine where file playout should
start and stop and how long the playout should be.
• Offset –The application fills in the content file’s offset from the metadata. To change the
offset for this playout only, enter a new offset in the form HH:MM:SS. The offset in the
playout’s metadata remains the same.
• Duration – The application fills in the content file’s duration from the metadata. To change
the duration for this playout only, enter a new duration in the form HH:MM:SS.
• Calculate Max Duration – This utility subtracts the offset from the untrimmed length of the
file to get the duration without any end trim. Click on the words Calculate Max Duration to
use it. If you want the runtime to be less than the max duration, change the entry in the
Duration field after calculating the Max Duration.
• Start Trim –The application fills in the content file’s start trim from the metadata. To change
the start trim for this playout only, enter a new trim in the form HH:MM:SS. To play the file
from its beginning, leave this field blank.
• End Trim –The application fills in the content file’s end trim from the metadata. To change the
end trim for this playout only, enter a new trim in the form HH:MM:SS. To end the playout
when the file ends, leave this field blank.
• Actual Duration – The original, untrimmed duration of the file. Offset + Runtime = Actual
Duration.
• Start – Use a Calendar icon to select a start date or enter a date in the form MM-DD-YYYYup
to one year from today.
• Time – Enter the start time in HH:MM:SS format using 24-hour time. For example, 1:00 PM is
13:00:00.
• Play Immediately – To start playout as soon as the Save button is clicked, check this box.
• Day of Week – Check one or more boxes to the right of the day of the week to have the file
recur on that day. To play the file every day, click Daily, which will check all the boxes. To
uncheck all the boxes, click None. There is a one-year limit on recurring playouts.
• Until Date – Use a Calendar icon to select the last day for the recurring playout up to one
year from today. If you are playing the file on several days of the week, it will play on the last
day up to and including the date you select.
Optional Program Guide Data
Include in Program Guide – normally checked by default for video file types. If you do not want the
program guide report to display this playout, such as for a test file, uncheck this box. How you
configure categories in the Content Management section of the Config page determines whether this
box will be checked by default every time you schedule a playout. For example, if you do not normally
want PSAs to appear in your Program Guide, edit the PSA category and set the Include in Guide
Default field to “No.” Then you will not have to uncheck this box every time you schedule a PSA.
Track Content Metadata – checked by default. If you want any changes you make to the file’s
metadata, such as a program description, to be automatically tracked in the playout metadata, check
this box. Uncheck the box to override the metadata for the selected file and use the metadata you tag
for this specific event.
Page 29
TelVue HyperCaster® User Manual / v5.0 / October 2014
© 2014 TelVue Corporation 16000 Horizon Way, Suite 500, Mt. Laurel, NJ 08054
HyperCaster® is a registered trademark of TelVue Corporation 800-885-8886 / www.telvue.com
28
• Program Code – A code that distinguishes what program this is, if program codes are used in
your workflow.
• Episode Code – A code that distinguishes what episode of a series this is, if episode codes
are used in your workflow.
• Program – If this installation does not use program codes, the name of the program as it
would be displayed in the Program Guide.
• Episode – If this installation does not use episode codes, the title of the episode is displayed
or entered here as it would be in the Program Guide.
• Description – The detailed description of the content.
Click the Save button to add the playout to the programming schedule or click the Cancel button to
return to the Content page without adding the playout.
The server checks for errors. If none are detected, the Content page of the newly scheduled playout
is displayed.
Searching and Browsing
Quick Search
To search for content on the main Content page by keyword, type a keyword or phrase in the Quick
Search box and press Search. The server will display all available content that matches the search.
The keyword may appear as typed in the file name, program, episode name, program or episode
code, description, or other content metadata.
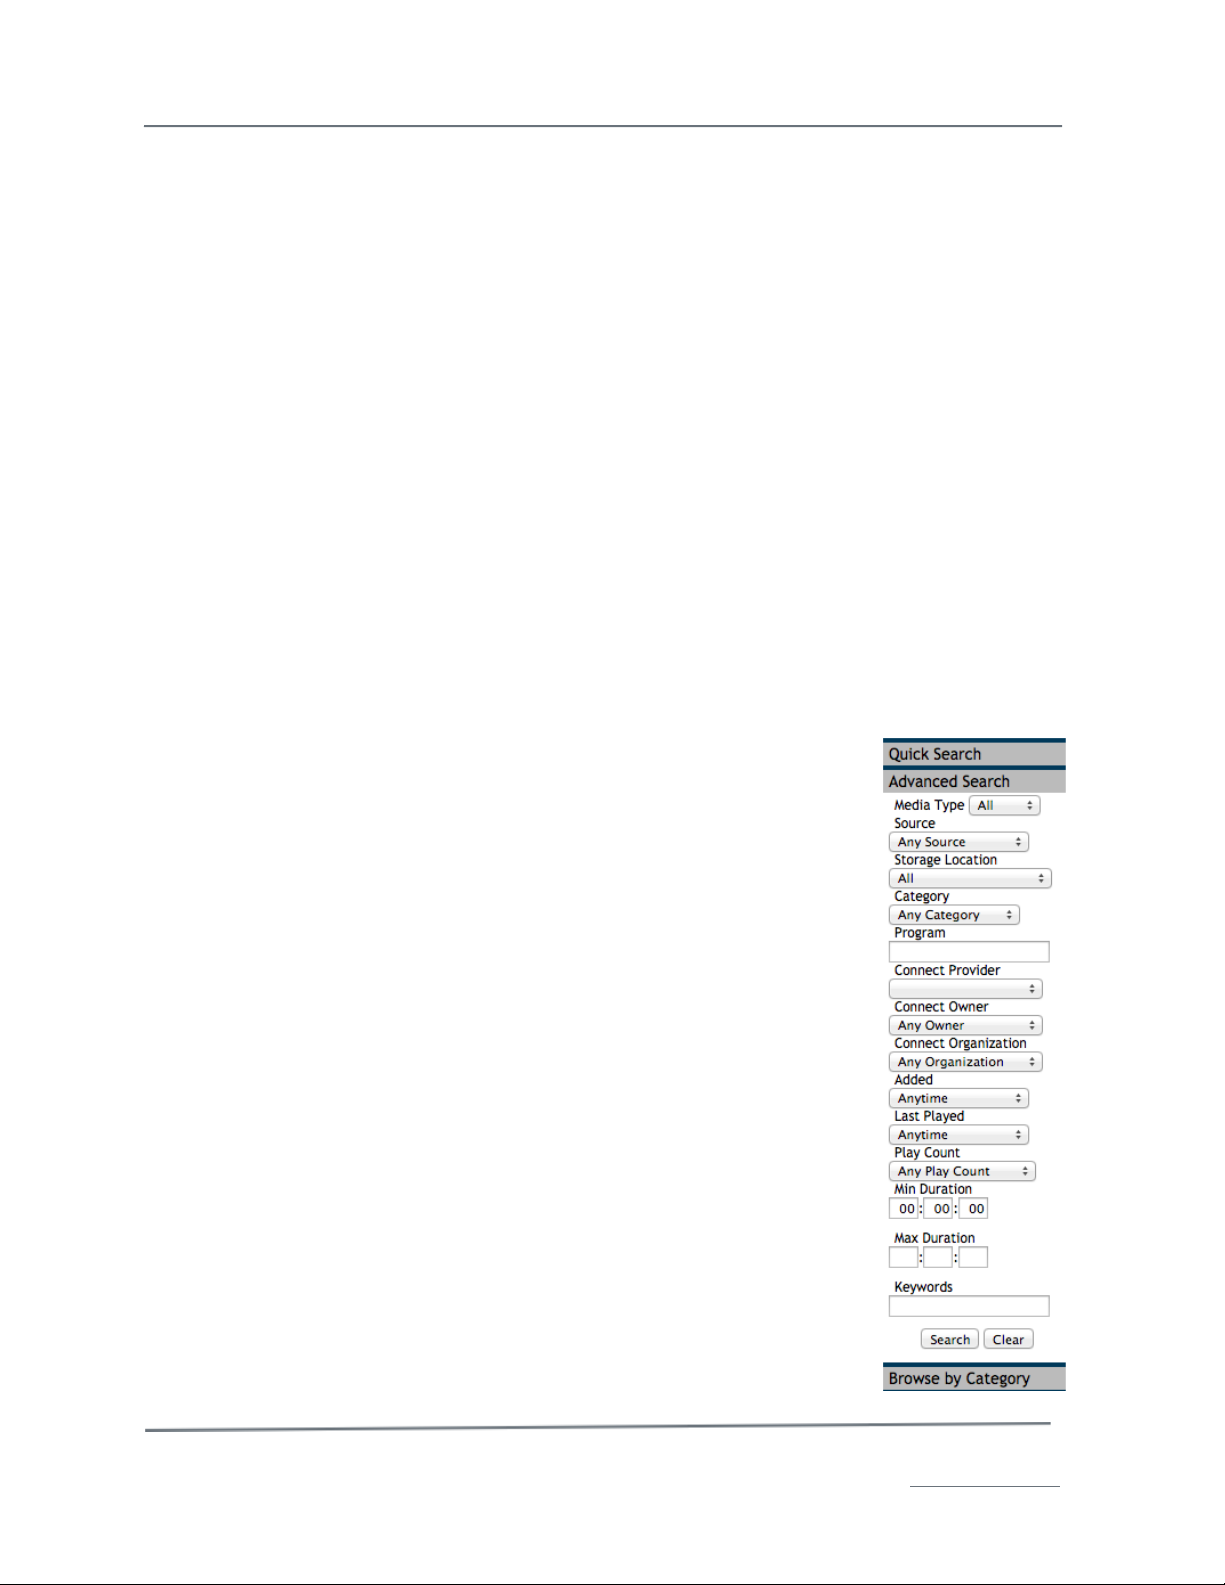
Advanced Search
To search for content using specific criteria, such as category or a media type,
press the Advanced Search tab. Fill in one or more of the boxes.
• Media Type – The type of media you want, such as audio file, a video,
an overlay, or an image, or any media type.
• Source – Select from uploaded, captured, or manually entered
content.
• Storage Location – Search any online or near-line archive that is
integrated with your HyperCaster.
• Category – Select one of the categories used on your HyperCaster,
such as PSA (public service announcements).
• Program – Enter the exact program title. If you are not certain of the
program title, use the Keywords field.
• Connect Provider – Filter by TelVue Connect Provider.
• Connect Owner – Filter by TelVue Connect Owner.
• Connect Organization – Filter by TelVue Connect Organization.
• Added – Select the time period that bests describes when this content
was added to your server. Time periods range from 5 minutes ago to
7 days ago. If the content was added more than 7 days ago,
select Anytime.
• Last Played – Select the time period that best describes when the
Web Application last played this content. Time periods range from 5
minutes ago to 7 days ago. If the content was played more than 7
days ago, select Anytime.
• Play Count – Select the number or range that best describes when
the Web Application last played this content. Play counts range from
Never Played to Played > 10 times. If you are uncertain how often the
content has been played, select Any Play Count.
Page 30
TelVue HyperCaster® User Manual / v5.0 / October 2014
© 2014 TelVue Corporation 16000 Horizon Way, Suite 500, Mt. Laurel, NJ 08054
HyperCaster® is a registered trademark of TelVue Corporation 800-885-8886 / www.telvue.com
29
• Min Duration – Enter the minimum duration of the content in hours, minutes, and seconds as
it would appear in the content metadata.
• Max Duration – Enter the maximum duration of the content in hours, minutes, and seconds
as it would appear in the content metadata.
• Keywords – Type any keywords that might help identify this content. Keywords can match
most metadata including the filename and file path.
Press Search. The Web Application displays the content that matches your search terms. If all results
of the search are not displayed, select a larger display number (up to 100) from the drop-down list at
the top of the page. If you don’t see the content you wanted, adjust the selections in one or more
categories or press Clear to start again. To see all titles again, press Clear, then press Search.
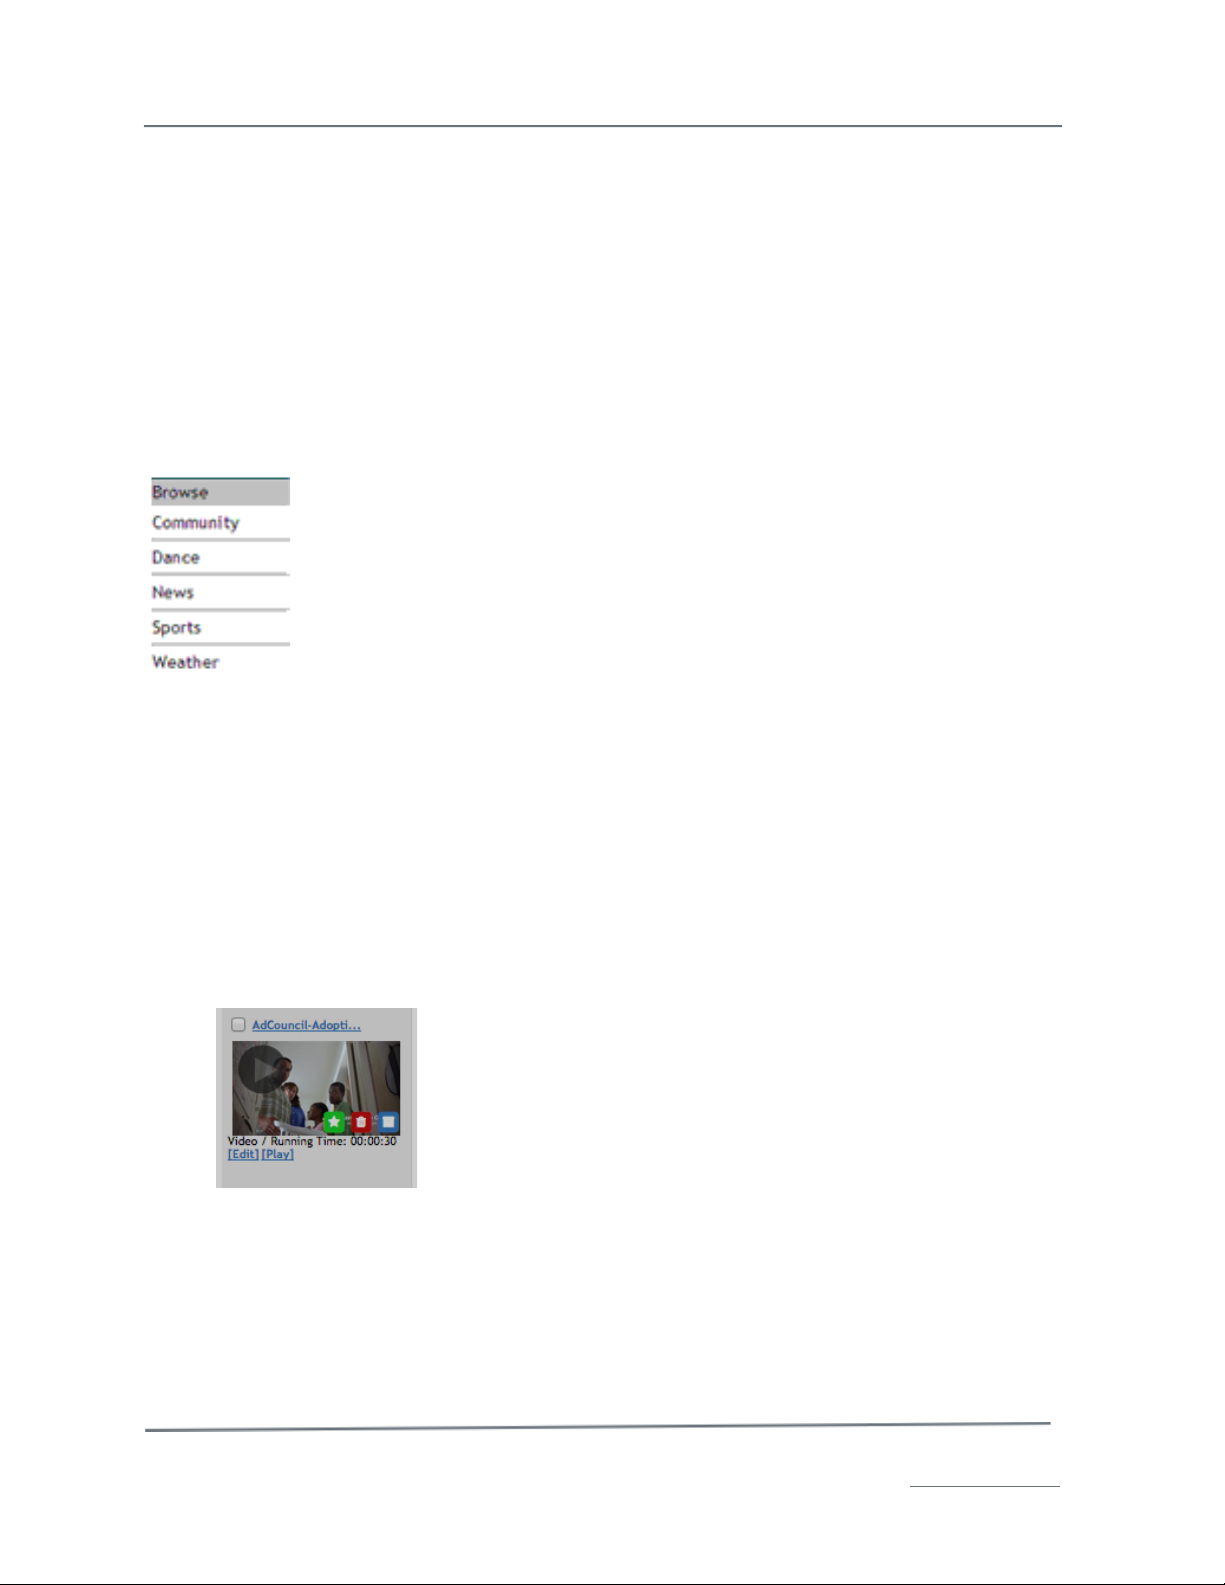
Browse
To see all content of a specific category, press the Browse tab and click on one of
the categories from the list. Categories may be customized under the Config tab in
the Content section. To stop browsing and display all content again, click on Quick
Search, clear the search field, and press the Search button.
To add a single content file to a category, display the content in Thumbnail view,
press the Browse tab, and drag the content thumbnail over the category. The
category bar blinks several times.
Browse to see all content of a specific category, press the Browse tab and click on
one of the categories from the list. Categories may be customized under
the Config tab ! Content section. To stop browsing and display all content again, click on Quick
Search, clear the search field, and press the Search button.
Thumbnails and Table Views
Thumbnail View
Each thumbnail displays a scene from the content with the following information.
• Checkbox – allows you to select the content for a bulk action, such as a purge, or deletion.
• Filename – the name of the content as it is stored in the application, typically the filename
without the extension. If the name is long, mouse over it to display the full name. Clicking on
the name takes you to the Show Content page.
• Icons – to visually display certain statuses (Green=New –
imported in the last week; Red=Pending scheduled deletion;
Blue=Archived; Broken Link=Offline).
• SD or HD – Thumbnail images are now generated and
displayed with the correct, native aspect ratio.
• Preview – click on the “play” arrow on the top left of a
thumbnail to launch a preview player in a pop-up lightbox.
• File Type and Running Time – whether this file is a video,
overlay, etc., followed by the playing time of this file, after any virtual
trimming, in hours, minutes, and seconds (HH:MM:SS).
• Program or Program Code – the program name or program code of this file. If the name is
too long, mouse over the ellipsis (. . .) to see the full name.
• Episode or Episode Code – the episode name or episode code of this file, if applicable. If
the name is too long, mouse over the ellipsis (. . .) to see the full name.
• Edit – Link to the edit page so you can edit the file information and optional metadata for this
content.
• Play – Link to the Schedule Playout page so you can schedule a playout date and time for this
content.
Page 31

TelVue HyperCaster® User Manual / v5.0 / October 2014
© 2014 TelVue Corporation 16000 Horizon Way, Suite 500, Mt. Laurel, NJ 08054
HyperCaster® is a registered trademark of TelVue Corporation 800-885-8886 / www.telvue.com
30
Table View
Table View displays the content as a list without any thumbnail images. As in Thumbnail View, you
may show 10, 20, 50, or 100 titles per page. To go to one of the other pages, click on the page
number links or the <Previous or > Next links in the lower-right corner.
• Select Checkbox– allows you to mark the content shown on the page for bulk actions by
checking the box.
• Filename– the filename of the content. The last portion of the filename usually indicates the
file type, such as MPG or JPG.
• Program or Program Code – The name of the program or its program code.
• Episode or Episode Code – The episode name or episode code of this file, if applicable.
• Size – the size of the file, typically in megabytes (MB) or gigabytes (GB).
• Duration– the runtime of this file in hours, minutes, and seconds (HH:MM:SS) including any
virtual trimming.
• Play Count – the number of times this file has been played since it was brought onto the
server. If you purge the file and re-import it, the play count is preserved.
• Create/Ingest Date & Time – the date, time, and day of the week the content file was
captured or imported onto the server. For a program placeholder, this shows the expected
ingest date, time, and day of the week. (T = Tuesday, Th = Thursday)
• Delete At – if this file is scheduled for deletion from the system, this field shows the date and
time the deletion will take place.
• Type – the type of content in this file, such as a video, an audio file, or an overlay.
• Level – if the file is normalized it will display the dBFS in the level column.
• Actions– the functions, or actions, you may do with this content. These actions are described
more fully under Content File Actions, below.
• Edit – allows you to edit the file information and optional metadata for this content.
• Play – allows you to schedule a playout date and time for this content.
Click on any underlined heading to sort the list by that category. To see the reverse order, click the
heading again.
Bulk Actions
To take action – such as delete or purge – on one or more content files, use the checkboxes to select
one or more files – or use the Select All checkbox to select all content on the current page (not
necessarily all titles on the system) – and click on the Bulk Actions tab on the left side bar of the
Page 32

TelVue HyperCaster® User Manual / v5.0 / October 2014
© 2014 TelVue Corporation 16000 Horizon Way, Suite 500, Mt. Laurel, NJ 08054
HyperCaster® is a registered trademark of TelVue Corporation 800-885-8886 / www.telvue.com
31
page. Choose one of the following actions from the drop-down list. Not
all actions are available on all systems.
Note: If you used the Search features and want to take bulk action on
all search results, use the drop-down list at the top of the page to
display all the results (up to 100 titles). This will help prevent you from
performing a bulk action on only some of the titles you want.
• Purge from Library – Purging files removes them from the
content list, but keeps them on the server. Content that is
scheduled, is used as continuity, or is part of any playlist cannot
be purged. Purging unattached content (TBD files) has the same
effect as deleting it, so you can reuse a TBD filename after
purging it.
To purge files, select them and click the Purge button. The application
asks for confirmation. If you are sure you want to purge these titles,
click Yes (OK). The application removes the selected files from the list
and unlocks the file on the server file system so it can be edited, written,
and deleted. Otherwise click No (Cancel), and the application leaves
the content list unchanged.
• Delete from Library and Filesystem – Deleting files removes them from the content
database and the server. Use this option to remove outdated content from the server. Once a
file has been deleted you can reuse the filename. Content that is scheduled, is used as
continuity, or is part of a playlist cannot be deleted.
To delete files, select them and click the Delete button. The application asks for confirmation. If you
are sure you want to delete these titles from the content list and server, click Yes (OK). The
application removes the selected files. Otherwise click No (Cancel), and the application leaves the
content list unchanged.
• Add to Category – Select a category from the drop-down list and click the Add button. The
application confirms that the selected titles have been added to the category.
• Remove from Category – Select a category from the drop-down list and click the Remove
button. The application confirms that the selected titles have been removed from the category.
Add Program – Using TBD
Use the Add Program feature to make placeholders for programs that you want to schedule but do not
actually have yet. For example, you might want to schedule the zoning board meeting to play several
times over the next month, but the meeting won’t be recorded until tonight. Programming that has
been scheduled but is not yet on the server is called “unattached content” and its thumbnail is a
TBD. To make this placeholder for unattached content, click on Add Program on the left side of the
Content page. The Add Program screen is displayed.
Page 33
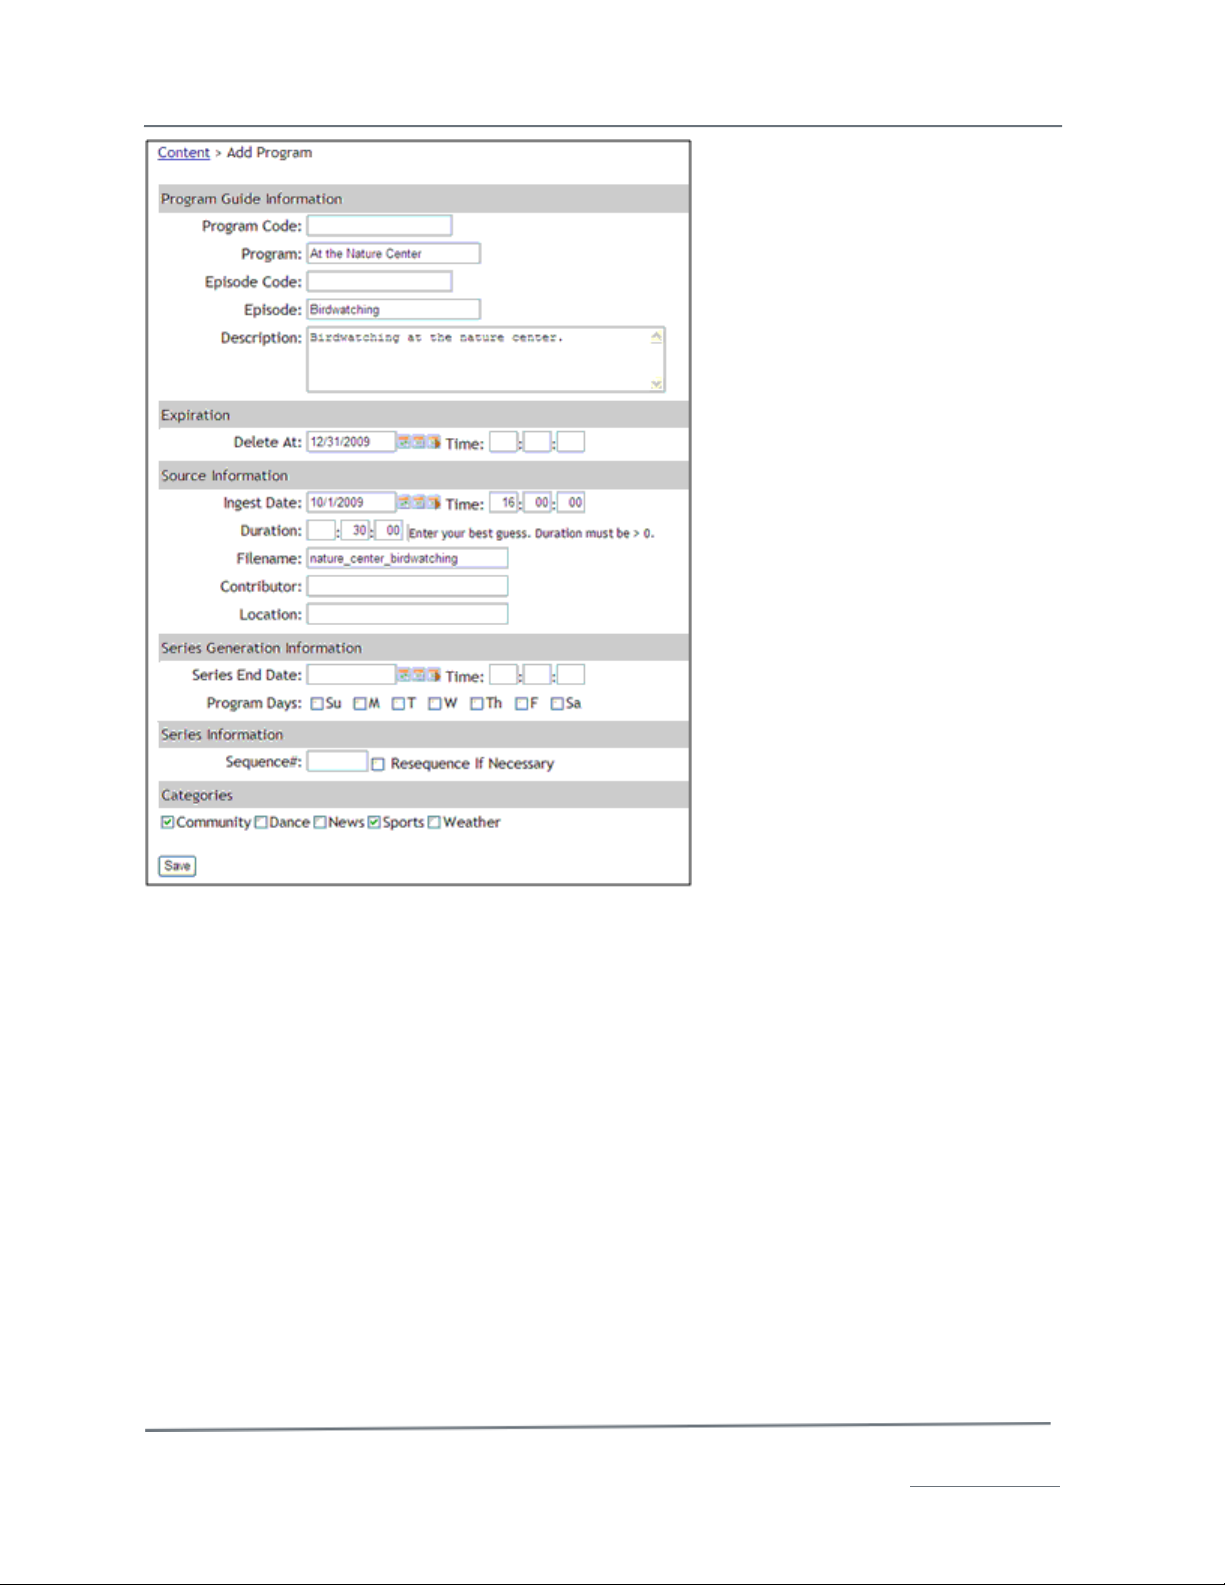
TelVue HyperCaster® User Manual / v5.0 / October 2014
© 2014 TelVue Corporation 16000 Horizon Way, Suite 500, Mt. Laurel, NJ 08054
HyperCaster® is a registered trademark of TelVue Corporation 800-885-8886 / www.telvue.com
32
Fill in the fields with information about the program.
• Program Guide Information
• Program Code – A code that distinguishes what type of program this is, if program
codes are used in this installation.
• Program – Required unless program codes are in use. The placeholder for the
program. This is the name that will display in the Program Guide.
• Episode Code – A code that distinguishes what episode of a series this is, if episode
codes are used in this installation.
• Episode –If the file is part of a series and each episode has a name, enter it here.
• Description – Type a detailed description of the content.
• Expiration – To remove the content from the application at a specific date and time,
enter them in the boxes. Otherwise the content will remain on the server until you
schedule a deletion.
• Source Information
• Ingest Date and Time – Required. For content that has been scheduled pending its
arrival, enter the date and time the content file is to be brought onto the server. To
set an auto ingest date, type a date in the form MM-DD-YYYY or use a Calendar icon to
choose a date up to one year from now.
• Duration – Required. Enter the expected duration of the content in HH:MM:SS format.
Page 34
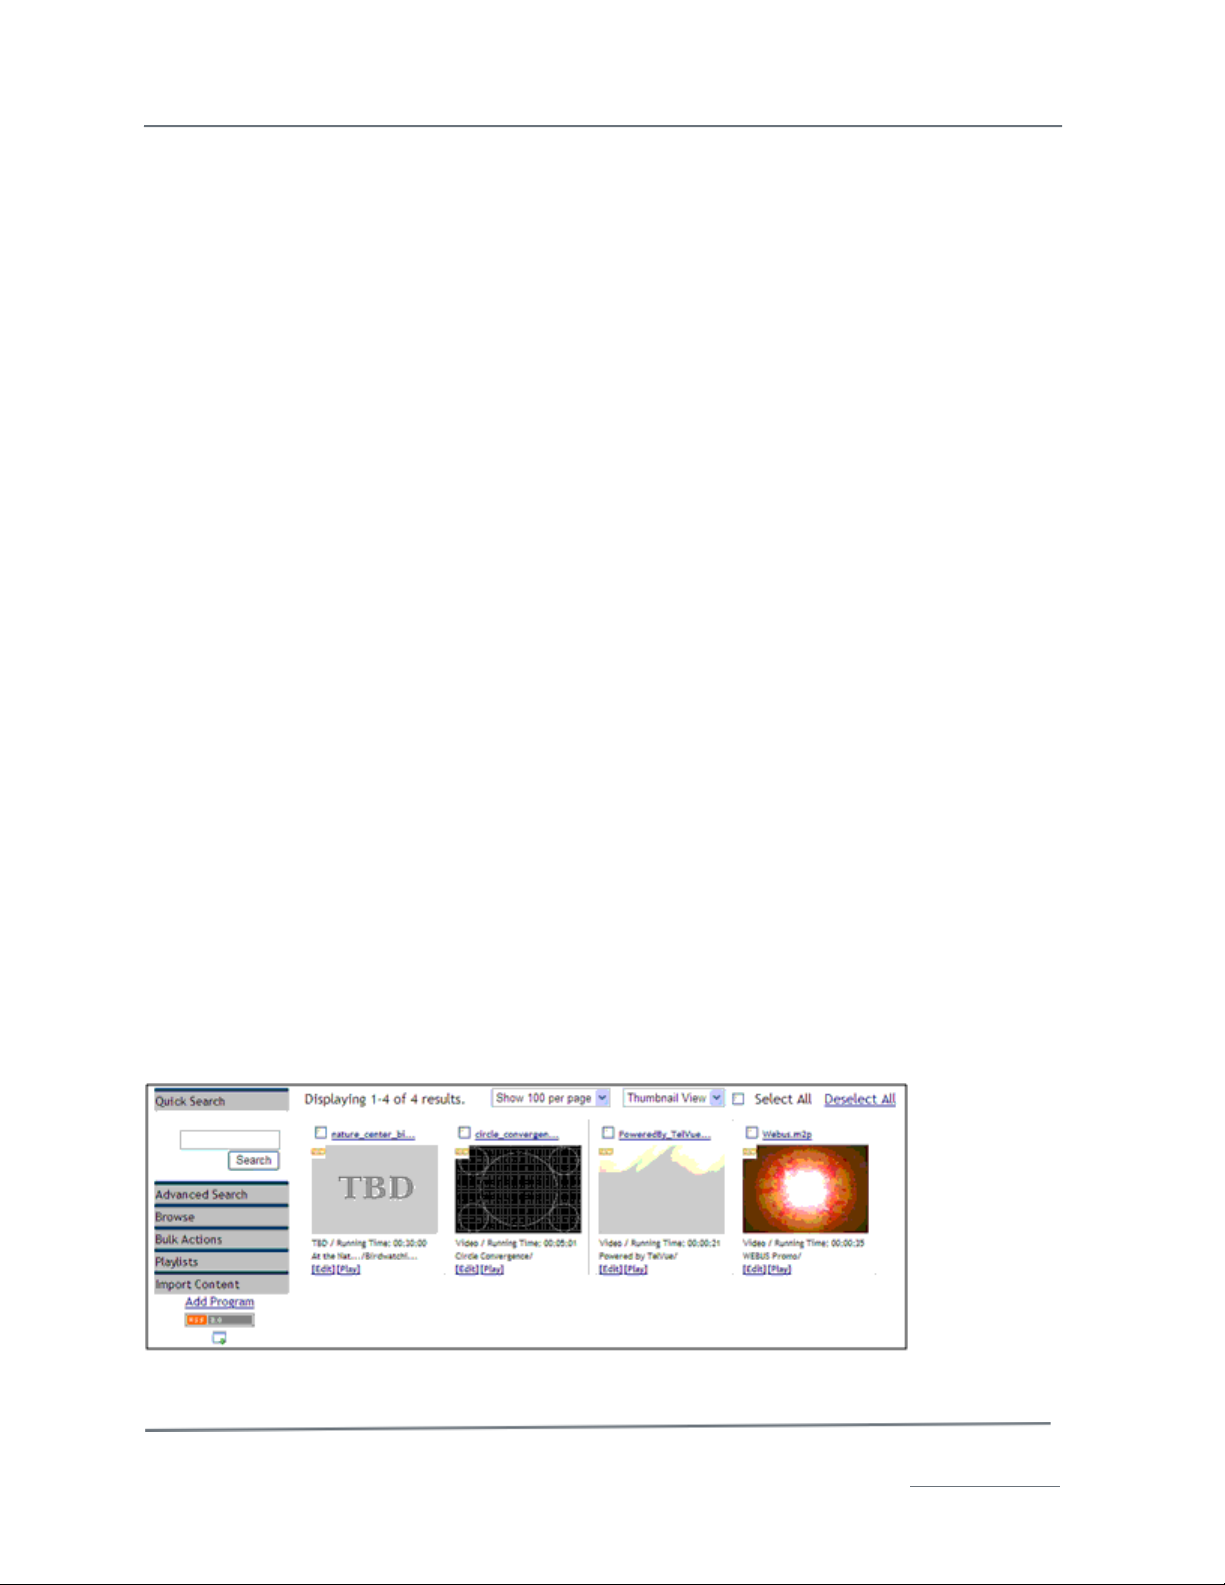
TelVue HyperCaster® User Manual / v5.0 / October 2014
© 2014 TelVue Corporation 16000 Horizon Way, Suite 500, Mt. Laurel, NJ 08054
HyperCaster® is a registered trademark of TelVue Corporation 800-885-8886 / www.telvue.com
33
• Filename – Required. Enter the filename of the content. When the content is ingested
later, its filename must match this filename exactly.
• Contributor – Required if Require Contributor for Unattached Content is checked in
Configuration –> Content Settings. The name of the person, company, or other entity
that supplied this content.
• Location – Required if Require Location for Unattached Content is checked in
Configuration –> Content Settings.
• Series Generation Information
This section creates a placeholder for each time you schedule this program. For example, if you
scheduled a program named parade to playout on Monday and Wednesday for the next four weeks,
the application will make 8 placeholders called parade_1.mpg, parade_2.mpg, through parade _8.mpg
on the Content page.
• Series End Date and Time –Enter the date and time when the last content file is to be
brought onto the server. Enter the date in the form MM-DD-YYYY or use a Calendar icon to
choose a date up to one year from now. Enter the time in the form HH:MM:SS or leave it
blank to have the series end at midnight.
• Program Days – Check one or more boxes for the day(s) you want to schedule the
program. The UI fills in the time for the program to air. You can change the time if
necessary, as long as it is later than the ingest time.
• Series Information
If you have previously generated a series and want to add one episode to it, fill in this
section. You cannot enter information here if you are creating a series using the Series
Generation Information section. Sequence Number – Enter this content file’s order in the
series. For example, if it is the fourth episode, enter 4.
• Re-sequence if Necessary – If you want the software to insert this episode and
renumber the episodes after it, check this box. Otherwise, if you entered a sequence
number that already exists, you will get an error.
• Categories– Select one or more event categories from the list, such as PSA (public
service announcements).
• Custom Attributes – If your installation uses custom attributes they are displayed
here. To set custom attributes go to Configuration tab ! Content Management !
Custom Metadata fields.
When you have finished, click the Submit button. The Add Program screen is redisplayed, either with
a message saying the program or series was added successfully or an error message. If you need to
add more placeholders, enter the information and click the Submit button again. To return to the
Content page, click the Content tab. A thumbnail for each placeholder is displayed with the others.
Page 35

TelVue HyperCaster® User Manual / v5.0 / October 2014
© 2014 TelVue Corporation 16000 Horizon Way, Suite 500, Mt. Laurel, NJ 08054
HyperCaster® is a registered trademark of TelVue Corporation 800-885-8886 / www.telvue.com
34
The Add Program function does not capture or import the content. Use the Record tab or your
installation’s encoding equipment to capture content. Use the Import feature on the Content tab to
import content onto the TelVue server.
Playlists
A playlist is a list of content that can be scheduled as continuity to play in a looping sequence rather
than playing just a single content file as continuity. Playlists cannot be scheduled as programming;
they can be used only for continuity.
Note: If you want to replicate a schedule of content to play at certain times, use the Export and
Import features on the Programming page.
Create Playlist
To create a playlist, click the Create Playlist button under the Playlists tab on the Content page. A
blank Playlist Metadata screen is displayed.
Fill in the playlist metadata fields as needed.
Descriptions
• Name – the name of the playlist.
• Program Code – A code that distinguishes what type of program this is, if program codes are
used in this installation.
• Program – The name of the playlist, if this installation does not use program codes.
• Episode Code – A code that distinguishes what episode of a series this is, if episode codes
are used in this installation.
• Episode – If this installation does not use episode codes but an episode name applies to this
playlist, enter it.
• Description – A brief description of the playlist, such as the type of files it contains.
Visibility
Private? – If you want this playlist’s contents to be invisible to other users, check this box. Private
playlists will not even be displayed in the content window for users who do not own them; they will be
invisible. However, users with Admin privileges can see all private playlists, even those they do not
own.
Page 36

TelVue HyperCaster® User Manual / v5.0 / October 2014
© 2014 TelVue Corporation 16000 Horizon Way, Suite 500, Mt. Laurel, NJ 08054
HyperCaster® is a registered trademark of TelVue Corporation 800-885-8886 / www.telvue.com
35
Categories
Select one or more content categories from the list.
When you have finished entering the playlist metadata, click the Save button. You now see the
Manage Playlist Items screen. See My Playlists: Manage Items to continue building the playlist.
Playlist Actions
The next two sections under Playlists let you manage playlists and their content. The difference
between “My Playlists” and “All Playlists” is that you can edit, manage, append content to, and delete
your playlists in the “My Playlists” list that are owned by you, but you can only view and copy playlists
in the “All Playlists” list that are owned by other users. Administrators can view and manage all
playlists, but other users cannot view private playlists other than their own and can manage only their
own playlists.
My Playlists: Edit Metadata
To edit the metadata in a playlist, select the playlist from the drop-down list and click the Edit
Metadata button. Change the playlist metadata and click the Save button. Once you have saved the
metadata changes, you can also add or delete items from the playlist by clicking Manage Playlist
Items next to the Save button.
My Playlists: Manage Items
To add, delete, or re-order items from a playlist, select the playlist from the drop-down list and click
the Manage Items button. The Manage Playlist Items screen is displayed.
Use the Search features to find images. Drag and drop image icons from the Search Results column on
the left of the screen to the playlist area.
To change the order of items in the playlist, drag the item’s icon to the place where you want it or
change its number in the box to the right of the icon. To delete an item from the playlist, click its trash
icon. When you have finished, click the Save Changes button. Click on Content to return to the
Content page, Playlist Metadata to edit the metadata for the playlist, or Enter Item Edit Mode to edit
individual item details such as the image duration.
Important: Your playlist changes will only be saved if you click the Save Changes button after
making changes.
My Playlists: Manage Items: Enter Item Edit Mode
Item Edit Mode allows you to see the duration, offset, and content detail for all items in the playlist.
To see and edit items, click on Enter Item Edit Mode at the top of the Manage Playlist Items
window. The list of items in the playlist is displayed. The top of the table shows how many items are
in the playlist and the duration of the entire playlist.
Page 37

TelVue HyperCaster® User Manual / v5.0 / October 2014
© 2014 TelVue Corporation 16000 Horizon Way, Suite 500, Mt. Laurel, NJ 08054
HyperCaster® is a registered trademark of TelVue Corporation 800-885-8886 / www.telvue.com
36
To edit the information for a playlist item, click on its Edit icon in the Action column. The Edit Playlist
Item screen is displayed.
You can change the duration of this image in this playlist by entering a new duration in hours,
minutes, and seconds. When you have finished, click on Save, or click Cancel to return to Item Edit
Mode without making any changes. When you have finished editing items in the playlist, click Exit Edit
Item Mode in the upper right corner to return to the Manage Playlist Items screen.
My Playlists: Append Content
To add content to the end of a playlist from the main Content page, check one or more thumbnails to
select them.
Select the playlist from the drop-down list and click the Append Content button. The system asks
you confirm; click OK to append the content. The new items are added to the end of the playlist and a
confirmation message is displayed at the top of the page.
My Playlists: Delete Playlist
To delete a playlist, select it from the My Playlists drop-down list and click the Delete Playlist button.
The system asks you confirm; click OK to delete the playlist.
All Playlists: View Metadata
To see a playlist’s metadata, including non-private playlists owned by another user, select the playlist
from the drop-down list and click the View Metadata button. The metadata screen for the playlist is
displayed.
You can view the metadata but you cannot edit it. To return to the Content screen, click the
word Content or the Content tab at the top of the page.
All Playlists: View Items
To see the content in a playlist, including non-private playlists owned by another user, select the
playlist from the drop-down list and click the View Items button. The list of items in the playlist is
displayed.
Page 38

TelVue HyperCaster® User Manual / v5.0 / October 2014
© 2014 TelVue Corporation 16000 Horizon Way, Suite 500, Mt. Laurel, NJ 08054
HyperCaster® is a registered trademark of TelVue Corporation 800-885-8886 / www.telvue.com
37
You can view the items in the playlist but you cannot edit them. To return to the Content screen, click
the word Content or the Content tab at the top of the page.
All Playlists: Copy Playlist
If you want to create a playlist that is similar to one that already exists, start by copying the existing
playlist. To copy a playlist, including one owned by another user, select it from the All Playlists dropdown list and click the Copy Playlist button. The metadata page for the playlist is displayed, with a
new playlist name in the format Copy(n) of Playlist Name.
Change the name and any other metadata as you would when creating a playlist. When you have
finished, click the Save button. To view or change the playlist items, click on Manage Playlist Items.
To return to the Content page, click the Content tab or on Content at the top of the page.
Archiving
The HyperCaster can be integrated with your own near-line NAS or SAN storage array. This feature
makes it easy to expand storage capacity by connecting to an existing or outside archive server. Once
integrated, the archived content is tracked in the same database as the HyperCaster content, making
it available for broadcast at any time, and eliminating having to keep
two separate systems.
The Archive server type shows up as an option in the pulldown menu
under Config → Remote Servers. From here you can choose to mount
your NAS via FTP or SMB.
Follow the instructions for configuring a remote server.
Once one or more archive servers are configured, you will see a new
Archive/Export section on the Content tab side panel. Here you can perform bulk
archiving actions including:
• Archiving content to one or more Archive Servers
• Restoring content from Archive
• Deleting content from Archive
When Archiving, you can optionally choose to have the local, online version
deleted from the HyperCaster after the Archive action is completed.
All archiving actions are performed as Tasks in the background, and you can see
the real-time progress on the Tasks tab.
Archived material can be searched from the Advanced Search on the Content
Sidebar, Calendar Scheduling Sidebar, and Manage Playlist Sidebar, with options
to filter your search by Storage Location.
Page 39

TelVue HyperCaster® User Manual / v5.0 / October 2014
© 2014 TelVue Corporation 16000 Horizon Way, Suite 500, Mt. Laurel, NJ 08054
HyperCaster® is a registered trademark of TelVue Corporation 800-885-8886 / www.telvue.com
38
A small blue storage box icon will
show up in the corner of the
thumbnail of any content that
has been archived.
A small broken link icon will show
up in the corner of the thumbnail
of any content that is archived
and no longer online (local) on
the HyperCaster’s own storage.
Additionally, the thumbnail is
faded out. This means the
content only exists on Archive,
and is considered to be Offline.
Archived content can still be seen and scheduled – like any other video on the HyperCaster. It can
also be previewed if a preview was created while a local copy still existed. When Offline content is
scheduled, the HyperCaster will automatically retrieve the content from Archive. How fast content can
be retrieved depends on the speed of your storage and network, the size of the file, and whether there
are other retrieval tasks in progress or in queue. As such, it is important to consider this when
scheduling offline content to make sure you are scheduling enough in advance to ensure the file is
retrieved prior to the start of the event.
Scheduled content that is still Offline is highlighted on your schedule with a slight fade out on the
schedule entry text. Offline scheduled content will also show up in the Missing File Report, XML feed,
and System Health based on the time window to be alerted. You can set the Missing File Alert Window
on the Config–>Schedule page. This is useful for example to receive email alerts in advance of playout
for missing files, whether those are TBD programs where the file as not been imported, or Offline
content that has not yet been retrieved.
A time-saving feature, if you choose to enable it, is to ask the HyperCaster to auto-archive content
upon import. This setting is found under Config → Content → Content. With this option enabled,
whenever content is imported, it will automatically be archived to the designated Archive server.
Export
To export the content list as a file named content.csv, click the Export icon on the left side of the
Content page. If your file system permits, you may rename the file. This file includes the filename
and duration of all the content on your server. Some installations find it helpful to have a list of what
is on their server. Others sort the content.csv file by duration so they can quickly find content that
can fill programming gaps
Content RSS Feed
The RSS feed button on the left side of the Content page is a quick link to information on the imported
content on your server in an RSS-like format. The actual display depends on the browser you are
using, and may include:
Page 40

TelVue HyperCaster® User Manual / v5.0 / October 2014
© 2014 TelVue Corporation 16000 Horizon Way, Suite 500, Mt. Laurel, NJ 08054
HyperCaster® is a registered trademark of TelVue Corporation 800-885-8886 / www.telvue.com
39
• Content filename, typically with a link to the Show Content page.
• When the content most recently played.
• Date and time the content record was last updated.
• Content categories.
• To return to the User Interface, click on your browser’s Back button.
Record
If your HyperCaster includes the IP Capture feature, the Record page allows you to capture files to
your media library or for future playout. It also shows you the real-time status of the active capture.
This page essentially acts like a simple VCR control for the capture feature.
Field Descriptions
• Capture Status– shows the state of the encoder. Possible states include:
o STOPPED –not currently recording.
o STARTED –currently recording.
o ERROR – the Web Application has detected a problem. Look at the top of the screen
for a description of the error.
• Elapsed Time – the amount of time it has been recording, in hours, minutes, and seconds.
• File Information:
1. Filename – If you are not using a placeholder name, enter a name for the file to be
recorded. Filenames must be unique on the server.
2. Unattached Program – If you have created a placeholder on the Content page for the
program you want to record, select it from the drop-down list.
3. File Duration – the duration of the capture in hours, minutes, and seconds (HH:MM:SS).
If left blank or set to 00:00:00, it default to 20:00:00. You may stop the capture and save
the file at that point at any time by clicking on the Stop Capture button.
• Feed Information– choose an incoming IP stream from the dropdown menu.
Tasks
The Tasks page displays the tasks the HyperCaster is performing in the background. Most background
tasks are normalization of content files.
Page 41

TelVue HyperCaster® User Manual / v5.0 / October 2014
© 2014 TelVue Corporation 16000 Horizon Way, Suite 500, Mt. Laurel, NJ 08054
HyperCaster® is a registered trademark of TelVue Corporation 800-885-8886 / www.telvue.com
40
Field Descriptions
• Filename – the name of the content file. Click on the filename to go to its Show Content
page.
• Task – what is being done to the file. The most common task is normalization.
• Status – whether the task is queued, multiplexing, or finished. For more information click on
the underlined status.
• Size – the size of the content file. Larger files typically require more time to normalize.
• Queued at – the date and time the HyperCaster scheduled the background task.
• Started at – the date and time the HyperCaster began the task. Most tasks are begun almost
immediately.
• Completed at – the date and time the HyperCaster finished the background task. Most tasks
are finished in a few seconds. If a background task does not complete in a reasonable length
of time, you can cancel it.
Programming
The Programming page shows both historical and pending events and allows you to manage the
schedule. Use this page to schedule playout, switch, capture, stream, device, and graphic overlay
events up to one year from today’s date.
Remember to schedule only content that is playable on your server. Your content must be encoded to
the specifications listed in the content section.
There are two programming views: Calendar and Classic.
Classic View
The default programming view is Classic View, which displays all events in table format. By default,
100 events are displayed per page in chronological order. Use the drop-down list at the top of the
page to display 10 – 1,500 programming events on the page.
Page 42

TelVue HyperCaster® User Manual / v5.0 / October 2014
© 2014 TelVue Corporation 16000 Horizon Way, Suite 500, Mt. Laurel, NJ 08054
HyperCaster® is a registered trademark of TelVue Corporation 800-885-8886 / www.telvue.com
41
Colors– the events list is color-coded for readability.
Gray – historical data. Events that have already been played are part of the history, and appear with
gray backgrounds. They can be viewed but not changed.
Scheduled (no color) – the event has been scheduled.
Green – the active event, such as a playout that is currently playing.
Yellow – the event you just scheduled
Field Descriptions and Display Options
To sort on any of the hyperlinked fields, click on the underlined hyperlink at the top of the column.
• (Checkbox) – allows you to choose one or more events for an action by checking the box. To
deselect an event, click in the checked box to “uncheck” it. To select all events on the page
(not necessarily all titles on the system), click the check box in the top header; all events on
the page will be automatically selected.
Note: To select all content in your system (up to 1,500 titles), first choose Show 1500 per page
from the drop-down box next to the words Classic View. Then click in the checkbox in the top
header.
• Type – shows whether this is a switch, capture, overlay, playout, stream, or device event.
• Out – the switch output port for a switch event.
• In – the A/V input port for a switch event. If breakaway is enabled, the “Audio In” and “Video
In” columns are displayed.
• Chan – the server output channel on which this event will occur.
• Feed – the server input feed for this event, such as a capture.
• Day – the day of the week for which this event is scheduled.
• Start Date – the date on which this event is scheduled to begin in the form MM/DD/YYYY.
• Start – the time of day this event is scheduled to begin, in 24-hour format.
• End – the time of day this event is scheduled to end, in 24-hour format. If an event runs past
midnight on its start date, its end time will appear to be earlier than its start time.
• Source – the name of the file for playouts and overlays. For captures and stream events the
source is the feed. For device events the source is the event name. For switch events the
source is the video input.
• Duration – the duration of this event in hours, minutes, and seconds.
• Program or Program Code – the program name or code from the event’s metadata.
• Episode or Episode Code – the episode name or code from the event’s metadata.
• Recur – if the event is a recurring event this field will display “Yes”, otherwise it will display
“No”.
• Action – lists the actions available for the event:
• View – allows you to see an event that has passed.
• Modify –allows you to change the parameters of an event that has not played.
• + (“Plus”) – allows you to schedule an event of the same type immediately after this one.
The + link exists for an event as long as there is a time gap between that event and the next
playout or stream event.
• p (“Playout”) – allows you to schedule a playout event after this event. The p link is
displayed as long as there is room in the schedule for a playout between this event and the
next event that will play through the server.
• s (“Stream”) – allows you to schedule a stream event after this event. The s link is
displayed as long as there is room in the schedule for a stream event between this event and
the next event that will play through the server.
• x (“Cross”) – allows you to add another type of event immediately after this one by crossing
from playout to switch, or switch to playout.
Page 43

TelVue HyperCaster® User Manual / v5.0 / October 2014
© 2014 TelVue Corporation 16000 Horizon Way, Suite 500, Mt. Laurel, NJ 08054
HyperCaster® is a registered trademark of TelVue Corporation 800-885-8886 / www.telvue.com
42
Display Options
The Classic View of the Programming page offers display options to control how many events appear
on the page at once.
• Calendar View – To see the Programming page in Calendar View, click on the words Calendar
View at the top left of the page. Calendar View lets you schedule playout events by dragging
and dropping icons onto a calendar.
• Show – To select how many events to display on the page, choose 10, 20, 50, 100, 500,
1000, or 1500 from the drop-down list.
Search Filters and Event Functions
Search Filters
The programming list may be filtered in several ways, using the drop-down lists and checkboxes in the
Search Filters section. To display a set of events, use the filters to set your search criteria, then press
the Search button at the end of the second row of search filters.
To suppress the search filters so you cannot see them on the page, click on Hide Search Filters in the
upper right corner of the page.
• Output – allows you to select the switch A/V output on which to filter. Select one output or all
output ports.
• Channel – allows you to select the server channel on which to filter. Select one channel or all
channels.
• Feed – allows you to select the feed on which to filter. This filter is available only in systems
with the IP Capture feature or capture capability such as DVB-ASI. Select one feed or all
feeds.
• Start Date – to see a different start date up to one year from now for the programming list,
click on a Calendar icon or type in a date in the form MM/DD/YYYY.
• End Date – to see a different end date up to one year from now for the programming list,
click on a Calendar icon or type in a date in the form MM/DD/YYYY.
• From – the earliest time of the day you want to see. To see events starting after midnight
(00:00:00) type the time in the boxes using 24-hour format.
• To – the latest time of the day you want to see. To see events ending before 11:59 PM
(23:59:59), type the time in the boxes using 24-hour format.
• Day of the Week – to display events beginning on some days of the week but not others,
check or uncheck the boxes as needed. For example, to display weekend events, check the Su
and Sa boxes and uncheck the others.
• Hide History – to suppress the display of events that have already occurred, beginning with
the start date and time, check this box. To see events that have already occurred, uncheck
the box.
• Switch – To hide switch events, uncheck the Switch box. This box appears only in systems
with a video switch.
• Playout – To hide playout events, uncheck the Playout box.
• Capture – To hide capture events, uncheck the Capture box. This box appears only in
systems with the IP Capture feature or capture capability such as DVB-ASI.
• Keywords – to filter for programming that contains certain words in the filename or
metadata, type the word or words in the box.
• Reset – to return to the defaults for all search filters, click the Reset button.
Event Functions
Below the Search Filters is a row of buttons that let you add events. You can add switch, stream, or
device events, playouts, overlays, or captures, depending on your server model.
Page 44

TelVue HyperCaster® User Manual / v5.0 / October 2014
© 2014 TelVue Corporation 16000 Horizon Way, Suite 500, Mt. Laurel, NJ 08054
HyperCaster® is a registered trademark of TelVue Corporation 800-885-8886 / www.telvue.com
43
Programming Functions: Add Switch Event
If this HyperCaster has been configured to control a video switch, you can schedule switch events. You
might schedule a switch event to broadcast from a live feed or to play a bulletin board.
Note: Manually switching by pressing the buttons on the switch panel or clicking on lock for
that switch output on the Dashboard overrides programmed switch events. The TelVue
software polls the switch 1 second before a scheduled switch event. If the switch has been
manually switched away, the scheduled switch event will be postponed until you unlock the
switch by pressing the buttons on the switch panel or going to the Dashboard and clicking on
unlock for that switch output.
To schedule a switch event from the Programming page, use the Add Switch Event button and enter
information about the date and time.
1. On the Dashboard, make sure the output port you plan to use is unlocked.
2. On the Programming page, click the Add Switch Event button. The Schedule Switch Event
page is displayed.
3. Fill in the fields on the screen as described below.
Port Settings
• A/V Output Port – Select a switch output port from the drop-down list.
• A/V Input Port – Select a switch input port from the drop-down list. If your switch
supports disabling an output select none to turn off the output. If breakaway is enabled,
separate drop-down lists for video input port and audio input port are displayed as shown
in the illustration.
• Duration – optional. However, a duration is recommended so the switch will return home
when the event ends. Enter the time you want the switch event to last in HH:MM:SS
format. Entering a duration also enables conflict checking on the specified output port for
the duration of the event. If you enter 00:00:00 the output will remain switched away
until you change it. If you previously ran a switch event with 0 duration that switched
away from the home port, you can schedule a 0 duration switch event to the home port to
resume normal operation.
Date & Time
• Start – Use a Calendar icon to select a date up to one year from now for the switch event.
• Time – Enter a start time in HH:MM format using 24-hour time. For example, 1:00 PM is
13:00:00.
• Switch Immediately – To start the switch event as soon as the Save button is clicked,
check this box.
Optional Recurrence
Page 45

TelVue HyperCaster® User Manual / v5.0 / October 2014
© 2014 TelVue Corporation 16000 Horizon Way, Suite 500, Mt. Laurel, NJ 08054
HyperCaster® is a registered trademark of TelVue Corporation 800-885-8886 / www.telvue.com
44
If you want to schedule this switch event for the same time on certain days of the week, complete
this section.
• Days of the Week – Check one or more boxes to the right of the day of the week to
make the switch on that day. To switch every day, click Daily, which will check all the
boxes. To uncheck all the boxes, click on None. There is a one-year limit on scheduling
recurring events.
• Until Date – Use a Calendar icon to select the last day for the switch event to recur, up to
one year from today. The last switch will occur on the last day of the week up to and
including the date you select.
Optional Program Guide Data
Enter metadata for switch events that correspond to on-air programs to be included in the
Program Guide.
• Include in Program Guide – checked by default. If you do not want the automatically
generated program guide to display this event, uncheck this box.
• Program Code – the code for this program, if used. A switch event need not have a
Program Code.
• Episode Code – the code for this episode, if applicable.
• Program – The name of the program as it would be displayed in the Program Guide. If
you need to change it (for example, to correct a misspelling), click in the box and type the
changes.
• Episode – If the file is part of a program series and each episode has a name, it is
displayed here. If you need to change it (for example, to correct a misspelling), click in the
box and type the changes.
• Description – A synopsis of the event as it would be displayed in a detailed program
guide or for a search. If you need to change it (for example, to correct a misspelling), click
in the box and type the changes.
4. Click the Save button to add the switch event to the schedule.
5. The server checks for errors. If none are detected, the Programming page is displayed with the
new switch event on the list.
For information on scheduling live switch events whose actual duration can vary, please see the
Typical Use Cases section of this manual.
Programming Functions: Add Playout Event
To schedule a single or recurring playout from the Programming page, use the Add Playout
Event button and enter the playout’s informatio
1. On the Programming page, click the Add Playout Event button. The Schedule Playout page is
displayed.
Page 46

TelVue HyperCaster® User Manual / v5.0 / October 2014
© 2014 TelVue Corporation 16000 Horizon Way, Suite 500, Mt. Laurel, NJ 08054
HyperCaster® is a registered trademark of TelVue Corporation 800-885-8886 / www.telvue.com
45
2. Fill in the fields on the screen as described below.
Channel & Content
• Channel – If this is a multi-channel installation select a channel from the drop-down list. If
this is a single-channel installation the channel will already be selected.
• File –Select any file from the drop-down list. Metadata, or information about the file, is
automatically displayed.
Offset – Duration or Start Trim – End Trim
Depending on the schedule settings you chose in Config ◊ Schedule Configuration,
your TelVue® server uses either Offset and Duration or Start Trim and End Trim to
determine where file playout should start and stop and how long the playout should
be.
• Offset –The application fills in the content file’s duration from the metadata. To change the
offset for this playout only, enter a new offset in the form HH:MM:SS. The offset in the
playout’s metadata remains the same.
• Duration – The application fills in the content file’s duration from the metadata. To change
the duration for this playout only, enter a new duration in the form HH:MM:SS.
• Calculate Max Duration – This utility subtracts the offset from the untrimmed length of the
file to get the duration without any end trim. Click on the words Calculate Max Duration to use
it. If you want the runtime to be less than the max duration, change the entry in the Duration
field after calculating the Max Duration.
Note: To store an offset and duration to be used every time this file is scheduled, edit
and save the file’s properties.
• Start Trim –The application fills in the content file’s start trim from the metadata. To change
the start trim for this playout only, enter a new trim in the form HH:MM:SS. To play the file
from its beginning, leave this field blank.
• End Trim –The application fills in the content file’s end trim from the metadata. To change the
end trim for this playout only, enter a new trim in the form HH:MM:SS. To end the playout
when the file ends, leave this field blank.
• Actual Duration – The original, untrimmed duration of the file. Offset + Duration = Actual
Duration.
Note: To store a start trim and end trim to be used every time this file is scheduled,
edit and save the file’s properties.
• Program Number – If the video is out of a series, the episode number would be entered
here.
Date & Time
• Start – Use a Calendar icon to select a start date or enter a date in the form MM-DD-YYYY up
to one year from today.
• Time – Enter the start time in HH:MM:SS format using 24-hour time. For example, 1:00 PM is
13:00:00.
• Play Immediately – To start playout as soon as the Save button is clicked, check this box.
• Cancel Conflicting Events – Check this box if you want the current event to take precedence
over any previously-scheduled events.
Page 47

TelVue HyperCaster® User Manual / v5.0 / October 2014
© 2014 TelVue Corporation 16000 Horizon Way, Suite 500, Mt. Laurel, NJ 08054
HyperCaster® is a registered trademark of TelVue Corporation 800-885-8886 / www.telvue.com
46
Optional Recurrence
• Day of Week – Check one or more boxes to the right of the day of the week to have the file
play on that day at the specified time. To play the file every day, click Daily, which will check
all the boxes. To uncheck all the boxes, click None. There is a one-year limit on recurring
playouts.
• Until Date – Use a Calendar icon to select the last day for the recurring playout. If you are
playing the file on several days of the week, it will play on the last day up to and including the
date you select. There is a one-year limit on recurring playouts.
Optional Program Guide Data
• Include in Program Guide – checked by default. If you do not want the program guide
report to display this playout, such as for a test file, uncheck this box.
• Track Content Metadata – checked by default. If the box is checked, the schedule will use
the metadata stored for this content file. Uncheck the box to override the metadata for the
selected file.
• Program Code –A code that distinguishes what type of program this is, if program codes are
used in this installation.
• Episode Code –A code that distinguishes what episode of a series this is, if episode names
are used in this installation.
• Program – If this installation does not use program codes, the name of the program.
• Episode – (when episode codes are not used) If the file is part of a series and each episode
has a name, it is displayed here.
• Description – Type a detailed description of the content.
3. Click the Save button to add the playout to the schedule.
4. The server checks for errors. If none are detected, the Programming page is displayed with the new
entry.
Programming Functions: Add Overlay
To schedule a single or recurring Graphic Overlay (either Bug, Ticker or Snipe) from the Programming
page, click the Add Overlay Event button and enter the Overlay’s scheduling information.
Page 48

TelVue HyperCaster® User Manual / v5.0 / October 2014
© 2014 TelVue Corporation 16000 Horizon Way, Suite 500, Mt. Laurel, NJ 08054
HyperCaster® is a registered trademark of TelVue Corporation 800-885-8886 / www.telvue.com
47
1. Fill in the fields on the screen as described below.
Channel & Overlay
• Channel – Select a channel from the drop-down list.
• Overlay – Select either a Bug, Ticker of Snipe from the drop-down list.
• Duration – Fill in the time you want to display the graphic Overlay on the channel in hours,
minutes, and seconds (HH:MM:SS).
Date & Time
• Start – Use a Calendar icon to select a date for the Overlay event to begin.
• Time – Enter a start time for the stream event in HH:MM:SS format using 24-hour time. For
example, 1:00 PM is 13:00:00.
• Play Immediately – To display the graphic Overlay as soon as the Save button is clicked,
check this box.
Optional Recurrence
• Day of Week – Check one or more boxes to the left of the day of the week to repeat the
Overlay on that day. To repeat this Overlay every day, click Daily, which will check all the
boxes. To uncheck all the boxes, click None. There is a one-year limit on scheduling Overlay
events.
• Until Date –Use a Calendar icon to select the last day for the Overlay to recur up to one year
from today. If you scheduled the Overlay to play several days per week, it will occur up to and
including the date you select.
2. Click the Save button to add the playout to the schedule.
3. The server checks for errors. If none are detected, the Programming page is displayed with the new
entry.
Programming Functions: Add Capture Event
The Add Capture Event feature is available only at installations with the IP Capture feature. Use this
action to set up the captures.
1. On the Programming page, click the Add Capture Event button. The Schedule Capture page is
displayed.
Page 49

TelVue HyperCaster® User Manual / v5.0 / October 2014
© 2014 TelVue Corporation 16000 Horizon Way, Suite 500, Mt. Laurel, NJ 08054
HyperCaster® is a registered trademark of TelVue Corporation 800-885-8886 / www.telvue.com
48
2. Fill in the fields on the screen as described below.
Feed & Capture
The Feed & Capture section is displayed only in systems with the IP Capture feature.
• Feed – Select a feed from the drop-down list. You can configure your feeds on Configuration
–> Feeds –> Live Streams
• Filename – Enter a name for the captured file.
• Autoname – To name the captured file automatically with the feed name and date and time
of capture, check this box.
• Unattached Content – If you have already scheduled a TBD placeholder for this content,
select the date and title from the drop-down list. The default is the TBD event closest to the
current date and time.
Date & Time
• Start – Use a Calendar icon to select a date for the capture to begin up to one year from now.
• Time – Enter a start time for the capture in HH:MM:SS format using 24-hour time. For
example, 1:00 PM is 13:00:00.
• Duration – Set the total time for the capture in hours, minutes, and seconds
(HH:MM:SS). The maximum capture time is 6 hours (06:00:00). If your installation
anticipates a longer capture, contact TelVue® Support.
• Preroll – Enter the number of seconds before the beginning of the capture time to start
capture, if desired. For example, a one-hour capture beginning at 3:00 AM with a 5-second
preroll will actually capture from 2:59:55 – 4:00:00.
• Postroll – Enter the number of seconds after the end of the capture time to end capture, if
desired. For example, a one-hour capture beginning at 3:00 AM with a 5-second postroll will
actually capture from 3:00:00 – 4:00:05.
• Capture Immediately – To start the capture as soon as the Save button is clicked, check
this box.
Auto Delete
• Auto Delete Date – Use a Calendar icon to select a date for the captured file to be deleted
from the server.
• Time – Enter a deletion time for the captured file in HH:MM:SS format using 24-hour time.
For example, 1:00 PM is 13:00:00. The default is midnight.
Optional Recurrence
• Day of Week – Check one or more boxes to the left of the day of the week to repeat the
capture on that day. To capture video every day, click Daily, which will check all the boxes. To
uncheck all the boxes, click None. There is a one-year limit on scheduling captures.
• Until Date – Use a Calendar icon to select the last day for the capture to recur up to one year
from today. If you plan to capture video on several days of the week, the capture will occur up
to and including the date you select.
Optional Program Guide Data
This program guide data will become the metadata for the capture.
• Program Code – Enter a code that distinguishes what program this is, if program codes are
used in this installation.
• Episode Code – Enter a code that distinguishes what episode of a series this is, if episode
codes are used in this installation.
• Program – If this installation does not use program codes, enter the name of the program.
• Episode – Enter the name of the episode, if applicable.
Page 50

TelVue HyperCaster® User Manual / v5.0 / October 2014
© 2014 TelVue Corporation 16000 Horizon Way, Suite 500, Mt. Laurel, NJ 08054
HyperCaster® is a registered trademark of TelVue Corporation 800-885-8886 / www.telvue.com
49
• Description – Enter a detailed description of the capture.
3. Click the Save button to add the capture to the schedule.
4. The server checks for errors. If none are detected, the Programming page is displayed with the
new capture.
Programming Functions: Add Stream Event
The Add Live Stream Event feature is available only at installations that are configured for streaming.
From the Programming page, click the Add Stream Event button and enter information about the
date and time.
1. On the Programming page, click the Add Stream Event button. The Schedule Live Stream
Event page is displayed.
2. Fill in the fields on the screen as described below.
Channel & Content
• Channel – Select a channel from the drop-down list.
• Feed – Select a feed from the drop-down list.
• Duration – Fill in the time you want to stream from the channel in hours, minutes, and
seconds (HH:MM:SS).
Date & Time
• Start – Use a Calendar icon to select a date for the stream event to begin up to one year from
now.
• Time – Enter a start time for the stream event in HH:MM:SS format using 24-hour time. For
example, 1:00 PM is 13:00:00.
• Stream Immediately – To start streaming as soon as the Save button is clicked, check this
box.
• Cancel Conflicting Events – Check this box if you want the current stream to take
precedence over any previously-scheduled events.
Page 51

TelVue HyperCaster® User Manual / v5.0 / October 2014
© 2014 TelVue Corporation 16000 Horizon Way, Suite 500, Mt. Laurel, NJ 08054
HyperCaster® is a registered trademark of TelVue Corporation 800-885-8886 / www.telvue.com
50
Optional Recurrence
• Day of Week – Check one or more boxes to the left of the day of the week to repeat the
stream on that day. To repeat this stream every day, click Daily, which will check all the
boxes. To uncheck all the boxes, click None. There is a one-year limit on scheduling stream
events.
• Until Date –Use a Calendar icon to select the last day for the stream to recurup to one year
from today. If you plan to stream from this channel several days per week, it will occur up to
and including the date you select.
Optional Program Guide Data
This program guide data will become the metadata for the stream.
• Program Code – Enter a code that distinguishes what program this is, if program codes are
used in this installation.
• Episode Code – Enter a code that distinguishes what episode of a series this is, if episode
codes are used in this installation.
• Program – If this installation does not use program codes, enter the name of the program.
• Episode – Enter the name of the episode, if applicable and if this installation does not use
episode codes.
• Description – Enter a detailed description of the stream event.
3. Click the Save button to add the stream event to the schedule.
4. The server checks for errors. If none are detected, the Programming page is displayed with the
new stream.
Scheduling Conflicts and Ripple
You can schedule several types of events at once, as long as they do not conflict with one
another. For example, you can schedule a playout and an overlay to run at the same time. Likewise
you can run a playout on one channel and a live stream on another channel. Scheduling a playout
and a live stream for the same channel at the same time, however, can cause a conflict.
If you schedule a conflict, the application will offer you options. Not all options are possible for all
conflicts.
Ripple – fit the event into the schedule and push everything else forward. This is a useful option if
the playout overlaps the next event by just a few seconds.
Ripple stops at midnight. If an earlier event is rippled, then any event scheduled over the
midnight hour will end at midnight, even if there is a schedule gap at 00:00:00.
If you ripple an event at 19:00:00 so the next event starts at 20:00:05, then all subsequent
playouts will start 5 seconds late until midnight or until the web application finds a gap of 5 or
more seconds, whichever comes first.
Ripple pushes playout events forward, but not overlay events.
Page 52

TelVue HyperCaster® User Manual / v5.0 / October 2014
© 2014 TelVue Corporation 16000 Horizon Way, Suite 500, Mt. Laurel, NJ 08054
HyperCaster® is a registered trademark of TelVue Corporation 800-885-8886 / www.telvue.com
51
• Start this Event Late – Let the event begin later than you tried to schedule it. If this is a
playout, viewers will not see the beginning of the file. Similarly, they will not see the intended
beginning of stream or switch events.
• End this Event Early – Let the event end earlier than you tried to schedule it so the next
event can begin on time. If this is a playout, viewers will not see the end of the
file. Similarly, they will not see the intended ending of stream or switch events.
• Cancel this Event – Remove the event you just tried to schedule. It might be best to begin
again, especially if you did not expect a conflict. For example, you might have scheduled a
playout for the wrong channel.
If you want to ripple any switch events or device events forward as well, check the boxes. However,
rippling switch and device events forward means they will start later than originally scheduled. For
example, suppose you scheduled a switch event to a live feed from town hall so you could broadcast
the mayor’s speech at 10:00 AM. Then suppose you schedule a playout at 8:00 AM that creates a 5minute conflict. If you ripple the schedule forward and include the switch event, you will switch to
town hall at 10:05 AM. If you do not include the switch event in the ripple, the event just before the
10:00 AM switch event will end 5 minutes early.
Programming Functions: Unschedule an Event
Single or multiple events can be removed from the programming schedule.
To unschedule an event:
1. Use the checkbox to select one or more events on the Programming page.
2. Click the Unschedule button. The application asks you to confirm the cancellation. If this is
a recurring event and you click Yes/OK, the application presents three choices.
• Unschedule just the selected event – Cancels just this instance of the playout or other
event. If the event is a playout in progress, this will cancel the playout immediately.
• Unschedule all recurrences linked to the scheduled event – Cancels all instances of the
playout or other event. All listings of the event are removed from the Programming
page. If the event is in progress, it is canceled immediately.
• Do not unschedule any events – Allows you to halt the cancellation.
3. Click on the appropriate cancellation choice. The Programming page is displayed without the
event.
Programming Functions: Block Copy
The HyperCaster v4.3 and above
supports Block Scheduling, a timesaving feature which allows the
programmer to copy groups of events
for insertion into different parts of the
programming schedule.
The “Block Copy” feature is accessible
from both the Classic and Calendar
Programming views.
• To create a new block of
programming, flrst check off
the events that you want
to include in that block
• Click on the “Block Copy”
button to open this pop-up
window:
Page 53

TelVue HyperCaster® User Manual / v5.0 / October 2014
© 2014 TelVue Corporation 16000 Horizon Way, Suite 500, Mt. Laurel, NJ 08054
HyperCaster® is a registered trademark of TelVue Corporation 800-885-8886 / www.telvue.com
52
• If you previously created and named a block of programs, you can choose one from the
pulldown menu on the right. If you do not choose a previously Saved Block, the currently
selected events will be used.
• Continue to the “Paste” section, where you will enter the Start Date/Time and Channel
information, and decide whether or not to cancel conflicting events.
• To paste to more than one programming slot, just click on the Add(+) link. Another time slot
option will appear.
• Under the “Manage” section, you can save your block of programming by name, or by adding
to an existing block.
• You can also delete blocks of programming that you no longer need.
With the Block Copy feature, you can easily do things like copy an entire day’s worth of programming
on Channel 1, and paste it to another day on that same Channel or other Channels. Or you can copy
and paste a block of programming for a specific day part range, or save commonly used blocks of
programming.
(Note: this feature was introduced in HyperCaster v4.3)
Programming Functions: Import and Export events
The HyperCaster can import event lists exported from other programs including other traffic and
scheduling systems such as Protrack and Facil for batch scheduling. Event list files are typically in CSV
or XML format. To import an event list:
1. On the Programming tab in Classic View, click the Choose File button and select the event list file
from your local computer file system.
2. Select the import format from the drop-down list. Possible formats include:
• Native – TelVue’s format that covers all event types on single-channel and multi-channel
systems and can be used for internal manipulations. Native can carry metadata associated
with the content, and you can edit the CSV file to change the metadata before importing.
Native format is recommended for batch copying, batch imports, and backups.
• Facil – a third-party format used by many access centers to manage assets, schedules, and
facilities. Facil supports only playout and switch events. It uses a Facil-specific CSV format.
• Annenberg – specific format requested by Annenberg Media. It supports only Channel 1 and
uses the format filename, start time. Annenberg files cannot have a header row.
• Protrack – a third-party format used for integrating with third-party broadcast traffic
systems. This format supports the Protrack raw log document format for scheduling playouts
and switch events. For imports, the log header must contain the TelVue channel name. For
switch events, the Protrack Source must match the TelVue Input Name, and the Switch
Input/Output settings for this channel must be correct. This format cannot be used for
exports.
3. Select a start date and time, if desired. If a start date and time is not provided, the dates and times
specified in the import list are used to schedule the events. If a start date and time is provided, the
schedule times in the event list file are moved relatively in a group to start at the new time. For
example, a four-hour schedule block from 8:00 AM-12:00 PM could be imported to start at 6:00 PM
and that same block would now be scheduled from 6:00 PM-10:00 PM.
Note: Either both the Start Date and Time fields must be filled in, or both fields must be left blank.
4. Click the Import button. When the import action is complete, the application generates a report
showing whether each entry scheduled successfully, and – if not – the reason.
To export an event list:
1. On the Programming tab in Classic View, filter the display for the events you want to
export, as needed.
Page 54

TelVue HyperCaster® User Manual / v5.0 / October 2014
© 2014 TelVue Corporation 16000 Horizon Way, Suite 500, Mt. Laurel, NJ 08054
HyperCaster® is a registered trademark of TelVue Corporation 800-885-8886 / www.telvue.com
53
2. Use the check boxes to select the events you want to export.
3. Select an export format from the drop-down list. Possible export formats include:
• Native – TelVue’s format that covers all event types on single-channel and multi-channel
systems and can be used for internal manipulations. Native can carry metadata associated
with the content, and you can edit the CSV file to change the metadata before
importing. Native format is recommended for batch copying, batch exports, and backups.
• Annenberg – specific format requested by Annenberg Media. It supports only Channel 1 and
uses the format filename, start time. It does not use a header row.
4. Click the Export button. The application exports the events to your file system in the
selected format. For example, if you exported files using the Native format, the export file
might be named export_native.csv.
Combining exporting with importing also provides a simple way to copy large scheduling blocks.
Native CSV Formatting
The Native CSV format can be used to import a schedule via the programming tab or by way of the
import/native hot folder on the server. It may also be exported from the server via the programming
tab, modified, and re-imported.
Required:
• Output – The server channel on which the video will be played.
• Date – Date of event in MM/DD/YYYY format.
• Time – Time of scheduled event in HH:MM:SS format.
• Type – Options include PLAYOUT, OVERLAY, STREAM, SWITCH, DEVICE.
• Source ID – The unique ID of the content that resides on the server. Null this field if you wish
to use the Source Name instead.
• Source Name – The name of the content item on the server.
• Offset – How far from the beginning of the file you want to start playing in seconds. 0 will
start from the beginning of the file.
• Duration– The length of time you want the playout to run in seconds.
Not Required:
These columns are not necessary for simple file plays. If any other action such as overlays or switch
events are used each column should be present in the below order.
• Output Name – The channel name
• Program Code – If program codes are used in your workflow, enter a code that distinguishes
what program this is. You can search on program codes in combination with a keyword search.
Page 55

TelVue HyperCaster® User Manual / v5.0 / October 2014
© 2014 TelVue Corporation 16000 Horizon Way, Suite 500, Mt. Laurel, NJ 08054
HyperCaster® is a registered trademark of TelVue Corporation 800-885-8886 / www.telvue.com
54
• Episode Code – If episode codes are used at your installation, enter a code that distinguishes
what episode of a program series this is.You can search on episode codes in combination with
a keyword search.
• Program – If this installation does not use program codes, enter the name of the program as
it should appear in the Program Guide.
• Title– Used for overlays.
• Episode – If this installation does not use episode codes, enter the name of the episode as it
should appear in the Program Guide, if applicable.
• Description – Enter a detailed description of the content as well as any keywords to be used
to search for this content.
• OSD – On-Screen Display & Emergency Notifications
• OSD Path – Path to the OSD
• OSD File – File name of the OSD
• Include In Guide – If you want the program guide report to display this playout.
• Track Content Attributes – If true the schedule will use the metadata stored for this content
file.
• Program Number – Use if program is many in a series. Found in the metadata of the file.
• Switch Command – Example of a switch from source 2 to output 1 is ” B002->001″
Tips on using Excel to help in scheduling
Excel will recognize the date column (B) and time column (C) as date and time values. But when doing
any calculations on them, you want them to behave as a combined date-time (so that, for example,
you properly roll over any midnight boundaries).
So in each cell you want to do a calculation (for example, the next cell’s date and time cells), you will
first combine the two values – just adding them will turn them into a combined date-time object. The
duration column (H) is shown in seconds, so to do math with it, use the TIME function, passing in the
H column as the third value (seconds).
Thus, to calculate a start date and time exactly after the previous program ends, the formula would
look like this (example here assumes current values are in row 2):
=B2+C2+TIME(0,0,H2)
This will at first give you a full date-time (5/24/2011 14:22), but use Excel’s Extract functions to
extract just the date (5/24/2011) or just the time with seconds (14:22:30) to match the column types
as expected. For the date, use the INT function, and for the time, use the MOD function. If we follow
the example above, they would be:
For the date, =INT(B2+C2+TIME(0,0,H2))
For the time, =MOD(B2+C2+TIME(0,0,H2),1)
You will repeat the exact same formula in both the B and C column, and may have to use Excle’s
formatting options to display only the date or only the time.
This way, you could create a sheet where each start date and time is calculated from the row before,
and you could enter whatever you want for the duration in each row.
Remember to empty the Source ID column if it does have values, as you want the import to match on
filename, which it will do if Source ID is blank.
Event Actions
The available actions for any event are listed in the Actions column on the right side of the
Programming screen in Classic View. You may view any event, and edit or add events associated with
an event that has not yet happened. For example, you can modify playout until it begins
playing. Shortly after the event has started the Modify option changes to View. When an action for a
specific event is selected, the Web Application opens the appropriate screen and automatically fills in
the available data, reducing typing and errors.
Page 56

TelVue HyperCaster® User Manual / v5.0 / October 2014
© 2014 TelVue Corporation 16000 Horizon Way, Suite 500, Mt. Laurel, NJ 08054
HyperCaster® is a registered trademark of TelVue Corporation 800-885-8886 / www.telvue.com
55
Event Actions: View
Past events can be viewed. Display the list of events on the Programming page, making sure the Hide
History box is unchecked. Click on the View action for the event. The example below shows the data
for a playout.
.
The information supplied when the playout was added is displayed in the Playout Detail screen. In
addition, the screen displays status information.
• Completed – The event ran normally.
• Ended Early/Late – The event stopped early or late.
• Missed – The event did not play.
• Terminated – The operator stopped the event.
To return to the Programming page, click the Close button at the bottom right of the screen.
Event Actions: Modify
To change some information about an event, click its Modify action. The information displayed is
identical to the information completed when the event was added but includes the event’s status.
• Pending or Scheduled – The event is scheduled but has not yet happened. It can still be
modified.
• Started – The event is currently playing or happening. It cannot be modified. If you need to
stop the event, go to the Dashboard and click the Stop button under the event.
When modifying an event you can change:
• Program Guide — Add the event to the Program Guide listing, or remove it if it is already
included.
• Metadata — Track or override the content metadata.
• Optional Recurrence — You can modify all recurrences or just this event. If you change
anything and want it to apply to all recurrences of the event, check the Update all recurrences
in this series? box.
Page 57

TelVue HyperCaster® User Manual / v5.0 / October 2014
© 2014 TelVue Corporation 16000 Horizon Way, Suite 500, Mt. Laurel, NJ 08054
HyperCaster® is a registered trademark of TelVue Corporation 800-885-8886 / www.telvue.com
56
When you have finished modifying the event, click the Save button to return to the Programming
page, or click the Cancel button to return to the programming page without changing anything.
Event Actions: Adding Subsequent Events
Use the action symbols to schedule others events immediately after this one.
• + “Plus” – Follow this event with another of the same type.
• p “Playout” – Schedule a playout event after this event.
• s “Stream” – Schedule a stream event after this event.
• x “Cross” – Schedule a switch event after this playout, or a playout after this switch event.
You can use these actions to construct a continuous schedule of events without re-entering dates and
calculating start times. The links are displayed for an event as long as there is a time gap between
that event and the next event. The Web Application fills in the correct data and start time information
so the new event will occur immediately after the preceding event finishes. In the example below, the
operator clicked on the Plus action of a playout event that was scheduled to end at 3:10 PM. The
date and time of the next playout are already filled in.
Fill in the displayed information as
needed, just as though you were adding
an event. Click on the Save button when
complete.
Calendar View
The other viewing mode available under the Programming tab is Calendar View, with today’s date at
the top of the page and a grid displaying the day’s programming. Each empty row in the grid
represents the time until the next 30-minute slot.
To switch to Calendar View from Classic View, click on Calendar View in the upper-left section of the
page.
Page 58

TelVue HyperCaster® User Manual / v5.0 / October 2014
© 2014 TelVue Corporation 16000 Horizon Way, Suite 500, Mt. Laurel, NJ 08054
HyperCaster® is a registered trademark of TelVue Corporation 800-885-8886 / www.telvue.com
57
Scheduling
Calendar View allows you to schedule by dragging-and-dropping video thumbnails from the slider on
the left on to the scheduling panel on the right. One or more scheduled events can also be dragged
from one place in the schedule to another. This reschedules (moves) the events.
Completed events can be selected so that they may be used as a basis for block copy/paste, or to
drag and drop schedule in the future.
Should you accidentally drag an event into a slot that conflicts with an existing event, a window will
alert you to the conflict, and offer the following options:
Views
To see the programming for an earlier date, click the double arrows << to the left of the date. To see
the programming for a later date, click the double arrows >> to the right of the date.
You can also jump from date to date by clicking on a date on the calendar under the Calendar tab on
the left side of the page.
The field names across the top of the Calendar View are:
• Time – the time of day when the event in this slot begins. When no programming is
scheduled the empty sections are divided into 30-minute time slots.
• Program – the program name of the playout, capture, or other event scheduled for that time
slot as taken from its metadata. If scheduled programming does not fill the 30-minute slot,
the display shows how much open time remains before the next 30-minute time slot.
• Episode – the name of an episode in a series, if available in the metadata.
• Source – the source of the playout or event, such as a filename or feed.
• Start – the exact time the playout or event will start, in HH:MM:SS format.
• Stop – the exact time the playout or event will end, in HH:MM:SS format.
• Duration – the length of time this event will run in hours, minutes, and seconds. If the event
is starting late or ending early, the duration shown will be shorter than the event’s actual
duration.
• Options – the available options or actions for this event, such as modifying it.
The menus on the left-hand side of the page offer more programming options.
Output
• Channels – to see programming for a particular output channel, select that channel from the
drop-down list.
• Switch Outputs – to see programming that is playing through a particular switch, select that
switch output from the drop-down list.
Page 59

TelVue HyperCaster® User Manual / v5.0 / October 2014
© 2014 TelVue Corporation 16000 Horizon Way, Suite 500, Mt. Laurel, NJ 08054
HyperCaster® is a registered trademark of TelVue Corporation 800-885-8886 / www.telvue.com
58
Calendar
Click on the Calendar bar to display the Calendar selection tool. To display the schedule for a different
month, click on the left-arrows (<<) or right-arrows (>>). To select a date, click on that date.
Bulk Actions
Bulk actions affect the playouts, but not the actual content.
• Unschedule – to remove an event from the schedule, select it and click the Unschedule
button. The application asks you to confirm the removal. Click on Yes (OK) to unschedule the
program. Otherwise click on No (Cancel), and the application leaves the programming
schedule unchanged.
Copy and Paste
Click on the Block Copy button to open the same copy/paste functions you have in the Classic View
Content Search
The Search window lets you narrow the list of content thumbnails displayed. Enter a keyword and
press Search. Any content that matches the criteria is displayed under Search Results.
To search on specific criteria such as category, duration, or how many times an event has played, click
on Edit Advanced Search to open the advanced search window. Fill in one or more criteria.
• Media Type – Choose from videos, still images (analog servers), or both.
• Category – Choose one content category or use all of them. The more disciplined your
installation is about categorizing content when adding it to the database, the more useful the
Category search criterion will be.
• Source – Choose from uploaded content, captured content, manually entered content, or any
source.
• Added – Select a time period when the content was added, 7 days ago to 5 minutes ago.
• Last Played – Select a time period when the content was last played on the server, from 7
days ago to 5 minutes ago, or anytime. This can help you avoid content that has been played
recently, or find content you want to run frequently.
• Play Count – Select a range corresponding to how many times the content has been played
on the server. This can help you schedule content that a sponsor expects your installation to
play a certain number of times, or avoid content that you have played often.
• Min Duration – Enter the minimum duration of the content you want to schedule using the
format HH:MM:SS. This can help you tailor your choices to the size of the scheduling gap you
want to fill.
• Max Duration – Enter the maximum duration of the content you want to schedule using the
format HH:MM:SS. This helps limit the content displayed to files that are small enough to fit
your scheduling gap.
Click the Search button at the bottom of the window. The search results are displayed in the Media
tab.
For example, suppose you have a schedule with a 15-minute gap to fill.
Click Edit Advanced Search to see the selection criteria.
Page 60

TelVue HyperCaster® User Manual / v5.0 / October 2014
© 2014 TelVue Corporation 16000 Horizon Way, Suite 500, Mt. Laurel, NJ 08054
HyperCaster® is a registered trademark of TelVue Corporation 800-885-8886 / www.telvue.com
59
Suppose you have a category called Fillers to fill these small gaps in the schedule. Select Fillers from
the Category drop-down list. Set the Min Duration to 5 minutes and the Max Duration to 15
minutes.
Click Search. The results are displayed in the Search Results section.
Search Results
Search Results displays thumbnails of content that was found during the search. To schedule the
content, drag the thumbnail to an open slot in the schedule. Continuing the example above, you could
drag School Board Video onto the schedule and reduce the 15-minute gap to 10 minutes.
External Sources
To schedule an event through an external source, such as a switch event, drag the source from the
External Sources list to an open slot in the schedule. If the event does not have a prescheduled
duration, click on Modify to set the duration.
Clicking on Modify opens the applicable scheduling screen. In this example, the Schedule Switch
screen opens. Change the Duration and click the Save button.
Scheduling Events Using the Actions on the Grid
Several event actions are available on the schedule grid in Calendar View. These actions let you
schedule events in a way similar to the method used in Classic View. Only the options available on
your TelVue® server are displayed on the schedule grid.
1. To schedule a playout, click on Content. This opens the Schedule Playout screen and fills in the
start time.
2. To schedule a stream event, click on Live Stream Source. This opens the Schedule Live Stream
Event screen and fills in the start time.
3. To schedule a switch event, click on External Source. This opens the Schedule Switch screen and
fills in the start time.
Import/Export functions such as copying blocks of a schedule also must be done in Classic View.
You are free to use Classic View or Calendar View – or both – to schedule programming for your
server. Use whichever method is convenient.
Reports Tab
The Reports page offers on-screen reports for the server system, and includes:
• As Run Report
• Missing File Report
• Program Guide Report
As Run Report
The default view is the As Run Report, which shows all events that have run on the application,
beginning with the oldest.
Page 61

TelVue HyperCaster® User Manual / v5.0 / October 2014
© 2014 TelVue Corporation 16000 Horizon Way, Suite 500, Mt. Laurel, NJ 08054
HyperCaster® is a registered trademark of TelVue Corporation 800-885-8886 / www.telvue.com
60
To view the As Run Report information differently, change the settings under the Reports>As Run
Report heading.
• Switch Output – Select a switch output from the drop-down list. This is available only in
systems with a switch.
• Channel– Select a channel from the drop-down list.
• Feed – Select a feed from the drop-down list. This is available only in systems with the IP
Capture feature.
• First Run Only – To display only events that are running for the first time, check this
box. This lets you show how much unique programming you have run.
• Repeats Only – To display only events that are rebroadcasts in this report period, check this
box.
• Show – Select the number of events to display on each page from the drop-down list.
• Event Types: The default is to display all event types. To hide certain event types, uncheck
the box next to it.
o Switch – This box appears only in systems with a switch.
o Playout – To hide playout events, uncheck the Playout box.
o Overlay - This box appears only in HyperCasters when integrated with a ProVue with
the added Graphics Overlay package.
o Capture – This box appears only in systems with the IP Capture feature.
o Continuity types – Event types that are scheduled as continuity can show up in the
As Run Reports:
" Playout
" Stream
" Playlist
• Keywords – to see programming that contains certain words in the filename or metadata,
type the word or words in this box.
• Categories – select an event category from the drop-down list or choose All Categories.
• Start Date – to see a different start date for the programming list, use a Calendar icon or
type in a date in the form MM/DD/YYYY.
• (Start) Time – to see events since a specific start time, type the time in the boxes using 24hour format.
• End Date – to see a different end date for the programming list, use a Calendar icon or type
in a date in the form MM/DD/YYYY.
• (End) Time – to see events up to a specific end time, type the time in the boxes using 24hour format.
• Clear – to clear all selections and return to the defaults, click the Clear button.
When you have finished selecting report criteria, click the Search button. The report with the selected
criteria is displayed.
Page 62

TelVue HyperCaster® User Manual / v5.0 / October 2014
© 2014 TelVue Corporation 16000 Horizon Way, Suite 500, Mt. Laurel, NJ 08054
HyperCaster® is a registered trademark of TelVue Corporation 800-885-8886 / www.telvue.com
61
As Run Report Field Headings
To sort the report entries, click on any underlined heading. To reverse the sort order, click on the
underlined heading again. For example, clicking on Type displays capture events first. Clicking on
Type again displays switch events first.
• Day – sorts the report alphabetically by day of the week.
• Date – sorts the report by date, from oldest to most recent.
• Type – the type of content in this file, such as a playout, capture, or switch event.
• Program or Program Code – the name of the program or its program code, depending on
how the schedule settings were configured.
• Episode or Episode Code – the episode name or episode code of this file, if applicable,
depending on how the schedule settings were configured. Some content might have a Program
name or code, but no Episode.
• Source– typically the title of the content file or the name of the live feed. Click on the link to
the program source to go to the Show Content page.
• Sched. Start – the scheduled start time for the event.
• Actual Start – the actual time the event started.
• Sched. End – the scheduled end time for the event.
• Actual End – the actual time the event ended.
• Scheduled Duration – the total time this event should require, in hours, minutes, and
seconds (HH:MM:SS).
• Actual Duration – the total time this event actually lasted, in hours, minutes, and seconds
(HH:MM:SS).
• Summary – the status of this event:
o Completed – the event finished as scheduled.
o Missed – the event was skipped.
o Partial – part of the event was completed as scheduled.
o Started – the event has started but is not scheduled to end yet.
o Stopped – the event stopped before it was completed.
For more details, click on the underlined status to go to the Event As Run Detail for this event.
Notes – brief comments on what happened, if the event did not run normally.
Missing File Report
The Missing File Report lists any files that are scheduled to play but have not yet been uploaded to
the server database. This includes offline files scheduled in the window that have not been retrieved
yet from archive storage.
Program Guide Report
The Program Guide page allows you to create a program guide for an output channel. You can view it
in the browser and export it to your website or a program guide service in a number of
formats. (In HyperCaster v5.0, the Program Guide Page moved to the “Reports” tab across the top
horizontal menu.)
Page 63

TelVue HyperCaster® User Manual / v5.0 / October 2014
© 2014 TelVue Corporation 16000 Horizon Way, Suite 500, Mt. Laurel, NJ 08054
HyperCaster® is a registered trademark of TelVue Corporation 800-885-8886 / www.telvue.com
62
To view the program guide, select the settings under the PROGRAM GUIDE heading.
• Channel or Switch Output – Select a server channel or switch output. The default is your
first channel or output port.
• Start and End Dates – Type the first and last dates you want to see in these boxes, or use a
Calendar icon to select dates. The greater the date range you select, the smaller the type in
your program guide will appear. The limit is eleven days.
• Format – Select a format from the drop-down list.
o Publish– displays program names and their durations for the hours when
programming is scheduled. Each event displays the Program Name and Episode Name
from the metadata – if they were filled in – and the event duration.
o Internal– displays the program names, filenames, feed names if applicable, and their
durations in HH:MM:SS format for the full 24-hour day. Each event displays the
Program Name and Episode Name from the metadata – if they were filled in – and the
event duration.
o X-List – uses CSV format so your installation can send schedules to TV Guide.
o XMLTV – outputs in an XML-based format used in several countries to create
customized TV schedules.
o Minerva – A full Minerva export consists of two data files: one that details each
program and one that details when those programs are scheduled to play. “Minerva
(Program Data)” is always present in the dropdown and allows the user to export the
program data file. As soon as Minerva export is enabled, users see the “Minerva
(Schedule Data)” option that allows them to download the schedule data file.
When you have finished specifying how you want your program guide to look, click the Display button
to see it. To download the guide in HTML format, click the Download button.
Page 64

TelVue HyperCaster® User Manual / v5.0 / October 2014
© 2014 TelVue Corporation 16000 Horizon Way, Suite 500, Mt. Laurel, NJ 08054
HyperCaster® is a registered trademark of TelVue Corporation 800-885-8886 / www.telvue.com
63
Customize Gaps in the X-List Schedule
If you are using the X-List program guide format, you can provide a title and category for
programming gaps that you are filling with continuity. For example, you could title a gap Bulletin
Board so that part of the program guide is not blank.
1. On the Program Guide page, click on Customize the gaps in your X-List schedule.
2. Next to Fill schedule gaps?, select the Yes button.
3. Type a program name that accurately applies to all continuity, such as Community News or Bulletin
Board.
4. Type a brief description if desired.
5. Select one of the X-List categories from the drop-down list.
6. Click the Save button.
Now, all gaps in your X-List schedule will use this program name, optional description, and category.
Config Tab
The Config tab allows administrators (“admins,” users with Admin-level privileges) to set parameters
that act as defaults for the server, such as channel names, user permissions, and network
configuration. To change any of these settings for the server, click on the applicable link. To return to
the Config page from any of the screens, click on the Config tab. Users with User-level privileges are
limited to some User Management functions and viewing the UI version information.
Page 65

TelVue HyperCaster® User Manual / v5.0 / October 2014
© 2014 TelVue Corporation 16000 Horizon Way, Suite 500, Mt. Laurel, NJ 08054
HyperCaster® is a registered trademark of TelVue Corporation 800-885-8886 / www.telvue.com
64
Note: The configuration options will vary, depending on your system and your level of permissions.
For instance, users of a HyperCaster-SDI will see a ProVue configuration box. Administrators will see
more options than users.
Page 66

TelVue HyperCaster® User Manual / v5.0 / October 2014
© 2014 TelVue Corporation 16000 Horizon Way, Suite 500, Mt. Laurel, NJ 08054
HyperCaster® is a registered trademark of TelVue Corporation 800-885-8886 / www.telvue.com
65
Here is a typical Config screen for someone with user privileges.
Channel Setup
Channel Setup requires admin-level privileges. Use the options in this section to name and edit
output channels, configure streaming, transitions, or continuity over a network channel, set the video
format, or set the multicast TTL format.
To name output channels or configure streaming, transitions, or continuity over a network channel,
click on the channels option. The application displays the Channel Setup page with a list of all
channels on this system.
Attributes
Click on the channel name or edit icon to edit. The application displays the Edit Channel screen.
The following fields are editable. To cancel
any unsaved changes and return to the
Config page, click the Cancel button at the
bottom of the screen.
• Name – Enter a short, descriptive
name for the channel.
• Description – Enter a longer
description about the channel that
will distinguish it from the others at
your installation.
• TV Guide Station ID – If your
installation submits schedules to TV
Guide in X-List format, enter your
station ID.
• Switch Output – (For systems with
a switch) Select a switch output for
this channel from the drop-down list.
• Switch Input – (For systems with a
switch) Select a switch input for this
channel from the drop-down list, if
applicable.
Page 67

TelVue HyperCaster® User Manual / v5.0 / October 2014
© 2014 TelVue Corporation 16000 Horizon Way, Suite 500, Mt. Laurel, NJ 08054
HyperCaster® is a registered trademark of TelVue Corporation 800-885-8886 / www.telvue.com
66
• Output Format – (HD-SDI) Select an output format from the drop-down list.
• Destination IP Address – (IPTV) This is initially blank or set to a local IP address. Enter the
IP address of the device where you want the stream to play.
• Destination IP Port – (IPTV) Enter a port number not used by any other streaming
applications that may send networked data to the video server.
• Bit Rate – (ASI and IPTV) You can select a bitrate standard, or enter your own choice for the
bit rate. The bitrate you select or enter is displayed in the box. Files that exceed this rate as
their total mux rate cannot be played on the channel. The options you can pick from for a predefined bit rate standard include:
CableLabs SD: 3.75 Mbps
CableLabs HD: 19 Mbps
ATSC: 19.396285 Mbps
• Program Map Table – (IPTV) This feature is for advanced users. Depending on your
program map table the files and transport stream sources that play from your server will be
remapped to new PIDs and filtered so that certain elements are passed through. Select from
several predefined PMT options or make your own in the config tab.
When you have finished entering attributes for this channel, click the Save button at the bottom of
the section.
Set Multicast TTL
If the system is configured to use the Linux Multicast TTL, this option will be displayed in the Channel
Setup section. To change the setting, click on the Multicast TTL option. The IP Multicast TTL
Configuration screen is displayed. Enter the number of router hops the system should attempt when
forwarding a multicast packet and click the Save button. Entering 0 has the same effect as pressing
the Cancel button. The change will take effect next time the server is rebooted.
Continuity
Continuity is a file or feed that plays when no other
programming is scheduled for a channel. For example, some
installations play a bulletin board when no other
programming is scheduled. If you enable continuity, choose
one of the sources: file, switch, feed, or playlist. Only one
source may be selected; selecting another will automatically
cancel a previously selected source. On a multi-channel
system, you can have different continuity on different
channels.
• Enable Continuity? – To enable continuity for this
channel, check this box.
• Continuity Resume – Continuity resume controls
where in a file or stream the continuity begins to
play again after scheduled programming finishes.
Page 68

TelVue HyperCaster® User Manual / v5.0 / October 2014
© 2014 TelVue Corporation 16000 Horizon Way, Suite 500, Mt. Laurel, NJ 08054
HyperCaster® is a registered trademark of TelVue Corporation 800-885-8886 / www.telvue.com
67
Checking continuity resume will prevent viewers from seeing the same piece of the continuity
clip over and over again.
To restart the continuity at the beginning after the scheduled programming finishes, leave the box
unchecked.
Note: If continuity is a playlist, then unchecking the Continuity Resume box means
the playlist will resume at the start of the next item on the list. A playlist does not
resume at the very beginning.
To resume the continuity at the point where it left off, check the box.
Note: If the continuity file or playlist does not support random access (playing a file at
any point), then checking the Continuity Resume box means the continuity will resume
at the beginning of the file or the current item on the playlist.
Each channel’s continuity may come from one source: a file, a switch, a feed, a playlist, or a WEBUS
channel. When you choose one source, the others will be blanked out. Only continuity options that
are available for your system will be displayed.
• Continuity File – If your continuity comes from a file, select it from the drop-down list. This
file will play when nothing else is playing on this channel.
• Continuity Switch – If your continuity resides on a DVD player, satellite, or other device, use
this drop-down list to select the switch through which the continuity file will play. If breakaway
is enabled, select both the video and audio inputs.
• Continuity Feed – If your continuity comes through a feed, such as a live source, select the
feed from the drop-down list. Only one channel on your system can receive continuity from a
feed.
• Continuity Playlist – If your continuity is a playlist of files, select it from the drop-down list.
If breakaway is enabled, you can select the audio feed – such as a radio station –
separately. To enable breakaway, go to the Switch Configuration section.
• Continuity WEBUS– If your continuity is a WEBUS channel, select it from the drop-down
list.
When you have finished entering the continuity information for this channel, click the Save button at
the bottom of the section.
To return to the Configuration menu page without making changes beyond what you have already
saved, click the Cancel button or the Config tab.
Content Management
Content Management requires admin-level privileges. To update content and import settings, add,
remove, and manage content categories and customize the content metadata fields, use these
options.
Content Categories
To manage the content categories, click on the categories option. The application displays
the Category Setup screen with the current category names, a brief description if one was entered,
and whether content in that category is listed in the Program Guide. If there are no categories yet, the
box will be empty.
The Include in Guide Default column tells whether content in that category will be listed in the
Program Guide and external schedule. If the default is set to Yes, content in that category will be
included in them. If the default is set to No or No Default, content in that category will not be
included. Content may be put in multiple categories, but if any category is set not to be included in
the Program Guide and external schedule, that piece of content will not appear in them unless you edit
the playout and check the Include in Program Guide option. For example, suppose you put a
Page 69

TelVue HyperCaster® User Manual / v5.0 / October 2014
© 2014 TelVue Corporation 16000 Horizon Way, Suite 500, Mt. Laurel, NJ 08054
HyperCaster® is a registered trademark of TelVue Corporation 800-885-8886 / www.telvue.com
68
recycling reminder in both the Community and PSA categories. Content in the Community category
normally appears in the Program Guide and external schedule, but PSAs do not. The PSA category
supersedes the Community category and the recycling announcement will not appear in the Program
Guide or external schedule.
• Edit – To edit a category, click on the category name or on its Edit icon. Change the name,
description, or program guide default of the category as desired. If you change the Include in
Guide default from Yes to No, or No to Yes, you can apply that change to all future events in
the category that are already scheduled. Click on the Save button at the bottom of the screen
to save the changes. To return to the Category Setup screen without making changes, click
the Cancel button.
• Delete – To delete a content category, click its Delete icon. The application asks you to
confirm the deletion. If you are sure you want to delete this category, click on Yes (OK).
Otherwise click on No (Cancel), and the application leaves the category unchanged.
• Add – To add a new content category, click the New Category button at the bottom of the
screen. The application displays the Add Category screen.
• Name – Enter a short, descriptive name for the category, preferably one word. This is what
will be displayed on the Programming and Content pages.
• Description – Enter a longer description about the category that will distinguish it from any
others on the database.
Page 70

TelVue HyperCaster® User Manual / v5.0 / October 2014
© 2014 TelVue Corporation 16000 Horizon Way, Suite 500, Mt. Laurel, NJ 08054
HyperCaster® is a registered trademark of TelVue Corporation 800-885-8886 / www.telvue.com
69
• Include in Guide– To include this category’s content in the Program Guide and external
schedule, choose Yes from the drop-down list. To omit this category’s content from the
Program Guide and external schedule, such as PSAs, choose No. If you change the default
from Yes to No, or No to Yes, you can apply that change to all future events in the category
that are already scheduled.
Click on the Add button at the bottom of the screen to add the category to the list. To return to the
Category Setup screen without adding a category, click the Cancel button.
You can add content to a category when adding the content file to the database, editing the content
metadata, or while displaying one or more content files on the Content page.
Content
There are several options available through the Config –> Content –> Content settings page:
1. Create Content Preview: when checked, will automatically create a preview version of all imported
content.
2. Delete all Existing Previews: is a housekeeping feature that will delete all previews previously
created in the HyperCaster.
3. The Transmux feature will look for any MPEG-2 Program Stream or MP4 mux containing H.264
(including most .mov formats) video, and transmux those to the MPEG-2 Transport Stream format
required to play out on the HyperCaster. To enable the Transmux feature, check the box “Transmux to
Transport Stream”. Re-multiplex supported MPEG-2 Program (with MPEG-2 video codec) and
MP4/MOV/AVI (with H.264/AVC video codec) files on import to Transport Stream. Produces a variable
mux rate output. Video preserved as-is from the original file including video bit rate. Audio preserved
as-is from the original file including audio bit rate for AC-3, MPEG-1 Layer II, and AAC audio. Other
audio formats converted to MPEG-1 Layer II for MPEG-2 video, and AAC for H.264 video. For more
detailed information on the Transmux feature, refer to the “Organize and Add Content” section of this
manual.
4. Auto Archive on Content Import: is a timesaving feature that will automatically push content to the
designated online or near-line storage location that was set up in the Config –> Remote Servers
settings.
Customize Metadata Fields
The media server lets you add your own metadata fields so you can tailor your content metadata to
your installation’s needs. For example your installation might track sponsors or certain producers. To
customize the metadata fields, click on the custom content metadata fields option. The application
displays the Metadata Setup screen. If there are no custom metadata fields, the box will be empty.
Page 71

TelVue HyperCaster® User Manual / v5.0 / October 2014
© 2014 TelVue Corporation 16000 Horizon Way, Suite 500, Mt. Laurel, NJ 08054
HyperCaster® is a registered trademark of TelVue Corporation 800-885-8886 / www.telvue.com
70
• Edit – To edit a metadata field, click on the field name or on its Edit icon. Edit the name,
description, or default value of the field as desired. Click on the Save button at the bottom of
the screen to save the changes. To return to the Metadata Setup screen without making
changes, click the Cancel button.
• Delete – To delete a metadata field, click its Delete icon. The application asks you to confirm
the deletion. If you are sure you want to delete this field, click on Yes (OK). Otherwise click
on No (Cancel), and the application leaves the field unchanged.
• Add – To add a new metadata field, click the New Attribute button at the bottom of the
screen. The application displays the Add Attribute screen.
• Name – Enter a short, descriptive name for the attribute (metadata field), preferably one or
two words. This is what will be displayed on the Programming and Content pages.
• Description – Enter a longer description about the attribute (metadata field) that will
distinguish it from any others on the database.
• Default Value – Enter a default value for the attribute (metadata field) if desired.
Click on the Add button at the bottom of the screen to add the attribute to the list. To return to the
Metadata Setup screen without adding an attribute, click the Cancel button.
Import Settings
To change the settings for imported content, click on the import option. The application displays
the Import Settings screen.
Page 72

TelVue HyperCaster® User Manual / v5.0 / October 2014
© 2014 TelVue Corporation 16000 Horizon Way, Suite 500, Mt. Laurel, NJ 08054
HyperCaster® is a registered trademark of TelVue Corporation 800-885-8886 / www.telvue.com
71
• Thumbnail Offset – The server displays a thumbnail for all imported content by capturing a
frame from the file. The thumbnail offset is the point in the file where the server captures the
frame. Enter a thumbnail offset in seconds or use the default of 20 seconds.
• Create TBDs when importing CSVs – TBD is a placeholder that allows you to schedule an
event before you even have the content. For TBD to work, you have to already know when
you expect to ingest the content, how long it should be, and the precise filename. To enable
this feature, check “Create TBDs when importing CSVs”. If you are used to scheduling via
CSV, this will automatically create TBDs for any item that does not yet have associated
content. Note: your Source name has to match the filename of the TBD content exactly.
Click on the Save button at the bottom of the screen to save the import settings. To return to the
Configuration menu without making changes, click the Cancel button.
External Devices
External Devices Configuration requires admin-level privileges. Use this option to create a tunnel to a
QAM modulator that is on the same network as your IPTV server. To edit, click new external device on
the config tab.
Page 73

TelVue HyperCaster® User Manual / v5.0 / October 2014
© 2014 TelVue Corporation 16000 Horizon Way, Suite 500, Mt. Laurel, NJ 08054
HyperCaster® is a registered trademark of TelVue Corporation 800-885-8886 / www.telvue.com
72
The application displays a table of device controllers and information about them.
• Name – The name of the device.
• Type – DekTec QAM
• Description – A few words describing the device, such as “QAM Modulator”
• IP Address – The IP address of the device.
• IP Port – The IP port where the device is connected to the server system.
• User Name – Required to access the device.
• Password – Required to access the device.
Opening External Device
To open the newly added device, click on the underlined device name, such as Illudium Q-36
Modulator. This will open a new window that shows the interface of your QAM device.
If needed instead select the edit button to change the name, description, or IP address of the device
as needed. Click the Save button to save changes and return to the External Devices Configuration
screen, or click the Cancel button to return without making any changes.
Feed Setup
The Feed Setup section is available only in installations with the IP Capture feature. Feed Setup
requires admin-level privileges. Use it to identify the directory (folder) for your captures, and settings
for any live stream sources your installation uses.
Capture Configuration
To set the default configuration for captures, click on the capture configuration option. The application
displays the Capture Configuration screen. To set defaults for captures, fill in the fields.
Page 74

TelVue HyperCaster® User Manual / v5.0 / October 2014
© 2014 TelVue Corporation 16000 Horizon Way, Suite 500, Mt. Laurel, NJ 08054
HyperCaster® is a registered trademark of TelVue Corporation 800-885-8886 / www.telvue.com
73
• Capture Destination Directory – Type the path to the folder where you normally want your
captures to be saved. Leave it blank to default to the directory where content is saved,
typically /media/psg/vol1.
• Capture Default Auto Delete Days – Type the number of days after a capture you normally
want it deleted from the server. To leave captures on the server until you delete them
manually, leave the box blank.
• Use Program Values as Defaults – To use the program values, check this box.
• FTP Master File On Capture – After the capture is done you can automatically ftp it to
another location. Check this box and select an FTP server from the drop-down list. The
servers on this list are added as described in the “Remote Server Configuration” section of this
manual.
• Delete Master File After Transfer – If you create a master file for captures and want it
deleted after successfully transferring the file to the server, check this box.
• Program Feed Server Host – Type the name or IP address of the server for the program
feed. If you want to get unattached programs from another server, enter that server’s name
as identified on your network.
When you have finished, click Save to save the configuration information or Cancel to stop.
Manage Live Stream Sources with IP StreamThruTM
To manage live stream sources, click on the stream sources option.
The application displays the Stream Source Setup screen. If there are no stream sources, the box
will be empty.
Page 75

TelVue HyperCaster® User Manual / v5.0 / October 2014
© 2014 TelVue Corporation 16000 Horizon Way, Suite 500, Mt. Laurel, NJ 08054
HyperCaster® is a registered trademark of TelVue Corporation 800-885-8886 / www.telvue.com
74
To add a stream source, click the Add Stream Source
button and fill in the fields.
• Type – Select a stream type such as Unicast from
the drop-down list.
• Name – Type a name for the stream source to
identify it when scheduling.
• Description – Type a description of the stream
source, if desired.
• IP Address – Type the IP address of where the
stream source originates.
• IP Port – Type the 5-digit port number between
50000 and 65535 to receive the UDP packets for this
stream source. Many installations select a random 5-digit number in this range. Make sure it
is not the same as an existing stream source IP port number.
• Protocol – Select a protocol such as UDP from the drop-down list.
• Max Bit Rate – Enter as accurate an estimation of the total multiplex rate of the incoming
video as possible. If your channel output requires a specific multiplex rate, it is up to you to
ensure that your incoming feeds match.
When you have finished, click Add to add the stream source or Cancel to stop. The new stream
source will be displayed on the list.
To change the information for a stream source, click the Edit icon. To delete a stream source, click the
Trash icon.
Graphic Overlays
The optional integrated graphics add-on – which requires TelVue ProVue IP Decoder integration –
allows you to manage station identification “bugs”, scrolling “tickers” across the screen, and “snipes”
for additional on-screen information. This works with both external TelVue ProVue decoders and
integrated decoders in a HyperCaster SDI or HyperCaster Analog model.
A “Ticker” is a text crawl overlay that can be used to run a message across the television screen
during a broadcast. A “Bug” is a graphic, usually the station logo, which can be placed anywhere on
the screen, but is usually placed discreetly in one corner. A “Snipe” is an automated on-screen
message that is most commonly used to promote upcoming programs on a TV channel, but can be
used to display other forms of information as well.
To manage graphics, go to the “Overlays” section under the Config tab of the HyperCaster interface.
“Tickers”: Creating a Text Crawl
Click on the “Tickers” link to see (and set) which text crawls are active on which channels.
To create a new ticker: select the “add” button on the right hand side of the interface to be brought to
the New Ticker Overlay page.
To edit an existing ticker: click on the ticker name to get to the editing interface.
Page 76

TelVue HyperCaster® User Manual / v5.0 / October 2014
© 2014 TelVue Corporation 16000 Horizon Way, Suite 500, Mt. Laurel, NJ 08054
HyperCaster® is a registered trademark of TelVue Corporation 800-885-8886 / www.telvue.com
75
This is where you will set the properties of the ticker, and enter the text of your message.
There are Information icons throughout the interface with more detailed explanations of each
feature. Also, any change you make in the settings will immediately be reflected in the live display on
the right side of the edit page.
1. Type the text of the message in the Content Properties box.
2. Position the crawl
a. You can either select one of the presets (Top or Bottom) from the General Properties
options, or
b. Set the position manually, using the Background Properties section. The X and Y axes
have been calibrated for each screen resolution to help you visualize the position on
the screen.
Page 77

TelVue HyperCaster® User Manual / v5.0 / October 2014
© 2014 TelVue Corporation 16000 Horizon Way, Suite 500, Mt. Laurel, NJ 08054
HyperCaster® is a registered trademark of TelVue Corporation 800-885-8886 / www.telvue.com
76
3. Adjust the speed of the crawl in the General Properties section by entering in this field the
number of seconds it takes for a character to cross the screen.
4. You get three color choices: Font, Background, and Border. You can set the transparency of
the background ribbon using the slider widget in the color picker.
5. Save your settings.
6. Turn the ticker for the desired channel “On”, and your ticker will be live.
“Bugs”: Inserting a logo or station ID
1. If your station logo is not already in PNG format, convert it. The size and transparency of the
Bug should be incorporated directly into the png image before upload.
2. Once uploaded, you can position the bug in two ways:
• Choose a preset type from the pulldown in General Properties
• Set a pixel value in the Horizontal and Vertical Position fields
3. Save your settings.
4. Turn the bug for the desired channel “On”, and your bug will be live.
Page 78

TelVue HyperCaster® User Manual / v5.0 / October 2014
© 2014 TelVue Corporation 16000 Horizon Way, Suite 500, Mt. Laurel, NJ 08054
HyperCaster® is a registered trademark of TelVue Corporation 800-885-8886 / www.telvue.com
77
Snipes
“Snipes” are automated on-screen messages that are most commonly used to promote upcoming
programs on a TV channel, but can be used to display other forms of information as well.
The HyperCaster/ProVue combination supports the creation of “Snipe Overlays” through the graphics
option that also includes on-screen “bugs” and “tickers”.
The difference between a “snipe” and a “ticker” is automation. While a “ticker” requires a message to
be manually typed into the interface, a “snipe” will dynamically generate an on-screen graphic based
on your choice of “date”, “time”, or “content” variables, such as the program and episode name of the
currently running program or next scheduled program. Additionally, a ticker scrolls text across the
screen from right to left, whereas a snipe displays text lines optionally on top of a custom image.
To create a snipe, you can start with a Preset Type (Top or Bottom). This will pre-populate a lot of the
fields, which are then easy to customize to your specifications. Here are the choices you can make:
• Background Properties. Choose Image or Color:
• “Image” allows you to upload your own background as a .png file. You need to upload
a distinct background image for each screen resolution. Place your image on the X and
Y axes.
• “Color” allows you to choose a band of color, plus a border (optional), and set the
width, height, and placement of that band of color. As with the “tickers”, you get
three color choices: Font, Background, and Border. You can set the transparency of
the background ribbon using the slider widget in the color picker.
• Text Fields. There are two lines of text, one on top of the other.
• The Text field will accept plain text, or you can choose from a list of preset variables
that determine which metadata are displayed.
Page 79

TelVue HyperCaster® User Manual / v5.0 / October 2014
© 2014 TelVue Corporation 16000 Horizon Way, Suite 500, Mt. Laurel, NJ 08054
HyperCaster® is a registered trademark of TelVue Corporation 800-885-8886 / www.telvue.com
78
• Click on the “Insert Variable at Cursor” link. The list of preset variables will pop up:
• Placement, color, font size/color, and style need to be set for both fields before you
save
• Note that the text lines must be smaller than, and positioned within the Image or
Color area to be seen both on the preview stage and also on-air.
• Text Line 1 is required, whereas Text Line 2 is optional.
• Duration Properties
• Select the default duration for how long the Snipe should stay on the screen. This is
used to auto populate the duration when scheduling a snipe.
• Optionally enable a fade-in effect when the snipe triggers by setting the fade-in
duration in milliseconds (for example 1000 would be 1 second).
If you want to start with a blank slate, it is best to fine tune and review each resolution that you are
broadcasting if running Simulcast channels. Otherwise you can just edit the single resolution you are
broadcasting and not worry about the others.
The default settings in the HyperCaster are currently set to display “You’re Watching (current show,
current episode)”. In the HyperCaster interface, this looks like this:
Page 80

TelVue HyperCaster® User Manual / v5.0 / October 2014
© 2014 TelVue Corporation 16000 Horizon Way, Suite 500, Mt. Laurel, NJ 08054
HyperCaster® is a registered trademark of TelVue Corporation 800-885-8886 / www.telvue.com
79
On screen, the default Top Preset for a Snipe could look like this:
To display other information, for example the current date, you could enter something like “Today’s
date is” in Text 1 field, and the following rules in Text 2: %a (for abbreviated weekday)%b (for
abbreviated month) %d (for date) and %Y (for year).
Variables are populated at the time of starting a snipe. If any variable cannot be filled, for example if
you use the Current Episode
Once created, a Snipe Overlay can be scheduled, like any other graphic overlay, by choosing the “Add
Overlay” option in the Programming → Classic View. You can also manually turn snipes on and off on
the Overlays tab. Note that if you manually turn on a snipe, it will remain on-air until you manually
turn it off.
Simulcast Overlays
The edit pages for both Tickers and Bugs have tabs for different resolutions, if you are
simulcasting in different resolutions / formats, such as HD and SD.
While saving an overlay, the HyperCaster will automatically populate every version, and automatically
scale to the size and resolution of the different output displays.
Starting with HyperCaster v. 4.2, you can choose a default resolution tab by going to Config–>
Overlays –> Config, and then choosing your preferred resolution. This feature is particularly useful for
stations that are not using multicast.
If you want to customize for each channel, you can fill out each resolution tab manually. But manually
specifying any value on a resolution tab will prevent that resolution from being automatically scaled
and populated. So if you update one tab, those changes do not automatically carry over to the other
versions. If you do update your graphics, you will have to manually re-start the overlay on each
channel for the changes to take effect.
Page 81

TelVue HyperCaster® User Manual / v5.0 / October 2014
© 2014 TelVue Corporation 16000 Horizon Way, Suite 500, Mt. Laurel, NJ 08054
HyperCaster® is a registered trademark of TelVue Corporation 800-885-8886 / www.telvue.com
80
Emergency Notification Console
The Emergency Notification Console allows a TV station administrator to grant key personnel (e.g. the
police department, the mayor’s office) the authority to compose a text ticker message that “crawls”
across the screen, overlaying any ongoing video programming, with no interference or access to the
rest of the broadcast server’s management interface. With this feature your town’s emergency
management team can reach your viewers quickly and directly. The emergency text message is typed
into an easy-to-use web interface.
1. First, an Admin has to Create an Emergency User:
• Go to Config –> Users to Create a new user
• Check the “Emergency” box under the user profile
• Save
2. Then the Admin has to Designate a ticker as your emergency line:
• See instructions on how to “create a ticker”
• Check the Emergency checkbox for the ticker style that you want to be used for emergencies
3. An Emergency User is now able to initiate an Emergency Ticker from the Emergency Console:
• Login as Emergency User
• Type the emergency message in the field
• Select whether the emergency ticker will run until manually stopped, or will stop at a specific
date and time
• Select one or more channels to display the emergency ticker
• Save
All other overlays will be suppressed while an Emergency Ticker is active to be sure that no other
overlays interfere with the important emergency message. When the Emergency Ticker is completed
or stopped, suppressed overlays will re-appear on air. While an Emergency Ticker is active, the page
header for all application users will display Emergency Ticker: ON AIR.
To stop an Emergency Ticker manually, simply return to the Emergency Console and click the Stop
Emergency Ticker button.
Page 82

TelVue HyperCaster® User Manual / v5.0 / October 2014
© 2014 TelVue Corporation 16000 Horizon Way, Suite 500, Mt. Laurel, NJ 08054
HyperCaster® is a registered trademark of TelVue Corporation 800-885-8886 / www.telvue.com
81
Emergency users can edit their user profile, for example to change their password, by clicking their
username in the upper right of the page header.
An Admin can also access and use the Emergency Console via the Config tab under Overlays –>
Emergency Console.
*Note: This feature is only available in HyperCaster/ProVue configurations with the Graphic Overlay
add-on feature.
ProVue Integration
HyperCaster 4.0 and above allows internal or external integration with the TelVue ProVue IP
decoder. The B1000 supports up to 4 internal ProVue decoders. The B100 supports one internal
decoder. But you can control any number of external ProVue decoders and assign any one of your
channels to those decoders.
Configure the ProVue, whether external or internal, through the HyperCaster UI:
1. Navigate to the “ProVue Decoders” section under the Config tab, and you will see a list
of all ProVues, external or internal, that are integrated with your HyperCaster.
2. At the extreme right of each ProVue listed, under the "Action" column, is a Restart
icon. This will reboot your ProVue with minimal interruption (no more than 3 seconds).
3. To add a decoder, click on New ProVue Decoder and fill out this template
4. To edit the decoder configuration, click
on the Action icon and fill out these
fields. (Note: if this is an internal
ProVue, some of these fields – like IP
address, port, unicast/multicast –
cannot be edited.)
For internal ProVue decoders, selecting a Channel will
automatically set that decoder to play that
HyperCaster channel. You can have more than one
ProVue decoder set to the same channel, for example
for Simulcast applications where one decoder is set to
HD, and one to SD.
For external ProVue decoders, selecting a Channel will
cause the application to validate that channel’s output
settings match the input settings in the ProVue. If
they don’t match, an alert will be displayed and it is up
to the user to address the incompatibility.
The HyperCaster will monitor any internal and external
Page 83

TelVue HyperCaster® User Manual / v5.0 / October 2014
© 2014 TelVue Corporation 16000 Horizon Way, Suite 500, Mt. Laurel, NJ 08054
HyperCaster® is a registered trademark of TelVue Corporation 800-885-8886 / www.telvue.com
82
ProVue decoders managed in the application as part of the System Health check. If communication is
lost with the decoder, or the decoder reports that it is not decoding when associated with a Channel
that should be playing, a System Health alert will be raised.
Remote Server Configuration
Remote Server Configuration requires admin-level privileges. To view or edit information on remote
servers, such as an archive server, click on Configure remote servers. The application displays the
Remote Server Setup screen.
The application displays the remote server name, description, type, protocol, path and icons for
available actions.
To return to the Config tab without taking any actions, click on Configuration at the top of the
screen. To add, edit, delete, or accept a remote server, click on the corresponding icon.
Add Remote Server
To add a remote FTP server for auto-transfer options, click the New Remote Server button. The
Add Remote Server screen is displayed.
• Server Type – choose a server type, e.g. Archive.
• Server Protocol – choose between SMB and FTP protocols.
• Name – Type a short, descriptive name for the remote server.
• Description – Enter a longer description about the remote server that will distinguish it from
the others at your installation.
• Type – Select the type of server this is, typically FTP or SFTP.
• Host – Enter the host for the remote server, typically localhost.
• Do not fetch content past – enter the number of days beyond which you do not require the
server to import content.
Page 84

TelVue HyperCaster® User Manual / v5.0 / October 2014
© 2014 TelVue Corporation 16000 Horizon Way, Suite 500, Mt. Laurel, NJ 08054
HyperCaster® is a registered trademark of TelVue Corporation 800-885-8886 / www.telvue.com
83
• Credentials – choose between Anonymous and Normal.
• Username – The name you will use to connect to the remote server. This must be a valid
username from your User Management list.
• Password – The password you will use to connect to the remote server.
• Password Confirm – Type the password again to make sure you have not made a mistake.
• For an Archive server, two additional fields will appear at the bottom of the form:
o “Share Name” and “Destination Directory” (for SMB)
o “Destination Directory” and an “Active Mode” checkbox (for FTP)
When you have finished, click Add to add the server to the list or Cancel to exit without adding the
server. You are returned to the Remote Server Setup screen.
Edit Remote Server
To edit the settings for a remote server, click on the Edit icon in the Action column. The Edit
Remote Server screen is displayed. Edit the fields as you would when adding a remote
server. Destination Directory can be edited here. When you have finished, click Save to save any
changes or Cancel to exit the screen without making any changes. You are returned to the Remote
Server Setup screen.
Test Remote Server
To test a remote server, click the Test icon. The system uses the username and password for this
remote server to attempt to access it, and responds with a message saying whether it was successful.
Delete Remote Server
To delete a remote server, click the Delete icon. The application asks you to confirm that you want to
delete the remote server. Click Yes/OK to delete it or No/Cancel to return to the Remote Server
Setup screen without deleting the server.
Schedule Configuration
Schedule Configuration requires admin-level privileges. The schedule settings allow you to set
defaults for the content you use in your programming. To configure schedule settings, click on the
schedule option. The application displays the Edit Schedule Settings screen.
Change the defaults by editing one or more of the following fields. To return to the Configpage
without making any changes, click the Cancel button.
Page 85

TelVue HyperCaster® User Manual / v5.0 / October 2014
© 2014 TelVue Corporation 16000 Horizon Way, Suite 500, Mt. Laurel, NJ 08054
HyperCaster® is a registered trademark of TelVue Corporation 800-885-8886 / www.telvue.com
84
• Allow Scheduling of Unattached Content? – If you want to be able to schedule content
that is not yet on the server, check this box. This option is useful at installations where
content is aired shortly after capture.
• Missing Files Alert Window – Missing File Alerts will warn the programmer when a video on
the schedule is missing, or – if the file has been archived – not yet retrieved from storage.
• Use Start Trim/End Trim? – The Web Application offers two ways to determine where file
playout should start and stop and how long the playout should be. You will see one or the
other when you edit content or schedule playouts. To use Offset and Duration, leave this box
unchecked. To use Start Trim and End Trim check this box. If you use a nonlinear editor such
as Ulead to find trim points, use Start Trim and End Trim.
• Default Overlay Duration – (Analog servers) Controls the default duration of overlays in
playlists. This feature is not available in this release.
• Use Program Episode Codes – If your installation uses program and episode codes, check
this box to use the “Program Code” and “Episode Code” fields when searching content and to
display the program and episode codes on content thumbnails and tables, on programming
screens, and in the As Run report. All unattached content you add to your server will be
identified by its Program Code and Episode Code combination.
• Cancel Overlapping Events on Import – Check this box to prevent an event from being
imported if it overlaps another scheduled event. This will also prevent hot folder and native
imports if they conflict with a scheduled event.
• Use Connect server schedule as master – If this setting is enabled, the remote Connect
server schedule will take precedence over all conflicting events.
• Delete Unscheduled Content – If enabled, any unscheduled content which has not been
updated in the previous 5 days will be removed from the server.
When you have finished editing the schedule settings, click the Save button at the bottom of the
screen. A message verifying that the changes were updated appears at the top of the screen. Click
the Config tab to return to the Configuration menu or click any tab to do other work.
Security Configuration
Security configuration requires admin-level
privileges. Use this option to manage your
firewall rules. To start, click on
firewall. The current firewall rules are
displayed.
To add a firewall rule, enter the
information in the Add Rule section at the
top of the page.
• Address – Enter the IP address of
the machine or range. Leave this
field blank to make the rule apply
anywhere, that is, to any machine
that tries to access your server.
• Netmask – Enter the source mask
for your IP address or range, such
as 255.255.0.0 or 255.0.0.0.
• Port – Choose FTP, Samba, or
3000 from the drop-down list.
• Block/Allow – To block this
machine or range, click the Block
radio button. To allow this
machine or range to access your
server, click Allow.
Page 86

TelVue HyperCaster® User Manual / v5.0 / October 2014
© 2014 TelVue Corporation 16000 Horizon Way, Suite 500, Mt. Laurel, NJ 08054
HyperCaster® is a registered trademark of TelVue Corporation 800-885-8886 / www.telvue.com
85
Click the Submit button on the right to add the rule.
To delete a firewall rule, click the Delete button to the right of that rule.
Firewall Status
When the firewall is running, its status is STARTED. In rare cases you might want to stop the firewall
briefly. For example, too many trusted machines are suddenly blocked and you need to give someone
access to diagnose the problem. To stop the firewall, click the Stop button. Be sure to start the
firewall again when the work is complete.
Guidelines for Firewall Rules
Adding a stream automatically adds a rule to the list.
If you have remote users, add a firewall rule so they can continue using remote access. You
must be on-site to add a rule; you cannot add one remotely.
It is good practice to record your rules, such by printing the firewall screen to paper or a file
and keeping it in a secure location off your network.
Do not delete the netbios rules. They are for Samba access.
In some cases you might want to return the firewall rules to the original configuration that
came with your server. For example, too many individual rules seem to conflict with one
another. Keep in mind that this will delete the firewall rules for active streams, remote users,
etc. Record your firewall rules, then click the Restore Initial Configuration button.
To return to the configuration page, click the Config tab.
Server Management
Server Management requires admin-level privileges. The Server Management section lets you
manage email settings, look at server information, change the hostname, configure your network
settings, and reboot or turn off the server.
Email
Enabling email notifications on your server will ensure that even when you are away from your server
you will be alerted to any significant events. To manage your email configurations, click on the email
option. The application displays the Email Configuration screen. The left portion is an example using
a gmail address as the account that will send the alert emails. Once you enter the credentials you can
send a test email to another account to ensure that your setup is working.
Once you save on this screen you have just one more step. Navigate to config -> users and select a
user that you would like the alert emails to be sent too. Make sure that user has a valid email address.
Select the Email notification check box and save. Repeat this for any other users as needed. Each
enabled user will now receive emails in the event of a server state change such as the firewall being
disabled or if you have an event scheduled within 4 hours that has no media uploaded. The missing
files alert window is configurable in the config -> schedule window.
Page 87

TelVue HyperCaster® User Manual / v5.0 / October 2014
© 2014 TelVue Corporation 16000 Horizon Way, Suite 500, Mt. Laurel, NJ 08054
HyperCaster® is a registered trademark of TelVue Corporation 800-885-8886 / www.telvue.com
86
Manage Network Configurations
To manage your network configurations, click on the network option. The application displays
the Network Configuration Management screen.
• Interface – the name of the host interface, such as eth0 or eth1.
• Type – the type of network connection, such as Ethernet.
• HW Address – Ethernet card identity
• Link Detected – if the link is being detected.
• IP Address – The IP address of the network. If the IP address is dynamic, this entry will
display DHCP. If DHCP is used, the assignment should match the MAC address of the Digital
Broadcaster.
• Speed – the connection speed.
• Route All Multicast On This Interface – if multicast is being streamed through that
ethernet port. To enable multicasting for this network connection, click on Route All
Multicast below the appropriate ethernet port. Multicast IP addresses must use the range
224.0.0.0 – 239.235.235.235.
Warning: Before enabling multicasting, talk to your system administrator.
• Interface is Active – if the ethernet port is being used.
• Using DHCP – if it is a DHCP or static IP Address.
• Netmask– The Netmask value of the network. The default value is 255.255.255.0.
Page 88

TelVue HyperCaster® User Manual / v5.0 / October 2014
© 2014 TelVue Corporation 16000 Horizon Way, Suite 500, Mt. Laurel, NJ 08054
HyperCaster® is a registered trademark of TelVue Corporation 800-885-8886 / www.telvue.com
87
• Activate at boot? – If this network connection should be activated when the server is booted
this entry will display yes.
• Enable multicast? – If multicasting has been enabled for this network connection, this entry
will display yes.
To edit a network configuration, click on the Edit icon in the Action column. The Edit Network
Configuration screen is displayed.
The following fields are editable.
• Name – the name of the host interface, such as eth0 or eth1.
• IP Address – Select either DHCP or Static. If Static, enter the assigned the IP address.
TelVue® generally recommends a Static IP address so any possible port forwarding does not
become stale due to IP address changes. If DHCP is used, the assignment should match the
MAC address of the Digital Broadcaster. The default is Static IP address 1.1.1.1.
• Netmask– Enter the Netmask value for your network. The default value is 255.255.255.0.
• Default Gateway– Enter the Default Gateway IP address. The Default Gateway is generally
the device on your network that routes Internet traffic to the Digital Broadcaster, for example
a cable or DSL router.
When you have edited the network configuration, click the Save button at the bottom of the screen. A
message verifying that the changes were updated appears at the top of the screen. Click the Config
tab to return to the Configuration menu or click any tab to do other work.
Note: Some changes to the network configuration, such as IP addresses and destination
ports, will make it necessary to reboot the media server. The media server will warn you and
give you the option of canceling the changes.
Changing the Hostname
The hostname of the server is displayed at the top of every screen. The default is the product model.
You can change the hostname of your server to help distinguish it from other servers of the same
model. Click on Change Hostname. Enter the new hostname and click the Save button. When you
reboot the server, the new hostname will be displayed at the top of the screen.
Running netstat
During troubleshooting you might be asked to run the netstat utility. Click the button at the bottom of
the Network Configuration Management screen. The results of the status check will be displayed on
the UI screen.
Page 89

TelVue HyperCaster® User Manual / v5.0 / October 2014
© 2014 TelVue Corporation 16000 Horizon Way, Suite 500, Mt. Laurel, NJ 08054
HyperCaster® is a registered trademark of TelVue Corporation 800-885-8886 / www.telvue.com
88
Set Samba Workgroup
Your server ships with an integrated Samba file sharing server for easy networked access to your
digital video files. Samba is a standard way to transfer files among the server and other computers on
the network. For example, you can use Samba to export a project from a Non-Linear Editor (NLE) to
the server.
To change the Samba workgroup, click on samba in the Server Management section.
Type the name of the new workgroup and click the Save and Apply button.
Turn Off or Reboot the Server
To turn off or reboot the server, click the Shutdown/Reboot option. The application displays the
Manage the Server or Services screen.
Read the warnings on the screen before shutting down or rebooting the server or restarting the server
application. Shutdown, reboot, and restart actions will interrupt work in progress, including any
programming you may currently be streaming to viewers. The interruption could be as brief as a few
seconds but could take several hours if the system performs a filesystem check upon startup. For
assistance or if you often need to reboot or restart your server, contact TelVue Support.
Shutdown
To shut down the server without restarting it, click Shutdown.
Reboot
To reboot the server, which will restart the server and the User Interface, click Reboot.
Page 90

TelVue HyperCaster® User Manual / v5.0 / October 2014
© 2014 TelVue Corporation 16000 Horizon Way, Suite 500, Mt. Laurel, NJ 08054
HyperCaster® is a registered trademark of TelVue Corporation 800-885-8886 / www.telvue.com
89
Note: The HyperCaster has a watchdog timer that automatically reboots the server after 2 minutes if it
should lock up or suffer a software crash.
Restart Application
To restart the server application, which will restart the User Interface and media server but not restart
the server hardware, click Restart Application.
To exit this page without doing anything, click Cancel.
Manage Time Settings
Set the time zone and select at least one NTP time server source so your HyperCaster can maintain
accurate time sync. The HyperCaster must be able to send and receive traffic on UDP Port 123 on your
network for NTP support. To set the time zone or time servers, click on “Time” in the Server
Management section.
• System Time Zone – Select your time zone from the pull-down menu and click the Save
button. This will cause services including web servers and database servers to reset, so you
many lose connection to the application momentarily.
• Trusted Time Servers – Enter the IP address of the time server you want your Digital
Broadcaster to use to set its clock. You might want to use a local time server on your network
as the primary source and a public server on the Internet as a backup. If using a public NTP
server, pick one that is close to your location and in your time zone. Click Save and Apply to
apply the time server settings. Your Digital Broadcaster’s clock will reset if necessary, then
run within a few milliseconds of accuracy.
Note: At this time, one place to find IP addresses of time servers around the world is
http://ntp.isc.org/bin/view/Servers/StratumTwoTimeServers. Look for a timeserver
with an open access policy. If you are in an area that uses Daylight Saving Time,
make sure the time server is in an area with DST also.
Note: Some installations block access to DNS or NTP for security purposes. Your
server, not just your workstation, must have access to a time server. You might need
to enter the IP address of your internal time server, rather than its hostname. If you
have difficulty accessing a time server, contact your IT staff.
View RAID Status
To view information on RAID disks and file systems on servers with RAID disk arrays, click on RAID in
the Server Management section.
Page 91

TelVue HyperCaster® User Manual / v5.0 / October 2014
© 2014 TelVue Corporation 16000 Horizon Way, Suite 500, Mt. Laurel, NJ 08054
HyperCaster® is a registered trademark of TelVue Corporation 800-885-8886 / www.telvue.com
90
To see the event log of hardware RAID processes, click the Show Event Log button below the Disk
Info section. If this installation has software RAID, click the Show Details button to see more
information. To exit the page, click on the Configuration tab.
SNMP Support
All health status categories are available via the SNMP protocol.
To use SNMP to monitor the HyperCaster’s System Health, set the SNMP Community String as
desired. You can download the TelVue MIBs from the Download link to import into your SNMP client or
NMS system. The HyperCaster supports reporting uptime, network interface statistics, and System
Health criteria via SNMP.
Be sure that the SNMP ports are enabled as desired in the HyperCaster Firewall configuration. The
default settings open the SNMP ports for common local network IP addresses:
Page 92

TelVue HyperCaster® User Manual / v5.0 / October 2014
© 2014 TelVue Corporation 16000 Horizon Way, Suite 500, Mt. Laurel, NJ 08054
HyperCaster® is a registered trademark of TelVue Corporation 800-885-8886 / www.telvue.com
91
Switch Configuration
The switch configuration option is available only in systems with a video switch. Switch configuration
requires admin-level privileges.
Contact TelVue Technical Support to see which switch models are supported.
Configure Switch Ports
To configure switch input and output ports, click on the switch ports option in the Switch Configuration
section. The application displays the Configure Switch screen.
The following fields are editable.
• Name – Enter a short, descriptive name for the switch.
Page 93

TelVue HyperCaster® User Manual / v5.0 / October 2014
© 2014 TelVue Corporation 16000 Horizon Way, Suite 500, Mt. Laurel, NJ 08054
HyperCaster® is a registered trademark of TelVue Corporation 800-885-8886 / www.telvue.com
92
• Description – Enter a longer description about the switch that will distinguish it from the
others at your installation.
• Enable Breakaway? – To enable breakaway, check this box. Enabling breakaway allows
separate audio and video input ports to be routed to the same switch output port.
• Switch Outputs – The names and brief descriptions of the available switch output ports are
listed. To change any of them, type the new name and brief description in the fields for that
output port.
• Video Switch Inputs – The names and brief descriptions of the available video switch input
ports are listed. To change any of them, type the new name and brief description in the fields
for that input port.
• Audio Switch Inputs – The names and brief descriptions of the available audio switch input
ports are listed. To change any of them, type the new name and brief description in the fields
for that input port.
When you have finished entering the configuration information for this switch, click the Save button at
the bottom of the screen. To return to the Config page without making any changes, click the Cancel
button.
Configure RS232 Settings
To change the RS232 settings for the switch, click on the RS232 option. The application displays the
Edit Switch RS232 Settings screen.
The following fields are editable.
COM Port – Enter the COM port number this switch will use.
Baud Rate – Select the baud rate for this switch from the drop-
down list.
When you have finished entering the configuration information for
the RS232 switch, click the Save button at the bottom of the
screen. To return to the Config page without making any changes, click the Cancel button.
Change Switch Configuration
The switch configuration option lets you control whether the HyperCaster will acknowledge or ignore a
manual switch (a switch using the buttons on the switch faceplate). To change the switch
configuration click on the configuration option.
To enable the HyperCaster to acknowledge a manual (faceplate) switch, select On from the drop-down
list. When the server detects a manual switch, it will ignore
programmed switch events until the operator returns the
switch to its home path manually.
To prevent the HyperCaster from acknowledging a manual
(faceplate) switch, select Off from the drop-down list. The
server will then ignore manual (faceplate) switches.
Click the Save button at the bottom of the screen. To return to the Config page without making any
changes, click on the Config tab.
Lock the Switch
When manual detection of switch action is on and the operator wants the switch to hold the same path
regardless of what events have been scheduled, the operator locks the switch. There are two ways to
lock the switch.
With the switch away from the home port, go to the Switch section of the Dashboard and click on Lock
for the output port you want to lock.
Page 94

TelVue HyperCaster® User Manual / v5.0 / October 2014
© 2014 TelVue Corporation 16000 Horizon Way, Suite 500, Mt. Laurel, NJ 08054
HyperCaster® is a registered trademark of TelVue Corporation 800-885-8886 / www.telvue.com
93
Manually change the switch path by pressing the buttons on the switch panel. Consult your switch
operations manual for guidance.
This table illustrates how the switch behaves, depending on whether it is locked into a path or
unlocked.
Page 95

TelVue HyperCaster® User Manual / v5.0 / October 2014
© 2014 TelVue Corporation 16000 Horizon Way, Suite 500, Mt. Laurel, NJ 08054
HyperCaster® is a registered trademark of TelVue Corporation 800-885-8886 / www.telvue.com
94
User Management
User Management is available to both users and admins. To add, remove, or manage system users or
their permissions click on the users option. A user can also be given API access while creating or
editing an account, and they are given an API Key which can be used whenever they need to access
API. The application displays the User Management screen.
Edit User
Those with user-level privileges may edit only their own information. To edit a user’s information, click
on the user name or on the Edit icon. Edit the full username, password, name, contact information, or
privileges as desired. Click on the Save button at the bottom of the screen to save the changes. To
return to the User Management screen without making changes, click the Cancel button.
Delete User
Only admins may delete a user. To delete a user from the list, such as when an employee leaves the
company or installation, click the Delete icon. The application asks you to confirm the deletion. If you
are sure you want to delete this username, click on Yes (OK). Otherwise click on No (Cancel), and
the application leaves the user on the list.
Note: Neither psgadmin nor psguser can be deleted.
Add User
Only admins may add a user. To add a new user to the application, click the New User button at the
bottom of the screen. The application displays the Add User screen.
At a minimum, enter the new user’s username,
password (twice), first name, and last name.
• Username – (Required) Enter the user’s ID.
This is the name the user will enter to log in. It may
be up to 30 alphanumeric characters in length.
• Password – (Required) Enter the user’s
password. It must be a minimum of 3 and a maximum
of 100 alphanumeric characters in length.
• Password Again – (Required) Retype the
user’s password. Retyping protects against accidental
misspellings.
• First Name – (Required) Enter the user’s first
name.
• Last Name – (Required) Enter the user’s last
name.
• Organization – Enter the name of the station,
institution, or other organization. Some installations
use this field for downloaded reports.
• Address 1, Address 2, City, State, Zip
Code, Email, Phone – Enter this optional contact
information for the user if you wish.
Page 96

TelVue HyperCaster® User Manual / v5.0 / October 2014
© 2014 TelVue Corporation 16000 Horizon Way, Suite 500, Mt. Laurel, NJ 08054
HyperCaster® is a registered trademark of TelVue Corporation 800-885-8886 / www.telvue.com
95
• Admin? – If this user will have administrative privileges, check this box. Admin privileges
include:
o System configuration – Admins can configure the server, any switches, feeds,
channels, remote servers, and schedules. Users cannot view most of these options on
the Configuration page.
o Content Editing – Admins can edit any content on the server. Users can edit only
the content they created or imported.
• User Preferences – Check the optional Show tooltips and Email notification here.
• API Access – Check the box to provide the user with a unique API Key, which gives the user
authorization to use API, view information about the server, and make changes to the server
or content.
Click on the Add button at the bottom of the screen to add the user to the application. To return to
the User Management screen without adding a new user, click the Cancel button.
Version and Configuration
Version and Configuration is available to users and admins. It allows you to see what software and
tool versions your server is running, provides a tool to install TelVue upgrade packages, and lets you
see log files.
Version Information
To view information on the current HyperCaster user interface, click on About under Systems. The
application displays the Version and Configuration Information screen.
The Versions box shows the user interface’s date stamp
in the form YYYYMMDDHHMM, release number, UI
revision number, schema version, MPEG tools version,
and Media Server version.
The Network Settings box shows:
1. External IP Address – the server address as
it appears to the outside world.
2. Internal IP address – the server address as it
appears on your network.
The Configuration box shows if configurations, such as
CCMS, Content Sources, H264 Support, and IP Capture,
are enabled or disabled.
To return to the Config tab, click the Config tab.
Installing a Software Upgrade
Warning: Upgrades are only installed by a support
representative of TelVue. Do not attempt to install
third-party software on your server.
Download Log Files
To create a log file in downloadable format for troubleshooting, click on Log Files in the Systems
section. Click on Create Log File at the bottom of the screen. The log file will be saved in your /vol1
directory (folder).
Page 97

TelVue HyperCaster® User Manual / v5.0 / October 2014
© 2014 TelVue Corporation 16000 Horizon Way, Suite 500, Mt. Laurel, NJ 08054
HyperCaster® is a registered trademark of TelVue Corporation 800-885-8886 / www.telvue.com
96
Backups
The server automatically makes a full, binary backup every day in a folder under vol1. The backup
also stores one week’s worth of select columns from the As Run report and the Program Guide in CSV
format. You do not need to configure the backup.
Additionally, the RAID disks in the server rack are redundant and hot-swappable. The system partition
uses RAID1, while the media partition uses RAID6.
Should you lose data, please contact TelVue® Technical Support for assistance.
Typical Use Cases
These examples describe some of the most popular uses of the HyperCaster. Additional information
and use cases may be found on TelVue’s self-service web portal at http://www.telvue.com/support.
Controlling What Appears in the Program Guide
To prevent fillers such as PSAs, switch events, etc. from displaying in the Program Guide and external
schedule, you can individually de-select the “Include In Program Guide” metadata for each event. With
some planning, however, you can avoid this. In the Category Setup section of the Config page, add a
category such as “Fillers” and set “Include In Guide Default” to No. Put your PSAs, fillers, and other
non-Program Guide events in these categories. Now when you schedule them, they will automatically
be excluded from the Program Guide and external schedule.
For example:
1. Go to Config → Manage Content → Categories.
2. Add a new category called Filler and set “Include In Guide Default” to No.
3. On the Content page in Calendar View, use Advanced Search in the sidebar to locate your fillers.
4. Use Bulk Actions to add multiple filler files to the Filler category.
5. Now when you drag and drop these filler programs in Calendar View or schedule them from Classic
View, they will not be displayed in the Program Guide or external schedule.
Extending an IP Capture without Re-Entering Metadata
If your installation has external IP Capture, you can automate some of the process of getting files onto
your broadcast server. To extend an IP Capture device on a broadcast or archive server without reentering the metadata for the file you plan to encode, set the feed name and FTP server to match,
then set the Master FTP File Server to FTP back to the feed.
1. Go to the Content page on the archive or broadcast server where you want to import the
content. Use the Add Program function to enter the placeholder. In the Source
Information section, make sure the Location field matches the Feed Name of the IP Capture
device.
2. On the other server’s Config page in the Feed Setup section, select capture configuration. Set
the Program Feed Server Host to the name or IP address of the TelVue server where the
metadata was entered for the placeholder in Step 1.
3. On the same capture configuration page, check the FTP Master File on Capture box so the
pull down of Master File FTP Servers displays. Select the archive or broadcast server’s
upload folder (directory).
4. Go to the Record page of the server with the external IP Capture device. Add the capture or
manual encode for the external IP Capture device. The Unattached Program pull down will
include the archive or B-series server so you can select the placeholder.
When the encoded file is completed, the encoder will FTP to the media import folder. Because the
filename will match the placeholder, the encoded file will auto-import to the root media folder, such as
vol1. You cannot specify a subfolder when auto-importing.
Page 98

TelVue HyperCaster® User Manual / v5.0 / October 2014
© 2014 TelVue Corporation 16000 Horizon Way, Suite 500, Mt. Laurel, NJ 08054
HyperCaster® is a registered trademark of TelVue Corporation 800-885-8886 / www.telvue.com
97
Live Streams
The HyperCaster is capable of rebroadcasting incoming streaming video. You can configure live stream
sources in the config tab.
Note: Pro and HD models that play 1920x1080i HD content do not support this feature.
Transcoding a live stream is very CPU-intensive at this bitrate.
Warning: Network streaming can send large amounts of data across your network. This can
cause network congestion if not coordinated with your IT department. Please confirm with
your IT department before enabling.
Live Stream Setup
The network stream for a channel will show video playouts only. External sources from a video switch
or device will not be streamed. JPEG images and overlays will not be streamed. To configure a
channel for network streaming, login as an admin and:
1. Click the Config tab.
2. In the Feeds section, click the link for Live Streams to display the Stream Source Setup page.
3. Click Add Stream Source.
4. Complete the add live stream source form.
• Type is Unicast or Multicast
• Enter a unique name.
• Description is optional.
• IP address for unicast is the source of the stream. If it is multicast the address must be in the
range of 224.0.0.0 to 239.255.255.255.
• IP Port must be between 3000 and 65535.
• Bit Rate. For HyperCaster the bit rate should match the rate of the incoming stream. The
stream will be playable on channels that have a bit rate that is at least as high as the stream.
5. Click Add to save.
The live stream is now able to be scheduled as an event. If your server has IP capture enabled you
may also record any live stream source. This can be done through the record tab or programming tab.
Publishing Your Schedule to Other Media
The HyperCaster includes an integrated, searchable, web-based Program Guide to which you can link
from your site without having to re-enter program information. You can link the Program Guide to
your website or export it to a spreadsheet or text file.
Page 99

TelVue HyperCaster® User Manual / v5.0 / October 2014
© 2014 TelVue Corporation 16000 Horizon Way, Suite 500, Mt. Laurel, NJ 08054
HyperCaster® is a registered trademark of TelVue Corporation 800-885-8886 / www.telvue.com
98
Making the Program Guide Available on your Website
1. Open the HyperCaster Web Application port (typically port 50000) on your router or firewall.
Consult your IT department for how to do this properly at your installation.
2. Link to the web site program guide module. The format for the link is
http://nnn.nnn.nnn.nnn:50000/external_schedule/simple_day_schedule?id=#
where nnn.nnn.nnn.nnn is the public IP address that routes port 50000 to the HyperCaster
and # is the channel id, such as “1” for output channel 1, “2” for output channel 2, etc… on a
multi-channel server.
3. Regularly set the metadata for your content and events so the Program Guide will show useful
information.
Users can select the day they want to view your schedule using the Calendar Picker. The
results show the program start times, the program names, and the next air date for each
program.
Users can also search the Program Guide by keyword to find specific air times of their favorite
shows.
4. To link to the external Program Guide from your own website HTML code, insert code using the
following format:
<a href=“http://nnn.nnn.nnn.nnn:50000/external_schedule?id=#”>Schedule For Channel
10</a>
where nnn.nnn.nnn.nnn is the server IP address and # is the channel number.
Copying the Program Guide to a Text File
1. Go to the program guide page at
http://nnn.nnn.nnn.nnn:50000/external_schedule/simple_day_schedule
for a single-channel system or
http://nnn.nnn.nnn.nnn:50000/external_schedule/simple_day_schedule?id=#
for a multi-channel system
where nnn.nnn.nnn.nnn is the public IP address that routes port 50000 to the Digital
Broadcaster and # is the channel id, such as “1” for output channel 1, “2” for output channel
2, etc… on a multi-channel server.
2. Highlight and copy the text you want.
3. Open a simple text editor such as NotePad, WordPad, or TextEdit and paste the text into a blank
file.
4. If you need the schedule for more dates, use the calendar picker at the left to display another date
and repeat Steps 2 – 3.
5. Rename and save the file to a local drive or device.
Scheduling a Live Switch Event whose Actual Duration Varies
Live events can be shorter or longer than the time you originally scheduled. For example your station
might schedule a weekly, two-hour switch to the camera at the high school basketball game. If the
game runs long you will want to continue to broadcast it. If the game ends early you will want to show
your viewers a related program.
Page 100

TelVue HyperCaster® User Manual / v5.0 / October 2014
© 2014 TelVue Corporation 16000 Horizon Way, Suite 500, Mt. Laurel, NJ 08054
HyperCaster® is a registered trademark of TelVue Corporation 800-885-8886 / www.telvue.com
99
One way to control what you broadcast when you have switched to a live event is to schedule the
event for less time than you expect it to run, then lock the switch manually until the event finishes.
The server will still play the event after the switch event, but viewers will continue to see the live
event.
1. On the Config page, go to Switch Configuration and make sure manual detection of switch
actions is on.
2. On the Programming page, schedule the switch event.
3. Schedule an event to follow the switch event.
4. After the switch event begins, go to the Dashboard and click the Lock option next to the switch
output you want to lock.
5. When the live event ends, release the switch lock by clicking the Unlock option on the
Dashboard. The event you scheduled to play at that moment is immediately visible to viewers
from its current point according to the schedule.
Continuing the basketball game example, suppose you expect the game to last two hours. You could
schedule the switch event to the game camera for only 90 minutes and follow it with a switch event to
your news studio feed for 90 minutes. After the basketball game begins, lock the switch. As long as
the game ends after 90 minutes but before three hours you can notify your news studio to begin postgame coverage, then release the switch lock.
Another possibility would be to schedule the switch to the basketball game camera for 90 minutes,
followed by a 60-minute continuity playlist. After the basketball game begins, lock the switch. Unlock
the switch when the game ends. If the game ends after 90 minutes, viewers will see the entire 60minute playlist. If the game ends after two hours, they will see the playlist from the middle to the end.
If the game ends after two hours and 25 minutes, they will see just the last five minutes of the
playlist.
Using Third-Party Editing Software
Refer to the Preparing Content Section of the TelVue website (www.telvue.com/content) for guidelines
on using several of the popular video editing software packages with your TelVue server. The USB key
that came with your server has an addendum to this manual with guidelines for:
Trimming DVD-compliant, MPEG-2 files.
Re-encoding files so they are DVD-compliant.
Note: TelVue’s recommendations regarding the use of third-party software packages
are subject to change without notice.
 Loading...