

Page 1

TELUS Satellite TV
HD receiver
User guide
Page 2

Table of contents
Welcome ......................................................................5
Important safety instructions
Safety tips
.....................................................................7
Your guide to TELUS Satellite TV
Where to find information on your account . . . . . . . . . . . . . . . . . . . . . . . . . . . . . . . . . . . . . . . . . . . . . . .8
About Satellite TV reception
Connecting to your home phone
Screensaver
. . . . . . . . . . . . . . . . . . . . . . . . . . . . . . . . . . . . . . . . . . . . . . . . . . . . . . . . . . . . . 8
.........................................................6
.....................................................8
. . . . . . . . . . . . . . . . . . . . . . . . . . . . . . . . . . . . . . . . . . . . . . . . . . . . . . 8
. . . . . . . . . . . . . . . . . . . . . . . . . . . . . . . . . . . . . . . . . . . . . . . . . . . .8
Your TELUS HD receiver ...........................................................9
Connecting your system ..........................................................11
Your remote control
Connection and setup
Setting up to display in HD . . . . . . . . . . . . . . . . . . . . . . . . . . . . . . . . . . . . . . . . . . . . . . . . . . . . . 16
Connecting to your TELUS Satellite TV antenna
Connecting your home phone
.............................................................14
...........................................................16
. . . . . . . . . . . . . . . . . . . . . . . . . . . . . . . . . . . . . . . . . . 16
. . . . . . . . . . . . . . . . . . . . . . . . . . . . . . . . . . . . . . . . . . . . . . . . . . . 17
Connecting an external hard drive ...................................................18
Attaching an external hard drive . . . . . . . . . . . . . . . . . . . . . . . . . . . . . . . . . . . . . . . . . . . . . . . . . . . 19
Removing an external hard drive
. . . . . . . . . . . . . . . . . . . . . . . . . . . . . . . . . . . . . . . . . . . . . . . . . . 19
Using your TELUS Satellite TV service ................................................20
Using the menu. . . . . . . . . . . . . . . . . . . . . . . . . . . . . . . . . . . . . . . . . . . . . . . . . . . . . . . . . . . 20
Using text fields. . . . . . . . . . . . . . . . . . . . . . . . . . . . . . . . . . . . . . . . . . . . . . . . . . . . . . . . . . . 22
Setting up your remote to control other devices
Controlling an A/V receiver. . . . . . . . . . . . . . . . . . . . . . . . . . . . . . . . . . . . . . . . . . . . . . . . . . . . . . 27
Switching between TV and device volume control
Using the onscreen guide
Using the browse banner . . . . . . . . . . . . . . . . . . . . . . . . . . . . . . . . . . . . . . . . . . . . . . . . . . . . . . 30
Using search
Using search history. . . . . . . . . . . . . . . . . . . . . . . . . . . . . . . . . . . . . . . . . . . . . . . . . . . . . . . . . 32
Find a program by its theme. . . . . . . . . . . . . . . . . . . . . . . . . . . . . . . . . . . . . . . . . . . . . . . . . . . . . 32
. . . . . . . . . . . . . . . . . . . . . . . . . . . . . . . . . . . . . . . . . . . . . . . . . . . . . . . . . . . . 31
. . . . . . . . . . . . . . . . . . . . . . . . . . . . . . . . . . . . . . . . . . . . . . . . . . . . . 29
. . . . . . . . . . . . . . . . . . . . . . . . . . . . . . . . . . . . . . . . . . 23
. . . . . . . . . . . . . . . . . . . . . . . . . . . . . . . . . . . . . . . . . . 28
Page 3

Table of contents
Timers .......................................................................33
Timer type . . . . . . . . . . . . . . . . . . . . . . . . . . . . . . . . . . . . . . . . . . . . . . . . . . . . . . . . . . . . . 33
Timer frequency
Timer priorities
Timer options. . . . . . . . . . . . . . . . . . . . . . . . . . . . . . . . . . . . . . . . . . . . . . . . . . . . . . . . . . . .34
Special considerations when using timers
Setting up an automatic timer
Setting up a manual timer
Deleting a timer. . . . . . . . . . . . . . . . . . . . . . . . . . . . . . . . . . . . . . . . . . . . . . . . . . . . . . . . . . .37
Using the timers list. . . . . . . . . . . . . . . . . . . . . . . . . . . . . . . . . . . . . . . . . . . . . . . . . . . . . . . . . 37
Changing the timer settings
. . . . . . . . . . . . . . . . . . . . . . . . . . . . . . . . . . . . . . . . . . . . . . . . . . . . . . . . . . 33
. . . . . . . . . . . . . . . . . . . . . . . . . . . . . . . . . . . . . . . . . . . . . . . . . . . . . . . . . . . 33
. . . . . . . . . . . . . . . . . . . . . . . . . . . . . . . . . . . . . . . . . . . . . . 34
. . . . . . . . . . . . . . . . . . . . . . . . . . . . . . . . . . . . . . . . . . . . . . . . . . . 35
. . . . . . . . . . . . . . . . . . . . . . . . . . . . . . . . . . . . . . . . . . . . . . . . . . . . . 36
. . . . . . . . . . . . . . . . . . . . . . . . . . . . . . . . . . . . . . . . . . . . . . . . . . . . 37
Timers when connected to an external hard drive........................................38
Editing a timer . . . . . . . . . . . . . . . . . . . . . . . . . . . . . . . . . . . . . . . . . . . . . . . . . . . . . . . . . . . 38
Setting up a Vu! Pass timer. . . . . . . . . . . . . . . . . . . . . . . . . . . . . . . . . . . . . . . . . . . . . . . . . . . . . 39
Pay Per View (PPV) ..............................................................40
Ordering a PPV event. . . . . . . . . . . . . . . . . . . . . . . . . . . . . . . . . . . . . . . . . . . . . . . . . . . . . . . . 40
Reviewing PPV purchases
. . . . . . . . . . . . . . . . . . . . . . . . . . . . . . . . . . . . . . . . . . . . . . . . . . . . . 41
Favourites lists .................................................................42
Editing favourites lists. . . . . . . . . . . . . . . . . . . . . . . . . . . . . . . . . . . . . . . . . . . . . . . . . . . . . . . . 42
Naming favourites lists
Selecting a favourites list
. . . . . . . . . . . . . . . . . . . . . . . . . . . . . . . . . . . . . . . . . . . . . . . . . . . . . . . 43
. . . . . . . . . . . . . . . . . . . . . . . . . . . . . . . . . . . . . . . . . . . . . . . . . . . . . . 44
Locks........................................................................45
Creating your password . . . . . . . . . . . . . . . . . . . . . . . . . . . . . . . . . . . . . . . . . . . . . . . . . . . . . . 46
Changing your password . . . . . . . . . . . . . . . . . . . . . . . . . . . . . . . . . . . . . . . . . . . . . . . . . . . . . . 46
Locking and unlocking your receiver
Locking by ratings
Locking by channel. . . . . . . . . . . . . . . . . . . . . . . . . . . . . . . . . . . . . . . . . . . . . . . . . . . . . . . . . 48
Locking or unlocking Pay Per View channels
Hiding adult content
Locking or unlocking the front panel
. . . . . . . . . . . . . . . . . . . . . . . . . . . . . . . . . . . . . . . . . . . . . . . . . . . . . . . . . 47
. . . . . . . . . . . . . . . . . . . . . . . . . . . . . . . . . . . . . . . . . . . . . . . . . . . . . . . . 50
. . . . . . . . . . . . . . . . . . . . . . . . . . . . . . . . . . . . . . . . . . . . . . . . 47
. . . . . . . . . . . . . . . . . . . . . . . . . . . . . . . . . . . . . . . . . . . . 49
. . . . . . . . . . . . . . . . . . . . . . . . . . . . . . . . . . . . . . . . . . . . . . . . 51
Page 4

Table of contents
Call Display on your TV ...........................................................52
Call Display screens. . . . . . . . . . . . . . . . . . . . . . . . . . . . . . . . . . . . . . . . . . . . . . . . . . . . . . . . . 52
Turning Call Display on and off
Viewing your Call Display history
Receiver customization ...........................................................54
Changing languages for descriptive video . . . . . . . . . . . . . . . . . . . . . . . . . . . . . . . . . . . . . . . . . . . . . 54
Using closed captioning
Using Dolby Digital surround sound
Changing the onscreen channel order
Changing the onscreen guide display. . . . . . . . . . . . . . . . . . . . . . . . . . . . . . . . . . . . . . . . . . . . . . . . 57
Resetting to factory defaults
Scheduling receiver updates
Enabling inactivity standby
. . . . . . . . . . . . . . . . . . . . . . . . . . . . . . . . . . . . . . . . . . . . . . . . . . . 52
. . . . . . . . . . . . . . . . . . . . . . . . . . . . . . . . . . . . . . . . . . . . . . . . . . 53
. . . . . . . . . . . . . . . . . . . . . . . . . . . . . . . . . . . . . . . . . . . . . . . . . . . . . . 55
. . . . . . . . . . . . . . . . . . . . . . . . . . . . . . . . . . . . . . . . . . . . . . . . 56
. . . . . . . . . . . . . . . . . . . . . . . . . . . . . . . . . . . . . . . . . . . . . . . 57
. . . . . . . . . . . . . . . . . . . . . . . . . . . . . . . . . . . . . . . . . . . . . . . . . . . . 58
. . . . . . . . . . . . . . . . . . . . . . . . . . . . . . . . . . . . . . . . . . . . . . . . . . . . 58
. . . . . . . . . . . . . . . . . . . . . . . . . . . . . . . . . . . . . . . . . . . . . . . . . . . . . 59
Personal Video Recorder (PVR) .....................................................60
Pausing live TV . . . . . . . . . . . . . . . . . . . . . . . . . . . . . . . . . . . . . . . . . . . . . . . . . . . . . . . . . . . 60
Reversing, fast-forwarding and skipping
Using slow motion and frame by frame . . . . . . . . . . . . . . . . . . . . . . . . . . . . . . . . . . . . . . . . . . . . . . . 61
Recording programs
Recording live TV . . . . . . . . . . . . . . . . . . . . . . . . . . . . . . . . . . . . . . . . . . . . . . . . . . . . . . . . . . 62
Watching a recording. . . . . . . . . . . . . . . . . . . . . . . . . . . . . . . . . . . . . . . . . . . . . . . . . . . . . . . .63
Recording while watching recorded content
Recording options
. . . . . . . . . . . . . . . . . . . . . . . . . . . . . . . . . . . . . . . . . . . . . . . . . . . . . . . . 62
. . . . . . . . . . . . . . . . . . . . . . . . . . . . . . . . . . . . . . . . . . . . . . . . . . . . . . . . . 64
. . . . . . . . . . . . . . . . . . . . . . . . . . . . . . . . . . . . . . . . . . . . . . 60
. . . . . . . . . . . . . . . . . . . . . . . . . . . . . . . . . . . . . . . . . . . . 63
Troubleshooting tools ............................................................65
First steps . . . . . . . . . . . . . . . . . . . . . . . . . . . . . . . . . . . . . . . . . . . . . . . . . . . . . . . . . . . . . 65
Troubleshooting tables
Resetting your receiver
Diagnostics. . . . . . . . . . . . . . . . . . . . . . . . . . . . . . . . . . . . . . . . . . . . . . . . . . . . . . . . . . . . . 67
Point dish and check switch
. . . . . . . . . . . . . . . . . . . . . . . . . . . . . . . . . . . . . . . . . . . . . . . . . . . . . . . 65
. . . . . . . . . . . . . . . . . . . . . . . . . . . . . . . . . . . . . . . . . . . . . . . . . . . . . . . 67
. . . . . . . . . . . . . . . . . . . . . . . . . . . . . . . . . . . . . . . . . . . . . . . . . . . . 67
Device code tables..............................................................68
Frequently Asked Questions (FAQs)
How to contact TELUS . . . . . . . . . . . . . . . . . . . . . . . . . . . . . . . . . . . . . . . . . . . . . . . . . . . . . . . 75
..................................................74
TELUS Satellite TV Terms of Service .................................................76
Index
........................................................................81
Page 5

Welcome
Congratulations on choosing TELUS Satellite TV™. You’ve opened up a whole new world of possibilities
for your TV viewing. Now you can say goodbye to planning around your shows and hunting for videos
at the store.
With a huge choice of digital channels including tons of HD, creating your ideal programming package
is easy. There are theme packs, international channels, premium sports packages, and premium movie
packages featuring the latest blockbuster movies.
High Definition (HD) TV delivers the best picture and the best viewing experience. You will see more
detail and enjoy a sharper, clearer and more vibrant picture than you would with standard definition TV.
Watch your favourite shows in true widescreen and see 45% more of the picture compared to standard
definition. Plus, enjoy rich, resonant sound through 5.1 Dolby® Digital surround sound.
TELUS Satellite TV also gives you digital features that regular TV can’t offer. Take advantage of the
Interactive Programming Guide that lets you instantly find your shows by date, time and theme.
There are a host of other great features including Call Display* on your TV, 45 commercial-free music
channels and Pay Per View (PPV) with a huge selection of videos, including Hollywood blockbusters,
kids’ programming, sports and special events.
55
Page 6

Important safety instructions
1
Do not use this device near water.
2 Clean only with a dry cloth.
3 Do not block any ventilation openings. Install in accordance with the instructions.
4 Do not install near any heat sources such as radiators, heat registers, stoves or other devices (including amplifiers) that produce heat.
5 Do not defeat the safety purpose of the polarized or grounding-type plug. A polarized plug has 2 blades with one wider than the other. A
grounding-type plug has 2 blades and a third grounding prong. The wide blade or the third prong are provided for your safety. If the provided
plug does not fit into your outlet, consult an electrician for replacement of the obsolete outlet.
6 Protect the power cord from being walked on or pinched, particularly at plugs, convenience receptacles, and the point where they exit from
the device.
7 Use only attachments/accessories specified.
8 Unplug this device during lightning storms or when unused for long periods of time.
9 Refer all servicing to qualified service personnel. Servicing is required when the device has been damaged in any way, such as the power
supply cord or plug is damaged, liquid has been spilled or objects have fallen into the device, the device has been exposed to rain or
moisture, does not operate normally, or has been dropped.
Apparatus shall not be exposed to dripping or splashing and no objects
filled with liquids, such as vases, shall be placed on the apparatus.
1
Ground clamp
2
Ground block
3
Grounding conductors
4
Satellite dish
5
Coaxial cable from satellite dish
6
Electric service equipment
7
Group clamps
8
Power service grounding electrode system
(NEC Section 810-21)
(NEC Art. 250, Part H)
4
1
2
3
5
6
7
8
6
Page 7

Safety tips
Unplug the receiver from the AC power outlet before cleaning
The use of accessories or attachments not recommended by the receiver manufacturer will void the Limited Warranty
Do not place the receiver in an enclosure such as a cabinet without proper ventilation
Do not stack the receiver on top of or below other electronic devices
Operate the receiver using only the type of power source indicated on the marking label. Unplug the receiver power cord by gripping
the power plug, not the cord.
Do not overload wall outlets or extension cords, as this can result in a risk of fire or electrical shock
Never insert objects of any kind into the receiver through openings, as the objects may touch dangerous voltage points or short out parts.
This could cause fire or electrical shock.
Make sure the outdoor parts of the antenna system are grounded in accordance with local, state, federal and National Electrical Code
(NEC) requirements
Do not locate the antenna near overhead light or power circuits, or where it can fall into such power lines or circuits. When installing
the antenna, take extreme care to avoid touching such power lines or circuits, as contact with them can be fatal.
Do not attempt to service the receiver yourself, as opening or removing covers may expose you to dangerous voltage, and will void
the Limited Warranty. Refer all servicing to authorized service personnel.
Use an outlet that contains surge suppression or ground fault protection. For added protection during a lightning storm, or when
the receiver is left unattended and unused for long periods of time, unplug the power cord from the wall outlet, disconnect the lines
between the receiver and the antenna, and disconnect the phone line. This will provide some protection against damage caused
by lightning or power line surges.
7
Page 8

Your guide to TELUS Satellite TV
This guide explains everything you need to know about your new TELUS Satellite TV service. It will help you understand how it works, ensure
you make the most of all the exciting features, and provide you with handy tips for troubleshooting.
Where to find information on your account
To check your TELUS Satellite TV account or to make changes to your programming package, please call 310-MYTV (6988).
About Satellite TV reception
Satellite T V uses satellites in orbit over the earth to deliver television and audio programming. The satellites stay aligned over one place on the
surface of the earth, so once your satellite dish is aimed, it won’t have to move to follow them.
Weather interference
Heavy rain, snow or dense cloud cover can sometimes reduce the satellite signal, which may interrupt your service. Your service will return
after the weather condition has passed. The TELUS installer will aim the satellite dish during installation to get the strongest signal and help
prevent rain and snow from causing interruptions.
Solar interference
Twice a year, as the sun orbits the earth, the sun moves to a position behind the satellite. This event occurs during a few days at the beginning
of each spring and fall. During these brief periods, you won’t be able to access your programming. This will only last a few minutes.
Connecting to your home phone
Your satellite receiver is equipped with a standard telephone jack and must be connected to an active home phone line. Once connected,
you can order Pay Per View events and channels using your remote control, use the Interactive TV weather features, and access other services
from TELUS Satellite TV such as onscreen Call Display (see full instructions on Connecting your home phone on page 17).
Screensaver
Whenever the receiver is turned off using your remote control or front panel power button, you’ll see the TELUS logo moving around
your TV screen. This feature is included to assure you that the connections between your receiver and TV haven’t been lost.
or the power button on the front panel of your receiver to resume watching programming.
Quick tip
Turning your receiver off when you’re not watching
TV will ensure your software is kept up-to-date.
Press
8
Page 9

Your TELUS HD receiver
Front view
Use this as a reference for all of the functions and connections of your receiver.
1 2
1
Smart card door – Slot for smart card for future use
2
Arrows – Moves selection up or down
3
Power – Turns receiver power on/off
4
Infrared port – Receives signals from your remote control
3 4
65
5
System info – Displays the System Information screen
6
Select – Selects highlighted item
9
Page 10

Your TELUS HD receiver
Back view
1 2 3 4
98765
1
RCA video/audio (out) – These connections are ideal for VCRs and older TVs; the audio ports can be used independently
if other video connections have been used
2
Optical audio (out) – This is an all digital audio connection, ideal for audio receivers
3
HDMI (out) – HDMI is the highest fidelity HD connection that contains both audio and video signals; use for HD TVs
4
Ethernet port – Not currently enabled
5
Satellite in – Connects to your satellite signal
6
Component video (out) – Component video cables can be used for high quality signals to either HD or non-HD TVs
7
S-Video (out) – S-Video is preferred for older TVs
8
USB port – Connects to your external hard drive
9
Phone jack – Connects to your telephone line
10
Page 11

Connecting your system
This chapter is the perfect place to find out how to connect the receiver to your TV and stereo equipment. You’ll find the following information
particularly helpful if you decide to move your receiver or if you get a new T V, VCR or DVD player.
Connecting your audio and video
Connect the audio and video outputs on your receiver to the audio and video inputs on your TV.
HDMI cable
Best setup
Use this if you are connecting
with an HDMI cable.
Power
An HDMI connection provides the highest quality audio and video to your HDTV through one cable. It supports both video and digital
surround sound. This is the connection to use if you are setting up HD.
1 Connect an HDMI cable between your TV and receiver.
2 Turn on your receiver and TV using the front panel buttons.
3 Confirm that you are getting a picture from the receiver. Consult your TV’s user guide if you need to change the audio/video input on your TV.
4 If you don’t see a picture, see Troubleshooting tables on page 67. In most cases, connecting the HDMI cable will optimize your TV’s display
settings. However, your TV may require selecting a different format to display from the receiver during setup.
5 Turn up the volume on your TV to confirm you have sound. If you don’t, your system may require you to connect RCA cables between your
receiver and TV.
RCA cables
Great setup
Audio In
Use this if you are connecting
with RCA cables.
Audio/Video Out
Power
11
Page 12

Connecting your system
Connecting your video
Connect the video outputs on your receiver to the video inputs on your TV.
Component video cables
PbPrInY
Best setup
Use this if you are connecting
with component video
cables.
Y
Pb
Pr
Power
A component cable provides high quality video to your HDTV.
1 Connect the component cable between your receiver and TV.
2 If you don’t see a picture, change the resolution setting on your receiver.
3 Turn the volume up on your TV to confirm you have sound. If you don’t, check to ensure the component cables are properly connected.
S-Video cable
S-Video In
Great setup
Use this if you are connecting
with an S-Video cable.
S-Video
12
Page 13

Connecting your system
Connecting your audio
Connect the audio outputs on your receiver to the audio inputs on your T V or A/V receiver.
A/V receiver with an optical cable
A/V receiver
Optical In
Optical
A/V receiver with RCA cables
A/V receiver
Audio In
Audio Out
Power
Power
Best setup
Use this if you are connecting
surround sound through
an
A/V receiver with an
optical cable.
Great setup
Use this if you are connecting
through an A/V receiver with
RCA cables.
13
Page 14

Your remote control
Tired of multiple remotes? The TELUS Satellite TV remote is universal and works with most TVs, DVD players, VCRs and A/V receivers. You can also use
this remote to control Personal Video Recorder (PVR) features if you’ve added an external hard drive. For information on programming your remote,
please see pages 23 – 28.
SAT
TV
POWER
VCR
AUX
TV
MENU
TV/ VIDEO
PAGE UP
PAGE DOWN
VOLUME UP
VOLUME DOWN
MUTE
GUIDE
MOVE
SELECTION
THEMES
BROWSE
SELECT
RECALL
INFO
VIEW LIVE TV
iTV
FORMAT
Switches your remote to satellite mode
Switches your remote to TV mode
Turns the device(s ) you’re controlling on and off
Switches your remote to VCR mode: also works on DVD players
Switches your remote to auxiliary mode such as DVD player or A/V receiver
Turns your TV on and off
Displays the main menu
Scrolls through available TV or video input sources
Moves cha nnel listings up or down one page at a time on the
onscreen guide
Decreases and increases volume
Turns all sound on and off
Displays the onscreen guide
Moves cha nnel selection up and down; also navigates up, down,
left or right through menus and guides
Searches for programs using themes
Displays to see what’s on other channels while you continue to
watch your program
Selects highlighted item
Returns to the previous channel
Displays the description of the selected program
Returns to viewing live TV
Directs you to Channels On Demand
Formats the picture width of the program you’re viewing
Quick tip
When you’re in SAT
mode and you switch to
another device, a pop-up
window alerts you that
the remote control is no
longer controlling your
recei ver.
SEARCH
If you’ve installed an external hard drive, the following remote buttons also allow you to access PVR functions:
PVR
SKIP BACK
SKIP FWD
BACK
PAUSE
FWD
STOP
PLAY
RECORD
Please note that , , and are not currently enabled.
Displays the search menu
Displays the list of recorded programs if you have connected an
external hard drive
Skips back in the guide one day at a time ; skips recorded program
back 10 seconds if you have connected an external hard drive
Skips forward in the guide one day at a time; skips recorded
program forward 30 seconds if you have connected an external
hard drive
Reverses your VCR/ DVD, recorded program or live TV
Pauses your VCR/DVD, recorded program or live TV
Advances your VCR/ DVD or recor ded progr am
Stops your VCR/DVD or recorded program
Plays your VCR/DVD or recorded program
Records live TV on your PVR or VCR
14
Page 15

Your remote control
Low battery warning
When you see a low battery warning message on your screen, the batteries in your remote control need to be replaced. Your remote uses
4 AAA batteries. When you need to replace them, insert new batteries into the back panel on the bottom of your remote.
Quick tip
If your remote control doesn’t seem to be working very well (for example, you have to
receiver on or off), it’s a good indication that the batteries are getting weak.
press
more than once to turn the
15
Page 16

Connection and setup
Setting up to display in HD
If you have subscribed to HD programming, use the following steps to select the desired HDTV format.
1 Press to open the main menu.
2 Use to highlight System Setup and press
3 Use to highlight HDTV Setup and press
4 Use to highlight the HD Format Settings that match the format that your T V suppor ts and press
5 Use to highlight the Aspect Ratio option that matches your T V and press
16:9 is the setting for widescreen HDT V display. 4:3 #1 is the setting to use on a 4:3 TV that uses
vertical compression. When displaying a 16:9 feed, the
picture will show black bars on the top and bottom of
the screen.
6 Press to highlight Done and press
.
.
.
.
. You can choose between the following options:
4:3 #2 is the setting to use on a 4:3 TV that does not
have internal vertical compression. When displaying a
16:9 feed, the picture will appear tall and skinny.
7 If required, set up your HDTV to display in the format you desire. Some HDTVs will automatically adjust to the resolution setting on your receiver.
Connecting to your TELUS Satellite TV antenna
Before you can begin connecting your receiver to your TELUS Satellite TV antenna, you must first complete the previous sections on
connecting your TV to the receiver.
1 Connect 2 RG-6 coaxial cables between the Satellite In 1 and Satellite In 2 ports on the receiver’s back panel to 2 available ports on
either the switch or LNBF in your existing system.
2 Press to open the main menu, highlight System Setup, then Installation, and then Point Dish to display the Point Dish screen
on the TV.
3 Select Check Switch. Select Te s t .
4 The receiver begins performing the check switch tests. When it’s finished, the installation summar y screen displays.
5 Make sure that the information on the installation summary screen identifies your system correctly and shows all transponders for all
satellites in your system.
6 Select OK to go to the Point Dish screen.
7 Select Cancel to exit the point dish menu. At this point, the receiver may start downloading software. If it does, follow the onscreen
instructions and don’t use the receiver until the process is complete. Otherwise, press
able to view your programming.
. After a few minutes, you should be
16
Page 17

Connection and setup
Connecting your home phone
You must keep your receiver connected to your home phone to order Pay Per View (PPV) events, use the interactive weather features,
or use other services with your remote.
You may be able to use a wireless phone jack; however, this may not support all the features such as onscreen Call Display.
If you have subscribed to TELUS High Speed or equivalent you may have to install a DSL filter to successfully connect with TELUS Satellite T V.
Call 310-MYTV (6988) to order your free filter.
Phone system setup
Connect a phone cable from the back of the receiver to an active home phone wall jack.
You must also set up the receiver for your home phone and set a prefix if you need one to make an outside call. For most installations,
all you need to do is set the home phone system type. The default setting of no prefix will allow correct dialing.
1 Press to open the main menu.
2 Use to highlight System Setup and press
3 Use to highlight Installation and press
4 Use to highlight Phone System and press
5 Navigate to To u c h To n e or Rotary Phone in the phone type list and press
6 Navigate to No Prefix or Prefix Code in the outside line prefix list and press
7 If you selected No Prefix press to select Done and press
.
.
.
.
.
.
8 If you selected Prefix Code: using the number buttons on your remote, enter the exact sequence you dial to obtain an outside phone line.
9 Press to highlight Done and press
.
17
Page 18

Connecting an external hard drive
Connect an external hard drive to your receiver to enable recording functionality. You can pause, replay and record live TV and see 9 days ahead in
the Interactive Programming Guide instead of only 2. The receiver is a single tuner, which means you can record only one show at a time.
The hard drive you use should meet these specifications:
7200 RPM
Between 40 GB and 1.0 TB of capacity
Holds a single hard drive (enclosures holding 2 disks are not supported)
Plugs into an AC power outlet
USB 2.0 connection
No sleep mode (cannot power down when idle)
Quick tip
3.5" external hard drives are more likely to meet the specifications than
2.5" external hard drives, which are designed more for portable use.
Attaching an external hard drive
1 Connect your external hard drive to the USB port on the back of the receiver.
2 Navigate to Yes and press
3 Navigate to Yes and press
4 The external hard drive will begin formatting and your receiver will automatically restart. This process will take approximately
5 minutes.
to format the drive.
to proceed with formatting. This will result in the loss of all previous data on the external hard drive.
Your external hard drive is now attached and ready for use. Refer to Timers on pages 38 and 39, and to PVR on pages 62 to 66
for more information.
18
Page 19

Connecting an external hard drive
Removing an external hard drive
1 Press to open the onscreen guide.
2 Use to highlight My PVR and press
3 Use to highlight Remove PVR and press
.
.
4 A pop-up window will appear asking you to confirm that you want to remove the external hard drive. Press to highlight Ye s and press
5 Remove your hard drive when the pop-up window indicates it is safe to. Your receiver will reset.
.
19
Page 20

Using your TELUS Satellite TV service
Using the menu
The menu makes using the receiver and selecting programs quick and easy. Use the menu to switch between features such as
search, locks, timers, preferences and more.
Surf zones
TELUS Satellite T V channels are organized by surf zones. That way, categories like sports, news or lifestyle are all grouped together
so you can easily surf through your favourite channels.
Channels Surf zone
10 –91 Descr iptive video
10 0 –18 7 French lang uage programming including PP V
19 6 –29 8
299–382 Movies, inclu ding PPV
38 8– 479 Sp orts
500 –599 News, learning, family and music
600–660 Lifestyle and variety
697–730 International programming
747–78 2 Mature programming, including PPV
901–988 Radio
1000
1030–1283 High Definition: Networks and U.S. Superstations
1251–12 83 High Definition: Movies
140 0–1534 High Definition: Sports
156 4–172 6 High Definition: News, learning, family
180 0 French On Demand Movies
1802–1891 High Definition: French programming
1933 High Definition programming
Digital standard a nd U.S. Superstations
English On Demand Movies
Navigating
Use the following buttons on the remote control:
Opens the main menu, then opens any of the other menus from the main menu
Opens the onscreen guide
Opens the Themes & Search menu
Displays the browse banner
Closes a menu and returns to watching a program
Scrolls through the menu; when a menu option or onscreen guide item is
highlighted, it becomes green
20
Page 21

Using your TELUS Satellite TV service
Quick tip
If the menu option has
a number next to it, you
can press that number
button on your remote
so you don’t need to
highlight the option first.
List of menus
PROGRAM GUIDE
THEMES & SEARCH
SELF SERVE
MY PVR
LOCKS
SYSTEM SETUP
*
TIMERS
PREFERENCES
*
Timers will display as Daily Schedule when an external hard drive is connected.
Accesses the onscreen guide
Searches programs by theme, title or description
Accesses Channels on Demand
Accesses PVR options when connected to an external hard drive
Allows the primar y user to block content
Accesses system features such a s Call Display and Pay Per View history
Lists scheduled Auto Tunes and Reminders
Sets up your receiver’s preferences
When you make a choice in a list, the receiver does not apply the change until you select Save or Done. If you don’t want to save any
changes, select Cancel to discard all the changes made in the menu.
Cancelling an action
You can cancel an action 3 ways:
Press
Press
if you want to return to watching a program
if you want to return to the previous menu
Wait a few moments and the menu will close automatically, discarding any changes you’ve made
21
Page 22

Using your TELUS Satellite TV service
Using text fields
When you use features on the receiver you might be required to enter information, such as the name of a movie, into areas known
as text fields.
You have 2 ways to enter the information:
Use
or
Use the number buttons on your remote like you would on a cell phone while the field is highlighted. For example, when looking for
the channel and times to watch “Cooking with Shawna”, you press 3 times for a C, press 3 times for an O, press 3 more times
for a second O, and press 2 times for a K to spell the word “Cook”.
to navigate the onscreen keypad. Press
to select the characters you want.
When the cursor is in the text field:
Press to delete characters
Press to move back without deleting characters
Press to enter a blank space, such as between words
Use the
You can keep from accidentally changing the channel or input on your T V by programming the remote in limited mode (page 23).
Once you’ve entered the term, scroll down in the resulting list of channels and press
to move forward without deleting characters
when you see the one you want.
22
Page 23

Using your TELUS Satellite TV service
Setting up your remote to control other devices
To use your remote to control other devices such as a TV, VCR, DVD player, tuner or A/V receiver, you must first program it to control them.
You can do this by either following the instructions in Setting up your remote control using device code tables on page 24 or the Setting up
your remote control using device codes scan procedure described on page 25.
Remote control modes
Use the remote control’s mode buttons to ensure you
are controlling the desired device. To change the mode,
press the button for the device you want the remote to
control. The mode button lights for 2 seconds
to show you that you’ve set the remote to that mode.
For your TELUS Satellite T V receiver
For your T V
For your VCR or DVD player
For your A /V receiver, VCR or DVD player
Quick tip
When you’re in SAT
mode and you switch to
another device, a pop-up
window alerts you that
the remote control is no
longer controlling your
recei ver.
Limited mode
You can program your remote control to work in limited mode to keep from accidentally changing the channel on your TV or VCR.
When you use your remote to control your TV in limited mode, you’ll only be able to use power, mute and volume. Also, when you use
the remote to control your VCR in limited mode, you’ll only be able to use power and the VCR function buttons.
Turning limited mode on and off
1 Press and hold mode (for example
2 Press
to turn limited mode on or
) until all the mode buttons light up. Release the mode button.
to turn limited mode off.
3 Press .
Limited mode is not used with A/V receivers.
Combination devices
If you are programming your remote to control a combination device, such as a TV/VCR or a TV/DVD, program the remote control in one
mode, and then repeat the procedure in the other mode. For example, to program the remote to control a TV/VCR using code 748, follow the
instructions to program the remote to control the TV using code 748, and then repeat the instructions for the VCR using the same code.
23
Page 24

Using your TELUS Satellite TV service
Setting up your remote control using device code tables
INSTRUCTIONS ADDITIONAL INFORMATION
Turn the device on. Use the device’s front panel buttons or the
1
remote control.
Find the brand name of the device in the tables
2
starting on page 70.
Press and hold the mode button until all the other
3
mode buttons light up, and then let go of the
button. The mode button should flash.
4
For AUX mode only. Press for a second T V,
for a second VCR or DVD player, or for an
A/V receiver.
Enter one of the 3-digit device codes from the table
5
using the number buttons on your remote.
6
If you want to program limited mode, press .
If not, skip to step 7.
Press .
7
If the brand isn’t listed, see Setting up your remote
control using device codes scan on page 25.
For example, hold for a TV until all of the other
mode buttons light. When you let go, will flash.
This step is for programming which kind of device
should be programmed in AUX mode. If you’re not
programming in AUX mode, skip to step 5.
The 3-digit device code should be for the brand
name of your device that you found in step 2.
See Limited mode on page 23 for more
information.
If you entered the code correctly, the mode button
should flash 3 times.
Press
8
not turn off, go to step 10.
Turn the device back on and try some other
9
buttons to make sure they work. If the code works
for other buttons, stop here.
10
11
If the code doesn’t work, repeat steps 3 through 9
with another device code from the tables.
If you can’t find a code that works tr y Setting up
your remote control using device codes scan
on page 25.
to turn off the device. If the device does
If the code works, the device should turn off.
Sometimes
If in limited mode, try or .
Try every code listed for your brand until one works
for your device.
works when other buttons don’t.
24
Page 25

Using your TELUS Satellite TV service
Setting up your remote control using device codes scan
If the code for your device isn’t listed in the tables starting on page 70, use this procedure to scan the remote control’s memory
for the device code.
INSTRUCTIONS ADDITIONAL INFORMATION
Turn the device on. Use the device’s front panel buttons or its remote
1
control.
Press and hold the appropriate mode button until
2
all the other mode buttons light up, and then let go
of the button. The mode button should flash.
For AUX mode only. Press for a second T V,
3
for a second VCR or DVD player, or for an
A/V receiver. Then press .
Press .
4
5
6
or
Press
turns off.
Press .
repeatedly until the device
For example, hold
mode buttons light. When you let go,
This step is for programming which kind of device
should be programmed in AUX mode. If you’re not
programming in AUX mode, skip to step 4.
This puts your remote in the scan mode.
As you press
in the memory to see if it can turn off your device.
When the device turns off, you have found a code
that might work.
Note: The mode button for the device will flash
rapidly 8 times when you’ve scanned all the codes
for that device.
The mode button flashes 3 times if you have entered
the code correctly. This stores the code you found.
for a TV until all of the other
, the remote tries each code
will flash.
Turn the device back on and try some other
7
buttons to make sure they work.
If necessary, repeat this procedure until you’ve tried
8
all the codes.
Sometimes
If using limited mode, try or .
works when other buttons don’t.
25
Page 26

Using your TELUS Satellite TV service
Finding device codes
INSTRUCTIONS ADDITIONAL INFORMATION
Press and hold the appropriate mode button until
1
all the other mode buttons light up, and then let go
of the button. The mode button should flash.
Press
2
determine your code. The mode button flashes the
number for each digit of the device code, with a
pause between the groups of flashes. A quick flash
is for zero.
For AUX mode: The first group of flashes tells you
3
what the AUX mode controls. A quick flash before
the 3-digit code is for a TV; 1 regular flash is for a
VCR or DVD player; and 2 flashes are for a tuner,
or amplifier.
For a satellite receiver programmed in AUX mode:
4
address number.
For limited mode: If you have programmed
5
a TV, VCR or DVD player in limited mode, the
mode button flashes once at the end of the
flash sequence.
twice. Watch the mode light to
will flash the same number of times as the
For example, hold
mode buttons light. When you let go,
For example, if the code is 570, the mode button
flashes 5 times, pauses, flashes 7 times, pauses,
and flashes once quickly.
For example, if the TV code is 570, flashes
once quickly (indicating 0 for TV), pauses, flashes
5 times, pauses, flashes 7 times, pauses, and
flashes once quickly.
For example, if the receiver address is 3,
flashes 3 times.
For example, if the TV code is 570, flashes once
quickly (indicating 0 for TV), pauses, flashes
5 times, pauses, flashes 7 times, pauses, flashes
once quickly, and then flashes once (indicating
limited mode).
for a TV until all of the other
will flash.
26
Page 27

Using your TELUS Satellite TV service
Controlling an A/V receiver
Use the following remote control buttons to control your A/V receiver.
Set up the remote as described on pages 23 to 26.
Press to set the remote to AUX mode ( will stay lit for 2 seconds).
Be sure to keep the remote in AUX mode to use the following buttons:
Turns the tuner/amplifier on and off
Controls tuner/amplifier volume (programming required)
Turns all sound on and off
Channel up/down
Changes tuner/amplifier inputs
27
Page 28

Using your TELUS Satellite TV service
Switching between TV and device volume control
When you set up the remote to control a TV, the mute and volume buttons control the T V volume. However, if you want to use the AUX mode
to control an A/V receiver and the device has a volume setting, you can set up the remote to control that device’s volume instead of the TV’s
volume. Be sure to set up your remote to control your device in AUX mode before using this feature. See page 27.
Setting the remote to control device volume
1 Press and hold
for 4 seconds until it flashes.
2 Press .
3 Press
4 Press
5 Press .
.
.
will flash 3 times.
6 Press .
7 Press
to make sure the volume works on your devices.
Setting your remote back to control TV volume
1 Press and hold
for 4 seconds until it flashes.
2 Press .
3 Press
4 Press
.
.
5 Press .
6 Press .
7 Press
will flash 3 times.
to make sure the volume works on your devices.
28
Page 29
Using your TELUS Satellite TV service
Using the onscreen guide
Use the guide to find out which shows are on now and which ones are coming up. The program guide shows programs on now and up
to 2 days in advance.
1 Press
to open the onscreen guide.
2 Use to scroll through program listings by channel or
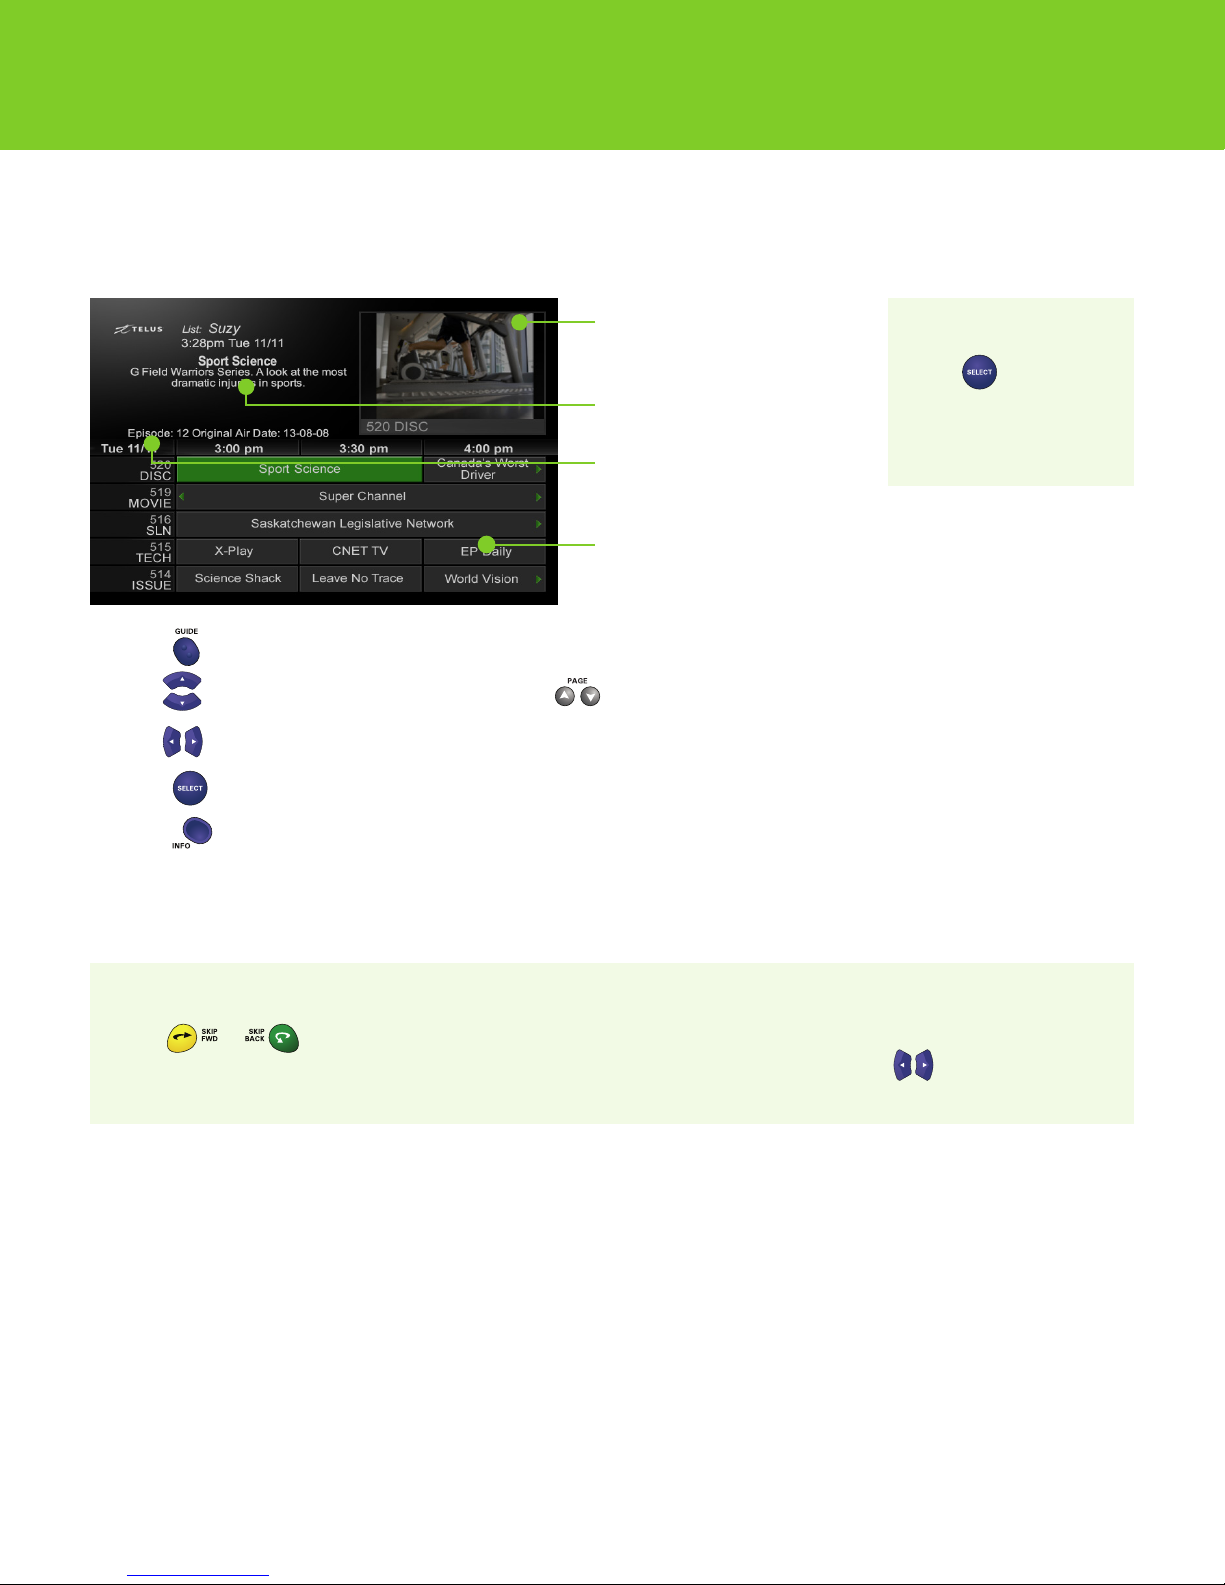
Picture in guide
Continue to watch your program
while searching the onscreen guide.
Information
Details about a highlighted program.
Guide
Displays program listings by channel
and time.
Programming view
Shows program listings for the next
2 days.
to scroll through them 1 page at a time.
Quick tip
Press
scheduled in the future
to schedule a Reminder
or an Auto Tune.
3 Use to move forward or back in time up to 2 days ahead.
4 Press
to tune in to the highlighted program.
5 Press to learn more about the program you highlighted.
A light grey background behind a channel means you haven’t subscribed to the channel. To subscribe to a channel, call
or go to channel 188 to see the Channels on Demand.
on a program
310-MYTV (6988)
Quick tip
Press or to move forward or back in the program listings a day at a time. To skip ahead a specific amount of
time, enter the amount of hours (up to 44) using the number buttons on your remote and press
back in the schedule.
to move forward or
29
Page 30

Using your TELUS Satellite TV service
Using the browse banner
With the browse banner, you can check what other programs are on, without interrupting your viewing.
When the browse banner is open you’ll see the program banner information relating to the current program at the top of the screen
and also at the bottom left of the screen. Information about the next program can be found at the bottom right of the screen.
1
While watching a program, press
.
2 Use to browse current programs on other channels
3
Use
to move forward and backward in the schedule
4
Press
to tune to that channel.
.
.
30
Page 31

Using your TELUS Satellite TV service
Using search
Use search to find your favourite shows. This feature will search all channels and find programs that match keywords that you enter.
1 Press to open the search screen.
2 Use to highlight Title to search for words that appear in the title of the program or Info to search for words that appear in the program
description and press
3 Using the onscreen keypad or the number buttons on your remote, enter the word or program title you would like to search for in the
search criteria field.
.
4 Use
5 Use
that is on now, the receiver tunes to that program. If you highlight a program that is in the future, you will be able to schedule an Auto Tune
or a Reminder (or a Recording if External Hard Drive connected).
6
Press
to highlight Search and press
and
to highlight Done and press
or to scroll through your search results and press
.
to close the search results screen.
to tune in to a program. If you highlight a program
31
Page 32

Using your TELUS Satellite TV service
Using search history
Your receiver creates a history of all of your previous searches, which you can reuse instead of typing the information again.
Quick tip
Use the edit or delete
options to change or
delete search keywords.
1 Press to open the search screen.
2 Use to highlight Histor y and press
to display the Search Histor y screen.
3 Use to highlight the keyword you want to search for from the history list.
4 Press to highlight Search and press
.
Finding a program by its theme
You can list and choose programs by theme such as movies or sports. You can then access program lists based on that theme and choose
the one you want.
Quick tip
1 Press to open the Themes & Search menu.
Press
almost any screen and
return to live TV.
to cancel
2 Use to select a category and press
3 Press to access the program list and use
on now, the receiver will tune to that program. If you choose an upcoming program, the Create Timer screen will display.
.
to highlight the desired program and press
. If you select a program that’s
32
Page 33

Timers
A timer is used to schedule which programs you want to either tune into or be reminded about. For most timers you select a specific
program on a specific channel and how often you want the timer to occur.
Timer type
There are 3 types of timers:
Aut o Tune – Automatically changes the channel to the program when it begins
Reminder – Displays an onscreen alert when the program is about to begin
VCR – Turns on your VCR when you’ve scheduled a recording to start
Timer frequency
Deciding how often you want to watch a program will help you set your timer appropriately:
Once – Sets a timer once. This feature works best for movies and sporting events.
Weekly – Sets a timer once a week, at a specific time, on that channel
Daily – Sets a timer once a day, at a specific time, on that channel
Mon-Fri – Sets a timer once a day, Monday through Friday, at a specific time, on that channel
If you have connected an external hard drive, you will be able to use all timer frequencies to schedule Recordings.
You will also be able to choose from:
All Episodes – Records each time that program is on a specific channel or group of channels
New Episodes – Records programs in their current season each time they occur on a specific channel or group of channels
Timer priorities
You cannot schedule more than one timer at the same start time. If you try to schedule a second timer at the same start time, a
warning message will display and you will need to cancel one of the timers.
Quick tip
Press
future to schedule a Reminder or an Auto Tune.
on a program scheduled in the
33
Page 34

Timers
Timer options
The timer options screen lets you set the following:
Start Early – Begins recording a few minutes early
End Late – Continues recording after the scheduled program ends
Use to adjust the number of minutes.
Special considerations when using timers
For locked programs – You must enter your receiver password before you can create an automatic timer. You can create
a manual timer for a locked program without entering your password. However, if you do this, the timer may display only an error
or request your password.
For Pay Per View programs – You must order a PPV program before you can create a timer for it
For blacked-out programs – Timers scheduled for blacked-out programs will not work
Quick tip
If the receiver’s off when a timer is scheduled, the receiver will automatically turn on. If you’ve scheduled an Auto Tune,
it will remain on for the duration of the program. If you have scheduled a Reminder, the receiver will turn off after a period
of time if there is no activity.
34
Page 35

Timers
Setting up an automatic timer
An automatic timer lets you set a timer to record a program every time it appears in the program guide. Even if the program’s scheduled
viewing time changes, the program will still automatically be recorded.
1 Press
2 Navigate to a future program and press
to find the program using the onscreen guide or press to open the browse banner.
. The Create Timer screen displays.
3 Navigate to highlight the Timer Frequency.
4 Navigate to highlight a Timer Type.
5 Navigate to adjust the Start Early and End Late timer options.
6 Navigate to select Create Timer and press
.
35
Page 36

Timers
Setting up a manual timer
With a manual timer, the start and end times are set by you and don’t follow the program guide information. This is useful for sports and other
live events that often go into overtime.
1 Press to open the main menu.
2 Use to highlight Timers and press
3 Highlight Create Timer and press
.
.
4 Navigate to highlight the Timer Frequency.
5 Navigate to highlight a Timer Type.
6 Use ,
or the number buttons on your remote to highlight the channel and press
.
7 Press to highlight Edit Time.
8 Use or the number buttons on your remote to set the Start Time and End Time. Be sure to include AM/PM for each.
Quick tip
When you set a timer for a program and the
program time changes, the timer will change
with it. Weekly, Daily and Mon-Fri timers move
only if the program is within 1 hour earlier or
4 hours later than the original start time the
timer was set for.
9 Use to set the Date.
10 Press to highlight Create Timer and press
.
36
Page 37

Timers
Deleting a timer
When you no longer need a timer you can easily delete it.
1 Press to open the main menu.
2 Use to highlight Timers and press
.
3 Press to access the timers list and to scroll and highlight the timer to delete.
4 Navigate to Delete and press
.
Using the timers list
Quick tip
Press
previous days’ timers.
The timers list shows the timers that are planned for today, the future and those that occurred in the recent past. You can choose to skip
a scheduled timer or restore a timer that wasn’t planned to occur, perhaps because of a conflict with another program. You can also choose
to review past timers to see which occurred, and the reason why one didn’t, if applicable.
to see the
You can use timers for up to 100 events, and you can also choose to view the start early/end late settings. Navigate to a future program
if you want to skip or restore a timer.
1 Press to open the main menu.
2 Use to highlight Timers and press
3 Press to access the timers list and to scroll. Press
.
to view the desired timer.
Changing the timer settings
1 Navigate to Edit and press
2 Navigate to Frequency, Type, Start Early and End Later.
3 Navigate to Create Timer and press
.
.
37
Page 38

Timers when connected to an external hard drive
Once you’ve attached an external hard drive, you can record programs and customize timers. You can also edit start and end times.
Editing a timer
1 Press to open the main menu.
2 Use to highlight Timers and press
.
3 Press to access the timers list and to scroll and highlight the timer to edit. Editing a timer and setting up a timer for Vu! Pass
require an external hard drive.
4 Navigate to Edit and press
.
5 Change the Frequency, Typ e , Start Early or End Late options.
6 Navigate to Create Timer and press
.
38
Page 39

Timers when connected to an external hard drive
Setting up a Vu! Pass timer
Vu! Pass lets you create timers to automatically record programs based on your search criteria. When the receiver finds programs that meet
your criteria, it automatically records them.
For example, if you saw a movie in the theatres and want to watch it again as soon as it shows on a movie channel, use the Exact Match
and Title function and type in the exact title of the movie. If the movie comes onto a channel you subscribe to, a timer will automatically record
it. The Vu! Pass also works for regular programming – simply search for programs using keywords.
1 Press to open the main menu.
2 Use to select Daily Schedule and press
3 Use to select Vu! Pass and press
.
.
4 Navigate to select Title to search for programs by title or Info to search by program description. Select Exact Match if you want to
search exactly what you’ve entered in either the program title or info. Press to highlight your desired search method.
5 Select Exact Match if you want to search exactly what you’ve entered in either the program title or info.
6 Use to access the text field and enter your search criteria using the onscreen keyboard, or with the number buttons on
your remote control.
7 Navigate to Options and press
8 Navigate to select Create Timer and press
the results.
After entering your search words and selecting Create Timer, be sure to review the timers that Vu! Pass creates, as some may not be
what you’re expecting. You can:
Pick selected events to skip
Review future timers each time the program guide is updated
Select Set Priority to change the priority of your Vu! Pass
if you would like to make edits to recording options.
. When the receiver has completed your search, the timer schedule will display
Adjust your search terms and method. To adjust your search, delete the unwanted Vu! Pass timer and try the following:
— Change your Vu! Pass search term(s) to be more specific
— Select Exact Match with the title or info
— Choose Vu! Pass when you select a future program within the onscreen guide, browse banner or search. This will enter the
program’s exact title.
9 Navigate to select Done and press
Quick tip
Vu! Pass recordings may fill the hard drive quickly. If you have
recordings you don’t want to lose, make sure they are protected.
.
39
Page 40

Pay Per View (PPV)
Invite all your friends and family over for a live PPV game or event and give everyone a front-row seat to the action. You’ll be able to watch live
sports and special events, and choose from a huge selection of videos, including the latest Hollywood blockbusters.
Ordering a PPV event
You can quickly order a PPV event using your remote, by phone
or online.
If you order through your remote, you’ll only be able to see the event
on that particular TV. If you decide you want to watch the event on
other receivers, simply order again by phone or online – you won’t be
charged again.
To order a PPV event using your remote you’ll need to have your home
phone connected to your receiver.
1 Pres
s to open the onscreen guide and navigate to select
a Pay Per View event from the onscreen guide.
2 Highlight Order and press
.
Channels Description
99
155 –160
162–179
316–324, 829–837
338–385
382–387
399
561
746, 749 and 750–762
835, 1000
999
180 0
For the most current PPV channel guide, visit telus.com/tv. *Prices subject to cha nge.
$0.99 English movies
French HD movies and events
French events and movies
Engli sh HD movies
Engli sh movies
Season al programming
English Sports Events
Kids movies
Adult
English On Demand
3D programming
French On Demand
*
Quick tip
You may need your
PIN to order a PPV event;
if you’ve forgotten it,
call 310-MYTV (6988).
For easy reference, record
your account PIN here:
3 Use to select Yes to confirm you want to purchase the event and press
Once you’ve confirmed an order, you’ll automatically be billed for it, so check to make sure it’s the program you want before you press Yes.
To order a PPV event by phone or online, you’ll need the event ID, which can be found by pressing
highlighted onscreen.
To order by phone, call 1-866-68-ORDER (67337) or order online at telus.com/payperview.
.
when the desired event is
40
Page 41

Pay Per View (PPV)
Reviewing PPV purchases
1 Press to open the main menu.
2 Use to highlight System Setup and press
3 Use to highlight Purchase History and press
.
.
4 Press and use to scroll through the Purchase History list.
5 Highlight Done and press
when finished.
41
Page 42

Favourites lists
You can customize the onscreen guide to display only the channels you want to view by selecting a default favourites list or creating
your own favourites list.
Selecting a default favourites list
1 Press
twice.
2 Use to highlight one of the following lists:
All Chan – lists all channels
All Sub – lists all the channels that you subscribe to
All HD – lists all the HD channels
3 Press
.
Creating and editing a favourites lists
1 Press
2
Press
3
Press
List 1 — List 2 — List 3 — List 4
4 Press
5 Highlight Modif y List and press
twice.
to select Favourites and press
twice to access the lists and use to highlight one of the following lists you want to edit:
.
.
.
Quick tip
Use
the list of channels one
page at a time.
6 Use to highlight the channels you want to add or remove and press
7
Press
to highlight Done and press
8
H
ighlight Done again and press
.
to save changes.
to scroll through
.
42
Page 43

Favourites lists
Naming favourites lists
You can name your favourites lists whatever you want, up to 8 characters in length.
1 Press to open the main menu.
2 Use to highlight Preferences and press
3 Use to highlight Favourites and press
4
Press
to access the lists and use
you want to edit. Press
.
5 Use to highlight Edit Names and press
keypad will display.
6
Enter the new list name using the onscreen keypad or the number
buttons on your remote.
7 Press to highlight Done and press
to
.
.
highlight
.
the one
. The onscreen
43
Page 44

Favourites lists
Selecting a favourites list
1 Press
twice to open the favourites list screen.
2 Use to highlight the default channel list or favourites list you want to view and press
You can also set your receiver to instantly change between the lists by repeatedly pressing
1 Press
2 Press to highlight Favourites and press
3 Ensure Guide Button is highlighted and press
twice to open the favourites list screen.
.
.
.
instead of selecting from the list.
44
Page 45

Locks
With locks, you are in charge of the content your family watches by blocking programming based on ratings or channels. When you block by
rating, all higher ratings will also be blocked.
When you’ve locked the receiver, if you try to access a locked item or open the locks menu, the receiver displays a message prompting
you to enter your password. You’re allowed 3 attempts to enter the correct password. If you fail to enter the correct password you won’t
be able to try again for several minutes.
45
Page 46

Locks
Creating your password
Your receiver doesn’t come programmed with a password, so before using locks you’ll need to set one up.
1 Press to open the main menu.
2 Use to highlight Locks and press
3 Use to highlight Lock System and press
4 Enter a 4 digit password using the number buttons on your remote and press
5 Enter the password again using the number buttons on your remote and press
.
.
.
.
Changing your password
1 Press to open the main menu.
2 Use to highlight Locks and press
3 Enter your current 4 digit password using the number buttons on your remote and press
4 Use to highlight Change Password and press
5 Enter your current password again using the number buttons on your remote and press
6 A pop-up window will appear asking you to enter your new password. Using the number buttons on your remote,
enter the new password and press
7 Enter your new password again using the number buttons on your remote and press
.
.
.
.
.
.
Your new password has been created. Remember to write it down somewhere safe. If you forget your password please call 310-MYTV (6988).
46
Page 47

Locks
Locking and unlocking your receiver
1 Press to open the main menu.
2 Use to highlight Locks and press
3 If your receiver is locked, enter your password using the buttons on your remote and press
4 Navigate to Lock System or Unlock System and press
a message prompting you to enter your password.
5 Enter your password using the number buttons on your remote and press
6 Confirm your password by re-entering it and press
.
.
. If you’re locking the receiver, the receiver displays
.
. All the locks you have set are now in effect.
Locking by ratings
You can lock programs based on ratings 8+ (PG), 14+ (PG), 18+ (R), NC17 and NR/AO or by expanded ratings such as violence, language,
nudity and sexual content.
When you block by rating, all higher ratings will be automatically blocked.
1 Press to open the main menu.
2 Use to highlight Locks and press
3 If your receiver is locked, enter your password using the buttons on your remote and press
4 Use to highlight Ratings Locks and press
.
.
.
5 Press to access the ratings list and navigate to the ratings or expanded ratings you want to lock and press
6 To unlock a rating, navigate to highlight the rating code and press to highlight Done. Press
.
7 Make sure the receiver is locked as described above to ensure that the ratings locks are applied.
.
47
Page 48

Locks
Locking by channel
You can lock any channel, including PPV. This type of lock keeps anyone from viewing these channels unless they enter the correct password.
1 Press to open the main menu.
2 Use to highlight Locks and press
3 If your receiver is locked, enter your password using the buttons on your remote and press
4 Use to highlight Channel Locks and press
5 Use to highlight each channel that you want to lock or unlock and press
the number buttons on your remote. A channel is locked if the check box next to the channel is green.
6 Press to highlight Done and press
are applied.
.
.
. You can also move to each channel number using
. Make sure the receiver is locked as described on page 47 to ensure that the channel locks
.
48
Page 49

Locks
Locking or unlocking Pay Per View channels
This type of lock keeps anyone from viewing all PPV channels. To lock specific PPV channels, please refer to Locking by channel
on page 48.
1 Press to open the main menu.
2 Use to highlight Locks and press
.
3 If your receiver is locked, enter your password using the buttons on your remote and press
4 Use to highlight Lock PPV or Unlock PPV and press
5 Press to highlight Yes and press
locks are applied.
. Make sure the receiver is locked as described on page 47 to ensure that the PPV channel
.
.
49
Page 50

Locks
Hiding adult content
When you hide adult channels you prevent the program guide, lists of themes and the browse banner from showing them. It also prevents
anyone from choosing these channels by using
1 Press to open the main menu.
or the number buttons on your remote.
2 Use to highlight Locks and press
.
3 If your receiver is locked, enter your password using the buttons on your remote and press
4 Use to highlight Hide Adult or Show Adult and press
5 Press to highlight Yes and press
adult locks are applied.
. Make sure the receiver is locked as described on page 47 to ensure that the
.
.
50
Page 51

Locks
Locking or unlocking the front panel
This lock keeps anyone from using the front panel buttons unless they enter the correct password; however, it doesn’t lock the remote control buttons.
1 Press to open the main menu.
2 Use to highlight Locks and press
.
3 If your receiver is locked, enter your password using the buttons on your remote and press
4 Use to highlight
5 Press to highlight Yes and press
to ensure that the front panel locks are applied.
Front Panel Lock
and press
. Make sure the receiver is locked as described on page 47
to lock or unlock the front panel
.
.
51
Page 52

Call Display on your TV
With Call Display, an onscreen pop-up window shows you the name and number of who is calling. You can then choose to take the call
or wait until the show is over. In order to receive onscreen Call Display, you must subscribe to Call Display on your TELUS home phone
and ensure that your phone line is connected to your receiver.
Call Display screens
When you receive a call you’ll see a Call Display pop-up screen. You can select OK to hide the message or it will disappear after 20 seconds.
If you’re using a menu when a call comes in, you’ll see a different Call Display pop-up window.
Turning Call Display on and off
1 Press to open the main menu.
2 Use to highlight System Setup and press
3 Use to highlight Installation and press
4 Use to highlight Caller ID and press
5 Navigate to Enable Caller ID or Disable Caller ID and press
6 Navigate to Done and press
.
.
.
.
.
52
Page 53

Call Display on your TV
Viewing your Call Display history
Simply follow these instructions to view and delete numbers from your Call Display history.
1 Press to open the main menu.
2 Use to highlight System Setup and press
3 Use to highlight Caller ID History and press
.
.
4 Press to access the history list and use to highlight the desired entry and press
5 Navigate to Delete or Clear List and press
6 Use to highlight Done and press
.
.
.
53
Page 54

Receiver customization
Changing languages for descriptive video
Some programs, such as movies, indicate at the beginning whether an alternate language or descriptive video is available.
An alternate language applies only to the audio part of a program and doesn’t change the language used in the menus displayed
by the receiver.
Descriptive video is a feature for the visually impaired that describes what’s happening during a program. This feature may not
be available on all channels and programs.
1 Press to open the main menu.
2 Use to highlight Preferences and press
3 Use to highlight Alternate Audio and press
.
.
4 Use to highlight your preferred language and press
5 Use to highlight Done and press
.
.
54
Page 55

Receiver customization
Using closed captioning
Your receiver offers many options for closed captioning (CC) so you can personalize it to suit your needs. Your receiver generates
these closed captions, so to enable closed captions, follow these instructions.
1 Press to open the main menu.
2 Use to highlight Preferences and press
3 Use to highlight Closed Caption and press
4 Use to highlight Caption On or Caption Off and press
.
.
5 Use to highlight from the following list of options and press
CAPTION FONT/SIZE
CAPTION COLOURS
CAPTION EDGE STYLE
CAPTIONING SERVICE
CAPTION OPACITY
RESET CC DEFAULTS
Selects the font and size that makes the closed captioning comfortable to read. When you’re finished, select Done.
Sets the background, font and edge colours. Choose the colour combinations that make the closed captioning
easy to read, then select Done.
Sets the edge style of the closed captioning text. Select Done when you’re finished.
Selects the service. Select Done when you’re finished.
Selects Provider, Transparent (see-through), Translucent (semi-see-through), Solid or Flashing.
Select Done.
Resets to Closed Captioning default settings
.
.
55
Page 56

Receiver customization
Using Dolby Digital surround sound
Dolby Digital gives you the ability to experience programs in awesome surround sound. An external decoder is required to enjoy this
feature; please refer to your decoder user’s guide for further information.
Not all programs contain Dolby Digital sound. To take full advantage of 5.1 Dolby Digital surround sound you need an HDMI or optical cable
and a stereo that supports this feature.
The receiver uses an HDMI or optical port for outputting digital audio. The optical output can provide 2 audio data types: Dolby Digital
and Linear PCM. Only Dolby Digital can provide full 5.1-channel sound. When both audio signals are present in the program, the receiver
defaults to Dolby Digital output unless you have selected PCM Only.
1 Connect your receiver to an external decoder.
2 Press to open the main menu.
3 Use to highlight System Setup and press
4 Use to highlight Dolby Digital and press
5 Navigate to choose from the following options and press
Dolby Digital/PCM – Select this option if your stereo can decode both Dolby Digital and Linear PCM signals.
Dolby Digital Only – Select this option if your stereo can decode only Dolby Digital and will not process Linear PCM
signals. See your stereo’s user guide for more details.
PCM Only – Select this option if your stereo cannot decode Dolby Digital signals.
.
.
.
The audio output is also dependent on what’s present in the program you’re watching.
If you’ve selected Dolby Digital Only but there’s only
PCM audio in the program, you won’t hear anything.
This also applies to the analog audio outputs.
Line Mode – When you use this setting in comparison
to RF Mode, the dynamic range is wider, which makes
the music and loud noises louder but voices quieter.
RF Mode – When you use this setting in comparison with
Line Mode, the dynamic range is narrower, which makes
music and loud noises quieter but voices louder.
6 Press to highlight Done and press
This table shows what type of output you will hear
OPTIONAL OUTPUT
SETTINGS
Dolby Digital only
PCM only
Dolby Digital/PCM
.
Dolby Digital PCM Both
Dolby Digital PCM Dolby Digital
PCM PCM PCM
Dolby Digital PCM Dolby Digital
56
Page 57

Receiver customization
Changing the onscreen channel order
You can set up the onscreen guide to list channels in descending or ascending order. If you don’t set a channel order, the program guide lists
the channels in descending order.
1 Press to open the main menu.
2 Use to highlight Preferences and press
3 Use to highlight Channel Order and press
4 Navigate to Ascending or Descending and press
5 Press
to highlight Done and press
.
.
.
.
Changing the onscreen guide display
Your receiver comes set to display the onscreen guide with video in the upper right corner. However, you can change the way
the onscre en gu ide displays the text and video.
1 Press to open the main menu.
2 Use to highlight Preferences and press
3 Use to highlight Guide Display and press
4 Press
Standard – Partial guide with video – This option is preset when you first set up your receiver. The onscreen guide displays video
in the upper right corner and 90 minutes of programming per page.
Enhanced – Par tial guide with video – Choose this option if you’d like larger text on your program guide. The program guide displays
video in the upper right corner and 60 minutes of programming per page.
Extended – Partial guide with video – Choose this if you’d like to see video in the upper right corner and 180 minutes of programming per page.
Standard – Full guide without video – Choose this if you’d like to see more channels per page.
Enhanced – Full guide without video – Choose this if you’d like to see more channels per page in large text.
Extended – Full guide without video – Choose this if you’d like to see more channels and 180 minutes of programming per page.
5 Press
and use
to highlight Done and press
to highlight one of the following guide display options. Press
.
.
.
.
57
Page 58
Receiver customization
Resetting to factory defaults
You can reset your receiver to discard any changes you’ve made except for locks. Resetting the receiver to factory default settings also
discards all favourites lists except the All Chan, All Sub and All HD lists.
You’ll need your password to reset the receiver to default settings. If you’ve forgotten it, just give us a call at 310-MYTV (6988).
1 Press to open the main menu.
2 Use to highlight System Setup and press
3 Use to highlight Factory Defaults and press
to reset the receiver’s preferences.
4 Press
to highlight Ye s or No and press
.
.
The receiver displays a warning message to confirm that you want
.
Quick tip
If you’ve set locks on the receiver and the receiver is locked, these locks will be kept
when resetting to factory defaults, but if the receiver is unlocked, any locks will be lost.
Scheduling receiver updates
Your receiver comes scheduled to update the program guide at 2:00 am MST/3:00 am PST every day.
If you decide to change this setting, it will not interfere with your scheduled timers.
1 Press to open the main menu.
2 Use to highlight Preferences and press
3 Use to highlight Updates and press
.
.
4 Highlight Enable or Disable.
5 Use to
6 Use
7 Press
to select the time
to select AM or PM
to highlight Done and press
.
.
.
58
Page 59

Receiver customization
Enabling inactivity standby
If your receiver is on for a period of time without any activity, the inactivity standby feature turns off the receiver so it can receive the latest
software updates automatically. It will also improve the reliability of your receiver. Enabling this feature is recommended.
Quick tip
Select Defaults to
reset the changes
you’ve made to this
feature.
1 Press to open the main menu.
2 Use to highlight Preferences and press
3 Use to highlight Inactivity Standby and press
4
Navigate to highlight
5 Press
to highlight Done and press
Inactivity Duration
and use
.
.
.
to select the amount of time you would like the receiver to wait before turning off
.
59
Page 60

Personal Video Recorder (PVR)
The features in this section are only available if you’ve installed an external hard drive.
Attach an external hard drive to take full control of your TV viewing and turn your TELUS Satellite TV HD receiver into a PVR. You’ll have the
power to pause, replay and record† live T V with the touch of a button. You can record a program while watching a pre-recorded program.
For more information on how to connect an external hard drive, please see page 18.
Pausing live TV
When watching a live program you can pause up to 1 hour. The onscreen pause timer shows you how long you’ve paused and how far
you’re behind the live program. If you think you might be away from your T V for more than an hour but don’t want to miss any of your show,
consider recording the program (see pages 64 and 66).
1 Press .
2 Press
3 Press
to start playing the program at the point you paused.
to go back to live TV.
Reversing, fast-forwarding and skipping
If you’ve installed an external hard drive, your receiver will temporarily save the channel you are watching for up to 1 hour,
allowing you to pause, rewind and fast-forward.
Reverses a program 4x, 15x, 60x or 300x normal speed by pressing it 1, 2, 3 or 4 times. For a live
progr am, you can only go as far back as the last channel change or 1 hour, whichever occurs first.
Advances a program 4x, 15x, 60x or 300x normal speed by pressing it 1, 2, 3 or 4 times. You cannot
view programming that hasn’t yet been broadcast.
Skips back in a program 10 seconds. Press again to skip back fur ther.
Skips forward in a program 30 seconds. Press again to skip ahead further.
60
Page 61

Personal Video Recorder (PVR)
The features in this section are only available if you’ve installed an external hard drive.
Using slow motion and frame by frame
Take full advantage of your PVR and use the slow motion, frame-by-frame advance or reverse features while you watch live TV.
Reverse slow motion
Press and then press
Press
Press
Press and then press to reverse the recording frame by frame
once to reverse the program at 1/4 the speed of normal play
twice to reverse at normal speed
to reverse the program in slow motion
Forward slow motion
Press and then press
Press
Press
Press
Press and then press to advance the recording frame by frame
Please note, you can’t fast-forward into a live program that has not yet been broadcast.
once to advance at 1/15 the speed of normal play
twice to advance at 1/4 the speed of normal play
three times to play the program
to advance the program in slow motion
61
Page 62

Personal Video Recorder (PVR)
The features in this section are only available if you’ve installed an external hard drive.
Recording programs
Recording a single episode
1 Pres
2 Navigate to highlight the future program that you want to record and press
3 Use
4 Press
5 Use
s
.
to navigate to the Frequency list. Use
.
to highlight Create Timer and press
to highlight ONCE.
.
Recording multiple episodes
1 Pres
2 Navigate to highlight the future program that you want to record and press
s
.
3 Use
New Episodes, Weekly, Daily or Mon-Fri.
to navigate to the Frequency list. Use
to highlight either All Episodes,
4 Use to navigate to the Type list and highlight PVR, Auto Tune or Reminder.
5 Use to highlight Create Timer and press
.
.
.
Recording live TV
Record live TV so you can watch your shows on your schedule. PVR recordings are listed in the My PVR screen,
which you can find quickly by pressing
1 Press
2 Use to highlight OK
3
4 Navigate to OK and press
.
or
Options and press
If you selected Options, select the desired recording option
.
.
.
.
62
Page 63
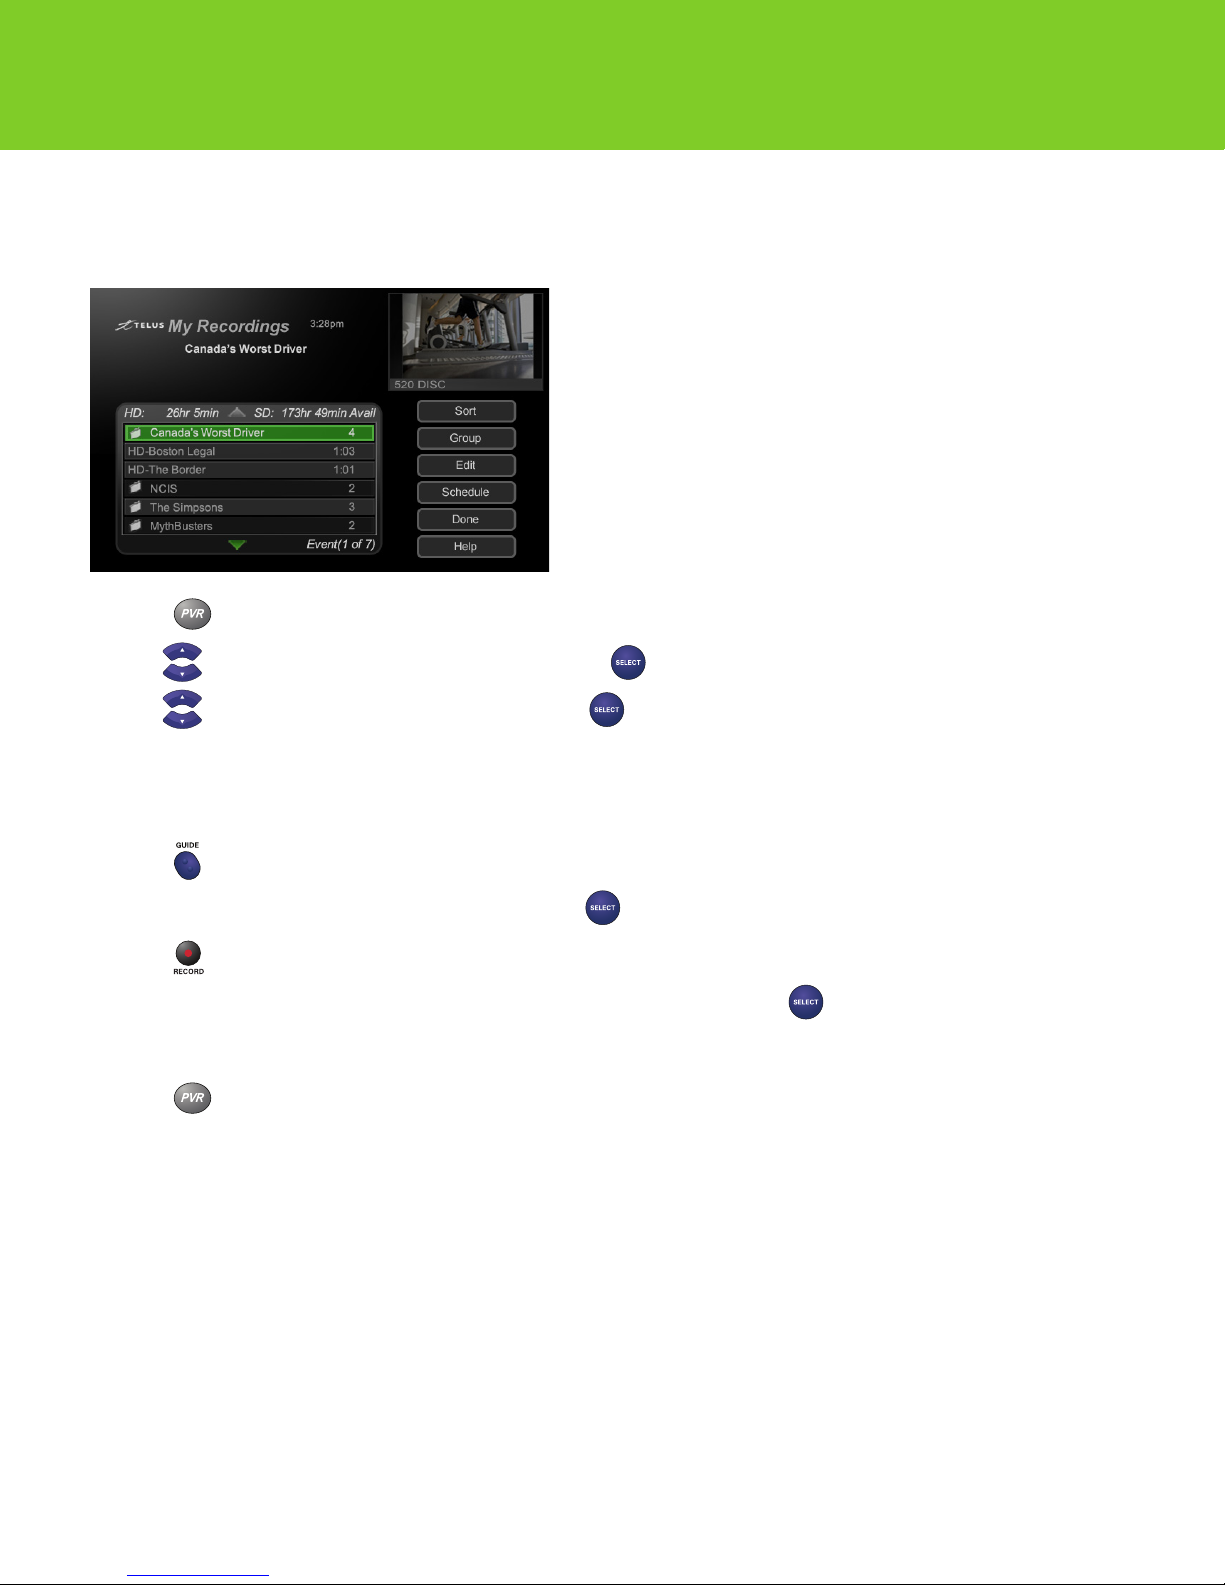
Personal Video Recorder (PVR)
The features in this section are only available if you’ve installed an external hard drive.
Watching a recording
1 Press
2 Use to select from the list of recorded programs and press
3 Use to highlight Star t, Start Over or Resume and press
to open the My PVR screen.
.
.
Recording while watching recorded content
You can set up your receiver to record a program while watching one you’ve already recorded.
1 Press
2 Navigate to find a program you want to record now and press
3 Press
4 Select OK to begin recording now or Options to customize your recording settings. Press
5 If you selected Options, see Recording options on page 66 for your choices.
6 Press
7 Select a program that you recorded earlier and start the playback.
You should now be watching a pre-recorded program while the receiver is still recording the other program.
to open the onscreen guide.
to tune to that program.
.
.
to display the PVR events screen. You should see the program that is recording, indicated by the red dot next to the listings.
63
Page 64

Personal Video Recorder (PVR)
The features in this section are only available if you’ve installed an external hard drive.
Recording options
When you set up a timer to record a live program you can choose from the following options:
Stop Recording Manually – The receiver will record until you press
Extend End Time – You can extend the stop time for the recording. This option is useful for programs that might run overtime such as
sporting events or awards shows.
Create a Recurring Timer – You can set up multiple daily, weekly or monthly timers so your favourite shows are always automatically recorded
Record the Entire Event – The receiver stops recording at the end of the event. This selection is available only if the receiver was tuned to
the channel at the beginning of the program. If you tune to a program after it starts, this option cannot be selected. You can record only the
part of the program that airs after you’ve tuned to it.
Recording using timers
For 2 minutes before the timer starts a recording, the receiver may display an onscreen countdown. This countdown disappears when
the program begins. While the countdown is displayed you can do one of the following:
Press
to clear it from the screen. This doesn’t stop the timer from starting.
Press
the timer.
or
to see more information on the timer. You can then either select OK to continue with the timer or Stop Timer to stop
Quick tip
Pressing to see more about a timer event only works once. Pressing again results in the current program’s
information being displayed in the normal way.
Quick tip
PVR timers set for sporting events automatically end late by 60 minutes to allow for overtime, so you’ll never miss a
moment of the action. If you prefer, you can change this setting in options when you set up the timer. If you have another
timer scheduled during the extension, it will be overridden.
64
Page 65

Troubleshooting tools
First steps
Sometimes resetting the receiver can fix a minor problem. See Resetting to factory defaults on page 60.
Make sure your receiver is connected to an active home phone line; see page 17
Check for anything that might be blocking the satellite signal (for example, tree branches, snow, etc.)
If you’ve tried the above steps and still have a problem, please refer to the troubleshooting tables below. These tables cover many
problems, usually with a simple solution for each one.
Troubleshooting tables
PROBLEM POSSIBLE SOLUTION
When a button on the remote is pressed, the
receiver doesn’t do what it should.
The power light on the receiver is on and there’s
a picture on the TV but no sound.
Onscreen Call Display isn’t working.
The power light on the receiver is on but the
TV image is black (no picture), frozen, has
breakups, has snow or shows small squares
of various colours.
A black box fills almost all of the TV screen.
The TV screen is all blue.
Ensure the batteries have power and are inserted correctly.
Check that you’re controlling the right device by pressing the corresponding mode button.
Check the volume level on your TV or audio equipment. Turn off mute or turn up volume as required.
Check the audio connectors and cables from the receiver to your TV or sound system.
Check your T V or sound system speakers.
Check that you’ve subscribed to Call Display on your TELUS home phone.
Check that you’ve connected the phone line to the phone jack on the back of the receiver.
Check that you’ve enabled the Caller ID option within your system setup.
Make sure your TV is plugged in.
Check that your TV is turned on and tuned to the correct input.
Ensure your TV’s brightness and contrast are adjusted correctly.
Make sure your TV is connected properly to the receiver.
Heavy rain, snow or cloud cover may be interfering with your transmission. Remove any snow or other debris
that may have collected around your satellite dish.
Use your TV’s remote (not your receiver’s remote or menus) to deactivate the closed captioning feature.
Refer to your T V’s user guide for more detailed instructions.
Check your TV manual to ensure you have connected the receiver to an input on the TV that is the
correct signal output
.
The onscreen guide or browse banner is not
displaying programs in the future.
Try the onscreen guide again at a later time. It may then be able to show programs for the time and
date you want.
65
Page 66

Troubleshooting tools
PROBLEM POSSIBLE SOLUTION
Some channels are missing on the onscreen
guide or browse banner.
Locks, such as locking programs by rating,
have not taken effect.
Someone orders a Pay Per View event
without permission.
Unable to order a Pay Per View event
from the receiver.
A Pay Per View event is not appearing on all
of the receivers.
A timer for a program that is repeated, like a
regularly scheduled program, doesn’t work
when the program comes on.
The receiver doesn’t recognize the external hard
drive, or the external hard drive won’t turn on.
Change between your favourites lists using the Guide button on your remote. You can choose from
custom favourites lists, the All Chan list, which includes all the channels, the All Sub list, which includes
all subscribed channels, and All HD list, which includes all HD channels.
Unlock your receiver using your PIN to display adult channels.
You must lock the receiver to apply any locks that you have set.
You can lock your receiver to prevent future unauthorized Pay Per View purchases.
Check that your receiver is connected to your home phone.
If you order through your remote control, you will only have access to the Pay Per View event on that
particular receiver. If you want to have access to a Pay Per View event on all your receivers you will
need to order by calling 1-866-68-ORDER (67337) or visiting telus.com/payperview.
If you’ve selected Once as the timer frequency, it will only work once. A Monday-Friday event timer works
Monday through Friday on the same channel at the same time. A daily event timer works every day.
A weekly event timer works once a week on the same channel at the same time every week.
Check that the external hard drive is plugged in to the power, and is also connected to the receiver.
Check that the external hard drive meets the necessary system requirements.
The receiver does not record the program
when an event timer is scheduled.
Ensure that you’ve set an Auto Tune or PVR timer reminder. You may have set a Reminder that
only reminds you that a program is about to start.
If you’re still unable to solve the problem, try resetting the receiver by holding down the Power button on the front of your receiver for 5 to
8 seconds. This resets the device and usually resolves most problems related to the receiver.
If you’re still having trouble, call 310-MYTV (6988). Before calling, be sure to have the date of purchase, plus either your client account number,
the receiver conditional access number, or the receiver model number. Display the System Info screen and write down the error number
as it appears in the top right corner of the screen.
66
Page 67

Troubleshooting tools
Resetting your receiver
To reset your receiver press and hold on the front of the receiver until the TV goes blank.
It’ll take a few minutes for your receiver to reset and come back on. When you reset your receiver it may have to download an updated guide.
If this is the case, it might take longer for the receiver to come back on.
Diagnostics
You may be asked to open the diagnostics screen when you call 310-MYTV (6988). Please remember to have an active phone line
connected to your receiver.
1 Press to open the main menu, select System Setup and then select Diagnostics. The diagnostics screen shows you various tests
you may need to perform:
Connection – Tests for a valid receiver phone connection.
Dial Out – If “No Dial Out Pending” is displayed, the receiver doesn’t need to have its smart card records updated.
Counters – Shows you a list of diagnostic counters. Use
2 Highlight Done and press .
Point dish and check switch
to scroll through the list.
You may be asked to display these screens when you call 310-MYTV (6988). Even though there are items that can be changed,
please only change them when asked.
1 Press to open the main menu.
2 Use to highlight System Setup and press
3 Use to highlight Installation and press
4 Use to highlight Point Dish and press
The bar at the bottom of the screen tells you the signal strength. Green is a good signal; red indicates the signal is not acceptable
or is from the wrong satellite.
5 Use to highlight Check Switch and press
tells you if you’re receiving signals from the satellites and which multi-dish switches you have installed, if any.
6 Use to highlight Te s t and press
7 Use to highlight Done and press
only if directed to when calling in.
.
.
.
. This screen shows you information to help maximize your satellite signal.
to display the installation summary screen. The installation summary screen
67
Page 68

Device code tables
Your universal remote control can be programmed to work with most TVs, DVD players, VCRs and A/V receivers. If you change or
replace your TV or your compatible device, you will need to reprogram your remote control. Please use the codes listed below and on
the following pages.
TV
Action
Admiral
Aiko
Akai
Alleron
A-Mark
Amtron
Anam National
AOC
Apex
Archer
Audiovox
Baycraft
Belcor
Bell & Howell
Bradford
Brockwood
Broksonic
Candle
Candle/Citizen
Capehart
Circuit City
Citizen
Colortyme
Concerto
Contec/Cony
Craig
Crown
Curtis Mathes
CXC
Cytron
Daewoo
Daytron
Dell
CODES
662
521 605 675
727
570 573
682
620
657
509 541 620 651 657 698
505 506 519 520 573 620 627652
653 654
730 743 744 745 757 814 815
620
620 657 662
536
652
590 675 683
657
627 652
562 748 752
506 523 525 536 627 652 654
573
519 627
627
506 516 523 524 525 526 590 652
654 657 658 680 727
573 627 652 654
523 652 654
541 655 657 662 726
536 541 657 662 694
526 536 657
506 516 526 573 590 641 645 650
652 654 658 680 683 703 708
541 657 662
903
505 524 526 529 530 531 573 630
652 653 654 658 684 698 719
727 816
526 627 652 654 658
772 773 774
TV
Dimensia
Dixi
Dumont
Echostar
Electrohome
Emerson
Envision
Fisher
Fortress
Fujitsu
Funai
Futuretech
GE
General Electric
Gibraltar
CODES
645 650
566 620
501 627 652
722
526 573 651 652 654 656 709 728
526 534 536 541 573 590 627 636
642 648 652 654 655 657 658 662
682 683 692 696 699 720 816
506 573 652 654
542 590 683
573
534 682 694
534 541 657 662 682 694
541 657 694
508 509 543 544 630 645 646 650
651 652 654 676 690 691 698 701
715 716 725 728 742 779 809 859
627
501 652
Goldstar 505 523 526 545 546 566 573 652
653 654 655 656 658 693 730
Granada
Grand
Grunpy
Hallmark
Harmon/Kardon
Harvard
Hinari
Hisense
Hitachi
IMA
Infinity
JBL
JC Penney
Jensen
627
627
657 682
627 652 654
561
657
534
759
523 526 548 549 553 554 555 585
597 626 636 638 643 648 652 654
655 702 718 726 786 788 789 790
791 792 801 802
657
566
566
505 506 516 525 526 543 546 631
645 646 650 652 653 654 658 676
680 690 691 701 725 726 728 730
556 573 652 654
68
Page 69

Device code tables
TV
JVC
Kawasho
Kenwood
Kloss
Kloss Novabeam
KTV
LG
Lloyd’s
Lloytron
Loewe
Logik
Luxman
LXI
M. Wards
Magnasonic
Magnavox
Majestic
Marantz
Megatron
Memorex
MGA
Midland
Mitsubishi
Mitsui
Montgomery Ward
Motorola
MTC
Multitech
NAD
National
NEC
Nikkai
Nikko
Normandic
Novabeam
NTC
Nyon
CODES
508 557 559 642 649 655 676 726
735 736 737 812 817 726 735 736
737 812 817
548 561 573 652 654
506 573 652 654 656
561 610
657 698 723 724
526 541 573 657 658 662 696
653 766
627
526
566
675
523 652 654
563 566 590 595 617 631 635 645
646 650 654 683 691 701 725
500 505 506 534 543 567 568
573
506 520 525 536 566 567 568 573
610 652 654 656 723 724 729 762
818 887 88
675
506 566 573 652 654
627 654
590 627 653 654 675 683 720
504 505 506 542 571 573 627 652
653 654 656 728
501 646 658 676 725 730
504 505 542 570 571 572 573 597
623 627 652 653 654 656 705 728
787 799 804
769
675
521 605 651
505 506 516 523 573 627 652 653
654 680
657
502 617 627 631 635 637 654
509
505 506 507 517 523 573 627 651
652 653 654 731 732
612
654 727
717
561
727
701
TV
Olevia
Onwa
Optimus
Optonica
Orion
Osaki
Panasonic
Philco
Philips
Philips Magnavox
Pilot
Pioneer
Portland
Price Club
Prism
Proscan
Proton
Pro View
Pulsar
Quasar
Radio Shack
Radio Shack/Realistic
RCA
Realistic
Runco
Sampo
Samsung
Samwon
Sansui
CODES
766 773
541 657
637
521 605 607
694
612
508 509 512 566 644 651 662 676
685 689 698 700 716 734 761 765
780 784 811 819 820 821 822 823
867 868 869 870 871 872 873 874
875 876 877 878 879 880 881 882
883 884 885 886 889 890 900
505 506 525 536 568 573 610 651
652 653 654 655 656 723 724 729
525 566 651 652 655 656 690 723
724 729 770 782 824 825 826 827
828 891 892 893 894
782 826 827 828 829
652 658
502 548 576 636 637 648 652
654 708
505 526 573 652 653 654 658 727
680
676
645 646 650 691 725 742 857
513 519 526 536 585 627 652
654 655
902
501 652
508 509 651 676 698 700 860 861
862 895 896
526 541 590 607 612 645 662
683 698
590 607 650 652 654 655 657 658
683 730
503 505 548 630 633 634 636 641
645 646 648 650 651 652 653 654
656 691 698 701 708 715 716 725
742 749 763 776 805 830 831 832
863 864
590 645 683
501
506 519 652 654 658 698 730 746
505 506 516 523 526 566 573 612
627 647 652 653 654 655 656 658
680 704 717 730 738 755 833
858 897
620
754 834
69
Page 70

Device code tables
TV
Sanyo
SBR
Schneider
Scotch
Scott
Sears
Seimitsu
Sharp
Shogun
Signature
Silver
Simpson
Solavox
Sony
Soundesign
Spectricon
Squareview
SSS
Starlite
Supra
SVA
Sylvania
Symphonic
Tandy
Tatung
Technics
Techwood
Teknika
Tera
Thomas
Thompson
TMK
Toshiba
CODES
542 590 652 683
566
566
654
526 534 541 600 652 654 655 657
662 682 696 701
523 534 542 563 590 595 601 604
617 627 631 635 645 646 650 652
654 656 682 683 688 691 703
725 726
627
521 526 585 605 607 628 629 652
654 655 658 739 740 741 777 794
803 835 836 898
652
675
573
525
612
500 578 640 690 758 781 783 795
796 797 798 806 807 808 810 837
838 839 840 841 842 843 844 845
525 536 541 627 652 654 657 682
520 620
694
505 541 573 652 657
657
523
901 905
506 525 536 566 568 569 573 600
610 652 654 656 723 724 729 733
756 764
632 657 662 692 694 846
521 605
509 651 698
508 676
523 573 652 654 676
504 505 512 516 523 524 525 526
534 536 541 573 644 652 653 654
655 657 658 662 675 680 682 685
726 727
513
627
709
523 573 627 652 654
516 590 617 631 635 680 683 688
750 771 785 793 847 848 849 850
851 852 853 854 855
TV
Totevision
Toyomenko
Universal
Vector Research
Victor
Video Concepts
Vidtech
Viewsonic
Wards
White Westinghouse
Yamaha
York
Zenith
Zonda
VCR
Adventura
Aiwa
Akai
American High
Amstrad
ASA
Asha
Audio Dynamics
Audiovox
Beaumark
Bell & Howell
Broksonic
Calix
Candle
Canon
Citizen
Colortyme
Craig
Curtis Mathes
Cybernex
Daewoo
DBX
Dimensia
Dumont
Dynatech
Electrohome
Electrophonic
CODES
526 658
627
543 690
506
557
570
505 573 627 652 653 654
760
536 573 607 645 650 652 653 654
656 675 682 690 715 723 724 729
816
505 506 573 652 653 654 656
627
501 520 639 652 675 693 775 778
813 899
620
CODES
588
588 622 623
513 515 516 517 518 568 682
678
588
556
675
592 600
676
675
581
559
676
534 594 675 676
554 678 679
534 591 592 594 675 676
592
591 675 676
554 592 594 605 607 675 678 679
675
534 547 559 588
592 600
607
549
588
512 676
676
70
Page 71

Device code tables
VCR
Emerson
Finlandia
Finlux
Fisher
Fuji
Funai
Garrard
GE
Go Video
Goldstar
Goodmans
Gradiente
Granada
Grundig
Harley Davidson
Harmon/Kardon
Headquarter
Hitachi
Instant Replay
ITT
JC Penney
JCL
Jensen
JVC
Kenwood
Kodak
LG
Luxor
Lloyd’s
LXI
M. Wards
Magnavox
Magnin
Marantz
Marta
Matsushita
MEI
Memorex
MGA
CODES
505 508 509 511 512 518 534 559
568 588 590 618 676 678
549
549 556 588
549 581 584 588 610
678
588
588
551 552 554 572 591 605 607 675
678 679
557 558 620
592 594 676
585
588
549 581
556
588
568 592
581
536 538 539 540 588 595 597 682
678
518
554 581 591 592 594 595 600 675
676 678 679
678
595 682
561 562 563 581 592 594 600 682
562 581 592 594 600 682
676 678
676
518
588
676
512 554 585 590 591
527 533 554 556 678 679 797 798
676
554 556 581 585 592 594 600 678
676
678
554 678
533 549 554 566 581 585 588 675
676 678
512 567 568
VCR
MGN Technology
Midland
Minolta
Mitsubishi
Motorola
MTC
Multitech
NEC
Nikko
Noblex
Olympus
Optimus
Optonica
Panasonic
Pentax
Pentex Research
Perdio
Philco
Philips
Pilot
Pioneer
Proscan
Pulsar
Quarter
Quartz
Quasar
Radio Shack
Radio Shack/Realistic
Radix
Randex
RCA
Realistic
Ricoh
Runco
Salora
Samsung
Sanky
Sansui
Sanyo
SBR
CODES
675
579
595
512 562 567 568 570 571 595
678
544 588 675
579 588 591 675
562 581 592 594 600 682
676
675
678
676
585
523 554 598 614 628 633 678 679
777 780 781 782 783 784 785 786
787 788 789 790 791 792 793 794
795 796 799 808 809 810
592 595
594
588
554 678 679
554 556 585 678 801 802 803 804
676
562 574 575 576 600
605 607
533
581
581
554 678 679 770 771 772 805 806
512 607 610 676
581 584 588 675 676 678 679
676
676
518 525 527 528 591 595 605 607
615 631 649 675 678 773 774 775
534 549 554 581 584 585 588 675
676 678 679
502
533
567 581
515 517 534 579 591 675 755 807
533
544 562 600 682
549 581 583 675
556
71
Page 72

Device code tables
VCR
Scott
Sears
Sharp
Shintom
Shogun
Singer
Sony
STS
Sylvania
Symphonic
Tandy
Tashiko
Tatung
Teac
Technics
Teknika
TMK
Toshiba
Totevision
Unitech
Vector Research
Victor
Video Concepts
Videosonic
Wards
XR-1000
Yamaha
Zenith
TV/VCR
Magnavox
Philips
Quasar
RCA
Samsung
Sylvania
DVD PLAYER
Aiwa
Alpine
Apex
Archos
CODES
508 534 559 590
549 581 584 595 610 676 678
512 585 595 607 625
595
675
678
500 501 502 504 768 778
678
554 556 567 588 678 679 756
588 594
581 588
676
594 682
588 594 682
554 633 678
554 588 676 678
675
534 535 567 584 590 769 776
591 675 676
675
534 592 600
561 562 600
534 568 592 600
591 675
534 588 595 675 676 678
588 678
581 592 594 600 682
500 501 533 779
CODES
887 797 888 798
891 801 892 802 893 803 894 804
860 770 861 771 862 772 895 805
896 806
863 773 864 774
755 755 897 807
756 756
CODES
634 694
653
654 655 744 757 835 839
885
DVD PLAYER
Bose
Broksonic
Clarion
Classic
CyberHome
Daewoo
Denon
Echostar
Emerson
Fisher
Funai
GE
Go Video
GPX
Hitachi
JVC
Konka
Koss
Magnavox
Memorex
Mintek
Mitsubishi
Norcent
Oritron
Panasonic
Philips
Pioneer
Proscan
Qwestar
RCA
Sampo
Samsung
Sansui
Sanyo
Sharp
Sony
Sylvania
Teac
Technics
Techwood
CODES
758 811
656 752
696
695
833
657 859
697 699 700
722
658
659
658
702 703
692 693 822
704
660 705 706 707 740 823 860 668
689 711 850 861 862 863
637 638 753
745
661
709
710
767 867
711
723
639 663 699 714 715 716 734 765
813 840 841 855 856 868 869 870
871 872 873 882
766 874
665 719 812 876 877 878 879 880
720
723
666 690 749 816 842 854
724
652 667 668 691 740 741 820 821
844 845 866 875 881 705
725 754
643
669 727 865
617 645 670 671 729 730 731 768
817 818 830 831 832 836 837 838
843 847 848 849 851 852 853 857
858 864 883 884
658 764 829
732
733
664
72
Page 73

Device code tables
DVD PLAYER
Toshiba
Yamaha
Zenith
TUNER/AMPLIFIER
Aiwa
Bose
Carver
Citizen
Denon
Fisher
GE
Goldstar
Harmon/Kardon
Hitachi
JBL
JVC
Kenwood
Magnavox
Marantz
Nakamichi
NEC
Onkyo
Optimus
Panasonic
Pioneer
Proton
Quasar
RCA
Sharp
Sherwood
Sony
Soundmatters
Teac
CODES
616 646 672 735 736 814 815 819
825 826 827 828 834 846
737 739
673 824
CODES
636 641 656 687 718 720 724
725 726
761 780
653
709
647 674 759 760 762 807 809
814 835
653
711
677 690
640 672 751
717
640
637 683 703 725 786 827
676 691 726 728 774 795 828 829
830 831 832 840 842
654 705
651 764
671
716
642 660 662 678 785 788 790 791
792 796 801
648 664
643 644 652 783 797 798 799 808
810 815 816 817 818 819 820
821 822 824 825 826 833 836 837
838 839
658 667 668 679 702 767 770 772
779 802 806 844
654 705
652
635 638 704 727
712 713 714 715
646 670
639 645 687 728 729 730 765 766
769 771 773 775 776 777 778 781
782 784 787 789 793 794 803 811
812 813
763
684
TUNER/AMPLIFIER
Technics
Toshiba
Victor
Yamaha
TV/DVD/VCR COMBO
Panasonic
TV/DVD COMBO
Apex
Broksonic
Cytron
Panasonic
RCA
Sansui
Sylvania
Toshiba
TV/VCR/TUNER COMBO
Panasonic
CODES
643 644 652 768 804 805 843
710
703
663 730 731 732 733 823 834 841
CODES
900/882/810
CODES
757/757
752/752
904/904
734/734 765/765
749/749
754/754
764/764
865/814 866/815
CODES
867/796/797 868/799/798
869/808/799 870/780/839
871/781/838 872/782/837
873/783/836 874/784/833
875/785/826 876/786/825
877/787/824 878/788/822
879/789/821 880/790/820
881/791/819 882/792/818
883/793/817 884/794/816
885/795/815 889/809/808
73
Page 74

Frequently Asked Questions (FAQs)
Please visit our website at telus.com/tv
and look under the FAQ section for a
complete list of frequently asked questions.
How does TELUS Satellite TV work?
TV signals are sent to your home from our satellites in space. The satellite
dish receives these signals and sends them to your receiver, which then
displays the programming on your TV.
Are all TELUS Satellite TV channels digital?
Yes, all TV channels on TELUS Satellite TV are delivered in a digital format.
What is High Definition (HD) and how can I get it?
High Definition (HD) TV delivers the best picture and the best viewing
experience. You will see more detail and enjoy a sharper, clearer and
more vibrant picture than you would with standard definition TV. Watch
your favourite shows in true widescreen and see 45% more of the picture
compared to standard definition. Plus, enjoy rich, resonant sound through
5.1 Dolby® Digital surround sound. To experience HD you will need an HD
TV, HD receiver and a subscription to HD channels. Your TELUS receiver is
HD ready and HD channels are included in all TELUS Satellite TV packages
so if you have an HD TV you are ready to enjoy the HD TV experience.
Will I be able to watch digital TV on my existing TV?
TELUS Satellite TV receivers have RCA, S-Video, component and HDMI
outputs. If your TV has one or more of these inputs, you will be able to
enjoy digital TV on your existing TV. However, if your TV only has a coaxial
input, you will need an RF remodulator to convert the signal from your
TELUS Satellite TV receiver to a coaxial output for your TV.
Do I need to purchase any new equipment to receive digital TV
from TELUS?
A receiver is needed for each TV you wish to receive TELUS Satellite T V
service on. You have the option to either rent or purchase your receiver;
both include all of the necessary cables to receive TELUS Satellite TV.
Can I purchase or rent additional receivers?
You can rent or purchase a maximum of 6 receivers per account.
Will plugging in my receiver(s) interrupt my home phone or
Internet service?
No. However, you can’t order a movie if your home phone is in use.
What if I can’t use my phone jack because there‘s already a phone
plugged into it?
A phone splitter will allow you to plug 2 cables into the same phone jack.
Phone splitters are available at most electronics and hardware stores.
Why are my HD channels not working?
Although you may currently have an HDTV that’s designed to receive HD
programming, you will need to subscribe to HD channels in order to receive
them. To subscribe to HD channels, please call 310-MYTV (6988).
How can I monitor what my children are watching when I am away
from the TV room?
Locks allow you to select and block programs from being viewed. This
feature is an effective tool in protecting children from viewing content
that you feel is inappropriate. Once you have set a password, you have
complete control over what is blocked. If you block content by rating, then
all programs that have that rating and higher will be blocked.
What should I do if I have problems with my TELUS Satellite TV
service?
Please see the troubleshooting section on pages 67 to 69 in this guide as
there may be an easy fix. If this does not solve the problem, try resetting
your receiver; if the problem persists, please contact us at 310-MYT V (6988).
Will I need a PIN to order Pay Per View events?
You will only be asked for a PIN when ordering adult PPV events. If you
have forgotten your PIN, please call 310-MYTV (6988). You’ll also need the
PPV event ID, which can be found by pressing Info on your remote when
the desired event is highlighted onscreen.
What should I do with my TV receiver when Daylight Savings Time
takes effect?
Please turn off your receiver by pressing the Power button (be sure the
green light on the front panel of the receiver is off) and leave it turned off for
at least 30 minutes. This will allow your receiver to update.
How many favourites lists can I create?
You can create up to 4 additional favourites lists that include your most
watched channels.
How can I order another remote control?
You can order another TELUS T V® remote control by calling 310-MYTV (6988).
A new remote control will be shipped to you within a few days. Charges
may apply.
What are the advantages of adding an external hard drive to
my receiver?
Your receiver instantly becomes a Personal Video Recorder (PVR) with
the capacity to store hours of programming. Everything you record will be
stored on the external hard drive for you to watch at your leisure. As an
additional bonus, your interactive programming guide will also be increased
from a 2-day view to 9 days.
How do I add PVR functionality to my digital receiver?
If you purchase an external hard drive, you can upgrade your HD receiver
to an HD PVR. Just plug it into your receiver and you’ll have the power to
pause, replay and record live TV with the touch of a button. Plus, you’ll be
able to find your favourite shows up to 9 days in advance instead of the
standard 2.
74
Page 75

Frequently Asked Questions (FAQs)
How much storage capacity does my external hard drive have?
It depends on the size of external hard drive you have:
External hard drive Hours of SD recording Hours of HD recording
250 GB 248 33
320 GB 319 43
500 GB 500 65
750 GB 750 10 0
1.0 TB 1000 133
Note – these times are approximate.
How many external hard drives can I attach to my receiver?
You can attach just one at a time.
Can I transfer my external hard drive between receivers?
Yes, you can but please remember that all the receivers must be under
the same account name. Plus, you can only transfer an external hard drive
from a 6131 receiver (this is the one you have) to other 6131 receivers.
Will I need to reset my PVR timers every time I reconnect my
external hard drive?
No, the PVR timers are stored on the external hard drive and will
automatically resume when you reconnect the external hard drive.
Where should I put my external hard drive when I’m using it?
It can get very hot while it’s on so, keep it in an open area, ensuring none
of the cooling vents are blocked.
Should I turn off my external hard drive when I turn off my receiver?
No, it’s not advisable, as it’ll mean the PVR function is switched off.
How do I disconnect my external hard drive?
In the My PVR menu select Remove PVR. Unplug the external hard drive
when the onscreen pop-up window indicates it is safe to do so. The
receiver will then restart.
What do I do if I’m having technical problems with my external
hard drive?
Please contact the manufacturer of the external hard drive for advice.
Want more information?
C
all 310-MYTV (6988), or visit telus.com/tv.
How to contact TELUS
If you have any questions, please call
If you have any comments or feedback, please email
310-MYTV (6988)
.
tvcomments@telus.com
.
75
Page 76

TELUS Satellite TV Terms of Service
This is an agreement between you and TELUS Communications Company (“TELUS”).
It sets out the terms and conditions that apply to your use of the direct-to-home
(“DTH”) television and audio broadcast Programming service, any DTH Equipment
provided to you for use with such services, as well as any associated installation,
support and maintenance services associated with such services, if any (collectively,
the “Services”). This agreement, together with TELUS rules and policies applying to
the use of the Services, form the agreement between you and TELUS for the Services
(the “Agreement
until you have accepted the terms of this Agreement. Unless otherwise agreed, by
having an IRD activated onto the Service to receive and use the Services, you are
accepting and agreeing to the terms of this Agreement. IF YOU DO NOT AGREE TO
THE TERMS OF THIS AGREEMENT, YOU MAY NOT USE THE SERVICES.
”). TELUS will not have a binding Agreement with you for the Services
1. Introduction
The words “you” and “Subscriber” refer to you, as a residential subscriber of the
Services and Programming in Canada and person whose name appears on
the Statement. By requesting, viewing or paying for any Programming, you are
deemed to have agreed to the terms and conditions of this Agreement unless you
immediately contact our Customer Service Centre to cancel your subscription to
the Programming.
2. Definitions
In this Agreement (in addition to other terms defined herein), the following terms have
the following meanings:
“Authorization Device” means a device inserted, embedded or incorporated into
an IRD, including a Smart Card, that authorizes the reception of Programming and
includes any software embedded therein;
“Bell TV
” means Bell ExpressVu Inc., in its capacity as general partner of Bell
ExpressVu Limited Partnership;
“Customer Service Centre” means the TELUS customer service centre;
“DTH Equipment” means the DTH equipment used to receive the Programming,
including, without limitation, the satellite equipment comprising the IRD, Authorization
Device, satellite antenna and remote control;
“TELUS”, “we”, “us”, or “our” means, and where the context requires, any successor
company or entity, and its respective affiliates, and the officers, directors, employees
or authorized agents of the foregoing;
“TELUS Account” or “Account” means the account opened by you to receive
Programming;
“IRD” means the integrated receiver and decoder: this is the television set-top
box that decodes the video and audio programs as they come into your television
from the dish antenna;
“Programming” means, as the context requires, any or all of the programming,
subscription programs, programming packages, Pay Per View services, interactive
weather services, à la carte programs, and any other services provided to you from
time to time, as part of the Service;
“Smart Card” means the conditional access card inserted or incorporated into the
IRD, which card is owned and used to authorize reception of Programming and
includes any software embedded therein; and
“Statement
” means the statement of your Service account.
3. Terms and Conditions – General
The terms and conditions of this Agreement and the rates, charges, fees and
Programming may change from time to time. TELUS will notify you in advance of
any change, and the effective date of that change, so that you may, as your sole and
exclusive remedy, cancel your subscription and pay applicable cancellation charges
if you don’t agree. The notice may be provided to you on or with your Statement or
by any other written notice that will likely come to your attention. If you fail to cancel
your subscription to the TELUS Service within 30 days of notice of any change and/
or if you continue to receive the Programming, you will be deemed to have accepted
such change. If we change the contents of any Programming, you agree that we
have no obligation to replace or supplement the Programming previously offered that
has been deleted, rearranged or otherwise changed or give you any credit or refund.
The provisions of this Agreement will continue to apply to any issue related to this
relationship after termination or cancellation of this Agreement.
4. Your Use of the DTH Equipment
a) The IRD Receiver/Decoder Unit
Your right to receive and view the Programming is granted only for IRDs situated
in Canada that have been authorized to receive such Programming. Your IRD will
not operate without an Authorization Device. TELUS reserves the right to verify
remotely or by contacting you directly that the service address is located in Canada
and that all active IRDs on your Account are located at the one address listed on
your Account as your “service address”. If you violate this or any other provision
or policy, TELUS may disconnect your access to the Programming immediately
without notice. You are responsible for all Programming that is ordered for your
IRD. If you have concerns about other persons ordering Programming for your
IRD without your authorization, request a personal identification number (PIN) for
your Account, which will be used by our Customer Service Centre to help prevent
unauthorized Programming orders. You may also contact our Customer Service
Centre to determine if any particular IRD model is compatible with all Programming
in which you are interested. TELUS may, in our sole discretion, for technological,
network or other reasons require a migration, recall, substitution or replacement
of all or any part of the DTH Equipment upon notice to you and on the terms
and conditions specified in our notice. Any replacement DTH Equipment will be
deemed to be the DTH Equipment referenced in this Agreement.
b) Programming requires telephone connection
Each IRD must be directly and continuously connected to the same operating
telephone service associated with your Account, unless TELUS otherwise expressly
approves prior to activation. Connection to an operating telephone service is a
condition of our granting you the right to receive and view the Programming and we
may, in our sole discretion, disconnect some or all Programming if we determine
that the IRD is not connected in this manner. We may verify the location of your IRDs
remotely or by contacting you directly. If TELUS is unable to contact you to perform
this verification, it may limit signal reception to a single receiver to a household
containing multiple receivers.
c) Minimum level of Programming required
As a condition of our granting you the right to receive and view the Programming,
you must subscribe to and maintain a minimum level of Programming specified by
TELUS when you subscribe to the Service. In addition, unless we agree otherwise,
the minimum period of time that you must continue to subscribe to at least the
minimum level of Programming (and pay for it) is 30 days. Please visit telus.com/
tv for information regarding the current minimum level of Programming required.
d) Authorization Devices
Authorization Devices, including Smart Cards, are non-transferable. Your
Authorization Device will work only in the IRD with which it was packaged or
activated. Notwithstanding that the Authorization Device was packaged with your
IRD (whether purchased or rented), all Authorization Devices are and remain the
property of Bell TV and any tampering or other unauthorized modification to an
Authorization Device may result in, and subject you to, legal action, or any other
action as set out in this Agreement. If you attempt to use that Authorization Device
with any other IRD without our authorization, we may terminate your right to receive
and view the Programming. We may require that you return the Smart Card to us if
it is defective or damaged, prior to providing a replacement Smart Card to you. In
addition, we may require that you return the Smart Card to us if you terminate your
Account, and failure to do so will result in a recovery charge being assessed against
76
Page 77

you. We may, in our sole discretion, implement a mandatory recall, substitution or
replacement of existing Authorization Devices, by notice to you that we will substitute
or replace, at our expense, the existing Authorization Device in your possession and
deliver to you a replacement Smart Card. You shall, within 7 days of our notice to
you of the recall, return the recalled Smart Card and activate the replacement Smart
Card. We will charge $100 to your TELUS Account for each recalled Smart Card in
your possession, which amount will be credited to your Account once you activate
the replacement Smart Card.
e) Liability for unauthorized use
If the Smart Card in the IRD you own or rent is destroyed, lost, stolen or
otherwise removed from your premises without your authorization, you must
notify our Customer Service Centre immediately to avoid liability for payment
for any unauthorized use or reception of Programming. You will not be liable for
unauthorized use after we have received your timely notification.
f) Additional IRDs in the same household
It is a condition that any additional IRD/Smart Card combination(s) rented or
purchased and activated to receive the same Programming as your initial IRD/Smart
Card must be located at the service address listed on your Account and must be
continuously connected to the same operating telephone line. We may, in our sole
discretion, disconnect the Programming if you activate additional IRDs in breach of
this requirement. The activation of any new additional IRDs/Smart Cards is subject
to the additional IRD fee described in Section 5(d), if applicable. You may activate up
to a maximum of 5 additional IRDs on your Account at any time. If you require more
than 5 additional IRDs, you must open a new separate TELUS Account to activate
such additional IRDs and you will be billed separately for the services received
through those additional IRDs.
g) Vacation Properties or Secondary Locations
Section 4(a) applies to you even if you order the Programming for a secondary
location, vacation property or mobile unit, such as a camper, boat or recreational
vehicle. You may not, under any circumstances, including vacation properties,
maintain multiple IRDs on one TELUS Account that are active at different locations
simultaneously. If an IRD is installed in a mobile unit such as a camper, boat or other
recreational vehicle, you are only permitted to have one IRD active on that Account.
5. Rates, Fees and Charges
a) Introduction
Programming rates, fees and charges are charged in accordance with this
Agreement. Other rates, fees and charges, or changes to the amount of existing
rates, fees and charges, may apply from time to time upon advance notice to you
(see also Section 3). Our rates, fees and charges for Programming are available
upon request from the Customer Service Centre. If you have any concerns contact
our Customer Service Centre.
b) Billing policies, Statements and payments
You shall pay in full all amounts billed for Programming and all taxes, fees and
other charges, if any, which are now or may in the future, be assessed on the
Statement for Programming and any other services you receive from us.
We will bill you each month in advance for your Programming and rental charges.
(Usage-based Programming will be billed in arrears.) All bills are due upon receipt.
Bills made available through the Internet are received when they are posted. Charges
not paid before the end of the grace period shown on your bill are assessed a late
payment charge at the prime rate of the Bank of Montreal plus 7%, converted to a
monthly compound rate and rounded up to the nearest quarter percentage point,
calculated from the due date, which you must pay in addition to all other amounts
owing to TELUS. Administrative and collection charges may apply, in accordance
with TELUS rules and policies, if your Account goes into arrears, including as a result
of returned or rejected payments or your failure to inform TELUS of any change to
your Account information for pre-authorized payments. If you subscribe to a pre-
authorized payment method, you waive pre-notification of the amounts and dates
of debits from your Account. TELUS may require you to make interim payments for
non-recurring charges you have incurred in the period between two monthly bills,
for such Services as are identified to you with the demand for payment. The grace
period for the payment of charges so identified expires 3 days after you receive
the demand for payment. You are responsible for maintaining a minimum spend of
$37.56 per month on Programming and LPIF contribution, excluding any Pay Per
View services, interactive services, bundle discount and all account administration
fees.
c) Termination of Programming by TELUS
If you do not pay in full all amounts owing as shown on your Statement within 30
days after the date when payment is required, or if you fail to comply with any of
your obligations under this Agreement at any time, in addition to our other rights and
remedies, we have the right to disconnect your Programming, in our sole discretion,
without notice or demand to you. We also reserve the right, without notice or
demand, to take whatever steps are necessary to disable or modify the software in
your IRD and/or Authorization Device if you breach any of your obligations under this
Agreement, including receiving Programming that you have not paid for, in whole
or in part.
d) Additional IRD Fee
f you initially or subsequently activate more than one IRD on your Account, you
may be charged an account administration fee by TELUS for the activation and
continued use of multiple IRDs/Smart Cards on your Account. TELUS may reduce
or eliminate this fee if you subscribe to specific combo programming packages or if
you are renting IRDs from TELUS.
e) Reconnection Fee
TELUS charges an account administration fee to reactivate an IRD that was
permanently deactivated upon your request, or where you transfer or assign
ownership of the IRD or otherwise transfer or assign responsibility for payment of an
existing TELUS Account, in all cases with prior written consent from TELUS.
f) Digital Service Fee
You shall pay to TELUS a monthly recurring digital service fee. This monthly recurring
fee, which relates to costs incurred in operating the network and maintaining
and/or upgrading technological platforms, may be reduced or eliminated
by TELUS, in its discretion, if you subscribe to specific combo programming
packages or based on the technological platform used to deliver Programming
to you.
6. Your Termination or Suspension of Programming
a) If you want to terminate all or a portion of your Programming
(i) Downgrading your Programming: You may terminate or downgrade the
reception of any part of your Programming by notifying our Customer Service
Centre, only if these two conditions are met: (x) any continuing Programming is
subject to the minimum Programming requirements set out in Section 4(c); and (y)
your Account is in good standing with all payments up to date. The Programming
you request to be terminated will be deactivated effective as of the next billing cycle
date after receiving your notice. Since you would have paid for the Programming
you are terminating or downgrading in advance up to the next billing cycle date,
no credit or refund will be payable in respect of such terminated or downgraded
Programming. In addition, no deactivation fee will be payable in such case.
However, if you are a subscriber and you attempt to downgrade your Programming
below the minimum Programming commitment you have agreed to, certain fees or
charges may be applicable.
(ii) Terminating or cancelling your Programming: You may terminate the
reception of all of your Programming by notifying our Customer Service Centre. All
the Programming you receive will be deactivated on the 30th day after receiving
your notice to cancel. However, if you are not a month to month subscriber, and
77
Page 78

you attempt to deactivate all of your Programming, certain fees or charges may be
applicable. If you are entitled to a credit for any amount in excess of $10, TELUS
will send you a cheque for that refund amount upon your request, but we will
not provide any refund or credit for an amount of less than $10. If you have any
questions regarding the return process, please call 310-MYTV (6988).
(iii) Outstanding Balance: If you cancel your right to receive and view any
Programming, you are still responsible for payment of all outstanding balances
accrued up to the date of termination.
b) If you want to temporarily suspend your Programming
You may temporarily suspend your right to receive and view the Programming
at any time by contacting TELUS at 310-MYTV (6988), provided that your
Programming is suspended for a minimum period of 6 consecutive weeks,
and not greater than 7 consecutive months. TELUS charges an account
administration fee. Upon reactivation, the minimum 1 month service requirement
set out in Section 4(c) will apply. If you fail to call and reactivate your Account
at the end of the permitted 7 month period, your Account will automatically be
reactivated, billing will be resumed and you will receive the Programming you
were receiving prior to its suspension. If you have temporarily suspended your
Programming and decide during that time to terminate or downgrade your
Programming pursuant to Sections 6(a) (i) or (ii) as applicable, your Account will
automatically be reactivated prior to any such requested change taking effect
so that the terms and conditions of Sections 6(a) (i) or (ii), as applicable, shall
apply to your request to terminate or downgrade your Programming. You may be
required to continue the payment of all rental and other fees applicable to you
under this Agreement or other agreement with TELUS relating to your receipt of
the Programming.
c) Your transfer of Account or DTH Equipment
If you are renting DTH Equipment from TELUS, you may not, without TELUS’ prior
written consent, transfer or assign your rights to the DTH Equipment to another
person. Also, if you own or rent your DTH Equipment, you may not assign or transfer
your rights to the Programming without our prior written consent. If you do, we
may deactivate your Programming. You shall notify us immediately, but in any event
not more than 5 days, after you move, sell, give away or otherwise transfer any
part or all of your DTH Equipment to anyone else. You are considered to be the
registered owner or lessee of your DTH Equipment listed on your Account, as the
case may be, and beneficiary of the rights in the Programming until we receive such
notice, and consent to the transfer of the DTH Equipment or Programming that you
requested and you may be liable for any charges or fees incurred by the use of your
DTH Equipment by anyone else up to the time that it is transferred. To transfer your
DTH Equipment to another person or TELUS Account, an administration transfer fee
will be applied to the TELUS Account of the new owner.
d) Security Deposit
TELUS may require a security deposit from you (i) before the Services are provided,
if you do not have a satisfactory credit history with TELUS or do not provide other
proof of creditworthiness satisfactory to TELUS, or (ii) at any time this Agreement
applies, if you have an unsatisfactory credit rating with TELUS as a result of your
payment practices, or (iii) if you clearly present an abnormal risk of loss. Interest on
any security deposit required by TELUS, at a rate equal to the rate established on
January 1 and July 1 of each year for daily interest savings accounts at a chartered
Canadian bank, shall be credited to your Account monthly. TELUS may apply any
portion of the security deposit against unpaid charges on your Account at any
time and, upon termination of this Agreement or where the conditions justifying the
security deposit no longer apply, will refund any outstanding security deposit, with
accrued interest, retaining only the amount then owing on your Account.
e) Term and Rates
At the end of the minimum term, if any, your TELUS Service will continue until
(i) you terminate this Agreement upon a thirty (30) day notice to TELUS, or (b)
TELUS terminates this Agreement as permitted herein (“Term”). Please note that
all Programming, programming rates, packaging, fees and charges for other
miscellaneous features or services, system access, late payment charges,
termination or cancellation charges may change over the Term. Taxes are, in all
cases, extra.
7. Limitation of Liability and Furnishing of Programming
a) Exclusion of Liability
TO THE EXTENT PERMITTED BY APPLICABLE LAW AND EXCEPT AS OTHERWISE
EXPLICITLY AGREED TO BY TELUS, ITS AFFILIATES, ITS SUPPLIERS (INCLUDING
TELESAT CANADA AND BELL TV), AND THE EMPLOYEES, DIRECTORS,
OFFICERS AND REPRESENTATIVES OF THE FOREGOING WILL NOT BE LIABLE
FOR THE DTH EQUIPMENT, THE SERVICES OR ANY INTERRUPTIONS IN
PROGRAMMING OR LIABLE FOR ANY DELAY OR FAILURE TO PERFORM, IF
SUCH DELAY OR NON-PERFORMANCE ARISES IN CONNECTION WITH ANY
ACTS OF GOD, FIRES, EARTHQUAKES, FLOODS, POWER FAILURE, SATELLITE
FAILURE OR MALFUNCTION, FAILURE TO REPLACE EXISTING TECHNOLOGY,
ACTS OF ANY GOVERNMENTAL BODY OR ANY OTHER CAUSE BEYOND OUR
REASONABLE CONTROL. WE MAKE NO WARRANTY, EITHER EXPRESSED
OR IMPLIED, REGARDING THE DTH EQUIPMENT, THE SERVICES OR THE
PROGRAMMING PROVIDED TO YOU AND ALL SUCH WARRANTIES ARE
EXPRESSLY EXCLUDED. IN NO EVENT SHALL WE HAVE ANY LIABILITY FOR
SPECIAL, INDIRECT, INCIDENTAL, PUNITIVE, EXEMPLARY OR CONSEQUENTIAL
DAMAGES, OR FOR ECONOMIC LOSSES (REGARDLESS OF THE THEORY
OF LIABILITY ASSERTED, INCLUDING NEGLIGENCE) RELATING TO THE
DTH EQUIPMENT OR RESULTING FROM OUR FURNISHING OR FAILURE TO
FURNISH ANY PROGRAMMING TO YOU OR FROM ANY FAULT, FAILURE,
DEFICIENCY OR DEFECT IN THE SERVICE OR PROGRAMMING FURNISHED TO
YOU. IN NO EVENT SHALL TELUS, ITS AFFILIATES, THE DIRECTORS, OFFICERS
AND REPRESENTATIVES OF THE FOREGOING OR ITS SUPPLIERS AND BELL
TV’S LIABILITY TO SUBSCRIBER (REGARDLESS OF THE THEORY OF LIABILITY
ASSERTED, INCLUDING NEGLIGENCE) EXCEED THE TOTAL VALUE PAID TO
TELUS BY SUBSCRIBER FOR PROGRAMMING IN THE MONTH PRECEDING
YOUR CLAIM. IT IS YOUR RESPONSIBILITY TO IMPOSE ANY RESTRICTIONS
ON VIEWING BY YOU, OTHER MEMBERS OF YOUR HOUSEHOLD, OR YOUR
OR THEIR INVITEES, AND WE SHALL HAVE NO LIABILITY TO ANYONE DUE TO,
OR BASED ON, THE CONTENT OF ANY OF THE PROGRAMMING FURNISHED
TO YOU.
b) Acknowledgement re: DTH Equipment
YOU ACKNOWLEDGE AND AGREE THAT: (i) TELUS AND BELL TV, ARE NOT
THE MANUFACTURER, DISTRIBUTOR, INSTALLER OR RETAILER OF YOUR
DTH EQUIPMENT, AND THEREFORE HAVE NO LIABILITY WHATSOEVER
FOR SUCH EQUIPMENT, INCLUDING IF THE SOFTWARE IN YOUR IRD OR
AUTHORIZATION DEVICE BECOMES DISABLED OR MODIFIED DUE TO THE
CIRCUMSTANCES OUTLINED IN SECTION 5(c) OR UPDATED OR UPGRADED
AS OUTLINED IN SECTION 4. ANY RIGHTS AND REMEDIES WITH RESPECT
TO THE DTH EQUIPMENT CAN BE FOUND IN THE LIMITED WARRANTY
ACCOMPANYING THE DTH EQUIPMENT AND MUST BE HANDLED DIRECTLY
IN ACCORDANCE THEREWITH; (ii) YOUR IRD AND AUTHORIZATION DEVICE
CONTAINS SOFTWARE THAT IS UNDER LICENCE TO, OR OWNED BY, BELL
TV. YOUR LICENCE TO USE THIS SOFTWARE IS LIMITED TO RECEIVING AND
VIEWING PROGRAMMING ON THE TELUS SERVICE IS AUTHORIZED ONLY
AND FOR NO OTHER PURPOSE. IF TELUS OR BELL TV HAS REASONABLE
GROUNDS TO BELIEVE THAT YOU ARE RECEIVING UNAUTHORIZED
PROGRAMMING, IN WHOLE OR IN PART, OR USING THE SOFTWARE FOR
ANY OTHER UNAUTHORIZED PURPOSE, TELUS AND/OR BELL TV RESERVES
THE RIGHT TO MODIFY OR DISABLE THE SOFTWARE IN YOUR IRD AND
SMART CARD. WARNING: IF THE SOFTWARE IN YOUR IRD AND/OR SMART
CARD IS DISABLED OR MODIFIED, YOUR RECEIVER MAY NOT FUNCTION
PROPERLY. YOU MAY NOT MODIFY, TEST, REVERSE ENGINEER, DECOMPILE,
78
Page 79

TAMPER OR ACCESS THIS SOFTWARE FOR ANY REASON WHATSOEVER;
(iii) TELUS AND/OR BELL TV RESERVES THE RIGHT, FROM TIME TO TIME
TO UPDATE, REPLACE OR UPGRADE THE SOFTWARE IN YOUR IRD AND
AUTHORIZATION DEVICE (BY SWAP, REPLACEMENT, RECALL OR OTHERWISE)
TO ENSURE THAT IT AND YOUR DTH EQUIPMENT THAT YOU EITHER OWN OR
ARE RENTING FROM TELUS WILL REMAIN COMPATIBLE WITH AND FUNCTION
PROPERLY WITH ANY TECHNOLOGICAL ADVANCES OR IMPROVEMENTS
MADE TO THE SERVICES. IN CERTAIN CIRCUMSTANCES, IT MAY BE
NECESSARY TO MODIFY OR REMOVE SOME SOFTWARE FEATURES TO
INTRODUCE NEW FEATURES AND TO ENSURE YOUR IRD AND AUTHORIZATION
DEVICE REMAINS COMPATIBLE WITH SUCH TECHNOLOGICAL ADVANCES OR
IMPROVEMENTS.
c) Programming availability
All Programming is provided on a “subject to availability” basis. Certain Programming,
including sports events, may be “blacked out” in your area of reception from time
to time at the request of the programmer for copyright or other reasons. If you
circumvent or attempt to circumvent any of these blackouts, you may be subject
to legal action. Programming may also be subject to temporary interruption due to
natural phenomena such as thunderstorms. TELUS will not refund charges for the
blackout period or temporary interruptions. In addition, TELUS, BELL TV, THEIR
RESPECTIVE AFFILIATES AND THE DIRECTORS, OFFICERS, EMPLOYEES AND
REPRESENTATIVES OF THE FOREGOING OR ITS SUPPLIERS, (INCLUDING
TELESAT CANADA), WILL NOT BE LIABLE FOR ANY LOSS OR DAMAGE WHICH
YOU SUFFER AS A RESULT OF ANY SUCH BLACKOUT OR TEMPORARY
INTERRUPTION. However, if TELUS causes a material interruption of Programming
that is not related to natural phenomena or causes outside of its control, TELUS
will provide a credit or refund, at your request, for the Programming interruption
period. For greater certainty, no credit or refund will be provided for Programming
interruptions resulting from TELUS disabling or modifying the software in an IRD
and/or Authorization Device pursuant to Section 5(c) of this Agreement, or if TELUS
can no longer provide any particular Programming for any reason.
d) Private viewing
The right we provide you to receive and view the Programming is for your private
home viewing, use and enjoyment. You will not receive, view or exhibit the
Programming outside of your private residence. The Programming may not be
rebroadcast, transmitted or performed in any form, and no admission charged, or
any other consideration received, by or for the benefit of Subscriber from any third
party in return for allowing such third party to listen to or view any Programming
provided by us.
e) Warning against piracy
It is against the law to receive the Programming, or any portion of the Programming,
without paying for it (unless permitted to do so by TELUS). Doing so may result
in civil or criminal penalty. TELUS also reserves the right to take any other action
to prevent the reception of its Programming without payment to, or authorization
by, TELUS, including the right to modify or disable, or cause the modification or
disabling of, the software in the IRD and Authorization Device in accordance with
Section 5(c) of this Agreement.
f) Additional rules for Pay Per View (“PPV”) Programming
Unless otherwise indicated by TELUS at the time you place your order for PPV
Programming, all sales of PPV Programming are final. If TELUS is unable to provide
any PPV Programming that you have ordered, TELUS shall credit you the amount
for that PPV Programming. TELUS shall have no other liability for cancelled events
or failure to provide any PPV Programming. Certain PPV Programming may only be
ordered if you also subscribe to other prerequisite channels on the TELUS Service.
You shall indemnify and hold harmless TELUS from any claims, liabilities, losses or
damages resulting from your use of PPV Programming in contravention of Section
7(d) or 7(e) of this Agreement. PPV Programming also includes season based
sports PPV programming packages where a customer may have access to all
or many games in a season of a professional sports league. Once you subscribe
to a season based sports PPV programming package, your subscription is an
ongoing one and will continue from season to season. To cancel, you must call
310-MYTV (6988) before the start of the next season since there are no refunds
once a season has started.
8. Privacy
You agree that TELUS may continue to collect, use and disclose personal
information about you for the purposes identified in the TELUS Privacy
Commitment (as it may be amended from time to time), which can be viewed
at www.telus.com. Those purposes are: 1. to establish and maintain a
responsible commercial relationship with you and to provide ongoing service;
2. to understand your needs and preferences; 3. to develop, enhance, market
or provide products and services; 4. to manage and develop our business and
operation; and 5. to meet legal and regulatory requirements. When providing
the DTH Services to you, TELUS will be acting as the agent of Bell TV, their
successors and assigns, and must collect and share personal information
about you to Bell TV. Information about Bell’s privacy policies is available at
www.bell.ca/privacy. You also agree that, for the purposes identified above,
TELUS may share your personal information on a confidential basis with third party
service providers. You acknowledge that if any such service provider is located
in the U.S. or other foreign country, your personal information may be processed
and stored in that country and may be accessed by the governments, courts,
and law enforcement or regulatory agencies of that country under its laws. More
information about TELUS’ privacy practices is available at the above Web site. If
you have any questions or concerns about these privacy practices, you may call
1-800-567-0000 or send an e-mail to privacy@telus.com.
9. Miscellaneous Provisions
a) Applicable Law and Enforceability
TELUS is a federally-regulated undertaking and as such, this Agreement, including
all matters relating to its validity, construction, performance and enforcement, shall
be governed by applicable federal laws and regulations of Canada and only those
provincial laws and regulations applicable to it. These terms and conditions are
subject to amendment, modification or termination if required by laws or regulations.
Each provision of this Agreement shall be construed as separable and divisible
from every other provision and the enforceability of any one provision, or portion
thereof, shall not limit the enforceability, in whole or in part, of any other provision
hereof. If any provision in this Agreement is declared to be illegal or in conflict with
any applicable law or regulation, that provision may be deleted or modified, without
affecting the validity of the other provisions. The term “including” means including
without limitation. The benefit of any provision limiting liability in favour of TELUS may
be exercised by Bell TV or extended to include Bell TV.
b) Change of name, address or telephone number
You shall give us prompt notice of your change of name, mailing address,
residency, address, telephone number and other relevant information by notifying
our Customer Service Centre. Notices are deemed to have been received when
they arrive at our Customer Service Centre.
10. Equipment
a) Equipment
All DTH Equipment not owned by you must be returned to TELUS upon termination
of this Agreement for any reason. TELUS may charge you for all work and
equipment supplied in order to extend existing TELUS network facilities to your
premises, including any expenses incurred to secure rights of way, access and
occupancy. TELUS is not responsible for the maintenance or repair of facilities or
equipment owned by you, and does not guarantee that the Services will operate
with all television sets, remote controls, home theatre components or other audio/
visual equipment. The Services require electrical power to operate, which you must
79
Page 80

supply at no charge to TELUS, and you acknowledge and accept that you may
lose service during a power outage unless you supply, install and maintain at your
own expense a battery backup power system. You agree to provide TELUS agents
and employees with access to the property and premises where the Services
are provided in order to inspect the facilities and equipment used to provide the
Services and to perform maintenance work. TELUS will provide reasonable notice
of any such inspection or maintenance work on your premises, except in cases of
emergency. You hereby agree not to sell, transfer, lease, assign any interest in, or
encumber all or any part of any TELUS-owned equipment that has been provided
for your use as part of the TELUS Services.
b) Purchased Equipment Subsidy
If you purchased the IRD or other DTH Equipment you use to receive the Services,
you agree that TELUS has subsidized the purchase price for such DTH Equipment
you use to receive the Services on the understanding that you will: (a) become
a subscriber of the Service for the period you agree to when you subscribe for
the Services and (b) activate the IRD with TELUS to receive the Service at the
address you provide to us when you subscribe for the Service within 60 days of
the date of purchase of the IRD. FAILURE TO ACTIVATE YOUR IRD WITHIN THIS
60 DAY PERIOD MAY RESULT IN A TELUS ACCOUNT BEING OPENED IN YOUR
NAME AND A CHARGE BEING APPLIED TO EITHER YOUR TELUS ACCOUNT OR
YOUR CREDIT CARD IN THE AMOUNT OF $299 FOR EACH NON-ACTIVATED
RECEIVER. You agree that these charges represent a reasonable estimate of
damages suffered by TELUS as a result of your failure to activate the receivers, or
any of them, within the 60-day period.
c) Early Termination
If you choose to terminate your service (or if TELUS terminates your service for
cause) prior to the end of your term commitment, you will be required to pay (as
liquidated damages and not as a penalty) a cancellation fee of $10.00/month for
every month remaining in contract, in addition to all other amounts then due to
TELUS.
d) Not a New Subscriber
You acknowledge and agree that the instant rebate given on the purchase of your
IRD is for new subscribers to Service only. If following the activation of your IRD, it is
determined that, when you subscribed for the Service, you had been a subscriber
of the Service in the last six (6) months, you shall be deemed to be in material
breach of this Agreement and TELUS may charge your TELUS Account the amount
of $200, which amount is a reasonable estimate of damages suffered by TELUS
as a result of your breach.
80
Page 81

Index
4:3 aspect ratio,
16:9 aspect ratio,
account information,
action, how to cancel,
adult content, hiding,
All Chan list,
All HD list,
All Sub list,
antenna, connecting,
aspect ratio,
audio and video, connecting,
audio, connecting,
Auto Tune timer,
AUX mode,
bars on top and bottom of screen,
batteries, remote control,
browse banner,
Call Display
history,
on your TV,
Check Switch,
closed captioning,
component video cables,
contact information,
Daily Schedule
descriptive video service,
device codes, remote control setup
finding,
scanning, 25
tables, 24,
diagnostics,
Dolby Digital sound,
Dolby Digital/PCM,
end time, extending,
enhanced – full guide with video,
enhanced – partial guide with video,
event ID,
extended – full guide with video,
extended – partial guide with video,
40, 74
16
16
8
21
50
42, 58, 66
42, 58, 66
42, 58, 66
16
16
13
21, 31, 33, 66
23–28
30
53
8, 52
16, 67
55
75
(see also timers), 21, 39
26
68–73
67
56
56
64
11
15
12
54
57
57
16
56
57
external hard drive
18
42
42
49
43
56
60
19
44
56
57
62
47
20
23
48
13
18
58
29, 57
60
60, 61
16
46
46
50, 74
11
49
57
8, 17
75
40
61
74–75
54
51
47
connecting,
removing,
specifications,
factory defaults,
favourites lists
default,
editing,
naming,
selecting,
find
(see search)
forwarding a program,
frame by frame, advancing and reversing,
Frequently Asked Questions (FAQs),
full guide with video – standard, enhanced, extended,
HD format settings,
HDMI connection, cable,
home phone, connecting,
hours of SD and HD recording,
language for descriptive video, changing,
limited mode,
line mode,
linear PCM,
live TV
pausing,
recording,
locks/locking
by channel,
by ratings,
changing password,
creating password,
locking or unlocking front panel,
locking and unlocking your receiver,
parental controls,
Pay Per View channels,
menu(s)
navigating,
21
list of,
onscreen channel order,
onscreen guide,
optical cable,
partial guide with video – standard, enhanced,
extended,
pausing live TV,
Pay Per View (PPV ), 40
locking,
ordering by phone or online,
57
81
Page 82

Index
ordering with remote,
reviewing purchases,
PCM Only,
Personal Video Recorder (PVR),
phone jack/splitter,
PIN,
Point Dish menu,
program, find by theme,
programs, blocking, 45,
PVR functionality,
RCA cables,
receiver(s)
additional,
controlling, 27
enabling inactivity standby,
front and back views,
resetting,
scheduling updates,
reception
solar interference,
weather interference,
record entire event,
recording
live TV,
options,
programs, while watching recorded content,
using timers,
recurring timer, creating,
reminder timer,
remote control,
controlling an A/V receiver,
controlling other devices,
controlling volume of other devices,
modes,
setup,
reset receiver to factory defaults,
reversing a program,
RF mode,
S-Video cable,
safety instructions,
safety tips,
satellite signal, 8,
screensaver,
search
by title or info, 31
history, 32
56
40, 66, 74
67
62
64
23
23–26, 68–73
56
7
11, 13
74
64
33
14, 15
12
8
40
41
74
16, 67
32
74
60– 64, 74
9, 10
58
8
8
64
60, 61
6
65
64
60–64
59
27
23
28
58
20
33
61
35
65
64
34
64
65–66
33
(see HD format settings)
12
39
63
60, 61
57
57
38, 39
signal, satellite, 8,
skip back & skip forward in a program,
slow motion,
standard – full guide with video,
standard – partial guide with video,
stop recording manually,
surf zones,
text fields,
theme(s),
timer(s)
automatic,
deleting,
editing,
frequency, 33
list,
manual,
options,
priorities,
settings,
special considerations,
sporting events,
Vu! Pass,
when connected to an external hard drive,
troubleshooting,
types of timers,
62
VCR timer,
vertical compression
video, connecting,
Vu! Pass timer,
watching a recording,
37
22
32
37
39
36
34
37
39
33
82
Page 83

the future is friendly
®
*Ca ll Displa y require s a subscr iption a nd is not available in all area s. †Sub ject to an d limite d by copy right la ws, digi tal righ ts manage ment res trict ions and f ormat ting req uiremen ts. Chan nel lineu p and
packag es are sub ject to ch ange. Dolb y is a regi stered trademar k of Dolb y Labora tories . Vu! is a trade-mark of Bell Canada. TELUS, TELUS TV, TELUS Satellite TV, the TELUS logo and the future is friendly are
trademarks of TELUS Corporation, used under licence. © 2012 TELUS. 01/12
 Loading...