

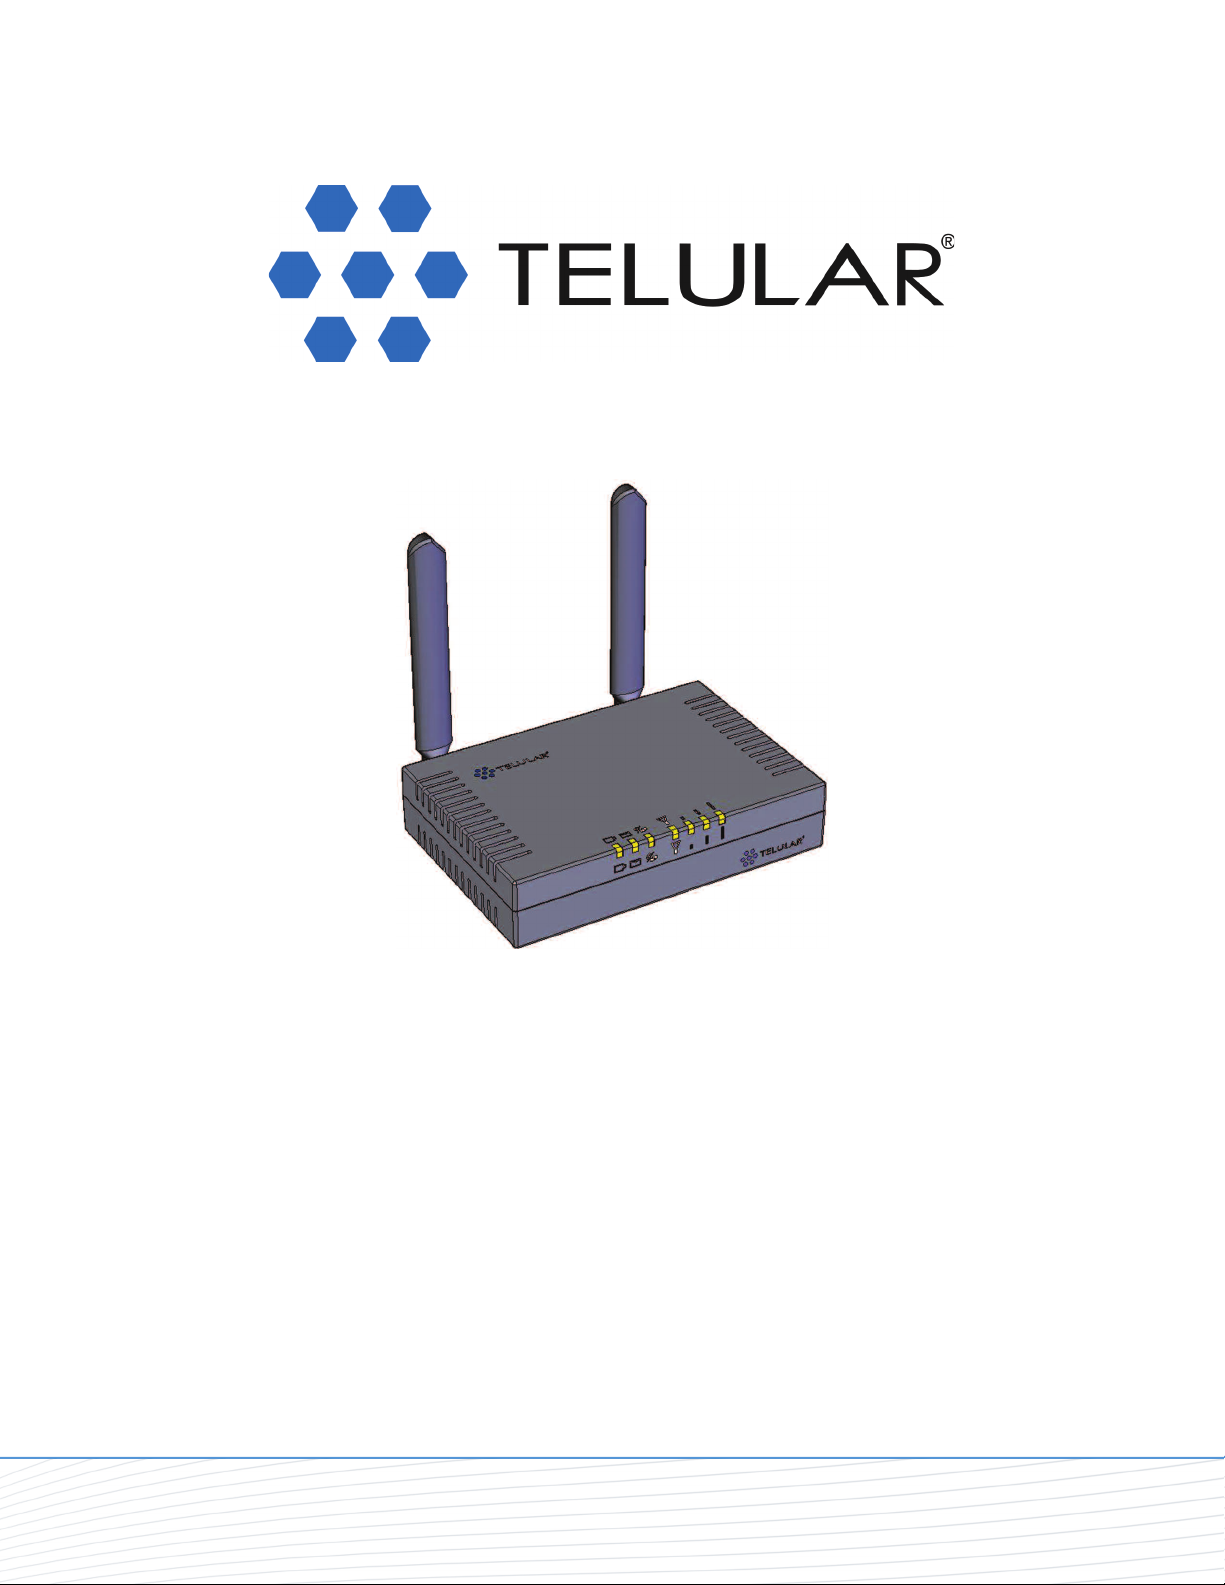
Telular SX7M User Manual
Wi PATH
TM
SX7T Terminal and SX7M Modem
User Guide
GSM/HSDPA
07/13/07 Part Number 56038501

Contents
Table of Contents
Introduction . . . . . . . . . . . . . . . . . . . . . . . . . . . . . . . . . . . . . . . . . . . . . . . . . . . . . . . .1
Getting Started With the Wi PATH SX7 . . . . . . . . . . . . . . . . . . . . . . . . . . . . . . . . . . .1
Your Wi PATH SX7 Components . . . . . . . . . . . . . . . . . . . . . . . . . . . . . . . . . . . . . . . . . . . . . .1
Set Up Your SX7 . . . . . . . . . . . . . . . . . . . . . . . . . . . . . . . . . . . . . . . . . . . . . . . . . . . . . . . . . .2
Connect the SX7 to Your Computer . . . . . . . . . . . . . . . . . . . . . . . . . . . . . . . . . . . . . . . . . . .5
Power Up the SX7 . . . . . . . . . . . . . . . . . . . . . . . . . . . . . . . . . . . . . . . . . . . . . . . . . . . . . . . . .5
Using the Telular Device Manager . . . . . . . . . . . . . . . . . . . . . . . . . . . . . . . . . . . . . .6
Setting Up Your Wireless WAN Data Connection . . . . . . . . . . . . . . . . . . . . . . . . . . .8
Status LEDs . . . . . . . . . . . . . . . . . . . . . . . . . . . . . . . . . . . . . . . . . . . . . . . . . . . . . . .11
Using the USB Connection Option . . . . . . . . . . . . . . . . . . . . . . . . . . . . . . . . . . . . .12
Install the USB Drivers . . . . . . . . . . . . . . . . . . . . . . . . . . . . . . . . . . . . . . . . . . . . . . . . . . . .12
Connect the SX7 to Your Computer With a USB Cable . . . . . . . . . . . . . . . . . . . . . . . . . . .13
Set Up a Dial-Up Networking (DUN) Connection . . . . . . . . . . . . . . . . . . . . . . . . . . . . . . . .13
Using the Voice and Fax Options (SX7T Only) . . . . . . . . . . . . . . . . . . . . . . . . . . .16
Using the Voice Calling Features on Your SX7T . . . . . . . . . . . . . . . . . . . . . . . . . . . . . . . . .16
Using the Fax Function on Your SX7T . . . . . . . . . . . . . . . . . . . . . . . . . . . . . . . . . . . . . . . .17
Voice/Fax Programming . . . . . . . . . . . . . . . . . . . . . . . . . . . . . . . . . . . . . . . . . . . . . . . . . . .19
Advanced Data Connection Options . . . . . . . . . . . . . . . . . . . . . . . . . . . . . . . . . . .22
Setup Options . . . . . . . . . . . . . . . . . . . . . . . . . . . . . . . . . . . . . . . . . . . . . . . . . . . . . . . . . . .22
Network Options . . . . . . . . . . . . . . . . . . . . . . . . . . . . . . . . . . . . . . . . . . . . . . . . . . . . . . . . .27
Administration Options . . . . . . . . . . . . . . . . . . . . . . . . . . . . . . . . . . . . . . . . . . . . . . . . . . . .31
Status Options . . . . . . . . . . . . . . . . . . . . . . . . . . . . . . . . . . . . . . . . . . . . . . . . . . . . . . . . . .33
PSTN Options . . . . . . . . . . . . . . . . . . . . . . . . . . . . . . . . . . . . . . . . . . . . . . . . . . . . . . . . . . .36
Advanced Settings . . . . . . . . . . . . . . . . . . . . . . . . . . . . . . . . . . . . . . . . . . . . . . . . . .38
Configuring TCP/IP Settings . . . . . . . . . . . . . . . . . . . . . . . . . . . . . . . . . . . . . . . . . . . . . . . .38
Glossary . . . . . . . . . . . . . . . . . . . . . . . . . . . . . . . . . . . . . . . . . . . . . . . . . . . . . . . . . .39
SX7 Connections: An Overview . . . . . . . . . . . . . . . . . . . . . . . . . . . . . . . . . . . . . . .40
Wi PATHTMSX7 User Guide
Wi PATH SX7
Power Line Cord
Power Supply Adapter
TNC Antennas
TM
Rechargeable
Battery Pack
Getting Started
Introduction
M
Thank you for choosing the Wi PATH
The SX7T Voice/Fax/Data Terminal and the SX7M Modem each provide high-speed wireless
WAN connectivity, taking advantage of your current GSM wireless services to deliver the best
performance available, including HSDPA, UMTS, EDGE, and GPRS service.
The SX7 adapts to changing locations and service availability and always uses the best
possible data connections available through your wireless service provider.
In addition to providing a reliable data connection, the SX7T HSDPA terminal version offers
voice and fax options that you can use simultaneously with your wireless data services
(network dependent; UMTS only).
T
SX7 as your wireless data connection solution.
Getting Started With the Wi PATH
TM
SX7
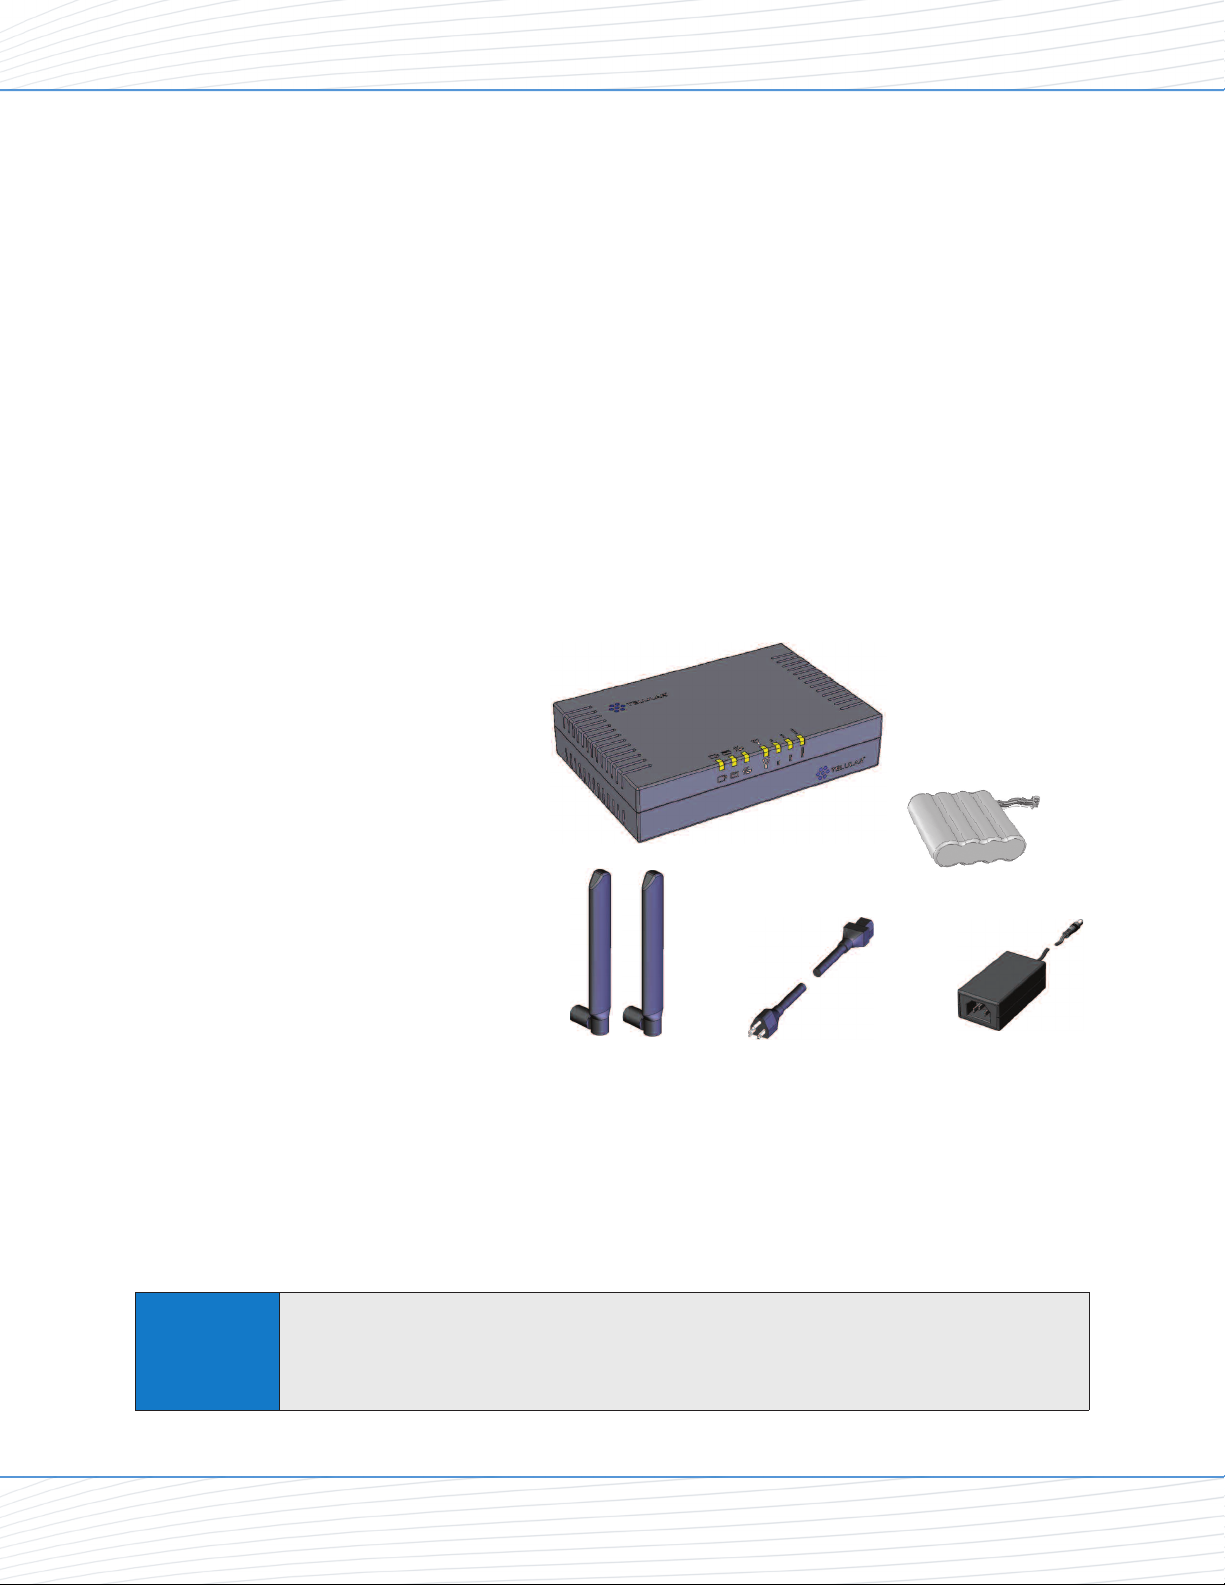
Your Wi PATH SX7 Components
Here’s what’s included with your Wi PATHTMSX7 purchase:
Wi PATH
2 TNC Antennas
Power Supply Adapter
Power Line Cord
Rechargeable
Battery Pack
Ethernet Cable (RJ-45)
(not pictured)
USB Cable (A to B)
(not pictured)
RJ-11 Phone Cable
(not pictured)
Quick Start Guide
(not pictured)
TM
SX7
Wi PATHTMSX7 1 User Guide
CD (contains User Guide and support materials)
(not pictured)
Make sure you have everything listed before continuing. If any items are missing or damaged,
please contact your authorized distributor for assistance.
SIM Card – Youwill also need to purchaseand installa SIM (Subscriber Identity Module)
IMPORTANT
cardto enable yourdevice to connect to yourwireless serviceprovider’s network.
Depending on how you will be using the SX7, you willneed to activate voice and data
services (SX7Tonly) or data services only on the SIM card.

Set Up Your SX7
Battery Terminal
Battery
Compartment
(open)
Rechargeable
Battery Pack
Battery
Connector
SIM Card
(installed)
1. Install the SIM Card into the SIM card holder in the battery compartment.
If applicable, remove the SIM Card from the larger plastic card holding it.
Remove the battery compartment door from your SX7 unit.
Carefully slide the SIM Card into the SIM card holder inside the battery compartment.
It will slide lengthwise as shown below, with the gold contact surface facing into the SX7
and the corner notch matching the plastic SIM holder outline.
Getting Started
Note
Do not touch the gold-colored areas of your SIM Card.
Wi PATHTMSX7 2 User Guide
2. Install the Rechargeable Battery Pack into the battery compartment.
With the battery compartment door open, insert the battery connector into the battery
terminal.
Tip
Arrange the battery pack in the battery compartment, so the battery connector wire is in
The battery connector will havethe rounded cornerside on the left when inserted into the
battery terminal.
the top right of the compartment.
Replace the battery compartment door.

Power
Input
Power Supply Adapter
Power Line Cord
(to power outlet)
TNC Antennas
Getting Started
3. Connect and hand-tighten the TNC Antennas. Once they are installed, orient the antennas
so they point upward (vertical orientation). This is the typical desktop application.
As marked on the backof the unit, the Antenna 1 terminalprimarily handlesvoice and data
Note
services.The Antenna 2 terminalprovides radio diversity foroptimized data speeds, as wellas
GPS functionalityforE911 and potential future location-based applications. EitherTNCAntenna
may be used in either terminal.
4. Connect the Power Supply Adapter to the unit’s Power Input and connect the Power
Line Cord to the Power Supply Adapter. Then, connect the Power Supply Adapter plug
into a power outlet.
E911(Enhanced 911)Information– Your unitis equipped with a GPS (Global Positioning
System) antenna forutilizing E911emergency location services where available.When
youplacean emergency 911 call fromyourdevice (SX7Tonly),the GPS feature will
IMPORTANT
calculate and transmit your approximatelocation.
Always report your location to the 911 operator when placingan emergency call.
Somedesignated emergency call takers, knownas Public Safety Answering Points
(PSAPs) maynot be equippedto receive GPS location informationfrom your SX7T.
Wi PATHTMSX7 3 User Guide
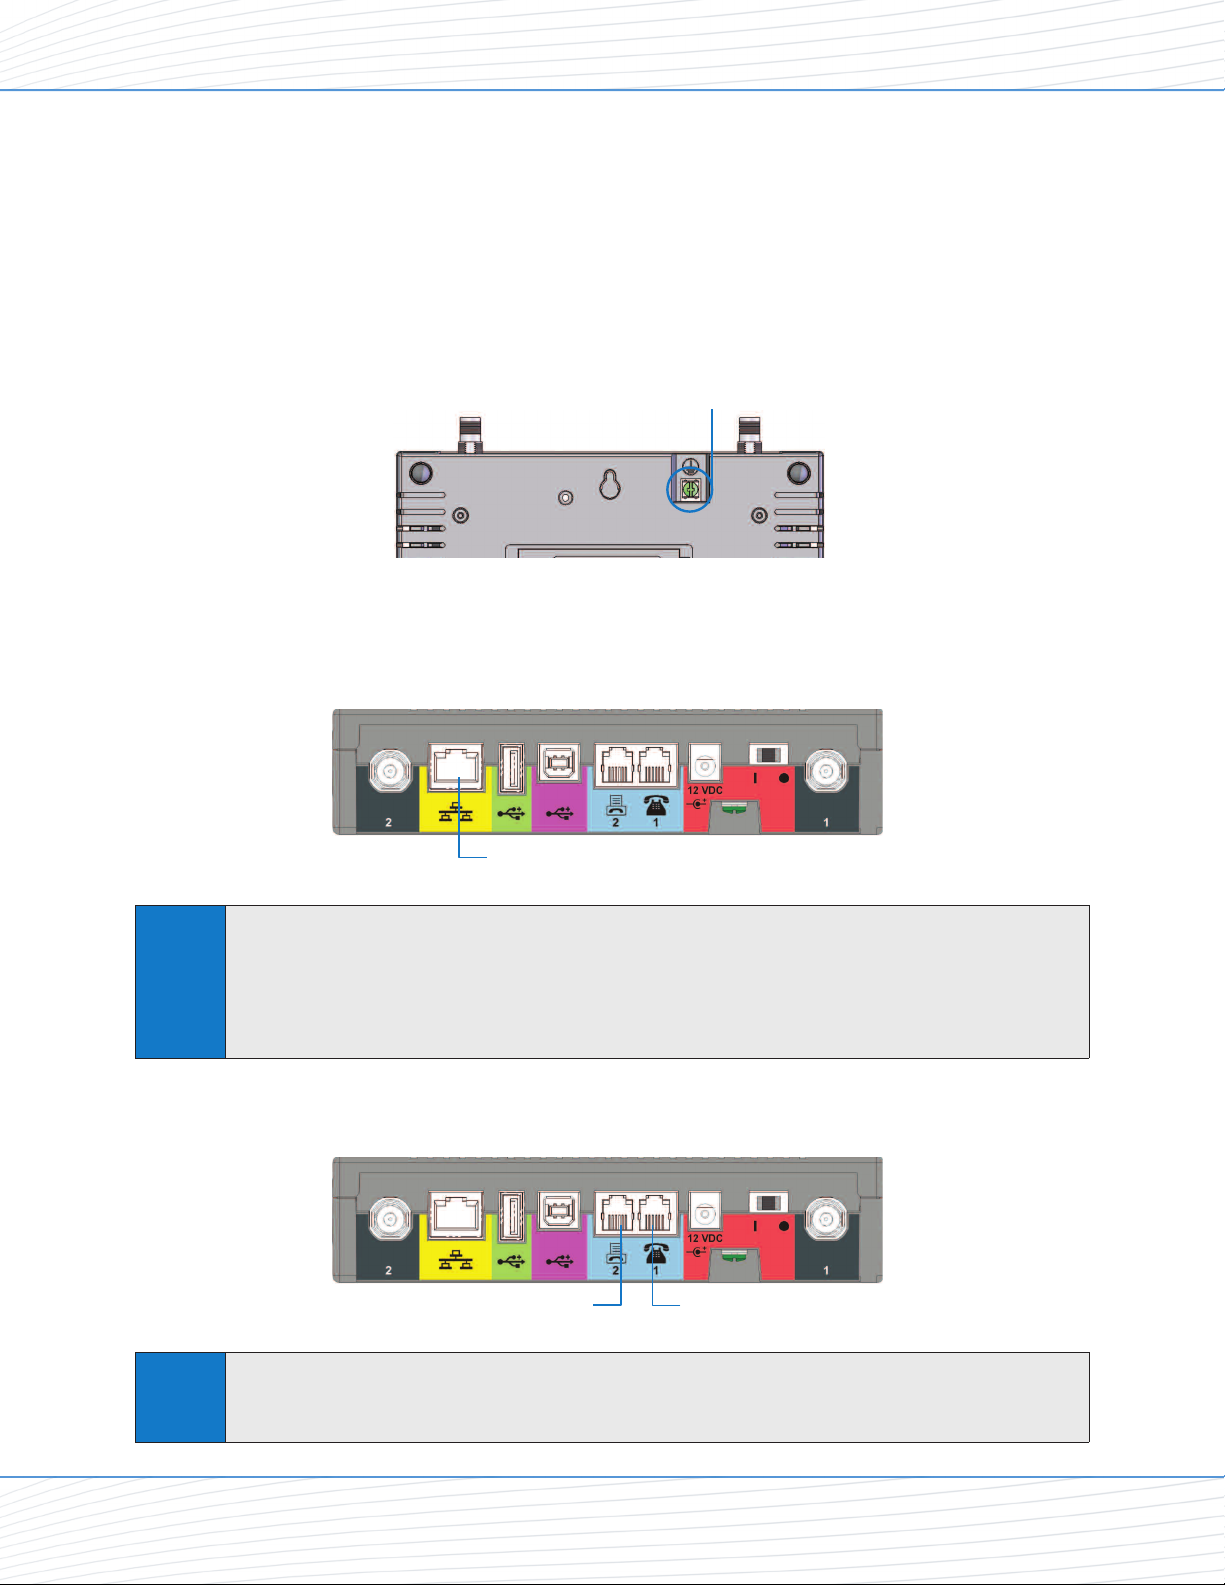
Ground Connector Screw
Phone (J1)
Phone/Fax (J2)
Ethernet Port
Getting Started
5. (Optional) For optimal performance and protection, you may elect to connect a copper wire
(not included) to the protective earth Ground Connector Screw to ground the device.
In a building environment, connecting to an earth ground (such as a cold water pipe)
can protect the device and peripherals from static and conducted electricity. It can also
reduce static or buzzing during voice calls (SX7T only).
In a vehicle environment, grounding to the frame and battery or alternator can reduce
static or buzzing during voice calls (SX7T only).
6. Connect the Ethernet (RJ-45) cable to the Ethernet Port on the SX7. (This cable will
serve as the connection to your computer in most configurations, including the primary
Wireless WAN data connection.)
It is recommended that you use the Ethernet connection foryourprimaryWirelessWAN data
connection;however, youmay also use Dial-UpNetworking (DUN) using the supplied USB cable
“Using the USB Connection Option” on page12).Before connecting with a USB, install
Note
(see
the SX7 USB driversincluded on the CD that waspackaged withyourdevice (see
USB Drivers”
on page 12).
“Install the
7. Depending on your usage needs, connect RJ-11 phone cables to the Phone (J1) and
Phone/Fax (J2) ports (SX7T only).
The Phone (J1) and Phone/Fax (J2)RJ-11 ports are onlyavailable on the SX7Tterminalmodel.
“Using theVoice and Fax Options (SX7TOnly)” on page 16 for information about setting
Note
See
up your RJ-11 Phoneand Phone/Fax jacks.
Wi PATHTMSX7 4 User Guide
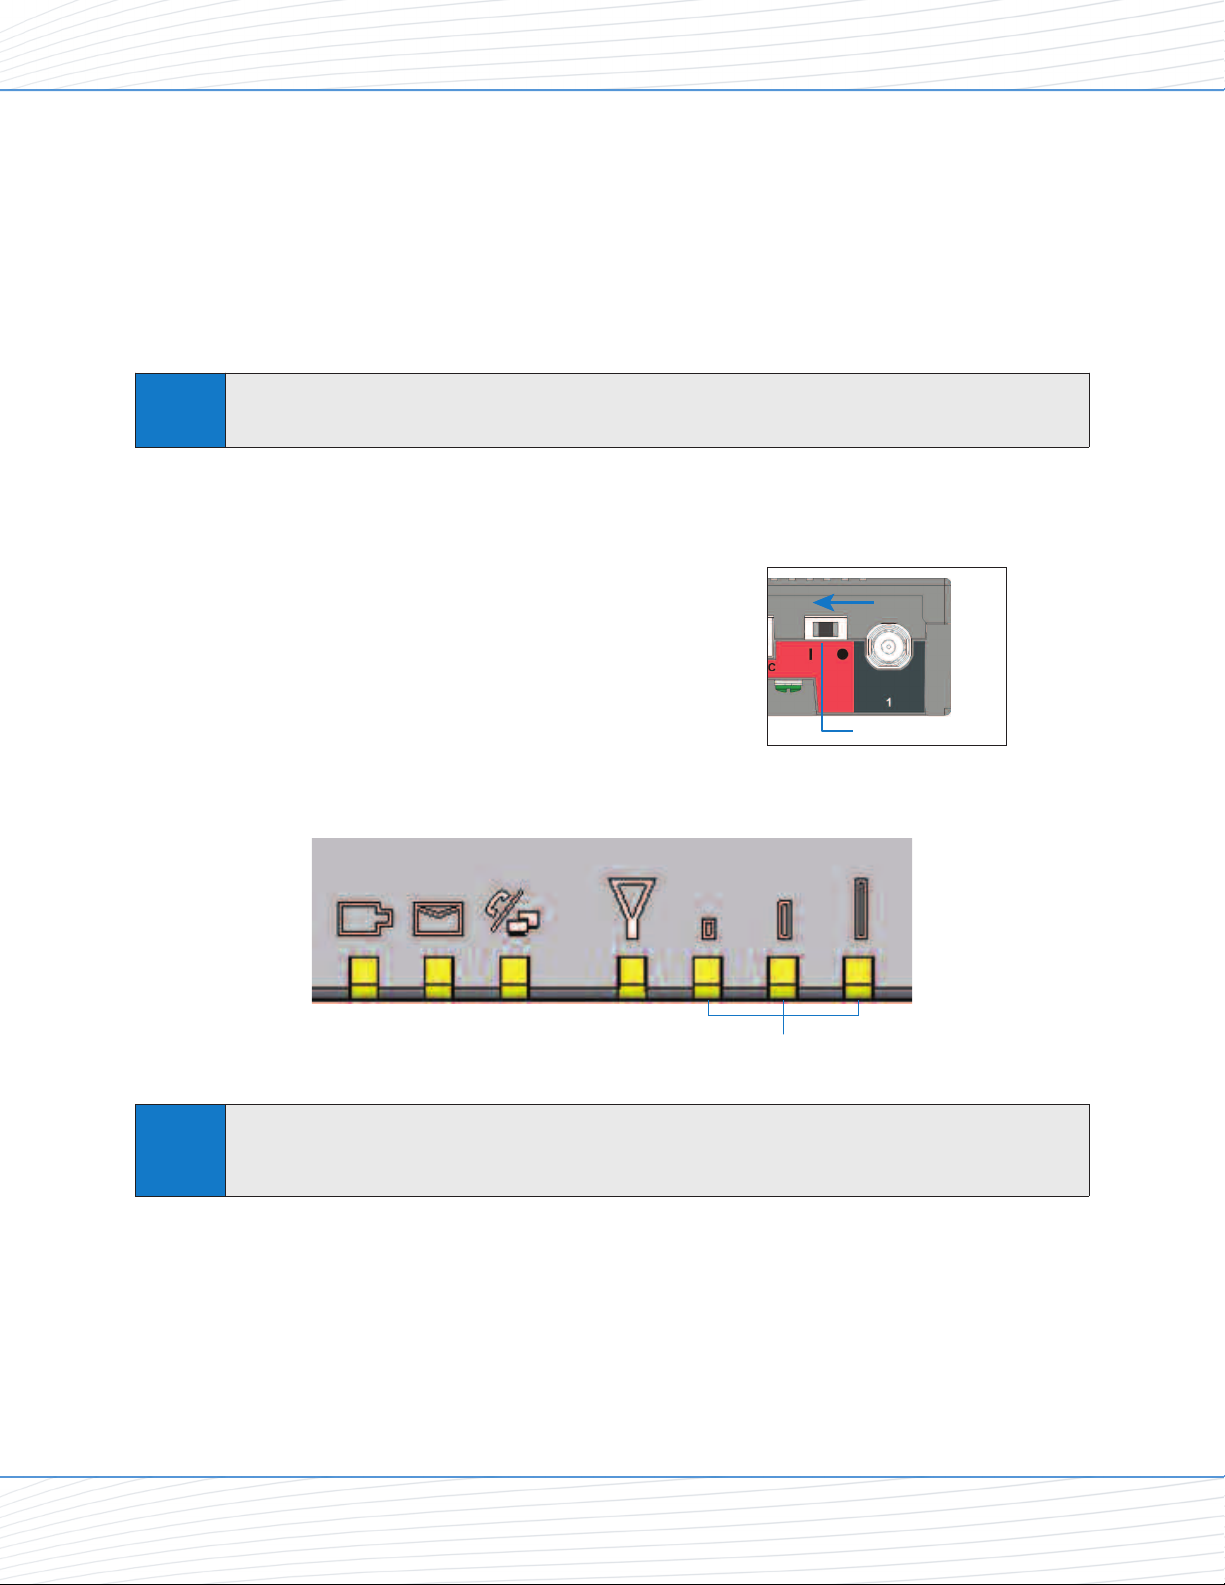
Signal Strength LEDs
Power Switch
Getting Started
Connect the SX7 to Your Computer
Before you connect your computer, ensure you do not have an existing landline data
connection and that you have either Internet Explorer or FireFox Web browser installed on
your computer.
Connect the Ethernet (RJ-45) cable from the SX7 to an available Ethernet port on your
computer.
Note
It is recommended that you use the Ethernet connection foryourprimaryWirelessWAN data
connection;however, youmay also use Dial-UpNetworking (DUN) using the supplied USB cable.
Power Up the SX7
1. With the Ethernet cable connected to both
your computer and the SX7, ensure that your
SX7 is off, and power up your computer.
2. Slide the Power Switch from right to left to
power up your SX7.
3. Wait a few minutes for the SX7 to initialize.
Once the signal strength LEDs are illuminated,
you are ready to proceed.
If your computeris configured with a preset IP address, youmay need to adjust your network
Note
settings to automaticallyretrieve an IP adddress from the SX7.See
Settings”
on page 38.
“ConfiguringTCP/IP
Wi PATHTMSX7 5 User Guide
Telular Device Manager Overview
Using the Telular Device Manager
The Telular Device Manager will allow you to configure all your connections, view your status,
and manage all your connection options in one place.
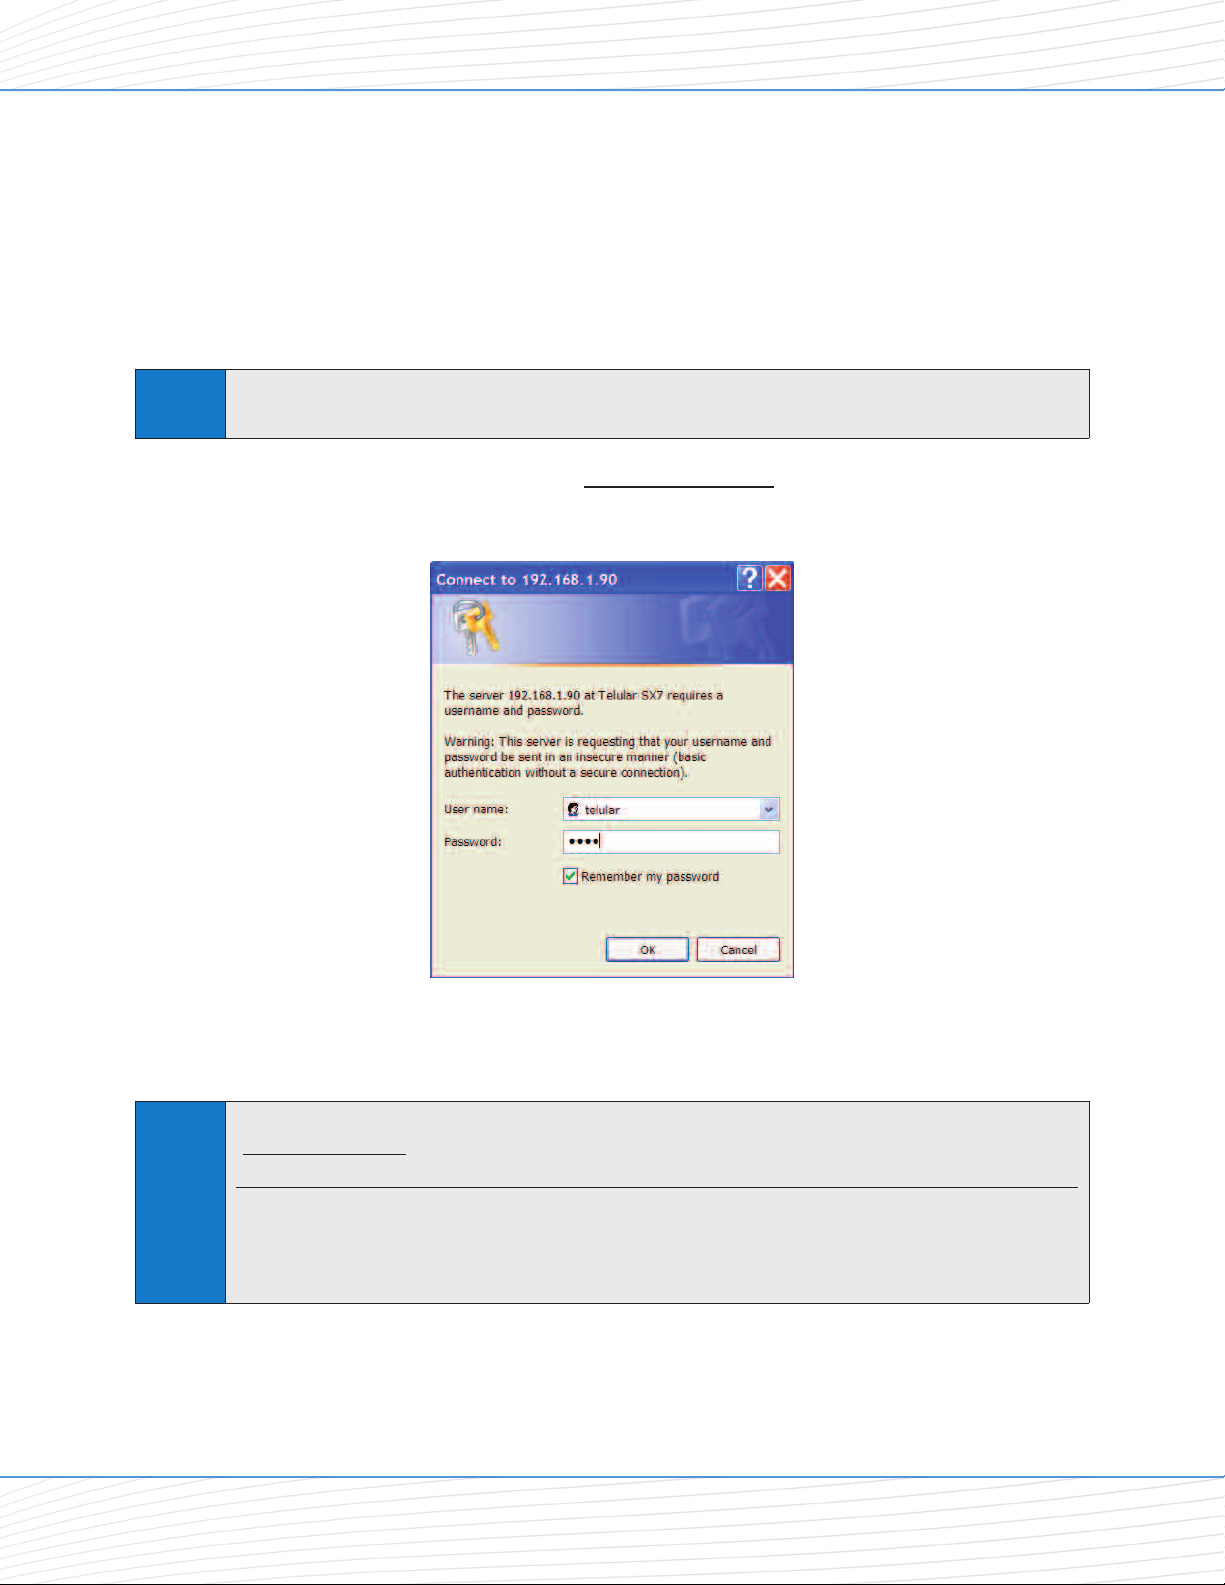
1. Connect to the Telular Device Manager.
Launch your Web browser (Internet Explorer or FireFox).
Note
Go to the browser’s address bar, type http://192.168.1.90, and press Enter or click the
Whenyou launchthe browser, you mayget a “Cannotdisplay web page” or similarerror.
Thisis normal.
green Go arrow. A “Connect to” dialogue will be displayed.
Enter the default User name (“telular”) and Password (“1234”) and click OK.
The Telular Device Manager will start and display the Home screen.
It is recommended that you bookmarktheTelularDevice Manager accesspage
http://192.168.1.90) so youcan easily reconnect yourdata service,accessyourstatus,
(
and customize additionalfeatures suchas Firewall and Port Forwarding.
Tip
Whenaddingor changing settings in the
change a setting, and thenmoveon to the nextitem you wantto change.When youhave
finishedmaking all your changes, click
down and restart,and all your new settingswill be in effect.
TelularDevice Manager, clickSavewheneveryou
Save again and then click Restart.TheSX7 willpower
Wi PATHTMSX7 6 User Guide

11
22
11
22
Telular Device Manager Overview
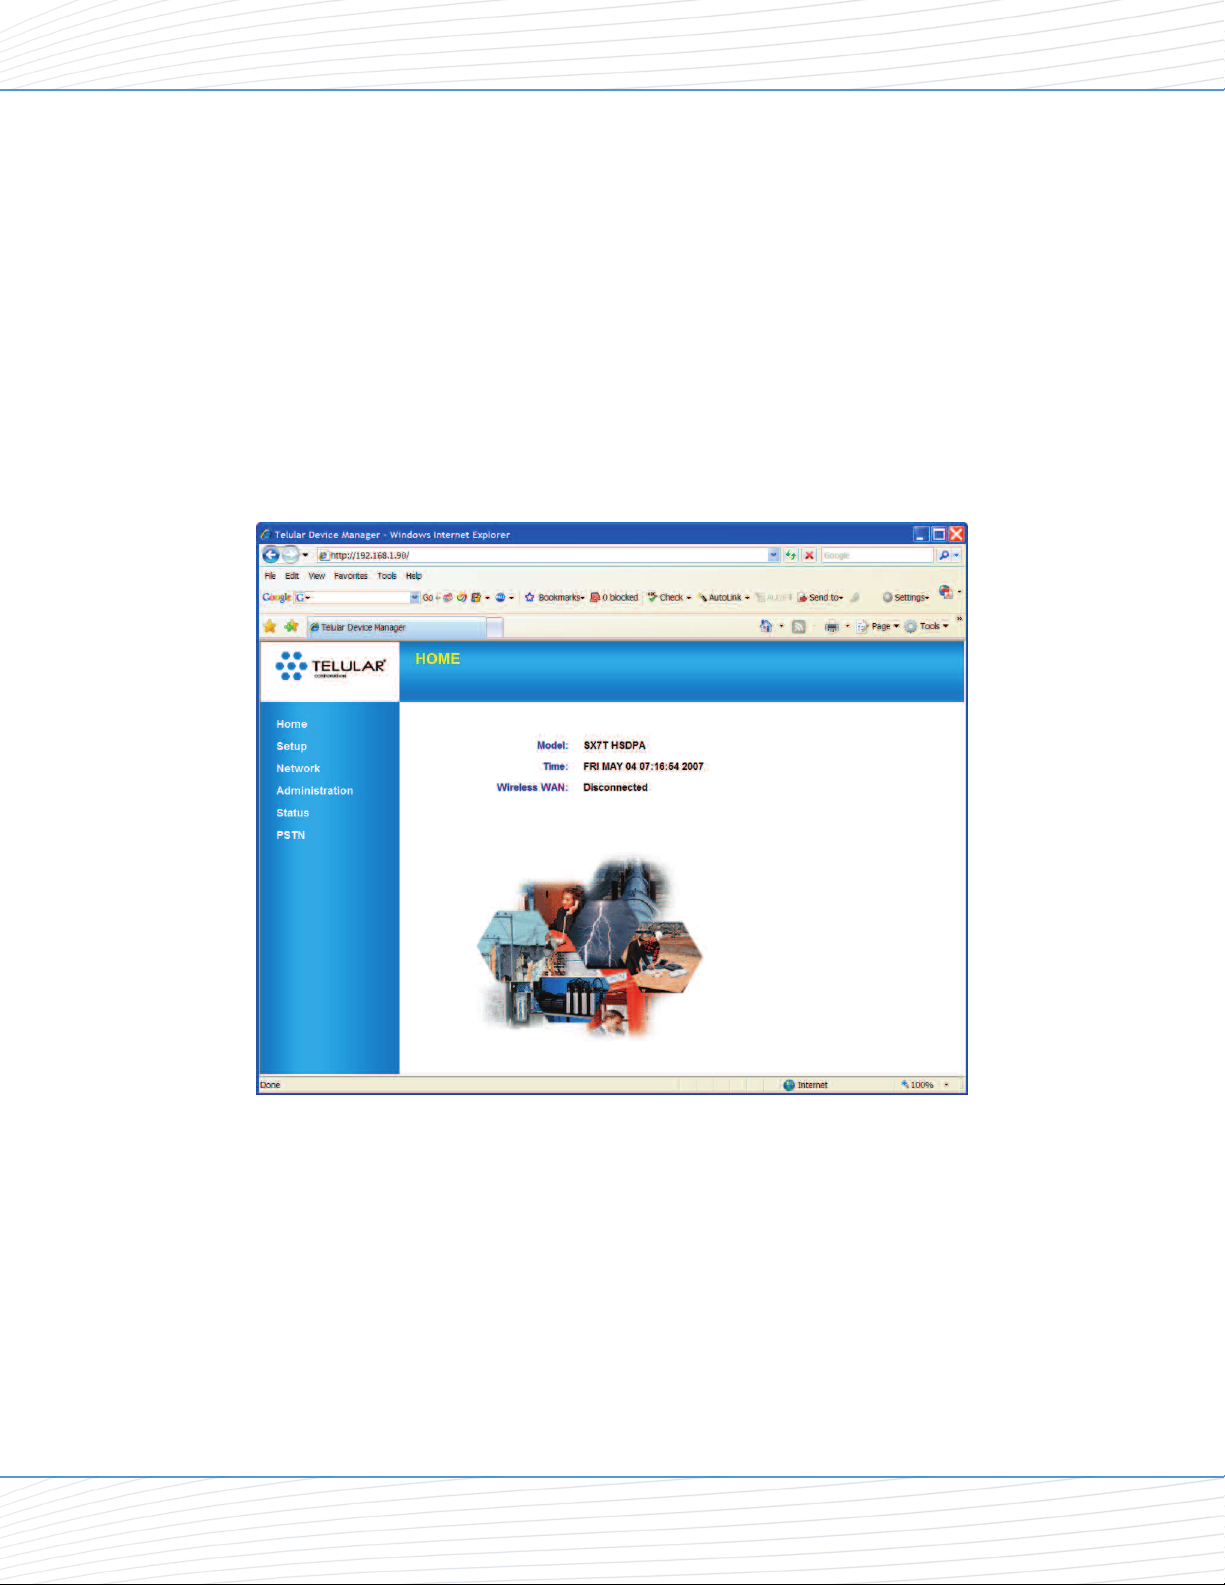
2. On the Home screen (see below), you will see the unit’s Model number, the Time, and
your Wireless WAN connection status.
3. Click an item in the column on the left (1) to display a Main Menu subject screen
(such as Setup, below). From a main menu screen, click a Sub Menu item in the
tabs at the top (2) to display the corresponding settings menu.
4. After selecting or adjusting your desired settings and clicking Save (1), you will need to
click Restart (2). The unit will power cycle and your new settings will be in effect.
Wi PATHTMSX7 7 User Guide
Data Connection: The Basics
Setting Up Your Wireless WAN Data Connection
Once the computer and the SX7 are connected and powered up, you will need to set up your
Wireless WAN data connection. The Wireless WAN connection is the primary data service
connection for your SX7.
1. Connect to the Telular Device Manager. (See “Using the Telular Device Manager” on
page 6.)
2. On the Home screen (see below), you will see the unit’s Model number, the Time, and
your Wireless WAN connection status.
Wi PATHTMSX7 8 User Guide
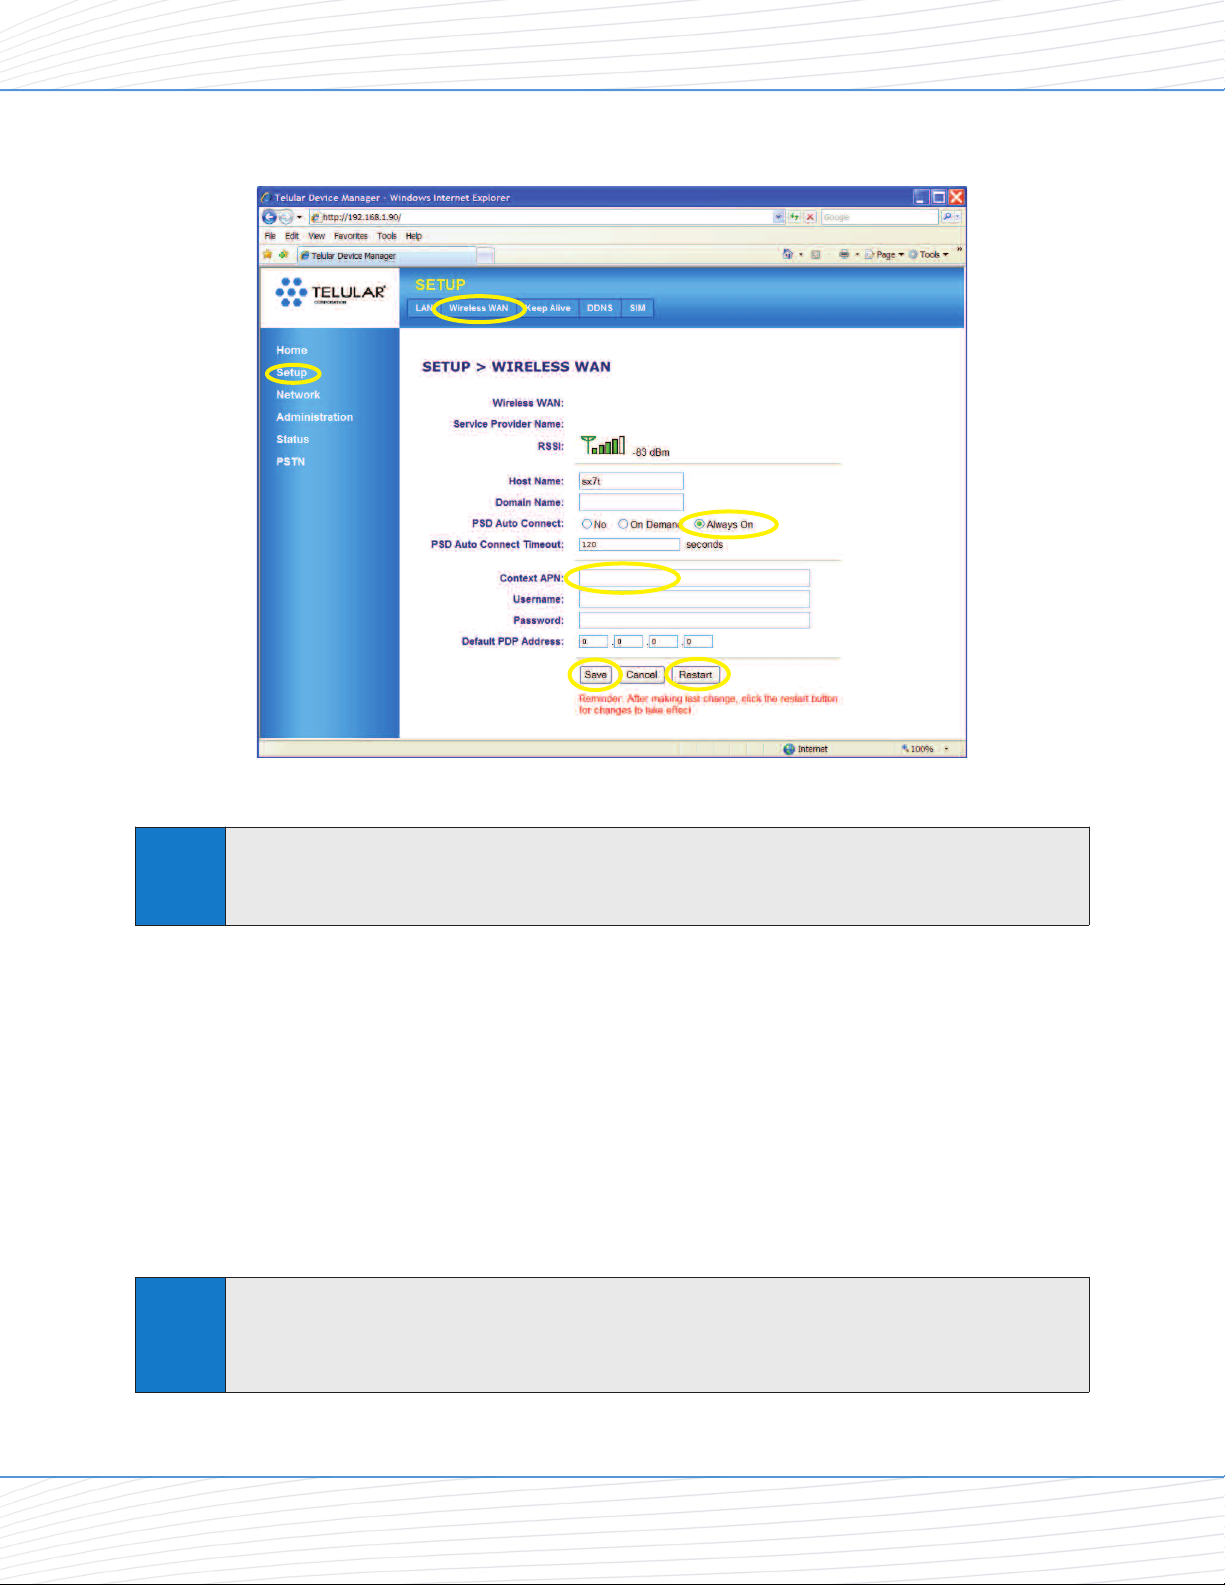
3. From the Home screen, click Setup (1) > Wireless WAN (2).
C
onnected
A
BC Wireless
isp.abcwireless
11
22
33
44
55
66
4a
4b
Data Connection: The Basics
4. For PSD Auto Connect, click Always On (3).
If you do not havean unlimited data plan with your wireless service provider,you may want to
On Demand insteadof Always On.On Demand connects to the network automatically
Tip
select
anytime you are using dataservices, but disconnects whenever no data is being transferred.
5. For Context APN (4), make sure the ISP (Internet Service Provider) name matches your
wireless service provider. For example, if ABC Wireless is your service provider, type
“isp.abcwireless.” (Please contact your wireless service provider for APN information.)
6. If required by your wireless service provider, enter your Username (4a) and Password (4b)
in the appropriate fields.
7. Click Save (5).
8. You will be prompted to restart the unit. You can continue adjusting additional settings and
clicking Save to update your configuration. When you have finished making all your
changes, click Restart (6) from the current screen.
If you are connecting through a USB Dial-Up Networking (DUN) connection(see “Using the
Note
USB Connection Option”
dial-up window will appear when yourestartthe SX7.Re-enter your information (if it is not
automatically populated) and click
on page 12), your dial-upconnection will be terminated and the
Connect.
Wi PATHTMSX7 9 User Guide

ABC Wireless
33
11
22
Data Connection: The Basics
9. To confirm your data connection, click Status (1). The Status > Router page will
auto-refresh every few seconds. Your WAN address from your wireless service provider
will be displayed next to WAN IP Address (3).
If the CurrentWAN Connection Status (2) indicates Not Connected or UnknownConnection
Note
Problem
experiencing connection problems, please contactTelular Tech Support or your wireless service
, go back throughthe previous stepsto verify your information.If you are still
provider’s customer service center if you purchased your SX7 through yourcarrier.
Tip
Onlythe Status page auto-refresheswhen viewing theTelular Device Manager. From any other
page, right-clickyour mouse and select
Refresh or Reload to refresh the current page.
10. Close the browser window, reopen it, and go to a website (such as
verify Internet connectivity.
Anytime you wantto verify yourconnection status,go to theTelularDevice Manager
http://192.168.1.90) and sign on.Yourstatuswill appear on both the Home screen (nextto
Tip
Note
(
“WirelessWAN”) and the Status page.
Foradditional data connectionoptions, settings,and features, see “AdvancedData Connection
Options”
on page 22.
www.telular.com) to
Wi PATHTMSX7 10 User Guide
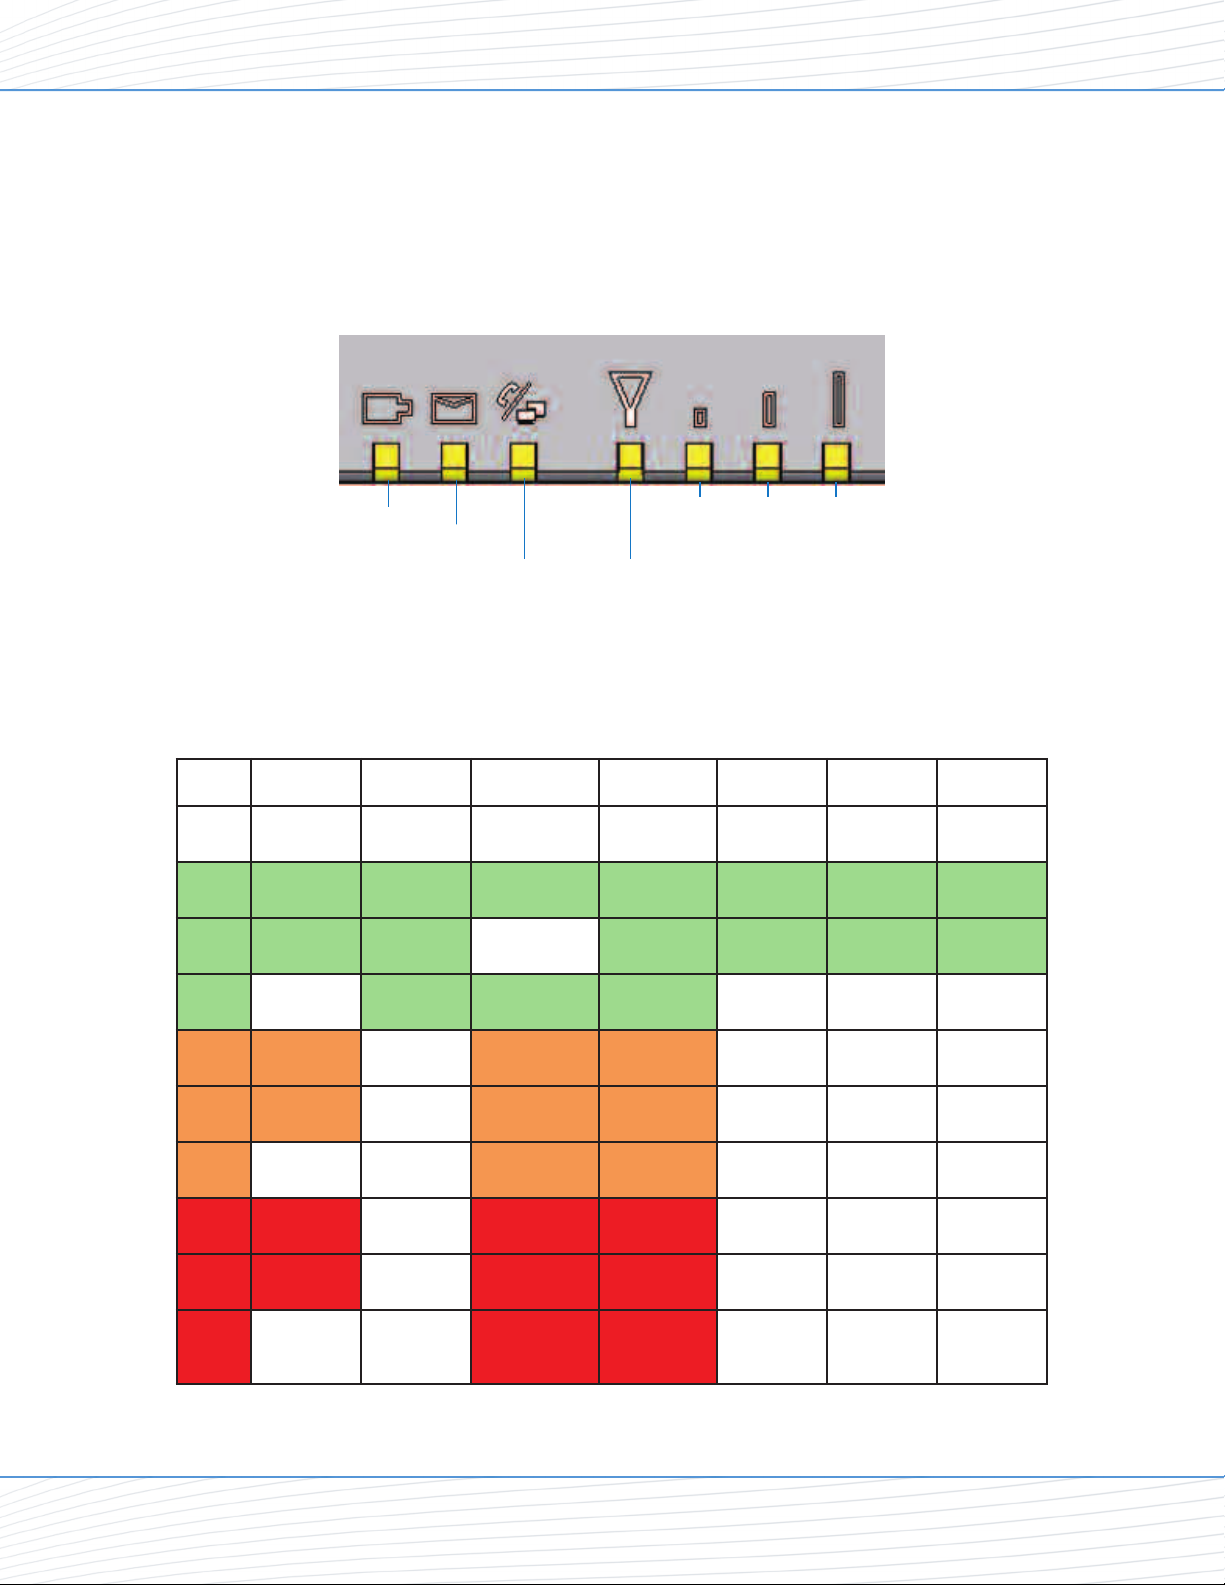
WiPATH SX7T LED Indicators
Power
Messaging
Phone/Fax/Data Service/SIM
Signal
Strength
1
Signal
Strength
2
Signal
Strength
3
Status Indicators
Status LEDs
In addition to checking your status through the Telular Device Manager on your computer, you
can also use the LED indicators on the unit for a quick check of valuable connection and
coverage information.
The following table explains how the LED colors and blink rates indicate your device’s coverage
and connection status.
LED Reference Table
Off
Solid
Slow
Fast
Solid
Slow
Fast
Power Messaging
No Messages
AC / Batt
Normal
Batt Only SMS Service / 2.5 G 1 Bar 1 Bar 2 Bars
AC / Batt
Charging
Low Batt
Voicemail On-Hook / WAN Service / 2G 1 Bar + GPS 2 Bars 3 Bars
Both
Phone /
Fax
On Hook /
No WAN
On-Hook /
WAN Tx
Off-Hook / WAN Roam / 2G
Off-Hook /
No WAN
Off-Hook /
WAN Tx
Service /
SIM
Service / 3G
Roam / 2.5G
Roam / 3G
Signal
Strength 1
No GPS
Signal
Strength 2
Signal
Strength 3
Solid
Slow
Batt fault Off-Hook / WAN No Service
Batt crit
Off-Hook /
No WAN
PIN Locked
Fast
Wi PATHTMSX7 11 User Guide
Off-Hook /
WAN Tx
SIM Error /
No SIM /
Net Reject
 Loading...