

Telular SX5P CDMA2000 User Manual

05/19/04 Part Number 56029702
P
HONECELL
®
SX5P
CDMA2000 1X
• Fixed Wireless Phone
800/1900 MH
Z CDMA
USER MANUAL
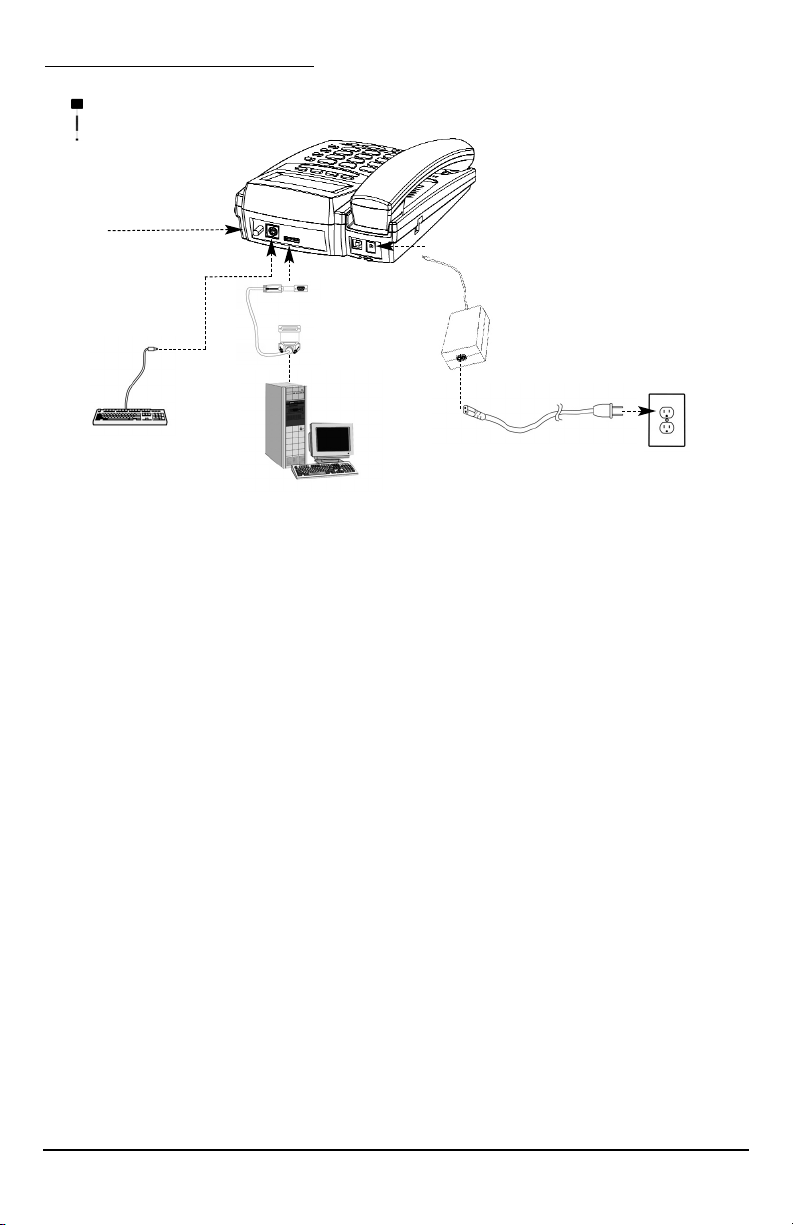
QUICK CONNECTION GUIDE
Phonecell®SX5 CDMA i User Manual
Fixed Wireless Phone
Telular
Serial Cable
or USB Cable
GPS Antenna
(USA Models Only)
Phonecell®SX5 CDMA ii User Manual
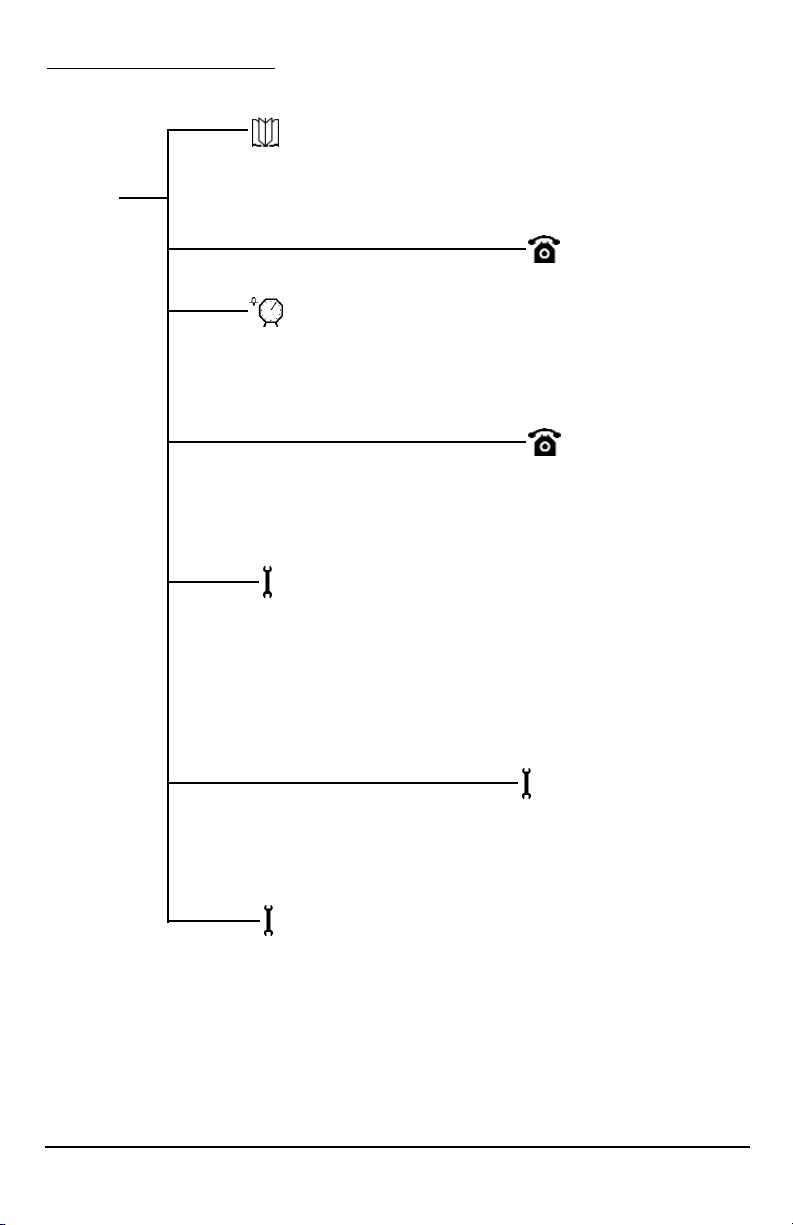
SX5 MENU STRUCTURE
Phonebook
View
Add
Edit
Erase
Time/Alarm
Alarm
Time Format
Date Format
Phone Settings
Banner
My Phone Number
DTMF Length
Key Volume
Auto Send Delay
Freq. Dial Number
Language
Dial Tone Type
LCD Contrast
Call Log
Missed
Outgoing
Incoming
Erase Logs
Call Time
Air Time
Clear Air Time
Menu
Ring/Alert
Ring Type
Ring Tone
Ring Volume
1 Min Alert
Service Alert
Alarm Tone
Data Settings
Data Port Map
Baud Rate
Selftest Cycle
RX Data Mode
TTY
Tech Mode
Security
New Lock Code
Restrict
Voice Privacy
RUIM CHV1 (RUIM Models Only)
Auto Lock
User Defaults
SW Version Info
Before installing your Phonecell®SX5, carefully remove the contents from the shipping carton
and check for evidence of shipping damage. If damage is found, contact your Authorized
Telular Distributor or shipping agent immediately.
SAFE OPERATION INSTRUCTIONS
IMPORTANT! Before installing or operating this product, read the SAFETY INFORMATION
section of this manual.
••
Install unit indoors.
••
Install unit on hard, flat surface for proper ventilation.
••
Do not expose unit to rain or moisture.
••
Do not place unit on or close to sources of heat
IMPORTANT NOTICES
TERMS AND CONDITIONS FOR USE OF PHONECELL®PRODUCTS ("Product")
These Terms and Conditions are a legal contract between you and Telular Corporation for the title to and use of the Product.
BY RETAINING AND USING THE PRODUCT AFTER RECEIPT OF IT, YOU AGREE TO THE TERMS AND CONDITIONS
INCLUDING WARRANTY DISCLAIMERS, LIMITATIONS OF LIABILITY AND INDEMNIFICATION PROVISIONS BELOW. IF
YOU DO NOT AGREE TO THE TERMS AND CONDITIONS, DO NOT USE THE PRODUCT AND IMMEDIATELY RETURN
THE UNUSED PRODUCT FOR ACOMPLETE REFUND. You agree to accept sole responsibility for any misuse of the Product
by you; and, in addition, any negligent or illegal act or omission of your or your agents, contractors, servants, employees, or
other users of the Product so long as the Product was obtained from you, in the use and operation of the Product.
INDEMNIFICATION OF TELULAR CORPORATION ("TELULAR")
YOU SHALL INDEMNIFY, DEFEND AND HOLD HARMLESS TELULAR FOR ANY OF THE COST, INCLUDING REASONABLE ATTORNEYS' FEES, AND FROM CLAIMS ARISING OUT OF YOU, YOUR CLIENTS' OR OTHER THIRD PARTIES'
USE OR OPERATION OF THE PRODUCT: (i) FOR MISUSE OR IN A MANNER NOT CONTEMPLATED BY YOU AND
TELULAR OR INCONSISTENT WITH THE PROVISIONS OF THIS MANUAL; (ii) IN AN ILLEGAL MANNER OR AGAINST
PUBLIC POLICY; (iii) IN A MANNER SPECIFICALLY UNAUTHORIZED IN THIS MANUAL; (iv) IN A MANNER HARMFUL
OR DANGEROUS TO THIRD PARTIES; (v) FROM CLAIMS BY ANYONE RESPECTING PROBLEMS, ERRORS OR MISTAKES OF THE PRODUCT; OR (vi) COMBINATION OF THE PRODUCT WITH MATERIAL, MODIFICATION OF THE
PRODUCT OR USE OF THE PRODUCT IN AN ENVIRONMENT NOT PROVIDED, OR PERMITTED, BY TELULAR IN WRITING. THE PARTIES SHALL GIVE EACH OTHER PROMPT NOTICE OF ANY SUCH COST OR CLAIMS AND COOPERATE, EACH WITH THE OTHER, TO EFFECTUATE THIS INDEMNIFICATION, DEFENSE AND HOLD HARMLESS.
TELULAR CORPORATION
Corporate Headquarters
647 North Lakeview Parkway
Vernon Hills, Illinois 60061, USA
Technical Support
Tel: 847-247-9400 • Fax: 847-247-0021
E-mail: support@telular.com • http://www.telular.com
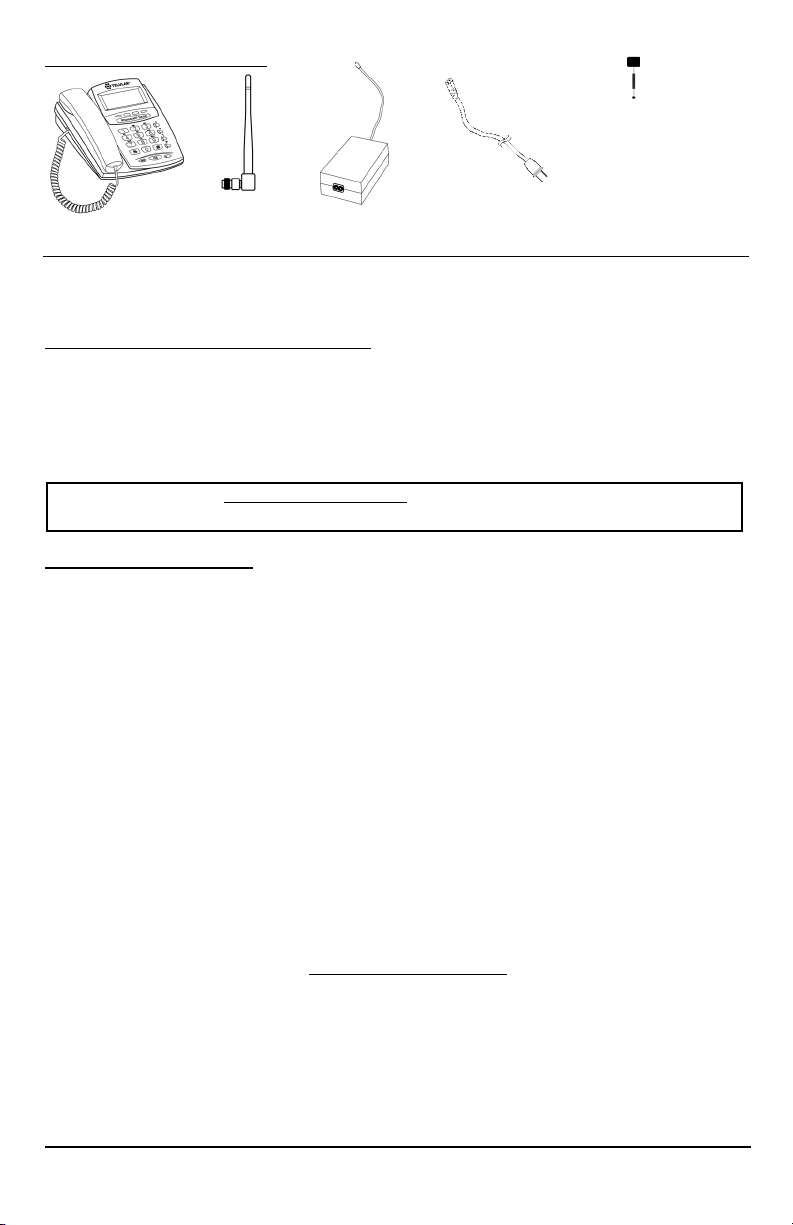
Power Supply
Phonecell®SX5
Desktop Phone
Spike Antenna
PLEASE SEE THE IMPORTANT NOTICES SECTION OF THIS MANUAL FOR
IMPORTANT INFORMATION ON USE, WARRANTY AND INDEMNIFICATION
LIST OF COMPONENTS
AC Power Cord
Part Number 56029702 ©2004 Telular Corporation, All Rights Reserved
Phonecell
®
SX5 CDMA iii User Manual
USA Only: GPS Antenna
and Mounting Plate (Not Shown)

T
ABLE OF CONTENTS
QUICK CONNECTION GUIDE .......................................................................................i
SX5 MENU STRUCTURE ..............................................................................................ii
LIST OF COMPONENTS ..............................................................................................iii
SAFE OPERATION INSTRUCTIONS...........................................................................iii
IMPORTANT NOTICES.................................................................................................iii
TABLE OF CONTENTS ................................................................................................iv
SX5 SETUP....................................................................................................................1
RUIM Card Installation...............................................................................................1
Emergency Batteries .................................................................................................1
Battery Operation.......................................................................................................2
Location and Setup....................................................................................................2
GPS Antenna Mounting (USA Only) ..........................................................................2
Connect the Handset .................................................................................................3
Desk Mounting...........................................................................................................3
Wall Mounting ............................................................................................................4
Connect the SX5 to AC Power ..................................................................................5
RUIM Usage ..............................................................................................................6
GETTING TO KNOW YOUR SX5..................................................................................7
Function Keys ............................................................................................................7
LCD Screen Icons......................................................................................................8
Service Indication ......................................................................................................8
CALL FUNCTIONS ........................................................................................................9
Making Calls ..............................................................................................................9
Receiving Calls ..........................................................................................................9
Ending Calls...............................................................................................................9
In-Call Functions........................................................................................................9
Voice Mail Access ....................................................................................................10
Reading Text (SMS) Messages ..............................................................................10
Sending a Text Message ........................................................................................10
Delete All Text Messages.........................................................................................10
Message Lock ..........................................................................................................11
Message Alert ..........................................................................................................11
PHONE BOOK ............................................................................................................12
Speed Dial by Location............................................................................................12
Searching the Phone Book and Dialing a Phone Book Entry .................................12
Adding an Entry into the Phone Book .....................................................................12
Edit a Phone Book Entry .........................................................................................13
Erase a Phone Book Entry ......................................................................................13
CALL LOGS .................................................................................................................13
View Missed Calls....................................................................................................13
View Outgoing Calls ................................................................................................14
View Incoming Calls ................................................................................................14
Erase All Call Logs ..................................................................................................14
View Last Call Time.................................................................................................14
View Total Air Time ..................................................................................................14
Clear Air Time ..........................................................................................................15
Phonecell®SX5 CDMA iv User Manual

TIME / ALARM ............................................................................................................15
Alarm........................................................................................................................15
Time Format.............................................................................................................15
Date Format.............................................................................................................15
RING / ALERT .............................................................................................................16
Ring Type.................................................................................................................16
Ring Tone.................................................................................................................16
Ring Volume ............................................................................................................16
One Minute Alert......................................................................................................16
Service Alert.............................................................................................................16
Alarm Tone...............................................................................................................17
PHONE SETTINGS......................................................................................................17
Banner .....................................................................................................................17
My Phone # (Display Only)......................................................................................17
DTMF Length...........................................................................................................17
Key Volume..............................................................................................................17
Auto Send Delay......................................................................................................17
Frequently Dialed Number.......................................................................................17
Change Language Displayed on LCD .....................................................................18
Dial Tone Type.........................................................................................................18
LCD Contrast ...........................................................................................................18
DATA SETTINGS .........................................................................................................18
Data Port Type .........................................................................................................18
Baud Rate................................................................................................................19
Self Test Cycle .........................................................................................................19
RX Data Mode .........................................................................................................19
TTY (Text Telephone for the Hearing Impaired) .....................................................19
SECURITY SETTINGS.................................................................................................19
New Lock Code .......................................................................................................19
Restrict Calls............................................................................................................19
Voice Privacy ...........................................................................................................20
RUIM CHV1 (RUIM Models Only) ...........................................................................20
Auto Lock.................................................................................................................20
User Defaults ...........................................................................................................20
SW Version Information ..........................................................................................20
WINDOWS XP/WINDOWS 2000 SETUP ....................................................................21
WINDOWS 98 SETUP .................................................................................................27
SENDING/RECEIVING A PC FAX...............................................................................31
SENDING/RECEIVING 1X DATA.................................................................................32
SENDING/RECEIVING CIRCUIT SWITCHED DATA..................................................33
SX5 TROUBLESHOOTING .........................................................................................34
CONFORMANCE STATEMENTS................................................................................35
SAFETY INFORMATION .............................................................................................36
WARRANTY.................................................................................................................37
Phonecell®SX5 CDMA v User Manual
SX5 SETUP
RUIM Card Installation (RUIM Model Only)
Consult your service provider to determine if your unit is a RUIM model. If so, your SX5 will only
be able to make emergency calls until you install a RUIM card. It will not receive calls or allow
non-emergency outgoing calls. For an explanation of how to configure your RUIM once your SX5
is set up, see RUIM Usage (page 6).
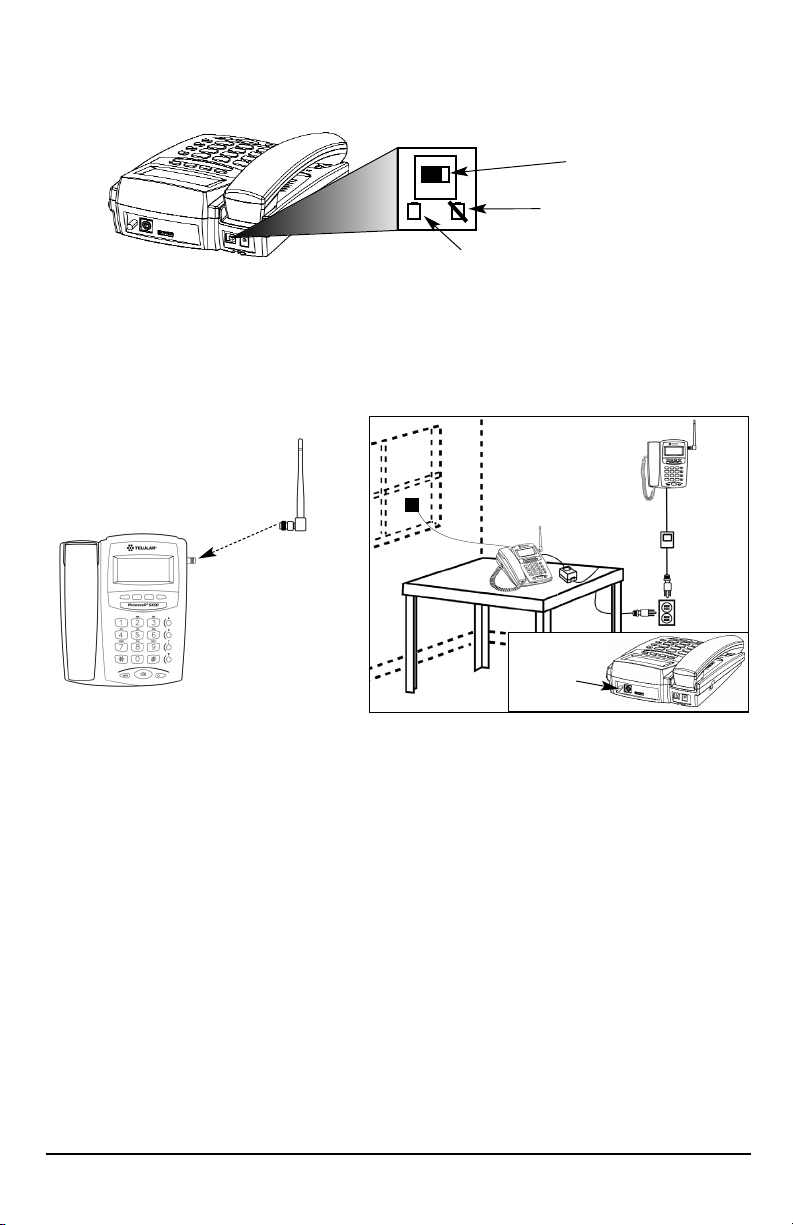
1. Remove the power supply if it has already been connected. The power supply must be
removed whenever a RUIM Card is removed or installed.
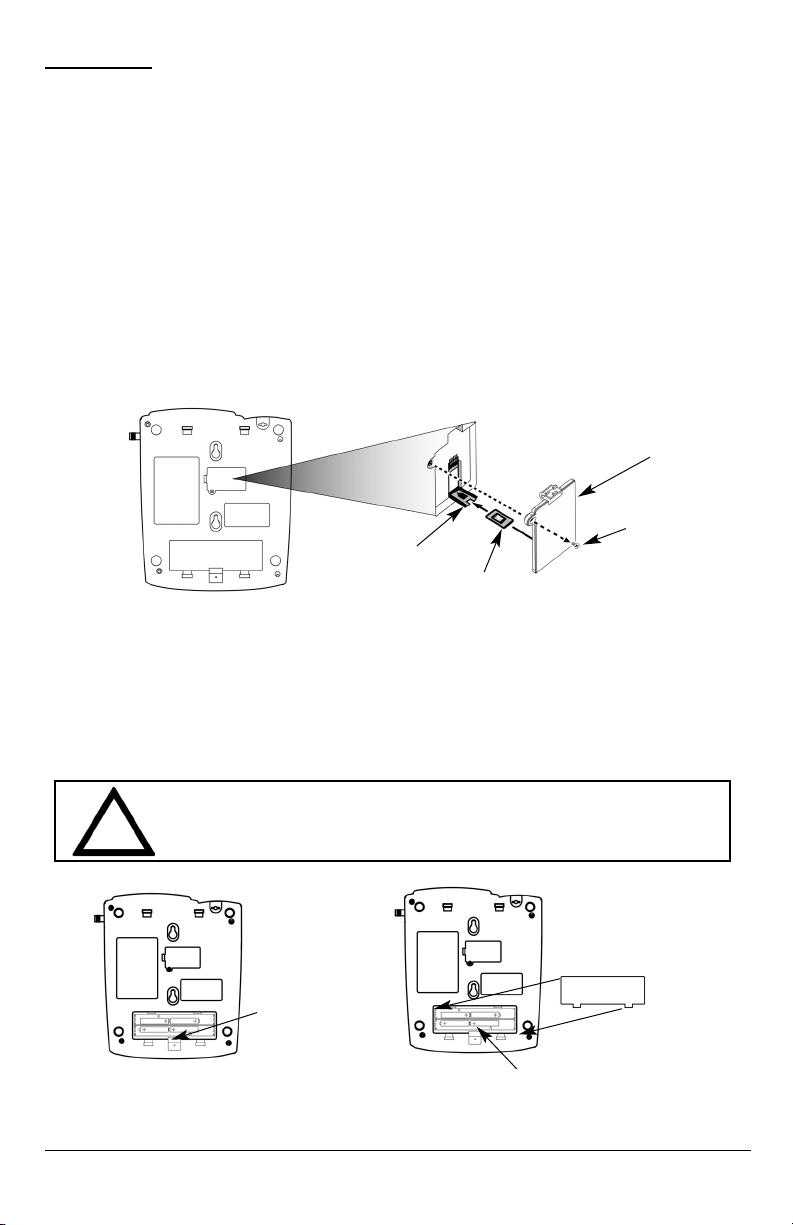
2. Remove the RUIM compartment cover. - see Figure 1.
3. Open the RUIM compartment holder.
4. Line up the RUIM card with the arrow on the RUIM card holder - see Figure 2.
5. Gently insert the RUIM card in the slot of the RUIM card holder.
6. Close the RUIM card holder.
NOTE: Do not force the RUIM card holder shut. Make sure the RUIM card is aligned properly
with the directional arrow on the holder.
7. Reattach the RUIM compartment cover, closing it with the separate cover screw provided.
Emergency Batteries
Install Batteries
1. Remove the battery access door screw located on the bottom of the unit - see Figure 3.
2. Open the battery compartment by lifting the access tab in the battery compartment’s center -
2. see Figure 3. A new unit may require some extra force to open the compartment.
3. Install 4 “AA” alkaline batteries (not supplied). and re-secure the door with screw.
RUIM Compartment Cover
RUIM Card
Holder
RUIM Card
Figure 1 - RUIM compartment cover.
Cover Screw
Figure 3 –
Battery access door.
Battery Access
Door Tab And
Screw
Battery Access
Door
4 AA Batteries
Figure 4 - Battery installation.
Figure 2 - RUIM card installation.
WARNING!
Only “AA” alkaline batteries are to be used with the Phonecell®SX5.
Use of any other batteries may result in fire and/or other damage to the unit.
!
Phonecell®SX5 CDMA 1 User Manual
Battery Operation
The unit will not automatically switch from AC to battery upon loss of AC power. The AC/Battery
switch must be changed manually to the battery position - see Figure 5. Battery power will provide up to 4 hours of talk time and 11 hours of standby.
Location and Setup
The SX5 comes with a standard spike antenna (TNC).
1. Attach and finger-tighten the antenna - see Figure 6. Do not over-tighten the antenna.
2. Select a location that is above ground and as close to windows (or exterior walls) as possible
to get the best signal - see Figure 7.
Figure 6 - Attach the antenna.
Figure 7 - SX5 location.
AC/Battery Switch
Battery Position
AC Position / Power On
Figure 5 – AC battery Switch.
Phonecell
®
SX5 CDMA 2 User Manual
GPS Antenna Mounting (USA Only)
To satisfy the FCC's Enhanced 911 (E-911) Phase II mandate, SX5 phones distributed in the USA
include a GPS antenna with a mounting bracket and suction cups. The GPS antenna uses satellite
technology during emergency calls to automatically report your location to a 911 dispatcher within
50-100 meters in most cases. For this feature to function, you must properly mount the GPS antenna on
a window as described below in addition to the standard antenna used for cellular system operation.
1 Mount the bracket on a window with good line of sight (no obstructions to the sky) using the
suction cups. A small amount of water or petroleum jelly applied to the window surface of the
suction cups will improve their long-term adhesion to the window. - see Figure 7.
2 Place the antenna on the topside center of the bracket. The bracket is tilted to aim the
antenna out the window and toward the sky.
3 Connect the antenna to the GPS Connector on on the rear panel of the SX5 - see Figure 7.
GPS Connector
(USA Models
Only)
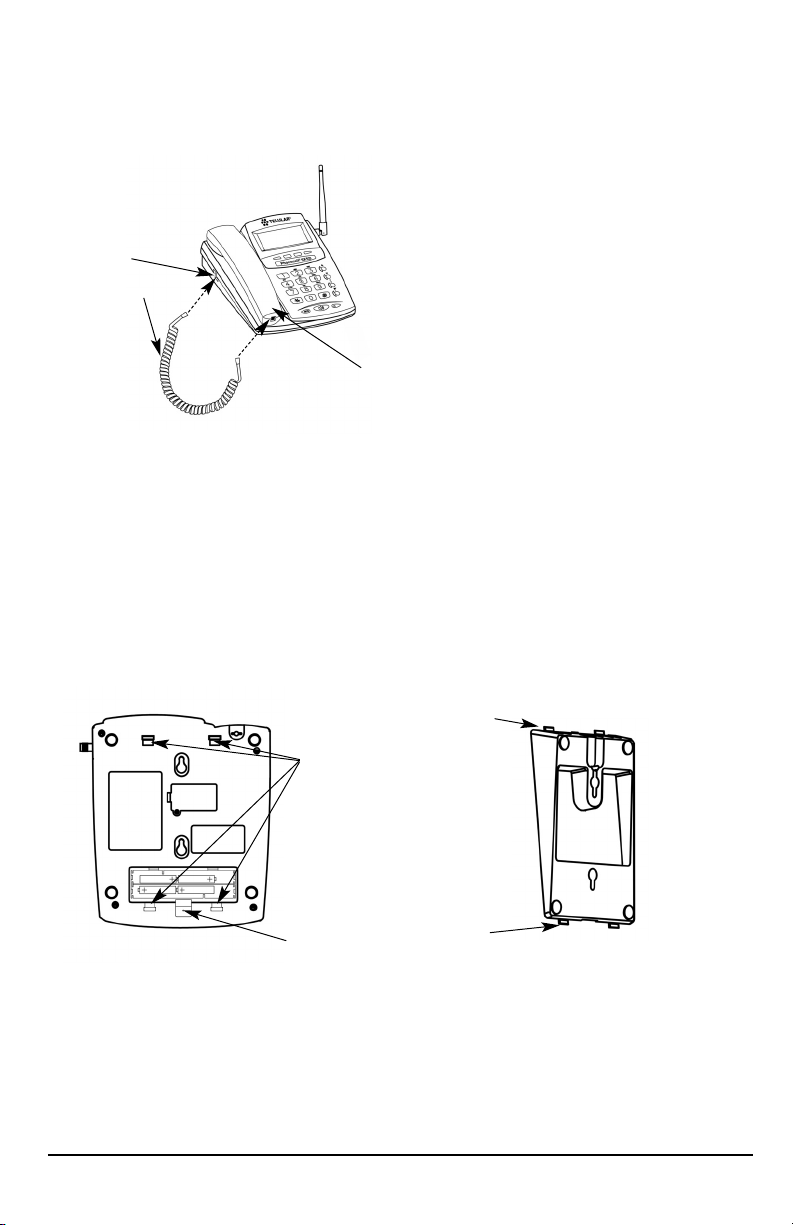
Connect the Handset
Before you can use the SX5, you must connect the handset cable.
1. Connect the handset cable to the phone jack - see Figure 8.
2. Connect the handset cable to the handset - see Figure 8.
Desk Mounting
A wedge is included with the SX5 to be used to position the SX5 for easier viewing of the LCD
screen and keypad. Attaching the wedge is optional. To attach the wedge, use the following
instructions.
1. Slide the wedge tabs on the thin end of the wedge into the bottom tab slots on the SX5 - see
Figure 9.
NOTE: Holding the wedge at an angle makes it easier to slide the wedge tabs into the
bottom tab slots.
Wedge slots
Battery tab slot
and screw
Wedge tabs
Wedge tabs
Figure 9 - Battery slot and wedge slots.
Phone jack
Handset cable
Handset
Figure 8 – SX5 handset connection.
Phonecell®SX5 CDMA 3 User Manual
Phonecell®SX5 CDMA 4 User Manual
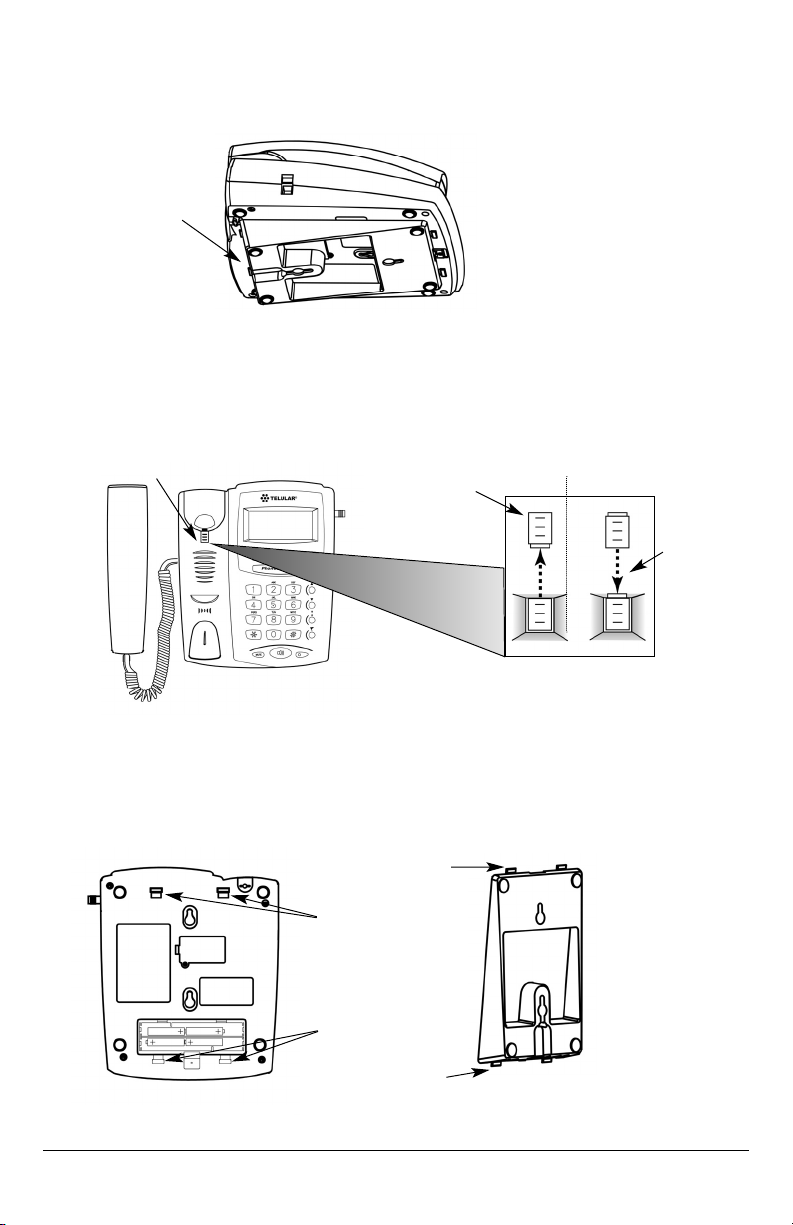
2. Snap the wedge tabs on the thick end of the wedge into the top tab slots - see Figure 10.
NOTE: The wedge will fit snugly, so it may be necessary to press the thick end of the wedge
towards the bottom tab slots (if the wedge tabs at the thin end have been inserted) in order to
snap it into the top tab slots.
Wall Mounting
1. Remove the mounting clip from the cradle and re-insert it with the tab pointing up - see
Figures 11 and 12.
2. Slide the wedge tabs on the thin end of the wedge into the bottom tab slots on the SX5 - see
Figure 13.
NOTE: Holding the wedge at an angle makes it easier to slide the wedge tabs into the bottom
tab slots.
Insert
Mounting
Clip into
the Cradle
(tab up)
Mounting Clip in
Cradle (tab up)
Figure 12 –
Handset mounting clip for wall-mount.
Remove
Mounting Clip
from the Cradle
(tab down)
Figure 11 –
Handset mounting clip assembly.
Top tab slots
Bottom tab slots
Wedge tabs
Wedge tabs
Figure 13 - Tab slots and wedge tabs.
Attach thick end
of wedge at top
of the SX5.
Figure 10 - Wedge attached for desk-mounting.
Phonecell®SX5 CDMA 5 User Manual
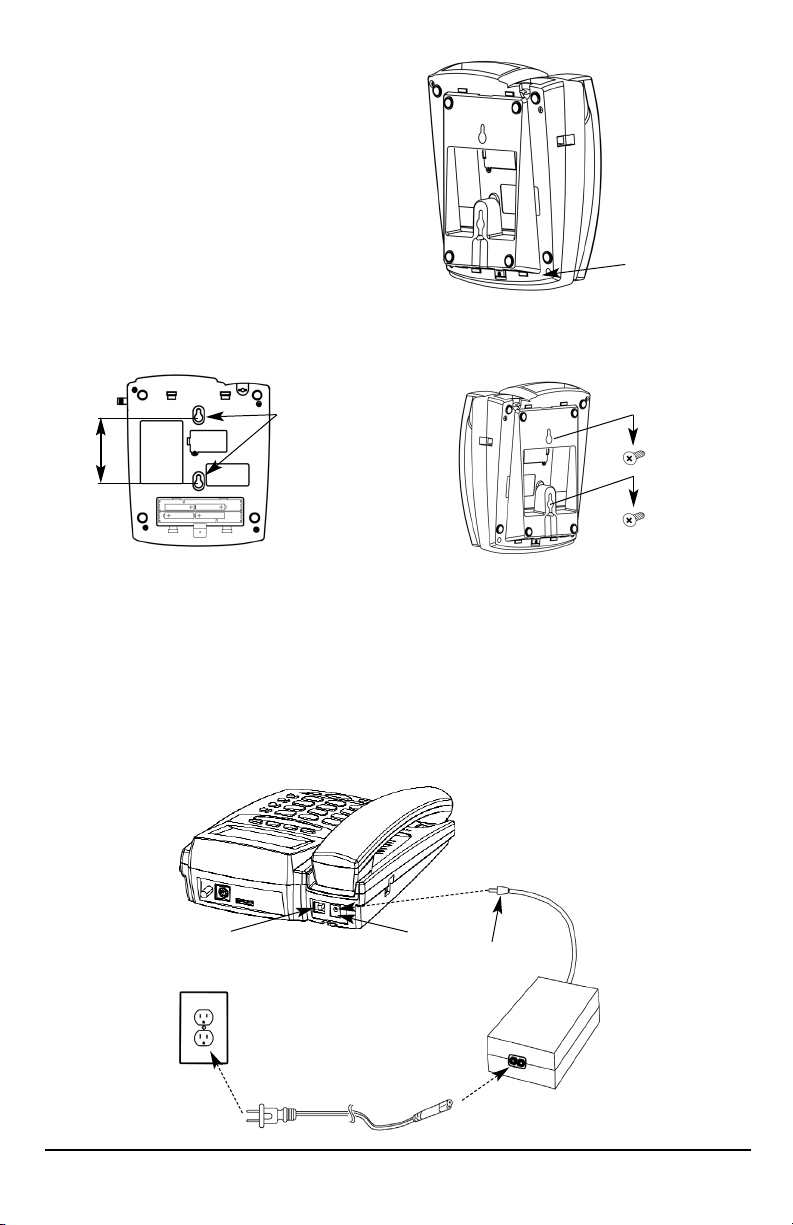
3. Snap the wedge tabs on the thick end of
the wedge into the top tab slots - see
Figure 14. The wedge will fit snugly, so it
may be necessary to press the thick end
of the wedge towards the bottom tab slots
(if the wedge tabs at the thin end have
been inserted) in order to snap it into the
top tab slots.
4. Mark two hole locations 83 mm (3-1/4
inches) vertically apart and drill two holes
into the wall.
5. Install the screws (not supplied) into the
wall, leaving a gap of approximately 3 mm
(1/8 inches) between the screw head and
the wall.
6. Align the mounting holes with the screws
and mount the SX5 onto the screws - see Figures 15 and 16.
Connect the SX5 to AC Power
1 Connect the barrel connector of the power supply to the AC power input on the rear panel of
the SX5 - see Figure 17.
2. Plug the AC power cord into the power supply.
3. Turn the AC/Battery switch to the AC position.
4. Plug the AC power cord into the wall socket. The SX5 will power up automatically.
5. Check the cellular signal strength and move the unit until the best signal possible is
achieved - see the Service Indication section of this manual.
AC Power Cord
Wall Socket
Power Supply
AC Power
Input
Barrel
Connector
Figure 16 – Mount the SX5 onto the screws.
83 mm (3-1/4 inches)
Figure 15 – SX5 mounting hooks.
Mounting
Holes
Attach thick end of
wedge at bottom
of the SX5.
Figure 14 - Wedge attached for wall-mounting.
AC/Battery
Switch
Figure 17 –
SX5 AC power connection.

RUIM Usage (RUIM Models Only)
Your service provider may require you to install a RUIM in your SX5 for it to operate normally (see
RUIM Card Installation (page 1) for details). Without a RUIM, these SX5 models will reject incoming
calls and allow only emergency outgoing calls.
Once a RUIM-using SX5 is operating normally, you can use it to set its RUIM to require a PIN, not
require a PIN, or change the existing PIN. See Security (page 20) for details.
Starting Your SX5 with a RUIM PIN
If your RUIM requires a PIN (Personal Identification Number, also called Cardholder Verification, or
CHV), follow these steps:
1. Power on your SX5.
2. The SX5 will prompt you to enter your PIN. Enter the PIN for your RUIM, then press STO.
3. If you enter the wrong PIN, the SX5 will display an error message and ask you to reenter the
PIN.
4. Entering an incorrect PIN three times will cause the SX5 to block the inserted RUIM. If your
RUIM is blocked due to incorrect PIN use, it will prompt you to enter the unblocking code. You
must contact your service provider to obtain this unblocking code. Do not guess at the block
code or use your own PIN to attempt to unblock the SX5; entering wrong codes will eventually cause the RUIM to become permanently blocked.
5. If you are unable to enter the correct PIN for the inserted RUIM, the SX5 will not operate
normally. It will reject incoming calls and permit only emergency outgoing calls.
Starting Your SX5 if Your RUIM Requires No PIN
Power on your SX5. No additional steps are necessary.
Starting Your SX5 if it is Bonded to a RUIM
A SX5 may be bonded to a specific RUIM. Once it has, the SX5 will not operate normally with any
other RUIM installed in it. It will reject incoming calls and permit only emergency outgoing calls. The
same holds true for any other SX5 the bonded RUIM is installed into: it will not operate normally.
To start a bonded SX5, power it on. No additional steps are necessary provided that the correct
RUIM is inserted into the SX5.
If you want to bond a SX5 to an RUIM, contact your service provider.
Phonecell
®
SX5 CDMA 6 Technical Manual
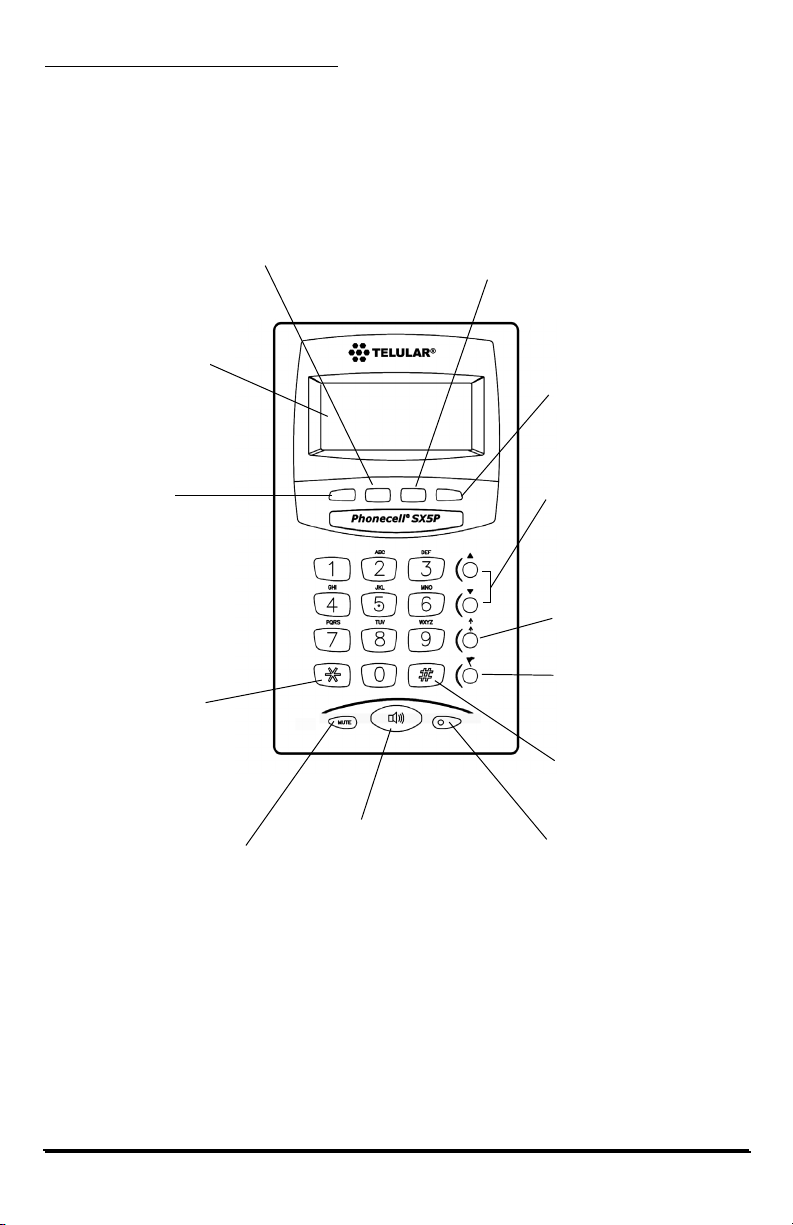
GETTING TO KNOW YOUR SX5
Function Keys
Operation of the SX5 is accomplished through the function keys on the keypad of the unit - see
Figure 18.
Figure 18 – SX5 keypad and function keys.
LCD Screen - Displays
icons, information, and
menu options necessary to
operate the SX5.
Mute - Prevents the party on the
other end of a call from hearing any
sound from the SX5.
Volume - Controls the speaker
volume level for the handset and
the speakerphone when the SX5 is
off-hook.
Redial - Dials the last number
called from the SX5.
Flash - Allows answering of a call
waiting and connecting 3-way
calls. Also used to automatically
connect a call after dialing (skip
dial delay).
Speakerphone - Engages the
speakerphone feature.
LED - Indicates a call in progress.
MENU - To access the
phone’s menus
MSG - To access voicemail or to send
an SMS (text message)
CLR - To clear an entry, erase
a digit during entry, or to go
back one menu level
STO - To store an entry
Star Key - Used as a back-
space key when entering
text.
Pound Key - Used as a
space key when entering
text.
Phonecell®SX5 CDMA 7 User Manual
Phonecell®SX5 CDMA 8 User Manual
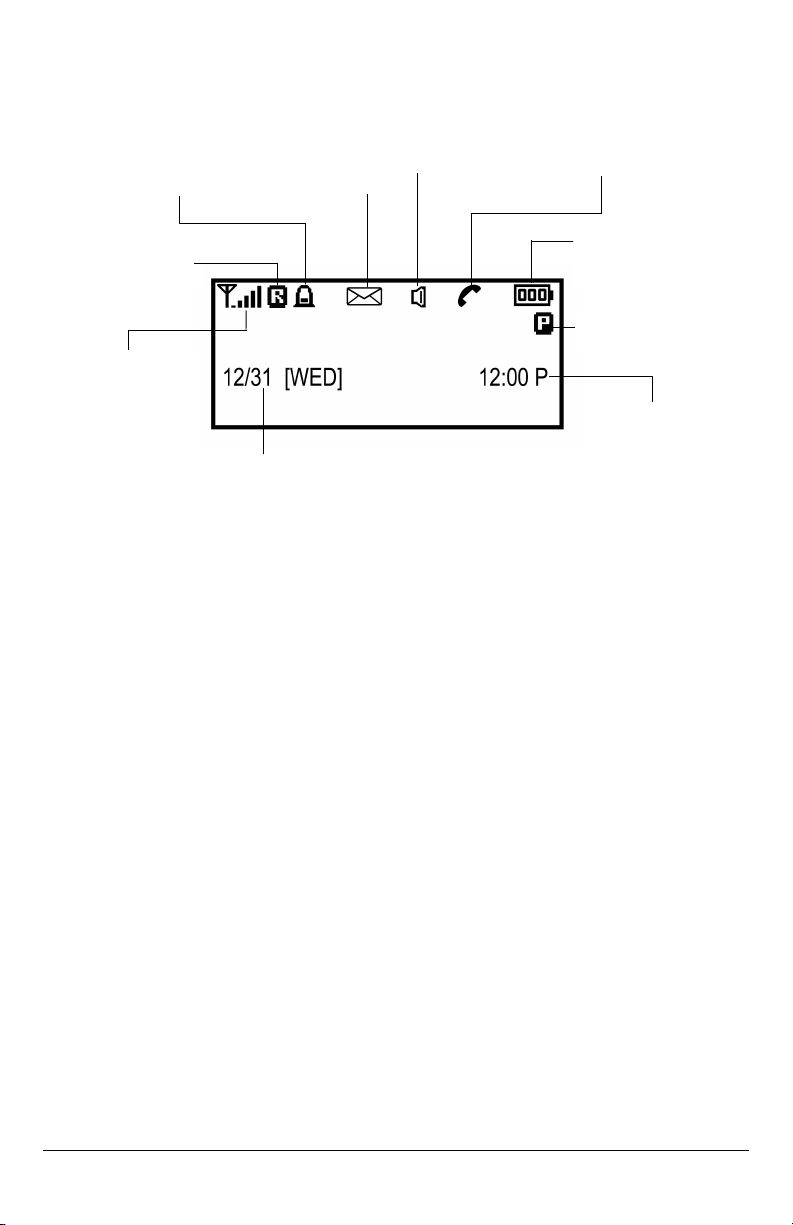
LCD Screen Icons
Icons displayed on the LCD screen indicate the features in use, the status of the phone, signal
strength and battery status - see Figure 19.
Service Indication
Full Service
When powered on, the banner and current date and time will display. If service is available, the
antenna icon will display indicator bars. The number and height of the indicator bars increases
as the signal grows stronger (the more bars, the better the signal).
No Service
When no service is available, the antenna icon will not display indicator lines. Contact your service provider to verify cellular service is activated. No calls can be made in this condition.
Figure 19 – SX5 LCD screen icons.
Received Signal
Strength - Indicates the
strength of the current
signal. The more bars,
the stronger the signal.
Message - Displays when
a new text or voicemail
message has been received.
Speaker - Indicates speaker
phone is activated.
Battery - Indicates the level of
battery power. The more bars,
the more power.
Clock - Displays the
current time.
ROAM - Indicates that
the unit is roaming.
Off Hook - Indicates handset is
off the cradle.
Date - Displays the
current date and day
of the week.
Alarm - Indicates that
the alarm feature has
been set.
Private - Indicates enhanced
voice privacy mode.

CALL FUNCTIONS
Making Calls
1. Pick up the handset or Press the SPEAKERPHONE key. The SX5 is now “off-hook.”
2. Listen for dial tone.
3. Dial the phone number. The dialed number will be displayed. The name will also be displayed
if it is stored in the phonebook.
Correct Dialing Errors
• To erase one digit, Press the CLR key once.
• To erase all digits, Press and hold down the CLR key until all digits are erased.
Redial the Last Telephone Number Dialed
1. Pick up the handset or Press the SPEAKERPHONE key. The SX5 is now “off-hook.”
2. Press the REDIAL key.
Receiving Calls
When there is an incoming call, the SX5 rings, an incoming call notification displays the call type
and Caller ID information (if available), and the LED blinks.
1. Pick up the handset or press the SPEAKERPHONE key. Press CLR to send the call directly
to voicemail.
2. Begin talking.
Receive a Call When Caller ID is Activated
The Caller ID feature displays the caller’s number when the SX5 rings. If the caller’s name and
number are stored together in the SX5 phonebook, the caller’s name and number will be displayed. Contact your service provider to activate this feature.
NOTE: If there are missed calls (calls not answered), “MISSED CALLS” will be displayed with
the number of calls missed. See the Call Logs section of this manual for more information.
Ending Calls
Hang up the phone by either placing the handset back onto the SX5 cradle or press the
SPEAKERPHONE key if using the speakerphone.
In-Call Functions
Mute a Call
1. While in a call, press the MUTE key. A notification will display in the upper right corner of the
LCD screen.
2. Press the MUTE key again to un-mute the microphone.
Adjust Volume
1. While in a call, press the Volume keys to raise or lower the handset/speakerphone volume.
Call Waiting
The FLASH key is used to answer call waiting and to switch between calls. Contact your service provider regarding the availability of the call waiting feature.
3-Way Calling
Contact your service provider regarding the availability of 3-way calling.
To perform a 3-way call:
1. Make the first call and wait until it connects.
2. After the first call is connected, dial the second number.
3. Press the FLASH key. This connects the second call and puts the first call on hold.
4. Wait for the second call to connect.
5. After you are connected to the second call, Press FLASH, which then connects the first
call and completes the 3-way call.
Phonecell®SX5 CDMA 9 User Manual
 Loading...