

Telular SX3e User Manual
PHONECELL
F
IXED
W
®
SX3e AMPS
IRELESS
T
ERMINAL
USER M ANUAL
Total communications freedom at your
fingertips...voice/fax/data.
06/25/01 Part No. 56017302

Introduction
Phone(s)
●
Battery
Back-Up
(optional)
Power
Supply
Fax Machine
●
AC Power
●
Computer
Modem
Thank you for choosing the Phonecell SX3 Fixed Wireless Terminal from Telular.
This innovative product lets you connect up to five pieces of standard telephone
equipment into a cellular network for total communications flexibility.
Please follow this guide to unpack, set up and operate your new Phonecell
safely and properly.
Telular is proud to welcome you as a valued customer.
Your satisfaction is our most important concern.
Telular Corporation
Corporate Headquarters
647 North Lakeview Parkway
Vernon Hills, Illinois 60061, USA
TECHNICAL
Tel: 847-247-9400 ••Fax: 847-247-0021
E-mail: mainoffice@telular.com ••http://www.telular.com
SUPPORT
Patents: Telular Corporation products are protected and manufactured under
one or more of the following U.S. patents and related
international patents and patents pending relating thereto:
4,658,096; 4,737,975; 4,775,997; 4,868,519; 4,922,517; 5,134,651;
5,361,297; 5,469,494; 5,046,085; 5,715,296.
Trademarks: Telular Corporation owns the following registered trademarks:
TELULAR and design, TELULAR, CELJACK, MAXJACK,
TELCEL, HEXAGON LOGO, PHONECELL, CELSERV,
TELGUARD, CPX, and AXCELL.
Part No. 56017302 ©2001 Telular Corporation, all rights reserved.
PHONECELL SX3eAMPS 2 USER MANUAL

Table of Contents
Introduction...............................................................................................2
Technical Support...................................................................................2
Getting Started
Unpacking the Phonecell SX3e ..............................................................4
Pre-Installation Checklist........................................................................4
Installation Summary ...............................................................................5
Step 1. Choose an Antenna Location.....................................................6
How to Connect the Antenna .................................................................7
Step 2. Plug in Your Telephone ...............................................................8
Connect Your Telephone........................................................................8
Place a Call – Adjust Your FWT.............................................................8
Adding More Phones..............................................................................8
Additional Telephone Equipment............................................................8
Step 3. NAM/Phone Number Setup .........................................................9
Optional A-Key (Authentication Code) Setup....................................11
Step 4. Install Your Phonecell
Wall-Mount Installation.........................................................................12
Desktop/Tabletop Installation................................................................13
Phonecell SX3e Operation
How to Use the LED Display................................................................14
How to Place a Call..............................................................................14
How to Receive a Call..........................................................................14
How to End a Call ................................................................................14
Hookflash Function ...............................................................................14
Important Tones and Alerts...................................................................15
How to Adjust the Volume Level...........................................................15
Fax/Data Transmission.........................................................................15
Variable Dial Time (Auto SEND Delay) Option.....................................16
Special Cellular Services......................................................................16
Data After SEND (In-Call DTMF Signaling) Option ..............................17
Zero Dial Delay for Frequently Called Numbers ..................................17
Phonecell SX3e Troubleshooting..........................................................18
Important Safety Information ................................................................19
AMPS Technician Programming
How to Enter the Programming Mode ..................................................22
How to Set the Access Overload Class (ACCOLC).........................23
How to Set the Access Method (EX) Option ....................................23
How to Set the Roam Option............................................................23
How to Set the Dial Tone After Remote On-Hook Option ................23
How to Set the Post-Receiver Off-Hook (ROH) Option....................24
How to Set the Pulse Dial Option.....................................................24
How to Initiate a Ring-Back Request................................................24
How to Restore the Factory Default Settings...................................24
How to Enable/Disable the Zero Dial Delay Option .........................24
PHONECELL SX3eAMPS 3 USER MANUAL
Getting Started...
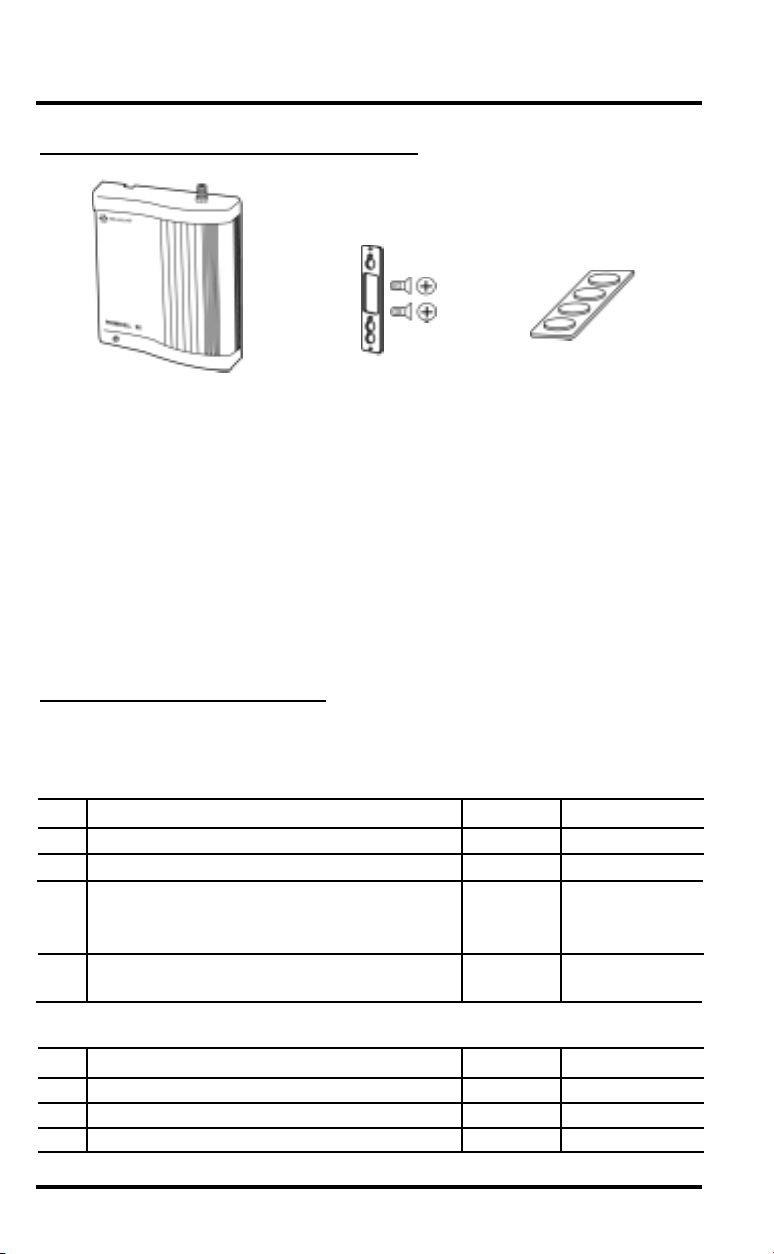
Un-Packing Your Phonecell SX3e
➊
The Phonecell SX3e comes with the following:
Phonecell SX3e Fixed Wireless Terminal (FWT)
➊
Mounting Bracket with Two Screws
➋
Four Rubber Feet for Desktop/Tabletop Use*
➌
(*Do not attach feet if wall-mounting the Phonecell.)
Carefully remove the unit from the shipping carton and check for evidence of
shipping damage. If damage is found, contact your Authorized Telular
Distributor or shipping agent immediately.
➋
➌
Pre-Installation Checklist
Before attempting Phonecell SX3e installation, make sure you have the following
components, tools and materials.
Components Needed
Qty. Description Supplied Not Supplied
1 External Power Supply with AC Line Cord ✔
1 Antenna (Spike, Magnetic-Mount, or Yagi) ✔
1 RJ-11 Modular Phone Cord (Length varies ✔
according to your specific installation and
the number of phones you plan to connect)
1 RJ-11 Phone Line Splitter (if you plan to ✔
connect more than one telephone device)
Tools & Materials Needed (for Wall-Mount Installation Only)
Qty. Description Supplied Not Supplied
1 Drill & Drill Bit ✔
1 Screwdriver ✔
1
21
/2-inch (3.75 cm) Mounting Screws ✔
PHONECELL SX3e AMPS 4 USER MANUAL

Installation Summary
There are four steps to installing the Phonecell SX3e FWT properly.
These steps are summarized below and explained in detail in the
remainder of this manual.
Step 1. Choose an Antenna Location (pg. 6-7)
••
Choose a location.
••
Next, connect power to the
FWT and turn the unit ON.
••
Then, connect the antenna (not supplied).
••
Check the cellular signal strength and
move the antenna until you achieve the
best signal possible.
Step 2. Plug In Your Phone (page 8)
••
Once the antenna is connected, hook up
a phone.
••
Then, make a test call to check noise levels,
and adjust the antenna location accordingly.
••
NOTE: If your Phonecell SX3e is not pre-programmed for NAM (Number Assignment Module)
information, you’ll need to perform the
NAM/Phone Number Setup in Step 3. Then, return
to this step (2).
••
Plug in additional phones, Fax and/or Modem.
Step 3. NAM/Phone Number Setup (pg. 9-11)
••
If your Phonecell was not pre-programmed for
NAM information, you need to perform the
NAM/Phone Number Setup procedure.
••
Otherwise, continue to Step 4.
Step 4. Wall or Desk Installation (pg. 12-13)
••
After you’ve selected a location and made all
the necessary connections and adjustments,
your Phonecell SX3e is ready for either
wall-mounting or desktop/tabletop use.
PHONECELL SX3e AMPS 5 USER MANUAL

Step 1. Choose an Antenna Location
Your Phonecell SX3 receives operating commands from the
cellular network and relies upon signal strength for proper
operation. Therefore, finding an antenna location with good
signal strength is critical for call quality.
A
NTENNA
••
Locate the antenna above ground and as close
to windows (or exterior walls) as possible – see
Fig. 1.
••
Try to install the antenna in an uninhabited area
(i.e. closets, attics, etc.) to ensure a minimum
separation of 16 inches (40 cm) between the
antenna and the inhabitants.
••
Preferably, the antenna should be mounted on
the building’s exterior – see Fig. 2.
••
High-gain (“Yagi”)antennas must be directed
toward your service provider’s nearest cell
tower.
••
Spike antennas must be pointed upward.
••
Keep antenna cable as short as possible – long
cable runs affect call quality.
••
Never splice antenna cable.
L
OCATIONTIPS
:
Fig. 1 Optional spike antenna
pointed upward and located near the
window for optimum signal strength.
Coaxial Cable
Fig. 2 Optional high-gain antenna installed on the building’s exterior. Always
direct the antenna toward the nearest cell tower of your service provider.
PHONECELL SX3e AMPS 6 USER MANUAL
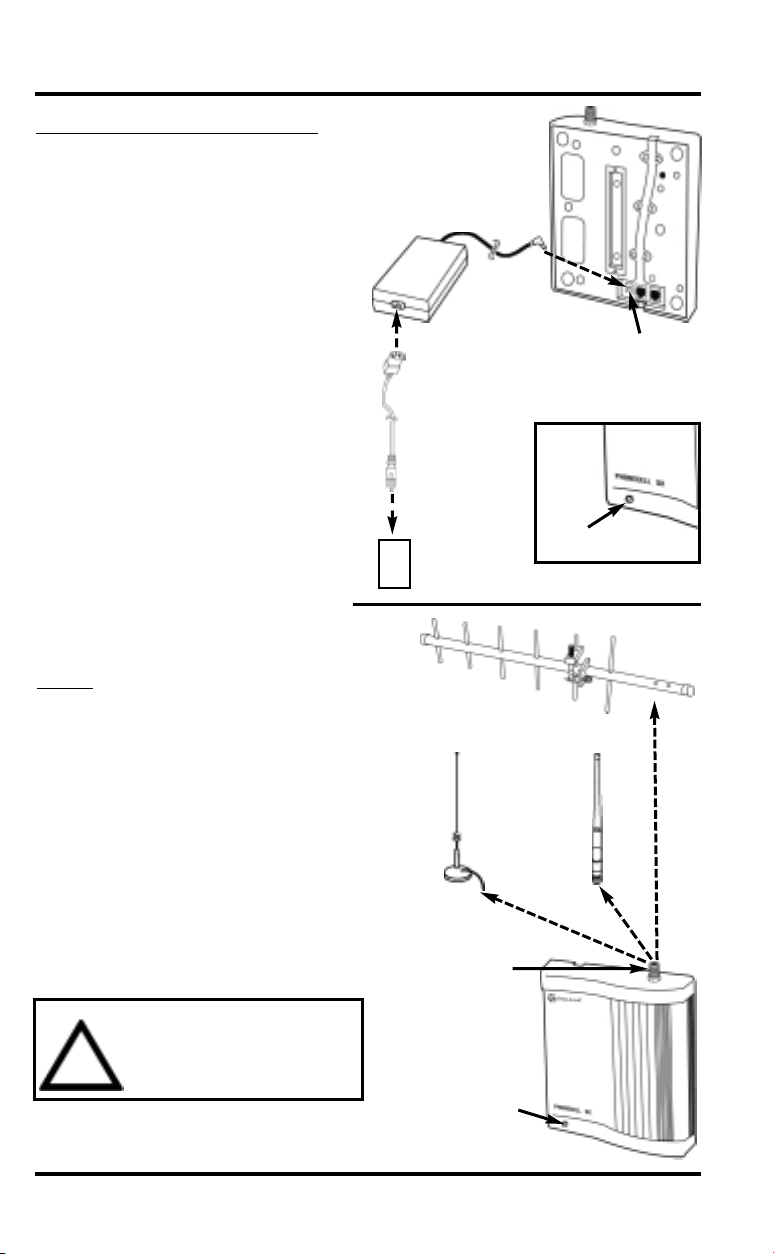
Antenna Location & Setup – Continued
How to Connect the Antenna:
1) Connect the Power Supply to the
DC “PWR” port on the back of
the Phonecell – see Figure 3.
2) Connect the AC line cord from
the power supply to the AC power
source. After approximately 10
seconds, the LED indicator on
the front of the FWT should turn
RED – see Figure 4
3) Connect an antenna to the TNC
antenna connector on top of the
FWT – see Figure 5.
4) Test the cellular signal strength
by checking the LED indicator on
the front of your Phonecell:
••
RED = No Service
••
YELLOW = Moderate signal
••
GREEN = Good signal.
5) Move the antenna from one
location to another until you
achieve the best signal
strength possible.
AC Line Cord
●
AC Power
●
Fig. 3
Optional
Power
Supply
“PWR” Port
LED
Indicator
Fig. 4
:
T
IP
Many things can obstruct the cellular
signal, and moving the antenna as
Optional Yagi
little as one meter (3 feet) can
dramatically improve signal
strength and call reception.
6) When you’re getting a strong
(GREEN) signal, you’re ready for
the next step – connecting a
phone and making a call.
Optional
MagneticMount
TNC
Antenna
Connector
Standard
Spike
WARNING!
Never operate your Phonecell
when any person is within 16
!
inches (40 cm) of the antenna.
LED
Indicator
Fig. 5
PHONECELL SX3e AMPS 7 USER MANUAL

Step 2. Plug In Your Telephone
The Phonecell SX3 lets you connect up to 5 pieces of standard telephone
equipment into a cellular network. Follow the steps below for quick installation.
Connect Your Telephone:
1) Locate the modular (RJ-11) line port
on your phone and plug in one end
of a standard (RJ-11) phone cord.
2) Connect the other end of the cord
to the RJ-11 port on the back of
your Phonecell SX3e – see Fig. 6.
Place a Call – Adjust Your FWT:
1) Pick up the phone receiver and listen
for dial tone.
2) If you hear dial tone, make a call.
3) While you’re talking with the other
party, listen for static and echo. If you
hear either, move the antenna until
you find the spot where voice
conversation is strong, and static
and echo are minimized.
NOTE: If you are unsuccessful in
dialing out, it’s probably due to
one of the following:
••
The antenna location needs to be
adjusted – see Step 1, page 6-7.
••
The NAM/Phone Number needs to
be set up – see Step 3, page 9-11.
••
Your cellular phone number has not
been activated – contact your
cellular service provider.
Fig. 6
To RJ-11 Port
Phone Cord
(
To Phone
s
To Fax
)
To
Modem
Adding More Phones?
Plug in an RJ-11 line splitter (not supplied) to connect additional phones to
your FWT – see Fig. 7. NOTE: you can
only make one phone call at a time.
Additional Telephone Equipment:
If you plan to use a device other than a
telephone with your Phonecell SX3 (such
as a modem), make sure that device will
work with a normal wired telephone line.
Fax Machines – Connect a fax machine
the same way it needs to be set up for
use on a regular wired telephone line.
PBX/KSU Systems – PABX
installation should only be performed
by experienced telephone technicians.
PHONECELL SX3e AMPS 8 USER MANUAL
Line
Splitter
Fig. 7 Optional RJ-11 Line Splitter
lets you connect additional phone
equipment to your Phonecell SX3e.
RJ-11
Port
Phone
Cords
IMPORTANT!
Make sure the wiring from the
telephone equipment to your
Phonecell SX3 is properly
!
protected from all transient
voltages, including lightning.
 Loading...