

Page 1
Arcata
2826/2806 CIP-D
User Guide
Page 2

This document is the copyright of Teltronics, Inc. and is intended for exclusive use of Teltronics customers. All rights are reserved.
Information in this document is subject to change without notice. Companies, names, and data used in examples herein are fictitious
unless otherwise noted. No part of this document may be reproduced, modified, republished, distributed, displayed or transmitted in any
form or by any means, electronic or mechanical, for any purpose, without the express written permission of Teltronics, Inc.
© 2010 Teltronics, Inc. All rights reserved.
The material in this document has been carefully reviewed; however, Teltronics, Inc. neither guarantees nor represents that this document is free of all errors or omissions and reserves the right to make corrections, changes, updates, or revisions to the information contained herein at any time.
The Teltronics and Cerato brand or product names are trademarks/servicemarks of and the exclusive property of Teltronics, Inc. of
Sarasota, FL.
Other than those trademarks/servicemarks held by Teltronics, Inc., any other brand and product names referenced in this manual are
trademarks or registered trademarks of their respective holders and are used here for informational purposes only.
Part Number: 610-0000-0847 Rev B
Teltronics, Inc.
2511 Corporate Way
Palmetto Florida 34221-8478 USA
Visit our web site at www.teltronics.com
Page 3

TABLE OF CONTENTS
UMMARY OF CHANGES 3
SOFTWARE LICENSE. . . . . . . . . . . . . . . . . . . . . . . . . . . . . . . . . . . . . . . . . . . . . . . . . . . . v
SUMMARY OF CHANGES . . . . . . . . . . . . . . . . . . . . . . . . . . . . . . . . . . . . . . . . . . . . . xvii
SAFETY INSTRUCTIONS . . . . . . . . . . . . . . . . . . . . . . . . . . . . . . . . . . . . . . . . . . . . . . . . xix
INTRODUCTION . . . . . . . . . . . . . . . . . . . . . . . . . . . . . . . . . . . . . . . . . . . . . . . . . . . . . . . 1
28xx CIP-D Features . . . . . . . . . . . . . . . . . . . . . . . . . . . . . . . . . . . . . . . . . . . . . . . . . .3
Components . . . . . . . . . . . . . . . . . . . . . . . . . . . . . . . . . . . . . . . . . . . . . . . . . . . . . . . .7
Quick Tour of the 28xx CIP-D . . . . . . . . . . . . . . . . . . . . . . . . . . . . . . . . . . . . . . . . . .10
PHONE SETUP . . . . . . . . . . . . . . . . . . . . . . . . . . . . . . . . . . . . . . . . . . . . . . . . . . . . . . . . 15
USING THE ARCATA PHONE . . . . . . . . . . . . . . . . . . . . . . . . . . . . . . . . . . . . . . . . . . . . 27
ACCOUNT CODE CALLING . . . . . . . . . . . . . . . . . . . . . . . . . . . . . . . . . . . . . . . . . . . . . . . . .28
ANSWERING CALLS . . . . . . . . . . . . . . . . . . . . . . . . . . . . . . . . . . . . . . . . . . . . . . . . . . . . . . .29
APPOINTMENT REMINDER . . . . . . . . . . . . . . . . . . . . . . . . . . . . . . . . . . . . . . . . . . . . . . . . .31
CALLBACK . . . . . . . . . . . . . . . . . . . . . . . . . . . . . . . . . . . . . . . . . . . . . . . . . . . . . . . . . . . . . . . 33
28xx CIP-D User Guide i
Page 4

CANCEL/HANG UP . . . . . . . . . . . . . . . . . . . . . . . . . . . . . . . . . . . . . . . . . . . . . . . . . . . . . . . .35
CONFERENCE . . . . . . . . . . . . . . . . . . . . . . . . . . . . . . . . . . . . . . . . . . . . . . . . . . . . . . . . . . . . . 36
CONTACT LIST . . . . . . . . . . . . . . . . . . . . . . . . . . . . . . . . . . . . . . . . . . . . . . . . . . . . . . . . . . . .37
DIAL . . . . . . . . . . . . . . . . . . . . . . . . . . . . . . . . . . . . . . . . . . . . . . . . . . . . . . . . . . . . . . . . . . . . .40
DIRECTORY . . . . . . . . . . . . . . . . . . . . . . . . . . . . . . . . . . . . . . . . . . . . . . . . . . . . . . . . . . . . . .42
FEATURES . . . . . . . . . . . . . . . . . . . . . . . . . . . . . . . . . . . . . . . . . . . . . . . . . . . . . . . . . . . . . . . .43
FORWARD . . . . . . . . . . . . . . . . . . . . . . . . . . . . . . . . . . . . . . . . . . . . . . . . . . . . . . . . . . . . . . . .44
HEADSET . . . . . . . . . . . . . . . . . . . . . . . . . . . . . . . . . . . . . . . . . . . . . . . . . . . . . . . . . . . . . . . . .46
HISTORY . . . . . . . . . . . . . . . . . . . . . . . . . . . . . . . . . . . . . . . . . . . . . . . . . . . . . . . . . . . . . . . . .47
HOLD . . . . . . . . . . . . . . . . . . . . . . . . . . . . . . . . . . . . . . . . . . . . . . . . . . . . . . . . . . . . . . . . . . . .50
INTERCOM (COM) CALLING . . . . . . . . . . . . . . . . . . . . . . . . . . . . . . . . . . . . . . . . . . . . . . . .51
LINE KEY LABELS . . . . . . . . . . . . . . . . . . . . . . . . . . . . . . . . . . . . . . . . . . . . . . . . . . . . . . . .53
MENU . . . . . . . . . . . . . . . . . . . . . . . . . . . . . . . . . . . . . . . . . . . . . . . . . . . . . . . . . . . . . . . . . . . .54
MUTE . . . . . . . . . . . . . . . . . . . . . . . . . . . . . . . . . . . . . . . . . . . . . . . . . . . . . . . . . . . . . . . . . . . .55
NAVIGATE . . . . . . . . . . . . . . . . . . . . . . . . . . . . . . . . . . . . . . . . . . . . . . . . . . . . . . . . . . . . . . .56
PAGE . . . . . . . . . . . . . . . . . . . . . . . . . . . . . . . . . . . . . . . . . . . . . . . . . . . . . . . . . . . . . . . . . . . . 57
PARK . . . . . . . . . . . . . . . . . . . . . . . . . . . . . . . . . . . . . . . . . . . . . . . . . . . . . . . . . . . . . . . . . . . .59
PARK PICKUP . . . . . . . . . . . . . . . . . . . . . . . . . . . . . . . . . . . . . . . . . . . . . . . . . . . . . . . . . . . . . 60
PICKUP (Group and Directed) . . . . . . . . . . . . . . . . . . . . . . . . . . . . . . . . . . . . . . . . . . . . . . . . .61
PRIVACY . . . . . . . . . . . . . . . . . . . . . . . . . . . . . . . . . . . . . . . . . . . . . . . . . . . . . . . . . . . . . . . . . 63
REDIAL . . . . . . . . . . . . . . . . . . . . . . . . . . . . . . . . . . . . . . . . . . . . . . . . . . . . . . . . . . . . . . . . . .64
RING TONES . . . . . . . . . . . . . . . . . . . . . . . . . . . . . . . . . . . . . . . . . . . . . . . . . . . . . . . . . . . . . .66
SPEAKERPHONE . . . . . . . . . . . . . . . . . . . . . . . . . . . . . . . . . . . . . . . . . . . . . . . . . . . . . . . . . .67
SPEED DIAL . . . . . . . . . . . . . . . . . . . . . . . . . . . . . . . . . . . . . . . . . . . . . . . . . . . . . . . . . . . . . .68
ii 28xx CIP-D User Guide
Page 5

TIME AND DATE . . . . . . . . . . . . . . . . . . . . . . . . . . . . . . . . . . . . . . . . . . . . . . . . . . . . . . . . . .70
TRANSFER . . . . . . . . . . . . . . . . . . . . . . . . . . . . . . . . . . . . . . . . . . . . . . . . . . . . . . . . . . . . . . .71
VIEW EXTENSION . . . . . . . . . . . . . . . . . . . . . . . . . . . . . . . . . . . . . . . . . . . . . . . . . . . . . . . . .72
VOICE MAIL . . . . . . . . . . . . . . . . . . . . . . . . . . . . . . . . . . . . . . . . . . . . . . . . . . . . . . . . . . . . . .74
VOLUME . . . . . . . . . . . . . . . . . . . . . . . . . . . . . . . . . . . . . . . . . . . . . . . . . . . . . . . . . . . . . . . . .75
WEB CONFIGURATION . . . . . . . . . . . . . . . . . . . . . . . . . . . . . . . . . . . . . . . . . . . . . . . . . . . .76
TROUBLESHOOTING. . . . . . . . . . . . . . . . . . . . . . . . . . . . . . . . . . . . . . . . . . . . . . . . . . . 77
VIEWING PHONE SETTINGS . . . . . . . . . . . . . . . . . . . . . . . . . . . . . . . . . . . . . . . . . . . . . 81
FCC REQUIREMENTS . . . . . . . . . . . . . . . . . . . . . . . . . . . . . . . . . . . . . . . . . . . . . . . . . . 85
ACCESS CODES AND AUDIBLE TONES . . . . . . . . . . . . . . . . . . . . . . . . . . . . . . . . . . . . 87
Access Codes . . . . . . . . . . . . . . . . . . . . . . . . . . . . . . . . . . . . . . . . . . . . . . . . . . . . . .88
Audible Tones . . . . . . . . . . . . . . . . . . . . . . . . . . . . . . . . . . . . . . . . . . . . . . . . . . . . . .89
Index . . . . . . . . . . . . . . . . . . . . . . . . . . . . . . . . . . . . . . . . . . . . . . . . . . . . . . . . . . . . . . 91
28xx CIP-D User Guide iii
Page 6

This page intentionally blank
iv 28xx CIP-D User Guide
Page 7

SOFTWARE LICENSE
TELTRONICS, INC. END USER LICENSE AGREEMENT (10.7.10)
NOTICE: BY DOWNLOADING, INSTALLING, COPYING, ACCESSING, CLICKING ON AN “ACCEPT” BUTTON,
OR OTHERWISE USING THE PRODUCT, END USER AGREES TO THE TERMS OF THIS END USER LICENSE
AGREEMENT. IF YOU ARE ACCEPTING THESE TERMS ON BEHALF OF THE END USER, YOU REPRESENT
AND WARRANT THAT YOU ARE ACTING ON BEHALF OF THE END USER AND ARE AUTHORIZED TO
ACCEPT THIS END USER LICENSE AGREEMENT ON THE END USER’S BEHALF AND THAT YOU HAVE THE
FULL AUTHORITY TO BIND THE END USER TO THESE TERMS AND CONDITIONS (SUCH END USER BEING
HEREIN REFERRED TO AS “YOU”). IF YOU DO NOT AGREE TO THESE TERMS AND CONDTIONS, DO NOT
DOWNLOAD, INSTALL, COPY, ACCESS, OR USE THE PRODUCT; AND WITHIN THIRTY (30) DAYS OF
DELIVERY OF THE PRODUCT RETURN THE UNUSED PRODUCT AND PROOF OF PURCHASE TO THE
PARTY FROM WHOM YOU PAID THE PRODUCT PURCHASE PRICE AND LICENSE FEES FOR A REFUND, IF
ANY OR SELECT THE “DO NOT ACCEPT” BUTTON. YOU AGREE THAT YOU HAVE READ, UNDERSTAND
AND SHALL ABIDE BY THIS END USER LICENSE AGREEMENT AND YOU AGREE THAT THIS END USER
LICENSE AGREEMENT IS ENFORECABLE LIKE ANY WRITTEN NEGOTIATED AGREEMENT SIGNED BY
YOU.
THE FOLLOWING TERMS AND CONDITIONS OF THIS END USER AGREEMENT AND SEPARATE
AGREEMENT(S) INCORPORATED HEREIN BY REFERENCE (COLLECTIVELY, “AGREEMENT”) APPLIES TO
28xx CIP-D User Guide v
Page 8

THE PRODUCTS DESCRIBED HEREIN AND FURNISHED TO YOU BY TELTRONICS OR ITS DISTRIBUTOR
OR RESELLER. THE SOFTWARE IS NOT SOLD TO YOU, BUT IS THE PROPERTY OF TELTRONICS AND/OR
ONE OR MORE OTHER THIRD PARTY LICENSORS PROTECTED BY COPYRIGHT LAWS AND
INTERNATIONAL TREATY. ANY USE OF THE SOFTWARE IS GOVERNED BY THIS AGREEMENT. YOU
AGREE THAT YOU ARE LICENSING THE SOFWARE FOR YOUR END USE ONLY AND NOT FOR RESALE OR
REDISTRIBUTION.
1. DEFINITIONS. “Product” means equipment, Software, product documentation and associated services
furnished to You concerning the use and support of the Product. “Software” means software object code,
application interfaces, documentation and any updates, revisions or modification thereto on magnetic tape,
diskette, CD-ROM, semiconductor device or other memory device.
2. LICENSE. (a) With respect to all Software of Teltronics and/or its vendors or suppliers which may be furnished
to You by Teltronics hereunder, You accept and agree to abide by all the license terms and conditions set forth
herein and any other separate license agreements that are specific to, and included in document or shrink wrap
form with the shipment of particular Software, or presented in electronic form (including click wrap form) during the
loading or installation of such Software. In the event of any conflict between the license terms and conditions set
forth herein and any such separate license agreements specific to any particular Software, the license agreements
specific to such particular Software shall prevail with respect to such particular Software. All Software furnished
hereunder shall be licensed only as set forth herein.
(b) Subject to your compliance with this Agreement including the license obligations pursuant to this Section , and
your payment of the applicable license fees, Teltronics grants to You a personal, nontransferable, nonexclusive and
revocable license to use the Software solely with the equipment sold to You by Teltronics or its distributor or
reseller, or such other equipment as may be authorized by Teltronics to support such use of the Software for your
vi 28xx CIP-D User Guide
Page 9

own business operation up to the number of concurrent devices and/or ports as may be authorized by Teltronics.
You shall not copy the Software except that You are permitted to make one (1) copy of the Software, to the extent
that it is made available in a form than is intended to be copied, only for backup purposes, provided that You shall
include on such copy the same copyright notice and proprietary marking that appear on the original Software
including diskette markings.
(c) You shall (i) not modify, translate, reverse engineer, reverse compile, decompile, recompile, disassemble, port,
copy, download or attempt to derive the source code from the Software, and no license to the source code is
provided herein; (ii) take all actions necessary to satisfy your obligations under these license provisions including
the issuance of adequate instructions and monitoring of all appropriate personnel within your organization to
ensure that such personnel satisfy these license obligations; and (iii) promptly return to Teltronics any magnetic
tape, diskette, CD-ROM, semiconductor device or other memory device or system and/or Documentation, which
has been replaced, modified or updated by Teltronics.
(d) The Software and all copies thereof shall at all times remain the sole and exclusive property of Teltronics or its
third party vendors or suppliers, as applicable, and You shall have no title to or interest in such Software and copies
thereof. You acknowledge that the Software constitutes valuable trade secrets of Teltronics and its third party
vendors or suppliers. You agree to use the Software solely in accordance with license provisions herein and all the
terms and conditions of this Agreement and to treat the Software as the confidential and proprietary information of
Teltronics. If You sell or otherwise dispose of the media on which the Software is fixed, such Software must be
erased or destroyed before any such sale or disposal so that the Software is no longer ascertainable from such
media.
(e) If You sell or otherwise transfer or dispose of the equipment which supports the use of the Software in your
business operation, or if You fail to comply with any of the terms of this Agreement, all of your rights hereunder to
28xx CIP-D User Guide vii
Page 10

possess and use the Software and all copies thereof shall immediately terminate and You agree to promptly return
the Software and all copies thereof to Teltronics.
3. PRODUCT CHARGES AND LICENSE FEES. Product charges and license fees paid by You are paid in
consideration of the rights granted under this Agreement.
4. TERM. The Agreement is effective upon your acceptance of its terms as herein provided or any use of the
Products and shall continue until terminated. You may terminate this Agreement at any time by returning the
Software and all copies thereof and extracts therefrom to Teltronics. Teltronics may terminate this Agreement upon
the breach by You of any term of this Agreement, and Teltronics shall have the right to injunctive relief enjoining
such acts or attempts constituting a breach (in addition to other legal remedies, all of which are non-exclusive).
Upon such termination by Teltronics, You agree to promptly return to Teltronics the Software and all copies and
extracts thereof. The following provision shall survive any termination of this Agreement: “Limited Warranty,”
“Limitation of Liability,” “Governing Law, Venue and Jurisdiction,” “Enforceability,” “No Waiver,” “Export
Compliance,” and “Entire Agreement.”
5. LIMITED WARRANTY. The only warranty Teltronics provides with respect to any Product is the written Limited
Warranty statement provided with the Product or, if no Limited Warranty statement is provided with the Product, the
Limited Warranty Statement available at the following internet address: http://www.Teltronics.com.
DISCLAIMER. EXCEPT AS SPECIFIED IN THE LIMITED WARRANTY STATEMENT SPECIFIED IN THE
SECTION ABOVE, ALL EXPRESS OR IMPLIED CONDITIONS, REPRESENTATIONS OR WARRANTIES
INCLUDING, WITHOUT LIMITATION, ANY IMPLIED WARRANTY OR CONDITION OF MERCHANTIBILITY,
FITNESS FOR A PARTICULAR PURPOSE (EVEN IF KNOWN TO TELTRONICS), NONINFRINGEMENT,
SATISFACTORY QUALITY OR ARISING FROM A COURSE OF DEALING, LAW, USAGE, OR TRADE
viii 28xx CIP-D User Guide
Page 11

PRACTICE ARE HEREBY EXCLUDED TO THE GREATEST EXTENT ALLOWED BY APPLICABLE LAW. THIS
DISCLAIMER AND EXCLUSION SHALL APPLY EVEN IF THE EXPRESS WARRANTY SET FORTH ABOVE
FAILS OF ITS ESSENTIAL PURPOSE.
6. LIMITATION OF LIABILITY. IN NO EVENT WILL TELTRONICS BE LIABLE FOR INCIDENTAL, INDIRECT,
SPECIAL, CONSEQUENTIAL, EXEMPLARY OR PUNITIVE DAMAGES OF ANY KIND EVEN IF THEY ARE
FORESEEN OR FORESEEABLE. TELTRONICS' MAXIMUM CUMULATIVE LIABILITY RELATIVE TO ALL
OTHER CLAIMS AND LIABILITIES, INCLUDING THAT WITH RESPECT TO DIRECT DAMAGES, WILL NOT
EXCEED THE LICENSE FEE PAID FOR THE SOFTWARE GIVING RISE TO THE CLAIM OR LIABILITY. THESE
DISCLAIMERS AND LIMITATIONS OF LIABILITY WILL APPLY REGARDLESS OF ANY OTHER CONTRARY
PROVISION OF THIS AGREEMENT AND REGARDLESS OF THE FORM OF ACTION, WHETHER IN
CONTRACT, TORT OR OTHERWISE, AND FURTHER WILL EXTEND TO THE BENEFIT OF TELTRONICS'
SUPPLIERS, DISTRIBUTORS AND RESELLERS AS THIRD-PARTY BENEFICIARIES. EACH PROVISION IN
THE AGREEMENT WHICH PROVIDES FOR A LIMITATION OF LIABILITY, DISCLAIMER OF WARRANTY OR
CONDITION OR EXCLUSION OF DAMAGES IS SEVERABLE AND INDEPENDENT OF ANY OTHER
PROVISION AND IS TO BE ENFORCED AS SUCH.
7. GOVERNING LAW, VENUE, AND JURISDICTION. This Agreement will be governed by and construed in
accordance with the laws of the State of Florida but without regard to that state’s conflict of laws principles. The
parties agree that any action to enforce any provision of this Agreement or arising out of this Agreement or the
business relationship between Teltronics and You will be brought in the state or Federal court of competent
jurisdiction in the State of Florida. You and Teltronics agree that the United Nations Convention on Contracts for
the International Sale of Goods (1980) shall not apply or govern this Agreement, the performance of, or any
transaction between the parties under this Agreement. Reasonable attorney fees shall be reimbursed, with respect
to the foregoing, to the party who prevails on the merits.
28xx CIP-D User Guide ix
Page 12

8. ENFORCEABILITY. If any provision of this Agreement shall be held to be invalid, illegal or unenforceable, the
validity, legality or enforceability of the remaining provisions shall in no way be affected or impaired.
9. NO WAIVER. Any non-enforcement of any provision of this Agreement by Teltronics shall not constitute a
waiver of such provision or prejudice Teltronics right to enforce such provision.
10. EXPORT COMPLIANCE. The Products including Software, product documentation and technology or direct
products thereof ("Products and Technology") are subject to U.S. export control laws and regulations and the
export of such Products and Technology is conditioned upon receipt of U.S. Government licenses and approvals.
You shall ensure that no Products and Technology shall reach any country where U.S. law prohibits the possession
or use of such Items. You shall comply with all export regulations of the U.S. Department of Commerce and shall
not transfer any Products and Technology from the country of delivery, or to any facility engaged in the design,
development, stockpiling, manufacturing or use of nuclear, missile, chemical or biological weapons, or to any
military end-user or for a military end-use, without first obtaining Teltronics’ written approval and all required
approvals of the applicable U.S. agencies. Your obligations hereunder shall survive so long as You possess or
control the Products and Technology.
11. THIRD PARTY LICENSE AGREEMENTS. A. You acknowledge and agree that installation and/or use of the
Software may be subject to activation by license key.
B. Teltronics licenses or may license certain portions of its software from others, inclusive of certain
components of the Software that consist of open source software (“GPL Software”) subject to the GNU General
Public License, Version 3, June 29, 2007 (the “GNU”), a copy of which will be provided to End User upon its written
request to Teltronics, Inc. 2511 Corporate Way, Palmetto, FL 34221. GPL Software is not owned by Teltronics.
Notwithstanding anything in this Agreement to the contrary, GPL Software is distributed by Teltronics to End User
for End User’s use solely under the terms of the GNU which govern the GPL Software and the copying,
distribution, and modification of the GPL Software. Teltronics may also provide SMS (short message services) and
Page 13

voice services for interoperating with the Software (“Third Party Software/Services”).Teltronics makes no
representations or warranties as to such Third Party Software/Services or their operation, except to the extent such
third party vendor provides such representation or warranty to Teltronics.
C. Vovida Software License (Version 1.0 Copyright (c) 2000 Vovida Networks, Inc. All rights reserved).
Redistribution and use in source and binary forms, with or without modification, are permitted provided that the
following conditions are met: (i) Redistributions of source code must retain the above copyright notice, this list of
conditions and the following disclaimer;(ii) Redistributions in binary form must reproduce the above copyright
notice, this list of conditions and the following disclaimer in the documentation and/or other materials provided with
the distribution; (iii)The names "VOCAL", "Vovida Open Communication Application Library", and "Vovida Open
Communication Application Library (VOCAL)" must not be used to endorse or promote products derived from this
software without prior written permission. For written permission, please contact vocal@vovida.org. (iv) Products
derived from this software may not be called "VOCAL", nor may "VOCAL" appear in their name, without prior
written permission of Vovida Networks, Inc. (v)THIS SOFTWARE IS PROVIDED "AS IS" AND ANY EXPRESSED
OR IMPLIED WARRANTIES, INCLUDING, BUT NOT LIMITED TO, THE IMPLIED WARRANTIES OF
MERCHANTABILITY, FITNESS FOR A PARTICULAR PURPOSE, TITLE AND NON-INFRINGEMENT ARE
DISCLAIMED. IN NO EVENT SHALL VOVIDA NETWORKS, INC. OR ITS CONTRIBUTORS BE LIABLE FOR
ANY DIRECT DAMAGES IN EXCESS OF $1,000, NOR FOR ANY INDIRECT, INCIDENTAL, SPECIAL,
EXEMPLARY, OR CONSEQUENTIAL DAMAGES (INCLUDING, BUT NOT LIMITED TO, PROCUREMENT OF
SUBSTITUTE GOODS OR SERVICES; LOSS OF USE, DATA, OR PROFITS; OR BUSINESS INTERRUPTION)
HOWEVER CAUSED AND ON ANY THEORY OF LIABILITY, WHETHER IN CONTRACT, STRICT LIABILITY, OR
TORT (INCLUDING NEGLIGENCE OR OTHERWISE) ARISING IN ANY WAY OUT OF THE USE OF THIS
SOFTWARE, EVEN IF ADVISED OF THE POSSIBILITY OF SUCH DAMAGE.
28xx CIP-D User Guide xi
Page 14

12. ENTIRE AGREEMENT. This Agreement and any written agreement executed by Teltronics and You for the
supply of the Software and related Products represent the entire agreement between Teltronics and You and
supersede all prior oral and written communications, agreements, promises, and understandings concerning the
Software and related Products. In the event of any conflict between the terms of any written agreement executed
by You and Teltronics and those of this Agreement, the terms of this Agreement shall prevail. Terms and conditions
as set forth in any purchase order which differ from, conflict with, or are not included in this Agreement, shall not
become part of this Agreement unless specifically accepted by Teltronics in writing.
xii 28xx CIP-D User Guide
Page 15

TELTRONICS PRODUCTS FOR VOIP COMMUNICATIONS
911 EMERGENCY CALLING LIMITATIONS AND OBLIGATIONS
(a) Customer, at Customer’s cost, shall be responsible for procuring the supply, implementation,
connection and support of any required telephone service including emergency 911 call service over the Internet
and/or public switched telephone network (“PSTN”) from one or more third party service providers as required for
use of Products including without limitation, VOIP phone and Soft Phone software and hardware furnished by
Teltronics or its distributors or resellers (“Products”) for voice over internet protocol (“VOIP”) communications.
(b) Customer are responsible for complying with all laws, rules and regulations applicable to the installation
and use of Products (collectively, “Laws”) including without limitation all Laws relating to 911 dialing for emergency
service.
(c) 911 dialing to an appropriate public safety answering point (“PSAP”) for emergency service is limited
when using a VOIP phone and Soft Phone Product co-located with and connected to the switch Product at
Customer’s enterprise location because VOIP communication service may be interrupted, delayed, lost or
terminated due to various causes including but not limited to power outage, excessive bandwidth consumption,
termination of service with or by the network service provider and/ or other T1 provider, product, equipment,
software, system and/or network failures or computer viruses. It is strongly recommended that Customer make
alternative 911 dialing available to employees and other individuals at Customer’s enterprise via traditional wire
line service over the PSTN.
28xx CIP-D User Guide xiii
Page 16

(d) Prior to initiating the use of Products in conjunction with any IP network including Internet telephone
service for VOIP communications, Customer shall notify, in writing, each employee and any other person
authorized to use the Products for such VOIP communications (individually and collectively “User(s))” of the
following limitations:
911 DIALING TO AN APPROPRIATE PUBLIC SAFETY ANSWERING POINT (“PSAP”) FOR EMERGENCY
SERVICE IS NOT AVAILABLE WHEN USING ANY PORTABLE VOIP PHONE OR SOFTPHONE PRODUCT AT A
STREET ADDRESS THAT IS DIFFERENT FROM THE STREET ADDRESS OF THE END USER’S ENTERPRISE
WHERE ITS SWITCH IS LOCATED AND CONNECTED VIA AN IP NETWORK CONNECTION TO THAT
REMOTE LOCATION. DO NOT USE SUCH PORTABLE VOIP PHONE OR SOFT PHONE PRODUCT AT THE
REMOTE LOCATION TO PLACE 911 EMERGENCY CALLS BECAUSE SUCH PORTABLE VOIP PHONE OR
SOFT PHONE IS NOT CAPABLE OF COMMUNICATING THE STREET ADDRESS OF THE REMOTE
LOCATION.
EMERGENCY 911 CALLS SHOULD BE PLACED OVER A WIRE LINE PHONE AT THE REMOTE LOCATION
WHICH IS CONNECTED TO TRADITIONAL PUBLIC SWITCHED TELEPHONE NETWORK (“PSTN”) FOR
LOCAL SERVICE OR OTHER PHONE THAT IS CAPABLE OF COMMUNICATING THE STREET ADDRESS OF
THE REMOTE LOCATION TO HELP INSURE THAT SUCH EMERGENCY 911 CALLS ARE ROUTED TO THE
APPROPRIATE PSAP OPERATOR RESPONSIBLE FOR RESPONDING TO EMERGENCIES AT THE REMOTE
LOCATION.
USERS MUST WARN ALL INDIVIDUALS AT THE REMOTE LOCATION THAT SUCH PORTABLE VOIP PHONE
xiv 28xx CIP-D User Guide
Page 17

OR SOFT PHONE PRODUCT CAN NOT BE USED TO PLACE ANY SUCH EMERGENCY 911 CALLS FROM
THE REMOTE LOCATION BECAUSE OF THIS LIMITATION. USERS MUST INSTRUCT ALL INDIVIDUALS AT
THE REMOTE LOCATION TO PLACE ANY 911 CALLS FOR EMERGENCY RESPONSE TO THE REMOTE
LOCATION FROM A WIRE LINE PHONE AT THE REMOTE LOCATION WHICH IS CONNECTED TO THE
TRADITIONAL PSTN FOR LOCAL SERVICE OR OTHER PHONE THAT IS CAPABLE OF COMMUNICATING
THE STREET ADDRESS OF THE REMOTE LOCATION TO HELP INSURE THAT SUCH EMERGENCY 911
CALLS ARE ROUTED TO THE APPROPRIATE PSAP RESPONSIBLE FOR RESPONDING TO EMERGENCIES
AT THE REMOTE LOCATION.
(e) If Customer permits any User to use the VOIP phone or Soft Phone Product at a remote location
connected to the switch at Customer’s enterprise location, it is strongly recommended that Customer affix a non
removable label on the hand set of each VOIP phone or Soft Phone Product, prior to any such use that displays the
following clear and conspicuous warning.
DO NOT USE THIS PHONE TO DIAL 911 EMERGENCY SERVICE CALLS UNLESS USER IS PHYSICALLY
LOCATED AT THE FOLLOWING ADDRESS: (INSERT CUSTOMER’S ENTERPRISE ADDRESS WHERE THE
PSAP WILL RESPOND TO 911 EMERGENCY CALLS DIALED THROUGH THE SWITCH).
28xx CIP-D User Guide xv
Page 18

(f) Customer agrees to defend, indemnify and hold harmless Teltronics, its subsidiaries, affiliates and their
respective officers, directors, employees, distributor, agents and suppliers from any obligations, claims, suits,
demands, causes of action, losses, liabilities, fines, penalties, damages, costs, or expenses, (including without
limitation, attorneys fees), arising on account of any injury or death of persons, or damage to property asserted or
incurred by or on behalf of any User, governmental entity or any other party arising out of or resulting from (i) any of
Customer acts or omissions including without limitation, any failure of Customer to comply with any Laws; or (ii)
any use, inability to use, removal, failure, delay, error, breakdown, absence, outage or interruption of any telephone
service including emergency 911 call service over the Internet and/or PSTN or any software, hardware or Product
including without limitation, any VOIP phone or Soft Phone Product.
xvi 28xx CIP-D User Guide
Page 19

SUMMARY OF CHANGES
Revision A, January 2010
• Initial Release
Revision B, December 2010
• Added information for Arcata 2826 phone.
• Changed product name from Vision i-Phone
to Arcata
28xx CIP-D User Guide xvii
Page 20

xviii 28xx CIP-D User Guide
This page intentionally blank
Page 21

SAFETY INSTRUCTIONS
CAUTION
To reduce the risk of fire or injury to
persons, read and follow these
instructions before installing or
operating the Arcata 28xx CIP-D:
• Follow all warnings and instructions marked on
the unit and in the user and installation
documentation.
• Read the installation instructions before you
connect the system to its power source or to
the LAN/IP connector.
• Do not place this unit on any unstable surface.
It could fall causing serious damage or
impeding operation.
• Do not use this unit in a location where it may
come in contact with liquids. Be careful to not
spill any liquids onto or near this unit.
• Never place this unit near or over a radiator or
heat register.
• Unplug this unit from all connections before
cleaning. Do not use liquid or aerosol cleaners.
Use only a damp cloth for cleaning.
• Never push objects of any kind into this unit as
they can touch dangerous voltage points or
short-out parts that could result in a risk of fire
or electrical shock.
• Do not use the unit to report a gas leak while in
the vicinity of the leak.
• Do not disassemble the unit. Opening or
removing covers can expose you to
dangerous voltages or other risks. Incorrect reassembly can cause electrical shock during
subsequent use.
• Unplug this unit from all connections and refer
servicing to qualified personnel when it
requires repair work, service, or under the
following conditions:
28xx CIP-D User Guide xix
Page 22

- If the power supply cord or plug is
damaged or frayed.
- If liquid is spilled into the unit.
- If the unit is exposed to water or rain.
- If the unit does not operate normally
by following the operating
instructions.
- If the unit is dropped or the casing is
damaged.
- If the unit exhibits a distinct change in
performance.
• Ultimate disposal of this product should be
handled according to all national laws and
regulations.
FAILURE TO FOLLOW THESE INSTRUCTIONS MAY
VOID PRODUCT WARRANTY.
SAVE THESE INSTRUCTIONS!
xx 28xx CIP-D User Guide
Page 23

INTRODUCTION
This guide details how to operate the Teltronics
Arcata 2826 CIP-D and 2806 CIP-D phones
(henceforth referred to as the 28xx CIP-D phone,
unless specific differences are noted). See your
system administrator for configuration issues or
questions about installation and setup.
Be sure to read the SAFETY INSTRUCTIONS chapter
before using your phone. FCC and Warranty
information is detailed in the FCC REQUIREMENTS
chapter.
Digital Support on the 2826 Phone
The 2826 CIP-D is a business phone that transmits
voice data over dedicated two-wire copper pair.
The 2826 can connect to either an HDLU or an
HDLU2 digital card on the Cerato switch and be
configured as a digital endpoint.
See Configuring the 2826 Phone on page 24.
IP Support
The 28xx CIP-D is a business phone that transmits
voice data using the data network instead of
traditional telephone lines, taking advantage of
the economies of an existing network while
retaining the capabilities and reliability of a
standard telephone.
The 28xx CIP-D uses an IPEC to interface with the
Teltronics Cerato switch, thereby retaining all the
features of the Cerato and adding the
advantages of IP telephony.
28xx CIP-D User Guide 1
Page 24
INTRODUCTION
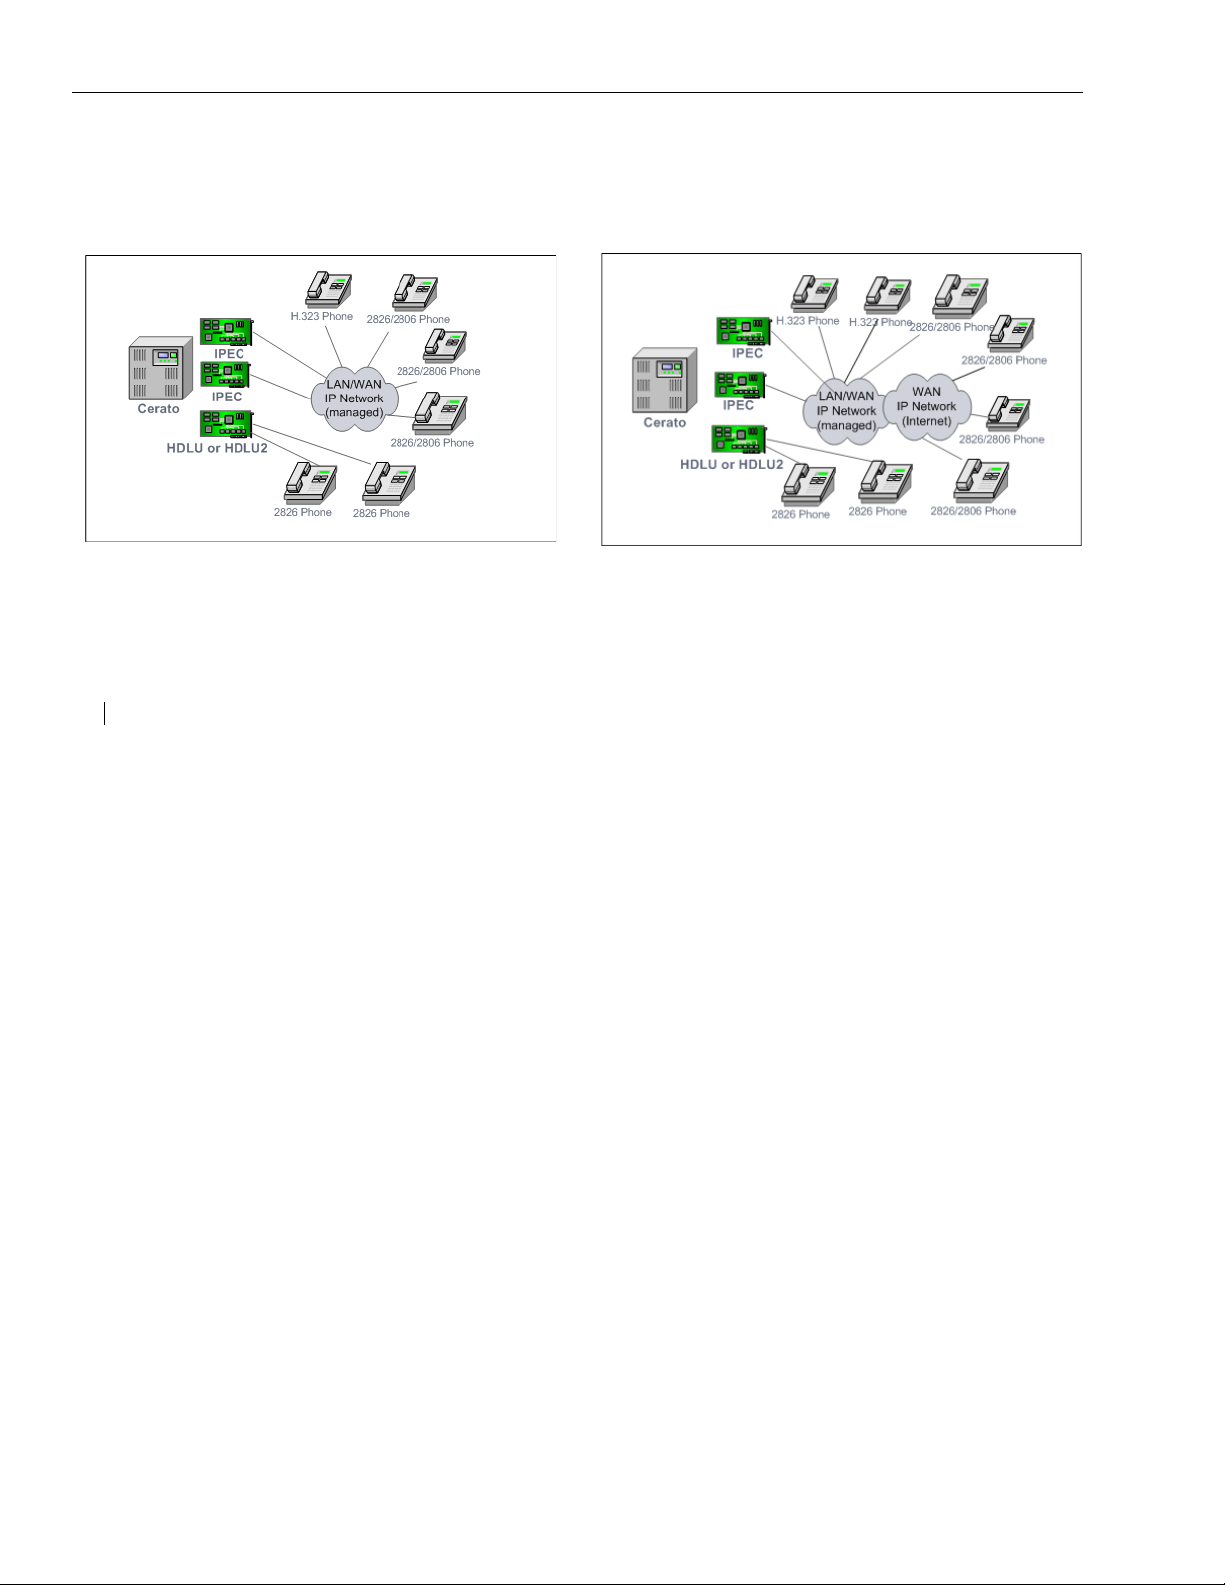
Voice over the Company Network
Voice over Internet
The 28xx CIP-D combined with an IPEC can be
used on the company data network, as shown in
Figure 1.
Figure 1. Voice over the company network
2 28xx CIP-D User Guide
The 28xx CIP-D can also be located at remote sites
by using WAN services such as the Internet, as
shown in Figure 2.
Figure 2. Voice over Internet
Page 25

INTRODUCTION
28xx CIP-D Features
The 28xx CIP-D has the following features:
* Does not apply to a 2826 phone configured for a
digital interface.
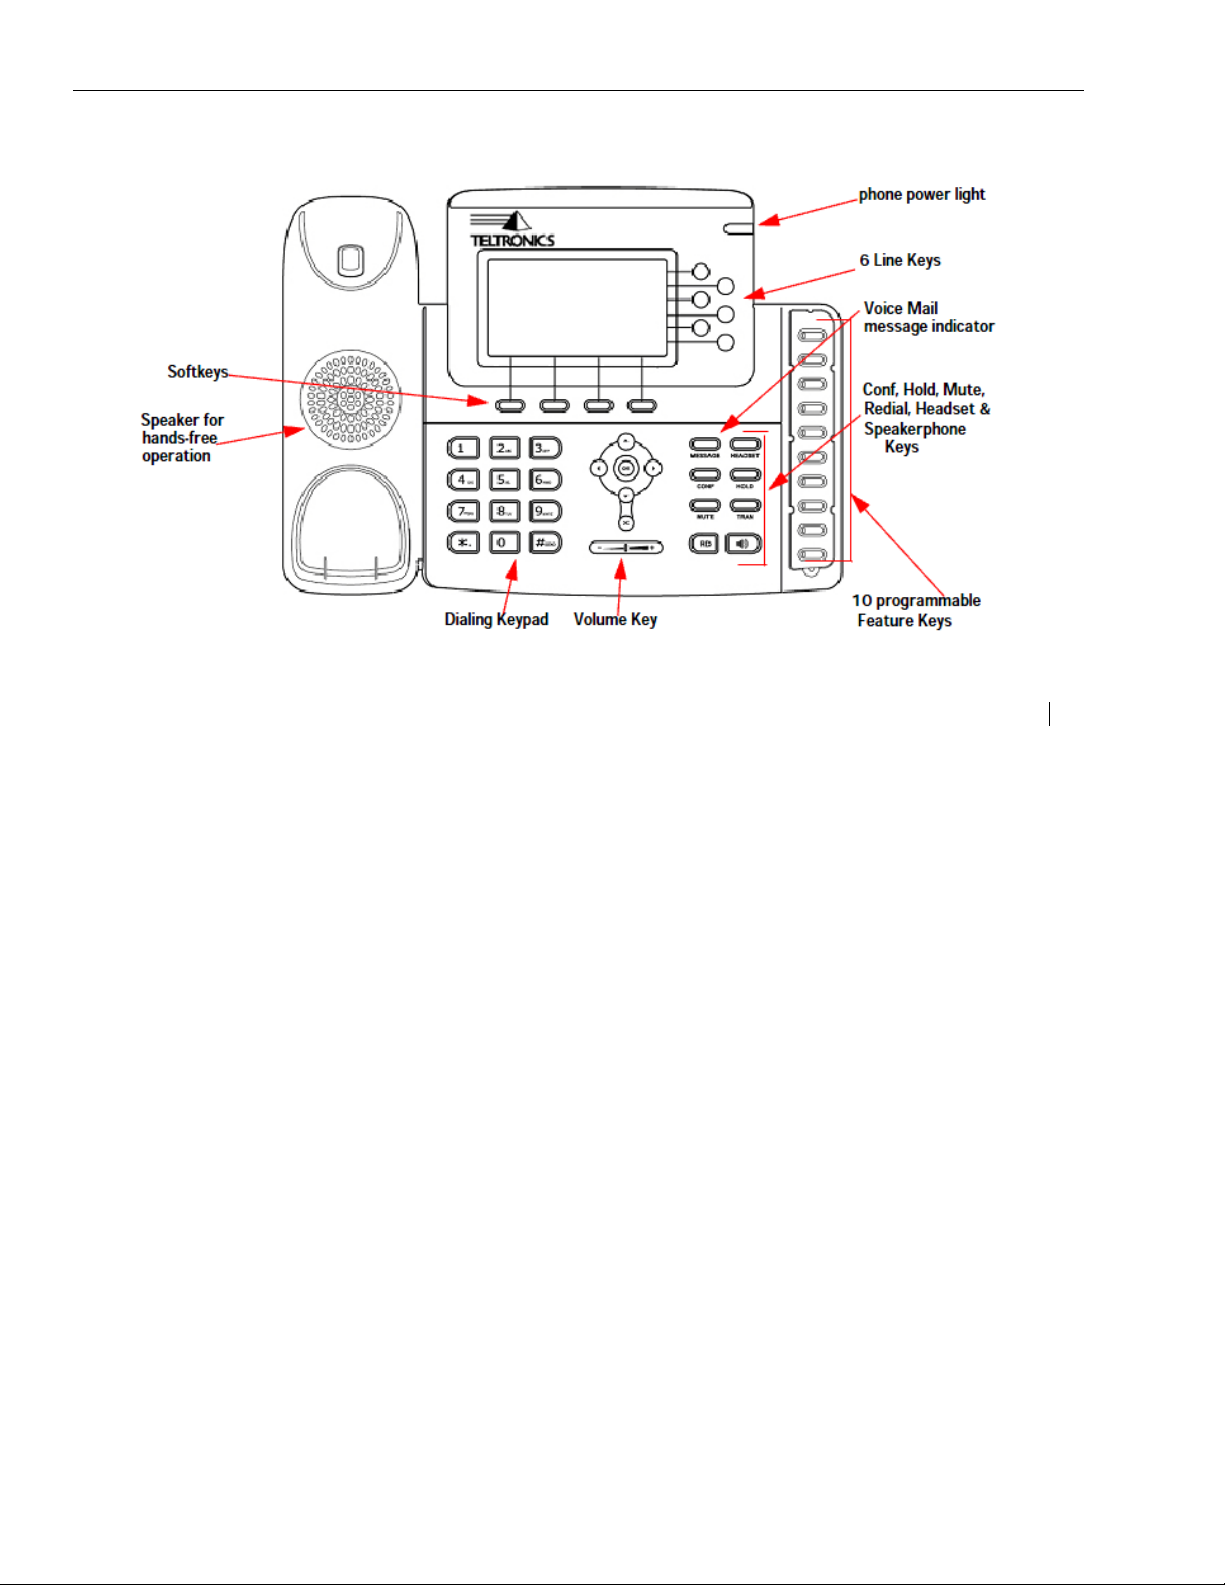
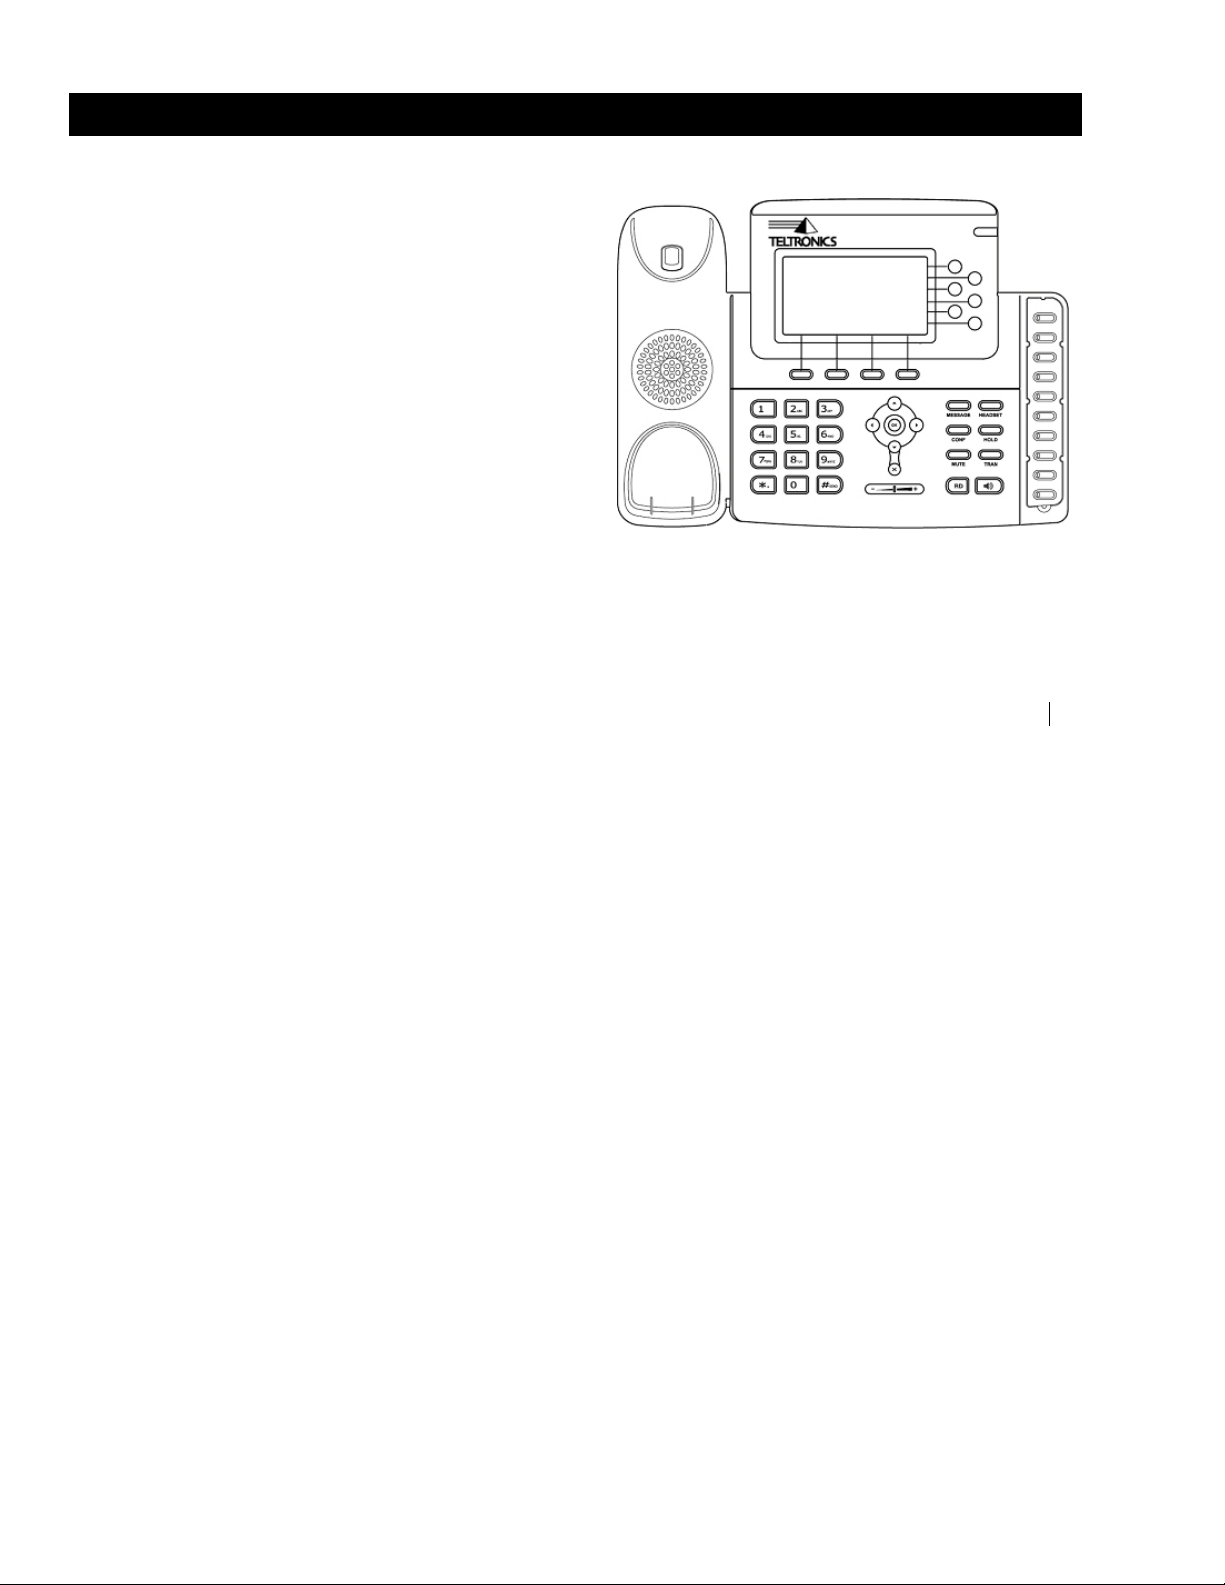
Keys and Indicators
• 4 Soft keys
• 6 LED LINE keys (with LED line-in-use
indicators)
• 10 Feature/Shared keys
• Optional BEM adds more keys depending
on configuration
• Headset indicator
• Speaker indicator
• Mute indicator
• Hold indicator
• Voice mail message indicator
• Privacy indicator
• Forward indicator
Display
• LCD – Text Display (9x22)
Audio
• Adjustable Handset Volume Control
• Hearing-Aid Compatible
• Adjustable Headset Volume Control
• Automatic Headset Detection
• 10 Ring Tones to select from
• 4-position modular headset jack
compatible with Plantronics and GN
Netcom business headsets
• Adjustable Speakerphone Volume
Control
28xx CIP-D User Guide 3
Page 26

INTRODUCTION
Phone Features
• Replay
• Date and Time
• 100 Entry Caller ID Log for Call History /
Logging
• Last 100 number Redial List for Outbound
Call Logging
• Message Waiting Indicator
• 100 Entry Directory
• 10 Entry Speed Dial List
• Advanced Call features (park,
conference, transfer)
Voice Mail Navigation
One touch access to:
• Time and Date
• Reply to Sender
• Play
• Save
4 28xx CIP-D User Guide
• Skip
• Delete
• Forward
Call Services
Quick access to:
• Call pickup (this extension, group)
• Page (by zone)
• COM
• Privacy
• Forward (all, busy, no answer)
• View Extension
Page 27

INTRODUCTION
Power options
• Power over LAN (IEEE Standard)
• AC Line Input
NOTE: The power for a 2826 Digital phone is
supplied from the tip and ring leads of the digital
port of the 20-20 switch.
Mechanical
• Size: 10.75” x 7.75” x 2.25”
• Weight: 2.2 lbs.
• Color: Black
Networking *
• Dual 10/100 Switch full/half-duplex
Ethernet ports
• 10/100 Base-T
• Auto Negotiation & Parallel Detection
• RJ-45, Category 5 per IEEE 802.3
Audio Codec Supported *
• G.711, G. 729AB
• Automatic Codec Negotiation
• Voice Activity Detection (VAD)
• Silence Suppression
Voice Transport *
• G.711, G.729AB
• Receive Jitter Buffer Provisioning
• Packetization Rate Provisioning
Quality of Service (QoS) *
• 802.1q
• 802.1p
• VLAN
28xx CIP-D User Guide 5
Page 28

INTRODUCTION
Certifications *
• DNS Support
• TIA 810
• USA FCC Part 15, Class A
• USA ULC
• IEEE Standard 802.3af option B
Protocols *
• TCP/IP (Transmission Control Protocol /
Internet Protocol)
• UDP (User Datagram Protocol)
• RTP (Real Time Transport)
DTMF Support *
• In-band DTMF Signaling
• Out-of-band DTMF signaling
IP Address Configuration *
• DHCP
• Static Address
6 28xx CIP-D User Guide
Configuration
• Password Protection
• Remote software upgrade
• Mass update of software upgrades
• Menu based configuration of system
settings
• Directory, speed dial, redial, call record
migration
Page 29
Components
INTRODUCTION
Figure 3. Arcata 28xx CIP-D Components
28xx CIP-D User Guide 7
Page 30
INTRODUCTION
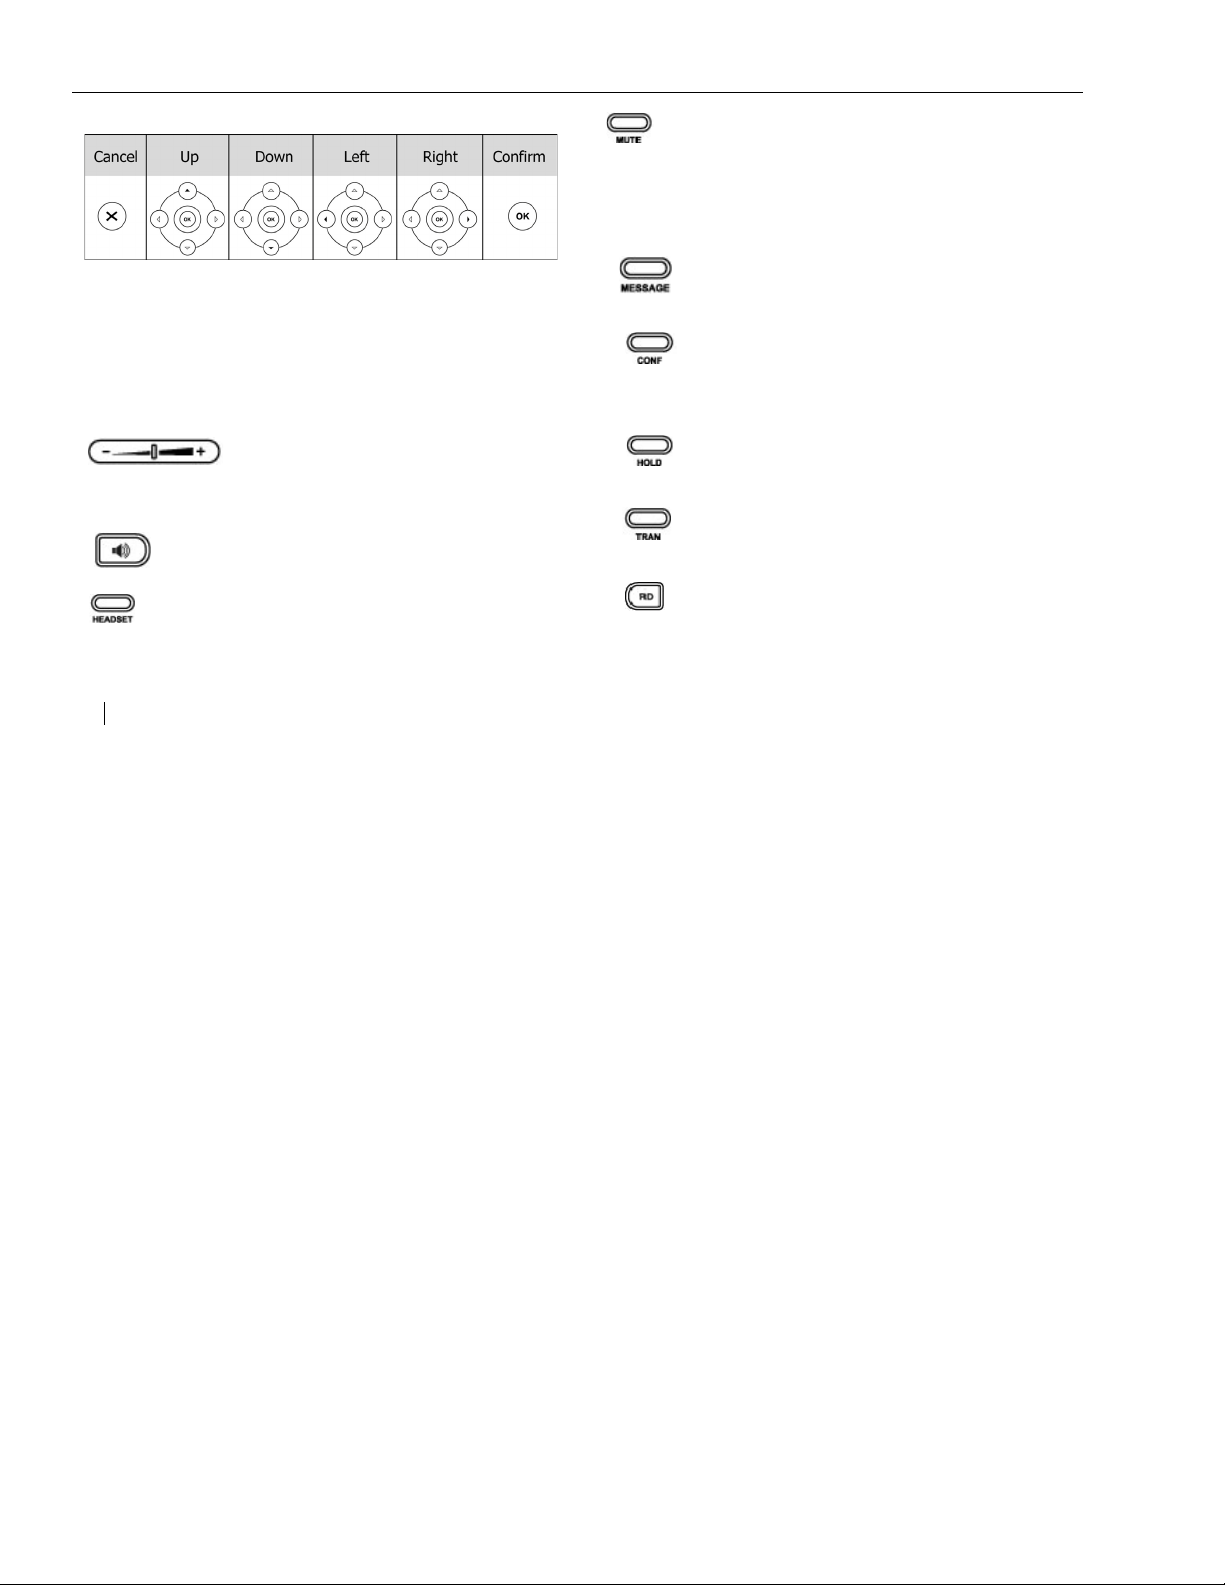
Navigation Keys
Mute audio transmission locally during
calls.
Hard Feature Keys
Use the navigation keys to move within the display
menus and to confirm or cancel actions.
Audio Device Control Keys
Use the audio device control keys to perform the
following actions depending on your phone type:
Adjust the volume of the handset,
headset, speaker, and ring tone.
Speakerphone: allows for hands-free
communication during calls.
Place and receive calls through an
optionally connected headset. The LED is on when
the phone is in Headset mode.
8 28xx CIP-D User Guide
Allow users to access voice mail directly.
Enable setup of a local multiple line
conference.
Place a call on hold or resume it.
Transfer current call to third party.
Dials most recently dialed number.
Page 31

INTRODUCTION
Icon Instruction
The phone displays different kinds of icons on its
LCD. Refer to the following table for their
meanings:
Icons Description
Missed calls
Call in
Call out
Input Method: all letters and
Input Method: numbers
Input Method: letters in lower case
Input Method: letters in upper case
Call mute
Call hold
Voice mail
Call forward
DND (Do not Disturb)
In Handset mode
In Headset mode
In Speakerphone mode
28xx CIP-D User Guide 9
Page 32
INTRODUCTION
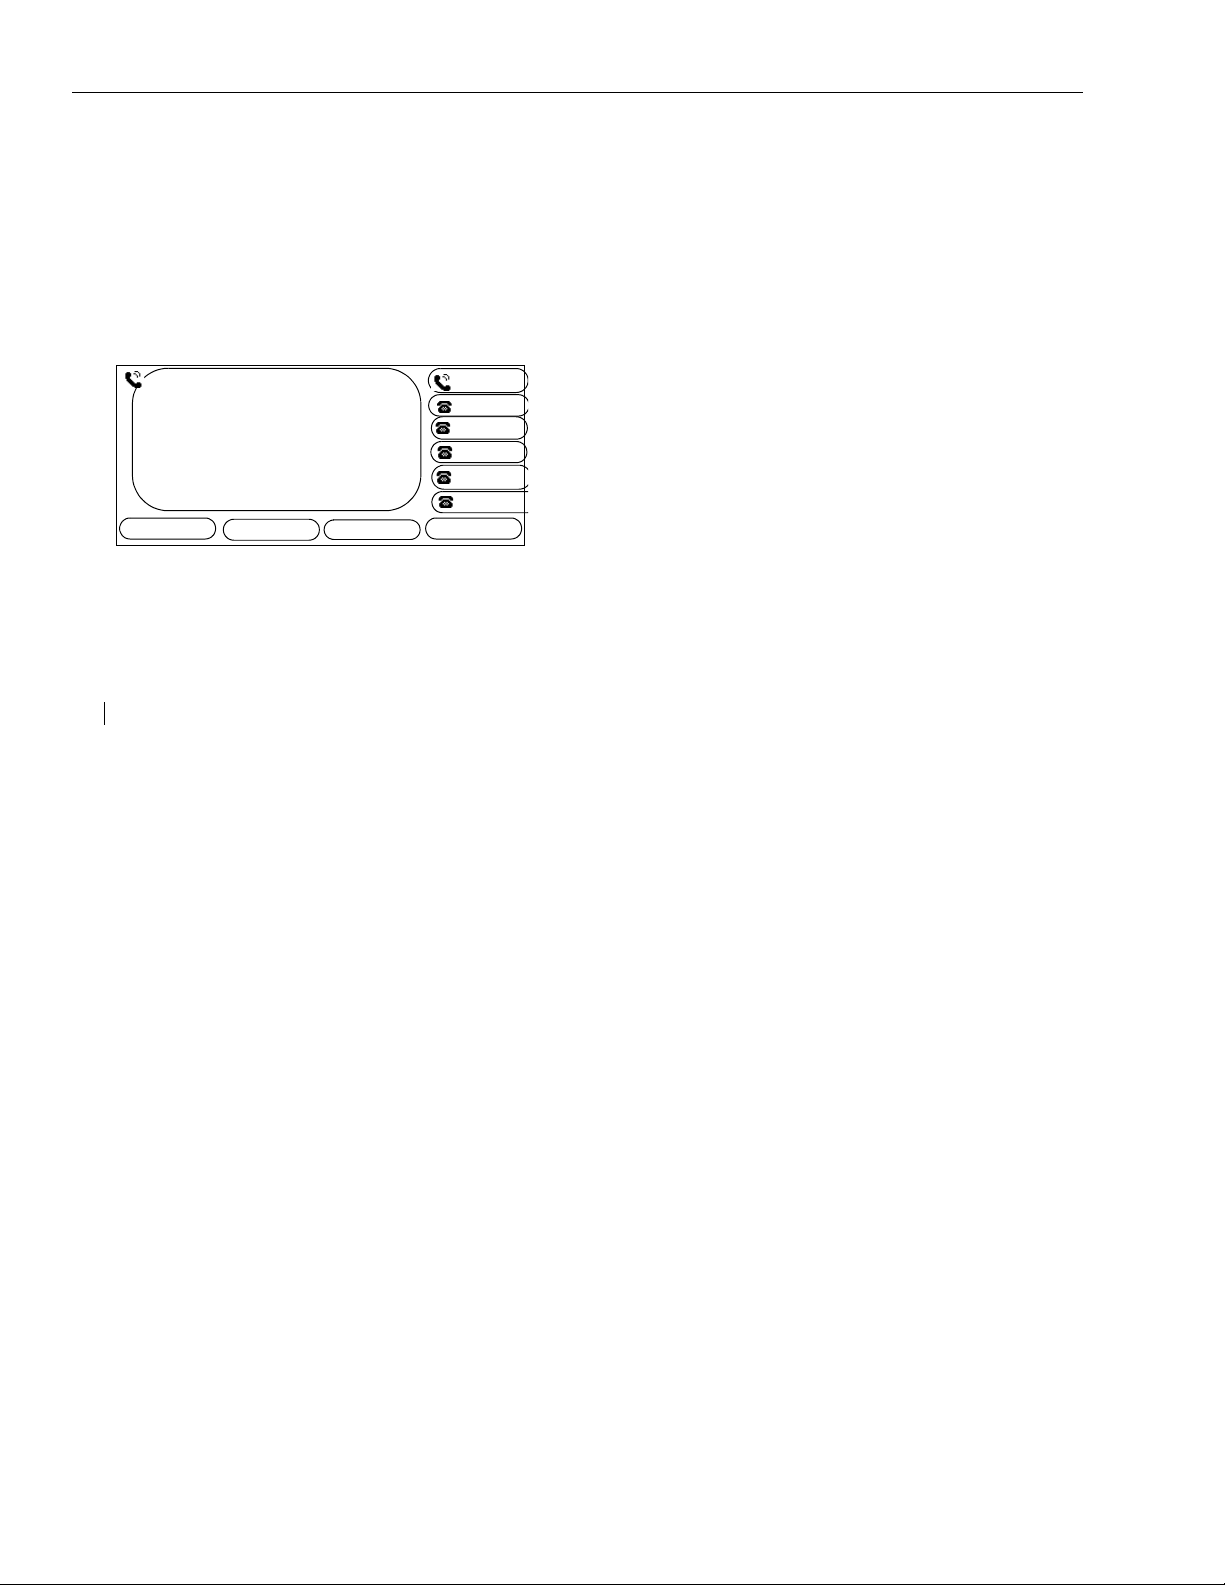
TUE DEC 29 11:42 AM
LINE 1 -IN CALL
T CRAMER
2155254
SMITH
HOLD
CONF
MORETRANSFER
DURATION: 1:14
Quick Tour of the 28xx CIP-D
LCD Operation
The 28xx CIP-D was designed to be easy to
operate. The functionality of the phone is detailed
in alphabetical, step-by-step instructions in the
Using the Arcata 28xx CIP-D chapter.
This section gives extra tips on using the LCD
menus so you can quickly start using the phone.
Refer to Figure 1, Arcata 28xx CIP-D Components,
when reading this section.
Call Answered LCD Screen
10 28xx CIP-D User Guide
The 28xx CIP-D has Feature/Share keys that the
System Administrator can configure for various
features, such as:, Intercom (COM), Park, Redial,
Account Code Calling, Appointment Reminder,
and Callback.
Note that you can create soft labels the first six
features via the Line Key Labels menu accessed
via the Menu soft key.
In addition to the feature/share keys and the
traditional physical keys on the 28xx CIP-D has four
soft keys located below the LCD that are used
with menus that display on the LCD.
Page 33

INTRODUCTION
10 Feature Keys
5 Feature Keys + 1 Line key
Soft keys
Soft keys change functionality depending on
what screen is displayed on the LCD.
Purpose of LCD
The LCD is used for viewing system information
and to set up and use the phone’s features. In
addition, the system administrator uses the screens
on the LCD to install and configure your 28xx CIPD.
Accessing LCD menus
You can access the LCD by pressing the following
keys:
• Soft keys located directly below the LCD (i.e.
HISTORY, DIRECTORY, FEATURES, MENU)
• VOLUME key
• NAVIGATE keys - changes LCD pages
• and the Feature/Shared keys
To view system information about your phone, see
VIEWING PHONE SETTINGS on page 81. Note that
only the System Administrator can change system
settings.
28xx CIP-D User Guide 11
Page 34

INTRODUCTION
Navigating the LCD menus
The following list describes how to navigate menus
displayed on the LCD:
• Selecting an option on LCD menu - press
the LCD key below the option.
• BACK - returns to the last LCD menu
page.
• SAVE - saves the changes and returns to
the last LCD menu page.
• CANCEL - deletes the changes on the
selected LCD page and returns to the
previous LCD menu page
• Dialing Keypad - Press keys on the Dialing
Keypad to enter letters and numbers on
the LCD. Press the key more than once
to select subsequent letters (for example,
press the ‘2’ key 3 times to get a ‘C’).
• Period Delimiter - To get the period
delimiter (e.g. 172.168.40.2) to display,
use the Asterisk (*) key on the Dialing
Keypad.
• NAVIGATE keys - Press the Up and Down
and Left and Right Arrows on the
NAVIGATE group of keys to access
subsequent pages on multiple page
menus on the LCD (for example, PG 1 of
2). LCD Menu pages display
corresponding arrows.
• RIGHT - used to add a space, such as
between a first and last name.
• BACK - used to replace a wrong
character.
• CLEAR - used to quickly remove the entire
character string.
• DIAL - dials the entry
• ADD TO SPEED DIAL - copies the current
entry to the Speed Dial List
12 28xx CIP-D User Guide
Page 35

• ADD TO CONTACTS - copies the current
entry to the Contact List
INTRODUCTION
28xx CIP-D User Guide 13
Page 36

INTRODUCTION
This page intentionally blank.
14 28xx CIP-D User Guide
Page 37
PHONE SETUP
Getting Started
Packing List
The following components are included in your
package. Check this list before installation to
ensure that you have received each item. If you
are missing any items, contact your IP phone
reseller.
• Arcata 28xx CIP-D
28xx CIP-D User Guide 15
Page 38

PHONE SETUP
• Phone Stand
• Ethernet Cable
•Power Adapter
Note The AC Power Adaptor is not
provided in the packing list. Please
contact your distributor for more
information
16 28xx CIP-D User Guide
Page 39
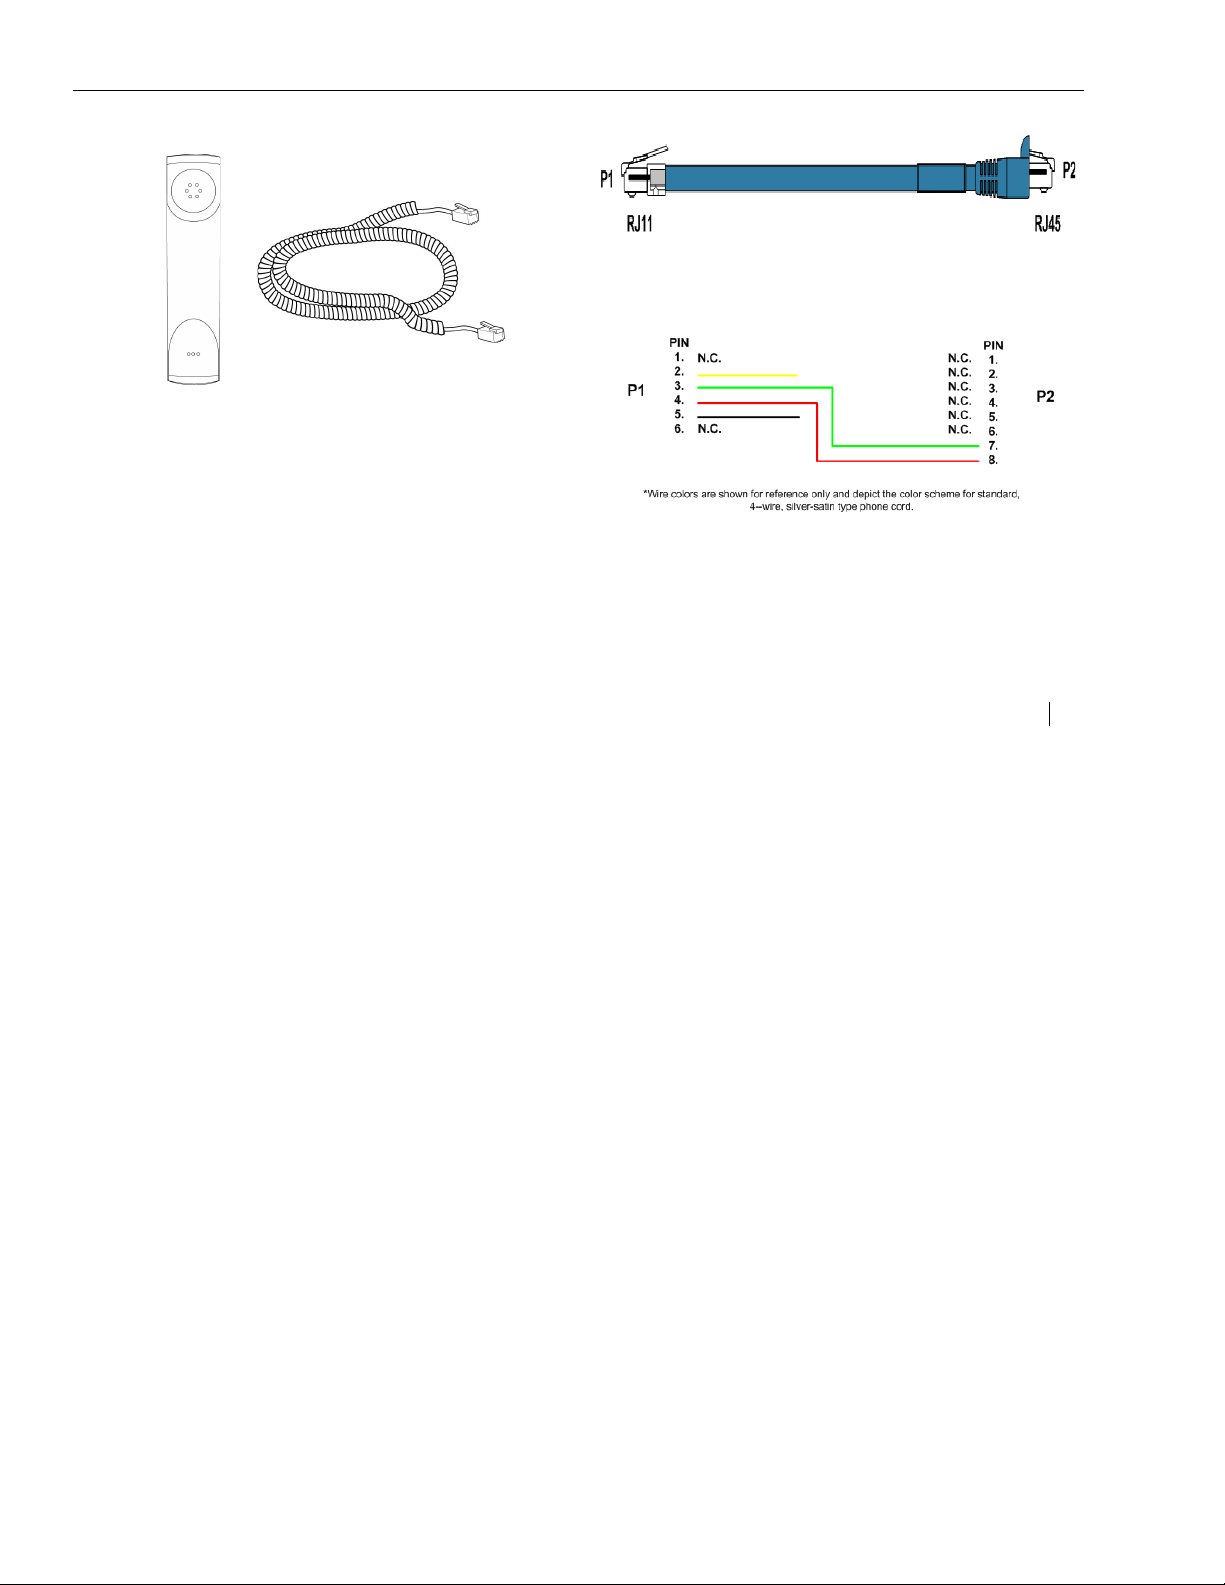
• Handset & Handset Core
• RJ11-to-RJ45 cable
This cable is provided for 2826 phones
configured as a digital endpoint. Use the
cable to connect the PC port on the back of
the 2826 phone to the RJ11 connection on an
HDLU or HDLU2 card in the 20-20.
A 10’ cable (p/n: 551-2000-0182) is supplied
with the phone. A 20’ cable (p/n: 551-2000-
0183) can be ordered separately.
PHONE SETUP
Figure 4. RJ11-to-RJ45 Cable
Figure 5. RJ11-to-RJ45 Cable Pinout
28xx CIP-D User Guide 17
Page 40

PHONE SETUP
Assembling the Phone
This section shows how to assemble the phone
with the components in the packing list.
1. Attach the stand.
2. Connect the handset and headset.
Note Headset is not provided in the
packing list. Please contact your
distributor for more information
18 28xx CIP-D User Guide
Page 41
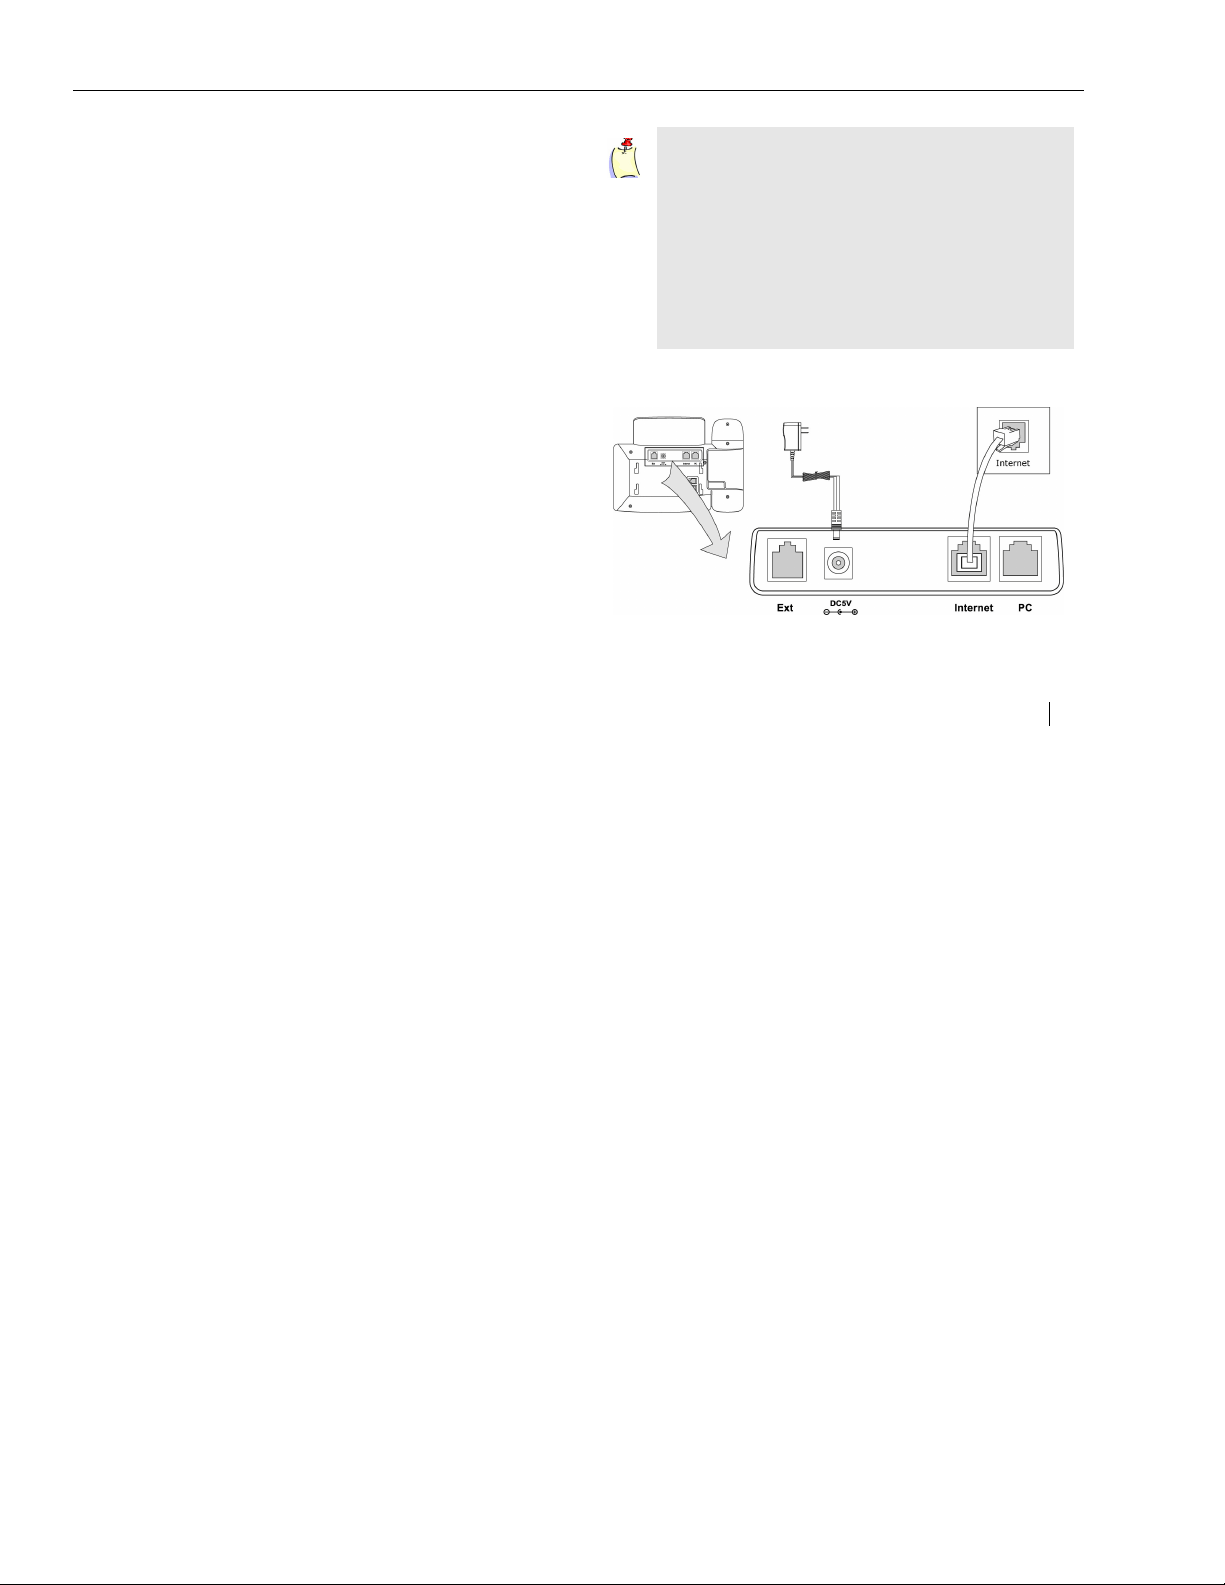
3. Connect to the network and power.
NOTE: If you are using a 2826 phone as a digital
endpoint, see Configuring the 2826 Phone on
page 24.
You can connect the network and power
source in either of two ways. (Your system
administrator will advise you on which one to
use):
• Use a PoE-compliant switch or hub.
IMPORTANT: Do not connect a 2826
phone configured as a digital endpoint
to a PoE-compliant switch or hub.
• Connect the phone to the AC power
directly using the power adapter.
PHONE SETUP
Note If inline power is provided, do not
install the AC adapter. Make sure the
Ethernet cable and switch/hub is PoE
compliant (except for a 2826 configured
as a digital endpoint).
The Internet Port can also be connected
to a Hub/Switch/IP PBX or other internet
devices.
28xx CIP-D User Guide 19
Page 42

PHONE SETUP
4. The 28xx phone can also share the network
connection with other network devices, such
as a PC. Connect the phone’s PC port and the
computer’s network port using an Ethernet
cable, as shown below.
NOTE: If you have a 2826 phone configured as a
digital endpoint, you connect the PC port to the
Cerato 20-20 using the special cable provided.
See RJ11-to-RJ45 cable on page 17.
5. Press the OK button on the Navigation Keys.
The phone will reboot, and on your PC you
should see the phone connecting and
downloading the rom file.
When the phone comes back up, verify that
the correct firmware version has been loaded
by pressing the Menu soft key and then the
DTMF digit 2.
6. Disconnect the Ethernet Cable from the
phone.
20 28xx CIP-D User Guide
Page 43

PHONE SETUP
Installing an Expansion Module (Optional)
The Teltronics EXP38 Expansion Module is designed
for improving the power and flexibility of Teltroncis
phones. It features 38 fully programmable DSS keys
each with a dual-color LED, connected to and
controlled by the phone with an RJ-12 cable line.
NOTE: The Cerato System supports a total of 48
buttons. In addition to the 19 buttons on the 28xx
phone, you can configure up to 29 buttons on the
Expansion Module.
Teltronics phones support the functions such as
speed dialing, BLF, Shared, and Park on each of
the programmable buttons on the EXP38.
The Teltroncis EXP38 is ideal for receptionists,
administrative assistants, power users, and
executives who need to monitor and manage a
large volume of calls on a regular basis.
Packing List
The Expansion Module includes the following
parts:
Specifications
• 2xRJ-12(6P6C) ports for data in and out
• Weight: 255g
• Dimensions: 132x143x42mm
• Operating humidity: 10~95%
• Storage temperature: max 140 F (60 C)
28xx CIP-D User Guide 21
Page 44
PHONE SETUP
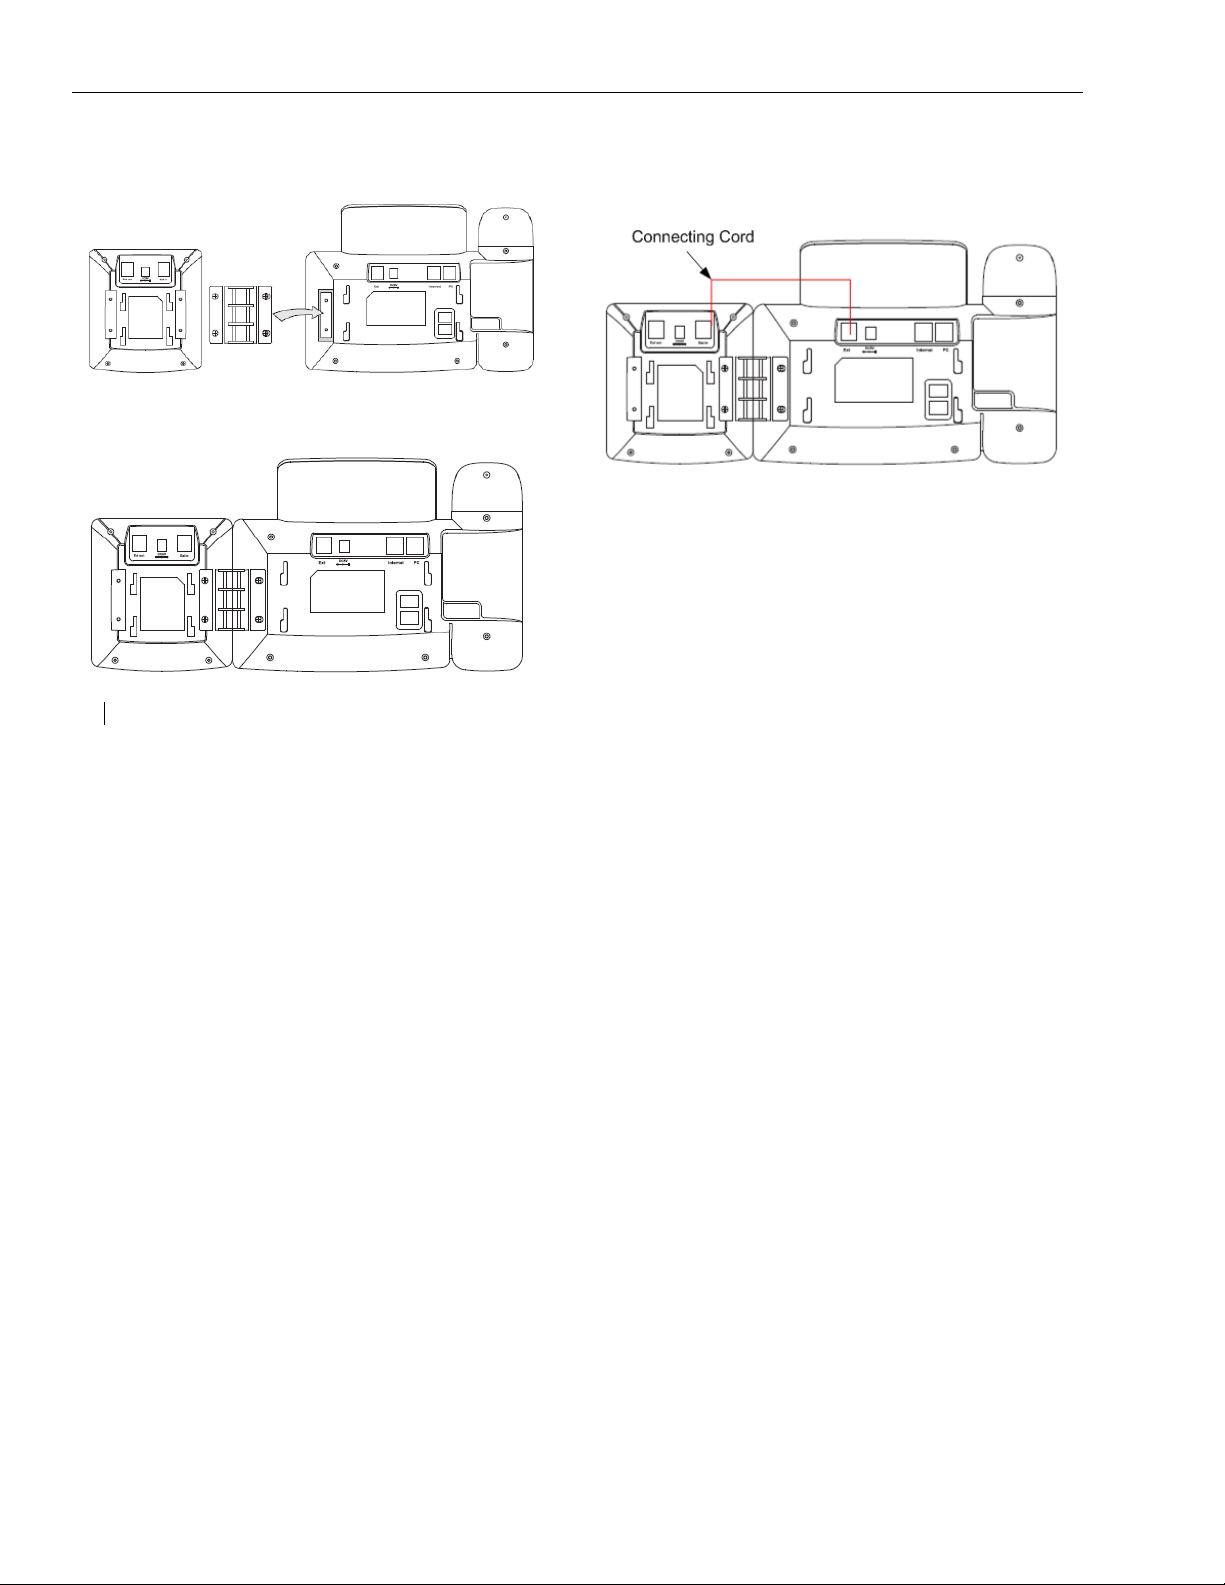
Steps
1. Use the connecting sheet and screw to
connect the EXP38 to the phone.
The EXP38 and the phone should be connected
as shown below:
2. Plug the connecting cord into the Ext jack of
the phone and then to the Ext jack on the
Expansion Module.
3. Connect the stands and the user-supplied
power adapter.
22 28xx CIP-D User Guide
Page 45

Expansion Module Numbering
When configuring the Expansion Module buttons
in the Cerato System, the buttons are numbered
as shown below:
PHONE SETUP
28xx CIP-D User Guide 23
Page 46

PHONE SETUP
Downloading Firmware from the Cerato 20-20
This section is intended for System Administrators.
Do not make any changes to youre phone
without consulting System Administrator.
NOTE: Requires Cerato 20-20 switch software
release 4.3 or above.
If you have no other way to download firmware to
the phone, you can enable the Switch Download
feature to have the phone download new
firmware from the Cerato 20-20.
Note that this method takes considerably longer
than TFTP. You should disable the feature after
downloading firmware.
1. Press the Menu button.
2. Press DTMF digit 3 (Modify Settings).
3. Press DTMF digit 3 (Phone Settings).
4. Press DTMF digit 4 (Switch Dwld).
5. Use the right Navigation Key to select Enable.
Configuring the 2826 Phone
NOTE: This section is intended for System
Administrators. Do not make any changes to
youre phone without consulting System
Administrator.
Digital Interface Loop Limits
• Digital Interface Loop Limits
26 AWG - 500 m for Tip and Ring
• Digital Interface Power Requirements
2.5 W supplied by the switch
24 28xx CIP-D User Guide
Page 47

PHONE SETUP
Line Type
The 2826 can connect to either an HDLU or an
HDLU2 digital card on the Cerato switch.
Configure the Line Type according to the card to
which the phone is connected.
To configure the Line Type:
1. Press the Menu button.
2. Press DTMF digit 3 (Modify Settings).
3. Press DTMF digit 3 (Phone Settings).
4. Press DTMF digit 3 (Line Type).
5. Use the right Navigation Key to select the
desired Line Type.
Converting the 2826 to CIP-D or SIP
The 2823 phone is configured as a digital
endpoint. To change the phone to a CIP-D or SIP
endpoint, perform the following:
1. Setup a TFTP Server and load the appropriate
firmware files provided by Teltronics:
T28.rom (SIP)
ccip.rom (CIP-D)
2. Connect an Ethernet Cable to the Ethernet
port on the back of the phone.
The phone will come up using DHCP.
3. On the phone, press the Menu soft key
followed by the DTMF digit 2.
4. Write down the IP configuration that the
phone received from DHCP: IP Address, IP
Netmask, and IP Gateway.
5. Power down the phone by disconnecting the
Ethernet cable.
28xx CIP-D User Guide 25
Page 48

PHONE SETUP
6. Press and hold the Speaker button while you
plug the Ethernet cable back into the Internet
port and continue pressing while the phone
boots up.
The phone will boot up in “Safe Mode”,
allowing you to upgrade the phone.
7. Enter the IP address from step 4.
8. Enter the IP address of the TFTP Server where
the rom files are located.
9. In the Protocol field select the desired
application (SIP or CIP-D).
NOTE: Use the down Navigation Keys to move
through fields. Use the right Navigation Key to
select the Protocol.
10. Press the OK button on the Navigation Keys.
The phone will reboot, and on your PC you
should see the phone connecting and
downloading the rom file.
11. When the phone comes back up, verify that
the correct firmware version has been loaded
by pressing the Menu soft key and then the
DTMF digit 2.
12. Disconnect the Ethernet Cable from the
phone.
26 28xx CIP-D User Guide
Page 49

USING THE ARCATA PHONE
This chapter details step-by-step instructions (in
alphabetical order) on how to use the Arcata
28xx CIP-D. Click on a procedure to go to that
page.
ACCOUNT CODE CALLING
ANSWERING CALLS
APPOINTMENT REMINDER
CALLBACK
CANCEL/HANG UP
CONFERENCE
CONTACT LIST
DIAL
DIRECTORY
FEATURES
FORWARD
HEADSET
HOLD
INTERCOM (COM) CALLING
LINE KEY LABELS
MENU
MUTE
PAGE
PARK
PARK PICKUP
PICKUP (Group and Directed)
PRIVACY
REDIAL
RING TONES
SPEAKERPHONE
SPEED DIAL
TIME AND DATE
TRANSFER
VIEW EXTENSION
VOICE MAIL
VOLUME
WEB CONFIGURATION
28xx CIP-D User Guide 27
Page 50

USING THE ARCATA PHONE
ACCOUNT CODE CALLING
The Account Code Calling feature is used to bill a
call to an specific account or project.
Check with your system administrator about the
exact method of entering an account or project
identification number.
Note See the ACCESS CODES AND AUDIBLE TONES
chapter for a table of access codes for your
phone.
To set up Account Code Calling:
1. Lift the handset and dial the Account Code
Calling access code _______.
2. Dial the specific account or project
identification number.
3. Dial * to indicate the end of the specific
account or project identification number.
Hear a dial tone.
28 28xx CIP-D User Guide
4. Dial the desired external telephone number,
using the access code for an outside line (e.g.,
‘9’) and area code.
Page 51

ANSWERING CALLS
TUE DEC 29 11:42 AM
LINE 1 -INCOMING
T CRAMER
2155254
SMITH
ANSWER
MENU
MORE
TUE DEC 29 11:42 AM
LINE 1 -IN CALL
T CRAMER
2155254
SMITH
HOLD
CONF
MORE
TRANSFER
DURATION: 1:14
USING THE ARCATA PHONE
When an incoming call comes into the Arcata
28xx CIP-D, the following screen appears on the
LCD:
Incoming Call LCD Screen
To answer a call:
1. Do one of the following:
• Lift the handset. or press the ANSWER soft key
or
•Press the SPEAKER or LINE key to turn on the
Speakerphone.
•Press the HEADSET key. The headset is
automatically detected if connected to the
Headset port on the back of the phone.
Note The Line Key LED turns green.
2. Start speaking to the caller.
Call Answered LCD Screen
28xx CIP-D User Guide 29
Page 52

USING THE ARCATA PHONE
Automatic Ringing Line Selection:
If multiple calls come in simultaneously, when you
lift the handset, press SPEAKER, LINE X, or HEADSET,
the lowest numbered line is answered.
Automatic Idle Line Selection:
If you have a call on hold (or accessed from a
Shared appearance on another phone) when
you lift the handset, press SPEAKER, LINE X, or
HEADSET, the next available Line is selected.
To hang up:
Do one of the following:
• Replace the handset or press the LINE key.
•Press the SPEAKER key.
•Press the HEADSET key.
Related topics: Park, Conference, Hold, Transfer,
Hangup, Speakerphone, Headset
30 28xx CIP-D User Guide
Page 53

APPOINTMENT REMINDER
USING THE ARCATA PHONE
The Appointment Reminder feature lets you set up
a reminder call that will ring at a specified time.
You can set up a maximum of three reminder calls
within 24 hours.
Note See the ACCESS CODES AND AUDIBLE TONES
chapter for a table of access codes for your
phone.
Note See the System Administrator to see if the
Timed Reminder or Remote Timed Reminder
features have been enabled for your phone.
To set up a reminder call:
1. Dial the Set Up Access Code:__________
2. Hear the confirmation tone,
3. Enter the time of the reminder in a 24-hour
format (i.e., 0600 = 6:00 am).
4. Hear the confirmation tone.
5. Replace handset.
To cancel a reminder:
1. Dial the Cancel Access Code:__________
2. Hear the confirmation tone. The reminder is
cancelled.
Remote Appointment Reminder:
The Remote Appointment Reminder lets you set
up or cancel a reminder call for another
extension.
To set up a remote reminder call:
1. Dial the Remote Set Up Access
Code:__________
2. Hear the confirmation tone.
3. Dial extension number.
4. Hear the confirmation tone.
5. Enter the time of the reminder in a 24-hour
format (i.e., 0600 = 6:00 am).
28xx CIP-D User Guide 31
Page 54

USING THE ARCATA PHONE
6. Hear the confirmation tone.
7. Replace handset.
To cancel a remote reminder:
1. Repeat Steps 1 - 4 using the Remote Cancel
Access Code: _______
32 28xx CIP-D User Guide
Page 55

CALLBACK
USING THE ARCATA PHONE
There are several types of Callback described
here:
•station
•trunk
Note See the ACCESS CODES AND AUDIBLE TONES
chapter for a table of access codes for your
phone.
Station Callback
The Callback feature places an automatic
callback on an extension that is busy or does not
answer. When the party you called hangs up or
returns and uses his or her phone once, your
extension will ring. If you answer the callback, the
system dials the extension.
To set up a Station Callback:
1. When making a call, you hear the busy signal
or the call rings without being answered.
2. Dial the Callback Access Code (2) or press the
Callback feature button if configured by the
System Administrator. Hear the confirmation
tone.
3. Replace the handset.
4. Hear ringing.
5. Lift the handset and wait for answer.
To cancel a Station Callback:
1. Dial the extension with Callback set up and
then replace the handset.
28xx CIP-D User Guide 33
Page 56

USING THE ARCATA PHONE
To set up On-Hook Queueing (Trunk Callback):
1. After you dial for an outside line, hear the Offhook Queue tone (three beeps followed by a
hold tone), or the On-Hook Queue tone (a
repeated sequence of three tones in a rising
scale).
2. Dial the Callback Access Code (2) or press the
Callback feature button if configured by the
System Administrator. Hear the confirmation
tone.
3. Hang up.
4. When you hear the triple ring callback, lift the
handset and wait for the called party to
answer.
Note When there are no available outside lines to
place your call, “On-Hook Queueing” lets you
hang up and remain in queue for one. Once an
outside line is available, “Off-Hook Queueing”
automatically calls you back with a triple-ring.
After you answer the callback, “On-Hook
Queuing” redials the party’s number for you.
34 28xx CIP-D User Guide
Page 57

CANCEL/HANG UP
Depending on the current procedure in progress,
there are several ways to hang up or cancel a call
or operation.
To cancel or hang up a call:
Do one of the following:
• Replace the handset or press the LINE key.
•Press the SPEAKER key.
•Press the HEADSET key.
To cancel an LCD operation:
Press the CANCEL or BACK soft key.
Related topics: Answering calls, Speakerphone,
Headset
USING THE ARCATA PHONE
28xx CIP-D User Guide 35
Page 58

USING THE ARCATA PHONE
TUE DEC 29 11:42 AM
LINE 1
T S
MITH
5254
SMITH
CANCEL CONNECT
MENU
MORE
DURATION: 0:58
TUE DEC 29 11:42 AM
LINE 1 - IN CALL
CONFERENCE
SMITH
CANCEL
CONNECT
MENU
MORE
DURATION: 0:18
CONFERENCE
The Conference feature allows you to talk with
two or more parties simultaneously.
To use the Conference feature:
1. While in conversation with the first party:
2. Press the CONF key or soft key. The first party is
put on hold as you hear dial tone.
Call in Progress LCD Screen
3. Dial the extension or phone number of the
second party.
4. When the second party answers, you may
36 28xx CIP-D User Guide
speak with him or her while the first party is still
on hold.
5. Press the Conf key or the Connect soft key to
connect all three parties in conference..
In Conference Screen
6. Repeat steps 3 through 5 to add more parties
to the conference call.
Note Press the More soft key, then the End Call soft
key to cancel the conference.
Related topics: Answering calls, Speakerphone,
Headset, Cancel/Hangup, Transfer
Page 59
CONTACT LIST
CAROL BAKER
JOHN SMITH
TERESA DUNN
BACK
CONTACT L IST 1/3
2110
2113
2117
OPTION
DIAL
ADD
0. CAROL BAKER
1. JOHN SMITH
2. TERESA DUNN
BACK
SELECT POSITION
2110
2113
2117
OPTION
DIAL
DELETE
USING THE ARCATA PHONE
The Contact list enables you to build your own list
of contacts to quickly dial, get detail about the
call, or add to the Speed Dial list.
Contact List screen
To open the Contact List:
1. Press the Directory soft key.
2. Scroll to the Contact List option and press OK.
The Contact List page appears.
To Dial a contact:
Scroll to the entry of the caller you wish to dial and
press the Dial soft key. The extension rings.
To Copy a contact to Speed Dial:
1. From the main Contact List screen, scroll to the
desired caller, then press the Option soft key. A
submenu opens.
2. Scroll to the Add to Speed Dial option and
press OK. The Select Position screen appears.
Select Position screen
28xx CIP-D User Guide 37
Page 60

USING THE ARCATA PHONE
1. NAME:
2. NUMBER:
CAN-
ADD CONTACT
DELETE
SAVE
AB3
CAROL BAKER
JOHN SMITH
TERESA DUNN
CANCEL
CONTACT L IST 1/3
OK
DETAIL
ADD TO SPEED
D
IAL
DELETE
3. Scroll to the position in the list you wish to add
the contact to and press the Select soft key.
The Detail screen for that contact appears.
4. Press the Save soft key.
The call record is added to the Speed Dial list.
To add a new listing to the Contact List:
1. Press the Add soft key. The Add Contact
screen displays.
4. Press the ABC soft key to toggle to the 123 soft
key, then enter the extension of the new
contact.
5. Press the Save soft key. The new contact
appears in the Contact List.
.To edit an existing contact:
1. Press the Option soft key. A submenu opens.
.
Add Contact Screen
2. Press the Ab3 soft key to toggle to the ABC soft
key, then enter the name of the new contact
3. Scroll down to the Number: field.
38 28xx CIP-D User Guide
Contact Screen
Page 61

2. Scroll to the Detail option on the submenu and
1. NAME:
2. NUMBER:
CANCEL
CAROL BAKER
DELETE
SAVE
AB3
CAROL BAKER
3244
press the OK soft key. The edit screen for the
selected contact opens.
3. Use the Delete soft key and the Ab3/ABC/123/
abc toggle soft keys to change the name
and/or number of the contact.
To delete a Contact:
1. Scroll to the desired contact.
2. Press the Option soft key.
3. Scroll to the Delete option and press OK. The
contact is removed from the Contact List.
USING THE ARCATA PHONE
Related topics: Answering calls, Speakerphone,
Headset, Directory, Speed Dial
28xx CIP-D User Guide 39
Page 62

USING THE ARCATA PHONE
TUE DEC 2911:42 AM
T
IMER: 0:11
LINE 1
5254
SMITH
HISTORY DIRECTORY
FEATURES
MENU
TUE DEC 2911:42 AM
L
INE 1 - IN CALL
TGW
5230
S
MITH
HISTORY
DIRECTORY
MORE
DIAL
To Dial a call:
Note The Arcata 28xx CIP-D has six LINE keys for
incoming and outgoing calls.
1. Do one of the following to get dial tone:
• Lift the handset or press a LINE key
•Press the SPEAKER key to turn on the
Speakerphone, or start dialing digits to
automatically select the Speakerphone
•Press the HEADSET key. The headset is
automatically detected if connected to the
phone.
On Hook Screen
40 28xx CIP-D User Guide
2. Press the keys on the Dialing Keypad of the
number you wish to dial, using the outside line
access code, if necessary. The number is
dialed.
Dialing Ext 5230 screen
Note See the ACCESS CODES AND AUDIBLE TONES
chapter for the outside line access code for your
phone.
Page 63

3. When the other party answers, the LCD screen
TUE DEC 2911:42 AM
L
INE 1 - IN CALL
R JONES
5230
S
MITH
HOLD
TRANSFER
CONF
MORE
DURATION: 0:49
below appears:
Connected to Ext 5230 Screen
USING THE ARCATA PHONE
28xx CIP-D User Guide 41
Page 64

USING THE ARCATA PHONE
1. CONTACT LIST
2. SPEED DIAL LIST
BACK
DIRECTORY MENU
DIRECTORY
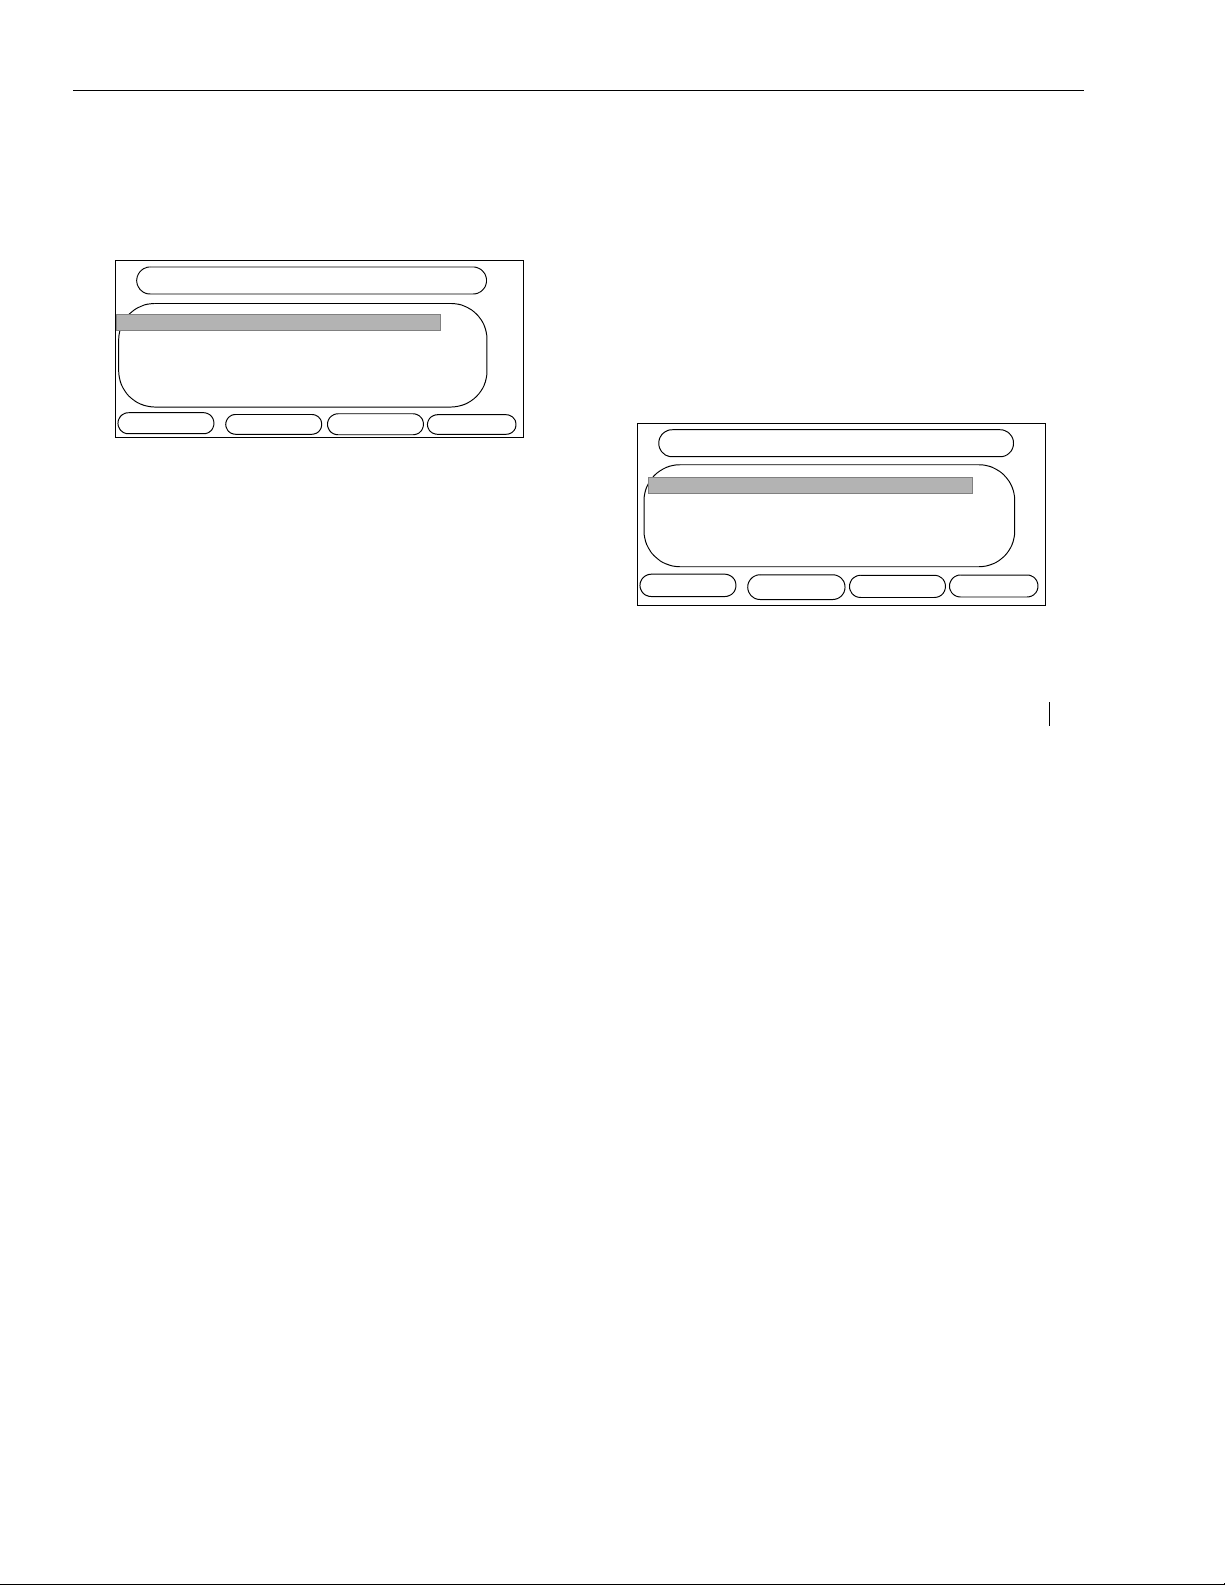
The Directory soft key provides access to the
Contact and Speed Dial lists.
1. Press the Directory soft key. The Directory
Menu page appears:
Directory Screen
To access the Contact List:
1. Scroll to the Contact List option and press OK.
2. See the instructions on using the Contact List in
this chapter.
42 28xx CIP-D User Guide
To access the Speed Dial List:
1. Scroll to the Speed Dial List option and press
OK.
2. See the instructions on using the Speed Dial List
in this chapter.
Related topics: Contact List, Speed Dial
Page 65

FEATURES
1. PRIVACY ON
2. FORWARD
3. PICKUP
4. PAGE
5. VIEW EXTENSION
6. COM
BACK
FEATURES
USING THE ARCATA PHONE
The Features soft key allows you to access several
miscellaneous features as shown on the Features
LCD screen:
Features LCD Screen
To access Features:
1. From the mainscreen, press the Features soft
key. The Features menu appears.
2. Scroll down to a desired feature and press OK.
The Features page accesses the following
features:
• PRIVACY
•FORWARD
• PARK PICKUP
•PAGE
• VIEW EXTENSION
• INTERCOM (COM) CALLING
3. Click on a feature in Step 2 to see details
about it.
Related topics: Privacy, Forward, Park, Pickup,
Page, View Extension, Intercom (COM) Calling
28xx CIP-D User Guide 43
Page 66

USING THE ARCATA PHONE
1. PRIVACY ON
2. FORWARD
3. PICKUP
4. PAGE
5. VIEW EXTENSION
6. COM
BACK
FEATURES
FORWARD
T
O:
CANCEL
FORWARDING
FORWARD
The Forward feature allows you to specify what
type of calls to forward to another extension when
the Forward feature is turned on:
• all calls
•busy
•no answer
•busy or no answer
To Forward a call:
1. Press the Features soft key to display the
Features menu:
Features Screen
44 28xx CIP-D User Guide
2. Scroll to the Forward option and press OK.
Forwarding Screen
3. Enter an extension to forward calls to on the
Dialing Keypad.
Page 67

USING THE ARCATA PHONE
1. ALL CALLS
2. BUSY
3. NO ANSWER
4. BUSY OR NO ANSWER
CANCEL
FORWARDING MODE
1. PRIVACY ON
2. CANCEL FORWARD
3. PICKUP
4. PAGE
BACK
FEATURES
The Forwarding Mode menu displays.
Forwarding Mode Screen
4. Select a Forwarding option. The Forward
feature is activated and a blinking Forward
icon appears on the main screen to indicate
the feature is on, until you cancel it as
described in the next section.
To Cancel Forwarding:
1. Press the Features soft key to display the
Features menu.
Features Screen to toggle off Forward
2. Toggle to the Cancel Forward option. The
Forward icon is removed from the main screen
and the feature toggled off.
Related topics: Answering calls, Speakerphone,
Headset.
28xx CIP-D User Guide 45
Page 68

USING THE ARCATA PHONE
HEADSET
The Arcata 28xx CIP-D automatically detects a
headset when a headset is connected to the
phone as described here.
To connect a headset to the Arcata 28xx CIP-D:
1. Plug the headset into the HEADSET port on the
bottom of the phone.
2. ? Unplug the handset from the HANDSET port
on the left side of the Arcata 28xx CIP-D and
plug it into the Headset.
To toggle from headset/handset:
1. Press the HEADSET key. The phone will toggle
between the headset and the Phone port on
the handset.
Note To change the volume on the headset, see
VOLUME section on page 75.
46 28xx CIP-D User Guide
To hang up a call:
1. Press the HEADSET or LINE key.
Related topics: Answering calls, Speakerphone,
Headset
Page 69

HISTORY
USING THE ARCATA PHONE
The History list provides several different ways of
viewing the last up to 100 previous calls:
• All Calls
• Dialed Calls
• Received Calls
•Missed Calls
To scroll from list to list, press the left or right
Navigate keys.
The lists are menus of the last 100 callers in the
order they were received. When a call is received,
the caller’s information (a call record) is stored in
the History list. If the maximum number of calls is
reached for the History list, when the newest
(101st) call record comes in, the oldest (1st) is
overwritten.
You can review details, dial, delete and copy the
call record to the Speed Dial or Contact lists with
the History feature.
The History lists use icons to the left of the caller’s
name to describe the type of call.
See the following table for a description of the
icons:
Icon Description
dialed calls
missed calls
received calls
28xx CIP-D User Guide 47
Page 70

USING THE ARCATA PHONE
TGW
J JONES
C KRAMER
B SMITH
BACK
ALL CALLS 1/100
5220
5208
5217
3232
OPTION
DIAL
DELETE
To Dial a caller:
Scroll to the entry of the caller you wish to dial and
press the Dial soft key. The extension rings.
To get details about a caller:
When calls come in that you miss, a text message
‘1 missed call’ appears on the phone main
History screen
To open the History list:
Press the History soft key.
To scroll through the History lists:
From the History list main page, use the left and
right Navigation keys to scroll through the four
types of organized History lists: All Calls, Dialed
Calls, Received Calls, Missed Calls.
48 28xx CIP-D User Guide
screen. Details about these calls can be viewed
on the History screen, as follows.
1. From the main History screen, scroll to the
caller you wish to get details for, then do one
of the following:
•press the Option soft key, then select Detail
•press OK
Page 71

USING THE ARCATA PHONE
1. NAME:
2. NUMBER:
3. TIME:
4. D
URATION
BACK
J JONES
J DENVER
5208
12/29/09 04:51 PM
1:14
OPTION
DIAL
DELETE
The call record for that person displays.
Call Detail Screen
To Copy a call record to Speed Dial:
1. From the main History screen, scroll to the
desired caller, then press the Option soft key.
2. Scroll to the Add to Contacts option and press
OK.
The call record is added to the Speed Dial list.
To Copy a call record to the Contacts list:
1. From the main History screen, scroll to the
desired caller, then press the Option soft key.
2. Scroll to the Add to Contacts option and press
OK.
The call record is added to the Contacts list.
To delete a record from the History list:
1. From the main History screen, scroll to the
desired caller, then press the Option soft key.
2. Scroll to the Delete All option and press OK.
The call record is deleted from the History list.
To delete all records from the History list:
1. From the main History screen, press the Option
soft key.
2. Scroll to the Delete All option and press OK.
The Warning screen appears.
3. Press the Yes soft key to answer the question
‘Delete all records?’
Related topics: Park, Conference, Transfer,
Hangup, Speakerphone, Headset
28xx CIP-D User Guide 49
Page 72

USING THE ARCATA PHONE
TUE DEC 2911:42 AM
L
INE 1 - IN CALL
R JONES
5230
S
MITH
HOLD
TRANSFER
CONF
MORE
DURATION: 0:49
TUE DEC 2911:42 AM
L
INE HOLDING
R JONES
5230
S
MITH
RESUME-
M
ENU
MORE
To place a caller on hold:
1. While in conversation:
HOLD
Call Answered LCD Screen
2. Press the HOLD key or soft key. The LINE key LED
blinks green while the caller is placed on hold.
50 28xx CIP-D User Guide
To remove a caller from hold:
3. Press the blinking LINE key or the Resume soft
key. The caller is removed from hold and you
can begin talking.
Related topics: Answering calls, Speakerphone,
Headset
Page 73

INTERCOM (COM) CALLING
TUE DEC 2911:42 AM
LINE 1-DIALING
SMITH
HISTORY
DIRECTORY
MORE
USING THE ARCATA PHONE
COM calls (internal only) override “Call Forward”
and ring the called extension with a distinctive
tone. COM calls to shared secondary extensions
can be answered by anyone in the group.
To establish an intercom call:
1. Press the Features soft key to open the
Features menu.
2. Scroll to the Com option and press OK. The
dialtone plays.
3. Enter an extension for the Intercom call in the
Dialing Keypad. The extension rings, overriding
the forwarding feature setup.
.
Intercom (COM) calling Screen
To place Callback or Call Waiting on a
“Forwarded” extension using COM calling:
1. Hang up after reaching the ‘forwarded to’
destination.
2. Press the COM soft key, or dial the COM calling
access code, followed by the extension. Hear
a busy tone or ringback.
28xx CIP-D User Guide 51
Page 74

USING THE ARCATA PHONE
3. Do one of the following:
• Dial the Callback access code (2) while
hearing a busy tone or ringback
• Dial the Call Waiting access code (8) while
hearing a busy tone
52 28xx CIP-D User Guide
Page 75

LINE KEY LABELS
1. LINE 1
2. L
INE 2
3. L
INE 3
4. L
INE 4
CANCEL
LINE KEY LABELS
EXT 3044
E
XT 3045
G
RACE KELLY.
J
OHN THOMAS
DELETE
MENU
AB3
USING THE ARCATA PHONE
The first six feature/shared keys on the phone can
be labeled via soft labels as follows:
To configure soft labels on the first six feature/
shared keys:
1. Press the Menu soft key. The Main Menu opens.
2. Scroll to the Line Key Labels option and press
OK. The Line Key Labels page appears.
Line Key Labels Screen
3. Scroll to the desired label position (1,2 or 3)and
use the Ab3/123/ABC/abc soft keys to enter
an alphanumeric label for the line key.
4. Press the Save soft key. The ‘Settings Changed:
Save and Reboot?’ screen appears.
5. Press the Save soft key again. The phone
reboots and the new label appears on the
LCD screen.
Related topics: Answering calls, Hold, Dial
28xx CIP-D User Guide 53
Page 76

USING THE ARCATA PHONE
1. RING TONES
2. SYSTEM INFORMATION
3. MODIFY SETTINGS
4. LINE KEY LABELS
5. ERASE DATA
BACK
MAIN MENU
MENU
The Menu soft key provides access to the following
features:
• Ring Tones - change ring sounds
• System Information - view info about the
phone
• Modify Settings - System Administrator use only
• Line Key Labels - add soft labels to the first six
feature/shared keys
• Erase Data - System Administator use only
To access the Main Menu, press the Menu soft key.
Main Menu Screen
54 28xx CIP-D User Guide
To access a Feature in the Main Menu:
1. Scroll to a desired feature in the Main Menu
and press OK.
2. See the instructions on using the feature in this
chapter.
Related topics: Contact List, Speed Dial
Page 77

MUTE
TUE DEC 29 11:42 AM
LINE 1 - IN CALL
JENNY JONES
2353030
SMITH
HOLD
CONF
MORE
TRANSFER
Mute
On
MUTE
DURATION: 0:44
USING THE ARCATA PHONE
The Mute feature allows you to put a caller on a
one-way hold; you can still hear them, but they
cannot hear you.
To mute a call:
1. While in conversation:
2. Press the MUTE key. The call is muted and the
MUTE icon and text appear on the main
screen.
Mute On Screen
To remove mute:
3. Press the Mute key again. The caller is
removed from mute and can hear you again.
Related topics: Answering calls, Hold
28xx CIP-D User Guide 55
Page 78

USING THE ARCATA PHONE
TGW
J J
ONES
C KRAMER
B SMITH
BACK
ALL CALLS 1/100
5220
5208
5217
3232
OPTION
DIAL
DELETE
Current Page # Total Page #’s
Up and
Down
Arrows
Left and
Right
Arrows
NAVIGATE
The Navigate keys (Up, Down, Left, and Right)
allow you to scroll through LCD screens with
multiple pages (indicated by arrows):
Navigation Arrow Keys
History Screen, Page 1 of 100
Related topics: Answering calls, Speakerphone,
Headset
56 28xx CIP-D User Guide
Page 79

PAGE
1. PRIVACY ON
2. FORWARD
3. PICKUP
4. PAGE
BACK
FEATURES
USING THE ARCATA PHONE
The Page feature connects you to one of the preconfigured zones in order to announce a page.
See your System Administrator for details on the
zones configured for your system. Note that the
number of zones available depends on the
paging system used.
Use this form to note the page zones configured
for your system:.
Zone Area Description
1 typically used for ‘all zones’
2
3
4
5
6
7
8
To make a page:
1. Press the Features soft key. The Features screen
appears.
Call Services LCD Screen
28xx CIP-D User Guide 57
Page 80

USING THE ARCATA PHONE
TUE DEC 29 11:42 AM
LINE 1 - IN CALL
ENTER ZONE
SMITH
END CALL
MENU
MORE
2. Scroll to the Page option and press OK. The
Enter Zone prompt appears.
Enter Zone screen
3. Enter the number of the zone you wish to page
on the Dialing Keypad.
4. Announce your page. The page is made for
the selected zone.
Related topics: Answering calls, Speakerphone,
Headset
58 28xx CIP-D User Guide
Page 81

PARK
TUE DEC 29 11:42 AM
LINE 1 - IN CALL
JENNY JONES
2353030
SMITH
HOLD
CONF
MORE
TRANSFER
DURATION: 4.20
USING THE ARCATA PHONE
The Park feature allows you to transfer or park a
call at an extension without ringing that extension,
while not interfering with the operation of that
extension.
To use Park:
See your System Administrator to set up the Park
feature for your phone.
1. While on a call:
2. Press the More soft key.
3. Press the Park soft key.
4. Enter the extension to park the call at. The call
is parked at that extension.
NOTE: See PARK PICKUP on page 60 for details on
how to pick up a parked call.
Related topics: Park Pickup (Group and Directed),
Answering Calls
28xx CIP-D User Guide 59
Page 82

USING THE ARCATA PHONE
1. PRIVACY ON
2. FORWARD
3. PICKUP
4. PAGE
BACK
FEATURES
EXTENSION:
CANCEL
PICK UP CALL
SELF
GROUP
PARK PICKUP
The Park Pickup feature allows you to pick up a
parked call at your or another extension.
To pick up a parked call on your extension:
1. Go to any phone on the system.
2. Press the Features soft key. The Features Menu
appears.
3. Scroll to the Pickup option and press OK. The
Pick Up Call page appears and the dial tone
plays.
4. Do one of the following:
• Enter the extension you wish to pick up a
parked call from using the Dialing Keypad
•Press the Self soft key to pick up the call at your
extension
5. The parked call is transferred to the
designated extension and you or the
individual answering the call may start
speaking to the caller.
Related topics: Answering calls, Speakerphone,
Headset, Park, Pickup (Group and Directed)
60 28xx CIP-D User Guide
Page 83

PICKUP (Group and Directed)
1. PRIVACY ON
2. FORWARD
3. PICKUP
4. PAGE
BACK
FEATURES
EXTENSION:
BACK
PICK UP CALL
SELF
GROUP
USING THE ARCATA PHONE
Directed Call Pickup:
A Directed Call Pickup lets you answer another
ringing extension from your phone.
To Pickup a ringing, parked, or camped on call:
1. From your phone:
2. Press the Features soft key.
The Features Menu appears..
3. Scroll to the Pickup option and press OK. The
Pick Up Call page appears and the dial tone
plays.
4. Enter the ringing, parked, or camped on
extension number.
5. Start speaking to the caller.
28xx CIP-D User Guide 61
Page 84

USING THE ARCATA PHONE
1. PRIVACY ON
2. FORWARD
3. PICKUP
4. PAGE
BACK
FEATURES
EXTENSION:
CANCEL
PICK UP CALL
SELF
GROUP
Group Call Pickup:
A Group Call Pickup allows you to pickup a ringing
extension without dialing the extension number,
provided the extension is in your pickup group.
To Pickup a ringing call within your pickup group:
1. From your phone:
2. Press the Features soft key.
The Features Menu appears..
3. Scroll to the Pickup option and press OK. The
Pick Up Call page appears and the dial tone
plays.
4. Do one of the following:
•Press the GROUP LCD key to answer a call
ringing at another extension in your Pickup
Group. If more than one extension in your
Pickup Group is ringing, you will be connected
to the call that arrived first.
• Enter the extension number of the phone you
wish to answer the ringing call from.
5. Start speaking to the caller.
Related topics: Answering calls, Speakerphone,
Headset, Park, Park Pickup
62 28xx CIP-D User Guide
Page 85

PRIVACY
1. PRIVACY ON
2. FORWARD
3. PICKUP
4. PAGE
BACK
FEATURES
TUE DEC 29 11:42 AM
LINE 1
2304
SMITH
HISTORY
FEATURES
MENU
DIRECTORY
Privacy On Indicator DND or Do Not Disturb
USING THE ARCATA PHONE
The Privacy feature allows you to place your
telephone in a temporary ‘busy’ condition to
prevent incoming calls. Callers to your extension
will hear a busy tone. Outgoing calls are
unaffected, but incoming calls will hear a busy
signal or are transferred to Voice Mail.
To toggle the Privacy feature:
1. Press the Features soft key to display the
Features menu:
Features Screen
2. Scroll to the Privacy On or Off option and press
OK to toggle it on or off. When Privacy is on,
and the Privacy icon (DND) appears on the
main screen when Privacy is on.
Features Screen
Related topics: Answering calls, Speakerphone,
Headset
28xx CIP-D User Guide 63
Page 86
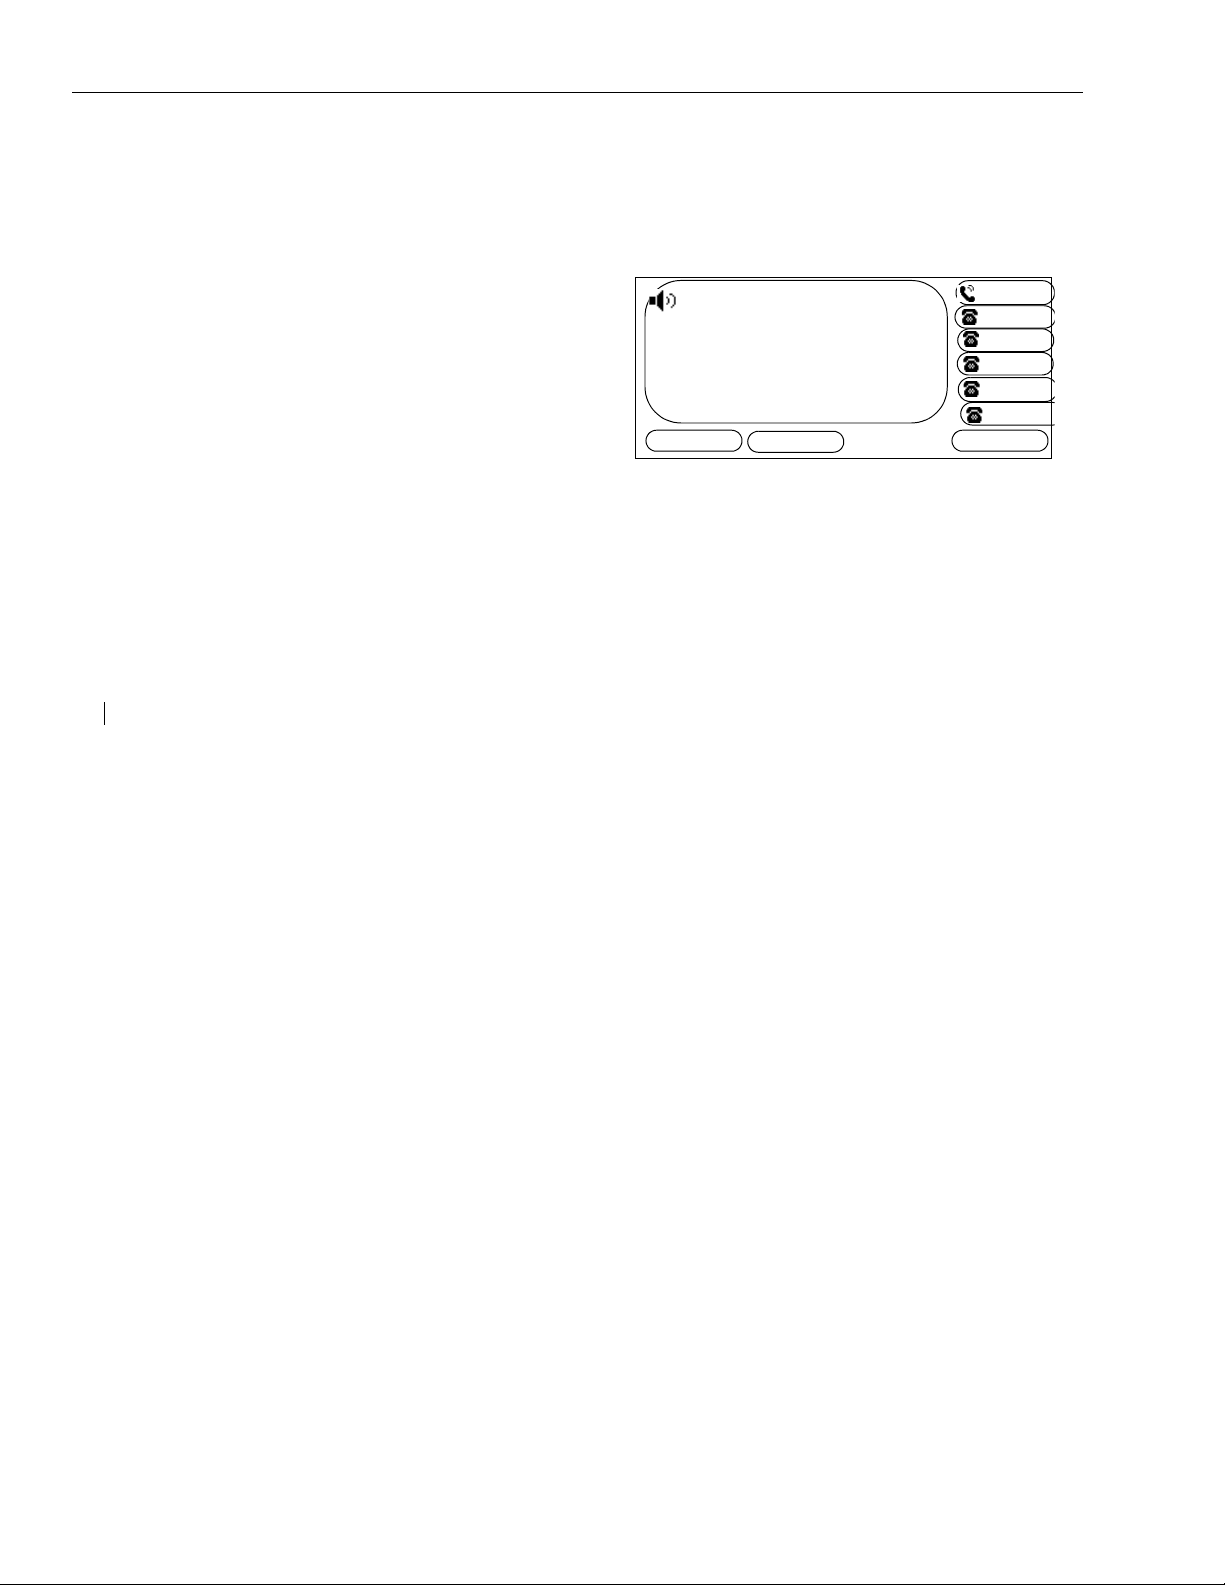
USING THE ARCATA PHONE
TUE DEC 2911:42 AM
LINE 1-DIALING
SMITH
HISTORY DIRECTO RY
MORE
REDIAL
The Redial feature allows you to quickly redial any
of the previous calls you have made.
If the Redial feature is disabled, the RD key will still
function, but the last number dialed will not be
saved to the Call History. This is a security feature
so that if you use a Security Code to dial out, it
cannot be accessed by another person through
your history.
To toggle the Redial feature on or off, see page
65.
64 28xx CIP-D User Guide
To redial a call:
Press the RD (Redial) key.
The REDIAL LCD menu appears, and the last
number dialed is redialed:
Redial Screen
Page 87

USING THE ARCATA PHONE
1. TIME OFFSET: SWITCH TIME
2. REDIAL LIST: ENABLE
3. LINE TYPE HDLU2
4. S
WITCH DWLD ENABLE
BACK
PHONE SETTINGS
AB3
OK
D
ELETE
To toggle the Redial feature on and off:
1. Press the Menu soft key. The Main Menu screen
appears.
2. Scroll to the Modify Settings option and press
OK.
The System Settings menu appears.
3. Scroll to the Phone Settings option and press
OK.
The Phone Settings menu appears.
Phone Settings screen
4. Scroll to the Redial List option and press the left
or right Navigate key to toggle the feature to
enable/disable.
5. Press the OK soft key.
The System Settings menu reappears.
6. Press the Save soft key.
The “Settings Changed: Save and Reboot?”
question appears.
7. Press the Save soft key.
The phone reboots and the Redial feature is now
enabled/disabled.
Related topics: Answering calls, Speakerphone,
Headset
28xx CIP-D User Guide 65
Page 88

USING THE ARCATA PHONE
1. RING TONES
2. SYSTEM INFORMATION
3. MODIFY SETTINGS
4. LINE KEY LABELS
5. ERASE DATA
BACK
MAIN MENU
CURRENT RING: 7
P
RESS A NUMBER KEY
(0 TO 9) TO SELECT A
RING TONE.
CANCEL
RING TONES
SAVE
RING TONES
The Ring Tone feature allows you to customize the
ring sound that calls make when they come in.
To customize the Ring Tone:
1. From the main screen, press the Menu soft key.
The Main Menu screen appears:
Main Menu screen
2. Scroll to the Ring Tones option and press OK.
66 28xx CIP-D User Guide
The Ring Tones screen appears.
Select Ring Tones screen
3. Press a number key (0 to 9) on the Dialing
Keypad to test the associated ring sound. The
number appears as the Current Ring.
4. Press the Save soft key to save the current ring.
Related topics: Answering calls, Speakerphone,
Headset
Page 89

SPEAKERPHONE
The speakerphone feature allows you to use the
built-in speakerphone on the Arcata 28xx CIP-D
instead of the handset or headset.
To dial a call using the speakerphone, with the
handset onhook, dial the desired number on the
Dialing Keypad.
To toggle from the handset to the speakerphone
as needed, press the speakerphone key.
Note To change the volume on the speakerphone,
see the VOLUME section on page 75.
Related topics: Answering calls, Speakerphone,
Headset
USING THE ARCATA PHONE
28xx CIP-D User Guide 67
Page 90

USING THE ARCATA PHONE
0. MARK
1. JENNY
2. ROGER PAUL
3. MARY KATISON
4. DENVER PAUL
5. CAROL
BACK
SPEED DIAL
3544
3540
3501
3522
3516
3503
EDIT
OPTION
DIAL
SPEED DIAL
The Speed Dial feature allows you configure up to
10 frequently dialed numbers.
Note To quickly open the Speed Dial List, press the
OK key.
Speed Dial LCD screen
68 28xx CIP-D User Guide
To dial a speed dial call:
1. Do one of the following to open the Speed
Dial List:
•Press the OK key
or
•Press the Directory soft key to open the
Directory Menu, then scroll to the Speed Dial
option and press OK.
The Speed Dial List opens.
2. Scroll to the entry you wish to dial and press
the OK key.
The number is dialed.
Page 91

USING THE ARCATA PHONE
1. NAME:
2. N
UMBER:
CANCEL
JENNY
JENNY
3540
AB3
D
ELETE
SAVE
To add or edit a speed dial entry:
1. From the Speed Dial List screen, press the Edit
soft key. The record for the selected option
opens.
Speed Dial LCD screen
2. Press the Ab3 soft key to scroll to the ABC soft
key and use the Dialing Keypad to enter or
edit the Name for the record.
3. Scroll to the Number option.
4. Press the ABC soft key to scroll to the 123 soft
key, then use the Dialing Keypad to enter or
edit the number for the record.
5. Press the Save soft key.
To Copy a Speed Dial entry to the Contacts List:
1. From the Speed Dial List, scroll to the desired
caller to copy to the Speed Dial List, then press
the Option soft key.
2. Scroll to the Add to Contacts option and press
OK. The entry is added to the Contacts List.
To delete a Speed Dial record:
1. From the Speed Dial List, scroll to the desired
contact.
2. Press the Option soft key.
3. Scroll to the Delete option and press OK. The
record is removed from the Speed Dial List.
Related topics: Answering calls, Speakerphone,
Headset
28xx CIP-D User Guide 69
Page 92

USING THE ARCATA PHONE
TUE DEC 29 11:42 AM
LINE 1 -IN CALL
T CRAMER
2155254
SMITH
HOLD
CONF
MORE
TRANSFER
DURATION: 1:14
Time and date
TIME AND DATE
The current time and date is displayed on the
main screen, as shown below. The time and date
are automatically set.
70 28xx CIP-D User Guide
Page 93

TRANSFER
TUE DEC 29 11:42 AM
LINE 1 -IN CALL
T CRAMER
2155254
SMITH
HOLD
CONF
MORE
TRANSFER
DURATION: 1:14
USING THE ARCATA PHONE
The Transfer feature allows you transfer the current
call to another extension.
To transfer a call:
1. While on a call:
In Conversation LCD Screen
2. Press the Transfer soft key. The first party is put
on hold as you hear dial tone.
3. Dial the extension to transfer the call to on the
Dialing Keypad.
4. Do one of the following:
• Unsupervised Transfer: Listen for ringback,
then, hang up to complete the transfer
• Supervised Transfer: When the second party
answers, announce the call transfer, then
hang up to complete the transfer.
Related topics: Forward, Park, Conference
28xx CIP-D User Guide 71
Page 94

USING THE ARCATA PHONE
1. PRIVACY ON
2. FORWARD
3. PICKUP
4. PAGE
5. VIEW EXTENSION
6. COM
BACK
FEATURES
EXTENSION:
CANCEL
VIEW EXTENSION
VIEW EXTENSION
You can check the status of any extension on the
network, including your own.
Features LCD Screen
To check the status of an extension:
1. Press the Features soft key.
2. Scroll down to View Extension and press OK.
72 28xx CIP-D User Guide
The View Extension page appears:
View Extension Screen
Page 95

3. Enter the extension you wish to check on the
EXTENSION: 5172
J CARROLL IDLE
F
CLOSE
VIEW EXTENSION
Dialing Keypad. The status is displayed (idle,
busy, etc.) Note: ‘F’ indicates the extension
has been forwarded.
Status of Ext 5172 Screen
USING THE ARCATA PHONE
28xx CIP-D User Guide 73
Page 96

USING THE ARCATA PHONE
Voi c e
Mail
Message
LED
VOICE MAIL
The Voice Mail feature allows you to receive calls
to a message box when you are away from your
phone, and retrieve the recorded message later
on.
The Voice Mail Message LED flashes green when
there is new voice mail in your message box.
74 28xx CIP-D User Guide
To retrieve voice mail messages:
1. When the Voice Mail Message LED flashes
green:
2. Press the MESSAGE key.
3. Enter your Voice Mail Password on the dialing
keypad at the voice prompt.
4. Follow the voice instructions to record a
greeting and check your voice messages.
Note To retrieve you voice mail when away from
your phone, see the System Administrator for
details.
Related topics: Answering calls, Speakerphone,
Headset
Page 97

VOLUME
RINGER VOLUME
BACK
VOLUME CONTROL
USING THE ARCATA PHONE
The volume on the Arcata 28xx CIP-D can be
toggled up or down for voice, headset, ringer or
speakerphone.
The Arcata 28xx CIP-D is hearing aid compatible
and offers 15 volume levels to select from.
To change the Cerato phone’s volume level:
1. For each of the following scenarios (either on
a call or not):
• handset - when the handset is off hook
• headset - with the HEADSET key pressed
• speakerphone - with the SPEAKERPHONE key
pressed
• ringer - when the handset is on hook
2. Press the VOLUME button to increment/
decrement the volume level, as follows:
• To increase the volume, press the plus sign to
the right on the Volume button
• To decrease the volume, press the minus sign
to the left on the Volume button
Related topics: Answering calls, Speakerphone,
Headset
28xx CIP-D User Guide 75
Page 98

USING THE ARCATA PHONE
WEB CONFIGURATION
NOTE: Web Configuration is not supported for a
2826 phone configured as a digital endpoint.
Typically, the Arcata 28xx CIP-D is configured by
the system administrator during initial installation
and setup. The phone can also be configured via
the Internet, and is a quick way to enter speed
dial and directory entries.
To configure the phone via the Internet:
1. Enter the IP address of your phone in Internet
Explorer.
The Web Interface page opens.
2. Select the field links (i.e., Network Settings,
Directory, Speed Dial, Callers List, Ring Tones)
to open each area for the phone and
configure the settings.
76 28xx CIP-D User Guide
Page 99

TROUBLESHOOTING
This chapter gives solutions to problems you
may encounter while operating the Arcata
28xx CIP-D. Contact your system administrator
for problems not referred to here.
PROBLEM/SOLUTION
Blank screen
- Check the AC adapter. Verify that
the adapter is not damaged and
that it is securely plugged into a
working electrical outlet.
- Verify that the ethernet cable is
securely attached to the Arcata
28xx CIP-D.
No dial tone
- Check the AC adapter. Verify that
the adapter is not damaged and
that it is securely plugged into a
working outlet.
- Verify that the ethernet cable is
securely attached to the Arcata 28xx
CIP-D.
- Unplug AC adapter and plug it back
in to reset the Arcata 28xx CIP-D.
- Check with the administrator/service
provider to make sure the Arcata
28xx
CIP-D is provisioned correctly.
Arcata 28xx CIP-D does not ring
- Check the ringer volume.
- Verify that the ethernet cable is
securely attached to the Arcata 28xx
CIP-D.
- Check with the administrator/service
provider to make sure the Arcata
28xx CIP-D is provisioned correctly.
Handset does not work
- Check the handset volume. See
VOLUME section on page 75.
28xx CIP-D User Guide 77
Page 100

Speakerphone does not work
- Check that the speakerphone light is
lit when
SPEAKER is pressed.
- Check the Speakerphone volume.
See VOLUME section on page 75.
Headset does not work
- Verify the headset is securely
plugged into the headset jack.
- Check that the headset light is lit
when
HEADSET is pressed.
- Check the Headset volume. See
VOLUME section on page 75.
Phone appears to be locked
- Force reboot by unplugging the AC
adaptor. All LEDs will light up and the
LCD will blank out for approximately
one minute before reestablishing
communication with the Cerato.
Line 2 or 3 lock up
- The Cerato is not set up properly for
the circuit. Contact your system
administrator.
Line 1 doesn’t hang up
- The Cerato is not set up properly for
the circuit. Contact your system
administrator.
LCD menu displays the wrong date or time
- The time zone offset is probably
wrong for your location. Contact
your system administrator.
The View Extension Forward indicator ‘F’
displays without Forward options set
- There may be some CRG 1 forwards
set in the switch for your primary
extension and your SKEY extension
for roll-over purposes and Voicemail.
78 28xx CIP-D User Guide
 Loading...