

Telstra VVX500 Phone Manual
Telstra VVX 500 Phone Guide | July 2014 Page 1
Telstra VVX500 Phone Guide
If you are required to initially configure you
IP phone you will be advised of the
Username and Password. This information
only needs to be entered once via the
QSetup soft key.
Tap the QSetup soft key
Tap the Server User field
Enter the Server User credentials (obtain
this information from Telstra.
This number will be your phone number)
Tap the Server Password field
Tap the Mode soft key and tap 123 (to
select numbers)
Enter the Server password (obtain this
information from Telstra)
Tap Save Config to Save the Config
You will now need to manually reboot the
phone
Press the Home button
Tap Settings
Tap Basic, swipe your finger up the screen
and
Tap Restart Phone
Tap the Yes soft key (to confirm)
Note 1: Restarting the phone may take a few
15 minutes
Note 2: If your phone has been preconfigured
the QSetup soft key will not be visible
Note 3: This is only required for phones that are
on DMS (Device Management System)
platform.
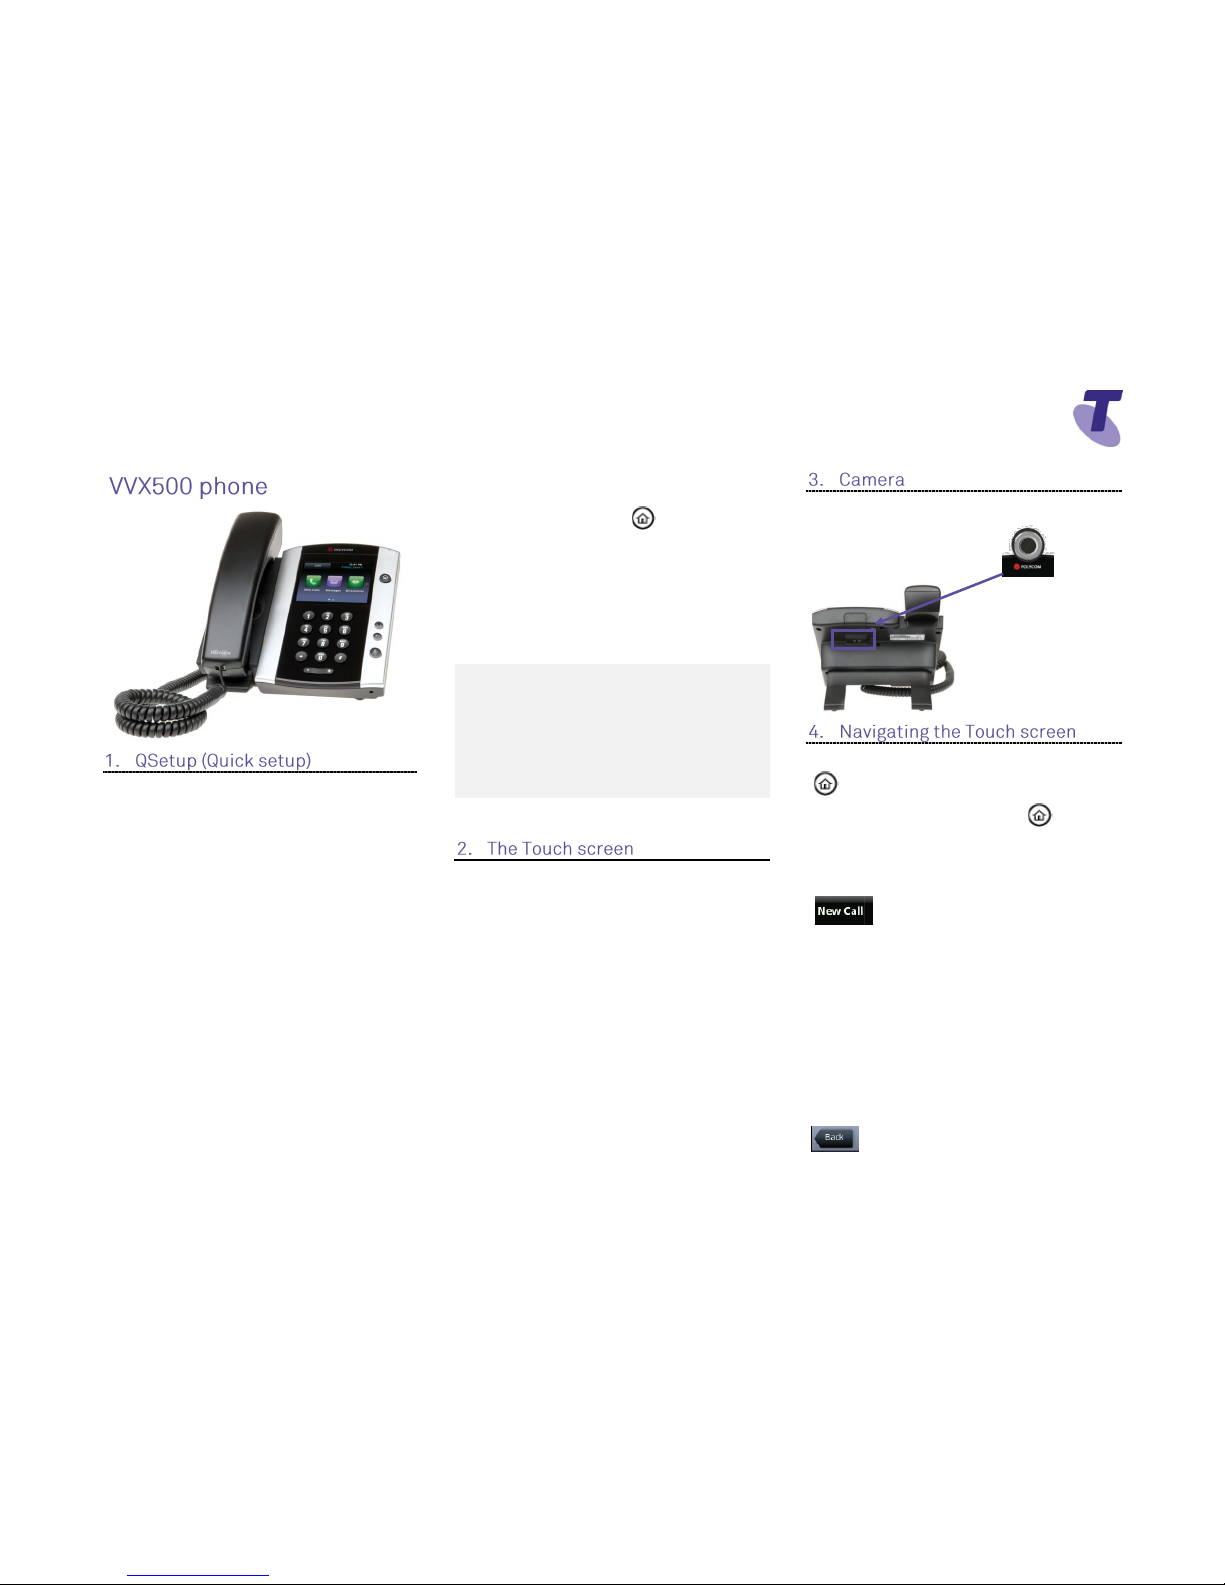
Your phone has a touch-sensitive screen.
To access features or obtain information,
tap the menu items, soft keys (the keys
along the bottom of the touch screen) and
field that display on the touch screen
To access further screens, swipe the
screen (move your finger across the
screen), either left or right to display further
screens.
Your VVX 500 Media phone supports a
Polycom USB camera
To enter the Home View main menu, press
To return to the Line View, press
To select a menu item, tap the menu icon
To select a soft key, tap the soft key
To select an option in a list, tap the option
To scroll through menu items listed on more
than one screen, touch the screen and drag
your finger in the required direction (Up, Down,
Left or Right)
OR
Swipe the screen, by moving your finger across
the screen in right to left or left to right motion
to display further screen options
To return to previous screen, tap Back
Slot on the back of your
phone for Polycom USB
camera
Telstra VVX 500 Phone Guide | July 2014 Page 2
Telstra VVX500 Phone Guide
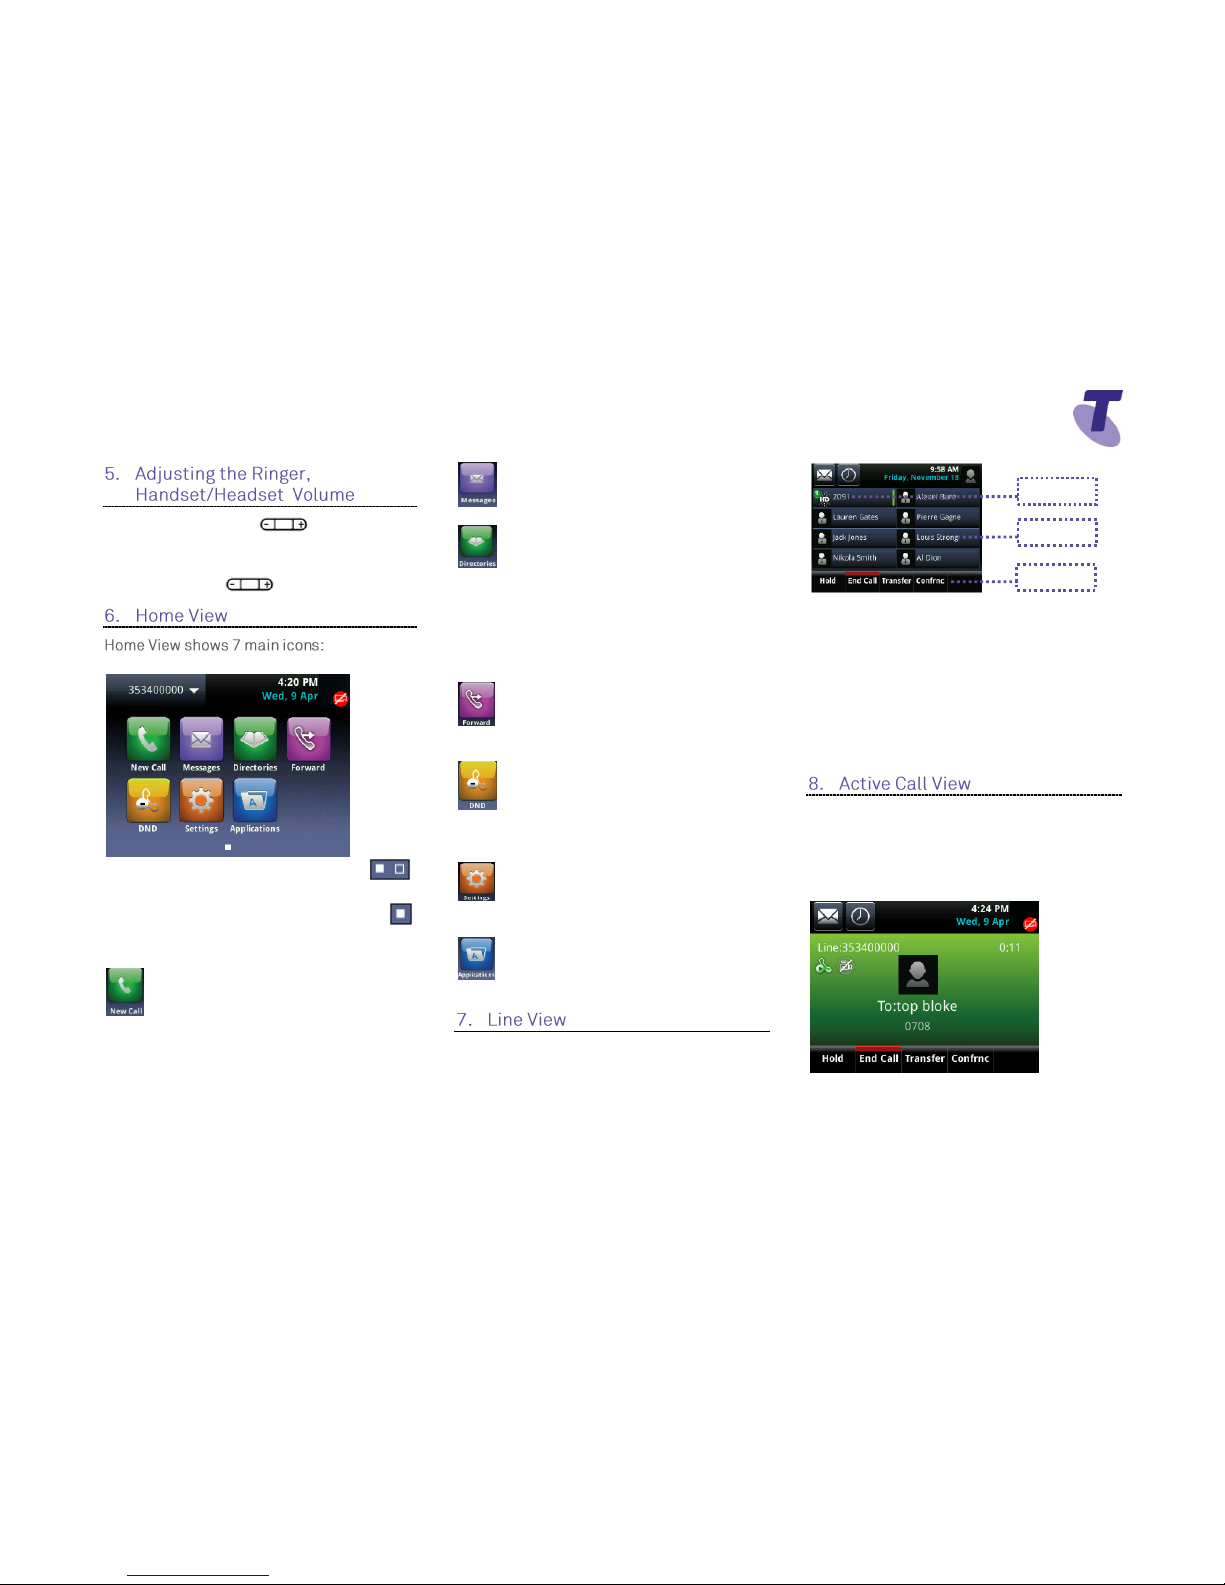
During a call, press the to adjust the
call volume
While the phone is idle, to adjust the Ringer
volume, press the volume buttons.
If you press and hold the page indicator,
Home View expands to display additional icons
To hide the additional icons, press and hold
Alternatively, you can Swipe the screen to
display additional cons
New Call – Tap New Call to display
Dialler
From the Dialler, you can enter a number or
URL and place a call
From the Dialler, you can access the Directory,
Recent Calls and Favorites
Messages – Tap Messages to access
your Voicemail Messages
Directories – Tap Directories to view all
the contacts in your Local Contact Directory
From your Directory, you can add and search
for contacts, as well as quickly access the
DialPad, Recent Calls and Favorites
Allows you to enable/disable your call
forward always, no answer or busy settings.
Allows you to enable/disable Do Not
Disturb. Calls cannot be received when
enabled.
Settings – Tap Settings to access
features and settings to customise your phone
Applications – Tap Applications to view
custom applications configured by your CGA
Line View is your phones default display.
Line View displays all your phone lines,
your favourites and soft keys.
If your phone is idle you can;
Tap a phone line to access the Dialer
If your phone has calls, the phone line
indicates the number of calls you have, and
if they are active or held
An active call displays a green bar
A held call displays as a Held call
This view displays the name and number of
the person you are talking with and the
duration of the call
From Active view you can, Hold, End Call,
Transfer or set up a Conference
Swipe the screen to take you back to Line View
Phone line
Favourites
Soft keys
Telstra VVX 500 Phone Guide | July 2014 Page 3
Telstra VVX500 Phone Guide
Lift the handset and enter the required
number by using the phone keypad
Enter a number
Tap the Dial icon
OR
With the handset on-hook, tap the New
Call icon or New Call soft key, enter the
phone number by using the phone keypad
Lift the handset OR
Tap the Answer soft key
OR
If you share a line with another phone, you
can answer calls as described above, or
you can wait for someone else to answer
the call. If you answer the call and place it
on hold, anyone who shares your line can
resume the held call.
Hang up the handset OR
Tap the End Call soft key
If the Call Waiting feature has been turned
on, while engaged in a call:
Call Waiting tone indicates another call to
your line.
Tap the Answer soft key to switch to and
answer the incoming call.
The initial call is automatically placed on
hold.
By tapping the screen you can toggle
between the active and held calls.
Tap the Resume soft key to resume your
conversation.
You cannot receive additional calls while
both lines are engaged.
Tap the Hold soft key
To return to the call
Tap the Resume soft key
To make another call while the original
caller is on hold
Tap the New Call soft key, enter the
required number
If multiple calls are on hold
Tap the call on hold to select it
Tap the Resume soft key, or press the
Hold button
To join all three parties onto an impromptu
conference call
With 2 calls in progress (1 call on hold and
1 call active)
Tap More
Tap Join
While Mute is activated, you can hear all
other parties, however they cannot hear
you.
During a call press the mute button
(The mute button is illuminated in red)
To turn off mute, press the mute button
again
Blind Transfer enables you to transfer a call
to another party without announcing the call
prior to transfer.
During a Call tap the Transfer soft key
Tap the Blind soft key
Enter the transfer destination number
Your call will be transferred automatically.
Consult Transfer enables you to transfer a
call to another party with consultation.
During a Call press the Transfer soft key
Enter the transfer destination number
When the party answers, announce the call
Press the Transfer soft key again to
complete the transfer.
If the party refuses the call (prior to
completing the transfer)
Press the Cancel soft key to be returned to
the original caller.
 Loading...