

Page 1
Telstra VVX 300 Phone Guide | July 2014 Page 1
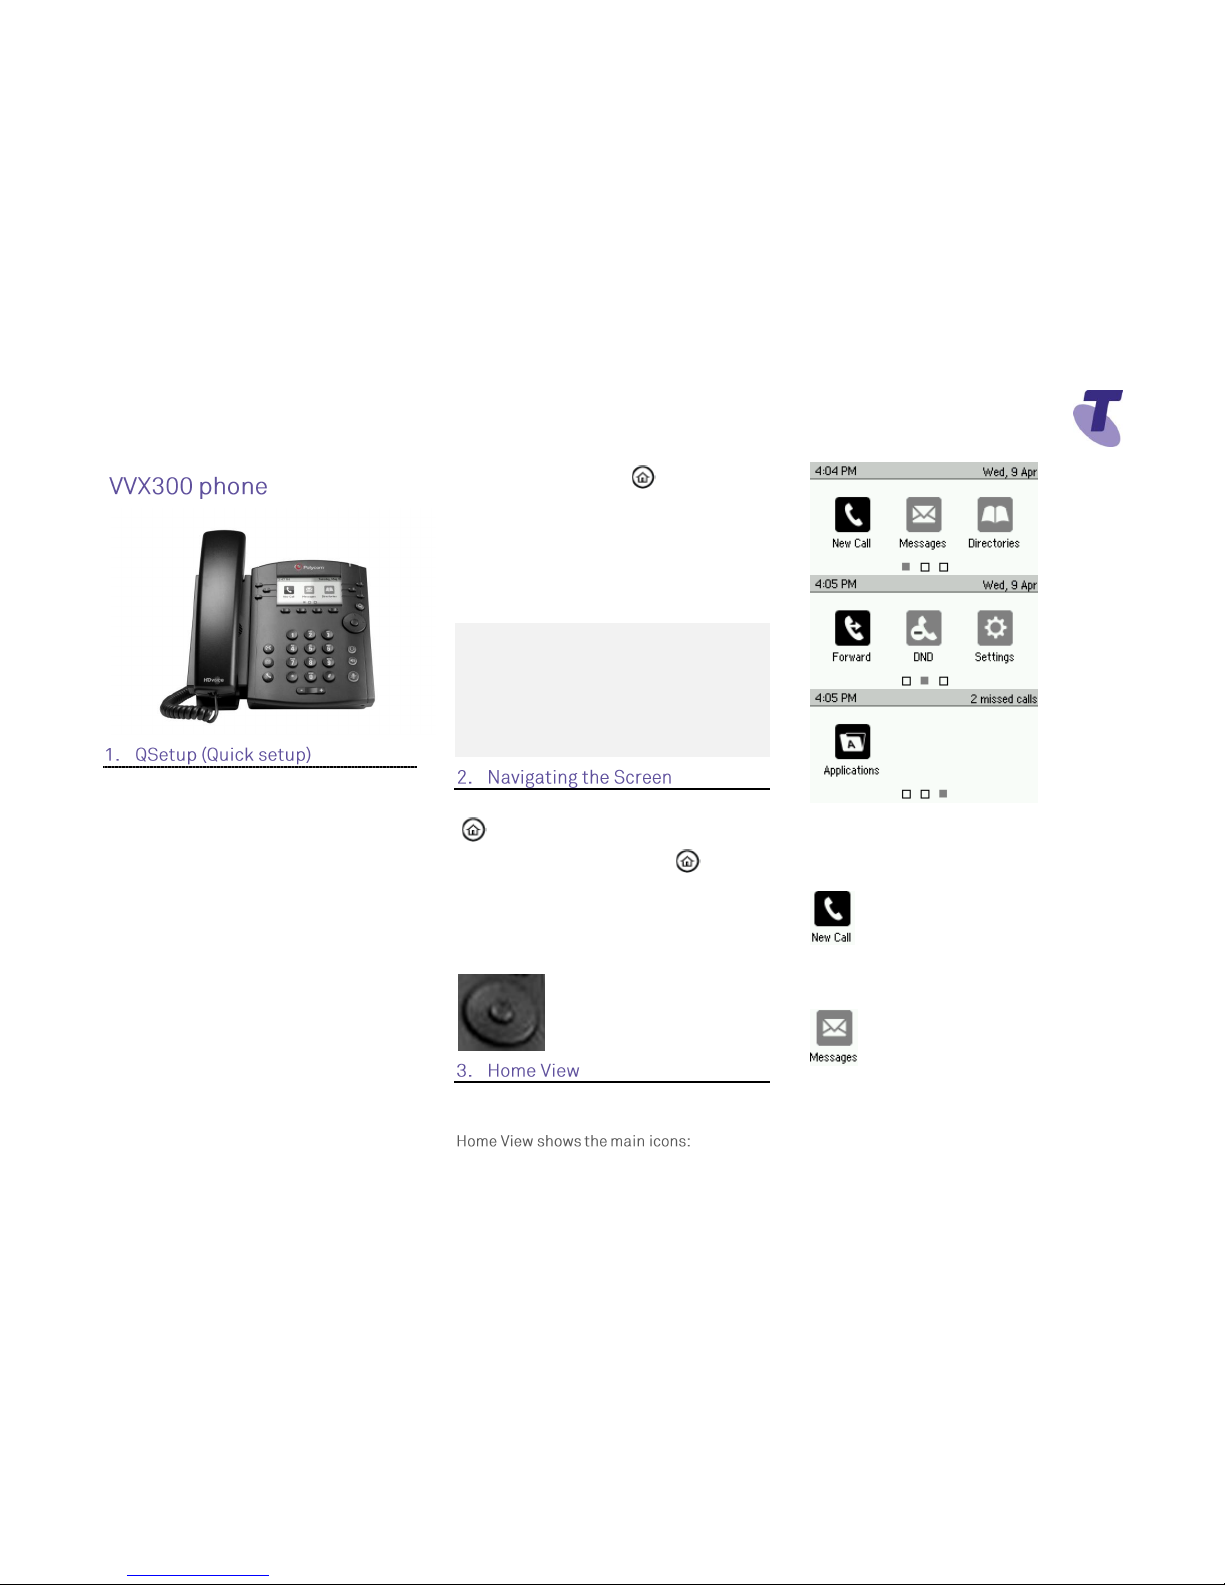
Telstra VVX300 Phone Guide
If you are required to initially configure your
IP phone you will be advised of the
Username and Password. This information
only needs to be entered once via the
QSetup soft key.
Press the QSetup soft key
Press the Server User field
Enter the Server User credentials (obtain
this information from Telstra.
This number will be your phone number)
Press the Server Password field
Press the Mode soft key and tap 123 (to
select numbers)
Enter the Server password (obtain this
information from Telstra)
Press Save Config to Save the Config
You will now need to manually reboot the
phone
Press the Home button
Press Settings
Press Basic , swipe your finger up the
screen and
Press Restart Phone
Press the Yes soft key (to confirm)
Note 1: Restarting the phone may take a few
minutes
Note 2: If your phone has been preconfigured
the QSetup soft key will not be visible
Note 3: This is only required for phones that are
on DMS (Device Management System)
platform.
To enter the Home View main menu, press
To return to the Line View, press
To select a menu item, press the Home button,
scroll through the icons ad select the relevant
option ie settings or directories by pressing the
Select button in the middle of the Navigation
button.
The VVX300 is a black and white screen
device.
To move through the pages press the right or
left arrow buttons on the Navigation button.
New Call – Select New Call to display
Dialler
From the Dialler, you can enter a number or
URL to place a call
Messages – Select Messages to
access your Voicemail Messages
Page 2
Telstra VVX 300 Phone Guide | July 2014 Page 2
Telstra VVX300 Phone Guide
Directories – Select the Directories
icon to view all the contacts in your Contact
Directory, recent calls and favorites
Forward - Select Forward to
enable/disable your call forward always, no
answer or busy settings.
DND - Select DND to enable/disable Do
Not Disturb. Calls cannot be received when
enabled.
Settings – Select Settings to access
features and settings to customise your phone
features
Applications – Select Applications
to view custom applications configured by your
CGA
To return to the Previous Screen select the
Back soft key.
The VVX300 has four soft key buttons at the
bottom of the phone. The contact sensitive tabs
appearing on the screen relate to the relevant
soft key.
During a call, press the to adjust the
call volume
While the phone is idle, to adjust the Ringer
volume, press the volume buttons.
Line View is a default display.
Line View displays all your phone lines,
your favourites and soft key tabs.
If your phone is idle you can;
Press New Call to access the Dialer
If your phone has calls, the phone line
indicates the number of calls you have, and
if they are active or held
A held call displays as
Active Call View
This view displays the name and number of
the person you are talking with and the
duration of the call
From Active view you can, Hold, End a
Call, Transfer or select the More soft key
for additional options
Lift the handset and enter the required
number by using the phone keypad.
Enter a number
Press the Speaker button
Or
With the handset on-hook, press the New
Call soft key, enter the phone number by
using the phone keypad
Page 3
Telstra VVX 300 Phone Guide | July 2014 Page 3
Telstra VVX300 Phone Guide
Lift the handset Or
Press the Answer soft key
Or
Press the green flashing line button
If you share a line with another phone,
when the phone line is receiving a call,
press the relevant line button to answer the
call. If you answer the call and place it on
hold, anyone who shares your line can
resume the held call.
Hang up the handset OR
Press the End Call soft key
If the Call Waiting feature has been turned
on, while engaged in a call:
Call Waiting tone indicates another call to
your line.
Press the Answer soft key to switch to and
answer the incoming call.
The initial call is automatically placed on
hold.
By using the Navigation button scroll to
highlight the held call.
Press the Resume soft key to resume your
conversation.
You cannot receive additional calls while
both lines are engaged.
Press the Hold soft key or Hold button
To return to the call
Press the Resume soft key or the Hold
button
To make another call while the original
caller is on hold
Press the New Call soft key, enter the
required number
If multiple calls are on hold, using the
Navigation button to scroll to the call on
hold and select it and then press the
Resume soft key
To join all three parties onto an impromptu
conference call
With 2 calls in progress (1 call on hold and
1 call active)
Press the More soft key and then the Join
soft key
While Mute is activated, you can hear all
other parties, however they cannot hear
you.
During a call press the mute button
(The mute button is illuminated in red)
To turn off mute, press the mute button
again
Blind Transfer enables you to transfer a call
to another party without announcing the call
prior to transfer.
During a Call press the Transfer soft key
Press the Blind soft key
Enter the transfer destination number
Your call will be transferred automatically.
Consult Transfer enables you to transfer a
call to another party with consultation.
During a Call press the Transfer soft key or
the Transfer button.
Enter the transfer destination number
When the party answers, announce the call
Press the Transfer soft key or button again
to complete the transfer.
If the party refuses the call (prior to
completing the transfer)
Press the Cancel soft key to be returned to
the original caller.
There are 3 Call forward options which can
be set from your handset using either soft
keys or Feature Access Codes; Call
Forward Always, Call Forward No Answer,
Call Forward Busy.
Page 4

Telstra VVX 300 Phone Guide | July 2014 Page 4
Telstra VVX300 Phone Guide
To forward all your calls to another number.
Press the Forward soft key
Press the Select soft key.
Use the Navigation button to highlight
option
Select Always
Enter the required number to forward your
calls to
Press the Enable soft key
An arrow is displayed on the phone
screen next to your phone number.
Press the Forward soft key
Select Always
Press Disable
To forward your calls to another number if
not answered after a specified number of
rings
Press the Forward soft key
Scroll to No Answer and select
Enter the required number to which to
forward your calls
Using the downward arrow on the
Navigation button scroll to the Forward
After Rings field and enter the required
number of rings (20 rings is the maximum)
Press the Enable soft key
Press the Forward soft key
Scroll to Call Forward No Answer. Scroll
and select No Answer.
Press the Disable soft key
To forward your calls to another number if
you are engaged on a call
Press the Forward soft key
Scroll down and select Busy
Enter the required number to which to
forward your calls
Press the Enable soft key
Press the Forward soft key
Scroll down and select Busy
Press Disable soft key
Call Forwarding is not available on Shared
Lines
When you enable Do Not Disturb (DND),
you prevent your phone from ringing. All
incoming calls are sent directly to
voicemail. All calls received while DND is
enabled, will be displayed in your Recent
Calls list
From Line View
Press the Do Not Disturb soft key (DND)
Press the Select soft key
Select Enable
The Do Not Disturb icon displays on
screen when enabled.
Or
From Home View
Using the Navigation button scroll across
and select the DND icon
Select Do Not Disturb
Press the Select soft key
Select Enable
From Line View
Press Do Not Disturb soft key (DND) the
icon changes on the screen to display that
Do Not Disturb is disabled.
Or
From Home View
Using the Navigation button scroll across
and select the Do Not Disturb icon .
The Do Not Disturb Service has been
turned off.
Page 5

Telstra VVX 300 Phone Guide | July 2014 Page 5
Telstra VVX300 Phone Guide
While engaged in one call:
Press the More soft key and select the
Confrnc soft key
Enter the required number or extension of
the second party
When the call connects
Press the More soft key and select the
Confrnc soft key
All parties are connected in a three-way
call.
To end the conference
Press the End Call soft key
Note: If either of the other two parties hang up,
your call with the remaining party stays intact. If
you hang up, the other two parties will be
disconnected
Note: There can be a maximum of 3 parties on
a conference call, unless you have the
Executive service pack which has the N-Way
feature which enables a total of 8 parties on a
Conference call.
To add a contact:
Press the Home button, scroll across and
select the Directories icon
Select Contact Directory
Press the Add soft key
Enter first name, scroll down and enter
last name. Scroll down to the contact field
and enter the number
Press the Save soft key
Pressing the Home button will take you
back to the home main screen.
From Home View
Scroll across and select the Directories
icon
Select Contact Directory.
Scroll to the required contact
Press Info and Press the Edit soft key.
Make the required changes and press the
Save Soft Key.
From Home view
Scroll across and select Directories
Select the Contact Directory. Scroll to
select the contact
Press the Info soft key
Press the More soft key
Press the Delete soft key
The screen will display the message “Are
you sure you want to delete the contact?”
Press the Yes or No soft key.
Pressing the Home button takes you back
to the main home screen
Your phone maintains lists of Missed,
Received and Placed calls. Each list can
hold up to 100 entries
Missed Calls
Received Calls
Placed Calls
From Home View
Press the Home button, scroll across and
select Directories, scroll down and select
Recent Calls. All calls are displayed.
From Line View
Press the Down arrow to access Missed
Call List
Page 6

Telstra VVX 300 Phone Guide | July 2014 Page 6
Telstra VVX300 Phone Guide
Press the Right arrow to access the
Placed Call List
Press the Left arrow to access the
Received Call List
Press the Up arrow to access the
Favorites Call List
From Line View
Press the required arrow and Press the
More soft key
Press the Clear soft key.
A menu will display listing all Calls, Missed
Calls, Received Calls, Placed Calls,
Displayed. Scroll onto the required option
and press the Select soft key
From Home View
Tap Directories
Select Recent Calls or an alternative list
Select Contact (you want to add to
favorites)
Tap More
Tap Add to
The following message will appear “Add to
Favorites with an index of XX”
Select Yes.
To change your ring type:
From Home View
Scroll across and Select Settings icon
Select Basic
Scroll down and select Ring Type
Scroll to select the Ring type option
Press the Play soft key to listen to the tune
Press the Select soft key to select the ring
type
Press the Back soft key four times to
return to the Home view screen
From the Home View
Scroll and select the Settings icon
Select Basic
Scroll down and select Backlight Intensity
Select Backlight On Intensity and choose
either High, Medium or Low and press the
Select soft key
Select Backlight Idle Intensity and choose
either High, Medium or Low and Press the
Select soft key
Or
Select Maximum Intensity
Select the Up or Down soft key to adjust
the intensity
Press the Back soft key to return to the
previous screen
You can connect an Analogue headset to
your phone. When the headset button is
pressed it illuminates green. All calls
received will be answered through the
headset. When the headset is activated,
Mute and Volume will take effect on the
headset device.
You set up your phone so that all incoming
and outgoing calls use your headset. At any
time you can switch to handset or speaker
mode
From the Home Screen
Scroll across and Select the Settings icon
Select Basic
Select Preferences
Scroll down and select Headset...
Select Headset memory...
Scroll down and select Enabled
Press the Home button to return to the
home screen
To access Headset memory mode, press the
headset key twice.
The headset button will flash when enabled
Page 7

Telstra VVX 300 Phone Guide | July 2014 Page 7
Telstra VVX300 Phone Guide
If your phone is unable to perform certain
tasks, a warning icon will display in the
status bar. The warning icon lets you know
that your phone has one or more issues
that you should know about. Contact your
Customer Group Administrator to advise
them of this issue.
From Line view press the voicemail
icon to access voicemail
OR
From the Home view select the Messages
icon and select Message Centre...
Enter a passcode, when prompted; after
your initial login you will need to change
your passcode.
It is essential your passcode be changed
for security reasons. It is important to keep
your new passcode private.
Record your name when prompted
Press the hash key (#)
Follow the prompts to save the recording,
or re-record your name
Press the Messages button, or dial
the Voice Portal extension.
Enter your passcode followed by the hash
key (#).
Press the Messages button or dial
the Voice Portal extension.
Press the star key (*) during the greeting.
Enter your mailbox ID (your extension).
Enter your passcode followed by the hash
key (#).
Press 1
Press 1 again
Dial the Voice Portal phone number.
Enter your mailbox ID (your extension)
followed by the hash key (#).
Enter your passcode followed by the hash
key (#).
1... Access your Voice Mailbox
2... Change your CommPilot Express
profile†
3... Go to the Greetings Menu
4... Change your Call Forwarding options
8... Change your passcode
9... Exit the Voice Portal
#... Repeat this menu
†... Only available if assigned.
Press the Messages button
Enter your passcode and press #
Press 3 to access your Greetings menu
Press 2 to change your Mailbox Busy
greeting
Record your Name
2... Change your conference Greeting
*... Go back to previous menu
#... Repeat menu
Tap the Messages icon
Enter your passcode and press #
Press 1 to access your voice mailbox
Press 3 to change your Mailbox No Answer
greeting
1... Record new No Answer Greeting
2... Play current Greeting
3... Revert to system default Greeting
*... Return to Voice Messaging main menu
#... Repeat menu
Page 8

Telstra VVX 300 Phone Guide | July 2014 Page 8
Telstra VVX300 Phone Guide
Your phone may indicate you have
Voicemail messages by the following:
A message counter in the Home View
A message icon in the status bar
If you have more than one message, the
icon will display a counter indicating the
number of messages
A message icon also scrolls under the Date
and Time display
Press the Message Button (this will
direct you to your voicemail, where you will
follow the prompts to retrieve your
messages
OR
From Home View select the Message icon
Select Message Centre (this will direct you
to your voicemail, where you will follow the
prompts to retrieve your messages
1... Listen to your messages
2... Change your mailbox Busy greeting
3... Change your mailbox No Answer
greeting
5... Compose and send a new message
7... Delete all messages
8... Modify the message deposit settings for
your mailbox
*... Go to the CommPilot Voice Portal
#... Repeat this menu
New messages flagged as urgent are
played first.
The message envelope for each message
is played first (time and date, sender if
known), followed by the message itself.
Use your keypad as follows to browse your
messages (you can interrupt the message
or envelope to perform any function):
1
2
3
4
5
6
7
ERASE
8
CALL
BACK
9
MORE
OPTIONS
*
BACK TO
MAILBOX
0
#
#... Save this message
7... Erase this message
2... Repeat this message
4... Return to previous message
5... Play the message envelope
6... Go to the next message
8... Call back the caller
9... Hear additional options
*... Go back to the previous menu
 Loading...