

Page 1
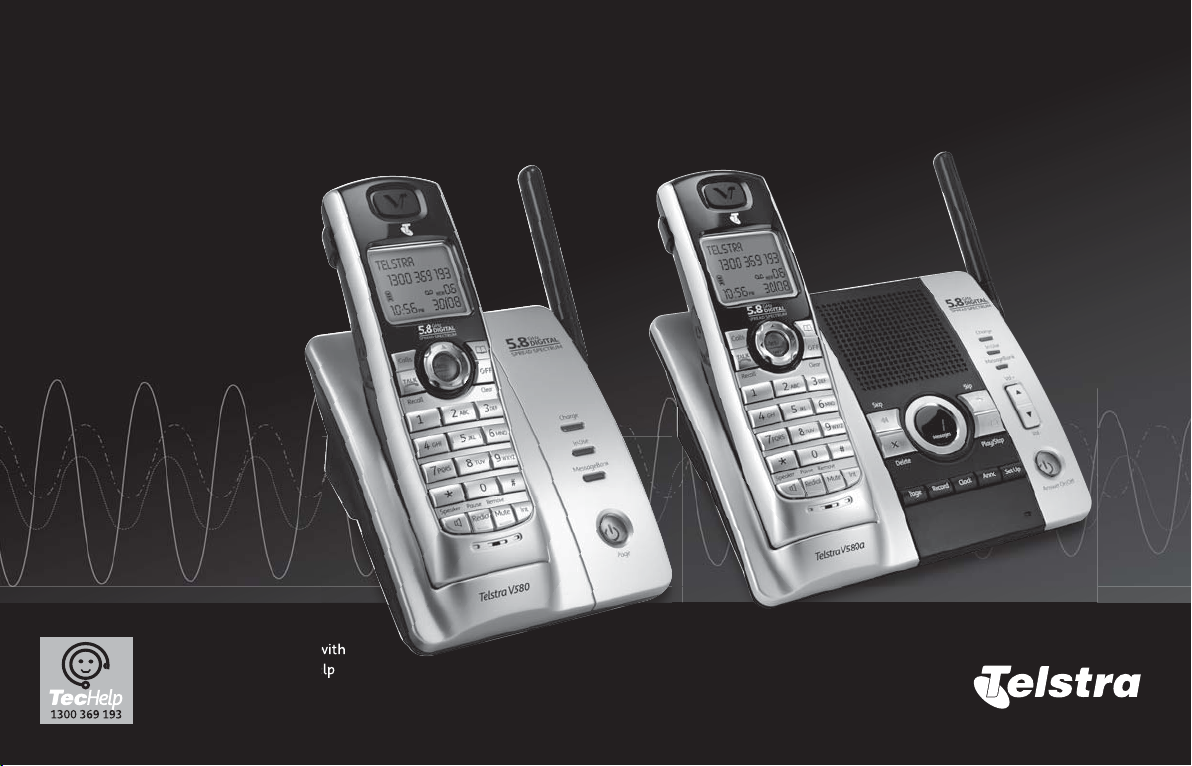
Telstra V580 & V580a
5.8 GHz Digital Cordless Phone /Integrated Answering Machine
User
Guide
If you have any problems with
your phone, refer to the Help
section of this User Guide or
call TecHelp on 1300 369 193.
Page 2

Introduction
to your Telstra V580 5.8 GHz Digital Cordless Phone /
Telstra V580a 5.8 GHz Digital Cordless Phone with Answering Machine
● 5.8 GHz Digital Cordless Phone
● Digital answering machine with 15 minutes recording time (V580a only)
● 50 Name and number Phonebook
● Use Calling Number Display to see the number of the person calling and keep track of unanswered calls
● Last number redial to display and redial the last 10 numbers called from your handset
12d
#
=:</+.=:/-><?7
A Digital Spread Spectrum (DSS) cordless phone provides excellent clarity, security and range. Since the voice transmission is first digitized
and then distributed across several frequencies, it is almost impossible for others to eavesdrop on your conversations. Channel hopping
increases clarity by limiting the effects of other external sources of interference.
/424?,7
Some Telstra services such as SMS, MessageBank® and Calling Number Display may attract feature and usage charges. Please visit Telstra.com for details.
2
Page 3

IMPORTANT
Got everything?
This equipment is not designed for making emergency telephone
calls when the power fails. Alternative arrangements should be
made for access to emergency services.
This User Guide provides you with all the information you need to
get the most from your phone.
Before you make your first call you will need to set up your phone.
Follow the simple instructions in ‘Getting Started’, on the next few
pages.
Battery cover must be in place at all times when the handset is
placed in the cradle
Need help?
If you have any problems setting up or using your Telstra V580/
V580a please contact the TecHelp line on 1300 369 193.
Alternatively, you may find the answer in ‘Help’ at the back of this
guide.
Telstra V580/V580a
● Telstra V580/V580a handset
● Telstra V580/V580a base unit
● Battery pack
● AC power adaptor
● Telephone line cord
● Telephone adaptor plug
● Desk/wall bracket
If you have purchased a Telstra V580/V580a multiple pack,
you will also have the following items for each additional
handset:
● Telstra V580/V580a handset
● Telstra V580/V580a charger
● Battery pack
● AC power adaptor
3
Page 4
In this guide
Introduction 2
Getting started 6
Telephone base installation 6
Install handset battery 8
Battery 9
Headset (Not supplied) 9
Belt clip 9
Wall mounting your Telstra V580/V580a 10
Fitting the bracket to wall mount the phone 10
Fitting the bracket to use the phone on a table/desk 11
Getting to know your Telstra V580/V580a 12
Handset layout 12
Using the NavKey 13
Handset screen icons 13
Handset display screen messages 14
V580 base layout 15
Base unit indicators 15
V580a base layout 16
Telephone settings 17
Ringer volume 17
Ringer tone 17
Key tone 18
Language 18
Clear voicemail 18
Using the Phone 19
Make, answer and end calls with the handset 19
Speakerphone 19
Mute 19
Volume 19
Ringer mute 20
Intercom 20
Conference call 20
Transfer an external call 20
Switch between external and internal calls 21
Answer an incoming call during an intercom call 21
Page handset 21
Phonebook 22
Store a Phonebook entry 22
Chart of characters 23
Search the Phonebook 24
Dial a Phonebook entry 24
Edit a Phonebook entry 24
Delete a Phonebook entry 24
4
Page 5

Using this guide
Telstra Network Services 25
Calling Number Display 25
Review the call log 25
Dial a call log entry 26
Save an entry to the Phonebook 26
Delete one or all entries 26
MessageBank® and Flashing Message Indicator 26
Call Waiting 27
Redial list 27
Dial from redial 27
Delete a redial entry 27
Using your answering machine (Telstra V580a only) 28
Message capacity 28
Answering system setup 28
Activate the answering system 28
Set the clock 28
Set number of rings 29
Set base ringer 29
Set remote access code 29
Set message alert tone 30
Outgoing announcement 30
Record your announcement 30
Play your announcement 30
Delete your announcement 31
Message playback 31
New message indication 31
Delete all messages 31
Record and play memos 32
Record a memo 32
Memo playback 32
Remote access 32
Remote access commands 33
Commands during playback mode 33
Message window displays 34
Troubleshooting 35
General Information 40
How many phones can I have? 40
Important safety instructions 40
Maintenance 41
Technical specifications 41
Product warranty & Customer service 42
Wall mounting template 43
5
Page 6
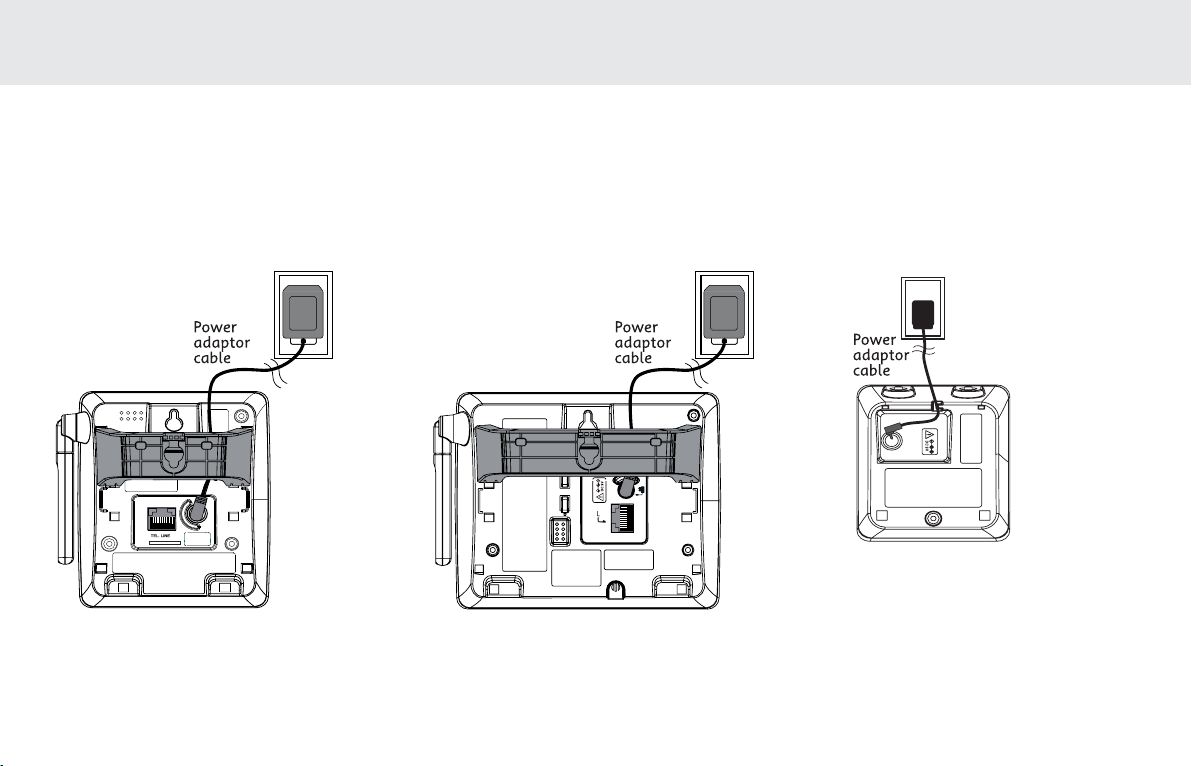
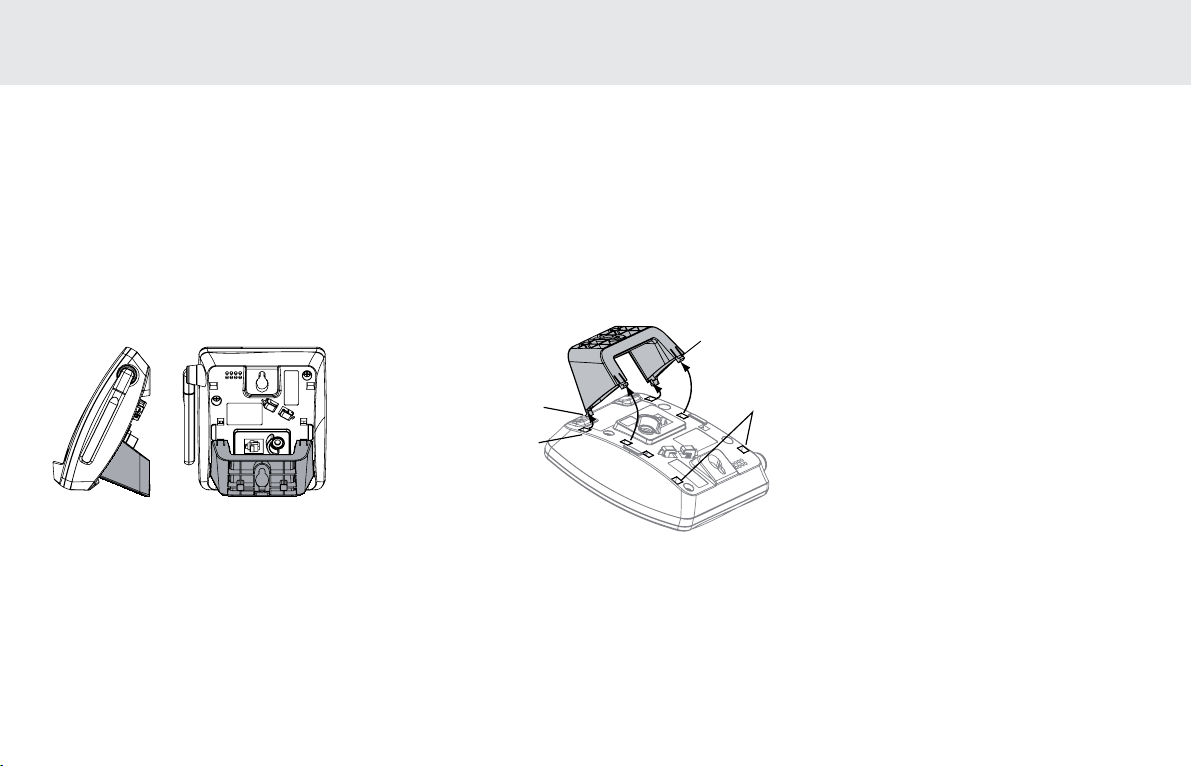
Getting started
Telephone base installation
It is recommended to install the telephone base away from any electronic equipment and appliances such as personal computers, computer routers, television sets,
microwave ovens, and refrigerators. Avoid excessive heat, cold, dust or moisture. When a location is selected, install the telephone base and the charger as shown below.
1. Plug the connector into the power jack at the bottom of the telephone base and chargers. Route cords through slots and plug the power adapter into the electrical outlet.
The power adapter must remain accessible at all times.
@",K]O @"K,K]O
6
@"@"K
/b^OX]SYX
Page 7

Getting started
2. Plug one end of the telephone line cord into the telephone line jack at the bottom of the telephone base. Route the telephone line cord through slot, then plug the other
end of the cord into the modular wall telephone outlet
@",K]O
6SXO-Y\N
3. Plug the telephone line cord into a telephone jack.
NOTE:
Use only the battery and AC power adapter supplied with this telephone. See page 40.
6SXO-Y\N
@"K,K]O
7
Page 8
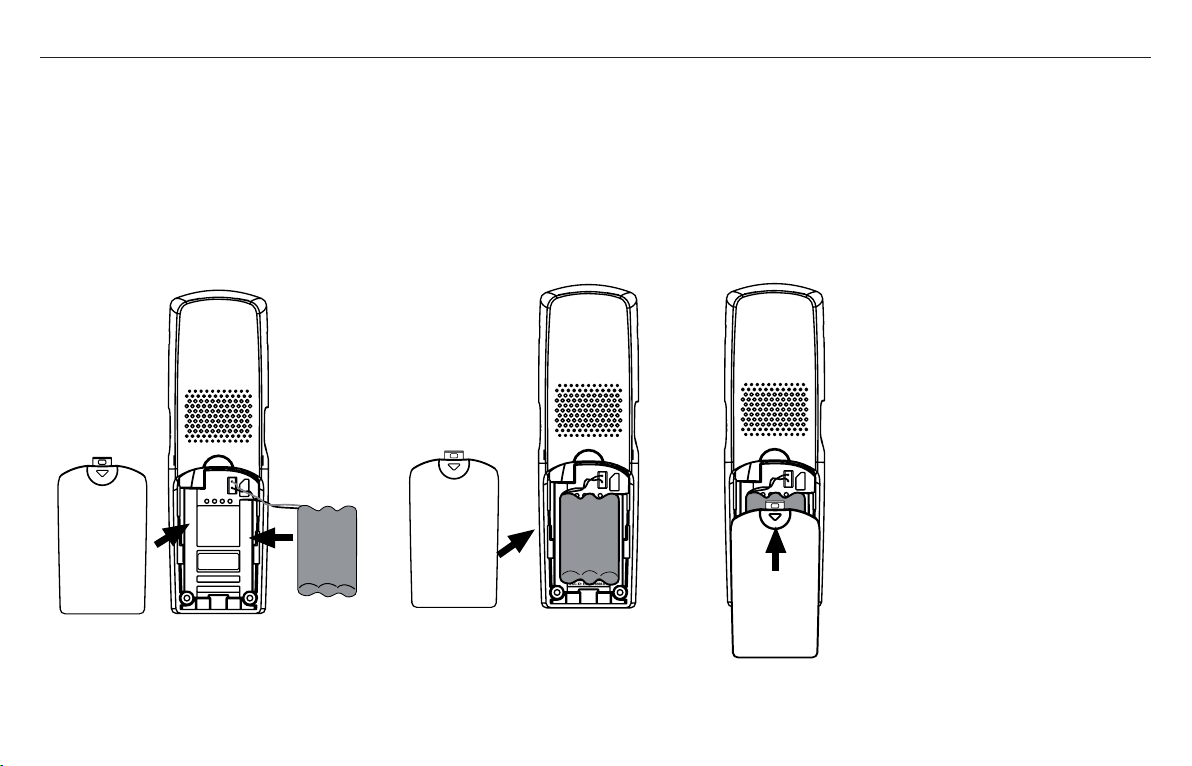
Getting started
Install handset battery
1. Align the two holes of the battery plug with the socket pins in the handset battery compartment, matching the red and black wires to the colour-coded label.
2. Place the battery in the compartment with the wires in the upper left corner.
3. Position the battery compartment cover and slide it towards the unit until it clicks into place.
4. For optimal performance, we recommend that you charge the handset for 18 hours.
You can keep the battery charged by returning the handset to the telephone base after each use.
When the battery power is fully depleted, a full recharge takes about 16 hours.
8
Page 9
Getting started
Battery
After the battery is fully charged, you can expect the following performance:
Operation Operating time
While in use (talking) 8 hours
While not in use (standby*) 96 hours (4 days)
*Handset is off the telephone base but not in use.
The battery needs charging when:
• A new battery is installed in the handset.
• Battery indicator on the handset display is flashing.
NOTE:
To purchase replacement batteries contact TecHelp on 1300 369 193.
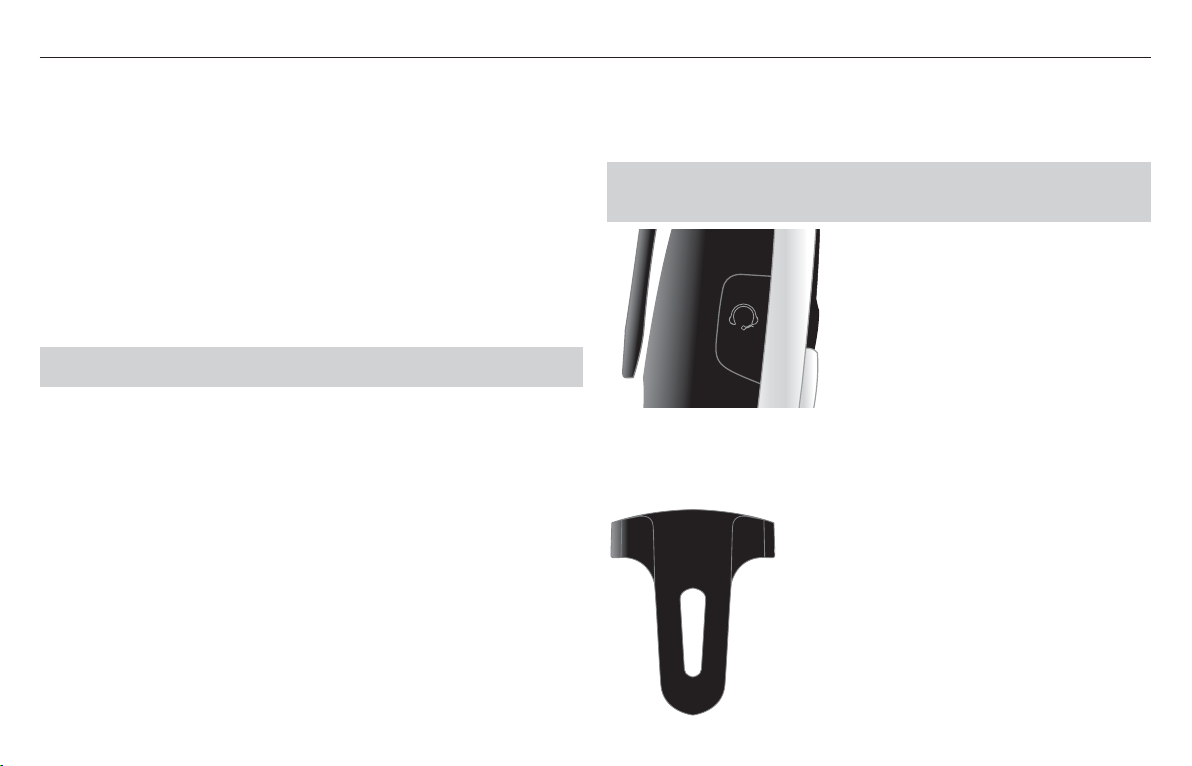
Headset (Not supplied)
You can plug an ACMA approved 2.5 mm headset into the jack on the side of the
handset (beneath the small rubber flap).
Note: Use only an ACMA approved headset. Do not use the headset while the
handset is placed in the base charging cradle.
Belt clip
Align the pins on the inside edge of the clip with the notches on the sides of the
handset.
9
Page 10
Wall mounting your Telstra V580/V580a
Your telephone base comes with the bracket installed, ready for desktop use. If you prefer to mount your telephone on the wall, it is designed to mount on a standard
Telstra wall mount plate.
Fitting the bracket to wall mount the phone
1. First, insert the lower portion tabs of the wall mounting bracket into the lower grooves in the telephone base, then snap the upper portion tabs of the wall mounting
bracket into place.
2. Mount the telephone base on the wall by positioning it so the mounting studs will fit into the holes on the telephone base and wall mounting bracket. Slide the
telephone base down on the mounting studs until it locks into place.
3. To remove the bracket, press both upper portion tabs firmly inward and pull the bracket downward until it release from the grooves.
`[[P][Z]_TZY_LM
WZbP][Z]_TZY_LM
`[[P]R]ZZaP^
WZbP]R]ZZaP^
Alternatively to wall mount the phone:
1. Using the template on page 43, drill two 3mm holes. Insert plastic plugs (optional) and partially screw the two screws into place. Ensure there is sufficient space allowed
for mounting the phone before drilling holes.
Caution: Ensure there is no risk of damaging any pipes or wiring that may be behind the wall.
2. Place the wall mount bracket over the two screws.
3. Slide the bracket downwards into position. Tighten the two screws to prevent the wall bracket from moving.
10
Page 11
Wall mounting your V580/V580a
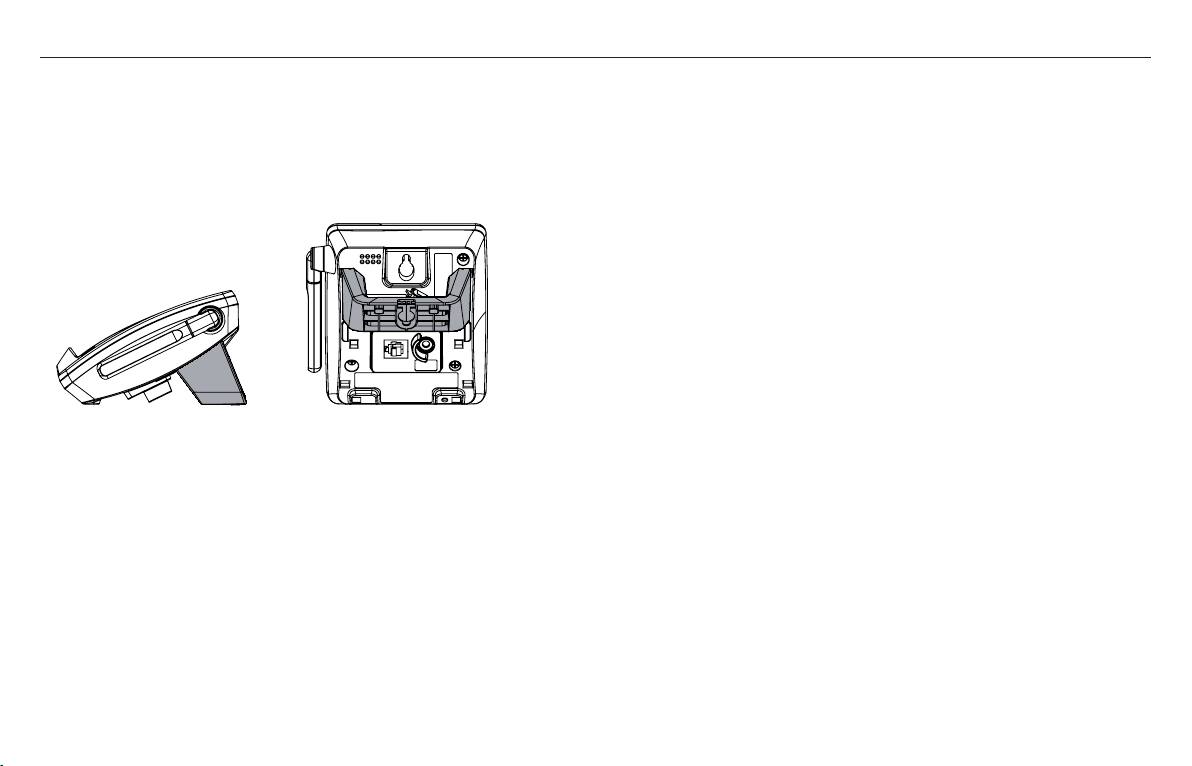
Fitting the bracket to use the phone on a table/desk
To place your telephone base on a desk or table, insert the wall mounting/desktop bracket. Insert the lower portion tabs of the bracket into the upper grooves of the
telephone base.
Snap the upper portion tabs of the bracket into place. To remove the bracket, press both upper portion tabs firmly inward and pull the bracket upward until it is released
from the grooves.
11
Page 12
Getting to know your Telstra V580/V580a
Handset layout
9IPWXVE
12d
#
/424?,7
=:</+.=:/-><?7
-KVV]
7OX_
=OVOM^
<OMKVV
+,- ./0
456123 789
>?@:;<= ABCD
"
!
=ZOKUO\ :K_]O <OWY`O
7_^O 3X^<ONSKV
.LWW^
1.
CALLS
2.
PHONEBOOK
3.
TALK/RECALL
<OMKVV
OFF/CLEAR
4.
-VOK\
5.
=ZOKUO\
6.
:K_]O
=POTLW
7.
<OWY`O
8`_P
8.
4Y_
-VOK\
#
9.
10.
:KQO
11.
12. Headset jack (2.5mm)
13.
ABCD
to
$
SPEAKER
REDIAL/PAUSE
MUTE/REMOVE
INTERCOM
PAGE
VOLUME+/-
8PY`
>PWPN_
NavKey
KEYPAD
12
Page 13
Getting to know your Telstra V580/V580a
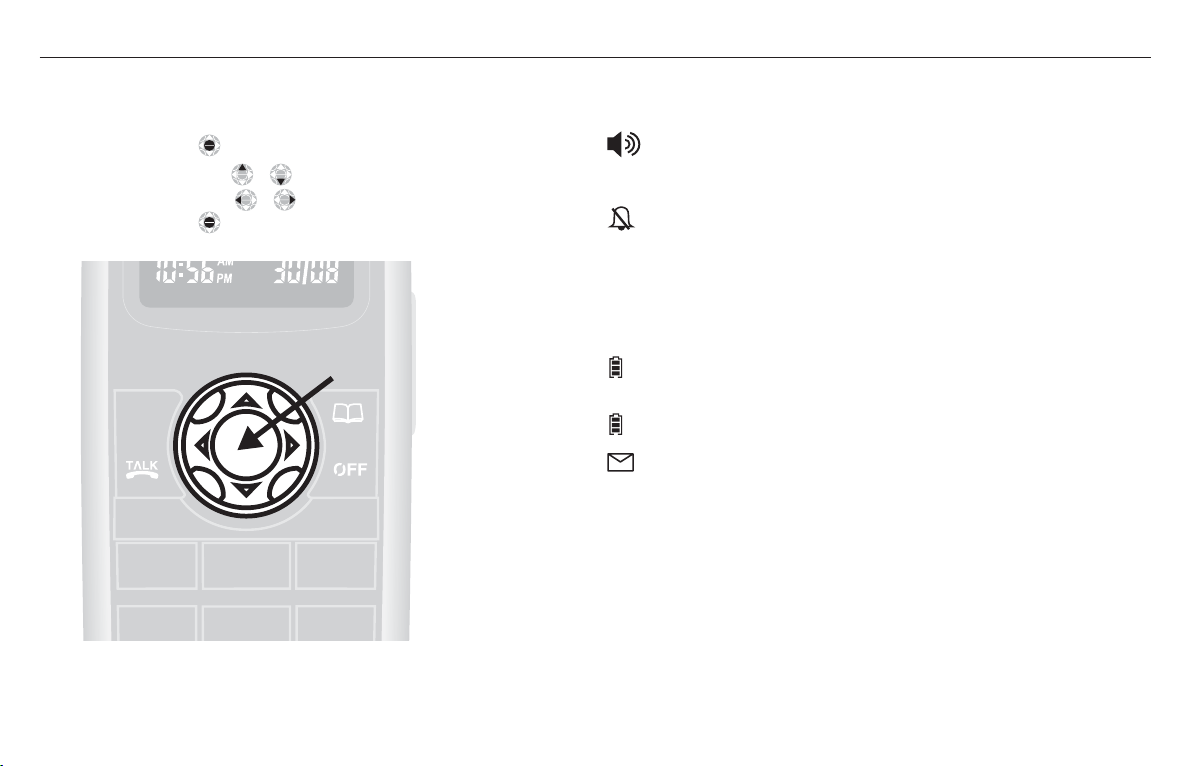
Using the NavKey
8PY`
Press the centre NavKey
Press the up or down NavKey
Press the left or right NavKey
Press the centre NavKey
>PWPN_
to display menus.
8PY`
8PY`
>PWPN_
>PWPN_
Y\
to navigate through menus.
8PY`
8PY`
>PWPN_
Y\
>PWPN_
8PY`
>PWPN_
to select a highlighted menu item.
@;
to navigate through menus.
.09?=0
-KVV]
701? =423?
<OMKVV -VOK\
/:B9
+,- ./0
456123 789
Handset screen icons
• Show on screen when the handset speakerphone is in use.
MUTED • Microphone is muted.
• Ringer off.
NEW • New call log entries.
NEW VOICEMAIL • New voicemail received.
SPEAKER • In speakerphone mode.
• Cycles (low, medium, and full) when handset
battery is charging.
• Flashes when a low battery condition is detected.
• Shows when new voicemail received.
13
Page 14

Getting to know your Telstra V580/V580a
Handset display screen messages
ALREADY SAVED The telephone number you have entered
is already stored in the directory.
CALL LOG EMPTY There are no call log entries.
CALLING HANDSET X Calling another handset.
CONNECTING The cordless handset is searching for the
telephone base.
PHONE BOOK EMPTY There is no directory entry.
HANDSET X IS CALLING Other handset is calling.
INTERCOM The handset is on an intercom call.
INCOMING CALL There is an incoming call.
INTERCOM ENDED The handset is terminating an intercom
call.
LIST FULL The directory is full.
LOW BATTERY The battery needs to be recharged.
NO SIGNAL, CALL ENDED Communication between handset and
telephone base is lost in intercom call.
OUTSIDE Connected to the external call during call
transfer.
**PAGING** The cordless handset locator has been
activated.
PLACE IN CHARGER The battery is very low. The handset
should be placed in the telephone base or
charger.
RINGER MUTE The ringer is muted temporarily during
incoming call.
SAVED Your operation has been saved.
14
UNABLE TO CALL TRY AGAIN Target handset is out of range, or on an
external call during intercom call.
UNABLE TO SAVE You are attempting to save caller ID entry
with no name or number.
WARNING CHECK BATTERY! The battery is not installed or not
installed properly in the handset –or-
The battery needs to be replaced.
An incorrect battery has been installed
by mistake. Use only the supplied Telstra
battery or equivalent.
XX MISSED CALLS There are un-reviewed calls in your call
log.
MICROPHONE ON MUTE has been turned off and the person
on the other end can hear you.
LINE IN USE Handset on the telephone line is in use.
ENDED You have just ended a call.
NO LINE There is no telephone line connected.
NEW VOICE MAIL There are new voice mail message(s).
PHONE The handset is in use.
SPEAKER The handset speakerphone is in use.
Page 15

Getting to know your Telstra V580/V580a
V580 base layout
1. CHARGE light
2. IN USE light
3. MessageBank light
4. PAGE handset
5. Antenna
Base unit indicators
3X?]O
- Flashes when there is an incoming call, or another handset is in use.
3X?]O
- On when the handset is in use.
7O]]KQO,KXU
101® or MessageBank® service.
-RK\QO
- Flashes when there is a new message on your Telstra Home Messages
- On when the handset is in the telephone base.
>OV]^\K@"
12d
#
/424?,7
=:</+.=:/-><?7
-RK\QO
3X?]O
7O]]KQO,KXU
:KQO
15
Page 16

Getting to know your Telstra V580/V580a
V580a base layout
=USZ
.OVO^O
:KQO <OMY\N -VYMU +XXM
>OV]^\K@"K
0
7O]]KQO]
=USZ
:VKc=^YZ
=O^?Z
12d
#
/424?,7
=:</+.=:/-><?7
-RK\QO
3X?]O
7O]]KQO,KXU
@YV
@YV
+X]aO\9X9PP
1. CHARGE light
2. IN USE light
3. MessageBank light
4. Volume +/-
5. Antenna
6. Answer On/Off
7. Skip left
8. Skip right
9. Delete
10. Play/Stop
11. Page
12. Record
13. Clock
14. Announce
15. Set Up
16. Mic
17. Message counter
16
Page 17

Telephone settings
Ringer volume
Your telephone has seven volume levels to choose from. You can adjust ringer volume either by the volume control on the right side of the handset, or in the handset menu.
To change the ringer volume:
1. Make sure the handset is in idle mode.
2. Press the volume button
3. Press
to choose the desired volume level. When finished, the new volume level will be saved.
-OR-
1. Press the centre NavKey
2. Press the up or down NavKey
3. Press the left or right NavKey
4. Press the centre NavKey
Ringer tone
This feature allows you to choose from ten ringer tones for incoming calls. To choose a ringer tone:
1. Press the centre NavKey
2. Press the up or down NavKey
3. Press the up or down NavKey
4. Press the centre NavKey
to display the current volume level on the screen.
8PY`
>PWPN_
in idle mode to display the menu.
8PY`
8PY`
>PWPN_
>PWPN_
Y\
to reach RINGER VOLUME then press the centre NavKey
8PY`
8PY`
>PWPN_
Y\
>PWPN_
8PY`
>PWPN_
to save. You’ll hear a confirmation tone.
8PY`
>PWPN_
in idle mode to display menu.
8PY`
>PWPN_
to save. You’ll hear a confirmation tone.
to adjust the volume. A sample of each ringer volume will be played when scrolling through the choices.
8PY`
8PY`
>PWPN_
>PWPN_
Y\
to reach RINGER TONE, and press the centre NavKey
8PY`
8PY`
>PWPN_
>PWPN_
Y\
to choose the desired ringer tone. A sample of the ringer tone will be played when scrolling through the options.
8PY`
>PWPN_
to confirm.
8PY`
>PWPN_
to confirm.
NOTE: Ringer will be off if the volume is set to zero, and a
If the ringer is turned off while scrolling through the options in
icon will be displayed.
RINGER TONE, the sample of ringer will not be heard.
17
Page 18

Telephone settings
Key tone
If you set the key tone to off, you will not hear a beep tone when you press any of the handset keys.
1. Press the centre NavKey
2. Press the up or down NavKey
3. Press the up or down NavKey
8PY`
>PWPN_
in idle mode to display menu.
8PY`
8PY`
>PWPN_
>PWPN_
Y\
to reach KEY TONE then press the centre NavKey
8PY`
8PY`
>PWPN_
>PWPN_
Y\
to choose between ON or OFF then press the centre NavKey
8PY`
>PWPN_
.
8PY`
>PWPN_
.
Language
The language menu allows you to select between ENGLISH, FRANÇAIS or ESPAÑOL to be used in all menus and screen displays. To change the language:
1. Press the centre NavKey
2. Press the up or down NavKey
3. Press the up or down NavKey
8PY`
>PWPN_
in idle mode to display menu.
8PY`
8PY`
>PWPN_
>PWPN_
Y\
to reach LANGUAGE then press the centre NavKey
8PY`
8PY`
>PWPN_
>PWPN_
Y\
to scroll through the choices, then press the centre NavKey
8PY`
>PWPN_
.
8PY`
>PWPN_
.
Clear voicemail
In this menu, you can turn off the message waiting indication on the handset screen.
1. Press the centre NavKey
2. Press the up or down NavKey
3. Press the centre NavKey
8PY`
>PWPN_
in idle mode to display menu.
8PY`
8PY`
>PWPN_
>PWPN_
Y\
8PY`
>PWPN_
to confirm when TURN INDICATOR OFF? displays, or press
to reach CLR VOICE MAIL, and press the centre NavKey
to cancel.
-VOK\
8PY`
>PWPN_
.
18
Page 19

Using the Phone
Make, answer and end calls with the handset
To make a call press
-OR-
1. Dial the number then press
2. To answer a call, press
3. To end a call, press
Speakerphone
During a call, press
=ZOKUO\
or
<OMKVV
-VOK\
=ZOKUO\
, then dial the number.
=ZOKUO\
or
<OMKVV
=ZOKUO\
,
<OMKVV
or any of the dial pad keys (0-9, #, *).
, or put the handset in the telephone base or charger.
on the handset to select between speakerphone and normal handset use.
Mute
The mute function allows you to hear the other party, but they will not be able to hear you. To use the mute function:
1. During a call, press
2. The screen will display the word
<OWY`O
8`_P
3. Press
NOTE: The screen displays the elapsed time as you talk (in hours, minutes and seconds). While entering a number to dial, press
hold
again to return to normal conversation.
:K_]O
=POTLW
to insert a pause.
<OWY`O
8`_P
on the handset.
MUTE.
Vol ume
1. During a call, use the volume button on the right side of the handset to adjust the listening volume.
2. Press the
volume control key to adjust the volume to a comfortable level.
<OWY`O
8`_P
or
to backspace; press and
-VOK\
19
Page 20

Using the phone
Ringer mute
This feature allows you to mute the ringer temporarily when the telephone is ringing.
Press
<OWY`O
8`_P
or
-VOK\
on the handset to temporarily silence the ringer. The next call will ring normally.
Intercom
The intercom feature allows conversation between one handset to another.
4Y_
1. Press
2. The screen will display
3. Use the dial pad to select the handset you wish to intercom.
4. The screen of the originating handset will display
5. The destination handset will ring, and the screen will display
6. To answer the intercom call on the handset, press
7. To end an intercom call, press
to display menu while in idle mode.
INTERCOM TO:
4Y_
,
, or place the handset back in the telephone base or charger.
-VOK\
CALLING HANDSET X.
HANDSET X IS CALLING.
=ZOKUO\
4Y_
,
,
<OMKVV
or any dialling keys (0-9,#,*) on the handset.
Conference call
You can conference up to two registered handsets on an external line. If one handset is on the line, press
<OMKVV
=ZOKUO\
or
on another handset to join the call.
Transfer an external call
This telephone allows you to transfer an external call from one handset to any other handset.
4Y_
1. During a call, press
2. Use the keypad to select the number of the destination handset, and the screen will display CALLING HANDSET X (the handset number is displayed on the
handset when in standby mode).
3. The destination handset will ring and the screen displays
4. To answer the call at the destination handset, press
5. Now the party at the originating handset can have a conversation with the party at the destination handset, and the screen displays
6. Press
on the originating handset to transfer the call.
-VOK\
20
to put the call on hold at the originating handset. The screen will display TRANSFER TO:
HANDSET X IS CALLING.
=ZOKUO\
<OMKVV
or
4Y_
,
or any keys (0-9, #, *) on the destination handset.
INTERCOM.
Page 21

Using the phone
NOTE: If the destination handset does not pick up the intercom call, the originating handset can return to the external call by pressing
If a call remains on hold for about 100 seconds, the screen of the originating handset shows
UNABLE TO CALL TRY AGAIN and reconnects to the external
call automatically. The destination handset returns to idle mode.
Switch between external and internal calls
When on an external call and you wish to intercom another system handset in your home without ending the external call:
4Y_
1. Press
The screen will display TRANSFER TO:
2. Press the handset number you wish to reach. The screen will display CALLING HANDSET X.
4Y_
3. Press
on the originating handset to switch between the external call (outside) and intercom call.
Answer an incoming call during an intercom call
1. During an intercom call, there will be an alert tone signalling an incoming call.
2. To answer the incoming call, press
3. To terminate the intercom call without answering the incoming call, press
<OMKVV
=ZOKUO\
or
on the handset, and the intercom call will end automatically.
on the handset.
-VOK\
Page handset
This feature allows the telephone base to page all the handsets.
1. Press
2. To stop paging, press
on telephone base, all the handset(s) will ring and the screens display PAGING.
:KQO
again on the telephone base,
:KQO
,or any keys (0-9, #, *) on the handset.
<OMKVV
<OMKVV
, or
.
-VOK\
21
Page 22

Phonebook
The Phonebook on the handset can store up to 50 entries, each entry consists up to 32 digits and 16 characters.
8PY`
1. The Phonebook can be accessed while in idle mode by pressing
2. Press
3.
Phonebook EMPTY is displayed on screen when there is no entry in the Phonebook.
to exit the menu without saving any changes.
-VOK\
or the centre NavKey
>PWPN_
twice.
Store a Phone book entry
8PY`
1. Press the centre NavKey
2. Press the up or down NavKey
3. The screen displays
<OWY`O
8`_P
4. Press
5. The screen displays
6. Press
to backspace, or press and hold
<OWY`O
8`_P
to backspace, or press # to insert a space. Press the centre NavKey
7. When the Phonebook is full and a save is attempted,
8. If you attempt to save a number already stored in the Phonebook,
>PWPN_
in idle mode to display menu, and press the centre NavKey
8PY`
8PY`
>PWPN_
>PWPN_
Y\
to choose STORE when in the Phonebook menu. Press the centre NavKey
ENTER NUMBER. Use the dial pad to enter the number.
:K_]O
=POTLW
for at least three seconds to insert a pause. Press the centre
ENTER NAME. Use the dial pad (see the Chart of characters on the next page) to enter the name.
8PY`
>PWPN_
to confirm.
LIST FULL will display.
ALREADY SAVED will display.
NOTE: Since the Phonebook is shared by all the handsets, only one handset can review the Phonebook at a time. If a handset attempts to enter the Phonebook while
another handset is in the Phonebook, NOT AVAILABLE AT THIS TIME will be displayed.
8PY`
>PWPN_
to enter the Phonebook.
8PY`
>PWPN_
8PY`
>PWPN_
NavKey
to select.
22
Page 23

PhoneBook
Chart of characters
Use the dial pad and the chart below to enter a name (up to 16 characters). Each press of a particular key causes characters to be displayed in the following order:
8_WLO\ -RK\KM^O\]LcX_WLO\YPUOcZ\O]]O]
5Oc !"#
¾
+ , - K L M
. / 0 N O P
1 2 3 Q R S
4 5 6 T U V
7 8 9 W X Y
! : ; < = ! Z [ \ ]
" > ? @ " ^ _ `
# A B C D # a b c d
) *
]ZKMO
<OWY`O
1. When entering characters, press
8`_P
to backspace. The entire name or number can be removed by pressing and holding
2. To insert a dialling pause, press and hold
:K_]O
=POTLW
for at least three seconds until a lowercase p appears on the handset screen.
<OWY`O
8`_P
for at least three seconds.
NOTE: When you enter a name, the handset will automatically display the first character of each word in uppercase. Press the NavKey
cursor one space to the left or right. Press
to enter a space.
8PY`
>PWPN_
Y\
8PY`
to move the
>PWPN_
23
Page 24

PhoneBook
Search the Phonebook
Entries are sorted alphabetically, and names beginning with numbers are presented first. An alphabetical search can be done after entering the Phonebook.
456
For example, press
1. Press
2. Use the dial pad to display the first name beginning with a letter associated with that key.
(JKL) once to find Jenny, twice to find Kristen, or three times to find Linda.
to enter the Phonebook, or press the centre NavKey
8PY`
>PWPN_
to choose REVIEW when in the Phonebook.
Dial a Phonebook entry
1. Press to enter the Phonebook, or press the centre NavKey
8PY`
8PY`
>PWPN_
>PWPN_
Y\
2. Press the up or down NavKey
3. Press
<OMKVV
or
=ZOKUO\
to dial the entry.
to scroll to the desired entry, or use the alphabetical search to find it.
Edit a Phonebook entry
1. Press to enter the Phonebook, or press the centre NavKey
press the centre NavKey
2. Press the up or down NavKey
3. The screen displays
<OWY`O
8`_P
4. Press
5. The screen displays
6. Press
to backspace, or press and hold
<OWY`O
8`_P
to backspace, or press # to insert a space. Press the centre NavKey
8PY`
>PWPN_
.
8PY`
8PY`
>PWPN_
>PWPN_
Y\
to scroll to the desired entry, or use the alphabetical search to find the number. Press the centre NavKey
EDIT NUMBER. Use the dial pad to enter the number.
:K_]O
=POTLW
for at least three seconds to insert a pause. Press the centre NavKey
EDIT NAME. Use the dial pad (see the Chart of characters on page 23) to enter the name.
Delete a Phonebook entry
1. Press to enter the Phonebook, or press the centre NavKey
8PY`
8PY`
>PWPN_
>PWPN_
Y\
2. Use the up or down NavKey
<OWY`O
8`_P
3. Press
to remove the entry, you’ll hear a confirmation tone.
24
to scroll to the desired entry, or use the alphabetical search to find the number.
8PY`
>PWPN_
to choose REVIEW when in the Phonebook menu.
8PY`
>PWPN_
and use the up or down NavKey
8PY`
>PWPN_
to confirm.
8PY`
>PWPN_
to choose REVIEW when in the Phonebook menu.
8PY`
8PY`
>PWPN_
>PWPN_
Y\
to choose REVIEW when in the Phonebook menu and
8PY`
>PWPN_
.
8PY`
>PWPN_
.
Page 25

Telstra Network Services
Calling Number Display
If you have subscribed to Telstra’s Calling Number Display service, you will be able to see your caller’s details on your handset display (provided it is not withheld e.g.
blocked calls) prior to answering the call.
Handset display screen messages
UNAVAILABLE The number is unavailable.May indicate that the call is from overseas or from a caller whose carrier does not participate in Calling Number Display.
PRIVATE The caller has withheld (blocked) their number or the call is from a Silent Line or unlisted number.
PAYPHONE The incoming call is from a payphone within Australia.
MOBILE The incoming call is from a mobile telephone from within Australia.
If your caller’s name and number are stored in the Phonebook and a name/number match is found, you will see the caller’s name on the display instead.
IMPORTANT: To use Calling Number Display and make the most of the Calls list feature you must first subscribe to Telstra’s Calling Number Display service. For more
details on Telstra’s Phone Features, including Calling Number Display, call Telstra on 13 2200. To ensure that the caller’s name is displayed, make sure you have stored
the full number, including the area code in the Phonebook
XX MISSED CALL and the word NEW will be displayed on screen if there are new call log entries (including missed and un-reviewed calls.) CALL LOG EMPTY will
display on screen if there are no call log entries.
The call log can be accessed on the handset by pressing
.LWW^
, or pressing the centre NavKey
If the telephone number of caller matches the exact telephone number in the directory, the name of the entry will be shown.
NOTE: Calling Number Display may not be available for every incoming call. In addition, the callers may intentionally block their telephone number.
Review the call log
.LWW^
1. Press
2. Use the up or down NavKey
3. The name, number, date and time of all incoming calls are displayed on the screen.
4. There will be an error tone when the list reaches the top or the end of the call log.
8PY`
8PY`
>PWPN_
>PWPN_
Y\
to scroll through the call log on the handset.
8PY`
>PWPN_
then CALL LOG, then press the centre NavKey
8PY`
>PWPN_
again.
25
Page 26

Telstra Network Features
Dial a call log entry
.LWW^
1. Press
2. Use the up and down NavKey
3. Press
595-5911, then the display options will be:
4. Press
8PY`
8PY`
>PWPN_
>PWPN_
Y\
to scroll to the desired entry.
repeatedly to display the possible dialling options when the telephone number in call log has 7, 8, 10 or 11 digits. For example, if the original number was 800-
=ZOKUO\
or
<OMKVV
to dial the entry.
Save an entry to the Phonebook
8PY`
8PY`
>PWPN_
>PWPN_
1. When in the call log, press the up or down NavKey
8PY`
2. Press the centre NavKey
>PWPN_
to save the entry.
3. If the entry has a name and a number, the screen displays
3. If the entry only has a name or a number,
NavKey
8PY`
>PWPN_
to save the entry.
EDIT NAME or EDIT NUMBER will display on screen. Use the dial pad to enter the name or number, and press the centre
Y\
to scroll to the desired entry.
SAVED.
NOTE: When saving or deleting a number on one handset, it will automatically update all other handsets. Only one handset can review the directory or call log at a time.
If another handset attempts to enter the Phonebook or the call log, it will display NOT AVAILABLE AT THIS TIME.
If the entry does not have a name and a number, UNABLE TO SAVE will display on screen.
Delete one or all entries
8PY`
8PY`
>PWPN_
>PWPN_
1. While in the call log, press the up or down NavKey
2. Press
<OWY`O
8`_P
to delete an entry. Press and hold
<OWY`O
Y\
to scroll to the desired entry.
8`_P
to delete all entries, the screen display DELETE ALL CALLS? then press the centre NavKey
8PY`
>PWPN_
, you’ll hear a
confirmation tone.
MessageBank® and Flashing Message Indicator (FMI)
The Telstra V580/V580a is designed to provide a visual indicator when a new message is left in your Telstra Home Messages 101® or MessageBank® service.
When a new message is left the text NEW VOICE MAIL and the icon will appear on the handset display and the MessageBank light on the base will light up. After
you have listened to your message(s), the text NEW VOICE MAIL and the icon will disappear and the MessageBank light on the base will turn off.
Call Telstra on 13 2200 to have the free Flashing Message Indicator feature activated on your line.
26
Page 27

Telstra Network Features
Call Waiting
Call Waiting tells you if a new caller is trying to contact you when you are already on the phone. A discreet tone alerts you to the new caller, so you can answer the second
incoming call by putting the first caller on hold.
1. Press
2. To switch between calls, press
then . Your first caller is put on hold and you can talk to your second caller.
<OMKVV
then , or alternatively to hang up on one call and return to a single call press
<OMKVV
then .
<OMKVV
If you subscribe to Telstra’s Calling Number Display, the second incoming caller’s number (and name if stored in the Phonebook) will appear on the handset display.
Redial list
The telephone stores the five most recently dialled numbers in the redial list. You can review, redial, or save numbers into the directory. When there are already five entries
in the redial list, the oldest entry is deleted to make room for the newest entry. Entries are displayed in reverse chronological order, i.e. from the oldest entry to the most
recent entry. The redial list can be accessed on the handset by pressing
:K_]O
=POTLW
while in idle mode.
Dial from redial
1. While in the redial list, press
2. Press
To change the number before dialling, press the centre NavKey
3. Press
=ZOKUO\
or
<OMKVV
<OWY`O
8`_P
to dial the number.
to backspace, or press and hold
Delete a redial entry
1. When in the redial list, press
<OWY`O
8`_P
2. Press
to remove the redial entry. A confirmation tone will be heard.
:K_]O
=POTLW
, or press the up or down NavKey
:K_]O
=POTLW
for at least three seconds to insert a pause. Press
:K_]O
=POTLW
, or press the up or down NavKey
8PY`
8PY`
>PWPN_
>PWPN_
Y\
to scroll to the desired number.
8PY`
>PWPN_
to select the number, and use the keypad to change the number.
8PY`
8PY`
>PWPN_
>PWPN_
Y\
to scroll to the number to be deleted.
<OMKVV
=ZOKUO\
or
to dial the number.
27
Page 28

Using your answering machine (Telstra V580a only)
You can operate your Telstra V580a answering machine from:
• the base
• remotely from any external Touchtone™ telephone.
The default setting for the answering machine is On. Until you change your outgoing message, your callers will be greeted with the pre-recorded message, “Hello, please
leave a message after the tone”.
Your answering machine is designed to answer calls after 15 rings when it is switched off. This is to enable you to operate the remote access functions of your
answering machine in the event your answering machine is switched off.
Answering system setup
The answering system uses voice prompts to guide you through the set up of the answering system. Press
Message capacity
The answering system can record up to 99 messages, depending on the length of each message. Individual messages can be up to four minutes in length, but the total
maximum recording time is 15 minutes. Messages will remain available for replay until they are deleted.
Activate the answering system
The answering system must be turned on to answer and record messages. If the answering system is turned off, the telephone base ANS ON/OFF light will be off.
To turn the answering system on or off, press
+X]aO\9X9PP
.
Set the clock
Before playing each message, the answering system announces the day and time the message was received. You should set the day and time before using the answering
system, so messages are dated correctly.
To set the clock:
-VYMU
1. Press
2. Press
3. Press
4. Press
5. Press
6. Press
28
, and the system will announce the current clock setting. The system will then announce “To set the CLOCK, press CLOCK.”
-VYMU
again and the system will announce the year.
=USZ
=USZ
=USZ
=USZ
=USZ
or
until the system announces the correct year, then press
=USZ
or
, until the system announces the correct hour, then press
=USZ
or
until the system announces the correct minutes, then press
=USZ
or
until the system announces the correct day, then press
-VYMU
. The system will announce the hour.
-VYMU
. The system will announce the minute.
-VYMU
. The system will announce the day.
-VYMU
. The system will announce the new clock setting and return to idle mode.
anytime to save and exit the SETUP menu.
:VKc=^YZ
Page 29

Using the answering machine (Telstra V580a only)
NOTE: Press and hold
=USZ
=USZ
or
during set up to advance by increments of ten in setting minute and year. Incoming Calling Number Display data sets the time and
date. You’ll need to set the year so the day of the week can be determined from the Calling Number Display information. The time will be set automatically only if you
subscribe to Telstra’s Calling Number Display. Setting this clock will not affect the handset clock, they are individual settings.
Set number of rings
This feature allows you to select the number of rings before the answering system answers. You can choose from two, four or six rings or toll saver. With toll saver active, the
answering system answers after two rings when there are new messages, and after four rings when there are no new messages.
To set the number of rings:
=O^?Z
1. Press
2. Press
in idle mode, and the system announces the number of rings setting.
=USZ
=USZ
or
until the system announces the desired setting, then press
=O^?Z
to save the setting and go to the next setting or press
to save and return to
:VKc=^YZ
idle mode.
Set base ringer
This feature allows you to select from three telephone base ringer volume levels: high, low or off.
To set the base ringer:
=O^?Z
1. Press
2. Press
in idle mode until the system announces the base ringer setting.
=USZ
=USZ
or
until the system announces the desired base ringer volume level, then press
=O^?Z
to save the setting and go to the next setting or press
:VKc=^YZ
to
save and return to idle mode.
NOTE: When calling remotely to check for messages, select toll saver in number of rings setting will help to save long distance charges because the answering system will
answer the incoming call after two rings when there are new messages.
Set remote access code
A two-digit security code is required to access the answering system from any touch tone telephone. The factory default code is 19. To set the remote access code:
=O^?Z
1. Press
2. Press
the next setting or press
in idle mode until the system announces the remote access code setting.
=USZ
=USZ
or
to change the remote access code by one, or press and hold
to save and return to idle mode.
:VKc=^YZ
=USZ
to change by increments of 10. Press
=O^?Z
to save the setting and go to
29
Page 30

Using the answering machine (Telstra V580a only)
Set message alert tone
This feature programs the system to beep every 10 seconds to alert you of new messages. The beeping will stop when all new messages have been reviewed. To set the
message alert tone:
=O^?Z
1. Press
2. Press
in idle mode until the system announces the message alert tone setting.
=USZ
=USZ
or
to toggle between on or off, then press
=O^?Z
to save the setting and go to the next setting or press
to save and return to idle mode.
:VKc=^YZ
NOTE: The answering system must be turned on for the message alert tone to function.
Outgoing announcement
The outgoing announcement is the message callers hear when calls are answered by the answering system.
The telephone is preset with a greeting that answers calls with “ Hello, please leave a message after the tone. ” You can use this factory announcement, or replace it with your
own outgoing announcement. While in the ANNC menu, press
Record your announcement
1. While in idle mode, press
<OMY\N
2. Press
to record, and the system announces “Record after the tone, press STOP when you are done.”
3. After the tone, speak towards the microphone at the bottom front of the telephone base from about nine inches away.
4. Press
when finished.
:VKc=^YZ
5. The answering system will automatically playback the newly recorded announcement. Press
+XXM
and the system will announce “Announcement, press PLAY or press RECORD.”
Play your announcement
1. While in idle mode, press
2. Press
to play, press
:VKc=^YZ
+XXM
and the system will announce “Announcement, press PLAY or press RECORD.”
again to stop the playback.
:VKc=^YZ
+XXM
again anytime to exit.
to stop the playback anytime.
:VKc=^YZ
30
Page 31

Z
Using the answering machine (Telstra V580a only)
Delete your announcement
1. While in idle mode, press
2. Press
to delete, and the system will announce “Announcement deleted.”
.OVO^O
NOTE: Your announcement can be up to 90 seconds in length. When your announcement is deleted, calls will be answered with the pre-programmed announcement.
If you receive calls when the memory is full, the telephone will ring 15 times, then answer and announce “Please enter remote access code.”
+XXM
and the system will announce “Announcement, press PLAY or press RECORD.”
Message playback
1. Press
If you have new messages waiting, you will hear only the new message (oldest first). If there are no new messages, the system will play back all messages (oldest first).
When playback begins, the total number of messages and the day and time it was received will be announced.
New message indication
The message display counter will flash when there are new answering system messages. If the new message alert tone is turned on, the telephone base will beep every ten
seconds when there are un-reviewed messages.
Options during playback
1. Press
2. Press
3. Press
4. Press
Delete all messages
1. When in idle mode, press and hold
to listen to messages. Press
:VKc=^Y
@YV
@YV
or
to adjust the speaker volume.
=USZ
to skip to the next message.
=USZ
to repeat the message currently playing. Press twice to listen to the previous message.
to delete the current message. The system will advance to the next message.
.OVO^O
to stop playback.
:VKc=^YZ
to delete all old messages. The system will announce “All old messages deleted.”
.OVO^O
NOTE: If the system has less than five minutes of recording time left, the remaining time will be announced. If F is flashing in the message window, memory is full.
You willhave to delete some messages before new ones can be received. Only old messages can be deleted. Messages can only be deleted after they are played.
31
Page 32

Using the answering machine (Telstra V580a only)
Record and play memos
Memos are your own recorded messages used as a reminder for yourself or other household members who use the same answering system. They are saved, played back
and deleted the same way as incoming messages.
Record a memo
1. While in idle mode, press
front of the telephone base from about nine inches away.
2. Press
when you finished recording.
:VKc=^YZ
Memo playback
1. While in idle mode, press
2. See the Options during playback on page 31 for other options.
<OMY\N
. The system announces “Record after the tone, press STOP when you are done.” After the tone, speak towards the microphone at the bottom
.
:VKc=^YZ
NOTE: Memo less than one second will not be recorded. “Memory is full.” will be announced if you press
Your memo can be up to four minutes in length.
<OMY\N
when the memory is full.
Remote access
You can access many features of your answering system remotely from most touch tone telephone. A two-digit security code is required to access the system and the
factory default code is 19; see page 29 to change it.
To connect remotely:
1. Dial your telephone number from a touch tone telephone.
2. When the system answers and announces the greeting, enter the two-digit security code.
3. After hearing a double beep, enter one of the remote commands in the following table.
4. Hang up or press 8 to end the call.
32
Page 33

Using the answering machine (Telstra V580a only)
Remote access commands
Hang up Saves all messages
1 Plays all messages
2 Plays new messages only
*5 Plays help menu
5 To stop
*7 Records the outgoing announcement
8 Hang up the call
0 Turns answering system on or off
Commands during playback mode
3 Deletes the message currently playing and announces “Message deleted.”
3 (twice) Deletes all old messages while no message is currently playing.
4 (twice) Plays the previous message
6 Skips to the next message
NOTE: After entering remote access mode, any new messages will be played automatically.Once the new messages have been played, the system will announce the
help menu options. If no key is pressed within 20 seconds, the remote access call is automatically disconnected.
33
Page 34

Using the answering machine (Telstra V580a only)
Message window displays
The message counter usually displays the total number of memos and incoming messages. See the list below for explanations of other displays in this counter.
0 No messages.
1-98 Total number of old message(s) recorded.
0-98 (flashing) Total number of new message(s) recorded in idle mode.
99 & F (alternating) Memory is full with total number of messages recorded.
1-99 (counting) Elapsed time while recording memo or announcement.
99 (flashing) Recording time exceeds 99 seconds.
1-99 (flashing) Current message number during new message playback.
1-99 Current message number during old message playback.
1-8 Current volume level while adjusting.
10-99 Current remote access code while setting.
ON (or) OFF Message Alert Tone (on or off).
02, 04, 06, tS Current number of rings while setting.
-- System is answering a call, or setting the time and date, or being accessed remotely.
-- (flashing) System is being programmed or initialized.
34
Page 35

Troubleshooting
If you have difficulty operating your telephone, please try the suggestions below. For Customer Service please contact TecHelp on 1300 369 193.
My telephone does not work at all.
• Make sure the battery is installed and charged correctly (see page 8). For optimum daily performance, return the cordless handset to the telephone base
after use.
• Make sure the telephone line cord is plugged firmly into the telephone base and the modular wall jack.
• Unplug the unit’s electrical power. Wait for approximately 15 seconds, then plug it back in. Allow up to one minute for the cordless handset and base to synchronize.
• Charge the battery in the cordless handset for at least 16 hours.
• Remove and re-insert the battery. If that still does not work, it may be necessary to purchase a new battery.
• Disconnect the telephone base from the modular jack and plug in a working telephone. If this telephone does not work, the problem is probably in the wiring or the local
service. For assistance with residential line faults contact Telstra on 13 22 03 or 13 22 55 for small business.
Low Battery is displayed on screen.
• Place the handset in the telephone base or charger for recharging.
• Remove and re-install the battery and use it normally until fully discharged, then recharge the handset on the telephone base or charger for 16 hours.
• If the above measures do not correct the problem, the battery may need to be replaced.
The battery does not charge in the handset or the handset battery does not accept charge.
• Make sure the handset is placed in the charger correctly. The CHARGE light on the telephone base or charger should be on.
• If the cordless handset is in the charger or in the telephone base but the CHARGE light is not on, refer to The charge light is off in this section.
• It may be necessary to purchase a new battery. Please refer to the Battery section (see page 8) of this user’s manual.
• The telephone might be malfunctioning. Please call TecHelp for assistance on 1300 369 193.
35
Page 36

Troubleshooting
The CHARGE light is off.
• Clean the charging contacts on the cordless handset(s) and telephone base each month using a pencil eraser or a dry non-abrasive fabric.
• Make sure the power adapter and telephone line cords are plugged in correctly and securely.
• Unplug the power adapter. Wait for 15 seconds before plugging it back in. Allow up to one minute for the cordless handset and telephone base to reset.
• The telephone might be malfunctioning. Please call TecHelp for assistance on 1300 369 193
The CHARGE Indicator on the telephone base is flashing.
• This is a signal that the battery is very low, completely depleted, or when there is no electrical contact between the battery and the telephone base.
• Ensure the connector of the battery is securely plugged into the handset and place the handset in the telephone base for charging.
There is no dial tone.
• First, try all the above suggestions.
• Move the cordless handset closer to the telephone base. It might be out of range.
• The telephone line cord might be malfunctioning. Try installing a new telephone line cord.
The telephone does not ring when there is an incoming call.
• Make sure the ringer is on. (See page 17).
• Make sure the telephone line cord and power adapter are plugged in properly (see page 6 and 7).
• The cordless handset may be too far from the telephone base. Move it closer to the telephone base.
• There may be too many extension phones on the telephone line to allow all of them to ring simultaneously. Try unplugging some of them.
• If the other telephones in your home are having the same problem, the problem is in the wiring or local service. Please call Telstra on 13 22 03 for residential customers or
13 22 55 for business customers for assistance (or your fixed line service provider).
• Other electronic products can cause interference to your cordless telephone. Try installing your telephone as far away as possible from the following electronic devices:
wireless routers, radios, radio towers, pager towers, cellular telephones, digital telephones, intercoms, room monitors, televisions, VCRs, personal computers, kitchen
appliances, and other cordless telephones.
36
Page 37

Troubleshooting
• Test a working telephone at the telephone jack. If another telephone has the same problem, the problem is in the telephone jack. Please call Telstra on 13 22 03 for
residential customers or 13 22 55 for business customers for assistance (or your fixed line service provider).
• The telephone line cord might be malfunctioning. Try installing a new telephone line cord.
• Re-install the battery and place the cordless handset in the telephone base.
• Wait for the cordless handset to synchronize with the telephone base. Allow up to one minute for this to take place.
I cannot dial out.
• First, try all the above suggestions.
• Make sure there is a dial tone before dialling. It is normal if the cordless handset takes a second or two to synchronize with the telephone before producing a dial tone.
Wait an extra second before dialling.
• If the other telephones in your home are having the same problem, the problem is in the wiring or local service. Please call Telstra on 13 22 03 for residential customers or
13 22 55 for business customers for assistance (or your fixed line service provider).
• Eliminate any background noise. Noise from a television, radio, or other appliances may cause the telephone to not dial out properly. If you cannot eliminate the
background noise, first try muting the cordless handset before dialling, or dialling from another room in your home with less background noise.
There is noise or interference during a telephone conversation. My calls fade out or cut in and out when I am using the
cordless handset.
• The handset may be out of range. Move it closer to the telephone base.
• Appliances or other cordless telephones plugged into the same circuit as the telephone base can cause interference. Try moving the appliance or telephone base to
another outlet.
• Other electronic products can cause interference to your cordless telephone. Try installing your telephone as far away as possible from the following electronic devices:
wireless routers, radios, radio towers, pager towers, cellular telephones, digital telephones, intercoms, room monitors, televisions, VCRs, personal computers, kitchen
appliances, wireless routers, and other cordless telephones.
• Microwave ovens operate on the same frequency as your telephone. It is normal to experience static on your telephone while the microwave oven is operating. Do not
install this telephone in the same outlet or near a microwave oven.
37
Page 38

Troubleshooting
• If your telephone is plugged in with a modem or a surge protector, plug the telephone (or modem/surge protector) into a different location. If this solves the problem, relocate your telephone or modem farther apart from each other, or use a different surge protector.
• The layout of your home or office might be limiting the operating range. Trying moving the telephone base to another location, preferably a higher location for better
reception.
• Disconnect the telephone base from the modular jack and plug in a corded telephone. If calls are still not clear, the problem may be in the wiring or local service. Please
call Telstra on 13 22 03 for residential customers or 13 22 55 for business customers for assistance (or your fixed line service provider).
• If the other telephones in your home are having the same problem, the problem may be in the wiring or local service. Contact your service provider for assistance. Do you
have an ADSL service? If yes, you need to have an ADSL filter installed at every telephone jack that has a telephone connected to it. Contact your ADSL service provider for
filter information.
The handsfree button does not work.
• Charge the battery.
My Calling Number Display features are not working properly.
• Calling Number Display is a subscription service. You must subscribe to this service from Telstra for this feature to work on your telephone.
Please contact Telstra on 13 22 00 for more information on this feature
• The caller may not be calling from an area which supports Calling Number Display.
The system does not receive Calling Number Display or the system does not display Calling Number Display
during call waiting.
• Make sure you subscribe to Calling Number Display and enable Call Waiting features.
• The caller may not be calling from an area which supports Calling Number Display.
The messages on the system are very difficult to hear
• Press on the side of the handset to increase the speaker volume.
38
Page 39

Troubleshooting
My cordless handset is not performing normally.
• Make sure the power cord is securely plugged into the telephone base. Plug the unit into a different working electrical outlet.
• Move the cordless handset closer to the telephone base. It may be out of range.
• Reset the telephone base by unplugging the unit’s electrical power. Wait for 15 seconds and plug it back in again. Allow up to one minute for the cordless handset and the
telephone base to synchronize.
• Other electronic products can cause interference to your cordless telephone. Try installing your telephone as far away from these electronic devices as possible: wireless
routers, radios, radio towers, pager towers, cellular telephones, intercoms, room monitors, televisions, personal computers, kitchen appliances and other cordless
telephones.
Common remedy for electronic equipment.
• If the unit is not responding normally, trying putting the cordless handset in the telephone base or the charger. If it does not seem to respond, try the following (in the
order listed):
• Disconnect the power to the telephone base.
• Disconnect the battery on the cordless handset and the spare battery in the telephone base.
• Wait a few minutes before connecting power to the telephone base.
• Re-install the battery and place the cordless handset into the telephone base or charger.
• Wait for the cordless handset to synchronize its connection with the telephone base. Allow up to one minute for this to take place.
39
Page 40

General information
How many telephones can you have?
All items of equipment have a Ringer Equivalence
Number (REN) which is used to calculate the number
of items that may be connected to any one telephone
line. The Telstra V580 has a total REN of 0.1, i.e. for a
base and up to 4 handsets. A total REN of 3 is allowed
per telephone line. If the total REN of 3 is exceeded, the
telephone may not ring. With different telephone types
there is no guarantee of ringing, even when the REN is
less than 3.
CAUTION:
To reduce the risk of fire or injury to persons, read and
follow these instructions:
1. Risk of explosion if battery is replaced by an incorrect
type. Use only the battery(ies) provided or equivalent.
3.6V 600mAH Ni-MH
2. Do not dispose of the battery(ies) in a fire. They may
explode. Check with local waste management codes
for special disposal instructions.
3. Do not open or mutilate the battery(ies). Released
electrolyte is corrosive and may cause burns or injury
to the eyes or skin. The electrolyte may be toxic if
swallowed.
4. Exercise care in handling batteries in order not to
create a short circuit with conductive materials such
as rings, bracelets, and keys. The battery and/or
conductor may overheat and cause burns.
5. Charge the battery(ies) provided with or identified
40
for use with this product only in accordance with the
instructions and limitations specified in this manual.
WARNING: TO PREVENT FIRE OR
SHOCK HAZARD, DO NOT EXPOSE THIS
PRODUCT TO RAIN OR ANY TYPE OF
MOISTURE.
Important safety instructions
When using your telephone equipment, basic safety
precautions should always be followed to reduce the
risk of fire, electric shock and injury, including the
following:
1. Read and understand all instructions.
2. Follow all warnings and instructions marked on the
product.
3. Unplug this product from the wall outlet before
cleaning. Do not use liquid or aerosol cleaners. Use a
damp cloth for cleaning.
4. Do not use this product near water (for example, near
a bathtub, kitchen sink, or swimming pool).
5. Do not place this product on an unstable table, shelf,
stand or other unstable surfaces.
6. Slots and openings in the back or bottom of the
telephone base and handset are provided for
ventilation. To protect them from overheating, these
openings must not be blocked by placing the product
on a soft surface such as a bed, sofa or rug. This
product should never be placed near or over a radiator
or heat register. This product should not be placed in
any area where proper ventilation is not provided.
7. Use only the Power adapter(s) supplied
For V580: Model 5005CS0900040
For V580A: Model 5008CS0900060
For V580/V580a Extension Charger:
Model 5002CS0900020
For assistance or to organise a replacement power
adapter contact TecHelp on 1300 369 193
8. Do not allow anything to rest on the power cord. Do
not install this product where the cord may be walked
on.
9. Never push objects of any kind into this product
through slots in the base or handset as they may
touch dangerous voltage points or short out parts
that could result in a risk of fire or electric shock.
Never spill liquid of any kind on the product.
10. To reduce the risk of electric shock, do not
disassemble this product, but take it to an authorized
service facility. Opening or removing parts of the
base or handset other than specified access doors
may expose you to dangerous voltages or other risks.
Incorrect reassembling can cause electric shock when
the product is subsequently used.
11. Do not overload wall outlets and extension cords as
this can result in the risk of fire or electric shock.
12. Unplug this product from the wall outlet and refer
servicing to an authorized service facility under the
following conditions:
Page 41

General information
A. When the power supply cord or plug is damaged or
frayed.
B. If liquid has been spilled onto the product.
C. If the product has been exposed to rain or water.
D. If the product does not operate normally by
following the operating instructions. Adjust only
those controls that are covered by the operation
instructions, as improper adjustment of other controls
may result in damage and often requires extensive
work by an authorized technician to restore the
product to normal operation.
E. If the product has been dropped and the base and/
or handset has been damaged.
F. If the product exhibits a distinct change in
performance.
13. Avoid using a telephone (other than cordless) during
an electrical storm. There is a remote risk of electric
shock from lightning.
14. Do not use the telephone to report a gas leak in the
vicinity of the leak.
15. Only put the handset of your telephone next to your
ear when it is in normal talk mode.
16. It is recommended that if you have a pacemaker
fitted you check with a medical expert before using
this product.
17. This power unit is intended to be correctly oriented
in a vertical or floor mount position. The prongs are
not designed to hold the plug in place if it is plugged
into a ceiling or under-the-table/cabinet outlet.
Maintenance
Taking care of your telephone
Your cordless telephone contains sophisticated
electronic parts, so it must be treated with care.
Avoid rough treatment
Place the handset down gently. Save the original
packing materials to protect your telephone if you ever
need to ship it.
Avoid water
Your telephone can be damaged if it gets wet. Do not
use the handset outdoors in the rain, or handle it with
wet hands. Do not install your telephone base near a
sink, bathtub or shower.
Electrical storms
Electrical storms can sometimes cause power surges
harmful to electronic equipment. For your own safety,
use caution when using electric appliances during
storms.
Cleaning your telephone
Your telephone has a durable plastic casing that should
retain its lustre for many years. Clean it only with a soft
cloth slightly dampened with water or a mild soap. Do
not use excess water or cleaning solvents of any kind.
Remember that electrical appliances can cause serious
injury if used when you are wet or standing in water.
If your telephone base should fall into water, DO NOT
RETRIEVE IT UNTIL YOU UNPLUG THE POWER CORD AND
TELEPHONE LINE CORDS FROM THE WALL. Then pull the
unit out by the unplugged cords.
Technical specifications
Frequency control: Crystal controlled
PLL synthesizer
Nominal effective Actual operating range
range: may vary according to
environmental conditions at
the time of use.
Size handset: 158.7mm X 52.7mm X 41.3mm
Size base: 128.7mm X 122.6mm X
77.5mm
Weight handset: 145.0 grams (including battery)
Weight base: 423.8 grams
Power requirements: Handset: 3 cells AAA
3.6V 600mAh NiMH battery
Telephone base: DC 9V@ 600mA
Phonebook memory: 50 memory locations;
up to 32 digits, 16 characters
per location
Call log: 50 memory locations
41
Page 42

Product warranty & Customer service
IMPORTANT
Please retain this booklet with your sales receipt as proof of the date of
purchase
Customer Service
If you require assistance in operating this product please call the TecHelp
Information Line – 1300 369 193 – or contact us by e-mail at:
tcpsupport@ingrammicro.com.au
If you are trying to access a Telstra Network Service and require assistance
specifically related to the network service or would like to subscribe to the service,
contact Telstra on 132200 for residential or 132000 for business.
Product Warranty
Subject to the conditions below, Telstra guarantees this product against any defect
in materials or workmanship under conditions of normal use for 24 months from
date of purchase.
The benefits conferred by this warranty are in addition to other warranties and
remedies that are implied under the Trade Practices Act and similar State and
Territory laws (Statutory Rights).
Subject to your Statutory Rights, the goods will not be eligible for service under this
warranty if:
A. Proof of purchase cannot be provided;
B. The defect was caused by an accident, misuse, abuse, improper installation or
operation, vermin infestation, lack of reasonable care, unauthorised modification,
loss of parts, tampering or attempted repair by a person not authorised by
Telstra; or
C. The product has been damaged by lightning or a mains power surge.
To obtain service during the terms of this warranty call the TecHelp Information
Line on – 1300 369 193 – or contact us by e-mail at:
tcpsupport@ingrammicro.com.au
If it is necessary to have the product serviced, the Customer Service Representative
will inform you of the product return process.
42
Please ensure that:
A. You provide proof of purchase;
B. Your product is suitably packaged; and
C. You have included all components from the original purchase.
Subject to your Statutory Rights:
A. Any claim under this warranty is limited to the cost of repair or replacement of
the product; and
B. If the goods are found to be in sound working order by the authorised service
centre, you may be charged a fee for service and for any other direct costs
associated with having the product delivered for service.
© COPYRIGHT 2007 Telstra Corporation Limited
This work is copyright. All rights reserved. Other than for purposes and subject to conditions
prescribed under the Copyright Act, no part of it may in any form or by any means (electronic,
mechanical, photo copying, microcopying, scanning, recording or otherwise) be reproduced,
stored in a retrieval system or transmitted without prior permission from Telstra Corporation
Limited ABN 33 051 775 556.
™ Trade Mark of Telstra Corporation Limited
® Registered Trade Mark of Telstra Corporation Limited
Page 43

Wall mounting template
Wall mounted spacing
Ensure there is sufficient space allowed for mounting the phone before
drilling holes. See page 10 and follow mounting instructions.
Caution: Ensure there is no risk of damaging any pipes or wiring that
may be behind the wall.
Drill two holes 3 mm
in diameter.
100 mm apart
43
Page 44

www.telstra.com
 Loading...