

Page 1
Telstra V1600 SMS Colour Screen
Digital DECT Cordless Telephone
User
Guide
IMPORTANT
3G SIM cards are not compatible with this product.
Do not attempt to download the phonebook from 3G SIM cards
to your Telstra V1600. (See page 20 for further details or check
with your mobile service provider if you are unsure).
If you have any problems with your phone, firstly refer to the
Help section of this User Guide or call Information line on 1300
302 699.
Page 2

Introduction
to your Telstra V1600 SMS Colour Screen
DECT Cordless Telephone
•
Large colour display, with friendly, intuitive menu icons
•
150 Name and number phonebook
Text Messaging Service* lets you send and •receive text
messages with your phone.
•
Use Calling Number Display^ to see who is calling and keep
track of unanswered calls
•
SIM card reader lets you copy your phonebook entries from
your mobile phone SIM card
•
Use up to 5 handsets with the base without the need for
additional wiring
*
For most Telstra and Telstra reseller customers for messages betwe
tible services.
compa
^ Excludes blo
areas.
cked calls. Monthly charges apply. Available in most
, all using the same phone line
DECT
As digital Enhan
(DECT) product, yo
•
Digital clarity
•
Digital range
•
Digital security
ced Cordless Telecommunications
ur Telstra V1600 provides:-
en
Page 3

IMPORTANT
This equipment is not designed for
making emergency telephone calls
when the power fails. Alternative
arrangements should be made for
access to emergency services.
This User Guide provides you with
all the information you need to get
the most from your phone.
Before you make your first call you
will need to set up your phone.
Follow the simple instructions in
‘Getting Started’, on the next few
pages.
Need help?
If you have any problems setting up
or using your Telstra V1600 please
contact Product Information on
1300 302 699.
Alternatively you may find the
answer to ‘Help’ at the back of this
guide.
Page 4
3 In this guide
Getting started 5
Location 5
Setting up 5
Setting the day and time 7
Getting to know your Telstra V1600
Handset buttons 8
Handset display icons 9
Navigating the menus 10
Menu map 11
Base 12
Using the phone 13
Switch handset on/off 13
Make a call 13
Preparatory dialling 13
End a call 13
Receiving calls 13
Earpiece volume 13
Make a handsfree call 14
Adjust handsfree volume 14
Answer a call handsfree 14
Redial a number from the
Dialled Call list 15
Secrecy (Mute) 15
Keypad lock 15
Paging 16
Phonebook 17
Add a new phonebook entry 17
Dial a number from the
phonebook 17
Edit an entry 18
View details 18
Delete an entry 18
Select ring tone 19
Copy SIM card 20
Telstra phone features 21
Text Messaging Service 21
Service Centres 21
Terminal Number 22
SMS Alert 22
User Settings 23
Writing/sending messages 23
View received messages 24
Saving message 24
Edit saved message 25
Calling Line Identification and text
messaging 25
Deleting a message 26
Deleting all messages 26
Calling Number Display 27
Call list 27
Opening the Call lists 28
Dial a number from the Call lists 28
Copy a number to the
phonebook 29
Delete individual entries 29
Delete all entries in a Call list 30
Page 5

In this guide 4
Delete all entries in all Call list 30
Flashing Message Indicator 31
Telstra Call Waiting 32
Telstra Home Message 101 32
Telstra Calling Features 33
Handset settings 35
Ringtone 35
Ringer volume 35
Handset name 36
Handset language 36
Menu colour 37
Auto-talk 37
Base settings 38
Base ring tone 38
Ringer volume 38
Handset priority 39
Recall mode 39
Security PIN 40
Set date and time 40
Set alarm 41
Change the alarm tone 41
Additional handsets and bases 42
Register a Telstra V1600
handset to a base 42
Select base 43
De-register a handset 44
Make an internal call to another
Handset 45
Transfer call 45
Three-way calling 46
Help 47
Information 47
Replacing the handset batteries 49
General information 50
Safety 50
Cleaning 50
Environmental 51
Telstra accessories & replacement
Items 51
Technical information 52
How many telephones can you
have? 52
Connecting to a PABX 52
Recall 53
PIN number 53
SIM card compatibility 53
Product warranty & Customer 54
service
Page 6
WARNING
Do not place your Telstra V1600
in the bathroom or other humid
areas
Handset range
The handset reception range
from the base is up to 300m
outdoors and up to 50m
indoors. Thick walls can severely
affect the range.
Range indicator
The
handset display indicates when
you are in range of the base. If
the symbol flashes and you hear
a warning beep, you are out of
range and will need to move
closer to the base.
IMPORTANT
Do not connect the telephone
line until the handset(s) is fully
charged.
The base must be plugged into
the mains power at all times.
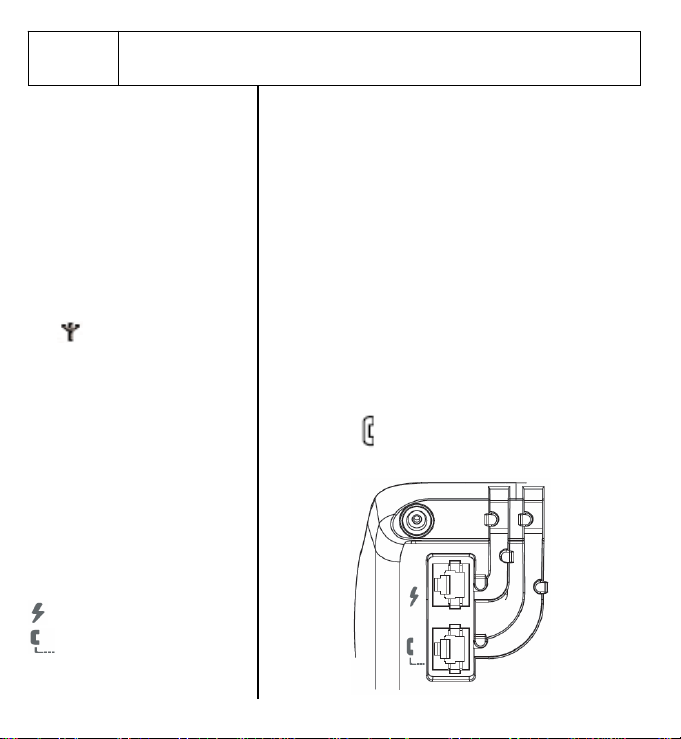
Which socket?
Power socket
Telephone line socket
Getting started 5
symbol on your
Location
You need to place your Telstra V1600 within 2
metres of mains power and telephone sockets so
that the cables will reach.
Make sure it is at least 1 metre away from other
electrical appliances to avoid interference.
Your Telstra V1600 works by sending radio signals
between the handset and base. The strength of
the signals depends on where you site the base.
Putting it as high as possible can help provide the
best signal.
Setting up
1.
Plug the mains power cable into the base. Then
plug the power adaptor into the mains wall
socket and switch the power on. The power
indicator
on the base lights up.
Page 7
Getting started 6
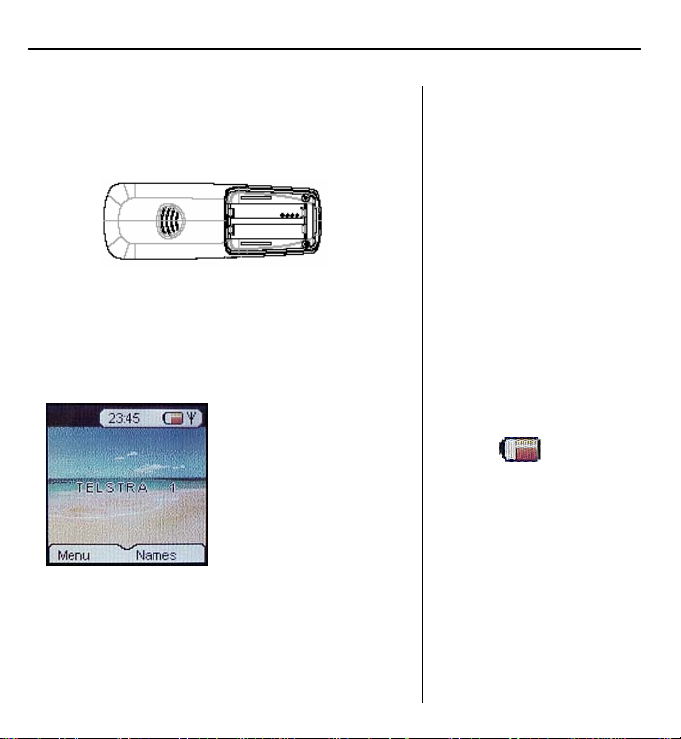
2.
Remove the battery compartment cover and
insert the 2 x AAA NiMH batteries supplied into
the handset. Slide the battery compartment
cover back into place.
3.
Charge the handset for at least 16 hours by
placing it on the base. The red Charging
indicator on the base comes on.
The screen will show the standby display and a
scrolling battery icon to show that the handset is
charging.
The backlit screen will
turn off after
approximately 30 sec.
Press any key to turn on
the screen again.
4.
After16 hours, plug the telephone line cord into
your Telstra V1600 base unit and the other end
into the wall socket.
Battery low warning
When the battery charge is low
the handset battery icon will be
empty and flashing. Place the
handset back on the base to
recharge.
Talk/Standby time
Under ideal conditions, fully
charged handset batteries
should give up to 10 hours talk
time or 100 hours standby on a
single charge. See ‘battery
performance’ on the following
page.
Page 8

7 Getting started
Battery performance
To keep your batteries in the
best conditions, leave the
handset off the base for a few
hours at a time (after the initial
16 hour charge).
Please note however, that new
NiMH batteries do not reach full
capacity until they have been in
normal use for several days.
Running the batteries right
down a least once a week will
help them last as long as
possible.
The charge capacity of
rechargeable batteries will
reduce with time as they wear
out, so reducing the
talk/standby time of the
handset.
Eventually, they will need to be
replaced. New batteries can be
obtained from your nearest
electrical retailer.
Helpline
If you have any difficulties
setting up your Telstra V1600,
please call Product Information
on 1300 302 699.
Setting the day and time
If you have subscribed to Telstra’s Calling Number
Display* service, the time and date will be set
automatically when you receive your first call. You
can also set the time manually.
1. On the handset, press Menu. Press
down to
Time settings
to
Set Date & Time
2. Enter the date, e.g. 02 05 for 2
then press OK. Scroll
then press OK.
nd
to scroll
May. Press OK.
3. Enter the time, e.g. 10 45 for 10:45am. Press OK.
This overwrites the current setting. If you make a
mistake press Clear to delete. Press OK.
4. Press and hold Back to return to standby.
Your Telstra V1600 is now ready to use.
*Excludes blocked calls. Monthly charges apply.
Available in most areas.
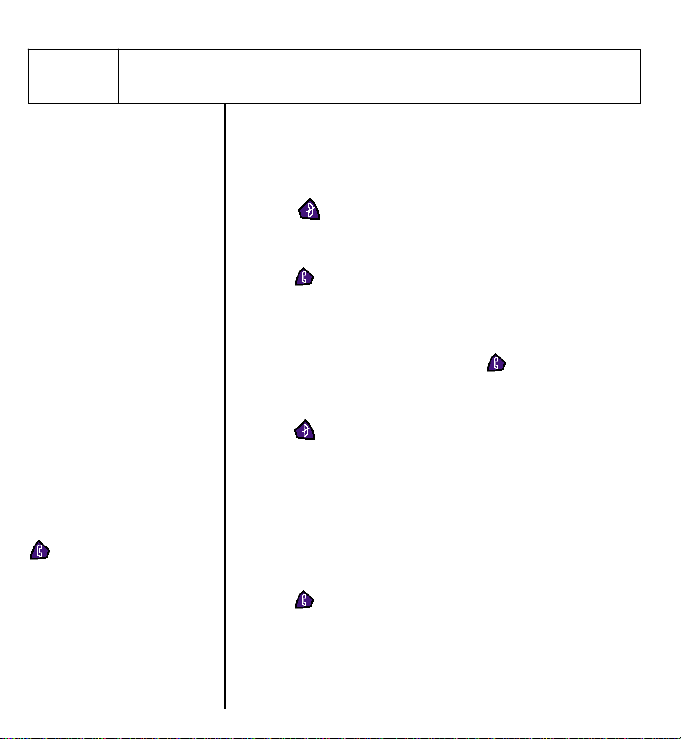
Page 9
pag
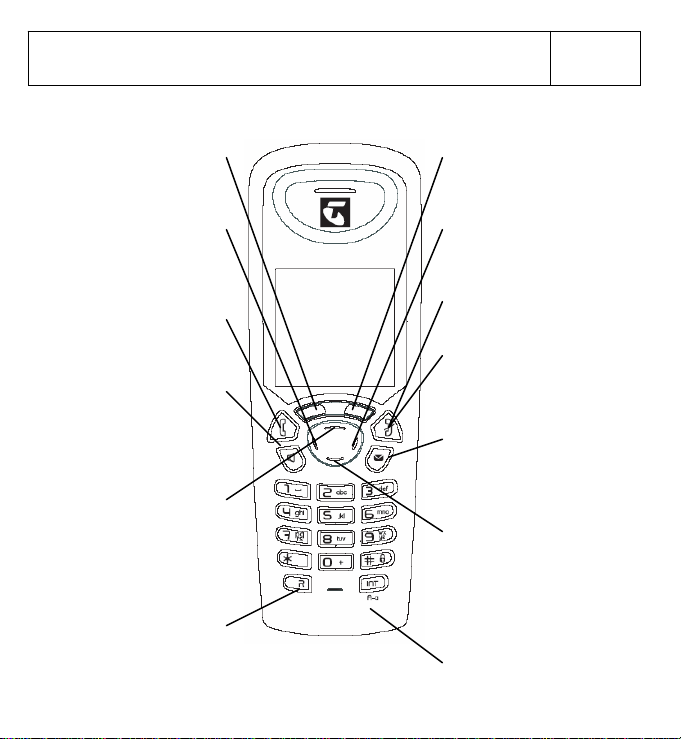
Handset buttons
On-screen option button
Open the main menu.
Select the options shown
on the screen, page 10.
Scroll through options. Press
up to open Dialled Calls list,
For use with a switchboard
and Telstra Calling Features,
Left toggle button
Used with the Talk button
to dial Telstra Home
Messages 101
Press to make calls,
Handsfree
Dial numbers and hold
conversations via the
handset loudspeaker,
Scroll/Dialled Calls list/
page 15 & 28.
During a call, press to
increase volume
Talk
page 13
page 14.
Volume
R (Recall)
e 53.
8 Getting to know your Telstra V1600
On-screen option button
Open the phonebook. Select
the options shown on the
screen, page 10
Right toggle button
Used during a call to answer
Telstra Call Waiting
End
End a call, page 13
Power
Press and hold to switch
handset on and off, page 13.
SMS
Press to access SMS main
menu, page 21
Scroll/Missed Calls list/Volume
Scroll through options. Press
down to open Missed Calls list,
page 27.
During a call, press to
decrease volume.
Int
Lets you make calls between
handset registered to the base,
page 45
Page 10
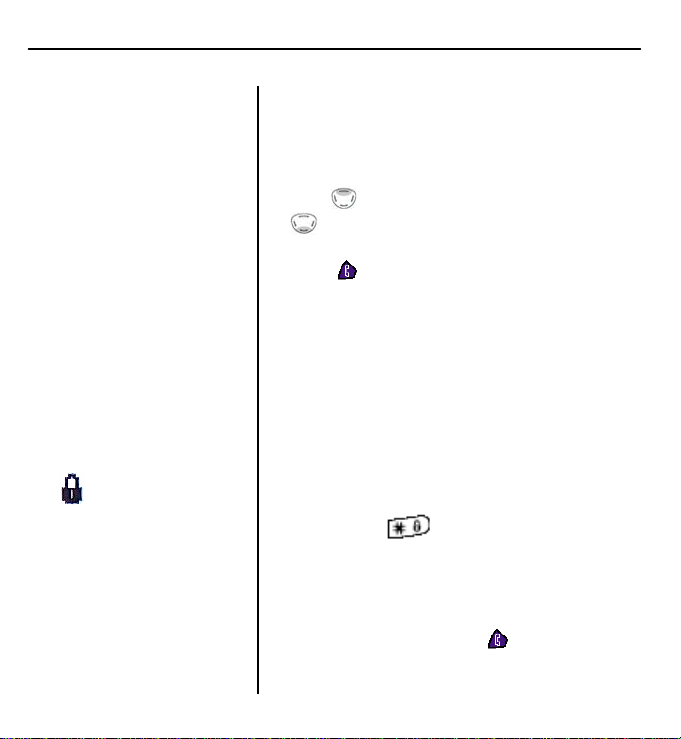
9 Getting to know your Telstra V1600
A
pag
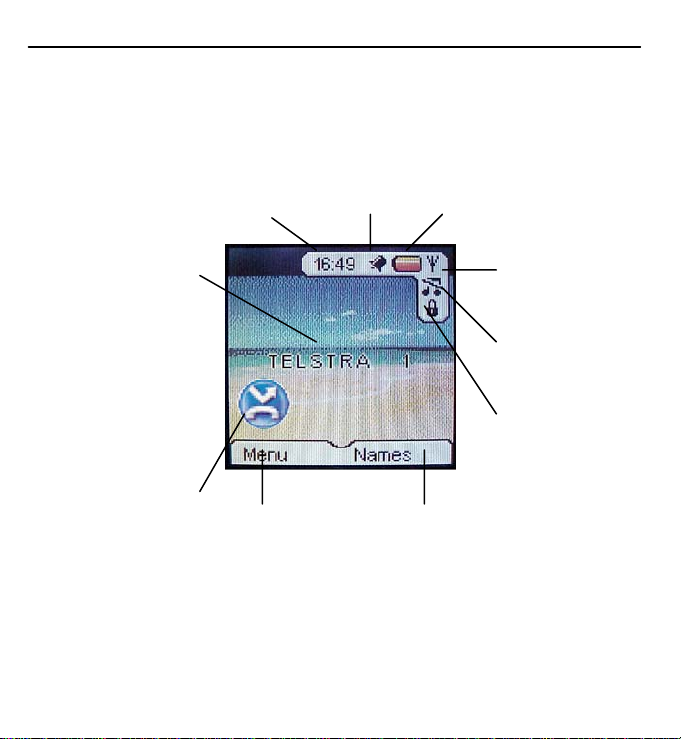
Handset display icons
Handset identity
The number of the
handset is displayed at
all times. You can
change the name on
the handsets, e.g.
Michael, Kitchen,
Office etc., page 36.
New Missed Calls*
You have new
(unread) entries in the
Missed Calls list, page
* You need to subscribe to Telstra Calling Number Display in order to receive the number
of your callers. Excludes blocked calls. Monthly charges apply. Available in most areas. For
more information, call 13 2200 for Residential or 13 2000 for Business services.
Current time,
page 40
Menu option
Press the key
28.
below to open
the main menu,
page 10.
larm set,
page 41
Names option
Press the key below to
open the phonebook,
page 17.
Battery
status
Range indicator
Flashes when out
of range
Handset ringer
off,
e 35
Keypad locked,
page 15
Page 11
Getting to know your Telstra V1600 10
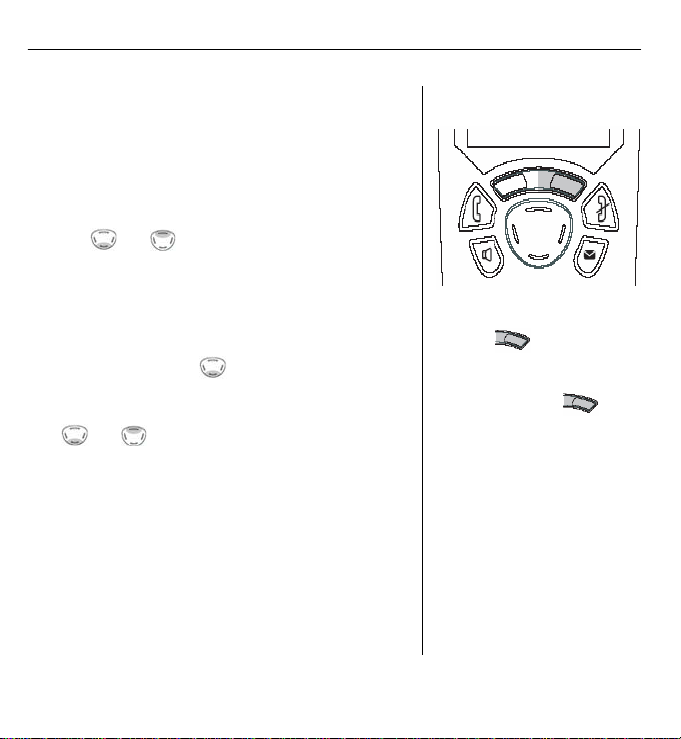
Navigating the menus
Your Telstra V1600 has a menu system, which is
easy to use. Each menu leads to a list of options.
You’ll find a menu map on the following page.
When the handset is switched on and in standby,
press Option button under
Menu
to open the main
menu.
Use the
and buttons to scroll to the menu
option you want. Then press OK to select further
options or to confirm the setting displayed.
For example, to change the handset ringer
volume:
Press Menu then scroll
to
Handset
then press OK.
Scroll down to
Use
level, or choose
Ring Volume
then press OK.
and to select the required volume
Ringer Off
to switch the ringer
off.
Press OK to confirm.
Exit or go back one level in the menu
To go to the previous level in the menu, press
Back.
To cancel an operation and/or return to standby
at anytime, press and hold Back.
Select the option displayed by
pressing
underneath it.
For example, press
select Names and open the
phonebook.
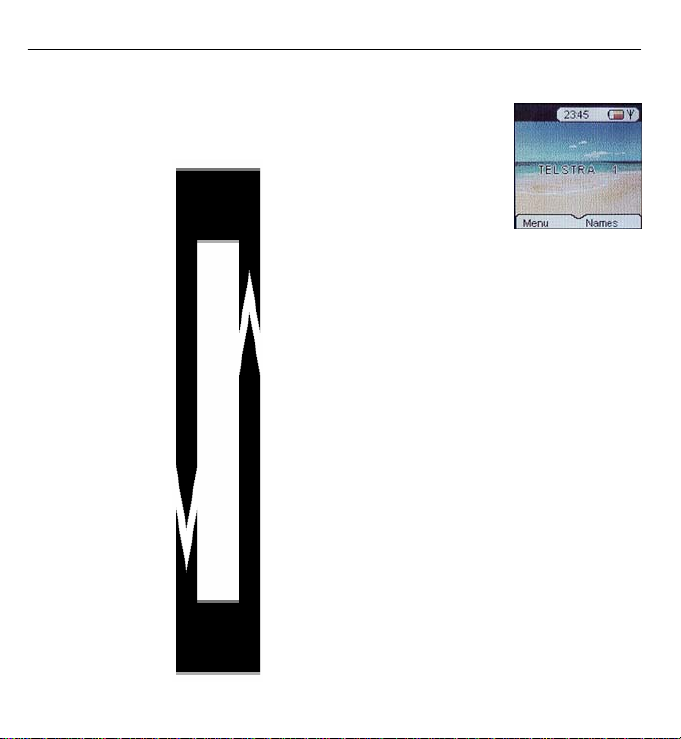
Display power save
If no button is pressed for 30
seconds, the handset display
automatically switches off to
‘power save’ mode. Press any
button to turn the display back
on.
the button
to
Page 12
11 Getting to know your Telstra V1600
Menu map
These are the options under each menu heading.
SMS
Write Message
Inbox
Outbox
Delete Messages
Settings
Settings
Calls list
Received calls
Missed calls
Dialled calls
Delete calls List
Handset
Ringtone
Ring Volume
Handset Name
Language
Menu Colour
Auto Talk
Base settings
Base Ringtone
Base Volume
Handset Priority
Recall Mode
System PIN
Registration
Register Handset
Select Base
De-register
Calling Features
Voice Mail
Telstra Voice Assistant
Call forward on busy
Call forward immediately
Call forward im. off
Call forward no answer
Call forward no ans. off
Call return
Cancel call back
Call waiting on
Call waiting off
Message Bank PIN
Edit Number
Time Settings
Alarm
Set Time & Date
Names menu
(page 17)
Names
Options
Add Entry
Show Details
Delete Entry
Edit Entry
Ring tone
Copy from SIM
Page 13
Getting to know your Telstra V1600 12
p
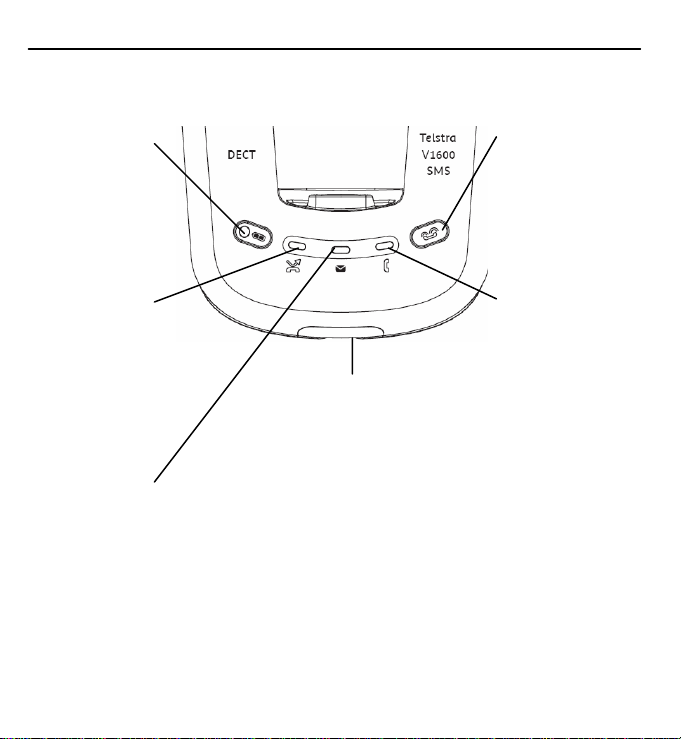
Base
Battery charging
light
Lights up when
the handset is
charging on the
base.
Missed Calls
indicator*
Lights up when
you have new
entries in the
Missed Calls list,
page 22.
New SMS
messages
Lights up when
you have new or
unread SMS
messages
* You need to subscribe to Telstra Calling Number Display in order to receive the number of
your callers. Excludes blocked calls. Monthly charges apply. Available in most areas. For more
information, call 13 2200 for Residential or 13 2000 for Business services.
^ Message retrieval is free from most Telstra fixed phones. Monthly charges and call charges
apply.
# Available to most Telstra home phone access customers.
SIM card reader
Insert your SIM card into
the tray to copy entries
from your SIM card to the
phonebook, page 20.
IMPORTANT
3G SIM cards are not
compatible with this
roduct.
Page button
Press to page the
handset(s), page 16.
Also used when
registering additional
handsets, page 42.
Power in use / FMI
indicator
Lights up when the
power is on.
- Flashes when
making or
receiving a call
(approx. once
every second)
- Flashes when a
message has been
left on
MessageBank®
or Telstra Home
Messages 101®
(approx. twice
every second)
page 25.
^
#
Page 14
13 Using the phone
Dialling numbers quickly
Numbers can also be
dialled direct from the
phonebook (page 17), the
dialled numbers list (page
15), or the calls list (page
27).
Call timer
The display shows the
duration of all external calls.
After you hang up, the total
call time is shown.
Auto-answer
If you would rather press
to receive a call when
the handset is on the base,
you need to switch Autotalk off, see page 37.
Switch handset on/off
1. Press
Make a call
1. Press
Preparatory dialling
1. Enter the number first. If you make a mistake as you
dial, press Clear to delete. Press
End a call
1. Press
Receiving calls
Providing you have subscribed to Telstra’s Caller
Number Display service*, the caller’s number (and
name if store in the phonebook) is displayed. An
animated icon is also presented toward the centre of
the display.
1. Press
up and speak.
*
Excludes blocked calls. Monthly charges apply. Available in
most areas.
and hold to switch the phone On and Off.
then dial the number your want.
to dial the number.
or place the handset back on the base.
or if the handset is on the base, simply lift it
Page 15

Using the phone 14
Earpiece volume
During a call:
Press
and or to increase or decrease the volume.
Handsfree
Handsfree lets you dial a number and talk to your caller
without holding the handset. It also enables other people
in the room listen to both sides of your conversation.
Make a handsfree call
Press
handset’s loudspeaker.
To switch back to the handset at any time, press
Press
Adjust handsfree volume
1.
Answer a call handsfree
When the phone rings:
1.
2.
. Dial the number. Your call can be heard over the
again.
to end call.
During a handsfree call, press and to increase or
decrease the volume.
Press . The call comes through the handset
loudspeaker.
If you want to switch the call to the earpiece, press .
You can switch to
handsfree at any time
during a call.
Just press
When in handsfree, the
display shows the
icon.
.
Page 16
15 Using the phone
The
icon is displayed
while the keypad is locked.
Redial a number from the Dialled Calls list
You can redial up to 20 of the last numbers called.
If you have stored a name in the phonebook to go
with the number, the name will be displayed as
well. See “Phonebook”, on page 17.
1.
Press to enter the
until the number you want to redial is
displayed.
2.
Press to redial the number.
Secrecy (Mute)
During a call, you can talk to someone nearby
without your caller hearing you.
1.
During the call, press Secrecy. The display shows
Secrecy on
2.
Press Off to return to your caller.
Keypad lock
You can lock the keypad to prevent accidental
dialing while carrying the handset around.
Press and hold
Keypad locked
Press Unlock to use the keypad again.
You can answer an incoming call while the
keypad is locked by pressing
the call the keypad will stay locked.
. Your caller cannot hear you.
Dialled Calls
until the screen shows
.
. When you end
list. Scroll
Page 17
Using the phone 16
Paging
You can use the
handset users that they are wanted or locate a
missing handset.
Press
Press
any button on the handset.
on the base. All registered handsets ring.
to stop the handsets ringing, or press
button on the base to alert
Paging calls cannot be
answered by a handset.
Page 18

17 Phonebook
If you subscribed to Telstra’s
Calling Number Display service
and want names in your
phonebook displayed instead of
the phone numbers, you must
store the full telephone number
including the area code.
Entering names
Use the keypad letters to enter
names. For example press 8 for
the letter t, or 6 for the letter o.
Keep pressing the same button
to scroll through the characters
shown on the screen.
Press
case. This Shift Lock icon will be
displayed
If the next character you want
to enter is on the same button
as the last, wait a moment for
the cursor to move right.
Press 1 to insert a space.
Press 1,
characters.
If you make a mistake, press
Clear to delete the last
character.
for letters in upper
*
or # for special
Your Telstra V1600 handset can store up to 150
entries in the phonebook. Each entry contains a
name and number. Names can be up to 16
characters long and numbers up to 20 digits.
Add a new phonebook entry
1. Press Names then Options
2. Press OK to select
Add Entry
.
3. Enter the name then press OK.
4. Enter the number then press OK to confirm.
It’s best to enter the full number, including the
area code.
5. Press and hold Back to return to standby.
Dial a number from the phonebook.
1. Press Names
2. Scroll
or to the name you want or use
the keypad to enter the first letter of the name.
3. Press
to dial.
Page 19

Phonebook 18
Edit an entry
1.
Press Names. Scroll or to the entry you
want then press Options.
2.
Scroll to
name is displayed.
3.
Press Clear to delete characters then enter the
new name then press OK. The number is
displayed.
4.
Press Clear to delete digits then enter the new
number then press OK to save.
5.
Press and hold Back to return to standby.
View Details
1.
Press Names. Scroll or to the entry you
want then press Options.
2.
Scroll to
number is displayed. You can edit the entry or
press and hold Back to return to standby.
Delete an entry
1. Press Names. Scroll
want then press Options.
2. Scroll
3. Press Yes to confirm or No to cancel.
4. Press and hold Back to return to standby.
Edit Entry
Show Details
to
Delete Entry
then press OK. The
then press OK. The
or to the entry you
then press OK.
Names are stored
alphabetically.
Page 20

19 Phonebook
Select ringtone
You can choose a different ringer melody to play
when you receive a call from a particular number
in the phonebook. For example, you may wish to
assign a different ring tone to friends and family
phone numbers.
1. Press Names. Scroll
want then press Options.
2. Scroll
3. Scroll
then press OK.
4. Press and hold Back to return to standby.
to
Ringtone
or to the melody you want
or to the entry you
then press OK.
Page 21

Phonebook 20
Copy SIM card
You can copy phonebook information stored on a
mobile phone SIM card to your Telstra V1600
phonebook. (Note: CDMA mobile handsets do not
have a SIM card, and so are not compatible with
this feature.)
If there is enough space, you can copy the
contents of more than one SIM card (see ‘Handset
memory full’ below)
1.
Slide the SIM card reader out of the base, insert
the SIM card into the reader and slide it back in.
2.
Press Names then Options to scroll to
from SIM
3.
The phonebook entries stored on your SIM card
. Press OK.
Copy
will be copied in the order of their location. Your
Telstra V1600 handset will then store the entries
in alphabetical order.
4.
Press and hold Back to return to standby.
NOTE
When you copy the contents of
your mobile phone SIM card
you will need to enter the SIM
card PIN code.
DO NOT ATTEMPT TO
DOWNLOAD THE
PHONEBOOK FROM 3G SIM
CARDS.
The SIM card reader in the
Telstra V1600 base is not
compatible with 1.8V SIM cards
(only available with 3G phones,
at the time of writing).
WARNING
Keep SIM cards away from small
children, as they are a possible
choking hazard.
Handset memory full
If the handset memory becomes
full during copying, not all the
entries will be transferred.
The maximum number of
entries is 150. If your handset
phonebook already contains
140 entries, only the first 10
entries on the SIM card will be
copied.
Page 22

21 Telstra phone features
Text messaging
Telstra V1600 can store up
to 50 messages in the Inbox
and Outbox, dynamically
allocated.
Each message can have up
to the 160 characters.
Shortcut to SMS menu
You can also press on the
key to access the SMS
menu directly.
Text Messaging Service *
Telstra customers can use this phone to send and
receive text messages. The phone will also display
the telephone number of the person who sent
you the message, as well as the time and date of
the message.
*
For most Telstra and Telstra reseller customers for
messages between compatible services. Charges apply.
Service centres
Telstra’s text messaging service centre numbers are
already setup in your Telstra V1600. If you change
or delete the Telstra text messaging service centre
numbers your Telstra text messaging service will
not work.
Telstra’s service centre number for SEND and
RECEIVE is 01983391.
You can change the service centre numbers as
follows:
1.
Press Menu and OK to open the SMS menu.
2.
Scroll to select
3.
Service Centres
4.
Receive Centres
Enter the telephone number of the SMS
receiving centre and then press OK.
5.
Scroll to select the
press OK. Enter the telephone number of the
SMS sending centre and then press OK.
Settings
is highlighted then press OK.
is highlighted then press OK.
then press OK.
Sending Centres
then
Page 23

Telstra phone features 22
Terminal Number
If you have more than one text messaging capable phone on
the same line you may not be able to receive text messages. To
prevent this you can change the terminal number of one or
more of the phones to prevent interference. You can also use
this feature to create personal text message mailboxes. Your
Telstra V1600 is set-up with Terminal number ‘0’ by default.
To change the terminal number:
1.
Press to open the SMS menu.
2.
Scroll to select
3.
Scroll to select
4.
Enter the terminal number (0-9) and then press OK.
Settings
Terminal
then press OK.
then press OK.
SMS Alert
This is to enable your Telstra V1600 to alert you when there is a
text message being received by the phone.
1.
Press to open the SMS menu.
2.
Scroll to select
3.
Scroll to select
4.
Scroll or to select On or
Settings
SMS Alert
then press OK.
then press OK.
Off
for incoming messages
alert. Press OK to confirm.
5.
On
SMS Alert
menu, select
Set Alert
then press OK to
select the alert tone. There are 3 tones selection:
- Morse
- Discreet
- Polyphonic
Select your choice then press OK to confirm.
Recipient Terminal
When sending a
message to a
personal mailbox,
be sure that you
enter the personal
terminal ID
number at the end
of the recipient’s
telephone number,
e.g. xx-xxxx-xxxx1,
xx-xxxx-xxxx = the
telephone
numbers, and
1 = recipient
personal terminal
ID.
If no terminal ID is
entered, your
message will be
sent to the default
terminal ID ‘0’,
which is the public
mailbox.
Page 24

23 Telstra phone features
Mailboxes
There are 4 personal
mailboxes with password
protection available.
Insert symbol
While typing or editing
your message, you can
insert symbols by pressing
Options, and then select
the
Insert Symbol
.
Users setting
This is to enable you and other users to setup your
personal mailboxes.
1.
Press to open the SMS menu.
2.
Scroll to select
3.
Scroll to select
4.
Add User
5.
Enter the new user name then press OK.
6.
Enter your password then press OK.
7.
Re-type your password then press OK to confirm.
A Terminal Number will be automatically assigned to
your mailbox. You can check and change your
Terminal Number (see Terminal Number, page22)
while you are in your personal mailbox.
Writing/sending messages
1.
Press to open the SMS menu.
2.
Write Message
3.
Type your message using the keypad. If you make
a mistake press Clear to delete character on the left
side of the cursor.
4.
When complete, press Options then
then press OK to send message.
5.
Enter the phone number of the recipient. Then
press Send to deliver the message.
6.
Press and hold Back to return to standby.
Settings
Users
is highlighted then press OK.
is highlighted then press OK.
then press OK.
then press OK.
Send to
Page 25

Telstra phone features 24
View received messages
When there is a new message received, the
handset display will show
there is a new / unread message in the
and the SMS message indicator on the base will
light up.
1.
Press to open the SMS menu.
2.
Scroll or to select
3.
The phone will list all the received messages.
The new / unread messages will be denoted
with icon on the side of the message.
4.
Select the new / unread message then press
Read to read message.
5.
To
Reply, Forward
Options to perform your selection.
6.
Press and hold Back to return to standby.
Saving message
You can write a message and save the unsent /
draft message into
1.
Press to open the SMS menu.
2.
Write Message
3.
When complete, press Options to select
then press OK to save message.
4.
Press and hold Back to return to standby.
or
Outbox
is highlighted then press OK.
to indicate that
Inbox
then press OK.
Delete
message, press
to be sent later.
Inbox
Save
,
Page 26

25 Telstra phone features
Edit saved message
1.
Press to open the SMS menu.
2.
Scroll or to select
3.
Scroll or to select the message to be
edited then press READ.
4.
Press Option and
go into editing mode.
5.
When completed, press Options and
highlighted. Press OK to save the edited
message.
6.
Scroll or to select if you want to
Send to
You can also select
personal mailbox selection to send the message
using your personal mailbox terminal.
7.
Press and hold Back to return to standby.
Calling Line Identification and Text Messaging
In accordance with world–wide standards for text
messaging, all messages including reply messages
will display the telephone number of the sender. If
you have a silent line or have blocked Calling line
Identification (CLI) and attempt to send a message
your message will be rejected.
You can call into the Telstra Fixed Phone SMS
service on 0198339999 and use the prompts to
turn off silent line or CLI blocking for text
messaging ONLY.
or
Edit
Delete
Outbox
then press OK.
is highlighted. Press OK to
Save
Edit
the messages.
User Name
to go into
is
,
Page 27

Telstra phone features 26
Deleting a message
You can delete a message in both the Inbox and
Outbox. To delete messages in a personal mailbox,
you will need to go into your personal mailbox to
perform the delete.
1.
Press to open the SMS menu.
2.
Scroll or to select
press OK.
3.
Scroll or to select the message to be
deleted then press Read.
4.
Press Option and scroll to select
then press OK.
5.
Press OK to confirm the delete.
6.
Press and hold Back to return to standby.
Deleting all messages
You can delete all messages in both the Inbox and
Outbox. To delete all messages in a personal
mailbox, you will need to go into your personal
mailbox to perform the delete.
1.
Press to open the SMS menu.
2.
Scroll or to select
then press OK.
3.
Scroll or to select
Messages
4.
Press OK again to confirm the delete.
5.
Press and hold Back to return to standby.
to be deleted then press OK.
Inbox
or
Outbox
Delete
Delete Messages
Inbox, Outbox
or
then
All
Page 28

27 Telstra phone features
IMPORTANT
* You need to subscribe to
Telstra Calling Number
Display in order to receive
the number of your callers.
Excludes blocked calls.
Monthly charges apply.
Available in most areas. For
more information, call
13 2200 for Residential or
13 2000 for Business
services.
Caller information not
available
On some incoming calls, the
telephone number of the
caller is not available and so
cannot be displayed.
In this case your Telstra
V1600 provides you with
some explanatory
information.
Unavail
The number is unavailable.
May indicate that the call is
from overseas or from a
caller whose carrier does not
participate in Calling
Number Display.
Calling Number Display *
If you subscribed to Telstra’s Calling Number
Display service your handset displays the
telephone number of the person who is calling
you, as well as the time and date of their call.
If the caller’s number matches an entry stored in
the phonebook, the name will also be displayed.
Please store the full telephone number, including
the area code, otherwise the name will not match
the number stored in the phonebook.
Calls lists
Your Telstra V1600 stores details of all calls you
make and receive in 3 different calls lists:
• Received calls – Calls you have answered.
• Missing calls – Calls that were not answered, or
‘missed’.
• Dialled calls – The last 20 numbers dialled, see
page 15.
A total of up to 50 entries can be stored in the
Received and Missed calls lists, and 20 entries in the
Dialled list.
You can view and dial numbers in any Calls lists
and copy them into the phonebook.
If a call is received when Calls list if full, the oldest
ntry will be replaced with details of the new caller. e
Page 29

Telstra phone features 28
When you have new missed calls, for example if
someone called while you were out, the display
will show the number of new entries in the Missed
Calls list.
Also, the
Press Read to view the missed calls. All new missed
calls in the list will have a next to them.
Opening the Calls lists
1.
Press Menu and scroll to select Calls list
menu then press OK.
2.
Scroll and to select the list you want to
view, then press OK.
3.
Use and to scroll through the entries
then press Options for further details.
4.
Press and hold Back to return to standby.
Dial a number from the Calls list
1.
From the standby screen, Press Menu and scroll
2.
Scroll to the Calls list you want:
Missed
3.
Scroll or to the entry you want then
press
indicator on the base will light up.
to select Calls list menu then press OK.
Received
or
Dialled
.
then press OK.
Private
The caller has withheld
(blocked) their number or
the call is from a silent line or
unlisted number.
Quick access
From the standby screen,
you can quickly access:
The Dialled Calls list by
pressing
The Missed Calls list by
pressing
.
.
,
Page 30

29 Telstra phone features
Copy a number to the phonebook
1.
From the standby screen, Press Menu and scroll
2.
Scroll to the Calls list you want,
Missed
3.
Scroll or to the entry you want then
press Options.
4.
Scroll or to
5.
Enter a name then press OK. The number is
displayed.
6.
Press OK.
7.
Press and hold Back to return to standby.
Delete individual entries
1.
From the standby screen, Press Menu and scroll
2.
Scroll to the Calls list you want,
Missed
3.
Scroll or to the entry you want then
press Options.
Delete
Back to cancel.
4.
Press and hold Back to return to standby.
to select Calls list menu then press OK.
Received
or
Dialled
to select Calls list menu then press OK.
or
Dialled
is highlighted. Press OK to confirm or
then press OK.
Add Entry
then press OK.
then press OK.
Received
,
,
Page 31

Telstra phone features 30
Delete all entries in a particular Calls list
1.
From the standby screen, Press Menu and scroll
to select Calls list menu then press OK.
2.
Scroll or to
then press OK.
3.
Scroll to the list you want then press OK.
4.
Press Yes to confirm and No to cancel.
5.
Press and hold Back to return to standby.
Delete all entries in all Calls lists.
1.
From the standby screen, Press Menu and scroll
to select Calls list menu then press OK.
2.
Scroll or to
press OK.
3.
Scroll to
4.
Press Yes to confirm and No to cancel.
5.
Press and hold Back to return to standby.
Delete Calls List
Delete Calls List
All Calls
then press OK.
then
Page 32

31 Telstra phone features
Note
# To arrange connection of the
Flashing Message Indicator
service, simply call Telstra on
13 2200.
Flashing Messages Indicator #
The Telstra V1600 is designed to provide visual
indication when a new message is left in your
Telstra Home Messages 101®* or
MessageBank®^ service.
*
Available to most Telstra home phone access
customers.
^Message retrieval is free from most Telstra fixed phones.
Monthly charge and call charges apply.
When a new message is left, two indicators will
appear:
Base unit – the
rapidly (approx. 2 flashes per second, and
Handset – a tape icon and text bubble reading
“
You have a new message
the handset.
After you have listened to your message(s), the
orange In Use light will return to a steady light and
TAPE icon & text bubble will disappear.
orange In Use light will flash
” will be displayed on
Page 33

Telstra phone features 32
Call Waiting*
Call Waiting lets you know if someone is trying to
call you while you are already on the phone. You
can answer that call and place the first caller on
hold by dialling Recall 2
*
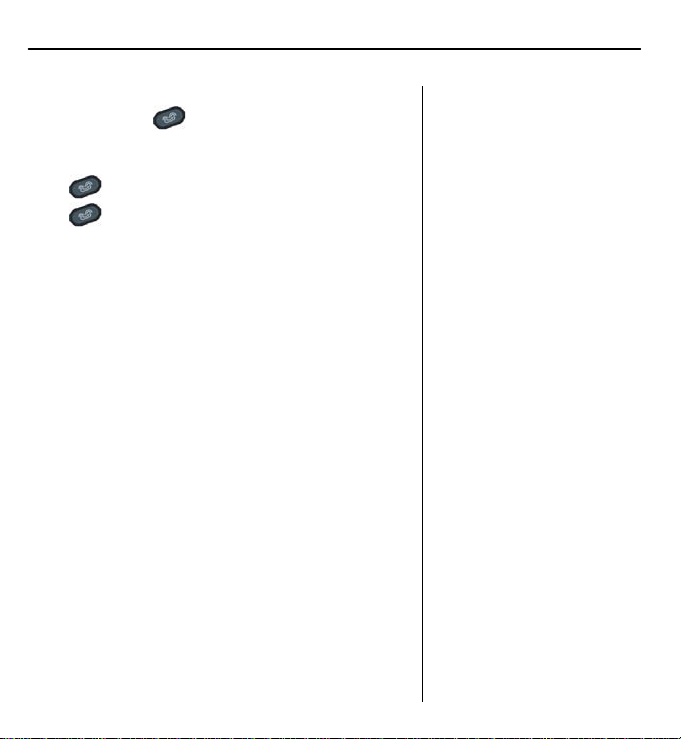
Available on most fixed phones.
or:
To Use Call Waiting
While on a phone call,
Press the RIGHT
The telephone will dial Recall 2.
MessageBank®^ and Telstra Home Messages
#
101®
MessageBank takes the message for you when
you’re on the phone or can’t answer it, so you can
call back when it suits you. Message retrieval is free
from most Telstra fixed phones. Telstra Home
Messages 101 is free to turn on and use.
^
Monthly charge and call charges apply.
#
Available to most Telstra home phone access customers.
or:
To call MessageBank® or Telstra Home Message
101®
From the standby screen,
press the LEFT
The telephone will dial 125101.
toggle button.
toggle button.
Page 34

33 Telstra phone features
Telstra Calling Features
Your Telstra V1600 is pre-programmed with the
following Telstra network features which can be
easily accessed or activated via the Calling Features
Menu
Calling Features
From the standby screen, Press Menu and scroll
or
OK.
Scroll
• Call fwd busy off
• Call fwd im. off
• Call fwd no answer
^Available to most Telstra home phone customers.
to select Calling Features menu then press
to select desired option:
Voice Mail
Telstra Voice Assist^
Call fwd busy
Call fwd immediate
Page 35

Telstra phone features 34
• Call fwd no ans. Off
Call Return
• Cancel Call back
Call waiting on
• Call waiting off
• MessageBank Pin
• Edit Number
Allows you to edit the following Calling Features
numbers:
Voice Mail
Telstra Voice Assist
Call fwd on busy off
Call fwd im. off
Call fwd no ans. off
Call Return
Cancel Call back
Call Waiting on
Call waiting off
MessageBank Pin
Page 36

35 Handset settings
If you have more than one
handset, you can have
different settings for each one.
The default ringtone for
external calls is Melody 5.
The default ringtone for
internal calls is Melody 1.
The default ringer volume is 3.
If the ringer is switched off, the
icon is displayed to
remind you
.
Using the Handset menu you can change the
settings of your handset.
Ringtone
You can choose from 5 melodies. You can set
different melodies for internal and external calls.
1. Press Menu, scroll
2. Ringtone is highlighted. Press OK. Press
3. Scroll
4. Press and hold Back to return to standby.
Ringer volume
There are five handset ringer volume levels and ‘Off’.
If you select ‘Off’, only the base will ring (unless you
have set the base ringer to ‘Off’ as well, see page 38).
1. Press Menu, scroll
2. Scroll
3. Use
4. Press and hold Back to return to standby.
to
Handset
to switch between
External
press OK.
or to the melody you want. A sample
is played. Press OK to confirm.
to
Handset
to
Ring Volume
then press OK.
or to select the volume level or
Ringer Off
then press OK to confirm.
then press OK.
or
Internal
then press OK.
or
then
Page 37

Handset settings 36
Handset name
You can change the name displayed on your
handset’s screen, e.g. Peter, Office, Kitchen etc. The
handset number is not altered.
1.
Press Menu, scroll to
OK.
2.
Scroll to
3.
Press Clear to delete the current name. Enter the
name you want then press OK to confirm.
4.
Press and hold Back to return to standby.
Handset language
You can set your handset to English, French,
German, Italian, Spanish, Dutch, or Portuguese.
1.
Press Menu, scroll to
OK.
2.
Scroll to
3.
Press or to select the language you
want then press OK to confirm.
4.
Press and hold Back to return to standby.
Handset, Name
Language
Handset
Handset
then press OK.
then press
then press OK.
then press
The handset name can be a
maximum of 8 characters.
Press
uppercase.
The default language is
English.
for letters in
Page 38

37 Handset settings
The default menu colour is blue.
By default, Auto-talk is set to On.
Menu colour
Choose from 3 different menu background
colours – blue, green and pink.
1. Press Menu, scroll
to
Handset
then press
OK.
2. Scroll
3. Press
Menu Colour
or to select the colour you want
then press OK.
to
– blue, green or pink.
4. Press Save to confirm.
5. Press and hold Back to return to standby.
Auto-talk
When the handset is on the base and the phone
rings, you can answer a call just by picking the
handset up from the base, without having to press
the
button.
You can also end a call by placing the handset
back on the base.
By switching Auto-talk off you will need to press
to answer a call and to hang up.
1.
Press Menu, scroll to
Handset
then press
OK.
2.
Scroll to
3.
Press or to select On or
4.
Press OK to confirm.
5.
Press and hold Back to return to standby.
Auto Talk
then press OK.
Off.
Page 39

Base ringtone
You can choose from 5 melodies.
1. Press Menu, scroll
press OK.
2.
Base Ringtone
3. Scroll
sample is played. Press OK to confirm.
4. Press and hold Back to return to standby.
Ringer volume
There are five ringer volume levels and ‘Off’.
1. Press Menu, scroll
then press OK.
2. Scroll
3. Press
Ringer Off
4. Press and hold Back to return to standby.
or to the melody you want. A
to
Base Volume
or to select the volume level or
then press OK to confirm.
to
Base Settings
is highlighted. Press OK.
to
Base Settings
then press OK.
then
38 Base settings
The default base ringtone is
Melody 5.
The default base ringer volume
is 3.
Page 40

39 Base settings
Recall 1 is 100ms
(standard for the Telstra
network and most PABX)
Handset priority
Normally, if you have more than one handset
registered to your base, they all ring at the same
time. However, you can set one of them to ring
before the others, so that calls can be answered at
one handset first.
1.
Press Menu, scroll to
press OK.
2.
Press to highlight
press OK.
3.
Scroll or to
at the same time or
one handset to ring first.
4.
Press OK.
5.
If choosing one handset to ring first, scroll or
to select the handset then press OK to
confirm.
6.
Scroll or to select the
then press OK to confirm.
Ring
7.
Press and hold Back to return to standby.
Recall mode
See ‘Connecting to a PABX’ for dialling mode and
recall settings, page 53.
In the menu,
available for PABX settings.
Recall 1
Base Settings
Handset Priority
All Handset
Select Handset
and
Recall 2
for all to ring
Numbers of
then
then
to choose
are
Page 41

Base settings 40
Security PIN
The security PIN is used for registering and deregistering handsets. The default security PIN is 0000.
You can set your own security PIN preference.
1. Press Menu, scroll
press OK.
2. Press
3. Enter the old PIN (default setting 0000) then press
OK.
4. Enter the new PIN, press OK and enter it again.
5. Press OK to confirm.
6. Press and hold Back to return to standby.
to highlight
to
Base Settings
System PIN
then
then press OK.
Time settings
Set date and time
If you have subscribed to Telstra’s Calling Number
Display, the date and time will be set automatically
when you receive your first call. You can also set the
date and time manually.
1.
Press Menu, scroll to
press OK.
2.
Scroll to
3.
Enter the date, e.g. 2708 = 27th August, then press
OK.
4.
Enter the time, e.g. 1430 = 2:30pm. Then press OK.
5.
Press and hold Back to return to standby.
Set Date & Time
Time Settings
, then press OK.
then
KEEP TRACK OF YOUR PIN
If you change the System PIN,
keep a record of the new
number by writing in the
space provided on page 53.
You need your System PIN for
registering handsets and for
some other options
If you make a mistake when
entering the date or time,
press Clear.
Page 42

41 Base settings
When an alarm is set, the
display shows the
When the alarm sounds, press
Stop to silence it.
Set alarm
1.
Press Menu, scroll to
press OK.
2.
Alarm
is highlighted, press OK. Press OK again
On/Off
to select
3.
Scroll or to highlight the option you
want, then press OK.
On Once
On Daily
each day.
Off
– alarm off
4.
Enter the time you want to set the alarm for, e.g.
0730 for 7:30am, then press OK.
5.
Press and hold Back to return to standby.
Change the alarm tone
1.
Press Menu, scroll to
press OK.
2.
Press OK again to select
3.
Scroll to
4.
Scroll or to select the melody you want
and press OK to confirm.
5.
Press and hold Back to return to standby.
.
– alarm sounds just once
– alarm sounds at the same time
Set Alarm Tone
Time Settings
Time Settings
Alarm
.
then press OK.
then
then
Page 43

You can use up to five handsets with your Telstra
V1600. To do this you need to register each
additional handset with the base following the
simple steps given below.
Each handset can be registered on up to 4 bases.
Register a Telstra V1600 handset to a base.
1.
On the base, press and hold until you hear
two beeps.
You have 90 second to complete the following
steps.
2.
On the handset, press Menu, scroll to
Registration
Registration Handset
OK.
3.
The display shows the available base stations. A
against one of them indicates the handset is
already registered with that base.
4.
Scroll to the base you want to register to
then press OK.
5.
Enter the four-digit Security PIN (default setting
0000) then press OK. The handset registration is
confirmed and the handset is given a handset
number (1-5) which is displayed.
6.
Press and hold Back to return to standby.
, then press OK.
is highlighted. Press
42 Additional handsets and bases
IMPORTANT
Before registration, make sure
the handset batteries are fully
charged and that you are close
to the base
.
Page 44

43 Additional handsets and bases
If you use a handset with two or
more bases you can select
automatic from the Select Base
menu so that your handset will
automatically link to the base
with the strongest signal.
Select base
If your handset is registered to more than one
base, for example, one at work and one at home,
you can quickly select which base it takes its signal
from.
1.
When in range of the base you want to
connect to, press Menu, scroll
Registration
2.
Scroll to
display shows
base stations. A against one of them indicates
the handset is registered with that base.
3.
Scroll or to the base you want or
choose
Automatic
base with the strongest signal. If you use a
handset with two or more bases you can select
Automatic from the Selected Base menu so that
your handset will automatically link to the base
with the strongest signal.
4.
Press and hold Back to return to standby.
, then press OK.
Select Base
Select Base
then press OK. The
and the available
to automatically select the
to
Page 45

Additional handsets and bases 44
De-register a handset
Use one handset to de-register another handset
from the same base.
1.
Press Menu, scroll to
press OK.
2.
Scroll to
3.
Enter the system PIN (default setting 0000) then
press OK.
The screen lists all handsets registered to the
base.
4.
Scroll or to select the handset you want
to de-registered then press OK.
5.
Press Yes to confirm or No to return to the
previous screen listing the handsets
6.
Press and hold Back to return to standby.
De-register
Registration
then press OK.
, then
Page 46

45 Additional handsets and bases
Using additional handsets
Make an internal call to another handset
If you have two or more handsets registered to
your base, you can make internal calls between
handsets.
Two handsets can be holding an internal call
while a third is on an external call.
1.
Press then the handset number (1-5).
The receiving handset displays your number.
2.
Press to hang up.
Transfer calls
You can transfer an external caller to another
handset.
1.
During an external call, press . Your caller is
put on hold.
2.
Dial the number of the handset you want (1-5).
3.
When the other handset answers you can tell
them they have a call, then press
external caller is transferred.
If the other handset does not answer or you
decide not to transfer the call, press
to your caller again.
. The
to talk
Page 47

Additional handsets and bases 46
Three-way call
You can hold a three-way call between two
internal handsets and an external caller.
1.
During an external call, press then the
handset number you want (1-5). Your external
caller is put on hold.
2.
When the other handset answers, press to
start the conference call.
3.
If the other handset does not answer, press
again to speak to your external caller.
4.
Press to hang up
.
During a conference call
Your handset displays
Conference, the number of the
handset called and either the
external caller’s number or
External Call.
Note
When on a three-way call, the
call can only be cleared by the
handset which set it up.
Page 48

47 Help
Product Information 1300 302
699
Call the V1600 Helpline:
•
If you are having difficulties
using your Telstra V1600
•
If you need a replacement
main power lead
Lines open:
onday to Friday M
(or ESST), 8:00am – 5:00pm EST
No display
• The batteries may be dead. Recharge or
replace the batteries, see ‘Replacing the
handset batteries’, page 49.
• Is the handset switched off? To switch the
handset on, see page 13.
No dial tone
• Check that the telephone line cord is plugged
into the phone socket.
• Check that the base is connect to the mains
power and switched on.
You cannot link up with the base
• nected to the mains
Check that the base is con
power and switched on.
• e? Move the handset
Are you out of rang
closer to the base.
Are the batteries low or flat? If so, charg• e the
batteries or replace them if necessary.
•
If using more than one base, check that you
nected to the correct base, see page
are con
43.
Page 49

Help 48
No ring on the handset
• Check that the ringer volume is switched on, see
page 38.
• Check that the base is plugged into the phone
socket and that it is also connected to the mains
power and switched on.
Buzzing noise on my radio, TV, computer or
hearing aid
• Sometimes, your Telstra V1600 and other
cordless telephones can interfere with other
electrical equipment if placed too close. Try
moving it as least one metre away from such
appliances.
e charging light does not appear to be working Th
• Check that the base is plu
socket and switched on.
• the handset has slotted correctly into
Check that
the base.
• t batteries have been
Check that the handse
correctly fitted.
gged into the mains
Please note
Telstra accepts no
responsibility for damage
caused to your Telstra
V1600 handset by using
other type of batteries.
any
Page 50

49 Help
Replacing the handset batteries
After a time, you may find that the handset
batteries are running out of charge more
quickly. This is a standard sign of wear and
the batteries will need replacing.
For spare AAA rechargeable NiMH batteries,
please contact your nearest electrical retailers.
Slide off the battery compartment cover and
remove existing batteries. Insert new batteries
and replace the compartment cover.
Page 51

IMPORTANT
This equipment is not designed for
making emergency telephone calls
when the power fails. Alternative
arrangements should be made for
access to emergency services.
Safety
General
• Only use the power supply included
with the product. Using an
unauthorised power supply will
invalidate your guarantee and may
damage the telephone.
• Use only the approved rechargeable
batteries supplied. Spare
rechargeable batteries are available
from your nearest electrical retailer.
• Do not open the handset (except to
replace the handset batteries) or the
base. This could expose you to high
voltages or other risks.
• Contact Product Information
1300 302 699 for all repairs.
Radio signal transmitted between
•
the handset and base may ca
interference t
o hearing aids.
on
use
50 General information
• It is recommended that advice from
a qualified expert be sought before
using this product in the vicinity of
medical equipment.
• Your product may interfere with
other electrical equipment, e.g. TV
and radio sets, clock/alarms and
computers if placed too close. It is
recommended that you place your
product at least one metre away
from such appliances to minimised
any risk of interference.
• Never dispose of batteries in a fire.
There is a serious risk of explosion
and/or the release of highly toxic
chemicals.
Cleaning
Simply clean the handset and base
with a damp (not wet) cloth, or an
anti-static wipe. Never use household
polish as this will damage the product.
Never use a dry cloth as this may
ause a static shock. c
Page 52

51 General information
Environmental
Do not expose to direct sunlight.
The produce may heat up when th
batteries are being recharged
during prolonged periods of use.
This is normal, however, we
recommend that to avoid
you do not place the product o
antique/veneered wood.
Do not stand your product on
carpets or other surfaces, which
generate fibres, or p
locations preventing the free flow o
air over its surface.
Do not submerge any part of your
product in w
damp or humid conditions, such as
bathrooms.
Do not expo
explosive or other hazardous
conditions.
There is a slight chance that your
phone could be damaged by an
electrical storm. We recommended
that you unplug the power an
lephone line cord from the base
te
r the duration of the storm.
fo
lace it in
ater and do not use it in
se your product to fire,
or
damage
n
d
Telstra Accessories and
replacement items
e
For a full range of accessories and
replacement items for the Telstra
V1600, please call Product
Information on 1300 302 699.
r
Page 53

Technical information
any telephones can you
How m
have?
All items of telephone equipment
have a Ringer Equivalence Number
(REN), which is used to calculate
number of items, which may be
connected to any other telephone
Your Telstra V1600 has a REN of
line.
0.1.
A total REN of 4 is allowed. If the
total REN of 4 is exceeded
telephone may not ring.
With different telephone types the
is not guarantee of ringing, ev
when the REN is less than 4.
Only use the approved
adaptor and charger.
Only use the approved A
chargeable batteries.
re
Connecting to a PABX
This product is intended for use
within Australia for connection to
public telephone network and
compatible PABX’s, which support
tone dialling and Time Break Recall. If
in doubt p
rovider.
p
lease consult your service
power
the
, the
re
en
AA NiMH
52
Access code and entering a pause.
If you are connecting your Telstra
V1600 to a PABX you may need to
enter an access code (e.g. 9) to
an outside line. To allow the PAB
time to pick up an outside line
before the rest of the number is
ialled, you may need to add a
d
pause in the dialling sequence.
9 – PABX co
P – Pause inserted in dialling
sequence
Pxxx xxx – Rest of the phone
9
number
When storing a number in the
phoneb k, at the point you woo
to insert a pause, press and hold
down
de for an outside line
.
until P is displayed.
get
X
ant
Page 54

53 Technical information
Recall
The
connected to certain PABX’s and
with some Telstra phone features.
PIN number
If you change the System PIN, keep a
record of the new number by
writing in the space provided on this
page.
PIN NUMBER
button is used when
SIM card compatibility
3G SIM card are not compatible with
this product.
Do not attempt to download
information from 3G SIM cards to
your Telstra V1600.
Please check with your network
provided first if you are unsure. 3G
SIM cards are 1.8V.
CDMA mobile phones do not have
a SIM car, and so are not compatible
with this product.
Page 55

Product warranty & Customer service
Product Warranty
Telstra Guarantees your product for 12 months from
the date of purchase against any defect in materials or
workmanship under conditions of normal use and
service and subject to proof of the date of the
purchase being provided and subject to the conditions
specified below.
The benefits conferred by this warranty are in addition
to all other rights and remedies in respect of the
product that the consumer has under the Trade
Practices Act and similar State and Territory laws.
Warranty Service Conditions
Subject to your statutory right referred to the above,
Telstra expressly limits its liability with respect to its
products to the person who purchases the product
from the Telstra authorised retailer.
Subject to your statutory right referred to the above,
Telstra expressly limits its liability with respect to its
products to whichever is the lowest amount out of:
A. The cost of having the goods repaired
B. The cost of replacing the goods, or
C. The cost of obtaining equivalent goods.
Subject to your statutory right referred to the above, in
the event of the goods requiring service under
warranty, the owner is responsible for the cost of
transportation to the authorised service organization.
Whilst in transit the goods are at the owner’s risk.
Subject to your statutory right referred to the above,
should the goods be found to be in sound working
order by the authorised service organization the
owner may be charged a service fee.
Subject to your statutory right referred to the above,
the goods will not be eligible for service under this
warranty if:
A. Proof of date of purchase cannot be provided;
B. The goods are not branded Telstra;
C. The goods have been rented to another person;
D. The defect was caused by an accident, misuse,
abuse, improper installation or operation, lack of
reasonable care, unauthorised modification, loss of
parts, tempering or attempted repair by a person
not authorised by Telstra;
E. The product has been damaged by lightning or a
mains power surge.
Do you really need service?
Before calling for service under this warranty have you:
Check that all cables are securely connected as
detailed in the User Guide.
Refer to the User Guide to ensure that the features are
being used correctly.
If you are trying to access a network service such as
Call Waiting, confirmed with your network provider
that you have access to this feature.
If You Require Warranty Service
To obtain service during the terms of this warranty:
Call Product Information on1300 302 699 for advice
and assistance on the repair of your product.
After consulting our operators, should it be deemed
necessary to have the product serviced, the operator
will inform you of your nearest authorised service
organization and provide a Return Authority Number.
Please ensure that:
A. You provide proof of the date of purchase.
B. That your product is suitably packaged (Preferably
in original packaging).
C. That you have included all components from the
original purchase.
D. That you provide details of the Return Authority
Number.
IMPORTANT
Please retain this booklet with your sales receipt as
proof of the date of purchase.
54
Page 56

www.telstra.com
 Loading...