

Page 1

TELSTRA
T-VOICE 503
DECT CORDLESS
PHONE
R
E
C
O
M
M
E
N
D
E
D
F
O
R
N
B
N
Page 2
2
GETTING TO KNOW YOUR PHONE
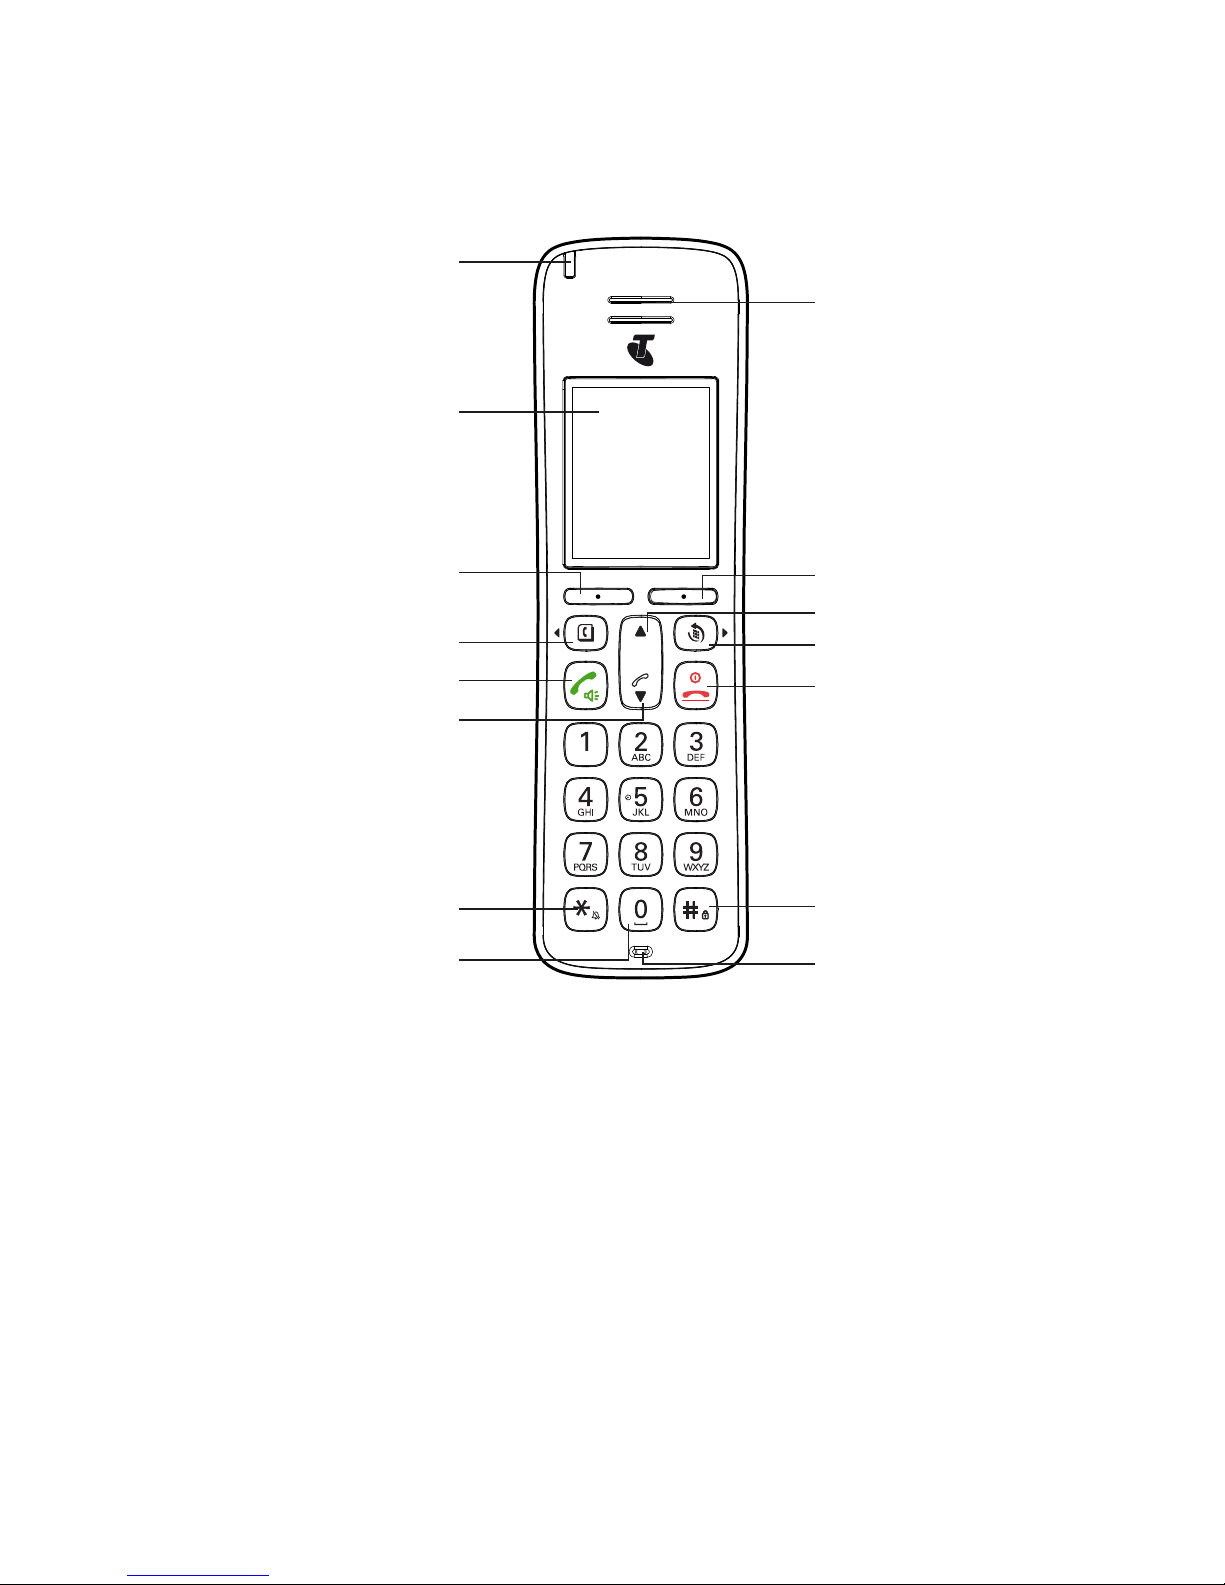
Overview of your handset
Symbol Function
B
(t)
Scroll left / Contacts / Recall - For scrolling left. Access to
phonebook. Press and hold to use Recall feature when connected
to a PABX, and with some Telstra Calling Features e.g. Call Waiting
u
Navigational key / Volume / Call List - For scrolling up. In call
volume adjustment during calls.
t
Talk key/Speakerphone - Make or answer a call. Activate and
deactivate hands-free during a call.
Earpiece
Display
Menu / OK
Navigation key / Volume /
Call list
Talk key / speaker phone
Activating / deactivating
the key lock
Scroll Right / Redial key
Microphone
Back / Clear / Mute
“End Call” / Power key / Exit
Navigation key / Volume
Activating / deactivating
the handset ringer / Change case /
Pulse to tone dialling
Pause / Space key
Scroll Left / Contacts / Recall
Ring indicator LED
Page 3

3
Asterisk key / Ringer on/off - For entering asterisks. Press and
hold down to switch handset ringer on/off. When entering names,
switch between upper and lower case lettering.
r
(u)
Redial - Open the redial list.
O
“End call”/Power Key - Press briey to end a call or return to
standby mode. Press and hold down to switch the handset on/off.
d
Navigational key / Volume / Call List - For scrolling down. Access
to Call List. In call volume adjustment during calls.
0
- 9
Alphanumerical keypad - For dialling telephone numbers.
#
Hash key / Keypad lock - In standby mode press and hold to lock/
unlock the keypad. For entering the hash symbol.
0
Space key - When entering name, insert space. While dialling,
insert a dialling pause.
Page 4
4
Handset display
Display icons
Signal icon
Displays when in hands-free mode
Mute is activated
Ringer is switched off
Indicates a missed call
Alarm is set
Battery is fully charged
Battery is partially charged
Battery is running low
Battery is almost fully discharged
Battery is empty
Page 5
5
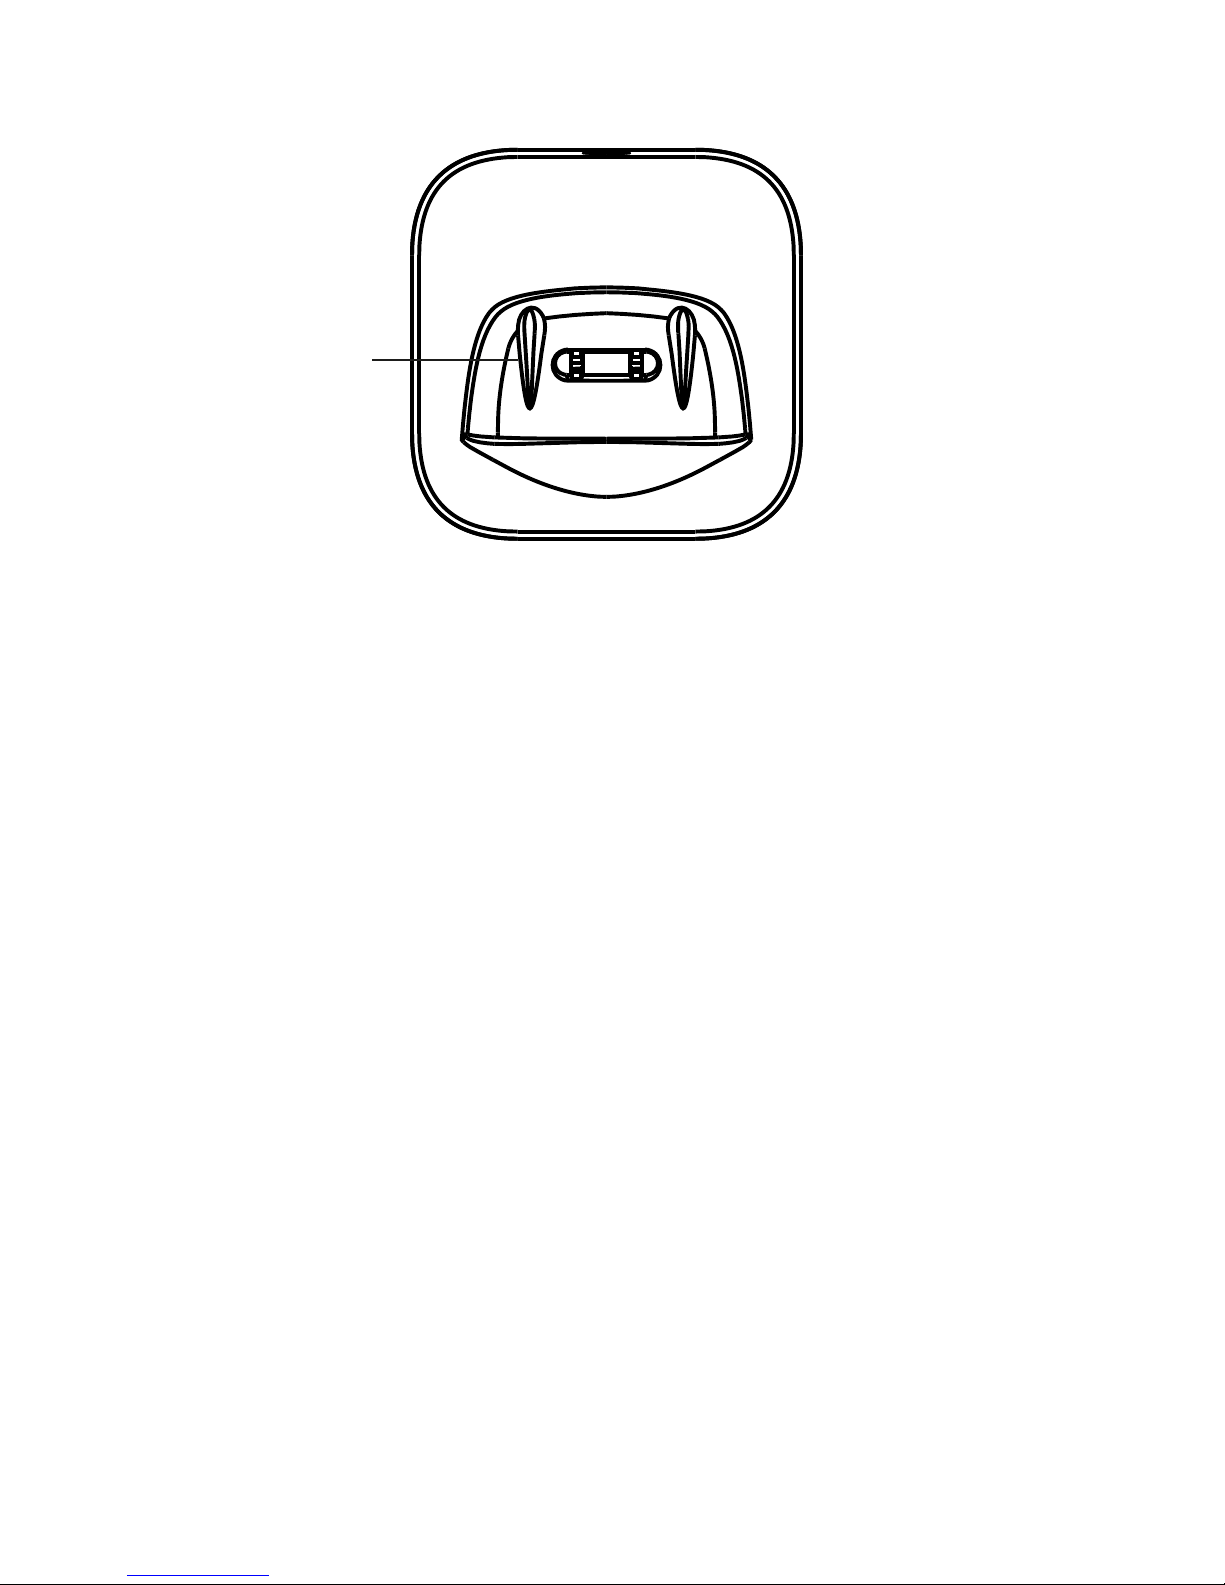
Overview of the charger
Charging contacts
Page 6

6
21 View the details or dial an entry
21 Edit a name and number
21 Delete an entry
22 Delete all entries
22 Predial an entry
22 Check the memory status
(Local contacts only)
23 Caller ID and call list
23 New calls alert
23 Dial a number in the Call List
23 Copy a Call List number
to the phonebook
24 View the details of an entry
24 Delete an entry
24 Delete the entire Call List
25 Predial an entry in the Call List
26 Clock and alarm
26 Set the date and time
26 Set the alarm
27 Call features
27 Add a speed dial number
27 Edit / Delete a speed dial number
28 Handset settings
28 Sound
29 Display
30 Language
30 De-registering a handset
31 Handset name
31 Auto hang-up
31 Auto answer
31 Restore to default settings
32 Handset version
32 Upgrade handset software
33 Advance settings
WHAT’S INSIDE
2 Getting to know your phone
2 Overview of your handset
4 Handset display
4 Display icons
5 Overview of the charger
8 Safety precautions
10 Getting started
10 HD VoiceTM calls
10 Location
10 Handset range
10 Signal strength
11 Contents of the package
11 Setting up
11 Connecting the charger
11 Power up the handset
12 Charging the batteries
12 Select a language
12 Registering the handset
13 Date and time
14 Navigating the menus
15 Menu map
16 Making and receiving call
16 Switch the handset on / off
16 Calls
17 Adjust the earpiece or
hands-free volume
17 Adjust the ringer volume
17 Mute
17 Hold
17 Intercom, second calls,
transferring calls and conference
calls
19 Lock/unlock the keypad
20 Phonebook
20 Store a name and number
Page 7

7
33 DECT settings
34 Internal names
34 Line settings
36 Line selection
36 Default settings
37 Help
39 Appendix
Page 8

8
SAFETY PRECAUTIONS
Your new Telstra T-Voice 503 handset is intended for use within Australia for
connection to a gateway network. Please read the safety precautions and user
guide carefully before installing the handset.
The user guide is a part of the product package and must be passed on to a new
owner.
Caution: Warning/danger statement, follow safety precautions!
• The ambient temperature must be between 0 °C and 40 °C.
• Please note that the ringer for incoming calls as well as signal tones are
emitted on the handset loudspeaker. Do not therefore hold the handset close
to your ear while one of these functions is on, otherwise your hearing may be
affected.
• Use only the following supplied power supply:
S004AGS0750030
• This product requires an electrical supply of 100 - 240 volts AC.
• The mains power plug must always be easily accessible.
• To disconnect the device from mains, separate the plug from the wall socket
rst.
Rechargeable batteries
Use the two supplied rechargeable batteries:
1.2V AAA 750mAh Highpower
Using other rechargeable batteries or non-rechargeable batteries/primary cells
can be dangerous and cause malfunctions in or damage to the telephone.
Product dimensions and weight (without battery)
Handset: (L) 175.0 x (W) 50.4 x (H) 31.5 / 132.4g
Charger: (L) 70.0 x (W) 70.0 x (H) 21.3 / 64.2g
Please Note:
• Do not immerse batteries in water or throw in the re.
• Rechargeable batteries can become warm while recharging.
• This is normal and not dangerous.
• Do not use any other type of charger since this may damage the batteries.
• Before using the handset, wearers of hearing aids should note that radio
signals can be picked up by the hearing aid and cause an unpleasant buzzing
noise.
• Do not use your cordless handset in environments at risk from explosion (e.g.
paintworks, petrol stations etc.)
• Do not position the handset in bathrooms or showers.
• The radio signals may inuence the working of medical equipment.
• In the event of a power cut or if the batteries are discharged, your handset will
not function!
Page 9

9
• The handset must not be charged up without batteries or the battery cover in
place.
• Do not touch open contacts.
Small Metal Objects
Small metal objects may stick to the handset due to the presence of magnetic
elds on the handset.
Exercise caution when used where metal objects can be picked up.
Environmental impact
At the end of the product’s life cycle, the telephone must not be disposed of
in normal domestic waste. Please take it to a collection point for processing
electrical and electronic equipment.
Some materials used in this product can be recycled if you take it to a recycling
depot.
By recycling parts or raw materials from used products you will be making an
important contribution to environmental protection. Please contact your local
authority if you require information about collection points in your neighbourhood.
Page 10

10
GETTING STARTED
IMPORTANT
Do not place your T-Voice 503 in the bathroom or other humid areas.
HD VoiceTM calls
HD Voice technology has revolutionised the telephone industry. Callers can now
feel better connected. The rich quality of HD VoiceTM calls is more effective and
offers a superior listening experience.
Location
You need to place your T-Voice 503 charger within 2 metres of the mains power
socket so that the cable will reach. The socket-outlet should be installed near the
equipment and should be easily accessible.
Make sure that it is at least 1 metre away from other electrical appliances to
avoid interference. Your T-Voice 503 works by sending radio signals between the
handset and gateway.
Handset range
The unit has a range of up to 300 metres outdoors when there is a clear line of
sight between the gateway and handset. Any obstruction between the gateway
and handset will reduce the range signicantly. With the gateway indoors and the
handset either indoors or outdoors, the range will normally be up to 50 metres.
Thick concrete and stone walls can severely affect the range.
Signal strength
The icon on your handset indicates that you are within range of the gateway.
When out of range of the gateway, the icon will show. If you are on a call, and the
out of range tone is set to on, you will hear a warning beep.
The line will hang up if the handset moves out of range of the gateway. Move
closer to the gateway and the handset will automatically reconnect.
Page 11
11
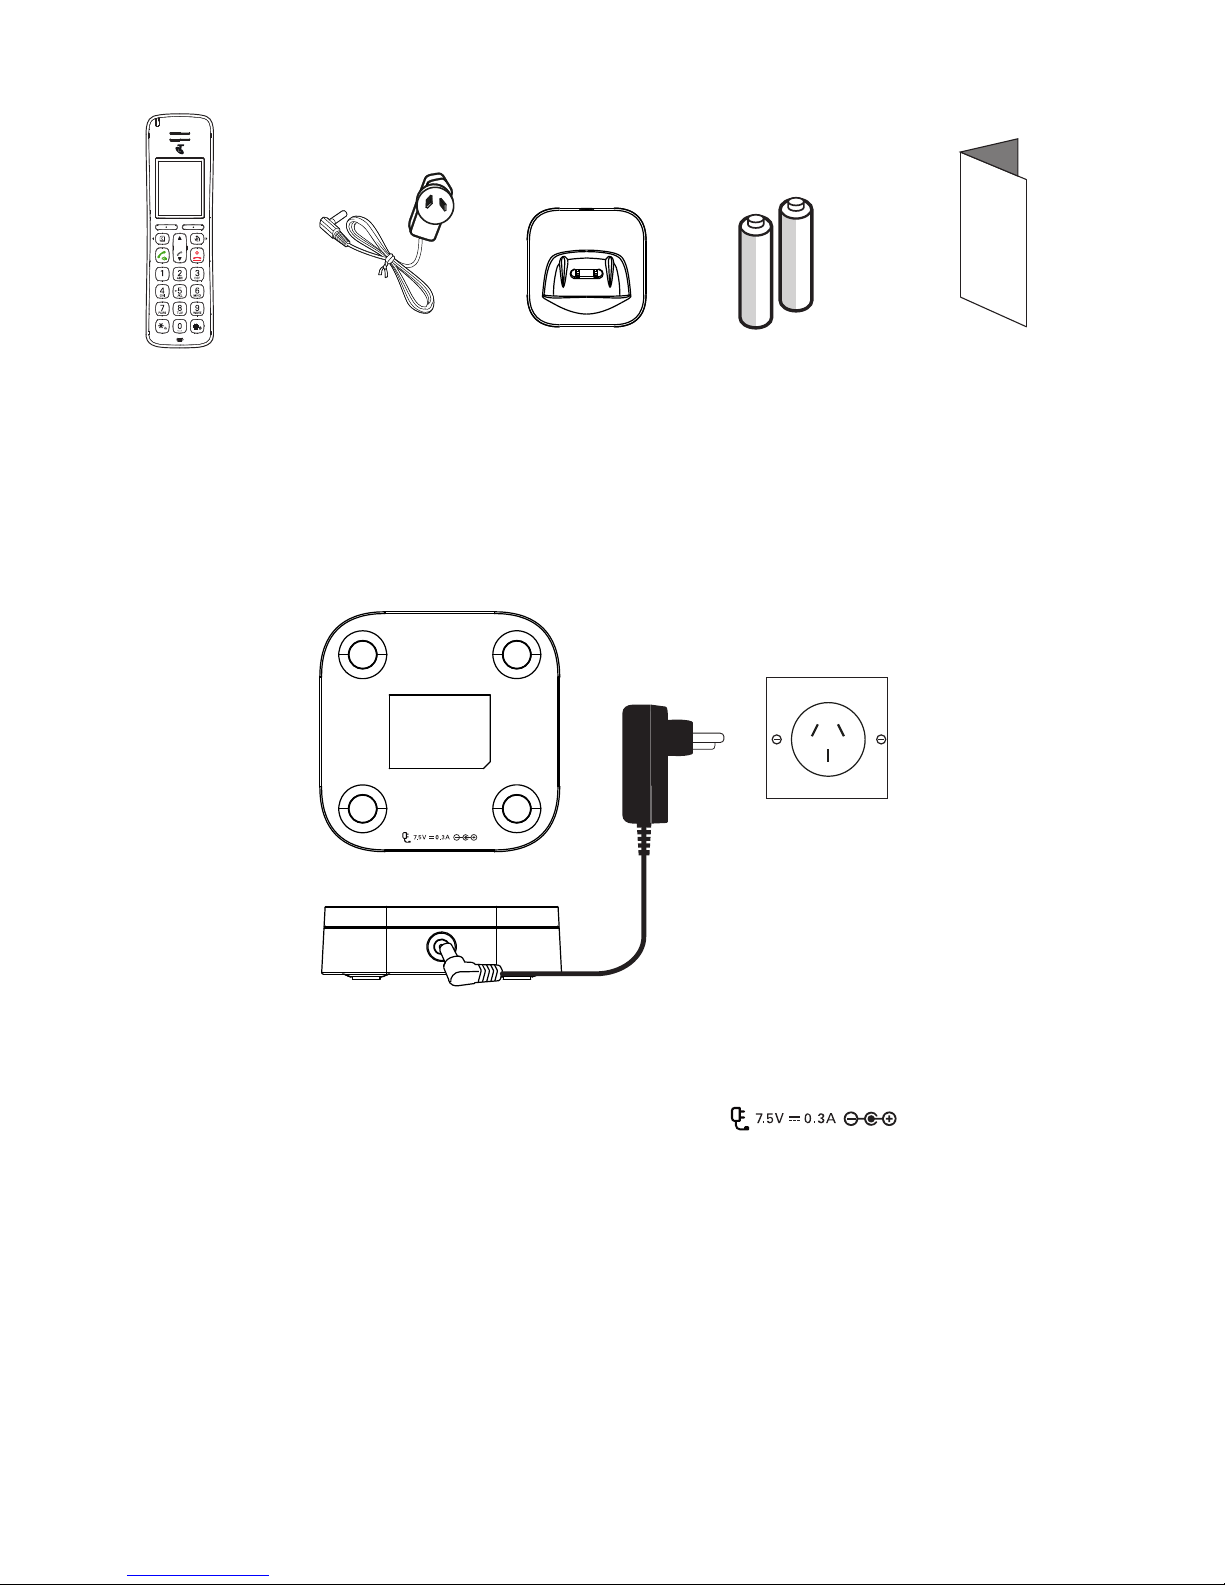
Contents of the package
Setting up
IMPORTANT
Use only the power adaptor supplied with the product.
Connecting the charger
1. Plug the power adaptor into the socket marked on the rear of
the charger and plug the other end into the mains power wall socket. Switch
on the mains power.
Power up the handset
1. The bottom part of the handset contains a battery compartment for housing
two type AAA batteries.
2. Remove the battery cover from the back of the handset and insert the 2 x AAA
NiMH rechargeable batteries supplied. Please note the ’+’ and ’-’ markings
inside the battery compartment and insert in the correct direction.
Handset
Charger
Mains
power
adaptor
2 x AAA
rechargeable
batteries (already
in handset)
Quick
Start
Guide
Page 12

12
3. Slide the battery cover back into place.
4. Place the handset on the charger to charge, see below.
Charging the batteries
If the battery charge status has reached its lower limit, the battery symbol ( ) is
displayed and a warning signal is heard every 60 seconds while on a call.
You have only a few minutes of talk time left.
When charging, the
icon will scroll on the display. Once charged scrolling will
stop.
You can use the telephone for up to 17.5 hours with fully charged batteries. The
handset has a standby time of up to 300 hours.
After you have inserted the batteries for the rst time, the battery display will
indicate the correct information on the charging status only after a complete
charging cycle. Use only approved rechargeable batteries NiMH AAA. Never use
disposable batteries/primary cells.
To keep your batteries in the best condition, leave the handset off the charger for
a few hours at a time. Running the batteries right down at least once a week will
help them last as long as possible.
The charge capacity of the rechargeable batteries will reduce with time, giving the
handset less talk / standby time. Eventually it will need to be replaced.
Batteries and the handset may become warm during charging. This is normal.
Select a language
When the handset is rst set up it will list the different languages, use d to scroll
to the required language and press
Select
.
Registering the handset
On the gateway:
1. Press the Pair button on the gateway for 5 seconds till the led ashes. Follow
st
ep 2 below.
On the handset:
2. If the handset is not registered to a gateway, press
Register
. The screen
1
Slide
2
Press down
Page 13

13
displays
Registering
and once successful
Registered
will be displayed.
3. If the handset is already registered to another gateway, press
Menu
, scroll d
to
Handset Settings
and press
Select
.
4. Scroll d to
Registration
and press
Select
.
5.
Register
is highlighted, press
Select
.
6. The screen displays
Registering
and once successful
Registered
will be
displayed.
Note
A beep will be heard if the registration is successful. The handset is automatically
assigned an available handset number. Use this number when making internal
calls.
If registration is not successful the rst time, please repeat the process again in
case the gateway registration period ran out of time.
If you still cannot register a handset to the gateway please check how many
handsets are already registered. The total number of handsets that can be
registered to a gateway is dependent on the gateway.
Date and time
Note
The phone can be set so that the gateway or handset can be the clock master,
once set this will sync across all handset.
If Clock Master is set to Base, the date and time is set automatically when
registered to the gateway. See page 33.
If Clock Master is set to Handset, you can also set the date and time manually. See
page 33.
1. Press
Menu
, scroll u to
Clock & Alarm
and press
Select
.
2.
Date/Time
is highlighted. Press
Select
.
3. To change the date format, scroll d to
Date Format
and scroll t or u to select
either
DD/MM
or
MM/DD
.
4. Scroll u to
Enter Date
, enter the date, e.g. when set to DD/MM, 27/08/17 for 27
August 2017 and press Ok.
5. Once the date is set, to change the time format, scroll d to
Time Format
and
scroll t or u to select either
12 Hours
or
24 Hours
.
6. Scroll u to
Enter Time,
enter the time, e.g. when set to 24 Hours, 1430 for
2:30pm and press
Save
.
If the current time format setting is 12 hour, scroll t or u to select
AM
or PM.
7. Press O to return to standby.
Your T-Voice 503 is now ready for use.
Page 14

14
Navigating the menus
Your T-Voice 503 has an easy to use menu system on the handset.
Each menu has a list of options, which you can see on the menu map on the
following page.
When the handset is in standby:
Scrolling through menus
1. From the standby screen, press
Menu
.
The main menu is opened.
2. Use the u /d /
B
(t) / r (u) keys to scroll through the menu.
3. Left softkey - press to action the corresponding word prompt shown in the
lower left corner of the display.
Right softkey - press to action the corresponding word prompt in the lower
right corner of the display.
4. Press O to return to standby.
Page 15

15
Menu map
Contacts
Local Contacts
Add
Edit 1
View
1
Delete
1
Delete All
1
Predial
1
Memory Status
Base Contacts
Add
Edit1
View
1
Delete
1
Delete All
1
Predial
1
Call List
Missed Call
Outgoing Calls
2
Accepted Calls
All Calls
2
Clock & Alarm
Date/Time
Alarm
Call Features
Voicemail
Call Forward
Call Waiting
Call Return
Voice Assistant
Speed Dial
Handset Settings
Sound
Ringer Volume
Ringtone
Key Beep
Out Range Tone
Cradle Tone
Display
Contrast
Wallpaper
Backlight Timeout
Language
Registration
Handset Name
Auto Hang-up
Auto Answer
Handset Setback
Handset Version
Advance Settings
DECT Settings
Change PIN
Clock Master
ECO +
Base Version
Base Setback
Internal Names
Line Settings
Line Selection
1
These options will only be available if there is an entry stored.
2
These options are dependent on the gateway.
Page 16

16
MAKING AND RECEIVING CALLS
Note
Your phone will automatically time the duration of all external calls, the call timer
will display on the screen. When the call ends, the total duration of your talk time
is shown for 1 second.
Switch the handset on / off
1. To power the handset off, press and hold O for about 5 seconds.
2.
Conrm?
,is displayed, press
Yes
to conrm or No to cancel.
3. Press O to turn the handset back on.
Calls
When making calls you can pre set the line selection to auto, manual or individual
line selection, see page 36. The default setting is auto, when a call is made the
gateway will automatically select the line.
1. Press t.
2. Dial the number.
If the line selection is set to manual, press t scroll u or d to highlight
Auto
or
Line Name
and press
Select
, if
Line Name
is selected scroll u or
d
to the desired line and press
Select
, then dial the number.
3. Press t again to switch to hands-free call.
Preparatory dialling
1. Dial the number rst. If you make a mistake press
Clear
to delete the last digit.
2. Press t to dial.
If the line selection is set to manual, press t scroll u or d to highlight
Auto
or
Line Name
and press
Select
, if
Line Name
is selected scroll u or
d
to the desired line and press
Select
.
3. Press t again to switch to hands-free call.
Make a call using speed dial keys
1. Press and hold the relevant keypad number, press t the number will be
dialled automatically.
If the line selection is set to manual, press t scroll u or d to highlight
Auto
or
Line Name
and press
Select
, if
Line Name
is selected scroll u or
d
to the desired line and press
Select
.
Note
To assign a speed dial number, see page 27.
Page 17

17
End a call
Press O, or place the handset back on the charger.
Note
You can end calls simply by placing the handset on the charger. To turn this
feature off, see Auto hang-up, see page 31 .
Receive a call
When you receive an external call, the phone rings, , the line information and
the phone number (or name if stored in the phonebook) is displayed.
1. Press t to answer the call and press t again to switch to hands-free.
Note
If you prefer for the call to be automatically answered when you lift the handset
off the charger, you will need to switch Auto answer on, see page 31.
Adjust the earpiece or hands-free volume
1. During a call, press u to increase and d to decrease the volume level. There
are 5 levels to choose from, volumes 1-5.
Adjust the ringer volume
In standby, press u and then scroll u or d to select the desired volume level.
While the phone is ringing, press u or d to select the desired volume level.
Press and hold in standby to turn the ringer off. Press and hold again to turn
the ringer back on.
Mute
1. During a call press
Mute
, m is displayed.
2. To turn mute off, press
Unmute
.
Hold
You can place your caller on hold. When on hold the icon will be red.
1. During a call press
Option, Hold
is highlighted, press
Select
.
2. To turn hold off, press
Option, Unhold
is highlighted, press
Select
.
Intercom, second calls, transferring calls and conference calls
Making an internal call
If more than one handset is registered to the gateway, an internal call can be
made between handsets and a second call can also be made.
1. If 2 handsets are registered to the gateway, press
Intercom
and the other
handset rings automatically.
Page 18

18
2. If 2 or more handsets are registered to the gateway, press
Intercom
and scroll
d
to select the handset that is to be called, press
Select
.
Receiving an internal call
When an internal call is received, the handset name or number that is calling is
displayed.
1. Press
Silence
to stop the handset ringing.
2. Press
Reject
to reject the call.
3. Press t to answer the call.
Making a second call
When on an internal or external call you can make a second internal or external
call without ending the rst call.
Second internal call
During a call:
1. Press
Option
and scroll d
Intercom
and press
Select
.
2. If 3 handsets are registered to the gateway the other handset rings
automatically.
3. If 3 or more handsets are registered to the gateway, scroll d to select the
handset that is to be called, or select
All Handsets
to ring all handsets, press
Select
.
4. When the third handset answers you can have an internal conversion.
5. Press
Option
, then scroll u or d to the required option.
Switch Calls
- to switch between the 2 calls.
Conference
- to join the 2 calls to make a 3-way call.
Transfer
- to transfer the call to the second handset.
Release Active
- to end the active call.
Second external call
During a call:
1. Press
Option
and scroll d to
Add Call
, press
Select
.
2. You can then either:
Dial the number manually.
Press B - to dial a number in the phonebook.
Press d - to dial a number in the Call List.
Page 19

19
Press
Dial
to dial.
3. If the line selection is set to manual, press t scroll u or d to highlight
Auto
or
Line Name
and press
Select
, if
Line Name
is selected scroll u or
d
to the
desired line and press
Select
.
4. When the second call answers you can have a conversion.
5. Press
Option
, then scroll u or d to the required option.
Switch Calls
- to switch between the 2 calls.
Conference
- to join the 2 calls to make a 3-way call.
Transfer
- to transfer the call to the second handset.
Release Active
- to end the active call.
Conference calls
If intrusion calls is set to allowed, see page 36, when a handset is on a call a
2nd handset can initiate a conference call. Press t on the 2nd handset and it will
take the same line and a conference call will begin.
Transferring calls
If when transferring calls the 2nd handset doesn’t answer then you can press
Option, Transfer
is highlighted, press
Select
to transfer the call to the second
handset unannounced.
Receiving a second call (call waiting)
When on an internal or external call you can receive a second internal or external
call without ending the rst call.
When there is a second call the call waiting screen will be displayed, you can
either press
Accept
to accept the second call and put your 1st caller on hold or
Reject
to reject the second call.
If the call is accepted, press
Option
, then scroll u or d to the required option.
Switch Calls
- to switch between the 2 calls.
Conference
- to join the 2 calls to make a 3-way call.
Transfer
- to transfer the call to the second handset.
Release Active
- to end the active call.
Lock/unlock the keypad
The keypad can be locked so that it cannot be operated accidentally.
Note
When the keypad is locked an incoming call can still be answered and the handset
will operate as normal. When the call ends, the keypad lock comes on again.
1. Press and hold #,
Keys Locked
is displayed.
2. Press and hold # again to unlock the keypad.
Page 20

20
PHONEBOOK
The handset gives you access to 2 phonebooks:
Local contacts - The contacts are saved locally on the handset.
Base contacts - The contacts are saved on the gateway. All the handsets registered to the
gateway can access these shared contacts.
The local phonebook can store up to 100 contacts. Names can be up to 16
characters and numbers up to 24 digits. The number of contacts in the gateway, is
dependent on the gateway the handset is registered to.
Every entry contains a rst and last name and up to 3 telephone numbers (e. g.
home, mobile, ofce).
There are 2 ways to enter the phonebooks, either press
B
to go directly to the last
phonebook accessed, then press
B
to switch between base and local contacts, or
you can go through the handset menu.
Store a name and number
If the T-Voice 503 is connected to a switchboard, you may need to enter a pause
in a number. This gives the switchboard time to nd an outside line. A pause
is normally stored after the switchboard access code (e.g. 9). When storing a
number, press and hold 0 until the display shows P. You can then continue
storing the phone number.
If you wish to display the name of your caller instead of the number, save the full
telephone number including the area code to your phonebook.
1. Press
Menu, Contacts
is displayed, press
Select
.
2. Scroll u or d to select the desired phonebook and press
Select
.
3. Press
Option, Add
is highlighted, press
Select
.
4.
First Name
is highlighted, enter the rst name.
5. Scroll d to
Last Name
, enter the last name.
6. Scroll d to select the number category you want to store the number under,
either
Home, Mobile
or
Ofce
.
7. Enter the number and press
Save
.
8. Press O to return to standby.
Note
Cancel storing an entry by pressing O at any time during the process.
ENTERING NAMES
Use the alphanumeric keypad to enter names in the phonebook.
For instance to enter the name Paul
P Press 7 once
A Press 2 once
Page 21

21
U Press 8 twice
L Press 5 three times
To enter a space, press 0.
WRITING TIPS
To change the text from Abc to ABC, abc or 123, press .
Press t or u to move between characters/digits.
Press
Clear
to delete a character, or press and hold
Clear
to delete all characters.
View the details or dial an entry
1. Press
Menu, Contacts
is displayed, press
Select
.
2. Scroll u or d to select the desired phonebook and press
Select
.
3. Scroll u or d to the entry you want or search alphabetically.
3. Press t to dial.
If the line selection is set to manual, press t scroll u or d to highlight
Auto
or
Line Name
and press
Select
, if
Line Name
is selected scroll u or
d
to the desired line and press
Select
.
4. Or to see the details, press
Option
scroll d to
View
and press
Select
.
Edit a name and number
1. Press
Menu, Contacts
is displayed, press
Select
.
2. Scroll u or d to select the desired phonebook and press
Select
.
3. Scroll u or d to the entry you want or search alphabetically and press
Option
.
4. Scroll d to
Edit
and press
Select
.
5.
First Name
is highlighted, press
Clear
to delete a character, or press and hold
Clear
to delete all characters. Edit the name.
6. Scroll d to
Last Name
, press
Clear
to delete a character, or press and hold
Clear
to delete all characters. Edit the name.
7. Scroll d to the number you want to edit, press
Clear
to delete a digit, or press
and hold
Clear
to delete all digits. Edit the number and press
Save
.
8. Press O to return to standby.
Delete an entry
1. Press
Menu, Contacts
is displayed, press
Select
.
2. Scroll u or d to select the desired phonebook and press
Select
.
3. Scroll u or d to the entry you want or search alphabetically and press
Option
.
4. Scroll d to
Delete
and press
Select
.
Page 22

22
5. Display shows
Delete?
.
6. Press
Yes
to conrm or No to cancel.
7. Press O to return to standby.
Delete all entries
1. Press
Menu, Contacts
is displayed, press
Select
.
2. Scroll u or d to select the desired phonebook and press
Select
.
3. Press
Option
, scroll d to
Delete All
and press
Select
.
4. Display shows
Delete All?
.
5. Press
Yes
to conrm or No to cancel.
6. Press O to return to standby.
Predial an entry
1. Press
Menu, Contacts
is displayed, press
Select
.
2. Scroll u or d to select the desired phonebook and press
Select
.
3. Scroll u or d to the entry you want or search alphabetically and press
Option
.
4. Scroll d to
Predial
and press
Select
.
5. If the entry has more than one number stored, d to the number you require,
press
Select
.
6. The number is displayed.
7. Press t to dial.
If the line selection is set to manual, press t scroll u or d to highlight
Auto
or
Line Name
and press
Select
, if
Line Name
is selected scroll u or
d
to the desired line and press
Select
.
Check the memory status (Local contacts only)
You can check how much phonebook memory you have on your phone.
1. Press B.
2. Press
Option
and scroll u to
Memory Status
and press
Select
. The display
shows the number of used phonebook entries.
3. Press O to return to standby.
Page 23

23
CALLER ID AND CALL LIST
Provided the identity of the caller is not withheld, the number of the caller will be
displayed together with the date and time of the call (if provided by the network).
A subscription to this service may be required.
Note
If the caller’s number is stored in your phonebook along with a name, when you
receive a call the name will also be displayed.
New calls alert
When you have new missed calls (incoming calls that you haven’t answered), the
display shows
X Missed Call(s)
and the icon ashes.
Note
You can either enter the Call List by pressing d or through the handset menu.
Dial a number in the Call List
1. Press d, scroll u or d to highlight the Call List (
Missed Calls, Outgoing Calls
,
Accepted Calls, All Call
) you want.
2. Press
Select
, the most recent number or name if stored in the phonebook is
highlighted.
3. Scroll u or d to the entry you want to dial.
4. Press t scroll u or d to select the desired line and press
Select
.
Copy a Call List number to the phonebook
1. Press d, scroll u or d to highlight the Call List (
Missed Calls, Outgoing Calls
,
Accepted Calls, All Call
) you want.
2. Press
Select
, the most recent number or name if stored in the phonebook is
highlighted.
3. Scroll u or d to the entry you want and press
Option
.
4.
Save Number
is highlighted, press
Select
.
5. Scroll u or d to select the desired phonebook and press
Select
.
6. Scroll d to select the number category you want to store the number under,
either
Home, Mobile
, or
Ofce
and press
Select
.
7.
First Name
is highlighted, enter the rst name and scroll d.
8.
Last Name
is highlighted, enter the last name and press
Save
.
9. Press O to return to standby.
Page 24

24
View the details of an entry
1. Press d, scroll u or d to highlight the Call List (
Missed Calls, Outgoing Calls
,
Accepted Calls, All Call
) you want.
2. Press
Select
, the most recent number or name if stored in the phonebook is
displayed.
3. Scroll u or d to the entry you want and press
Option
.
4. Scroll d to
View
and press
Select
. The number (and name if stored in the
phonebook), and the time and date of the call are displayed.
5. Press O to return to standby.
Delete an entry
1. Press d, scroll u or d to highlight the Call List (
Missed Calls, Outgoing Calls
,
Accepted Calls, All Call
) you want.
2. Press
Select
, the most recent number (or name if stored in the phonebook) is
displayed.
3. Scroll u or d to the entry you want and press
Option
.
4. Scroll d to
Delete
and press
Select
. The display shows
Delete?
.
5. Press
Yes
to delete or No to cancel.
6. Press O to return to standby.
Delete the entire Call List
1. Press d, scroll u or d to highlight the Call List (
Missed Calls, Outgoing Calls
,
Accepted Calls, All Call
) you want.
2. Press
Select
, the most recent number (or name if stored in the phonebook) is
displayed.
3. Press
Option
, scroll d to
Delete All
and press
Select
. The display shows
Delete
All?
.
4. Press
Yes
to delete or No to cancel.
5. Press O to return to standby.
Page 25

25
Predial an entry in the Call List
1. Press d, scroll u or d to highlight the Call List (
Missed Calls, Outgoing Calls
,
Accepted Calls, All Call
) you want.
2. Press
Select
, the most recent number (or name if stored in the phonebook) is
displayed.
3. Scroll u or d to the entry you want and press
Option
.
4. Scroll d to
Predial
and press
Select
. The number is displayed.
5. Press t to dial.
If the line selection is set to manual, press t scroll u or d to highlight
Auto
or
Line Name
and press
Select
, if
Line Name
is selected scroll u or
d
to the desired line and press
Select
.
Page 26

26
CLOCK AND ALARM
If you have subscribed to your network’s Caller ID service, if Clock Master is set
to Base the gateway automatically sets the date and time of the handset when
registered. If the Clock Master is set to handset, you can also manually set the
time on the individual handsets.
Set the date and time
1. Press
Menu
, scroll u to
Clock & Alarm
and press
Select
.
2.
Date/Time
is highlighted. Press
Select
.
3. To change the date format, scroll d to
Date Format
and scroll t or u to select
either
DD/MM
or
MM/DD
.
4. Scroll u to
Enter Date
, enter the date, e.g. when set to DD/MM, 27/08/17 for 27
August 2017 and press Ok.
5. Once the date is set, to change the time format, scroll d to
Time Format
and
scroll t or u to select either
12 Hours
or
24 Hours
.
6. Scroll u to
Enter Time,
enter the time, e.g. when set to 24 Hours, 1430 for
2:30pm and press
Save
.
If the current time format setting is 12 hour, scroll t or u to select
AM
or PM.
7. Press O to return to standby.
Set the alarm
1. Press
Menu
, scroll u to
Clock & Alarm
and press
Select
.
2. Scroll d to
Alarm
and press
Select
.
3. Activation is highlighted, scroll t or u to
Off, Once
or
Daily
.
4. Scroll d to highlight
Enter Time
.
5. Enter the time (HH:MM).
If the current time format setting is 12 hour, scroll t or u to select
AM
or PM.
6. Scroll d to highlight
Ringtone
t or u to select the desired ringtone and press
Save
.
7. Press O to return to standby.
Notes
If the alarm is set to
Once
, will disappear from the screen after the alarm has
sounded once.
If the alarm is set to
Daily
, will remain on the screen after the alarm has
sounded.
When the alarm rings, press
Off
or O to stop the ring.
Page 27

27
CALL FEATURES
Add a speed dial number
1. Press
Menu
, scroll d to
Call Features
and press
Select
.
2. Scroll d to
Speed Dial
and press
Select
.
3. Scroll u or d to select the key where you want to store the number, press
Select
.
If the entry is empty
No Number
will be displayed, press
Edit
.
4.
Name
is highlighted, enter the name and scroll d to highlight
Number
.
5. Enter the number and press
Save
.
6. Press O to return to standby.
Note
To dial a speed dial number, see page 16
Edit / Delete a speed dial number
1. Press
Menu
, scroll d to
Call Features
and press
Select
.
2. Scroll d to
Speed Dial
and press
Select
.
3. Scroll u or d to select the key where the number is stored, press
Select
.
4.
Name
is highlighted, press
Clear
to delete a character, or press and hold
Clear
to delete all characters. Edit the name if necessary.
5. Scroll d to the number, press
Clear
to delete a digit, or press and hold
Clear
to
delete all digits. Edit the number if necessary and press
Save
.
6. Press O to return to standby.
Page 28

28
HANDSET SETTINGS
Sound
Ringer volume
The ring volume can be set to different volume levels. Choose from 5 volume levels
or Off.
1. Press
Menu
, scroll d to
Handset Settings
and press
Select
.
2.
Sound
is highlighted. Press
Select
.
3.
Ringer Volume
is highlighted. Press
Select
.
4. Scroll u or d to the volume you require and press
Select
.
5. Press O to return to standby.
Ringer melody
Different ringer melodies of the handset can be set. Choose from 10 different
ringer melodies. While scrolling a sample ring will be heard for each melody.
1. Press
Menu
, scroll d to
Handset Settings
and press
Select
.
2.
Sound
is highlighted. Press
Select
.
3. Scroll d to
Ringtone
and press
Select
.
4. Scroll u or d to the ringtone you require and press
Select
.
5. Press O to return to standby.
Key beep
When you press a button on the T-Voice 503 handset, you will hear a beep. You can
switch this beep on or off.
1. Press
Menu
, scroll d to
Handset Settings
and press
Select
.
2.
Sound
is highlighted. Press
Select
.
3. Scroll d to
Key Beep
and press
Select
.
4. Scroll u or d to
On
or
Off
and press
Select
.
5. Press O to return to standby.
Out of range tone
When on a call if you move out of range of the gateway, you will hear a beep. You
can switch this tone on or off.
1. Press
Menu
, scroll d to
Handset Settings
and press
Select
.
2.
Sound
is highlighted. Press
Select
.
Page 29

29
3. Scroll d to
Out Range Tone
and press
Select
.
4. Scroll u or d to
On
or
Off
and press
Select
.
5. Press O to return to standby.
Cradle tone
When you place the handset on the charger, you will hear a beep. You can switch
this beep on or off.
1. Press
Menu
, scroll d to
Handset Settings
and press
Select
.
2.
Sound
is highlighted. Press
Select
.
3. Scroll d to
Cradle Tone
and press
Select
.
4. Scroll u or d to
On
or
Off
and press
Select
.
5. Press O to return to standby.
Display
Display contrast
You can set the display contrast on the handset screen.
1. Press
Menu
, scroll d to
Handset Settings
and press
Select
.
2. Scroll d to
Display
and press
Select
.
3.
Contrast
is highlighted. Press
Select
.
4. Scroll u or d to the contrast you require and press
Select
.
5. Press O to return to standby.
Wallpaper
Select from 4 different wallpapers for your handset or set to no wallpaper.
1. Press
Menu
, scroll d to
Handset Settings
and press
Select
.
2. Scroll d to
Display
and press
Select
.
3. Scroll d to
Wallpaper
and press
Select
.
4. Scroll u or d to the wallpaper you require and press
Select
.
5. Press O to return to standby.
Display backlight
You can set the amount of time before the backlight turns off.
1. Press
Menu
, scroll d to
Handset Settings
and press
Select
.
2. Scroll d to
Display
and press
Select
.
3. Scroll d to
Backlight Timeout
and press
Select
.
Page 30

30
4. Scroll u or d to the time you require and press
Select
.
5. Press O to return to standby.
Language
1. Press
Menu
, scroll d to
Handset Settings
and press
Select
.
2. Scroll d to
Language
and press
Select
.
3. Scroll u or d to the language you require and press
Select
.
4. Press O to return to standby.
Registration
On the gateway:
1. Press the Pair button on the gateway for 5 seconds till the led ashes. Follow
set 2 below.
On the handset:
2. If the handset is not registered to a gateway, press
Register
. The screen
displays
Registering
and once successful
Registered
will be displayed.
3. If the handset is already registered to a gateway, press
Menu
, scroll d to
Handset Settings
and press
Select
.
4. Scroll d to
Registration
and press
Select
.
5.
Register
is highlighted, press
Select
.
6. The screen displays
Registering
and once successful
Registered
will be
displayed.
Note
A beep will be heard if the registration is successful. The handset is automatically
assigned an available handset number.
If registration is not successful the rst time, please repeat the process again in
case the gateway registration period ran out of time
If you still cannot register a handset to the gateway please check how many
handsets are already registered. The total number of handsets that can be
registered to a gateway is dependent on the gateway.
De-registering a handset
A handset can cancel any handset registered to the same gateway. This allows the
handset to end the wireless connection with the system.
1. Press
Menu
, scroll d to
Handset Settings
and press
Select
.
2. Scroll d to
Registration
and press
Select
.
3. Scroll d to
Unregister
and press
Select
.
Page 31

31
4. Enter the PIN and press Ok.
5. Scroll u or d to the handset that you want to de-register and press
Select
.
6. The display shows
Unregister?
, press
Yes
to de-register or No to cancel.
7. Press O to return to standby.
Handset name
A personalized name can be set for each handset to easily distinguish between
them. A name can be up to 16 characters.
1. Press
Menu
, scroll d to
Handset Settings
and press
Select
.
2. Scroll d to
Handset Name
and press
Select
.
3. The handset name is displayed, press
Clear
to delete a character, or press and
hold
Clear
to delete all characters. Enter the new name and press
Save
.
4. Press O to return to standby.
Auto hang-up
The phone is set to end calls by placing the handset on the charger. This feature
can be switched off so that calls can only be ended by pressing
O
.
1. Press
Menu
, scroll d to
Handset Settings
and press
Select
.
2. Scroll d to
Auto Hang-up
and press
Select
.
3. Scroll u or d to
On
or
Off
and press
Select
.
4. Press O to return to standby.
Auto answer
The phone is set to answer calls by pressing t if you would rather be able to
answer the call by lifting the handset off the charger you will need to turn this
feature on.
1. Press
Menu
, scroll d to
Handset Settings
and press
Select
.
2. Scroll d to
Auto Answer
and press
Select
.
3. Scroll u or d to
On
or
Off
and press
Select
.
4. Press O to return to standby.
Restore to default settings
1. Press
Menu
, scroll d to
Handset Settings
and press
Select
.
2. Scroll d to
Handset Setback
and press
Select
.
3.
Conrm?
is displayed, Press
Yes
to conrm or No to cancel.
4. Press O to return to standby.
Page 32

32
Handset version
1. Press
Menu
, scroll d to
Handset Settings
and press
Select
.
2. Scroll d to
Handset Version
and press
Select
.
3. The software version will be displayed.
4. Press O to return to standby.
Upgrade handset software
You can upgrade the handset to the latest software, this can be checked manually
or the handset checks for new software every time it is switched on or at 12:00am
every day and sends a notication. The gateway may also send a notication.
It is recommended that the battery shows at least 2 bars before upgrading
software
Manually
1. Press
Menu
, scroll d to
Handset Settings
and press
Select
.
2. Scroll d to
Handset Version
and press
Select
.
3. Press
Upgrade
, the screen will either display
SW Up to Date
or
New SW Available
,
if there is new software available press
Upgrade
, once the upgrade is complete
the handset will reboot.
Base or handset notication
1. When new software is available,
New SW available
will display on the standby
screen.
2. Press
Menu
, scroll d to
Handset Settings
and press
Select
.
3. Scroll d to
Handset Version
and press
Select
.
4. Press
Upgrade
, the screen will either display
New SW Available
, press
Upgrade
,
once the upgrade is complete the handset will reboot.
Page 33

33
ADVANCE SETTINGS
Advanced settings availability are dependent on the CAT-iq gateway that is being
used.
DECT settings
Change PIN
Some functions are protected by a 4 digit PIN code which must be entered if
the settings are changed. The default depends on the gateway. The PIN can be
changed to a preferred number.
When entering a PIN, the digits are shown as ****
1. Press
Menu
, scroll u to
Advance Settings
and press
Select
.
2.
DECT Settings
is highlighted. Press
Select
.
3.
Change PIN
is highlighted. Press
Select
.
4. Enter the old PIN and press Ok.
5. Enter the new PIN and press Ok.
6. Re-enter the new PIN and press
Save
.
7. Press O to return to standby.
Clock master
The phone can be set so that the gateway or handset can be the clock master,
once set this will sync across all handset.
1. Press
Menu
, scroll u to
Advance Settings
and press
Select
.
2.
DECT Settings
is highlighted. Press
Select
.
3. Scroll d to
Clock Master
and press
Select
.
4. Scroll u or d to
Base
or
Handset
and press
Select
.
5. Press O to return to standby.
ECO plus
You can set the gateway Eco+ mode via this menu, and the transmission power
method depends on the gateway.
1. Press
Menu
, scroll u to
Advance Settings
and press
Select
.
2.
DECT Settings
is highlighted. Press
Select
.
3. Scroll d to
ECO +
and press
Select
.
4. Scroll u or d to
De-activate
or
Activate
and press
Select
.
5. Press O to return to standby.
Page 34

34
Base version
1. Press
Menu
, scroll u to
Advance Settings
and press
Select
.
2.
DECT Settings
is highlighted. Press
Select
.
3. Scroll d to
Base Version
and press
Select
.
4. The Firmware, EEPROM and Hardware Versions will be displayed.
5. Press O to return to standby.
Restore to default settings
1. Press
Menu
, scroll u to
Advance Settings
and press
Select
.
2.
DECT Settings
is highlighted. Press
Select
.
3. Scroll d to
Base Setback
and press
Select
.
4.
Conrm?
is displayed, Press
Yes
to conrm or No to cancel.
5. Press O to return to standby.
Internal names
This will show you the handsets registered to the gateway.
1. Press
Menu
, scroll u to
Advance Settings
and press
Select
.
2. Scroll d to
Internal Names
and press
Select
.
3. Scroll u or d to the required handset and press
Option
.
Dial
- to intercom the selected handset.
Edit
- to prevent a call from the selected handset being intercepted, and edit
the handset name.
Delete
- to unregister the selected handset.
4. Press O to return to standby.
Line settings
Line name
If you have multiple lines, each line can have a different name.
1. Press
Menu
, scroll u to
Advance Settings
and press
Select
.
2. Scroll d to
Line Settings
and press
Select
.
3. Enter the PIN and press Ok.
4. Scroll u or d to the required line and press
Option
.
5.
Line Name
is highlighted, press
Select
.
6. The line name is displayed, press
Clear
to delete a character, or press and hold
Clear
to delete all characters. Enter the new name and press
Save
.
Page 35

35
7. Press O to return to standby.
Line ID
1. Press
Menu
, scroll u to
Advance Settings
and press
Select
.
2. Scroll d to
Line Settings
and press
Select
.
3. Enter the PIN and press Ok.
4. Scroll u or d to the required line and press
Option
.
5. Scroll d to
Line ID
and press
Select
.
6. The line ID is displayed.
7. Press O to return to standby.
Attached handset
1. Press
Menu
, scroll u to
Advance Settings
and press
Select
.
2. Scroll d to
Line Settings
and press
Select
.
3. Enter the PIN and press Ok.
4. Scroll u or d to the required line and press
Option
.
5. Scroll d to
Attached Handset
and press
Select
.
6. Scroll u or d to the required handset.
7. Then scroll t or u to the check or uncheck the handset and press
Save
.
8. Press O to return to standby.
Multi call mode
You can set the gateway to single call or multiple calls mode.
1. Press
Menu
, scroll u to
Advance Settings
and press
Select
.
2. Scroll d to
Line Settings
and press
Select
.
3. Enter the PIN and press Ok.
4. Scroll u or d to the required line and press
Option
.
5. Scroll d to
Multi Call Mode
and press
Select
.
6. Scroll u or d to
Single
or
Multiple
and press
Select
.
7. Press O to return to standby.
Page 36

36
Intrusion call
When intrusion is set to allow if a call is in progress a second handset can connect
without being invited, creating a 3-way call.
1. Press
Menu
, scroll u to
Advance Settings
and press
Select
.
2. Scroll u to
Line Settings
and press
Select
.
3. Enter the PIN and press Ok.
4. Scroll u or d to the required line and press
Option
.
5. Scroll d to
Intrusion Call
and press
Select
.
6. Scroll u or d to
Not Allowed
or
Allowed
and press
Select
.
7. Press O to return to standby.
Line selection
When making calls you can pre set the line selection to auto, manual or individual
line selection.
1. Press
Menu
, scroll u to
Advance Settings
and press
Select
.
2. Scroll d to
Line Selection
and press
Select
.
3. Scroll u or d to select
Manual, Auto
or the desired named line and press
Select
.
4. Press O to return to standby.
Default settings
Phonebook Unchanged
Ring volume 3
Ring tones 1
Key tone On
Out of range tone Off
Cradle tone On
Handset name Supplied by the gateway
Date & time 01-01-2016, 00:00
Auto answer Off
Auto hang-up On
Alarm Off
Call list gateway dependent
Redial list gateway dependent
Receiver/speaker volume 3
Line selection Auto
Speed dial Unchanged
Page 37

37
HELP
No dial tone
• Check that the gateway is connected to the network properly.
• Check that the mains power is connected properly.
No display
• Check that the batteries are inserted correctly and fully charged. Use only
approved rechargeable batteries supplied.
• Check that the handset is switched on. Press and hold O.
• Reset the unit by removing the batteries and disconnecting the mains power.
Wait for around 15 seconds before connecting it again.
• Allow up to one minute for the handset and gateway to synchronize.
LCD and key backlight does not light up during operation
• Battery charge is low. Fully charge the batteries.
Signal icon is not white
• Handset is out of range. Move closer to the gateway.
• Check that the mains power is connected properly.
Keypad does not seem to work
• Check that the keypad lock is not on.
Battery icon is not scrolling during charge
• Adjust the handset slightly on the charger.
• Clean the charging contacts with a cloth moistened with alcohol.
• Check that the charger power is connected properly.
• The battery is full. The battery icon will appear steadily on the display.
No Caller Display
• Check with the network operator.
• The caller may have withheld their number.
• The record cannot be found in the phonebook.
• Check that the correct name/number is stored in the phonebook, with the full
area code.
Cannot register a handset to the gateway
• The number of handsets that can be registered is dependent on the gateway. Check
that correct PIN code (default is dependent on the gateway) has been entered.
• Check that the handset and gateway are at least one metre away from other
electrical equipment to avoid interference when registering.
Handset does not ring
• The handset ringer volume may be set to Off.
Page 38

38
Noise interference on my phone or on other electrical equipment nearby
Place the phone at least one metre away from electrical appliances or any metal
obstructions to avoid any risk of interference.
Page 39

39
APPENDIX
Care
Your telephone is a sophisticated product in terms of design and construction,
and should therefore be handled with care.
To clean the telephone, wipe rst with an antistatic cloth or a damp, soft leather
cloth and then dry using a dry cloth.
Disposing of the rechargeable battery
All used batteries must be recycled and should not disposed of in domestic
waste. Please dispose of them according to the ofcial regulations. Take them to a
recycling depot. The batteries will be recycled since they may, for example, contain
lithium (Li), nickel cadmium (Ni - Cd), lead (Pb), cadmium (Cd) or mer- cury (Hg).
The batteries are labelled with symbols and information on their contents, e.g.:
Warranty conditions
Your Telstra T-Voice 503 comes with a manufacturer’s warranty of 24 months from
the date of purchase.
Our goods come with guarantees that cannot be excluded under the Australian
Consumer Law. You are entitled to a replacement or refund for a major failure
and compensation for any other reasonably foreseeable loss or damage. You
are also entitled to have the goods repaired or replaced if the goods fail to be of
acceptable quality and the failure does not amount to a major failure.
To nd out more information about your consumer rights if your device is faulty,
please call us on 13 22 00 or go to:
https://go.telstra.com.au/helpandsupport/home-phone/ or http://www.telstra.
com/faultyproducts
Page 40

crowdsupport.telstra.com.au
telstra.com/x
13 22 00
 Loading...