

Page 1
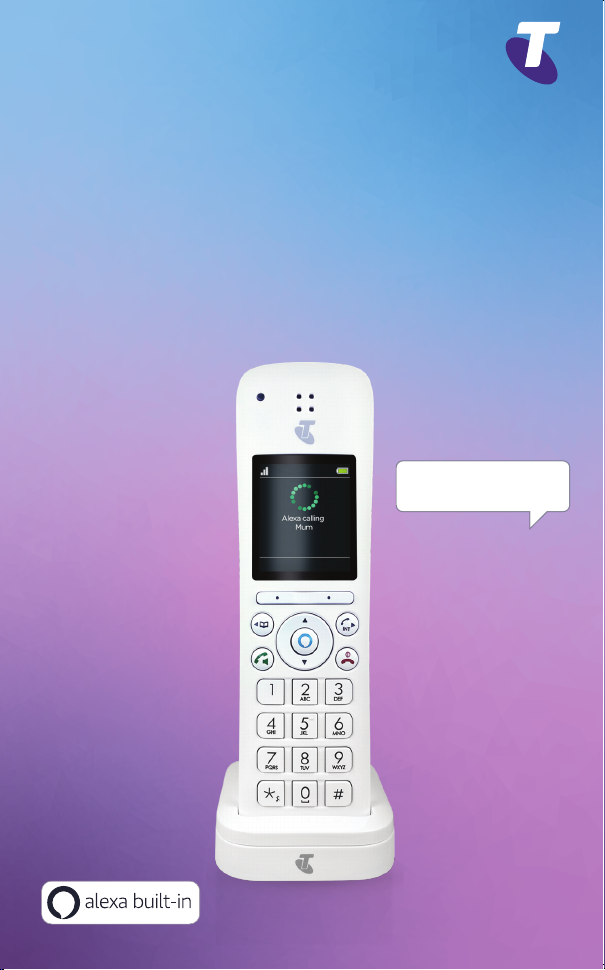
Getting to know your
Telstra Voice Control
Additional Handset
Model TVC-A
“Alexa, call Mum.”
Page 2
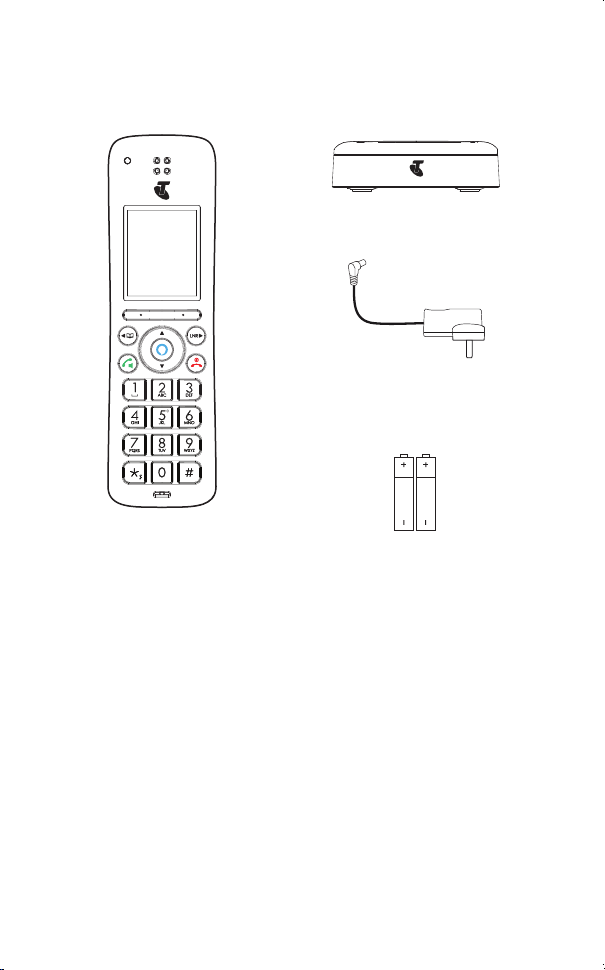
1. What’s in the box
1 x Handset
1 x Charger
1 x power adaptor
for the charger
2 x Ni-MH 750mAh
rechargeable battery cells
Note
This quick start guide is for the Telstra Voice Control Additional Handset,
Model TVC-A. To use this handset, it must be paired to the TVC-C base
(refer to section 3 "Pairing your Additional handset to the TVC-C Base").
1
Page 3
e
2. Getting Started
3
4
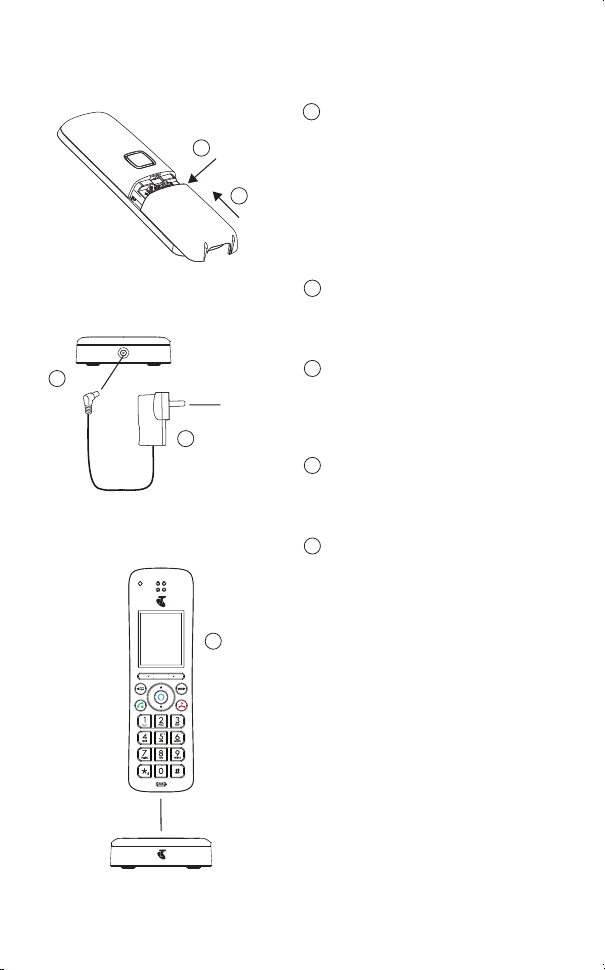
Remove the battery cover from
1
the back of the handset and
1
2
5
insert the rechargeable Ni-MH
battery cells supplied.
Please note the ‘+’ and ‘-’
markings inside the battery
compartment and insert in the
correct direction.
Slide the battery cover back
2
into place.
Plug the power adaptor jack
3
into the socket on the rear
of the charger.
Plug the power adaptor into the
4
mains power wall socket.
Place the handset on the
5
charger to charge.
Note
To maximize battery performanc
we recommend to fully charge
the batteries; place the handset
on the charger and charge for at
least 16 hours continuously.
Important
Use only the approved battery
cells (2 x AAA Ni-MH 750mAh
rechargeable batteries) supplied
with your handset.
Never use alkaline batteries as
this will damage the handset.
2
Page 4
3. Registering your Handset
Pairing your Additional handset to the TVC-C Base
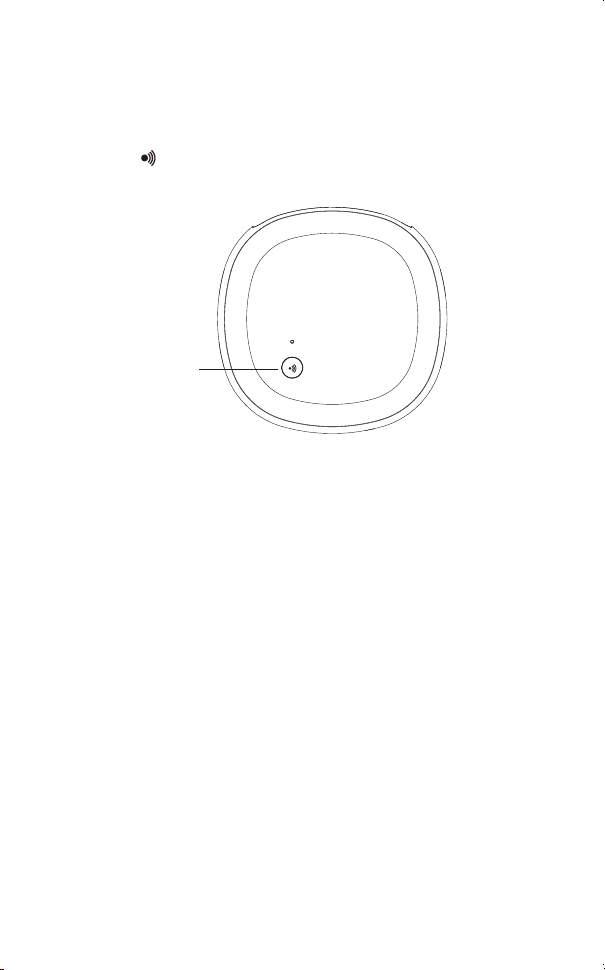
On the base:
Press and hold button for more than 5 seconds. You have 120 seconds
in which to register a handset.
Pair Button
On the handset:
Register
Select
will be displayed.
Note
If the PIN is no longer set to default (0000) then you will be prompted to
enter the PIN to register the handset.
A beep will be heard if the registration is successful. The handset is
automatically assigned an available handset number.
If registration is not successful the first time, please repeat the process
again in case the base registration period ran out of time.
. The screen displays
Registering
and once successful
Registered
3
Page 5
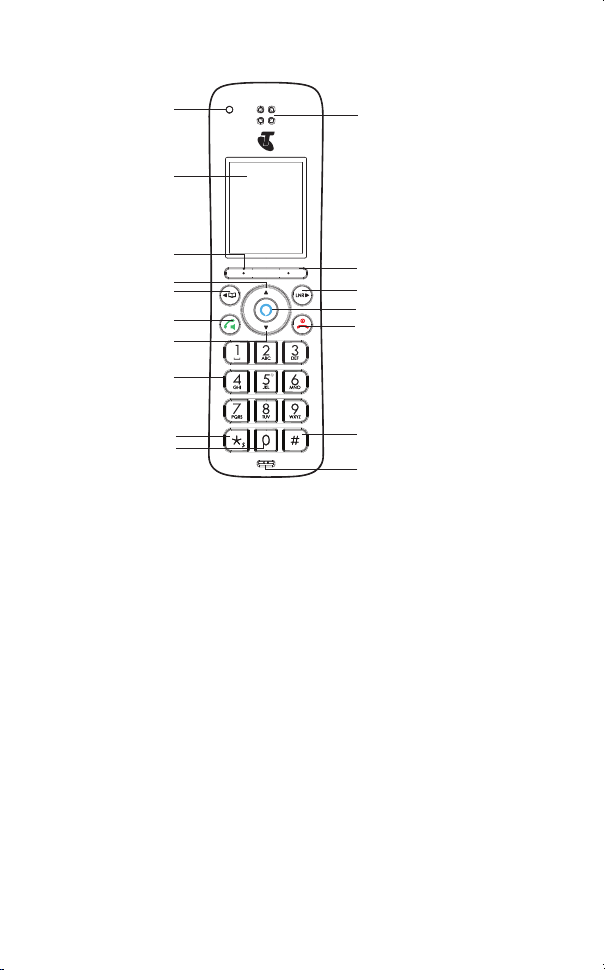
4. Overview of the handset
A
K
B
C
D
E
F
G
L
M
N
O
H
I
J
A Ring indicator LED
Flashes when the phone rings.
B Display
For display icons, see “Overview of the handset display” on page 11.
C Left soft key / Menu / Select / OK
In standby, press to enter the main menu.
When
Select
settings.
D Scroll up / Volume up
Scroll up through lists and menu options.
During a call, press to increase the earpiece and hands-free volume.
In standby, press to enter the handset ringer volume setting.
When you have entered the handset ringer volume setting, press to increase
the
When the phone is ringing, press to increase the handset ringer volume.
E Scroll left / Contacts / Recall
In main menu, press to scroll left.
In editing mode, press to move the cursor to the left.
In standby, press to open the contacts list.
In pre-dial mode, press and hold to insert a recall (R) for switchboard / PABX
services and some network services.
F Talk / Hands-free
In standby or pre-dial mode, press to make a landline call with earpiece.
During a call, press to activate and deactivate hands-free.
or OK is displayed on the screen, press to select or confirm the
handset ringer volume.
P
Q
4
Page 6
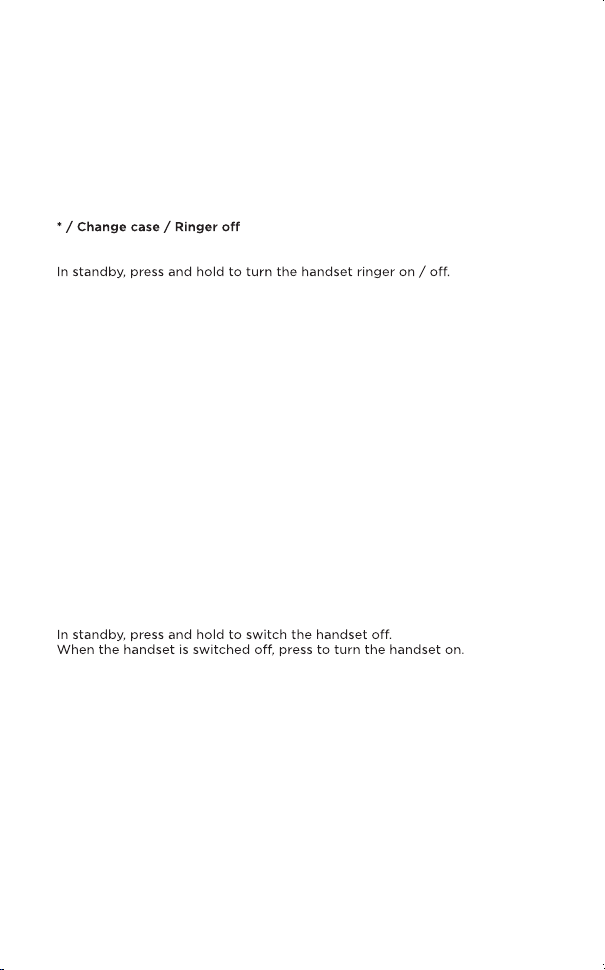
G Scroll down / Volume down
Scroll down through lists and menu options.
During a call, press to decrease the earpiece and hands-free volume.
In standby, press to enter the handset ringer volume setting.
When you have entered the handset ringer volume setting, press to decrease
the handset ringer volume.
When the phone is ringing press to decrease the handset ringer volume.
H Speed dial keys
In standby, press and hold to add, view, edit or dial the speed dial information
for that key.
During a call, press and hold to dial the speed dial information for that key.
I
In standby, pre-dial or editing mode, press to insert a “*”.
In editing mode, press to toggle between Abc, ABC, abc and 123 format.
J Space / Pause
In editing mode, press to insert a space.
In pre-dial mode or during a call, press and hold to insert a pause (P).
K Earpiece
L Right soft key / All calls list / Clear / Back
In standby, press to enter the all calls list.
When
Clear
is displayed on the screen, press to delete one character or digit.
Clear
When
or digits.
When
M Scroll right / Calls list / Intercom
In main menu, press to scroll right.
In editing mode, press to move the cursor to the right.
In standby, press to open the calls list menu.
In standby, press and hold for intercom.
N Alexa key
Press to activate Alexa.
O End call / Power / Exit
During a call, press to end a call.
In menu, editing or pre-dial mode, press to exit to standby screen without
making changes.
is displayed on the screen, press and hold to delete all characters
Back
is displayed on the screen, press to select or confirm the option.
P #
In standby, pre-dial or editing mode, press to insert a “#”.
In standby, press and hold to play your answer machine messages.
In editing mode, press to bring up symbols.
Q Microphone
5
Page 7
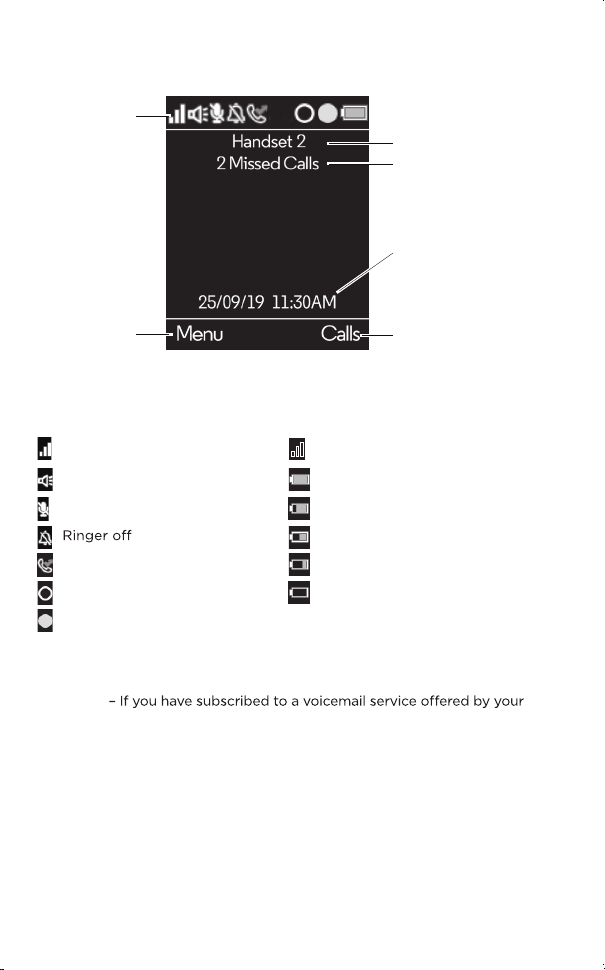
5. Overview of the standby screen
Status bar
Handset name
Handset notifications
Date and time
Left soft key
information
Status bar icons
Signal icon Handset out of range
Hands-free on Batteries are fully charged
Mute Batteries are partially charged
Batteries are running low
Missed call Batteries are almost empty
Alexa message notification Batteries are empty
Alexa session in use
Handset notifications
Line In Use – When another handset is on a landline call.
Voicemail
telephone service provider, the handset can notify you when you have new
voicemail messages.
X Missed Call(s) – When you have unread new missed call(s).
Note
In the event your voicemail message notification gets out of sync with your
telephone service provider’s voice messaging system, you can manually
reset it by deleting the voicemail entry from your calls list. This will remove
the notification from the handset display; it does not delete your voicemail
messages.
Right soft key
information
6
Page 8

6. Menu map
Contacts
View
Predial
or
Press to enter
the contacts list.
1
Calls List
Missed Calls
Received Calls
Outgoing Calls
Answered Calls
All Calls
Answering Machine
Answer Mode
Play All
Delete Old Messages
Outgoing Message
Number of Rings
Call Settings
Auto Hang-up
Auto Answer
Speed Dial
Handset Settings
Sounds
Ringer Volume
Ringtone
Key Beep
Out of Range Tone
Docking Tone
Display
Contrast
Wallpaper
Backlight Timeout
Registration
Register
Unregister
Handset Name
Handset Reset
Handset Version
Advanced Settings
Base Settings
Change PIN
Base Version
Base Reset
Internal Names
Line Settings
Intrusion Call
Recall Mode
Country
Local
IDD
Date/Time
Enter Date
Date Format
Enter Time
Time Format
You must have allowed access to your contacts in the Telstra Voice app
for the contacts list to be available on your Telstra TVC-C handset(s).
Caller ID shows you who is calling and includes date and time of calls.
The caller ID information may not be available for every incoming call. The
callers may intentionally withheld their names and/or telephone numbers.
Or they may be calling you through a switchboard. You must subscribe to
your network provider’s Caller ID or Call Waiting service for these features
to work. Charges may apply.
7
Page 9

7. Navigating the menu
1. From the standby screen, press
The main menu is opened and the display will show the main menu
icons.
2. Use the / /
3. Left soft key - press to action the corresponding word prompt shown
in the lower left corner of the display.
Right soft key - press to action the corresponding word prompt in the
lower right corner of the display.
4. Press to return to standby.
/ keys to scroll through the menu.
Menu
.
8. Date & time
The date and time on your handset device are set automatically during
set-up with the Telstra Voice app. If you subscribe to caller ID service,
the day, month and time are set automatically with each incoming call,
thereafter.
In the event your handset date and time get out of sync after events like
power cuts or a switch to daylight-saving time, you can set the date and
time manually.
8.1 Set the date and time
1. Press
2. The last set date is displayed. Enter the date, e.g., when set to DD/MM,
3. To change the date format, scroll to
4. The last set time is displayed. Enter the time, e.g., when set to 24
Menu
, scroll to
25/09/2019 for 25 September 2019 and press
select either
Hours, 14:30 for 2:30pm.
If the current time format setting is 12 Hours, scroll or
or PM.
DD/MM
Date/Time
or
MM/DD
and press
. Press OK.
Select
.
OK
Date Format
.
and scroll or to
to select
AM
8
Page 10
5. Once the time is set, to change the time format, scroll to
and scroll or
6. Press to return to standby.
to select either
12 Hours
or
24 Hours
. Press
Time Format
Save
.
9. Making calls
9.1 Landline calls
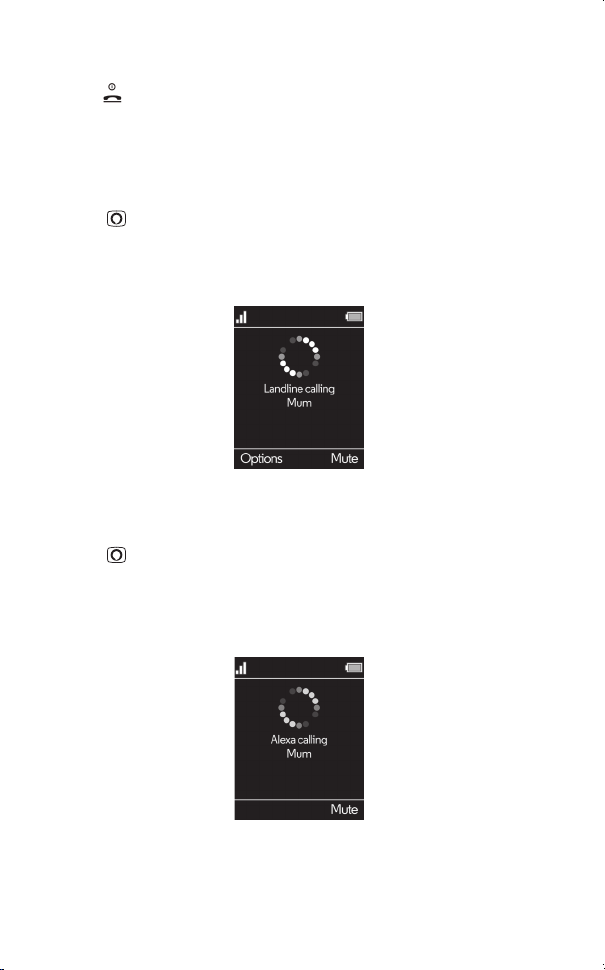
The Telstra Voice Control Handset gives you direct access to your smartphone
contacts. You can now call a contact via your handset using Alexa:
1. Press
2. After the beep, say for example “Call Mum”.
3. Alexa will ask you to confirm the contact, once confirmed the number
will dial automatically over the landline.
9.2 Alexa-to-Alexa calls
To call a contact who is registered with Alexa Calling and Messaging via
your handset Alexa key:
1. Press
2. After the beep, say for example “Call Mum’s Alexa”.
3. Alexa will ask you to confirm.
4. Once confirmed Alexa will automatically connect over the internet
network.
.
.
Note
Alexa uses your Internet connection to make calls, and requires a strong
connection. Any problems with your network can aect call quality, or
cause the call to drop.
9
Page 11

9.3 Making intercom calls
If more than one handset is registered to the base, an internal call can be
made between handsets.
Select
and the
.
1. If 2 handsets are registered to the base, press and hold
other handset rings automatically.
2. If 2 or more handsets are registered to the base, press and hold and
scroll to select the handset to be called, press
9.4 Answering calls
When you receive a call, the phone rings and the phone number (or name
if stored in the contacts list) is displayed.
1. Press to answer the call.
2. Press again to switch to hands-free.
Note
If you prefer for the call to be automatically answered when you lift the
handset o the charger, you will need to switch Auto answer on, please
refer to the full User Guide Call settings section.
9.5 Ending a call
Press , or place the handset back on the charger.
Note
You can end calls simply by placing the handset on the charger. To turn
this feature o, please refer to the full User Guide Call settings section.
10. Call blocking
You must subscribe to your network provider’s caller ID service for this
feature to work. Charges may apply.
You can add numbers to the call blocking list as they come through or by
using the Call Blocking menu on the Telstra Voice app.
A maximum of 1000 numbers can be added to the call blocking list.
10.1 Block an unknown caller
You can block an incoming landline call from an unknown caller, i.e. a
number that is not in your contacts list.
Block
1. When the handset is ringing, press
2. The handset will be silenced and
The incoming call screen will continue to display until the call times
out or the caller hangs up.
Note
When you receive a call from a blocked number, the ringer will be
silenced.
in
caller hangs up.
Blocked
coming call screen will continue to display until the call times out or the
will be displayed followed by the caller’s number. The
10.2 Unblock a number
You can view and unblock a number via the
1. Open the Telstra Voice app on your smartphone.
.
Added to Call Blocking
Telstra Voice app.
will be displayed.
10
Page 12
2. Tap on
3. Tap on
4. Scroll or to the entry you want to unblock and swipe left.
5. Tap on
Settings
.
Call Blocking
Unblock
.
to unblock the number.
11. Paging call
This feature allows you to locate misplaced handsets.
1. Press on the base. All registered handsets will ring for 30 seconds.
2. Press on the base again to cancel the paging call.
3. Press
Ignore
or on the handset to stop the paging call.
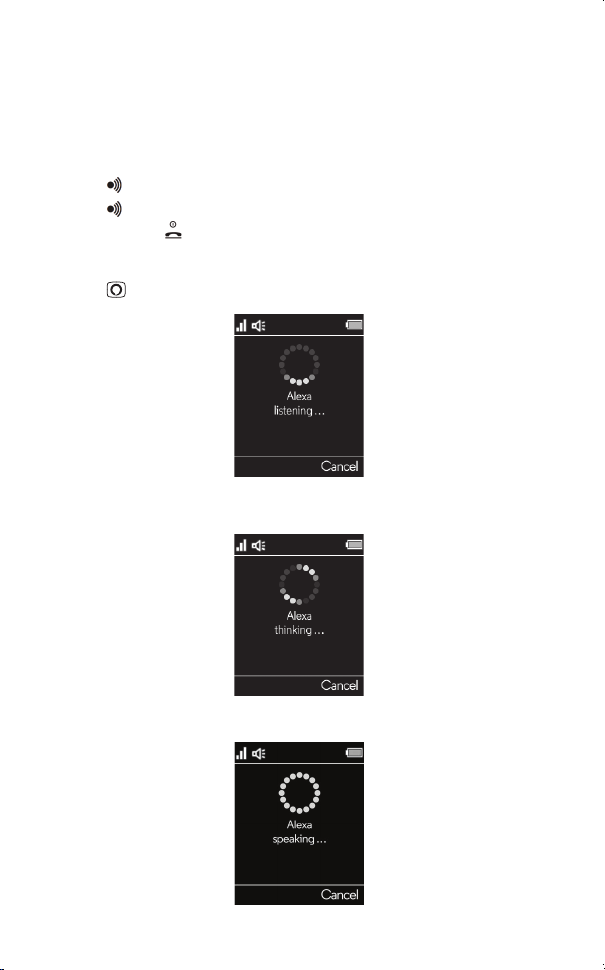
12. Using Alexa on your handset
1. Press , the display will show
2. You can then ask Alexa what you need. For example:
“What’s the weather?” The screen will display
Alexa listening...
and a beep will be heard.
Alexa thinking...
.
3. When a response is provided, the display will show
11
Alexa speaking...
Page 13

Note
Alexa may not be able to process your request in the event of network
or connectivity issues. If you are unable to place your call via Alexa, you
should dial the number directly using the handset keypad.
Warning
You will not be able to call the emergency services from this phone in the
event of a power cut, so make sure you have another way to call for help
in an emergency.
13. Calls list
13.1 Telstra Voice Control calls list
Landline calls will be logged in the handset calls list and also in the
Telstra Voice app.
Calls
to enter the
Press the right soft key
menu by pressing . For more information, refer to the full User Guide
Calls list section.
1. Press , scroll or to highlight the calls list (
,
Outgoing Calls, Answered Calls, All Calls
Calls
Select
2. Press
list) is displayed.
3. Scroll or to view the entries.
. The most recent number (or name if stored in the contacts
All Calls
list. Or enter the calls list
).
Missed Calls, Received
13.2 Alexa-to-Alexa calls list
Alexa-to-Alexa call history can be viewed through the Amazon Alexa app.
14. Alexa alarms, reminders and timers
Alarms, reminders and timers can be set using Alexa.
14.1 Set an Alexa alarm
1. Press .
2. After the beep, say for example “Set an alarm for (time of day).”
Note
Set a repeat alarm on the same day / time of the week or a repeat alarm
for the same time every day, weekdays only, or weekends only.
14.2 Set an Alexa reminder
1. Press .
2. After the beep, say for example “Set a reminder to ring Mum at 4pm.”
Note
Set a repeat reminder on the same day / time of the week or a repeat
reminder for the same time every day, weekdays only, or weekends only.
12
Page 14

14.3 Set an Alexa timer
1. Press .
2. After the beep, say for example “Set a timer for 2 minutes.”
3. To check how much time is left ask Alexa.
4. When the time is up an alarm will sound.
Note
An alarm, reminder and timer will sound on the handset that it is
activated on.
15. Announcements
Alexa can make announcements from your Telstra Voice Control Handset
to all other compatible Alexa enabled devices on your account.
1. Press
2. After the beep, say for example “Announce dinner is ready.”
3. Alexa will advise announcing and all linked Alexa built-in devices will
receive the announcement.
.
13
Page 15
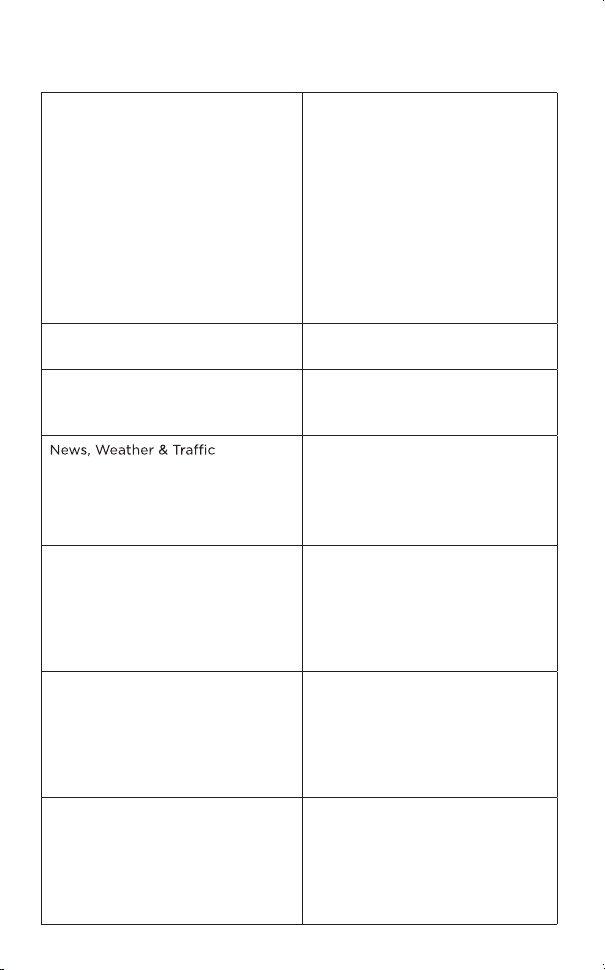
16. Things to try – just tap and say:
To do this... Say this...
Ask Alexa to make landline calls to
your contacts or to other numbers
supported by your landline service
provider. Charges may apply –
check with your landline service
provider.
Tip: If there is more than one
contact of a requested name or
there is more than one number for
your contact – Alexa will ask you
which one you would like to call.
Dial a mobile or landline number “Call 0-2-0-7-9-4-6-0-1-2-3.”
“Call (Mum).”
“Call (Lucia’s) mobile.”
“Call (Jarred) on her home phone.”
“Call (Jarred) at work.”
“Call (Mum’s) office.”
Make a call to another compatible
Echo and / or Alexa device
Questions & Answers “What can I say?”
Timers, Alarms and Calendars “Set a 10-minute timer.”
Smart Home “Turn on the lights.”
“Call (Dad’s) Echo.”
“Call (Richard’s) Alexa.”
“What’s in the news?”
“Will it rain this weekend?”
“What’s the weather in Sydney?”
“How’s my commute?”
“Who was the first man on the
moon?”
“When is sunset?”
“Why is the sky blue?”
“Remind me to water the plants.”
“Add birthday card to my
shopping list.”
“What’s on my calendar today?”
“Set the temperature to 21
degrees.”
“Lock the front door.”
“Dim the bedroom to 20%.”
14
Page 16

Alexa Skills “What are your popular skills?”
“Let’s play a game.”
“Help me sleep.”
“Teach me something.”
Music & Radio “Play music for cooking.”
“What song is this?”
“Play pop from the ‘90s.”
“Play the station 4KQ on
TuneIn.”
Audible Audiobooks “Go back.”
“Stop reading in 30 minutes.”
“What audiobooks do I have?”
For more examples, go to Things to Try in the Amazon Alexa app.
Note
Certain services are subject to change or withdrawal at any time, or may
not be available in all areas and may require separate subscriptions.
15
Page 17

17. Answering machine
Your Telstra Voice Control Handset has a built-in answering machine that can answer
and record calls for you when you are unavailable to answer the phone.
When the answering machine is turned on,
There is one answer mode – Answer & Record mode with 60 minutes recording
time. Up to 59 messages with 3 minutes maximum length per message can be
recorded.
When the answering machine memory is full, it announces, “Hello! Your call cannot
be taken at this moment and you cannot leave a message. So please call later.”
You must delete some messages before you can record a new call.
Note
When you are on a call, the answering machine will not answer the second
incoming call.
displays on the handset screen.
17.1 Answer mode
The answering machine must be turned on to answer and record messages. When
it is turned on, it announces, “Hello! Your call cannot be taken at this moment. So
please leave your message after the tone.”
1. Press
2.
3. Scroll and to
4. Press to return to standby.
Menu
Answer Mode
, scroll to
is highlighted. Press
Answering Machine
On
or and press
Select
Select
and press
.
.
Select
.
17.2 Outgoing message
Your answering machine comes with a pre-recorded outgoing message
announcement. You can use this pre-recorded outgoing message or
replace it with your own.
17.2.1 Play
1. Press
2. Scroll to
3.
Note
During the playback of your own recorded outgoing message, you can press
to delete it.
If your recorded outgoing message is deleted, calls are answered with the default/
pre-recorded outgoing message, “Hello! Your call cannot be taken at this moment.
So please leave your message after the tone.”
17.2.2 Record
1. Press
2. Scroll to
3. Scroll to
Menu
Play
is highlighted. Press
Menu
, scroll to
Outgoing Message
, scroll to
Outgoing Message
Record
Answering Machine
Select
Answering Machine
and press
and press
and press
and press
Select
Select
to play the current outgoing message.
and press
Select
.
Select
.
.
Select
.
.
Delete
16
Page 18

4. After the tone, speak clearly to the handset microphone. Press
recording.
5. The handset automatically plays back the recorded outgoing message.
If you are not happy with the recording, press
again to re-record.
17.2.3 Use default
When this feature is set to on, you can switch back to use the default outgoing
message without deleting your own recorded one.
1. Press
Menu
2. Scroll to
3. Scroll to
4. Scroll and to
5. Press to return to standby.
Note
In order to use this feature, you must first have recorded your own outgoing
message.
, scroll to
Outgoing Message
Use Default
Answering Machine
and press
On
or and press
and press
Select
and press
Select
.
Select
.
Delete
.
and select
Select
Save
to end the
Record
option
.
17.3 Number of rings
When the answering machine is turned on, it answers all incoming calls after the
number of rings set.
1. Press
Menu
2. Scroll to
3. Scroll and
4. Press to return to standby.
, scroll to
Number of Rings
d to choose from
Answering Machine
and press
2 Rings, 3 Rings
and press
Select
.
up to
Select
.
10 Rings
and press
Select
17.4 Playing your messages
When a new message is received on the answering machine, the handset display
shows
X New Message
To play messages:
1. In standby, press and hold
Or, press
Play All
and press
2. New messages will be played followed by older messages.
to indicate the number of new messages received.
# on the handset.
Menu
, scroll to
Select
.
Answering Machine
and press
Select
. Then scroll to
.
17
Page 19

3. During the message playback, press the keys below to perform the following
functions:
Turn the playback volume up.
Turn the playback volume down.
Play previous message.
Repeat current message.
Play next message.
Delete current message.
Switch to speakerphone mode.
Stop playback and return to standby.
Note
During message playback, the handset will display the current message
information. This includes the caller ID information, date and time. If you do not
subscribe to your network provider’s caller ID service, the handset shows
Only one handset can access the answering machine at a time.
During message playback, if there is an incoming call or another handset makes a
call, message playback will be stopped.
17.5 Deleting old messages
1. Press
2. Scroll to
3.
Menu
Confirm?
Is displayed. Press
, scroll to
Delete Old Messages
Answering Machine
Yes
and press
and press
to confirm or No to cancel.
Select
Select
.
.
Message
17.6 Intercepting a call
When the caller is leaving a message, you can press to stop the recording and
speak to the caller.
.
18
Page 20

18. Help
Unable to find the device during product set-up
• Check that the power adaptor is securely plugged into the base and
mains power wall socket.
• Check that the Ethernet cable is securely plugged into the router.
• Check that the smartphone is connected to the same Wi-Fi network as
your router.
• Reset the Telstra Voice Control device by removing the batteries from the
handset and pressing the RESET button on the base. Wait for around 15
seconds before connecting it again. Allow up to one minute for the handset
and base to synchronise.
• If these suggestions do not help, try to reset your base from the handset
by selecting
User Guide Advanced Settings section.
Phone does not work
• Check that the power adaptor is securely plugged into the base and
mains power wall socket.
• Check that the batteries are inserted correctly in the handset and that
the handset is switched on. Use only approved rechargeable b
supplied.
• Check that telephone line cord is firmly plugged into the base socket
and the telephone wall socket. Use only the supplied telephone line cord
or ensure that the pin connections are correct when using an existing
telephone line cord.
• Check with your telephone network provider for network issues.
• Reset the Telstra Voice Control device by removing the batteries from the
handset and pressing the RESET button on the base. Wait for around 15
seconds before connecting it again. Allow up to one minute for the handset
and base to synchronise.
• Move the handset and/or base away from other electrical appliances or
metal objects and try again.
• Check that you are not too far from the base.
No dial tone
• Refer to Phone does not work section above.
• If these suggestions do not help, disconnect the telephone line cord
and connect the telephone line cord to another telephone to check
that the telephone line cord is not faulty.
• If there is still no dial tone, try another telephone wall socket as the
wiring to the current telephone wall socket may be faulty.
Unable to make landline calls
efer to No dial tone section above.
• R
• Check that you have dial tone.
• Check that the line is not in use and that there is no ongoing Alexa
session on another handset.
Base Reset
from
Advanced Settings
menu, please refer to the full
atteries
19
Page 21

No display
• Check that the batteries are inserted correctly and fully charged. Use
only approved rechargeable batteries supplied.
• Check that the handset is switched on.
Handset does not ring
• Refer to No dial tone section above.
•
Check that the handset ringer volume is not set to o.
• Check that you have not accidentally blocked the caller.
• Check that the handset is registered to the base.
• Check that you do not have more than 4 telephony or fax products
plugged into the same line.
Weak audio or call cutting in and out
• Refer to Phone does not work section above.
• If you subscribe to high-speed internet service through your telephone
line, try installing a DSL (Digital Subscriber Line) filter between
the base and the telephone wall socket. This filter will help prevent
interference, noise and caller ID problems caused by DSL interference.
No Caller Display
• Check the subscription with your telephone network operator.
• If you subscribe to high-speed internet service through your telephone
line, try installing a DSL (Digital Subscriber Line) filter between
the base and the telephone wall socket. This filter will help prevent
interference, noise and caller ID problems caused by DSL interference.
• The caller may have withheld their number.
• Check that your caller is not making call through a switchboard.
Caller Display cannot show the contact name match
• Refer to No Caller Display section above.
• Check that you have allowed Telstra Voice app access to your
smartphone contacts.
• Check that the contact can be found in the contacts list.
• Check that the correct number is
full area code.
Battery icon is not scrolling during charge
• Check that the power adaptor is securely plugged into the charger and
mains power wall socket.
• Check that the handset is properly seated in the cradle.
• Clean the charger contacts with a cloth moistened with alcohol.
• The battery is full. The battery icon will appear steady on the display.
stored in the contacts list, with the
20
Page 22

Searching… appears on the handset
• Check that the power adaptor is securely plugged into the base and
mains power wall socket.
• Check that you are not too far from the base.
• Reset the Telstra Voice Control device by removing the batteries from the
handset and pressing the RESET button on the base. Wait for around
15 seconds before connecting it again. Allow up to one minute for the
handset and base to synchronise.
• Try re-registering the handset.
Cannot register a handset to the base
• Up to 5 handsets can be registered to the base. If 5 handsets are
already registered, de-register a handset before registering a new one.
Unable to open the Amazon Alexa app
• Force close the app.
• Restart your smartphone.
• Uninstall and reinstall the app.
• For further help you can go to Apple or Google support.
iOS - https://getsupport.apple.com/.
Android - https://support.google.com/android/.
Unable to open the hellovoice app
• Force close the app.
• Restart your smartphone.
• Uninstall and reinstall the app.
Alexa does not respond
• Check that the power adaptor is securely plugged into the base and
mains power wall socket.
• Check th
• Check that your internet connection is working.
• Once the Alexa key is pressed wait for the beep before making your
request.
• Check that the line is not in use and that there is no ongoing Alexa
session on another handset.
Unable to use Alexa to call a person or contact name
• Refer to Alexa does not respond section above.
• Check that you have allowed Amazon Alexa app access to your
smartphone contacts.
• Check that your contact is correctly saved and listed in
Amazon Alexa app.
at the Ethernet cable is securely plugged into the router.
Contacts
of the
21 22
Page 23

Page 24

telstra.com/x
crowdsupport.telstra.com.au
13 22 00
 Loading...