

Page 1

TELSTRA MOBILE BROADBAND
TURBO 21 MODEM QUICK START GUIDE
Page 2

Page 3
1
Welcome to the Turbo 21 Modem
The Turbo 21 Modem is compatible with these operating
systems:
• Windows Vista
®
• Windows® XP
• Mac OS® 10.4.11 or later
You will also need an:
• unused USB port on your computer. Do not
connect the modem to a USB hub or a USB port
on a keyboard.
• activated SIM card and account information
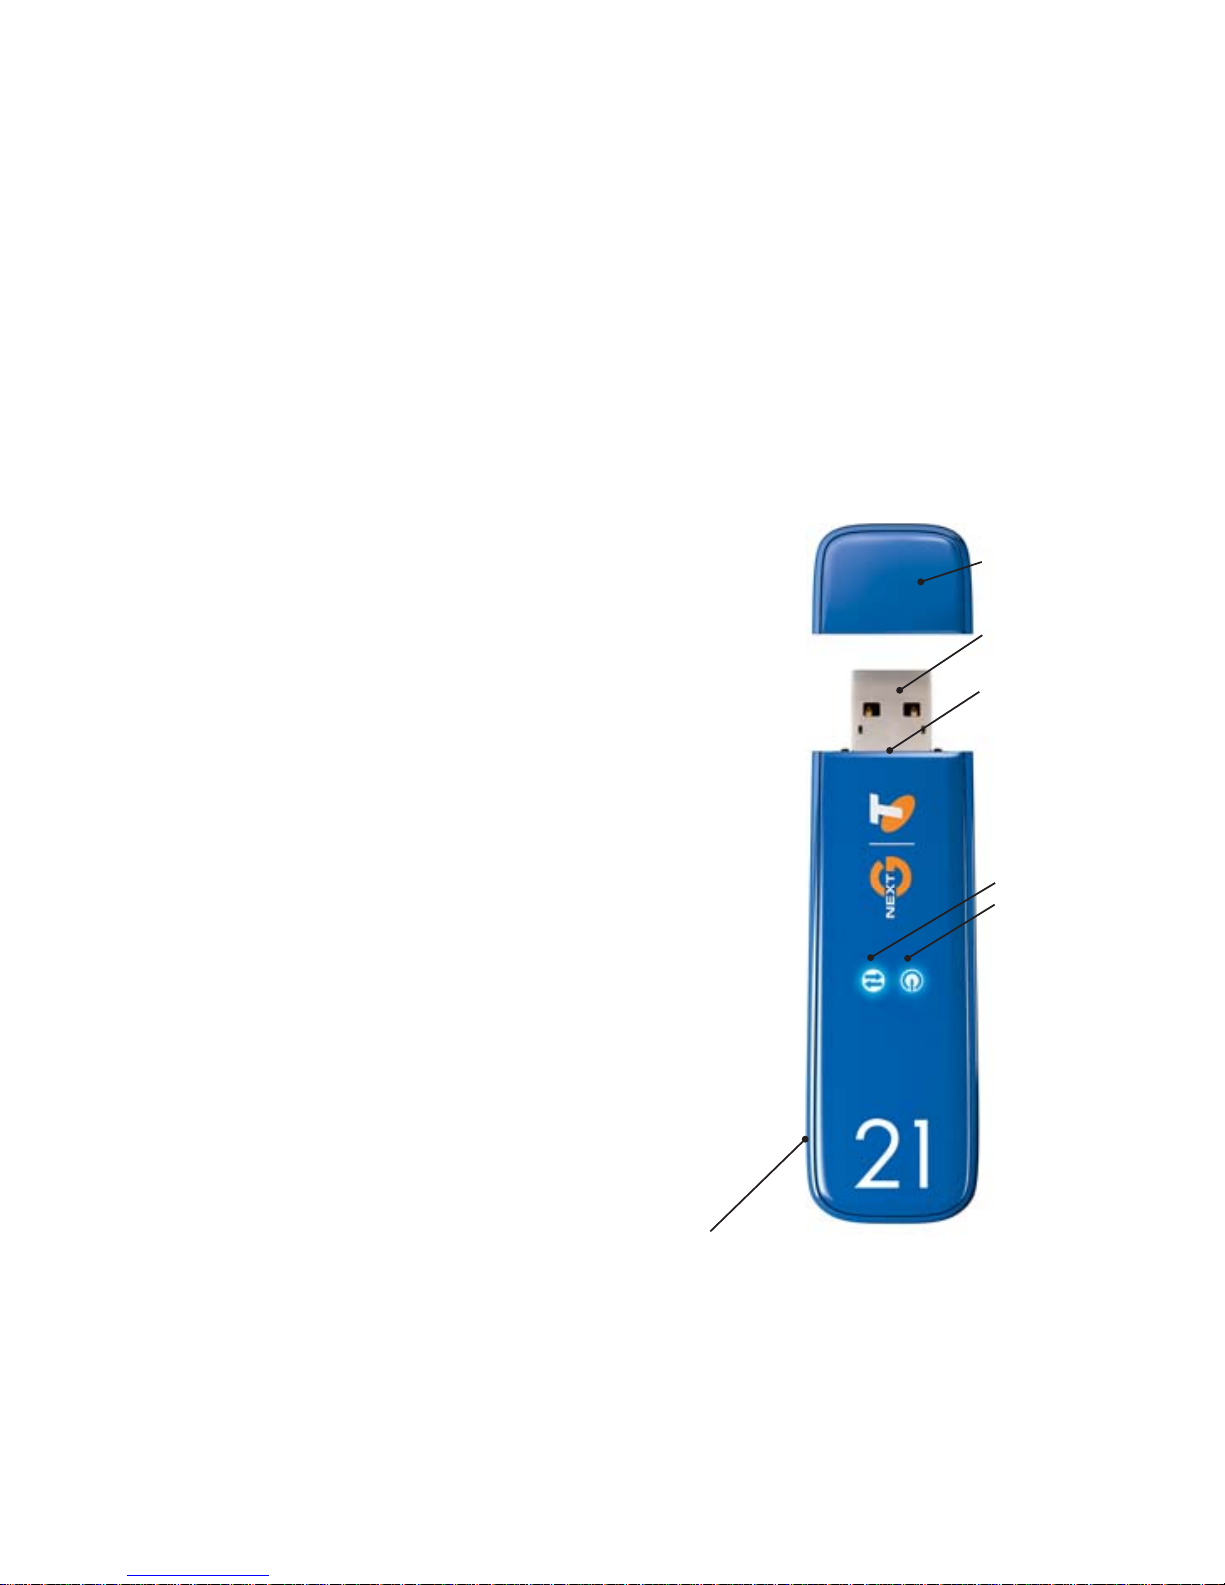
External antenna connector
LEDs (see page 4)
Data
Power
SIM card and
microSD slots
USB connector
Cap
Your package contains:
• Turbo 21 Modem with TRU-Install
™
• This Quick Start Guide
• USB extension cable
• Laptop clip
• 1 GB microSD™ card
• External antenna
• Lanyard
• Carrying pouch
Page 4

2
2
3
1
This modem is TRU-Install enabled and does not require a CD for installation.
Remove the cap from the end of the modem and insert
the SIM card into the top slot, as shown in the illustration.
Push the SIM card in slightly beyond the edge of the plastic
housing until it clicks into place.
To remove the SIM card, push it in and then release it.
Install your Turbo 21 Modem
Insert the modem into the USB slot on your computer.
Windows
TRU-Install launches automatically. If TRU-Install does not
launch:
1. Double-click My Computer (Windows XP) or Computer
(Vista) on your desktop.
2. Click the TRU-Install drive.
3. Under the TRU-Install drive, open the Win folder and
double-click Setup.exe. Follow the onscreen prompts to
install the Connection Manager software.
Mac OS X
Launch the Installer package. If you do not see the Installer package, open
Finder and go to “3G Watcher” device.
Once the software is installed, the modem searches for a network. When the modem fi nds
a network, the Connect button in Connection Manager becomes available. Click Connect to
connect to your network.
Mac OS X Users: See the next page for steps you must follow the fi rst time you run Connection Manager.
Page 5

3
Attach the lanyard
To keep everything together, it’s a good idea to thread the lanyard through the cap and the
modem, as shown in the illustrations.
1
2
4
3
Mac OS X 10.4.11
1. After clicking Connect in Connection Manager, open System Preferences and select Network.
2. When the “new port detected” message appears, note the name of the new port, and click OK.
3. In the Network window, in the Show list, select the new port you identifi ed in the previous step.
4. Click Apply Now.
Your modem connects to the network.
Mac OS X 10.5
1. After clicking Connect in Connection Manager, the messsage “A new network interface has been
detected” appears. Click the Network Preferences... button.
2. In the Network window, click Apply.
Your modem connects to the network.
Page 6

The two LEDs show the current status of the modem.
LED Operation
LED State Indicates
Power Off One of the following states:
• The modem is not inserted in the computer
• The computer is off or in “suspend and resume” mode
• The modem radio has been turned off using Watcher or
another connection Client
Solid blue The power is on, the modem is working normally.
Blinking blue The fi rmware is being updated. Do not remove the modem
from the computer.
Blinking amber The modem is searching for service (initializing).
Solid amber Modem error — either the modem is having a problem initial-
izing (searching for service) or is offl ine because of a failure.
Contact your service provider.
Data
Off The modem is unable to detect 3G service.
Blinking blue The modem has detected a 3G network (HSPA, HSPA+) and is
ready to connect.
Solid blue The modem is connected to a 3G network and can send and
receive data.
4
Page 7

Page 8

2131214 Rev. 1.0 (May 2009)
© 2009 Sierra Wireless. All rights reserved.
Heart of the Wireless Machine® is a registered trademark of Sierra Wireless. Watcher® is a trademark of Sierra Wireless,
registered in the European Community. Sierra Wireless, the Sierra Wireless logo, the red wave design, and TRU-InstallTM
are trademarks of Sierra Wireless. Windows® is a registered trademark of Microsoft Corporation. Mac OS® is a trademark
of Apple Inc., registered in the US and other countries. Other trademarks are the property of the respective owners.
 Loading...