

Page 1

A GUIDE
TO YOUR
TELSTRA T-HUB
®
2
HANDSET
FOR MORE INFORMATION:
CALL 1300 136 841
VISIT telstra.com/thub
VISIT A TELSTRA STORE
Page 2

This guide will help you get started as quickly and easily
as possible. It’ll help you get connected and show you
all kinds of ways to get the most from your T-Hub
®
2
Handset. You’ll be making calls in no time.
For more information on using your T-Hub® 2 Handset
visit telstra.com/thub or visit Telstra Crowd Support at
www.crowdsupport.telstra.com.au.
2 3
WHAT’S
INSIDE
05 Let’s get started
05 Preparing the handset
06 Registering your T-Hub 2 handset
08 Handset setup
10 A closer look at the T-Hub 2 handset
13 Battery
14 Home screen & event notifications
15 Calling
15 Taking a call
16 Rejecting, answering and ending the call
17 Incoming call during a call
18 Outgoing call
20 Internal call
21 Transferring a call between handsets
22 Call waiting
24 3-way call
25 Make 2nd call
25 Paging
LET’S GET THIS
SHOW ON THE ROAD
Page 3
26 Call log
26 Contacts
27 Contact synchronisation
28 Contact list
30 Edit a contact
30 Add a contact
31 Delete a contact
31 Settings
32 Sound
35 Display
38 Time
40 Call features
43 System
44 Software updates
45 Keypad lock
46 Troubleshooting
46 Contacts
46 Software updates
47 Registration
47 Settings
48 Customer Service and Product Warranty
LET’S GET
STARTED
4 5
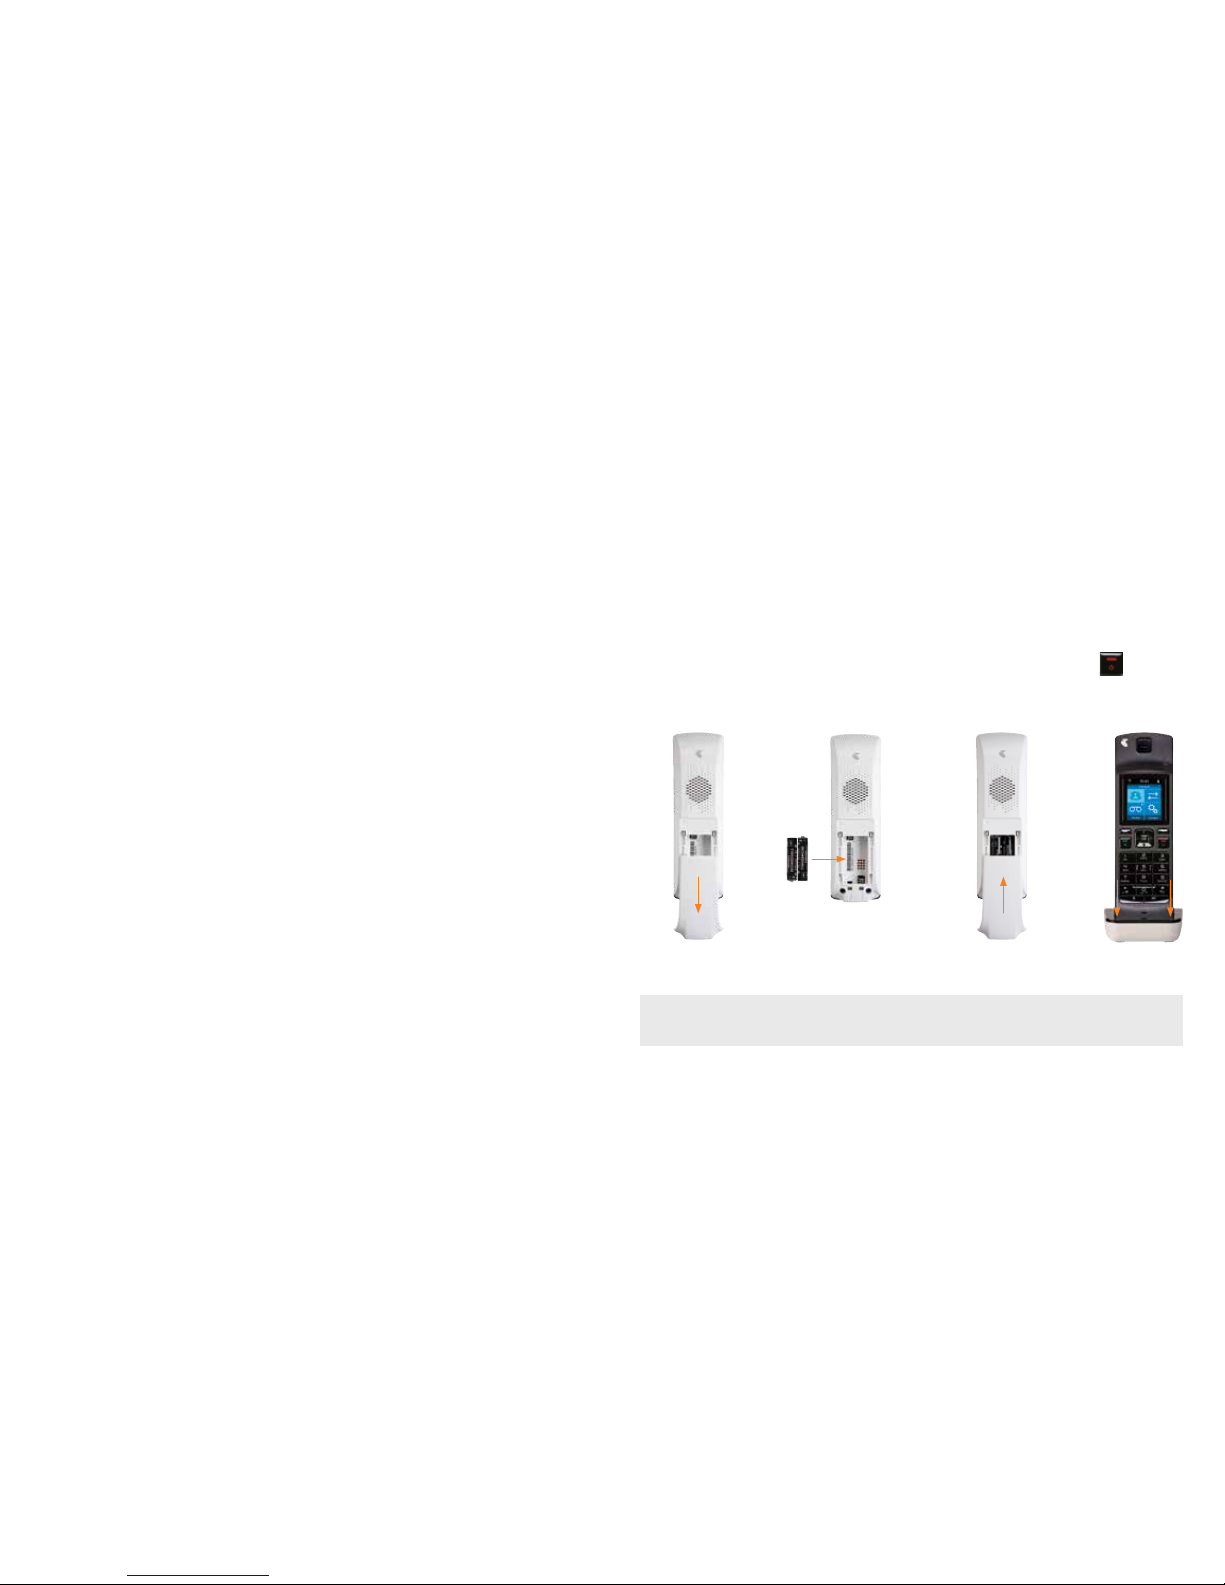
PREPARING THE HANDSET
1. Remove the bac k cover of the handset.
2. Insert batteries in th e handset
3. Replace the handset cov er.
4. Pl ace the handset into the handset dock and connect the do ck to mains power
using one of the power supplies provide d.
You can now turn the handset on by pressing and holding down the Power key .
1.
3.
2. 4.
Note: It is recommended that the Han dset is charged initially overnight to get optimum
battery per formance.
Page 4
6 7
REGISTERING
YOUR THUB 2
HANDSET
Once the handset is registere d, you will be able to make and receive
calls, manage contac ts and access voice messages.
If your T-Hub 2 Handset came as part of a T-Hub 2 Kit, it will already
be registered to the T-Hub 2 Base Station. You can always tell if your
handset is registered as it will always display the home scre en.
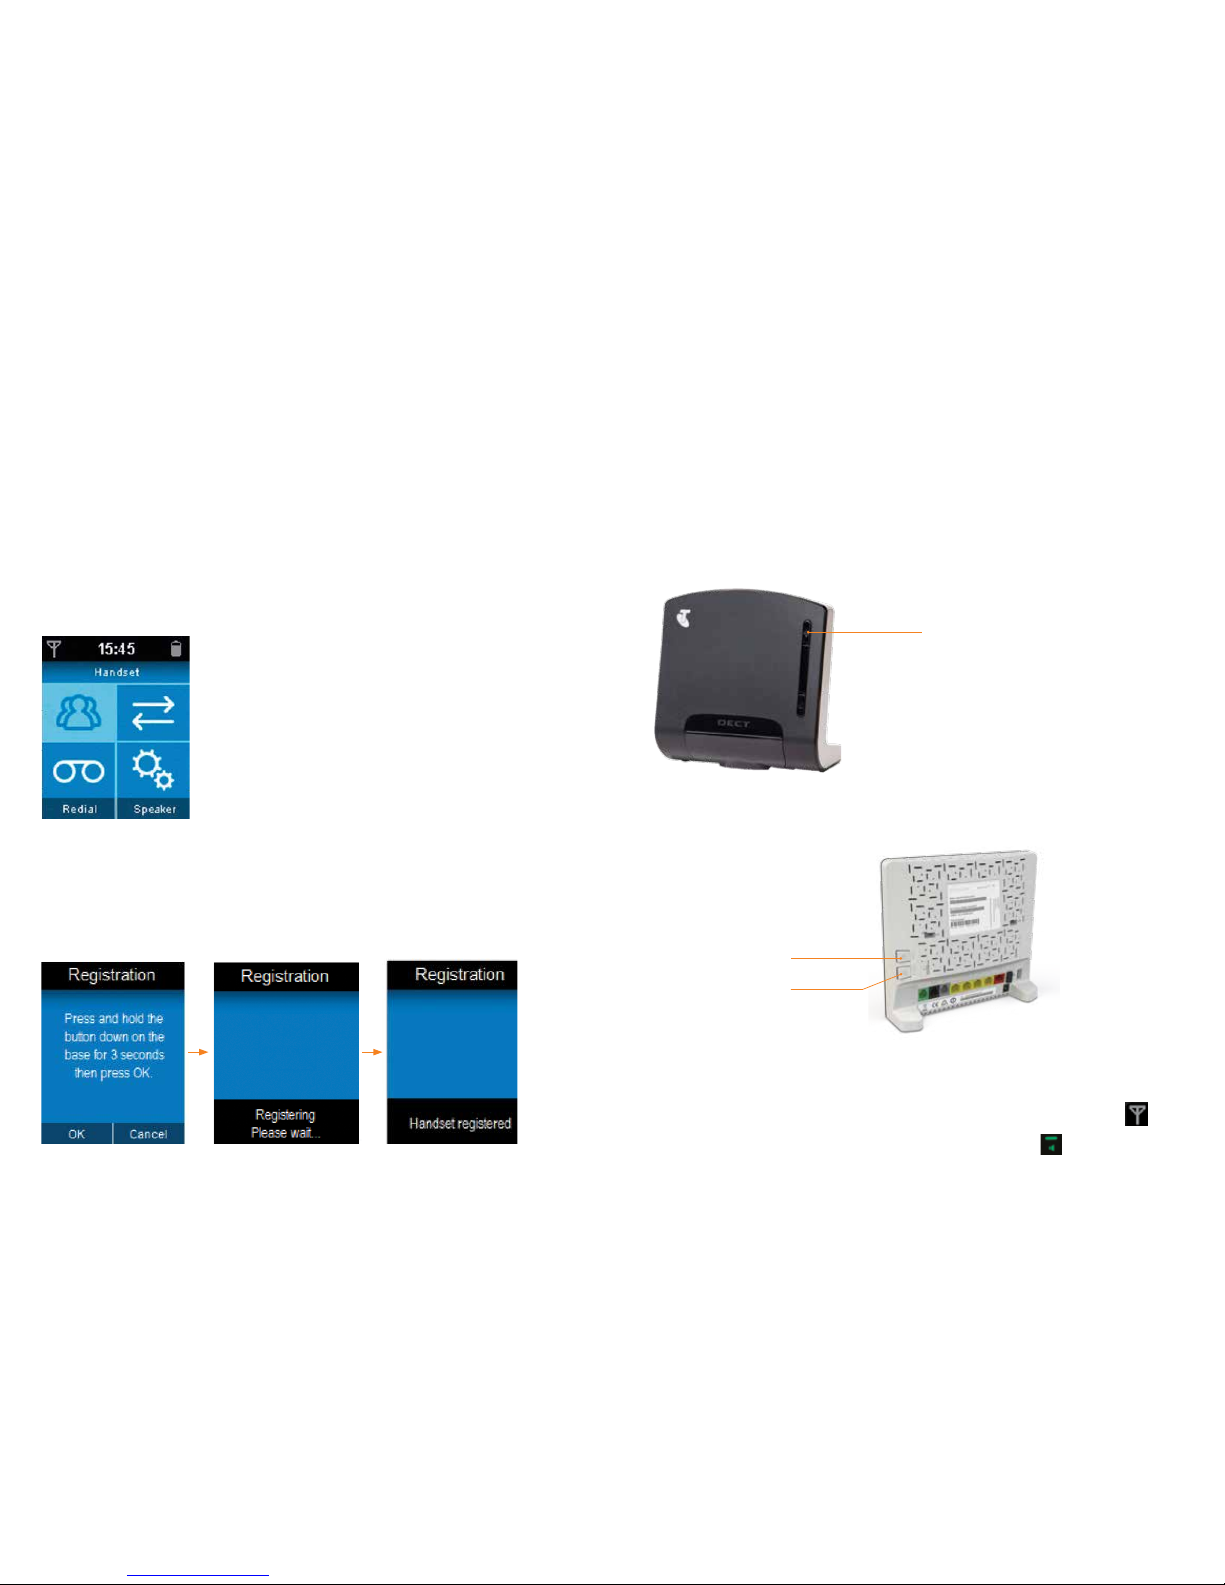
TO REGISTER YOUR T-HUB 2 HANDSET
1. If you have not done so already, turn on your handset. It will promp t you to
register the handset – select “ Register handset”, and press OK.
2. Your handset will then prompt yo u to prepare the base station for registration;
• If yo u have a base station, press and hold down the Page but ton for 3 seconds,
until the LED light is flashing blue.
• If yo u have a T-Gateway, press the white DECT button which is located on the bac k for
3 seconds. The DECT L ED on the front of the T-Gateway™ should now flash orange.
Page Butto n
WPS button
DECT but ton
3. On the handset, press OK to st art registration – this may take up to 60 seconds
to complete. Once registered, the handset displ ay will read ‘Handset registered’.
An antenna symb ol will also appear on the top left hand side of the handset screen .
4. To test that you have dial tone, press the Call button on the han dset .
Registration Screens
Handset Home Scr een
Page 5
8 9
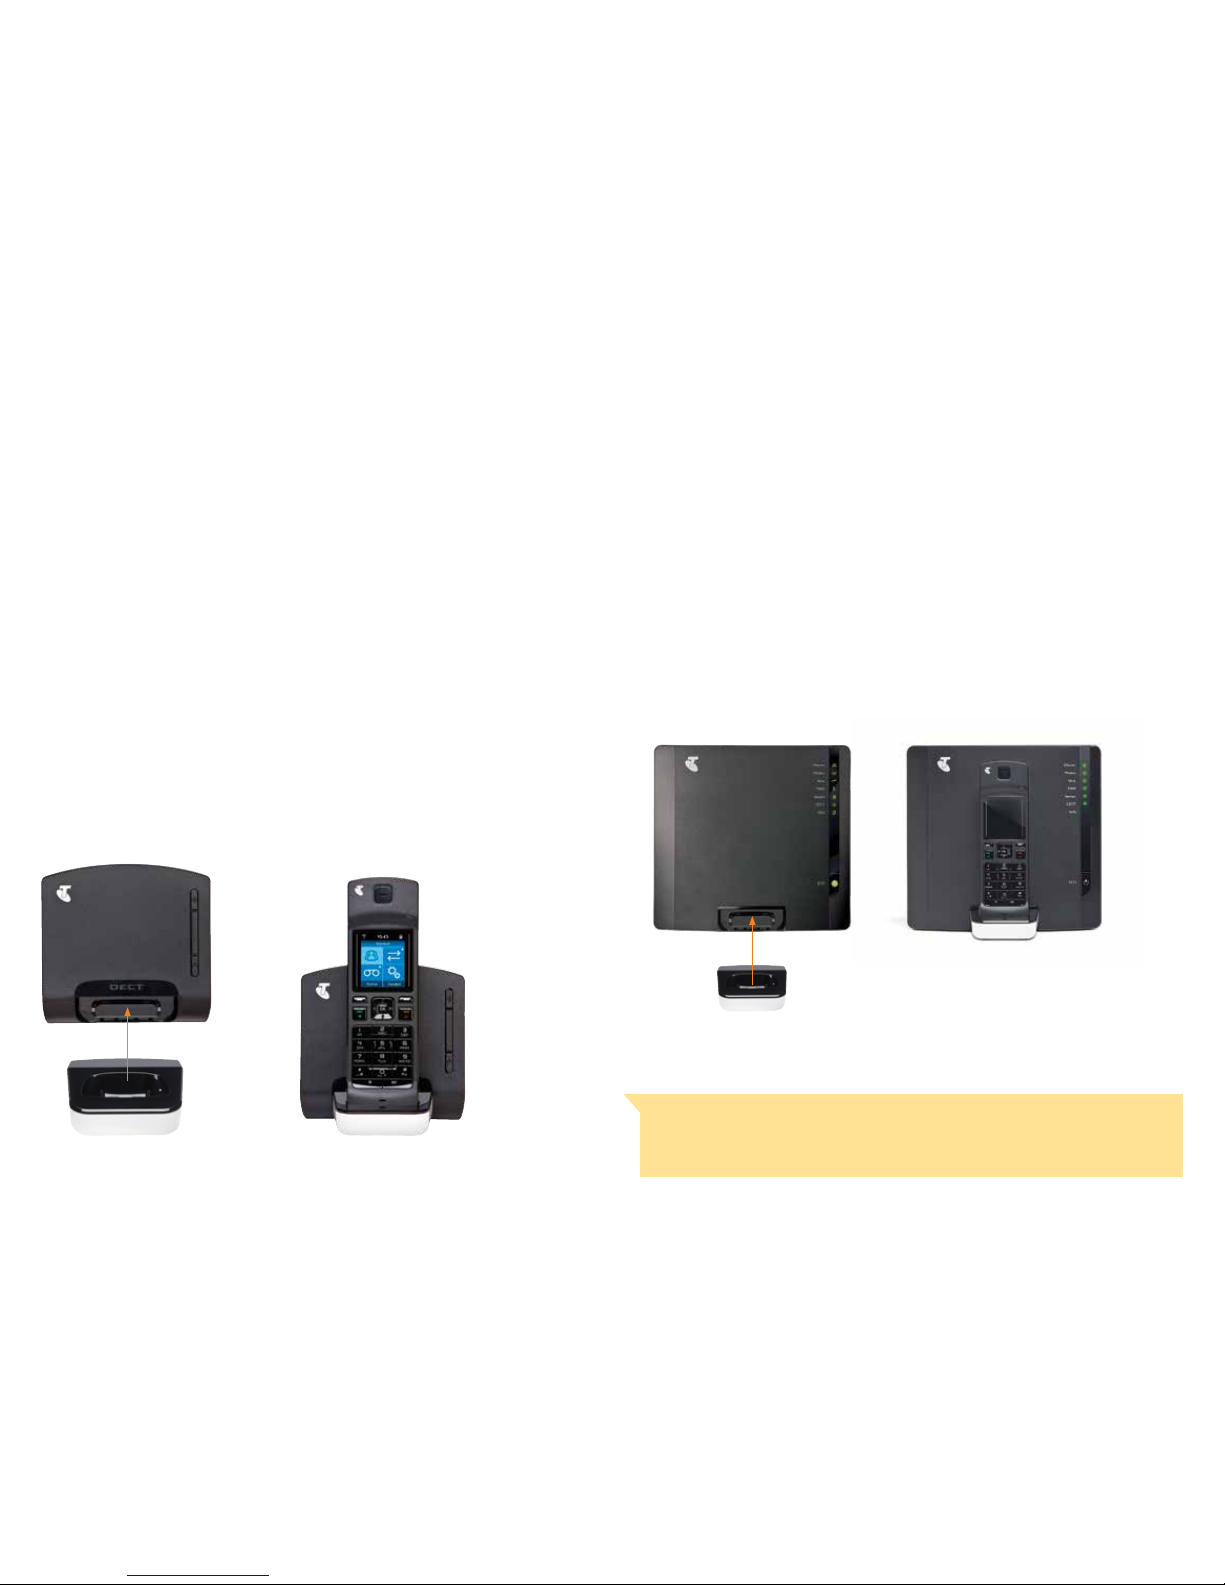
CONNECTING THE HANDSET
TO THE T-GATEWAY
To connect the handset to the T-Gateway:
1. Remove the plastic cover from the b ottom of the T-Gateway by pulling
it towards you.
2. P ush the handset dock into the cavity at the bot tom of the T-Gateway
– it should click into place.
3. To remove, press down on the leve r under the handset dock and pull it
away from the T-Gateway.
HANDSET SETUP
You can choose to place your handset any where in your home –
depending on whether or not you want to “dock ” it together with the base
station or T-Gateway. The advantage of docking your handset is that you
only need one power supply (which saves on clut ter).
If you want to locate your handset separately to your bas e station or
T-Gateway – simply choose a location for your handset dock ne ar a power
point in your preferred room, and plug it in.
If you want to locate your handset together with yo ur base station or
T-Gateway, follow these simple steps:
1. Remove the plas tic cover from the bottom of the base station by p ulling
it towards you.
2. Push th e handset dock into the cavity at the bottom of th e base station
– it should click into place.
3. To remove, press down on the leve r under the handset dock and pull it
away from the base station.
Warning: Care should be taken when using the handset whe n it has been left off the
handset dock. The han dset includes a magnetic coupling feature in the receiver for use
with hearing aids and, as a result, may also pick up and retain small pins and stap les and
other small magnetic items near the re ceiver.
Page 6

10 11
A CLOSER LOOK
AT THE THUB 2
HANDSET
1
8
6
10
5
2
3
7
11
9
4
LED INDICATOR HANDSET STATUS
Solid gre en
Batteries near to fully charge d.
Flashing gre en on dock
Batteries charg ing.
Flashing blue
You are receiving an internal or external call.
You have one or more missed calls.
You have one or more voice mails pending.
Solid re d off dock
Low charge.
Flashing red of f dock
Very low charge, batterie s need charging.
Flashing red o n dock
Charging batteries.
1 LED Indicator
The LED indicator shows the status of
the Handset.
FEATURE DESCRIPTION
2 Volume control
• To control the volume of the sp eaker on your
Handset.
• During a call use the Up/Down key to increase
the volume of caller’s voice.
3 Left sof t key
• To select the option shown above it
in the display.
4 Right soft key
• To select the option shown above it
in the display.
5 OK/Select button
• To confirm or select.
• From st andby, to display new event messages
on the display.
Page 7

12 13
Up
• To scroll up through menus/lists.
• From standby, to open the Dialled calls list.
• D uring a call, to increase the volume of the
callers voice.
D own
• To scroll down through menus/lists.
• From standby, to open the All calls list.
• D uring a call, to decrease the volume of the
callers voice.
Left
• To scroll left through menus/fields.
Right
• To scroll right through menus/fields.
6 End/Power button
• To end a call.
• To exit a menu.
• When holding, to switch the Handset of f or on.
7 Talk button
• To make or receive a call.
• During a call, to switch to and from handsfre e mode.
8 Keypad
• To enter numbers/letters.
9 Voicemail
• Hold this bu tton down for at least two seconds to check
your Voicemail.
10 Intern al calls
• Pre ss this button to make an internal call to another
Handset registered to the same Ba se station.
11 Recall
• Pre ss and hold this button to switch to an incoming call
(if Call Waiting is activated on your phone ser vice).
Warning: Th e T-H ub® 2 Tablet and Handset require electricity to work. During p ower failure
you will not be able to make any telephone calls. Alternative arrang ements should be made
to access emergenc y services in times of power failure.
BATTERY
Charge Duration
The T-Hub 2 Handset will run for 3 hours of continuous use when
fully charged. When it is not in the dock b eing charged, it will last
up to 3 days. This will be influenced by whethe r you fully charge the
handset each time and environmental fac tors such as temperature.
To keep the battery in the best c ondition, leave the handset out of
the dock for a few hours at a time.
Charging the Batteries
The handset batter y icon (in the top right-hand corner of the screen)
shows how much batter y life the handset currently has. When the
handset batter y icon is showing as empty (no bars), you will need to
recharge the handset by placing it b ack into the handset dock.
You may also hear a “low battery ” warning beep if the handset
is being used while the batter y is approaching empty. While the
handset batter y is charging, the battery icon will show animated
bars “filling up” the batter y level.
If the batter y icon appears to suggest that your handset is charging
but when you remove it from th e dock after 30 minutes and the
handset turns off, it may sugges t that your batteries are not working
and need to be replace d.
Replacing the Batteries
The T-Hub 2 batteries will last for 24 months. If the handset
batteries don’t appear to b e staying charged for as long as it used to,
you can replace them with ano ther set as long as they have similar
specification, i.e. 1.5V A AA Ni-MH batteries, 600mAh o r greater.
Page 8
14 15
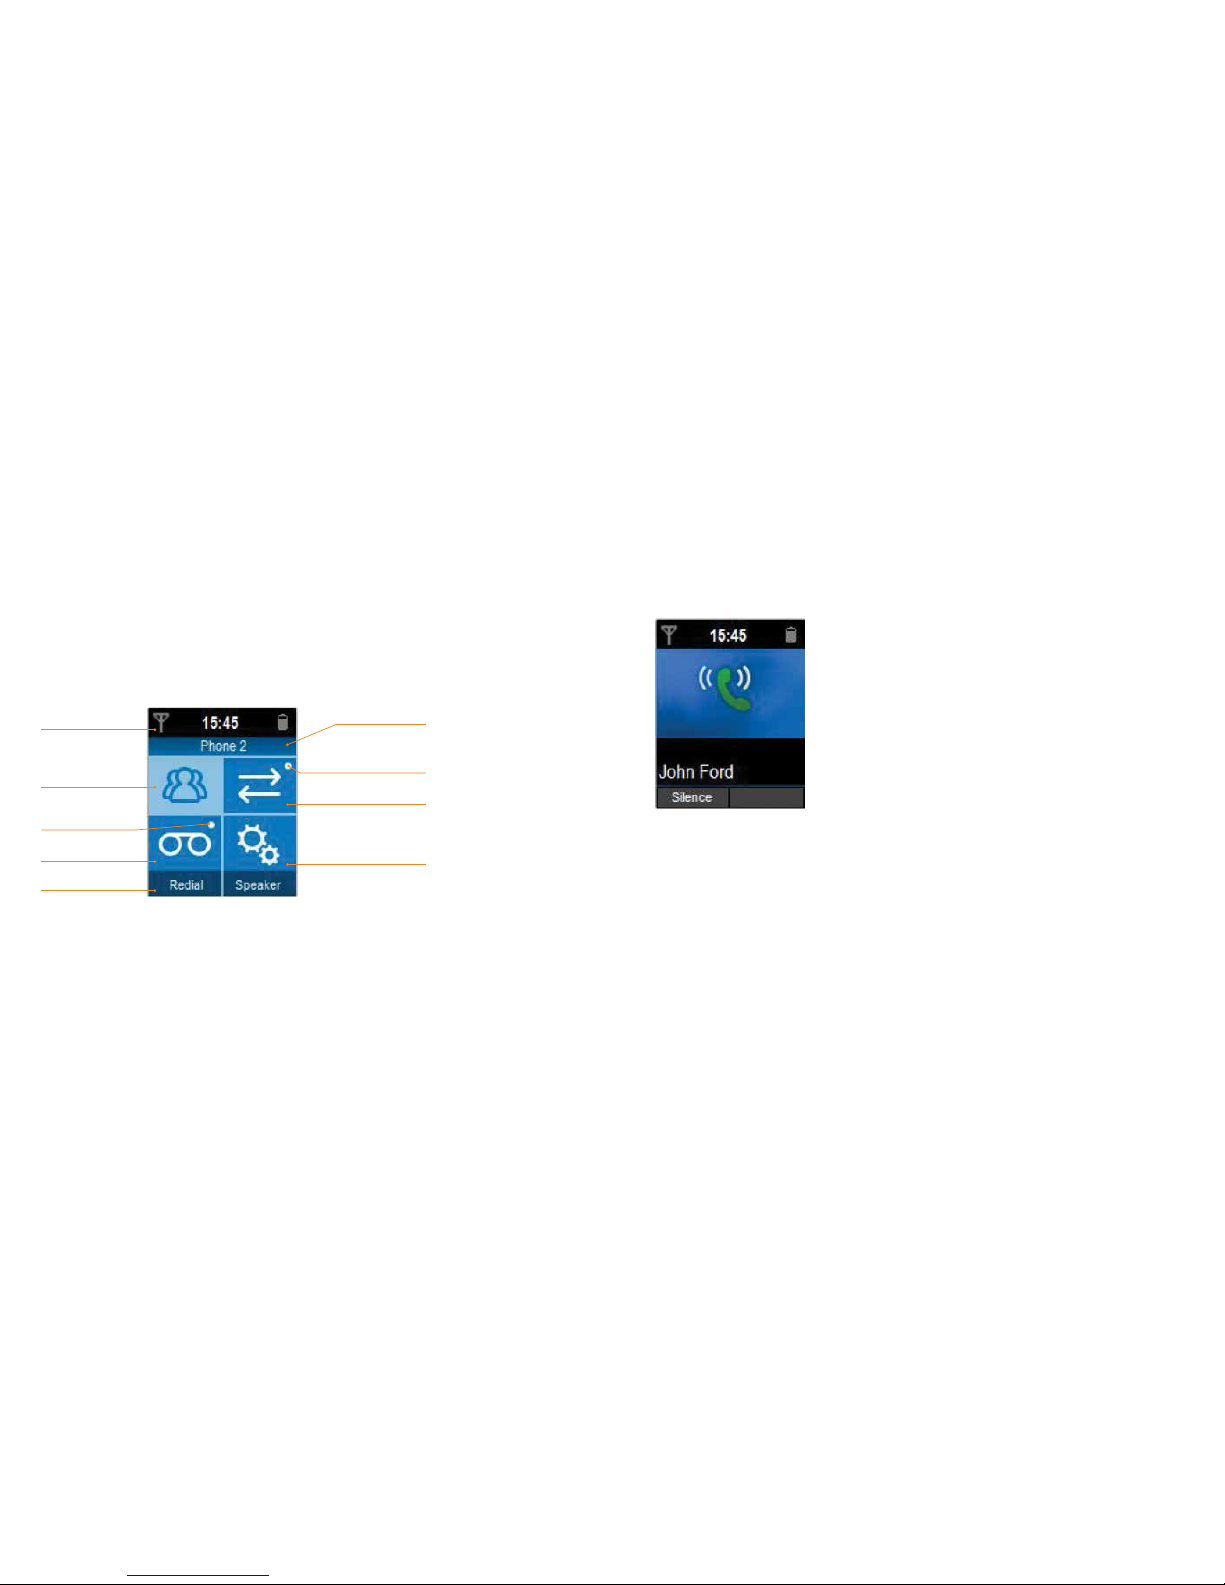
HOME SCREEN & EVENT NOTIFICATIONS
The Home scre en is composed of 3 parts:
• Top bar named Title: Det ails the time & batter y, ringer status,
telephone connectiv ity and alarm symbols
• Below the Title bar: Displays the name of th e handset
• Bot tom Bar: Redial soft key to access the Outgoing call list and
Speaker soft key to go off-hook in speaker mo de.
TAKING A CALL
When the handset receiv es an incoming call the caller’s
information is displayed.
If there is a match between th e incoming number and a contact
in the T-Hub 2 Contacts, the first name and last name will b e
displayed. If there is no match, the number will be displaye d.
When a call is received wi th an unknown number the handset
will display Unavailable in the incoming call screen.
When a call is received wi th a private number, the display will
show Private in the incoming call scree n.
Settings
Call log
Missed call indicator
Handset name
Title
Contacts
Voice mail
Softke ys
New voicemail
indicator
Incoming Cal l
CALLING
Page 9

16 17
REJECTING, ANSWERING AND ENDING THE CALL
Rejecting a Call
Reject a call by pressing the Power key or p ressing the left soft key named
Silence. The ringtone for th at handset shall be silenced. All other handsets and
tablets registered to the base s tation or T-Gateway will continue to ring.
Answering a Call
The call is answered by pressing th e Talk key . T he callers details and call
duration is displayed.
Ending a Call
The call is ended by pres sing the Power key or by the other par ty.
INCOMING CALL DURING A CALL
To take an incoming call when on another call, select Answer on lef t soft key.
Once the incoming call has be en accepted, swap between the incoming call and the
other call by pressing the Swap b utton.
Rejecting a Call Answering a Call
Incoming 2nd Call Incoming Call on Hold
Ending a Call
Note: Select Reject to reject the incoming call. The call waiting be eps will continue in the
background until the calling par ty hangs up.
If the internal call is released by one of the handset or tablet s, the remaining handset or
tablet is automatically connecte d to the external call.
Page 10

18 19
OUTGOING CALL
Making a Call
Start dialling the numbers and press the Ta lk k ey to make a call.
The calling screen will be displaye d and the call timer will start.
From this screen the Op tions available include:
• Re cord number in Contacts
• S et number as a Speed dial number
Rejecting a Call Number Options Sc reen
Dialling fro m Contacts
Search for a contact by selecting the Contacts icon from the hands et and begin typing
the contacts name using the keyp ad. Alternatively, scroll down the list of contacts.
Once a contact is selected, the default number ap pears below the name. Use the left
and right to change the number (if more than one number re corded). Press the Tal k key
to make a call.
Dial Contacts
Pre Dialling Screen Number Options Sc reen
Dialling from th e Call Log
When an entry within the Call Log is selected, pr essing the Talk key will dial the number.
A press on the Power key will take you back to the handset h ome screen.
Page 11

20 21
INTERNAL CALL
Press the INT key to make an internal call to another handse t or
tablet registered to the base st ation or T-Gateway.
If there are 3 or more registered or tablets, their details will be displaye d.
Otherwise the han dset will call the other registered device automatically.
If the receiving handset doesn’t answer the incoming c all after 30
seconds, the internal call will be au tomatically dropped.
When the internal call is terminated by either part y, the other handset
will automatically hang up.
Make an Internal Call Incoming Internal Call Active Internal Call
Call Answered
Call Transferred Transfer In Call Opti ons
In Call Options Transfer Call
TRANSFERRING A CALL BETWEEN HANDSETS
• To transfer a call to another handset or tablet that is registere d to the base station or
T-Gateway, select the Options soft key
• Scroll down to select Transfer c all and then select OK.
• Scroll down to the phone th at the call is to be transferred to or select Ring all phones
to ring all handsets and tablets and then sele ct OK
• Wh en the other phone answers the internal call, a link is established with
the handset and the exter nal caller hears silence.
• To transfer the call, th e handset that sets up the call needs to select
Options using the left sof t key and select Transfer call.
Page 12

22 23
CALL WAITING
Beeps will sound during a call if another call is receive d. The name of the number
or name of the caller will be displayed.
Select Answer to answer the call.
If the call waiting is answered, the first call is put on hold and the c all is
established with the se cond call.
Swap between callers by s electing the Swap sof t key.
Use the Options soft key to cho ose from a number of options, including
ending the current call.
Select Hang up active call to end the active call and switc h back to the call
that is on hold.
Call Waiting
Swap Callers
Transfer In Call Options
Note: In the unlikely event that another call comes in while on an internal call and there is
already an external call on h old, the internal call will be dropped, and the incoming call will
be connected.
Note: The call that is on hold is highlighted in blue on the scre en e.g. John Ford.
The active c all is highlighted in black on the screen e.g. 0234567890
Page 13

24 25
3-WAY CALL
Once the call waiting call has b een answered and there is one call on hold,
merge both calls to set up 3-Way call by selec ting Merge calls in the Options menu.
The call will to continue with the remaining caller if one of th e callers hangs up.
MAKE 2ND CALL
Initiate a second call by selecting Options and Make 2nd call.
Once the dial tone is heard, begin dialling the number or sele ct the person to call by
selecting Contacts and then press Call.
Press the End sof t key to end the second call and be reconnec ted to the first call.
PAGING
Paging is initiated by pressing and releasing the top but ton on the Base Station (Page button)
or DECT button on the T-Gateway. All devices registere d to the Base Station or T-Gateway
and in range will begin to ring.
Paging is offered for 1 minute. At the end of that time all handsets and tablet will stop ringing.
The paging call is presented as an internal call & can be stopp ed by following actions:
• If th e End option is selected or End Call is pressed on any handset the pa ging notification is
removed from all handsets .
• C an also be stopped by pressing and releasing the Page but ton on the base station or DECT
button on the T-Gateway again.
• Pre ssing the Talk button during Paging call acts in the same manner as pressing the End Call
button: Ends the paging call.
Paging calls are not presented on handsets which are in use.
If the ringer is switched off on a handset, this is temporarily disable d for paging so that the
handset can be found.
3 Way Call
Make 2nd Call Screen s
Note: A merged call cannot be trans ferred.
Page 14

26 27
Contacts Fields
The contacts fields on the handset are made up of the following:
• First name (20 characters),
• Last name (20 characters),
• Home number (25 digits),
• Mobile number (25 digits),
• Work number (25 digits)
• Ringtone (to assign a dedicated ring tone to a contact)
• D efault number (to select the number to be used by default in case of more than
1 number in a contact).
CONTACT SYNCHRONISATION
When a new contact is store d, modified or deleted on the handset,
synchronisation is automatically per formed between the tablet, hands et &
the base/T-Gateway. The contact will be store d in the BigPond account setup
during the installation Wizard.
CALL LOG
The Call Log lists All Calls , Missed calls, Inco ming calls (answered),
Outgoing calls, to a max imum of 150 entries.
A small dot will appear on the Call Log icon to indicate a miss ed call. Once all the
missed call details have be en viewed in the Call Log the indicator will disappear.
To move from one list to another, use the Left or Right keys on the handset.
To call a number from the Call Log list, highlight the name/
number using the Up/Down scroll keys and pres s the Talk k ey .
Save a number in the call log by scrolling to the number,
selecting Options and select New contact.
CONTACTS
Add, delete and view contacts b y selecting the Contacts icon using the scroll keys
and the OK button on the hands et.
View up to 1000 contacts that are shared be tween the T-Hub 2 handset and other
tablets registered to the same b ase station or T-Gateway.
Note – contacts will not be shared b etween non T-Hub 2 devices registered to the
base station or Gateway.
Note: Contacts will not be share d between non T-Hub 2 devices registered to the base
station or Gateway.
Important Note
Only those contacts t hat are synchronised with the BigPond email account setup during
the Installation Wizard will be shared acros s the T-Hub 2 handsets and tablets.
Any contacts sourc ed from an account created after completing the inst allation wizard, eg.
Secondar y BigPond account, Facebook, Gmail, will only be viewable on the tablet that
it has been set up on.
All the fields defined in Co ntacts are synchronised with the Tablet.
There are more fields available on the T-Hub 2 tablet, however they are
not visible on the handsets.
Contact Fie lds Screen
Page 15

28 29
CONTACTS LIST
From the handset home screen, th e contacts list can be accesse d by scrolling to the
Contacts icon and pre ssing OK.
The first line is used for p erforming a quick search. By typing in tex t, the contact list will
jump to the contact result that is closes t to the entry.
A selected contac t will display the First Name and Last Name and the default phone
nu mber.
Browse the list of contacts wi th the UP and DOWN keys. If the contact has more than one
phone number, change the number to be called by scrolling with LEF T and RIGHT keys.
To make a call press the Talk key or press OK, it will dial the selected number.
Contacts Screen
Contacts Options Screen
Once the contact is s elected, press the Options soft key and
another menu will pop up.
Add contact to add a new contac t into Contacts.
View details to see all fie lds of this contact.
Edit to modify c ontact fields.
Set as speed dial to ch oose a shortcut from idle to dial this number
(long press on the digit will call that number directly).
Delete contact to delete this contact.
Memory status to know the remaining spac e available to save contacts.
Synchronise to forc e the contacts to be synchronised bet ween the base
station or T-Gateway and the tablet.
Note: Digit 1 is assigned to the voicemail number and c annot be assigned to another number.
Page 16

30 31
EDIT A CONTACT
To edit a contact:
• S elect the contact, select the Options sof t key and select Edit
• Use t he Up and Down keys on the handset to move between fie lds.
• Pr ess the Save soft key to save or press the Cancel soft key to clear digits
or characters in the field.
ADD A CONTACT
To add a contact:
• Select Contacts from the handset Home Page.
• Pr ess the Options soft key
• Select Add contact
• Edit the n ecessary fields
Add a contact from the Call Log.
• S elect the Call Log from the handset Home Page
• S croll down to the phone number
• Pr ess the Options soft key
• Select New cont act or Add to existing contact
Alternatively, add a contact by ty ping in the number from the Home Screen
and then select Option to add the numbe r to Contacts.
DELETE A CONTACT
• To delete a contact, s elect Contacts from the handset Home Page .
• S elect the contact to delete.
• Pr ess the Options soft key
• Select Delete contact
RINGTONE
It is possible to assign a ringtone to a contact when c reating or editing a contact.
SETTINGS
Use the Settings function to adjust the:
• Sound
• Display
• Time
• C all Features
• System
Edit Contact Screen
Create a Contac t Screen
Delete a Contac t Screen
Page 17

32 33
SOUND
Modify the ringtones, ring tone volume, handset and speakerphone
volume and alert tones.
Ringtones
Modify the ringtone to be playe d for incoming (external) or internal calls.
Ring Volume
Modify the volume of the ringtone. B y default it is set on Level 3.
Handset volume
Modify the volume of the handset when on a call. B y default it is set on Level 3.
Speaker volume
Modify the volume of the call when it is on hands fre e. By default it is set on Level 3.
Sound Set tings Screen
Ringtones Setting Screens
Ring Volume Screen Handset Volume Scre en Speaker Volume Scre en
Page 18

34 35
Voicemail alert
Turn the voicemail alert tone to off o r on. It is set as On by default.
Handset tones
Turn the Keypad, Low Bat tery and Out of Range handset tones to of f or on.
All tones are set as On by default.
DISPLAY
Wallpaper
The wallpaper can be selected from the 6 available wallpap ers,
with blue being the default:
Voicemail Aler t
Handset Tones
Wallpaper Options
Note: The wallpaper will only change for the Home scr een - all other screens will use the
default blue wallpaper
Page 19

36 37
Brightness
Modify the brightness of the display by se lecting Settings from the Home Screen,
followed by Display and then Brightness.
Modify the brightness to one of fi ve levels.
Night Mode
The following options are available when setting Night Mode:
• Off turns Night Mode off. This is the default setting.
• Dim screen turns the hands et screen off between 9pm to 6am.
Note: The time that the screen dims cannot be adjusted.
• Dim s creen & LED turns the handset screen and LED off f rom 9pm to 6am.
LED Indicator
Turn the LED indicator off or on. By def ault the LED in turned on.
Night Mode
LED Settings
Handset Brightness
Page 20

38 39
Alarm
One alarm can be set to ring only once or on a daily basis. The alarm is
specific to the handset and does not syn chronise with other T-Hub 2
handsets or tablets registered to the base station .
Alarm Set tings
Time format
Set the time on the handset to be displayed in 12 hour or in 24 hour format.
Time Format Set tings
Time Set tings
TIME
Set an alarm, time and change the format in which the time is pr esented
from 12 hour to 24 hour.
If the handset is registered to a T-Gateway, the time on the handset will be
automatically synchronised with the T-Gateway which receive s the time from
the internet. Change the time on the handset m anually, however the handset
call log will no longer be synchronised wit h the call log on all other devices
registered t o the T-Gateway.
If th e handset is registered to a T-Hub 2 Base Station, the time on the
handset will be automatically synchronise d with the base station which
receives the time from t he internet. If the base station is not connected to
the modem/router using an Ethernet cable, the han dset time will have to be
manually set. Each time the handset bat teries are removed/replaced or the
base station is turned of f, the time will have to be reset.
If the handset is receiving the time f rom the T-Gateway or T-Hub 2 Base
Station, it will automatically change for daylight s aving.
Page 21

40 41
Call Forward – turn s Call Forward on or off. Under this feature, select f rom
Call Forward S ettings
Call Waiting Sett ings
CALL FEATURES
Modify the call waiting , call forwarding and other call features.
Call Waiting - turns Call Waiting on or off.
• Immediate – forwards all calls imme diately to a nominated number
• Busy - for wards all calls to a nominated number if the line is busy
• No answer – for wards all calls to a nominated number if the call is not answered
Immediate Off Set Immediate On Call Immediate On
Immediate Off Set Immediate On Call Immediate On
No Answer Off Set No Answer On No Answer On
Page 22

42 43
System Info Set tings
Auto Pickup Set tings
• Off – turns off all Call Forward set tings
Upon activating or deactivating a call for ward feature a confirmation tone and a
recorded voice res ponse acknowledging the status will be heard.
Auto Pickup – will automatically connect the call when you pick the handset ou t
of the dock. This is set to On by default. When it is Of f, select Answer when the
handset is picked out of the dock .
Auto Handsfree S ettings
Auto Handsfree – will automatically put all calls on handsfre e
when the call is answered. The hands et will remain in handsfree
even if the handset is put back into the do ck. If the setting is Off,
the call will end when the handset is put b ack into the dock.
SYSTEM
System Info
The sof tware version of the handset and base station or T-Gateway can be
acces sed from Settings and selecting System followe d by System Info
Handset sof tware: displays the software version of the handse t
Base sof tware: displays the software version of the base s tation or
T-Gateway that it is registered to.
Base IP address: this give the IP addre ss of the base station or T-Gateway.
Important Note
If the handset is registered to a T-Hub 2 Base Station, the T-Hub 2 Base Station must be
connected to a modem /router using an Ethernet (yellow) cable if the Base and Handset is
to receive the latest sof tware updates
Note: the IP address will not be presented if th e T-Hub 2 Base Station is not connected to a
modem/router using an Ethernet (yellow) cable
Page 23

44 45
If the software upg rade is interrupted for any reason (batteries go flat, hands et out of
range, batteries remove d), the soft ware upgrade is stopped but will restart automatically
when the handset is once again available.
Once the upgrade is finished, the s creen will show Software update complete.
A press on the OK button will ret urn the display to the Home Screen.
SOFTWARE UPDATES
Software update s are performed automatically. The handset will check on a daily basis
or each time it is turned back on against th e base station or T-Gateway to see if there is
an update available.
When there is an update available, the handset will initiate the installation proc ess and
preventing calls from being made or re ceived.
KEYPAD LOCK
The handset keypad can b e lock and unlocked from the home screen
by a long press on the * ke y.
Press OK to unlock the keypad if you pres s any key.
It will still be possible to dial 000 if the keypad is locked.
De-Register Handsets
Software Up dates
Registration
A handset can deregister another p hone or tablet or deregister itself.
Once de-registered, th e handset will show the Not registered screen.
Important Note
If the T-Hub 2 Handset is registered to a T-Hub 2 Base Station, the T-Hub 2 Base Station
must be connected to a m odem/router using an Ethernet (yellow) cable if the Base and
Handset is to receive the lates t software updates.
Page 24

46 47
CONTACTS
I can’t see the c ontacts that are on my T-Hub 2 Tablet on my T-Hub 2 Handset?
Only those contacts t hat are created on the tablet and synchronised with the
BigPond account setup during the install ation wizard are shared across T-Hub 2
Handsets and Tablets. Contacts from other ac counts such as Google, Windows
Live, Facebook are only visible on the T-Hub 2 Tablet.
I can’t see the c ontacts on my non T-Hub Handset?
T-Hub 2 contacts cannot be synchronised with n on T-Hub 2 handsets.
Are contac ts created on the Handse t always shared on the Tablet?
Yes .
Is there any way to disabl e contacts that are cre ated on the Handset from being
shared acros s other T-Hub 2 handsets or Tablets?
No.
SOFTWARE UPDATES
How long does it take to up date the software on th e Handset?
After it has been d ownloaded, it should take no more than 10 minutes to upgrade
the handset.
How do I know that have the l atest software on t he Handset?
Check the sof tware version on the Handset by going to Settings-> System->System
Info->Handset Software and check it against the sof tware version outlined on
www.telstra.com/thub FAQ’s .
What does it mean i f Handset LED is flashing red?
When the Handset LED is flashing red it m eans that they are in the process of
downloading and installing a software up date. Do not remove the power or the
ethernet cable from the b ase station during an update otherwise the handset or
base station may be damaged.
Red LED static when off d ock means that the battery status is low (25%).
Red LED flashing when of f dock means when the battery status is ve ry low
(almost empty <5%).
Does the sof tware update count toward s my usage?
No. All software up dates are unmetered.
REGISTRATION
How can I connec t an existing cordless teleph one to the T-Hub Base St ation?
For non T-Hub handsets, refer to the User Manual for that device for step by s tep
instruction on how to set up the handse t for registration. The registration setting
can usually be found within the Set tings section of the handset.
Once the handset is ready, hold down the Page bu tton (top button on the front of
the Base Station) or DECT button on the T-Gateway for 5 seconds. It sho uld start
flashing blue.
Press OK or confirm (depend ent on the handset) to start the registration proc ess.
SETTINGS
How do I turn off the H andset screen at night?
From the Handset, select Se ttings->Display->Night mode and select whether the
Screen is to be turned of f or whether the screen and LED is to be turned of f.
Note – the screen will only be turned of f between 9pm and 6am.
What does it mean i f the Handset LED is flashing “bl ue”?
This means that there is a missed c all or voice message.
What does the white d ot on the Call Log icon mean?
There is a missed call.
What does the white d ot on the Voicemail icon mean?
There is a new voice mess age.
TROUBLESHOOTING
Note: For non T-Hub handsets to connect to the T-Hub 2 Base Station it must be GAP
compliant. Majority of the major brands are G AP compliant.
Page 25

48 49
IMP ORTA NT
Please retain this booklet with your sales re ceipt as proof of the date
of purchase.
Customer Service
If you require assistance in operating this pro duct please call
Telstra T-Hub Support on 1300 136 841.
Voluntary Product Warranty
In addition to your Statutory Right s and subject to the conditions in
the next paragraph, Telstra also warrants that t his product will be
free from any defect in materials or wo rkmanship under conditions
of normal use for a period of 24 months from date of purchas e.
We do not warrant that the product will be fre e from defects caused
by an accident, misuse, abuse, improper ins tallation or operation,
vermin infestations, lack of reas onable care, unauthorised
modification, loss of par ts, tampering or attempted repair by a
person not authorise d by Telstra; or where the product has been
damaged by lightning or a mains power surge.
Where a valid claim is made under this Voluntary Produc t Warranty,
we will, at no cost to you, repair or replace t he product within a
reasonable time. Subject to your Statu tory Rights, if your claim under
this Voluntary Product Warrant y is not valid, you may be charged a
fee under this Voluntary Produc t Warranty for the ser vice and for any
direct costs asso ciated with having the product delivered for ser vice.
To make a claim under this Voluntary Product Warranty, you must
provide proof of purchase and call Telstra T-Hub Support on
1300 136 841 to arrange, at our expense, for a prepaid return satchel
for you to send the product an d all the components from the original
purchase. Alternatively, you may return the produc t and all the
components from the or iginal purchase to a Telstra Shop to make a
claim under this Voluntary Pro duct Warranty.
CUSTOMER SERVICE AND
PRODUCT WARRANTY
The benefits c onferred by this Voluntary Product Warranty are in
addition to other rights and remedies that are available to you unde r
law, which cannot be excluded. The proc esses for this Voluntary
Product Warranty in no way limit your rights which aris e as a result of
your Statutor y Rights.
This Voluntary Produc t Warranty is given by:
Telstra Corporation Limited, ABN 33 051 775 556
Business address: 242 Exhibition Street, Melb ourne, VIC 3132
Phone number: 1300 368 387
Email address: cu stomerfeedbac k@team.telstra.com
Please note: These contac t details are not product return or service
contact details. To make a claim in relation to this Voluntary Product
Warranty, please call
Telstra T-Hub Support on 1300 136 841 or visit your place of purchase.
Statutory Rights
Our goods come with guarantee s that cannot be excluded under the
Australian Consumer Law. You are entitled to a replacement or ref und
for a major failure and for compensation for any other re asonably
foreseeable loss or damage . You are also entitled to have the goods
repaired or replaced if the g oods fail to be of acceptable quality and
the failure does not amount to a major failure.
™ and ® are trade marks an d registered trade mar ks of Telstra Corporation Limi ted, ABN 33 051 775 556.
 Loading...