

Page 1

GETTING
CONNECTED
Installation Instructions
for your Home Network Gateway (HNG)
TG797n V3
• IMPORTANT:
BEFORE YOU START
Read all safety instructions and notices provided
by the manufacturer before commencing installation
Page 2
GETTING CONNECTED 32 GETTING CONNECTED
This guide is designed to help you get started with your new Home
Network Gateway (HNG). Please make sure you keep it in a safe
place, as you may fi nd you need to refer to it again at a later date.
CONTENTS
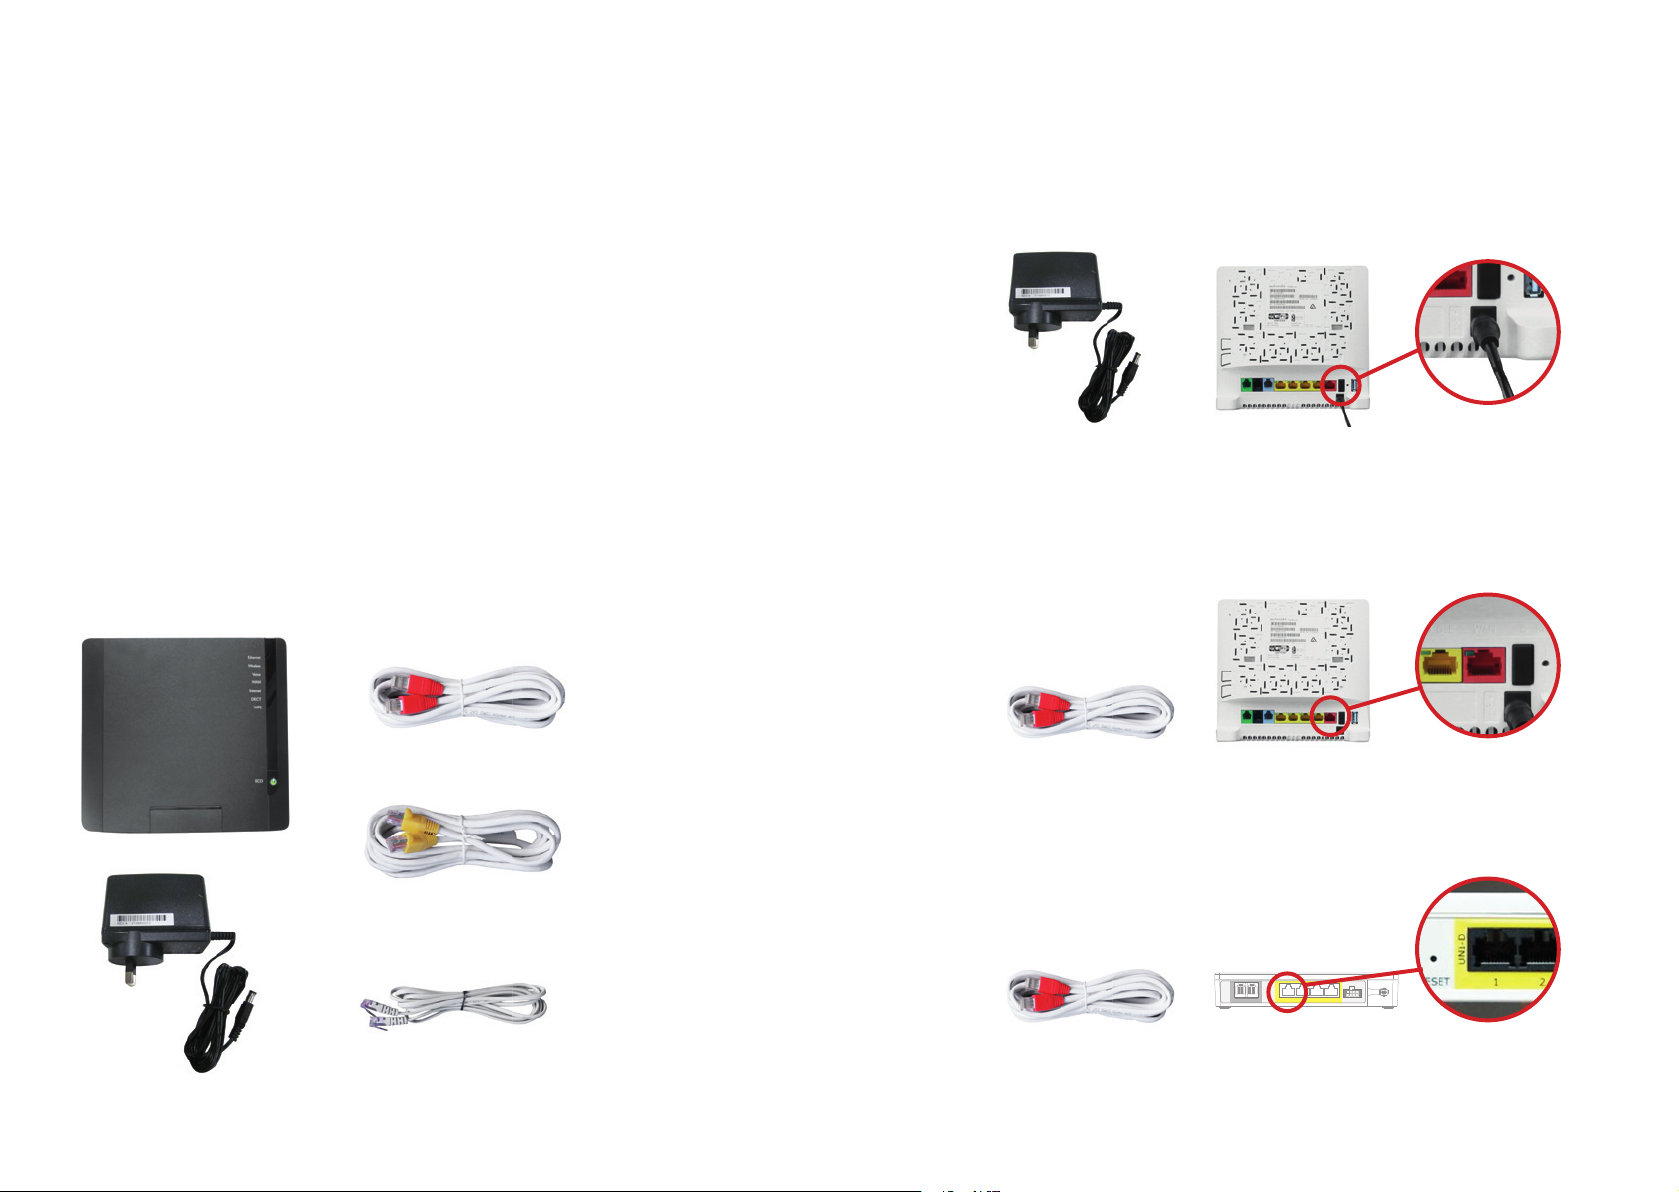
1. Home Network Gateway (HNG)
2. Ethernet cable (white with red ends)
3. Ethernet cable (white with yellow ends)
4. Telephone cable (grey)
5. Power Supply Adaptor
6. Wi-Fi Information Card
21
1
2
Plug the Power Supply Adaptor into the HNG power inlet port on the back of the HNG, then
plug the adaptor into a general purpose power outlet and push the ON/OFF button on the
back of your HNG to turn on the HNG.
When the HNG is powering up, the Status / Power LED (labelled ‘ECO’) will blink red
and once powered, it will turn solid red.
If your service includes BROADBAND or VOICE service (delivered via the UNI-D port of
the NTD), plug one end of the supplied Ethernet cable (white with red ends) into the red port
labelled WAN on the back of your HNG.
3
Connect the other end of the Ethernet cable (white with red ends) to the required UNI-D Port
5
4
3
of the NBN Co’s Network Terminating Device (NTD).
UNI-V
UNI-D
RESET
1 2 3 4
POWER
Page 3
GETTING CONNECTED 54 GETTING CONNECTED
4
5
Only one type of voice service can operate on the HNG at a time, if you are not
sure your service is VOICE (delivered via the HNG and the UNI-D port of the NTD)
or ANALOGUE VOICE (delivered directly from the UNI-V port) please consult
your service provider.
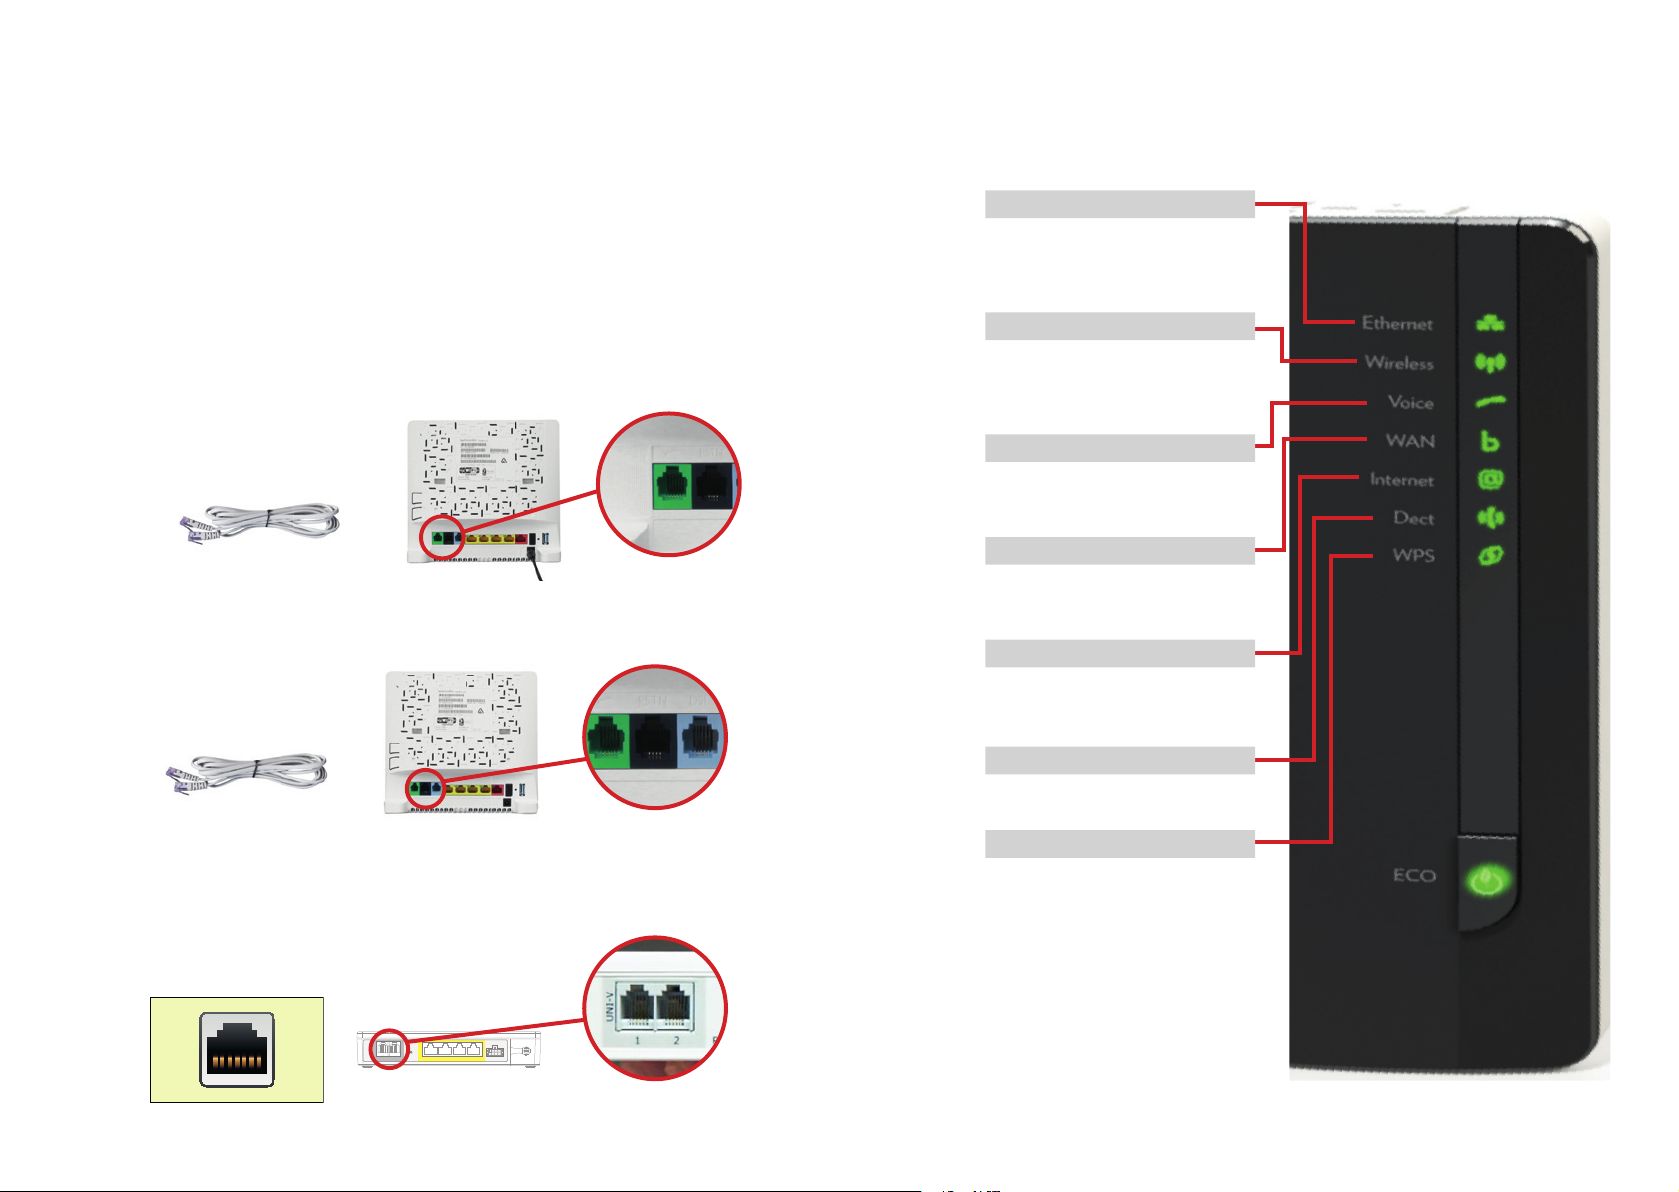
To connect your VOICE service:
A. Connect an existing working analogue telephone to your HNG by using the supplied grey
telephone cable. If your analogue telephone is already equipped with a suitable cable you
may use that instead.
B. Plug the grey cable into the green phone port labelled with a telephone symbol on the back
of the HNG.
C. If not already connected, connect the other end of the telephone cable into the phone port
of your analogue telephone.
If your service includes ANALOGUE VOICE service (delivered via the UNI-V port of the NTD),
plug the supplied grey telephone cable into the black port labelled PSTN on the back of your HNG.
Check the status of the LED indicators on the Home Network Gateway
(Note: it can take up to 3 minutes after powering the HNG for a connection to be established).
7
Ethernet indicator:
Indicator will be green if there is a
PC connected via Ethernet (see step
8) and blinks when data is being
transmitted.
Wireless indicator:
Indicator will be green if there is a
device connected on Wi-Fi (see step
8) and blinks when data is being
transmitted.
Voice indicator:
Indicator will be green ONLY if your
service includes a Voice service and
is registered (see step 4).
WAN indicator:
Indicator will be green when
connected to Broadband supply and
blinks when data is being transmitted.
Internet indicator:
Indicator will be green when internet
is connected and blinks when data is
being transmitted.
Connect the other end of the grey telephone cable to the relevant UNI-V port of the NBN Co
Network Terminating Unit (NTD) OR to a phone socket in your premises already connected
6
to the UNI-V port of the NTD.
UNI-V
UNI-D
RESET
You can now use the HNG as a DECT base station with your ANALOGUE VOICE service.
1 2 3 4
POWER
DECT indicator:
Indicator will be green ONLY if a
DECT Cordless Phone is connected.
WPS indicator:
Indicator will be green when Wi-Fi is
connected.
If any of these indicators are not
working, contact your Service
Provider.
Page 4

6 GETTING CONNECTED
BUTTONS ON THE HNG 7
To connect to your BROADBAND access:
8
A. WIRED - Recommended for desktop computers
• Plug one end of the Ethernet cable (white with yellow ends) into the required yellow
• Connect the other end of the Ethernet cable (white with yellow ends) into the Ethernet
B. WIRELESS - Recommended for laptop computers
• Select your HNG’s wireless network name (SSID) from the wireless networks available
• Enter the wireless key (WPA key) for your HNG. Your HNG’s wireless key also is printed
Connect your computer to the HNG via one of the following methods:
Use the supplied Ethernet cable (white with yellow ends)
Ethernet ports on the back of the HNG.
port of your computer.
Use your computer’s Wi-Fi adaptor:
on your computer. Your HNG’s wireless network name is printed on the back of the
device or on the card that was in the box.
on the back of the device or on the card that was in the box.
ADDITIONAL INFORMATION
ADVANCED SET UP AND CONFIGURATION
You can access and edit the HNG settings via its confi guration web page.
To access the HNG confi guration page, enter 10.0.0.138 in your web browser’s
address bar and follow the instructions provided in set up and confi guration menus.
BUTTONS ON THE HNG
Wi-Fi Protected Setup (WPS) button
This button allows you to add new wireless devices
also equipped with ‘WPS’ capability to your network
easily without the need to enter any of your wireless
settings manually.
DECT Cordless Phone Pairing / Paging button
When pressed for 1 to 3 seconds, this function
will page all connected DECT phones, and when
pressed for longer than 3 seconds, it will switch to
registration mode and allow you to pair your DECT
phones to the integrated DECT base station.
ECO button
This button allows you to disable or enable
your wireless access point. A long press disables
Wi-Fi and a short press enables Wi-Fi.
Note the following LED status colours:
• Alternatively, for wireless devices with ‘Wi-Fi Protected Setup (WPS)’ capability,
press the WPS button on the HNG and on the device (if relevant) to connect to the
wireless network.
You’re now connected to your service
Flashing red: HNG is powering up
Solid red: HNG is powered on and not connected to
the internet
Solid green: Indicates your HNG has an internet
connection
Solid blue: Indicates Wi-Fi is disabled
No colour: HNG is off
RESET button
This button allows you to reset the HNG to its
factorysettings by pressing and holding it until
a reset occurs.
Page 5

8 HNG CONFIGURATIONS
HNG CONFIGURATIONS
HNG CONFIGURATIONS 9
STANDALONE BROADBAND
NBN Co’s NTD
STANDALONE VOICE
NBN Co’s NTD
UNI-D Port
UNI-V
RESET
UNI-D
1 2 3 4
POWER
WAN (Red) port
of the HNG
LAN (Yellow) port of
the HNG or via Wi-Fi
BROADBAND AND VOICE
NBN Co’s NTD
(Green) phone port of
the HNG labelled with
UNI-D Port
UNI-V
RESET
UNI-D
1 2 3 4
POWER
WAN (Red) port
of the HNG
LAN (Yellow) port of
the HNG or via Wi-Fi
a telephone symbol
UNI-D Port
UNI-V
RESET
UNI-D
1 2 3 4
POWER
WAN (Red) port
of the HNG
(Green) phone port of
the HNG labelled with
a telephone symbol
Page 6

HNG CONFIGURATIONS 1110 HNG CONFIGURATIONS
STANDALONE ANALOGUE VOICE
(HNG will function as a DECT cordless
base-station only – cordless handset is
not provided)
NBN Co’s NTD
Connect the HNG directly to the relevant
UNI-V port or alternately to a phone
socket already connected to the UNI-V
port of the NTD
(Black) port of the
HNG labelled PSTN
UNI-V Ports
UNI-V
RESET
UNI-D
1 2 3 4
POWER
Alternative
home wiring
BROADBAND & ANALOGUE VOICE
NBN Co’s NTD
Connect the HNG directly to the relevant
UNI-V port or alternately to a phone
socket already connected to the UNI-V
port of the NTD
(Black) port of the
HNG labelled PSTN
UNI-V Port UNI-D Port
UNI-V
RESET
UNI-D
1 2 3 4
Alternative
home wiring
POWER
WAN (Red) port
of the HNG
LAN (Yellow) port of
the HNG or via Wi-Fi
Page 7

SUPPORT: 1300 739 331
 Loading...