

Page 1
IMPORTANT SAFETY INSTRUCTIONS
For Your Safety
Do not use the telephone during an electrical storm as it is possible to get a
shock. Refer to the Telstra White Pages® directory for further information.
RENTAL TERMS AND CONDITIONS
Your rental telephone is subject to the terms and conditions set out in Part A - General
of the Basic Telephone Service Section of Our Customer Terms, which is available for
inspection at most Telstra shops or at www.telstra.com.au/customerterms/index.htm.
RENTAL TELEPHONE FAULTS
For any service diffi culties and faults call 13 2203 for Residential or 13 2255 for
Small Business customers or check the Telstra White Pages® directory for further
contact numbers.
TELSTRA TEXT MESSAGING (SMS) SERVICE
Call 0198339999 and follow voice prompts for information on how to use your Telstra
text messaging (SMS) feature.
CARE OF THE TELEPHONE
• Avoid hard knocks and do not drop the telephone.
∑• Keep the telephone away from heaters.
• Clean the telephone surface with a damp cloth. Do not use detergents or immerse the
telephone in water.
• The performance of the telephone may be affected by electro-magnetic interference
if placed near radio transmitters, diathermy machines, welding machines etc.
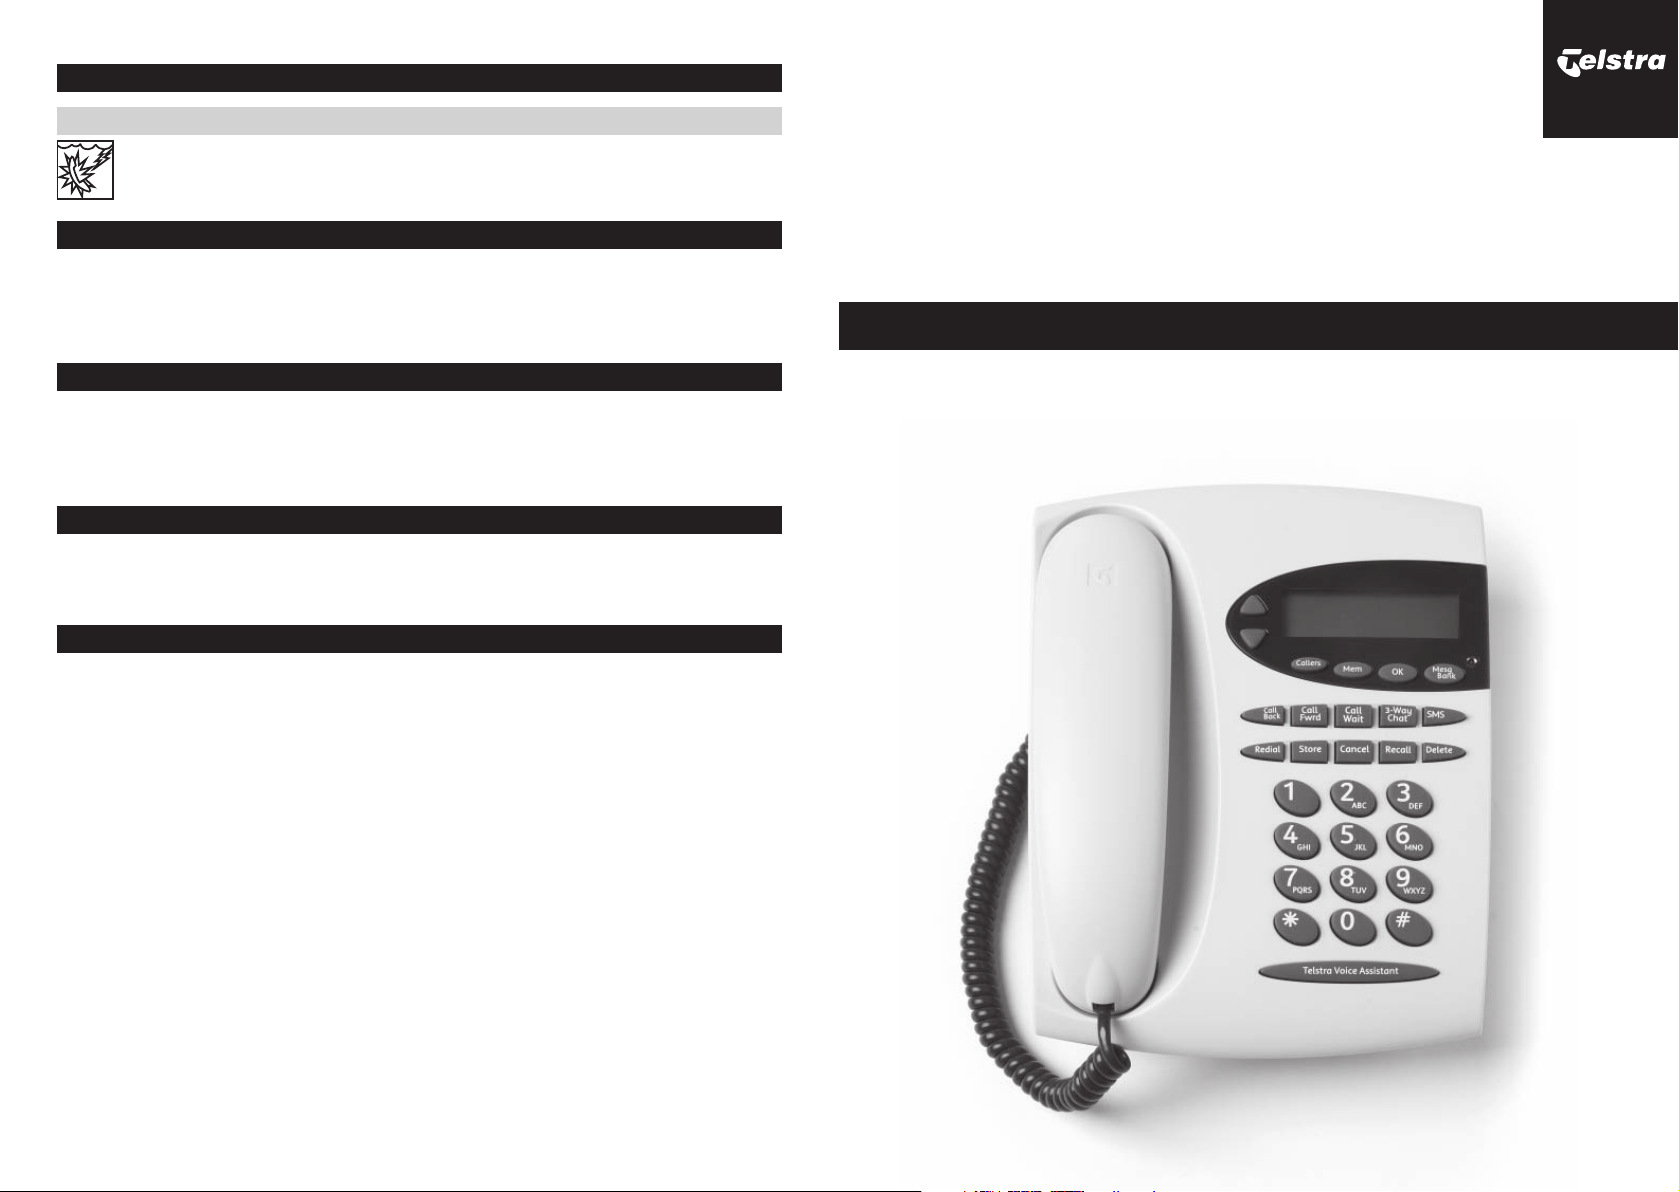
Telstra T1000C SMS
Calling Number Display Rental Telephone
User Guide
To fully benefi t from this Australian designed and manufactured telephone,
please read the User Guide and keep handy for future reference.
© COPYRIGHT Telstra Corporation Limited
This work is copyright. All rights reserved. This document is subject to conditions prescribed under the
Copyright Act. No part of it may in any form or by any means (electronic, mechanical, photocopying,
micro copying, scanning, recording or otherwise) be reproduced, stored in a retrieval system or transmitted
without prior permission from Telstra Corporation Limited ABN 33 051 775 556.
® Registered trade mark of Telstra Corporation Limited
16
Page 2
-
KVV
<O^_\X
<
ONSK
V
-
KVV
0a\
N
-
KVV
A
KS^
=^Y\O
A
Kc
-RK^
<
OMKVV
.
OVO^
O
-
KVVO\]
7OW
7O
]Q
,KXU
95
Callers
Mem
M
esg
Bank
OK
CONTENTS
FEATURES OF THE TELEPHONE
Getting Started 2
Features of the Telephone 3
Telephone Settings 4
Using MessageBank® Button 7
How to use your Telstra T1000C Telephone Features 9
Important Safety Instructions 16
Rental Terms and Conditions 16
Rental Telephone Faults 16
Telstra Text Messaging (SMS) Service 16
Care of the Telephone 16
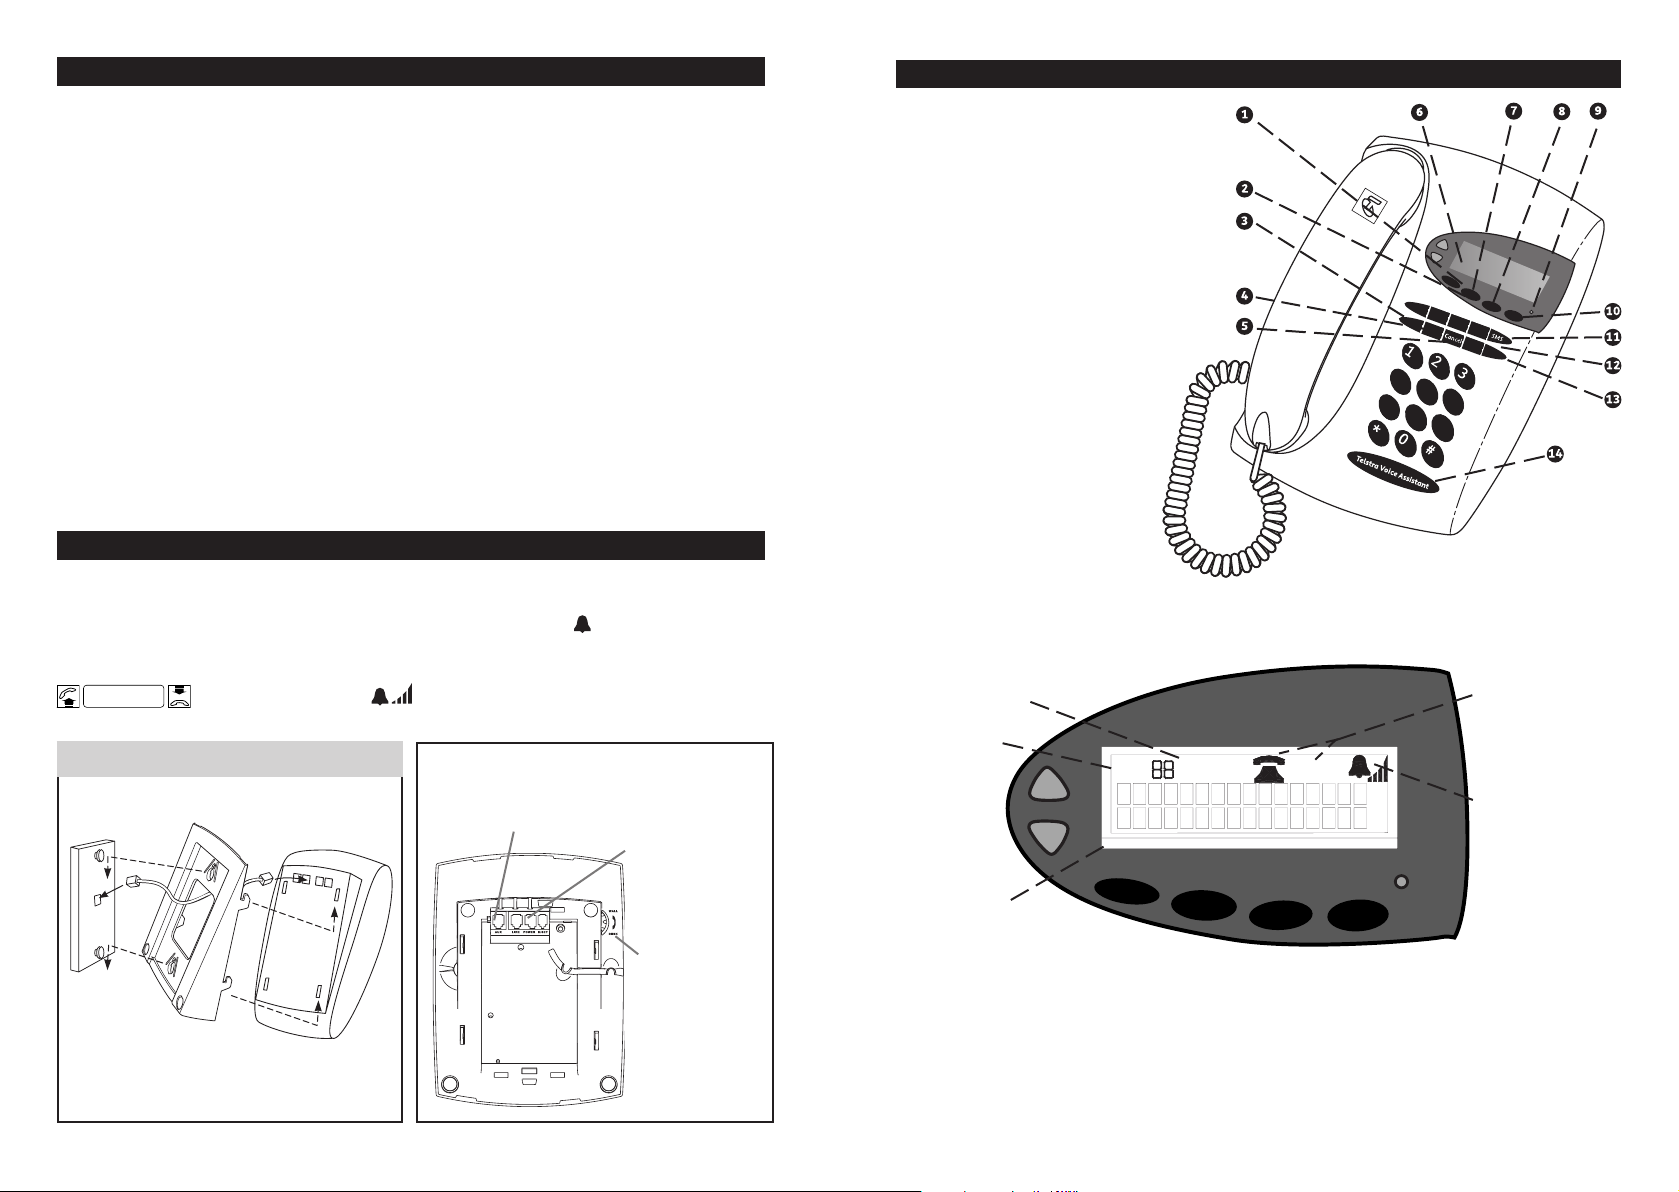
GETTING STARTED
When you unpack the telephone you will need to ensure the cords are placed
in the slots provided in the base as shown in the diagram below.
When you connect the telephone to a line, the display will show
Lift the handset to ensure the telephone is powered up, will ring correctly
and is ready to use.
Wait for Dial Tone
Repeat this step whenever the telephone has been disconnected from the line.
Desk/Wall Mounting Your Telstra T1000C
Wall mounting diagram
Note: Short cord is provided
with installation of wall socket.
Adjust the handset hook on the base.
The display will show
An additional line socket is located at the rear
of the phone to allow for connection of other
ACA approved equipment, e.g. an answering
machine, extension ringer or modem.
Visual Message
Waiting Power
Pack socket
is located
at the rear.
An adjustable
handset hook
can be set in
position for wall
mounting by
rotating the dial
on the rear left
side of the phone.
1. Ringer and earpiece level and scroll
through Callers and Memory Lists.
2. Names stored in memory will be
displayed when the callers number
matches the number in memory
1
.
3. Redial button used to easily
redial the last number dialled.
4. Store button used to turn on Phone
Features and adjust ringer and contrast.
5. Cancel button used to turn off
phone features e.g. Call Wait.
6. Two line LCD Calling Number
Display with a 20 number call list
7. 20 number memory directory with
One-Touch dial using OK button.
8. OK button used to confi rm
menu selections.
1
.
!"#
'()
0123
$%&
*+,
-./
456
789:
9. Visual Message Wait Indicator.
10. MessageBank button used
to retrieve messages from
MessageBank.
11. Sending and receiving
text messages
2
.
12. One Touch Phone Feature buttons.
13. Delete button used to delete
numbers from the Callers and Memory lists.
14. Telstra Voice Assistant button for voice control of phone features.
Memory List
New Caller
Indicator
SMS List
NEW
SMS
MEM
NEW
CALLER
Ringer Level
Indicator
T1000C Screen
1. You need to subscribe to Telstra Calling Number Display in order to receive the number of your callers.
Monthly charges apply. Available most areas. Not available for blocked calls. For more information,
call 13 2200 for Residential or 13 2000 for Business services.
2. Text message functionality available to eligible Telstra and Telstra reseller customers with text capable
phones such as this T1000C. Telstra expects the fi xed line text messaging functionality will become more
widely available at a later stage and all other customers wishing to use this function should confi rm its
availability with their service provider.
2 3
Page 3
TELEPHONE SETTINGS
<ONSKV
-KVVO\]
To adjust the ringer volume when the telephone is ringing
Press or while the phone is ringing
To adjust the ringer volume when the telephone is idle
1. Press
2. Press
Display will show (Min)
to clear the display and save setting.
(Max)
To suppress the fi rst ring
When text messages are delivered to your phone, your phone will ring once.
If you do not want your phone to ring for text messages, you can suppress
the fi rst ring. However, this is not recommended as any other phone you have
connected to the same line will still ring.
To suppress the fi rst ring
Press
Display will show “SUPPRESS FIRST RING”, press
To re-enable the fi rst ring
Press
Display will show “ENABLE FIRST RING”, press
Key tone
When the handset is lifted, your phone generates a key tone for each valid key press.
If you have a power adaptor connected, the key tone is generated when the handset
is on the hook.
To disable the key tone
Press
Display will show “DISABLE KEY TONE”, press
To enable the key tone
Press
Display will show “ENABLE KEY TONE”, press
To adjust the display contrast
1. Press
2. Press
3. Press
or to adjust contrast
to clear the display and save the setting.
Display will show “CONTRAST”.
To adjust the earpiece volume
press
Confi rmation tone will stop after the minimum or maximum setting has been reached.
Note: The earpiece volume will reset to normal when the handset is replaced, unless you fi x the level.
Adjusts the earpiece volume to one of four levels.
To fi x the earpiece volume
press or to adjust the volume and press
To have the volume reset to normal when the handset is replaced
press or to adjust the volume and press
Note: The T1000C also provides magnetic coupling in the handset for use with hearing aids with
a T position switch.
Last Number Redial
Press
The display shows the last number dialled. to call the last number dialled.
Callers List
The Callers List can store up to 20 incoming callers numbers.
The symbol
on the display shows there is an unanswered new call in the Callers List.
8/A-+66
Viewing and dialling from the Callers List
Press
The symbol
Note: The Callers List will store the number, date and time of the last 20 calls.
then or to fi nd number. Lift the handset to call the number.
will turn off when the callers key is pressed.
8/A-+66
4 5
Page 4

Storing numbers and names in Memory
7OW
7OW
.OVO^O
7OW 7OW
7OW
-KVVO\]
7OW
-KVVO\]
7OW
.OVO^O .OVO^O
7OW
7O]Q
,KXU
7O]Q
,KXU
.OVO^O
7O]Q
,KXU
.OVO^O
7O]Q
,KXU
7O]Q
,KXU
7O]Q
,KXU
You can store up to 20 numbers and names in Memory:
1. Press
memory location.
2. Enter the phone number, including the area code.
3. Press
(maximum of 13 letters including spaces).
4. Press to save number and name in Memory.
5. Press to return to standby mode or press or to locate an empty memory
location to store another name and number.
Hints:
If you make a mistake while entering a name or number, press
letter or number.
OR
Press
AKc
Press
-RK^
The cursor shifts one space to the right automatically or press to move the cursor right.
Space can be entered by pressing
then or “ENTER NUMBER” on the display indicates an empty
to save number only, or press
to start again.
to enter a 1.5 second pause between numbers if needed.
to enter a name using letters on keypad
to delete the previous
USING MESSAGEBANK® BUTTON
If you are a Telstra Home Messages 101® and MessageBank3 user, it’s now even easier to
retrieve your messages. Your T1000C is programmed to access Telstra Home Messages 101
and MessageBank.
To retrieve a message from your message service
press
and follow the message service prompts.
3
You can store your PIN under the MessageBank Button
Press
Note: Your PIN is not required for Telstra Home Messages 101.
Note: Your PIN number will only be visible when entering.
To delete your PIN
Press
Copying a number from the Callers List to Memory
1. Press
2. Press
3. Press
4. Press to return to standby mode or press or to locate an empty memory
location to store another name and number.
then or to fi nd an empty memory.
then or to select number.
to enter name using letters on keypad and press to save.
Deleting numbers and names from the Callers List or Memory
Press
to delete entry.
or
, pre ss or to select entry and then press
Dialling from Memory
Press
press or to select number and then lift the handset to call.
To retrieve a message from your message service3 when you have stored your PIN
press
message service prompts.
Note: Display shows “MESSAGEBANK”.
You can change the programmed number to access other messaging services,
e.g. MessageBank Virtual3 & MessageBank Combined3.
Wait for password prompt, press
and then follow the
To change your access number to access other messaging services
Press
Enter the access number, press then
Visual Message Waiting Indication (VMWI)
The T1000C is designed to provide Visual Message Waiting (a fl ashing red indicator) when
you connect the T1000C Power Pack. To purchase the T1000C Power Pack and arrange the
connection to the VMWI service , simply call Telstra on 13 2200. When a message is left
in your MessageBank service, a signal is sent to your telephone and the red indicator will
fl ash and the word “VOICE MESSAGE” will be displayed. The red indicator will stop fl ashing
a short time after you have listened to all your messages.
3. Monthly charges apply for MessageBank. Message retrieval is free from Telstra fi xed phones anywhere
in Australia. Retrieval charges apply from mobiles, payphones and for calls using a Telstra Telecard™.
6 7
Page 5

Installing the Visual Message Waiting Indication Feature
7OW
.SKV
When you purchase the T1000C Power Pack, follow the instructions provided and plug
the unit into the special socket labelled “POWER” located at the rear of the telephone.
Note: Telstra Home Messages 101 and MessageBank can interfere with the operation of some personal alarm
devices used to contact emergency services. If you use a personal alarm please consult the provider of your
service before activating Home Messages 101 on your telephone.
On-hook features without power adaptor
The following functions can be performed without lifting the handset:
• You can pre-dial a number on the display, and then dial it by simply
lifting the handset.
• Adjust the phone settings (except the earpiece volume).
• View the Callers List.
• View the Memory List.
• View the text message list.
• Compose and send a text message.
• Delete an entry in the Callers List or Memory List.
• Add numbers and names to Memory.
Note: Press to clear the display.
Additional features when the Power Pack is connected:
• Light fl ashes with ring and when there are unviewed text messages.
• A key tone sounds for each valid key pressed.
HOW TO USE YOUR TELSTRA T1000C TELEPHONE FEATURES (available in most areas)
To turn on Call Waiting
This feature enables you to answer a second call while you are on the phone.
press
When you are on a call and you hear two beeps:
1. Press
-KVV
to swap between callers.
AKS^
2. Press to hang up one caller and return to the caller on hold.
3. Press
AKc
to talk to both callers at the same time4.
-RK^
-KVV
AKS^
To turn off Call Waiting
press
-KVV
AKS^
To make an enquiry call while you are on a call
This feature enables you to call someone while you are on a call.
During a call press
To return to the fi rst caller after the second person hangs up, press
If you wish to set up a 3-way conversation after the second person answers,
simply press
AKc
-RK^
To have a 3-Way Chat
This feature enables you to establish a 3-way conversation.
To end 3-Way Chat simply
press
AKc
-RK^
To turn on Call Forward
5
6
press
AKc
-RK^
This feature enables you to forward your calls to your mobile or another number selected.
press
-KVV
0a\N
press
-KVV
0a\N
To forward calls to a number stored in Memory
-KVV
Press
4. Applicable call costs and usage charges apply.
5. Applicable call costs and usage charges apply. Available most areas.
6. Applicable call costs apply for forwarded calls. Calls can be forwarded to most numbers in Australia.
press
to dial the number, then press
8 9
0a\N
press
then scroll or
-KVV
0a\N
Page 6

To turn off Call Forward
-KVV
,KMU
-KVV
,KMU
-KVV
,KMU
7OW
-KVVO\]
press
To use Call Back when a number is busy
This feature enables you to arrange an automatic call back to a busy number.
If the number you’re calling is engaged, press
-KVV
0a\N
7
To cancel Call Back
Calling Line Identifi cation and text messaging
In accordance with worldwide standards for text messaging, all messages
(including reply messages) will display the telephone number of the sender.
If you have a Silent Line or have blocked Calling Line Identifi cation and attempt
to send a message, your message will be rejected.
To alter your service so that you can send text messages, call the Telstra Fixed Phone
SMS service on 0198339999 and use the setup menu to turn off Silent Line or Calling Line
Identifi cation blocking for text messaging ONLY.
Note: For information on how to use your Telstra text messaging service call 0198339999 and follow
the voice prompts.
Using Telstra Feature Assistant
press
8
If your fi xed home phone is with Telstra you can ‘tell’ your phone to turn Call Waiting or
Call Forward9 on or off, check their status, or listen to information on other Telstra features.
press
The Telstra Voice Assistant button dials 1# for you.
Telstra Text Messaging (SMS)
10
Your Telstra T1000C SMS can send text messages to and receive text messages from
compatible mobile telephones and compatible fi xed line telephones in Australia.
Important:
Text message functionality available to eligible Telstra and Telstra reseller customers with
text capable phones such as this T1000C. Telstra expects the fi xed line text messaging
functionality will become more widely available at a later stage and all other customers
wishing to use this function should confi rm its availability with their service provider.
How to register to Telstra’s text messaging service
Registration is automatically done when you send or receive your fi rst text message
from your Telstra T1000C SMS Phone. When registration occurs, the system will send
you a text message welcoming you to the service and confi rming your registration.
Sending of text messages
The text message service will make repeated attempts to deliver a message if your line is
busy or otherwise unavailable. Undelivered text messages will be stored for a maximum
of 7 days. After 7 days the message will be deleted from the server.
To compose and send text messages
With text messaging you can send and receive text messages up to 160 characters long.
You can type in messages using the letters on the keypad as normal.
Some special Key Characters are included on the following keys:
1 Key - . , ‘ ? ! “ 1
* Key - - @ / : _ # & * = < >
0 Key – SPACE 0
1. Press Display shows “SEND NEW SMS”.
2. Press Display shows “ENTER MESSAGE”.
3. Use the letter keys to enter the text message.
4.Press
5. Enter the telephone number including area code, or press
and scroll to required number and press
6. Press Display shows “SEND SMS?”
Note: To edit the text message, press Display shows “EDIT SMS?”. Press and enter revised text.
Then press Display shows “ SEND SMS?”.
7. Press Display shows “SENDING”.
Note: Display shows “SENT TO #” when text message is sent .
to select. Display shows “ENTER NUMBER”.
10
to select.
or
7. Applicable call costs and usage charges apply. Available most areas.
8. Available to most customers who are directly billed by Telstra for access and local calls.
9. Applicable call costs apply for forwarded calls. Calls can be forwarded to most numbers in Australia.
10. Charges apply for each message sent even if not received.
10 11
10. Charges apply for each message sent even if not received.
Page 7

Receiving text messages
7OW
-KVVO\]
7OW
.OVO^O
.OVO^O
.OVO^O
.OVO^O
Your T1000C SMS can store up to 25 incoming text messages. When the memory is full,
the phone will display “SMS LIST FULL”. When you receive a text message you will hear
a short ring and the display will show “#SMS”. If you have connected the T1000C Power
Pack the light will be fl ashing.
To view received text messages
When you receive a text message the display will show “#SMS”
1. Press Display shows “VIEW RECEIVED MESSAGES”.
2. Press Display shows the 1st message phone number and the 1st line of the
message.
3. Press to scroll through all received messages.
4. Press to select a message and press or to read the full message and to see
the date and time of the message.
5. Press to return to the received messages list.
To reply to a text message
1. While viewing a selected received text message, press Display shows “REPLY?”.
2. Press Display shows “ENTER MESSAGE”. Enter your text message using
letters on keypad.
3. Press Display shows “SEND SMS?”.
4. Press Display shows “SENDING”.
Note: Display shows “SENT TO #” when text message is sent .
To store the sender’s telephone number in memory while viewing
a received text message:
1. Press then until display shows “VIEW RECEIVED MESSAGES”.
2. Press then to select text message number.
3. Press
Note: The display shows “ENTER NAME” if there is an available memory.
to enter name using letters on keypad.
4. Press to save name and number in memory.
5. Press to return to standby mode or press or to view other received
text messages.
If the text message memory is full
When the text message memory is full, the phone will display the number of unviewed
text messages followed by “SMS:LIST FULL” e.g. “10 SMS:LIST FULL”.
If all the messages have been viewed but not deleted, the phone will display
“SMS:LIST FULL”.
You need to delete some received messages to make room for new ones.
To delete individual text messages
1. Press and scroll to “VIEW RECEIVED MESSAGES”.
2. Press and scroll to the message you want to delete.
3. Press
4. Press
Note: Display moves to next message.
Display shows “DELETE?”.
again to delete message.
To forward a text message
1. While viewing a selected received text message, press and scroll to “FORWARD
SMS?” using
2. Press Display shows “ENTER NUMBER”.
3. Enter telephone number including area code, or press
required number and press to select.
4. Press Display shows “SEND SMS?”.
5. Press Display shows “SENDING”.
Note: Display show “ SENT TO #” when text message is sent .
10
To delete all text messages
or
and scroll to
1. Press
2. Press Display will show “DELETE ALL SENT SMS?”.
3. Press to “DELETE ALL UNSENT SMS?”
OR
Press
OR
Press
4. Press or
Display will show “DELETE SMS OR MESSAGEBANK PIN”.
to “DELETE ALL RECEIVED SMS?”
to “DELETE ALL SMS?”.
to delete the select messages.
To call the sender of a text message
While viewing a selected received text message, press and scroll to “CALL?” using
Press Display shows telephone number, then lift handset to call.
10. Charges apply for each message sent even if not received.
12 13
Page 8

SMS Service Centre numbers
The Telstra SMS Service Centre Send and Receive numbers are preset in your T1000C SMS
phone. If you accidentally change the Send or Receive numbers you will need to re-enter
them in order for your text messaging service to work.
Telstra’s Send SMS service number is 01983391.
Telstra Receive SMS service Centre number is 01983391.
The default terminal number is 0.
Changing the SMS service phone numbers
To change the SMS service number for sending text messages:
1. Press
2. Press Display will show “OUTGOING SMSC 01983391”.
3. Enter the new number.
4. Press to store the new number.
Display will show “TERMINAL ID 0”.
To change the SMS service number for receiving text messages:
Changing the terminal number
To change the terminal number or sub-address for sending and receiving text messages:
1. Press
2. Enter the new terminal number (1 to 9).
3. Press to store the new number.
Display will show “TERMINAL ID 0”.
Two or more SMS phones on the same line
If you have more than one SMS phone on the same line the phones may not operate
properly when receiving text messages. To overcome this you should change the terminal
number(s) so that only one phone has a terminal number of 0. The phone with a terminal
number of 0 will receive all text messages sent to your default address. The other phone(s)
will only receive text message sent to their specifi c sub-address. All phones will be able to
send text messages.
1. Press
2. Press Display will show “INCOMING SMSC 01983391”.
3. Enter the new number.
4. Press to store the new number.
Note: SMS Service Centre phone numbers cannot be blank.
Display will show “TERMINAL ID 0”.
Sub-addressing of text messages
Telstra’s fi xed text messaging service allows you to send text messages to a specifi c
phone when there is more than one phone connected to a telephone line. This may be
useful when you want to direct a message to a specifi c household member for privacy
reasons. Each phone can be given a different terminal number (from 1-9), text messages
can be sent to an individual phone by simply adding an extra digit to the phone number
corresponding to the terminal number of the particular phone. For example, if a text
message is sent to a fi xed line with an additional digit “1” added to the telephone number,
only a phone set up with terminal number “1” on that line would receive the message.
The default terminal number for your phone is “0” and your phone will automatically
receive all text messages sent unless they have an additional sub-address digit added.
14 15
 Loading...