

Telstra Outdoor 900 User Manual
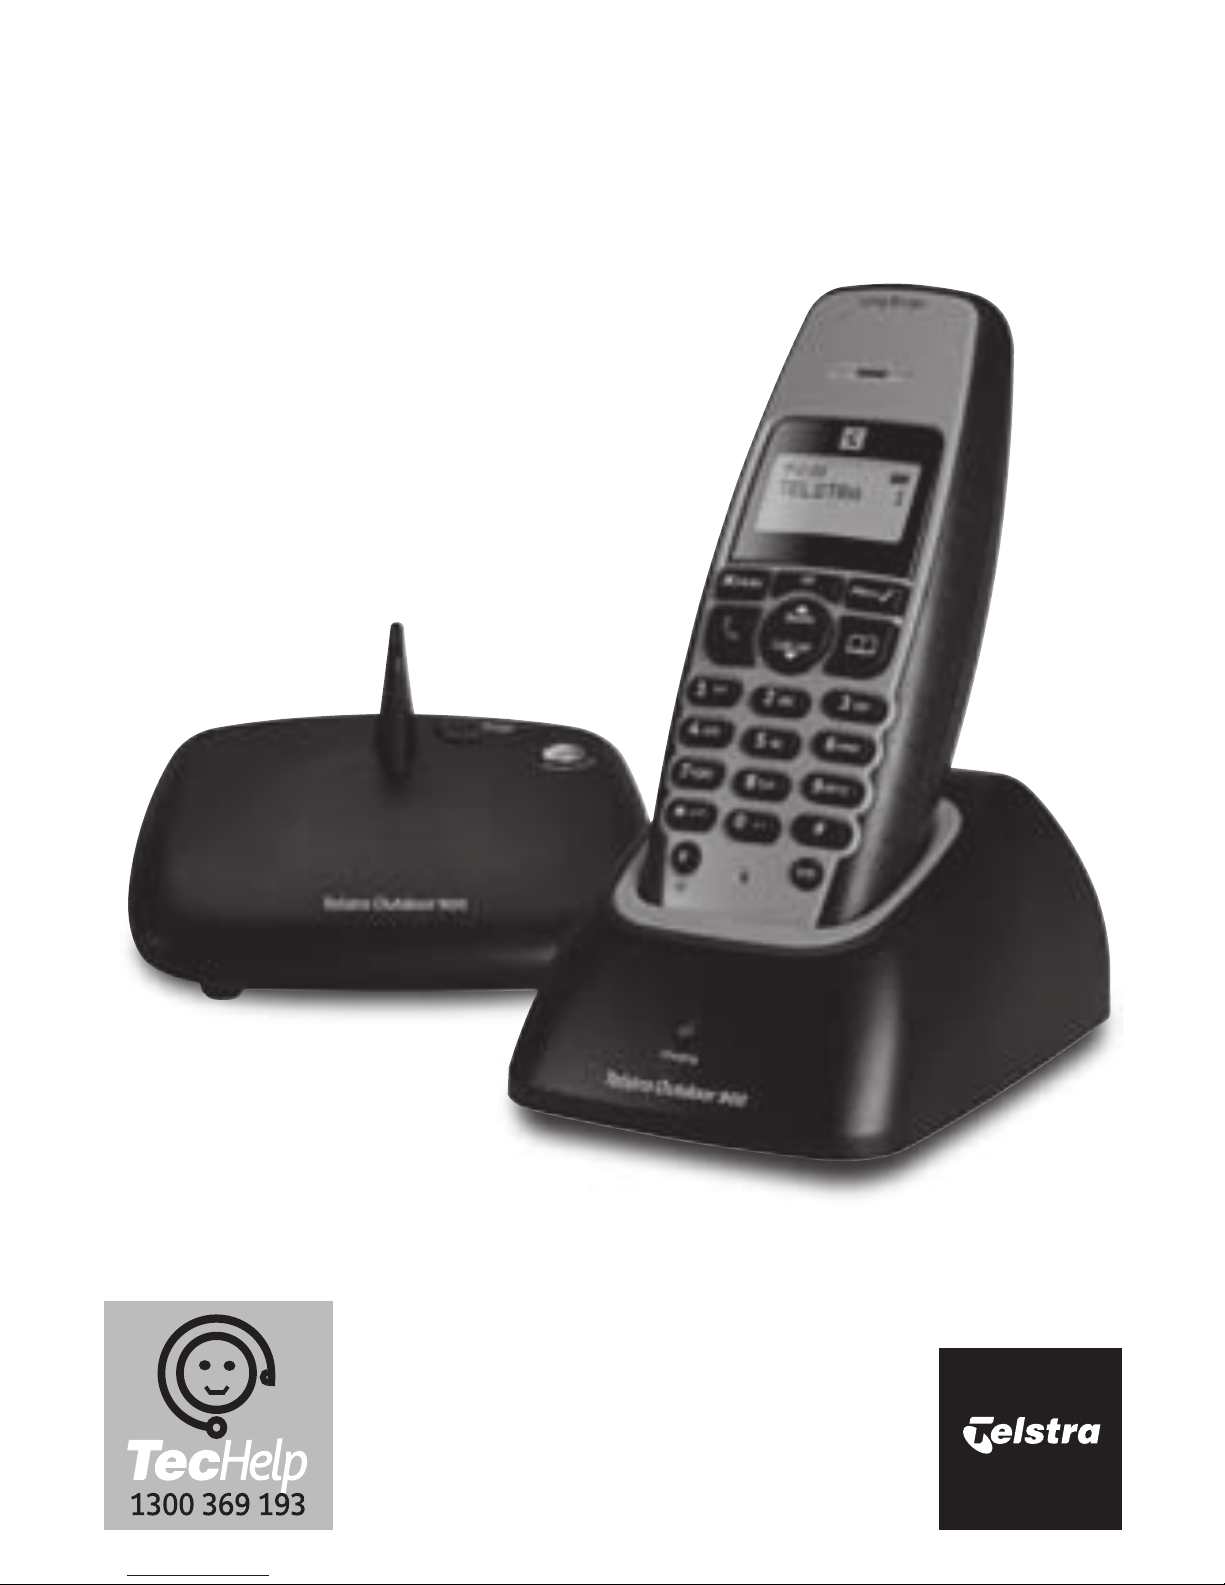
Telstra Outdoor 900
Long Range DECT Cordless Telephone
User Guide
If you have any
problems with your
phone, refer to the Help
section of this User
Guide or call TecHelp on
1300 369 193.

1
Introduction
to your Telstra Outdoor 900
Long Range DECT Cordless Telephone
● Splash and dust resistant
● Long Range DECT cordless telephone
● Built-in torch
● Send and receive text messages
1
● 50 Name and number phonebook
● Use Calling Number Display2 to see the number of the
person calling and keep track of unanswered calls
● Last number redial to display and redial the last 10 numbers
called from your handset
As a Digitally Enhanced Cordless Telecommunications
(DECT) product, your Telstra Outdoor 900 provides: -
● Digital clarity
● Digital range
● Digital security
See Things you need to know on page 42 for important information.

2
IMPORTANT
This equipment is not
designed for making
emergency telephone
calls when the power fails.
Alternative arrangements
should be made for access
to emergency services.
This User Guide provides
you with all the
information you need to
get the most from your
phone.
Before you make your
first call you will need to
set up your phone. Follow
the simple instructions in
‘Getting Started’, on the
next few pages.
Need help?
If you have any problems
setting up or using your
Telstra Outdoor 900 please
contact the TecHelp line on
1300 369 193.
Alternatively, you may
find the answer in ‘Help’ at
the back of this guide.
Got everything?
Telstra Outdoor 900
● Telstra Outdoor 900 handset
● Telstra Outdoor 900 RF base unit
● Telstra Outdoor 900 charger unit
● 2 x AAA NiMH rechargeable
batteries
● AC power adaptor x 2
● Telephone line cord
● Telephone adaptor plug
● Wall mounting bracket
If you have purchased a
Telstra Outdoor 900 multiple
pack, you will also have the
following items for each
additional
handset:
● Telstra Outdoor 900 handset
● Telstra Outdoor 900 charger
● 2 x AAA NiMH rechargeable
batteries
● AC power adaptor (red plug)
● Wall mounting bracket

In this guide
3
Introduction 1
In this guide 3
Getting started 6
Location 6
Setting up 6
Time and date settings 8
Set time on handset 8
Set date on handset 8
Getting to know your
Telstra Outdoor 900 9
Handset buttons 9
Handset display icons 10
Navigating the menus 11
Telstra Outdoor 900 menu map 12
Telstra Outdoor 900 Base Unit
Components 13
Using the phone 14
Switch handset on/off 14
Make a call 14
Preparatory dialling 14
End a call 14
Receiving calls 14
Handsfree 14
Make a handsfree call 14
Adjust earpiece/handsfree
volume 15
Answer a call in handsfree 15
Earpiece volume 15
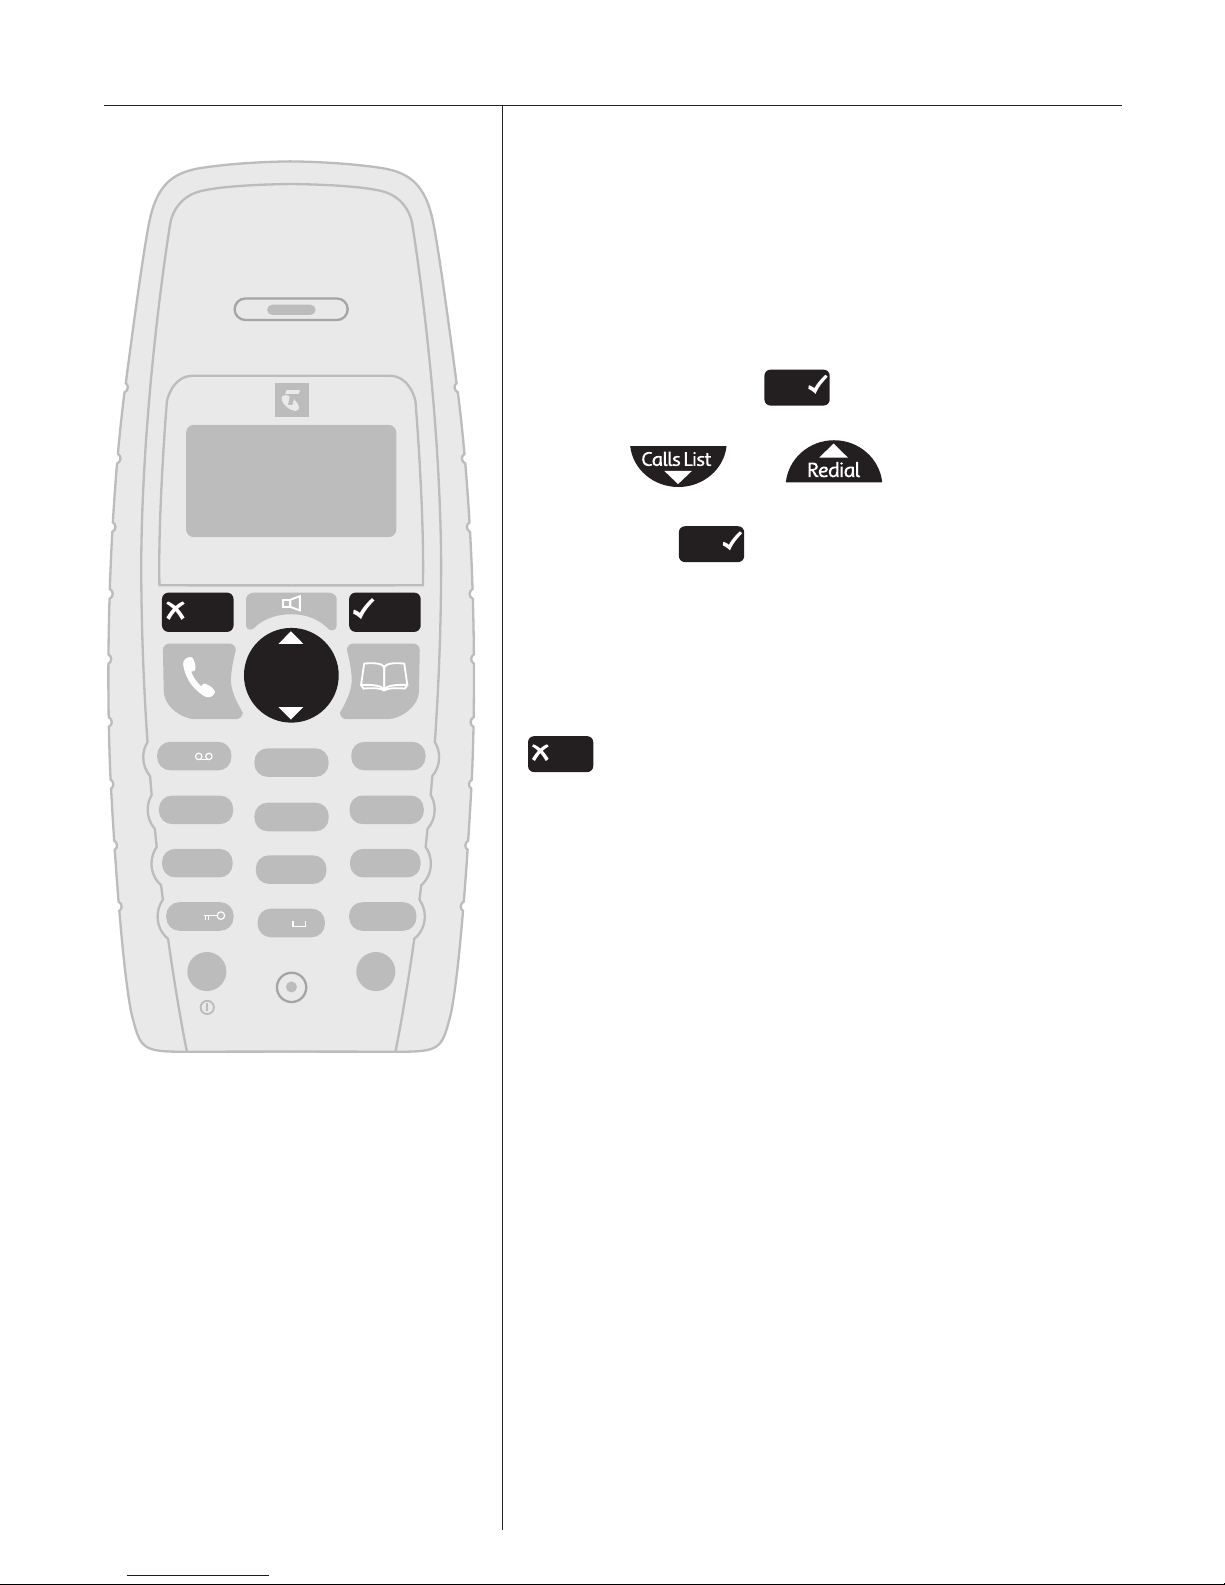
Redial a number from the
Dialled Calls list 15
Redial a number from the
Calls list 15
Storing numbers from the
Callers list 16
Deleting individual telephone
numbers from the Callers list 16
Deleting the entire Calls list 17
Secrecy (Mute) 17
Keypad lock 17
Paging 17
Phonebook 18
Add a new Phonebook entry 19
Dial a number from the
Phonebook 19
Edit an entry 19
View Phonebook 20
Delete an entry 20
Paging handsets 20
To page a handset from the base 20
Handset ringtone 21
Base station ringtone 21

Handset ring volume 21
Base station ring volume 22
To switch the keypad & warning
beeps on & off 22
Handset name 22
Handset language 23
Auto-talk 23
Security PIN 23
Set alarm 24
To default/reset the handset &
base to original settings 24
Factory settings 24
Telstra phone features 25
Calling Number Display 25
Calls lists 25
Flashing Message Indicator 26
MessageBank® and
Telstra Home Messages 101® 26
To listen to your messages 26
Call Waiting 26
To accept a Call Waiting call 26
Text Messaging (SMS) 27
To register for Telstra’s text
messaging service 27
Calling Line Identifications and
text messaging 27
Using text messaging 27
Character map 28
Button character 28
To write and send a text
message 29
Receiving and reading text
messages 29
Delivery of text messages 29
Open Inbox 29
Deleting 30
SMS settings 30
SMS Service Centre numbers 30
To change the SMS Service
Centre phone numbers 31
Set SMS text alert 31
Sub-addressing for multiple
users 32
Receiving sub-addressed text
messages 32
Setting up sub-addresses for
multiple
users 32
Reading sub-addressed text
messages 33
Sending sub-addressed text
messages 33
Default settings for text
messaging (SMS) 33
In this guide 4

Additional handsets and bases 34
Select base 34
Using additional handsets 35
Make an internal call to
another handset 35
Transfer calls 35
Three-way call 36
Help 37
General information 39
Replacing the handset batteries 39
Safety 39
General 39
Cleaning 40
Environmental 40
Telstra accessories and
replacement items 40
How many telephones can you
have? 41
Connecting to a PABX 41
Access code and entering a
pause 41
Recall 42
PIN number 42
Things you need to know 42
Product warranty & Customer
service 43
Wall mounting template 44
5 In this guide
Getting started
WARNING
While your Telstra Outdoor
900 is splash resistant, do
not immerse in water.
Range indicator
The symbol on your
handset display indicates
when you are in range of
the base. If the symbol
flashes and you hear a
warning beep, you are out
of range and will need to
move closer to the base.
IMPORTANT
Do not connect the
telephone line until the
handset(s) is fully charged.
The base must be plugged
into the mains power at
all times.
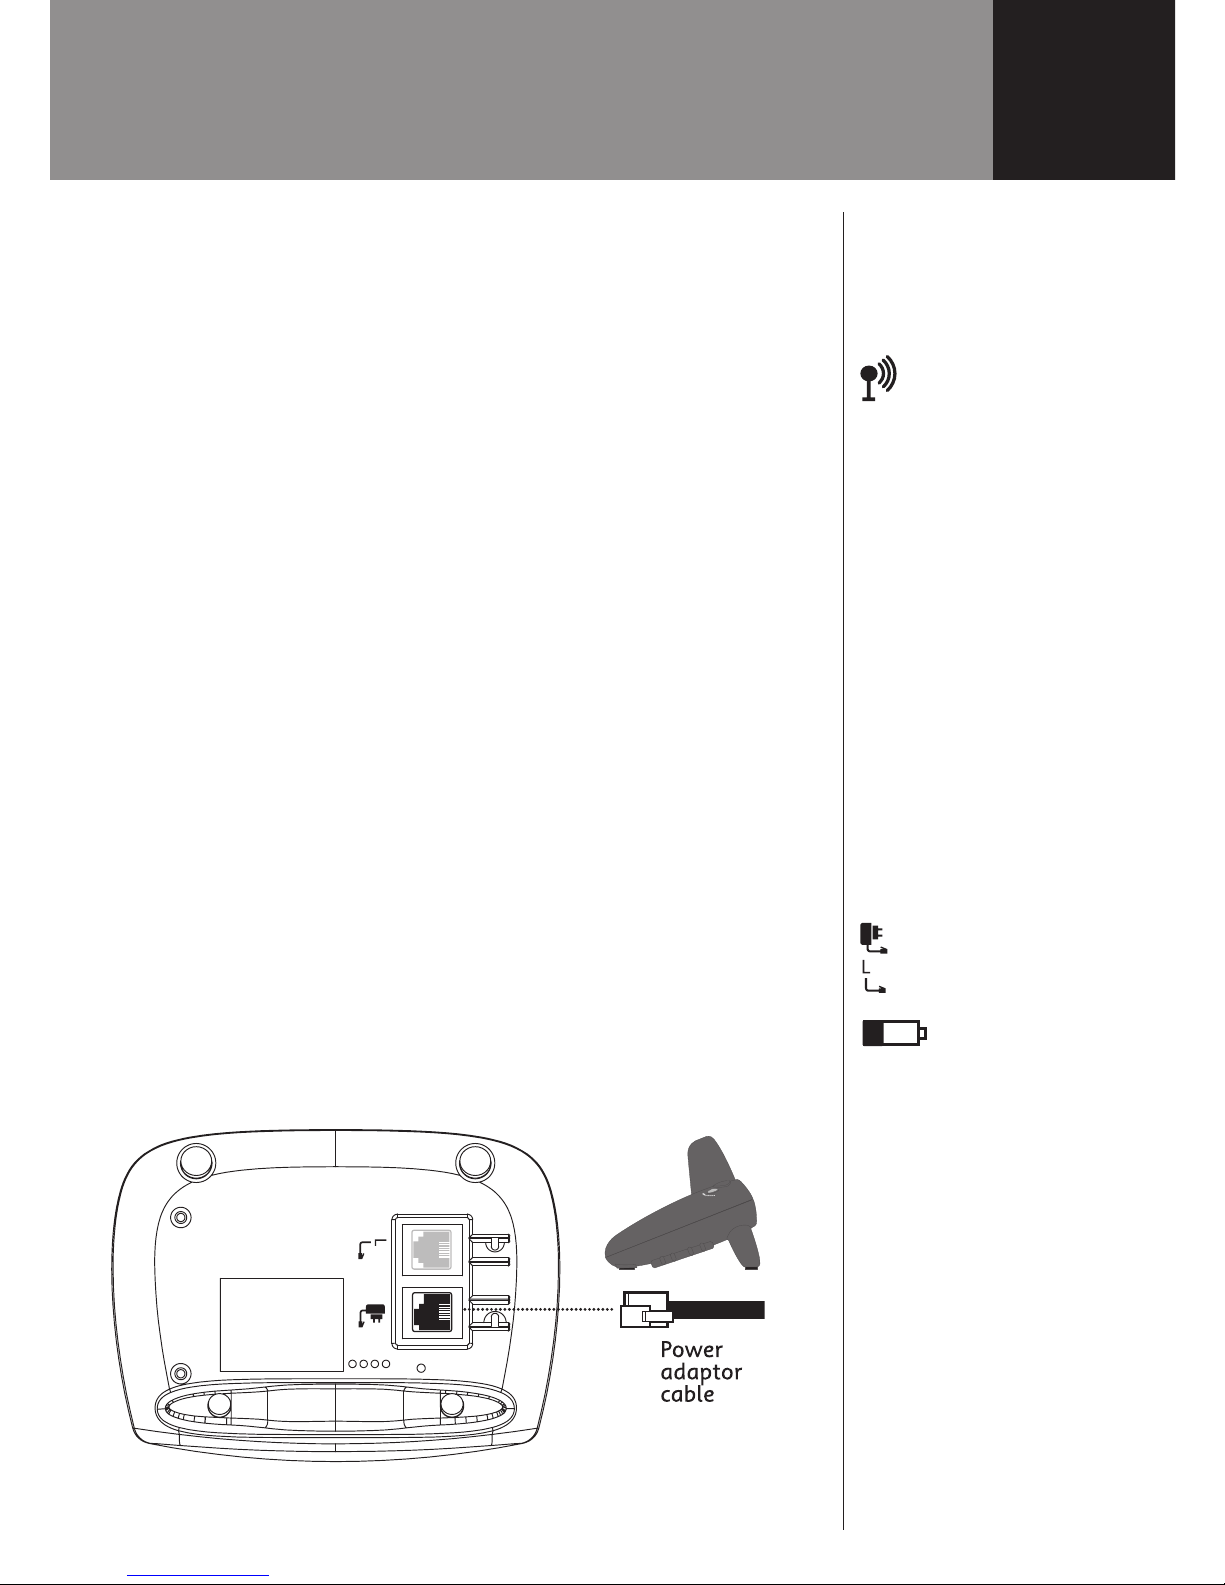
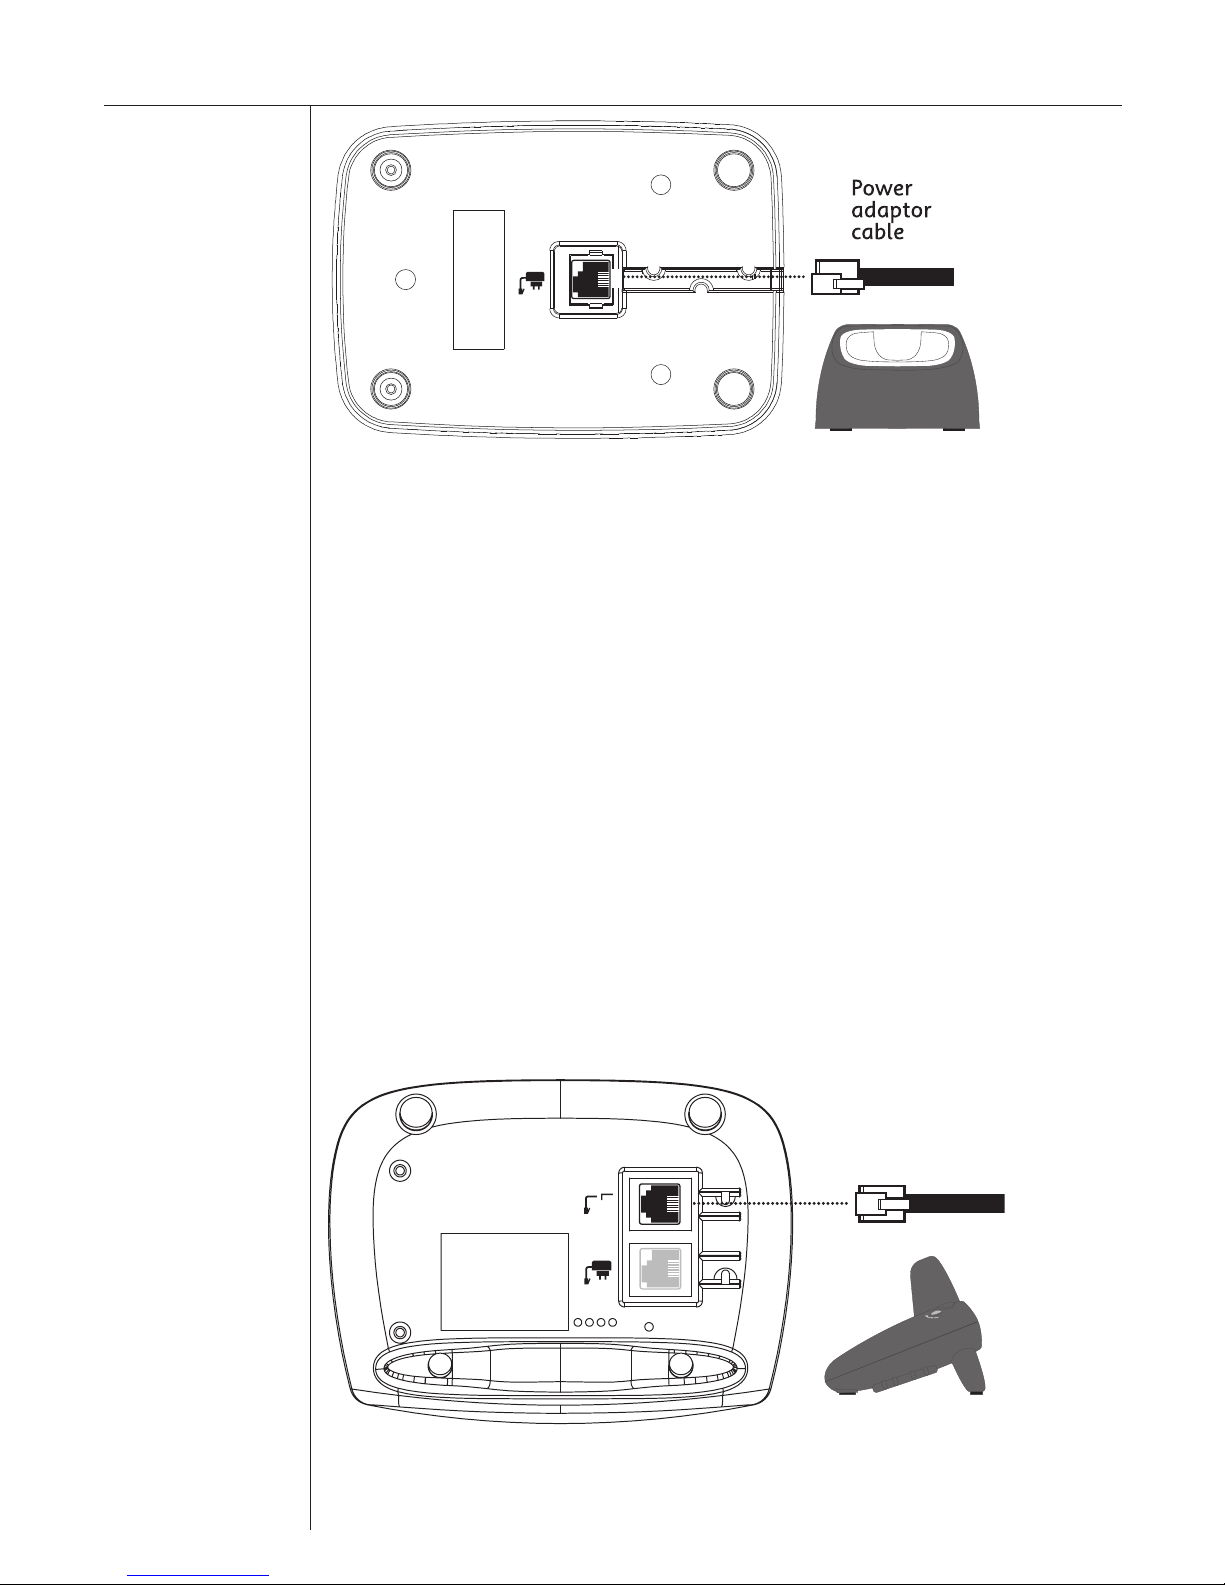
Which socket?
Power socket
Telephone line socket
Battery low warning
When the battery charge
is low the handset battery
icon will be empty and
flashing. Place the handset
back on the base to
recharge.
Talk/Standby time
Under ideal conditions,
fully charged handset
batteries should give up
to 10 hours talk time or
100 hours standby on a
single charge. See ‘Battery
performance’ on the next
page.
Location
You need to place your Telstra Outdoor 900 base unit
within 2 metres of a mains power and telephone socket
so that the cables will reach.
Make sure it is at least 1 metre away from other
electrical appliances to avoid interference.
Your Telstra Outdoor 900 works by sending radio signals
between the handset and base. The strength of the
signal depends on where you site the base. Putting it as
high as possible can help to provide the best signal.
Setting up
1. Main base unit - Plug the mains power cable into the
socket marked on the underside of the base and plug
the other end into the mains power wall socket and
switch the power on.
The green
Power/In use light on the base comes on.
Handset charging unit - Plug the mains power
cable (red plug) into the socket on the underside of
the base and plug the other end into the mains power
wall socket and switch the power on.
6
Battery
performance
To keep your
batteries in the
best condition,
leave the handset
off the base for
a few hours at a
time (after the
initial 16 hour
charge).
Please note
however, that
new NiMH
batteries do
not reach full
capacity until
they have been
in normal use for
several days.
Running the
batteries right
down at least
once a week will
help them last as
long as possible.
The charge
capacity of
rechargeable
batteries will
reduce with time
as they wear out,
so reducing the
talk/standby time
of the handset.
Eventually they
will need to be
replaced. New
batteries can be
purchased from
TecHelp on 1300
369 193 or your
nearest electrical
retailer.
-RK\QSXQ
>OV]^\K6<
2. Insert the 2 x AAA NiMH batteries supplied into the handset
as below.
a. Unscrew the battery door and belt-clip.
b. Remove the belt-clip.
c. Lift the battery door.
d. Insert the batteries observing the (+ and -) polarity.
e. Replace the battery cover and belt clip
3. Charge the handset for at least 16 hours by placing it on the
charger.
The red charging indicator light on the charger comes on.
The screen will show the standby display and a scrolling
battery icon to show that the handset is charging.
6SXOMY\N
4. After 16 hours, plug the telephone line cord into your Telstra
Outdoor 900 base unit and the other end into the wall socket.
Getting started7
Getting started
Helpline
If you
have any
difficulties
setting up
your Telstra
Outdoor 900,
please call
TecHelp on
1300 369
193.
IMPORTANT
- Please
ensure your
mains power
adaptor
socket is
within reach.
See: Things
you need
to know on
page 42 for
important
information.
Time and date settings
Set time on the handset
If you have subscribed to Telstra Calling Number Display feature2,
the time will be set automatically when you receive your first call.
You can also set the time manually.
1. Press
Menu
scroll to Date and Time.
2. Press the
Menu
button to confirm.
3. Scroll to SET TIME and press
Menu
button to confirm.
4. Enter the current time in 24 hour format using the keypad. e.g.
2.04PM = 1404.
5.Press the
Menu
button to confirm.
Set date on the handset
1. Press
Menu
scroll to Date and Time.
2. Press the
Menu
button to confirm.
3. Scroll to SET TIME and press
Menu
button to confirm.
4. Enter the current date in day/month format ie. 26/08
5.Press the
Menu
button to confirm.
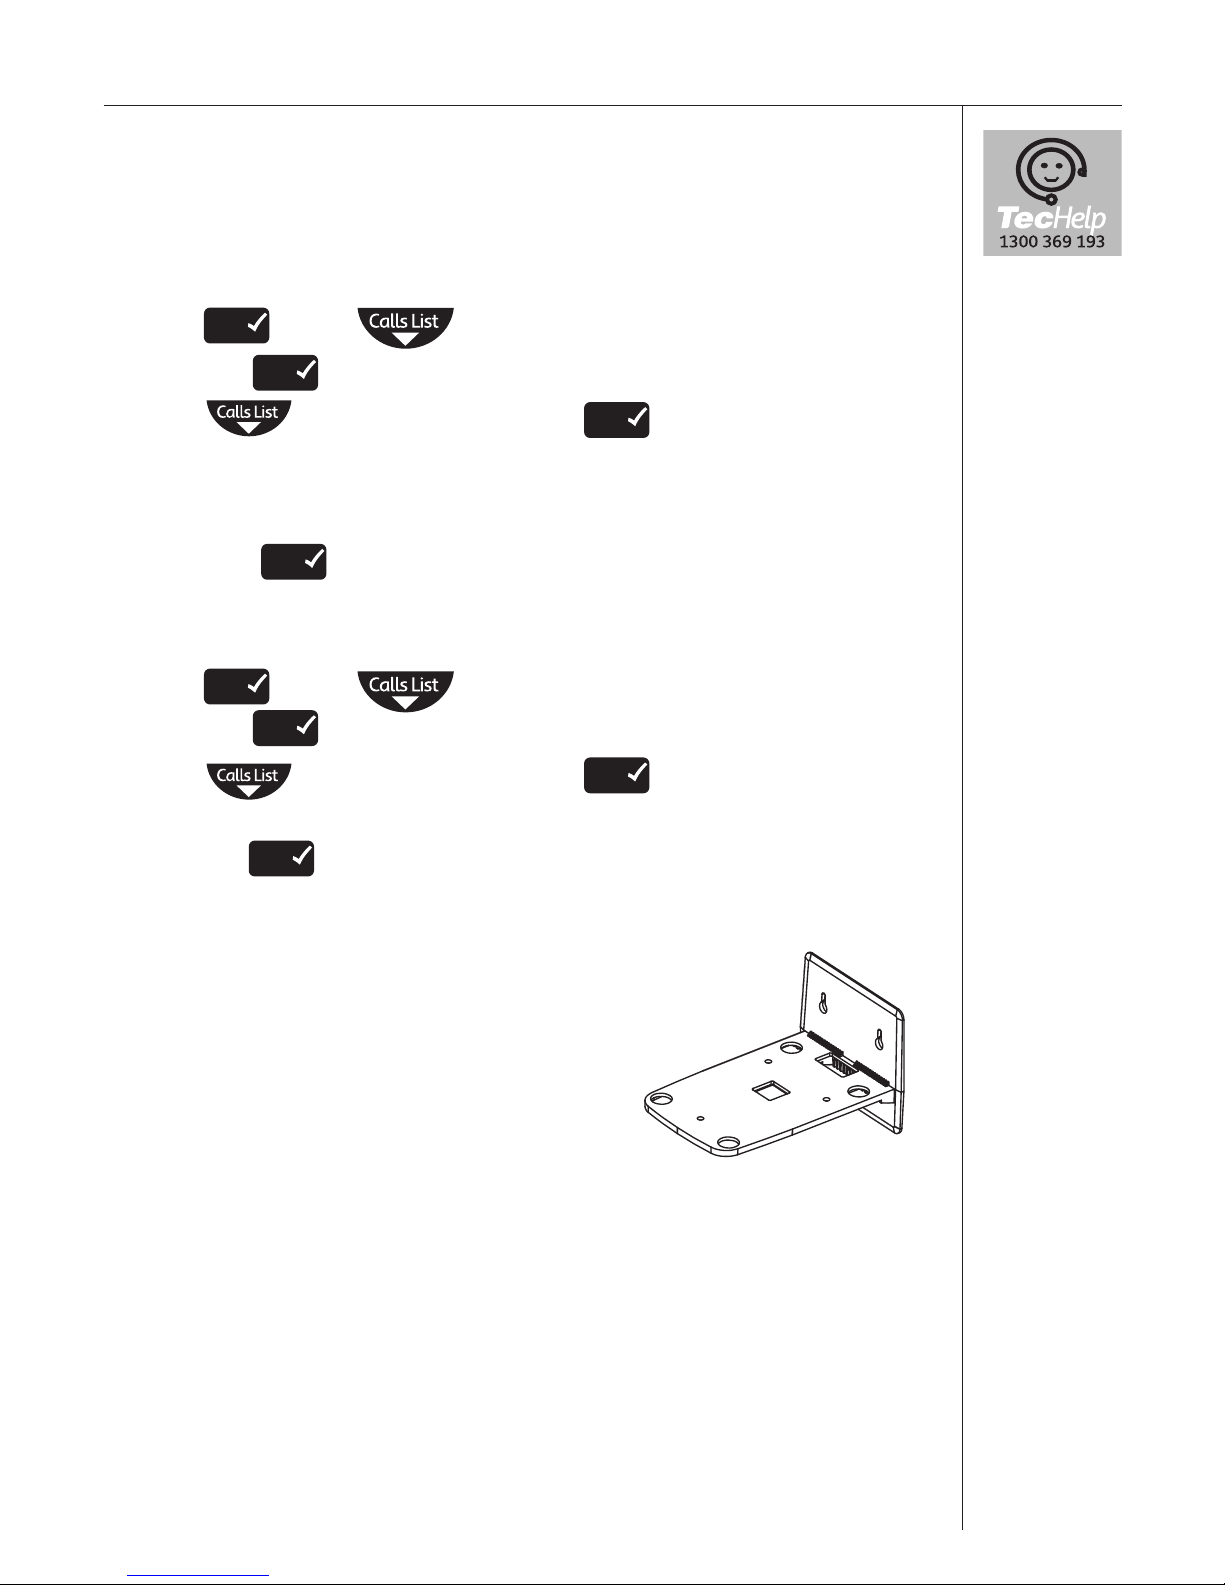
Wall Mounting
You can wall mount your Telstra Outdoor
900 handset charger by using the wall
mounting bracket included. Before you
drill holes in cavity walls, we recommend
you check for electrical wiring and wear
personal protective equipment.
1. Locate and screw the wall mounting bracket on the wall using
the screws provided and the drilling template located in the
back of the User Guide.
2. Run the mains power cable through the rectangular hole
located at the back of the wall mounting bracket and insert
the red plug into the charger base.
3. Place the charger unit on the wall mounting bracket locating
the rubber feet into the locator holes.
8
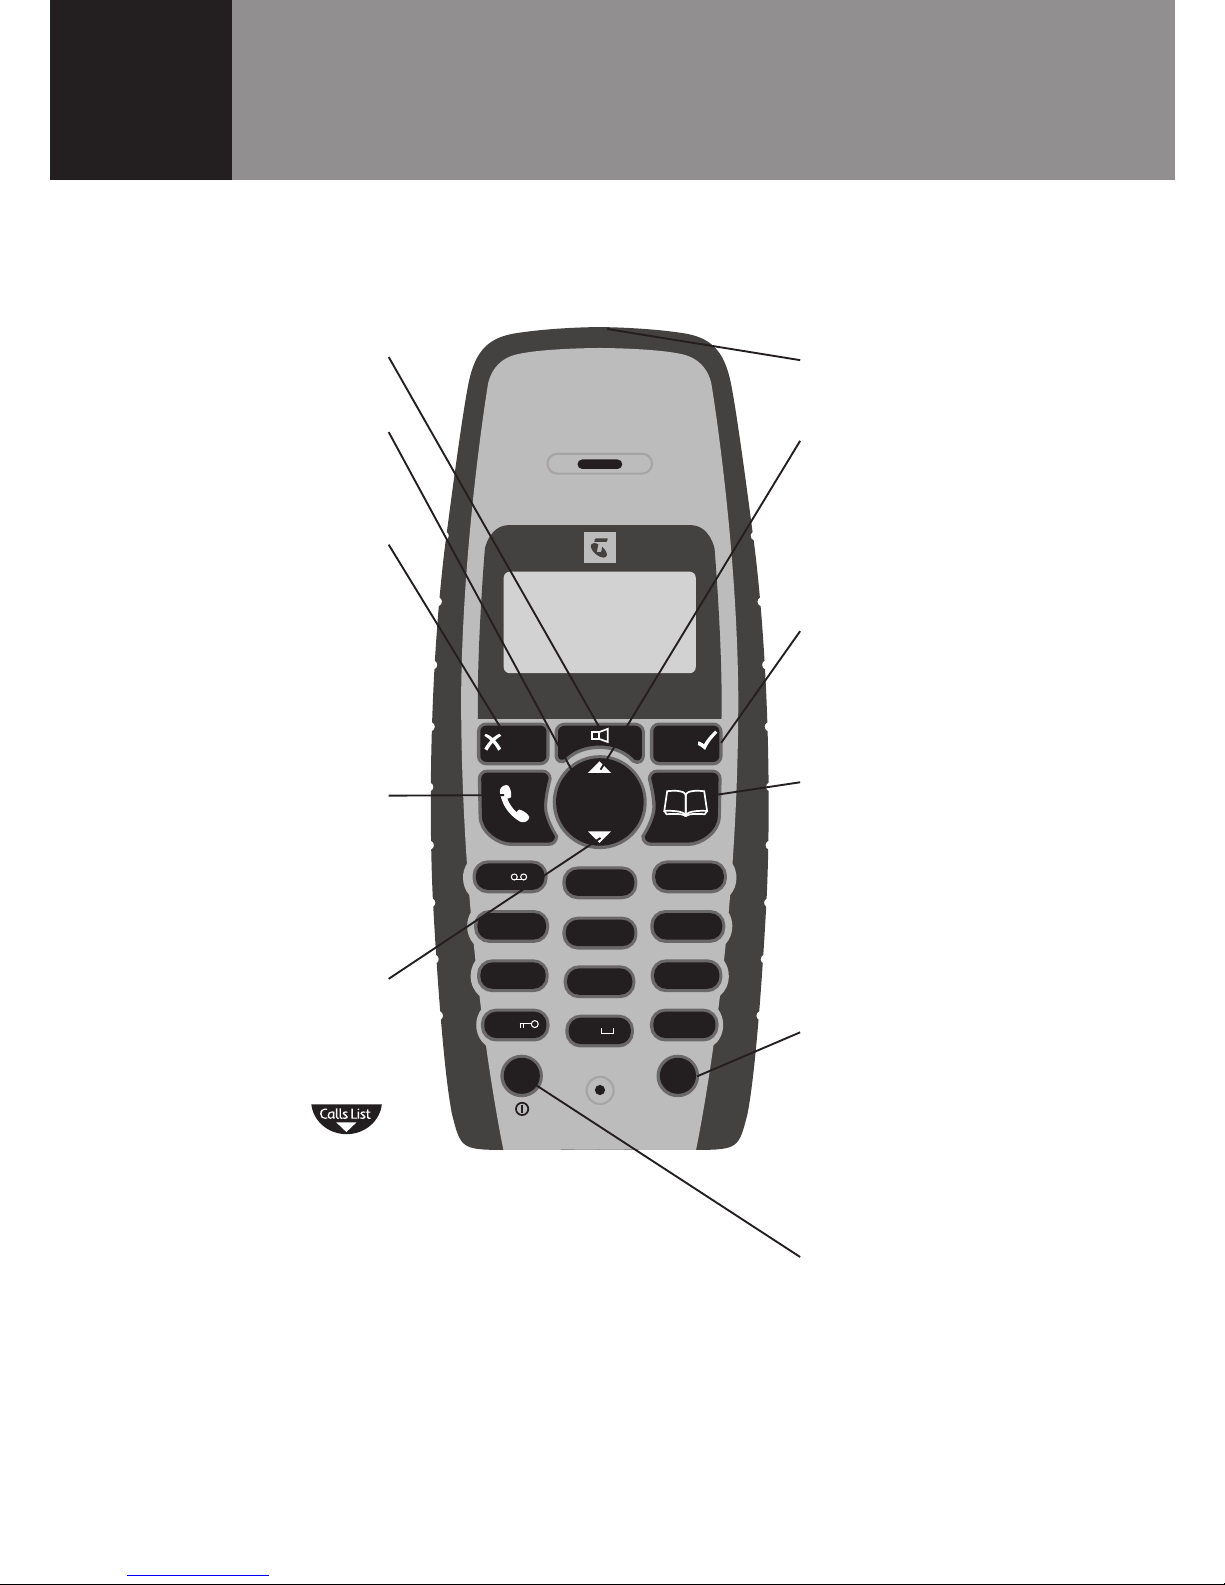
Torch light
Scroll/Volume
Scroll through options.
During a call, press to
increase volume.
✓/Menu button
Press to access menu or
activate an operation.
Phonebook/Exit menu
Used to recall names
and numbers from the
Phonebook, page 19.
Also used to exit Menu
operations.
Int
Lets you make calls
between handsets
registered to the base,
page 35.
R (Recall)/Power
For use with a PABX and
Telstra Calling Features,
page 42. Power on/off.
Handset
buttons
Handsfree button
Redial/Pause
button
Mute/Clear
Press to mute callers,
page 17. Used to
delete characters
from a name or
number, page 18.
Talk/End
Press to make call
and end a call, page
14.
Scroll/Missed Calls
list/Received calls/
Volume
Scroll through
options. Press
to open Missed Calls/
Received calls list,
page 15. During a call,
press to decrease
volume.
6
Y
X
Q
<
K
X
Q
O
<
3X^
+,-
./0
456
123
!
:;<=
789
#
ABCD
"
>?@
<ONSKV
7_^O 7OX_
-KVV]6S]^
9
Getting to know your Telstra Outdoor 900
Getting to know your Telstra Outdoor 900 10
Handset display icons
CY_RK`OKXOaWO]]KQOSXcY_\
>OV]^\K2YWO7O]]KQO]Y\7O]]KQO,KXU]O\`SMO
CY_K\OWKUSXQKXOb^O\XKVMKVV
0VK]RSXQ$CY_K\O\OMOS`SXQKXSX^O\XKVMKVV
=^OKNc$CY_K\OWKUSXQKXSX^O\XKVMKVV
=^OKNc$CY_K\OSX^ROMKVVO\VS]^
0VK]RSXQ$>RO\OK\OXOaMKVV]]^Y\ONSX^ROMKVV]VS]^-8.
>RS]X_WLO\SX^ROMKVVO\VS]^S]KWS]]ONMKVV
>RS]X_WLO\SX^ROMKVVO\VS]^aK]KV\OKNc^KUOX
0VK]RSXQ$:VOK]OMRK\QO^RORKXN]O^
=^OKNc$3XNSMK^SYXYPLK^^O\cMKZKMS^c
-cMVSXQ^R\Y_QR^RO]OQWOX^]$>RORKXN]O^S]LOSXQMRK\QON
AROX^RO:RYXOLYYUS]LOSXQ_]ON
AROXSXWOX_YZO\K^SYX
>ROUOcZKNVYMUS]KM^S`K^ON
=^OKNc$>ROMYXXOM^SYX^Y^ROLK]O_XS^S]]K^S]PKM^Y\c
0VK]RSXQ$,K]O_XS^S]Y_^YP\KXQO
>ROX_WLO\S]VYXQO\^RKXNSQS^]
CY_RK`OKXOa^Ob^=7=WO]]KQO
See Things you need to know on page 42 for important information.
11 Getting to know your Telstra Outdoor 900
6
Y
X
Q
<
K
X
Q
O
<
3X^
+,-
./0
456
123
!
:;<=
789
#
ABCD
"
>?@
<ONSKV
7_^O 7OX_
-KVV]6S]^
Navigating the menus
Your Telstra Outdoor 900 has a menu system
which is easy to use. Each menu leads to a
list of options. You’ll find a menu map on the
following page.
When the handset is switched on and in
standby, press the
Menu
button to open the
main menu.
Use the and buttons to scroll
to the menu option you want.
Then select
Menu
to select further options or
confirm the setting displayed.
Exit or go back one level in the menu
To go to the previous level in the menu, press
Mute
12
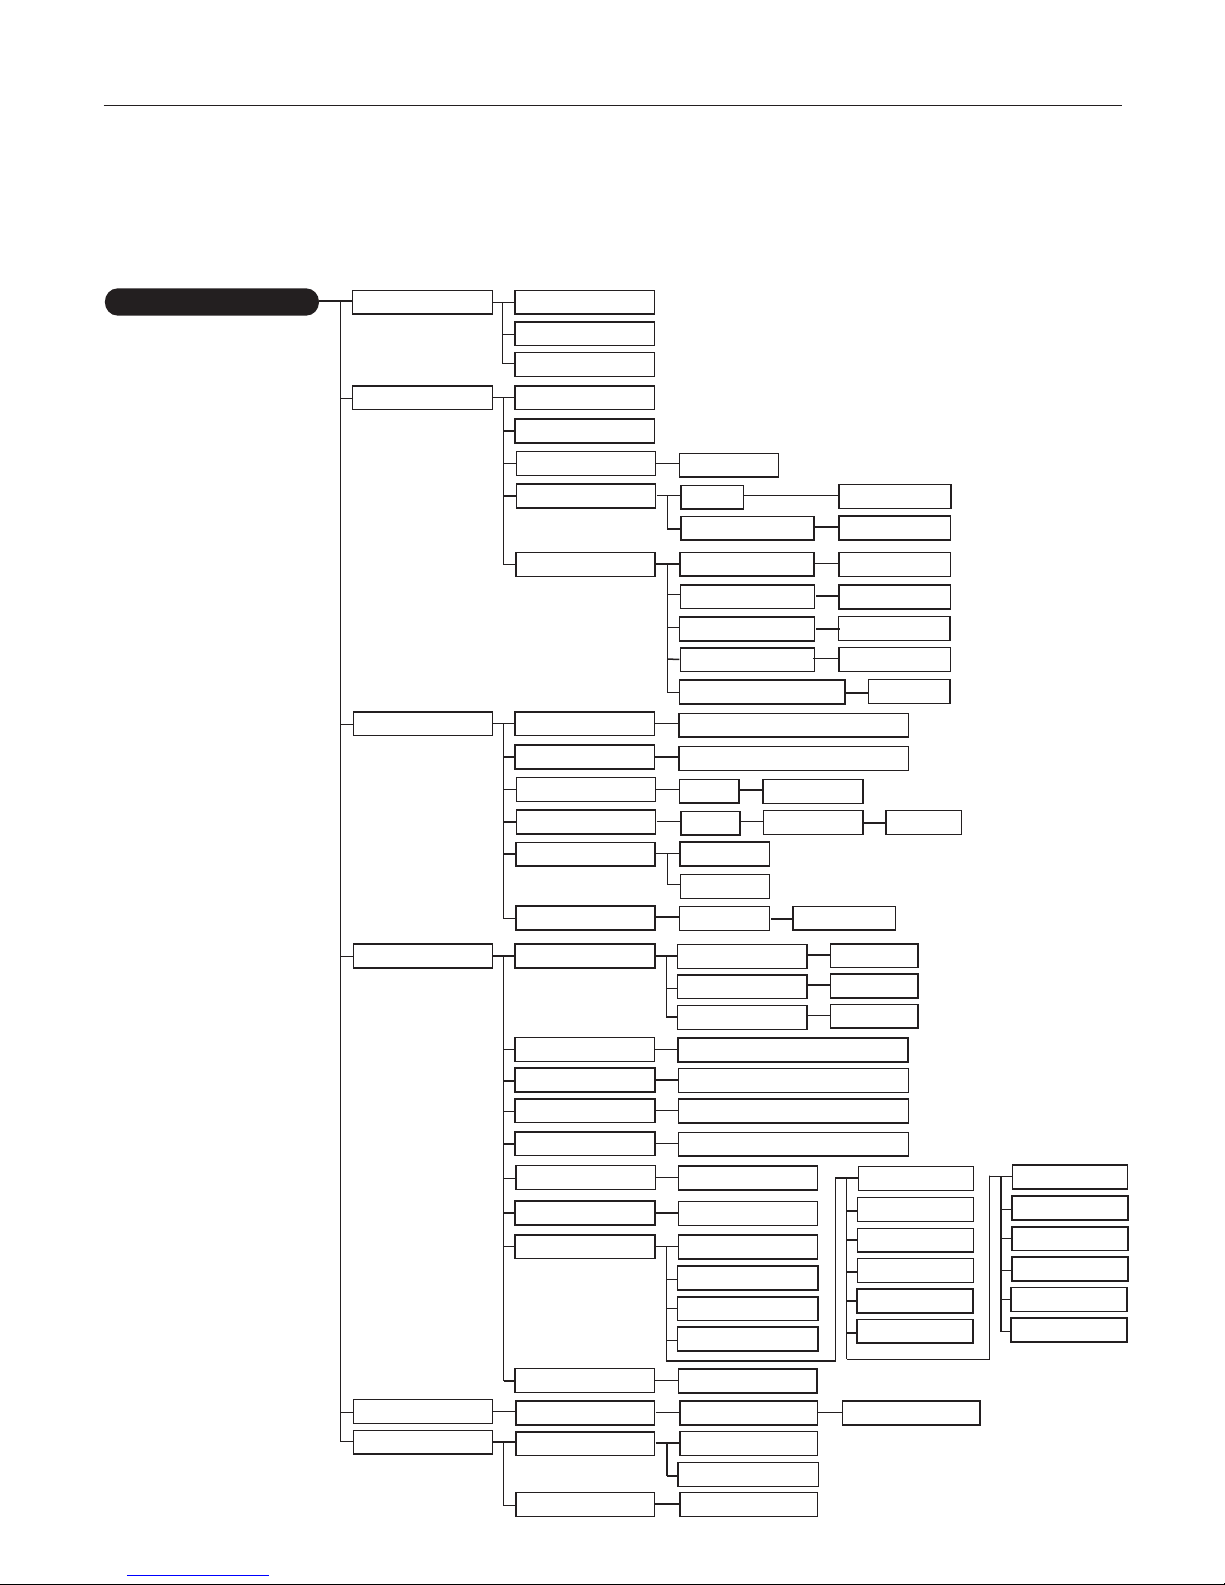
Telstra Outdoor 900 menu map
:RYXO ,YYU
+NN /X^\c
7YNSPc /X^\c
.OVO^O /X^\c
<OQS]^O\
2KXN]O^
,OOZ
6Ya ,K^^O\c
9_^ <KXQO
5
Oc^YXO
9X 9PP
9X 9PP
9X 9PP
9X 9PP
@YV_WO 9PP
@YV_WO 9PP
/b^ <SXQ @YV
3X^ 7OVYNc
7OVYNc
7OVYNc
7OVYNc
/b^ 7OVYNc
+_^Y +X]aO\
2KXN]O^8KWO
5Oc 6YMU
6KXQ_KQO
/XQVS]R
1O\WKX
0\KXMKS]
3^KVSKXY
=O^ ?Z ,K]O @YV_WO
,K]O 7OVYNc
.OV 2KXN]O^
:SX )
:38 )
2KXN]O^ )
:SX -YNO
:SX )
8Oa :SX
<O^cZO
.OPK_V^
<OMKVV
=OVOM^ ,K]O
<OQ ,K]O
<OMKVV
,K]O I I I
,K]O
<OMKVV
-YXPS\W)
=7= 3XLYb
:O\]YXKV=7=
A\S^O
7O]]KQO)
<OMOS`O-OX^\O
.OVO^O+VV
3XLYb
-YXPS\W)
=7==O^^SXQ]
7O]]KQO+VO\^
=OXN=O\`SMO
<OMOS`O
>O\WSXKV8_WLO\
=OXN-OX^\O
#
3X^ <SXQ @YV
@YV_WO 9PP
+_^Y
.K^O>SWO
=O^.K^O
=O^>SWO =O^+VK\W
/]ZKXYV
8O^RO\VKXN]
.KX]U
8Y\NQO
=`OX]UK
:YV]US
-O]Uc
=VY`OXMSXK
:Y\^_Q_O]
7KQcK\
:cMMUK
/RXSUK
:O\]YXKV=7=
-YXPS\W)
9X9PP
=OXN
=OXN
6< P_XM^SYX]
Getting to know your Telstra Outdoor 900
Getting to know your Telstra Outdoor 900
13
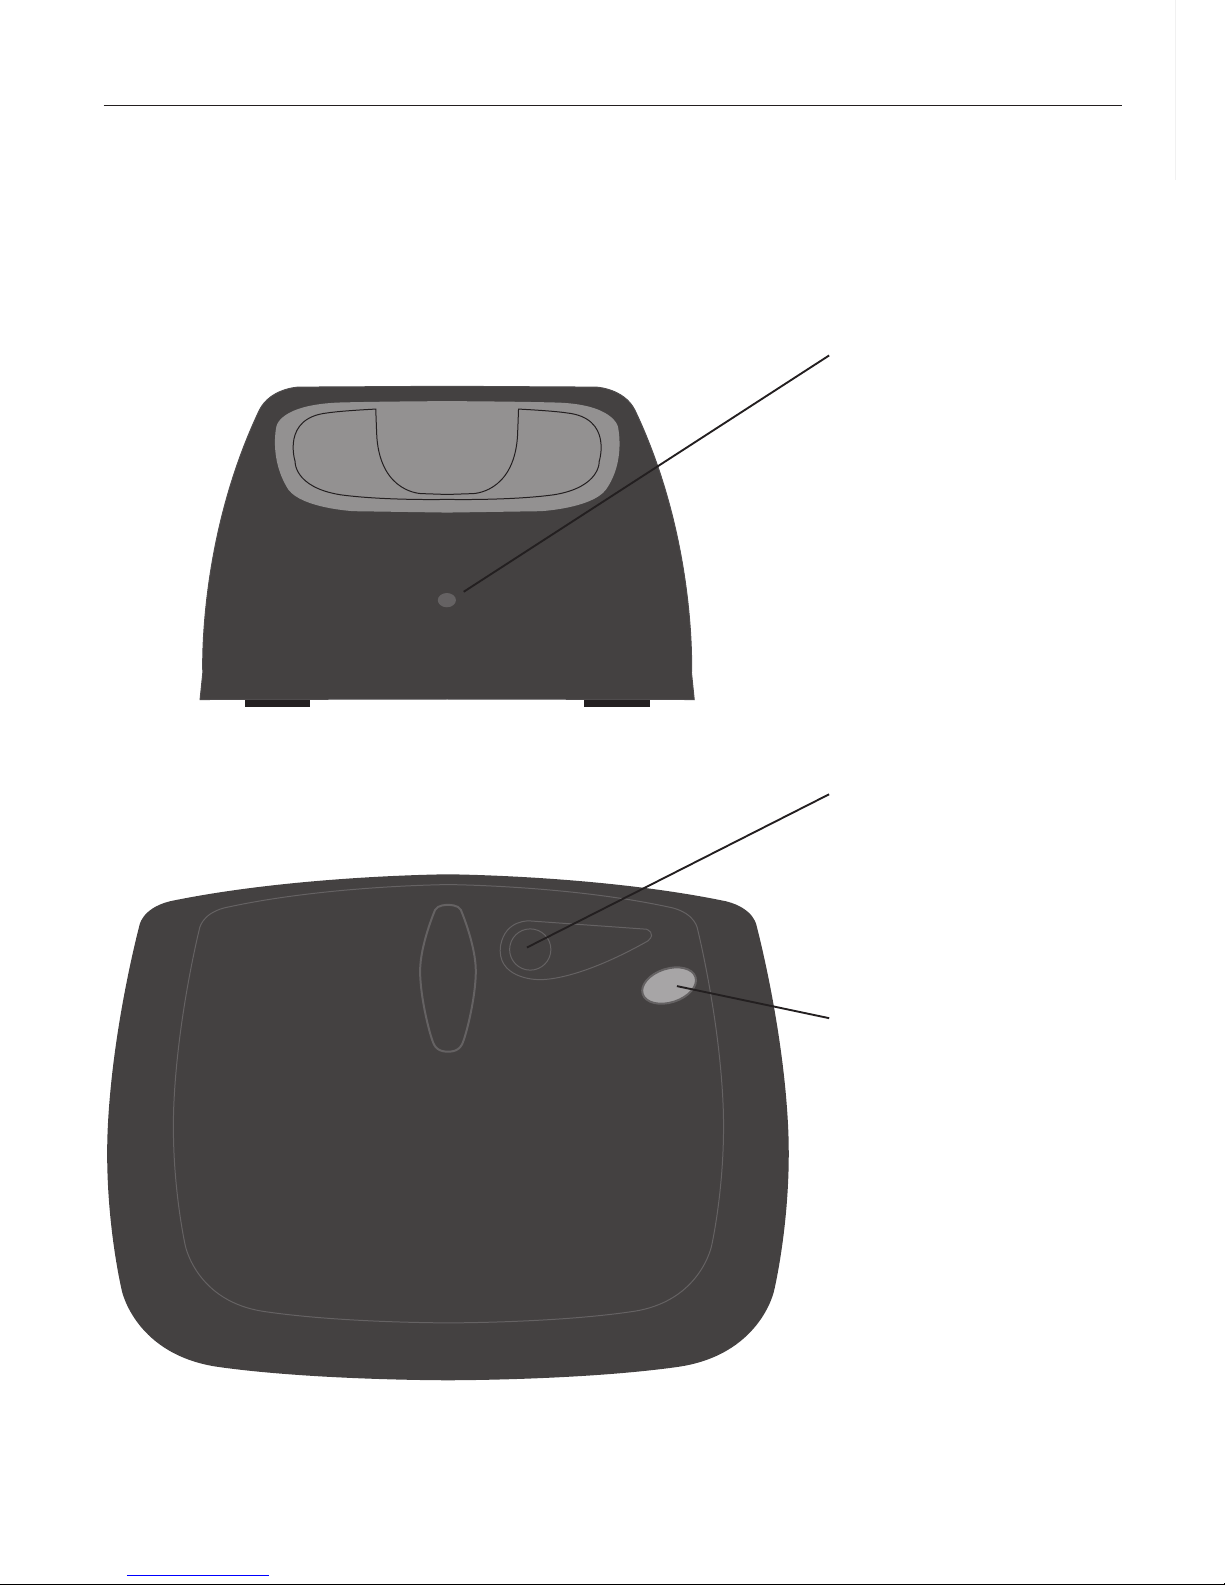
Battery charging
light
Lights up when the
handset is charging
on the base.
Page button
Press to page the
handset(s), page 20.
Power in use light
Lights up when the
power is on.
- Flashes when
making or receiving
a call (approx. once
every second)
- Flashes slowly when
you have a new voice
or text message.
Telstra Outdoor 900 Base Unit Components
-RK\QSXQ
>OV]^\K9_^NYY\#
>OV]^\K9_^NYY\#
:KQO
:
Y
a
O
\
3
X
?
]
O
.SL]RP]`YT_
=1`YT_
 Loading...