

Page 1

Call 125 111
Click www.telstra.com/nextg
Come in to a Telstra Shop or Telstra Dealer
C011 A.46006239.P14
FEB 09
Next G™ network
User Guide
Page 2

The Next G™ network gives
you everything you need, faster.
One-click applications, instant
downloads, on-the-spot browsing,
mobile TV and email from many
places means you can have the
whole world in your pocket.
Let’s start the ride.
Welcome to Australia’s Largest
and Fastest National Mobile Network.
Page 3

Getting Started
Setting up your phone 03
Copying your contacts 05
Setting up voice and
Video MessageBank™ 07
Personalise your phone 09
MyEmail 10
MySync 13
Video Calling
How to make a mobile
to mobile video call 17
Barring your video
calling service 18
My Place – your mobile menu
BigPond® Mobile Services 21
Mobile FOXTEL from Telstra 25
Yellow™ Mobile 27
BigPond Music 29
1234 35
Whereis® Mobile 37
BigBlog & Photos 43
Picture Messaging 52
Downloads 55
My Account 59
Page 4

01 02
Getting started
You can set up your Next G™ mobile quickly and easily.
Page 5
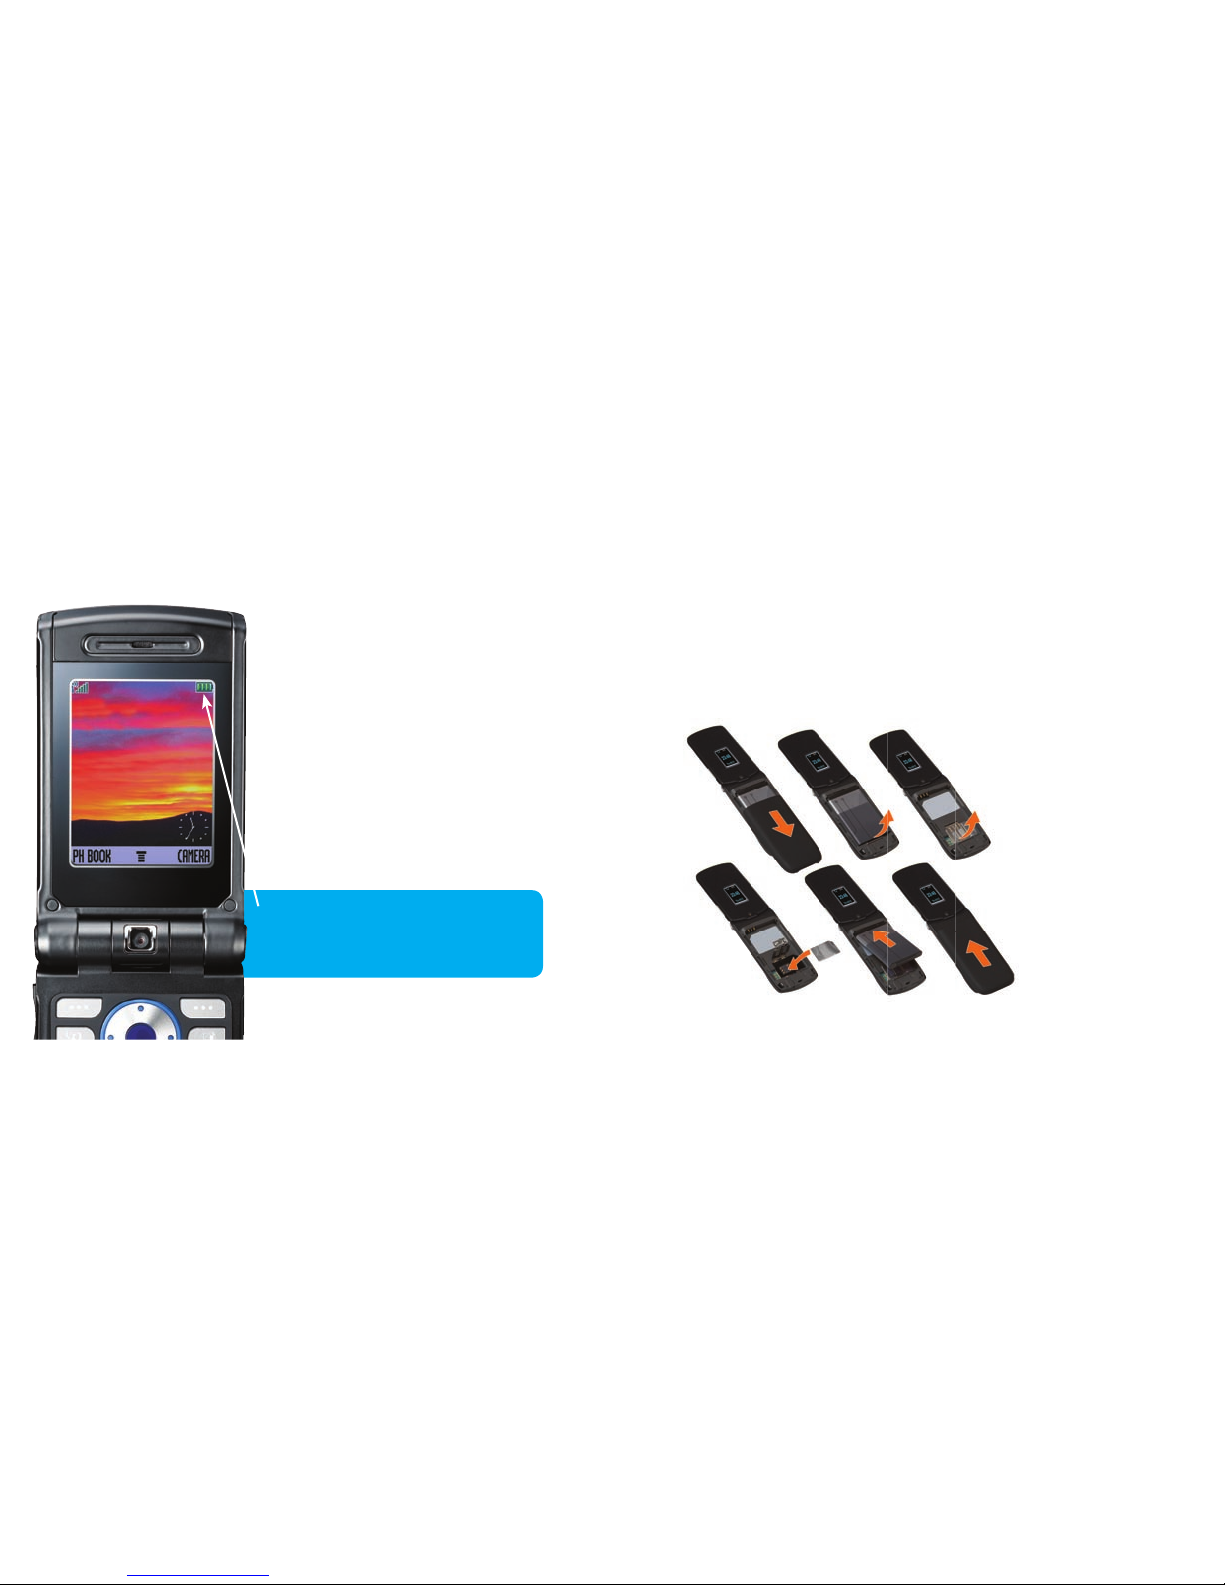
Inserting the Next G™ SIM card
The SIM card stores your contacts and personal settings.
Insert your SIM card like this:
Setting up your phone
Charging your phone
Your phone should already be at
least half-charged. Simply plug
your phone in until the battery-level
indicator on your screen shows it is full
– this is usually after 4 or more hours.
Try to charge your mobile until it is
completely full for the rst charge,
after this you can charge your phone
as and when needed.
Your mobile has a battery-level
indicator on the screen*. Your
battery power level is here.
* Battery indicator and placement on screen
may vary between handsets.
03 04
Page 6

Copying your contacts
Depending on how you purchased your Next G™ mobile,
selected Telstra Shops and Dealers may have already
transferred your contacts from your old handset to your
Next G™ mobile.
OR
There are 2 ways to copy your contacts yourself.
See the next page.
1. Copying contacts from your SIM card
a) Remove the SIM card from your old mobile and put it
into your new mobile.
b) You’ll be prompted to copy all of the contacts. Once your
contacts have been copied, remove the old SIM and put
your new Telstra Next G™ SIM back into your Telstra
Next G™ mobile. You can leave your contacts on your
mobile or move them to the Next G™ SIM.
2. Copying contacts from your mobile phone address book
a) Put your new Telstra Next G™ SIM card into your old
mobile and copy the contacts to the Telstra Next G™ SIM.
b) When you’ve copied the contacts to the Telstra Next G™
SIM card, put it in your new Telstra Next G™ mobile.
You can leave your contacts in the Telstra Next G™
SIM address book or copy them direct to the mobile.
05 06
Page 7

07 08
Setting up your voice and Video MessageBank™
1. Voice MessageBank®
To set up your personal voice greeting, dial 101 and then
press the voice call button on your handset to call your
MessageBank® service.
Once your call is connected, simply follow the prompts.
2. Video MessageBank
a) Check you are in a Next G™ coverage area then dial 101
(in Australia only) and press the video call button to make
a video call to your Video MessageBank™ service.
b) Follow the visual and audio prompts to set your Video
MessageBank PIN.
c) Record your video personal greeting or select a fun
greeting. You can also view an introduction to your
new Video MessageBank service.
Page 8

09 10
Personalise your phone with BigPond Tones & Pics
1. Press the BigPond button where it’s Free to Browse1.
2. Select Tones & Pics from the Home tab and choose from
the list displayed, eg to choose a wallpaper for your mobile,
select Pics.
3. Once you nd a wallpaper you like, click Buy. The next screen
will tell you the price and ask you to conrm your purchase.
After a moment, you’ll see a conrmation screen telling you
that the image has been downloaded.
4. Your chosen wallpaper will appear on your handset, you can
save it as a pic, and then set it as your new wallpaper straight
away! To get a new ringtone or SMS tone, just choose Tones
and follow the same instructions.
MyEmail
Access email on your mobile from multiple accounts
such as BigPond®, Windows Live Hotmail or Yahoo7! Mail.
MyEmail is available on the Next G™ network with a
compatible handset.
To nd out if your mobile phone is compatible go to
www.telstra.com/myemail. Then nd out how to get even
more value with MyConnect at www.telstra.com/myconnect
To nd out how to use MyEmail, go to the next page.
Page 9
11 12
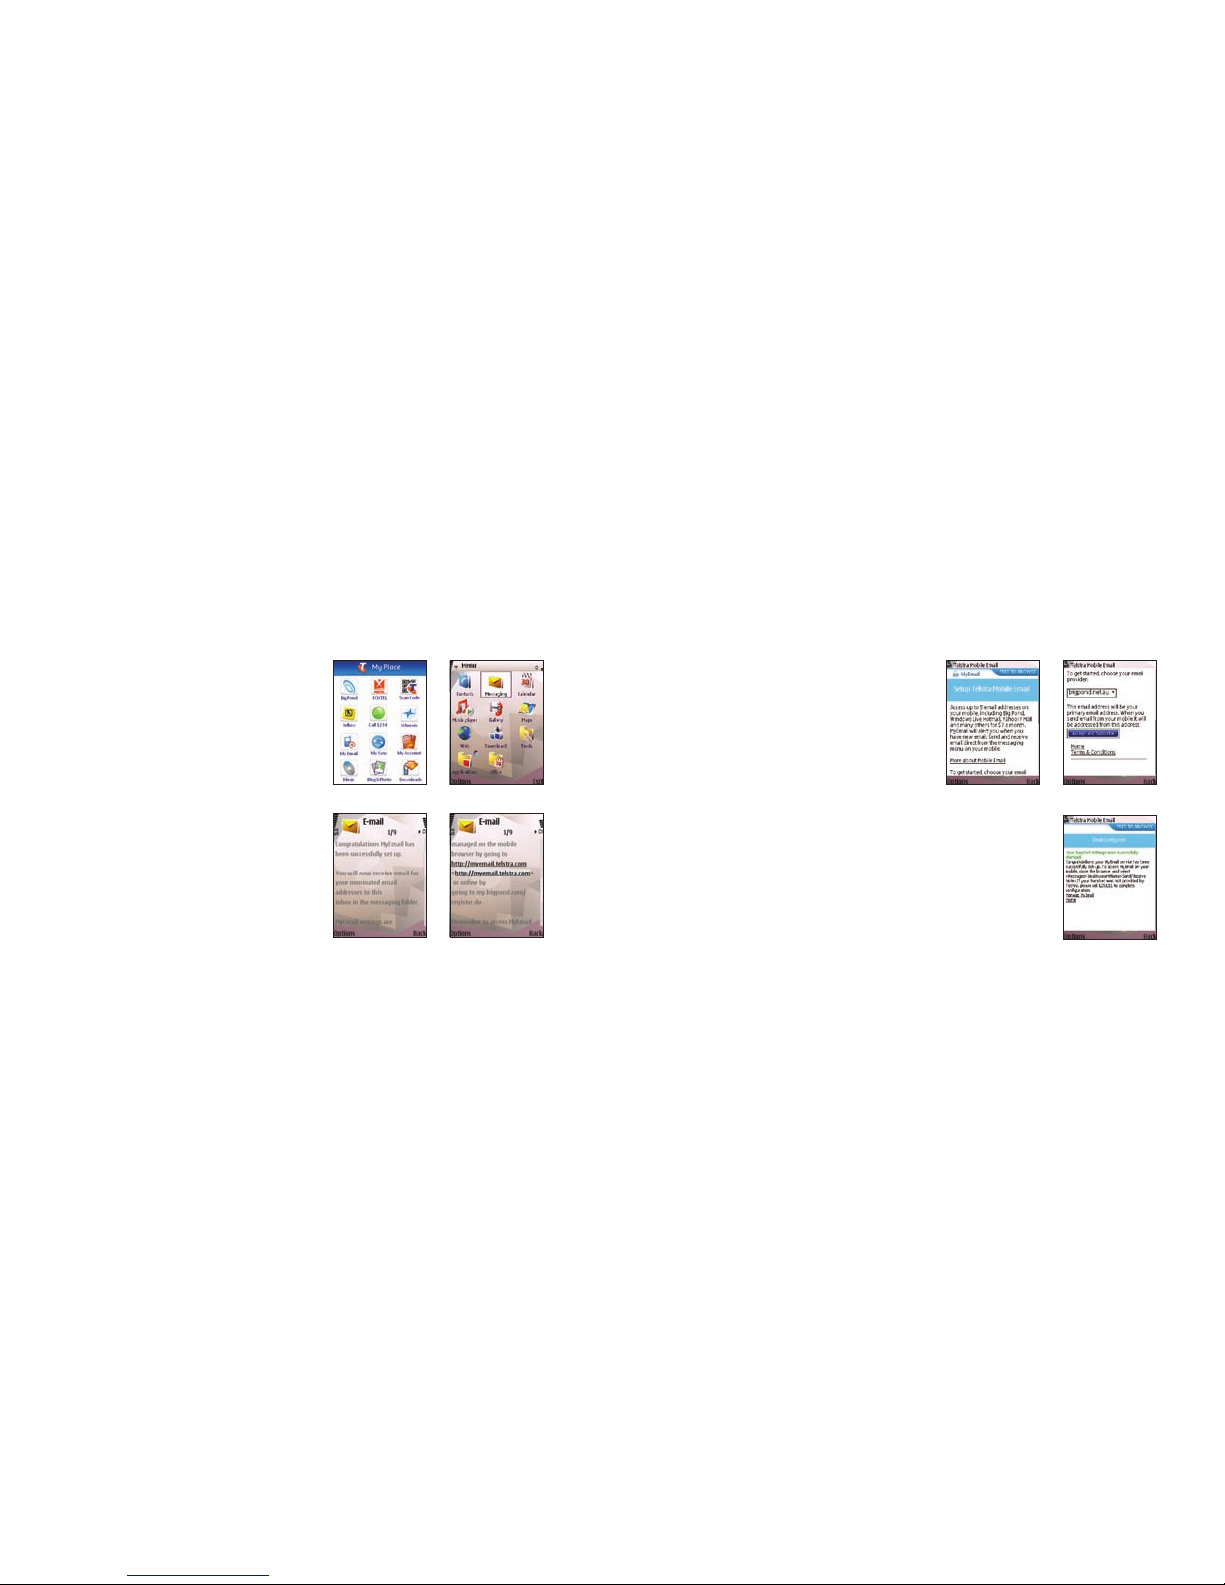
To use MyEmail:
Step 1 Select the MyEmail
icon on the My Place,
BigPond or phone menu
Step 3 Follow the onscreen
instructions to setup
your email account
Step 2 Select the link
to the MyEmail
preloaded WAP site,
which will take you
to the setup page
Step 4 Select Manage MyEmail
and follow the onscreen
instructions
Page 10
13 14
MySync
An automatic online backup service for contacts saved
on your mobile handset so you will not lose this valuable
information if you lose, break or upgrade your mobile phone.
MySync is available on the Next G™ network with a compatible
handset. To nd out if your mobile phone is compatible go to
www.telstra.com/mysync. Then nd out how to get even more
value with MyConnect at www.telstra.com/myconnect
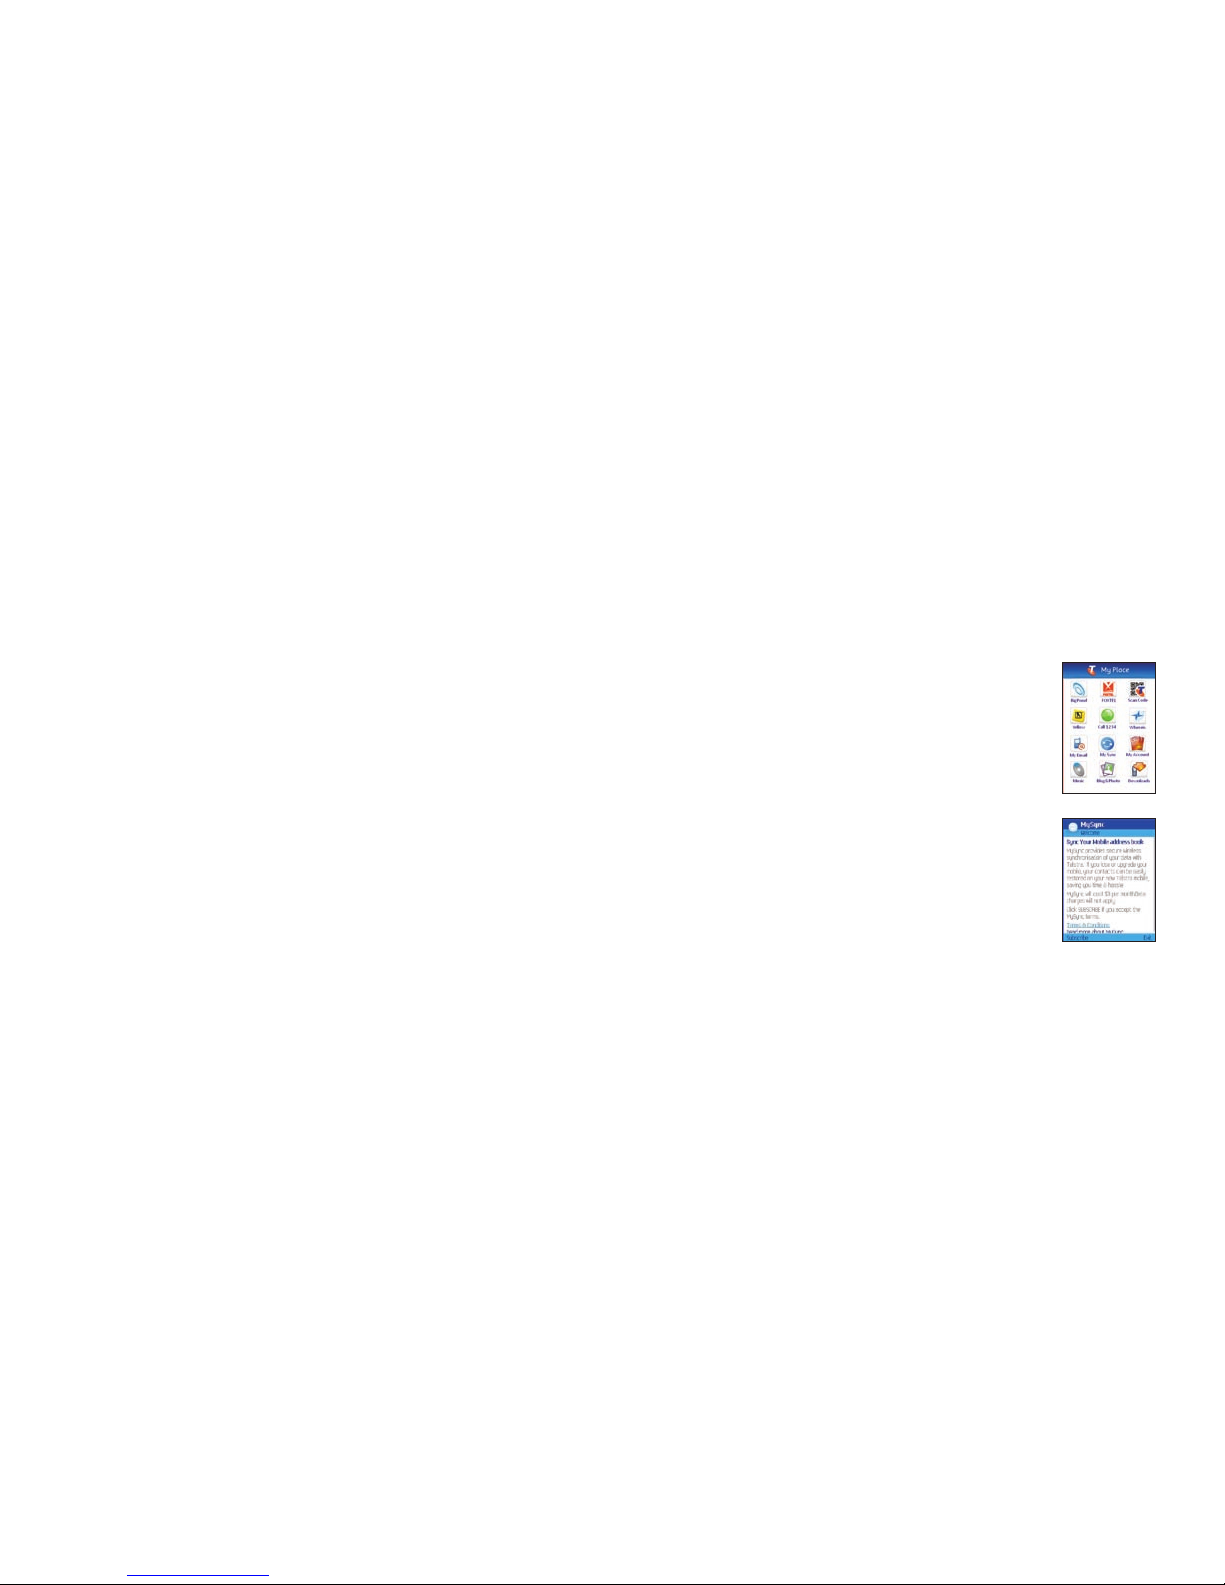
To use MySync on your mobile phone:
Step 1 Select the MySync icon on the
My Place or BigPond menu
Step 2 Follow the quick setup wizard
and sync your contacts
Page 11

15 16
Next G™ mobile to mobile video calling means you can talk face
to face in many places.
Video calling
Page 12

For more information about video calling go to
www.telstra.com.au/nextgnetwork/experience/video_calling.htm
How to make a mobile to mobile video call
1. Check you are in a Next G™ coverage area.
2. Enter the number you wish to call or select it from your
address book.
3. Press the video call button and say, or wave, hello! If you
can’t nd the button, click the Video Call menu option or
refer to your manufacturer’s handset guide.
The audio component of the call will default to the phone’s
loudspeaker, but you can use a headset if you want privacy. If the
Video Call fails, you’ll have the option to make a voice call instead.
To make and receive video calls, both parties must be in a Next G™
or 3G coverage area and have a video calling compatible handset.
17
18
Barring your video calling service
You can ask us to bar your handset from making and receiving
video calls by calling 125 111. If you do this and someone tries
to video call you, their video call will fail and they’ll be asked to
make a voice call instead.
Page 13

My Place
– your new
mobile menu
You can access the My Place
menu by selecting the
symbol from the phone menu.
Just one click for the very best
of BigPond Mobile Services,
from music and email to
Mobile FOXTEL from Telstra
and Yellow™ Mobile.
My Place has it all
Mobile FOXTEL
from Telstra
BigPond
Music
Yellow
BigPond Mobile
Services
Whereis
My Account
Downloads
BigBlog &
Photos
1234
19
20
Page 14

If you want sports…
1. Click Sport from the Home tab to
see the options and choose the
sport you like, for example, NRL,
and you will be redirected to the
NRL page. This service is free to
browse when accessed via the
Home tab
1
.
2. Watch the latest match highlights
by clicking Play in the video section.
You will then see a video card letting
you know the cost to watch this
video. You can watch the video
again anytime in the next 24 hours
without being charged again.
21 22
Free to browse
BigPond® Mobile Services
There’s a whole range of BigPond Mobile Services you
can browse for free in the Home and Today tabs
1
on your
Telstra Next G™ mobile, and when content or subscription
fees apply, we’ll let you know.
Press the BigPond button to access the Home and Today
tabs and browse for free
1
.
Page 15

Want to play some games?
1. Click Games from the Home tab to bring up
the Games menu. To see a list of newly
released, popular games select Top 10 Games.
Or you can select the game you want to play
using Games by Genre. This service is free to
browse when accessed via the Home tab1.
2. Found the game you want? Click Buy to
purchase. You’ll see the price on the next
screen. Click Accept & Buy and select Ye s
to continue installation.
3. Once installation is complete, you will see
a conrmation screen thanking you for your
purchase and the receipt number. You can
now nd and play the game anytime from
your games folder.
Check out the new Web tab
You’ll nd sites such as Hotmail, Yahoo Mail, RSVP and Myspace
Mobile which are now only a click away – you don’t even have to
type in the web address!
Press the BigPond button to access the Web tab.
23 24
WEB TAB
The best way to use the Web tab is with
a Browsing Pack. To nd out more go to
www.telstra.com/mobile or call 125 111.
Page 16

25
Mobile FOXTEL from Telstra
Mobile FOXTEL from Telstra gives you the
excitement of up to 30 bite size channels
on your mobile phone. Mobile FOXTEL from
Telstra shows are made especially for your
Next G™ handset, so they are just the right
size and length to watch when you are on
the move.
You will need an active monthly subscription
to Mobile FOXTEL from Telstra, available from
the homepage.
Click the FOXTEL icon from the My Place
menu or press the BigPond button and browse
for free1.
Once you’re a subscriber, here are some of the channels†
you can choose from:
SKY NEWS Headlines
SKY NEWS Business
CNN
MTV*
Discovery Mobile*
FOX8*
E! Entertainment*
THE COMEDY CHANNEL*
Fashion TV
FOX SPORTS NEWS TV
Disney Channel*
Union*
† Usage limit of 15 mins per session, 200 mins per month may apply.
* These channels are specically made for your mobile, so there is usually
1-3 hours worth of varied content per channel at any given time.
26
Free to browse
Page 17

Yellow™ Mobile
When you’re out and about and
need results fast, you can now
search the Yellow™ Mobile
directory on your Next G™
phone simply by entering a
business name or type. Find
a bargain on Trading Post®
Mobile, be in all the right
places with Citysearch® Mobile
and search the mobile web with
Sensis® Mobile. When you press
the BigPond button, these services
are Free to Browse
1
.
To use Yellow™ Mobile on your handset:
1. Press the BigPond button, then click the
Yellow™ search icon.
2. Once you’re on the Yellow™ Mobile
homepage, simply enter the name or
type of business you need to nd.
3. You can enter a location or leave it blank
and use the Locate Me feature to search for
businesses close to where you’re standing.
27 28
Free to browse
Page 18

BigPond Music
Listen to a sample of that hot new
track on your mobile and, if you
love it, download the song to add to
your music collection – and for dual
download tracks, you pay once and
then get it on your mobile and your
PC! You can also buy it as a hot new
ringtone. It’s music on the move,
the way you want it.
Press the BigPond button, then Music
on the Home tab and this service is Free
to Browse
1
.
29 30
Purchasing and previewing new music
Click the BigPond button and then Music
on the Home tab
1
. Any music you download
will go to your BigPond Music Player.
Not all handsets are able to play music –
please refer to www.bigpondmusic.com
or check your manufacturer’s guide to see
if your handset is music-player capable
(not required when purchasing ringtones).
Free to browse
Page 19

Play it your way
Browse the site until you nd a track you want. Select it,
and choose from the following options:
To download a ringtone:
Click Buy True Tone, and follow the prompts. Once download
is complete, the new ringtone will be available to use from
your phone’s Tone Settings menu.
To watch a preview of the video clip:
Select Preview Music Video.
To watch the complete video clip:
Select Watch Full Video.
To listen to a 30-second sample of the song:
Click Preview. To buy the full music track, click Buy
Full Track and review the purchase information.
Click BUY and the song will start downloading.
Playback will start automatically after as
little as 5% of the track has been downloaded.
Once the download is complete, you will
be able to play the track as often as you
like using your BigPond Music Player.
31 32
Page 20

34
33
Using your BigPond Music Player
To listen to all of the tracks currently in
My Music, click the Play button.
To view and edit My Music playlists, or to listen
to specic tracks, click the Music Note button.
If your handset does not support the BigPond
Music Player, please refer to your handset
manual to nd out how to nd and play your
music on your mobile (not all handsets are
able to play music).
Dual Downloads
Dual Downloads enables both mobile and online BigPond Music
customers to purchase a single music track and have a compatible
version of the track delivered to both their compatible Next G™
or 3G mobile phone and their PC at the same time!
To receive the PC version of the track, you must register by
logging on to www.bigpondmusic.com and selecting the Dual
Downloads tab. Simply complete your online registration to
start getting your tracks on your computer too.
Page 21

35 36
1234
1234 offers you a concierge style, operator-assisted service
that’s like having your own personal assistant ready to look
things up for you straight away, 24 hours a day, 7 days a week.
1234 can not only nd and connect you to a person or business,
but can also help your day run more smoothly, by giving you
information like:
• Street directions • Sports scores
• Weather forecasts • Find a fact
• Movie times • Citysearch® information
And if you don’t have a pen and paper handy, in most cases,
1234 can SMS the information straight to your mobile phone.
Citysearch® Mobile
For non-stop entertainment options, make sure you get on to
Citysearch® Mobile – the ultimate entertainment guide to dining,
lm, music and TV.
Press the BigPond button, and then Citysearch® on the Home tab
and browse this for free1.
Page 22

What’s Nearby?
This option lets you nd leisure products and
services nearby, from a nominated address.
You can also browse selected nearby businesses,
and plot them on a map according to your current
location. Don’t forget to save your favourite shops
and services to
My Place
.
1. Click What’s Nearby? from the Whereis®
Mobile homepage. The next screen lets you
choose from several types of businesses.
2. Click the service you want to nd. For instance,
if you want a chemist, click Shops and select
Chemists from the list of services presented.
Whereis® Mobile
Press the BigPond button, then select Whereis® Mobile
on the Home tab
1
and browse for free.
Whereis® Mobile gives you four helpful search options:
What’s Nearby?, Get Directions, Get a Map and even
locate your buddies with Find your Friends.
37 38
Free to browse
Page 23

2. Add a stop-off if you need to (perhaps you’re picking someone
up or going to another party rst), and select your mode of
transport. If driving, be sure to specify if you do not want to
use tollways (select No Tolls). Click OK to see the Map screen.
3. To read written directions for any part of your journey, click
corresponding Details and you can follow your trip
turn-by-turn. You can also click the double arrows next to
any directions to view a small map location of that street.
4. To see a larger map of the steps in your complete journey,
go back to the Map (in step 2) and select Map under the
corresponding step.
5. You can move from screen to screen using the links on every
page depending on whether you want to see your journey
details in text or map format. To begin a new search, click
Home to get back to the Whereis® Mobile homepage
3. After selecting Chemists, you’ll see a new screen with a small
map noting the locations of nearby chemists, listed in order of
proximity. Simply select one to get the address, phone number
and detailed map location. Click the phone number to call them
straight away!
4. Just click Home to return to the Whereis® Mobile homepage.
Get Directions
You can see step-by-step directions from your current location
to a nominated address, or between two specied locations,
whether you plan to walk or drive.
Use it to locate or avoid tollways, and nd out the travelling
time and distance to your destination.
1. Click Get Directions from the Whereis® Mobile homepage.
The next screen shows your current journey specications.
Simply click Start Place or End Place to change the locations.
39 40
Page 24

Find your Friends
Register for Whereis® Everyone and invite
your friends with compatible Telstra mobile
phones to register too.
You’ll then be able to look up the approximate
location of your friends within coverage areas
and Get a Map to see their position, as well as yours.
You can then SMS or call your friends to arrange
to meet at places you can nd using What’s Nearby?
Get a Map
View a map of the surrounding area based
on your current location, or at a speci ed
address. Once you know where you are,
you can specify this location to search
for local businesses and services using
What’s Nearby? or nd the best way to
get there using Get Directions.
Click Get a Map from the Whereis® Mobile
homepage to view a map of your current
location.
41 42
Page 25

BigBlog & Photos
1. Press the BigPond button, then Blogs & Photos on the
Home tab
1
to browse for free.
2. Select BigBlog on the next screen to get to the BigBlog
main homepage.
BigBlog
Most BigPond Broadband members can take pics with their
mobile and send them to their BigBlog & Photos service account
while they’re on holiday
2
. Invite anyone you know to view your
pics. And anyone with your BigBlog web or WAP link details can
view your BigBlog photos and videos as well!
43 44
You don’t have to own a BigBlog to access this site – you can
look at other people’s BigBlogs even if you don’t have one.
Currently you can only register for the BigBlog service online.
In the near future, you will be able to register for the BigBlog
service from your Telstra mobile.
Free to browse
Page 26

View and edit your prole
Click View Prole from your BigBlog homepage on your mobile
to see your user prole. Select Edit Prole to change your
information. Simply type over the information currently in the
form elds that you want to change and select Save.
View, edit or add to your BigBlog Photo Gallery or MMS Posts
Click View Photo Gallery or View MMS Posts and select the
gallery or posts you wish to view, edit or add to. You can view
and delete the images in the gallery using the links underneath
the pics.
Using your personal BigBlog
You need a BigPond online account to set
up your BigBlog from your PC before you can
access it from your mobile.
Click Login from the BigBlog mobile homepage
and enter your BigPond User ID and password
in the form eld provided. You will then see your
personal BigBlog page.
Add an entry
Click Add Post and type your entry in the form
eld provided. Click Save to add the post to
your BigBlog. Once you’ve viewed and are
happy with it, click My BigBlog to return to
your BigBlog homepage.
45 46
To add a picture using your mobile, simply take a photo and send
it via MMS to 125 BLOG (125 2564).
Page 27

Photos
1. Press the BigPond button to access the BigBlog & Photos
application, then select Photos from the next screen.
2. You must be a Telstra mobile customer or a BigPond online
customer (Dial-up or Broadband) to register, use and manage
a Photos service, however you can share your photo albums
with anyone.
3. You’ll be redirected to the Photos homepage, where you’ll see
a sample image and album. Once you have uploaded images
and created albums, the sample will be replaced by the last
photo in the last album that was viewed.
Searching and reading other BigBlogs on
your mobile
Even if you don’t own a BigBlog, you can still
search for a blog on your mobile. To browse
different blogs, choose from the list on the BigBlog
main homepage on your mobile to access, and
add comments to other personal blogs.
For instance, clicking Most Popular Posts will
bring up a list of all the blogs that have the most
comments. Or, just type the name of the blog
in the search form eld at the bottom of the
screen and click Go. A list of matches will appear.
Click a blog to view it, and add comments using
the links.
47 48
Page 28

Managing albums and photos
From the Create Album conrmation screen, or the
Photos homepage, choose the album you want to manage,
eg My favourite pics.
Select from the list of options for that album:
To view all images in the album, click • View Slideshow.
To view, edit, delete or share a particular image, click • Manage
Photos. Scroll through the gallery to nd the image, and click
the Manage button. Click the links to move the photo to another
album or to delete it.
Uploading photos
To upload photos to your Photos account, send your pic as an
MMS to 125 FOTO (125 3686). Your handset limits messages
to 300kb. If an image is larger, the handset will automatically
resize it. You will then receive a text message telling you that
the photo has been successfully uploaded.
You can view the photos by going to your Photos homepage
and clicking Unled Photos.
Creating a new album
Click Create Album on the Photos homepage. On the next
screen, enter the name of your new album in the form eld
and click Create. A conrmation screen will let you know
that you have created the album successfully
49 50
Page 29

To share an album, click • Share Album and you’ll receive a
text message with a URL address. Simply forward this text
message to anyone in your address book so your friends and
family can view your photos either online or from their mobiles.
To delete an album, click • Delete Album and select Yes on the
con rmation screen.
To rename an album, click • Rename Album and type the
new album name in the form eld provided and click the
Rename button.
51 52
Picture Messaging
What is MMS/picture messaging?
With the MMS/picture message function
enabled on your Telstra camera phone,
you can take and send photos to
anyone who also has an MMS
compatible phone or email address.
It’s as easy as snapping a photo and
pressing send. And even if you don’t
have a camera phone, you’ll still be
able to receive and send pictures once
MMS is enabled.
How do I send a picture message?
All you need to do to set up your phone
for picture messaging is call, save your
new phone settings and send.
Page 30

Call – If you have an MMS compatible phone, call 125 130
to retrieve your new phone settings.
Save – We’ll then send you a message asking you to save
your new phone settings. This will enable you to send and
receive picture messages. If you experience any dif culties
call us on 125 111.
Send – To check if your phone is now MMS compatible, simply
send a free test to 176 667. You’ll then receive a con rmation
MMS with text and an image.
For a free MMS tutorial, go to www.telstra.com.au/mobile/
products/messaging/mms.htm and click MMS Tutorial.
Pics sent by MMS will appear in the MMS Posts section
of your BigBlog, not your gallery.
53 54
Page 31

55 56
1. Select the Downloads icon from the
My Place menu and select the content
you would like to see.
For instance, if you want to see the latest Tones,
highlight it using the up and down navigation
keys and click the centre navigation key to go
to the Tones preview screen.
The rst time you start Downloads you will
need to update it by clicking Update Now.
This free update will ensure you have the
latest content.
If you have updated your Downloads in
the last 24 hours, go directly to Step 3.
Downloads
Downloads is the perfect quick stop for the latest movie
trailers, songs, ringtones, true tones, games and wallpapers.
Simply follow the steps on the next page to download the
latest Tones, Pictures and Games, or to watch Movie Trailers
and Music Videos.
Page 32

Need help with your Downloads? Just select
Help from the options menu using the left soft
key and choose from a list of topics.
57 58
2. You will need to wait while Downloads
updates. Click OK to continue.
3. Once you see the Tones preview screen,
use the left and right navigation keys at
the top of the screen to move back and
forward between the previews. Listen to
the ringtone by clicking Play Preview.
If you’d like to purchase the ringtone,
click Buy, which also tells you the price
of the ringtone. You can bring up the
Downloads menu options at any time
by using the left soft key.
4. After clicking Buy, you will be connected to the internet in order
to buy your ringtone. You’ll need to click Buy again to con rm
the download.
5. You will see a con rmation screen if the download is successful.
You can now use your new ringtone by going to your phone’s
ringtone settings.
Page 33

My Account
My Account lets you view and pay your Telstra bills on your
mobile. View how much data you’ve been using on your mobile
or see what your next bill is shaping up to be. It’s easy to stay
on top of things using My Account.
The two most popular services are:
My Subscriptions – lists all the content
subscriptions you are currently subscribed
to; and
My Bill – enables you to view and pay your
current Telstra bills, and get an indication of
what your next bill will cost. This is a free service
and you will not be charged for access or data
usage to use My Bill.
Select My Account from the Home tab
1
by
pressing the BigPond button.
59 60
Page 34

My Subscriptions
1. Click My Subscriptions from the My Account menu to see your
active subscriptions. Select a subscription to see further details.
2. If you no longer want to subscribe to this service, click Cancel
Subscription. You will be presented with a nal conrmation
screen for the cancellation of this service. To cancel, select Yes .
3. An information screen will inform you that the cancellation
is conrmed.
4. To go back to My Account, click BigPond Home and scroll
down to My Account.
61 62
You will need to have registered for Online Billing at
www.telstra.com/myaccount to view bills on your mobile.
Page 35

b) To change the payment method, date or amount,
simply click Change Payment Date, Method or Amount.
Click Modify to proceed with the changes to the payment.
c) If you choose to pay with a different credit card to what
you have used before, click Other Credit Card to enter
the card details. To save you from entering your credit
card details every time you make a payment, tick the
Remember Card box and type in an alias (eg Steve’s Visa)
in the alias box. The credit card with its alias will then be
saved for future selection. Click Next Step to proceed with
the changes to the payment.
After submitting the payment, you will receive a payment
receipt advising you if the payment was successful.
63 64
My Bill
1. Select My Account from the My Place menu
and select My Bill. You should now see the
Online Bill login screen for you to enter your
Username and Password.
2. Pay Current Bills
a) Clicking Pay Current Bills will give you
the option to pay your current bills using
a credit card or Direct Debit with Telstra,
depending on whether you are registered
for Direct Debit with Telstra or you have
previously paid with a credit card. Click
Submit to proceed to pay without making
any changes.
Page 36

65
Things you need to know
To check for coverage in your area go to
www.telstra.com.au/mobile/networks
1. Browsing charges apply when you access third party
websites or when you type a URL address into your browser.
Content and/or subscription charges may apply.
2. Only in Australia or where Telstra has MMS roaming agreements.
3. Calls Yet to be Billed
Clicking Calls Yet to be Billed provides you with a summary
of the charges and data usage that you can expect to receive
in your next bill. These are estimates only and do not include
applicable discounts or cap plan information. To view itemised
charges, simply log on to your Online Bill via www.telstra.com
using your computer.
4. View Current Bills
Clicking View Current Bills provides you with a summary
of the various types of calls made and other account charges.
Only summary level information can be viewed via your
handset. To view itemised charges, simply log on to your
Online Bill via www.telstra.com using your computer.
You can also view more details for a particular service by
clicking the service number.
Click Exit Online Bill to return to My Account.
66
Citysearch® and the Citysearch logo are registered trade marks of Citysearch Australia Pty Ltd.
Trading Post® is a registered trade mark and the Trading Post logo is a trade mark of Research
Resources Pty Ltd.
FOXTEL marks are used under licence by FOXTEL Management Pty Limited.
™ Trade mark of Telstra Corporation Limited
® Registered trade mark of Telstra Corporation Limited ABN 33 051 775 556
 Loading...