

Page 1
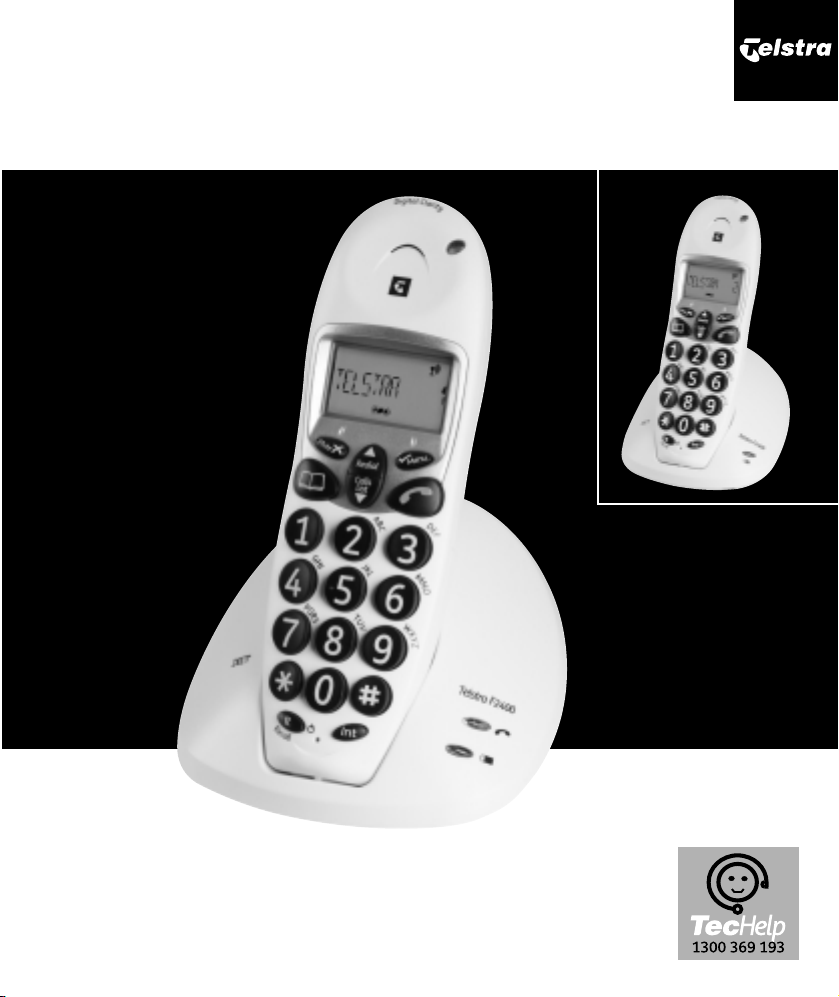
Telstra F2400
Digital DECT Cordless Telephone
User
Guide
F2400 extension
If you have any problems with your phone, first refer to the Help
section of this User Guide or call TecHelp line on 1300 369 193.
Page 2

Introduction
to your Telstra F2400
Digital DECT Cordless Telephone
● 30 name & number Phonebook
● Telstra Calling Number Display*
● Handsfree operation
● Large keypad buttons
* Monthly charges apply. Service available in most areas.
Not available for blocked calls.
As a Digitally Enhanced Cordless Telecommunications
(DECT) product, your Telstra F2400 provides: -
● Digital clarity
● Digital range
● Digital security
Page 3

IMPORTANT
This equipment is not designed for
making emergency telephone calls
when the power fails.
Alternative arrangements should be
made for access to emergency
services.
This User Guide provides you with all
the information you need to get the
most from your phone.
Before you make your first call you
will need to set up your phone. Follow
the simple instructions in ‘Getting
Started’, on the next few pages.
Need help?
If you have any problems setting up or
using your Telstra F2400 please
contact the TecHelp line on
1300 369 193.
Alternatively, you may find the
answer in ‘Help’ at the back of this
guide.
Got everything?
●
Telstra F2400 handset
● Telstra F2400 base unit
● 2 x AAA NiMH rechargeable
batteries
● AC power adaptor
● Telephone line cord
● Telephone adaptor plug
Page 4
In this guide
3
Getting started 5
Setting up 5
Getting to know your phone 7
Handset buttons 7
Base unit 8
Display icons 9
Using the phone 10
Receiving calls 10
Making calls 11
Handsfree facility 11
Dialling stored numbers from
the Phonebook 12
Call duration display 12
Switching the handset on and off 13
Range information 13
Muting the microphone in the
handset 14
Adjusting the receiver volume 14
Redial facility 15
Deleting redial numbers 15
Deleting all redial numbers 16
Keypad lock 16
Paging from the base station
to the handset 17
Phonebook 18
Entering numbers in the
Phonebook 18
How to enter names 19
Changing numbers stored in the
Phonebook 20
Deleting stored numbers from the
Phonebook 22
Telstra Network Services 23
Telstra Calling Number Display 23
Calls list 23
To view the phone numbers on
the Calls list 24
Storing phone numbers from the
Calls list to the Phonebook 25
Deleting individual numbers
from the Calls list 26
Deleting the entire Calls list 27
Telstra Home Message 101 &
MessageBank® 28
Flashing Message Indication 29
Recall 30
Using pause 31
Page 5
In this guide
4
Special functions 32
Menu structure 33
Setting the ring tone on the
handset (ring melodies) 34
Ring tone volume on the handset 35
Setting the ring tones on the
base unit (ring melodies) 36
Ring tone volume on the base unit37
Auto answer 37
Changing display names 38
Activating / Deactivating
warning tones 39
Changing the PIN code 40
Setting the display language 41
Setting the Flash (Recall) time 42
Restoring factory settings 43
Using the Telstra F2400
additional handsets 45
Multiple handsets 45
Making an internal call 45
Connecting external calls to
another handset 46
Logging on Telstra F2400
additional handsets 47
Logging on other DECT-GAP
telephones to the base unit 48
Logging on a handset to another
DECT-GAP base unit system or a
third party base unit 48
Logging off handsets 49
Additional base stations 50
Selecting a base station 51
Help 52
General information 54
Technical data 55
Product warranty & Customer
service 56
Page 6

WARNING
Do not place your
Telstra F2400 in
the bathroom or
other humid areas.
IMPORTANT
The power adaptor
must always be
connected.For
safety reasons, use
only the power
adaptor provided.
Setting up
Follow these steps to set up your Telstra F2400 ready for
use
Location
You need to place your Telstra F2400 base unit close
enough to a mains power and telephone socket so that the
cables will reach.
The strength of the handset signal depends on where you
site the base. Putting it as high as possible can help to
provide the best signal. Make sure it is at least 1 metre
away from other electrical appliances to avoid
interference.
Setting up the base and handset
1. Insert the plug of the power adaptor into the socket on
the back of the base unit
Getting started
5
Page 7
Talk/Standby
times
Under ideal
conditions, the
handset batteries
should give about
10 hours talk time
or 100 hours
standby on a
single charge.
Note
New batteries do
not reach full
capacity until they
have been in
normal use for
several days.
The charging light
on the base
station will come
on, if the battery
capacity is too
low, the
symbol will flash
in the display and
you will hear
warning tones
every 60 seconds.
2. Plug the power adaptor into the mains wall socket and
switch the power on.
3. Install the 2 x AAA rechargeable batteries supplied into
the handset by pressing on the upper edge of the
battery compartment and slide it downwards.Now
insert the batteries taking care to ensure that the
polarity is correct. Close the battery compartment cover.
4. Place the handset in the base station with the display to
the front for at least 16 hours.
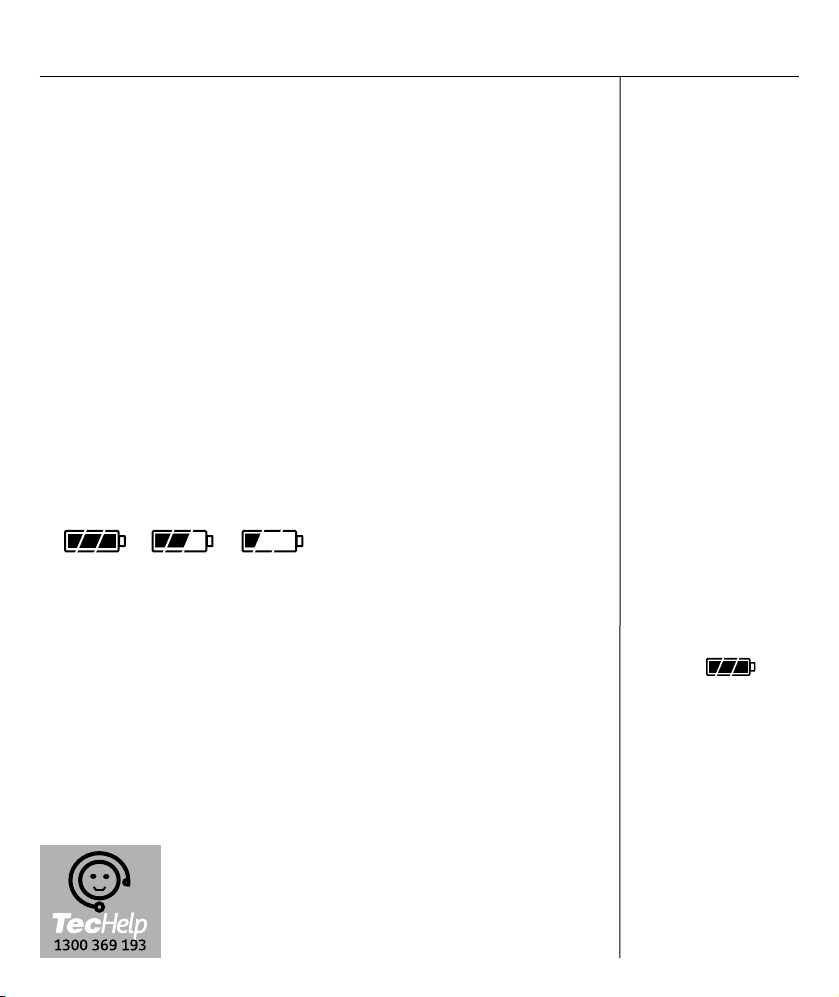
The current battery capacity is shown in the display.
Full Half Low
5. Once fully charged, connect the telephone cable
supplied to the telephone socket and the telephone jack
on the back of the base station. Use only the new
telephone cable & adaptor provided.
Your Telstra F2400 is ready for use.
Customer Helpline
If you have any difficulties setting up your
Telstra F2400 please call the TecHelp line on
1300 369 193.
Getting started
6
Page 8
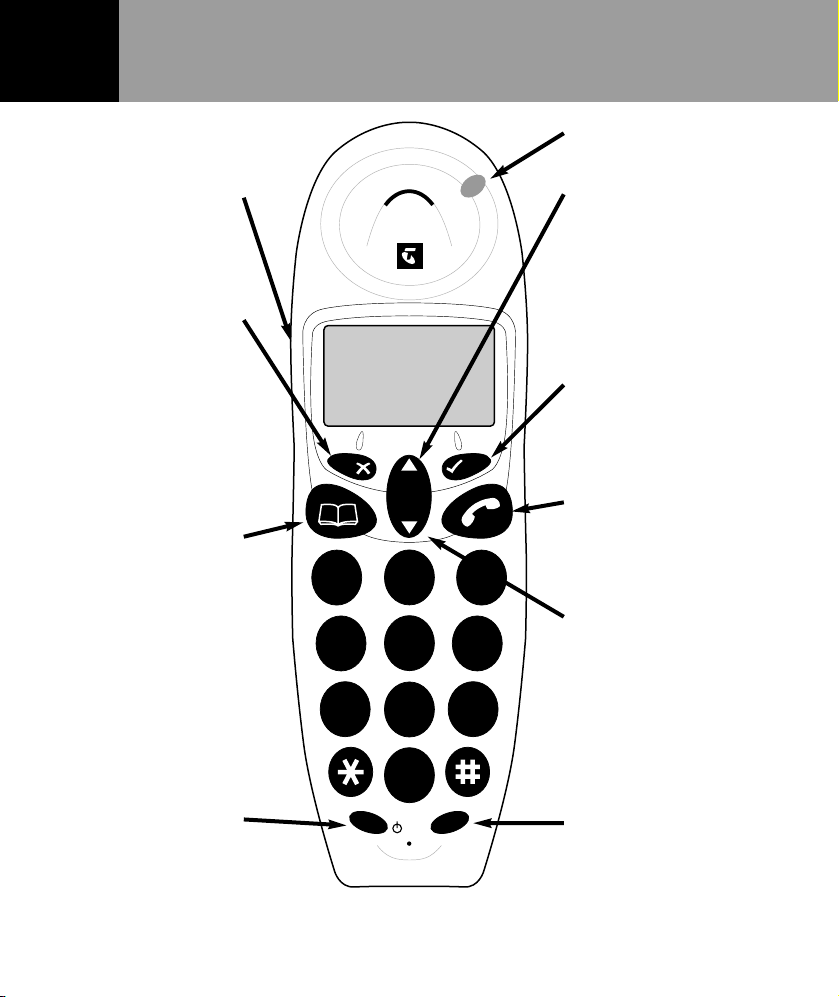
Handset buttons
Handsfree
Activates handsfree
mode.
Delete / Mute
button
Delete and edit
numbers. During a
call, press to stop
your caller hearing
you, page 14.
Phonebook / Exit
menu
Used to recall
names and numbers
from the
Phonebook,
page 18.
Also used to exit
Menu operations.
Recall button
For use with Telstra
network services
and PABX’s,
page 30.
Call indicator
Redial
Selection button to
choose an operation.
Opens the Calls list and
scrolls through the
entries, page 15.
✓Menu button
Press to access menu or
activate an operation.
Phone button
Press to make,receive
or end calls, page 10.
Calls List
Selection button to
choose an operation.
Opens the Calls List and
lets your scroll through
entries, page 24.
Internal calls
To make internal calls
or transfer between
handsets registered to
the base, page 45.
Getting to know your phone
7
D
i
g
i
t
a
l
C
l
a
r
i
t
y
123
456
789
0
R
A
B
C
Redial
M
enu
Calls
List
M
ute
D
E
F
G
H
I
J
K
L
M
N
O
W
X
Y
Z
T
U
V
P
Q
R
S
Int
R
e
c
a
l
l
Exit
Page 9
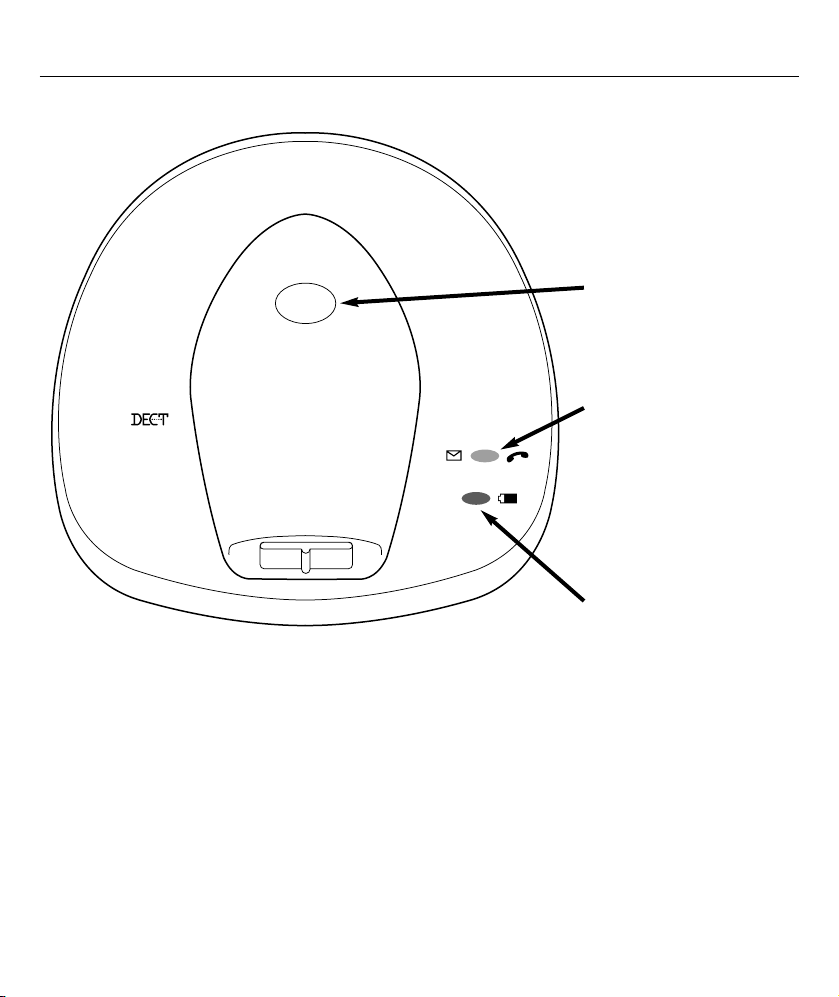
Base unit
PAGE button
Press to page the
handset(s), page 17.
Power / In Use
Comes on when
connected to a power
supply and flashes
when a handset is in
use.
Charge light
Goes a steady red
when the handset is
charging,page 6.
Getting to know your phone
8
Page
Telstra F2400
Page 10
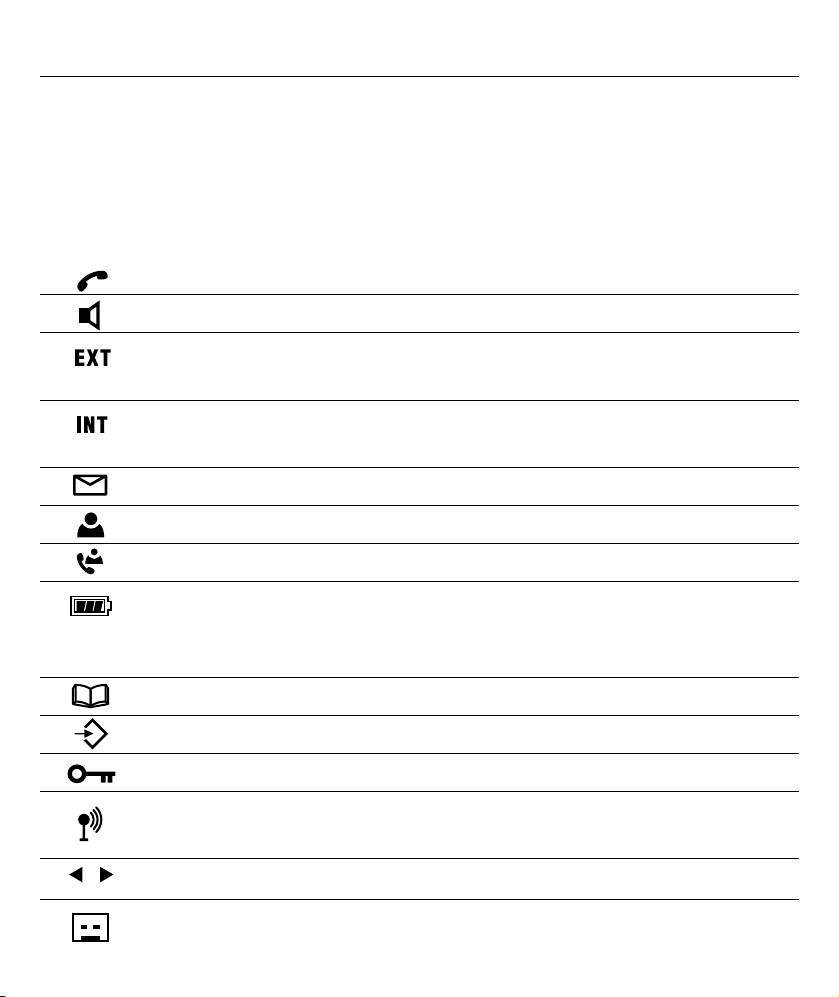
Display icons
In the normal operating mode, the display shows the names of the handset.
The pre-set name can be changed at any time. For more information, refer to
page 38. In addition, the main functions are shown in the display by means of
various symbols.
You are making a call.
Handsfree mode on.
You are making an external call.
Flashing: You are receiving an external call.
Steady: You are making an internal call.
Flashing: You are receiving an internal call.
There are new calls stored in the calls list (CND)
This number in the calls list has already been called back.
This call was answered.
Flashing: Please charge the handset.
Steady: Indication of battery capacity.
Cycling through the segments: The handset is being charged.
When the phonebook is being used.
When in menu operation.
The keypad lock is activated.
Steady: The connection to the base unit is satisfactory.
Flashing: Base unit is out of range.
The number is longer than 12 digits.
Flashing Message Indicator icon.
Getting to know your phone
9
Page 11
Note:
While the handset
is ringing, you can
adjust the ringer
volume by means
of the and
buttons.
Note:
Please refer to the
Telstra Network
Services section for
information on
how caller’s
numbers are
displayed. When
the Auto Answer
feature is selected,
the call is
automatically
answered as soon
as you lift the
handset from the
base station, see
page 23.
Receiving calls
When a call arrives, the ringing tone sounds on the
handset and on the base station. The handset will ring a
little later than the base station due to the radio
transmission.The message will flash in the display.
1. Press the button on the handset and the
connection will be made. The call indicator on the base
station will flash during the call.
2. To end the call replace the handset in the base station or
press the button on the handset.
Using the phone
10
Page 12
Note:
If you have
entered a number
incorrectly,you
can delete the
number one digit
at a time by
repeatedly
pressing the
button.
Or hold down the
button to
delete the whole
number.
Note:
You can also get a
dial tone by
pressing the
button,then dial
the number
directly. With this
method, it is not
possible to correct
individual digits in
the number in the
manner described
above.
Making calls
1. Enter the required telephone number with a maximum
of 32 digits using the number pad. As the display is only
capable of showing 12 digits, in the case of longer phone
numbers only the last 12 digits are displayed.
2. Press the button and the phone will dial the
number entered.
Handsfree facility
1. Press the button at the start of or during a call. You
will now hear a dial tone or the person you are speaking
to over the loudspeaker in the handset.
By pressing the button repeatedly you can change
between normal and handsfree mode during a call.
2. Always end calls using the handsfree facility by pressing
the button.
Using the phone
11
Page 13
Dialling stored numbers from the Phonebook
1. Press the button. The display will now show the
first number stored in alphabetical order.
2. You can scroll through the stored numbers with the
or buttons.
To search for a phone number alphabetically, press the
appropriate letter.
3. Now press the button and the telephone number
displayed will be automatically dialled.
Call duration display
The call duration in minutes and seconds is shown in the
display during a call. Fifteen seconds after dialling, the
display will switch from showing the number dialled to
showing the duration of the call. The call duration will be
retained in the display for a few seconds after the call has
been ended.
Using the phone
12
Page 14
Switching the handset on and off
1. You can switch off the handset by pressing and holding
the button. If the handset is switched off, no
battery power will be used. It will not be possible to
receive calls.
2. Press the button once to switch the handset on
again. The display will show the message BASE 1 and
the handset will switch on after a short time.
The handset will also switch itself on automatically as
soon as you replace it on the base station.
Range information
The range of the handset is up to 50 metres in closed
rooms and up to 300 metres outdoors.
When there is a good contact with the base station, the
symbol will come on in the display.
If you are too far from the base station, the symbol will
flash and you will hear warning tones. In this case, move
nearer to the base station, otherwise the call will be
interrupted.These warning tones can be switched off, see
page 39.
Using the phone
13
Page 15
Muting the microphone in the handset
You can turn off the handset microphone during a call by
using the button.You can then speak to another
person without the caller hearing you. The loudspeaker in
the handset remains switched on and you can continue to
hear the caller.
1. Press the button once during a call. The message
MUTE will appear in the display.
2. To switch the microphone on again, press the
button once more.The MUTE message will go off and
you can continue the call as normal.
Adjusting the receiver volume
If the receiver volume is too quiet or too loud, you can
change this to suit your requirements.
You can adjust the volume during a call by means of the
and buttons. The selected volume will be shown
in the display with the message EAR VOL 1 to 5.
Using the phone
14
Page 16
Note:
If the redial
number is stored in
the Phonebook,
the name will
automatically
appear in the
display instead of
the phone number.
Redial facility
You can use the redial facility if the number is engaged or
does not answer.Your telephone stores the last five
numbers dialled.
1. Press the button and the last phone number dialled
will be shown in the display.
2. Further redial numbers can now be selected using the
button.The button is used to page back
through the list.
3. Now press the button and the telephone number
displayed will be automatically dialled.
Deleting redial numbers
To delete an individual number from the redial list, proceed
as follows:
1. Press the button and scroll to the number that is to
be deleted by using the and buttons.
2. Press the button and the display will show
DELETE?.
3. Confirm with the button and the telephone
number will be deleted from the redial list.
Using the phone
15
Page 17
Note:
The keypad lock
can also be
activated via the
menu.
Deleting all redial numbers
To delete all numbers from the redial list, proceed as
follows:
1. Press the button.
2. Hold the button until DELETE ALL? appears in
the display.
3. Confirm with the button and all telephone
numbers will be deleted from the redial list.
Keypad lock
If you frequently carry the handset with you, you can lock
the keypad so that buttons are not pressed
unintentionally. Incoming calls can be received as normal
when the keypad lock is on.
Activating the keypad lock
1. Press the button on the handset for three seconds.
The symbol will appear in the display.
Deactivating the keypad lock
1. To deactivate the keypad lock, press the button
twice.
Using the phone
16
Page 18

Paging from the base station to the handset
If you cannot remember where you have left the handset,
press the button on the base station. The handset
will ring for 30 seconds so you can find it. To cancel the
ring, press any button on the handset or the button
on the base.
Using the phone
17
Page
Page
Page 19

Notes on the
Phonebook:
One of the three
ring tones can be
assigned to each
phone number
stored.In this way,
you can tell who is
calling you from
the ring tone. This
assignment will
only work when
you are connected
to Calling Number
Display.
Always enter the
full number
including the area
code so that the
telephone can also
associate
incoming local
calls with a
Phonebook entry.
You will find
further
information on
Calling Number
Display on page
23.
30 numbers together with names can be stored in the
Phonebook. The maximum length for a number is 20 digits.
Entering numbers in the Phonebook
1. Press the button. The display shows
PHONE BOOK.
2. Press the button again. The display shows
ADD ENTRY.
3. Again confirm with the button. The display shows
NAME?.
4. Now enter the associated name (max. 12 letters) using
the number pad. You will find information on how to
enter names in the next section.
5. Confirm the name with the button. The display
will show NUMBER?.
6. Enter the required telephone number using the number
pad.
7. Again confirm with the button. The display will
show MELODY 1 – 3.
Phonebook
18
Page 20

If the memory
capacity of 30
numbers has been
reached,the next
time you try to
store a number the
display will show
the message
MEMORY FULL.
In order to create
more space, other
numbers must be
deleted.
8. Now select which melody you wish to assign to this
phone number using the and buttons.
9. Again confirm with the button. The display will
again show ADD ENTRY.
10. If you want to enter more numbers, proceed as under
Item 3. To exit, hold the button.
How to enter names
The number keys are also printed with letters for entering
names. By repeatedly pressing the appropriate button,
upper case letters as well as numbers can be entered.
Example: You want to enter the name Peter.
Press:
, once
, twice
, once
, twice
three times.
To enter a space, press the button once.
A hyphen can be entered by pressing the button
twice.
Phonebook
19
Page 21

To enter the same letter twice or a letter on the same
button,press the appropriate letter and then wait until the
cursor automatically jumps to the next position.
Incorrect letters can be deleted with the button.
Changing numbers stored in the Phonebook
1. Press the button. The display will show PHONE
BOOK.
2. Press the button again. The display will show ADD
ENTRY .
3. Now press the button. The display will show
MODIFY ENTRY.
4. Press the button again. The display will now show
the stored numbers in alphabetical order.
5. Now choose the number that you want to change using
the and buttons.
6. Confirm the selection with the button. The display
will show the name and the cursor will appear flashing
after the last letter.
Phonebook
20
Page 22

7. Now change the name using the number pad, see page
19.
8. After you have completed the required changes, press
the button. The display will now show the
number.
9. Now change the number using the number pad. The
individual digits of the phone number can be deleted by
repeatedly pressing the button.
10. After you have completed the required changes,
confirm again with the button. The display will
show MELODY.
11. Now select which melody you wish to assign to this
phone number using the and buttons.
12. After you have completed the required changes, press
the button again. The display will show
MODIFY ENTRY.
13. If you want to change more numbers proceed as under
Item 4. Exit the programming mode by holding the
button.
Phonebook
21
Page 23

Deleting stored numbers from the Phonebook
1. Press the button. The display will show PHONE
BOOK.
2. Press the button again. The display will show ADD
ENTRY.
3. Press the button. The display will show DELETE
ENTRY.
4. Confirm with the button.
5.Choose the number that you want to delete using the
and buttons.
6. After you have found the required number, press the
button and the display will show CONFIRM?
7. Press the button and the Phonebook entry will be
deleted. The display again shows the message DELETE
ENTRY.
8. If you want to delete more numbers, proceed as under
Item 4. Exit the delete mode by holding the
button.
Phonebook
22
Page 24

IMPORTANT
*
You need to subscribe to
Telstra’s Calling Number Display
service in order to receive
numbers of your callers.
Available most areas.Monthly
charges apply. Not available for
blocked calls. For more
information, call 13 2200 for
Residential or 13 2000 for
Business services.
Caller information not
available
With some incoming calls the
telephone number of the caller
is not available and cannot
therefore be displayed.
In some cases, your Telstra
F2400 provides you with some
explanatory information about
the type of call received.This
will be one of the following:-
UNAVAILABLE
The number is unavailable.
WITHHELD
The call is from a silent line or
unlisted number or the caller
has withheld (blocked) their
number.
PAYPHONE
The caller is ringing from a
payphone.
Telstra Calling Number Display*
If you subscribe to Telstra Calling Number
Display service your handset displays the
telephone number of the person who is
calling you. It also has Call Waiting Display
which will also display the caller’s telephone
number while you are on a call.
If the caller’s number matches an entry stored
in the Phonebook, the name will also be
displayed.
Please store the full telephone number,
including the area code, otherwise the name
will not match the number stored in the
Phonebook.
Calls list
All callers numbers are stored in a caller list.
A total of 30 phone numbers can be stored in
the list. When the list is full, the oldest
number is always deleted from the list. If new
numbers from unanswered calls are stored in
the list, the symbol will flash in the
display.
Telstra Network Services
23
Page 25

Notes:
More information
can be called up
using the
button.
If the phone
number is longer
than 12 digits, the
remaining
numbers will be
displayed.
Displays the
number when the
name of the caller
is already stored in
the Phonebook.
Displays the date
and time of the
call.
If no further data
is available, the
display will show
ADD?.
You can return
to the list by
pressing the
button.
To view the phone numbers on the Calls list
1. Press the button and the last phone number
received will be shown in the display. If the caller list is
empty, the display will show EMPTY.
2. Further numbers in the caller list can now be selected by
means of the and buttons. If there are no more
phone numbers available, you will hear a tone. Two
symbols in the display will tell you whether the entry in
the caller list has been answered or not.
= Indicates answered call.
= Indicates unanswered call.
3. If you want to call back a number on the caller list,
simply press the button and the number will be
dialled immediately.
4. Exit the caller list by holding the button.
Telstra Network Services
24
Page 26

Note:
When the
telephone number
has been stored
with a name in the
Phonebook, the
name that has
been entered will
appear in the Calls
list instead of the
phone number.
Storing phone numbers from the Calls list to the
Phonebook
A phone number stored in the caller list can be saved
directly to the Phonebook.
1. Press the button and the last phone number
received will be shown in the display.
2. Now select the telephone number that you want to put
into the Phonebook by using the and buttons.
3. Press the button until the message ADD? appears
in the display.
4. Press the button again. The display will show
NAME?.
5. Enter the associated name (max. 12 letters) using the
number pad.
6. Press the button and the number will be shown in
the display again.
7. Press the button again. The display will show
MELODY 1 – 3.
Telstra Network Services
25
Page 27

8. Select which melody you wish to assign to this phone
number using the and buttons.
9. Press the button and the number will be stored in
the Phonebook.
Deleting individual phone numbers from the
Calls list
1. Press the button and the last phone number
received will be shown in the display.
2. Select the telephone number that you want to delete by
using the and buttons.
3. Press the button. The display will show
DELETE?.
4. Press the button and the number will be deleted
from the Calls list or you can exit the Delete mode by
pressing and holding the button.
Telstra Network Services
26
Page 28

Deleting the entire Calls list
1. Press the button and the last phone number
received in the caller list will be shown in the display.
2. Hold the button until DELETE ALL? appears in
the display.
3. Press the button in order to delete the Calls list or
you can exit the Delete mode by holding the
button.
Telstra Network Services
27
Page 29

Note
^ Monthly charges
apply. Available
most areas.
Telstra Home Message 101™ & MessageBank®
When you can’t take a call, Telstra Home Message 101 or
MessageBank®^ is the easy way to answer. Use it when
you’re away from your phone, on another call, when you
have dialled up the internet or you simply can’t answer.
You will know when you have new messages when you
hear a special dial tone when you pick up your telephone.
To play back messages (Telstra Home Message 101™ or
MessageBank®
1. Press and hold the button for 1.5 seconds. Your
Telstra F2400 will access the telephone line and
automatically dial 125 101.
Follow the voice prompts to access your messages.
Or
1. Press the button. You will hear a dial tone.
2. Press and hold the button for 1.5 seconds. The
Telstra F2400 will access the telephone line and
automatically dial 12 555.
Follow the voice prompts to access your messages.
Telstra Network Services
28
Page 30

Flashing Message Indication
The Telstra F2400 is designed to provide visual indication
when a message is left in your Telstra Home Messages 101
or MessageBank® service.
To arrange the connection to the Flashing Message
Indicator service,simply call Telstra on 13 2200.
When a new message is left on your Network Message
Bank service, a icon will appear on the handset
display.
After you have listened to your new message/s the
icon will disappear.
Telstra Network Services
29
Page 31

Note:
The pause can also
be saved with
numbers in the
Phonebook.
Recall
You can use the button on your telephone on
PABX’s and when using Telstra network services.
Recall button on PABX’s
If you have connected your telephone to a PABX,you can
use all the facilities such as call transfer,automatic recall,
etc. The RECALL button gives you access to these facilities.
The FLASH time “100ms” will be required on most PABX’s
however “600ms” is available as an option, see page 42.
Telstra Network Services
30
Page 32

Note:
The pause can also
be saved with
numbers in the
Phonebook.
Using Pause
Follow the voice prompts to access your messages.
Some PABX’s require a pause after the access code for an
outside line before dialling can start. An automatic pause
can be inserted so that you don’t have to wait for a dial
tone after the access code.
Telstra Network Services
31
Page 33

All further programming functions can be accessed by
means of a very user-friendly menu.
Here are a few general instructions to help you find your
way around the menu:
The menu is accessed by means of the button.The
symbol comes on in the display during
programming.
You can find the required menu option using the
and buttons.
This option is selected using the button.
You can go back one level each time by pressing the
button.
Each save procedure will be cancelled automatically if
no input is made within 15 seconds.
You can leave programming mode at any time without
making any changes by holding the button.
Special functions
32
Page 34

Special functions
33
Menu
structure
Phone Book
Add Entry
Delete Entry
Modify Entry
Set Up Base Volume
Base Melody
Del Handset
Pin Code
Recall
Default
Handset
Beep
Int Ring Vol
Ext Ring Vol
Int Melody
Ext Melody
Auto Answer
Name
Language
Key Lock
Volume 1, 2, 3, Off
Melody 1, 2, 3
Pin ?
Pin ?
Recall 1
Recall 2
PIN ?
eytone
K
Low Battery
Out Range
Volume 1, 2, 3, Off
Volume 1, 2, 3, Off
Melody 1, 2, 3
Melody 1, 2, 3
On - Off
.........
Deutsch
Italiano
Nederl
English
Francais
.........
Handset ?
New Pin
On - Off
On - Off
On - Off
Retype
Register
Select Base
Reg Base
Base- 1___
Base- 1234
Page 35

Setting the ring tone on the handset (ring
melodies)
Your handset can respond with three different ringing
tones when a call comes through. If you are using the
telephone system with several handsets, you can set
different ring tones for external and internal calls.
1. Press the button.
2. Select the HANDSET menu with or and confirm
with button.
3. Select the function EXT MELODY (ring tone for
external calls) or INT MELODY (ring tone for internal
calls/with two handsets only) with the or
buttons and confirm with button.
4. Select the required melody with and buttons
and confirm with button.
5. Select further menu functions or exit the menu by
pressing and holding the button.
Special functions
34
Page 36

Ring volume on the handset
The volume of the ring on the handset can be adjusted in
three steps.If at any time you do not want to be disturbed,
you can also turn the ring off altogether. If the ring is
turned off, incoming calls will only be signalled at the base
station and by means of the display on the handset.
1. Press the button.
2. Select the HANDSET menu with and buttons
and confirm with button.
3. Select the function EXT RING VOL (volume for
external calls) or INT RING VOL (volume for internal
calls/with two handsets only) with the and
buttons and confirm with button.
4. Select the required volume using and buttons
or switch the ring off with VOLUME OFF and confirm
with button.
5. Select further menu functions or exit the menu by
pressing and holding the button.
Special functions
35
Page 37

Setting the ring tones on the base unit (ring
melodies)
The base unit can also respond with three different ringing
tones when a call comes through.
1. Press the button.
2. Select the SETUP menu with and and confirm
with button.
3. Select the BASE MELODY function with and
and confirm with button.
4. Select the required melody with and and
confirm with button.
5. Select further menu functions or exit the menu by
pressing and holding the button.
Special functions
36
Page 38

Ring volume on the base unit
The volume of the ring on the base station can be adjusted
in three steps. If at any time you do not want to be
disturbed, you can also turn the ring off altogether.
1. Press the button.
2. Select the SETUP menu with and and confirm
with button.
3. Select the BASE VOLUME function with and
and confirm with button.
4. Select the required volume using and or switch
the ring off with VOLUME OFF and confirm with
button.
Auto answer
Incoming calls are answered automatically when you lift
the receiver from the base station. If you only want calls to
be accepted by means of the button, you can deactivate
the auto answer facility.
1. Press the button.
Special functions
37
Page 39

2. Select the HANDSET menu with and and
confirm with button.
3. Select the AUTO ANSWER function with and
and confirm with button.
4. Select ON or OFF with and and confirm with
button.
5. Select further menu functions or exit the menu by
pressing and holding the button.
Changing display names
In normal operation, the message TELSTRA appears in
the display. If you have logged on two F2400 handsets to
one base station, it can be useful to give each handset its
own name. The number after the name is used to make
internal calls to the handset.
1. Press the button.
2. Select the HANDSET menu with and confirm
with button.
3. Select the NAME function with and and confirm
with button.
Special functions
38
Page 40

4. Enter the required name using the number pad. Letters
already entered can be deleted by repeatedly pressing
the button.
5. Confirm with button.
6. Select further menu functions or exit the menu by
pressing and holding the button.
Activating/Deactivating warning tones
Here, various warning tones can be activated or
deactivated.
Button click: Each time a button is pressed, the handset
confirms with a button click. The button click can be
switched on or off.
Warning tone for low battery: If the battery capacity is
too low, a warning tone will remind you that you must
charge the handset.
Range warning: If you are too far away from the base
station, a warning tone will remind you that you are losing
contact with the base station.
Special functions
39
Page 41

1. Press the button.
2. Select the HANDSET menu with and and
confirm with button.
3. Select the BEEP function with and and confirm
with button.
4. Select one of the functions KEYTONE, LOW BATTERY
or OUT RANGE with and and confirm with
button.
5. Switch the selected warning tone ON or OFF with
and and confirm with button.
6. Select further menu functions or exit the menu by
pressing and holding the button.
Changing the PIN code
A PIN code protects some functions of the telephone
system against unauthorised use. The PIN code consists of
four numbers. As supplied,the PIN code is set to 0000.To
change the PIN code, proceed as follows:
1. Press the button.
Special functions
40
Page 42

2. Select the SETUP menu with and and confirm
with button.
3. Select the PIN CODE function with and and
confirm with button.
4. Enter the current four-digit PIN code using the number
pad (factory setting 0000) and confirm with
button.
5. Enter the new four-digit PIN code using the number pad
and confirm with button.
6. Enter the new four-digit PIN code once more for
confirmation and confirm with button.
7. Select further menu functions or exit the menu by
pressing and holding the button.If the old PIN code
is not entered correctly, the process will be aborted.
Setting the display language
The display messages can be set up in German, Italian,
English, French and Dutch.
1. Press the button.
Special functions
41
Page 43

2. Select the HANDSET menu with and and
confirm with button.
3. Select the LANGUAGE function with and and
confirm with button.
4. Select a language with and and confirm with
button.
5. The language will be changed over after a short time
and the display will indicate that it is ready once more.
Setting the Flash (Recall) time
1. Press the button.
2. Select the SETUP menu with and and confirm
with button.
3. Select the RECALL function with and and
confirm with button.
4. Select the flash time FLASH 1 (100ms) or FLASH 2
(600ms) with and and confirm with
button.
5. Exit the entry mode by holding the button
pressed.
Special functions
42
Page 44

Restoring factory settings
The handset and the base station are reset to the factory
settings using this function. The Phonebook, the Calls list
(CND) and all phone numbers in the redial facility will be
deleted.
Factory settings:
Language: English Handset name: TELSTRA
Battery warning tone: On Auto answer: On
Range warning: On External ring tone: 3
Button click: On Internal ring tone: 1
Receiver volume: 3 Handset ring tone volume: 3
Pin code: 0000 Base ring tone: 2
Pause: 3 sec. Base ring tone volume: 3
1. Press the button.
2. Select the SETUP menu with and and confirm
with button.
3. Select the DEFAULT function with and and
confirm with button.
Special functions
43
Page 45

Note:
If you have
forgotten the PIN
code, you can also
restore the factory
settings without it.
1. Remove a
battery from the
handset.
2. Hold the
button pressed
and replace the
battery.Hold the
button pressed
until the message
DEFAULT
appears in the
display.
3. Confirm with
button and
the factory
settings will be
restored.You can
abort the process
by pressing the
button.
4. Enter the PIN code using the number pad (factory setting
0000) and confirm with button.
The message CONFIRM? will appear in the display.
5. Confirm with the button.
6. After a short time, the factory settings will be restored.
The display will indicate the ready mode once more.
Special functions
44
Page 46

Warning:
If another handset
is already using
the external line,
the indicator light
will illuminate on
all handsets. In
this case, it is not
possible to make a
further external
calls.
Multiple handsets
One additional handset can be logged onto your base
station. The additional handset can be purchased from
your Telstra dealer.
When you use multiple handsets you will have the
following options:
•
Internal calls between handsets.
•
External calls can be transferred between handsets.
•
Incoming external calls are signalled on all handsets.
Making an internal call
When you have connected multiple handsets to a base
station, you will be able to make calls between handsets.
To do this, press the button and then the number
or of the required handset. The call is answered by
pressing the button on the handset called.
Using the Telstra F2400
additional handsets
45
Page 47

Connecting external calls to another handset
If you have answered an external call on one handset, you
can transfer the external call to another handset. To do
this, press the button and then the number ( or
) of the required handset.
If there is no reply from the handset called, you can take
the call back with the button.
After the internal call has been answered at the other
handset, you have the following options:
A. Consultation: You can now speak to the internal caller
and return to the external caller by pressing the
button.You can switch between the external and the
internal call as many times as you like in this way.
B. Transfer the call: The external call is transferred to the
handset called by pressing the button on the first
handset.
You can also transfer the external call to a handset directly
without consultation by dialling the internal number after
pressing the button and then pressing the
button once the other handset has answered.
Using the Telstra F2400 additional handsets
46
Page 48

Logging on Telstra F2400 additional handsets
1. Press and hold the button on the base unit for 6
seconds until you hear two signal tones. Now log on the
new handset to the base station within 90 seconds.
2. Press the button on the handset.
3. Select the REGISTER menu with and and
confirm with button.
4. Select the REG BASE menu with and and
confirm with button.
5. Enter the number of the base station (1 - 4) using the
number pad. If the handset is already connected to a
base station, the corresponding numbers will flash.
6. Confirm your entry with the button. A search will
now be carried out for the base station.
7. After the base station has been found, you must enter
the PIN Code for the base station (factory setting 0000).
8. Confirm your entry with the button and after a
few seconds you will hear a signal tone. The handset is
now logged on and can be used for external and internal
calls.
Using the Telstra F2400 additional handsets
47
Page
Page 49

9. An internal number will now be automatically assigned
to the handset. The handset that has already been
logged on has the internal number 1. The second
handset to be logged on is given the internal number 2.
These internal numbers are shown in the right of the
display next to the name.
Logging on other DECT-GAP telephones to the
base station
In order to log on a DECT-GAP handset, follow the
instructions in the other supplier’s operating manual. Then
press the button on the base station of the Telstra
F2400 for 6 seconds. Use the PIN code to log on (factory
setting 0000).
Logging on a handset to another DECT-GAP base
station system or a third party base station
1. Prepare other base station
Follow the operating instructions indicated under ‘Logging
on additional handsets’ of the base station you would like
to log on to.
2. Logging on the Telstra F2400 handset
Proceed as described above from point 2., but use the PIN
code of the base station you would like to log on to
(instead of 0000).
Using the Telstra F2400 additional handsets
48
Page
Page 50

Logging off handsets
A handset can only be logged off using another handset
that is still logged-on. It is therefore not possible to carry
out the logging-off procedure using the handset that is to
be logged off.
1. Press the button on the handset.
2. Select the SETUP menu with and and confirm
with button.
3. Select the DEL HANDSET function with and
and confirm with button.
4. Enter the PIN code of the base station (factory setting
0000) and confirm with the button.
5. Select the number or of the handset to be
logged off and confirm with the button.You can
abort the process by pressing the button. If the
logging-off is successful, after a few seconds you will
hear a signal tone. The handset is now logged off and
can no longer be used for external and internal calls.
Using the Telstra F2400 additional handsets
49
Page 51

Additional base stations
You can increase the range of the handsets by using
additional base stations. In order to make use of this effect,
all base stations must be connected to the same telephone
line.
Make sure that the ranges of all base stations overlap.
Each handset must be registered to each base station.
Please test the range of the handsets before putting a new
base station into operation.
If a handset is logged on to all base stations and if the
automatic base station selection is activated (further
information in this chapter), the handset will
automatically search for the next base station when it
goes out of range of the current base.
Any calls in progress will be lost when the handset
changes from one base to another. It is not possible to
transfer external calls or make internal calls between
handsets that are logged on to different base stations.
Using the Telstra F2400 additional handsets
50
Page 52

Selecting a base station
1. Press the button on the handset.
2. Select the REGISTER menu with and and
confirm with button.
3. Select the SELECT BASE menu with and and
confirm with button.
4. The display will now show all base stations that the
handset is already logged on to.
The number of the currently active base station will
flash. Select the required base station to which the
handset is to be switched by means of the number pad.
Or change to the AUTO setting with the and
buttons.With this setting, the handset changes
automatically to the nearest base station when the
connection to the current base station becomes too
weak.
5. Confirm with the button.
Using the Telstra F2400 additional handsets
51
Page 53

If you have problems with your telephone, please check
the following points first. For technical problems,you can
also contact TecHelp line on 1300 369 193.
No calls possible
• The telephone line is not correctly connected or is faulty.
• Use only the telephone cable provided.
• Test whether your telephone connection is in order by
using another telephone.
• The power supply is not plugged in or there is a total
power failure.
• The rechargeable batteries are flat or defective.
• You are too far away from the base station.
Connection is cut off or drops out
• You are too far away from the base station.
• Incorrect position for the base station.
Help
52
Page 54

The system no longer responds or is in an undefined
state
• Reset all functions to the factory settings. Before doing
so, briefly remove the power supply from the socket.
Factory settings see page 43.
The charging light does not come on.
• Place the handset properly on the base station, clean the
contact surfaces on the handset and on the base station
with a soft, dry cloth.
The battery symbol flashes in the display after a few
hours
• Place the handset on the base station for 16 hours.
If this does not help, replace the rechargeable batteries.
Display dark
• Caused by direct sunlight, allow the handset to cool
down.
Help
53
Page 55

Position - There must be a 240 Volt mains
socket near to where the telephone is
positioned. Do not set up the base station in
the immediate vicinity of other electrical
equipment such as microwaves or hi-fi
systems, as this may result in mutual
interference.
The location has a decisive influence on the
trouble-free operation of the telephone.
Do not use the handset in areas where there
is a risk of explosion.
Excessive exposure to smoke, dust, vibrations,
chemicals, moisture, heat or the direct rays of
the sun must be avoided.
Power supply - Use only the TELSTRA plug-in
power supply provided, as other power
supplies could damage the telephone and
will invalidate the Product Warranty.There is
a risk of electric shock if the power supply is
opened while connected to the mains.
Standard rechargeable batteries - Always
use standard rechargeable batteries, Type
AAA 1.2V 550mA. Use of other batteries may
damage the phone and will invalidate the
Product Warranty.
The maximum standby and talk times
quoted are applicable for the standard
rechargeable batteries supplied under
optimum conditions. Ambient temperature,
charging cycle and other external factors,
such as the radio loading in the area of use,
can considerably reduce the operating times.
Furthermore, the charging capacity will be
reduced if the phone is used or stored at very
high or low temperatures.
Charging the handset - It is normal for the
handset to become warm when charging and
this is not dangerous. Do not use other
manufacturer’s charging equipment for
charging the handset, as otherwise damage
could occur.
PAB X’s - The telephone can also be
connected to a PABX.You can find out from
the dealer from whom the equipment was
purchased whether your telephone will work
on your PABX without any problems. Due to
the large number of different PABX’s, it is not
possible to guarantee this function.
Information regarding medical equipment -
The telephone works with a very low
transmission power. This low transmission
power presents no risk to health according to
the current state of research and technology.
However, it has been shown that portable
telephones have the potential in certain
circumstances to interfere with some medical
equipment when switched on. It is
recommended that advice from a qualified
medical expert be sought before using this
product in the vicinity of medical equipment.
General information
54
Page 56

Disposal - If the useful life of the standard
batteries or the complete equipment has
expired, please dispose of these carefully in
accordance with the statutory requirements
and in a manner friendly to the environment.
Do not dispose of batteries in a fire, immerse
in water or dispose of with normal household
waste.
Temperature and Ambient Conditions - The
telephone is designed for use indoors with a
temperature range of 10 °C to 30 °C. The base
station must not be installed in damp rooms
such as a bathroom or laundry. Avoid
proximity to sources of heat such as radiators
and do not expose the unit to direct sunlight.
Cleaning and care - The surface of the case
can be cleaned with a soft, dry,lint-free
cloth.
Never use cleaning agents, particularly
aggressive solvents.No attention is
necessary apart from cleaning the case
occasionally.The rubber feet of the base
station are not resistant to all cleaning
agents. The manufacturer can therefore not
accept any liability for possible damage to
furniture or the like.
Hearing aid compatibility - The telephone
has a special circuit working on the basis of
induction for transmitting speech to hearing
aids. Please set your hearing aid to “T”.
Technical data
Standard DECT-GAP
Channel number 1880 to 1990 MHz
Power supply Base station 230/240V,50 Hz
Range Indoors up to 50 m
Range Outdoors up to 300 m
Standby up to 100 hours
Max. call duration up to 10 hours
Rechargeable batteries 2 x 1.2V/550mAh, Type AAA
Dialling method Tone only
Permissible ambient temperature 10°C to 30°C
Permissible relative humidity 20 to 75%
Recall button function 100ms or 600ms
General information
55
Page 57

Product Warranty
Telstra Guarantees your product for 12 months from date of purchase against any defect in materials or
workmanship under conditions of normal use and service and subject to proof of the date of purchase
being provided and subject to the conditions specified below.
The benefits conferred by this warranty are in addition to all other rights and remedies in respect of the
product that the consumer has under the Trade Practices Act and similar State and Territory laws.
Warranty Service Conditions
Subject to your statutory rights referred to above, Telstra expressly limits its liability with respect to its
products to the person who purchases the Product from the Telstra authorised retailer.
Subject to your statutory rights referred to above, Telstra expressly limits its liability with respect to its
products to whichever is the lowest amount out of:
A. The cost of having the goods repaired;
B. The cost of replacing the goods; or
C. The cost of obtaining equivalent goods.
Subject to your statutory rights referred to above, in the event of the goods requiring service under
warranty,the owner is responsible for the cost of transportation to the authorised service organisation.
Whilst in transit the goods are at the owners risk.
Subject to your statutory rights referred to above, should the goods be found to be in sound working
order by the authorised service organisation, the owner may be charged a service fee.
Subject to your statutory rights referred to above, the goods will not be eligible for service under this
warranty if:
A. Proof of date of purchase cannot be provided;
B. The goods are not branded Telstra;
C. The goods have been rented to another person;
D.The defect was caused by an accident, misuse, abuse,improper installation or operation, lack of
reasonable care,unauthorised modification, loss of parts, tampering or attempted repair by a person not
authorised by Telstra;or
E. The product has been damaged by lightning or a mains power surge.
Do you really need service?
Before calling for service under this warranty have you:
Checked that all cables are securely connected as detailed in the User Guide?
Referred to the User Guide to ensure that the features are being used correctly?
If you are trying to access a network service such as Call Waiting, confirmed with your network provider
that you have access to this feature?
If You Require Warranty Service
To obtain service during the terms of this warranty:
Call the Product Information Line (1300 369 193) for advice and assistance on the repair of your product,
or contact us by E- mail at: tcpsupport@ techpac.com
After consulting our operators,should it be deemed necessary to have the product serviced, the operator
will inform you of your nearest authorised service organisation and provide a Return Authority Number.
Please ensure that:
A. You provide proof of the date of purchase.
B. That your product is suitably packaged. (Preferably in original packaging.)
C. That you have included all components from the original purchase.
D.That you provide details of the Return Authority Number.
IMPORTANT
Please retain this booklet with your sales receipt as proof of the date of purchase.
Product warranty & Customer service
56
Page 58

© COPYRIGHT 2004 Telstra Corporation Limited
This work is copyright. All rights reserved. Other than for purposes and subject to conditions prescribed under the Copyright Act,no
part of it may in any form or by any means (electronic, mechanical,photo copying, microcopying, scanning,recording or otherwise)
be reproduced, stored in a retrieval system or transmitted without prior permission from Telstra Corporation Limited ABN 33 051 775
556
™ Trade Mark of Telstra Corporation Limited
® Registered Trade Mark of Telstra Corporation Limited
Page 59

Page 60

www.telstra.com
 Loading...