

Page 1
GETTING TO
KNOW YOUR
TELSTRA EASY
CONTROL 202
CORDLESS
PHONE WITH
ANSWERING
MACHINE
General information
Guarantee
Our goods come with guarantees that cannot be
excluded under the Australian Consumer Law.
You are entitled to a replacement or refund for
a major failure and compensation for any other
reasonably foreseeable loss or damage. You
are also entitled to have the goods repaired or
replaced if the goods fail to be of acceptable
quality and the failure does not amount to a
major failure.
To nd out more information about your
consumer rights if your device is faulty, please
call us on 13 22 00 or go to
https://go.telstra.com.au/helpandsupport/
home-phone/ or http://www.telstra.com/
faultyproducts
How to recycle your equipment
When the Telstra Easy Control 202 reaches its
end of life, it needs to be disposed of according
to local laws and regulations, please contact
the customer service helpline found in this user
guide for information on how to dispose of the
product free of charge.
Important safety instructions
Follow these safety precautions when using
your phone to reduce the risk of re, electric
shock, and injury to persons or property:
Keep all slits and openings of the phone
unblocked. Do not set the phone on a heating
register or over a radiator. Ensure that proper
ventilation is provided at the installation site.
Do not use while wet or while standing in water.
Do not use this product near water
(for example, near a bath tub, kitchen sink,
or swimming pool).
Do not allow anything to rest on the power
cord. Place the power cord so that it will not be
walked on.
Never insert objects of any kind into the product
vents as that may result in re or electric shock.
Unplug this product from the wall outlet before
cleaning.
Do not use liquid cleaners or aerosol cleaners.
Use a damp cloth for cleaning.
Do not disassemble this product. If service or
repair work is required, contact the customer
service helpline found in this user guide.
Do not overload wall outlets and extension cords.
Avoid using during an electrical storm. Use a
surge protector to protect the equipment.
Do not use this phone to report a gas leak,
especially if you are in the vicinity of the gas line.
Small metal objects may stick to the handset
due to the presence of magnetic elds on the
handset. Exercise caution when used where
metal objects can be picked up.
Warning
Please note that this equipment is not designed
for making emergency telephone calls when the
power fails. Alternative arrangements should be
made for access to emergency services.
Cleaning
Clean the handset and base (or charger) with a
damp (not wet) cloth, or an anti-static wipe.
Never use household polish as this will damage
the product. Never use a dry cloth as this may
cause static shock.
Technical Information
How many telephones can I have?
All items of telephone equipment have a Ringer
Equivalence Number (REN), which is used to
calculate the number of items which may be
connected to any one telephone line. Your Telstra
Easy Control 202 has a REN of 0,2. A total REN
of 3 is allowed. If the total REN of 3 is exceeded,
the telephones may not ring. With different
telephone types, there is no guarantee of ringing,
even when the REN is less than 3.
Important: Only use the mains power
adaptors, cables and rechargeable batteries
supplied in this box, or this product may
not work. Any replacement rechargeable
batteries must be the same type. Telstra
accepts no responsibility for damage
caused to your phone by using any other
type of batteries.
Rechargeable batteries
already fitted
Remove this tab
and charge batteries
for 16 hours before use.
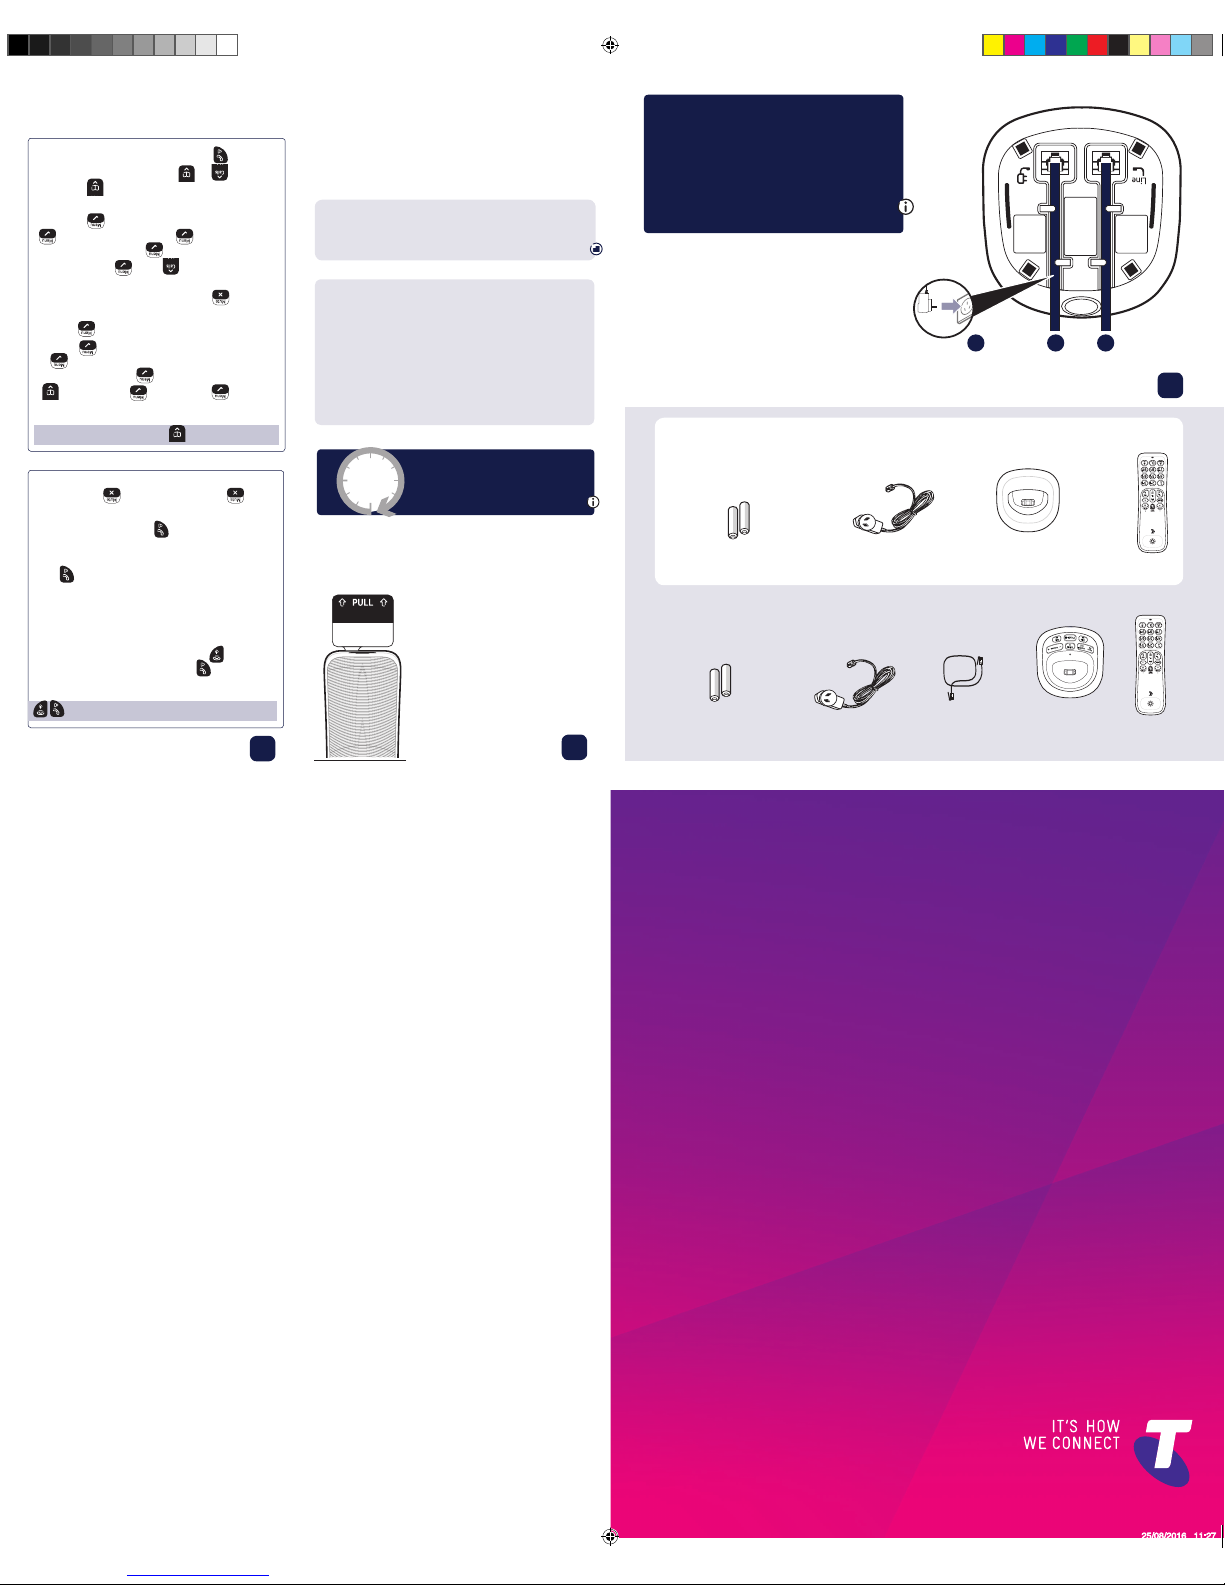
What’s in the box
Handset
Base
Telephone
line cord
(pre-installed)
Mains power adaptor
2x AAA Ni-MH 550mAh
rechargeable batteries
(already in handset)
Handset
2x AAA NiMH 550mAh
rechargeable batteries
(already in handset)
Mains
power
adaptor
Charger
For each additional handset
1 Plug in
1 2 3
2 Charge
1 Activate the batteries by
pulling the plastic tab away
from the bottom of the
handset.
2 The handset will check for
a link with the base station.
Once found, follow the
prompt to set the date and
time.
3 Place the handset on the
base to charge the batteries
for 16 hours.
16 hrs
Important: you should charge
the batteries for 16 hours
before using the handset for
the rst time.
Set up your additional handsets
1 For each additional handset and charger: plug
the mains power adaptor into the socket on
the underside of the charger, secure the cable
behind the retaining clip and plug the other
end into the wall power socket and switch on.
2 Activate the batteries as shown above. Then
place the handset on the charger to charge
for 16 hours.
If you need to remove the batteries, open the
battery compartment cover and using the nger
hole, grip the batteries and gently pull them out.
Your Easy Control 202
is ready to use.
3 Using your phone
Making and receiving calls
Make and end a call
Press green then dial the phone number.
Press red to end the call.
Answer a call
If Auto Pick-Up is set to On, lift the handset
from base or charger to answer the call.
If Auto Pick-Up is set to Off, lift the handset
from base or charger and press green
to
answer the call.
If the handset is not on base or charger you’ll
need to press green
.
Mute
Press during a call. Press to return to
your caller.
1 The telephone line cord is already tted,
plug the other end into the wall socket.
2 Plug the mains power adaptor into the
base, with the cable clipped in the groove
provided.
3 Plug the other end of the power adaptor
into the wall power socket and switch on.
Phonebook
Store entry in phonebook (up to 50)
1 Press , then press again. Scroll
to New Entry, press .
2 Enter name using keypad and press .
3 Enter phone number and press to save.
4 Add to VIP? is displayed. Press if you
want to add to your VIP list , otherwise
press
. Saved! is displayed.
To save a number to your phonebook from
the Calls list, press
, then . Scroll to
the number and press . Save Number is
displayed, press
. Enter name and press .
Edit the number if required, press to save.
Dial entry in phonebook
1 From the home screen, press .
2 Scroll or to display the entry and
press to dial.
Easy Control 202 250816.indd 1 25/08/2016 11:27
Page 2
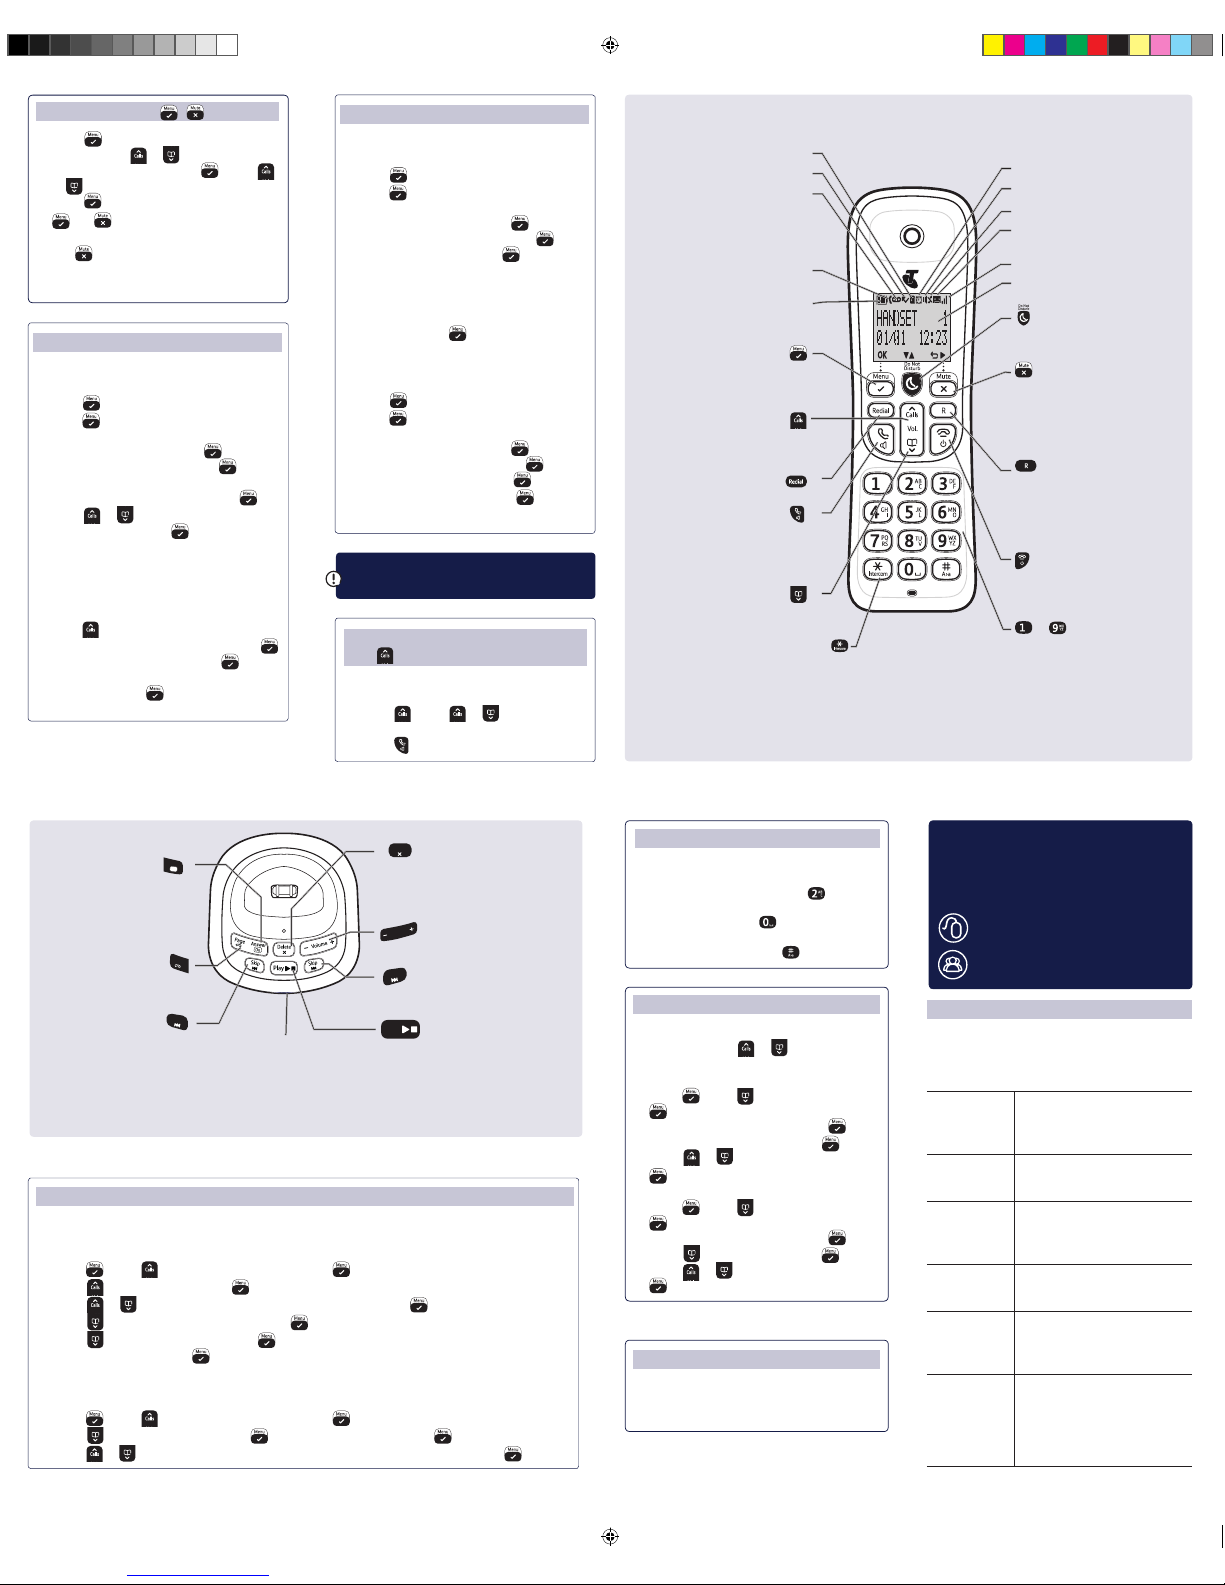
Menu / Left option button
Press to enter the main menu,
access sub-menus and conrm
options.
Enter Calls list.
Move up through menu options.
Increase volume.
Open redial list.
In standby mode, make/receive
phone calls.
In talk mode switch handsfree
on/off.
Access your stored phonebook.
Move down through menu
options.
Decrease volume.
Do Not Disturb (DND)
In standby mode, press to turn
DND setting on or off.
Mute / Right option button
Press to conrm the option
above the button, to delete or
go back to the previous screen.
Press during a call to mute your
mic.
R (Recall) used on Network
services like, Call Waiting, Call
Froward and 3-way Chat.
Press and hold to enter a pause
(P) when dialling.
End a call.
Press and hold to turn handset
on/off.
to Speed dial buttons
When a direct memory number
is stored, in standby, press and
hold to dial a stored speed dial
number.
Phonebook open
New missed call received
Voicemail received
Flashing – new voicemail
received.
Steady - voicemail has been
listened to.
Line is in use
Flashing – incoming call.
Battery charge status
Empty and ashing when
needs recharging.
Alarm is set
Handsfree on
Handset ringer off
Answer machine on
Flashing – new messages.
Signal strength
Handset name
Press and hold to make an
internal call to other handsets
registered to the base.
Handset buttons and display icons
Handset volume and sound
Incoming speech volume
During a call, press or to increase or
decrease the volume of your caller’s voice.
Handset ringer volume
1 Press , scroll to Personal Set, press
.
2 Handset Tone is displayed, press .
3 Ring Volume is displayed, press .
4 Scroll or to adjust the volume, press
to save.
Handset ringtone
1 Press , scroll to Personal Set, press
.
2 Handset Tone is displayed, press .
3 Scroll to Ring Melody, press .
4 Press or to hear ringtones, press
to save.
Using the keypad
When entering letters you may need to press
the same button a few times until the letter
you want is displayed, e.g. press once for
A, twice for B, three times for C
To enter a space, press .
To toggle between upper and lower case
characters, press and hold .
Need some help?
If you need help, call us on 13 22 00.
You can also go to https://www.telstra.com.
au/support/category/home-phone for online
support
Problem Solution
Phone doesn’t
work
Have you activated the
batteries correctly?
Check that the mains power is
correctly connected.
No dial tone Only use the cables supplied.
Make sure the telephone line
cord is plugged in correctly.
You have a
dial tone, but
the phone will
not dial out
If you are connected to a
switchboard, check whether
you need to dial an access
code.
Handset not
charging
Make sure the handset is
turned on before placing on the
base or charger to charge.
Can’t make or
receive calls
Check that the mains power is
correctly connected.
The batteries may need
recharging.
Phone ringer
does not ring
Check if ringer volume is
switched off.
Check if Call Block or DND is
not active or switched on.
When DND is switch on
DoNotDisturb is displayed.
Troubleshooting
Most problems can be xed with a few simple
checks.
Base buttons
Answer
On
Turn answer machine
on/off.
Red light on the button
is on when the answer
machine is on.
Page
Answer
On
Press to locate handsets.
Skip
Press to skip to
previous message.
In use charging light
Blue light is on and
ashes when phone
rings or the handset is
in use.
Steady when the
handset is charging.
Delete
During playback, press to
delete message playing. In idle,
press and hold to delete all
old messages.
Volume
Adjust speaker volume.
Skip
Skip forward to start of next
message during playback.
Play
Button ashes when there are
new messages. Press to play
messages, and stop message
during playback.
Answer machine
Your answer machine is on and ready to record messages. You can control it using the buttons on the
base or using the handset Answ Machine menu.
Record your own outgoing message
1 Press . Press to display Answ Machine, press .
2 Scroll to Answer Mode, press .
3 Scroll or to display Answer + Rec or Answer only and press .
4 Scroll to display Personalized and press .
5 Scroll to display Record and press . Recording is displayed and you’ll hear a beep. Speak
your message, then press
to end recording.
Set the answer delay
Make sure the answer delay is set for your answer machine to answer before the voicemail service.
Therefore, the answer delay should be less than on your voicemail service.
1 Press . Press to display Answ Machine, press .
2 Scroll to Answ Setting and press . Ring delay is displayed, press .
3 Scroll or to display the number of rings you want (2-9) or Time saver and press .
Nuisance Call Blocking
Block an incoming call according to
your blacklist
1 Press , scroll down to Call Block and
press
again. Enter the PIN (default
0000).
2 Scroll to Blacklist and press .
3 Block Mode is displayed. Press .
4 Scroll to the setting you require, either Block
all, Allow VIP or Block List and press
.
5 Scroll or to display Always On or
Start & end and press
.
If you select Start & end, enter the block
call start time and press OK, then enter the
end time and press OK.
Block incoming calls from a number
in your Call list
1 Press , to enter the Call List. Then scroll
to the entry you want to block and press
.
2 Scroll down to Call Block, press .
3 Screen will show the number that will
be blocked. Press
and number will
be blocked.
Connecting to the NBN™
If you need help connecting your cordless
phone to the NBN call us on 1800 834 273 or
go to www.telstra.com/NBNgatewaysetup
Important: The call block feature will not
work if the Block Mode is set to Off.
crowdsupport.telstra.com.au
telstra.com/x
Nuisance Call Blocking
Block an incoming call by prex in
your Call list
1 Press , scroll down to Call Block and
press
again. Enter the PIN (default
0000).
2 Scroll to Blacklist and press .
3 Scroll to Block number and press .
4 Scroll to Add new and press .
5 Enter number is displayed. Enter the
required number, for example to block
Overseas calls you can then enter 0011
which is the prex for Overseas calls. Enter
0011 then press
to save the prex. You
will hear the conrmation beep.
To activate the call block feature
using the prex you just entered:
1 Press , scroll down to Call Block and
press
again. Enter the PIN (default
0000).
2 Scroll to Blacklist and press .
3 Block Mode is displayed. Press .
4 Scroll to Block list and press .
5 Always on is displayed. Press to save.
6 You will hear the conrmation beep.
View or dial a number in Call
list
1 The Call list stores details of the last 50
incoming calls.
2 Press . Press or to scroll
through the list.
3 Press to dial the number.
Using the menu
• Press to open the main menu, scroll
through using or . When the menu
you want is displayed, press . Press
or to scroll through the sub menus and
press to select.
• and buttons let you select options
displayed above the buttons on the display.
• Use to exit a menu or go back.
• If no buttons are pressed for 30 seconds
the handset will return to the idle screen.
Easy Control 202 250816.indd 2 25/08/2016 11:27
 Loading...