

Page 1

TELSTRA DECT
CORDLESS HEADSET
USER GUIDE
This cordless headset has been designed for ease of
use. Please read the instructions and keep it handy for
future reference. If you have any problems with your
headset, refer to the Help section of this User Guide.
Page 2

2
3
INTRODUCTION
To your Telstra DECT Cordless Headset
Cordless headset - Work wirelessly with your Telstra
telephone base. Enjoy the convenience with the easy
one-button answer, and simple controls of volume and
mute. By attaching accessories to the headset, you can
freely choose from multiple wearing styles: over the ear,
over the head or behind the neck.
This User Guide provides you with all the information
you need to get the most from your headset. Before
using, you will need to set up your headset. Follow the
simple instructions on the next few pages.
NEED HELP?
PLEASE LOOK IN THE HELP SECTION AT THE END OF THE
USER GUIDE IF YOU EXPERIENCE ANY OPERATIONAL
DIFFICULTIES WITH YOUR TELSTRA PRODUCT, OR PLEASE
CONTACT THE TECHELP INFORMATION LINE 1300 369 193
OR CONTACT US BY EMAIL AT: tcpsupport_au@vtech.com
GOT EVERYTHING?
The package contains the following items:
Telstra DECT cordless headset
Telstra DECT headset charger unit
Headset charger unit power adapter
Lithium polymer rechargeable battery pack
Head band & neck band
2 Ear hooks
3 Earbuds
User guide
•
•
•
•
•
•
•
•
Page 3

3
IN THIS GUIDE
Connect your headset 5
Headset charger unit installation 5
Headset battery installation 6
Charge the headset 7
Attaching accessories to your headset 8
Earbuds 8
Over-the-ear hook 9
Over-the-head band 12
Behind-the-neck band 15
Getting to know your Headset 17
Front of headset 17
Back of headset 18
Top of headset 19
Headset lights overview 20
Headset alert tones overview 21
Using the headset 22
Turn the headset on or off 22
Answer or end a call 22
Volume control 22
Temporary ringer silencing 23
Mute 23
Page 4

4
5
Call Waiting 23
Join a call in progress 24
Intercom 24
Answer an incoming call during an intercom call 26
Call transfer using intercom 26
Help 28
General information 31
Replacing the headset battery 31
Safety 31
Cleaning 32
Environmental 33
Customer service & Product warranty 34
Page 5

5
Note: Ensure power cord is fed through slot on
charger unit so the unit sits ush with the desk.
CONNECT YOUR HEADSET
HEADSET CHARGER UNIT INSTALLATION
Plug the mains power adaptor into the socket on the
bottom of the headset charger unit.
Plug the other end into the wall power socket and
switch on.
1.
2.
Page 6
6
7
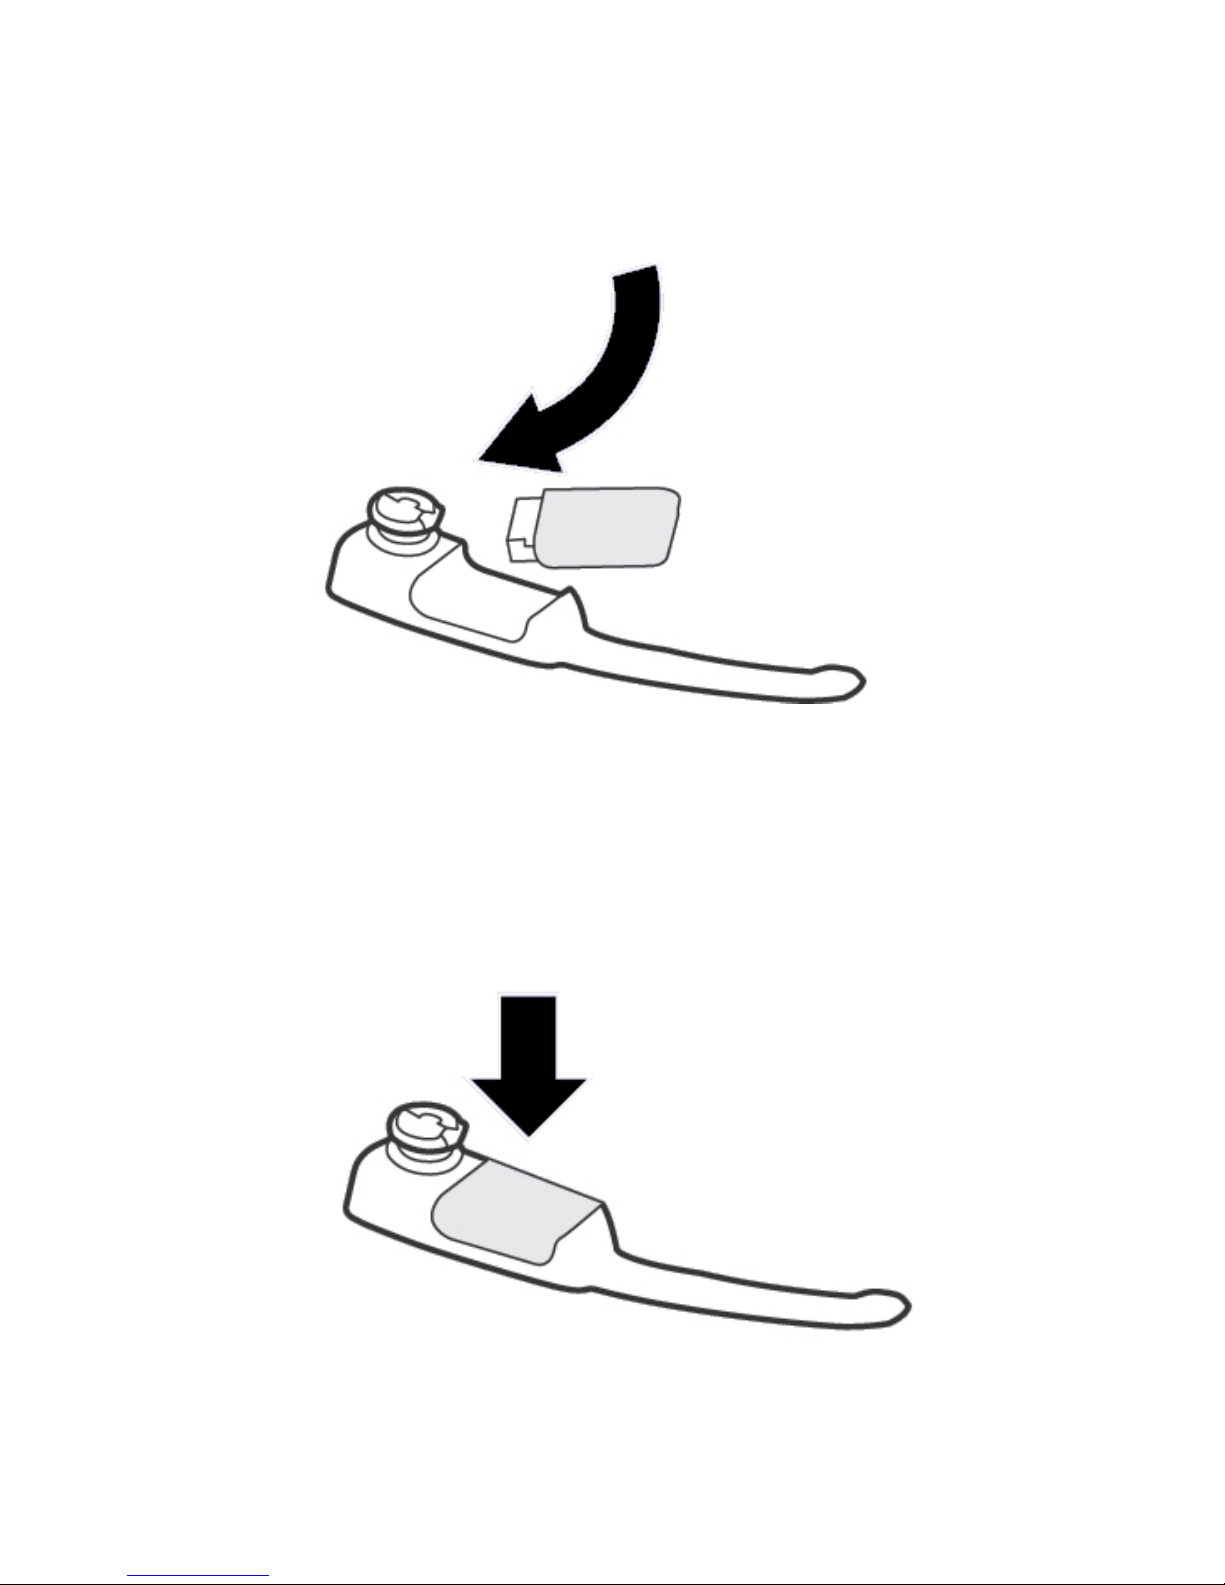
HEADSET bATTERY INSTALLATION
Insert the battery pack into the battery
compartment.
1.
Press the battery pack down gently until it clicks
into place..
2.
Page 7
7
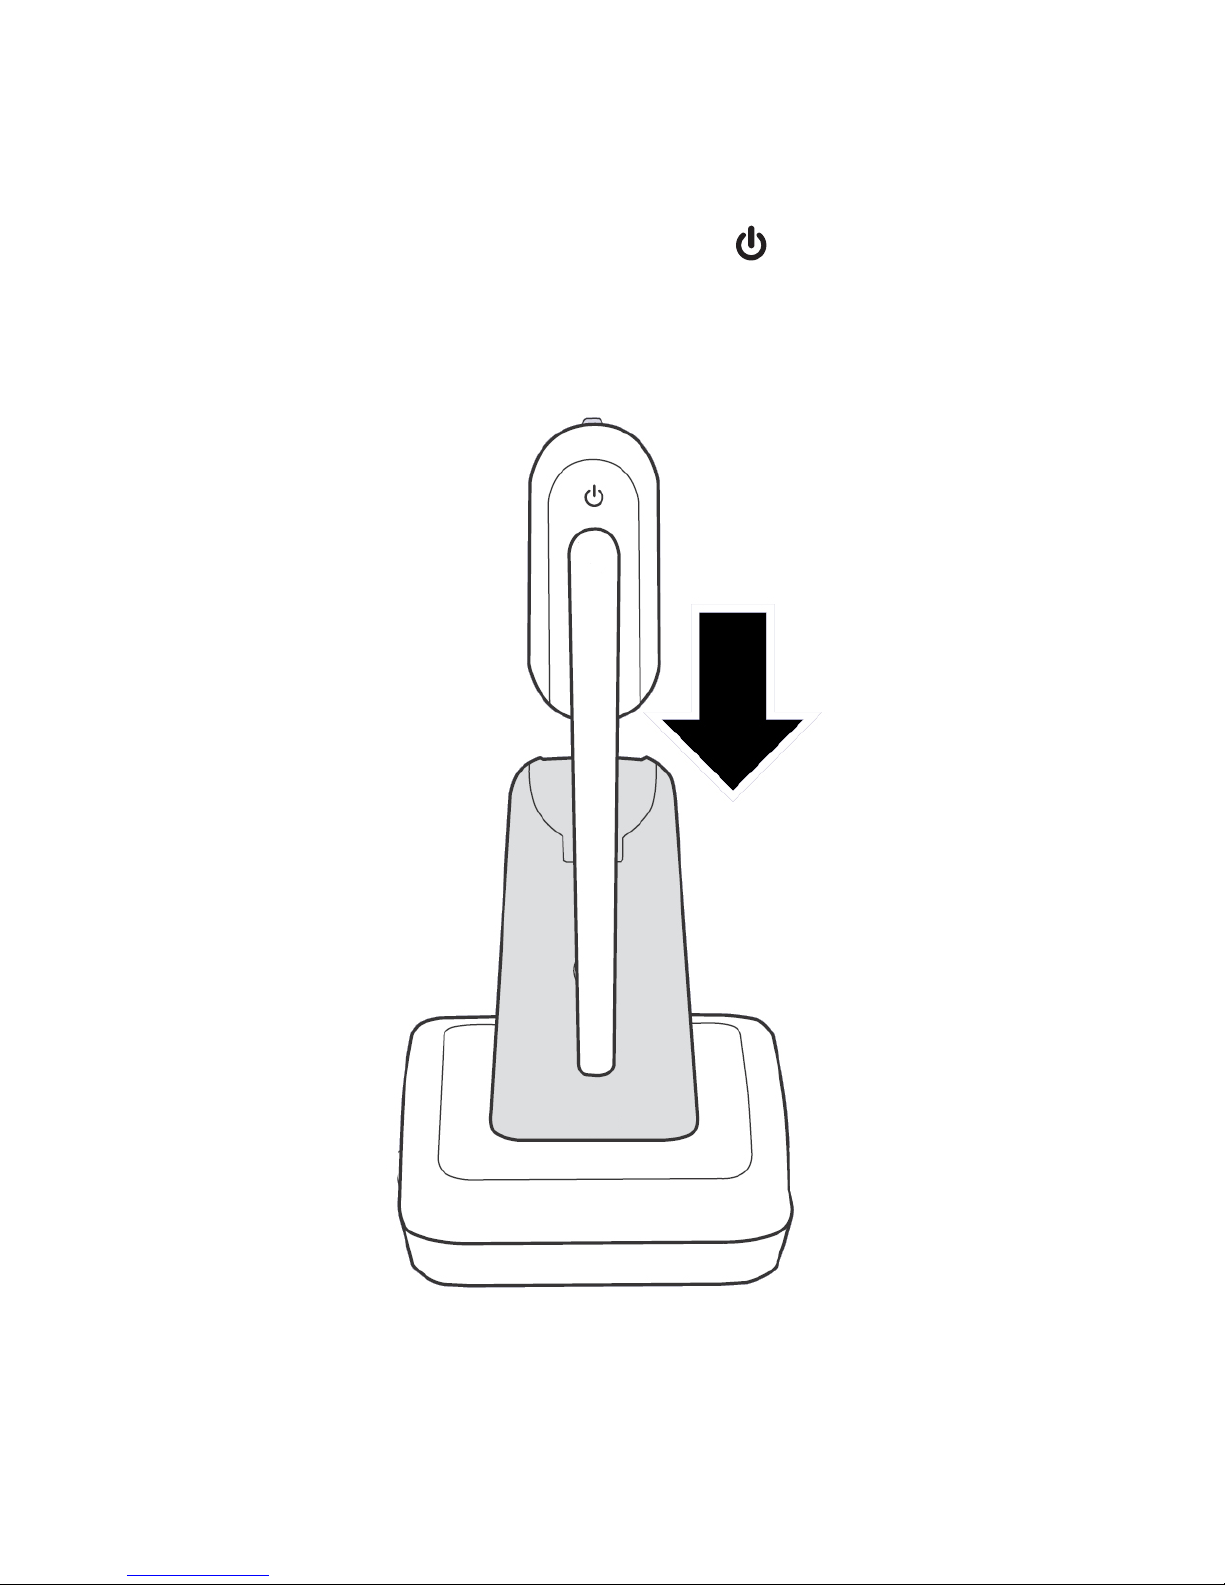
CHARGE THE HEADSET
Insert the headset into the magnetic charging mount
on the headset charger unit and leave it to charge for
at least 3 hours before use. The light will ash red
to indicate the battery is charging.
1.
Page 8
8
9
ATTACHING ACCESSORIES TO
YOUR HEADSET
EARbUDS
There are three sizes of earbuds provide in the package.
The medium-sized earbud is already attached to
the headset.
To remove an earbud from the headset earpiece:
Hold both sides of the earbud and twist, then pull the
earbud gently until it separates from the earpiece.
To attach an earbud to the headset earpiece:
Choose the earbud of your desired size.
Attach the earbud to the earpiece as shown in the
diagram on the next page.
Press the earbud down gently on the earpiece until it
clicks into place. Move the earbud around so that the
protruding bump on the earbud is pointing towards
your mouth when placed on your ear.
1.
2.
3.
Page 9

9
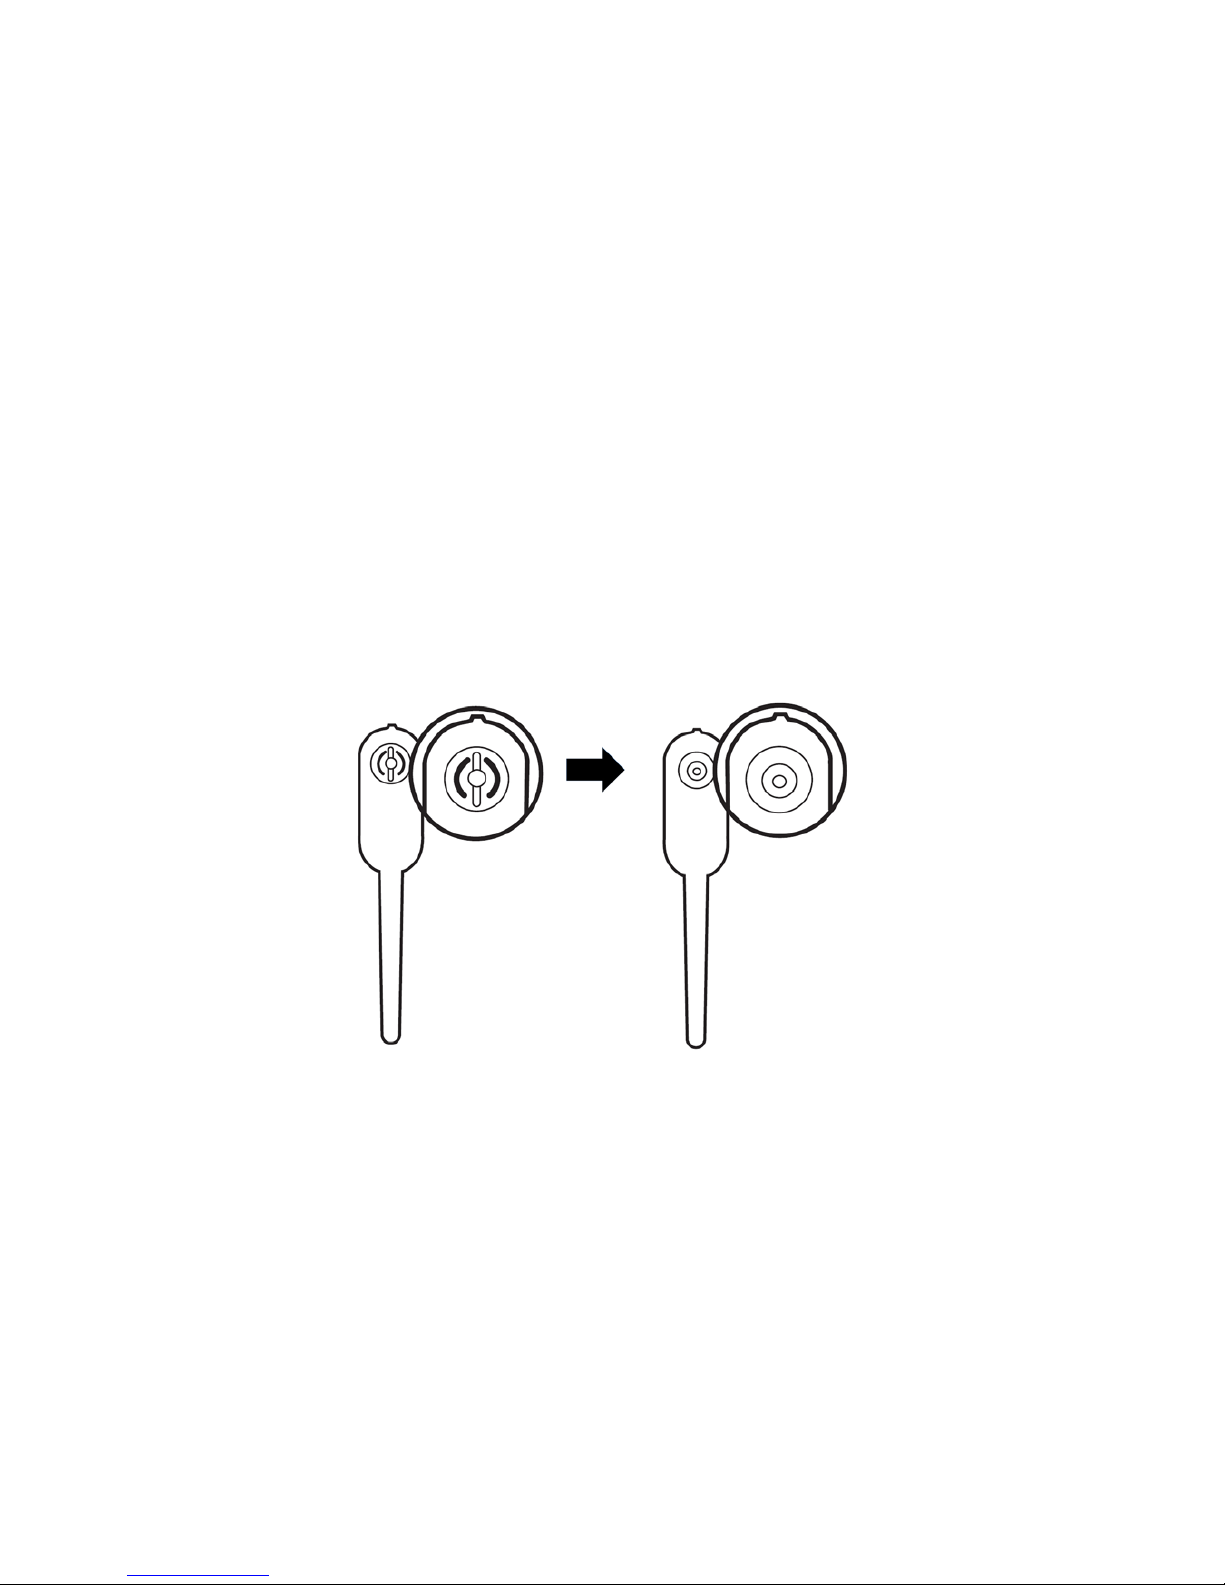
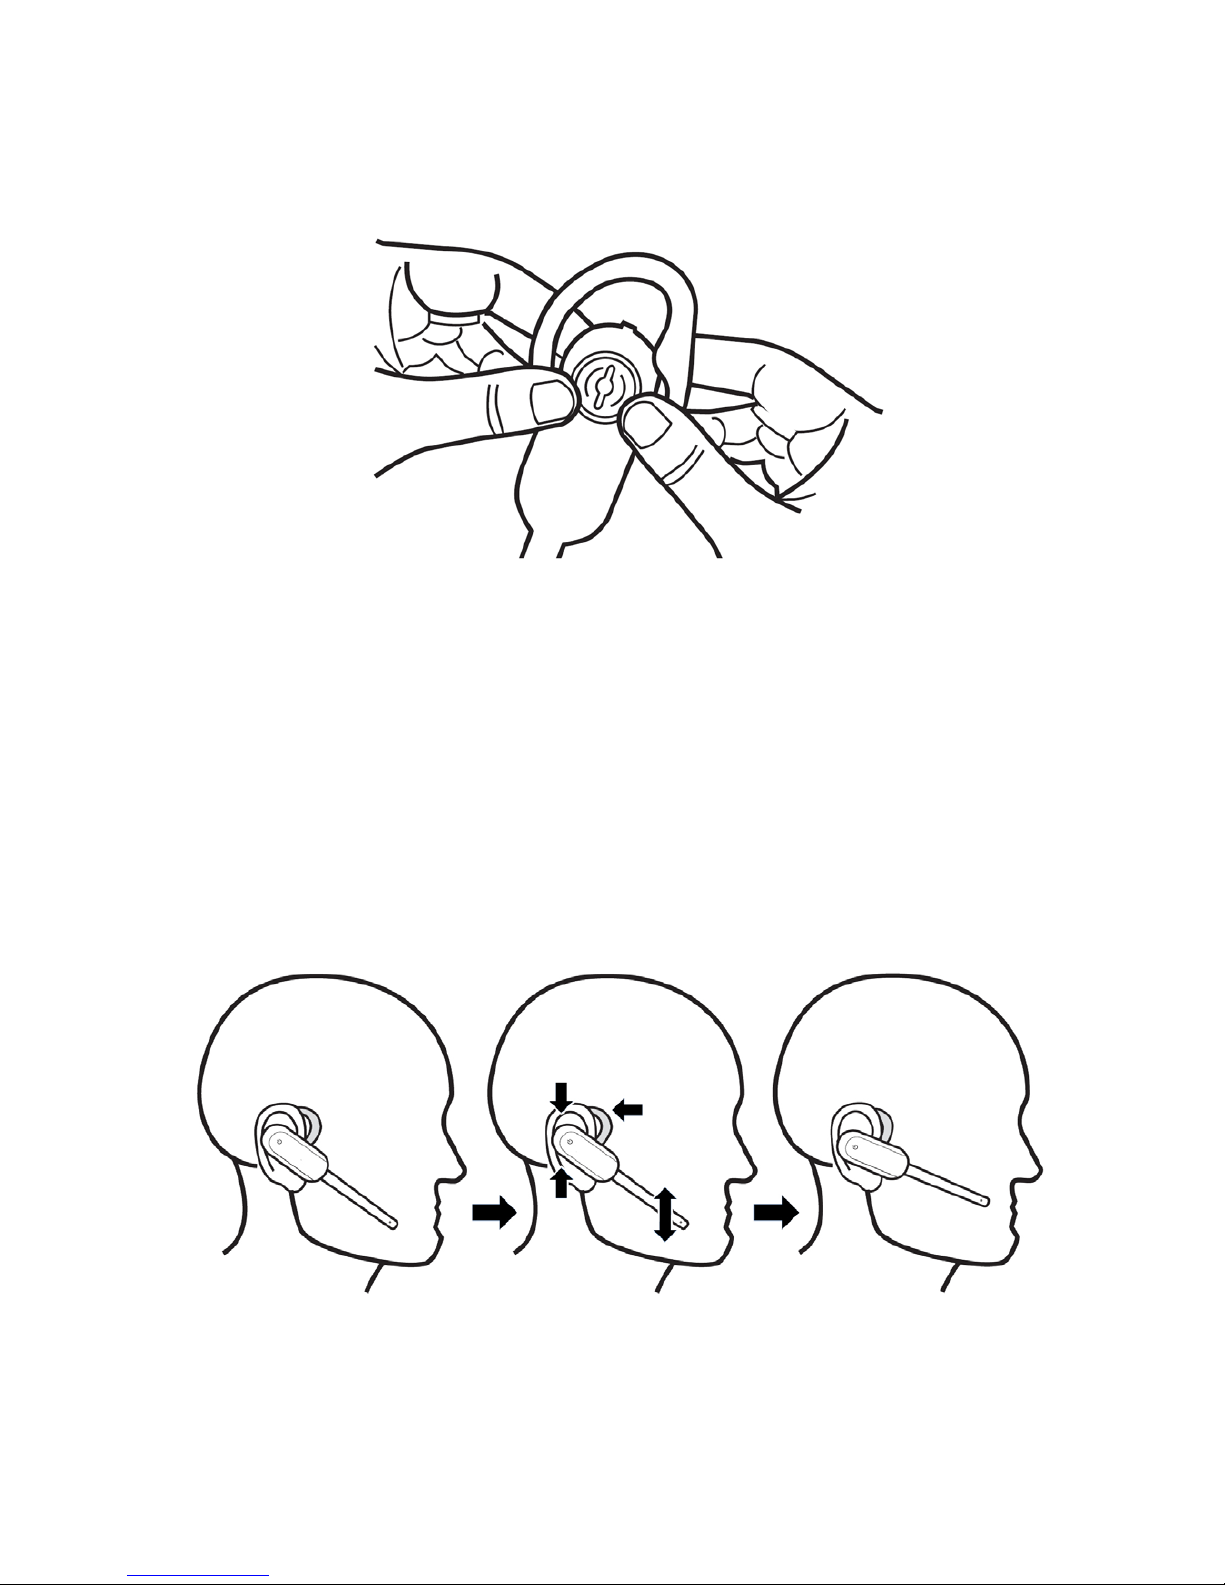
OVER-THE-EAR HOOk
There are two sizes of ear hooks provided in the package.
You can choose the most suitable ear hook and then
attach it to the headset.
To adjust the headset to wear on the left or right ear:
To wear on the left ear:
Make sure the ear hook ring is positioned as shown
in the diagram below before installation.
Then, attach the ear hook ring to the headset.
1.
2.
Page 10
10
11
To wear on the right ear:
1. Make sure the ear hook ring is positioned as shown
in the diagram below before installation.
2. Then, attach the ear hook ring to the headset.
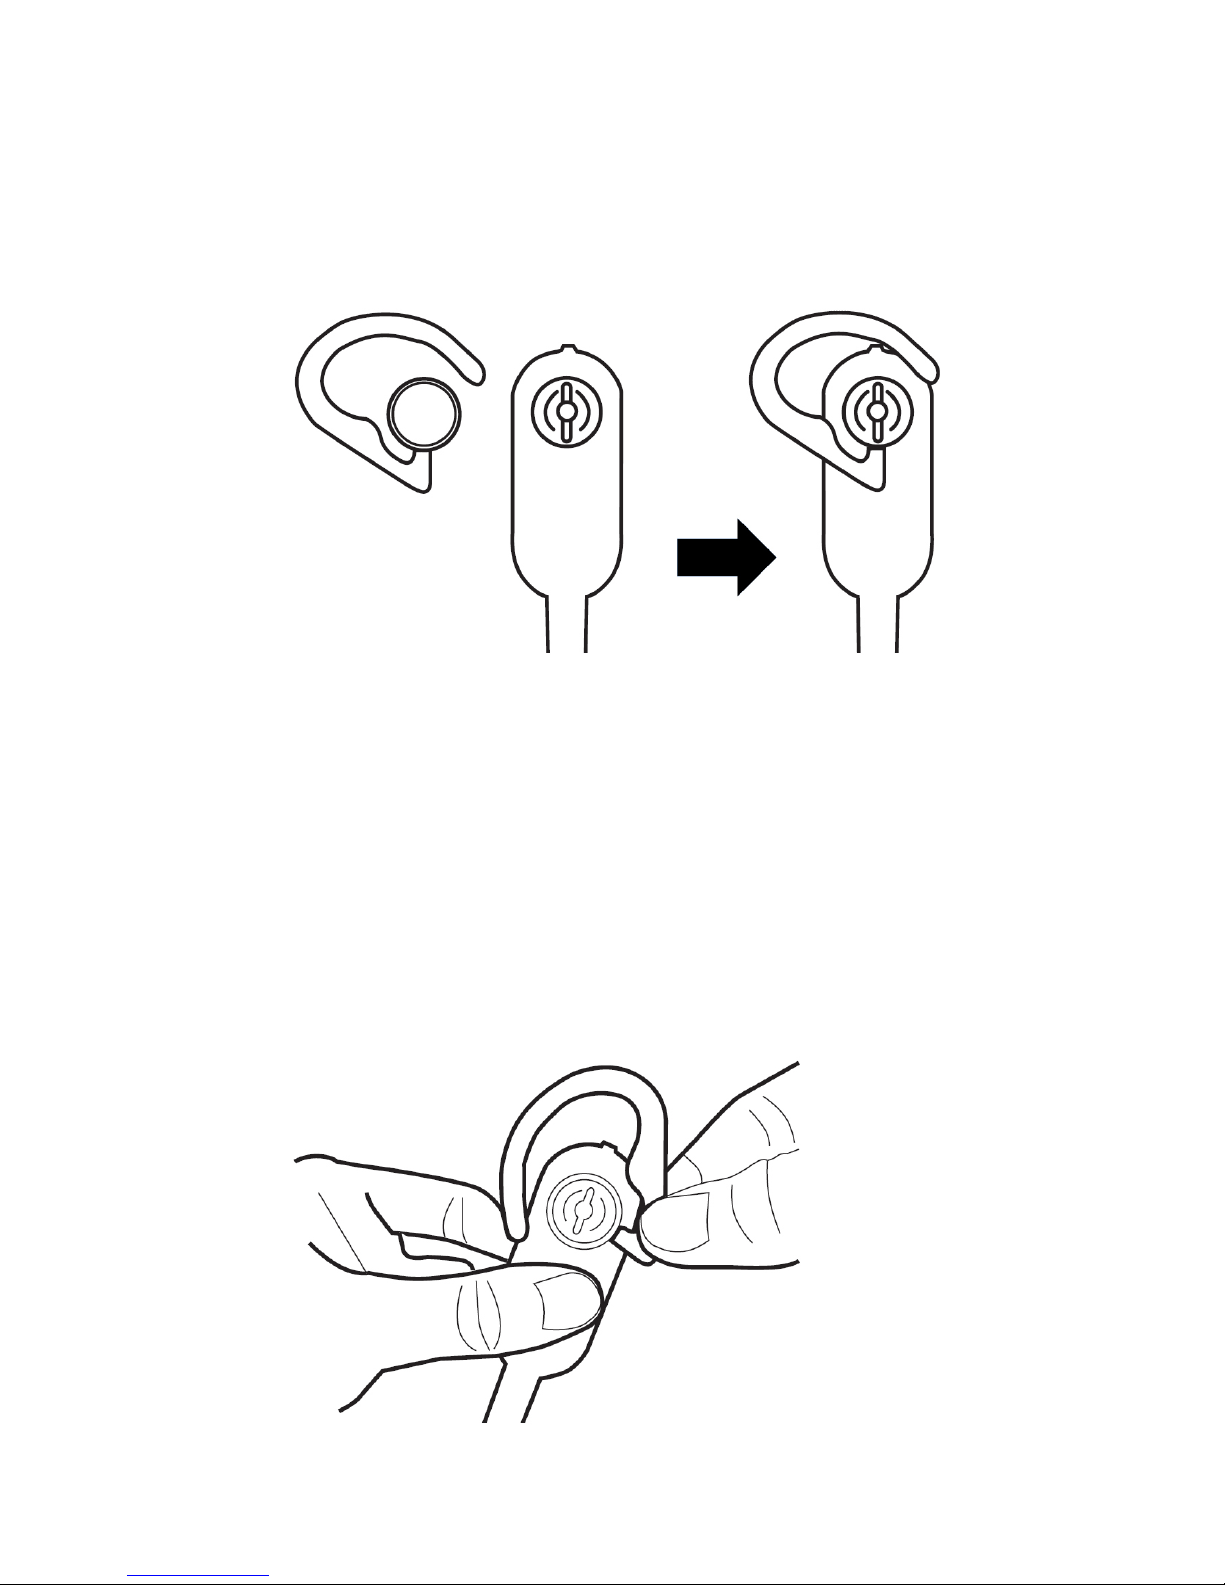
To attach the ear hook to the headset:
To wear on the left ear:
Remove any headset attachment connected to the
headset earpiece (except the ear bud).
Insert the earpiece into the ear hook.
1.
2.
Page 11
11
Press the edge of the ear hook ring towards the
earpiece until it clicks into place.
Hook the headset onto the ear you want to use and
adjust the angle of the headset until the microphone
is pointing towards your mouth.
3.
4.
Page 12
12
13
To remove the ear hook from the headset:
Hold the headset with one hand and twist, then gently
pull the ear hook with the other hand until it separates
from the earpiece.
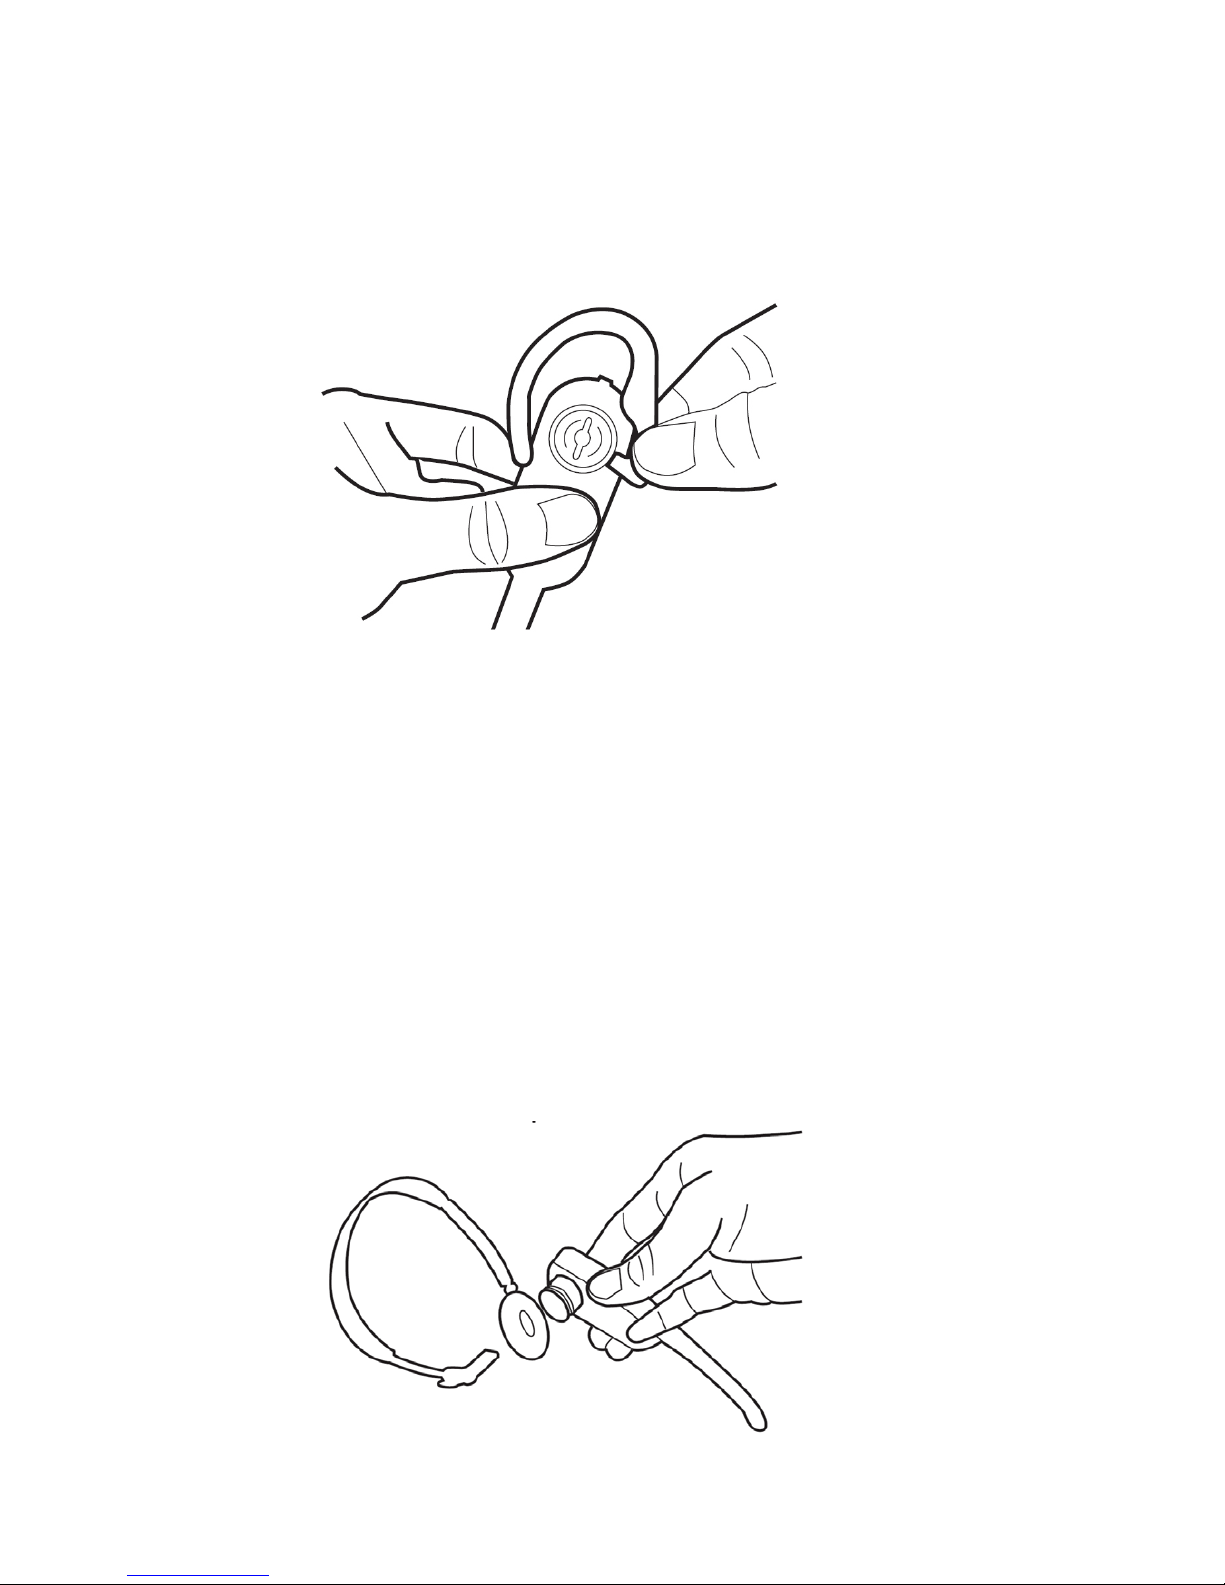
OVER-THE-HEAD bAND
To attach the head band to the headset:
Remove any headset attachment connected to the
headset earpiece (except the earbud).
Insert the earpiece into the head band.
1.
2.
Page 13

13
Push the earpiece towards the head band ring until it
clicks into place.
Adjust the head band to t your head. Adjust and
rotate the angle of the headset until the microphone
is pointing towards your mouth.
3.
4.
Page 14

14
15
To remove the head band from the headset:
Hold the headset with one hand and the head band ring
with your other hand. Twist and gently pull the headset
until it separates from the head band ring.
Page 15

15
bEHIND-THE-NECk bAND
To attach the neck band to the headset:
Remove any headset attachment connected to the
headset earpiece (except the earbud).
Insert the earpiece into the neck band ring.
Push the earpiece towards the neck band ring until it
clicks into place.
1.
2.
3.
Page 16

16
17
Place the neck band around your neck with the
padded neck band rings over your ears.
Adjust and rotate the angle of the headset until the
microphone is pointing towards your mouth.
To remove the neck band from the headset:
Hold the headset with one hand and the neck band ring
with your other hand. Twist and gently pull the headset
until it separates from the neck band ring.
4.
5.
Page 17

17
1
GETTING TO kNOw YOUR HEADSET
FRONT OF HEADSET
On/Off button and light
Press to answer or end a call.
1.
•
Page 18

18
19
bACk OF HEADSET
Earpiece
Battery pack
Open to replace the battery pack.
Microphone
The microphone incorporates noise cancelling
technology for clearer calls.
1.
2.
•
3.
•
1
2
3
Page 19

19
Vol+/Vol-
Push the volume switch on the headset to Vol- or
Vol+ to adjust the headset ringer volume while in
idle mode or the earpiece listening volume while on
a call.
2. Mute/Recall
Press to mute the microphone during a call.
Press and hold for two seconds to answer an
incoming call when you receive a call waiting alert
during a call.
Press to mute the ringer in the earpiece when
there is an incoming call.
1.
•
•
•
•
1
2
TOP OF HEADSET
Page 20

20
21
HEADSET LIGHTS OVERVIEw
Light Pattern Status
BLUE
Steadily on The headset is placed onto
the charger unit and fully
charged.
Flashing The headset is in idle mode
and not charging.
Double ashing The headset is on a call.
Triple ashing The headset is powering on.
Quadruple
ashing
There is an incoming call.
RED
Steadily on The headset is charging on
the charger unit.
Flashing The headset is battery is low
and it needs to be returned to
charger unit for charging.
Triple ashing Powering off.
RED/
BLUE
Toggling slowly The headset is not registered.
Toggling quickly The headset is in registration
mode and registering to the
base.
OFF
N/A Power off, with no battery
installed, or the battery is
dead.
Page 21

21
HEADSET ALERT TONES OVERVIEw
Pattern Status
One short beep
every 30 seconds
Headset microphone is muted•
Two beeps The ringer volume has reached its
lowest setting.
The listening volume has reached
its highest/lowest setting.
Any key is pressed while the
Headset is out of range.
•
•
•
Two low beeps There is an incoming call during
a call.
•
Two rapid beeps
every 20 seconds
The headset has low battery
warning.
•
Three rapid beeps
every 20 seconds
Headset is out of range of headset
charger.
Headset is not yet registered to a
headset charger.
•
•
Three rapid
beeps
Headset is powering on or off.•
Page 22

22
23
USING THE HEADSET
TURN THE HEADSET ON OR OFF
Turn the headset on:
Press and hold for two seconds. The light will ash
blue for three times and you will hear three beeps as it
turns on.
Turn the headset off:
Press and hold for two seconds. The light will ash
red for three times and you will hear three beeps as it
turns off.
ANSwER OR END A CALL
To answer a call on the headset:
Press to answer an incoming call.
To end a call on the headset:
Press on the headset or place the headset back in the
headset charger unit.
VOLUmE CONTROL
To adjust the headset earpiece ringer volume:
Push the volume switch on top of the headset to Vol+
or Vol- when it is not in use to adjust the volume.
To turn the ringer volume off, push the volume switch
to Vol- until you hear two beeps when the headset is
not in use.
•
•
Page 23

23
To adjust the headset earpiece listening volume:
Push the volume switch on top of the headset to Vol+
or Vol- when on a call to adjust the volume.
TEmPORARY RINGER SILENCING
When the headset is ringing, you can temporarily silence
the ringer of the headset without disconnecting the call.
The next call rings normally at the preset volume.
To silence the ringer temporary on the headset:
Press Mute/Recall on the top of the headset
to temporarily silence the ringer in the headset
earpiece.
mUTE
The mute function allows you to hear the other party
but the other party cannot hear you
To mute a call on the headset:
During a call, press Mute/Recall. You hear “Mute on”.
Press Mute/Recall again to resume the
conversation. You hear “Mute off”.
CALL wAITING
If you have subscribed to your network provider’s Call
Waiting service and it is switched on, you will hear a call
waiting alert tone on the headset earpiece if there is an
incoming call while you are already on a call.
•
•
•
•
Page 24

24
25
Press and hold Mute/Recall on the headset for two
seconds to put your current call on hold and answer
the new call.
To switch back and forth between calls at any time,
press and hold Mute/Recall for two seconds.
JOIN A CALL IN PROGRESS
The headset can join an outside call on a handset or the
telephone base.
To join a call with the headset:
When a handset or the telephone base is already
on a call, PressPressress on the headset at any time to join
the call. Do not hang up the handset until you want to
end the call.
INTERCOm
Use the intercom feature for conversations between
your headset and your handset. You can only use the
handset or telephone base to initiate an intercom call.
To initiate an intercom call:
Using a handset:
Press MENU on the handset in idle mode.
Press or to highlight Intercom, then press
SELECT.
Your handset displays INTERCOM and a list of
devices.
> Press or to highlight HEADSET and then
press SELECT. The headset rings.
1.
2.
•
1.
2.
•
Page 25

25
Using the telephone base:
Press MENU on the telephone base in idle mode.
Press or to highlight Intercom, then press
SELECT.
Your telephone base displays INTERCOM and a
list of devices.
> Press or to highlight HEADSET and then
press SELECT. The headset rings.
To answer an intercom call on the headset:
Press on the headset.
To silence an intercom call on the headset:
Press Mute/Recall on the headset.
To mute while on an intercom call on the headset:
Press Mute/Recall on the headset. You hear “Mute on”.
Press Mute/Recall again to resume the conversation.
You hear “Mute off”.
To end an intercom call on the headset:
Press on the headset.
1.
2.
•
Page 26

26
27
ANSwER AN INCOmING CALL DURING AN
INTERCOm CALL
When you receive an outside call during an intercom
call, there is an alert tone on the headset
To answer the call, press and hold Mute/Recall on
the headset for two seconds. The intercom call ends
automatically.
To end the intercom call without answering the outside
call, press on the headset. The intercom call ends
and the headset continues to ring.
CALL TRANSFER USING INTERCOm
Use the intercom feature to transfer an outside call
from a handset to the headset.
During a call, press OPTION.
Press or to scroll to Intercom, then press
SELECT.
Your handset displays INTERCOM and a list of
devices.
> Press or to highlight HEADSET and then
press SELECT. The headset rings.
To answer the call, press on the headset. The. The
outside call is now on hold.
1.
2.
•
3.
Page 27

27
From this intercom call, you have the following
options:
You can transfer the call from the handset to
the headset. Press OPTION, then press SELECT
to select Transfer. The headset automatically
connects to the outside call.
You can let the headset join on the outside call in
a three-way conversation. Press OPTION. Press
or to scroll to Share call on your handset,
then press SELECT.
You can press and hold Mute/Recall on the
headset for two seconds to take the outside call.
You can end the intercom call on the headset
and continue the outside call with your handset.
Press on the headset.
4.
•
•
•
•
Page 28

28
29
My headset doesn’t work at all.
Make sure that the battery is securely installed in
the cordless headset.
Charge the battery in the cordless headset for at least
three hours. For optimum daily performance, return
the cordless headset to its base when not in use.
Reset the headset. Turn the headset off and then
turn it on again (page 22).
Other electronic products such as TVs, radios,
computers and other DECT phones can cause
interference with your cordless headset. Try moving
the headset and headset charger unit as far away
as possible from these types of electronic devices.
You may need to purchase a new battery.
The headset battery does not accept charge.
Make sure that the battery is securely installed in
the cordless headset.
If the cordless headset is in its headset charger unit
but the light on the headset does not turn on, refer
to ‘The light on the headset is off while charging’ in
this Help section (page 29-30).
Charge the battery in the cordless headset for at
least three hours. For optimum daily performance,
return the cordless headset to the headset charger
unit when not in use.
You may need to purchase a new battery.
•
•
•
•
•
•
•
•
•
HELP
Page 29

29
I hear an echo when using the headset
Try adjusting the earpiece listening volume, see
page 23.
I hear other calls while using my headset.
Disconnect your Telstra telephone base from the
telephone jack, and plug in a different telephone. If
you still hear other calls, call your telephone service
provider.
The headset does not ring when there is an incoming call.
The headset does not have an external ringer. You
can only hear the ring tone when you are wearing
the earpiece.If you have pressed Mute/Recall on the
headset when it is ringing, it mutes the ring tone of
the headset. The ring tone resumes on the next call.
The layout of your home or ofce might be limiting
the operating range. Try moving the headset and
headset charger unit to another location, preferably
to a higher location.
Other electronic products such as TVs, radios,
computers and other DECT phones can cause
interference with your cordless headset. Try moving
your headset as far away as possible from these
types of electronic devices.
Install the battery again.
The light on the headset is off while charging.
Make sure the power adapter is plugged into the
headset charger correctly and securely.
•
•
•
•
•
•
•
Page 30

30
31
Make sure that the battery is securely installed in
the headset.
Make sure the headset is placed properly into the
headset charger unit to charge.
Unplug the unit’s electrical power. Wait for 15
seconds, then plug it back in. Allow up to one
minute for the headset and headset charger unit to
reset.
Clean the charging contacts of the headset and
headset charger unit each month using a pencil
eraser or dry cloth.
Common cure for electronic equipment:
If the headset is not responding normally, try resetting
the headset. Do the following in the order listed:
Disconnect the power to the headset charger unit.
Disconnect the headset battery.
Wait a few minutes.
Connect power to the headset charger unit.
Re-install the headset battery and place the
headset into the headset charger unit.
Wait for the headset to reestablish its connection
with the headset charger unit. Allow up to one
minute for this to take place.
TecHelp line 1300 369 193
Call TecHelp:
if you are having difculties using your Telstra DECT
cordless headset.
if you need a replacement battery or mains power lead.
•
•
•
•
1.
2.
3.
4.
5.
6.
•
•
Page 31

31
REPLACING THE HEADSET bATTERY
After a time, you may nd that the headset battery is
running out of charge more quickly.
This is a standard sign of wear and the battery will
need replacing. Replacement Lithium (Li-ion) polymer
rechargeable batteries can be purchased from TecHelp
line on 1300 369 193 your local electrical retailer.
Slide off the battery compartment cover and remove
existing battery. Insert the new battery and replace the
compartment cover until it clicks into place.
SAFETY
Only use the power adapter included with the
product. Using an unauthorised power adapter
will invalidate your guarantee and may damage
the headset charger unit.
Use only the approved rechargeable battery
supplied. Spare rechargeable batteries can be
purchased from TecHelp on 1300 369 193 or your
local electrical retailer.
Do not open the headset (except to replace the
headset battery). This could expose you to high
voltages or other risks.
Radio signal transmitted between the headset
and the telephone base may cause interference to
hearing aids.
•
•
•
•
GENERAL INFORmATION
Page 32

32
33
It is recommended that advice from a qualied
expert be sought before using this product in the
vicinity of emergency / intensive care medical
equipment.
Your product may interfere with other electrical
equipment, e.g. TV and radio sets clock / alarms and
computers if placed too close. It is recommended
that you place your product at least one metre
away from such appliances to minimise any risk of
interference.
Disconnect telephone line from base when
replacing headset back-up batteries.
Please note
Telstra accepts no responsibility for damage caused
to your Telstra DECT cordless handset by using any
other type of battery.
Never dispose of batteries in a re. There is a
serious risk of explosion and/or the release of highly
toxic chemicals.
Dispose of batteries as per local / state
requirements.
CLEANING
Simply clean the headset with a damp (not wet) cloth,
or an anti-static wipe.
Never use household polish as this will damage the
product. Never use a dry cloth as this may cause a
static shock.
•
•
•
•
•
Page 33

33
ENVIRONmENTAL
Do not expose to direct sunlight.
The product may heat up when the battery is being
recharged or during prolonged periods of use. This
is normal. However, we recommend that to avoid
damage you do not place the product on antique /
veneered wood.
Do not stand your product on carpets or other
surfaces which generate bres, or place it in locations
preventing the free ow of air over its surface.
Do not submerge any part of your product in water
and do not use it in damp or humid conditions, such
as bathrooms.
Do not expose your product to re, explosive or
other hazardous conditions.
There is a slight chance that your headset could
be damaged by an electrical storm. We recommend
that you unplug the power from the head charger
unit, as well as the power and telephone line cord
from the telephone base for the duration of the storm.
•
•
•
•
•
•
Page 34

34
35
IMPORTANT
Please retain this booklet with your sales receipt as
proof of the date of purchase.
Customer Service
If you require assistance in operating this product
please call the TecHelp Information Line on
1300 369 193 or contact VTech by e-mail at:
tcpsupport_au@vtech.com.
If you are trying to access a Telstra Network Service
and require assistance specically related to the
network service or would like to subscribe to the
service, contact Telstra on 13 22 00 for residential
or 13 20 00 for business.
Voluntary Product Warranty
In addition to your Statutory Rights and subject to the
conditions below, VTech warrants that this product will
be free from any defect in materials or workmanship
under conditions of normal use for a period of 12
months from date of purchase.
CUSTOmER SERVICE &
PRODUCT wARRANTY
Page 35

35
VTech do not warrant that the product will be free from
defects if defects are caused by an accident, misuse,
abuse, improper installation or operation, vermin
infestations, lack of reasonable care, unauthorised
modication, loss of parts, tampering or attempted
repair by a person not authorised by VTech; or where
the product has been damaged by lightning or a mains
power surge.
Where a valid claim is made under this Voluntary
Product Warranty, VTech will, at no cost to you, repair
or replace the product within a reasonable time.
Subject to your Statutory Rights, if your claim under
this Voluntary Product Warranty is not valid, you may
be charged a fee under this Voluntary Product Warranty
for the service and for any direct costs associated with
having the product delivered for service.
To make a claim under this Voluntary Product Warranty
you must call the TecHelp Information Line on 1300 369
193 or contact VTech by e-mail at:
tcpsupport_au@vtech.com where a Customer Service
Representative will inform you of the product return
process. You will need to ensure that:
You provide proof of purchase;
Your product is suitably packaged (original packaging is
not required); and
You have included all components from the original
purchase.
Page 36

36
37
For your records
Date of purchase:
_______________________________
Place of purchase:
_______________________________
Serial number:
_______________________________
For Voluntary Product Warranty purposes proof of
purchase is required so please keep your receipt.
The benets conferred by this Voluntary Product
Warranty are in addition to other rights and remedies
that are available to you under law, which cannot be
excluded. The processes for this Voluntary Product
Warranty in no way limit your rights whicharise as a
result of your Statutory Rights.
Page 37

37
This Voluntary Product Warranty is given by:
VTech Telecommunications (Australia) Pty Ltd ABN 70
136 672 627
Address: 24 Gilby Road, Mount Waverley 3149
IMPORTANT NOTE: THIS IS NOT A PRODUCT RETURN
OR SERVICE ADDRESS – PLEASE CONTACT TECHELP
BY PHONE OR EMAIL FOR PRODUCT AND WARRANTY
SUPPORT. NO LIABILITY WILL BE ACCEPTED BY VTECH
FOR PRODUCTS RETURNED TO THIS ADDRESS UNDER
THIS VOLUNTARY PRODUCT WARRANTY.
Phone number: 1300 369 193
Email address: tcpsupport_au@vtech.com
Statutory Rights
Our goods come with guarantees that cannot be
excluded under the Australian Consumer Law. You are
entitled to a replacement or refund for a major failure
and compensation for any other reasonably foreseeable
loss or damage. You are also entitled to have the goods
repaired or replaced if the goods fail to be of acceptable
quality and the failure does not amount to a major
failure.
Page 38

38
FOR MORE INFORMATION CALL:
TECHELP ON 1300 369 193 OR
EMAIL: TCPSUPPORT_AU@VTECH.COM
Version A
91-007626-010-100
 Loading...