

Page 1
Page 2

2
Page 3

CONTENTS
Package Contents ......................................................................................... 5
Introduction ..................................................................................................... 7
Description ...................................................................................................... 7
Access 200 Features ................................................................................ 9
Access 200 Display ................................................................................ 10
Getting Started .............................................................................................. 11
Desk Mounting ........................................................................................... 12
Telephone Operation ................................................................................... 13
Making a call .............................................................................................. 13
Predialling a Number .................................................................................. 13
Answering a Call ........................................................................................ 14
Adjusting the Ring Volume ......................................................................... 15
Dialling or Redialling Numbers ................................................................... 15
Redialling .................................................................................................... 16
Dialling From the Directory ........................................................................ 17
Dialling From the Callers List ..................................................................... 17
Dialling From Quick-Dial Memories ........................................................... 18
The Notepad ............................................................................................... 19
Dialling From the Notepad .......................................................................... 19
Writing to Notepad...................................................................................... 20
Moving a notepad entry .............................................................................. 20
During a Call, You Can ... ........................................................................... 21
Muting a Call .............................................................................................. 22
Switching to and From Listen-in Mode....................................................... 22
Switching to and From Handsfree Mode .................................................... 23
Answering Call Waiting .............................................................................. 23
Handsfree Operation .................................................................................. 24
Extension in Use ......................................................................................... 25
The Settings Menu...................................................................................... 26
Personalising Your Phone ............................................................................ 26
Caller-Name Match .................................................................................... 31
Calling Number Distinctive Ring Match ..................................................... 32
Storing Names and Numbers ...................................................................... 33
How to Enter a Number ............................................................................. 33
3
Page 4

CONTENTS
How to Enter a Name ................................................................................ 34
Keypad Character Table ............................................................................... 35
How to Assign a Melody ............................................................................ 35
The Directory ............................................................................................ 36
Adding to the Directory: .............................................................................. 36
Modifying a Directory Entry ........................................................................3 8
The Quick-Dial Memories .......................................................................... 39
Using Caller Display .................................................................................... 41
The Callers List: ......................................................................................... 41
Using Network Services ..............................................................................47
Visual Message Waiting Service ................................................................ 48
Using the Services List ............................................................................... 48
Modifying the Services List ........................................................................ 50
Messages and Error Beeps ........................................................................ 51
Troubleshooting ............................................................................................ 52
Some Important Safety Instructions .......................................................... 53
Warranty .........................................................................................................5 4
Customer Service .........................................................................................5 4
The information contained in this document was correct at the time of printing. However, in order
to improve its products, Telstra reserves the right to modify the details in this document at any
time and without warning.
©
COPYRIGHT 2001 Telstra Corporation Limited
This work is copyright. All rights reserved. Other than for purposes and subject to conditions
prescribed under the Copyright Act, no part of it may in any form or by any means (electronic,
mechanical, photocopying, microcopying, scanning, recording or otherwise) be reproduced, stored
in a retrieval system or transmitted without prior permission from Telstra Corporation Limited.
TM
Trade mark of Telstra Corporation Limited.
®
Registered Trade mark of Telstra Corporation Limited ABN 33 051 775 556.
4
Page 5
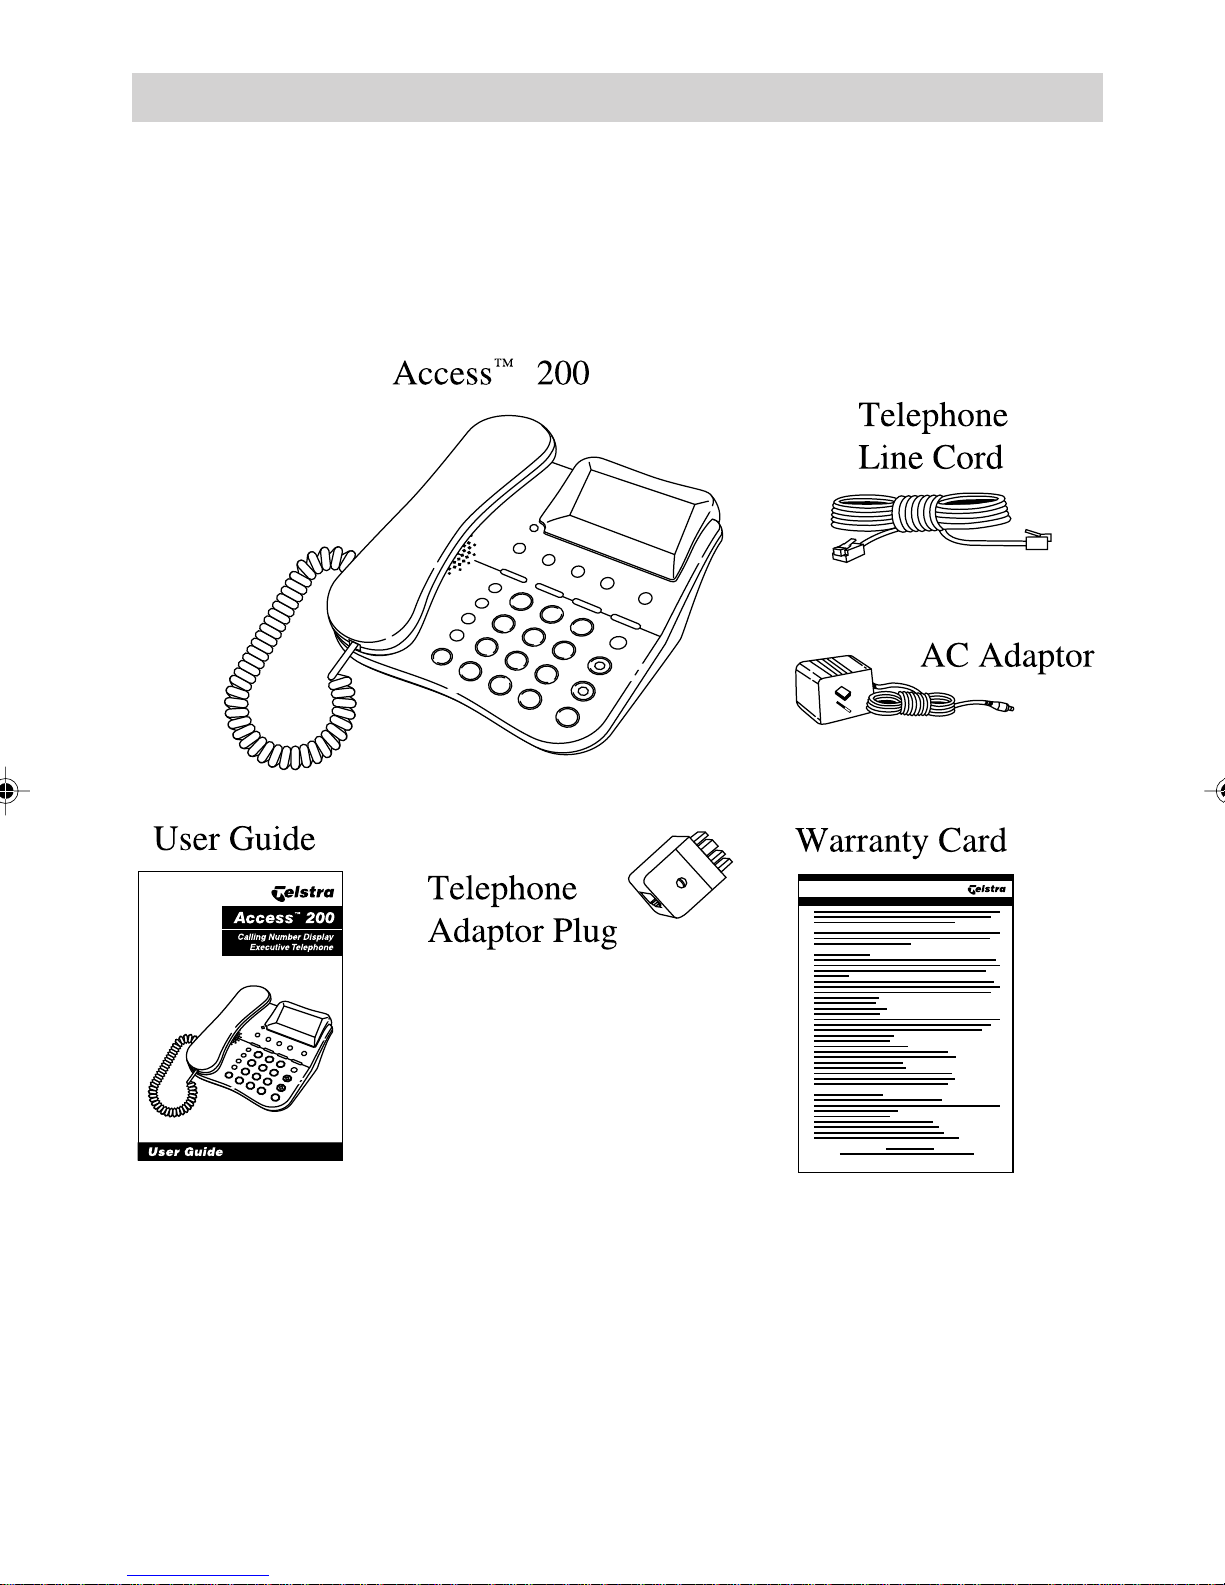
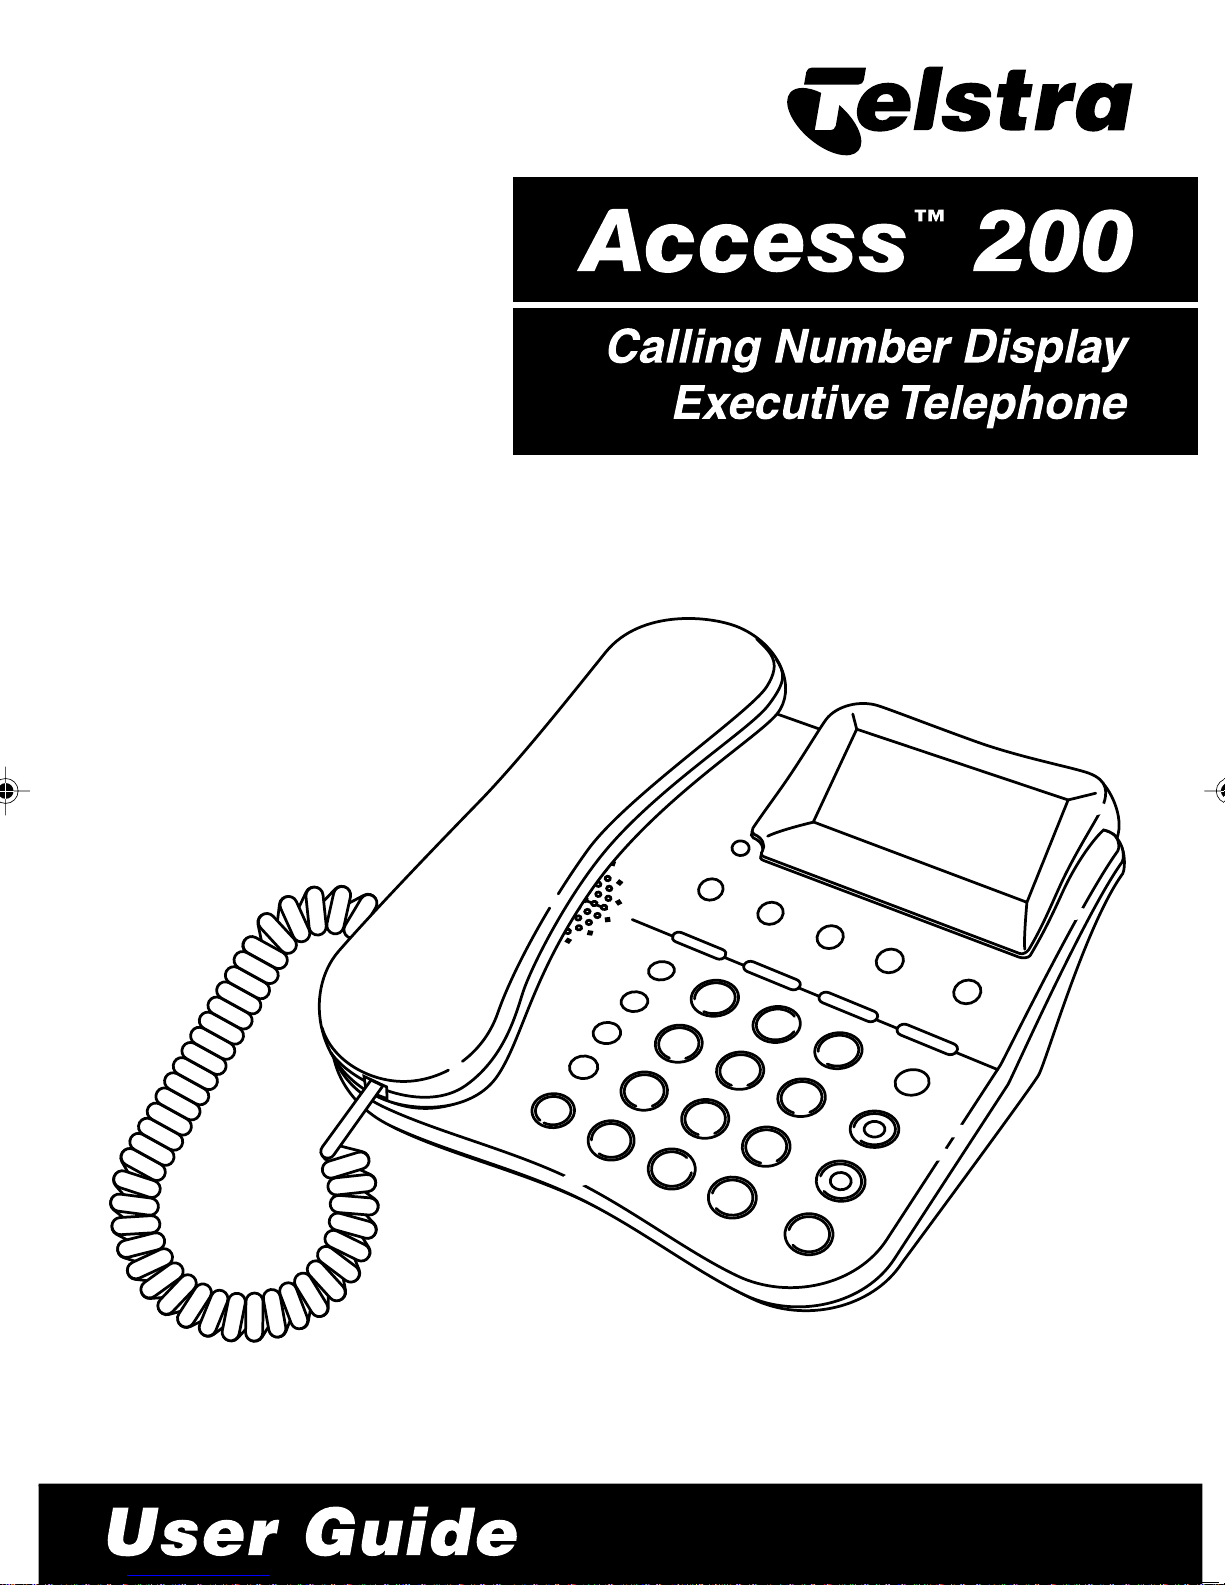
Package Contents
The Access 200 package contains:
5
Page 6

6
Page 7

INTRODUCTION
DESCRIPTION
Congratulations on your purchase of the Telstra
Access
200 Calling Number Display Executive
Telephone. The Access 200 is an exciting addition
to Telstras modern range of stylish, efficient
communications equipment. The Access 200s
large digital display, its dedicated function keys and
its intuitive menu-driven interface make it one of
the simplest feature-rich products available. To
obtain full benefit from the Access 200, please read
these instructions and keep them handy for future
reference.
Your Telstra Access 200 displays and stores the
telephone number of your telephone callers as well
as the date and time at which calls were recorded.
Your Access 200 allows you to:
Record the telephone number of incoming calls
when you are absent.
View the telephone number of an incoming call
before you answer. Provided the number is not
blocked, the Access 200 displays the callers
telephone number after the first ring of the
telephone. Whether you decide to answer the
call or not, the callers number is recorded in
the call log.
See at a glance whether the incoming call is
blocked or not. When the telephone is ringing
the speed at which the New Calls Indicator
Light flashes informs you if the caller has
blocked their telephone number.
7
Page 8

DESCRIPTION
Your Access 200 allows you to:
In future, when available from the Telstra
network, view the telephone number of an
incoming call when you are already on the
telephone (Calling Number Display on Call
Waiting). The visual indicators and a tone in
your telephone handset will inform you when
a new call is waiting.
The Access 200 gives you the telephone
number of a new caller provided the number is
not blocked and helps you to decide
whether to switch between the two calls or to
ignore the incoming call. In either case, the
telephone number is stored in the call log.
In future, when available from the Telstra
network, see if you have received a message in
your voice mail box. If you have a Voice Mail
Service, the Access 200 displays the * icon
to inform you that a message is recorded in
your voice mail box. A short time after you
have listened to your messages, the Voice Mail
Service sends a signal to your Access 200 to
automatically turn off the * icon.
8
Page 9
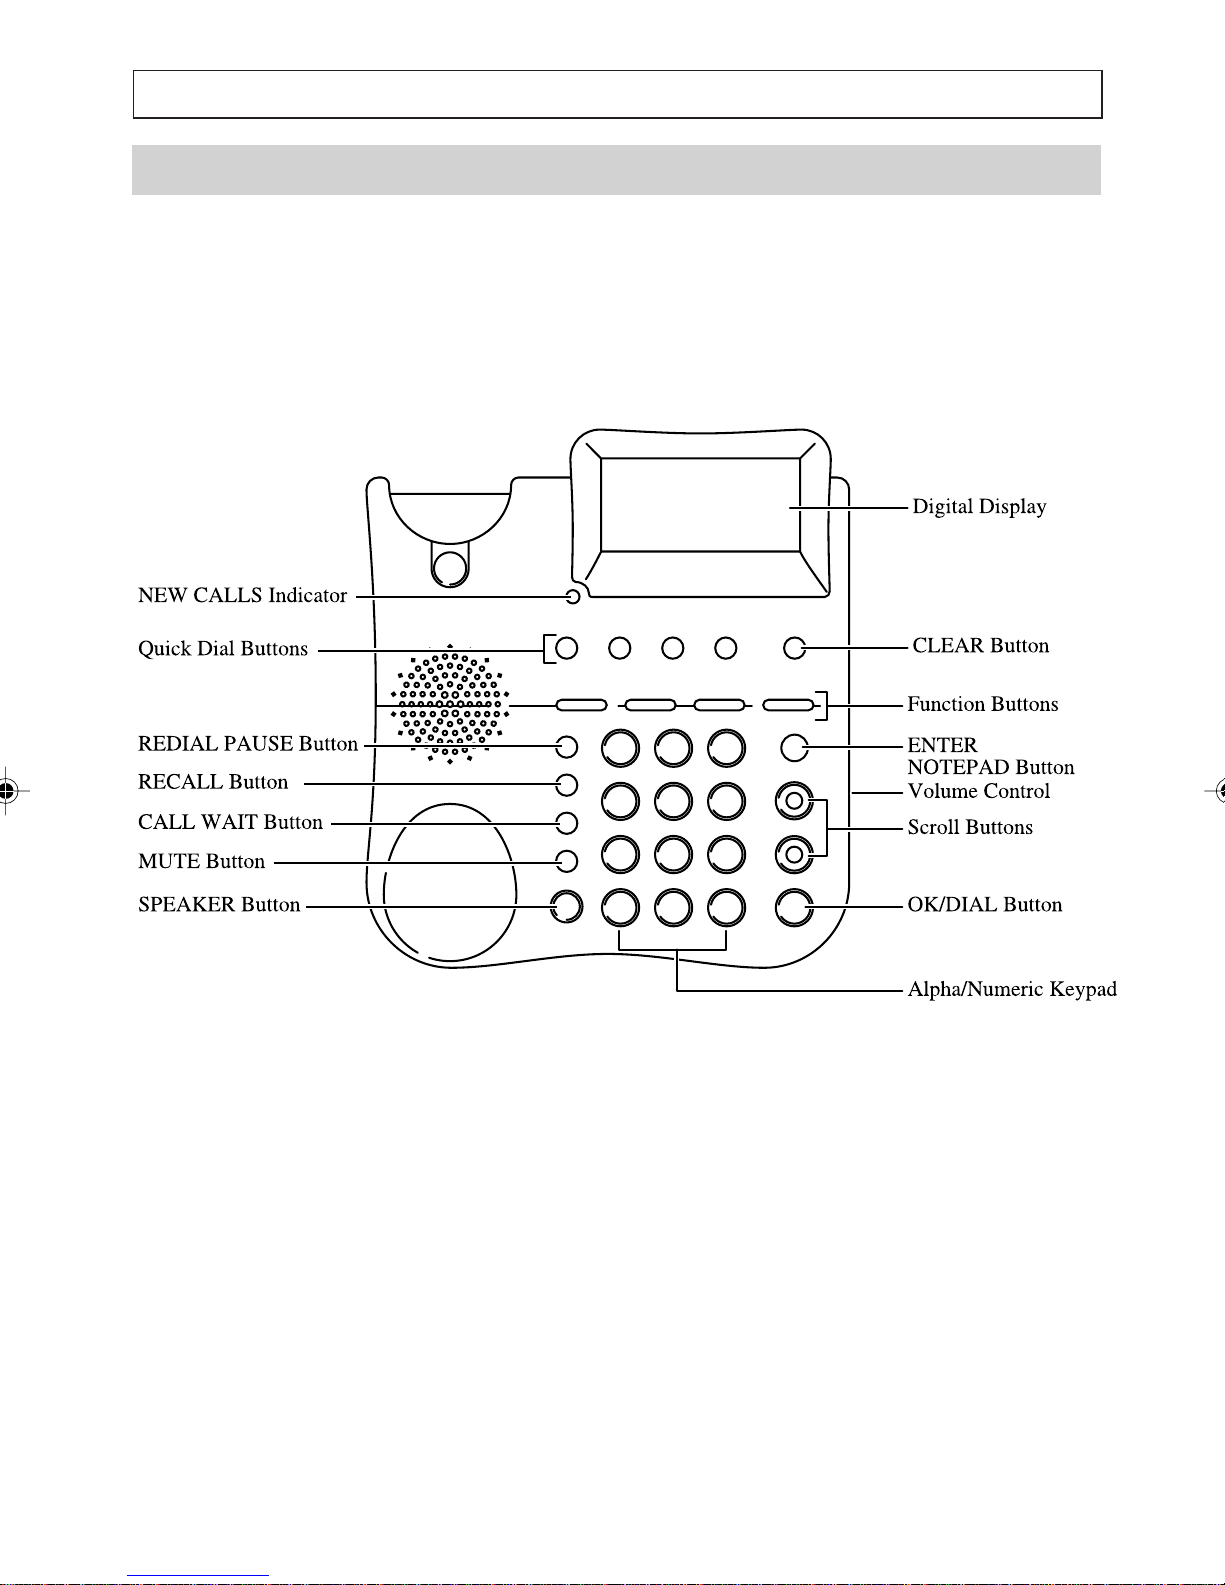
FEATURES
Access™ 200 Features
9
Page 10
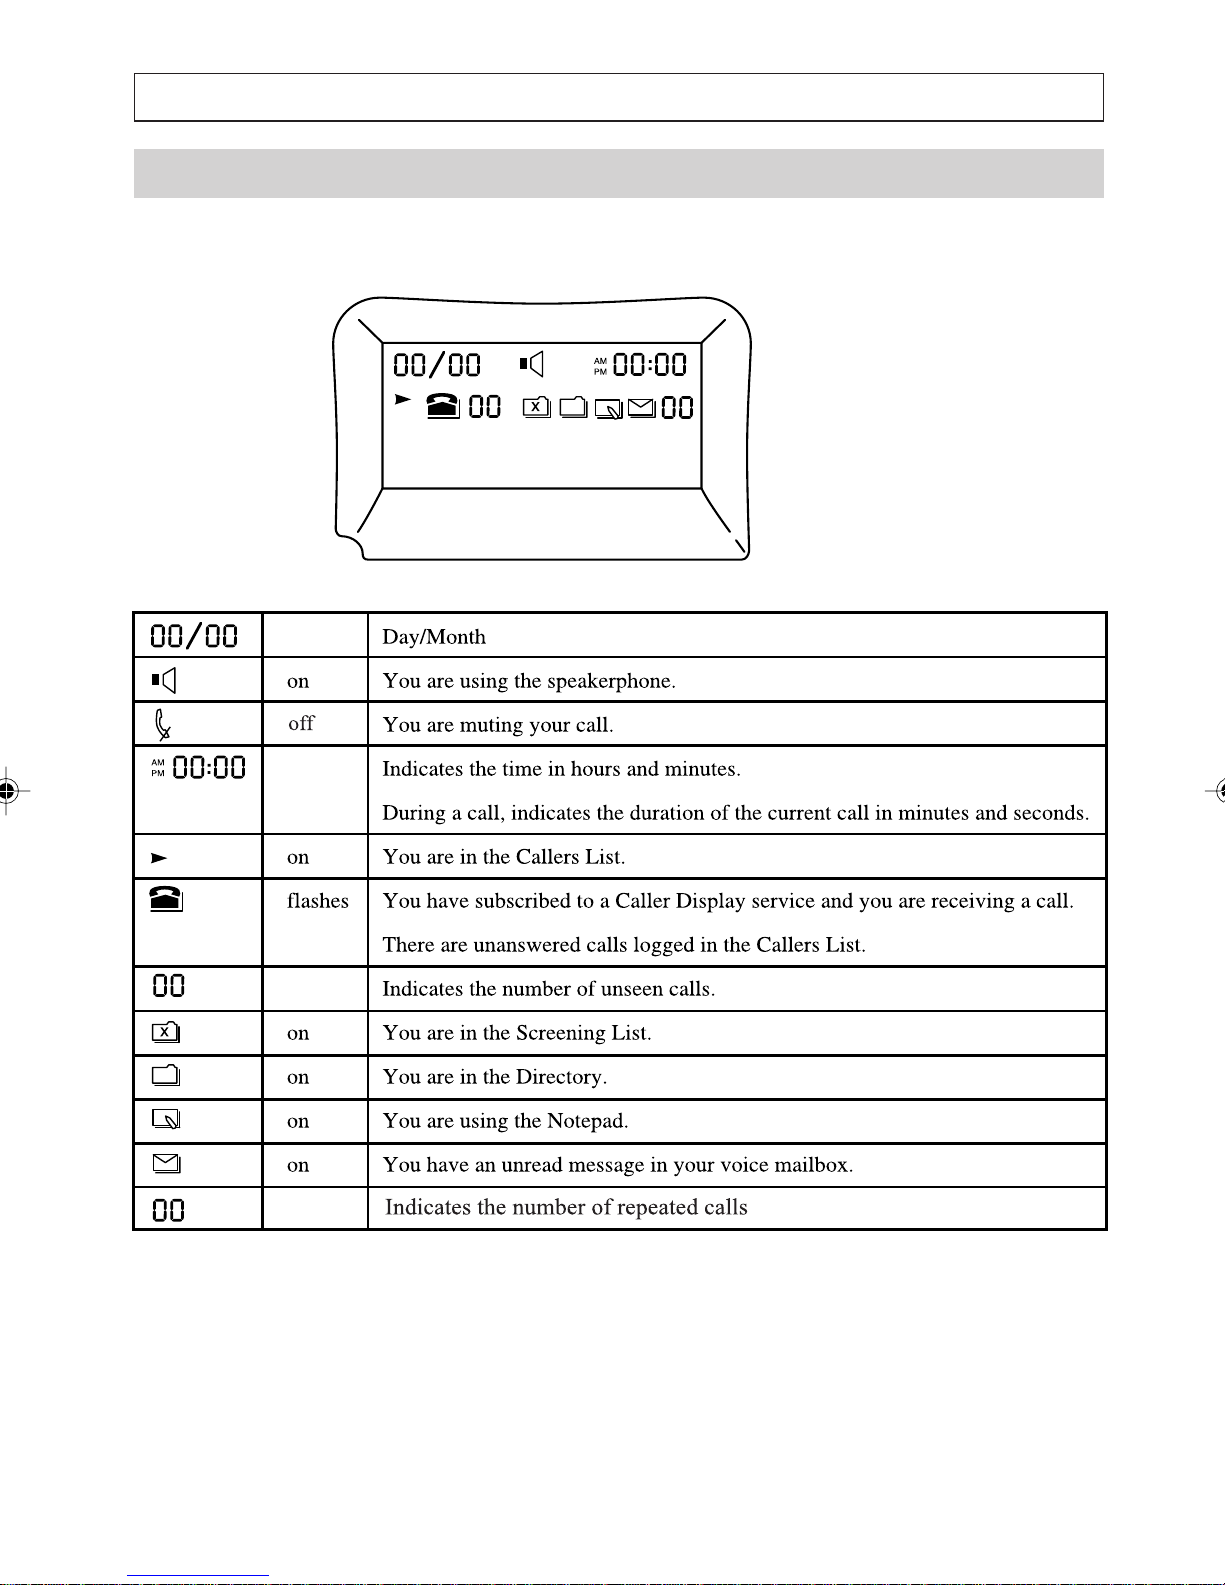
DISPLAY
Access™ 200 Display
10
Page 11

GETTING STARTED
Installing your Access 200:
The telephone should be located near a 240V AC
power source.
Step 1. Connect the handset cord:
Turn the telephone over. Plug one end of the coiled
handset cord into the right hand modular socket
Then insert the cord into the channel below the
socket and plug the other end of the cord into the
handset.
Step 2. Connect the line cord:
Plug one end of the telephone line cord into the
left-hand modular socket. Then insert the cord into
the channel below the socket and plug the other
end of the cord into the telephone line socket using
either the Modular Adaptor provided or the modular
plug depending on the type of telephone line socket
using either the modular adaptor plug provided or
the modular plug depending on the type of
telephone line socket in use.
Step 3. Connect the AC Power Adaptor:
Insert the small plug of the AC power adaptor into
the DC 9V socket. Then insert the cord into the
channel below the socket and plug the power
adaptor in the power outlet.
11
Step 2
Step 3
Step 1
Page 12
GETTING STARTED
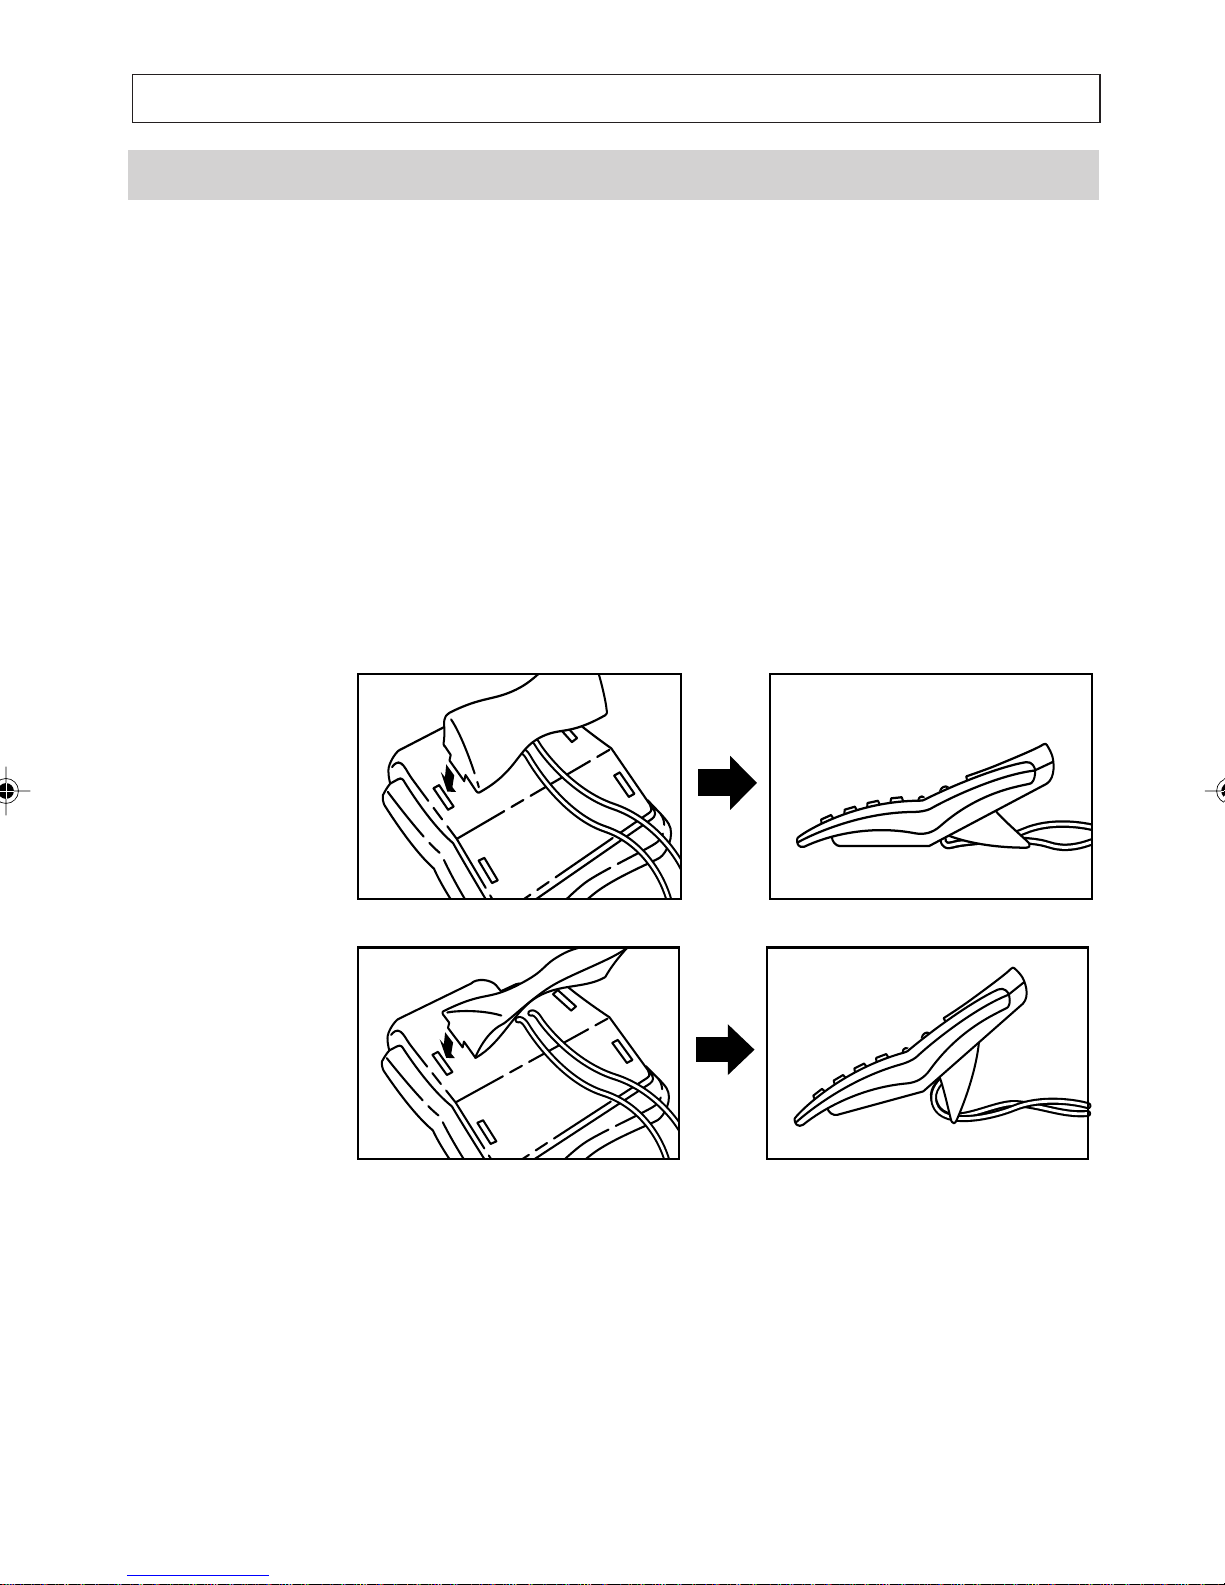
Desk Mounting
The Access 200 is a provided with a special stand
which is fitted as shown.
Squeeze the sides of the stand to fit it into the two
slots on the upper reverse side of the telephone.
Two positions are possible, depending on which
way you install the stand.
12
Page 13

TELEPHONE OPERATION
Making a call
1. Lift the handset and dial the phone number
2. To end the call, replace the handset.
Note:
You can dial the number manually using the keys
[0] through [9] and the keys [RECALL], [PAUSE]
[#] and [*].
Predialling a Number
JKL
5
TUV WXYZ
MNO
6
Or you can retrieve and dial a number stored in
any of the Quick-Dial memories simply by pressing
the [M1], [M2], [M3] or [M4].
Or you can retrieve a number stored in the
Directory or Callers List and the press [OK] to
dial.
You can enter a number before lifting the handset.
This allows you to view, and if necessary, change
the number before dialling it.
1. With the handset still on hook enter a number.
You can correct mistakes or modify the number
using the [CLEAR] key
] or [] keys to move the cursor right
the [
to delete digits and
or left.
13
Page 14
TELEPHONE OPERATION
2. Lift the handset and then press [OK] to dial.
Answering a Call
The messages displayed by your telephone depend
on the the services provided by the Telstra
network. If you have the Calling Number Display
service, when a call is received, the telephone rings
and the New Calls alert and symbol both flash.
The display also shows the telephone number of
the person calling, provided the number is not
blocked.
1. Lift the handset then speak.
2. To end the call, replace the handset.
Note:
You can answer a call even if you are in the Menu,
the Directory, or any other list. When the telephone
rings, the display alternates between the current
screen and the callers telephone number (if
provided). This stops shortly after you answer
the call.
14
Page 15
TELEPHONE OPERATION
Adjusting the Ring Volume
You can increase, decrease or even turn off the
ring volume through the Settings menu.
1. Press and hold [SERV/MENU] for 2 seconds
SERV/MENU
to enter the Settings Menu.
DIAL
OK
DIAL
OK
SERV/MENU
2. Press [
] to scroll to the SET RING
VOLUME option, then press [OK].
3. Press [
] or [] to scroll to the volume level
desired (HIGH, MEDIUM, LOW or OFF )
then press [OK].
4. Press [SERV/MENU] to exit the Settings
menu.
Dialling or Redialling Numbers
You can also make calls by redialling the last
number called or by dialling from the Directory,
Callers List, Quick-Dial memories or notepad.
15
Page 16

TELEPHONE OPERATION
Redialling
To Redial the Last Number Dialled
REDIAL
PAUSE
REDIAL
PAUSE
DIAL
OK
REDIAL
PAUSE
1. Lift the handset then press [REDIAL].
The telephone displays the last number dialled and
redials it.
To View the Number Before Redialling
1. Press [REDIAL] to display the number
2. Modify the number if you want to (see How to
Enter a Number.)
3. Press [OK] to dial handsfree or lift the handset
and then press [OK] to dial.
To Clear the Redial Number From Memory
1. Press [REDIAL] to display the number
DIAL
OK
2. Press
to delete, then [OK] to confirm.
Note:
You cannot clear the redial number from the
memory during a call.
16
Page 17

TELEPHONE OPERATION
Dialling From the Directory
1. Press [DIRECTORY]
DIRECTORY
The display indicates how many entries are in
the Directory, then shows the first entry.
2. Press [
To speed up the search, you can enter the first
letter of the entrys name. The first name
beginning with that letter appears. Then Press
] or [] to find the desired entry.
[
3. Press [OK] to dial in handsfree or lift the
handset and then press [OK] to dial.
The telephone dials the number and exits from
the Directory.
Dialling From the Callers List
1. Press [CALLERS]
CALLERS
The display shows the most recent entry and
the u symbol appears (indicating that you
] or [] to find the desired entry.
DIAL
OK
are in the Callers List.)
2. Press [
[OK] to confirm your selection.
The display shows the number to be dialled and
on the second line the messages NBR TO BE
DIALLED and CHECK AREA CODE are
shown alternately.
Remember your telephone logs caller numbers
exactly as sent by the Telstra network. In some
cases, this means the area code might have to
be modified before the callers number can be
successfully dialled from your area.
] or [] to find the caller, then press
17
Page 18

TELEPHONE OPERATION
3. Adjust the number as appropriate.
4. Press [OK] to dial in handsfree or lift the
handset and then press [OK] to dial.
The telephone dials the number and exits from
the Callers List.
Note:
If you do not have the Calling Number Display
Service , the Callers List will always be empty.
Dialling From Quick-Dial Memories
To dial directly:
1. Lift the handset, then press [M1], [M2],
[M3],or [M4].
The telephone displays and dials the number
assigned to the key you press.
To view the number before dialling:
1. Press [M1], [M2], [M3] or [M4]
2. Press [OK] to dial in handsfree or lift the
handset and then press [OK] to dial.
18
Page 19

TELEPHONE OPERATION
The Notepad
The notepad facility allows you to enter and store a
number during a call. This may be useful when in
a hurry, in an emergency situation, or when there is
no pen or paper to hand. After you end the call
you can retrieve the number from the notepad and
dial it or move it to the Directory or a Quick-Dial
memory.
Dialling From the Notepad
The notepad facility allows you to enter and store a
number while on a call and then dial the number
ENTER
NOTEPAD
after your call.
1. Press [NOTEPAD]
The symbol appears and the number in the
notepad is displayed.
2. Modify the number if you need to.
3. Press [OK] to dial in handsfree or lift the
handset and then press [OK] to dial.
19
Page 20

TELEPHONE OPERATION
Writing to Notepad
During a call you can enter and store a number in
the notepad memory.
1. During a call (and when not viewing the
2. Press and hold the key to clear the current
Directory or other lists) press [NOTEPAD].
The symbol appears and the display shows
the number currently in the notepad or the
message NOTE EMPTY if there is no
number.
number (if any).
ENTER
NOTEPAD
Moving a notepad entry
3. Enter a number then press [NOTEPAD].
The number is saved and you exit automatically
from the notepad. If you exit the notepad or
terminate the call before completing your
number then whatever is on the screen is
automatically saved.
After you end your call, you can retrieve the
number from the notepad and dial it, or move it
to the Directory or Quick Dial memory.
Note:
The notepad content is lost if power is removed
from the telephone.
ENTER
NOTEPAD
You can transfer and save the contents of your
notepad to the Directory or any of the Quick-Dial
memories.
1. Press [NOTEPAD]
20
Page 21

TELEPHONE OPERATION
ENTER
NOTEPAD
DIRECTORY
2. Press [NOTEPAD] again and hold it for 2
seconds.
3. Press [DIRECTORY], [M1], [M2], [M3] or
[M4].
If the chosen destination is full the move
request is cancelled. Choose another
destination or exit the Notepad and delete any
unwanted entries from the destination list.
4. Modify the name and number (if necessary)
and assign a melody.
The notepad number is saved in the specified
destination and the notepad is cleared. The
display automatically exits from the notepad.
During a Call, Y ou Can ...
Mute and unmute the microphone
Write a number to the notepad
View the Directory, Quick Dial memories,
Switch to and from listen-in mode
Switch to and from handsfree mode
Answer a second call
Callers List and Screening List
21
Page 22

TELEPHONE OPERATION
Muting a Call
During a call you can switch off the microphone so
that the person on the telephone cannot hear you.
However, you can still hear them.
MUTE
1. During a call, press [MUTE]
The microphone is muted and the HANDSET
MUTED symbols flashes.
2. To unmute the microphone, press [MUTE]
MUTE
again.
Switching to and From Listen-in Mode
During a call you can activate the Speakerphone so
that those around you can hear the person you are
talking to. The person can only hear whoever talks
through the handset.
SPEAKER
SPEAKER
1. Press [SPEAKER] to activate the
Speakerphone. During a call the speaker
volume can be adjusted by turning the rotary
wheel on the right hand side of the telephone.
2. To switch off the speaker press [SPEAKER]
again.
22
Page 23

TELEPHONE OPERATION
Switching to and From Handsfree Mode
During a call you can switch from using the
handset to using the speaker (and vice versa)
SPEAKER
Answering Call Waiting
If you are already on the line and you hear the call
wait beeps, you can speak to the second caller using
the Call Wait button.
CALL WAIT
1. To answer a second call press the [CALL
1. To switch to handsfree mode press and hold
[SPEAKER] while replacing the handset.
2. To switch back to the handset mode simply lift
the handset.
WAIT] key. The first caller is put on hold.
CALL WAIT
2. To switch from one call to the other, press
[CALL WAIT] key again.
Note:
In future when Calling Number Display on Call
Waiting is available, the Access 200 will display the
telephone number of the second caller. If you
ignore the Call Waiting, the telephone number will
be stored in the Caller's List.
23
Page 24

TELEPHONE OPERATION
Handsfree Operation
The Handsfree feature of your telephone enables
you to make and answer calls while remaining free
for other activities.
To make a call:
SPEAKER
SPEAKER
SPEAKER
SPEAKER
1. Either press [SPEAKER] then dial the
telephone number or predial the telephone
number and then press [OK].
2. To end the call press [SPEAKER].
To answer a call:
1. Press [SPEAKER] then speak.
2. To end the call press [SPEAKER].
To adjust the handsfree speaker volume:
During a call turn the rotary wheel on the right
hand side of the telephone to increase or decrease
the handsfree speaker volume.
24
Page 25

TELEPHONE OPERATION
To switch to and from handset mode:
1. To switch to handset mode, simply lift the
handset.
SPEAKER
Extension in Use
2. To switch back to handsfree mode press and
hold [SPEAKER] while replacing the handset.
If someone is using a parallel telephone the display
shows the message EXTENSION IN USE and
the New Calls Indicator is switched on.
Note:
The message EXTENSION IN USE is also
displayed if your telephone is not plugged into the
telephone line socket.
25
Page 26

PERSONALISING YOUR PHONE
The Settings Menu
Your telephone is ready to use as soon as it is
SERV/MENU
connected and installed as explained at the
DATE AND TIME
SELECT RING TYPE
SET RING VOLUME
SET CALL TIMER
CLR MESSAGE ICON
CALL LIST MODE
CALL LIST MEMORY
SET ERROR BEEP
SERV/MENU
DIAL
OK
beginning of this User Guide. However, to obtain
the most out of the telephone some features will
need setting (e.g. the date and time) and other
features may need adjusting (e.g. the ringer).
All of these features are accessible through the
Settings Menu.
Note:
The Settings menu is not available during calls
1. Press and Hold [SERV/MENU] for 2 seconds
to enter the Setting Menu.
2. Press [
] to scroll to the option you want then
press [OK] to select it. The display shows the
options current setting if it has one.
DIAL
OK
SERV/MENU
3. Press [
] or [] to view the possible settings
for the current option, then press [OK] to select
the setting you want.
This sets the option and returns you to the main
menu. Some options like DATE and TIME
require you to enter a value using the keypad.
4. To exit the Settings menu press
[SERV/MENU].
Power Failure
Your settings are not lost in the event of a power
failure. Only the notepad and redial numbers are
lost.
26
Page 27

PERSONALISING YOUR PHONE
Setting Date and Time:
To set the Date and Time hold the [SERV/MENU]
SERV/MENU
key down for 2 seconds until:
SETTINGS
DATE AND TIME
DIAL
OK
DIAL
OK
SERV/MENU
appears on the display. Press [OK] and the DAY
of the months will flash. Use the digits keys to
enter the changes. The initial setting is 00/00
PM 12:00, with day/month on the left and hours/
minutes on the right. Press any digit key to change
AM to PM. Use [
] and [] to move the cursor.
Press [OK] when all changes have been
completed.
Selecting Ring Type:
To set the standard Ring Type you can choose
between two melodies, Type A (default) or Type B.
Press and hold the [SERV/MENU] key down for 2
seconds until:
SETTINGS
DIAL
OK
DATE AND TIME, press [
] key to select next
item.
SETTINGS
SELECT RING TYPE
appears on the display. Press [
] and [] keys
to choose the ring type. Press [OK] when all
changes have been completed. The telephone gives
a sample ring as you scroll through each setting.
27
Page 28

PERSONALISING YOUR PHONE
Setting Ring Volume:
To set the volume level for the ringer.
SERV/MENU
Press and hold the [SERV/MENU] key down for
2 seconds until:
SETTINGS
DIAL
OK
DATE AND TIME, press [
item.
SETTINGS
SET RING VOLUME
appears on the display. Press [
to choose the ring volume. Choose between
HIGH, MEDIUM (Default) LOW or OFF.
The telephone gives a sample ring as you scroll
through each setting.
Press [OK] when all changes have been
completed.
Setting Call Timer:
To switch the call timer to option ON or OFF.
When ON (default) the call timer is activated and
] key to select next
] and [] keys
SERV/MENU
DIAL
OK
displayed with every incoming and outgoing call.
Press and hold the [SERV/MENU] key down for 2
seconds until:
SETTINGS
DATE AND TIME, press [
item.
SETTINGS
SET CALL TIMER
appears on the display. Press [
to choose the setting required. Choose between
ON or OFF. Press [OK] when all changes have
been completed.
28
] key to select next
] and [] keys
Page 29

PERSONALISING YOUR PHONE
Clearing Message Waiting Indicator:
If the * symbol is displayed when there are not any
messages in your voice mail mailbox, use this menu
to option as CLR MESSAGE ICON to clear it
from the screen.
Press and hold the [SERV/MENU] key down for 2
SERV/MENU
seconds until:
SETTINGS
DIAL
OK
SERV/MENU
DATE AND TIME, press [
] key to select next
item until:
SETTINGS
CLR MESSAGE ICON
appears on the display. Press [OK] to clear the
icon.
Setting Call List Mode:
To set the Callers List to Log ALL CALLS or
only UNANSWERED CALLS. The default is
ALL CALLS.
Press and hold the [SERV/MENU] key down for 2
seconds until:
DIAL
OK
SETTINGS
DATE AND TIME, press [
] key to select next
item until:
SETTINGS
CALL LIST MODE
appears on the display. Press [
] and [] keys
to choose from the settings ALL CALLS or
UNANSWERED. Press [OK] when all changes
are completed.
29
Page 30

PERSONALISING YOUR PHONE
Setting Call List Memory:
Sets the Callers List to log either names and
numbers or number only. The default is Name
and Number and sets the maximum number of
entries to 25. The selection of NUMBER ONLY
automatically sets the maximum number of entries
to 50.
SERV/MENU
Press and hold the [SERV/MENU] key down for 2
seconds until:
SETTINGS
DATE AND TIME, press [t] key to select next
item until:
DIAL
OK
SETTINGS
CALL LIST MEMORY
appears on the display. Press [t] and [s] keys to
choose the setting required. Choose between
NAME AND NUMBER or NUMBER ONLY.
Press [OK] when all changes are completed
Note:
If you change the current setting , all the entries
currently in the Caller List are deleted.
Setting Error Beep:
Switches the beep function ON (default) or OFF.
When this function is ON, a short beep sounds if
you press a key that cannot be used in certain
situations.
The error beep will only work if the handset is on
the hook.
30
Page 31

PERSONALISING YOUR PHONE
Press and hold the [SERV/MENU] key down for 2
SERV/MENU
seconds until:
SETTINGS
DIAL
OK
Caller-Name Match
DATE AND TIME, press [
] key to select next
item until:
SETTINGS
SET ERROR BEEP
appears on the display. Press [
] and [] keys
to choose the setting required. Choose between
ON or OFF. Press [OK] when all changes are
completed.
This is an automatic feature that personalises the
Calling Number Display information received by
the telephone.
If the caller number matches an entry in the
Directory, the Screening List or a Quick Dial
memory, the telephone displays the stored name
instead of the name sent by the network, for
example, displayed as MUM.
31
Page 32

PERSONALISING YOUR PHONE
Calling Number Distinctive Ring Match
This is a programmable feature that personalizes
your Calling Number Display information received
by the telephone.
You can program your telephone to use a
distinctive ring melody for a particular caller,
thereby knowing who is calling you without the
need to view the display.
If the caller number matches an entry in the
Directory or a Quick-Dial memory, the telephone
uses the ring melody assigned to that entry. When
assigning a ring melody you can choose the
standard (this is melody A or B depending on the
Settings menu) or one of three distinctive melodies.
See How to assign a melody
Note:
The ringer applies the distinctive melody only when
the telephone number has been received and
identified, which means that the first ring is always
standard.
You can store a number and a name in the
Directory, Screening List or the Quick Dial
memories. To do this enter the list by using the
relevant key and then modify the entry if
necessary.
The choice for the distinctive melodies will only be
available for the Directory and the Quick Dial
memories.
32
Page 33

STORING NAMES AND NUMBERS
How to Enter a Number
REDIAL
PAUSE
RECALL
REDIAL
PAUSE
To enter a number, use the keypad keys [0] through
[9] the [#] and [*] keys and the [PAUSE] and
[RECALL] keys.
Press [
] (NEXT) to move the cursor right.
[
] (PREV) to move the cursor left and
Press to delete the digit at the current cursor
position
Press and hold to clear all digits one by one.
To insert a digit, position the cursor to the
immediate right of the insertion point.
Pause Characters:
If your number ends with an external access code
(such as a voice mail password) then enter one or
more pause characters before the access code.
RECALL
To obtain a pause character, press PAUSE (the
display shows P). The pause character generates a
pause of 2 seconds. If this not long enough then
insert additional pause characters.
Recall Characters:
If your number contains a Recall to activate a
network Easycall feature, then enter a [RECALL]
character before the Recall sequence. To obtain a
RECALL character press the [RECALL] key
( the display shows R).
33
Page 34

STORING NAMES AND NUMBERS
How to Enter a Name
To enter a name, use the keys [0] through [9].
Each keys corresponds to several characters (see
the keypad character table) at the end of this
section.
Press a key several times to obtain the desired
character. For example to enter the letter C press
[2], [2], [2].
Press [t] to move to the next letter if this is on the
same key as the current letter. If not the just press
the key you want.
For example to enter MAC press [8], [2], [t] [2],
[2], [2].
To enter a space press [1]. To enter two spaces
PREV
press [1] [t] [1].
Press [s] (PREV) to move the cursor left and [t]
(NEXT) to move the cursor right.
Press to delete the character at the current
cursor position.
Press and hold to clear all characters one by
one.
To insert a character position the cursor to the
immediate right of the insertion point and press the
desired key(s).
34
Page 35

STORING NAMES AND NUMBERS
Keypad Character Table
How to Assign a Melody
After you add, modify or move a Number/Name
entry to the Directory or Quick Dial memories the
display shows the melody selection screen:
STANDARD RING: [*]
Key
1
2
3
4
5
Characters Characters
Key
,
space - ()&,.1 MNO6
ABC2 PQRS7
DEF3 TUV8
GHI4 WXYZ9
JKL5
6
7
8
9
0
0
DIAL
OK
DISTINCT : [1] [2] [3]
The blinking character ( [*], [1], [2], [3] ) shows
the position of the cursor and also indicates which
melody is currently assigned to the Number/Name
entry. All new entries are automatically set to the
standard melody.
Use [
desired melody then press [OK].
Alternatively:
Press [*] to select Standard then press [OK]
Press [1] to select Distinctive 1 then press [OK]
Press [2] to select Distinctive 2 then press [OK]
Press [3] to select Distinctive 3 then press [OK]
] and [] to move the cursor to the
35
Page 36

STORING NAMES AND NUMBERS
The telephone gives a sample ring if you change
the melody or if you press [*], [1], [2], or [3].
Once a melody is assigned the process of adding
modifying or moving the Number/Name entry is
complete.
To view a melody setting:
DIAL
OK
The Directory
DIRECTORY
If you want to see which melody is assigned to a
given Number/Name entry, proceed as if to modify
the entry. Step through the name and number by
pressing the [OK] key. This brings you to the
melody selection screen.
You can store up to 50 name and number entries in
the Directory. Your entries are automatically
alphabetized and can be quickly found through an
alphabet search.
For ease of search enter your name in a consistent
way i.e. all first names first or last names first.
Adding to the Directory:
1. Press [DIRECTORY]
The display indicates how many entries are in
ENTER
NOTEPAD
DIAL
OK
the Directory, then shows the first entry.
2. Press [ENTER]
The display shows the ADD NEW ITEM
and MODIFY options. If the directory is full
(50 entries) then the option ADD NEW ITEM
does not appear. You must delete an entry
before adding another.
3. Press [OK] to select the ADD NEW ITEM
option.
36
Page 37

STORING NAMES AND NUMBERS
ENTER
NOTEPAD
DIAL
OK
DIAL
OK
4. Enter the number then press [OK]
5. Enter the name then press [OK]
6. Assign the melody then press [OK]
The new entry is saved and the display returns
to the Directory at the entry just added.
7. Press [DIRECTORY] to exit the Directory or
DIRECTORY
DIRECTORY
DIAL
[ENTER] to repeat the process.
Finding a Directory Entry:
1. Press [DIRECTORY].
2. Press [
] or [] to find the entry you want
(press and hold to scroll rapidly), or enter the
first letter of the entrys name.
For example press [9] to go to the first name
beginning with W or 99 to go to the first name
beginning with X. If there are no names
beginning with W the message W: NO
ENTRIES! is displayed.
3. When youve found the entry you can:
Press [OK] to dial the displayed number
OK
or press [ENTER] to access the MODIFY
option or press [DIRECTORY] to exit the
Directory.
37
Page 38

STORING NAMES AND NUMBERS
Modifying a Directory Entry
1. Press [DIRECTORY]
DIRECTORY
ENTER
NOTEPAD
DIAL
OK
2. Press [
] to go to the desired entry
3. Press [ENTER]
4. Press [
] to scroll the MODIFY option the
press [OK]
5. Modify the number then press [OK]
6. Modify the name then press [OK]
7. Modify the melody setting then press [OK]
The modified entry is saved and the display
returns to the Directory at the entry just
modified.
8. Press [DIRECTORY] to exit the Directory, or
DIRECTORY
DIRECTORY
DIAL
OK
[ENTER] to repeat the process.
Deleting a Directory Entry:
1. Press [DIRECTORY]
2. Press [
] to go to the desired entry
3. Press and release the clear key .
4. Press [OK] to confirm the deletion, or press
any digit to cancel.
38
Page 39

STORING NAMES AND NUMBERS
Deleting all Directory Entries:
1. Press [DIRECTORY].
DIRECTORY
2. Press and hold the clear key for 2 seconds.
DIAL
3. Press [OK] to confirm the deletion, or press
OK
The Quick-Dial Memories
Your telephone has 4 quick dial memories [M1],
[M2], [M3], and [M4] in which to store your most
frequently dialled numbers. Quick dial memories
can contain name and number or number only
entries.
The maximum length for a number is 16 digits and
the maximum length for a name is 16 characters.
any digit to cancel.
ENTER
NOTEPAD
DIAL
OK
Setting/Modifying Quick-Dial memory
1. Press [M1], [M2], [M3], or [M4].
2. Press [ENTER].
3. Enter/modify the number then press [OK].
4. Enter/modify the name then press [OK].
5. Enter/modify the melody setting then press
[OK].
39
Page 40

STORING NAMES AND NUMBERS
The entry is saved and assigned to the Quick-Dial
key selected.
DIAL
6. Press the memory key [M1], [M2], [M3] or
[M4] to exit or press [OK] to dial the number.
OK
Clearing a Quick Dial Memory
1 Press [M1], [M2], [M3], or [M4]
2. Press and release the clear key .
3. Press [OK] to confirm the deletion or press any
digit key to cancel.
40
Page 41

USING CALLER DISPLAY
The Callers List:
If you have the Calling Number Display service
your telephone logs your incoming calls in the
Callers List. This allows you to call people back
quickly and easily. The most recent caller is logged
at the top of the list.
You can set the Callers List to log all incoming calls
or only unanswered calls. The default setting is to
log all calls. You can also set the Callers List to log
the callers name and number or their number only.
The default setting is to log the name and the
number.
CALLERS
The Callers List can store up to 25 name and
number entries or up to 50 number only entries.
If the list is full the oldest entry is automatically
deleted when a new call is logged.
Unseen Calls:
When a new unanswered call is logged, the New
Calls Indicator flashes slowly the symbol
blinks and the Unseen Call counter increments by
one. The New Calls Indicator continues to flash
(except when you are in a call) until all the
unanswered calls have been seen.
Viewing the Caller List:
1. Press [CALLERS]
The display shows the most recent entry and the
u symbol appears (indicating you are in the
Callers List).
41
Page 42

USING CALLER DISPLAY
2. Press [] or [] to browse through your
DIAL
3. Press [
OK
Moving a Caller Entry:
You can transfer an entry from the Callers List into
the Directory the Screening List or any of the
Quick-Dial memories. This allows you to keep the
entry for as long as you like.
Callers List.
If you read a new entry it is assumed to be seen
and the Unseen Counter decrements by one.
to exit or [OK] to dial the number.
CALLERS
ENTER
NOTEPAD
DIRECTORY
SCREENING
1 Press [CALLERS]
2. Press [
] or [] to go to the entry you want.
3. Press [ENTER]
The display shows the message MOVE TO ?
4. Press [DIRECTORY], [SCREENING], [M1],
[M2], [M3], or [M4].
If the chosen destination is full the move
request is cancelled. Choose another destination
or exit the Callers List and delete any unwanted
entries from the destination list.
5. Modify the name and number (if necessary)
and assign a melody.
The caller entry is deleted from the Callers List
and saved in the specified destination. The
display returns to the next entry.
42
Page 43

USING CALLER DISPLAY
6. Press [CALLERS] to exit, or scroll to another
CALLERS
Deleting a Caller Entry:
1. Press [CALLERS]
CALLERS
2. Press [
3. Press and release the clear key .
entry and repeat the process.
] or [] to go to the entry you want
DIAL
OK
CALLERS
DIAL
OK
4. Press [OK] to confirm the deletion or press
any digit key to cancel.
Deleting all Caller Entries:
1. Press [CALLERS]
2. Press and hold the clear key for 2 seconds
4. Press [OK] to confirm the deletion or press
any digit to cancel.
The Screening List:
The Screening List is where you store the name
and number (or number only) of any unwanted
caller. When you receive a call from someone
whose number is in your Screening List, the ring
volume is automatically silenced after the first ring
and the New Calls Indicator continues to flash
rapidly until the caller hangs up. The caller
however continues to hear the ringing tone.
43
Page 44

USING CALLER DISPLAY
The Screening List can contain up to 5 name and
number or number only entries. You can either add
the entry manually or more likely transfer it directly
from the Callers List.
Adding to the Screening List:
To add an entry by transferring it from the Callers
List. If you want to add an entry manually proceed
as follows:
1. Press [SCREENING].
SCREENING
ENTER
NOTEPAD
DIAL
OK
DIAL
OK
DIAL
2. Press [ENTER].
The display shows the ADD NEW ITEM and
MODIFY options. If the directory is full
(entries) the option ADD NEW ITEM does
not appear. You must delete an entry before
adding another.
3. Press [OK] to select the ADD NEW ITEM
option.
4. Enter the number the press [OK].
5. Enter the name then press [OK].
OK
44
Page 45

USING CALLER DISPLAY
6. Press [SCREENING] to exit the Screening List
SCREENING
Modifying an entry in the Screening List:
1. Press [SCREENING].
SCREENING
or [ENTER] to repeat the process.
ENTER
NOTEPAD
DIAL
OK
DIAL
OK
DIAL
2. Press [
] or [] to go to the entry you want.
3. Press [ENTER].
4. Press [
] to scroll to the MODIFY option
the press [OK].
5. Modify the number then press [OK].
6. Modify the name then press [OK].
OK
SCREENING
The modified entry is saved and the display
returns to the Screening List at the entry just
modified.
7. Press [SCREENING] to exit the Screening
List.
45
Page 46

USING CALLER DISPLAY
Deleting an entry from the Screening List:
1. Press [SCREENING].
SCREENING
DIAL
OK
SCREENING
DIAL
OK
2. Press [
] or [] to go to the entry you want
3. Press and release the clear key .
4. Press [OK] to confirm the deletion or press
any digit key to cancel.
Deleting all entries from the Screening List:
1. Press [SCREENING].
2. Press and hold the clear key for 2 seconds.
3. Press [OK] to confirm the deletion or press
any digit key to cancel.
46
Page 47

USING NETWORK SERVICES
Calling Number Display Features:
If you have the Calling Number Display service
provided by your network your telephone offers the
following features for incoming calls:
Caller List:
The callers number (or name and number, if
provided), is logged in the Callers List. You can
choose to have all incoming calls logged or just the
unanswered calls.
Caller Name Match:
If the callers name and number are stored in the
Directory the Screening List or in a Quick-Dial
memory the telephone displays the stored name
instead of the name sent by the network .
Caller Ringer match:
You can program your telephone to use a
distinctive ring for a particular caller thereby
knowing even at a distance who is calling you.
Unwanted Calls:
If the callers number is stored in your Screening
List the ring volume is automatically silenced after
the first ring and the New Calls Indicator will flash
rapidly.
Anonymous Call Alert:
If the New Calls Indicator flashes quickly when
you receive a call this indicates that the caller has
asked the network to block their telephone number.
47
Page 48

USING NETWORK SERVICES
Visual Message Waiting Service
In future, when available from the Telstra network,
if you have Voice Mail message service that
includes the visual message waiting indication
feature, the * symbol appears and the New Calls
alert flashes whenever you have a message waiting
for you. When you have read all the messages in
the voice mailbox the * symbol disappears
automatically.
Note:
If the * symbol remains on the screen after you
have read all your messages you can clear it
manually by selecting the CLR MESSAGE Icon
Using the Services List
SERV/MENU
DIAL
OK
option in the Settings menu.
For easy access to your local network services,
your telephone provides you with a list of the most
popular and useful Telstra Easycall® network
services.
1. Press [SER/MENU] to access the list of
available services. For example, Call Blocking,
Call Back, Cancel Call Back, Call Wait ON,
Call Wait OFF, Call Forward Immediate ON,
Call Forward OFF, 3 Way Conference and
.
Transfer.
2. Press [
] and [] to scroll to the service you
want, then press OK.
48
Page 49

USING NETWORK SERVICES
3. The service code is dialled automatically.
To initiate Call Blocking and prevent your telephone
number from being sent to the called party, select
Call Blocking in the Service Menu. Press [OK] to
dial the code 1831, before you dial the number to
be called.
To call forward your calls select Call Fwd Imm
ON from the Service Menu. Press [OK] then dial
the number to which calls will be forwarded, then
press [OK]. A confirmation tone will be heard and
a voice message will be recorded.
Call Back is used when the called number is busy.
Simply hang up the telephone, the Select Call Back
from the Service Menu. Press [OK] to dial the
network code. Hang up the telephone and wait for
Telstra's network to call you back.
49
Page 50

USING NETWORK SERVICES
Modifying the Services List
You can modify the network services to suit your
SERV/MENU
needs.
1. Press [SERV/MENU] to access the list of
available services. For example, Call Block,
ENTER
NOTEPAD
DIAL
OK
DIAL
OK
DIAL
Call Forward ON, Call Forward OFF, Call Wait
ON, Call Wait OFF, Call Back.
2. Press [
] to scroll to the service to be
modified, then press ENTER.
3. Press [OK] to select the modify option.
4. Enter the required network service code then
press [OK].
5. Modify the name of the service, then press
OK
[OK].
If the Error Beep has been set ON the telephone
will beep to warn you that you are trying to use a
feature that is not currently available.
1. You are trying to set an invalid time or date
setting.
2. You are trying to use the [
] or [] keys
when you have already reached the top or
the bottom of the entry list.
3. You are trying to use MOVE or COPY
functions to transfer an entry to an invalid list or
to one which is already full.
50
Page 51

MESSAGES AND ERROR BEEPS
Screen Messages: When NAME/NUM has been selected, the
following screen messages may be seen:
Message Reason
'--------------------' The call is from overseas.
'UNAVAILABLE' The call is from a payphone. (PAYPHONE may be
displayed.)
'--------------------' This tells you that the call is either:
'PRIVATE' 1. A silent line caller.
2. A caller who has chosen to Block their number.
3. An older type of telephone exchange (ie not
digital.)
4. A non Telstra Service.
5. An AMPS mobile service
'0396637698' Display of the callers telephone Number Only
'--------------' sent by the network where Name is not available.
'0396637698' Display of the callers telephone Number and
'JOHN SMITH' Name of a call you are receiving or have just
missed. When available.
'DATA ERROR' During data transmission, a break in
communications has occurred. It may be that you
took the handset off hook before the second ring.
'BOTTOM' Indicates that the oldest message has been
'01 IN LIST' reached and gives the number of calls in the log.
In this examples: one call is in the log.
'TOP' Indicates that the most recent message has been
'06 IN LIST' reached and gives the number of calls in the log.
In this examples: six calls are in the log.
'NO CALLS' No calls are stored in the log.
EXTENSION IN USE Someone is using a parallel telephone or your
telephone is not plugged into the telephone
line socket.
51
Page 52

TROUBLESHOOTING
Problem Solution
The * symbol has not Have you waited long enough? Remember it
automatically disappeared takes a few minutes for the symbol to be
from the screen after you disabled automatically.
have listened to the
messages on your voice
mailbox.
A problem has occurred You can remove the icon by selecting the CLR
during data transmission. MESSAGE ICON option in the settings menu.
You do not get connected Is the area code correct. Remember, your
when dialling a number telephone logs the caller numbers exactly as sent
logged in your callers list. by the network. In some cases, this means the
area code might have to be modified before the
callers number can be successfully dialled from
your area.
The callers name or The Calling Number Display Service you have
telephone number does may not work when the telephone is connected to
not appear on the display. a PABX.
You may not have been connected to Calling
Number Display Service.
Your telephone does not Check if the ringer is switched off.
ring.
The screen frequently This message does not indicate a malfunction of
displays DATA ERROR. your telephone or your Access 200. There may
be a problem with the telephone line or you may
have answered the telephone to quickly.
A Call Waiting tone is Make sure that you have been connected to the
heard but the Calling Calling Number Display on Call Waiting Service
Number Display is not with Telstra when available from Telstra.
displayed.
52
Page 53

SOME IMPORTANT SAFETY INSTRUCTIONS
When using your telephone equipment basic safety
precautions should always be followed to reduce
the risk of fire, electric shock and injury to persons,
including the following:
1. Read and understand all instructions.
2. Follow all warnings and instructions marked on
the product.
3. Do not use the Access 200 during an electrical
storm as it is possible to get a shock.
4. Do not use the Access 200 when near water
or when wet.
5. Do not use detergents or sprays on the
Access 200. Clean outside parts with a damp
cloth.
6. Do not open the unit. There are no user
accessible parts inside. Warranty conditions do
not apply if the unit is opened.
7. Keep openings on the Access 200 clear. Keep
away from heaters and out of direct sunlight.
8. Make sure the line cord and AC Power
Adaptor cords are protected from damage. Do
not put the Access 200 where cords can be
damaged by people walking on them.
9. Do not push objects into the openings in the
telephone. This could cause an electric shock.
53
Page 54

TECHELP
WARRANTY
TecHelp is our commitment to providing superior
service for our Corded and Cordless Telephones,
Answering Machines and accessories. We support
this by providing the following:
Product Information Line 1300 369 193
12 Month Product Warranty
Referral service for product repairs outside of
warranty
If the Access 220 is faulty and the warranty period
has not expired, please follow the procedures
detailed under Telstra Warranty on the Warranty
Card. A repair service is available for products not
eligible for warranty replacement. Please contact
the product Support Line for information on your
nearest repairer.
These rights are in addition to your rights under the
Trade Practices Act 1974 (Cth).
CUSTOMER SERVICE
If there are problems using this telephone after
following all the instructions in this User Guide,
please call our Product Information Line.
Product Support Line number:
FREECALL
8:00am - 5:00pm Monday to Friday
* A free call except from a mobile phone which will be charged
at the applicable mobile rates.
TM
1800 034 456*
54
Page 55

55
Page 56

Trade mark of Telstra Corporation Limited.
® Registered trade mark of Telstra Corporation Limited ABN 33 051 775 556.
4060A20UG.p65
 Loading...