

Page 1

TELSTRA 13350 DECT6.0
CORDLESS TELEPHONE WITH
ANSWERING MACHINE
USER GUIDE
This telephone has been designed for ease of use.
Please read the instructions and keep it handy for future reference.
If you have any problems with your phone, refer to the Help section of this
User Guide.
Page 2

2
INTRODUCTION
To your Telstra 13350 DECT6.0 Cordless Telephone with Answering Machine
Phonebook –The home phonebook stores up to 100 entries.
Telstra’s Calling Number Display* lets you see who’s calling. Your phone
stores details of the last 20 callers in the Call List.
Answering machine, with up to 30 minutes digital recording time and
helpful voice prompts.
By saying certain voice commands to the pendant, you can hear information
such as the date or time, or call photo speed dial numbers, or even review
call list, messages or reminders.
* IMPORTANT
You need to subscribe to Telstra’s Calling Number Display service to be able
to see the caller’s number or name when called, or in the Calls List. See page
52 for more details.
IMPORTANT
This product features Power Fail Back-up. During a mains power
interruption, you can supply the power stored in the handset battery to the
base unit, so you can make calls-see page 40 for further details.
This User Guide provides you with all the information you need to get the
most from your phone. Before you make your rst call, you will need to set up
your phone. Follow the simple instructions on the next few pages.
•
•
•
•
Page 3

3
NEED HELP?
PLEASE LOOK IN THE HELP SECTION AT THE END OF THE USER GUIDE IF
YOU EXPERIENCE ANY OPERATIONAL DIFFICULTIES WITH YOUR TELSTRA
PRODUCT, OR PLEASE CONTACT THE TECHELP INFORMATION LINE
1300 369 193 OR CONTACT US BY EMAIL AT: tcpsupport_au@vtech.com
GOT EVERYTHING?
The package contains the following items:
Telstra 13350 handset
Telstra 13350 answering machine unit
AC power adaptor
Telephone line cord
Battery compartment cover
NiMH rechargeable battery
1 User guide
If you have purchased Telstra 13350 with additional handset, you will also have
the following items:
Telstra 13350 handset
Telstra 13350 charger unit
AC power adapter
NiMH rechargeable battery
If you have purchased Telstra 13350 with pendant, you will also have the
following items:
Telstra 13350 Pendant
Telstra 13350 Pendant charger with power adaptor
Pendant belt clip
Pendant lanyard
•
•
•
•
•
•
•
•
•
•
•
•
•
•
•
Page 4

4
IN THIS GUIDE
Important safety instructions 9
Getting started 11
Location 11
Setting up 12
Installation options 17
Battery low warning 21
Battery performance 21
Date and time 22
Getting to know your phone 23
Handset buttons 23
Telephone base buttons 26
Pendant overview (only for model with pendant) 28
Handset display 30
Navigating the menus 31
Handset menu layout 31
Keystroke table 33
Using the phone 34
Make, answer or end a call 34
Speakerphone 34
Audio Assist
35
Equalizer 35
Volume control 35
Mute 36
Page 5

5
Temporary ringer silencing 36
Redial 36
Chain dialing 37
Transfer a call 37
PAGE handset 38
Join a call in progress 38
Intercom 39
Power fail back-up 40
Phonebook 42
Add a phonebook entry 42
Review phonebook entries 42
Alphabetical search 42
Edit a phonebook entry 43
Delete a phonebook entry 43
Speed dial for pendant (only for model with pendant) 44
Store a speed dial entry 44
Edit a speed dial entry 44
Dial a speed dial number 44
Reminder 45
About the reminder 45
Add a reminder 45
Review reminders 46
Delete reminders 46
Add and review reminders remotely 46
Page 6

6
Phone settings 47
Using the menu 47
Ringer volume 47
Ringer tone 47
Set date and time 48
Calling number display voice announce
48
Talking digit 49
Clear voicemail indicators 49
Rename handset 49
Key tone 50
Use calling number display to automatically set date and time 50
Quiet mode 50
Happy message (only for model with pendant) 51
Voice command (only for model with pendant) 51
Telstra Network Services* 52
Calling number display 52
Memory match 53
Call list display screen message 53
Missed call indicator 54
Review the call list 54
Save a call list entry to the phonebook 54
Flashing message indicator (FMI) 55
Telstra home messages 101® or messageBank
®
56
Call waiting 56
3-Way Chat 56
Page 7

7
Answering machine 57
Announcement 57
Record your own announcement 57
Answer on/off 57
Call screening 58
Number of rings 58
Remote access code 59
Message alert tone 59
Message recording time 59
Answering machine and voicemail 60
Message capacity 61
Call screening 61
Call intercept 62
Temporarily turn off the message alert tone 62
Message playback 62
Delete all old messages 63
Record, play and delete memos 64
Remote access 64
Pendant (only for model with pendant) 66
Voice command 66
About voice command 66
Use voice command 66
Common commands 66
Reminders 67
Answering machine messages 67
Call list 68
Page 8

8
Help 69
General information 79
Replacing the handset batteries 79
Safety 79
Cleaning 80
Environmental 80
How many telephones can you have? 81
Customer service & Product warranty 82
Page 9

9
IMPORTANT SAfETY INSTRUCTIONS
When using your telephone equipment, basic safety precautions should always
be followed to reduce the risk of re, electric shock and injury, including the
following:
Read and understand all the instructions.
Follow all warnings and instructions marked on the product.
Unplug this product from the wall outlet before cleaning. Do not use liquid
or aerosol cleaners. Use a damp cloth for cleaning.
Do not use this product near water (for example, near a bath tub, kitchen
sink, swimming pool) or in humid areas.
Do not overload wall outlets and extension cords as this can result in the
risk of re or electric shock.
Unplug this product from the wall outlet and contact TecHelp on
1300 369 193 under the following conditions:
When the power supply cord or plug is damaged or frayed.
If the product does not operate normally by following the operating
instructions.
If the product has been dropped and the outer casing has been
damaged.
If the product exhibits a distinct change in performance.
Avoid using a telephone during an electrical storm. There may be a remote
risk of electric shock from lightning.
Do not use the telephone to report a gas leak in the vicinity of the leak.
Use only the supplied NiMH (Nickel Metal Hydride) batteries. The operation
periods for the handsets are only applicable with the default battery
capacity.
The use of other battery types or non rechargeable batteries/primary
mobile batteries can be dangerous. These may cause interference and/or
unit damage. Telstra will not be held liable for damage arising from such
noncompliance.
1.
2.
3.
4.
5.
6.
•
•
•
•
7.
8.
9.
10.
Page 10

10
Use only the AC power adaptors supplied with this product. Please contact
TecHelp on 1300 369 193 for replacement adaptors.
Please ensure that the batteries are inserted according to the correct
polarity as indicated on the re-chargeable batteries and the internal
markings inside the handset battery compartment.
Do not immerse the batteries in water, and do not place them in a re.
Telephone receivers produce magnetic elds that can attract small metallic
objects such as pins or staples. To avoid injury, do not place the handset
where such objects can be picked up.
11.
12.
13.
14.
Page 11

11
LOCATION
Place your Telstra 13350 within 2 metres of the mains power socket and
telephone socket so that the cables will reach.
Make sure it is at least 1 metre away from other electrical appliances to avoid
interference. Your Telstra 13350 works by sending radio signals between the
base and handset/pendant. The strength of the signal depends on where you
locate the base. Putting it as high as possible ensures the best signal.
The maximum range between the base station and the handset is
approximately 300 meters.
GETTING STARTED
Page 12
12
SETTING UP
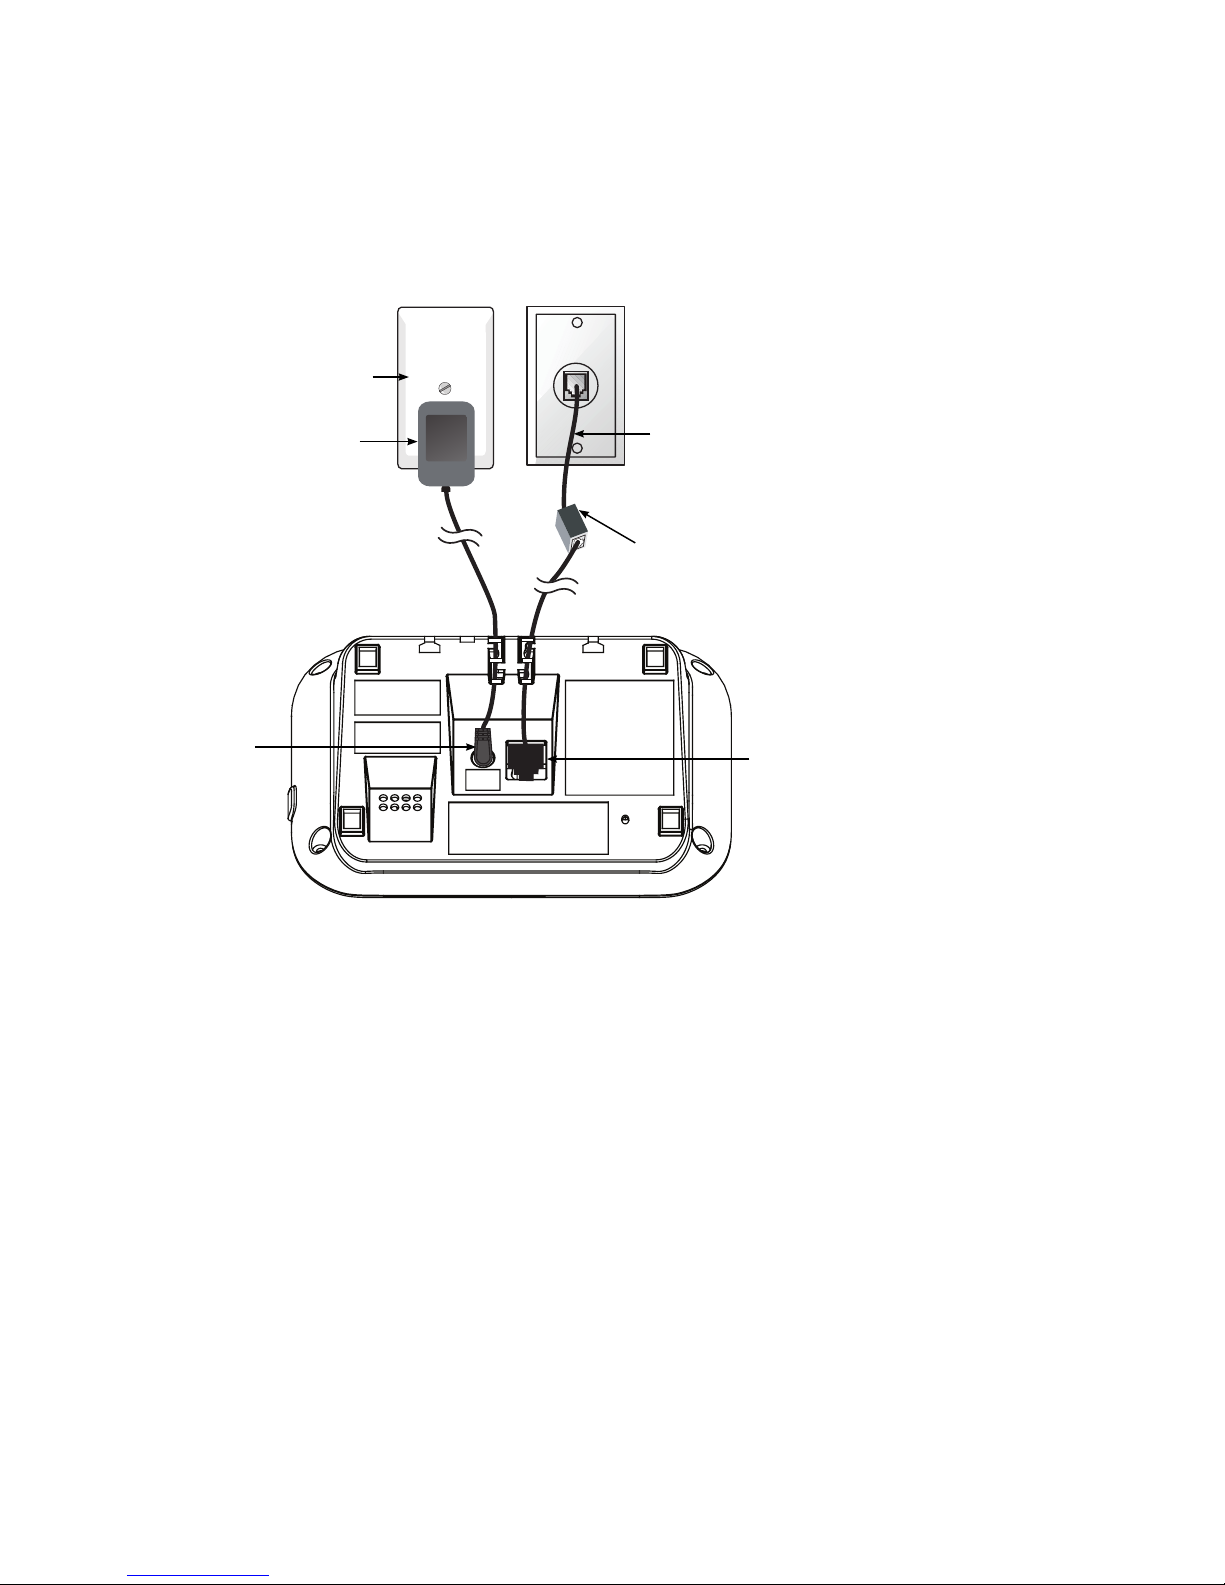
Telephone base installation
Plug the mains power adapter cable into the base station, plug the other
end of the mains power adapter into a mains power wall socket.
Insert one end of the telephone line cord into the base station and the other
end of the telephone line cord into a telephone wall jack. If you have DSL
high speed internet service, a DSL lter (not included) is required.
CAUTION:
If you subscribe to telephone service from a cable company or a VoIP service provider,
plug the telephone line cord into the modem/router/terminal adapter provided by your
cable/VoIP service provider. Contact your cable/VoIP service provider if you have any
difculties in installation.
1.
2.
Telephone line cord
If you have DSL high-speed
Internet service, a DSL lter (not
included) is required.
Telephone base
power adapter
Mains power
wall socket
Telephone line jack
Power cord jack
Page 13
13
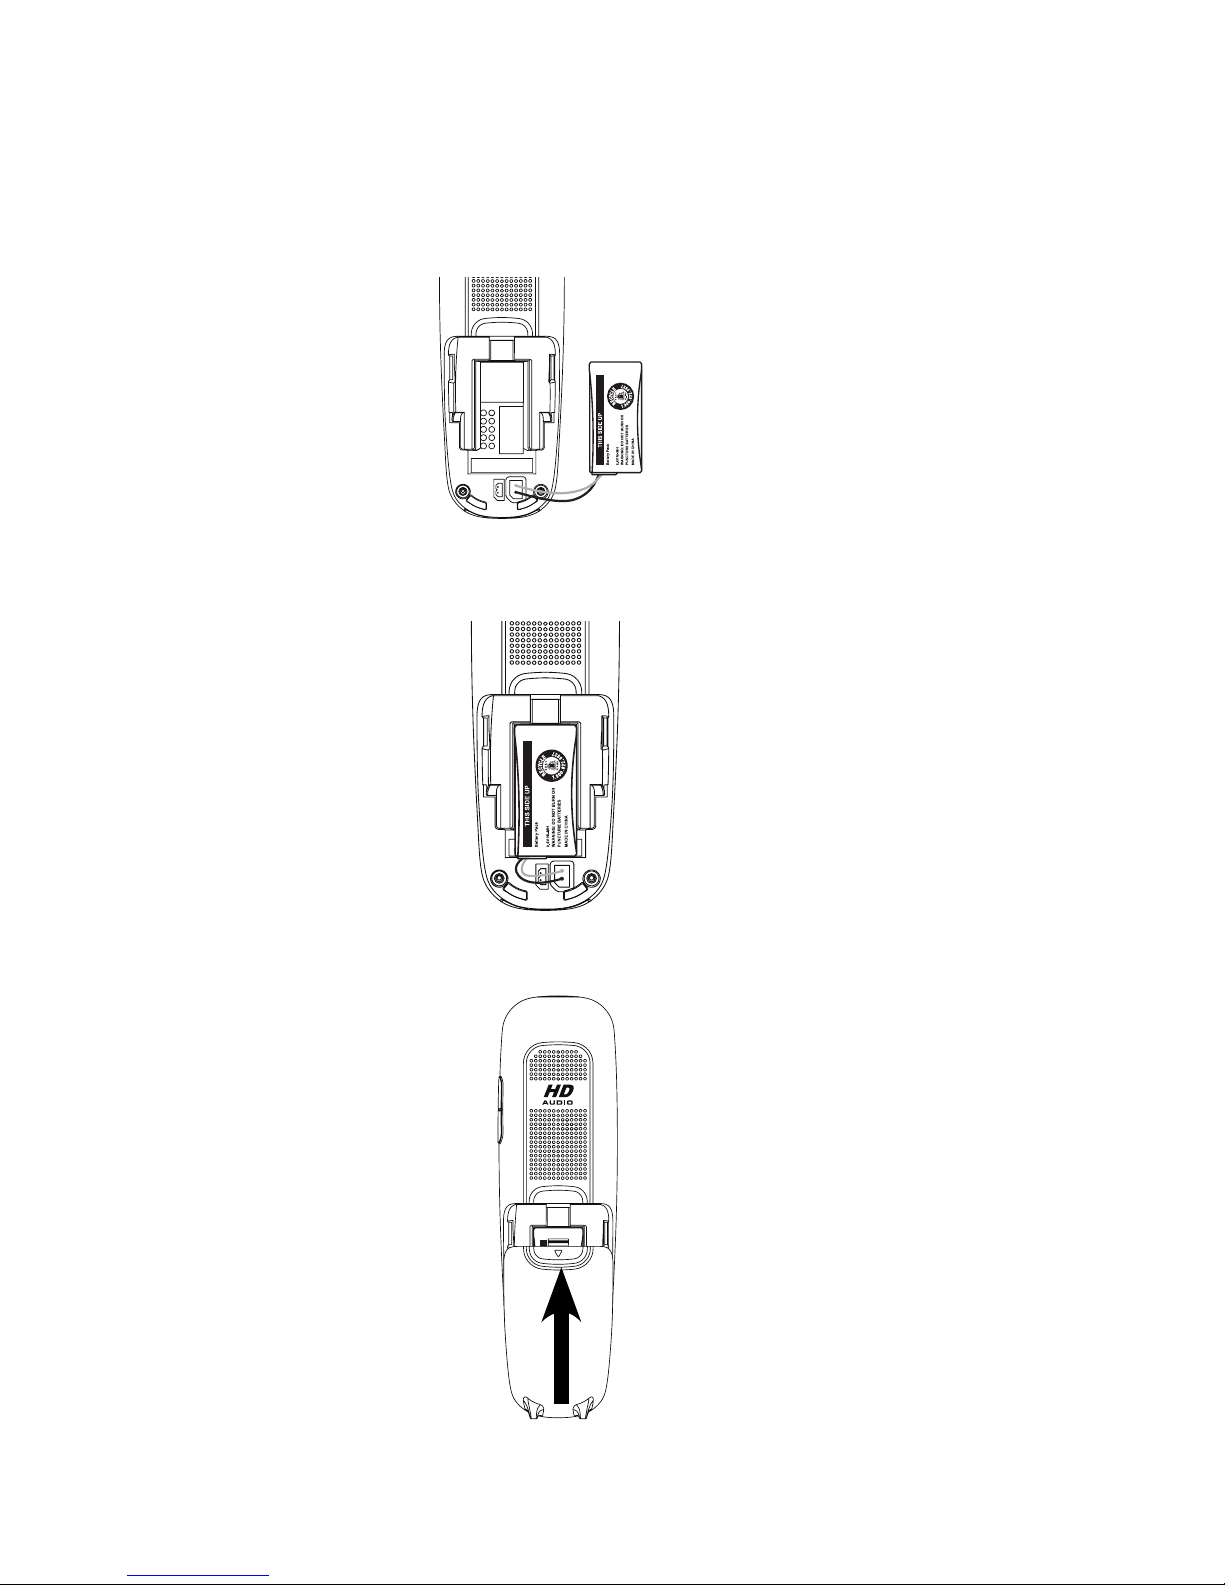
Handset batteries installation
Slide open the battery compartment cover to t the NiMH battery into the
handset. Plug the battery connector securely into the socket.
Place the supplied rechargeable battery with the label THIS SIDE UP facing
up and the wires inside the battery compartment.
Slide the battery compartment cover towards the center of the handset
until it clicks into place.
1.
2.
3.
Page 14
14
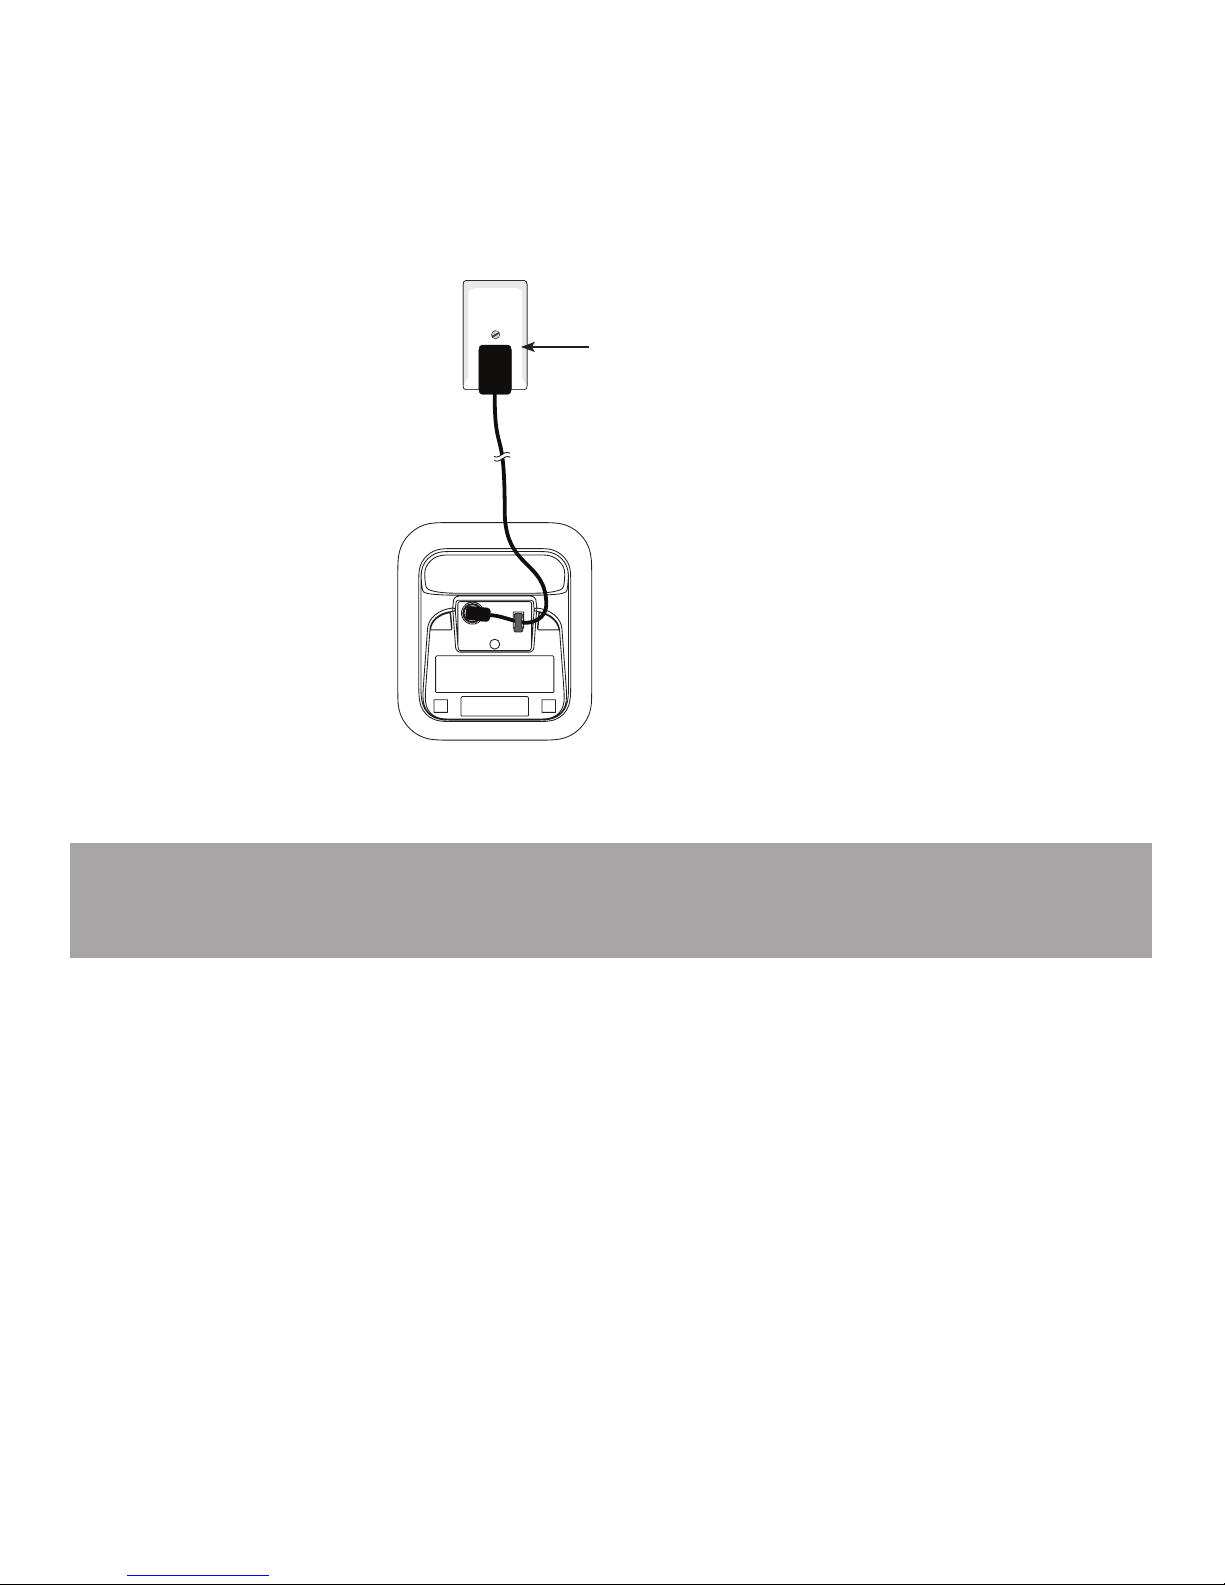
Additional handset charger installation
Plug the power cable into the charger base.
Plug the other end into a mains power wall socket.
Place the handset in the handset charger to charge.
1.
2.
3.
Note: Ensure power cord is fed through slot on base so unit sits ush with
the desk.
Mains power
wall socket
Page 15
15
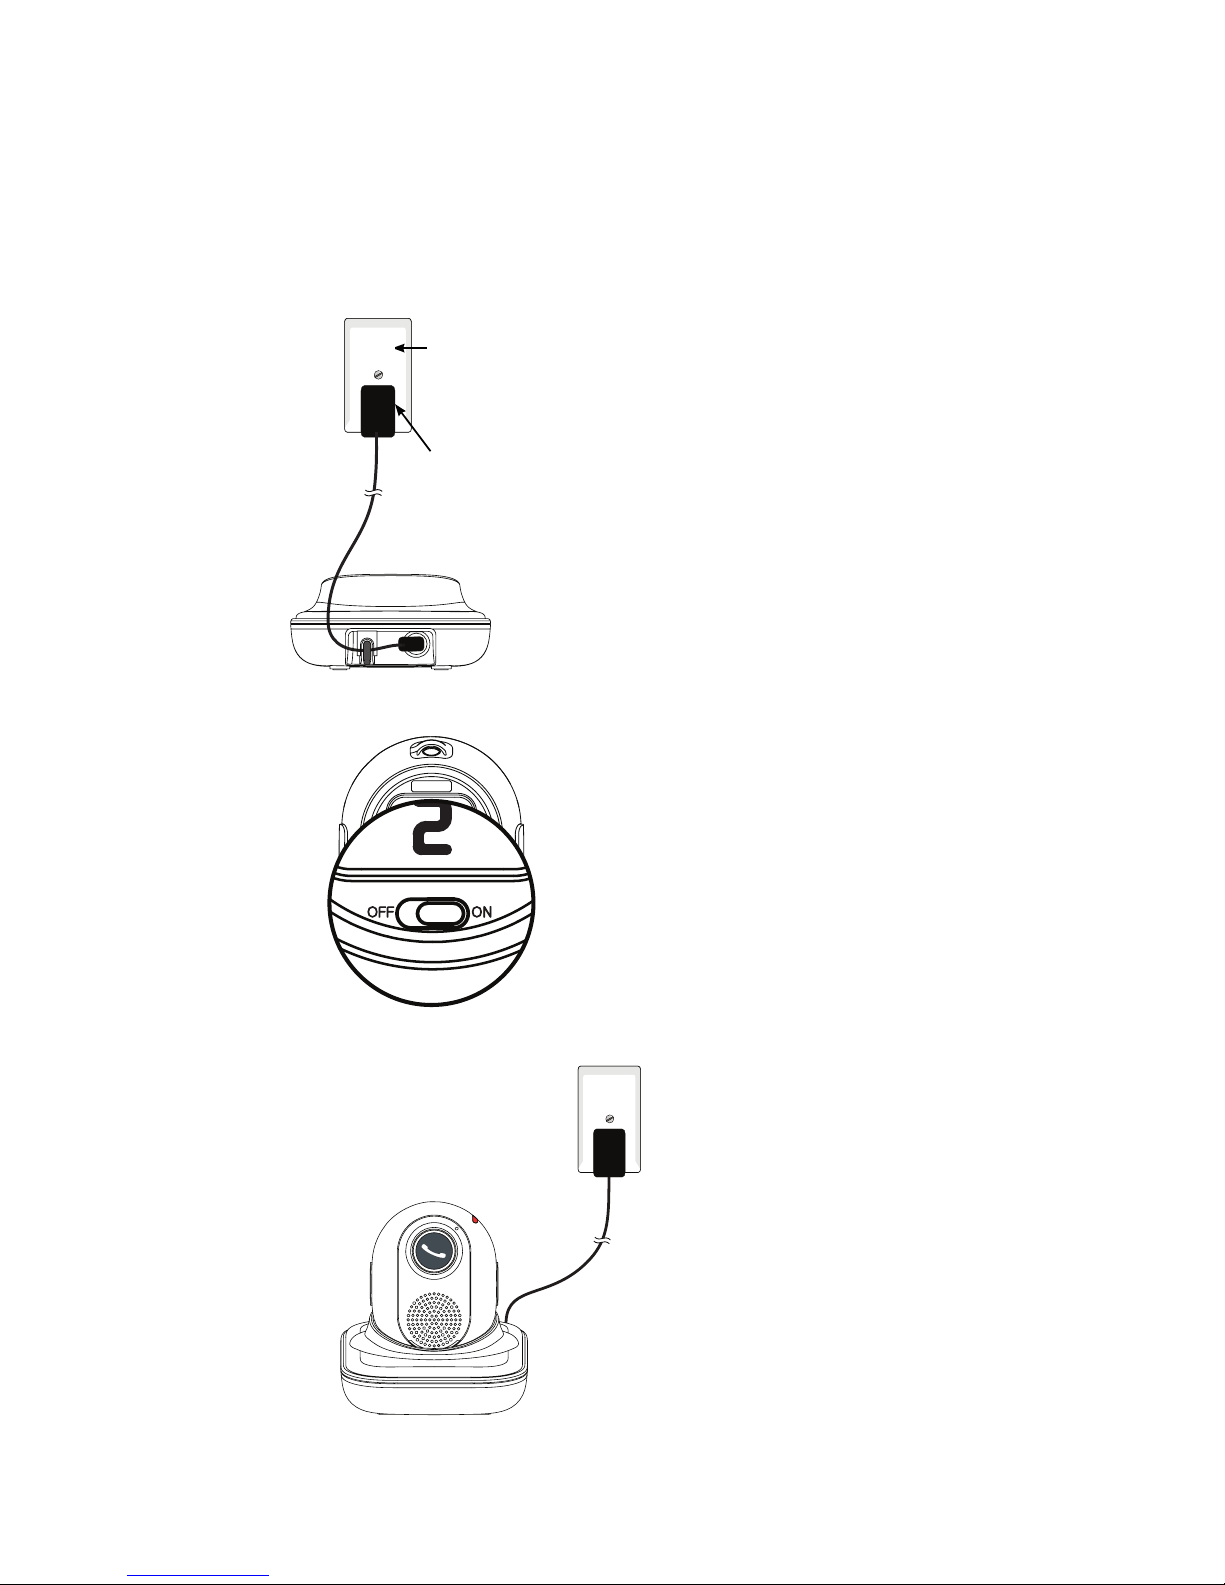
Pendant charger installation (only for model with pendant)
Plug the pendant charger power adapter cable into the charger base, then
route the cable through the slot. Plug the other end into a mains power wall
socket.
Switch ON the pendant.
Place the pendant in the pendant charger to charge.
1.
2.
3.
Pendant charger
power adapter
Mains power wall
socket
Page 16
16
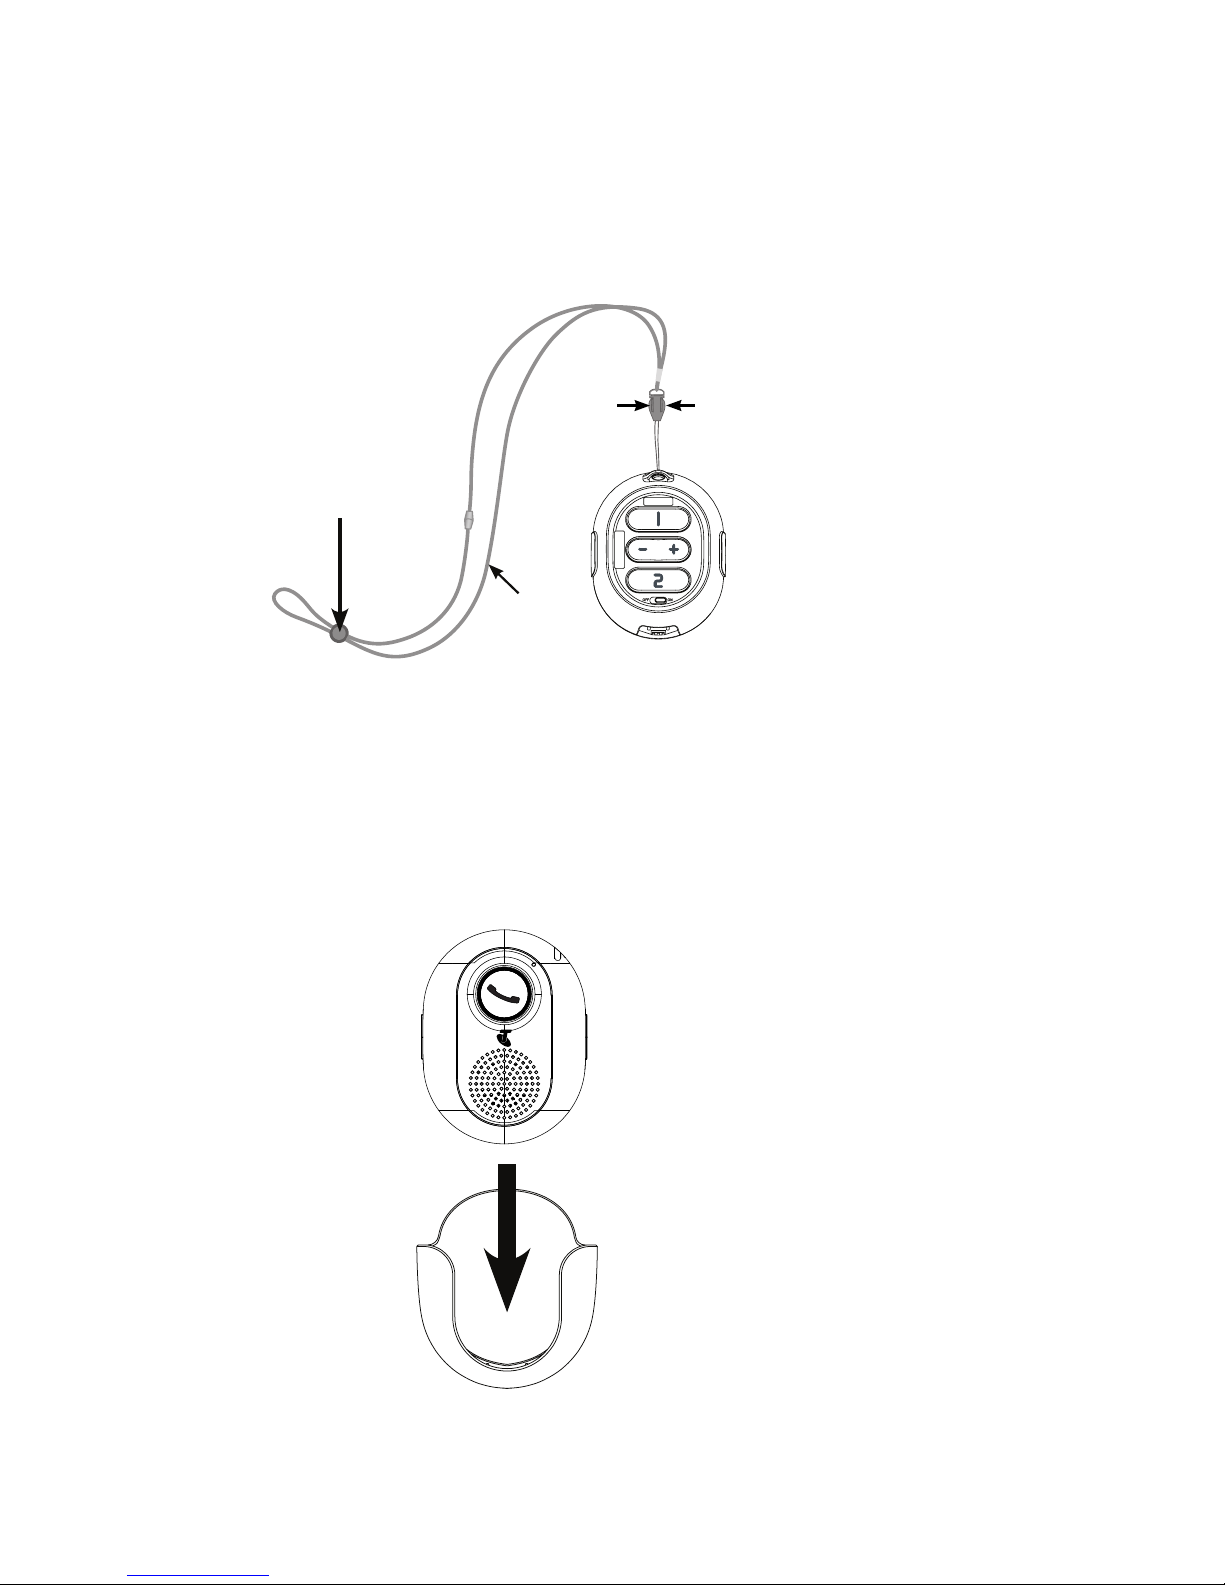
Pendant attachment
Pendant lanyard:
Pinch the end of the loop string into the slot on the top of the pendant.
Insert the long end of the lanyard into the loop string.
Fasten the loop string.
Pendant belt clip:
Put the pendant into the belt clip until it clicks in place.
When you use the pendant belt clip, remove the pendant lanyard if it is attached
to the pendant.
1.
2.
3.
Press down on the push
button slider to adjust the
length of the lanyard for
comfortable wearing.
Necklace
Press down the tabs on
both sides of the lanyard
clip to remove the
necklace of the lanyard.
Page 17
17
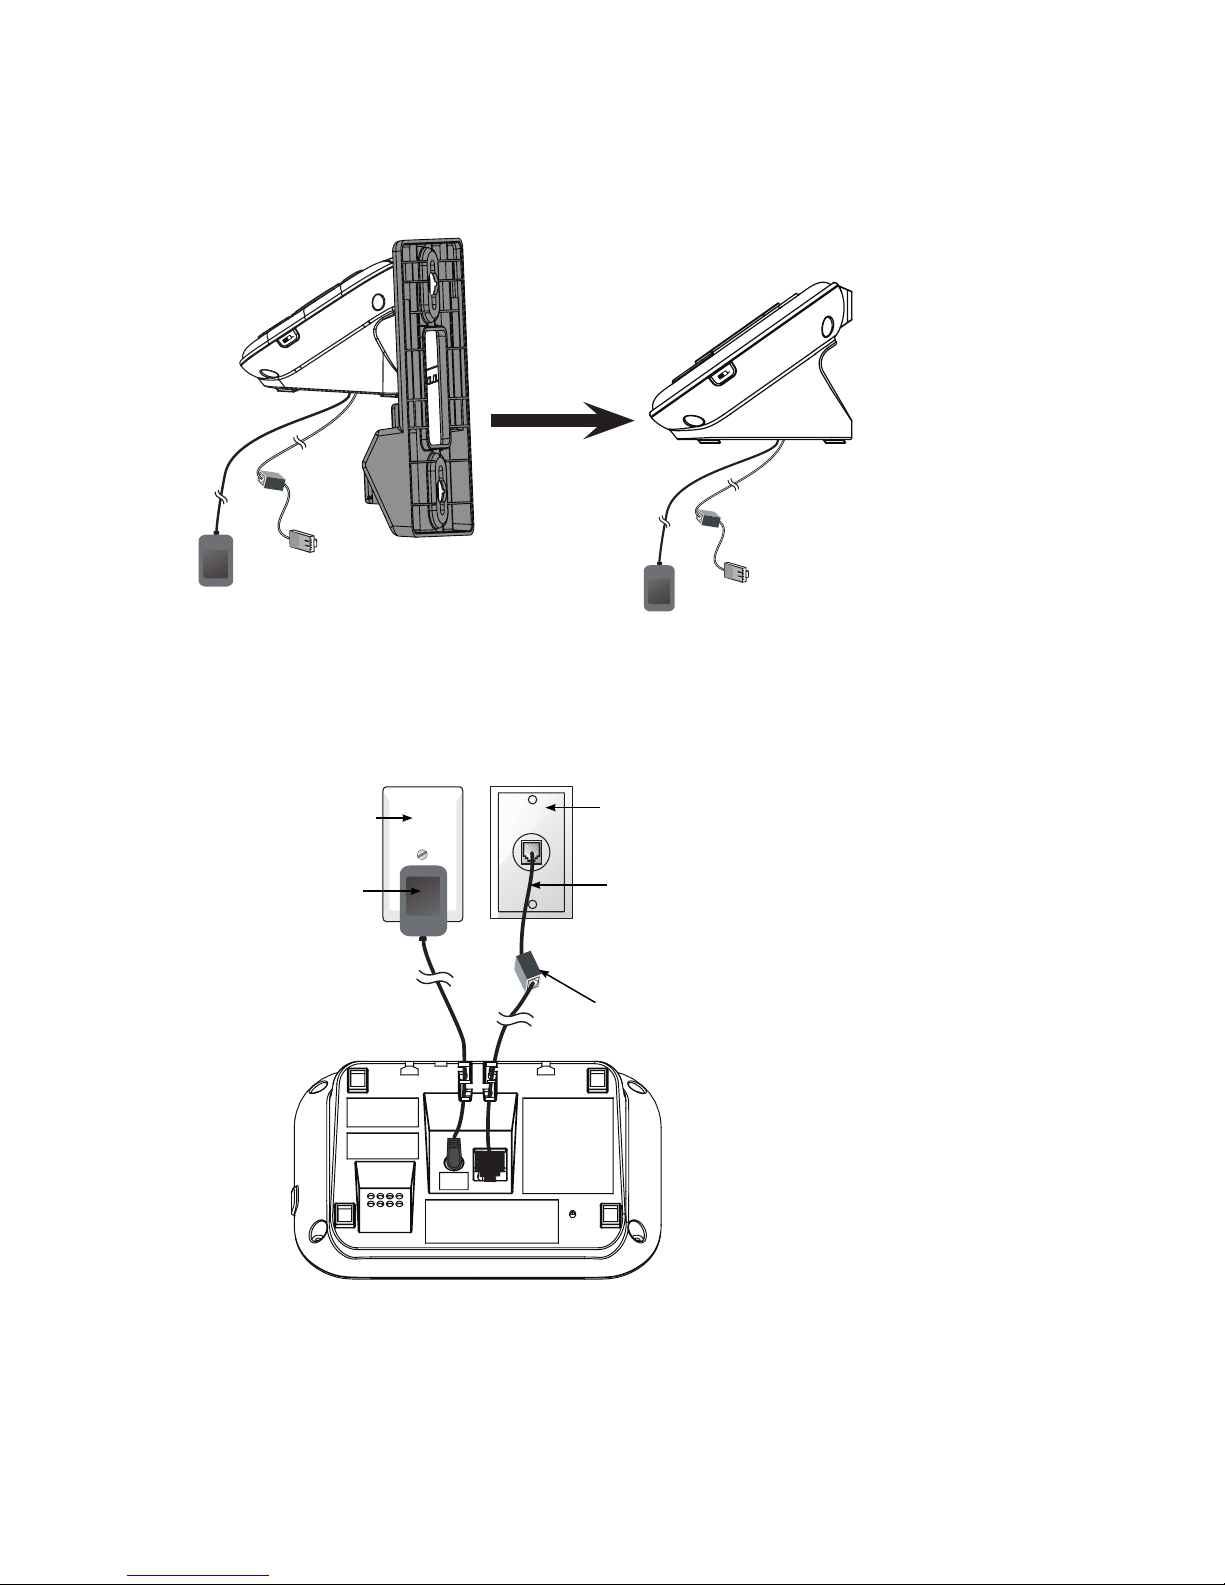
INSTALLATION OPTIONS
Your telephone base is ready for tabletop use. If you want to mount your
telephone on a wall, follow the steps below to connect the telephone base
with a standard dual-stud telephone wall mounting plate. You may need a
professional to install the wall mounting plate.
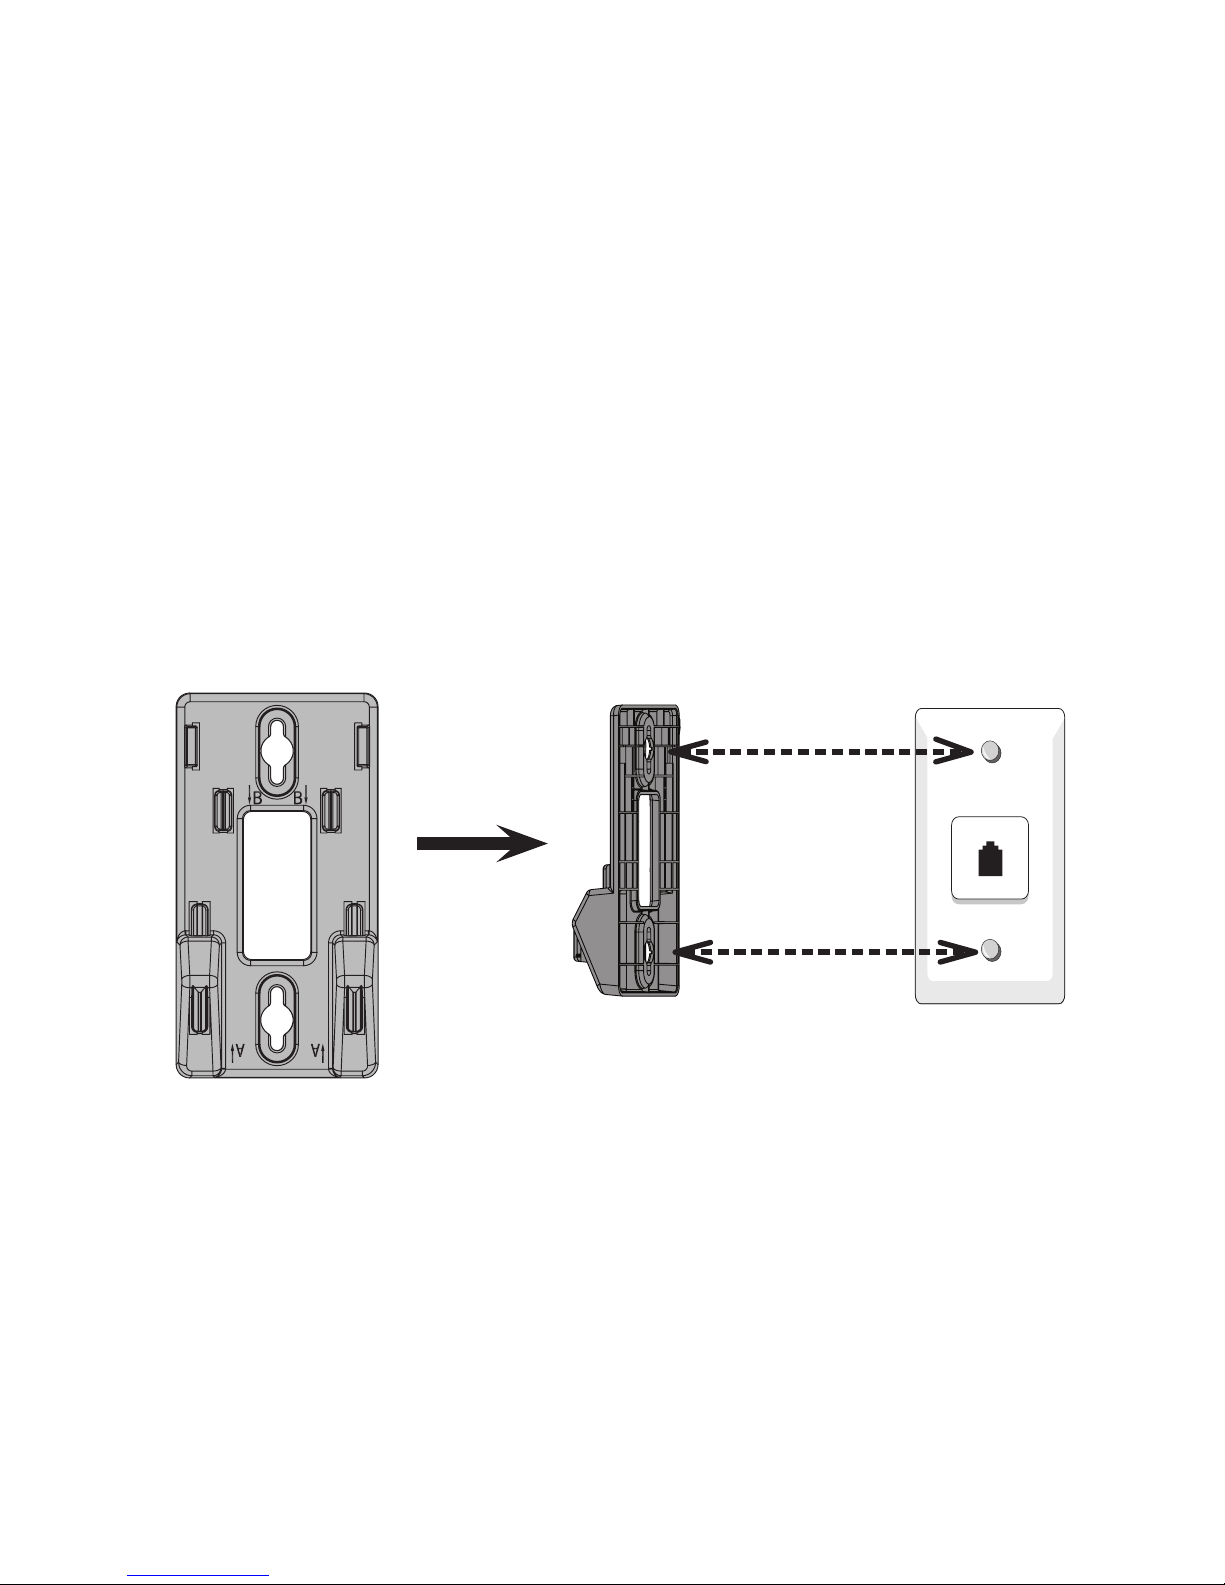
Tabletop to wall mount installation
To install the telephone base in the wall mount position, make sure you rst
unplug the power adapter cord and telephone line cord from the telephone
base and wall outlets.
With the upper tabs (marked B) on top, align the holes of the wall mount
bracket with the studs on the standard wall mounting plate and slide the
bracket down until it locks securely.
1.
Page 18
18
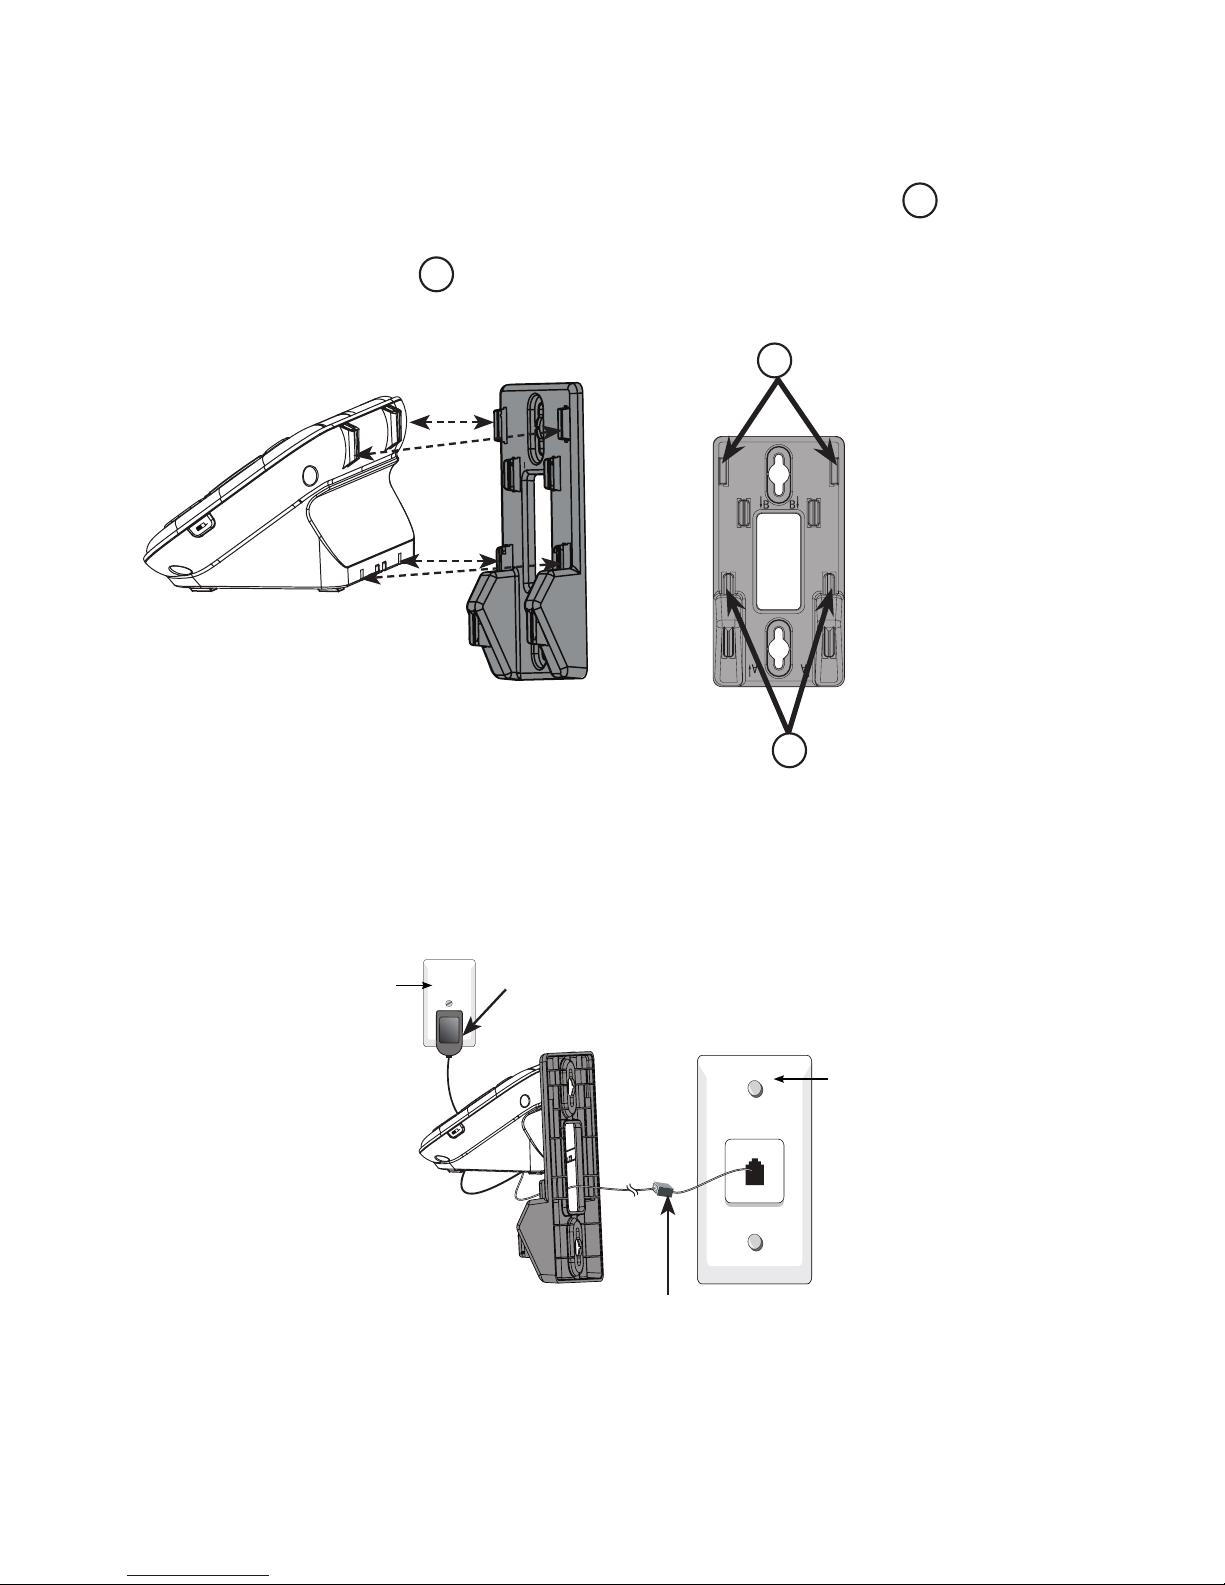
Hold the cords to the side of the telephone base. Align the upper slots on
the back of the telephone base just above the upper tabs 1 of the wall
mount bracket. Make sure the lower slots of the telephone base are aligned
above the lower tabs 2 of the wall mount bracket. Push the telephone
base down until it clicks securely place.
Plug the other end of the telephone line cord into the telephone wall jack (
or DSL lter). Plug the large end of the power adaptor into a mains power
wall socket.
2.
3.
1
2
B
B
Telephone base
power adapter
Mains power
wall socket
Telephone line cord
Telephone
wall jack
Page 19
19
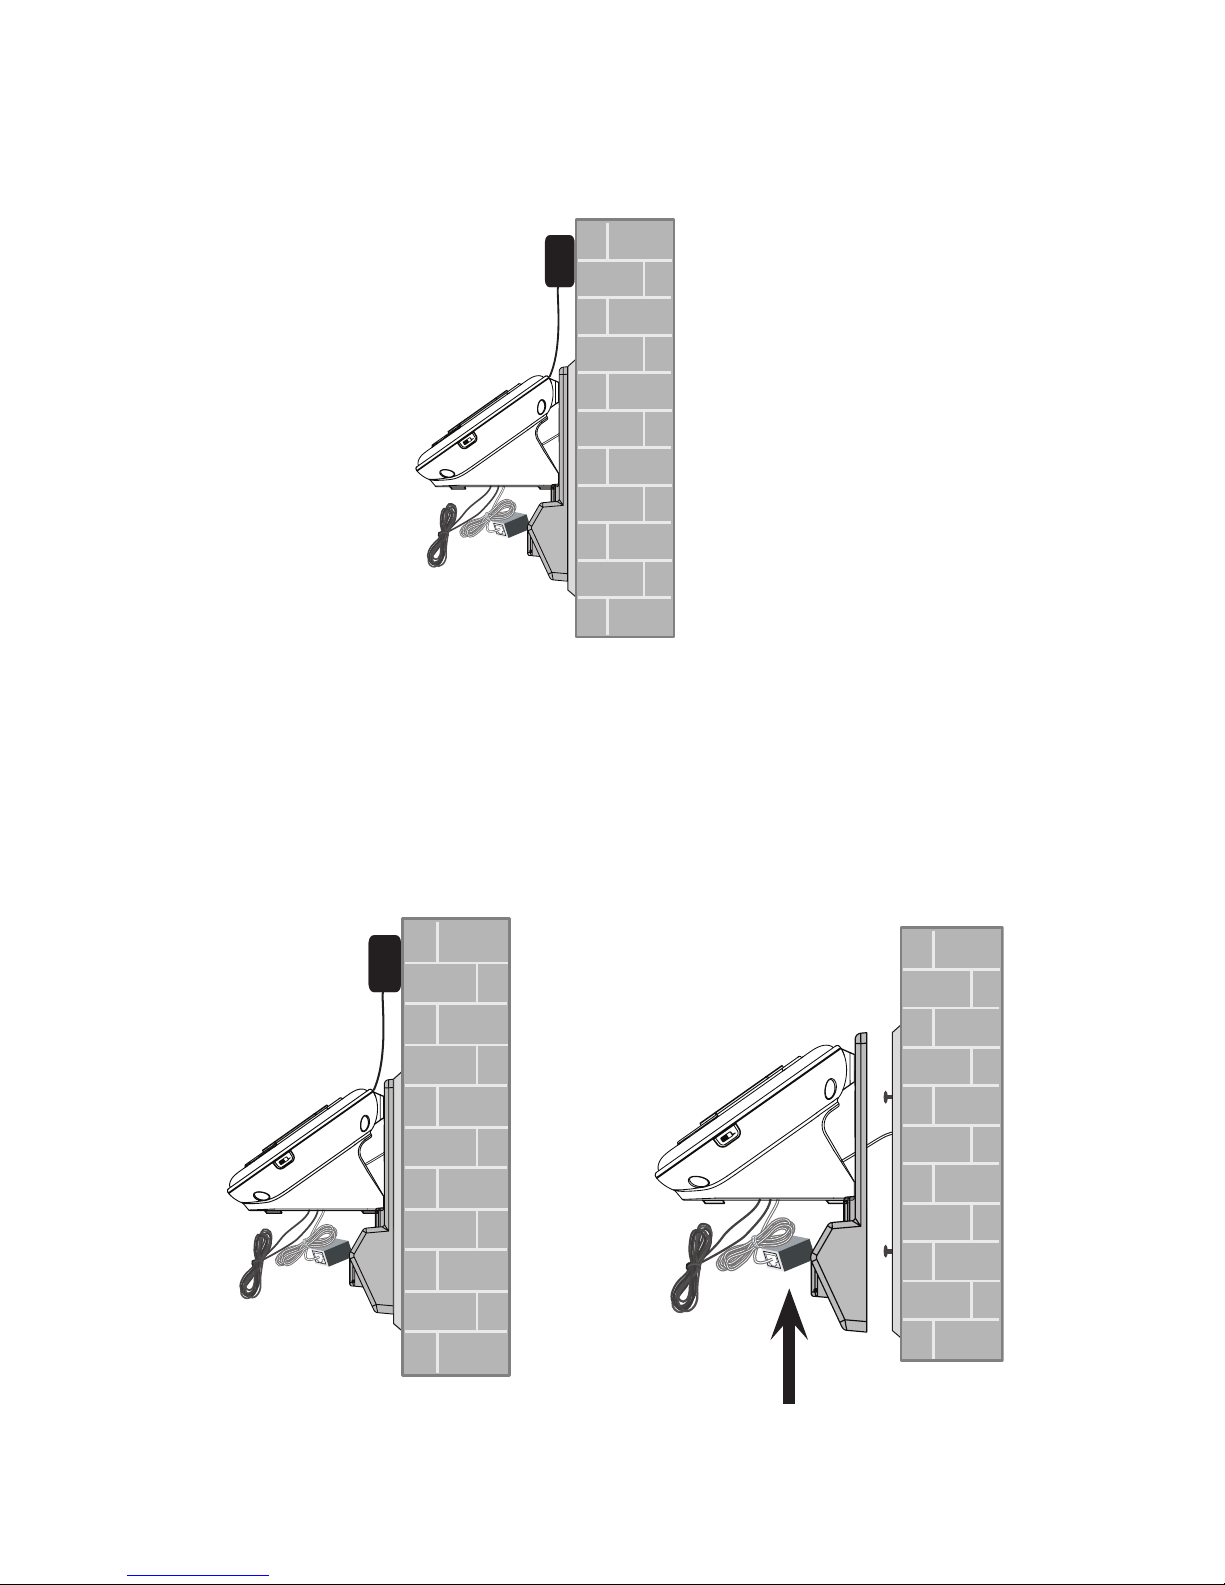
Bundle the telephone line cord and power adaptor cord neatly with twist
ties. Place the bundled cords into the space behind the telephone base.
Wall mount to tabletop installation
To change the telephone base from the wall mount position to tabletop
position, follow the steps below.
Unplug the telephone line cord (or DSL lter) from the wall. Unplug the
power adaptor from the mains socket. Push the wall mount bracket up to
remove it from the wall.
4.
1.
Page 20
20
Untie the telephone line cord and power adaptor cord. Push the wall mount
bracket to detach it from the telephone base.
Plug the other end of the telephone line cord into the telephone wall jack (or
DSL lter). Plug the large end of the power adaptor into a mains power wall
socket.
2.
3.
Telephone line cord
If you have DSL high-speed
Internet service, a DSL lter (not
included) is required.
Telephone base
power adapter
Mains power
wall socket
Telephone
wall jack
Page 21

21
IMPORTANT
Check for a dial tone by pressing . If you hear a dial tone, the installation
is successful.
WARNING
Do not place your Telstra 13350 in the bathroom or other humid areas.
IMPORTANT
The base station must be plugged into the mains power socket at all times.
Do not connect the telephone line until the handset is fully charged. Only use
the power adaptor, telephone cables and NiMH batteries supplied with the
product.
BATTERY LOW WARNING
If the icon ashes in the handset display you will need to recharge the
handset before you can use it again.
During charging, the icon will appear to be lling in the display.
BATTERY PERfORMANCE
In ideal conditions, the fully charged battery should give up to 12 hours talk
time, or 160 hours standby time, on a single charge. Note that a new battery
will not reach full capacity until it has been in normal use for several days.
To keep the batteries in the best condition, leave the handset off the base for
a few hours at a time. Running the battery right down at least once a week will
help it last as long as possible. The charge capacity of the rechargeable battery
will reduce with time as it wears out, giving the handset less talk / standby time.
Eventually it will need to be replaced. A replacement battery can be obtained by
contacting TecHelp on 1300 369 193 or from your local electrical retailer.
After charging your handset for the rst time, subsequent charging time is
about 6–8 hours a day. The battery and handset may become warm during
charging, however, this is normal.
Page 22

22
USING YOUR TELSTRA 13350 PHONE ON A BROADBAND ADSL
LINE?
If this product is to be used on a broadband ADSL line, then you must ensure
that it is connected via an ADSL lter. Using this product on a Broadband
line without an ADSL lter may cause problems with this product and your
Broadband service.
DATE AND TIME
If you have subscribed to Telstra’s Calling Number Display service, the date and
time are set automatically with each incoming call.
The date and time is recorded with each answering machine message you
receive. If you have not subscribed to Telstra’s Calling Number Display Service
you can set the date and time manually.
Set the date and time manually
Press when idle.
Press or to scroll to Set date/time, then press .
Enter the month, date and year, then press .
Enter the hour and minute, then press or to select AM or PM.
Press .
1.
2.
3.
4.
5.
Page 23
23
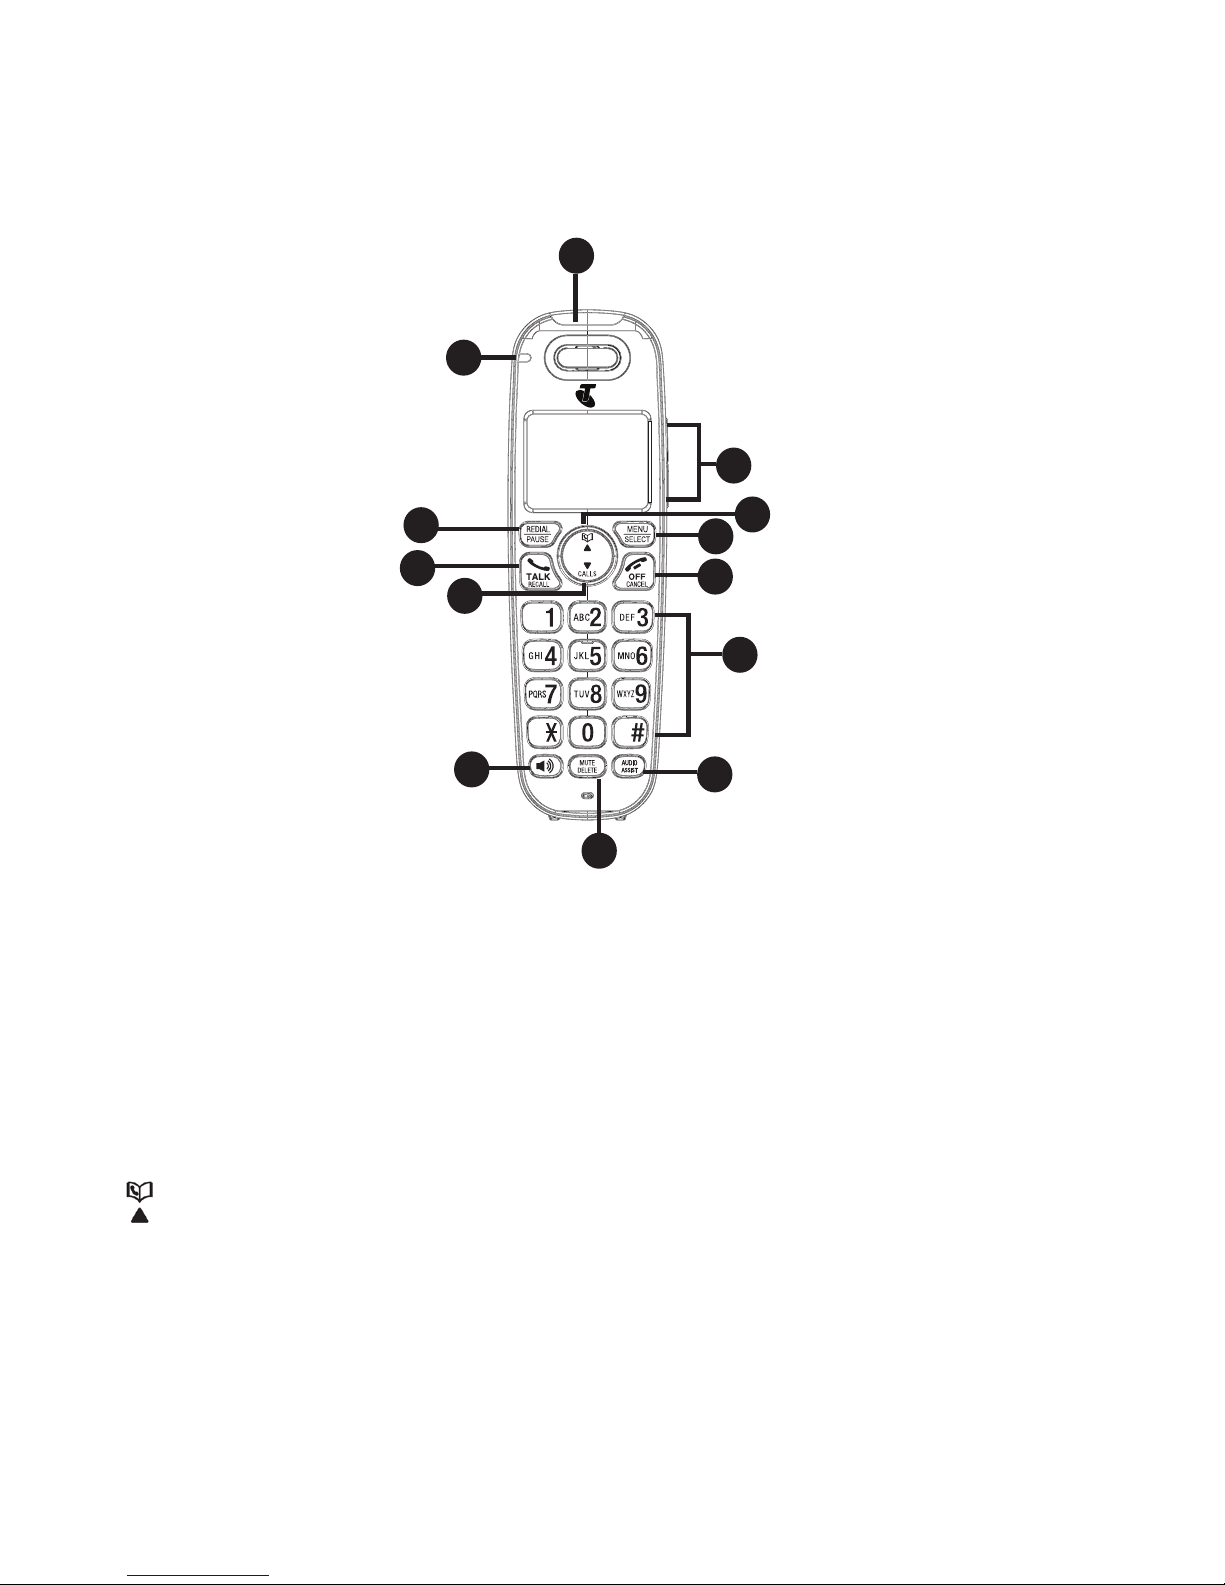
HANDSET BUTTONS
INCOMING CALL LIGHT
Flashes when there is an incoming call/ the base is paging the handset.
CHARGE LIGHT
On when the handset is charging.
DIR/UP
Press to review the phonebook when in idle.
Press to scroll up while in menus or lists.
Press to move the cursor to the right while entering names or numbers.
1.
•
2.
•
3.
•
•
•
12
10
9
8
7
6
1
4
3
2
13
5
11
GETTING TO kNOW YOUR PHONE
Page 24

24
MENU/SELECT
Press to show the menu.
Press to select an item or save an entry/setting while in a menu.
TALK OFF/CANCEL
Press to hang up during a call.
Press to cancel an operation, or back up to the previous menu while in a
menu.
Press and hold to return to idle mode while in a menu.
Press to silence the handset ringer temporarily while the phone is
ringing.
Press and hold to erase the missed call indicator when idle.
CID/DOWN
Press to review the call list log when idle.
Press to scroll down while in menus or lists.
Press to move the cursor to the left while entering names or numbers.
TALK/RECALL
Press to make or answer a call.
Press to access Network Features during a call.
REDIAL/PAUSE
Press repeatedly to view the last 10 numbers dialed.
Press and hold to insert a dialing pause while dialing or entering
numbers.
ALPHANUMERIC KEYPAD/ *(star) /#(hash)
Press to enter numbers or characters/*/#.
Press any key to answer an incoming call.
key in idle mode: Press and hold to access Telstra Home Message
101
®
or MessageBank®.
4.
•
•
5.
•
•
•
•
•
6.
•
•
•
7.
•
•
8.
•
•
9.
•
•
•
Page 25
25
Press to switch between upper case and lower case while entering
characters.
Press repeatedly to display other dialing options when reviewing a call
list entry.
Press and hold to set and turn on the quiet mode, or turn it off.
Press and hold during a call to answer call waiting.
Press and hold to start a 3-Way-Chat.
AUDIO ASSIST
Press to enhance the clarity and loudness of the caller’s voice during a
call.
MUTE/DELETE
Press to mute the microphone during a call.
Press to silence the handset ringer temporarily while the phone is
ringing.
Press to delete an individual entry while reviewing the redial list/
phonebook/call list/reminder.
Press to delete a character or digit while entering names or numbers.
Press to delete the playing message/announcement/reminder.
SPEAKER/
Press to make or answer a call using the speakerphone.
Press to switch between the handset speakerphone and the handset
earpiece during a call.
VOL+/VOL-
Press to adjust the listening volume during a call or message playback.
Press to adjust the handset ringer volume while idle.
•
•
•
•
•
10.
•
11.
•
•
•
•
•
12.
•
•
13.
•
•
Page 26
26
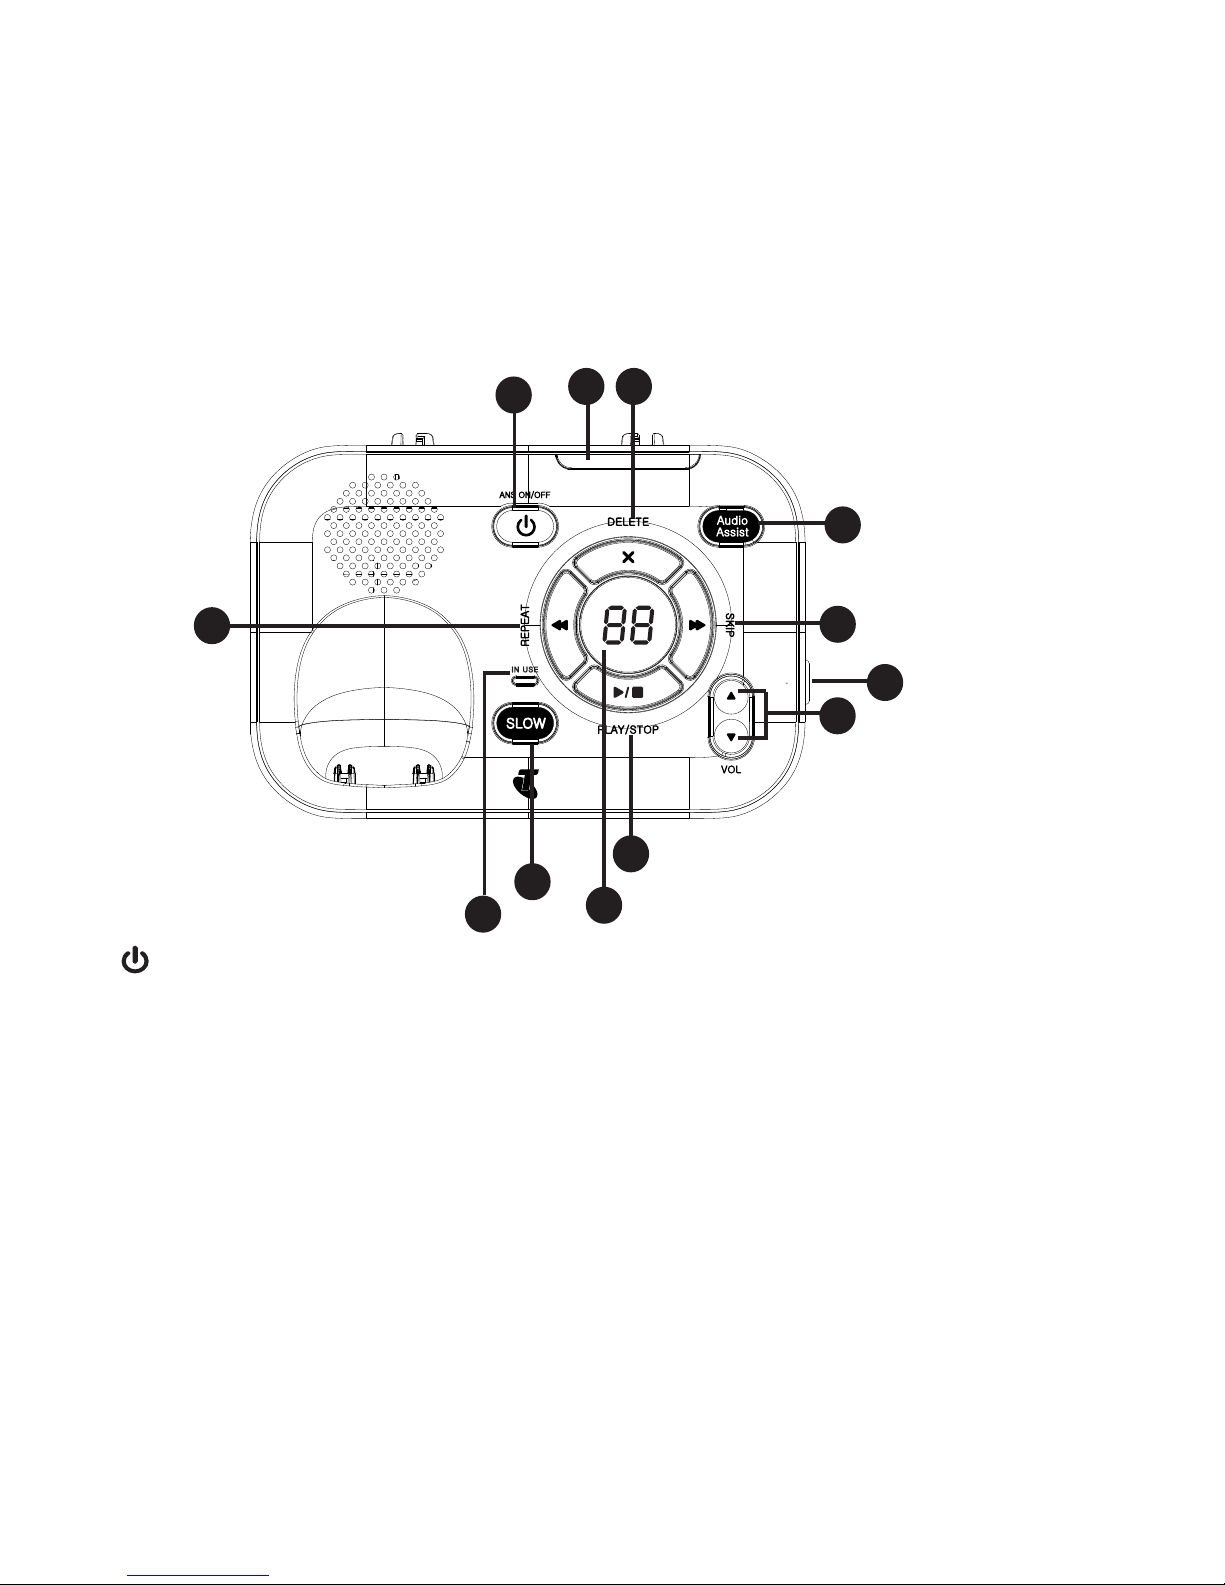
TELEPHONE BASE BUTTONS
INCOMING CALL LIGHT
Flashes when there is an incoming call.
1.
•
ANS ON/OFF
Turn the built-in answering machine on or off.
On when the answering machine is turned on.
DELETE/X
Press to delete the playing message/announcement/reminder..
AUDIO ASSIST
Enhance the clarity and loudness of the caller’s voice during message
playback and during a call.
2.
•
•
3.
•
4.
•
PAGE
4
3
2
1
5
9
8
7
6
10
11
12
Page 27

27
SKIP
Skip to the next message during message playback.
REPEAT
Press once to repeat the playing message.
Press twice to play the previous message.
PLAY/STOP
Start or stop message playback.
/VOL AND /VOL
Adjust the listening volume message playback.
Adjust the base ringer volume while idle.
PAGE
Page all handsets and pendants when idle.
MESSAGE WINDOW
Show the number of messages, and the other information of the
answering system or telephone base.
SLOW
Slow down the message playback.
IN USE LIGHT
On when the phone is in use or the answering machine is answering an
incoming call.
On when a device is being registered.
Flashes when devices are being deregistered.
Flashes when another telephone on the same line is in use.
Press to skip to the next message during message playback.
5.
•
6.
•
•
7.
•
8.
•
•
9.
•
10.
•
11.
•
12.
•
•
•
•
•
Page 28

28
TALK ON
Answer or end a call.
PENDANT LIGHT
On steady when the pendant is in use.
Flashes quickly when there is an incoming call.
Flashes twice every three seconds when any other telephone system
device is in use.
PENDANT STATUS LIGHT
Stays solid red when the pendant is charging.
Flashes red when the pendant is in low battery.
Stays solid green when the pendant is fully charged.
Flashes red and green when the base is paging the pendant.
Flashes quickly in red and green during pendant registration.
Flashes orange three times when the pendant is not registered.
1
Call photo speed dial 1.
1.
•
•
•
•
2.
•
•
•
•
•
•
3.
•
10 OCT 2012
Janet ko
7
2
1
10 OCT 2012
Janet ko
4
5
6
3
PENDANT OVERVIEW (ONLY fOR MODEL WITH PENDANT)
Page 29

29
VOL+/VOL-
Adjust the listening volume during a call/message playback.
Adjust the pendant ringer volume while in idle mode.
2
Call photo speed dial 2.
ON AND OFF SWITCH
Switch to turn the pendant on/off.
VOICE
Press to use the voice command feature.
4.
•
•
5.
•
6.
•
7.
•
Page 30

30
HANDSET DISPLAY
Display icons Description: Icons can be on (visible), or Flashing or Off (not
visible)
Battery is low; place handset in charger to recharge.
Full battery power level.
2/3 battery power level.
1/3 battery power level.
The handset speakerphone is in use.
On steadily if the handset ringers are turned off.
New voicemail received from your telephone service
provider.
MUTE Microphone is muted.
NEW New call list- Missed and new calls.
ANS ON The answering machine is turned on.
New message in the answering machine.
Page 31

31
NAVIGATING THE MENUS
Your Telstra 13350 has an easy to use menu system. Each menu has a list of
options, as outlined on the following page.
To enter the main menu of the handset
Press in idle mode to enter the main menu.
Press or to select a handset feature menu, then press to enter
that menu.
Press to cancel an operation, back up to the previous menu, or exit that
menu.
To return to idle mode, press and hold .
HANDSET MENU LAYOUT
Play message Answering sys Intercom Phonebook Caller ID log
Announcement
Delete all old
Record memo
Answer ON/OFF
Ans sys setup
TELSTRA 1
All pendants
(pendant
model only)
All devices
Review
Add contact
Review
Del all calls
1.
2.
3.
4.
Note: If no key is pressed within 30 seconds, the telephone automatically
returns to idle mode.
Page 32

32
Reminder Ringers Tones Talking digit Set date and
time
Review
Set reminder
On/off
Ringer volume
Ringer tone
Key tone
Battery low
Out of range
Pendant
(pendant
mode
only)
Annc Caller ID Time
format
Date format Setttings Reset
Memory 1
Memory 2
Pendant
Ringer
Voice
command
Happy
Message
Set all On/Off
Local handset
Base
Pendant
(pendant
model only)
12-HR
24-HR
MM/DD/YY
DD/MM/YY
Talking Digit
Clr voicemail
Rename
handset
CID time
sync
Flash time
Reset?
Page 33

33
kEYSTROkE TABLE
Dialing
key
Characters by number of key presses
1 2 3 4 5 6 7 8 9 10 11
1 1 . -
,
( ) * # & / ,
2 a b c A B C 2
3 d e f D E F 3
4 g h i G H I 4
5 j k l J K L 5
6 m n o M N O 6
7 p q r S P Q R S 7
8 t u v T U V 8
9 w x y z W X Y Z 9
0 Space 0
*
#
Note: When entering a name in the phonebook, the rst letter of each word
is automatically capitalized.
Page 34

34
USING THE PHONE
MAkE, ANSWER OR END A CALL
Using the handset
To make a call on a handset:
Press or .
When you hear a dial tone, dial the number.
To answer a call on a handset:
Press or or any dialing key.
To end a call on a handset:
Press or place the handset in the handset charger.
Using the pendant (only for model with pendant)
To make a call on a pendant:
Press or to dial the corresponding speed dial number.
To answer a call on a pendant:
Press .
To end a call on a pendant:
Press or place the pendant in the pendant charger.
SPEAkERPHONE
Handset speakerphone:
When the handset is on a call, press to switch between the handset
speakerphone and the handset earpiece.
Page 35

35
AUDIO ASSIST
Use the audio assist feature to enhance the clarity and loudness of the voice
on handset earpiece or the telephone base speakerphone.
To turn on Audio Assist on the handset:
While you are on a call using the handset earpiece, press AUDIO ASSIST on
the handset.
Press AUDIO ASSIST again to turn off.
To turn on Audio Assist on the telephone base:
During message playback, press Audio Assist on the telephone base.
Press Audio Assist again to turn off.
EqUALIzER
The equalizer enables you to change the quality of the audio for both handset
earpiece and speakerphone to best suit your hearing. The default setting is
Natural.
Press MENU during a call.
Press to choose Equalizer.
Press or to scroll to Natural, Treble 1, Treble 2 or Bass, then press
.
VOLUME CONTROL
To adjust the listening volume on a handset:
During a call, press VOL+ or VOL-.
To adjust the listening volume on a pendant (only for model with pendant ):
During a call, press .
•
•
•
•
1.
2.
3.
Page 36

36
MUTE
The mute function allows you to hear the other party but the other party
cannot hear you.
During a call, press .
Press again to resume the conversation.
TEMPORARY RINGER SILENCING
When the telephone is ringing, you can temporarily silence the ringer of the
handset or the telephone base without disconnecting the call. The next call
rings normally at the preset volume.
To silence the ringer temporary on a handset:
Press .
To silence the ringer temporary at the telephone base:
Press /VOL.
To silence the ringer temporary on a pendant (only for model with pendant):
Press VOL-.
REDIAL
The last 10 telephone numbers dialed (up to 30 digits) are stored in thedialed (up to 30 digits) are stored in the (up to 30 digits) are stored in the
system memory.
Press when idle.
Press , or repeatedly to browse.
When the desired entry displays, press or to dial.
•
•
Page 37

37
CHAIN DIALING
Use this feature on the cordless handsets to initiate a dialing sequence from
numbers stored in the phonebook, call list or redial list while you are on a call.
To access a number from the phonebook while on a call:
Press .
Press or to scroll to Phonebook, then press .
Press or to scroll to the desired entry, then press .
To access a number from the call list while on a call:
Press .
Press or to scroll to Caller ID log, then press .
Press or to scroll to the desired entry, then press .
To access a number from the redial list while on a call:
Press to enter the redial list.
Press , or repeatedly to browse to the desired entry.
Press .
TRANSfER A CALL
While on an outside call, you can transfer the call from a handset to another
system device.
To transfer a call from a handset:
During a call, press . Press or to scroll to Transfer, then press .
If you have two or more handsets/pendants, press or to scroll to
the desired device and then press .
The outside call is put on hold and the handset shows Transferring call/
Transferring call to all. The destination device rings.The destination device rings.
To answer the call on the destination handset, press , or any dialing
key.
1.
2.
3.
1.
2.
3.
1.
2.
3.
1.
•
2.
Page 38

38
-OR-
To answer the call on the pendant, press .
PAGE HANDSET
This feature helps you nd misplaced handsets and pendants.
To start the paging tone:
Press /PAGE on the right side of the telephone base. All idle handsets
and pendants ring and the handsets screens display ** Paging **.
To stop the paging tone:
Press , or any dialing key on a handset, or return the handset to the
telephone base or charger.
-OR-
Press on a pendant.
-ORPress /PAGE on the telephone base.
JOIN A CALL IN PROGRESS
Another handset or pendant can join an outside call. You can share an outside
call with up to four handsets/pendants at the same time.
To join a call with a handset:
Press or
to join the call.
Press or place the handset in the telephone base or handset charger toor place the handset in the telephone base or handset charger to
exit the call.
To join a call with a pendant:
Press to join the call.
Press or place the pendant in the pendant charger to exit the call.or place the pendant in the pendant charger to exit the call.
•
•
•
•
•
•
•
•
Page 39

39
INTERCOM
Use the intercom feature for conversations between two system devices.
To initiate an intercom call with a handset:
Press , then or to scroll to Intercom, then press . Press or
to scroll to the desired device and press . Your handset showsYour handset shows Calling
HANDSET X/Calling BASE 0/Calling all pendants/Calling all devices.
The destination device rings. The destination handset shows HANDSET X
is calling.
To answer the intercom call on the destination handset, press ,
or
any dialing key.
-OR-
To answer the intercom call on a pendant, press .
To end the intercom call on either handset, one party presses , or, or
places the handset back in the telephone base or handset charger.
-OR-
To end the intercom call on the pendant, press or place the pendant
back in the pendant charger.
1.
2.
3.
Page 40

40
POWER fAIL BACk-UP
Telstra’s Power Fail back-up system lets you make calls during a mains power
interruption with your cordless phone. During a mains power interruption, you
can supply the power stored in your handset battery to the base unit, so you
can make calls even when the power is out.
Make a call using Power Fail Back-Up mode
If there is only one handset registered to the base:
Once the handset is placed onto the main base unit, enter the telephone
number, and then press or . The speakerphone will be turned on
automatically and call is made.
OR
Lift up the handset and enter the telephone number.
Place the handset back onto the main base unit within 60 seconds.
The speakerphone will be turned on automatically and call is made.
Handset may show Please wait… whilst the handset starts up the base
before dialling.
To end the call, press .
1.
1.
2.
3.
Notes:
If there is more than one handset registered to the base, the handset on
the main base unit should be left as a power supply of the base and you
can use the other handset(s) to make calls like normal.
The handset should always remain on the main base unit for the entire
length of the call.
•
•
Page 41

41
Answer a call using Power Fail Back-Up mode
If there is only one handset registered to the base:
When the phone rings, keep the handset on the main base unit and
press or to answer the call. The speakerphone will be turned on
automatically and call is answered.
To end the call, press .
1.
2.
Notes:
If there is more than one handset registered to the base, the handset on
the main base unit should be left as a power supply of the base and you
can use the other handset(s) to receive calls like normal.
The power supplying handset should always be placed on the main base
unit for the entire length of the call.
The range of the base unit is limited during Power Fail Back-Up mode.
Keep the handset close to the base unit.
To save power, suggest turning off the answering machine in Power Fail
Back-Up mode and turning on only when necessary.
•
•
•
•
Page 42

42
The phonebook stores up to 100 entries, which are shared by all devices.
ADD A PHONEBOOk ENTRY
Press when idle.
Press or to scroll to Phonebook, then press .
Press or to scroll to Add contact, then press .
Enter a number.
-OR-
Copy a number from the redial list by pressing then
p
q
, or pressing
repeatedly to nd the desired number. Press to copy the number.
Press .
Enter a name, then press .
REVIEW PHONEBOOk ENTRIES
Phonebook entries appear alphabetically.
Press when idle to show the rst entry in the phonebook.
Press
p
q
to browse through the entries.
ALPHABETICAL SEARCH
Press when idle to show the rst entry in the phonebook.
Use the dialing keys to enter the letter associated with the name. For
example, if you have the entries named Jennifer, Jessie, Kevin and Linda
in your phonebook, press 5 (JKL) once to see Jennifer (when Jennifer
displays, press to see Jessie), twice to see Kevin, or three times to see
Linda. If necessary, press
p
q
to browse.
1.
2.
3.
4.
5.
6.
1.
2.
1.
2.
PHONEBOOk
Page 43

43
EDIT A PHONEBOOk ENTRY
Search for the desired entry in the phonebook (see Review phonebook
entries or Alphabetical search on page 42). Press .
Edit the number, then press .
Edit the name, then press .
DELETE A PHONEBOOk ENTRY
To delete the displayed phonebook entry, press , then press . You
cannot retrieve a deleted entry.
1.
2.
3.
•
Page 44

44
There are two speed dial keys, 1 and 2, on the pendant.
Use a handset to store two contacts that you may need to call more often.
STORE A SPEED DIAL ENTRY
Press when idle..
Press or to scroll to Pendant, then press .
Press or to scroll to Memory 1 or Memory 2, then press .
Enter a number, then press .
Enter a name, then press .
EDIT A SPEED DIAL ENTRY
Press when idle..
Press or to scroll to Pendant, then press .
Press or to scroll to Memory 1 or Memory 2, then press .
Edit the number, then press .
Edit the name, then press .
DIAL A SPEED DIAL NUMBER
Press or to dial the number stored in the corresponding speed
dial location.
-OR-
Use the voice command feature to dial (see page 66).
1.
2.
3.
4.
5.
1.
2.
3.
4.
5.
•
SPEED DIAL fOR PENDANT (ONLY fOR
MODEL WITH PENDANT)
Page 45

45
ABOUT THE REMINDER
The reminder feature helps remind you of important events. You can set
the reminder to remind you only once, or in daily, weekly or monthly bases.
Once you set the reminder, the system will alert you at the reminder time by
sending an alert tone on handset. You can stop the alert by pressing the
button on the handset, or pressing the key on the pendant (for pendant
model only) which will play the reminder via the pendant.
ADD A REMINDER
You can store up to 9 reminders in total. Each reminder can be up to four
minutes in length. The total storage capacity for the answering machine and
reminders is approximately 30 minutes.
To add a reminder with a cordless handset:
Press when idle.
Press or to scroll to Reminder, then press .
Press or to scroll to Set reminder, then press .
Enter the month, date and year, then press .
Enter the hour and minute, then press or to scroll to select AM or PM,
then press .
The system announces, “Record after the tone. Press 5 when you are
done.” After the tone, speak towards the microphone.
Press when done.
Press or to scroll to the frequency you would like to set, then press
.
1.
2.
3.
4.
5.
6.
7.
8.
REMINDER
Page 46

46
REVIEW REMINDERS
When playback begins, the total number of reminders is announced. Before
each reminder, you hear the day and time of the recording. After the last
reminder, the screen displays End of reminder and you hear, “End of
reminder.”
To play reminders with a handset:
Press when idle.
Press or to scroll to Reminder, then press .
Press to select Review. The reminders play automatically.
To play reminders with a pendant (only for model with pendant):
When the reminder alarm sounds, the key on the pendant will ash.
Press the key on the pendant to retrieve the reminder.
Use the voice command feature (see page 66) to review the past and
upcoming reminders.
DELETE REMINDERS
During playback:
Press on the cordless handset to delete the reminder.
Press DELETE X on the base to delete the reminder.
ADD AND REVIEW REMINDERS REMOTELY
You can also add or review reminders remotely from any touch-tone telephone.
See Remote access on page 64 for more information.
1.
2.
3.
•
•
•
•
Page 47

47
USING THE MENU
You can use the menu of a cordless handset to change the telephone settings.
Press when idle.
Press or until the screen displays the desired feature menu.
Press to enter the menu.
To return to the previous menu, press .
To return to idle mode, press and hold .
RINGER VOLUME
Telephone base ringer volume:
Press VOL or VOL when idle.
Handset ringer volume:
Press VOL+ or VOL- when idle.
Pendant ringer volume:
Press when idle.
RINGER TONE
Handset ringer tone:
Press when idle.
Press or to scroll to Ringers, then press .
Press or to scroll to Ringer tone, then press .
Press or to scroll to sample each ringer tone, then press .
1.
2.
3.
•
•
•
•
•
1.
2.
3.
4.
PHONE SETTINGS
Page 48

48
Pendant ringer tone (only for model with pendant):
Press when idle.
Press or to scroll to Pendant, then press .
Press or to scroll to Pendant ringer, then press .
Press or to scroll to sample each ringer tone, then press .
SET DATE AND TIME
The answering system announces the date and time of each message prior
to playing it. Before using the answering system or reminder, set the date
and time as follows. If you subscribe to Calling Number Display service, the
date and time are set automatically with each incoming call. Make sure the
settings are correct so that the reminder feature works properly.
Press when idle.
Press or to scroll to Set date/time, then press .
Enter the month, date and year, then press .
Enter the hour and minute, then scroll to select AM or PM.
Press .
CALLING NUMBER DISPLAY VOICE ANNOUNCE
The voice announce feature lets you know who’s calling without having to look
at the display.
Press when idle.
Press or to scroll to Annc Caller ID, then press .
Press or to scroll to the desired option, then press .
Set all On/Off - Change the setting for all devices.
Local handset - Change the setting for that handset only.
Base - Change the setting for the telephone base only.
Pendant - Change the setting for the pendant only (pendant mode only).
Press or to scroll to On or Off, then press .
1.
2.
3.
4.
1.
2.
3.
4.
5.
1.
2.
3.
•
•
•
•
4.
Page 49

49
TALkING DIGIT
You can select the volume or turn off the audible spoken tone that is spoken
when you press the dialing key during predialing.
Press when idle.
Press or to scroll to Settings, then press SELECT.
Press or to scroll to Talking Digit, then press .
Press or to scroll to sample each volume level (4 levels, including Off),
then press .
CLEAR VOICEMAIL INDICATORS
Use this feature when the telephone indicates that there is new voicemail but
there are none. This feature only turns off the indicators, New voicemail and .
It does not delete your voicemail messages. As long as you have new voicemail
messages, your telephone service provider continues to send the signal to
turn on the indicators.
Press when idle.
Press or to scroll to Settings, then press .
Press or to scroll to Clr voicemail, then press . The screen will
display “Reset Voicemail Indicator?”.
Press .
RENAME HANDSET
You can create a name for each system handset.
Press when idle.
Press or to scroll to Settings, then press .
Press or to scroll to Rename handset, then press .
Enter the desired name, then press .
1.
2.
3.
4.
1.
2.
3.
4.
1.
2.
3.
4.
Page 50

50
kEY TONE
The handset is set to beep with each key press. You can set the key tone
volume or turn the key tone off for each handset.
Press when idle.
Press or to scroll to Tones, then press .
Press or to scroll to Key tone, then press .
Press or to scroll to sample each volume level (total 4 levels,
including Off), then press .
USE CALLING NUMBER DISPLAY TO AUTOMATICALLY SET DATE
AND TIME
If you subscribe to Calling Number Display service, the date and time are set
automatically with each incoming call. Follow the steps below to turn the CID
time sync feature on or off. The default setting is On.
Press when idle.
Press or to scroll to Settings, then press .
Press or to scroll to CID time sync, then press .
Press or to scroll to On or Off, then press .
qUIET MODE
You can turn on the quiet mode for a period of time (1-12 hours). During this
period, all tones (except paging tone) and call screening are muted.
When you turn on the quiet mode, the answering machine turns on
automatically. When the quiet mode duration expires, the answering machine
remains on.
1.
2.
3.
4.
1.
2.
3.
4.
Page 51

51
To set and turn the quiet mode on:
Press and hold on the handset. The handset shows Quiet: _ _ hours
(1-12 hours).
Enter the desired duration (1-12), then press .
To turn the quiet mode off:
While the quiet mode is on, press and hold .
HAPPY MESSAGE (ONLY fOR MODEL WITH PENDANT)
Happy messages are pendant greeting messages. The default setting is On.
Press when idle.
Press or to scroll to Pendant, then press .
Press or to scroll to Happy message, then press .
Press or to scroll to On or Off, then press .
VOICE COMMAND (ONLY fOR MODEL WITH PENDANT)
You can turn the pendant voice command feature (see pages 66-68) on or off.
Press when idle.
Press or to scroll to Pendant, then press .
Press or to scroll to Voice command, then press .
Press or to scroll to On or Off, then press .
1.
2.
•
1.
2.
3.
4.
1.
2.
3.
4.
Page 52

52
*Subscription and/or usage charges may apply to use these services. Call
132200 or visit telstra.com/homephone for more information.
CALLING NUMBER DISPLAY
If you have subscribed to Telstra’s Calling Number Display service, you will
be able to see your caller’s number on your handset display (provided it is
not blocked) prior to answering the call. If your caller’s name is stored in the
phonebook and a number match is found, you will see the caller’s name on the
display instead.
Calling Number Display from the home line allows you to see the name,
number, date and time of the incoming calls. The calling number display may
appear differently if the caller is matched to a phonebook entry (see Memory
match on page 53).
When Telstra’s Calling Number Display is active on your service, dialled
numbers will be saved in the telephone’s Call list. Your phone can store up
to 50 answered and unanswered calls with date/time information in the call
log. The number will be shown on the display when the phone is ringing. If
the number matches with one of the entries in your phonebook, the caller’s
name stored in the phonebook will be displayed with the number. The phone
deletes the oldest entry when the log is full to make room for new calls. This
information is common to all handsets, so changes made using any handset
are reected in all other handsets. If you answer a call before the information
appears on the screen, it does not show in the call list history.
Note: If the phone number has more than 24 digits, only the last 24 digits
will be saved or shown in the call list.
TELSTRA NETWORk SERVICES*
Page 53

53
Missed calls are marked with xx Missed call(s). Each time you review a call
list entry marked with NEW, the number of missed calls decreases by one.
When you have reviewed all the missed calls, the missed calls indicator no
longer shows. You can review, redial, and copy an entry into the phonebook.
Entries appear in reverse chronological order. Only one handset can review
the call list at a time. If a handset tries to enter the call list while another
handset is already in it, Not available at this time appears. The call list
information might not be available for every incoming call. The callers might
intentionally block their names and / or telephone numbers.
MEMORY MATCH
If the incoming telephone number matches the exact telephone number in
your phonebook, including area code, the name that appears on the screen
matches the corresponding name in your phonebook.
For example, if Christine Smith calls, her name appears as Chris if this is how
you entered it into your phonebook.
CALL LIST DISPLAY SCREEN MESSAGE
With some incoming calls, if the telephone number is not available, the handset
may display one of the following explanations:
Unavailable This caller’s number is unavailable.
Private The caller is blocking the telephone number.
When the list is full, and a new call is received, the oldest entry will be deleted
automatically.
Note: The number you see on your calling number display is in the
format sent by the telephone service provider. It usually delivers 10-digit
telephone numbers (area code plus telephone number).
Page 54

54
IMPORTANT
To use Telstra’s Calling Number Display you must rst subscribe to the
service from Telstra. For more information on Telstra Network Services call
Telstra on 13 22 00. To ensure the caller’s name is displayed, make sure
you have stored the full telephone number, including the area code, in the
phonebook.
MISSED CALL INDICATOR
When there are calls that have not been reviewed in the call list, the screens
display XX Missed calls. When you have reviewed all the missed calls, the
missed call indicator goes away.
Each time you review a call list entry marked NEW on the cordless handset,
the number of missed calls decreases by one.
If you do not want to review the missed calls one by one, press and hold or
on the handset when not in use to clear the missed call indicator. All the
entries are then considered old and kept in the call list.
REVIEW THE CALL LIST
Review the call list to nd out who called, to return the call, or to copy the
caller’s name and number into your phonebook.
To review the call list with a handset:
Press when idle.
Press or to browse.
To review the call list with a pendant:
Use the voice command feature (see page 68).
SAVE A CALL LIST ENTRY TO THE PHONEBOOk
Search for the desired call list entry (see review the call list on page 54).
Press to choose an entry.
1.
2.
•
1.
2.
Page 55

55
Edit the number, then press .
Edit the name, then press .
fLASHING MESSAGE INDICATOR (fMI)
The Telstra 13350 is designed to provide visual indication when a new
message is left in your Telstra Home Messages 101® or MessageBank®
service. To arrange connection of the Flashing Message Indicator service,
simply call Telstra on 13 22 00. When a new message is left, New voicemail
the icon will be displayed on the handsets. After you have listened to your
message(s), the icon will disappear and the indicators on the handsets
turn off automatically.
Reset the voicemail indicators when the telephone indicates that there is
new voicemail but there is none (for example, when you have accessed your
voicemail while away from home). Clearing the voicemail waiting indicators
only turns off the indicators; it does not delete your voicemail messages. As
long as you have new voicemail messages, your telephone service provider
continues to send the signal to turn on the indicators.
To reset the voicemail indicator:
Press in idle mode to enter the main menu.
Press or to scroll to Settings, then press .
Press or to scroll to Clr voicemail, then press .
The screen displays Reset Voicemail Indicator?, then press .
3.
4.
1.
2.
3.
4.
Notes:
Your telephone service provider might alert you to new voicemail
messages with a stutter (broken) dial tone. Contact your telephone
service provider for more details.
For more information about the difference between your answering
system and voicemail, see page 60.
•
•
Page 56

56
TELSTRA HOME MESSAGES 101® OR MESSAGEBANk
®
You can get messages from your Telstra xed home phone when you are away
from the phone, busy on another call or using the Internet. Callers will hear a
standard greeting inviting them to leave a message.
To call Telstra Home Messages 101® or MessageBank
®
While the handset is in idle mode, press and hold . The handset will dial
125101.
OR
Press or , then press and hold . The handset will dial 125101.
CALL WAITING
Call Waiting tells you if a new caller is trying to contact you when you are
already on the phone. A network tone alerts you to the new caller, so you can
answer your second incoming call by putting the rst caller on hold.
Press and hold . Your rst caller is put on hold and you can talk to your
second caller.
To revert back to the original caller, press and hold again.
3-WAY CHAT
This service is available on most lines ready for you to use. If you are already on
a call, you can add another person and then have a 3-Way Chat.
To put existing call on hold and make a new call then to 3-Way chat
Press on the handset you are currently using.
Dial the second phone number.
Press and hold on the handset to connect the 3-Way Chat after the
second call answered.
To Split a 3-Way Chat or switch between callers
Press and hold ..
1.
2.
1.
2.
3.
•
Page 57

57
The answering system can record and store up to 99 messages. Each
message can be up to 3 minutes in length depending on the message length
set (see Message recording time on page 59 ).The total storage capacity for
the outgoing message, messages and memos is approximately 30 minutes.
The actual recording time depends on individual message characteristics.
Messages remain available for replay until you delete them.
ANNOUNCEMENT
The telephone is preset with a greeting that answers calls with, “Hello. Please
leave a message after the tone.” You can use this preset announcement, or
replace it with your own.
RECORD YOUR OWN ANNOUNCEMENT
You can record an announcement up to 90 seconds, but any announcement
shorter than two seconds will not be recorded.
To record an announcement with a handset:
Press when idle.
Press or to scroll to Answering sys, then press .
Press again to select Announcement.
Press again to select Record annc. The system announces, “Record
after the tone. Press 5 when you are done.” After the tone, speak towards
the microphone.
Press 5 when done.
ANSWER ON/Off
The answering system must be turned on to answer and record messages.
When the answering system is turned on, the ANS ON/OFF light on the
telephone base turns on and ANS ON displays on the handset.
1.
2.
3.
4.
5.
ANSWERING MACHINE
Page 58

58
To set answer on/off with a handset:
Press when idle.
Press or to scroll to Answering sys, then press .
Press or to scroll to Answer ON/OFF, then press .
Press or to scroll to On or Off, then press .
To set answer on/off at the telephone base:
Press ANS ON/OFF to turn the answering system on or off.
CALL SCREENING
Use this feature to choose whether incoming messages can be heard over the
cordless handset or the telephone base while they are being recorded.
Press when idle.
Press or to scroll to Answering sys, then press .
Press or to scroll to Ans sys setup, then press .
Press again to select Call screening.
Press or to scroll to On or Off, then press .
NUMBER Of RINGS
You can choose two, three, four, ve or six rings, or toll saver. With toll saver
selected, the answering machine answers after two rings if you have new
messages, or after four rings when there are no new messages. This enables
you to check for new messages and avoid paying long distance charges when
calling from out of your local area.
Press when idle.
Press or to scroll to Answering sys, then press .
Press or to scroll to Ans sys setup, then press .
Press or to scroll to # of rings, then press .
Press or to scroll to select 6, 5, 4, 3 or 2, then press .
1.
2.
3.
4.
•
1.
2.
3.
4.
5.
1.
2.
3.
4.
5.
Page 59

59
REMOTE ACCESS CODE
A two-digit security code is required to access the answering machine
remotely from any touch-tone telephone. The preset code is 00. You can set
the code from 00 to 99.
Press when idle.
Press or to scroll to Answering sys, then press .
Press or to scroll to Ans sys setup, then press .
Press or to scroll to Remote code, then press .
Enter a two-digit number, then press .
MESSAGE ALERT TONE
When the message alert tone is set to On, and there is at least one new
message, the telephone base beeps every 10 seconds. The message alert
tone is preset to Off.
There is no audible alert at the handset.
Press when idle.
Press or to scroll to Answering sys, then press .
Press or to scroll to Ans sys setup, then press .
Press or to scroll to Msg alert tone, then press .
Press or to scroll to On or Off, then press .
MESSAGE RECORDING TIME
You can set the recording time allowed for incoming messages. The message
length is three minutes by default.
Press when idle.
Press or to scroll to Answering sys, then press .
Press or to scroll to Ans sys setup, then press .
Press or to scroll to Recording time, then press .
Press or to scroll to 3 minutes, 2 minutes or 1 minute, then press .
1.
2.
3.
4.
5.
1.
2.
3.
4.
5.
1.
2.
3.
4.
5.
Page 60

60
ANSWERING MACHINE AND VOICEMAIL
Your telephone has separate indicators for two different types of voice
messages: those left on its built-in digital answering machine and those left
with your telephone service provider’s voicemail. Your telephone’s built-in digital
answering machine messages and voicemail messages are separate. Each
alerts you to new messages differently.
If XX New messages displays on the cordless handsets, there are new
messages in the built-in answering machine. To listen to the messages
recorded on your digital answering machine, press /PLAY/STOP on the
telephone base.
If and New voicemail display on the cordless handset, your telephone
service provider is indicating that it has new voicemail for you.
To listen to your voicemail, press and hold 1 on your handset. Some
telephone service providers bundle or combine multiple services like
voicemail and call waiting, so you may not be aware that you have voicemail.
To check what services you have and how to access them, contact your
telephone service provider.
To use your voicemail service rather than your answering machine, turn off your
answering machine. To use your answering machine rather than your voicemail
service, contact your telephone service provider to deactivate your voicemail
service.
Using the answering machine and voicemail together
You can also use your telephone answering machine and voicemail together by
setting your built-in answering machine to answer before voicemail answers
as described below. To learn how to program your voicemail settings, contact
your telephone service provider. Then, if you are on a call, or if the answering
machine is busy recording a message and you receive another call, the second
caller can leave a voicemail message.
Set your answering machine to answer calls at least two rings earlier than your
voicemail is set to answer. For example, if your voicemail answers after six
rings, set your answering machine to answer after four rings. Some voicemail
•
•
Page 61

61
providers may program the delay before answering calls in seconds instead of
rings. In this case, allow six seconds per ring when determining the appropriate
setting.
MESSAGE CAPACITY
The answering machine can record and store up to 99 messages. Each
message can be up to three minutes in length. The total storage capacity
for the announcement, messages, memos and reminders is approximately
30 minutes. The actual recording time depends on individual message
characteristics. Messages remain available for replay until you delete them.
CALL SCREENING
To screen a call at the telephone base:
If the answering machine and call screening are on, the announcement and
the incoming message broadcast at the telephone base while the call is
answered by the answering machine.
Options while a message is being recorded:
Press p/VOL or q/VOL to adjust the listening volume.
Press /STOP to temporarily turn off the feature.
To screen a call at a handset:
If the answering machine and call screening are on, press . The
announcement and the incoming message broadcast at the handset while the
call is answered by the answering machine.
Options while a message is being recorded:
Press VOL+/VOL- to adjust the listening volume.
Press OFF to temporarily turn off the feature.
Press to temporarily turn on the feature if it is set to off.
Press to switch between the speakerphone and the handset earpiece.
•
•
•
•
•
•
Page 62

62
CALL INTERCEPT
If you want to talk to the caller whose message is being recorded, press
or
on a cordless handset.
TEMPORARILY TURN Off THE MESSAGE ALERT TONE
If the message alert tone is turned on, the telephone base beeps every 10
seconds when there are new messages. Pressing any telephone base key
(except /PAGE) temporarily silences the message alert tone.
The message alert tone resumes when you receive a new message.
MESSAGE PLAYBACk
To play messages on a handset:
Press when idle.
Press to select Play messages.
If you have only new or old messages, the messages play automatically.
-ORIf you have both new and old messages, Press or to scroll to Play new
msgs or Play old msgs, then press .
Options during playback:
Press VOL+/VOL- to adjust the message playback volume.
Press 6 to skip to the next message.
Press 4 to repeat the message. Press 4 twice to hear the previous message.
Press to delete the playing message.
Press to switch between speakerphone mode and handset mode.
Press to enhance clarity and loudness of message.
Press to call back the caller. The screen displays Call back? .
Press to conrm or press to cancel.
1.
2.
3.
1.
2.
3.
4.
5.
6.
7.
Page 63

63
Press to pause the playback and view the caller’s information. You can
press or to call back.
To play messages at the telephone base:
Press /PLAY when idle.
If you have only new or old messages, the messages play automatically.
-OR-
If you have both new and old messages, the new messages play
automatically.
Options during playback:
Press p/VOL or q/VOL to adjust the message playback volume.
Press /SKIP to skip to the next message.
Press /REPEAT to repeat the message. Press /REPEAT twice to hear
the previous message.
Press X/DELETE to delete the playing message.
Press /STOP to stop the playback.
Press to reduce the playback speed.
Press to enhance clarity and loudness of message.
To play messages at a pendant:
Use the voice command feature (see page 67).
DELETE ALL OLD MESSAGES
You can only delete old (reviewed) messages. You cannot delete new
messages until you review them. You cannot retrieve deleted messages.
To delete all old messages with a handset:
Press when idle.
Press or to scroll to Answering sys, then press .
Press or to scroll to Delete all old, then press .
8.
1.
2.
•
•
•
•
•
•
•
•
1.
2.
3.
Page 64

64
Press to conrm.
To delete all old messages with the telephone base:
Press X/DELETE when idle.
Quickly press X/DELETE again.
RECORD, PLAY AND DELETE MEMOS
Memos are your own recorded messages used as reminders for yourself or
others using the same answering machine. Play and delete them in the same
way as incoming messages.
Press when idle.
Press or to scroll to Answering sys, then press .
Press or to scroll to Record memo, then press .
The system announces, “Record after the tone. Press 5 when you are
done.” After the tone, speak towards the microphone.
Press 5 when done.
REMOTE ACCESS
A two-digit security code is required to access the answering machine
remotely from any touch-tone telephone. The preset code is 00.
Dial your telephone number from any touch-tone telephone.
Enter the two-digit security code after the announcement and the
long beep.
The system announces, “Press star for reminder or press pound to listen
to messages.” Press or .
After pressing , you can enter one of the following remote
commands:
4.
1.
2.
3.
4.
5.
1.
2.
3.
•
Page 65

65
Command Function
1 Review reminders.
2 Set reminders.
3 End the call.
4 Turn reminder off.
-OR-
After pressing , you can enter one of the following remote commands.
Command Function
1 Play all messages.
2 Play new messages.
3 Delete the current message (during playback).
33 Delete all old messages.
4 Repeat the current message (during playback).
5 Stop.
*5 Hear a list of remote commands.
6 Skip to the next message (during playback).
*7 Record a new announcement.
8 End the call.
0 Turn the answering system on or off.
•
Page 66

66
PENDANT (ONLY fOR MODEL WITH
PENDANT)
VOICE COMMAND
ABOUT VOICE COMMAND
By saying certain commands to the pendant, you can hear information such
as the date or time, or call photo speed dial numbers, or even review call log,
messages or reminders.
USE VOICE COMMAND
Press VOICE on either side of the pendant when the telephone is idle. After
you hear a beep, say your command to the pendant.
COMMON COMMANDS
“What can I say?” - To hear a list of voice commands.
“What time is it?” - To hear the current time.
“What is the date?” - To hear the current date.
“Call speed dial X.” - To call a photo speed dial number.
“Intercom all.” - To send out intercom request to all devices.
“Cancel.” - To return to idle mode.
Page 67

67
REMINDERS
Press VOICE and say “Review reminders.”
During the playback, press VOICE and say one of the following commands:
“What can I say?” - To hear a list of voice commands.
“Skip reminder.” - To skip to the next reminder.
“Repeat reminder.” - To repeat the reminder.
“Stop.” - To stop the reminder playback.
“Cancel.” - To continue the reminder playback.
ANSWERING MACHINE MESSAGES
Press VOICE and say “Review messages.”
During the playback, press VOICE and say one of the following commands:
“What can I say?” - To hear a list of voice commands.
“Skip message.” - To skip to the next message.
“Repeat message.” - To repeat the message.
“Slow playback.” - To slow down the message playback.
To resume normal playback, press VOICE and say
“Play normal.”
“Stop.” - To stop the message playback.
“Delete.” - To delete the current message.
“Cancel.” - To continue the message playback.
Page 68

68
CALL LIST
Press VOICE and say “Review call log.”
During the playback, press VOICE and say one of the following commands:
“What can I say?” - To hear a list of voice commands.
“Skip call log.” - To skip to the next call log entry.
“Repeat call log.” - To repeat the call log entry.
“Stop. - To stop the call log entry playback.
“Cancel.” - To continue the call log entry playback.
“Call back.” - The system will ask, “Would you like to call XXX?”
Say “Yes” to call the number.
Say “No” to return to the playback.
•
•
If you do not say the command within ve seconds, or the system does not
understand your command, the system will say, “Sorry, I didn’t catch that. Please
press the voice command button and try again.”
Page 69

69
My telephone doesn’t work at all.
Make sure the power cord is securely plugged in.
Make sure you plug the battery connector securely into the cordless
handset.
Make sure you plug the telephone line cord securely and rmly into the
telephone base and the telephone wall jack.
Charge the battery in the cordless handset for at least 11 hours. For
optimum daily performance, return the cordless handset to the handset
charger when not in use.
Charge the pendant for at least 3 hours. For optimum daily performance,
return the pendant to the pendant charger when not in use. (For pendant
mode only)
Make sure you turn the pendant on before use.
If the battery is completely depleted, charge the handset or the pendant
for at least 30 minutes before use.
Reset the telephone base. Unplug the electrical power. Remove the
handset battery. Wait for approximately 15 seconds, then plug it back in.
Allow up to one minute for the cordless handset, pendant and telephone
base to reset.
You may need to purchase a new handset battery.
I cannot get a dial tone.
Try all the suggestions above.
Move the cordless handset or the pendant closer to the telephone base.
You may have moved out of range.
If the previous suggestions do not work, disconnect the telephone base
from the telephone jack and connect to a different phone. If there is no
dial tone on that phone either, the problem is in your wiring or telephone
service. Contact your telephone service provider.
•
•
•
•
•
•
•
•
•
•
•
•
HELP
Page 70

70
Your line cord may be defective. Try installing a new line cord.
I cannot dial out.
Try all the suggestions above.
Make sure you have a dial tone before dialing. The cordless handset or the
pendant may take a second or two to nd the telephone base and produce
a dial tone. This is normal. Wait an extra second before dialing.
Eliminate any background noise. Noise from a television, radio or other
appliances might cause the phone to not dial out properly. If you cannot
eliminate the background noise, rst try muting the cordless handset
before dialing, or dial from another room with less background noise.
If other phones in your home are having the same problem, contact your
telephone service provider (charges may apply).
If you have changed your telephone service to digital service from a cable
company or a VoIP service provider, the telephone line may need to be
rewired to allow all existing telephone jacks to work. Contact your service
provider for more information.
My cordless handset/pendant isn’t performing normally.
Make sure you plug the power cord securely into the telephone base. Plug
the power adapter into a different, working electrical outlet without a wall
switch.
Move the cordless handset or the pendant closer to the telephone base.
You may have moved out of range.
Reset the telephone base. Unplug the electrical power. Remove the
handset battery. Wait for 15 seconds then plug the power cord back in,
and reinstall the backup batteries. Allow up to one minute for the cordless
handset/pendant and telephone base to reset.
Other electronic products can cause interference with your cordless
phone. Try installing your phone as far away as possible from these types
of electronic devices.
•
•
•
•
•
•
•
•
•
•
Page 71

71
Out of range OR Base no power appears on my cordless handset.
Ensure you plug the telephone base in properly and the power is on.
Place the cordless handset closer to the telephone base for
synchronization.
Move the cordless handset closer to the telephone base. You may have
moved out of range.
Reset the telephone base. Unplug the electrical power. Remove the
handset battery. Wait for 15 seconds then plug it back in. Allow up to one
minute for the cordless handset and telephone base to reset.
Other electronic products can cause interference with your cordless
phone. Try installing your phone as far away as possible from these types
of electronic devices.
The handset battery does not accept charge while in the handset charger.
If the cordless handset is in the handset charger and the charge light is
not on, refer to The charge light is off on page 74.
Charge the battery in the cordless handset for at least 11 hours. For
optimum daily performance, return the cordless handset to the handset
charger when not in use.
If the battery is completely depleted, charge the handset for at least
30 minutes before use.
You may need to purchase a new battery.
The pendant battery does not accept charge while in the pendant charger.
If the pendant is in the pendant charger and the pendant status light is
not on, refer to The charge light is off on page 74.
Charge the battery in the pendant for at least 3 hours. For optimum daily
performance, return the pendant to the pendant charger when not in use.
If the battery is completely depleted, charge the pendant for at least
30 minutes before use.
•
•
•
•
•
•
•
•
•
•
•
•
Page 72

72
I get noise, static, or weak signals even when I’m near the telephone base.
If you subscribe to high-speed Internet service (DSL - digital subscriber
line) through your telephone line, you must install a DSL lter between the
telephone line cord and the telephone wall jack. The lter prevents noise
and Calling Number Display problems as a result of DSL interference.
Contact your DSL service provider for more information about DSL lters.
You may be able to improve the performance of your cordless phone by
installing your new telephone base as far as possible from any other
existing cordless telephone system that may already be installed.
Other electronic products can cause interference with your cordless
phone. Try installing your phone as far away as possible from these types
of electronic devices.
Do not install this phone near a microwave oven or on the same electrical
outlet. You may experience decreased performance while the microwave
oven is operating.
If you plug your phone in with a modem or a surge protector, plug the
phone (or modem/surge protector) into a different location. If this does
not solve the problem, relocate your phone or modem farther apart from
one another, or use a different surge protector.
Relocate your phone to a higher location. The phone may have better
reception in a high area.
If other phones in your home are having the same problem, contact your
telephone service provider (charges may apply).
I experience poor sound quality when using the handset speakerphone.
For increased sound quality while using the handset speakerphone, place
the handset on a at surface with the dialing keys facing up.
I hear other calls while using my phone.
Disconnect the telephone base from the telephone jack, and plug in a
different telephone. If you still hear other calls, call your telephone service
provider.
•
•
•
•
•
•
•
•
•
Page 73

73
The telephone does not ring when there is an incoming call.
Make sure that the ringer is not off.
Make sure you plug in the telephone line cord securely into the telephone
base and the telephone jack.
Make sure you plug in the power cord securely.
Make sure the backup batteries are correctly installed if necessary.
The cordless handset/pendant may be too far from the telephone base.
Charge the battery in the cordless handset for at least 11 hours. For
optimum daily performance, return the cordless handset to the handset
charger when not in use.
Charge the pendant for at least three hours. For optimum daily
performance, return the pendant to the pendant charger when not in use.
You may have too many extension phones on your telephone line to allow
all of them to ring simultaneously. Try unplugging some of the other
phones.
The layout of your home might be limiting the operating range. Try moving
the telephone base to another location, preferably to a higher location.
If other phones in your home are having the same problem, contact your
telephone service provider (charges may apply).
Test a working phone at the phone jack. If another phone has the same
problem, contact your telephone service provider (charges may apply).
Other electronic products can cause interference with your cordless
phone. Try installing your phone as far away as possible from these types
of electronic devices.
Remove and install the cordless handset battery again. Place the
cordless handset in the handset charger. Wait for the cordless handset
to reestablish its connection with the telephone base. Allow up to one
minute for this to take place.
Your line cord may be defective. Try installing a new line cord.
•
•
•
•
•
•
•
•
•
•
•
•
•
•
Page 74

74
My calls cut in and out while I’m using my cordless handset/pendant.
Other electronic products can cause interference with your cordless
phone. Try installing your phone as far away as possible from these types
of electronic devices.
Do not install this phone near a microwave oven or on the same electrical
outlet. You may experience decreased performance while the microwave
oven is operating.
If you plug your phone in with a modem or surge protector, plug the phone
(or modem/surge protector) into a different location. If this does not
solve the problem, relocate your phone or modem farther apart from one
another, or use a different surge protector.
Relocate your telephone base to a higher location. The phone may have
better reception when installed in a high area.
If other phones in your home are having the same problem, contact your
telephone service provider (charges may apply).
The charge light is off.
Make sure you plug the power and line cords in correctly and securely.
Reset the telephone base. Unplug the electrical power. Remove the
handset battery. Wait for 15 seconds then plug the power cord back in,
and reinstall the backup batteries. Allow up to one minute for the cordless
handset/pendant and telephone base to reset.
Clean the charging contacts on the cordless handset/pendant and the
handset/pendant charger each month with a pencil eraser or cloth.
Make sure that the handset battery is installed properly.
My Calling Number Display isn’t working properly.
Calling Number Display is a subscription service. You must subscribe to
this service from your telephone service provider for this feature to work
on your phone.
The caller must be calling from an area that supports caller ID.
•
•
•
•
•
•
•
•
•
•
•
Page 75

75
Both your and your caller’s telephone service providers must use caller ID
compatible equipment.
If you subscribe to high-speed Internet service (DSL - digital subscriber
line) through your telephone line, you must install a DSL lter between the
telephone line cord and the telephone wall jack. The lter prevents noise
and Calling Number Display problems resulting from DSL interference.
Contact your DSL service provider for more information about DSL lters.
My telephone does not receive Calling Number Display when on a call.
Make sure you subscribe to Calling Number Display with call waiting
features from your telephone service provider. Calling Number Display
feature works only if both you and the caller are in areas offering Calling
Number Display service, and if both telephone service providers use
compatible equipment.
The messages on the answering machine are incomplete.
If a caller leaves a very long message, part of it may be lost when the
answering machine disconnects the call after the preset recording time.
If the caller pauses for too long, the answering machine stops recording
and disconnects the call.
If memory on the answering machine becomes full during a message, the
answering machine stops recording and disconnects the call.
If the caller’s voice is very soft, the answering machine may stop recording
and disconnect the call.
The messages are very difcult to hear.
Press p/VOL on the telephone base, or VOL+ on the cordless handset, or
VOL+ on the pendant to increase the listening volume.
The answering machine does not answer after the correct number of rings.
Make sure that the answering machine is on. ANS ON should show on the
cordless handset and ANS light on the telephone base should be on.
•
•
•
•
•
•
•
•
•
Page 76

76
If toll saver is activated, the number of rings changes to two when you
have new messages stored.
If the memory is full or the machine is off, the machine will answer after
10 rings.
In some cases, the answering machine is affected by the ringing system
used by your telephone service provider.
If you subscribe to voicemail service, change the number of rings so
that your answering machine answers before your voicemail answers.
To determine how many rings activate your voicemail, contact your
telephone service provider.
If there is a fax machine connected to the same telephone line, try
disconnecting the fax machine. If that solves the problem, consult your
fax machine documentation for information on compatibility with
answering machine.
The telephone does not respond to remote commands.
Make sure you enter your remote access code correctly.
Make sure you are calling from a touch-tone phone. When you dial a
number, you should hear tones. If you hear clicks, the phone is not a
touch-tone telephone and cannot activate the answering machine.
The answering machine may not detect the remote access code while
your announcement is playing. Try waiting until the announcement is over
before entering the code.
There may be interference on the phone line you are using. Press dialing
keys rmly.
The answering machine does not record messages.
Make sure that the answering machine is on. ANS ON should show on the
cordless handset and ANS light on the telephone base should be on.
Make sure the memory of the answering machine is not full.
•
•
•
•
•
•
•
•
•
•
•
Page 77

77
If you subscribe to voicemail service, change the number of rings so
that your answering machine answers before your voicemail answers.
To determine how many rings activate your voicemail, contact your
telephone service provider.
If there is a fax machine connected to the same telephone line, try
disconnecting the fax machine. If that solves the problem, consult your
fax machine documentation for information on compatibility with
answering machine.
The answering machine announces “Time and day not set.”
You need to reset the system clock.
The outgoing announcement is not clear.
When you record your announcement, make sure you speak in a normal
tone of voice, about 20 centimeters from the handset or telephone base.
Make sure there is no background noise (TV, music, etc.) while recording.
New voicemail and show on the cordless handset and I don’t know why.
Your telephone has both a built-in answering machine and voicemail
indication. If New voicemail and appear on the cordless handset, then
your telephone has received a signal from your telephone service provider
that you have a voicemail message waiting for you to retrieve from them.
Contact your telephone service provider for more information on how to
access your voicemail.
I cannot retrieve voicemail messages.
Your telephone has both a built-in answering machine and voicemail
indication. They are independent features and each alerts you to
new messages differently. If you subscribe to voicemail service
from your telephone service provider, contact your telephone
service provider for more information on how to access your
voicemail.
•
•
•
•
•
•
•
Page 78

78
Common cure for electronic equipment:
If the telephone is not responding normally, try resetting the telephone. Do
the following in the order listed:
Disconnect the power to the telephone base.
Disconnect the handset battery.
Wait a few minutes.
Connect power to the telephone base.
Re-install the battery and place the handset into the cordless charger.
Wait for the handset to reestablish its connection with the telephone
base. Allow up to one minute for this to take place.
TecHelp line 1300 369 193
Call TecHelp:
if you are having difculties using your Telstra 13350.
if you need replacement batteries or mains power lead.
1.
2.
3.
4.
5.
6.
•
•
Page 79

79
REPLACING THE HANDSET BATTERIES
After a time, you may nd that the handset batteries are running out of charge
more quickly.
This is a standard sign of wear and the batteries will need replacing.
Replacement rechargeable
Nickel Metal Hydride (NiMH) batteries can be purchased from TecHelp line on
1300 369 193 your local electrical retailer. Slide off the battery compartment
cover and remove existing batteries. Insert the new batteries and replace the
compartment cover until it clicks into place.
SAfETY
Only use the power supply included with the product. Using an
unauthorised power supply will invalidate your guarantee and may
damage the telephone.
Use only the approved rechargeable batteries supplied. Spare
rechargeable batteries can be purchased from TecHelp on 1300 369 193
or your local electrical retailer.
Do not open the handset (except to replace the handset batteries) or the
base. This could expose you to high voltages or other risks.
Radio signal transmitted between the handset and base may cause
interference to hearing aids.
It is recommended that advice from a qualied expert be sought before
using this product in the vicinity of emergency / intensive care medical
equipment.
Your product may interfere with other electrical equipment, e.g. TV
and radio sets clock / alarms and computers if placed too close. It is
recommended that you place your product at least one metre away from
such appliances to minimise any risk of interference.
•
•
•
•
•
•
GENERAL INfORMATION
Page 80

80
Please note
Telstra accepts no responsibility for damage caused to your Telstra 13350
handset by using any other type of batteries.
Never dispose of batteries in a re. There is a serious risk of explosion
and/or the release of highly toxic chemicals.
Dispose of batteries as per local / state requirements.
CLEANING
Simply clean the handset and base with a damp (not wet) cloth, or an antistatic wipe.
Never use household polish as this will damage the product. Never use a dry
cloth as this may cause a static shock.
ENVIRONMENTAL
Do not expose to direct sunlight.
The product may heat up when the batteries are being recharged or
during prolonged periods of use. This is normal. However, we recommend
that to avoid damage you do not place the product on antique / veneered
wood.
Do not stand your product on carpets or other surfaces which generate
bres, or place it in locations preventing the free ow of air over its
surface.
Do not submerge any part of your product in water and do not use it in
damp or humid conditions, such as bathrooms.
Do not expose your product to re, explosive or other hazardous
conditions.
There is a slight chance that your phone could be damaged by an
electrical storm. We recommend that you unplug the power and telephone
line cord from the base for the duration of the storm.
•
•
•
•
•
•
•
•
Page 81

81
HOW MANY TELEPHONES CAN YOU HAVE?
All items of telephone equipment have a Ringer Equivalence Number (REN),
which is used to calculate the number of items which may be connected to
any other telephone line. Your Telstra 13350 has a REN of 0.1. A total REN of 3
is allowed, if the total REN of 3 is exceeded, the telephone may not ring. With
different telephone types there is not guaranteed of ringing, even when the
REN is less than 3.
Page 82

82
IMPORTANT
Please retain this booklet with your sales receipt as proof of the date of
purchase.
Customer Service
If you require assistance in operating this product please call the TecHelp
Information Line on 1300 369 193 or contact VTech by e-mail at:
tcpsupport_au@vtech.com.
If you are trying to access a Telstra Network Service and require assistance
specically related to the network service or would like to subscribe to the
service, contact Telstra on 13 22 00 for residential or 13 20 00 for business.
Voluntary Product Warranty
In addition to your Statutory Rights and subject to the conditions below,
VTech warrants that this product will be free from any defect in materials or
workmanship under conditions of normal use for a period of 12 months from
date of purchase.
VTech do not warrant that the product will be free from defects if defects are
caused by an accident, misuse, abuse, improper installation or operation,
vermin infestations, lack of reasonable care, unauthorised modication, loss
of parts, tampering or attempted repair by a person not authorised by VTech;
or where the product has been damaged by lightning or a mains power surge.
Where a valid claim is made under this Voluntary Product Warranty, VTech
will, at no cost to you, repair or replace the product within a reasonable time.
Subject to your Statutory Rights, if your claim under this Voluntary Product
Warranty is not valid, you may be charged a fee under this Voluntary Product
Warranty for the service and for any direct costs associated with having the
product delivered for service.
CUSTOMER SERVICE & PRODUCT WARRANTY
Page 83

83
To make a claim under this Voluntary Product Warranty you must call the
TecHelp Information Line on 1300 369 193 or contact VTech by e-mail at:
tcpsupport_au@vtech.com where a Customer Service Representative will
inform you of the product return process. You will need to ensure that:
You provide proof of purchase;
Your product is suitably packaged (original packaging is not required); and
You have included all components from the original purchase.
For your records
Date of purchase:
_______________________________
Place of purchase:
_______________________________
Serial number:
_______________________________
For Voluntary Product Warranty purposes proof of purchase is required so
please keep your receipt.
The benets conferred by this Voluntary Product Warranty are in addition to
other rights and remedies that are available to you under law, which cannot
be excluded. The processes for this Voluntary Product Warranty in no way
limit your rights which arise as a result of your Statutory Rights.
Page 84

84
This Voluntary Product Warranty is given by:
VTech Telecommunications (Australia) Pty Ltd ABN 70 136 672 627
Address: 24 Gilby Road, Mount Waverley 3149
IMPORTANT NOTE: THIS IS NOT A PRODUCT RETURN OR SERVICE ADDRESS
– PLEASE CONTACT TECHELP BY PHONE OR EMAIL FOR PRODUCT AND
WARRANTY SUPPORT. NO LIABILITY WILL BE ACCEPTED BY VTECH FOR
PRODUCTS RETURNED TO THIS ADDRESS UNDER THIS VOLUNTARY
PRODUCT WARRANTY.
Phone number: 1300 369 193
Email address: tcpsupport_au@vtech.com
Statutory Rights
Our goods come with guarantees that cannot be excluded under the
Australian Consumer Law. You are entitled to a replacement or refund for a
major failure and compensation for any other reasonably foreseeable loss or
damage. You are also entitled to have the goods repaired or replaced if the
goods fail to be of acceptable quality and the failure does not amount to a
major failure.
Page 85

85
FOR MORE INFORMATION CALL:
TECHELP ON 1300 369 193 OR
EMAIL: TCPSUPPORT_AU@VTECH.COM
Version A
91-006724-010-100
 Loading...