

Page 1
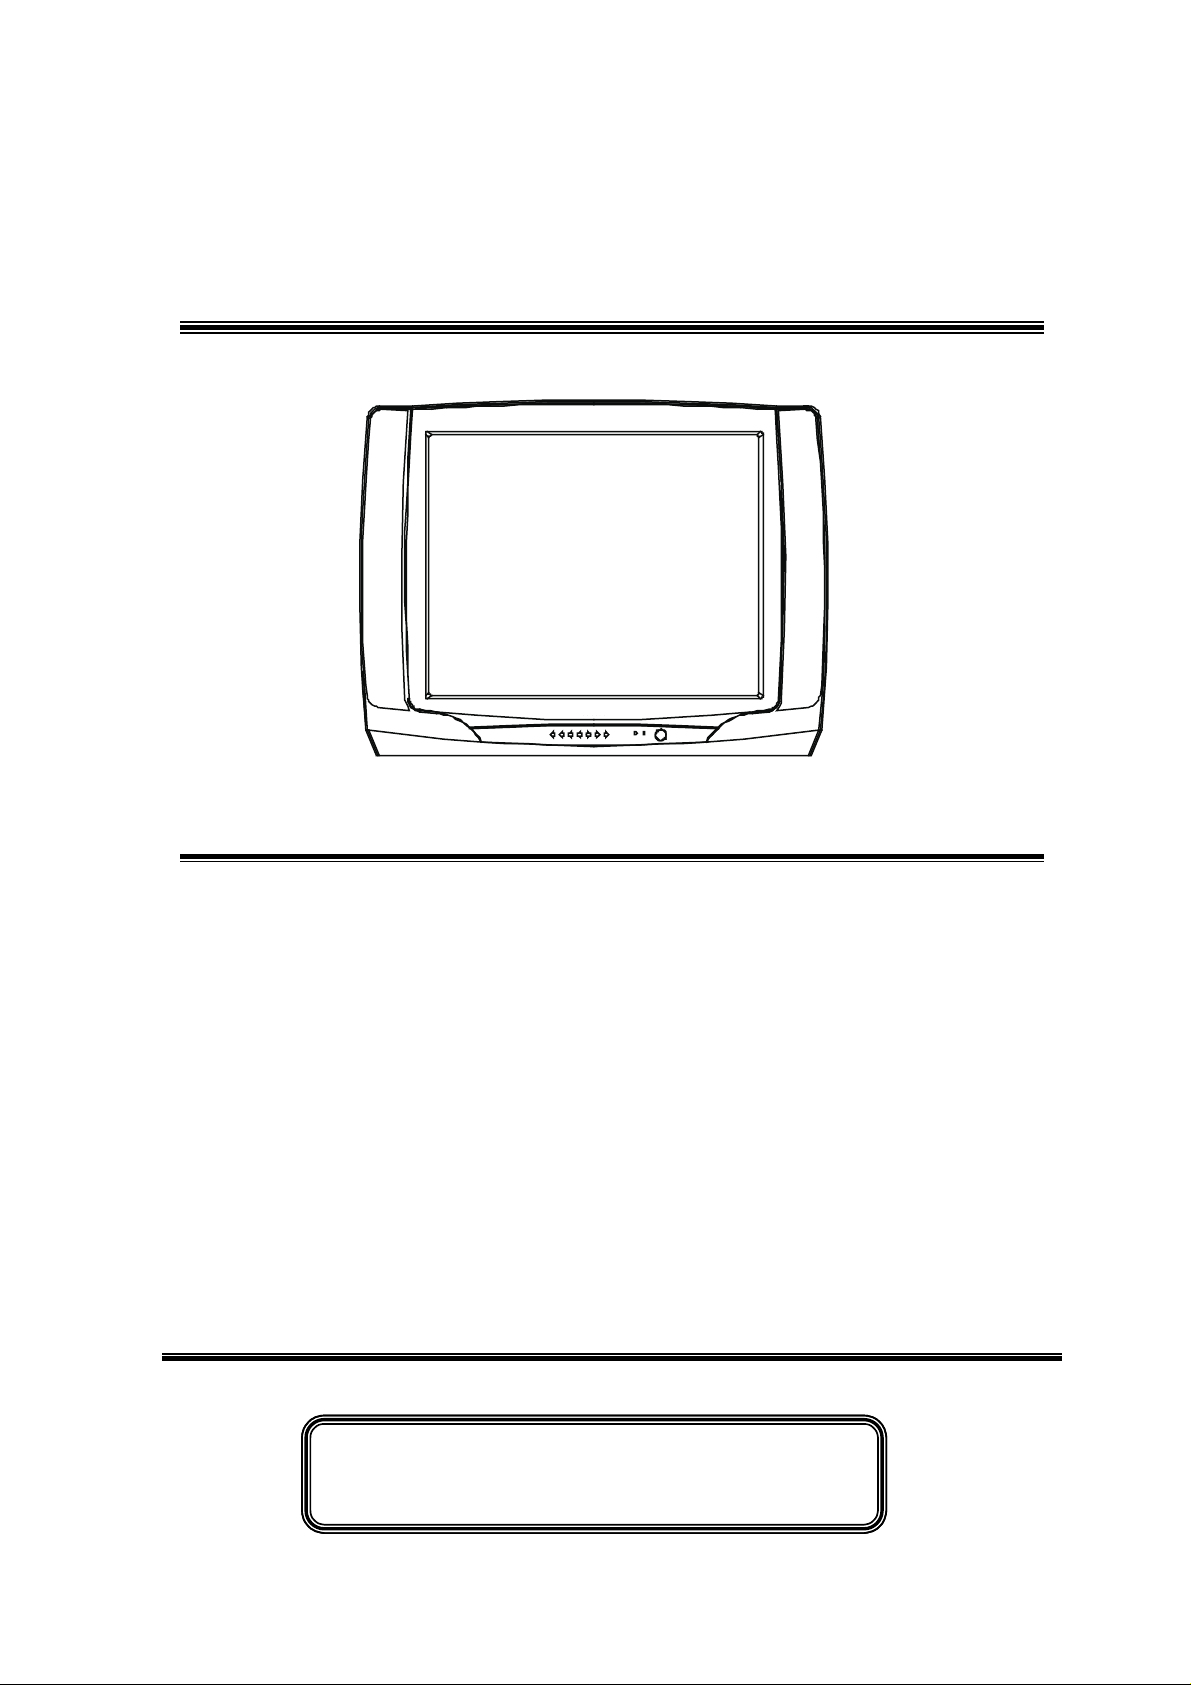
TELSTAR
SERVICE MANUAL
CTV-2618
1. Caution……………………………………………………………2
2. Specification………………………………………………………6
3. BOM List…………………………………………………………9
4. Alignment Procedure………………………………………….…36
5. Block Diagram……………………………………………………40
6. Schematic Diagram………………………………………………41
7. PCB Layout………….……………………………………………42
8. Exploded View Diagram……………………….............................43
This manual is the latest at the time of printing, and does not
include the mo difi cat io n w hich ma y b e made af ter the pri nti ng, by
the consta nt improvement of product.
Page 2
CAUTION:
Use of controls, adjustments or procedures other than those specified herein may result in
hazardous radiation exposure.
CAUTION: TO REDUCE THE RISK OF
CAUTION
RISK RISK OF OF ELECTRIELECTRICC
SHOCK SHOCK DO DO NOT NOT OPEN.OPEN.
The lighting flash with arrowhead symbol, with an equilateral triangle is intended to
alert the user to the presence of uninsulated voltage within the product s
enclosure that may be of sufficient magnitude to constitute a risk of electric shock to
the person.
The exclamation point within an equilateral triangle is intended to alert the user to the
presence of important operating and maintenance (servicing) instructions in the
literature accompanying the appliance.
ELECTRICAL SHOCK, DO NOT REMOVE
COVER (OR BACK). NO USER SERVICEABLE
PARTS INSIDE. REFER SERVICING TO
QUALIFIED SERVICE PERSONNEL.
dangerous
WARNING: TO REDUCE RISK OF FIRE OR ELECTRIC SHOCK, DO NOT
EXPOSE THIS APPLIANCE TO RAIN OR MOISTURE.
2
Page 3
IMPORTANT SAFETY INSTRUCTIONS
CAUTION:
Read all of these instructions. Save these instructions for later use . Follow all Warnings and
Instructions marked on the audio equipment.
1. Read Instructions- All the safety and operating instructions should be read before the product is operated.
2. Retain Instructions- The safety and operating instructions should be retained for future reference.
3. Heed Warnings- All warnings on the product and in the operating instructions should be adhered to.
4. Follow Instructions- All operating and use instructions should be followed.
FOR YOUR PERSONAL SAFETY
1. When the power cord or plug is damaged or frayed, unplug this television set from the wall outlet and refer servicing to
qualified service personnel.
2. Do not overload wall outlets and extension cords as this can result in fire or electric shock.
3. Do not allow anything to rest on or roll over the power cord, and do not place the TV where power cord is subject to
traffic or abuse. This may result in a shock or fire hazard.
4. Do not attempt to service this television set yourself as opening or removing covers may expose you to dangerous
voltage or other hazards. Refer all servicing to qualified service personnel.
5. Never push objects of any kind into this television set through cabinet slots as they may touch dangerous voltage
points or short out par ts that could result in a fire or electric shock. Never spill liquid of any kind on the television set.
6. If the television set has been dropped or the cabinet has been damaged, unplug this television set from the wall outlet
and refer servicing to qualified service personnel.
7. If liquid has been spilled into the television set, unplug this television set from the wall outlet and refer servicing to
qualified service personnel.
8. Do not subject your television set to impact of any kind. Be particularly careful not to damage the picture tube surface.
9. Unplug this television set from the wall outlet before cleaning. Do not use liquid cleaners or aerosol cleaners. Use a
damp cloth for cleaning.
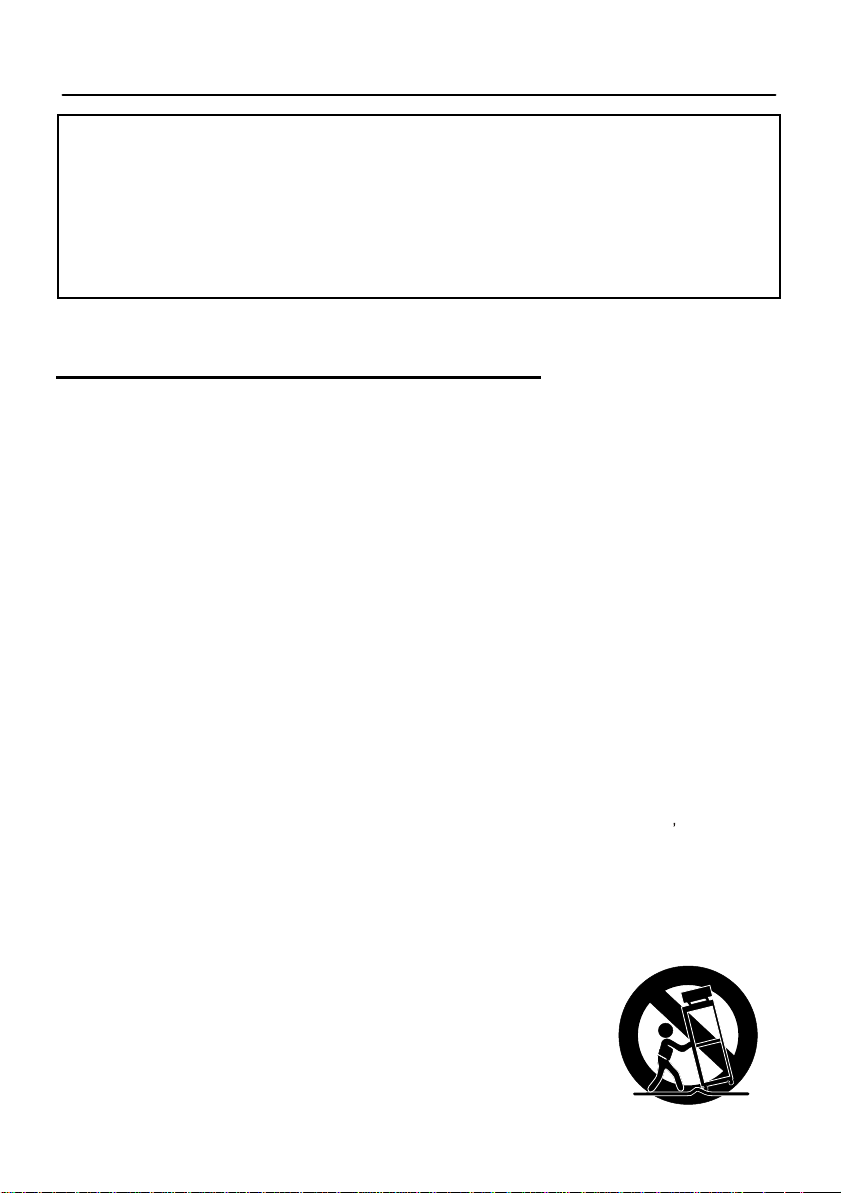
10.1. Do not place this television set on an unstable cart, stand, or table. The television set may fall, causing serious injury
to a child or an adult, and serious damage to the appliance. Use only with a cart or stand recommended by the
manufacturer, or sold with the television set. Wall or shelf mounting should follow the manufacturer s instructions, and
should use a mounting kit approved by the manufacturer.
10.2. An appliance and cart combination should be moved with care. Quick stops, excessive force, and uneven surfaces
may cause the appliance and cart combination to overturn.
3
Page 4
PROTECTION AND LOCATION OF YOUR SET
11. Do not use this television set near water ... for example, near a bathtub, washbowl, kitchen sink, or laundry tub, in a
wet basement, or near a swimming pool, etc.
Never expose the set to rain or water. If the set has been exposed to rain or water, unplug the set from the wall
outlet and refer servicing to qualified service personnel.
12. Choose a place where light (artificial or sunlight) does not shine directly on the screen.
13. Avoid dusty places, since piling up of dust inside TV chassis may cause failure of the set when high humidity persists.
14. The set has slots, or openings in the cabinet for ventilation purposes, to provide reliable operation of the receiver, to
protect it from overheating. These openings must not be blocked or covered.
Never cover the slots or openings with cloth or other material.
Never block the bottom ventilation slots of the set by placing it on a bed, sofa, rug, etc.
Never place the set near or over a radiator or heat register.
Never place the set in enclosure, unless proper ventilation is provided.
a built-in
PROTECTION AND LOCATION OF YOUR SET
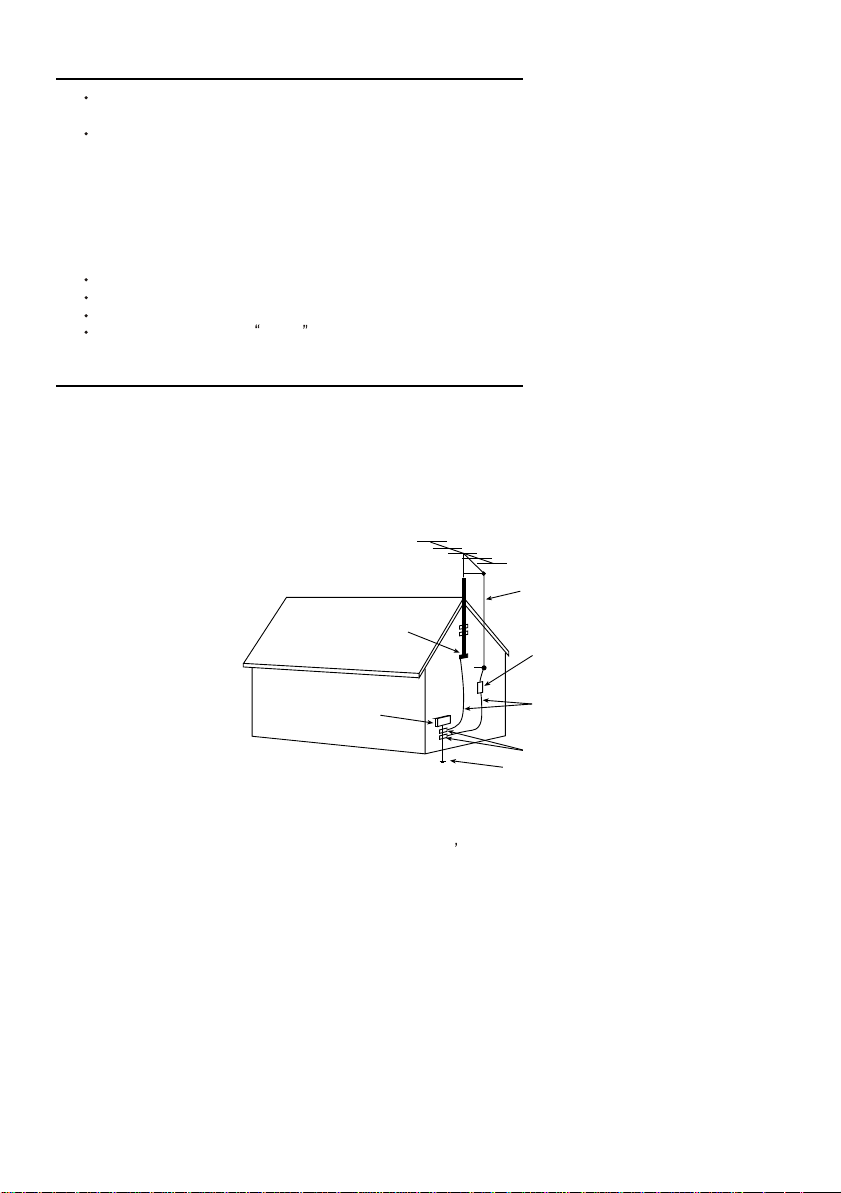
15.1. If an outside antenna is connected to the television set, be sure the antenna system is grounded so as to provide some
protection against voltage surges and built up static charges, Section 810 of the National Electrical Code, NFPA No.
70-1975, provides information with respect to proper grounding of the mast and supporting structure, grounding of the
lead-in wire to an antenna discharge unit, size of grounding conductors, location of antenna discharge unit, connection
to grounding electrode, and requirements for the grounding electrode.
EXAMPLE OF ANTENNA GROUNDING AS PER NATIONAL ELECTRICAL CODE INSTRUCTIONS
EXAMPLE OF ANTENNA GROUNDING AS PER
NATIONALELECTRICAL CODE
ANTENNA
LEAD- INWIRE
GROUND CLAMP
ELECTRIC SERVICE
EQUIPMENT
NEC-NATIONALELECTRICAL CODE
ANTENNA DISCHARGE
UNIT (NEC SECTION
810-20)
GROUNDING
CONDUCTORS
(NECSECTION 810-21)
GROUND CLAMPS
POWER SERVICE GROUNDING
ELECTRODE SYSTEM
(NEC ART 250. PARTH)
15.2. Note to CATV system installer : (Only for the television set with CATV reception)
This reminder is provided to call the CATV system attention to Article 820-40 of the NEC that provides
installer s
guidelines for proper grounding and, in particular, specifies that the cable ground shall be connected to the grounding
system of the building, as close to the point of cable entry as practical.
16. An outside antenna system should not be located in the vicinity of overhead power lines or other electric lights or power
circuits, or where it can fall into such power lines or circuits. When installing an outside antenna system, extreme care
should be taken to keep from touching such power lines or circuits as contact with them might be fatal.
17. For added protection for this television set during a lightning storm, or when it is left unattended and unused for long
periods of time, unplug it from the wall outlet and disconnect the antenna. This will prevent damage due to lightning
and power-line surges.
4
Page 5

OPERATION OF YOUR SET
18.
This television set should be operated only from the type of power source indicated on the marking label. If you are not
sure of the type of power supply at your home, consult your television dealer or local power company. For television
sets designed to operate from battery power, refer to the operating instructions.
19. If the television set does not operate normally by following the operating instructions, unplug this television set from the
wall outlet and refer servicing to qualified service personnel. Adjust only those controls that are covered in the operating
instructions as improper adjustment of other controls may result in damage and will often require extensive work by a
qualified technician to restore the television set to normal operation.
20. When going on a holiday : If your television set is to remain unused for a period of time, for instance, when you go on
a holiday, turn the television set and unplug the television set from the wall outlet.
off
IF THE SET DOES NOT OPERATE PROPERLY
21. If you are unable to restore normal operation by following the detailed procedure in your operating instructions,
do not attempt any further adjustment. Unplug the set and call your dealer or service technician.
22. Whenever the television set is damaged or fails, or a distinct change in performance indicates a need for
service, unplug the set and have it checked by a professional service technician.
23. It is normal for some TV sets to make occasional snapping or popping sounds, particularly when being
turned on or off. If the snapping or popping is continuous or frequent, unplug the set and consult your
dealer or service technician.
FOR SERVICE AND MODIFICATION
24. Do not use attachments not recommended by the television set manufacturer as they may cause hazards.
25. When replacement parts are required, be sure the service technician has used replacement parts specified
by the manufacturer that have the same characteristics as the original part. Unauthorized substitutions
may result in fire, electric shock, or other hazards.
26. Upon completion of any service or repairs to the television set, ask the service technician to perform
routine safety checks to determine that the television is in safe operating condition.
5
Page 6
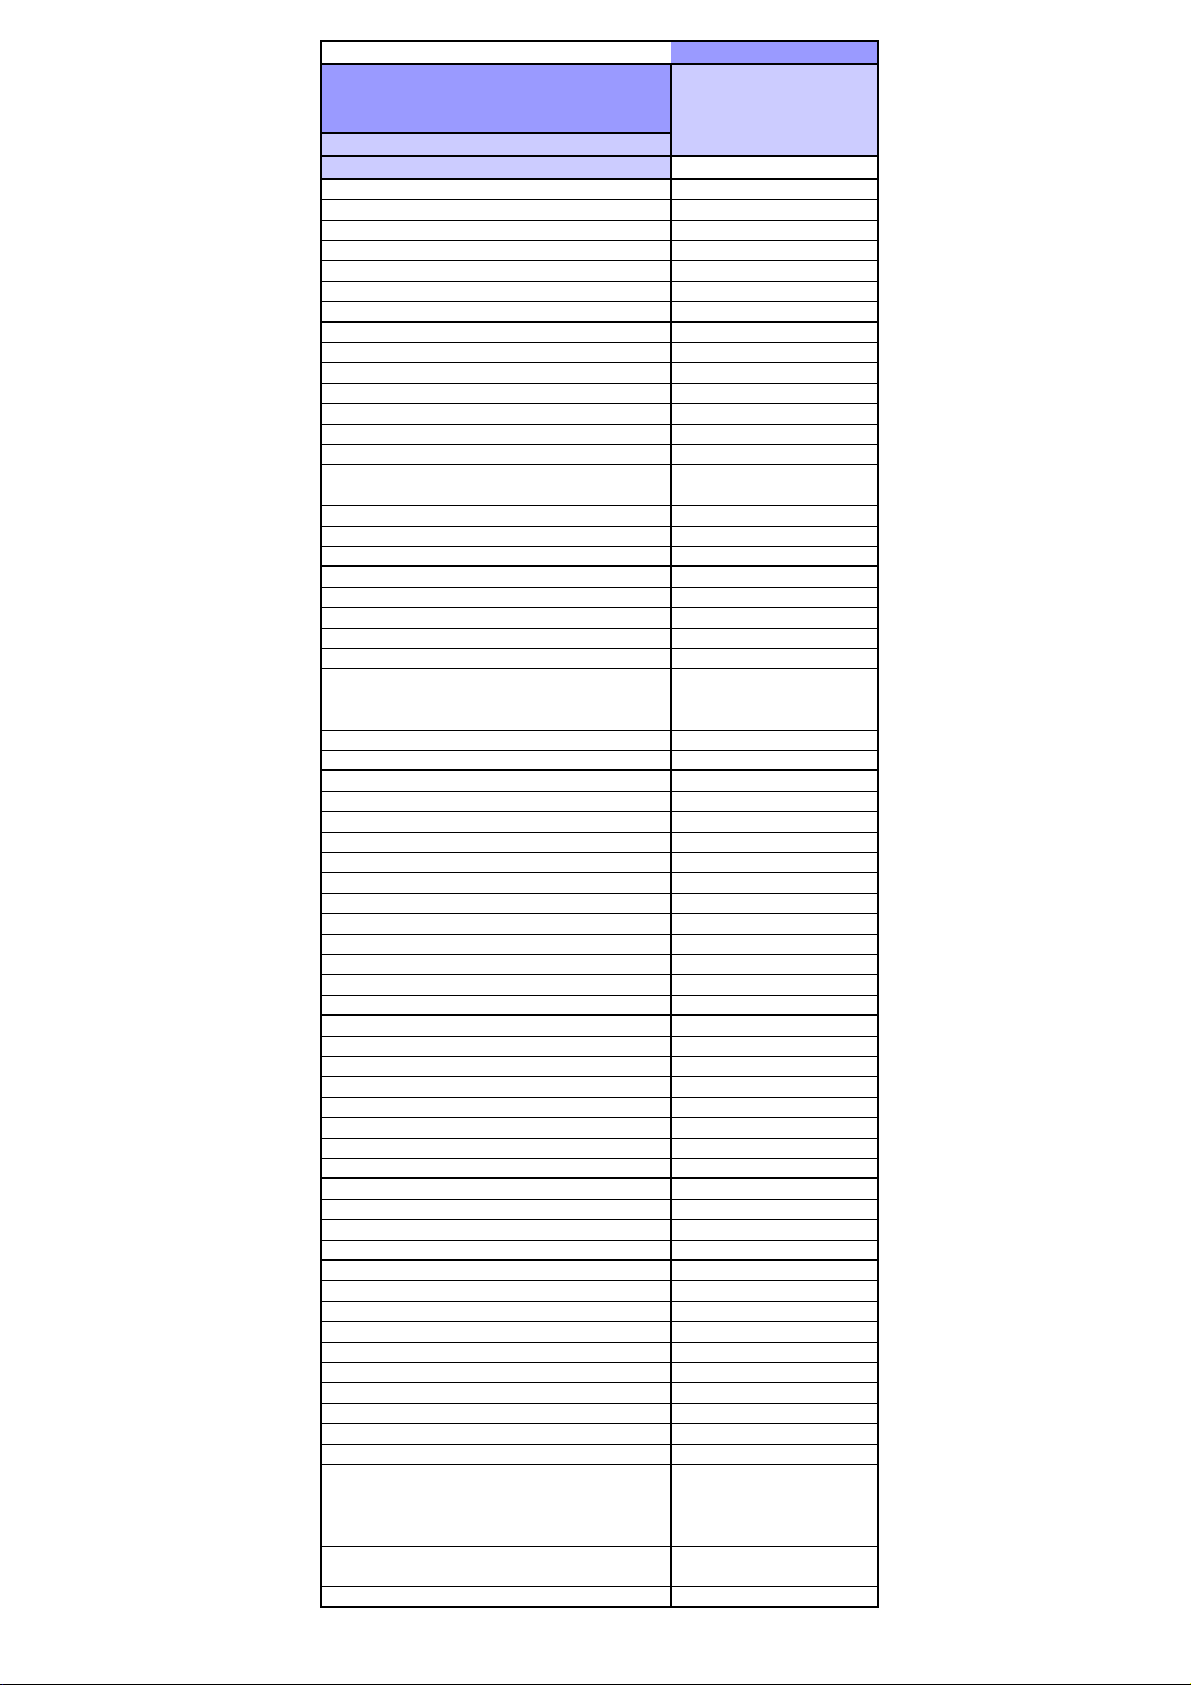
PFS2 FORMAT-1 Report
p
p
g
g
gy
g
q
q
y
y
y
g
g
play
ype
(
y
y)
y)
g
g (
)
p
p
p
p
guag
p
p
Date:
ProductView......:
Re
ort by............:
Specs / Products
SRF NO./ODF NO.
MasterData
Customer Id
Version
Status
Brand
EAN
UPC
Rece
tion
+Tunin
+Tunin
+Tunin
+Fre
+Channels
+IF Fre
+TV Systems Off Air
+Add S
+TV S
+Sound S
Picture - Processin
+Scan
+Scan Modes
+Wide Screen Switchin
+Combfilter
+Picture Control
+Pict Enhancement
+Pict Noise Reduction
Picture - Dis
+Display T
+Screen Format
+Size
+Deflection S
+Tube Technology (CRT onl
+CRT Defl
+CRT Gun
+CRT Ma
+Resolution
+Coatin
+White Point
Sound
+Leaflet Power
+RMS Power Intern
+RMS Power Extern
+Surround Sound
+Sound Features
- presets/channels
- technolo
- Indication
Bands
stems Ext In
stems Multi
stems
Visual)" - size/vis. cm
stem (CRT onl
n field
only for D.V. sets
Product:@
CTV-2618
43023803
MONGE IMPORTDORA,
0.1
WG Archived
TELSTAR
\
181, Full-Cable
PLL
--Full-Cable
PAL MN NTSC M (3.58 -
4.5)
--PAL NTSC
MPX
Standard
4:3
X
4 Picture Modes,
Brightness, Color, Contrast,
Tint, Sharpness Cont Var
Blue Mute
---
DV - CRT - FSQ
4:3
25"
Black Matrix, Iron
Stand Gun
Neutral
+Sound Control
Sound - S
+S
+S
+S
User Interface
+Interface Name
+Voice Control
+Menu
+Menu Colours
+Menu Lan
+S
+O
+PP Features
+Tuning/Install Features
+Clock/Timer Functions
+Local Controls Front
2003-10-24 14:46 2518PFS 1 of 3
eakers
eaker configuration
eakers used
eaker Size
es
ecial Features
erational Features
2
Normal Range
M34
Cursor Control
English, Portuguese, Spain
Auto Channel Prog,
Channel Edit, Factory
Mode, Language Selection,
Service Mode
Alarm Timer, Crystal Clock,
Sleep timer
Page 7
Date:
p
p
(
)
(
)
p
yp
ypenr
r
p
(
)
)
)
)
)
)
)
(
)
y
g
p
t
)
)
(
)
(
)
)
p
y
g
g
p
p
y
g
y
g
q
y
yp
p
p
p
y
g
g)
)
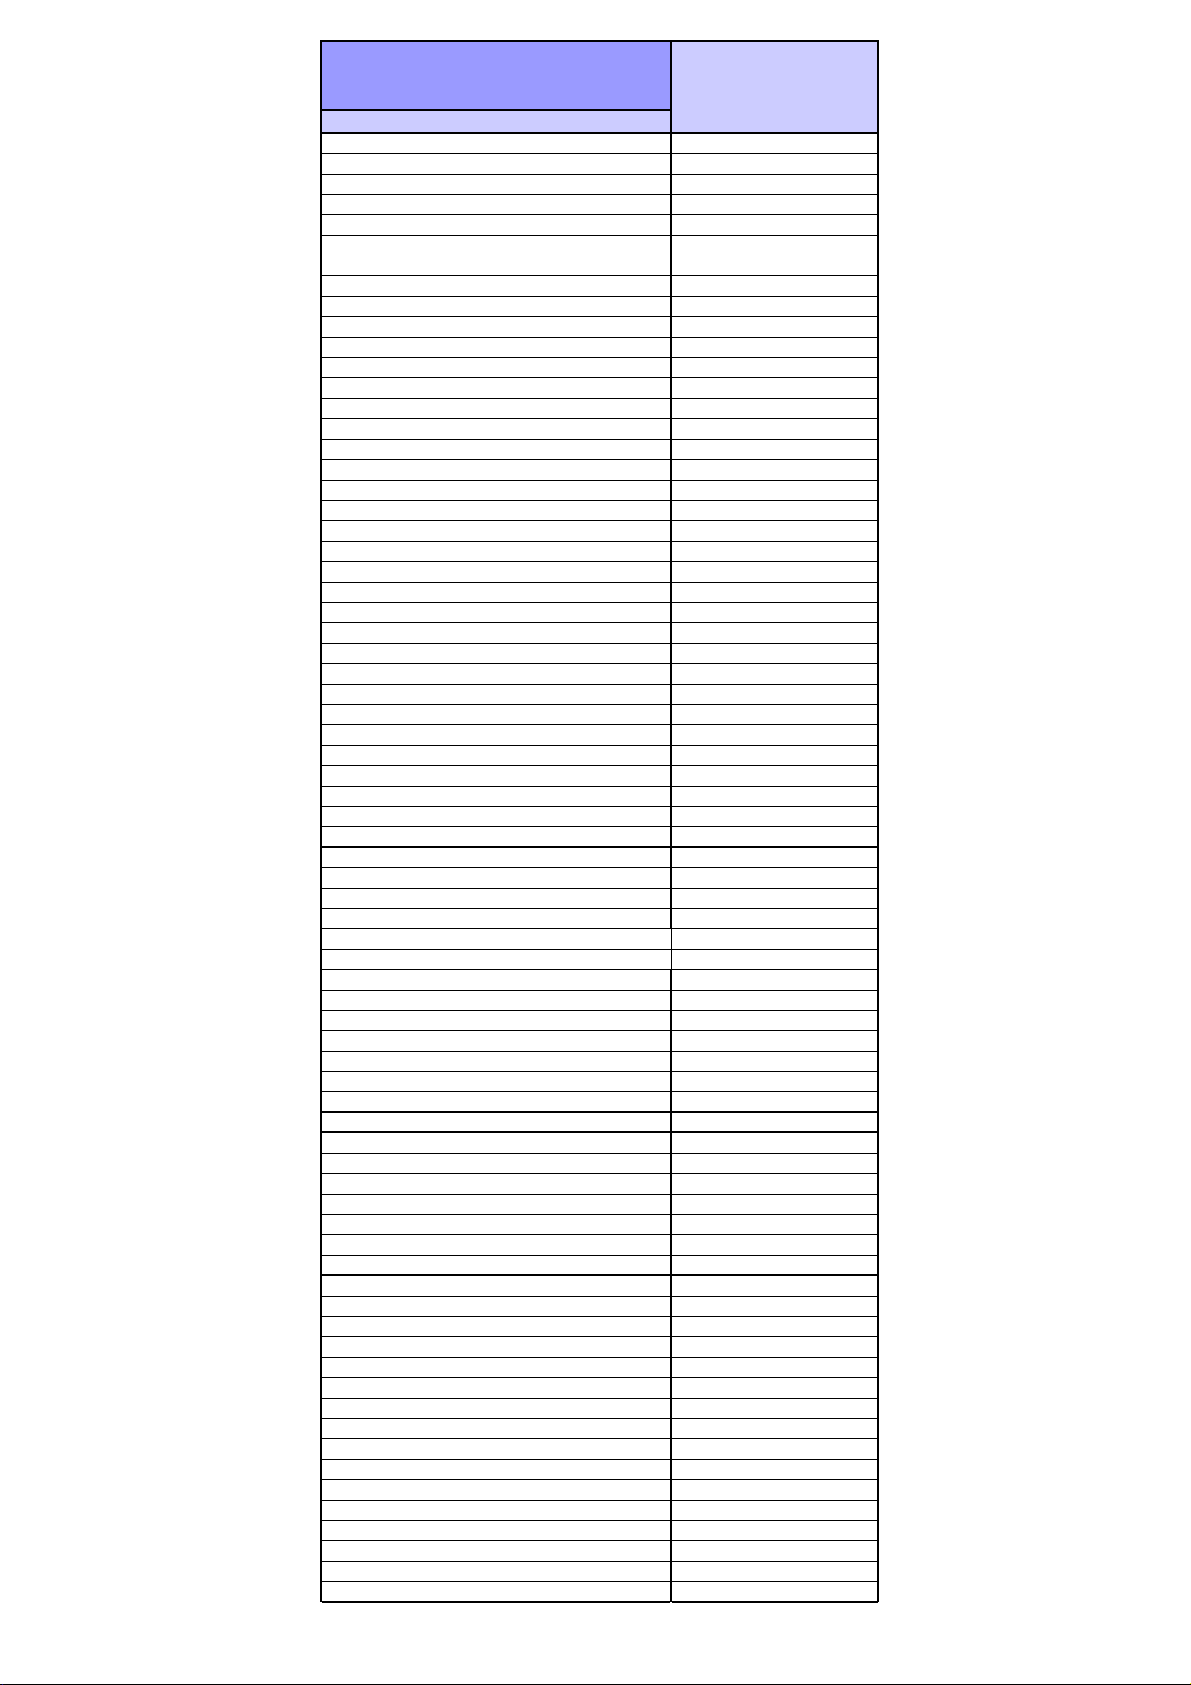
ProductView......:
Re
ort by............:
Specs / Products
+Local Controls To
+Indicators - screen
+Indicators - front
+Numb of Loc Cont
+Number of Ind.
+Local Controls (Old)
Remote Control
+Remote Control - sco
+Remote Control - t
+Remote Control - t
+Remote Control - features
Connectors Rea
+Scart RGB+Y/C+CVBS
+Scart RGB+CVBS
+Scart CVBS+Y/C
+Com
+In Y/C+Cinch
+In Y/C+Cinch(CVBS+Mo
+In Y/C+Cinch(St
+In BNC (CVBS
+In Cinch(CVBS+St
+In Cinch(CVBS+Mo
+Out Cinch(CVBS+St
+Out Cinch
+Out Cinch Audio Stereo
+Out Cinch Audio Mono
+Out Cinch Dolb
+Di
+Louds
+Control Busses
+Feature Slot
+ITV Smart Port
+Terr. Antenna in
Guide + IR Blaster Jack
Connectors Fron
+In Cinch (CVBS + St
+In Cinch (CVBS+Mo
+Headphone Out
onent In (Y/U/V) Cinch
CVBS+Mo
Audio Out
eakers
incl Mains
incl Mains
e
e
CVBS+St
Surround
Product:@
CTV-2618
7
Channel +-, Tact Switch,
Vol +-, TV/AV, MENU
TV
Standard
E
X
X
75 Ohms (F type)
Connectors Side
+In Y/C + Cinch
+In Y/C + Cinch Stereo
+In Cinch
+IN Cinch (CVBS + Mo
+Headphone Out
Connectors To
Connectors Mechanical
lin
St
+Cabinet Name
+Confi
+Gra
+Cabinet Colour and Finish
+Mechanics
+S
General
+Se
+Chassis
+Software Deliver
+Software Version
+Mains Volta
+Mains Fre
+T
Power Consum
Power Consum
Power Consum
+Power in "ON" for
+Power in Standb
+Power in "OFF" for
Wei
Weight (P)TV (excl. Package
uration
hics/Logo's
eaker Visibilit
ment
e Mains Cord
ht (P)TV (incl. Packagin
CVBS+St + Mo
CVBS + St
Mode
e
uenc
tion (P)TV in On
tion SB in Watts
tion Semi SB in W
for
X
2158
Symm
Standard
Standard 4:3
M34
110-240V
50/60Hz
Less than 6W
2003-10-24 14:46 2518PFS 2 of 3
Page 8
Date:
p
g
R
quip
ging
guag
pp
pp
pp
quip
ging
ging
ging
pp
g
V
ype
g
y
(
g
gy
g
ype
ype
y
yp
yp
k
y
g
t
)
y
)
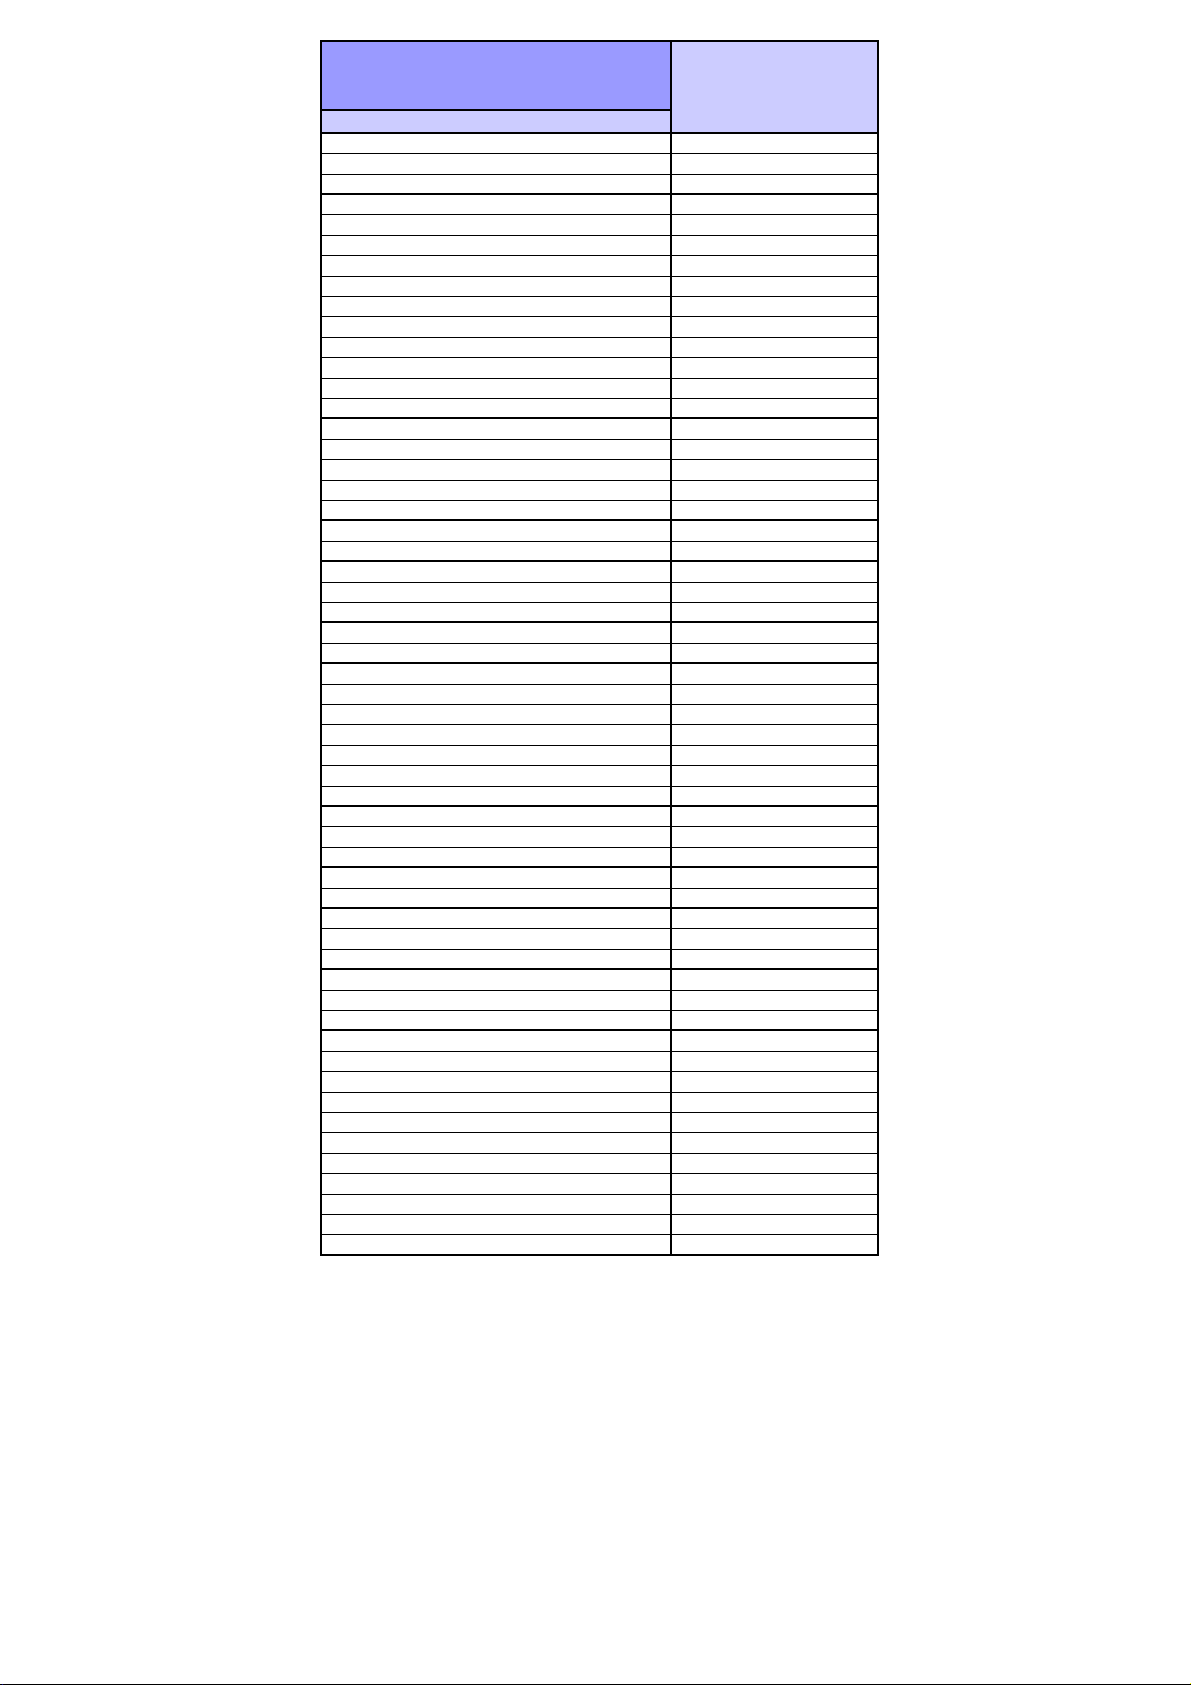
ProductView......:
Re
ort by............:
Specs / Products
Weight AVUnit excl Packagin
+INDICATION on BACKCOVE
+Channel
Final E
+Packa
+Documents and manuals
+Lan
+Cables Su
+Antenna Su
+Stand Su
+Aux E
Packa
Packa
Packa
Miscellaneous
+EAN Indication
+A
+Tests
+Local Inte
arious Perf. Param.
+Service Call-Rate
PIP/POP
+T
+Features
ital Reception
Di
+Transmission
Built-in Data S
+Text Standard
+
+Nbr bck
+Text Technolo
+Digital Data handlin
+Program Guide
Built-in Clock/Timer
+T
+Features
Built-in Radio
+T
Built-in PC displa
+PC Synch
+PC Control
Built-in DVD drive
+T
+T
Phased Out Items
+Tuner/Frontend
+Sensitivit
+CRT EHT
+Li
+Accoun
+XX(Radio Antenna in
+Non Volatile Memor
+In Y/C + Cinch(CVBS+Mo
Version of deck
ment
- methods
es DFU
lied
lied
lied
m Supplied
- width cm
- height cm
- depth cm
robation
ration
stem
Tele)text Features
rnd page / Mem Size
e of Medium
e of Dec
htning Protection
Product:@
CTV-2618
No PIP/POP
n/a
2003-10-24 14:46 2518PFS 3 of 3
Page 9
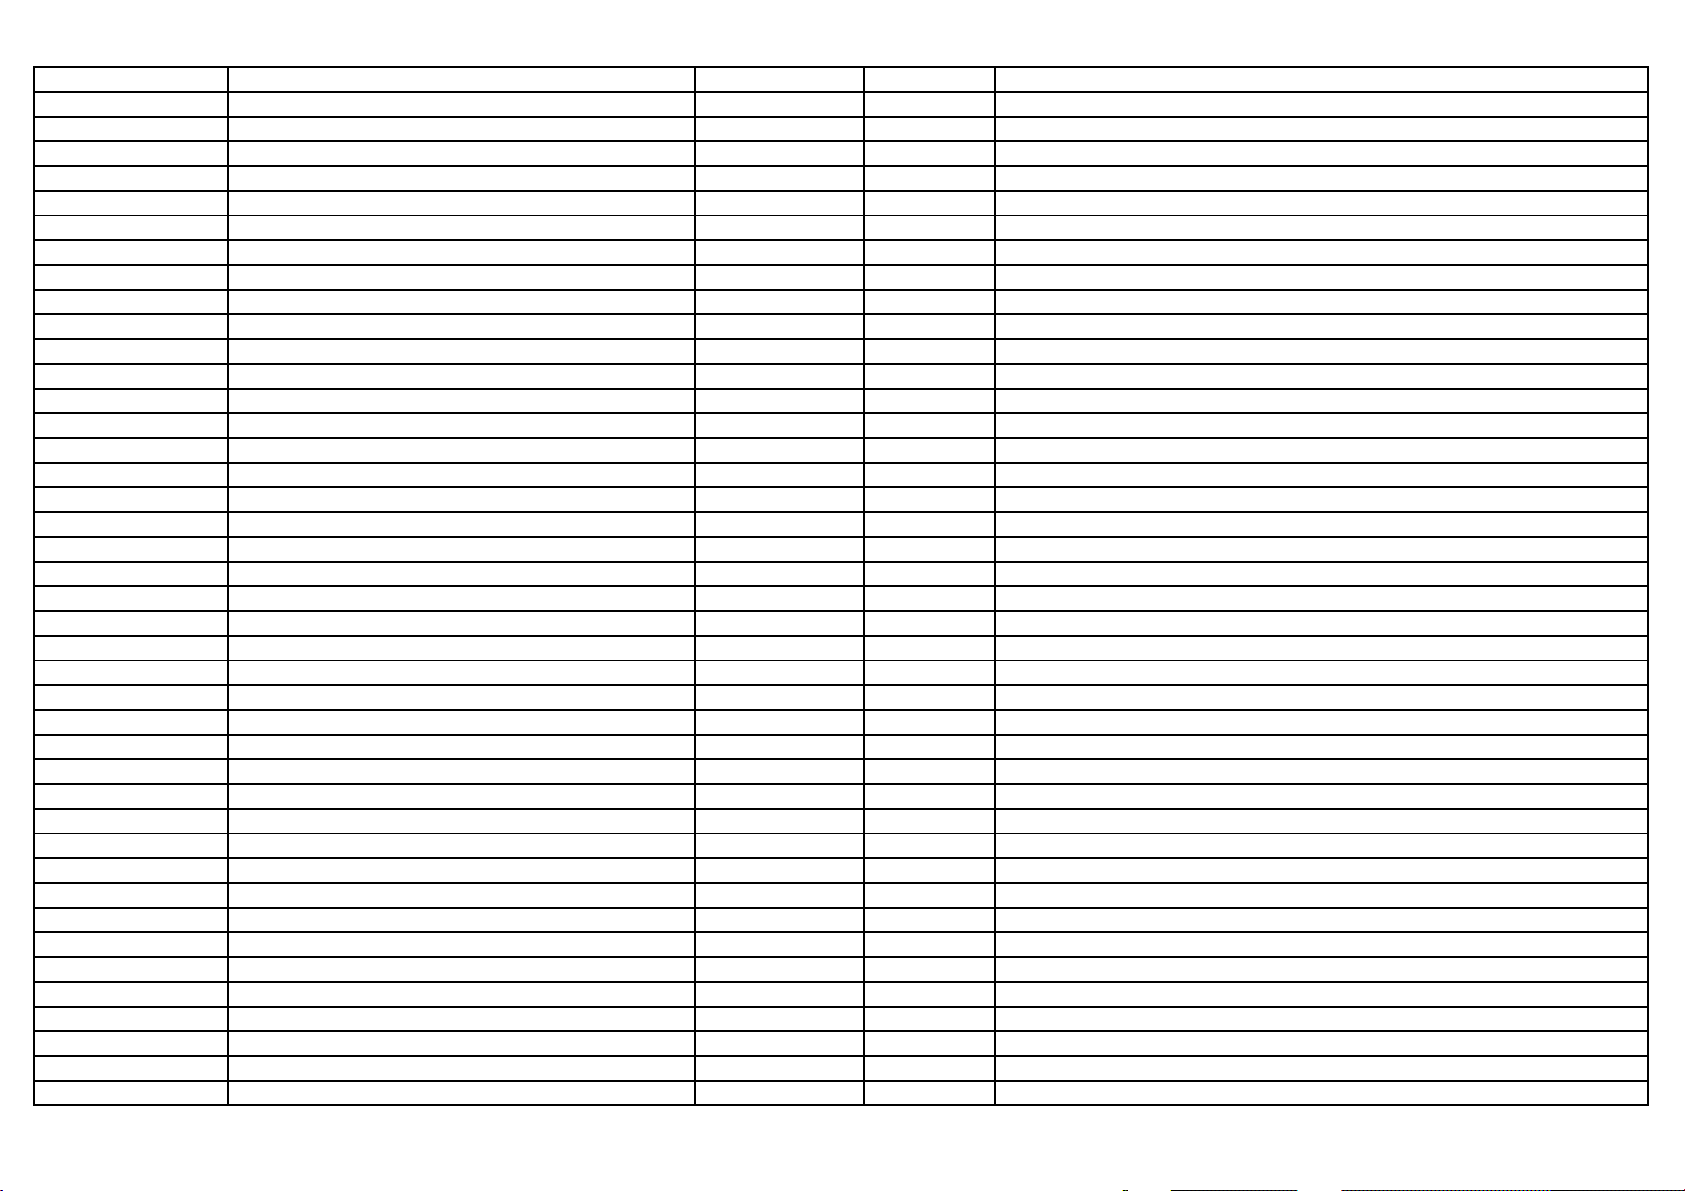
Item No. Description Quantity Req. Designator Remarks
08-02518M-AVY ASS'Y - SIDE AV BD 1
11-SC1815-YBX TRANSISTOR 2SC1815Y 1 Q962
11-SC1815-YBX TRANSISTOR 2SC1815Y 1 Q963
11-SK2541-0BX FET 2SK2541(N-CHANNEL) 1 Q961
13-000040-66P IC 4066 (ANALOG SW.) 1 IC951
18-CB0102-JNX RES. C.F. 1K OHM 1/6W +/-5% 1 R952
18-CB0102-JNX RES. C.F. 1K OHM 1/6W +/-5% 1 R953
18-CB0102-JNX RES. C.F. 1K OHM 1/6W +/-5% 1 R954
18-CB0102-JNX RES. C.F. 1K OHM 1/6W +/-5% 1 R955
18-CB0103-JNX RES. C.F. 10K OHM 1/6W +/-5% 1 R964
18-CB0104-JNX RES. C.F. 100K OHM 1/6W +/-5% 1 R963
18-CB0104-JNX RES. C.F. 100K OHM 1/6W +/-5% 1 R965
18-CB0153-JNX RES. C.F. 15k OHM 1/6W +/-5% 1 R967
18-CB0222-JNX RES. C.F. 2.2k OHM 1/6W +/-5% 1 R956
18-CB0222-JNX RES. C.F. 2.2k OHM 1/6W +/-5% 1 R957
18-CB0222-JNX RES. C.F. 2.2k OHM 1/6W +/-5% 1 R958
18-CB0222-JNX RES. C.F. 2.2k OHM 1/6W +/-5% 1 R966
18-CB0223-JNX RES. C.F. 22k OHM 1/6W +/-5% 1 R959
18-CB0820-JNX RES. C.F. 82 OHM 1/6W +/-5% 1 R951
18-CB0820-JNX RES. C.F. 82 OHM 1/6W +/-5% 1 R961
18-CB0820-JNX RES. C.F. 82 OHM 1/6W +/-5% 1 R962
26-EBP102-KBX CAP. CER 1000 PF 50V +/-10% B 1 C962
34-R220J2-0EX COIL PL - 22 UH +/-5% 1 L961
41-WJ0060-B00 WIRE BARE JUMPER 6mm 1 J953
41-WJ0060-B00 WIRE BARE JUMPER 6mm 1 J956
41-WJ0060-B00 WIRE BARE JUMPER 6mm 1 J955
41-WJ0060-B00 WIRE BARE JUMPER 6mm 1 J954
41-WJ0060-B00 WIRE BARE JUMPER 6mm 1 J952
41-WJ0065-B00 WIRE BARE JUMPER 6.5MM 1 J951
41-WJ0125-B00 WIRE BARE JUMPER 12.5MM 1 J957
46-39136H-07X 7P 2468#24/1185#26 550 TJC3-7Y/SCN-7Y 1 P902 FOR M.BD P901
47-RCA041-XX0 JACK RCA 3PH H=8MM YL WH RD/SW 1 P951
47-SVI002-XX0 Y/C SOCKET VERTICAL TYPE 1 P961
25-BCB101-M1X CAP. ELEC 100 UF 16V +/-20% 1 C963
25-BCB470-M1X CAP. ELEC 47 UF 16V +/-20% 1 C951
25-BCB470-M1X CAP. ELEC 47 UF 16V +/-20% 1 C954
25-BCB470-M1X CAP. ELEC 47 UF 16V +/-20% 1 C955
25-BCB470-M1X CAP. ELEC 47 UF 16V +/-20% 1 C961
40-2518SM-SIB P.C.B. SIDE AV BD 1
26-EBP103-ZFX CAP. CER 0.01UF 50V +80/-20% F 1 C964
08-02518M-FCY ASS'Y - FRONT CABINET 1
9
Page 10

Item No. Description Quantity Req. Designator Remarks
02-GND025-XX0 ASS"Y - CRT GND WIRE&HOUSE 1
36-DEG250-BX1 DEGAUSSING COIL 2730mm 1
42-81308F-XX0 SPEAKER (76MMX127MM) 8 0HM 8W 1 SP601
42-81308F-XX0 SPEAKER (76MMX127MM) 8 0HM 8W 1 SP602
44-25OFLN-FD1A CRT 64SX502Y22-DC02 (ASCH) 1 CRT01
46-14026H-02X HS 2P 2468#22 570mm S11-2Y/7mm 1 P601H FOR M. BD P601
46-27580H-02X HS 2P22 600/7 TJC3-2Y 1 P602H FOR M. BD P602
46-27688H-04X HS 4P A/B 400/13 RBGW TJC1/4Y 1 P411H FOR D.Y COIL
54-113970-0U0 PVC TUBE #5 L=ROLL 0.32 FOR SPK CONNECTORS
54-114000-00X FELT TAPE (150mmX19mmX0.3mm) 3 FOR FRONT CAB.
54-205140-000 SPACER CRT MOUNTING T=2MM 2 FOR M.BD BKT & REAR CAB.
54-205140-000 SPACER CRT MOUNTING T=2MM 4 MTG CRT TO F.CAB.
54-314740-0X0 CRT FIBRE SHEET (22mmX22mmX0.8mm) 4 FOR CRT
55-2518FC-0CN FRONT CABINET (II) 1
55-2518FP-0HA FRONT PANEL 1
56-2518FB-0HA PUSH BUTTON 1
56-2518LE-0HC LENS 1
56-2518PK-0HA POWER KNOB 1
58-2518SI-3UI INLAY SIDE AV 1
59-130460-00X RUBBER PAD (25mmX7mm) 2 STICK ON F.CAB (FOOTING)
59-312160-000 SPEAKER RUBBER CUSHION 8 MTG SPK
62-216340-0UA HOLDER POWER CORD HIPS-KINGFA 113(VO) 1
62-307210-0HA KNOB ADAPTER 1
63-B30060-BT2 S/T SCREW B 3.0 X 6 BT 2 MTG SIDE AV BD & FRONT CAB.
63-B30100-BT4 S/T SCREW B 3 X 10 BT 3 MTG PUSH BUTTON & FRONT CAB.
63-B30100-BT4 S/T SCREW B 3 X 10 BT 1 MTG LENS & FRONT PANEL
63-W30140-HS4 S/T SCREW W 3 X 14 HS 8 MG SPK & FRONT CAB.
65-A60180-20E EXT. TOOTH WASHTER 6 X 18 X 2 4 MTG CRT
63-H60300-BF4 S/T SCREW H 6 X 30 BF 4 MTG CRT & FRONT CAB.
67-X21679-0E0 SPRING CRT 6mmX50mmX0.6mm 2
67-X24970-0E0 SPRING 1
57-10654X-00F
cable ties(2.5mmX95mm) 12
08-02518M-RCY ASS'Y - REAR CABINET 1
54-114000-00X FELT TAPE (150mmX19mmX0.3mm) 10 STICK ON R.CAB
55-2518RC-0CN REAR CABINET (II) 1
58-2518MP-0UI PLATE MODEL NO. 1
58-2518RI-5UI INLAY REAR AV 1
59-130460-00X RUBBER PAD (25mmX7mm) 2 STICK ON R.CAB(FOOTING)
63-B40200-AB3 S/T SCREW B 4 X 20 AB 10 MTG FRONT & R.CAB
63-F30100-BT3 S/T SCREW F 3 X 10 BT (BLACK) 2 MTG RCA JACK & R.CAB
08-02575M-CRY ASS'Y - CRT BD 1
10
Page 11
Item No. Description Quantity Req. Designator Remarks
10-1N4148-ABX DIODE 1N4148 (SWITCHING) 1 D501
10-1N4148-ABX DIODE 1N4148 (SWITCHING) 1 D502
10-1N4148-ABX DIODE 1N4148 (SWITCHING) 1 L501
11-A562TM-0BX TRANSISTOR 2SA562TM-0 1 Q507
11-SC1815-YBX TRANSISTOR 2SC1815Y 1 Q502
11-SC1815-YBX TRANSISTOR 2SC1815Y 1 Q504
11-SC1815-YBX TRANSISTOR 2SC1815Y 1 Q506
11-SC4544-0AX TRANSISTOR 2SC4544 1 Q501
11-SC4544-0AX TRANSISTOR 2SC4544 1 Q503
11-SC4544-0AX TRANSISTOR 2SC4544 1 Q505
18-CB0102-JNX RES. C.F. 1K OHM 1/6W +/-5% 1 R515
18-CB0272-JNX RES. C.F. 2.7k OHM 1/6W +/-5% 1 R514
18-CB0561-JNX RES. C.F. 560 OHM 1/6W +/-5% 1 R501
18-CB0561-JNX RES. C.F. 560 OHM 1/6W +/-5% 1 R505
18-CB0561-JNX RES. C.F. 560 OHM 1/6W +/-5% 1 R510
18-CB0681-JNX RES. C.F. 680 OHM 1/6W +/-5% 1 R506
18-CB0681-JNX RES. C.F. 680 OHM 1/6W +/-5% 1 R509
18-CB0681-JNX RES. C.F. 680 OHM 1/6W +/-5% 1 R511
18-CB0681-JNX RES. C.F. 680 OHM 1/6W +/-5% 1 R522
18-CB0681-JNX RES. C.F. 680 OHM 1/6W +/-5% 1 R502
18-CB0681-JNX RES. C.F. 680 OHM 1/6W +/-5% 1 R503
18-CB0681-JNX RES. C.F. 680 OHM 1/6W +/-5% 1 R508
18-CB0681-JNX RES. C.F. 680 OHM 1/6W +/-5% 1 R513
18-FE0272-JNX RES. M.O. 2.7K OHM 1/2W +/-5% 1 R519
18-FE0272-JNX RES. M.O. 2.7K OHM 1/2W +/-5% 1 R520
18-FE0272-JNX RES. M.O. 2.7K OHM 1/2W +/-5% 1 R521
18-FG0183-JHX RES. M.O. 18K OHM 2W +/-5% 1 R516
18-FG0183-JHX RES. M.O. 18K OHM 2W +/-5% 1 R517
18-FG0183-JHX RES. M.O. 18K OHM 2W +/-5% 1 R518
25-BLA100-M1X CAP. ELEC 10 UF 250V +/-20% 1 C504
26-AMK102-KRX CAP. CER 1000 pF 2KV +/-10% R 1 C505
26-EBP103-ZFX CAP. CER 0.01UF 50V +80/-20% F 1 C508
26-EBP103-ZFX CAP. CER 0.01UF 50V +80/-20% F 1 C509
26-EBP391-JCX CAP. CER. 390PF 50V +/-5% CH 1 C501
26-EBP391-JCX CAP. CER. 390PF 50V +/-5% CH 1 C502
26-EBP471-JCX CAP. CER 470PF 50V +/-5% CH 1 C503
34-R220K2-1BX COIL CHOKE 22 UH +/-10% 1 L502
35-237250-00X FERR. BEAD HF70 4.5X5.0 2 FOR C508(L505 & L506)
40-2980UA-CRA P.C.B. CRT BD 1
41-WJ0050-B00 WIRE BARE JUMPER 5MM 1 L504
41-WJ0050-B00 WIRE BARE JUMPER 5MM 1 L503
11
Page 12
Item No. Description Quantity Req. Designator Remarks
41-WJ0060-B00 WIRE BARE JUMPER 6mm 1 R504
41-WJ0060-B00 WIRE BARE JUMPER 6mm 1 R507
41-WJ0060-B00 WIRE BARE JUMPER 6mm 1 R512
41-WJ0075-B00 WIRE BARE JUMPER 7.5MM 1 J503
46-10967W-01X PIN BASE *1 TJC1-1A 1 P501 F FOR CRT GROUNDING HOUS.
46-30615H-04X HS 4P24 460 F/W TJC3-4Y/SCN-4 1 P502 F FOR M.BD P421
46-37030H-05X HS 5P 2468#24 450 TJC3-5Y/SCN 1 P503 F FOR M.BD P201
47-265540-0U7 SOCKET CRT GZS10-2-4 (C.B.) 1 S501
25-BCB471-M1X CAP. ELEC 470 UF 16V +/-20% 1 C506
08-02575M-PWY ASS'Y - POWER PARTS 1
10-HER108-FBX DIODE HER108 1 D803
10-0EU2YX-FBX DIODE EU2YX (FAST RECOVERY) 1 D834
10-0EU2YX-FBX DIODE EU2YX (FAST RECOVERY) 1 D833
10-0RU3AM-F0X DIODE RU3AM (FAST RECOVERY) 1 D831
10-1N4004-EBX DIODE IN4004 (RECTIFIER) 1 D843
10-1N4148-ABX DIODE 1N4148 (SWITCHING) 1 D842
11-0BF422-0BX TRANSISTOR BF422 (NPN) 1 Q831
11-SC4793-0AX STANSISTOR 2SC4793 1 Q801
13-00SE14-0NS IC SE140N 1 IC831
13-STRF66-56P IC STR-F6656 1 IC801
18-CB0152-JNX RES. C.F. 1.5k OHM 1/6W +/-5% 1 R833
18-CB0223-JNX RES. C.F. 22k OHM 1/6W +/-5% 1 R840
18-CB0392-JNX RES. C.F. 3.9K OHM 1/6W +/-5% 1 R841
18-CD0102-JNX RES. C.F. 1k OHM 1/4W +/-5% 1 R805
18-CD0102-JNX RES. C.F. 1k OHM 1/4W +/-5% 1 R808
18-CD0272-JNX RES. C.F. 2.7K OHM 1/4W +/-5% 1 R813
18-CD0470-JNX RES. C.F. 47 OHM 1/4W +/-5% 1 R809
18-CD0479-JNX RES. C.F. 4.7 OHM 1/4W +/-5% 1 R811
18-CD0560-JNX RES. C.F. 56 OHM 1/4W +/-5% 1 R837
18-CD0829-JNX RES. C.F. 8.2 OHM 1/4W +/-5% 1 R842
18-CE0105-JNX RES. C.F. 1M OHM 1/2W +/-5% 1 R806
18-CE0105-JNX RES. C.F. 1M OHM 1/2W +/-5% 1 R806A
18-CE0563-JNX RES. C.F. 56k OHM 1/2W +/-5% 1 R803
18-CE0563-JNX RES. C.F. 56k OHM 1/2W +/-5% 1 R804
18-FG0223-JHX RES. M.O. 22K OHM 2W +/-5% 1 R836
18-FG0333-JHX RES. M.O. 33K OHM 2W +/-5% 1 R810
18-FG0333-JHX RES. M.O. 33K OHM 2W +/-5% 1 R839
22-NTC479-XX0 NTC 4.7 OHM +/-18% NTC4.7D2-14 1 R802
22-PTC140-XX0 POSISTOR 14 OHM 1 RT801
25-BKA100-M1X CAP. ELEC 10 UF 200V +/-20% 1 C808
25-BKA100-M1X CAP. ELEC 10 UF 200V +/-20% 1 C838
12
Page 13
Item No. Description Quantity Req. Designator Remarks
25-BKJ221-M1X CAP. ELEC 220 UF 200V +/-20% 1 C835
25-BMJ391-M1X CAP. ELEC 390 UF 400V +/-20% 1 C806
26-AIC221-KBX CAP. CER 220 PF 500V +/-10% B 1 C830
26-AIC221-KBX CAP. CER 220 PF 500V +/-10% B 1 C833
26-AIC221-KBX CAP. CER 220 PF 500V +/-10% B 1 C836
26-AIC221-KBX CAP. CER 220 PF 500V +/-10% B 1 C844
26-AIC221-KBX CAP. CER 220 PF 500V +/-10% B 1 C841
26-AIM103-KBX CAP. CER 0.01UF 500V +/-10% B 1 C805
26-AIM103-KBX CAP. CER 0.01UF 500V +/-10% B 1 C834
26-AIM103-KBX CAP. CER 0.01UF 500V +/-10% B 1 C837
26-AKK222-KRX CAP. CER 2200 PF 1KV +/-10% R 1 C814
26-AMK221-JZX CAP. CER 220pF 2KV +/-5% SL 1 C807
26-AQK472-ZFX CAP. CER 4700PF 250VAC+80-20%F 1 C803
26-AQK472-ZFX CAP. CER 4700PF 250VAC+80-20%F 1 C804
26-EBP102-KBX CAP. CER 1000 PF 50V +/-10% B 1 C811
26-EBP103-ZFX CAP. CER 0.01UF 50V +80/-20% F 1 C815
26-EBP221-JCX CAP. CER 220PF 50V +/-5% CH 1 C810
27-MHM104-K0X CAP. METAL P.E. 0.1UF 400V 10% 1 C802A
34-R220K2-1BX COIL CHOKE 22 UH +/-10% 1 L838
35-139730-00X FERR. BEAD BF60 2 FOR L801
35-237250-00X FERR. BEAD HF70 4.5X5.0 2 FOR D804
35-237250-00X FERR. BEAD HF70 4.5X5.0 2 FOR D831
35-237250-00X FERR. BEAD HF70 4.5X5.0 2 FOR D832
35-237250-00X FERR. BEAD HF70 4.5X5.0 2 FOR D833
35-237250-00X FERR. BEAD HF70 4.5X5.0 2 FOR D834
35-237250-00X FERR. BEAD HF70 4.5X5.0 2 FOR D830
41-AJ0175-BEE WIRE BARE JUMPER 17.5MM 1 L801
41-WJ0060-B00 WIRE BARE JUMPER 6mm 1 J812
41-WJ0085-B00 WIRE BARE JUMPER 8.5MM 1 J801
41-WJ0100-B00 WIRE BARE JUMPER 10MM 1 J815
41-WJ0100-B00 WIRE BARE JUMPER 10MM 1 J816
41-WJ0100-B00 WIRE BARE JUMPER 10MM 1 D850
41-WJ0100-B00 WIRE BARE JUMPER 10MM 1 J850
41-WJ0100-B00 WIRE BARE JUMPER 10MM 1 J851
41-WJ0125-B00 WIRE BARE JUMPER 12.5MM 1 J806
41-WJ0125-B00 WIRE BARE JUMPER 12.5MM 1 R831
41-WJ0135-B00 WIRE BARE JUMPER 13.5MM 1 J814
41-WJ0145-B00 WIRE BARE JUMPER 14.5MM 1 J807
41-WJ0150-B00 WIRE BARE JUMPER 15MM 1 R812
41-WJ0150-B00 WIRE BARE JUMPER 15MM 1 J809
41-WJ0150-B00 WIRE BARE JUMPER 15MM 1 J814A
13
Page 14
Item No. Description Quantity Req. Designator Remarks
41-WJ0175-B00 WIRE BARE JUMPER 17.5MM 1 J804
41-WJ0175-B00 WIRE BARE JUMPER 17.5MM 1 J803A
41-WJ0200-B00 WIRE BARE JUMPER 20MM 1 J805
46-10962W-02X PIN BASE *2 TJC2-2A 1 P801 F FOR DEGAUSSING COIL
46-35184W-03X PIN BASE *3 TJC1-3A 1 P802 F FOR POWER CORD
50-03150D-1GS1 FUSE 3.15AT 250VAC 5mmX20mm 1 F801
64-B30120-104 M/C SCREW B 3 X 12 1 FOR IC 801
64-P30080-104 M/C SCREW P 3 X 8 1 FOR IC841
64-P30080-104 M/C SCREW P 3 X 8 1 FOR IC851
64-P30080-104 M/C SCREW P 3 X 8 2 FOR IC 801
65-Z30050-23M NUT M 3 1 FOR IC801
66-20516X-0B0 FUSE HOLDER 2 FOR F801
67-109180-4M2 HEAT SINK 1 FOR IC851
67-H27292-3A0 HEAT SINK 1 FOR IC841
67-H29550-8A0 HEAT SINK 1 FOR IC801
67-H34692-0A0 HEAT SINK 1 FOR IC801
90-209770-SR1 SILICONE GREASE G-746 0.0006
10-0FR104-FBX DIODE FR104 (FAST RECTIFIER) 1 D832
10-HS2V4A-DBX DIODE 500mW 2.4HSA 1 D841
10-HS3V9A-DBX DIODE 500mW 3.9HSA 1 D839
10-HS16VC-DBX DIODE 500mW 16HSC 1 D807
10-HS10VC-DBX DIODE 500mW 10HSC 1 D840
36-LIF022-AX0 LINE FILTER 1 T801
18-KE0105-JN3 RES. H.VOLT. CC 1M OHM 1/2W +/-5% 1 R801
18-KF0825-JH3 RES. H.VOLT.CC 8.2M OHM 1W +/-5% 1 R835
26-APK222-ME4 CAP. CER 2200PF 400VAC+/-20% E 1 C839
27-AQT224-MVH CAP. M.PP 0.22 UF 275VAC 20% 1 C802
27-AQT224-MVH CAP. M.PP 0.22 UF 275VAC 20% 1 C801
66-343730-0B0 HOLLOW RIVET 1.6X3.0XL3.2 2 FOR DB801(+)/(-)
66-343730-0B0 HOLLOW RIVET 1.6X3.0XL3.2 2 FOR C801
66-343730-0B0 HOLLOW RIVET 1.6X3.0XL3.2 4 FOR T801
66-343730-0B0 HOLLOW RIVET 1.6X3.0XL3.2 2 FOR C802
66-343730-0B0 HOLLOW RIVET 1.6X3.0XL3.2 3 FOR RT801
66-343730-0B0 HOLLOW RIVET 1.6X3.0XL3.2 4 FOR T803
66-343730-0B0 HOLLOW RIVET 1.6X3.0XL3.2 2 FOR D830
66-343730-0B0 HOLLOW RIVET 1.6X3.0XL3.2 2 FOR D831
66-343730-0B0 HOLLOW RIVET 1.6X3.0XL3.2 2 FOR L838
66-343730-0B0 HOLLOW RIVET 1.6X3.0XL3.2 5 FOR T802(P1,P3,P9,P10,P18)
25-BCA102-M1X CAP. ELEC 1000 UF 16V +/-20% 1 C846
25-BCB331-M1X CAP. ELEC 330 UF 16V +/-20% 1 C843
25-BCB470-M1X CAP. ELEC 47 UF 16V +/-20% 1 C849
14
Page 15
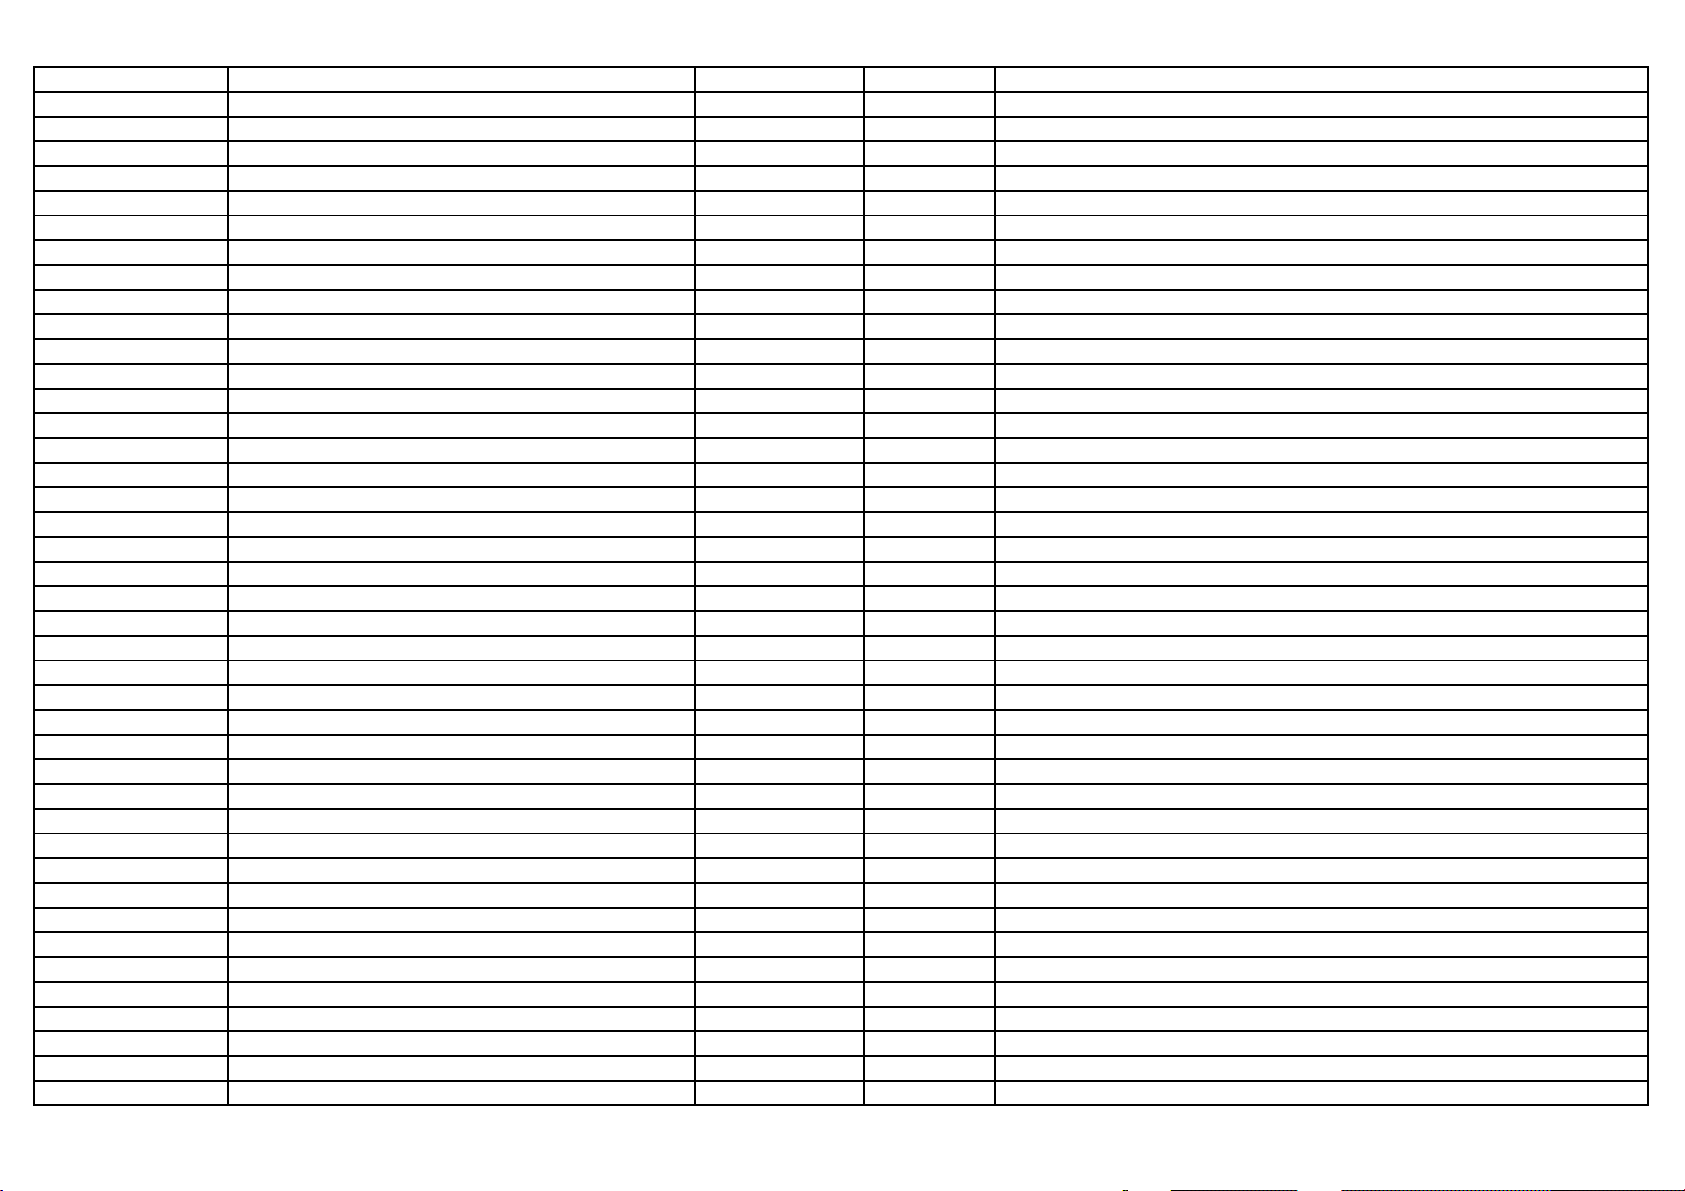
Item No. Description Quantity Req. Designator Remarks
25-BCB470-M1X CAP. ELEC 47 UF 16V +/-20% 1 C855
25-BDB470-M1X CAP. ELEC 47 UF 25V +/-20% 1 C809
25-BEA102-M1X CAP. ELEC 1000 UF 35V +/-20% 1 C832
36-TRF001-AX2 TRANSFORMER CONV. BCK-4901-77 1 T802
13-UA7805-C0S IC UA7805C 1 IC841
13-L7809C-VAP IC L7809CV 1 IC851
10-00EU1Z-FBX DIODE EU1Z (FAST RECOVERY) 1 D804
10-00EU1Z-FBX DIODE EU1Z (FAST RECOVERY) 1 D805
10-00EU1Z-FBX DIODE EU1Z (FAST RECOVERY) 1 D806
10-0RU4YX-F0X DIODE RU4YX (FAST RECOVERY) 1 D830
10-D3SB60-H7X DIODE D3SB60 (BRIDGE RECT.) 1 DB801
66-382330-0B7 RIVET 2.0X3.7X3.5 2 FOR C806
66-382330-0B7 RIVET 2.0X3.7X3.5 2 FOR C835
66-382330-0B7 RIVET 2.0X3.7X3.5 2 FOR P801
18-RG0138-JHX RES. WIRE ROUND 0.13 OHM 2W +/-5% 1 R807
18-RG0228-JHX RES. WIRE ROUND 0.22 OHM 2W +/-5% 1 R830
36-LIF001-XX0 LINE FILTER LCL1602 1 T803
26-EBP103-ZFX CAP. CER 0.01UF 50V +80/-20% F 1 C847
26-EBP103-ZFX CAP. CER 0.01UF 50V +80/-20% F 1 C848
26-EBP103-ZFX CAP. CER 0.01UF 50V +80/-20% F 1 C854
26-EBP103-ZFX CAP. CER 0.01UF 50V +80/-20% F 1 C856
26-EBP103-ZFX CAP. CER 0.01UF 50V +80/-20% F 1 C831
26-EBP103-ZFX CAP. CER 0.01UF 50V +80/-20% F 1 C845
26-EBP103-ZFX CAP. CER 0.01UF 50V +80/-20% F 1 C842
11-SB649A-CAX TRANSISTOR HSB649A-C 1 Q830
13-0HPC92-2CP PHOTO COUPLER HPC922-C 1 IC802
18-CD0272-JNX RES. C.F. 2.7K OHM 1/4W +/-5% 1 R838
18-CB0682-JNX RES. C.F. 6.8K OHM 1/6W +/-5% 1 R832
18-CD0100-JNX RES. C.F. 10 OHM 1/4W +/-5% 1 R815
18-CB0102-JNX RES. C.F. 1K OHM 1/6W +/-5% 1 R816
10-1N4148-ABX DIODE 1N4148 (SWITCHING) 1 D816
10-1N4148-ABX DIODE 1N4148 (SWITCHING) 1 D815
11-SA1015-YBX TRANSISTOR 2SA1015Y 1 Q815
41-WJ0125-B00 WIRE BARE JUMPER 12.5MM 1 J808
26-APK471-KB4 CAP. CER 470 pF 400VAC +/-10% 1 C812
26-APK471-KB4 CAP. CER 470 pF 400VAC +/-10% 1 C813
08-02988M-MSY ASS'Y - MSP PARTS 1
11-SC1815-YBX TRANSISTOR 2SC1815Y 1 Q1001
11-SC1815-YBX TRANSISTOR 2SC1815Y 1 Q1002
11-SC1815-YBX TRANSISTOR 2SC1815Y 1 Q1003
11-SC1815-YBX TRANSISTOR 2SC1815Y 1 Q1004
15
Page 16
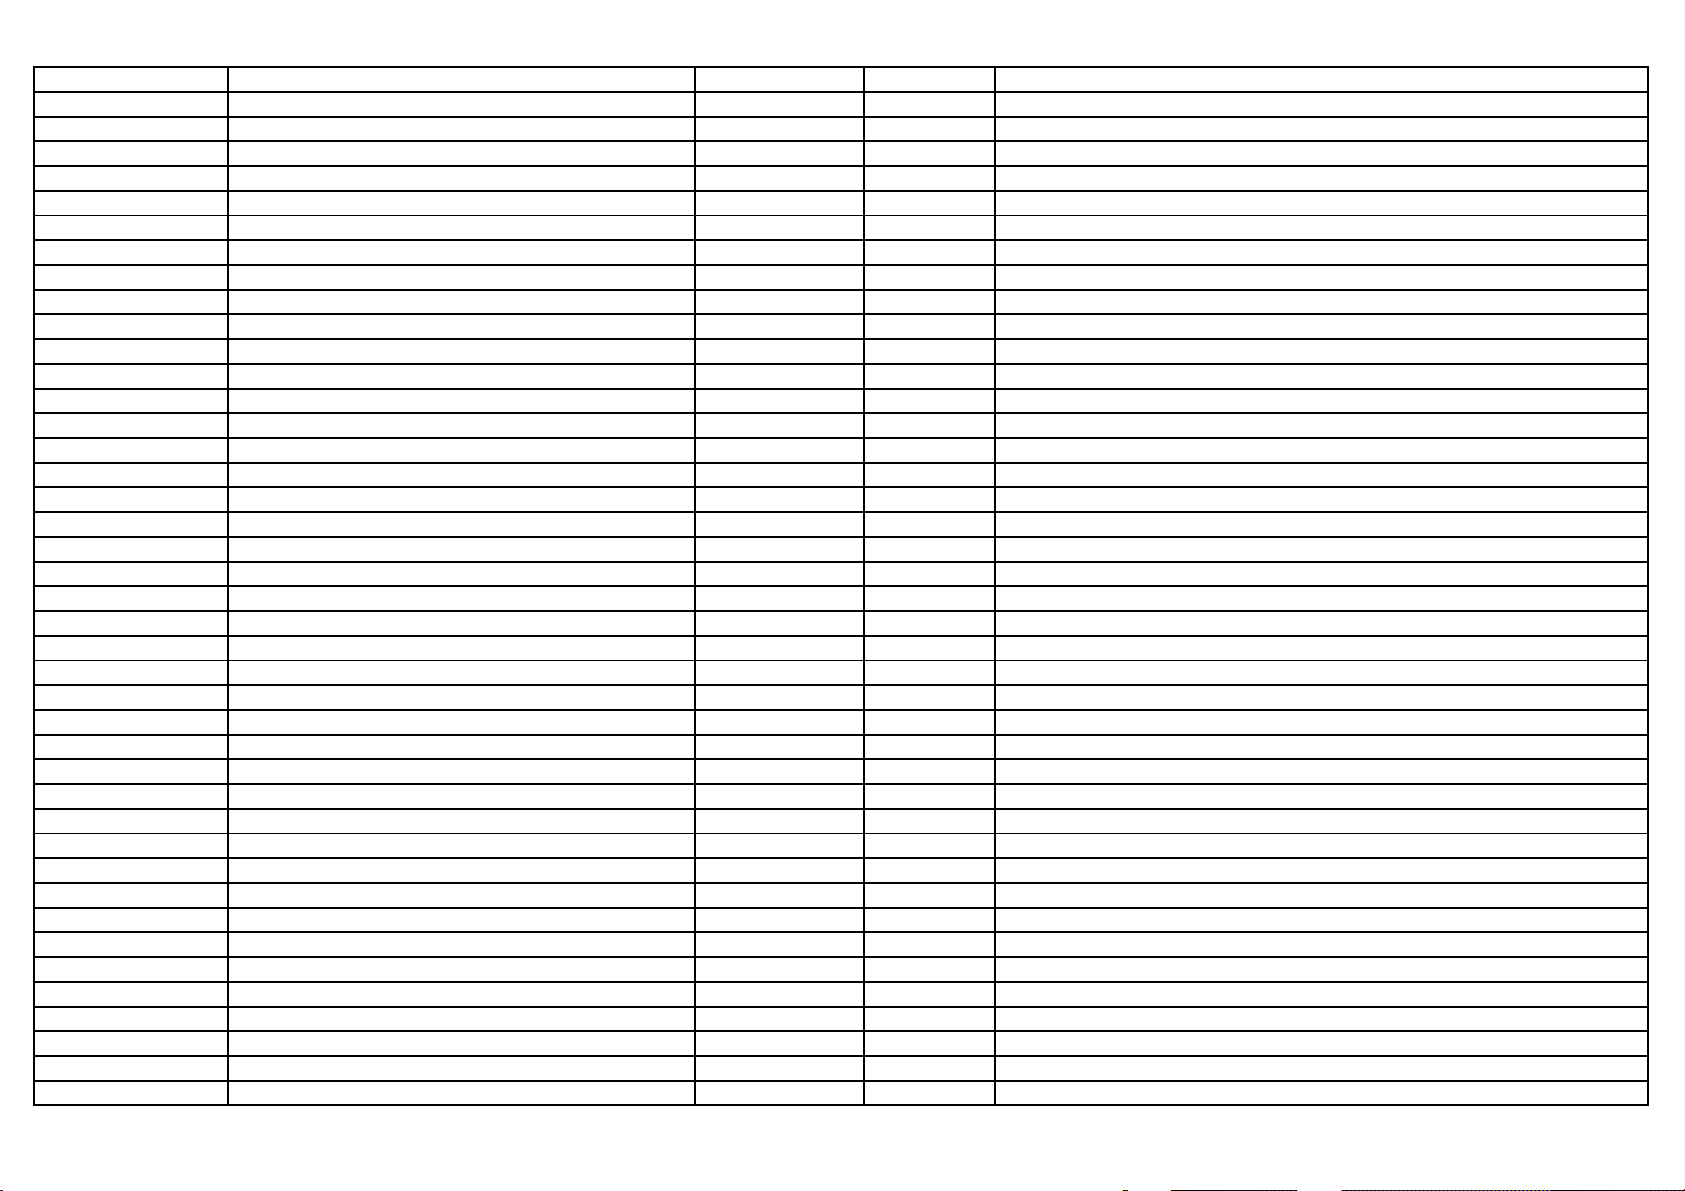
Item No. Description Quantity Req. Designator Remarks
18-CB0101-JNX RES. C.F. 100 OHM 1/6W +/-5% 1 R1001
18-CB0101-JNX RES. C.F. 100 OHM 1/6W +/-5% 1 R1002
18-CB0102-JNX RES. C.F. 1K OHM 1/6W +/-5% 1 R1021
18-CB0102-JNX RES. C.F. 1K OHM 1/6W +/-5% 1 R1004
18-CB0102-JNX RES. C.F. 1K OHM 1/6W +/-5% 1 R1022
18-CB0102-JNX RES. C.F. 1K OHM 1/6W +/-5% 1 R1023
18-CB0102-JNX RES. C.F. 1K OHM 1/6W +/-5% 1 R1024
18-CB0102-JNX RES. C.F. 1K OHM 1/6W +/-5% 1 R1025
18-CB0103-JNX RES. C.F. 10K OHM 1/6W +/-5% 1 R1003
18-CB0152-JNX RES. C.F. 1.5k OHM 1/6W +/-5% 1 R1007
18-CB0332-JNX RES. C.F. 3.3k OHM 1/6W +/-5% 1 R1005
18-CB0470-JNX RES. C.F. 47 OHM 1/6W +/-5% 1 R1006
26-ABC152-KBX CAP. CER 1500 PF 50V +/-10% B 1 C1012
26-ABC339-CZX CAP. CER 3.3 PF 50V +/-0.25 SL 1 C1001
26-ABC339-CZX CAP. CER 3.3 PF 50V +/-0.25 SL 1 C1002
26-EBP102-KBX CAP. CER 1000 PF 50V +/-10% B 1 C1021
26-EBP102-KBX CAP. CER 1000 PF 50V +/-10% B 1 C1022
26-EBP102-KBX CAP. CER 1000 PF 50V +/-10% B 1 C1023
26-EBP102-KBX CAP. CER 1000 PF 50V +/-10% B 1 C1024
26-EBP471-JCX CAP. CER 470PF 50V +/-5% CH 1 C1025
26-EBP560-JZX CAP. CER 56PF 50V +/-5% SL TUBE 1 C1003
26-EBP560-JZX CAP. CER 56PF 50V +/-5% SL TUBE 1 C1004
26-EBP560-JZX CAP. CER 56PF 50V +/-5% SL TUBE 1 C1005
34-R220J2-0EX COIL PL - 22 UH +/-5% 1 L1001
41-WJ0060-B00 WIRE BARE JUMPER 6mm 1 J1002
41-WJ0060-B00 WIRE BARE JUMPER 6mm 1 J1003
41-WJ0060-B00 WIRE BARE JUMPER 6mm 1 J1005
41-WJ0065-B00 WIRE BARE JUMPER 6.5MM 1 J1006
41-WJ0065-B00 WIRE BARE JUMPER 6.5MM 1 J1007
41-WJ0065-B00 WIRE BARE JUMPER 6.5MM 1 J1009
41-WJ0080-B00 WIRE BARE JUMPER 8 MM 1 J1004
41-WJ0090-B00 WIRE BARE JUMPER 9MM 1 J1001
45-OSC18M-4Y0 CRYSTAL 18.432M 1 X1001
25-BCB100-M1X CAP. ELEC 10 UF 16V +/-20% 1 C1013
25-BCB100-M1X CAP. ELEC 10 UF 16V +/-20% 1 C1014
25-BCB100-M1X CAP. ELEC 10 UF 16V +/-20% 1 C1015
25-BCB100-M1X CAP. ELEC 10 UF 16V +/-20% 1 C1016
25-BCB100-M1X CAP. ELEC 10 UF 16V +/-20% 1 C1008
25-BCB470-M1X CAP. ELEC 47 UF 16V +/-20% 1 C1019
25-BFB339-M1X CAP. ELEC 3.3 UF 50V +/-20% 1 C1010
13-P3440G-B8P IC MSP3440G B8(52-PIN PSDIP) 1 IC1001
16
Page 17
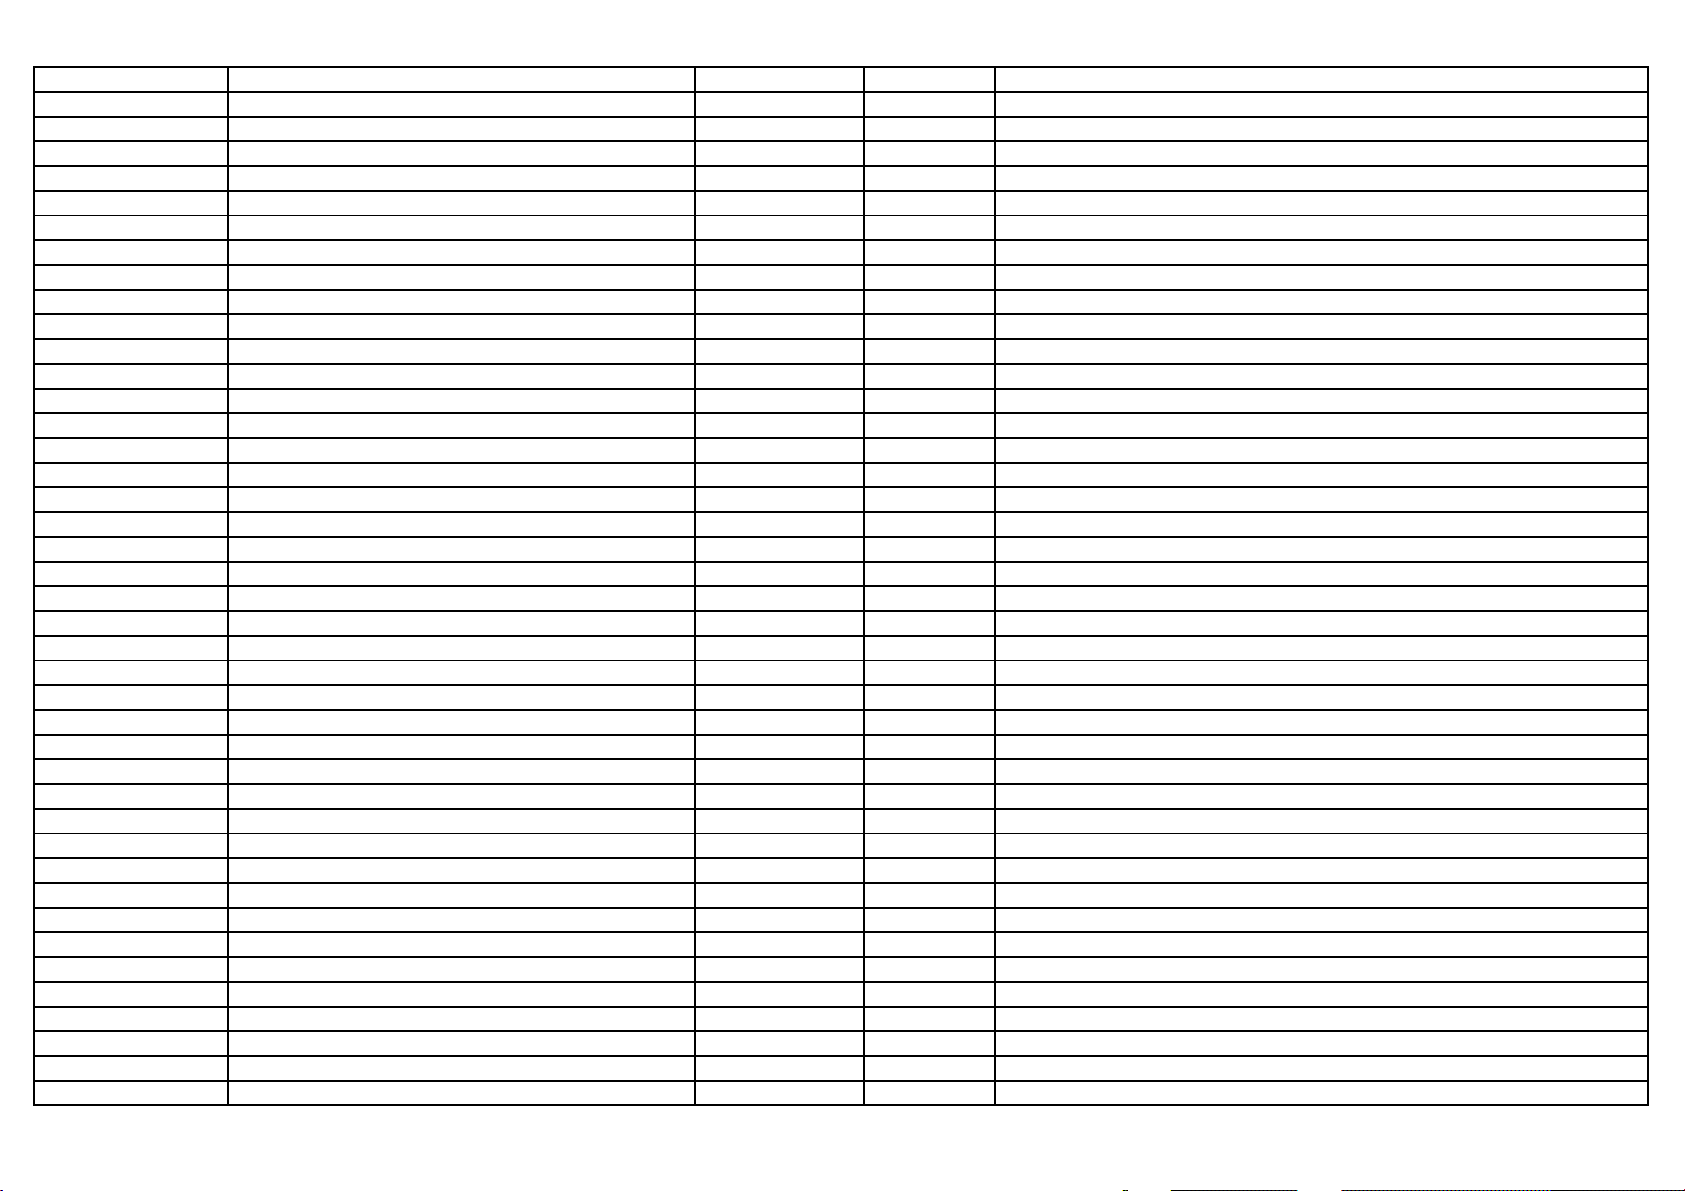
Item No. Description Quantity Req. Designator Remarks
41-WJ0050-B00 WIRE BARE JUMPER 5MM 1 J1021
41-WJ0050-B00 WIRE BARE JUMPER 5MM 1 J1022
26-EBP390-JCX CAP. CER 39PF 50V +/-5% CH 1 C1034
26-EBP390-JCX CAP. CER 39PF 50V +/-5% CH 1 C1035
26-EBP103-ZFX CAP. CER 0.01UF 50V +80/-20% F 1 C1006
26-EBP103-ZFX CAP. CER 0.01UF 50V +80/-20% F 1 C1009
26-EBP103-ZFX CAP. CER 0.01UF 50V +80/-20% F 1 C1011
26-EBP103-ZFX CAP. CER 0.01UF 50V +80/-20% F 1 C1018
26-EBP104-ZFX CAP. CER 0.1UF 50V +80%/-20% 1 C1017
26-EBP104-ZFX CAP. CER 0.1UF 50V +80%/-20% 1 C1030
26-EBP104-ZFX CAP. CER 0.1UF 50V +80%/-20% 1 C1031
26-EBP104-ZFX CAP. CER 0.1UF 50V +80%/-20% 1 C1032
26-EBP104-ZFX CAP. CER 0.1UF 50V +80%/-20% 1 C1033
08-2518SM-MAN ASS'Y - MAIN BD 1
07-457FF5-NX1 TUNER UV1336/AGN2(FS181CH 5V) 1 TU101
10-0BY228-F0X DIODE BY228 1 D411
10-1N4001-EBX DIODE 1N4001 (RECTIFIER) 1 D301
10-1N4148-ABX DIODE 1N4148 (SWITCHING) 1 D031
10-1N4148-ABX DIODE 1N4148 (SWITCHING) 1 D203
10-1N4148-ABX DIODE 1N4148 (SWITCHING) 1 D211
10-1N4148-ABX DIODE 1N4148 (SWITCHING) 1 D212
10-1N4148-ABX DIODE 1N4148 (SWITCHING) 1 D213
10-1N4148-ABX DIODE 1N4148 (SWITCHING) 1 D221
10-1N4148-ABX DIODE 1N4148 (SWITCHING) 1 D223
10-1N4148-ABX DIODE 1N4148 (SWITCHING) 1 D601
10-1N4148-ABX DIODE 1N4148 (SWITCHING) 1 D631
10-1N4148-ABX DIODE 1N4148 (SWITCHING) 1 D711
10-1N4148-ABX DIODE 1N4148 (SWITCHING) 1 D721
11-0BC337-0BX TRANSISTOR (NPN) BC337-40 1 Q008
11-DD1556-0AX TRANSISTOR 3DD1556 1 Q412
11-SA1015-YBX TRANSISTOR 2SA1015Y 1 Q211
11-SA1015-YBX TRANSISTOR 2SA1015Y 1 Q009
11-SA1015-YBX TRANSISTOR 2SA1015Y 1 Q203
11-SA1015-YBX TRANSISTOR 2SA1015Y 1 Q631
11-SA1015-YBX TRANSISTOR 2SA1015Y 1 Q721
11-SA1015-YBX TRANSISTOR 2SA1015Y 1 Q911
11-SC1815-YBX TRANSISTOR 2SC1815Y 1 Q006
11-SC1815-YBX TRANSISTOR 2SC1815Y 1 Q251
11-SC1815-YBX TRANSISTOR 2SC1815Y 1 Q252
11-SC1815-YBX TRANSISTOR 2SC1815Y 1 Q451
11-SC1815-YBX TRANSISTOR 2SC1815Y 1 Q711
17
Page 18
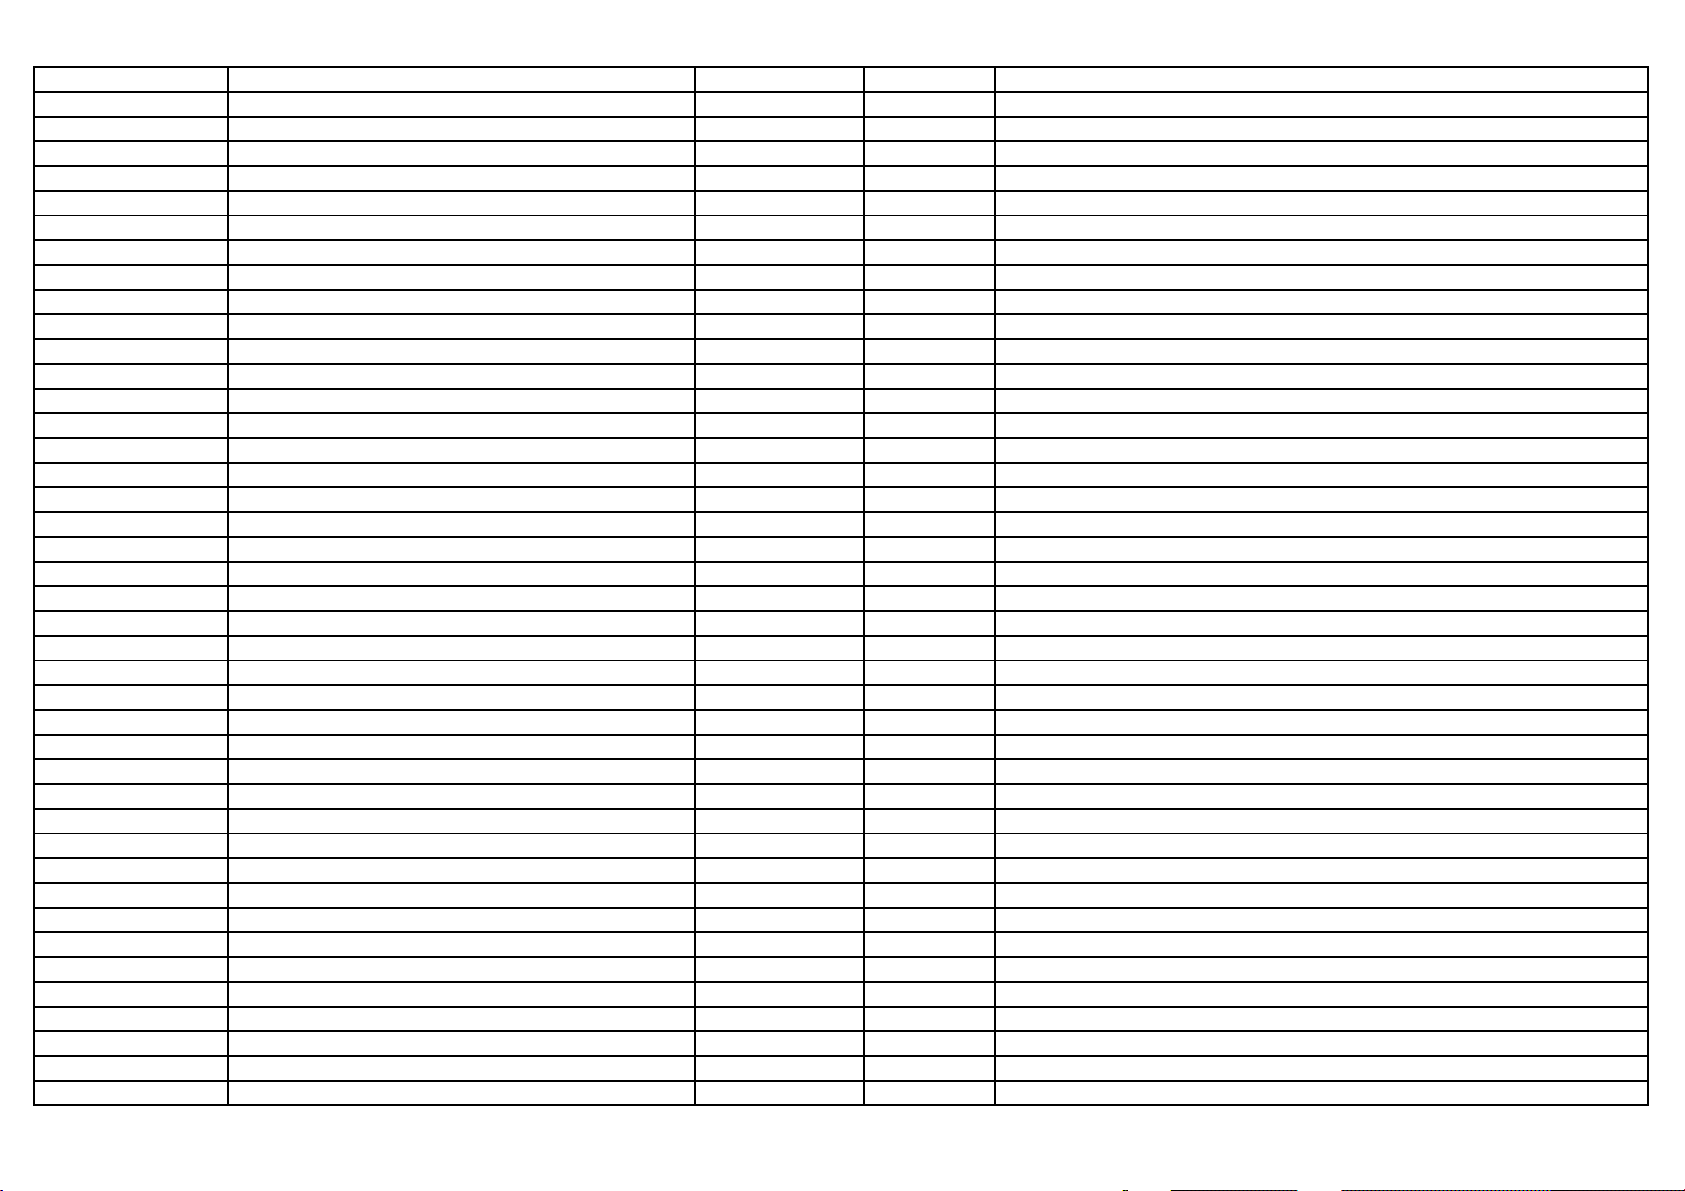
Item No. Description Quantity Req. Designator Remarks
11-SC1815-YBX TRANSISTOR 2SC1815Y 1 Q901
11-SC1815-YBX TRANSISTOR 2SC1815Y 1 Q902
11-SC1815-YBX TRANSISTOR 2SC1815Y 1 Q903
11-SC1815-YBX TRANSISTOR 2SC1815Y 1 Q912
11-SC1815-YBX TRANSISTOR 2SC1815Y 1 Q931
11-SC3779-DBX TRANSISTOR 2SC3779D (RF AMPL) 1 Q101
11-SK2541-0BX FET 2SK2541(N-CHANNEL) 1 Q007
13-000040-52P IC 4052 1 IC901
13-00M24C-04P IC 4K EEPROM M24C04-BN6 1 IC002
13-0TA842-7KS IC TA8427K 1 IC301
13-0TDA26-16S IC TDA2616 (AUDIO O/P) 1 IC601
13-A12V01-TOP IC TCL-A12V01-TO 1 IC001
13-TB1240-ANP IC TB1240AN 1 IC201
14-LED05R-XX1 LED RED FB205 1 D010
18-CB0101-JNX RES. C.F. 100 OHM 1/6W +/-5% 1 R012
18-CB0101-JNX RES. C.F. 100 OHM 1/6W +/-5% 1 R013
18-CB0101-JNX RES. C.F. 100 OHM 1/6W +/-5% 1 R018
18-CB0101-JNX RES. C.F. 100 OHM 1/6W +/-5% 1 R022
18-CB0101-JNX RES. C.F. 100 OHM 1/6W +/-5% 1 R048
18-CB0101-JNX RES. C.F. 100 OHM 1/6W +/-5% 1 R053
18-CB0101-JNX RES. C.F. 100 OHM 1/6W +/-5% 1 R056
18-CB0101-JNX RES. C.F. 100 OHM 1/6W +/-5% 1 R101
18-CB0101-JNX RES. C.F. 100 OHM 1/6W +/-5% 1 R102
18-CB0101-JNX RES. C.F. 100 OHM 1/6W +/-5% 1 R233
18-CB0101-JNX RES. C.F. 100 OHM 1/6W +/-5% 1 R253
18-CB0101-JNX RES. C.F. 100 OHM 1/6W +/-5% 1 R914
18-CB0102-JNX RES. C.F. 1K OHM 1/6W +/-5% 1 R024
18-CB0102-JNX RES. C.F. 1K OHM 1/6W +/-5% 1 R045
18-CB0102-JNX RES. C.F. 1K OHM 1/6W +/-5% 1 R046
18-CB0102-JNX RES. C.F. 1K OHM 1/6W +/-5% 1 R050
18-CB0102-JNX RES. C.F. 1K OHM 1/6W +/-5% 1 R107
18-CB0102-JNX RES. C.F. 1K OHM 1/6W +/-5% 1 R220
18-CB0102-JNX RES. C.F. 1K OHM 1/6W +/-5% 1 R234
18-CB0102-JNX RES. C.F. 1K OHM 1/6W +/-5% 1 R301
18-CB0102-JNX RES. C.F. 1K OHM 1/6W +/-5% 1 R304
18-CB0102-JNX RES. C.F. 1K OHM 1/6W +/-5% 1 R451
18-CB0102-JNX RES. C.F. 1K OHM 1/6W +/-5% 1 R909
18-CB0102-JNX RES. C.F. 1K OHM 1/6W +/-5% 1 R915
18-CB0102-JNX RES. C.F. 1K OHM 1/6W +/-5% 1 R946
18-CB0102-JNX RES. C.F. 1K OHM 1/6W +/-5% 1 R947
18-CB0102-JNX RES. C.F. 1K OHM 1/6W +/-5% 1 R005
18
Page 19
Item No. Description Quantity Req. Designator Remarks
18-CB0102-JNX RES. C.F. 1K OHM 1/6W +/-5% 1 R036A
18-CB0103-JNX RES. C.F. 10K OHM 1/6W +/-5% 1 R003
18-CB0103-JNX RES. C.F. 10K OHM 1/6W +/-5% 1 R004
18-CB0103-JNX RES. C.F. 10K OHM 1/6W +/-5% 1 R017
18-CB0103-JNX RES. C.F. 10K OHM 1/6W +/-5% 1 R022A
18-CB0103-JNX RES. C.F. 10K OHM 1/6W +/-5% 1 R037
18-CB0103-JNX RES. C.F. 10K OHM 1/6W +/-5% 1 R038
18-CB0103-JNX RES. C.F. 10K OHM 1/6W +/-5% 1 R042
18-CB0103-JNX RES. C.F. 10K OHM 1/6W +/-5% 1 R047
18-CB0103-JNX RES. C.F. 10K OHM 1/6W +/-5% 1 R081
18-CB0103-JNX RES. C.F. 10K OHM 1/6W +/-5% 1 R225
18-CB0103-JNX RES. C.F. 10K OHM 1/6W +/-5% 1 R632
18-CB0103-JNX RES. C.F. 10K OHM 1/6W +/-5% 1 R716
18-CB0103-JNX RES. C.F. 10K OHM 1/6W +/-5% 1 R757
18-CB0103-JNX RES. C.F. 10K OHM 1/6W +/-5% 1 R237
18-CB0104-JNX RES. C.F. 100K OHM 1/6W +/-5% 1 R039
18-CB0104-JNX RES. C.F. 100K OHM 1/6W +/-5% 1 R205
18-CB0104-JNX RES. C.F. 100K OHM 1/6W +/-5% 1 R206
18-CB0104-JNX RES. C.F. 100K OHM 1/6W +/-5% 1 R905
18-CB0104-JNX RES. C.F. 100K OHM 1/6W +/-5% 1 R934
18-CB0104-JNX RES. C.F. 100K OHM 1/6W +/-5% 1 J651
18-CB0123-JNX RES. C.F. 12k OHM 1/6W +/-5% 1 R244
18-CB0123-JNX RES. C.F. 12k OHM 1/6W +/-5% 1 R919
18-CB0151-JNX RES. C.F. 150 OHM 1/6W +/-5% 1 R105
18-CB0151-JNX RES. C.F. 150 OHM 1/6W +/-5% 1 R258
18-CB0151-JNX RES. C.F. 150 OHM 1/6W +/-5% 1 R916
18-CB0151-JNX RES. C.F. 150 OHM 1/6W +/-5% 1 R917
18-CB0152-JNX RES. C.F. 1.5k OHM 1/6W +/-5% 1 R204
18-CB0152-JNX RES. C.F. 1.5k OHM 1/6W +/-5% 1 R213
18-CB0152-JNX RES. C.F. 1.5k OHM 1/6W +/-5% 1 R212
18-CB0152-JNX RES. C.F. 1.5k OHM 1/6W +/-5% 1 R214
18-CB0152-JNX RES. C.F. 1.5k OHM 1/6W +/-5% 1 R087A
18-CB0153-JNX RES. C.F. 15k OHM 1/6W +/-5% 1 R051
18-CB0153-JNX RES. C.F. 15k OHM 1/6W +/-5% 1 R245
18-CB0153-JNX RES. C.F. 15k OHM 1/6W +/-5% 1 R452
18-CB0153-JNX RES. C.F. 15k OHM 1/6W +/-5% 1 R601
18-CB0153-JNX RES. C.F. 15k OHM 1/6W +/-5% 1 R602
18-CB0181-JNX RES. C.F. 180 OHM 1/6W +/-5% 1 R108
18-CB0182-JNX RES. C.F. 1.8K OHM 1/6W +/-5% 1 R715
18-CB0201-JNX RES. C.F. 200 OHM 1/6W +/-5% 1 R259
18-CB0221-JNX RES. C.F. 220 OHM 1/6W +/-5% 1 R203
19
Page 20
Item No. Description Quantity Req. Designator Remarks
18-CB0221-JNX RES. C.F. 220 OHM 1/6W +/-5% 1 R215
18-CB0221-JNX RES. C.F. 220 OHM 1/6W +/-5% 1 R216
18-CB0221-JNX RES. C.F. 220 OHM 1/6W +/-5% 1 R255
18-CB0221-JNX RES. C.F. 220 OHM 1/6W +/-5% 1 R217
18-CB0221-JNX RES. C.F. 220 OHM 1/6W +/-5% 1 R261
18-CB0221-JNX RES. C.F. 220 OHM 1/6W +/-5% 1 R401
18-CB0622-JNX RES. C.F. 6.2k OHM 1/6W +/-5% 1 R029
18-CB0222-JNX RES. C.F. 2.2k OHM 1/6W +/-5% 1 R033
18-CB0222-JNX RES. C.F. 2.2k OHM 1/6W +/-5% 1 R034
18-CB0222-JNX RES. C.F. 2.2k OHM 1/6W +/-5% 1 R035
18-CB0222-JNX RES. C.F. 2.2k OHM 1/6W +/-5% 1 R036
18-CB0222-JNX RES. C.F. 2.2k OHM 1/6W +/-5% 1 R713
18-CB0222-JNX RES. C.F. 2.2k OHM 1/6W +/-5% 1 D215
18-CB0222-JNX RES. C.F. 2.2k OHM 1/6W +/-5% 1 R631
18-CB0223-JNX RES. C.F. 22k OHM 1/6W +/-5% 1 R634
18-CB0223-JNX RES. C.F. 22k OHM 1/6W +/-5% 1 R722
18-CB0223-JNX RES. C.F. 22k OHM 1/6W +/-5% 1 R902
18-CB0223-JNX RES. C.F. 22k OHM 1/6W +/-5% 1 R901
18-CB0223-JNX RES. C.F. 22k OHM 1/6W +/-5% 1 R906
18-CB0223-JNX RES. C.F. 22k OHM 1/6W +/-5% 1 R907
18-CB0223-JNX RES. C.F. 22k OHM 1/6W +/-5% 1 R918
18-CB0223-JNX RES. C.F. 22k OHM 1/6W +/-5% 1 R932
18-CB0223-JNX RES. C.F. 22k OHM 1/6W +/-5% 1 R933
18-CB0224-JNX RES. C.F. 220k OHM 1/6W +/-5% 1 R251
18-CB0271-JNX RES. C.F. 270 OHM 1/6W +/-5% 1 R711
18-CB0272-JNX RES. C.F. 2.7k OHM 1/6W +/-5% 1 R227
18-CB0272-JNX RES. C.F. 2.7k OHM 1/6W +/-5% 1 R082
18-CB0273-JNX RES. C.F. 27k OHM 1/6W +/-5% 1 R084A
18-CB0331-JNX RES. C.F. 330 OHM 1/6W +/-5% 1 R222
18-CB0331-JNX RES. C.F. 330 OHM 1/6W +/-5% 1 R223
18-CB0331-JNX RES. C.F. 330 OHM 1/6W +/-5% 1 R229
18-CB0331-JNX RES. C.F. 330 OHM 1/6W +/-5% 1 R257
18-CB0331-JNX RES. C.F. 330 OHM 1/6W +/-5% 1 R021
18-CB0332-JNX RES. C.F. 3.3k OHM 1/6W +/-5% 1 R014
18-CB0332-JNX RES. C.F. 3.3k OHM 1/6W +/-5% 1 R015
18-CB0332-JNX RES. C.F. 3.3k OHM 1/6W +/-5% 1 R054
18-CB0332-JNX RES. C.F. 3.3k OHM 1/6W +/-5% 1 R055
18-CB0332-JNX RES. C.F. 3.3k OHM 1/6W +/-5% 1 R254
18-CB0332-JNX RES. C.F. 3.3k OHM 1/6W +/-5% 1 R302
18-CB0332-JNX RES. C.F. 3.3k OHM 1/6W +/-5% 1 R472
18-CB0332-JNX RES. C.F. 3.3k OHM 1/6W +/-5% 1 R086A
20
Page 21
Item No. Description Quantity Req. Designator Remarks
18-CB0333-JNX RES. C.F. 33K OHM 1/6W +/-5% 1 R208
18-CB0333-JNX RES. C.F. 33K OHM 1/6W +/-5% 1 R287
18-CB0333-JNX RES. C.F. 33K OHM 1/6W +/-5% 1 R714
18-CB0393-JNX RES. C.F. 39K OHM 1/6W +/-5% 1 R314
18-CB0432-JNX RES. C.F. 4.3K OHM 1/6W +/-5% 1 R083
18-CB0470-JNX RES. C.F. 47 OHM 1/6W +/-5% 1 R019
18-CB0470-JNX RES. C.F. 47 OHM 1/6W +/-5% 1 R016
18-CB0470-JNX RES. C.F. 47 OHM 1/6W +/-5% 1 R059
18-CB0471-JNX RES. C.F. 470 OHM 1/6W +/-5% 1 R106
18-CB0471-JNX RES. C.F. 470 OHM 1/6W +/-5% 1 R235
18-CB0471-JNX RES. C.F. 470 OHM 1/6W +/-5% 1 R912
18-CB0471-JNX RES. C.F. 470 OHM 1/6W +/-5% 1 R913
18-CB0471-JNX RES. C.F. 470 OHM 1/6W +/-5% 1 R091
18-CB0472-JNX RES. C.F. 4.7k OHM 1/6W +/-5% 1 R049
18-CB0472-JNX RES. C.F. 4.7k OHM 1/6W +/-5% 1 R211
18-CB0472-JNX RES. C.F. 4.7k OHM 1/6W +/-5% 1 R903
18-CB0472-JNX RES. C.F. 4.7k OHM 1/6W +/-5% 1 R908
18-CB0473-JNX RES. C.F. 47K OHM 1/6W +/-5% 1 R040
18-CB0473-JNX RES. C.F. 47K OHM 1/6W +/-5% 1 R243
18-CB0560-JNX RES. C.F. 56 OHM 1/6W +/-5% 1 R109
18-CB0561-JNX RES. C.F. 560 OHM 1/6W +/-5% 1 R228
18-CB0622-JNX RES. C.F. 6.2k OHM 1/6W +/-5% 1 R084
18-CB0683-JNX RES. C.F. 68K OHM 1/6W +/-5% 1 R088A
18-CB0750-JNX RES. C.F. 75 OHM 1/6W +/-5% 1 R911
18-CB0752-JNX RES. C.F. 7.5K OHM 1/6W +/-5% 1 R221
18-CB0752-JNX RES. C.F. 7.5K OHM 1/6W +/-5% 1 R288
18-CB0820-JNX RES. C.F. 82 OHM 1/6W +/-5% 1 R931
18-CB0822-JNX RES. C.F. 8.2K OHM 1/6W +/-5% 1 R242
18-CD0100-JNX RES. C.F. 10 OHM 1/4W +/-5% 1 R043
18-CD0122-JNX RES. C.F. 1.2K OHM 1/4W +/-5% 1 R724
18-CD0181-JNX RES. C.F. 180 OHM 1/4W +/-5% 1 R226
18-CD0222-JNX RES. C.F. 2.2K OHM 1/4W +/-5% 1 R723
18-CD0272-JNX RES. C.F. 2.7K OHM 1/4W +/-5% 1 R313
18-CD0272-JNX RES. C.F. 2.7K OHM 1/4W +/-5% 1 J405
18-CD0392-JNX RES. C.F. 3.9K OHM 1/4W +/-5% 1 R312
18-CD0392-JNX RES. C.F. 3.9K OHM 1/4W +/-5% 1 R725
18-CD0471-JNX RES. C.F. 470 OHM 1/4W +/-5% 1 R044
18-CD0829-JNX RES. C.F. 8.2 OHM 1/4W +/-5% 1 R605
18-CD0829-JNX RES. C.F. 8.2 OHM 1/4W +/-5% 1 R606
18-CE0121-JNX RES. C.F. 120 OHM 1/2W +/-5% 1 R731
18-CE0229-JNX RES. C.F. 2.2 OHM 1/2W +/-5% 1 R305
21
Page 22
Item No. Description Quantity Req. Designator Remarks
18-EG0109-JHX RES. FUS. 1 OHM 2W +/-5% 1 R422
18-EG0109-JHX RES. FUS. 1 OHM 2W +/-5% 1 R431
18-EG0159-JHX RES. FUS. 1.5 OHM 2W +/-5% 1 R461
18-FE0121-JNX RES. M.O. 120 OHM 1/2W +/-5% 1 R306
18-FE0472-JNX RES. M.O. 4.7K OHM 1/2W +/-5% 1 R471
18-FF0221-JGX RES. M.O. 220 OHM 1W +/-5% 1 R307
18-FF0242-JGX RES. M.O. 2.4K OHM 1W +/-5% 1 R402
18-FF0681-JGX RES. M.O. 680 OHM 1W +/-5% 1 R411
18-FG0103-JHX RES. M.O. 10K OHM 2W +/-5% 1 R421
18-FG0399-JHX RES. M.O. 3.9 OHM 2W +/-5% 1 R726
18-FG0479-JHX RES. M.O. 4.7 OHM 2W +/-5% 1 R303
25-264610-M1X CAP. ELEC 4.7UF 50V +/-20% NP 1 C417
25-BKA100-M1X CAP. ELEC 10 UF 200V +/-20% 1 C421
25-BKG101-M1X CAP. ELEC 100 UF 200V +/-20% 1 C422
25-BLA100-M1X CAP. ELEC 10 UF 250V +/-20% 1 C442
26-AIC221-KBX CAP. CER 220 PF 500V +/-10% B 1 C431
26-AIC221-KBX CAP. CER 220 PF 500V +/-10% B 1 C441
26-AIC332-KBX CAP. CER 3300 PF 500V +/-10% B 1 C402
26-AIC391-KBX CAP. CER 390 PF 500V +/-10% B 1 C403
26-AIM103-KBX CAP. CER 0.01UF 500V +/-10% B 1 C401
26-EBP100-JCX CAP. CER 10PF 50V +/-5% CH 1 C022
26-EBP100-JCX CAP. CER 10PF 50V +/-5% CH 1 C023
26-EBP101-JCX CAP. CER 100PF 50V +/-5% CH 1 C245
26-EBP101-JCX CAP. CER 100PF 50V +/-5% CH 1 C254
26-EBP102-KBX CAP. CER 1000 PF 50V +/-10% B 1 C002
26-EBP102-KBX CAP. CER 1000 PF 50V +/-10% B 1 C003
26-EBP102-KBX CAP. CER 1000 PF 50V +/-10% B 1 C008
26-EBP102-KBX CAP. CER 1000 PF 50V +/-10% B 1 C009
26-EBP102-KBX CAP. CER 1000 PF 50V +/-10% B 1 C011
26-EBP102-KBX CAP. CER 1000 PF 50V +/-10% B 1 C019
26-EBP102-KBX CAP. CER 1000 PF 50V +/-10% B 1 C024
26-EBP102-KBX CAP. CER 1000 PF 50V +/-10% B 1 C025
26-EBP102-KBX CAP. CER 1000 PF 50V +/-10% B 1 C085
26-EBP102-KBX CAP. CER 1000 PF 50V +/-10% B 1 C108
26-EBP102-KBX CAP. CER 1000 PF 50V +/-10% B 1 C109
26-EBP102-KBX CAP. CER 1000 PF 50V +/-10% B 1 C224
26-EBP102-KBX CAP. CER 1000 PF 50V +/-10% B 1 C305
26-EBP102-KBX CAP. CER 1000 PF 50V +/-10% B 1 C411
26-EBP102-KBX CAP. CER 1000 PF 50V +/-10% B 1 C312
26-EBP102-KBX CAP. CER 1000 PF 50V +/-10% B 1 C615
26-EBP102-KBX CAP. CER 1000 PF 50V +/-10% B 1 C616
22
Page 23
Item No. Description Quantity Req. Designator Remarks
26-EBP102-KBX CAP. CER 1000 PF 50V +/-10% B 1 T141
26-EBP102-KBX CAP. CER 1000 PF 50V +/-10% B 1 C022A
26-EBP103-ZFX CAP. CER 0.01UF 50V +80/-20% F 1 C020
26-EBP103-ZFX CAP. CER 0.01UF 50V +80/-20% F 1 C029
26-EBP103-ZFX CAP. CER 0.01UF 50V +80/-20% F 1 C075
26-EBP103-ZFX CAP. CER 0.01UF 50V +80/-20% F 1 C103
26-EBP103-ZFX CAP. CER 0.01UF 50V +80/-20% F 1 C105
26-EBP103-ZFX CAP. CER 0.01UF 50V +80/-20% F 1 C106
26-EBP103-ZFX CAP. CER 0.01UF 50V +80/-20% F 1 C203
26-EBP103-ZFX CAP. CER 0.01UF 50V +80/-20% F 1 C205
26-EBP103-ZFX CAP. CER 0.01UF 50V +80/-20% F 1 C215
26-EBP103-ZFX CAP. CER 0.01UF 50V +80/-20% F 1 C226
26-EBP103-ZFX CAP. CER 0.01UF 50V +80/-20% F 1 C229
26-EBP103-ZFX CAP. CER 0.01UF 50V +80/-20% F 1 C256
26-EBP103-ZFX CAP. CER 0.01UF 50V +80/-20% F 1 C273
26-EBP103-ZFX CAP. CER 0.01UF 50V +80/-20% F 1 C275
26-EBP103-ZFX CAP. CER 0.01UF 50V +80/-20% F 1 C732
26-EBP103-ZFX CAP. CER 0.01UF 50V +80/-20% F 1 C915
26-EBP120-JCX CAP. CER 12PF 50V +/-5% CH 1 C209
26-EBP150-JCX CAP. CER 15PF 50V +/-5% CH 1 C014
26-EBP150-JCX CAP. CER 15PF 50V +/-5% CH 1 C015
26-EBP150-JCX CAP. CER 15PF 50V +/-5% CH 1 C016
26-EBP150-JCX CAP. CER 15PF 50V +/-5% CH 1 C017
26-EBP220-JZX CAP. CER 22PF 50V +/-5% SL TU 1 C013
26-EBP221-JCX CAP. CER 220PF 50V +/-5% CH 1 C026
26-EBP222-KBX CAP. CER 2200PF 50V +/-10% B 1 C207
26-EBP222-KBX CAP. CER 2200PF 50V +/-10% B 1 C221
26-EBP222-KBX CAP. CER 2200PF 50V +/-10% B 1 C604
26-EBP222-KBX CAP. CER 2200PF 50V +/-10% B 1 C606
26-EBP330-JCX CAP. CER 33PF 50V +/-5% CH 1 C917
26-EBP330-JZX CAP. CER 33PF 50V +/-5% SL TU 1 C017A
26-EBP331-JCX CAP. CER 330PF 50V +/-5% CH 1 C301
26-EBP390-JCX CAP. CER 39PF 50V +/-5% CH 1 C018
26-EBP470-JZX CAP. CER 47PF 50V +/-5% SL 1 C035
26-EBP470-JZX CAP. CER 47PF 50V +/-5% SL 1 C036
27-ALQ332-J0X CAP. M.PP 3300PF 1.6KV +/-5% 1 C413
27-ALQ392-J0X CAP. M.PP 3900PF 1.6KV +/-5% 1 C415
27-ALR922-J0X CAP. M.PP 0.0092UF 1.6KV +/-5% 1 C414
27-MBC104-J0X CAP. M.P.E 0.1 UF 63V +/-5% 1 C211
27-MBC104-J0X CAP. M.P.E 0.1 UF 63V +/-5% 1 C213
27-MBC104-J0X CAP. M.P.E 0.1 UF 63V +/-5% 1 C212
23
Page 24
Item No. Description Quantity Req. Designator Remarks
27-MBC104-J0X CAP. M.P.E 0.1 UF 63V +/-5% 1 C242
27-MBC104-J0X CAP. M.P.E 0.1 UF 63V +/-5% 1 C252
27-MBC224-J0X CAP. M.P.E 0.22UF 63V +/-5% 1 C307
27-MBC333-J0X CAP. M.P.E 0.033UF 63V +/-5% 1 C302
27-MBC393-J0X CAP. M.P.E 0.039UF 63V +/-5% 1 C308
27-MBC474-J0X CAP. M.P.E 0.47UF 63V +/-5% 1 C225
27-MBC474-J0X CAP. M.P.E 0.47UF 63V +/-5% 1 C603
27-MBC474-J0X CAP. M.P.E 0.47UF 63V +/-5% 1 C605
27-MCC272-J0X CAP. M.P.E 2700PF 100V +/-5% 1 C471
27-PBC223-J0X CAP. P.E 0.022 UF 63V +/-5% 1 C610
27-PBC223-J0X CAP. P.E 0.022 UF 63V +/-5% 1 C612
27-PBC472-J0X CAP. P.E 0.0047UF 63V +/-5% 1 C244
27-PBC563-J0X CAP. P.E 0.056 UF 63V +/-5% 1 C304
27-PBC682-J0X CAP. P.E 0.0068UF 63V +/-5% 1 C251
27-RHQ223-J0X CAP. PP 0.022 UF 400V +/-5% 1 C416
27-RHQ563-J0X CAP. PP 0.056 UF 400V +/-5% 1 C451
34-A608K6-1BX COIL CHOKE 0.6 UH +/-10% 1 L412
34-R100J2-0EX COIL PL - 10 UH +/-5% 1 L252
34-R101J2-0EX COIL PL - 100 UH +/-5% 1 L201
34-R101J2-0EX COIL PL - 100 UH +/-5% 1 L211
34-R101J2-0EX COIL PL - 100 UH +/-5% 1 L271
34-R109J2-0EX COIL PL - 1 UH +/-5% 1 L103
34-R109J2-0EX COIL PL - 1 UH +/-5% 1 L141
34-R220J2-0EX COIL PL - 22 UH +/-5% 1 L001
34-R220J2-0EX COIL PL - 22 UH +/-5% 1 L204
34-R220J2-0EX COIL PL - 22 UH +/-5% 1 L911
34-R220J2-0EX COIL PL - 22 UH +/-5% 1 L931
34-R220J2-0EX COIL PL - 22 UH +/-5% 1 L005
34-R229J2-0EX COIL PL - 2.2 UH +/-5% 1 L002
34-R330J2-0EX COIL PL - 33 UH +/-5% 1 L101
36-LIN210-XX1 COIL LINEARITY 21 UH 1 L413
36-WID801-XX1 COIL WIDTH 800 UH 1 L414
37-BSC290-1650X FLYBACK BSC29-0165 1 T461
38-236083-00X COIL IFT FOR VCO 45.75MHZ 1 T271
41-BF0050-0BB WIRE UL 1007 #24 50MM BLK 1 FOR P2/P001 TO S006/R085A
41-WJ0050-B00 WIRE BARE JUMPER 5MM 1 C662
41-WJ0050-B00 WIRE BARE JUMPER 5MM 1 C744
41-WJ0050-B00 WIRE BARE JUMPER 5MM 1 FOR Q749(B-E)
41-WJ0050-B00 WIRE BARE JUMPER 5MM 1 L102
41-WJ0050-B00 WIRE BARE JUMPER 5MM 1 C112
41-WJ0060-B00 WIRE BARE JUMPER 6mm 1 J010
24
Page 25
Item No. Description Quantity Req. Designator Remarks
41-WJ0060-B00 WIRE BARE JUMPER 6mm 1 J011
41-WJ0060-B00 WIRE BARE JUMPER 6mm 1 J041
41-WJ0060-B00 WIRE BARE JUMPER 6mm 1 J046
41-WJ0060-B00 WIRE BARE JUMPER 6mm 1 J054
41-WJ0060-B00 WIRE BARE JUMPER 6mm 1 J240
41-WJ0060-B00 WIRE BARE JUMPER 6mm 1 J105
41-WJ0060-B00 WIRE BARE JUMPER 6mm 1 J205
41-WJ0060-B00 WIRE BARE JUMPER 6mm 1 J205A
41-WJ0060-B00 WIRE BARE JUMPER 6mm 1 J208A
41-WJ0060-B00 WIRE BARE JUMPER 6mm 1 J216
41-WJ0060-B00 WIRE BARE JUMPER 6mm 1 J217A
41-WJ0060-B00 WIRE BARE JUMPER 6mm 1 J218A
41-WJ0060-B00 WIRE BARE JUMPER 6mm 1 J242
41-WJ0060-B00 WIRE BARE JUMPER 6mm 1 J243
41-WJ0060-B00 WIRE BARE JUMPER 6mm 1 J258
41-WJ0060-B00 WIRE BARE JUMPER 6mm 1 J608
41-WJ0060-B00 WIRE BARE JUMPER 6mm 1 J622
41-WJ0060-B00 WIRE BARE JUMPER 6mm 1 J624
41-WJ0060-B00 WIRE BARE JUMPER 6mm 1 J651A
41-WJ0060-B00 WIRE BARE JUMPER 6mm 1 J719A
41-WJ0060-B00 WIRE BARE JUMPER 6mm 1 J075
41-WJ0060-B00 WIRE BARE JUMPER 6mm 1 J909
41-WJ0060-B00 WIRE BARE JUMPER 6mm 1 J910
41-WJ0060-B00 WIRE BARE JUMPER 6mm 1 J916
41-WJ0060-B00 WIRE BARE JUMPER 6mm 1 J917
41-WJ0060-B00 WIRE BARE JUMPER 6mm 1 J919
41-WJ0060-B00 WIRE BARE JUMPER 6mm 1 J922
41-WJ0060-B00 WIRE BARE JUMPER 6mm 1 R082A
41-WJ0060-B00 WIRE BARE JUMPER 6mm 1 R115
41-WJ0060-B00 WIRE BARE JUMPER 6mm 1 R219A
41-WJ0060-B00 WIRE BARE JUMPER 6mm 1 R238
41-WJ0060-B00 WIRE BARE JUMPER 6mm 1 R751
41-WJ0060-B00 WIRE BARE JUMPER 6mm 1 R041
41-WJ0060-B00 WIRE BARE JUMPER 6mm 1 R083A
41-WJ0065-B00 WIRE BARE JUMPER 6.5MM 1 J031
41-WJ0065-B00 WIRE BARE JUMPER 6.5MM 1 J209
41-WJ0065-B00 WIRE BARE JUMPER 6.5MM 1 J215
41-WJ0065-B00 WIRE BARE JUMPER 6.5MM 1 J237
41-WJ0065-B00 WIRE BARE JUMPER 6.5MM 1 J632
41-WJ0065-B00 WIRE BARE JUMPER 6.5MM 1 J633
41-WJ0065-B00 WIRE BARE JUMPER 6.5MM 1 J908
25
Page 26
Item No. Description Quantity Req. Designator Remarks
41-WJ0065-B00 WIRE BARE JUMPER 6.5MM 1 JP213
41-WJ0070-B00 WIRE BARE JUMPER 7MM 1 J044
41-WJ0070-B00 WIRE BARE JUMPER 7MM 1 J207
41-WJ0070-B00 WIRE BARE JUMPER 7MM 1 J915
41-WJ0075-B00 WIRE BARE JUMPER 7.5MM 1 J024
41-WJ0075-B00 WIRE BARE JUMPER 7.5MM 1 J038
41-WJ0075-B00 WIRE BARE JUMPER 7.5MM 1 J040
41-WJ0075-B00 WIRE BARE JUMPER 7.5MM 1 J042
41-WJ0075-B00 WIRE BARE JUMPER 7.5MM 1 J047
41-WJ0075-B00 WIRE BARE JUMPER 7.5MM 1 J048
41-WJ0075-B00 WIRE BARE JUMPER 7.5MM 1 J049
41-WJ0075-B00 WIRE BARE JUMPER 7.5MM 1 J201A
41-WJ0075-B00 WIRE BARE JUMPER 7.5MM 1 J208
41-WJ0075-B00 WIRE BARE JUMPER 7.5MM 1 J210
41-WJ0075-B00 WIRE BARE JUMPER 7.5MM 1 J223A
41-WJ0060-B00 WIRE BARE JUMPER 6mm 1 J235
41-WJ0075-B00 WIRE BARE JUMPER 7.5MM 1 J238
41-WJ0075-B00 WIRE BARE JUMPER 7.5MM 1 J301
41-WJ0075-B00 WIRE BARE JUMPER 7.5MM 1 J303
41-WJ0075-B00 WIRE BARE JUMPER 7.5MM 1 J307
41-WJ0075-B00 WIRE BARE JUMPER 7.5MM 1 J309
41-WJ0075-B00 WIRE BARE JUMPER 7.5MM 1 J610
41-WJ0075-B00 WIRE BARE JUMPER 7.5MM 1 J615
41-WJ0075-B00 WIRE BARE JUMPER 7.5MM 1 J706
41-WJ0075-B00 WIRE BARE JUMPER 7.5MM 1 J704
41-WJ0075-B00 WIRE BARE JUMPER 7.5MM 1 J717
41-WJ0075-B00 WIRE BARE JUMPER 7.5MM 1 J718
41-WJ0075-B00 WIRE BARE JUMPER 7.5MM 1 J719
41-WJ0075-B00 WIRE BARE JUMPER 7.5MM 1 J911
41-WJ0085-B00 WIRE BARE JUMPER 8.5MM 1 J052
41-WJ0085-B00 WIRE BARE JUMPER 8.5MM 1 J057
41-WJ0085-B00 WIRE BARE JUMPER 8.5MM 1 J206
41-WJ0085-B00 WIRE BARE JUMPER 8.5MM 1 J251
41-WJ0085-B00 WIRE BARE JUMPER 8.5MM 1 J905
41-WJ0085-B00 WIRE BARE JUMPER 8.5MM 1 J241
41-WJ0090-B00 WIRE BARE JUMPER 9MM 1 J034
41-WJ0095-B00 WIRE BARE JUMPER 9.5MM 1 J906
41-WJ0100-B00 WIRE BARE JUMPER 10MM 1 J002
41-WJ0100-B00 WIRE BARE JUMPER 10MM 1 J003
41-WJ0100-B00 WIRE BARE JUMPER 10MM 1 J022
41-WJ0100-B00 WIRE BARE JUMPER 10MM 1 J102A
26
Page 27
Item No. Description Quantity Req. Designator Remarks
41-WJ0100-B00 WIRE BARE JUMPER 10MM 1 J103
41-WJ0100-B00 WIRE BARE JUMPER 10MM 1 J201
41-WJ0100-B00 WIRE BARE JUMPER 10MM 1 J202
41-WJ0100-B00 WIRE BARE JUMPER 10MM 1 J221A
41-WJ0070-B00 WIRE BARE JUMPER 7MM 1 J402
41-WJ0100-B00 WIRE BARE JUMPER 10MM 1 J403
41-WJ0100-B00 WIRE BARE JUMPER 10MM 1 J607
41-WJ0100-B00 WIRE BARE JUMPER 10MM 1 J612
41-WJ0100-B00 WIRE BARE JUMPER 10MM 1 J708
41-WJ0100-B00 WIRE BARE JUMPER 10MM 1 J902
41-WJ0100-B00 WIRE BARE JUMPER 10MM 1 J913
41-WJ0100-B00 WIRE BARE JUMPER 10MM 1 J918
41-WJ0100-B00 WIRE BARE JUMPER 10MM 1 R282
41-WJ0100-B00 WIRE BARE JUMPER 10MM 1 R283
41-WJ0100-B00 WIRE BARE JUMPER 10MM 1 R284
41-WJ0100-B00 WIRE BARE JUMPER 10MM 1 R285
41-WJ0105-B00 WIRE BARE JUMPER 10.5MM 1 J023
41-WJ0105-B00 WIRE BARE JUMPER 10.5MM 1 J304
41-WJ0110-B00 WIRE BARE JUMPER 11MM 1 J037
41-WJ0110-B00 WIRE BARE JUMPER 11MM 1 J055
41-WJ0110-B00 WIRE BARE JUMPER 11MM 1 J710
41-WJ0110-B00 WIRE BARE JUMPER 11MM 1 J711
41-WJ0110-B00 WIRE BARE JUMPER 11MM 1 J712
41-WJ0115-B00 WIRE BARE JUMPER 11.5MM 1 J043
41-WJ0115-B00 WIRE BARE JUMPER 11.5MM 1 J611
41-WJ0115-B00 WIRE BARE JUMPER 11.5MM 1 J709
41-WJ0115-B00 WIRE BARE JUMPER 11.5MM 1 J051
41-WJ0120-B00 WIRE BARE JUMPER 12MM 1 J606
41-WJ0120-B00 WIRE BARE JUMPER 12MM 1 J912
41-WJ0125-B00 WIRE BARE JUMPER 12.5MM 1 J026
41-WJ0125-B00 WIRE BARE JUMPER 12.5MM 1 J027
41-WJ0125-B00 WIRE BARE JUMPER 12.5MM 1 J028
41-WJ0125-B00 WIRE BARE JUMPER 12.5MM 1 J045
41-WJ0125-B00 WIRE BARE JUMPER 12.5MM 1 J058
41-WJ0125-B00 WIRE BARE JUMPER 12.5MM 1 J059
41-WJ0125-B00 WIRE BARE JUMPER 12.5MM 1 J104
41-WJ0125-B00 WIRE BARE JUMPER 12.5MM 1 J259
41-WJ0125-B00 WIRE BARE JUMPER 12.5MM 1 J411
41-WJ0125-B00 WIRE BARE JUMPER 12.5MM 1 J415
41-WJ0125-B00 WIRE BARE JUMPER 12.5MM 1 J901
41-WJ0125-B00 WIRE BARE JUMPER 12.5MM 1 J925
27
Page 28
Item No. Description Quantity Req. Designator Remarks
41-WJ0125-B00 WIRE BARE JUMPER 12.5MM 1 J926
41-WJ0135-B00 WIRE BARE JUMPER 13.5MM 1 J920
41-WJ0140-B00 WIRE BARE JUMPER 14MM 1 J006
41-WJ0140-B00 WIRE BARE JUMPER 14MM 1 J007
41-WJ0140-B00 WIRE BARE JUMPER 14MM 1 J008
41-WJ0140-B00 WIRE BARE JUMPER 14MM 1 J009
41-WJ0140-B00 WIRE BARE JUMPER 14MM 1 J015
41-WJ0140-B00 WIRE BARE JUMPER 14MM 1 J016
41-WJ0150-B00 WIRE BARE JUMPER 15MM 1 J001
41-WJ0150-B00 WIRE BARE JUMPER 15MM 1 FOR S002/R082A TO S001/R087A
41-WJ0150-B00 WIRE BARE JUMPER 15MM 1 J030
41-WJ0150-B00 WIRE BARE JUMPER 15MM 1 J036
41-WJ0150-B00 WIRE BARE JUMPER 15MM 1 J039
41-WJ0150-B00 WIRE BARE JUMPER 15MM 1 J050
41-WJ0150-B00 WIRE BARE JUMPER 15MM 1 J212
41-WJ0150-B00 WIRE BARE JUMPER 15MM 1 J214
41-WJ0150-B00 WIRE BARE JUMPER 15MM 1 J246
41-WJ0150-B00 WIRE BARE JUMPER 15MM 1 J248
41-WJ0150-B00 WIRE BARE JUMPER 15MM 1 J249
41-WJ0150-B00 WIRE BARE JUMPER 15MM 1 J602
41-WJ0150-B00 WIRE BARE JUMPER 15MM 1 J609
41-WJ0150-B00 WIRE BARE JUMPER 15MM 1 J627
41-WJ0150-B00 WIRE BARE JUMPER 15MM 1 J628
41-WJ0150-B00 WIRE BARE JUMPER 15MM 1 J629
41-WJ0150-B00 WIRE BARE JUMPER 15MM 1 J914
41-WJ0150-B00 WIRE BARE JUMPER 15MM 1 J921
41-WJ0155-B00 WIRE BARE JUMPER 15.5MM 1 J308
41-WJ0155-B00 WIRE BARE JUMPER 15.5MM 1 J407
41-WJ0155-B00 WIRE BARE JUMPER 15.5MM 1 J408
41-WJ0165-B00 WIRE BARE JUMPER 16.5MM 1 J616
41-WJ0165-B00 WIRE BARE JUMPER 16.5MM 1 J617
41-WJ0165-B00 WIRE BARE JUMPER 16.5MM 1 R103
41-WJ0170-B00 WIRE BARE JUMPER 17MM 1 J218
41-WJ0170-B00 WIRE BARE JUMPER 17MM 1 J219
41-WJ0170-B00 WIRE BARE JUMPER 17MM 1 J220
41-WJ0170-B00 WIRE BARE JUMPER 17MM 1 J222
41-WJ0170-B00 WIRE BARE JUMPER 17MM 1 J221
41-WJ0175-B00 WIRE BARE JUMPER 17.5MM 1 J020
41-WJ0175-B00 WIRE BARE JUMPER 17.5MM 1 J029
41-WJ0175-B00 WIRE BARE JUMPER 17.5MM 1 J101
41-WJ0175-B00 WIRE BARE JUMPER 17.5MM 1 J203
28
Page 29
Item No. Description Quantity Req. Designator Remarks
41-WJ0175-B00 WIRE BARE JUMPER 17.5MM 1 J213
41-WJ0175-B00 WIRE BARE JUMPER 17.5MM 1 J257
41-WJ0175-B00 WIRE BARE JUMPER 17.5MM 1 J406
41-WJ0175-B00 WIRE BARE JUMPER 17.5MM 1 J619
41-WJ0175-B00 WIRE BARE JUMPER 17.5MM 1 J923
41-WJ0175-B00 WIRE BARE JUMPER 17.5MM 1 J928
41-WJ0175-B00 WIRE BARE JUMPER 17.5MM 1 J929
41-WJ0175-B00 WIRE BARE JUMPER 17.5MM 1 J412
41-WJ0180-B00 WIRE BARE JUMPER 18MM 1 J224
41-WJ0180-B00 WIRE BARE JUMPER 18MM 1 J905A
41-WJ0195-B00 WIRE BARE JUMPER 19.5MM 1 J305
41-WJ0195-B00 WIRE BARE JUMPER 19.5MM 1 J306
41-WJ0200-B00 WIRE BARE JUMPER 20MM 1 J228
41-WJ0200-B00 WIRE BARE JUMPER 20MM 1 J229
41-WJ0200-B00 WIRE BARE JUMPER 20MM 1 J230
41-WJ0200-B00 WIRE BARE JUMPER 20MM 1 J231
41-WJ0190-B00 WIRE BARE JUMPER 19MM 1 J232
41-WJ0190-B00 WIRE BARE JUMPER 19MM 1 J234
41-WJ0200-B00 WIRE BARE JUMPER 20MM 1 J250
41-WJ0200-B00 WIRE BARE JUMPER 20MM 1 J252
41-WJ0200-B00 WIRE BARE JUMPER 20MM 1 J621
41-WJ0200-B00 WIRE BARE JUMPER 20MM 1 J630
41-WJ0200-B00 WIRE BARE JUMPER 20MM 1 J631
45-OSC16M-0Y0 CRYSTAL 16MHZ 1 X001
45-OSC4M4-3Y0 CRYSTAL 4.43MHz (CL=16pF) 1 X201
45-TRA4M5-0Y0 CER TRAP TPS 4.5MHZ 1 Z252
46-12866W-02X PIN BASE *2 S11-02Y 1 P601 F FOR F.CAB(SPK)
46-20598W-04X PIN BASE *4 TJC1-4A 1 P411 F FOR D.Y CONNECTOR
46-33079W-02X PIN BASE *2 TJC3-2A 1 P602 F FOR F.CAB(SPK)
46-33079W-04X PIN BASE *4 TJC3-4A 1 P421 F FOR CRT BD P502
46-33079W-05X PIN BASE *5 TJC3-5A 1 P201 F FOR CRT BD P503
46-33079W-06X PIN BASE *6 TJC3-6A 1 P002 F FOR W.BAL. ADJUST
46-33079W-07X PIN BASE *7 TJC3-7A 1 P901 F FOR SIDE AV BD P902
47-RCA023-XX1 RCA JACK 3PV YEL WHI RED/SW 1 P911
47-RCA023-XX1 RCA JACK 3PV YEL WHI RED/SW 1 P941
48-TAC002-XX0 TACT SWITCH 1 S006
48-TAC002-XX0 TACT SWITCH 1 S007
48-TAC002-XX0 TACT SWITCH 1 S008
48-TAC002-XX0 TACT SWITCH 1 S009
48-TAC002-XX0 TACT SWITCH 1 S010
48-TAC002-XX0 TACT SWITCH 1 S011
29
Page 30
Item No. Description Quantity Req. Designator Remarks
48-TAC002-XX0 TACT SWITCH 1 S005
48-TAC002-XX0 TACT SWITCH 1 S014A
54-128700-0X0 FIBRE WASHER 3.3 X 10 X 0.8 2 FOR FBT
62-226920-0HA LED HOLDER ABS-LG H121 (HB) 1
62-227680-0UA BRACKET ABS-KINGFA 606 (UO) 1
62-313410-0HA BRACKET 1
63-B30100-BT4 S/T SCREW B 3 X 10 BT 2 MTG FBT & M.BD
63-W30100-AB4 S/T SCREW W 3 X 10 AB 7 MTG M.BD & M.BD BKT
63-W30120-AB4 S/T SCREW W 3 X 12 AB 1 MTG FBT BKT & M.BD BKT
64-B30120-104 M/C SCREW B 3 X 12 2 MTG IC601
64-P30080-104 M/C SCREW P 3 X 8 3 FOR Q722 & IC301 & Q412
65-Z30050-23M NUT M 3 2 FOR IC301 & Q412
66-343730-0B0 HOLLOW RIVET 1.6X3.0XL3.2 10 FOT T461
67-H27292-1A0 HEAT SINK 1 FOR Q722
67-H30147-1A0 HEAT SINK 1 FOR Q412
67-H34423-5A0 HEAT SINK (A=50 C=17.5MM) 1 FOR IC601
70-271510-00A SERVICE CARD 1 FOR PRODUCTION USE
71-270870-0A9 LABEL 2
90-209770-SR1 SILICONE GREASE G-746 0.0009
90-269080-ZU0 CLEAN COATING TC-131L 14KG/BARREL 0.0001
10-79C33V-DBX DIODE ZENER 33V 1/2W 5% 1 D101
41-WJ0060-B00 WIRE BARE JUMPER 6mm 1 R224
10-0FR104-FBX DIODE FR104 (FAST RECTIFIER) 1 D412
10-0FR104-FBX DIODE FR104 (FAST RECTIFIER) 1 D421
10-0FR104-FBX DIODE FR104 (FAST RECTIFIER) 1 D431
10-0FR104-FBX DIODE FR104 (FAST RECTIFIER) 1 D441
10-HS4V7C-DBX DIODE 500mW 4.7HSC 1 D222
10-HS5V1B-DBX DIODE 500mW 5.1HSB 1 D001
10-79C8V2-DBX DIODE ZENER 8V2 1/2W 5% 1 D471
10-HS12VC-DBX DIODE 500mW 12HSC 1 D731
10-HS12VC-DBX DIODE 500mW 12HSC 1 D732
36-HDR001-AX1 TRANSFOR HOR. DRIVE (MAGNETIC CORE) 1 T401
51-BC0243-0DG01 POWER CORD UL PLUG HOUS *3P 1
25-GFB109-K1X CAP. ELEC 1UF 50V +/-10% 1 C223
66-343730-0B0 HOLLOW RIVET 1.6X3.0XL3.2 2 FOR L413
66-343730-0B0 HOLLOW RIVET 1.6X3.0XL3.2 2 FOR C418
66-343730-0B0 HOLLOW RIVET 1.6X3.0XL3.2 2 FOR C414
66-343730-0B0 HOLLOW RIVET 1.6X3.0XL3.2 2 FOR D411
66-343730-0B0 HOLLOW RIVET 1.6X3.0XL3.2 2 FOR C415
66-343730-0B0 HOLLOW RIVET 1.6X3.0XL3.2 2 FOR C412
66-343730-0B0 HOLLOW RIVET 1.6X3.0XL3.2 2 FOR C413
30
Page 31
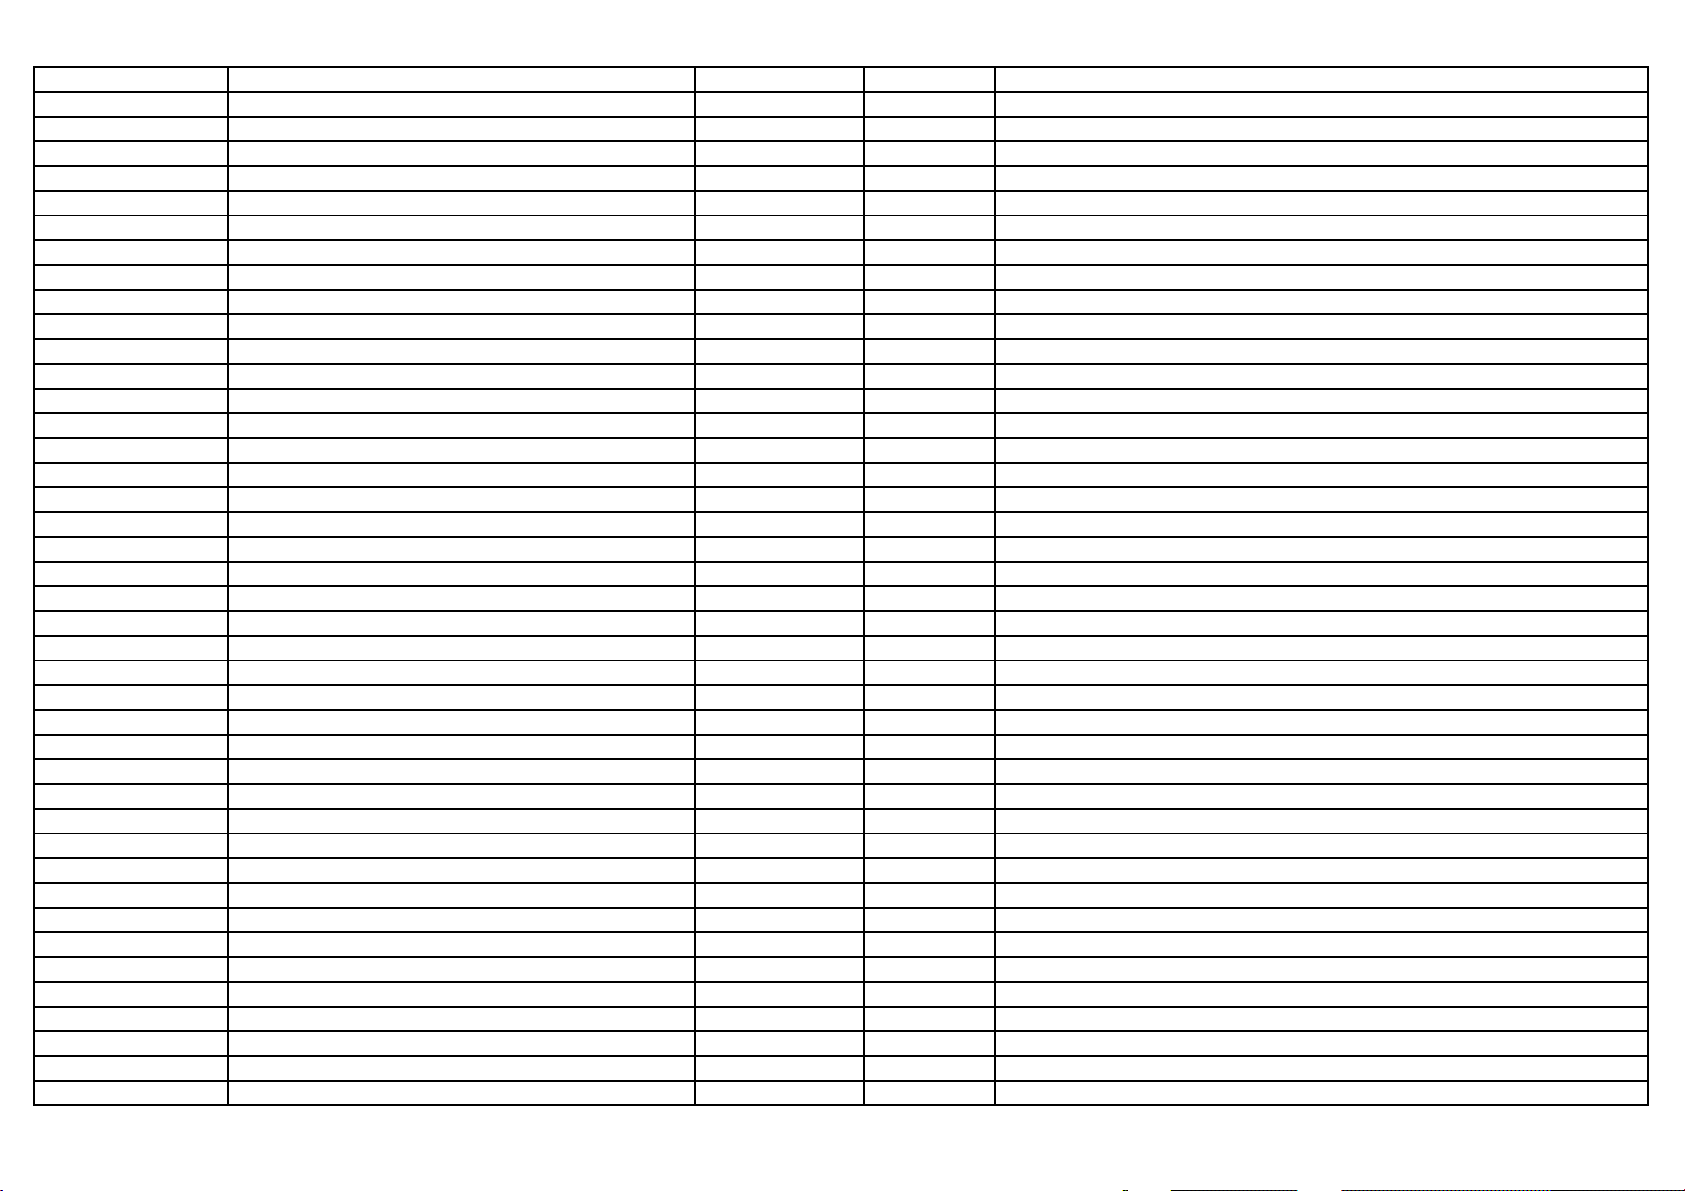
Item No. Description Quantity Req. Designator Remarks
66-343730-0B0 HOLLOW RIVET 1.6X3.0XL3.2 3 FOR Q412
66-343730-0B0 HOLLOW RIVET 1.6X3.0XL3.2 2 FOR C416
66-343730-0B0 HOLLOW RIVET 1.6X3.0XL3.2 2 FOR L141
26-EBP221-JCX CAP. CER 220PF 50V +/-5% CH 1 C232
41-WJ0175-B00 WIRE BARE JUMPER 17.5MM 1 J618
25-BCB100-M1X CAP. ELEC 10 UF 16V +/-20% 1 C074
25-BCB100-M1X CAP. ELEC 10 UF 16V +/-20% 1 C214
25-BCB100-M1X CAP. ELEC 10 UF 16V +/-20% 1 C276
25-BCB101-M1X CAP. ELEC 100 UF 16V +/-20% 1 C021
25-BCB101-M1X CAP. ELEC 100 UF 16V +/-20% 1 C217
25-BCB101-M1X CAP. ELEC 100 UF 16V +/-20% 1 C228
25-BCB101-M1X CAP. ELEC 100 UF 16V +/-20% 1 C257
25-BCB101-M1X CAP. ELEC 100 UF 16V +/-20% 1 C631
25-BCB101-M1X CAP. ELEC 100 UF 16V +/-20% 1 C901
25-BCB101-M1X CAP. ELEC 100 UF 16V +/-20% 1 C902
25-BCB101-M1X CAP. ELEC 100 UF 16V +/-20% 1 C914
25-BCB101-M1X CAP. ELEC 100 UF 16V +/-20% 1 C227
25-BCB220-M1X CAP. ELEC 22 UF 16V +/-20% 1 C278
25-BCB221-M1X CAP. ELEC 220 UF 16V +/-20% 1 C911
25-BCB470-M1X CAP. ELEC 47 UF 16V +/-20% 1 C202
25-BCB470-M1X CAP. ELEC 47 UF 16V +/-20% 1 C274
25-BCB470-M1X CAP. ELEC 47 UF 16V +/-20% 1 C630
25-BCB470-M1X CAP. ELEC 47 UF 16V +/-20% 1 C912
25-BCB470-M1X CAP. ELEC 47 UF 16V +/-20% 1 C913
25-BCB470-M1X CAP. ELEC 47 UF 16V +/-20% 1 C943
25-BCB470-M1X CAP. ELEC 47 UF 16V +/-20% 1 C944
25-BCB470-M1X CAP. ELEC 47 UF 16V +/-20% 1 C032
25-BCB471-M1X CAP. ELEC 470 UF 16V +/-20% 1 C030
25-BDA102-M1X CAP. ELEC 1000 UF 25V +/-20% 1 C608
25-BEA102-M1X CAP. ELEC 1000 UF 35V +/-20% 1 C432
25-BEA102-M1X CAP. ELEC 1000 UF 35V +/-20% 1 C601
25-BEA102-M1X CAP. ELEC 1000 UF 35V +/-20% 1 C609
25-BEA102-M1X CAP. ELEC 1000 UF 35V +/-20% 1 C611
25-BEA221-M1X CAP. ELEC 220 UF 35V +/-20% 1 C306
25-BEB101-M1X CAP. ELEC 100 UF 35V +/-20% 1 C731
25-BEG222-M1X CAP. ELEC 2200 UF 35V +/-20% 1 C303
25-BEG222-M1X CAP. ELEC 2200 UF 35V +/-20% 1 C309
25-BFB100-M1X CAP. ELEC 10 UF 50V +/-20% 1 C222
25-BFB100-M1X CAP. ELEC 10 UF 50V +/-20% 1 C311
25-BFB101-M1X CAP. ELEC 100 UF 50V +/-20% 1 C104
25-BFB109-M1X CAP. ELEC 1 UF 50V +/-20% 1 C206
31
Page 32
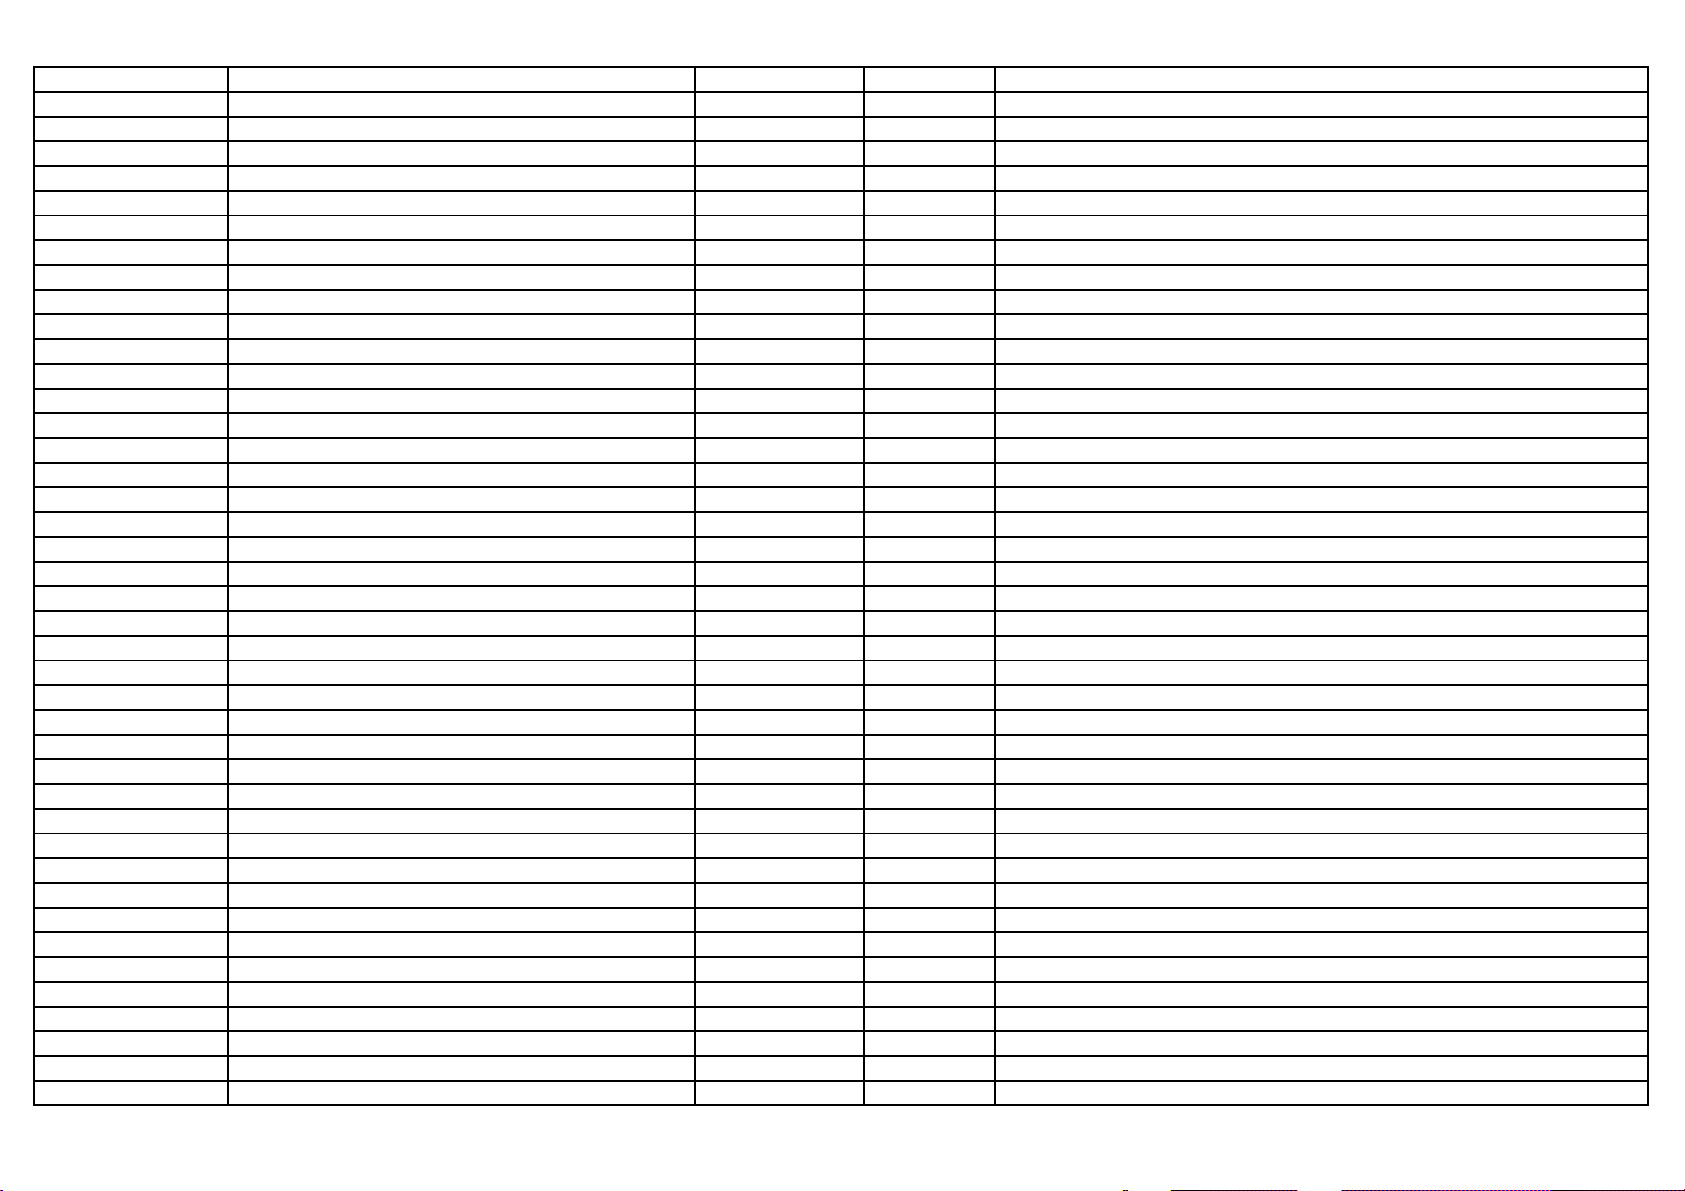
Item No. Description Quantity Req. Designator Remarks
25-BFB109-M1X CAP. ELEC 1 UF 50V +/-20% 1 C253
25-BFB109-M1X CAP. ELEC 1 UF 50V +/-20% 1 C635
25-BFB470-M1X CAP. ELEC 47 UF 50V +/-20% 1 C102
25-BFB479-M1X CAP. ELEC 4.7 UF 50V +/-20% 1 C101
25-BFB479-M1X CAP. ELEC 4.7 UF 50V +/-20% 1 C107
11-C144ES-0BX TRANSISTOR PDTC144ES (NPN) 1 Q632
27-AHR434-JSX CAP. M.PP 0.43 UF 400V +/-5% 1 C418
18-CB0151-JNX RES. C.F. 150 OHM 1/6W +/-5% 1 R271
25-BFB478-M1X CAP. ELEC 0.47 UF 50V +/-20% 1 C271
26-EBP102-KBX CAP. CER 1000 PF 50V +/-10% B 1 C272
66-382330-0B7 RIVET 2.0X3.7X3.5 2 FOR R404
41-WJ0175-B00 WIRE BARE JUMPER 17.5MM 1 J627A
41-WJ0175-B00 WIRE BARE JUMPER 17.5MM 1 J628A
18-CB0331-JNX RES. C.F. 330 OHM 1/6W +/-5% 1 R904
67-H30179-7A0 HEAT SINK 1 FOR IC301
41-WJ0060-B00 WIRE BARE JUMPER 6mm 1 J081
62-2518MB-1UN MAIN BD BRACKET 1
26-EBP101-JCX CAP. CER 100PF 50V +/-5% CH 1 C235
26-EBP101-JCX CAP. CER 100PF 50V +/-5% CH 1 C236
26-EBP101-JCX CAP. CER 100PF 50V +/-5% CH 1 C237
41-WJ0125-B00 WIRE BARE JUMPER 12.5MM 1 J211
18-RF0109-JGX RES. WIRE ROUND 1 OHM 1W +/-5% 1 R311
25-GFB478-K1X CAP. ELEC 0.47 UF 50V 10%CEC-K 1 C208
11-SC2482-0BX TRANSISTOR 2SC2482 1 Q401
11-IRR001-3X0 IR RECEIVER MODULE HK381A 1 IR001
11-DD2603-RAX TRANSISTOR 3DD2603-R 1 Q722
26-EBP103-ZFX CAP. CER 0.01UF 50V +80/-20% F 1 C204
26-EBP103-ZFX CAP. CER 0.01UF 50V +80/-20% F 1 C602
26-EBP103-ZFX CAP. CER 0.01UF 50V +80/-20% F 1 C632
26-EBP103-ZFX CAP. CER 0.01UF 50V +80/-20% F 1 C633
26-EBP103-ZFX CAP. CER 0.01UF 50V +80/-20% F 1 C037
26-EBP104-ZFX CAP. CER 0.1UF 50V +80%/-20% 1 C745
45-SAWF39-530 SAW FILTER F3953M 1 Z141
45-SAWF93-700 SAW FILTER F9370 1 Z141(1-5PIN)
26-EBP102-KBX CAP. CER 1000 PF 50V +/-10% B 1 C109A
25-GFB478-K1X CAP. ELEC 0.47 UF 50V 10%CEC-K 1 C243
18-GM0302-KTX RES. CEMENT 3K OHM 7W +/-10% 1 R404
57-10654X-00F
cable ties(2.5mmX95mm) 3
25-DFB470-M1X CAP. ELEC 47 UF 50V +/-20% 1 C916
25-DFB470-M1X CAP. ELEC 47 UF 50V +/-20% 1 C931
34-R569J2-0EX COIL PL - 5.6 UH +/-5% 1 L254
32
Page 33
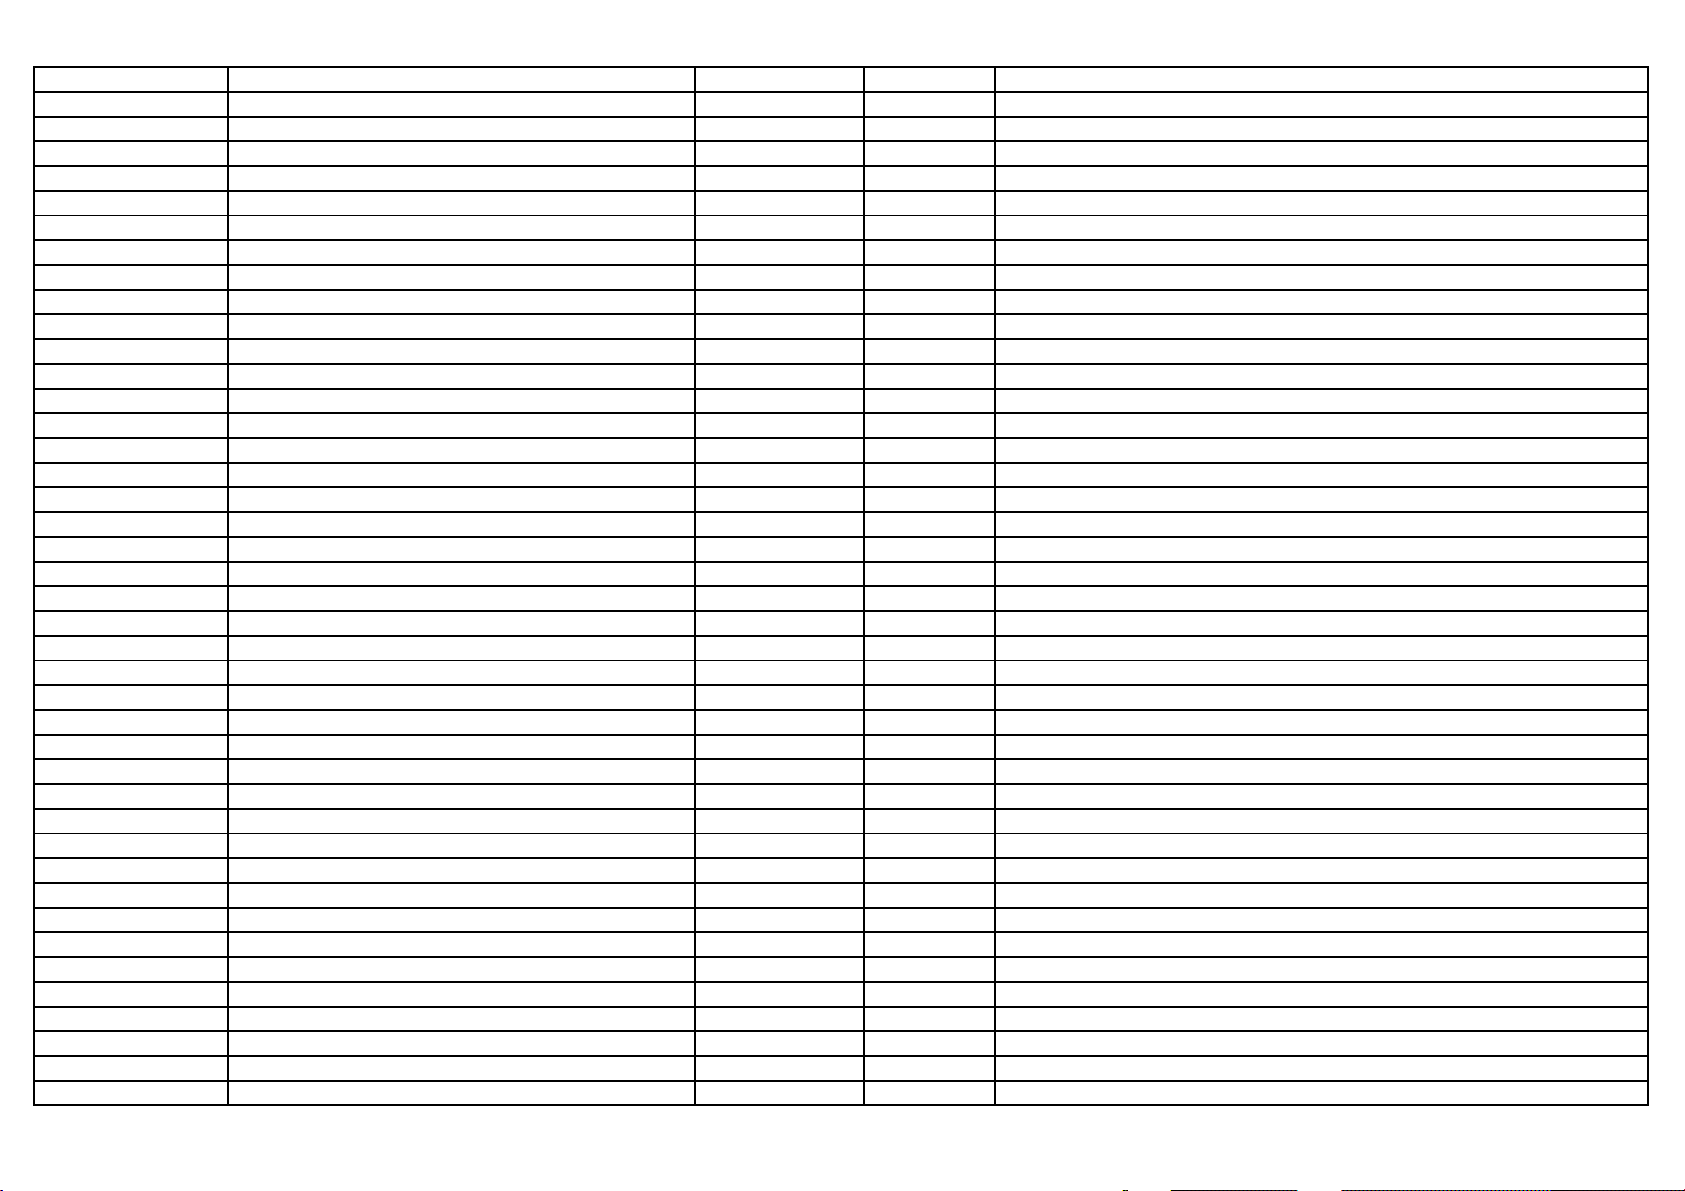
Item No. Description Quantity Req. Designator Remarks
40-2980UA-MAL P.C.B. MAIN BD 1
08-2518SM-PA1 ASS'Y - PACKING PARTS 1
72-2518SM-E03 OPERATION MANUAL 1
74-022032-6WE POLYBAG (23cmX34cmX0.06mm) 1
74-120120-80HAA POLYBAG W/SUFFOCATION WARNING 1
75-2518LL-CC0 POLYFOAM (LL) 1
75-2518LR-CC0 POLYFOAM (LR) 1
75-2518UL-CC0 POLYFOAM (UL) 1
75-2518UR-CC0 POLYFOAM (UR) 1
76-02518E-0AT CARTON BOX 1
08-HS45E0-M34A ASS'Y - REMOTE HANDSET BD 1
10-1N4148-ABX DIODE 1N4148 (SWITCHING) 1 D1502
10-1N4148-ABX DIODE 1N4148 (SWITCHING) 1 D1503
10-1N4148-ABX DIODE 1N4148 (SWITCHING) 1 D1504
10-1N4148-ABX DIODE 1N4148 (SWITCHING) 1 D1505
10-1N4148-ABX DIODE 1N4148 (SWITCHING) 1 D1507
11-0BC337-0BX TRANSISTOR (NPN) BC337-40 1 Q1501
14-IRE05B-XX0 IR EMITTING DIODE TSAL6200 1 D1501
18-CB0229-JNX RES. C.F. 2.2 OHM 1/6W +/-5% 1 R1502
18-CB0682-JNX RES. C.F. 6.8K OHM 1/6W +/-5% 1 R1501
26-EBP101-JCX CAP. CER 100PF 50V +/-5% CH 1 C1501
26-EBP101-JCX CAP. CER 100PF 50V +/-5% CH 1 C1502
40-2901NT-RMA P.C.B. REMOTE HANDSET BD 1
41-WJ0060-B00 WIRE BARE JUMPER 6mm 1 J1501
45-COS455-KY0 CERAMIC RESONATOR 455KHZ 1 X1501
49-HS45E0-00X RUBBER PAD KEYS 1
54-302000-00X FELT TAPE 15 X 4 CM 1
55-HS45EB-0HA LOWER CASE - REMOTE HANDSET 1
55-HS45ED-0HA DOOR BATT. - REMOTE HANDSET 1
55-HS45ET-1HA CASE UPPER - REMOTE HANDSET 1
56-HS45EK-1HAAA KEY KNOB (OVAL) LEFT 1
56-HS45EK-1HAAB KEY KNOB (OVAL) RIGHT 1
56-HS45EK-2HAAA KEY KNOB (OVAL) UPPER 1
56-HS45EK-2HAAB KEY KNOB (OVAL) LOWER 1
58-HS45E2-9UI INLAY REMOTE HANDSET 1
74-009022-60C POLYBAG HANDSET (9CMX22CM) 1
25-HBB470-M1X CAP. ELEC 47UF 10V +/-20% 1 C1503
13-SC9028-23B IC SC9028-023 1 IC1501
67-X26968-0E2 BATT. TERMINAL (+/-) 1
67-X29681-1E2 BATTERY CONTACT SPRING (-) 1
67-X29682-0E2 BATTERY CONTACT SPRING (+) 1
33
Page 34
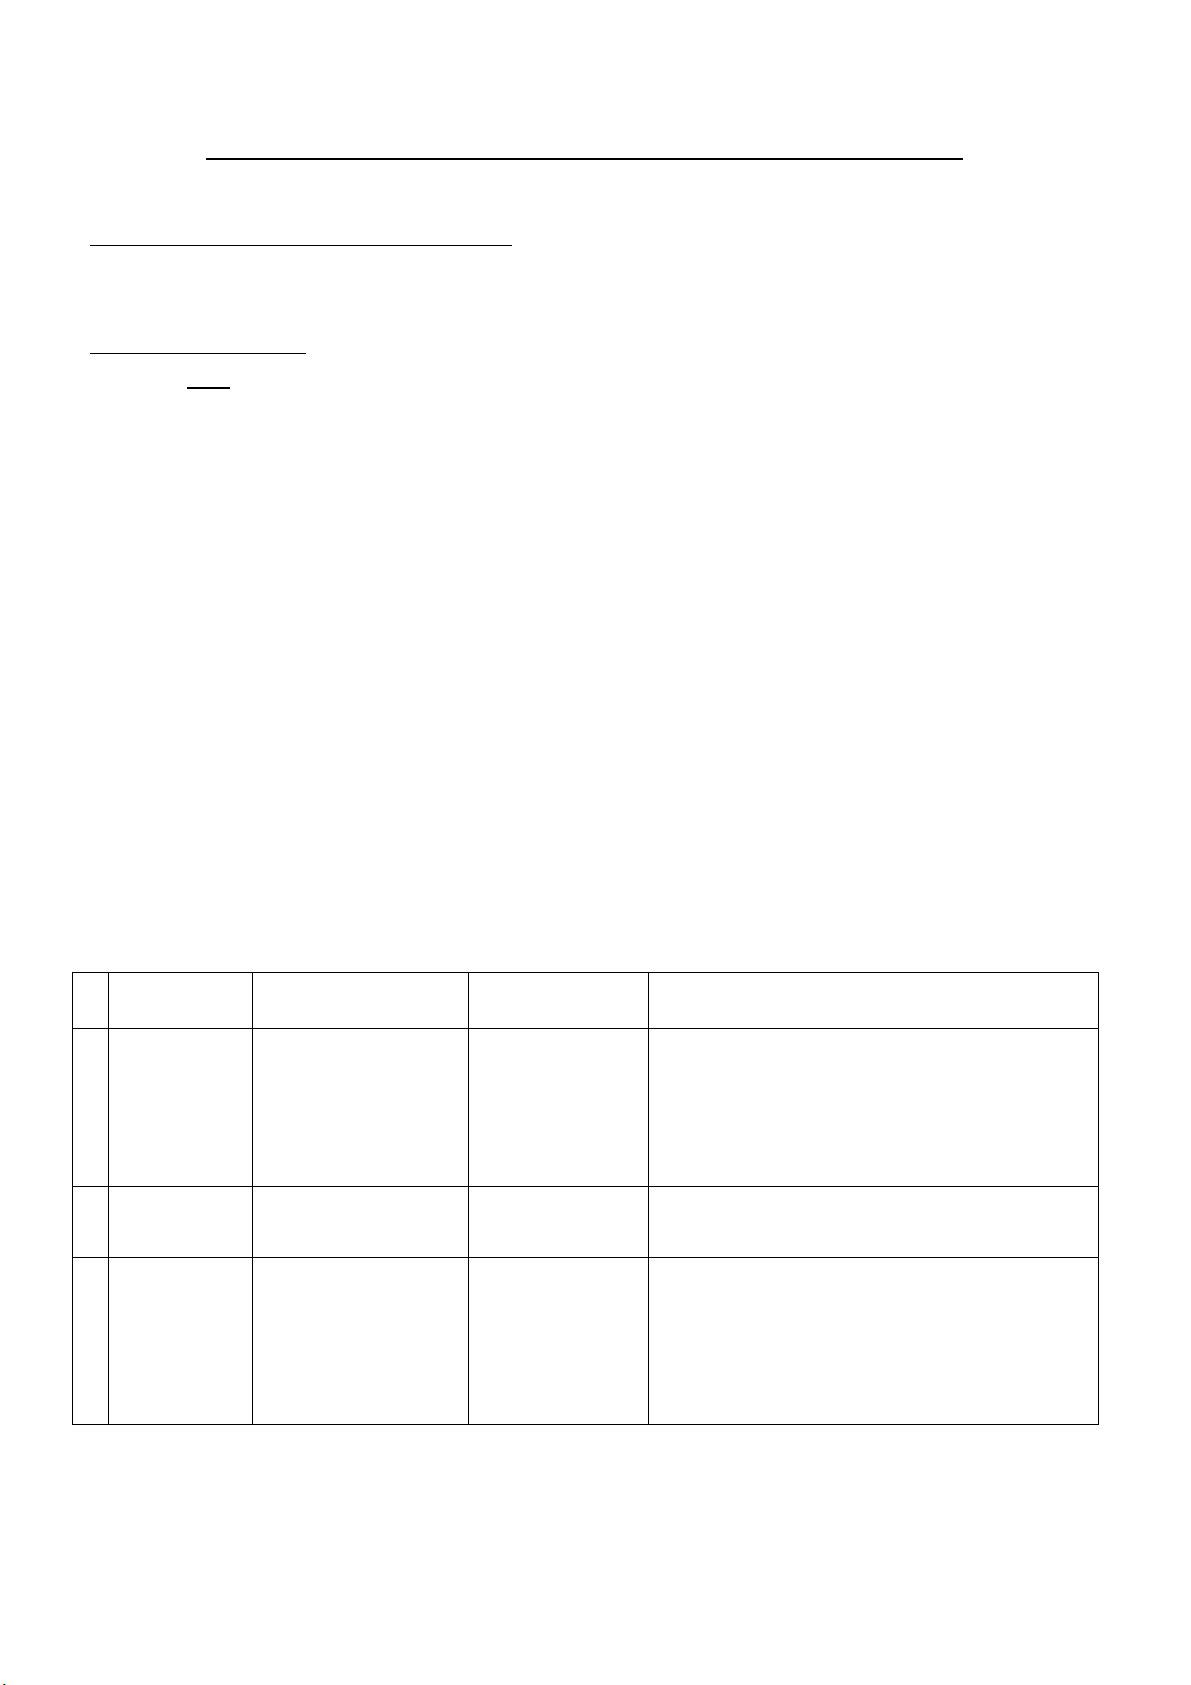
TB1240 + TCLM34 chassis alignment instruction
f
Enter factory mode in production line
Simply press the D-mode key on the factory remote handset.
Enter service mode
Press and hold the VOLUME DOWN key tightly on the unit until minimum level and don’t release the
VOLUMN DOWN key, then press the “0” key on the remote handset three times.
“D” letter on the screen indicated that the factory mode was entered. Now you can use the shortcut key
to access the factory menu. All change in factory data will save in EEPROM automatically
Note:
1. You can disable th e D-Mode key (on factory remote handset) b y change “BIT-0” of “MODE0” to
“0”. If the D-Mode key was disabled, you can’t enter D-Mode by the D-mode key on the factory
remote (but you can still enter service mode). It is suggested to disable the D-Mod e key b efore the
set leave the factory.
2. On the factory remote handset, you can find the “BUS OFF” key. It can cut off the I2C control from
the CPU to other IC. This is only useful when automatic adjustment of white balance.
3. All system data in menu of “key 7” must keep unchanged when servicing. Otherwise, the se t may not
work properly.
Setting method:
No Adjustment
Items
1 Screen
voltage
2 Focus voltage ------------ Cross hatch
3 VCO ------------ Apply an IF
Data Name (default
value inside blanket)
------------ “IRGB cut off”
Conditions and
input signal
must set to 80 (all
signal (see tuner
frequency) to the
pattern)
pattern.
spec. for
IF input.
Setting method (need enter D-mode)
Press “-/--” key on the remote handset and
the screen will become a horizontal line.
Then adjust the “screen” VR on the
flyback until the horizontal line can just be
seen (minimum visible intensity).
Adjust the “focus” VR on the flyback until
the screen becomes clear.
Monitor the DC voltage at pin 48 o
IC201, then adjust T271 until the voltage at
pin 48 become 4.62 +/- 0.02 V.
Press the AFT button on the factory remote
and AFT adjustment will be done
automatically.
Page 35
4 Vertical
f
f
geometry for
PAL system
(Key 2)
VPOS50 (03)
HIGH50 (1A)
VLIN50 (04)
VSC50 (05)
OSD50 (2F)
Input a PAL cross
hatch pattern.
Adjust VPOS50 for vertical position.
Adjust HIGH50 for vertical amplitude.
Adjust VLIN50 for vertical linearity.
Adjust VSC50 for vertical S-correction
Adjust OSD50 for OSD position (normally
use default value).
5 Vertical
geometry for
NTSC system
(Key 3)
6 Horizontal
geometry for
PAL system
(Key 4)
7 Horizontal
geometry for
NTSC system
(Key 5)
VPOS60 (00)
HIGH60 (21)
VLIN60 (05)
VSC60 (08)
OSD60 (2B)
HPOS50 (0F)
HSIZE50 (18)
PARA50 (18)
TRAP50 (0C)
CORN50 (0D)
VEHT50 (03)
HEHT50 (04)
HPOS60 (14)
HSIZE60 (18)
PARA60 (1A)
TRAP60 (0D)
CORN60 (0D)
VEHT60 (02)
HEHT60 (04)
Input a NTSC
cross hatch
pattern.
Input a PAL cross
hatch pattern with
black and white
background.
Input a NTSC
cross hatch
pattern with black
and white
background.
Adjust VPOS60 for vertical position.
Adjust HIGH60 for vertical amplitude.
Adjust VLIN60 for vertical linearity.
Adjust VSC60 for vertical S-correction
Adjust OSD60 for OSD position (normally
use default value).
Adjust HPOS50 for horizontal position.
Adjust HSIZE50 for horizontal width.
Adjust PARA50, TRAP50 and CORN50
until the vertical line at left and right side
of the picture become straight.
VEHT and HENT is for the picture size
stability when changing the brightness o
the screen. Receive pattern o f cross hatch
with black background and then change to
white background, then compare the
vertical and horizontal size between black
and white background. Adjust VEHT and
HEHT until you get the minimum
difference of screen size. After you adjust
VEHT and HEHT, you must re-adjust
vertical and horizontal amplitude.
Adjust HPOS60 for horizontal position.
Adjust HSIZE60 for horizontal width.
Adjust PARA60, TRAP60 and CORN60
until the vertical line at left and right side
of the picture become straight.
Adjust VEHT and HEHT using same
method of PAL system. Also need readjustment of vertical and horizontal
amplitude.
8Key 6
(Status
adjustment)
RFAGC (35)
PIFAFT (44)
HAFC (00)
S-B-Y (08)
S-R-Y (08)
Receive a 60dB
grey scale + color
bar signal
RFAGC – monitor the voltage at AGC pin
of the tuner. Then increase the setting o
RFAGC until the tuner AGC voltage reach
maximum (about 5V). Then decrease the
RFAGC setting until the AGC voltage just
drop.
Adjust S-B-Y and S-R-Y to get the optimal
color for SECAM system.
Please keep the PIFAFT value after auto
AFT adjustment.
HAFC item must use the default value.
Page 36
(curve of
volume
control)
9 White balance
adjustment
(key 1)
VLOMAX (7E)
VOL05 (48)
VOL25 (65)
VOL50 (70)
R CUT (80)
G CUT (80)
B CUT (80)
G DRV (40)
B DRV (40)
--------- VOLMAX is the volume output level at
100%.
VOL05 is the volume output level at 5%
VOL25 is the volume output level at 25%
VOL50 is the volume output level at 50%
Remark: The value of VOL05, VOL25 and
VOL50 was not suggested to vary in every set.
It is suggested to use the default value.
Black and white
pattern (PAL)
1. Measure the dark side of the picture with a
color analyzer and set RCUT to 80. Then
adjust BCUT and GCUT until the data on
the analyzer become x = 284, y = 299.
2. Measure the bright side of the picture,
Then adjust BDRV and GDRV until the
data on the analyzer become x = 284, y =
299.
3. Repeat step 1 and 2 until you get right
color on both dark and bright side of the
screen.
Other adjustment (default value was suggested, except BRTC)
10 Key 0 OSD (07)
OSDF (65)
TXCX (30)
RGCN (20)
TNTX (28)
TNTN (28)
---------- OSD – OSD position
OSDF - Oscillating frequency setting
TXCX – OSD intensity when maximum
RGCN – OSD intensity when minimum
TNTX – maximum tint level
TNTN – minimum tint level
contrast
contrast
11 Key 8 SCNT (0F)
CNTX (3F)
CNTN (00)
BRTX (20)
BRTN (20)
COLX (35)
COLN (00)
12 Key 9 CNTC (25)
BRTC (40)
COLC (50)
TNTC (35)
COLP (00)
COLS (54)
BRTS (00)
---------- SCNT – sub contrast for luminance signal
CNTX – maximum contrast
CNTN – minimum contrast
BRTX – maximum brightness
BRTN – minimum brightness
COLX – maximum color
COLN – minimum color
---------- CNTC – 50% contrast
BRTC – 50% brightness
COLC – 50% color
TNTC – 50% tint
COLP – color level for PAL
COLS – color level for SECAM
BRTS – sub brightness for SECAM
For the adjustment of BRTC, re ceive an 8
step grey scale pattern and adjust all
picture settings to 50%. Then adjust B RTC
until the first and second step on the screen
can just be distinguished.
Page 37
13 SKIP key
18
V-BASS(14)
V-TRE(14)
M-BASS(32)
M-TRE(32)
T-BASS(5A)
T-TRE(5A)
MODE5(0E)
AV GAIN(19)
Smart Pic.
(Sound
Effect
Setting)
V-BASS -- Voice Bass
V-TRE -- Voice Treble
M-BASS -- Music Bass
M-TRE -- Music Treble
T-BASS -- Theatre Bass
T-TRE -- Theatre Treble
MODE 5 -- Please see "Parameter Illustration"
AV GAIN -- AV2 input audio gain
(sharpness
adjustment)
SHPTV3 (17)
SHPAV3 (1A)
SHPTV4 (16)
SHPAV4 (16)
SHPX (25)
SHPN (10)
---------- SHPTV3 – 50% sharpness in 3.58 system
(TV)
SHP AV3 – 50% sharpness in 3.58 system (AV)
SHPTV4 – 50% sharpness in 4.43 system
(TV)
SHP AV4 – 50% sharpness in 4.43 system (AV)
SHPX – maximum sharpness
SHPN – minimum sharpness
14 INTRO SELF ADJ (00)
SELF VCO (80)
CCD OSD (42)
CCD OSDF (63)
VOL OUT (73)
15 SOUND
(Sync.
Checking)
PYNX (28)
PYNN (14)
PYXS (26)
PYNS (16)
16 MARK
(Time setting)
ONTM (00)
SWTM (0A)
PLVL (80)
PNUM (00)
17 CALL
(DBE setting)
MPB-STR (43)
MPB HMC (0D)
MPB HP (07)
MPB LP (07)
MPB LIM (EC)
SUB FRE (28)
SUB HP (02)
VOL MAL (03)
---------- SELF ADJ– auto detection option
SELF VCO – auto detection of VCO
CCD OSD – adjust horizontal location for
CCD display.
CCD OSDF – oscillating fre quency se tting fo r
CCD display.
VOL OUT – adjust the level of AV audio
output.
Remark : SELF ADJ and SELF VCO are auto
adjustment, no need to adjust by manual.
----------- PYNX – upper limit of sync. checking (blue
back on/off)
PYNN –lower limit of sync. checking (blue
back on/off)
PYXS –upper limit of sync. checking (during
tuning)
PYNS –lower limit of sync. checking (during
tuning)
----------- ONTM – Blank screen timing when turn on
TV
SWTM – Degaussing timing when turn on TV
PLVL – X-ray protection start-up voltage
(input voltage of X-ray protection pin)
PNUM – X-ray protection timing setting
----------- MPB-STR – Effect Strength
MPB HMC – Harmonic content
MPB HP – High Pass Corner Frequency
MPB LP – Low Pass Corner Frequency
MPB LIM – Amplitude limit
SUB FRE – Subwoofer Corner Frequency
SUB HP – Subwoofer Complementary High
Pass Filter
VOL MAL – Volume Loudspeaker
Page 38
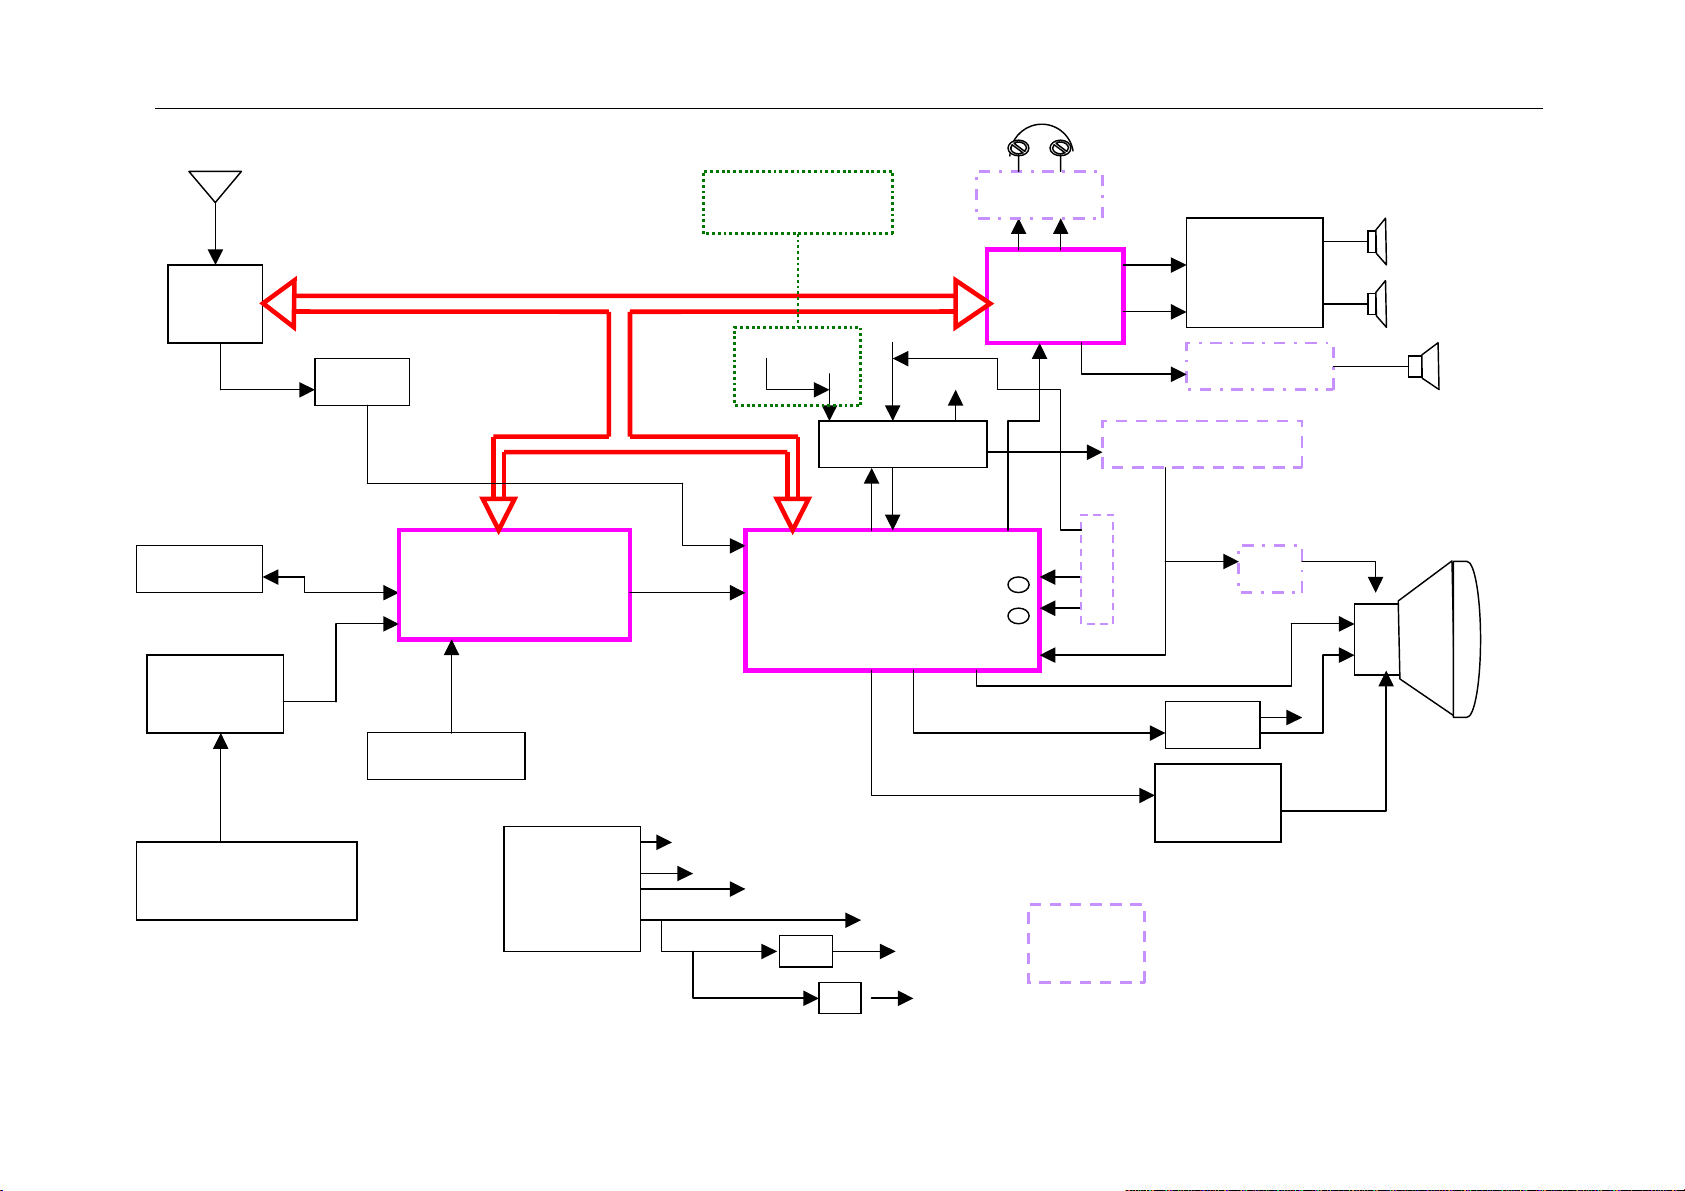
M34 Block Diagram 2002/9/5 By GaoJF
TUNER
FS
PIF&SIF
EEPROM
RECEIVER
AMP
REMOTE CONTROL
TC9028F-023
SAW
TV Body Button
2
I
C BUS
MCU
MICRO COMPUTER
TMP88CS38N
STRF6656
POWER
OSD RGB
24V
140V
In the TV body Side
S Vid eo
AV1 IN
CVBS
PAL/NTSC 1 CHIP
TB1240
12VA 12V
7809
AV2 IN
4052
CVBS/YC
V/C/D
9V
H-L H-R
TDA2822m
(MSP3440)
AV Out
SIF
Y/C
37
38
BTSC
Optional
Function
RCH
LCH
COMB.F(TDA9181)
Y
Cb
Cr
Y/C
HOUT
VERT OUT
TA8427K
TDA2616Q
TDA2616Q
VM
28V
Rsp
Lsp
WOOFER sp
CRT
7805
5V
Page 39
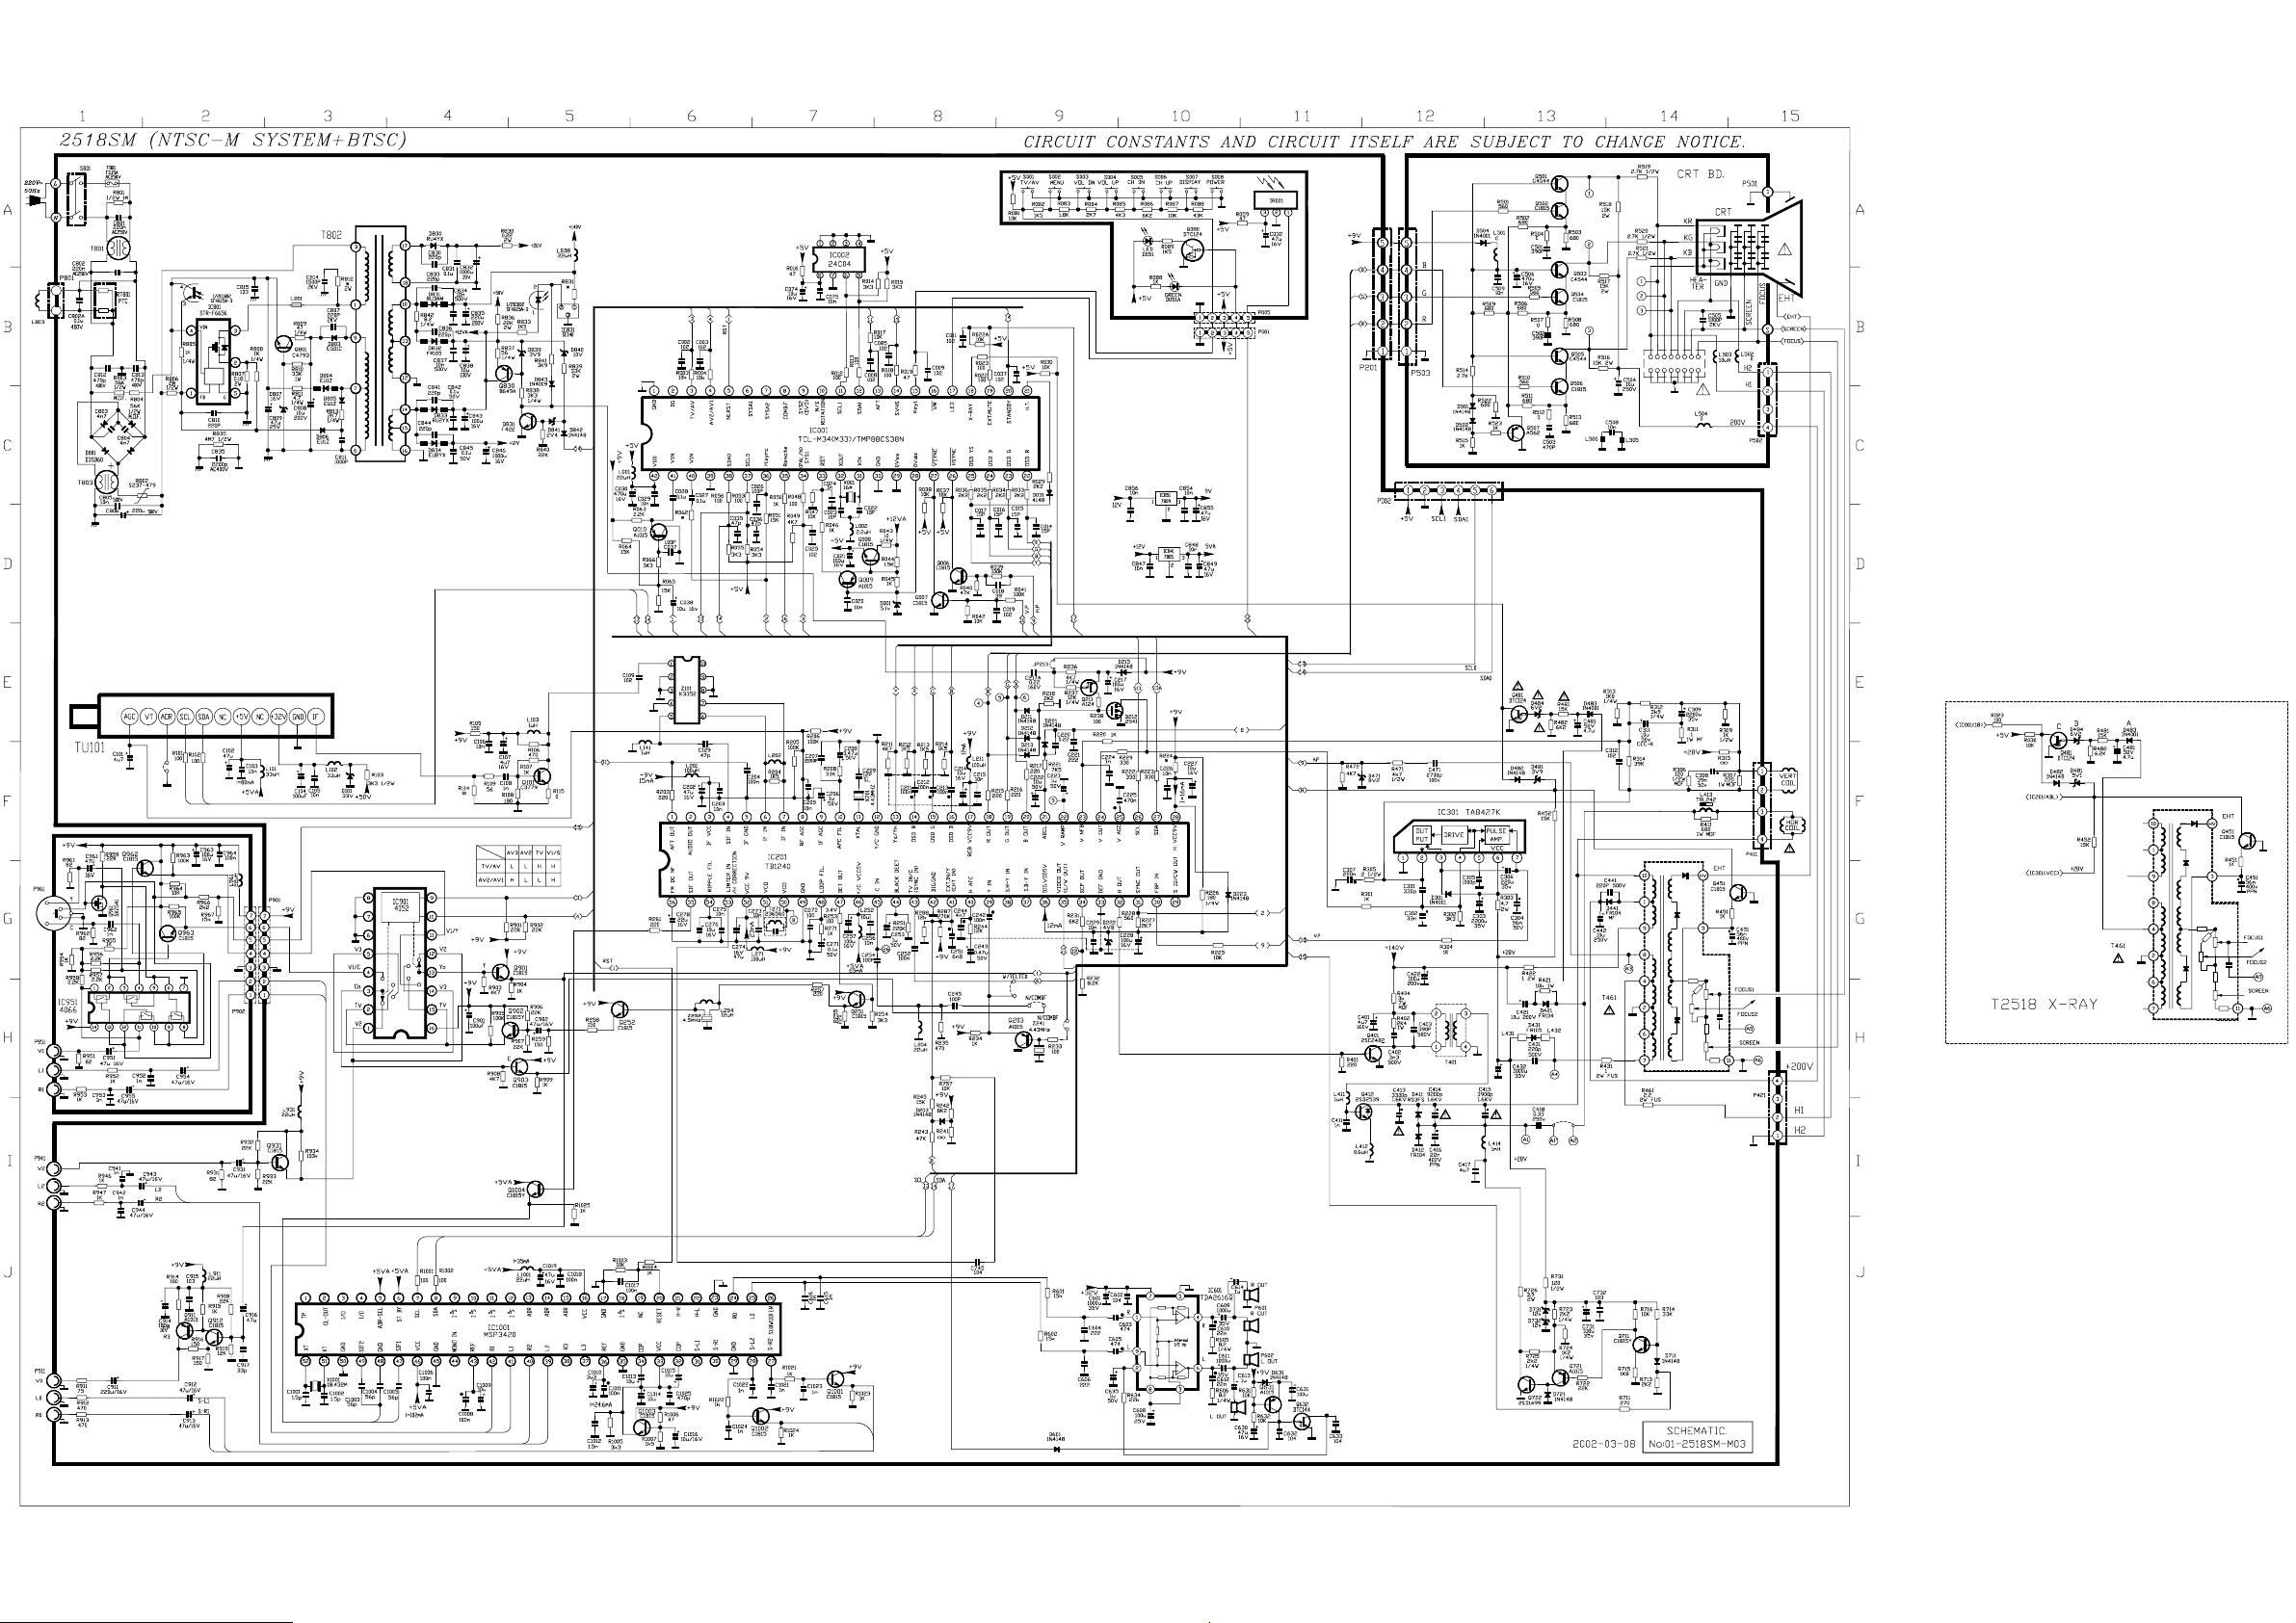
Page 40
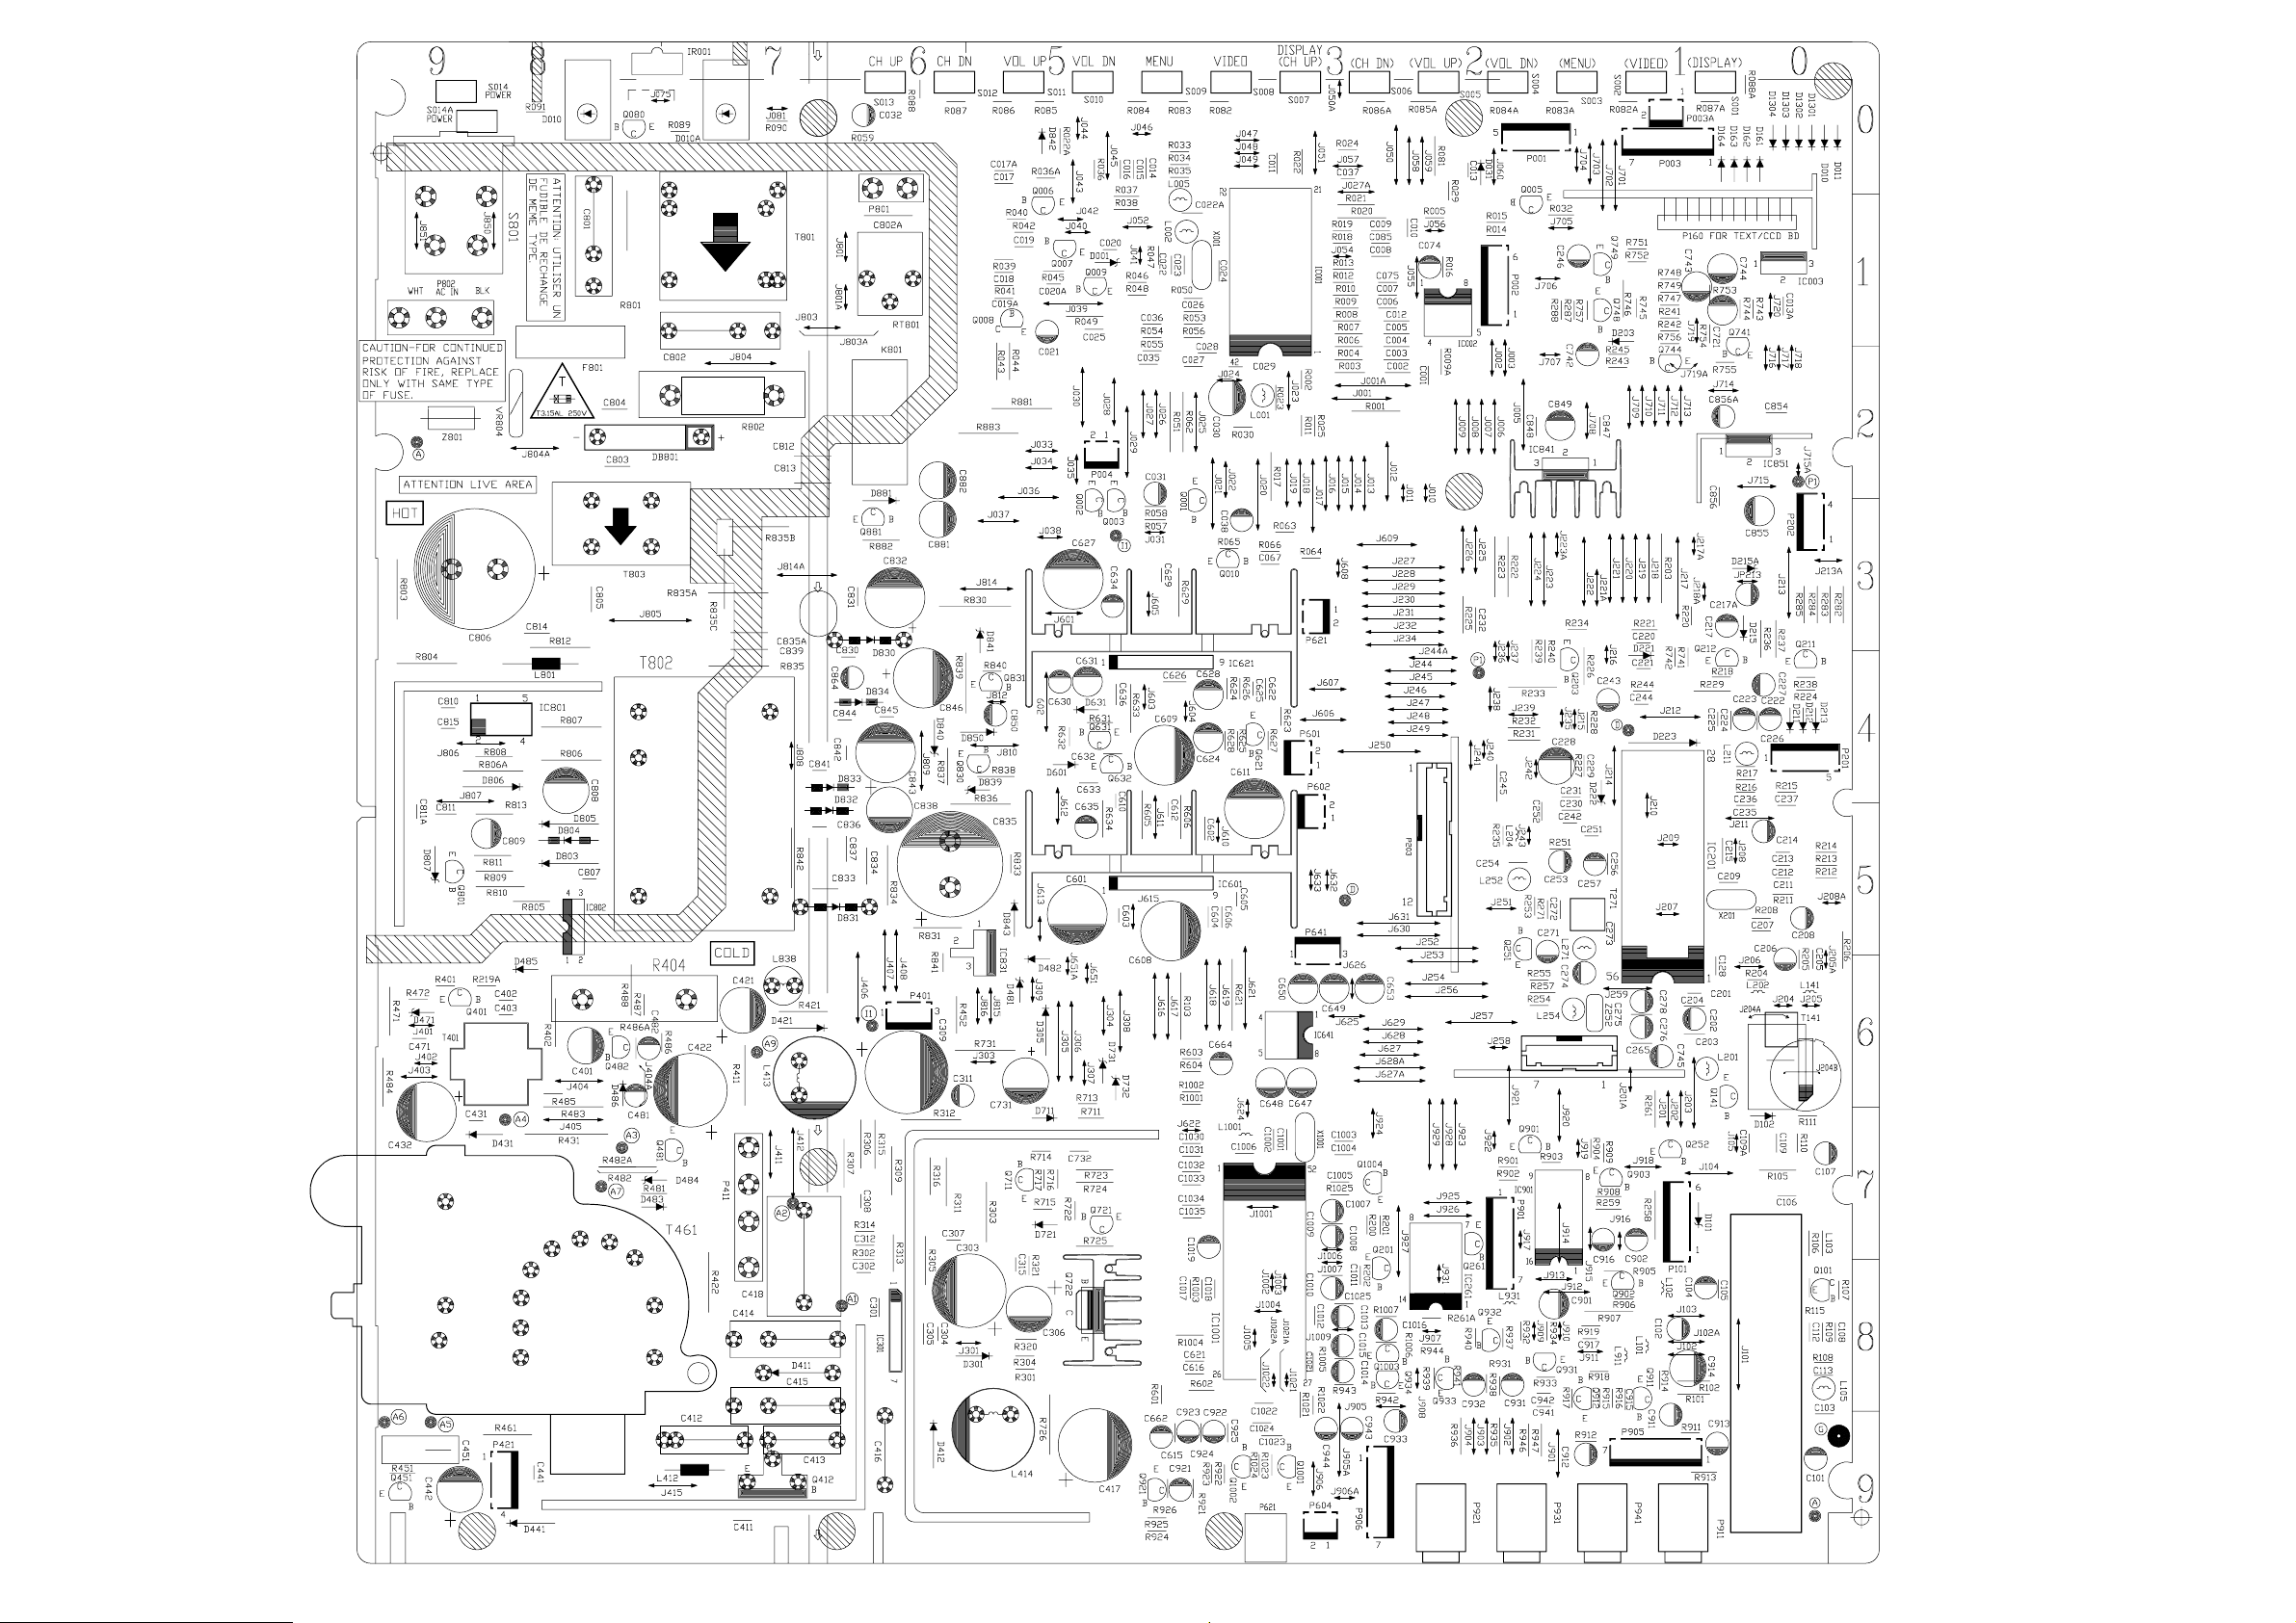
Page 41
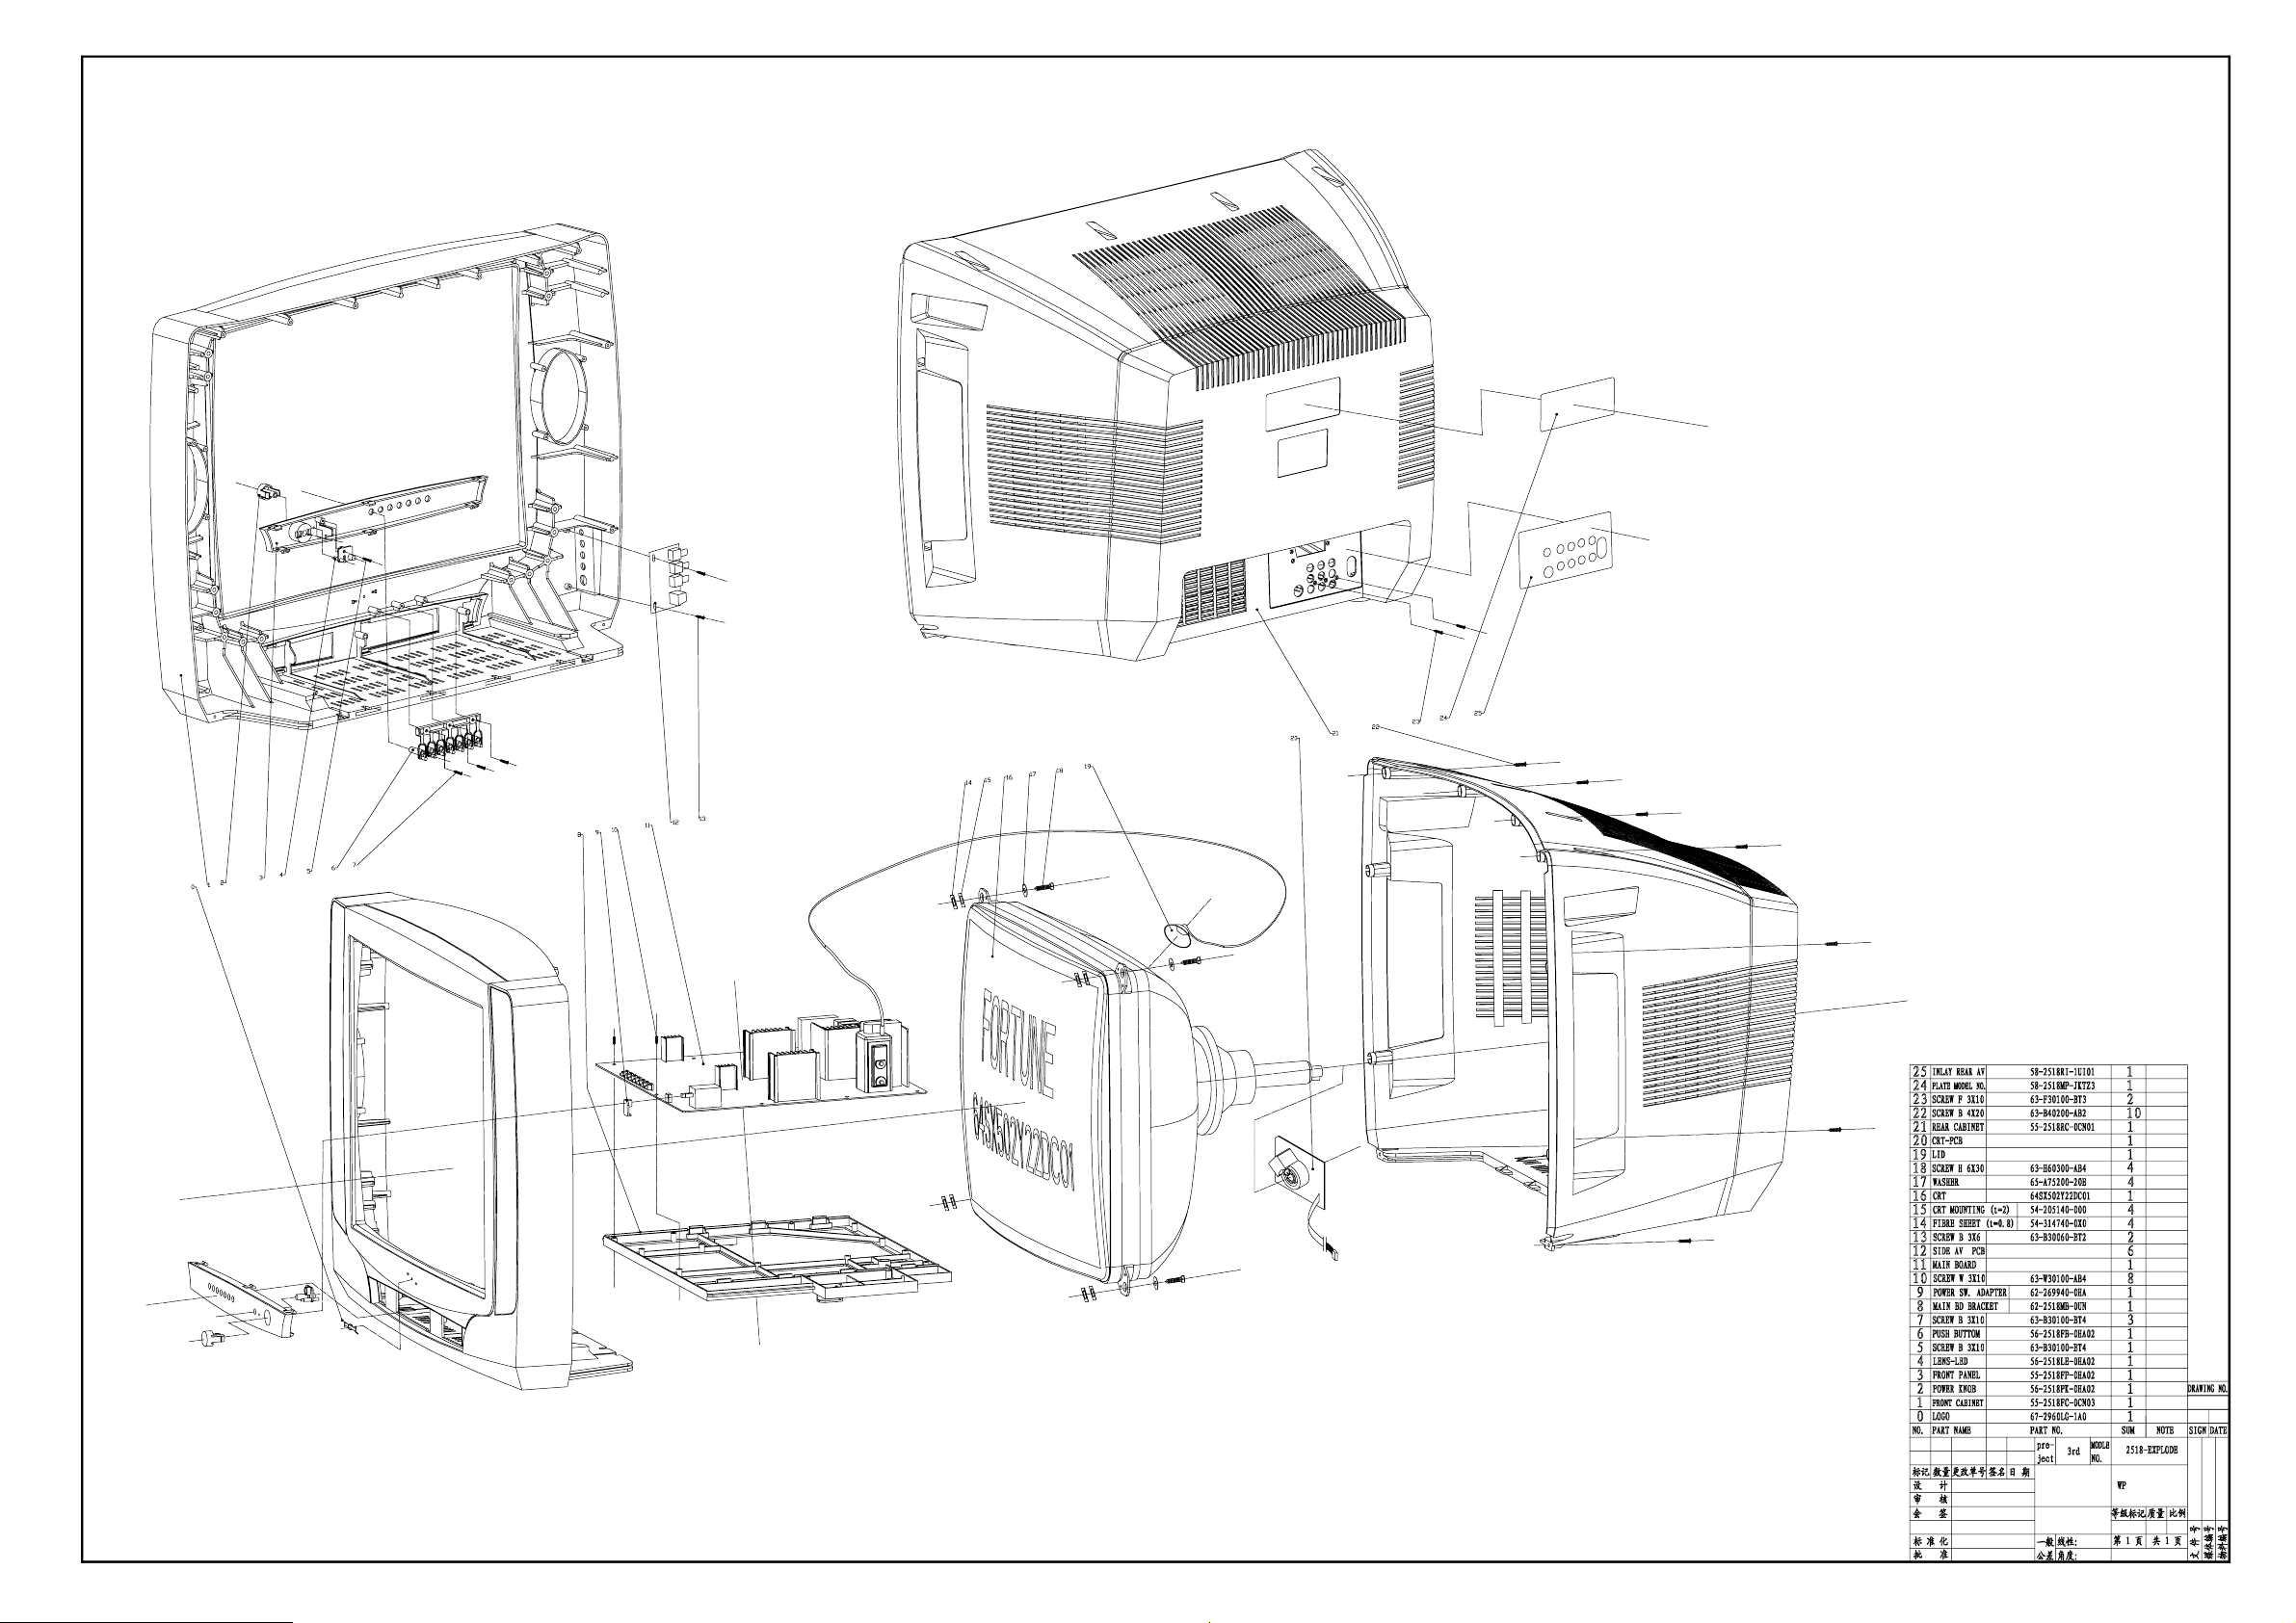
 Loading...