

www.telson.co.kr
User Manual

LIMITED WARRANTY STATEMENT
1. WHAT THIS WARRANTY COVERS :
Telson offers you a limited warranty that the enclosed subscriber unit and its enclosed
accessories will be free from defects in material and workmanship, according to
the following terms and conditions:
( 1 ) The limited warranty for the unit and enclosed accessories shall be for a period
of one(1) year from the date of original purchase. The remaining warranty period
for the unit being repaired or replaced shall be determined by presentation of
the original sales receipt for the purchase of the unit.
( 2 ) The limited warranty extends only to the original purchaser of the product and is
not assignable or transferable to any subsequent purchaser/end user.
( 3 ) The limited warranty is good only to the original purchaser of the product during
the warranty period as long as it is in the United States of America and Mexico.
( 4 ) The external housing and cosmetic parts shall be free of major defects at the time
of shipment and, therefore, shall not be covered under these limited warranty
terms.
( 5 ) Upon request from Telson, the consumer must provide information satisfactory to
Telson to prove the date of purchase or exchange.
( 6 ) The customer shall bear the cost of shipping the product to the Customer Service
Department of Telson. Telson shall bear the cost of shipping the product back to
the consumer after the completion of service under this limited warranty.
2. WHAT THIS WARRANTY DOES NOT COVER:
(1 ) Defects or damage resulting from use of the product in other than its normal and
customary manner.
( 2 ) Defect or damage from abnormal use, abnormal conditions, improper storage,
exposure to moisture or dampness, unauthorized modifications, unauthorized
connections, unauthorized repair, misuse, neglect, abuse, accident, alteration,
improper installation, or other acts which are not the fault of Telson, including
damage caused by shipping, blown fuses, or spills of food or liquid.
( 3 ) Breakage or damage to antennas unless caused directly by defects in material or
workmanship.
( 4 ) Alleged defects or malfunctions of the product if the Customer Service
Department at Telson was not notified by the consumer during the applicable
limited warranty period.
( 5 ) Products, which have had the serial number, removed or made illegible.

( 6 ) This limited warranty is in lieu of all other warranties, express or implied either in
fact or by operations of law, statutory or otherwise, including but not limited to
any implied warranty of marketability merchantability or fitness for a particular use.
( 7 ) Damage resulting from use of non-Telson approved accessories.
( 8 ) All plastic surfaces and all other externally exposed parts that are scratched or
damaged due to normal customer use.
( 9 ) Products operated outside published maximum ratings.
(10) Products used or obtained in a rental program.
(11) Consumables (such as fuses).
3. STATE LAW RIGHTS:
No other express warranty is applicable to this product. THE DURATION OF ANY IMPLIED
WARRANTIES, INCLUDING THE IMPLIED WARRANTY OF MARKETABILITY OR
MERCHANTABILITY, IS LIMITED TO THE DURATION OF THE EXPRESS WARRANTY
HEREIN. TELSON SHALL NOT BE LIABLE FOR THE LOSS OF THE USE OF THE
PRODUCT, INCONVENIENCE, LOSS OR ANY OTHER DAMAGES, DIRECT OR
CONSEQUENTIAL, ARISING OUT OF THE USE OF, OR INABILITY TO USE, THIS PRODUCT OR FOR ANY BREACH OF ANY EXPRESS OR IMPLIED WARRANTY,
INCLUDING THE IMPLIED WARANTY OF MARKETABILITY OR MERCHANTABILITY
APPLICABLE TO THIS PRODUCT.
Some states do not allow the exclusion or limitation of incidental or consequential damages or
limitations on how long an implied warranty lasts; so these limitations or exclusions may not
apply to you. This warranty gives you specific legal rights and you may also have other rights,
which vary from state to state.
4. HOW TO GET WARRANTY SERVICE :
To obtain warranty service, please call the following telephone number from anywhere
in Mexico:
HANCEL S.A DE C.V
AD : Minas Palacio No. 42, Bodega 8 Col. San Antonio Zomeyucan c.p. 53750
Naucalpan, Estado de Mexico, Mexico
TEL : (52)55 5301-3368, 5301-7515, 5301-8232
FAX : (52)55 5301-3581, 5301-3490
in America:
www.telsonusa.net
Tel. 1-866-483-5766
Please call or write for the location of the Telson authorized service center nearest
you and the procedures for obtaining warranty claims.

Copyright TELSON Corporation 2004. All rights reserved.
Any reproduction, transmission or redistribution of these materials shall be
partially or wholly prohibited without the prior written consent of Telson
Electronics Co., LTD.
The company continues to form a development policy and may be able to change
or improve the product without a prior notice.
In no case, Telson Electronics Co., LTD. shall be liable for data loss, estimated
damage to potential income, special damage, accidental damage, subsequent
damage, or indirect damages, data loss, regardless of causal factors.
The content of the manual shall be supplied as it is. Telson Electronics Co., LTD.
does not guarantee the accuracy and reliability of the manual nor be responsible
for otherwise apparent or implied warranty of the commercial purpose or specific
appropriateness of the contents in the related materials as long as applicable
laws require the foregoing matters. Telson Electronics Co., LTD. may revise or
withdraw the manual without any prior notice.
A certain product may not be offered for sale depending on a region. Please
inquire about it at the nearest Telson Electronics Co., LTD. branch or shop.

Menu map
NOTE: Numbers in parenthesis next to each item are the locations of the items in the
menu structure. Numbers less than 10 can be used as “short cut numbers”. Short
cuts can be used to access menus quickly by pressing the numeric keys on the
keypad after entering Menu Mode.
CALL INFO (1)
All Calls (1-1)
Missed Calls (1-2)
Received Calls (1-3)
Dialled numbers (1-4)
Clear Logs (1-5)
Call Timers (1-6)
GPRS Info (1-7)
SONND(2)
Bell/Melody(2-1)
RingerVib(2-2)
Effect Sound(2-3)
Bell Volume(2-4)
Effect Volume(2-5)
Audio Profiles(2-6)
PDA (3)
Schedule(3-1)
MEMO(3-2)
Alarm(3-3)
World Time(3-4)
Calculator(3-5)
Find Schedule
Reservation Call
Anniversary
Settings (4)
Phone Setting(4-1)
Call Setting(4-2)
Divert(4-3)
Display
Clock Setting
Backlight
Language
Software Version
Network Setting(4-4)
Security(4-5)
Reset Settings(4-6)
SMS (5)
Message Inbox(5-1)
Message Outbox(5-2)
Send Message(5-3)
Message Box(5-4)
Setting(5-5)
Voice Mail(5-6)
Broadcast
Message(5-7)
Select Network
SIM Password
Handset Lock
Handset Call Barring
Network Call Barring
Message Center
Message Lifetime
Message Format
Storage Status
Get Voice Mail
Setting
Read New
Setting

PhoneBook(6)
View All(6-1)
Search(6-2)
Add Entry(6-3)
Add Speed Dial(6-4)
Copy All(6-5)
Delete All(6-6)
Settings(6-7)
Phone Memory(6-8)
My Phone Number(6-9)
GAME (7)
Cusion Tank(7-1)
Edit Groups(6-7-1)
Save nos. to(6-7-2)
Browser (8)
Home(8-1)
Resume(8-2)
BookMarks(8-3)
Setting(8-4)
Empty Cache(8-5)
Verision Info(8-6)
WAP Profile(8-4-1)
Cache Mide(8-4-2)

Package contents
TDG-320 Phone
Lithium Ion Battery
Travel Charger
User Manual

TABLE OF CONTENTS
LIMITED WARRANTY
Menu map
Package contents
Table of Contents
Safety Information
General Information
1. Your Phone
Phone components
Button functions
ICON DEFINITIONS
2. Getting started
Installing and removing the battery
Charging the battery
Using Batteries
Using The Sim Card
Muting
DTMF On/Off
Move to the Main Menu
Text input
Key Functions
Input
Keys
Entering special characters
Input mode
Changing letter case
Entering Information using T9
5. Menu functions
Call Info (Menu1)
All Calls (1-1)
Missed Calls(1-2)
Received Calls(1-3)
4. Basic Functions
Turning the Phone On and Off
Making and Answering a Call
Dialing
Dialing with the Recent Call History
Dialing with Speed Dial
Answering a Call
In-Call Functions
Adjusting the Earpiece Volume
HOLD
End All Calls
Dialled numbers(1-4)
Clear Logs(1-5)
Call Timers(1-6)
GPRS Info(1-7)
Sound (Menu2)
Bell/Melody(2-1)
RingerVib(2-2)
Effect Sound(2-3)
Bell Volume(2-4)

Effect Volume(2-5)
Select Network(4-4-1)
Audio Profiles(2-6)
PDA (Menu3)
Schedule(3-1)
MEMO(3-2)
Alarm(3-3)
World Time(3-4)
Calculator(3-5)
Setting (Menu4)
Phone Setting(4-1)
Display(4-1-1)
Idle Graphic(4-1-1-1)
Banner(4-1-1-2)
Contrast(4-1-1-3)
Clock Setting(4-1-2)
Date & Time(4-1-2-1)
Time Format(4-1-2-2)
Display(4-1-2-3)
Backlight(4-1-3)
Language(4-1-4)
Software Version(4-1-5)
Call Setting(4-2)
Call Waiting(4-2-1)
Security(4-5)
SIM Password(4-5-1)
Handset Lock(4-5-2)
Handset Call Barring(4-5-3)
Network Call Barring(4-5-4)
Reset Settings(4-6)
SMS (Menu5)
Message Inbox(5-1)
Message Outbox(5-2)
Send Message(5-3)
Message Box(5-4)
Setting(5-5)
Message Center(5-5-1)
Message Lifetime(5-5-2)
Message Format(5-5-3)
Storage Status(5-5-4)
Voice Mail(5-6)
Get Voice Mail(5-6-1)
Setting(5-6-2)
Broadcast Message(5-7)
Read New(5-7-1)
Setting(5-7-2)
Divert(4-3)
Network Setting(4-4)
Phone Book (Menu6)
View All(6-1)

Search(6-2)
Recall By Name(6-2-1)
Recall By Num(6-2-2)
Recall By Group(6-2-3)
Add Entry(6-3)
Add Speed Dial(6-4)
Copy All(6-5)
Delete All(6-6)
Settings(6-7)
Edit Groups(6-7-1)
Save nos. to(6-7-2)
Phone Memory(6-8)
My Phone Number(6-9)
GAME (Menu7)
Cusion Tank(7-1)
Browser (Menu8)
Home(8-1)
Resume(8-2)
BookMarks(8-3)
Setting(8-4)
WAP Profile(8-4-1)
Cache Mide(8-4-2)
Empty Cache(8-5)
Verision Info(8-6)
Specifications

SAFETY INFORMATION
Please read and observe the following information for the safe and proper use of your phone and
to prevent any unanticipated damage. Also, keep the user manual in an accessible place at all the
times after reading it.
Explosion, Shock, and Fire Hazards
.
Unplug the power cord and charger during lightning storms to avoid electric shock
or fire.
.
Do not use your phone in high explosive areas as the phone may generate sparks.
.
Do not put your phone in a place subject to excessive dust and keep the minimum
required distance between the power cord and heat sources.
.
Unplug the power cord prior to cleaning your phone, and clean the power plug pin
when it is dirty.
.
Do not damage the power cord by bending, twisting, pulling, or heating. Do not use
the plug if it is loose as it may cause fire or electric shock.
.
When using the power plug, ensure that it is firmly connected. If it is not, it may
cause excessive heat or fire.
.
Do not place any heavy items on the power cord. Do not allow the power cord to be
crimped as it may cause fire or electric shock.
.
Do not disassemble the phone.
.
Do not place or answer calls while charging the phone as it may short-circuit the
phone and/or cause electric shock or fire.
.
If you put your phone in a pocket or bag without covering the receptacle of the
phone (power plug pin), metallic articles (such as a coin, paperclip or pen) may shortcircuit the phone. Always cover the receptacle when not in use.
.
Do not short-circuit the battery. Metallic articles such as a coin, paperclip or pen in
your pocket or bag may short-circuit the + and – terminals of the battery (metal
strips on the battery) upon moving. Short-circuits of the terminal may damage the
battery and cause an explosion.
.
Do not disassemble the battery as it may cause electric shock, short-circuit, or fire.
.
Do not expose the phone to excessive vibration or a sharp impact.
.
Never place your phone in a microwave oven as it will cause the battery to explode.

General Warnings and Cautions
.
Store the battery in a place out of reach of children.
.
Using a damaged battery or placing a battery in your mouth may cause serious
injury.
.
Do not place items containing magnetic components such as a credit card, phone
card, bank book or a subway ticket near your phone. The magnetism of the phone
may damage the data stored in the magnetic strip.
.
Do not hold or let the antenna come in contact with your body during a call.
.
Talking on your phone for a long period of time may reduce the call quality due to
heat generated during use.
.
When the phone is not used for a long period of time, store it in a safe place with the
power cord unplugged.
.
Only use the batteries, antennas, and chargers provided by Telson. The warranty will
not be applied to products provided by other suppliers.
.
Using the phone in proximity to receiving equipment (i.e., TV or radio) may cause
interference in the phone.
.
Only authorized personnel should service the phone and its accessories. Faulty
installation or service may result in accidents and consequently invalidate
the warranty.
.
Use only the antenna provided or approved by Telson. Unauthorized antennas,
modifications or attachments may affect the quality of phone calls, damage the
phone or result in a violation of FCC regulations.
.
Do not use the phone if the antenna is damaged. If the damaged antenna
gets in contact with the skin, it may cause a slight burn. Please contact Telson
Authorized Service Center to replace the damaged antenna.
.
Do not use the phone in areas where its use is prohibited. (For example: aircraft).
.
Do not expose the phone to high temperatures or high humidity.
.
Do not immerse your phone in water. If this happens, turn it off immediately
and remove the battery. If the phone does not work, take it to a Telson Authorized
Service Center.

GENERAL INFORMATION
Security code
To prevent unauthorized use of your phone and/or altering of settings, some of the functions are
designed to operate only by entering the security code. The factory set default security code is
last 4 digits of your phone number. To avoid unauthorized use of your phone, change the code
in the SETTING menu. Keep the new code secret and in a safe place which is separate from your
phone.
Battery
Li-Ion battery LBTC8100ME/LBEC8100ME is the re-chargeable battery available for your
phone.
WARNING!: Use only batteries, chargers and accessories approved by the phone
manufacturer. The use of any other types will invalidate any approval or warranty
applying to the phone, and may be dangerous.
1. YOUR PHONE
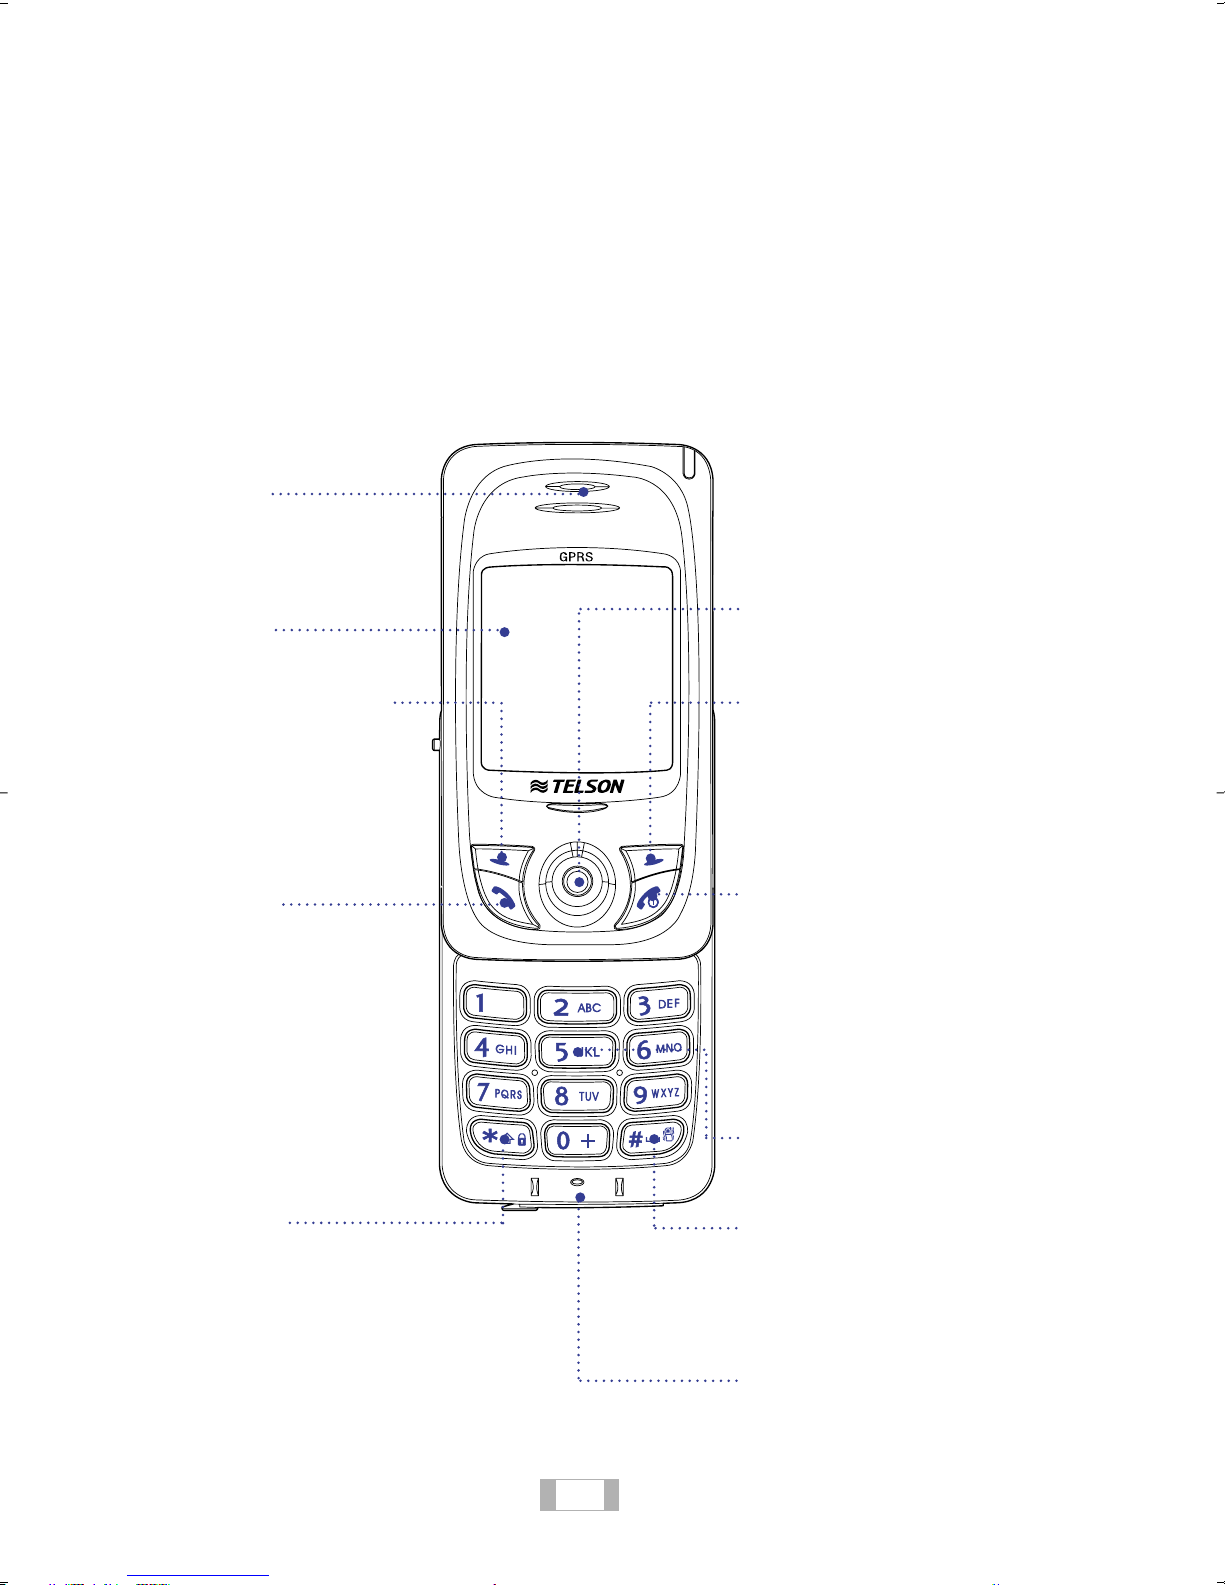
Phone components
Speaker
Display
Main Menu Key/Soft
Function Key
Press this button to select
the Main Menu or the Left
Menu at the bottom of the
screen.
Function Key (See p.16)
Joystick Navigation key
WAP Key / Soft
Function Key
Press this button in the
Idle Screen to use the
WAP Service or to select
the Right Menu at the
bottom of the screen.
Send Key
Enter a phone number and
press the Send key to make
a phone call.
Press and hold this key
without entering a phone
number to redial the last
number dialed.
Lock Key
Press and hold this key to lock
the phone.
(To unlock a locked phone, you
have to enter your PIN.)
End Key
Turns the phone on or off (See p.28)
Ends the current call
Returns to the Idle Screen (Exit
function)
Pressing this button returns to the
Idle Screen regardless of the current
menu.
Number Keys
Manner Mode Key
Press and hold this key to select or
unselect vibration for notifying of a
call arrival instead of a ring tone.
Microphone
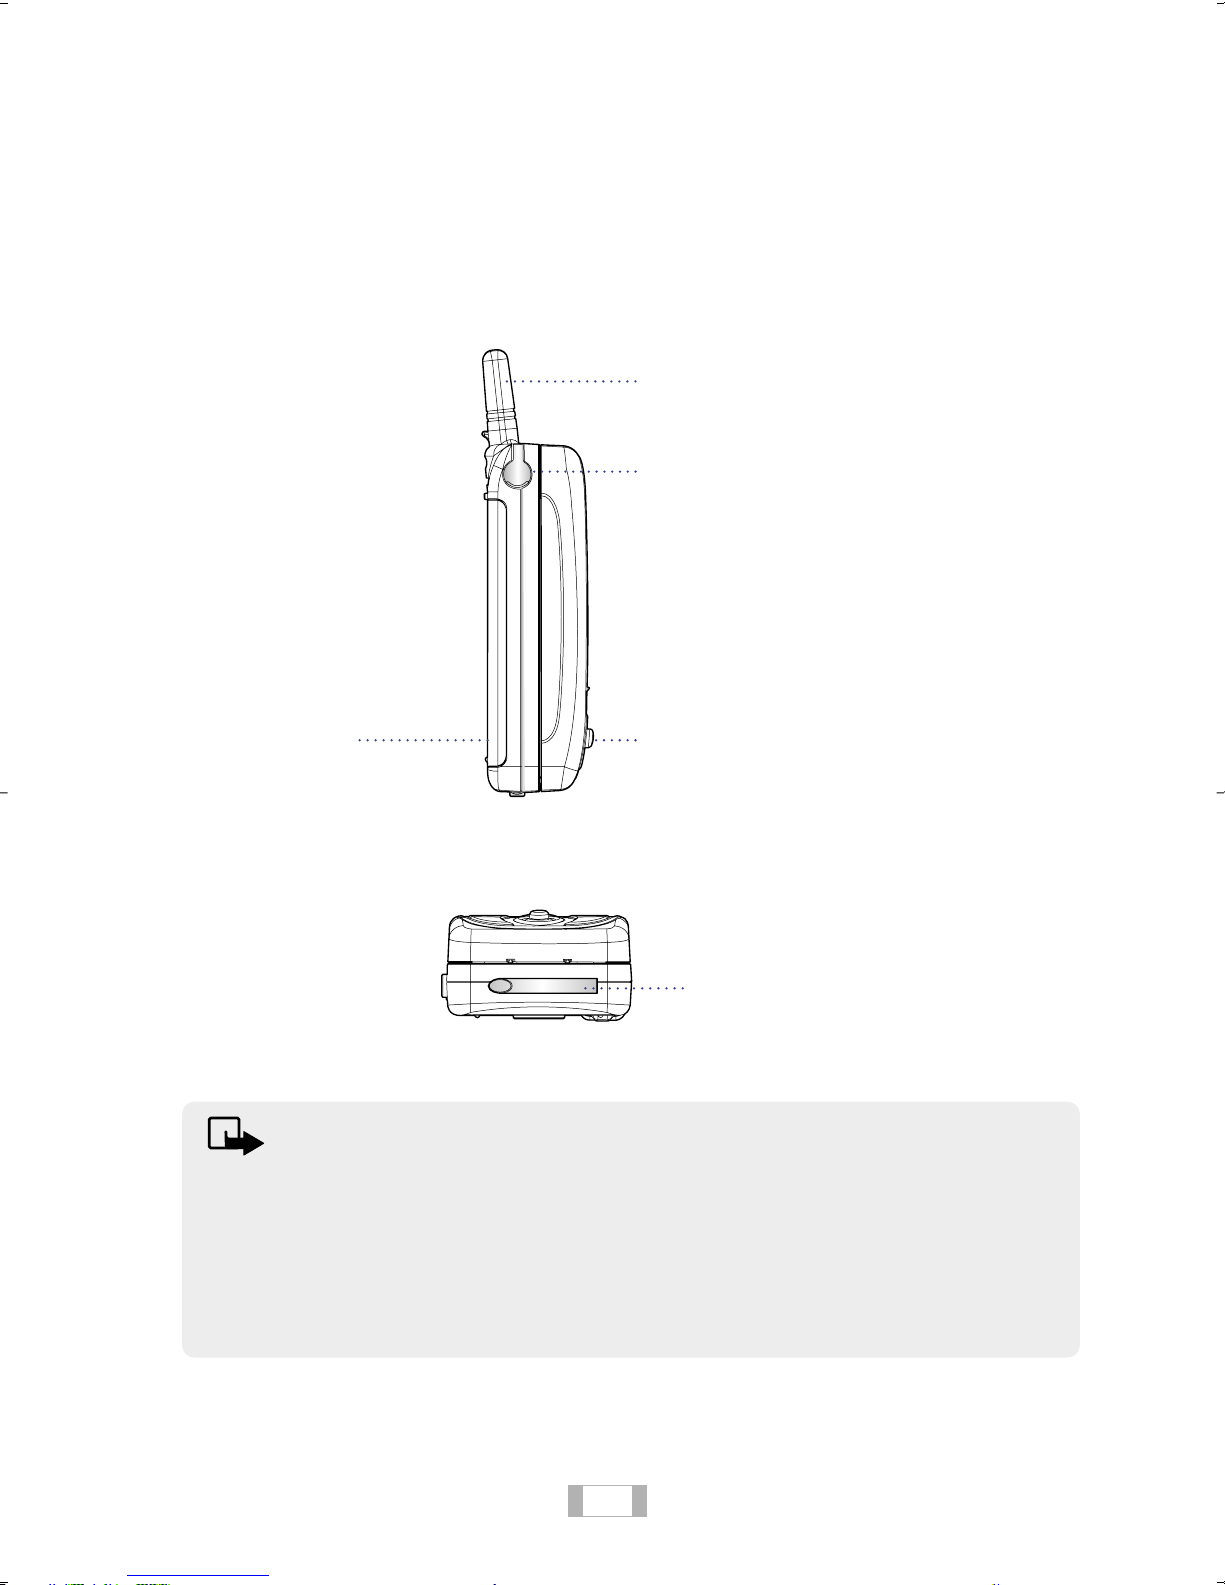
Antenna
Headset
Use this port to
connect a headset to
Battery
Joystick Navigation key
(See p.16 Function Key)
24-pin connector
Use this connector to use the
Travel Charger
(See p.21)
Note
Since the connector can suffer an electrical short circuit from coming into
contact with metal, do not remove the rubber covers.
If the phone turns off due to an electric short circuit, remove and re-install
the battery and turn the phone on again.
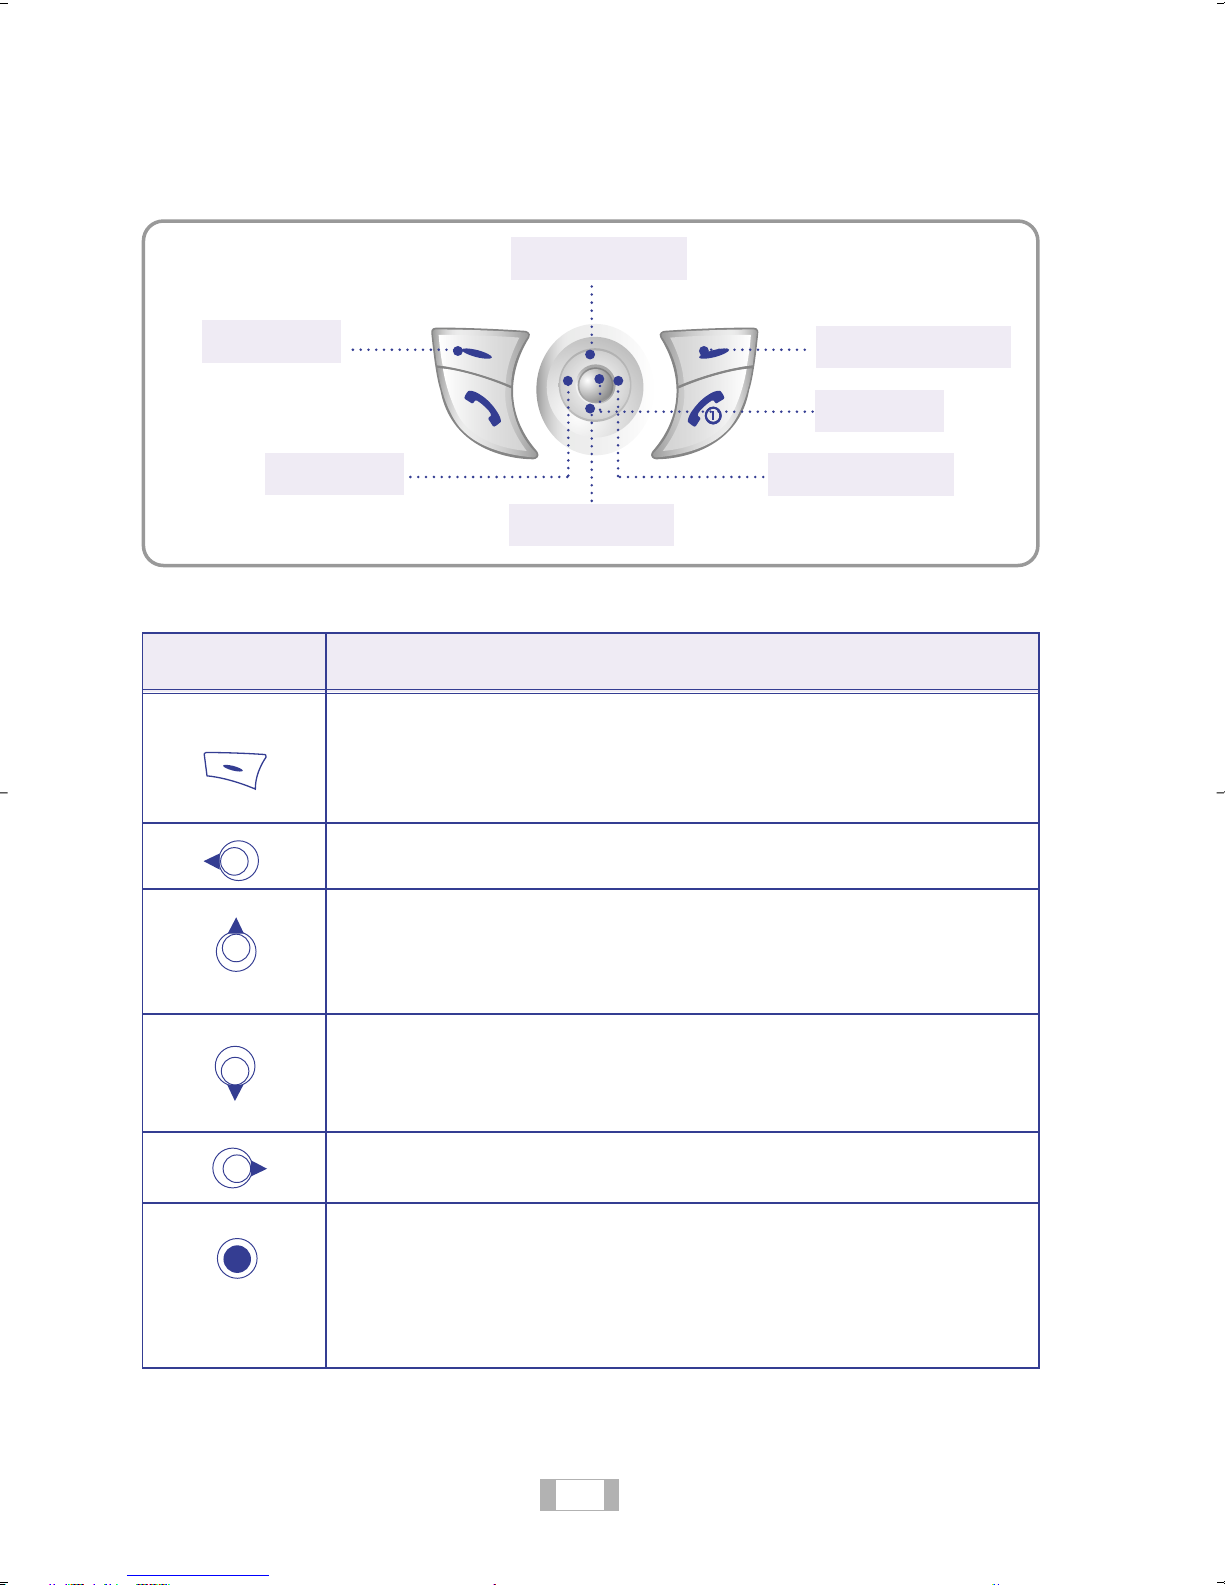
Button functions
1. On the Idle Screen
SMS
Main Menu
Key
Phone Book Menu
WAP
All Calls
Sound
Schedule
Function
� Launches the Main Menu
1.Call Info , 2.Sound 3.PDA, 4.Setting, 5.SMS
6.Phone Book , 7.Game , 8.Browser
All Calls: Launches the Call History in the Idle Screen.
�Launches the SMS menu. (See p.41)
�Scroll the screen & move up: Provides a screen scroll function to scroll up
the screen to display menus and a move up function.
�Melody: You can select Melody in the Idle Screen.
�Scroll the screen & move down: Provides a screen scroll function to scroll
down the screen to display menus and a move down function.
�Scheduler: Launches the Scheduler in the Idle Screen.
�Select Function: By pressing this button you can select a menu or function.
�Middle Soft Key (OK)
�[Long-press]: Launches WAP
�[Short-press]: Select
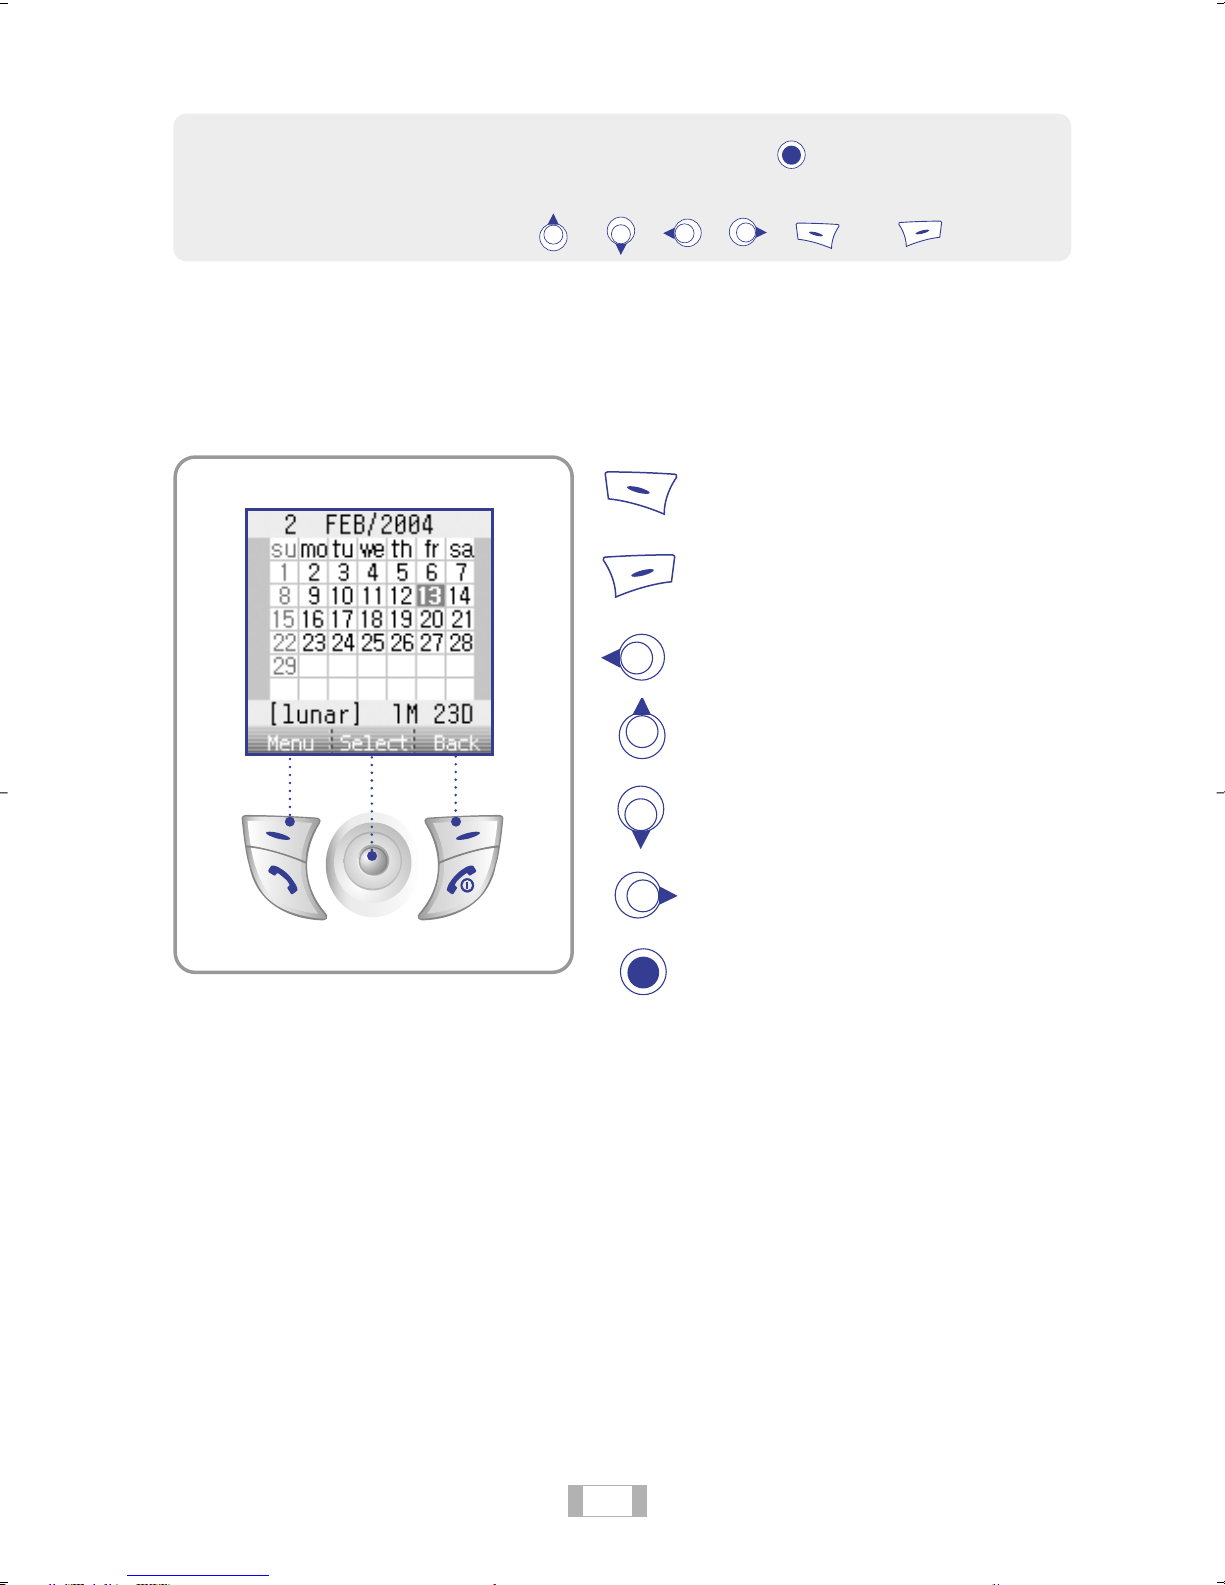
2. On the Menu Screen
(Example: Scheduler)
Selects the bottom left item on the
LCD screen.
Selects the bottom right item on the
LCD screen.
Moves left
Moves up
Moves down
Moves right
Selects an item or Enable or Disable
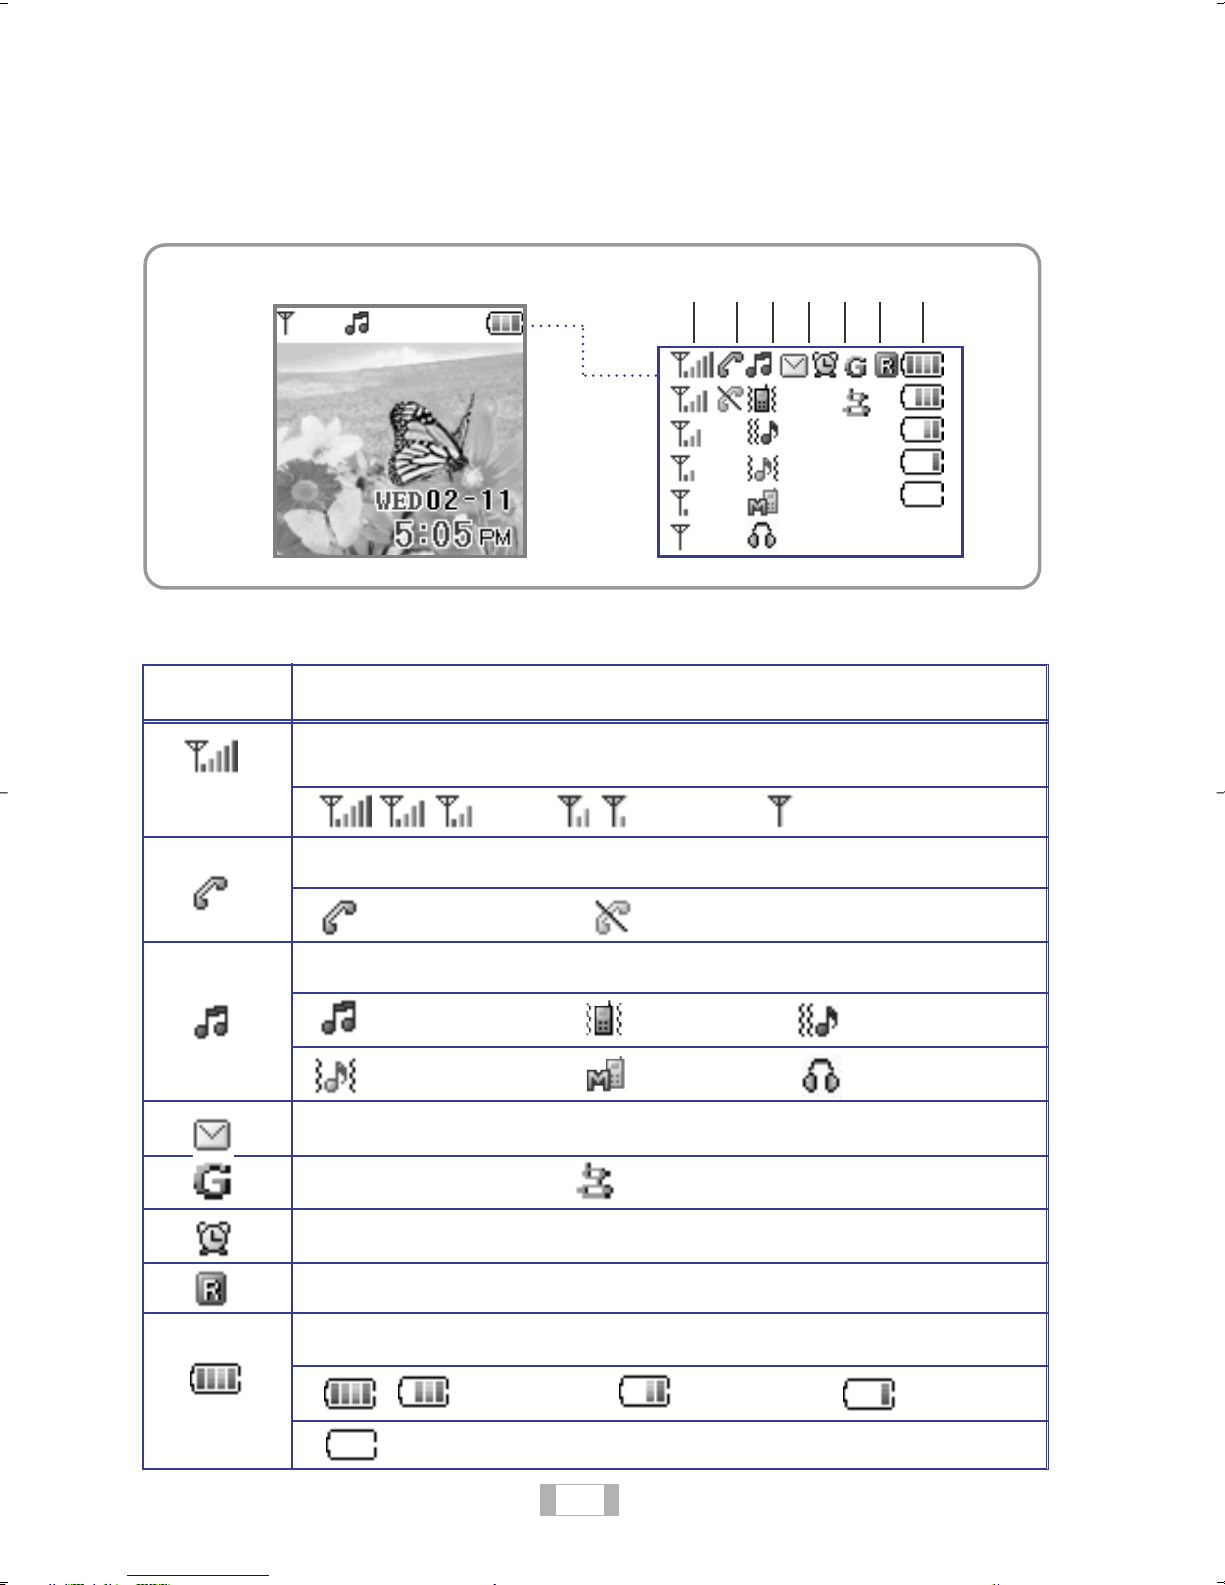
ICON DEFINITIONS
1. Status Screen Icons
2. Icons
Icon
Idle Screen
Description
Signal strength of the service area
Good Not Good
23456 7
1
Not in the Service Area
Appears while attempting a call
Attempting a Call Disconnected
Appears when ring tone is selected
Bell
Bell after Vibration
Appears when an SMS arrives.
GPRS Connection
Appears when the Alarm function is selected.
Appears when the Roaming service is selected.
Shows the remaining battery charge.
High
Charge Required
Vibration
Manner Mode
GSM Connection
Mid
Bell and Vibration
Ear Jack
Low
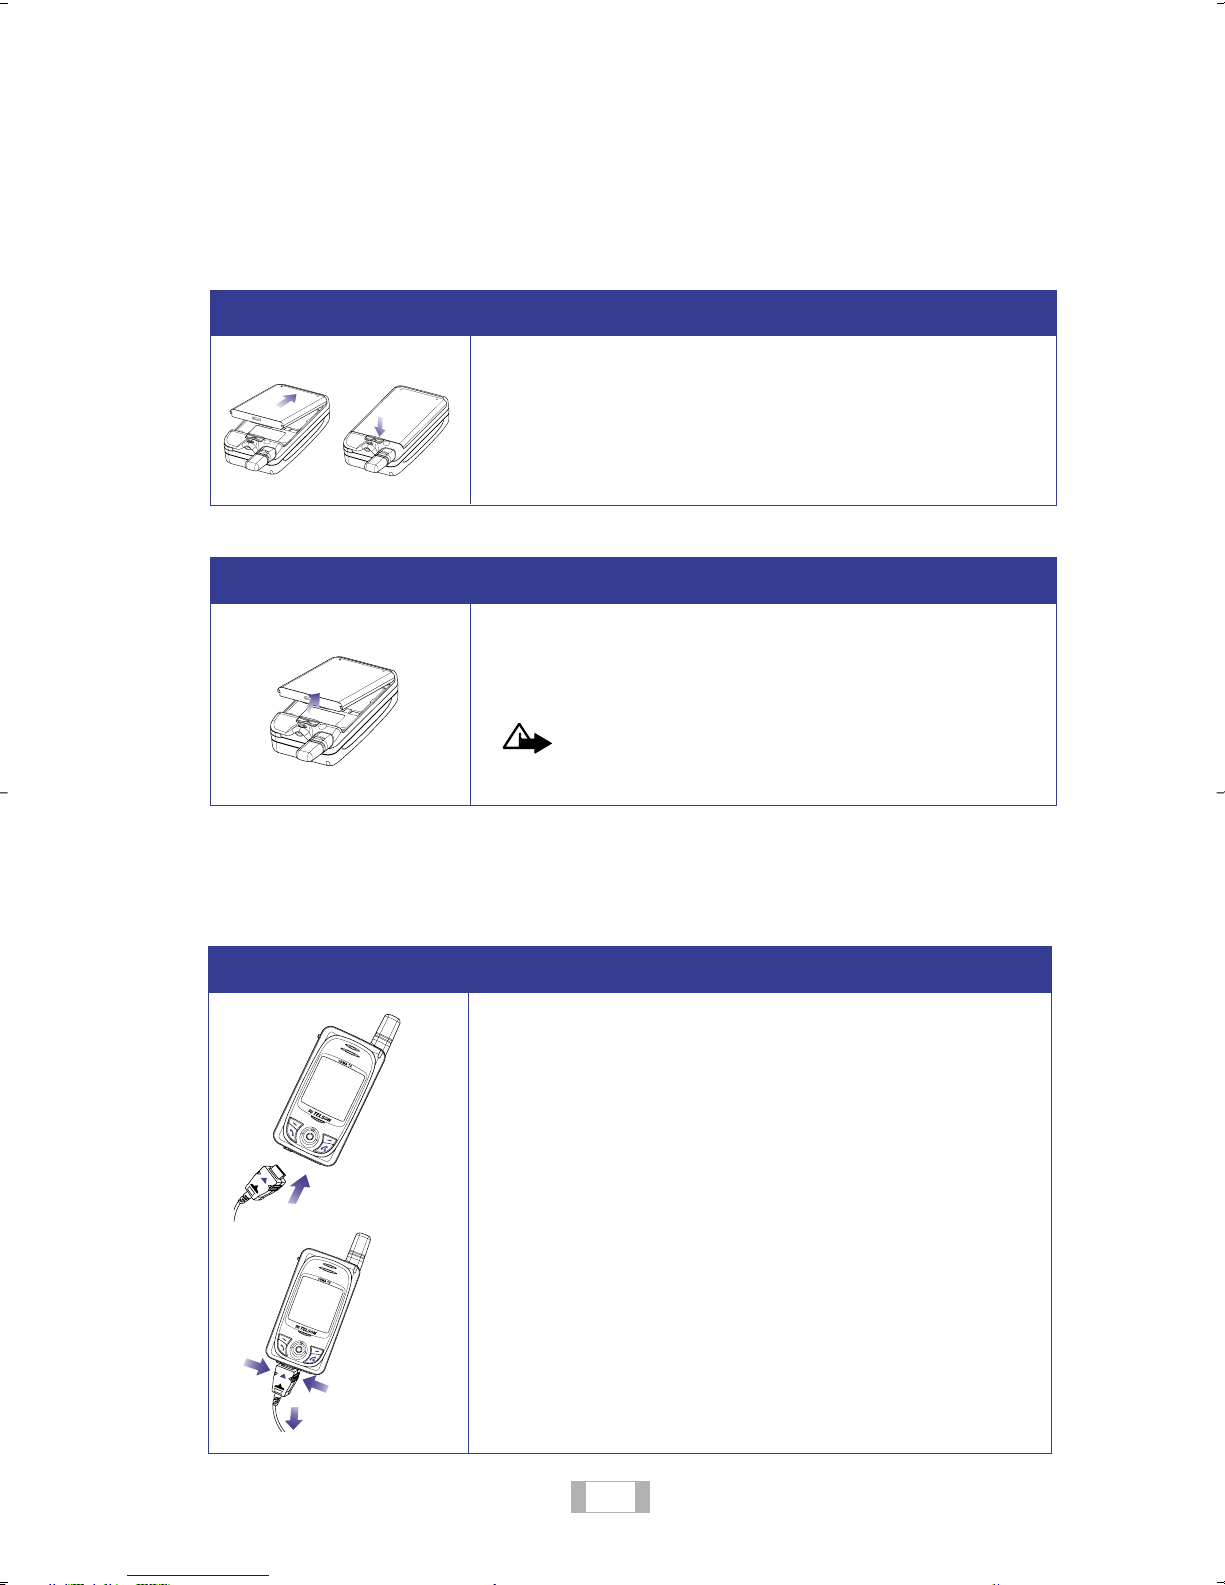
2. GETTING STARTED
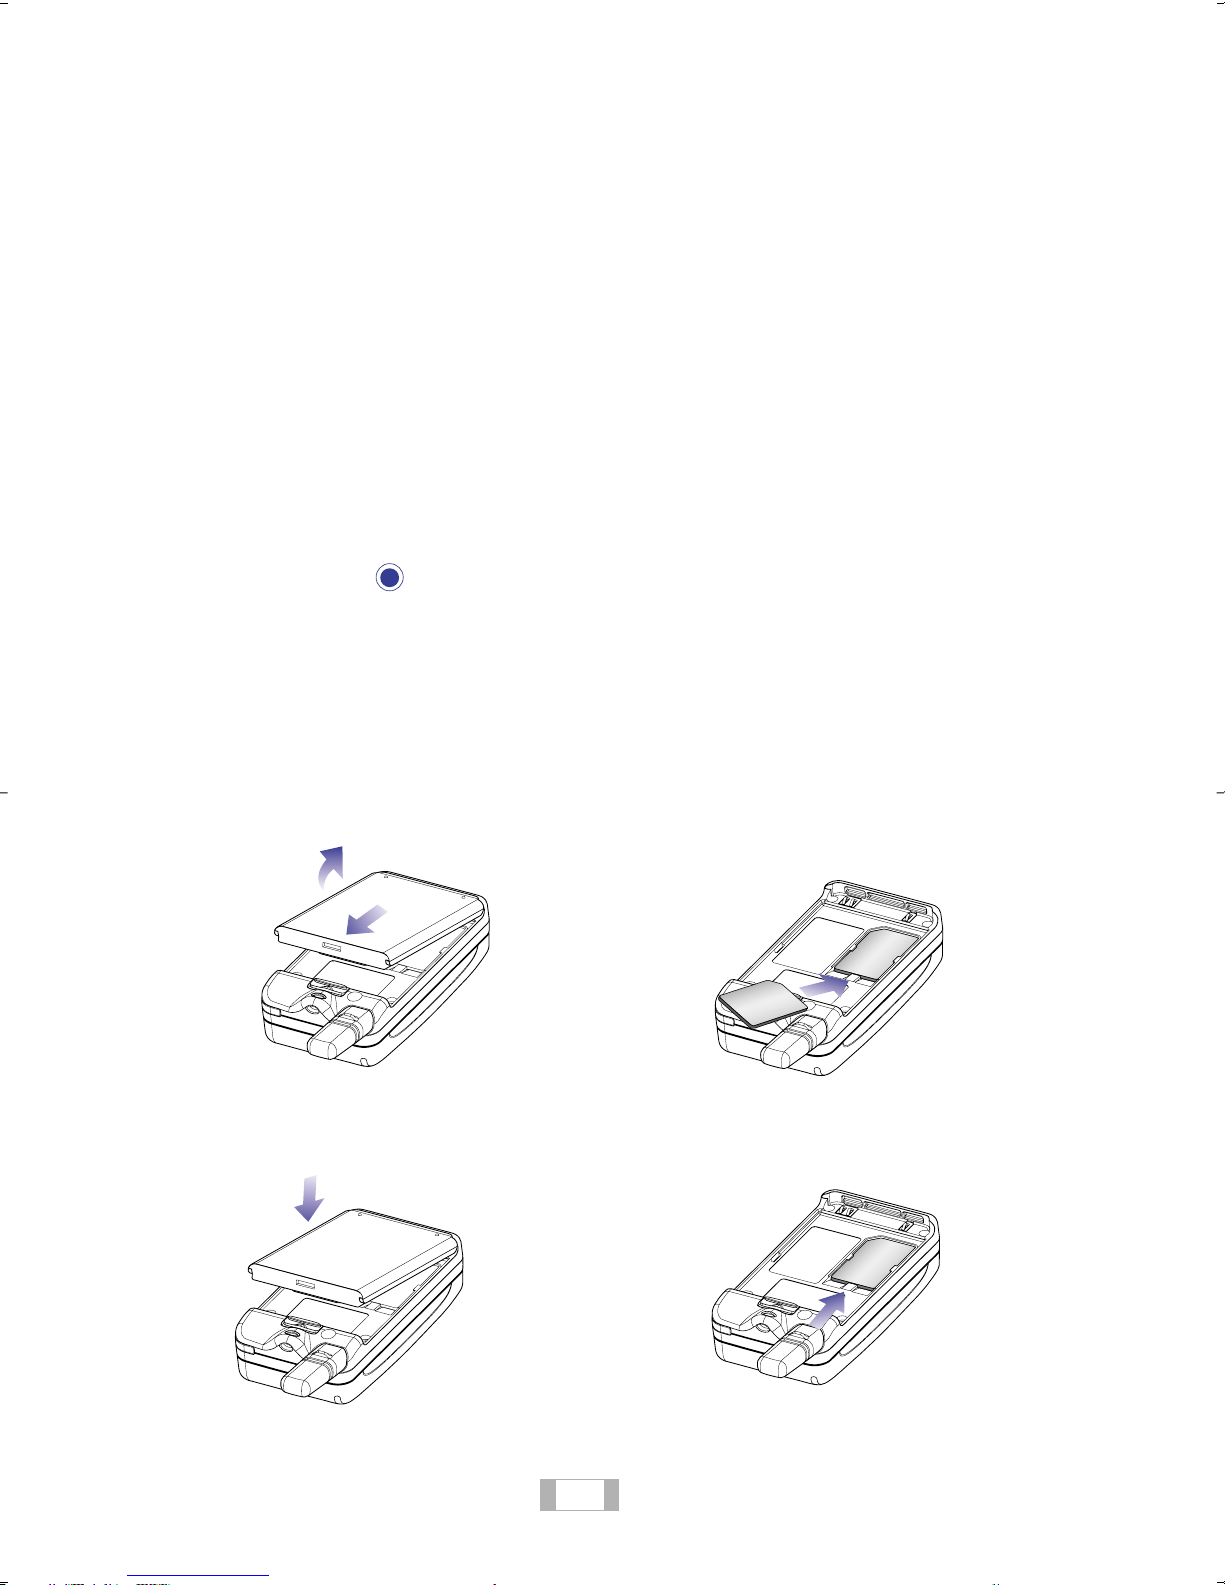
Installing and removing the battery
INSTALLING THE BATTERY
.
Remove the battery from its protective packaging.
.
Insert the bottom of the battery into the opening on
the back of the phone.
.
Press the top of the battery down until it “clicks”
firmly into place.
REMOVING THE BATTERY
.
Push the release button towards the top of the phone.
.
Remove the battery by lifting it with the two (2) finger
grips located on each side of the battery .
Charging the battery
CHARGING THE BATTERY
Since the battery is not fully charged when you purchased the
phone, please fully charge it prior to use.
Phone
Connection
Phone
Disconnection
Warning! Before removing the battery, always
make sure that the phone is switched off first.
1. Remove the rubber packing on the bottom of the
phone.
2. Push the charger plug into the slot until it is fully
inserted with the arrow on the charger facing up.
You may void your warranty if you incorrectly
insert the charger. Follow these instructions.
3. Plug the charger into an appropriate electrical
outlet. (A red light will appear on the charger)
4. When you disconnect the charger from your
phone, remove it by tightly holding both sides of
the connector and pulling it out of the phone.

USING BATTERIES
1. Precautions for Battery Use
1. Charge your battery only with a charger approved by the phone manufacturer.
Never use a battery not approved by the phone manufacturer because it may
cause damage to your phone, or may even explode.
2. Keep the charger and battery clean.
If there are strange substances on any of the metal parts, this may prevent the
battery from charging.
3. Do not disassemble the battery or charger. Do not leave the battery near a fire.
There may be a danger of explosion.
4. Do not cause an impact to the battery and do not drop it.
This may affect and reduce the battery lifetime.
5. Keep the battery at room temperature (5~35°…).
Leaving the battery in a hot or cold place will reduce the capacity and life of
the battery.
For long-term storage, separate the battery from the phone.
6. When the operating time (talk-time and standby time) is shorter than half of
the optimal operating time, it is time to buy a new battery.
The battery can be charged and discharged repeatedly but it will eventually
wear out.
7. A used battery must to be handled as hazardous waste.
The battery includes recyclable metals.
2. Battery Charge Display
1. When the battery change is low, the Battery icon ‘ ’ blinks and the ‘Low
Battery Warning! Charging Required’ message appears on the phone screen
with a warning sound.
2. When the battery is completely discharged, the ‘Battery Empty. Phone Turning
Off’ message appears and the mobile phone is turned off.
3. Battery Charge Status
Completely Charged
Insufficiently Charged
Charging Required
Completely Discharged
Status
BATTERY USAGE TIME
Talk and standby times for fully charged batteries.
Type
Standard
Talktime
Standby
60 ~ 100 mins
80 ~ 120 hrs
TackTime (calking, messaging, Internet access, downloads, and data connectvity) and standby
time may vary depending on conditions.
BATTERY CHARGING TIME
Charging times for fully discharged batteries.
Type
Time
Charging time may vary depending on charging conditions.
Charging may not occur in extreme hot or cold conditions. Charge the battery at room
temperatures.
Standard
140 mins
USING THE SIM CARD
�
Installing and Removing the SIM Card
When the SIM card is improperly installed or the SIM card is damaged, the
“Insert Card” message appears on the screen. If the card is improperly installed,
remove the SIM card and insert it again. If the SIM card is damaged, contact your
card provider.
When there is no installed SIM card, an “Insert Card” message appears.
Turn the phone off and insert the card
When a SIM card is installed, the “Enter PIN Code” message appears on the
screen. Enter the number supplied by the card provider that is longer than 4
digits, and press (OK).
If you enter an incorrect PIN 3 times in succession, the SIM card is locked.
The “PIN Is Blocked” message appears and the "Enter PUK" message appears
requiring the PUK code.
In this case, enter the PUK code supplied when you purchased the card.
If you enter an incorrect PUK code 10 times in succession, the card is locked.
1. Remove the Battery 2. Insert the SIM Card
4. Install the Battery 3. Insert the SIM Card
Note
Please take care when handling the SIM card. Rubbing or scratching the
surface easily damages the SIM card.
When not using the mobile phone, keep the SIM card out of reach of children.
�
PIN
There are several PIN codes used for the mobile phone and the SIM card. These
PIN codes prevent unauthorized use of the mobile phone and the SIM card. If the
PIN is required hereafter, enter the PIN and press the (OK) key (The PIN is
displayed on the phone as “****”). If you enter a wrong number, press (CLR)
to delete the number and enter the correct number.
�
SIM PIN
A PIN (Personal Identification Number, 4 ~ 8 digits) is required to use the phone
when the R-SIM card is installed. A PIN is normally supplied with the R-SIM card.
4. If you select PIN Enable in the 'Settings Menu' (see p.53), a PIN is required
whenever you turn the phone on.
If you enter an incorrect PIN 3 times in succession, the R-SIM card is locked.
To unlock a locked card, refer to the following description about R-SIM PUK.
�
SIM PUK
A PUK code
You can unlock a locked PIN in the following way.
1. When you turn the phone on, the "Enter PUK Code" message appears asking you
to enter the PUK code.
PIN unlock number8 digitsis used to unlock a locked PIN.
2. Enter the correct PUK code and press (OK) and unlock the locked R-SIM card.
3. When a new PIN code is required, enter the new PIN and press (OK).
4. Enter the new PIN again and press the (OK).
Note
A PUK code may not be supplied with the PIN when you purchase the card.
To unlock a locked PUK code, contact the card manufacturer or your card
provider.
If you enter an incorrect PUK code 10 times in succession, the R-SIM card is
invalidated so that you cannot use the card anymore and you have to replace the
card with a new one.
When the R-SIM card is invalidated due to 10 successive PUK code inputs, the
'Access Denied' message appears on the phone.
When the confirmed new PIN is different from the first one, the 'PIN
Inconsistent' message and the 'Enter PUK Code' message appears again asking
you to re-enter the PUK code.
Since this is not a problem caused by an incorrect PIN, you can use the card
even after 10 'PIN Inconsistent' messages appear, provided that you have
entered the correct PUK code when the "Enter PUK Code" message appears. That
is, you can unlock the locked PIN by entering the correct PUK code.
TIP
You can unlock a locked PIN and use the phone by entering the PUK code as
above. The card is locked when you successively enter an incorrect PIN.
However, you can use the card as long as you don’t enter an incorrect PUK
code 10 times in succession. Therefore you can create a new PIN even if you
forget the PIN. If you enter an incorrect PIN three times in succession when
the PIN is required, the PUK Code is requested.
At this time enter the PUK code supplied when the card was purchased to
create a new PIN. At this time, if you enter a correct PUK once, 10 incorrect
PUK codes are counted from that time on, and you should take care not to
enter successive incorrect PUK codes.

�
CALL
- When a SIM card is installed,
If PIN Enable is selected for the card, a PIN is required when the phone is turned on.
Pressing at this time shows the Emergency List.
To end an Emergency Call, press the .
- When a SIM card is in the Access Denied status,
When an Access Denied SIM card is inserted, turning on the phone to make an
Emergency Call displays the
NO SIM CARDmessage.
- When no SIM card is installed,
When there is no SIM card, an animation is displayed showing that the insertion of the
card is required. In this state, only Emergency Calls (112) are allowed.
To end an Emergency Call, press .
Note
When you insert the SIM card, you have to reset the phone.

4. BASIC FUNCTIONS
TURNING THE MOBILE PHONE ON AND OFF
Turning the phone on
Open your phone.
Press and hold .
As soon as the phone is powered on, the initial graphic images will be shown
in this order.
�
UWhen the phone is in Manner Mode or Vibration Mode, appears with
vibration.
�
UIn Lamp mode, is displayed.
Turning the phone off
Press and hold for 1.5 seconds or longer, to turn off the phone.
Note: Press and hold until the ending graphics appear. If the phone will not
properly power off, remove and reinstall the battery. Then, you can turn the phone back
on when you are ready.
MAKING AND ANSWERING CALLS
�Dialing
When the Idle Screen is displayed, enter the area code and the phone number
and press .
When you have entered a wrong number, press to erase the last digit entered.
When you have finished your call, close the phone or briefly press .
Pressing during a call, allows the use of In-Call Functions.
�Dialing with Recent Call History
Up to 10 recent Received, Dialed and Missed calls are saved and displayed.
Press to display the call history.
Received and Missed numbers are recorded only when you have subscribed to the
Caller Identification Service.
�Dialing with Speed Dial
You can dial by pressing a preset Speed Dial Number and pressing without entering the
complete phone number.You can configure up to 8 Speed Dials.
1-digit address (2~9): Press and hold down a speed dial number.

�Answering a Call
When a call arrives, you can answer the call by opening the phone or pressing,
or pressing any key while the slide is opened.
When you have finished your call, close the slide or press .
The call time blinks and then the Idle Screen appears.
When you have subscribed to the Caller Identification Service,
- When a call arrives, the phone number of the caller is displayed. If the number is
saved in the Phonebook, the Name of the corresponding Address is displayed.
- When you miss a call, the number and time of the call is displayed.

In-Call Functions
�Adjusting the Earpiece Volume
You can adjust the earpiece volume by 5 levels.
During a call, if you want to adjust the earpiece volume,
press and .
For descriptions to adjust the earpiece volume in the Idle Screen, refer to p.46.
�Hold
You can place the current call on hold when a new call arrives.
During a call, press .
Press to answer the new call.
�End All Call
You can disconnect all calls that may be connected with more than 3 persons.
During a call, press .
Press to disconnect all calls.
�Muting
During a call, you can temporarily switch your phones microphone off so that the
other party cannot hear you.
During a call, press .
Press to switch off the microphone of the phone.

�DTMF ON/OFF
You can switch DTMF tone on/off.
During a call, press .
Press to switch DTMF time on/off.
�Move to the Main Menu
You can use the Main Menu during a call.
During a call, press .
Press to use the Main Menu.

Idle Screen Functions
�Configuring Manner Mode
You can configure Ring Tone Vibration, Key Tone Mute and Manner Mode.
Open the phone and press and hold for a short while.
Press and hold for a short while, to disable this function.
When Manner Mode is disabled, disappears.
Once Manner Mode is selected it remains even after you turn the phone off and on.
You can use Manner Mode when you are in places where silence is required as
public places or auditoriums.
�Configuring Lock Mode
You can lock the phone with one-touch. When your phone is locked, you can unlock your
phone by entering the PIN.
Open the phone and press and hold for a short while.
If you enter the saved PIN, the locked phone is unlocked.
The PIN is preset to 1234.
The Handset Lockmessage appears.
If Lock Mode is configured, the Enter Lockmessage appears requiring the PIN
when you move to the menu.

�
Text input
KEYS FOR NUMBERS/LETTERS
The following table shows letters/numbers displayed on screen when you press the corresponding keys.
0
1 . , ’ : - ? ! @
2, a(A), b(B), c(C)
3, d(D), e(E), f(F)
4, g(G), h(H), i(I)
5, j(J), k(K), l(L)
6, m(M), n(N), o(O)
7, p(P), q(Q), r(R), s(S)
8, t(T), u(U), v(V)
9, w(W), x(X), y(Y), z(Z)
Key Functions
: Press to scroll and select a text entry mode.
~
~
(Type Text): In T9 mode, press one key per letter to Input text.
(Type Numbers): In 123 (Numbers) mode, press once to Input
numbers.
(Next): In T9 mode, press to display other matching words.
(Punctuation): In T9 mode, press to insert punctuation in a word
and complete a sentence.
(Space): Press to complete a word or insert a space.
(Case): Press to cycle through lower case, upper case, or mixed
mode
(Clear): Press to delete a single space or character. Press and hold
to delete entire words .

�
Functional Key
Menu
(Changes the
Text Input Mode)
Menu
(Changes Text Input Mode, Saves Entered Text.)
1. Accept text: Saves the entered text.
Text Input Mode
2. T9 Russian: T9 Russian Mode
Delete
3. T9 English: T9 English Mode
4 .Multi-tap: Letter Mode
5. Numeric: Number Mode
6. Symbols: Symbol Mode
Inputting capital/lower English text
Press an alphanumeric key repeatedly until the desired character appears in the
edit window.
Characters appear one after another as follows , .
Press key to change to other character input mode.
To continuosly enter alphabet that is located on a same key.
wait for 5 seconds after input to be automatically entered or press key
to move the cursor.

To insert a blank space, move the cursor using key or press key
to select a blank character among the special character set.
To delete the entered symbol, press .
Press and hold to delete all texts.
Inputting numbers
Press the corresponding alphanumeric key.
Press key to change to other character input mode.
To insert a blank space, move the cursor using key or press key to
select a blank character among the special character set.
Press key to erase the entered character one by one.
Press and hold key to erase all entered characters.
Inputting Special Characters
Press key from all input mode.
Move the cursor to the desired character by using keys and press
key to select the special character in the edit window.
Press key to go back to the previous input mode from the special character
input mode.
To insert a blank space, move the cursor using key or press key
to select a blank character among the special character set.
Press key to erase the entered character one by one.
Press and hold key to erase all entered characters.

Input mode
Changing input modes:
T9 Mode
.
To use T9 input mode, press and hold .
.
Press then select Entry mode, then select T9 mode.
ABC Mode
.
Press then select Entry mode, then select ABC mode.
.
Press and hold .
123 (Numbers) Mode
.
Press then select Entry mode, then select 123 mode.
.
Press and hold .
Note:
: You can select capital/ small letters by pressing the
Manner mode key.
Entering Information Using T9
T9 is a quick way to enter text. Using an internal dictionary, T9 predicts the word
you are trying to enter. Press the corresponding key once to enter the letter.
For instance, to enter BALL, press 2, 2, 5, 5. If the word does not appear, press
NEXT to see other matching words.
T9 Text Input
Edit Short Messages and Phonebook entries using T9 text input.
Using the NEXT Key
After you have finished typing a word, if the word displayed is not the word you
want, press to display additional choices.
For example, follow these steps:
1. Press: .
2. Display: Good
3. Press:
4. Display: Home, Gone, Hood......

5. MENU FUNCTIONS
1. Call Info
All Calls (1-1)
�
Using this menu, you can view all call records.
View
[Menu]
� The call record shows received, dialed and missed calls.
� Numbers not configured in the Phonebook are represented by the caller’s phone
number and the name is represented by
� To save a phone number, press [Menu] in the Call Record.
� You can directly view the call record by pressing in the Idle Screen.
� Pressing displays the call record.
� You can select a number from the call record and make a call with the number by
pressing .
Call Info All Calls
‘None’.
Missed Calls (1-2)
�
You can view the numbers of missed calls.
[Menu]
Call Info Missed
Calls
View
3366

Received Calls (1-3)
�
You can view the numbers of all received calls.
View
[Menu]
Call Info Received
Calls
Dialled numbers (1-4)
�
You can view dialed numbers.
[Menu]
Call Info Dialled
numbers
Clear logs (1-5)
�
You can delete all call records.
View
[Menu]
Call Info Clear logs
Call timers (1-6)
�
You can view the call timers that represent the total call time and the last call time.
[Menu]
Call Info Call timers
Yes/No OK
Last Call/
All calls
3377
OK

GPRS Info (1-7)
�
GPRS Info
[Menu]
Call Info GPRS Info
Choose
1~4
OK
1.Current Connection: Menu deleted
2. All Connections: Total amount of traffic
3. Last Connection: The amount of traffic of the last connection
4. Clear Logs: Deletes all GPRS Info records
3388

2. Sonnd
Using this menu, you can configure the bell and the volume of the phone.
Bell/Melody (2-1)
You can select one of 10 melodies.
[Menu]
� If an item from the Bell/Melody list is selected, the Bell/Melody is played so that you
can listen to it before selecting it.
� The Bell/Melody continues to play until the item is unselected.
� When melodies have been downloaded through WAP or PC Sync., the downloaded
melodies are added to the melody list that originally consists of the default melodies.
� To delete a downloaded melody, press .
A confirmation message appears. (You cannot delete default melodies.)
Sound Bell/Melody
Choose OK
Ringer/Vib (2-2)
�
You can select Bell Only, Vib. Only, Vib Then Bell, or Lamp.
[Menu]
Sound Ringer/Vib
Choose
1~4
3399
OK

Effect Sound (2-3)
�
You can decide whether to use various sound effects.
[Menu]
Sound Ringer/Vib
Choose
1~5
Yes/NoOK OK
1. Key Tone : You can enable or disable the Key Tone.
2. Power On/Off : You can enable or disable the Power On and Off Sounds.
3. Folder On/Off : You can enable or disable the Slide Open and Close Sounds.
4. Warning Message : You can enable or disable the Warning Message Sound.
5. OK Message : You can enable or disable the OK Message Sound.
Bell Volume (2-4)
�
You can adjust the bell volume.
[Menu]
Sound Bell Volume
Volume OK
Effect Volume (2-5)
�
You can configure the volume of the various sounds.
[Menu]
1. Key Tone, 2. Power On/Off, 3. Folder On/Off, 4. Warning Message, 5. OK Message
Sound Effect
Volume
Choose
1~5
4400
VolumeOK OK

Audio Profiles (2-6)
You can configure the audio profiles.
[Menu]
Sound Audio
Profiles
Choose
1~7
Menu
Active/
Setting
ChooseOK
� Select Normal, Meeting, Outdoor, Car or Silent.
� Select Bell/Melody, Ringer/Vib, Effect Sound, Bell Volume or Effects Volume
For more information, refer to pages 45~47.
� You can rename and save User1 and User2.
4411

3. PDA
Schedule (3-1)
�
Using this menu, you can easily manage anniversaries, important appointments and your
schedule.
1. Add Schedule
[Menu]
PDA Schedule
Menu
Add
Schedule
� TIME : Press , configure the time of the selected data (HH:MM) using the
number keys and press [OK].
� TITLE : Press and enter the title. (Refer to the Text Input Mode on page 33)
� CONTENTS : Press and enter the description.
� ALARM : Configure whether to set the alarm (ON/OFF) by pressing .
� MELODY : Select one of the melodies (01~10) by using .
This menu isonly configurable when ALARM is configured to
‘ON’.
� When you finish the configuration, press to save the changes and to return to
the previous screen.
� The configured date is represented by the icon.
2. Add Dday
[Menu]
PDA Schedule
� When a D-day is configured, the configured date is represented by .
Menu
Enter
Description
Add Dday OK
4422

3. Delete All
� The function deletes all schedules.
[Menu]
PDA Schedule
Menu
Delete All
※To view your schedule
� Press on a date. The schedule list will be displayed.
MEMO (3-2)
�You can easily record a memo whenever and wherever you want.
Text Input for New Memos
Write a
[Menu]
PDA Memo
Menu Add OK
memo
Viewing Saved Memos
[Menu]
PDA Memo
SUB MENU
1. Add : Adds a new memo.
2. Delete : Deletes the selected memo.
3. Delete All : Deletes all memos.
OK
View memo
Information
4433

Alarm (3-3)
�You can configure the alarm for a specified time.
[Menu]
1. AM/PM
2. Time
� Select an item by using and enter the time by pressing the number keys.
3. Interval
�Configure using .
� Once : The Alarm goes off once.
� Daily : The Alarm goes off at the same time everyday.
� Weekday : The Alarm goes off at the same time every weekday.
PDA Alarm
Select either AM or PM.
Configure the alarm time.
Configure the alarm interval.
OK Choose
Select Save
1~4
4. Tone
5. Set
You can select one of the 10 melodies and configure the alarm sound
using the selected melody.
Select either On or Off.
4444

World Time (3-4)
�
Using this menu, you can check the current time for the major cities around the world.
[Menu]
PDA World Time
Display Order City CityDisplay Order
1
2
3
4
5
6
7
8
9
10
Beijing
Seoul
Adelaide
Sydndy
Auckland
Honolulu
Anchorage
Los Angeles
Denver
Mexico
11
12
13
14
15
16
17
18
19
20
New York
Santiago
Rio
London
Paris
Athens
Moscow
Tehran
Karachi
Delhi
� Move to another city by using .
� The current time is always displayed at the bottom of the screen.
4455

Calculator (3-5)
�This menu provides a calculator function including memory save and accumulation functions.
<To calculate 3 X 5>
[Menu]
PDA Calculator
Key Operation
UP
RIGHT
DOWN
LEFT
*KEY
OK
#KEY
+ Addition
/ Division
- Subtraction
X Multiplication
Decimal point
= Equal
AC Memory recall
3 X 5 =
� You can use the operators for calculations.
� You can enter up to 13 digits for a number. The result of a calculation has to
be smaller than 8 digits.
� Press the key briefly to delete the last digit.
4466

4. Setting
Phone Setting (4-1)
Display (4-1-1)
Idle Graphic (4-1-1-1)
�You can configure the image to be displayed on the Idle Screen.
[Menu]
Setting
Phone
Setting
Display Idle
Graphic
Image
Select 1~5
OK
SUB MENU
1. List : You can select one from the Animation list 1~5.
2. Image : You can select one from the Animation preview 1~5.
3. When images have been downloaded via WAP or PC Sync., the downloaded images
are added to the image list originally consisting of default images.
4. To delete downloaded image, press .
A confirmation message appears.
(You cannot delete the default images.)
Banner (4-1-1-2)
�Using this menu you can configure the banner to be displayed on the Idle Screeen.
(A banner allows up to 14 English and 7 Spanish characters)
[Menu]
Setting
Phone
Setting
Display Banner
4477
Enter Banner
Text
OK

Contrast (4-1-1-3)
�Using this menu, you can adjust the brightness of the screen to your preferred
[Menu]
Setting
Phone
Setting
Display Contrast
OKAdjust
brightness
Clock Setting (4-1-2)
Date&Time (4-1-2-1)
�You can configure the date and time.
Date&Time
[Menu]
Setting
Phone
Setting
Clock
Setting
Date &
Time
� MM/DD/YYYY : Move to an item using , and directly configure the date.
� HH:MM : Directly enter the hour and the minutes by using the number keys.
입력
OK
4488

Time Format (4-1-2-2)
You can select either a 12Hour or 24Hour display option.
[Menu]
Setting
Phone
Setting
Clock
Setting
Time
Format
OK12Hour/
24Hour
Display (4-1-2-3)
You can configure the display options of the time and date on the Idle Screen.
[Menu]
Setting
1. Time Only : Only display the time on the Idle Screen.
2. Date Only : Only display the date on the Idle Screen.
3. Time & Date : Displays both the time and the date on the Idle Screen.
Phone
Setting
Clock
Setting
Display
OKChoose
1~4
4. Off : Does not display the time and the date on the Idle Screen.
4499

Backlight (4-1-3)
You can configure the LCD Backlight Time.
[Menu]
Setting
Phone
Setting
Backlight
/1Minute
Language (4-1-4)
You can select the language (English / Spanish).
[Menu]
Setting
Phone
Setting
Language
Spanish
Software Version (4-1-5)
You can view the software version.
OK5 sec/15sec
OKEnglish/
[Menu]
Setting
Phone
Setting
Software
Version
5500
OK

Call Setting (4-2)
Call Waiting (4-2-1)
You can decide whether to use Call Waiting mode.
[Menu]
Setting
Call
Setting
Call
Waiting
OKOn/Off
Divert (4-3)
Divert
[Menu]
Setting
1. All Calls : Select this option to forward all calls to the phone.
2. When Busy : Select this option to forward calls that arrive while the line is busy.
Divert
OKChoose
1~7
3. Not Reachable : Select this option to forward calls that arrive when the phone is out
of the service area.
4. No Reply : Select this option to forward calls that are not answered after a certain
period of time.
5. All Data Calls : Select this option to forward SMS data
6. All FAX Calls : Select this option to forward FAX data
7. Cancel All : Select this option to cancel all configured Call Divert Options.
5511

Network Setting (4-4)
Select Network (4-4-1)
You can configure the network settings.
[Menu]
Setting
Network
Setting
Select
Network
OKAuto/
Manual
� Auto : Select this option to automatically select the network.
� Manual : Select this option to manually select a network from the available network
list.
Security (4-5)
SIM Password (4-5-1)
SIM Password를 변경합니다.
Enter Lock
Password
[Menu]
Setting
Security SIM
(Default:
1234)
Password
OKSet/ Change
PIN No.
1. Set : Select either ON or OFF.
2. Change PIN No. : Enter the Old PIN1, the new PIN and the new PIN again, and then
press to save. The PIN is preset to
‘1234’.
5522

Handset Lock (4-5-2)
You can change the PIN of the phone.
Enter Lock
Password
[Menu]
Setting
Security Handset
1. Set : Select either ON or OFF.
2. Change Lock No. : Enter the Old PIN, the new PIN and the new PIN again, and then
(Default:
1234)
Lock
OKSet/ Change
PIN No.
press to save. The PIN is preset to
‘1234’.
Handset Call Barring (4-5-3)
Handset Call Barring
Enter Lock
Password
[Menu]
Setting
Security Handset
1. Bar Incoming : Bars answering incoming call (On/Off)
2. Bar Outgoing : Bars dialing a phone number from the “Fixed Call” list. (On/Off)
(Default:
1234)
Call Barring
On/Off
Outcoming
OKIncoming/
5533

Network Call Barring (4-5-4)
Network Call Barring
Enter Lock
Password
[Menu]
Setting
Security Network
SUB MENU
1. Bar Foreign Calls : Bars foreign calls.
2. Only Local & Home : Bars local calls.
3. Bar Incominng Calls : Bars answering incoming calls.
4. Bar Incoming If Abroad : Bars answering incoming international calls.
5. Bar Outgoing Calls : Bars dialing any calls.
(Default:
1234)
Call Barring
Choose
1~6
Choose
1~6
OK
6. Cancel All : Clears all settings of the “Network” menu.
SUB MENU
1. All services : On / Off / Status
2. Voice calls : On / Off / Status
3. Data : On / Off / Status
4. Fax : On / Off / Status
5. Messages : On / Off / Status
6. All exceept msgs : On / Off / Status
Reset settings (4-6)
Using this menu, you can reset the phone to the factory settings.
[Menu]
Setting
Reset
Settings
OKYes/NoYes/No
5544

5. SMS
Messages are received and saved as long as there is free space on the SIM card.
Message Inbox (5-1)
You can view and save received messages.
View Inbox
Information
[Menu]
SMS
SUB MENU
1. Delete : Deletes the selected message.
Message
Inbox
Menu OKInbox
submenu Choose1~6
2. Delete All : Deletes all messages.
< After reading a message >
� Sub menu
1. Text Reply : Sends a reply to the message.
2. Forward : Forwards the message to another person.
3. Delete : Deletes the message from the phone.
� You can make a call to the sender of the current message by pressing the Send key.
� When there is no message, ‘No more messages’appears.
5555

Message Outbox (5-2)
You can view and save sent messages.
Outbox
[Menu]
SMS
SUB MENU
1. Delete : Deletes the selected message.
2. Delete All : Deletes all messages.
< After reading a message >
SUB MENU
Message
Outbox
Information
View
Menu SelectOutbox
submenu Choose1~3
1. Forward : Forwards the sent message to another person.
2. Edit : You can edit and send the message.
3. Delete : Deletes the message from the phone.
5566

Send Message (5-3)
Using this menu, you can write a message.
[Menu]
SMS
Send
Message
Input
Message
OK
Input
Sent to
Number
SUB MENU
1. Send : Sends the message immediately.
2. Save : Saves the message in Message Outbox.
� Up to 462 Russian or 926 English characters are allowed for a message.
� For more information about using Text Input Modes, refer to page 33.
Message Box (5-4)
You can save a short message (up to 30 English Spanish).
OK
(Send/Save)
[Menu]
SMS
Message
Box
SUB MENU
1. Edit : Select this option to edit the message.
2. Add Msg : Saves a message. You can edit or send a saved message.
(For information about how to send a message, refer to page 64.)
3. Delete : Deletes the selected message.
4. Delete All : Deletes all messages in the Message Box.
Menu
5577
Choose
1~3
OK

Setting (5-5)
Message Center (5-5-1)
Message Center
[Menu]
SMS
Message Lifetime (5-5-2)
You can configure the lifetime of a message.
Setting Message
Center
Input
Message
Center
Nmuber
OK
[Menu]
SMS
Setting Message
Lifetime
Select
Time
OK
� Lifetime: One Hour, Two Hours, Six Hours, One Day, Two Days, One Week,
Four Weeks and Six Months
Message Format (5-5-3)
You can configure the message format.
[Menu]
SMS
Setting Message
Format
Select
Format
OK
� Format: Normal, Fax, Voice Mail, ERMES, Nation’l Paging, X.400 and Internet
5588

Storage Status (5-5-4)
Message Format을 설정합니다.
[Menu]
SMS
Setting Storage
Status
� Shows the memory usage of the Message Box. (Usage / Total format.)
Voice mail (5-6)
Get Voice Mail (5-6-1)
Retrieves Voicemail
[Menu]
SMS
Voicemail Get
VoiceMail
OK
Setting (5-6-2)
Setting
[Menu]
SMS
Voicemail Setting Home/Roam
OK
Mailbox
5599

Brodcast Message (5-7)
A broadcast message is a text message of up to 93 characters that is sent to all GSM
terminals within a cell by the network at a regular interval.
Read New (5-7-1)
You can view the last broadcast message.
View
Broadcast
[Menu]
SMS
Brodcast
Message
Read New
Setting (5-7-2)
You can configure the Language and the Subject.
Information
[Menu]
SMS
Brodcast
Message
Settingl Lanuage/
Subject
OK
1. Language : You can add a Language by pressing .
� Deutsch, Italiano, Francais, Espanol, Dansk, Nederlands, Svenska, Dansk, Portugues,
Suomi, Norsk and Turkce.
� The default language is English.
� The SMS Cell Broadcast Menu may be hidden depending on the service groups and
related services availability.
2. Subject
1) User Defined
� Add : Standard ID (e.g. Weather forecast), Specific ID (e.g. 257), All (to receive all cell
broadcast messages)
2) Active
6600

6. Phone Book
View All (6-1)
Using this menu, you can view all numbers saved on the phone and the SIM card.
[Menu]
Phone
Book
View All
Menu
Add/Edit/
Delete
OK
SUB MENU
1. Add : You can add a new number. (See page 70)
2. Edit : You can edit and send the message.
3. Delete : You can delete the selected message.
Search (6-2)
You can search for a phone number saved on the phone and the SIM card
Recall By Name (6-2-1)
Using this menu, you can easily find a phone number saved in the Phonebook by entering a
part or all of the name.
[Menu]
Phone
Book
Search
Recall By
Name
6611
Search a
Number by
Name
OK

SUB MENU
1. Add : You can add a new number. (See page 70)
2. Edit : You can edit and send the message.
3. Delete : You can delete the selected message.
� If you enter a character, all addresses including the character are found.
� If you press without entering a character, all numbers will be displayed.
Recall By Num (6-2-2)
Using this menu, you can easily find a phone number saved in the Phonebook by
entering a part of or all of the number.
Search a
Number by
[Menu]
Phone
Book
Search
Recall By
Num
Number
OK
SUB MENU
1. Add : You can add a new number. (See page 70)
2. Edit : You can edit and send the message.
3. Delete : You can delete the selected message.
� You can easily find a phone number by entering a part of or all of the number.
Recall By Group (6-2-3)
You can find a phone number by searching by the group.
Search a
Number by
[Menu]
Phone
Book
Search
Recall By
Group
Group
OK
6622

SUB MENU
1. Add : You can add a new number. (See page 70)
2. Edit : You can edit and send the message.
3. Delete : You can delete the selected message.
� Select a group from the group list and search for a number belonging to the group.
Add Entry (6-3)
Phone에 200개의 전화번호를 등록할 수 있으며, SIM Card는 용량에 따라 다릅니다.
Description of icon
NAME
GROUP
PHONE
HOME
OFFICE
FAX
EMAIL
BIRTHDAY
When you save to the phone,
You can save an entry according to the Phonebook Settings.
Add new
information
[Menu]
Phone
Book
Add Entry
in an empty
entry
OK
� Select Name, Group, H.P-1, HOME, OFFICE, FAX, E-mail1 or Birth.
� You can assign an entry to a pre-configured group.
6633

When you save to the SIM card,
The number of phone numbers that can be saved on a SIM card is determined by the
capacity of the SIM card.
Add new
information
[Menu]
Phone
Book
SUB MENU
1. Name : Enter the name.
2. H.P-1 : Enter the phone number. (Up to 20 digits.)
Add Entry
in an empty
entry
OK
Add Speed Dial (6-4)
Using this menu, you can add a speed dial number that can be used to make a phone call
with a single key stroke.
[Menu]
Phone
Book
SUB MENU
1. Edit : You can enter or edit the name and phone number.
2. Delete : You can delete a registered Speed Dial.
Add Speed
Dial
Menu Edit/
Delete
OK
6644

Copy All (6-5)
Using this menu, you can copy all phone numbers saved on the SIM card or the phone.
[Menu]
Phone
Book
Copy All Phone/
SIM
OK
1. Phone To SIM
Copies the phone numbers saved on the phone to the SIM card.
2. SIM To Phone
Copies the phone numbers saved on the SIM card to the phone.
Delete All (6-6)
Deletes all phone numbers saved on both the phone and the SIM card.
[Menu]
Phone
Book
Delete All Phone/
OK
SIM
6655

Settings (6-7)
Edit Groups (6-7-1)
Using this menu, you can add, rename and edit a group.
[Menu]
Phone
Book
Settings
Edit
Groups
Menu Edit/
Sound
OK
SUB MENU
1. Edit : You can change the default name of the ‘Group’.
2. Sound : Select a group by using , and press to configure the ring tone for
the group.
� You can add up to 9 groups.
� You can enter up to 15 alphanumeric characters for a group name.
� For information on how to specify a group, refer to ‘Add Entry’
Save nos. to (6-7-2)
전화번호 저장을 Phone과 SIM Card 중 선택하여 저장할 수 있게 설정합니다.
[Menu]
Phone
Book
SUB MENU
1. SIM card : Select this option to automatically save Phonebook information on the
SIM card.
2. Phone memory : Select this option to automatically save Phonebook information on
the phone.
3. Choice : Select this option to select where to save to (either to the SIM card or the
phone) when Phonebook information is saved.
Settings
Save nos.
to
6666
Choose
1~3
Save

Phone Memory (6-8)
You can check the memory usage of the Phonebook for the SIM card and the phone.
View
Memory
[Menu]
Phone
Book
Phone
Memory
Information
Save
My Phone Number (6-9)
Using this menu, you can save your phone number.
[Menu]
Phone
Book
My Phone
Number
Menu OK
Edit/
Delete
SUB MENU
1. Edit : You can edit the name and the phone number.
2. Delete : You can delete the item.
6677

7. GAME
Cusion Tank (7-1)
Cushion Tank is a special tank, which contains weapons whose shots rebound off ground
objects.
The ground where the game is played on, is surrounded by blocks and walls, so when the
Cushion Tank launches its cannon, the launched shot is reflected by the angle of the ground
objects.
Per turn, the gamer can move the position of the tank to the left or the right, and adjust the
angle of the cannon to try to hit the opponent’s camp or tank.
If the angle of the launching cannon is incorrectly calculated, it is possible that gamers may
hit themselves, so it is very important to try to correctly calculate the launch angle and the
use of the items.
‘Cushion Tank Battle Round’ can be enjoyed in two modes, singles mode or doubles mode.
Singles mode is for a single gamer to play against the PHONE and which has five stages of
advancing difficulties. Doubles mode allows two gamers to take turns playing against each
other.
If you can successfully win both modes, you can proudly consider yourself the best operator
of the most advanced weapon, the Cushion Tank.
[Menu]
GAME
Causion
Tank
Key Operation
Direction Control / Move
View Menu
Fire
Use an Item
6688

Game Progress
� The game has two modes, singles and doubles mode. Singles mode is for a single gamer
to play against the phone through five stages of advancing difficulties. Doubles mode allows
two gamers to play against each other in turns.
� The gun barrel of the tank can be adjusted between 15 and 75 degrees in both the left and
the right directions, and the gun can be fired in the adjusted direction.
� A triangle appears and disappears above the tank depending on whose turn it is to attack.
� The location of the 10 reflective blocks, positioned in the game space, change after each
turn, and one of the reflective blocks is an item block. Firing the weapon and hitting the item
block shown as an icon, will reflect the weapon and the gamer obtains the item.
� There are a total of 15 items, which consist of 9 attack items, 3 defense items and 3
miscellaneous items. When an item is obtained, it fills the Item Box at the bottom of the
screen, and can be used by the gamer using the use item button (button number 9) when it
is that gamer
’s turn.
� The function of the Question Item (which belongs to the miscellaneous items) is not
known when it isobtained or in the Item Box, and its real capability can only be known when
it is being used, so it needs to be used with care.
� The Item Box can only keep one item, and therefore it is replaced with a new item
whenever a new item is obtained, even though there is an unused item in the box. So, it is
advantageous to use the obtained item appropriately and quickly.
� When the tank is hit, the number displayed above it, is the number of HP (Hit Points)
being lost. (With the exception of the time when HP are being added, as a reverse function
depending on the item)
� The outcome of the game is determined when the tank exhausts all HP and explodes, or
one of the players falls into the ground within their own positional block.
� The stage result screen shows the score that was calculated from the remaining HP
quantity at the completion of the stage, and taking into account the number of turns used.
Even though the stage can be cleared using the same quantity of HP, the number of turns
6699

used can make the difference, so it is important to finish as quickly and with using as few
turns as possible.
� Because the tank being hit by the weapon loses its HP based on where it was hit and by
what weapon it was hit by, the key strategy to win the game is to use movement and precise
angle adjustments to deliver maximum damage.
��
HEIGHT DESTROY ITEM
The Height Destroy Item is an attack item that can destroy all positional blocks in a
vertical direction when hitting the positional blocks where the tank is located.
��
QUESTION ITEM
The Question Item is an item whose function is unknown when it is obtained and is in the
Item Box. The Question Item exists with the
‘ ? ’status in the Item Box, and only turns into
an item when it is used and performs its function.
��
GAGE CHANGE ITEM
The Gage Change Item is an item that exchanges the HP gages of the gamer and the
opponent.
��
DRACULA ITEM
The Dracula Item is an item that fills the opponent’s HP in reverse by the amount of the
damage inflicted. When hit by the weapon using this item, the opponent
’sHP is filled with
the amount of damage. However when it hits the positional ground, it is destroyed without
any change.
��
50% ITEM
The 50% Item is an item that decreases the HP of the tank by half The 50% Item is an
item that decreases the gage by half regardless of the remaining quantity of HP, and it might
show up when using the Question Item, so be careful.
��
PERFORATION ITEM
The Perforation Item is an item that enables the weapon to penetrate the positional block.
There is hardly any damage when this launched weapon hits the tank, but when it hits the
positional block, the weapon penetrates in the direction of its movement and causes
damage accordingly.
7700

Types and Functions of items
��
SECOND CHANCE ITEM
The Second Chance Item is an item that enables the launching of a weapon one more
time. When this item is used, one more round is launched in the currently adjusted direction.
��
DOUBLE COUNTER ITEM
The Double Counter Item is an item that separates the weapon into two parts and attacks
from the position where they first hit.
��
NUCLEAR ITEM
The Nuclear Item is the most powerful weapon, a nuclear bomb weapon.
��
REMOTE CONTROL ITEM
The Remote Control Item is a weapon item that explodes when the button is pressed
once again after the weapon is launched. When an item is chosen and the weapon is
launched, the weapon goes on rebounding like any other normal weapon, and if the weapon
launch button is pressed once again, the weapon explodes at that spot. The weapon
functions normally until pressed once again.
��
LAND ADD ITEM
The Land Add Item enables the recovery of the tank’s positional blocks (land). The Land
Add Item does not recover the entire land, but it recovers the lowest level line block that
prevents the tank from crashing.
��
ROOT SIGHT ITEM
The Root Sight Item is an item that shows the rebound route of the weapon being
launched by the tank. This item shows on a dotted line the moving direction of the weapon
to be fired. The route shown is for 10 rebounds, and the weapon to be used must be a
normal weapon.
��
HP ADD ITEM
The HP Add Item is an item that enables the recovery of the HP gage of the tank. Starting
with a total of 180 HP, when this item is used, 40 HP are filled. No weapon is launched, and
it is the turn of the opponent.
7711

��
SHIELD ITEM
The Shield Item is an item that provides a tank defense shield. A defense shield is
created around the tank and provides a defense for two turns. The Shield Item does not
provide a defense against positional block damage, and so it does not provide a defense
against the tank crashing.
��
WIDTH DESTROY ITEM
The Width Destroy Item is an attack item that can destroy all positional blocks in a
horizontal direction when hitting the positional blocks where the tank is located.
7722

8. Browser
Home (8-1)
You can connect to the URL set in the WAP profile.
Resume (8-2)
You can use this menu to connect to the page last accessed.
Bookmarks (8-3)
You can view the bookmark list in this menu. (When there is more than one bookmark
in the list) You can change or delete the names and addresses of the bookmark.
Setting (8-4)
This menu is configured as follows.
- WAP Profiles
- Cache Mode
:
WAP profiles (8-4-1)
Choose a profile from the list or add a new profile through “Add New”.
1. Activate
You can activate the profile by choosing one from the profile list.
2. Edit
You can change all values set in the browser, and this menu is configured in the
following way.
- Homepage - Gateway
- Image - Bearer
- Connection Type - Data Bearer Settings
- Connection Option - GPRS Bearer Settings
- Confirm Download
7733

2-1 Homepage
This menu enables you to enter a URL site to use as the home page.
You do not need to include
‘http://’. which is automatically added by the WAP
browser.
2-2 Image
You can use the value of the default image settings without changes.
�
Display Image
This menu enables you to choose whether to display the WAP card.
�
Update Image
This menu enables you to choose whether to allow the display to be shown before the
download of the WAP card is completed. You can choose whether to show the ALT
text or not while the image is being downloaded and before it is displayed.
2-3 Connection Type
This menu has two options,
“None”and “Secure”, and is related to the gateway that
the user connects to.
- None: Connectionless secure connection.
- Secure: Connection-orientated secure connection.
2-4. Connection Option
The Connection Options are “Temporary”and “Continuous”and are related to the
gateway that the user connects to.
�
Temporary
This menu is a service of a non-connecting type.
�
Continuous
This menu provides an assured transmission method, but can generate lots of
network traffic.
7744

2-5 Gateway
Most WAP gateways do not require a User ID and Password. If the user gateway is
used and supported by the network, it needs to be set up before connecting to the
WAP site.
2-6 Bearer
You have to choose a bearer service that is supported by the respective WAP
gateway. This service will be either Data, SMS or GPRS.
2-7 Data Bearer Setting
The value setting of this service is only useful when “Data”is chosen.
�
IP Address
You can enter the IP address of the WAP gateway that is used to connect to the WAP
page.
�
Dial
You need to enter the phone number needed for dialing a connection to the WAP
gateway. This value is to be provided by the respective network.
�
Data Call Type
You have to determine the type of data call for a connection. The types are
“Analogue”and “ISDN”and are to be provided by the respective network.
�
Data Call speed
The Data Call Speed represents the data connection speed of the user, and is to be
provided by the respective network. The values are 2400, 4800 and 9600.
�
User ID
This User ID is used by the dial-up server (not the WAP gateway), and is to be
provided by the respective network.
�
Password
This is a Password for the access point (not the WAP gateway). This value is to be
provided bythe respective network.
7755

�
Timeout
The user has to determine the timeout period from three choices (30, 60, or 120).
Even if the user did not successfully send or receive the data during the determined
timeout period while using the browser, the respective data request will
automatically end when the timeout period ends. From the current screen, the user
can view the cards effectively stored in the handset cache of the memory through the
WML cards, or via “Offline”, but from the current screen, if the user chooses the
linked card not stored in the cache, a new data call will be requested.
2-8
GPRS Bearer Setting
The settings of this service are valid only when the bearer is configured as “GPRS”.
�
IP Address
You can enter the IP address of the WAP gateway that is used to connect to a WAP
page.
�
Access Point Name
You have to enter the WAP gateway APN to connect to a WAP page.
The network should provide this value. The default value is
�
User ID
“cmwap”.
This is the user ID to connect to an access point. The network should provide this
value.
�
Password
This is the password to connect to an access point (not for a WAP gateway).
The network should provide this value.
3. Change Name
You can change the name of a Profile.
4. Delete Profile
You can delete a Profile saved in the Profile List.
7766

Cache mode (8-4-2)
You can determine whether to check for pages in the Lode cache when connecting to a
WAP page. Using thus menu, you can avoid loading a page that is already saved in the
cache.
� Always Cache: Check cache when connecting to WAP.
� Never Check: Never check cache when connecting to WAP.
Empty cache (8-5)
Using this menu, you can delete all data in the cache.
Version Info (8-6)
Using this menu, you can view the version of the WAP.
7777

SPECIFICATIONS
Frequency Band
Frequency Precision
Weight
Transmission Power
Operation
Phone
Transmission (TX): 824.64 MHz ~ 848.37 MHz
Reception (RX): 869.64 MHz ~ 893.37 MHz
Within allocated frequency ± 300 Hz
Less than 85 g
0.3 W ± 50 %
℃ ~ +50℃
-20
Temperature
T/A
Relative Humidity
0℃ ~ +40℃
5% ~ 95%
Patent and Trademark Information
“T9 text Input is covered by U.S.Pat.5,818,437,U.S.Pat.5,953,541,U.S.Pat.6,011,554,U.S.Pat.
6,307,548 and other patents pending.”
Licensed by QUALCOMM Incorporated under one or more of the following United States Patents
and/or their counterparts in other nations:
4,901,307 5,490,165 5,056,109 5,504,773 5,101,501
5,506,865 5,109,390 5,511,703 8,228,054 5,535,239
5,267,261 5,544,196 5,267,262 5,568,483 5,337,338
5,600,754 5,414,796 5,657,420 5,416,797 5,659,569
5,710,784 5,778,338
lssue 1
7788

Safety Information
1 . SAFETY INFORMATION FOR FIXED WIRELESS TERMINALS
.POTE NTIALLY EXPLOSIVE ATMOSPHERES
Turn your phone OFF when in any area with a potentially explosive atmosphere
and obey all signs and instructions. Sparks in such areas could cauls e an
explosion or fire resulting in bodily injury or even death.
.
INTERFERENCE TO MEDICAL DIVICES
Certain electronic equipment may be shielded against RF signal from you wireless
phone. (pacemakers, Hearing Aids, and so on) Turn your phone OFF in health care
facilities when any regulations posted in these areas instruct you to do so.
RF signals may affect improperly installed or inadequately shielded electronic
system in motor vehicles.
.EXPOSURE TO RF ENERGY
Use only the supplied or an approved replacement antenna.
Do not touch the antenna unnecessarily when the phone is in use.
Do not move the antenna close to, or touching any exposed part of the body when
making a call.

SAR INFORMATION
THIS MODEL PHONE MEETS THE GOVERNMENT’S
REQUIREMENTS FOR EXPOSURE TO RADIO WAVES.
Your wireless phone is a radio transmitter and receiver. It is designed and manufactured not to
exceed the emission limits for exposure to radiofrequency (RF) energy set by the Federal
Communications Commission of the U.S. Government. These limits are part of comprehensive
guidelines and establish permitted levels of RF energy for the general population. The
guidelines are based on standards that were developed by independent scientific organizations
through periodic and thorough evaluation of scientific studies. The standards include a
substantial safety margin designed to assure the safety of all persons, regardless of age and
health. The exposure standard for wireless mobile phones employs a unit of measurement
known as the Specific Absorption Rate, or SAR. The SAR limit set by the FCC is 1.6 W/kg. *
Tests for SAR are conducted with the phone transmitting at its highest certified power level in all
tested frequency bands. Although the SAR is determined at the highest certified power level,
the actual SAR level of the phone while operating can be well below the maximum value. This is
because the phone is designed to operate at multiple power levels so as to use only the power
required to reach the network. In general, the closer you are to a wireless base station antenna,
the lower the power output. Before a phone model is available for sale to the public, it must be
tested and certified to the FCC that it does not exceed the limit established by the government
adopted requirement for safe exposure. The tests are performed in positions and locations (e.g.,
at the ear and worn on the body) as required by the FCC for each model. The highest SAR
value for this model phone when tested for use at the ear is 0.4 W/Kg
and when worn on the
body, as described in this user guide, is 0.317 W/Kg
. (Body-worn measurements differ among
phone models, depending upon available accessories and FCC requirements). While there may
be differences between the SAR levels of various phones and at various positions, they all meet
the government requirement for safe exposure. The FCC has granted an Equipment
Authorization for this model phone with all reported SAR levels evaluated as in compliance with
the FCC RF exposure guidelines. SAR information on this model phone is on file with the FCC
and can be found under the Display Grant section of http://www.fcc.gov/ oet/fccid after
searching on FCC ID: MC6TDG-320TME
.
Additional information on Specific Absorption Rates (SAR) can be found on the Cellular
Telecommunications Industry Association (CTIA) web-site at http://www.wow-com.com.
* In the United States and Canada, the SAR limit for mobile phones used by the public is 1.6
watts/kg (W/kg) averaged over one gram of tissue. The standard incorporates a sub-stantial
margin of safety to give additional protection for the public and to account for any variations in
measurements.

SAFETY INFORMATION FOR RF EXPOSURE
Body worn operation
This device was tested for typical body-worn operations with the back of the phone
kept 15 mm. from the body. To maintain compliance with FCC RF exposure
requirements, use only belt-clips, holsters or similar accessories that maintain a 15 mm.
separation distance between the user’s body and the back of the phone, including the
antenna. The use of belt-clips, holsters and similar accessories should not contain
metallic components in its assembly. The use of accessories that do not satisfy these
requirements may not comply with FCC RF exposure requirements, and should be
avoided.
FCC Compliance Information
This device complies with Part 15 of FCC Rules.
Operation is subject to the following two conditions:
(1) This device may not cause harmful interference, and
(2) This device must accept any interference received.
Including interference that may cause undesired operation.

U.S.A.
U.S.FEDERAL COMMUNICATIONS COMMISSION
RADIO FREQUENCY INTERFERENCE STATEMENT
INFORMATION TO THE USER
NOTE : This equipment has been tested and found to comply with the limits for a Class B
digital device pursuant to Part 15 of the FCC Rules.
These limits are designed to provide reasonable protection against harmful Interference in
a residential installation This equipment generates, uses, and can radiate radio frequency
energy and, if Not installed and used in accordance with the instructions, may cause
harmful Interference to radio communications. However, there is no guarantee that
interference will not occur in a particular Installation. If this equipment does cause harmful
interference to radio or television reception, which can be determined by turning the
equipment off and on, the user is encouraged to try to correct the interference by one or
more of the following measures:
z Reorient or relocate the receiving antenna.
z Increase the separation between the equipment and receiver.
z Connect the equipment into an outlet of a circuit different from that to which
the receiver is connected.
z Consult the dealer or an experienced radio/TV technician for assistance.
Changes or modification not expressly approved by the party responsible for Compliance
could void the user’s authority to operate the equipment. Connecting of peripherals requires
the use of grounded shielded signal cables.
 Loading...