

Page 1

MTP-1530II Modular Thermal Printer
User Manual
Telpar
800-872-4886
Fax: 603-742-9938
Website: www.telpar.com
E-mail: info@telpar.com
© 2012 Telpar (Rev.20120510)
Page 2

Telpar MTP-1530II Receipt Thermal Printer User Manual
Warranty
Telpar — Printer Limited Warranty
.WARRANTIES AND DISCLAIMERS. Products manufactured by Telpar are warranted against defects in
workmanship and materials for a period of twelve (12) months from the date of shipment to the original
user, provided the Product (a) remains unmodified, (b) is used only in the United States or Canada, (c) is
operated under normal and proper conditions, as Telpar determines in its sole discretion, and (d)
Customer provides prompt written notice Telpar of any defects as to parts and/or workmanship to.
Telpar may provide an extended warranty on certain Products or components thereof for an additional
price determined solely by Telpar and such extended warranty shall only be effective to the extent
memorialized in writing by Telpar. Telpar’s sole obligation and Customer’s exclusive remedy for
defective Telpar-manufactured Products is limited to repair or replacement, as Telpar determines in its
sole discretion. The warranty described above does not include any labor or service costs for removing
or replacing parts, or any shipping charges. Any repair performed by Telpar under this warranty does
not extend the original warranty period of any Product. This warranty shall not apply to any Product
which has: (i) been repaired or altered, except by Telpar; (ii) not been maintained in accordance with all
of the operating or handling instructions supplied by Telpar, or (iii) been subjected to misuse, willful
acts, abuse, tampering, negligence or accident, unusual physical or electrical stress, as Telpar
determines in its sole discretion. Customer acknowledges that Telpar provides no warranty for any third
party materials and Telpar is not responsible and will have no liability for any items or services provided
to Customer by any person or entity other than Telpar. Telpar’s duty to perform under any warranty
may be delayed, at Telpar’s sole option, until Telpar has been paid in full for all Products purchased by
Customer. No such delay shall extend the warranty period. To obtain assistance under this limited
warranty, Customer should contact the selling agency or write to: Telpar, Warranty Claims Department,
187 Crosby Road, Dover, NH, 03820, U.S.A. Telephone: 800-872-4886 or fax: 603-742-9938. No person
(including, without limitation, any agent, salesman, dealer or distributor) has the authority to act on
behalf of Telpar to expand Telpar’s obligation beyond the terms of this express warranty, or to state that
the performance of the Product is other than published by Telpar. For Products not manufactured by
Telpar, to the extent permitted Telpar assigns to Customer the benefits of any warranties provided to
Telpar by the manufacturer(s) of the Product. THE FOREGOING IS A LIMITED WARRANTY AND IT IS
THE ONLY WARRANTY PROVIDED BY TELPAR. TELPAR DISCLAIMS ALL WARRANTIES, EXPRESS OR
IMPLIED, INCLUDING ALL IMPLIED WARRANTIES OF MERCHANTABILITY AND FITNESS FOR A
PARTICULAR PURPOSE AND ALL WARRANTIES OR INDEMNITIES FOR PATENT OR COPYRIGHT
INFRINGEMENT. IN NO EVENT SHALL TELPAR BE LIABLE FOR ANY INDIRECT, INCIDENTAL, SPECIAL
OR CONSEQUENTIAL DAMAGES, INCLUDING LOSS OF PROFITS, REVENUE, DATA, OR USE, INCURRED
BY CUSTOMER OR ANY THIRD PARTY, WHETHER IN AN ACTION IN CONTRACT OR TORT, ARISING
OUT OF OR RELATED TO THIS AGREEMENT, EVEN IF TELPAR OR ANY OTHER PERSONS HAS BEEN
ADVISED OF THE POSSIBILITY OF SUCH DAMAGES. TELPAR’S LIABILITY FOR DAMAGES HEREUNDER
FOR ANY CAUSE WHATSOEVER SHALL IN NO EVENT EXCEED THE AMOUNTS RECEIVED BY TELPAR
FROM THE CUSTOMER FOR THE PRODUCTS. TELPAR SHALL NOT BE RESPONSIBLE FOR ANY LOSS,
DAMAGE OR EXPENSE OF ANY KIND CAUSED DIRECTLY OR INDIRECTLY BY THE USE OR
PERFORMANCE OF THE PRODUCT PROVIDED HEREUNDER.
Upon inspection, Telpar will make necessary repairs or replacement and return the merchandise,
shipping prepaid.
MTP-1530II User Manual (Rev.20120510)Page ii
Page 3

Telpar MTP-1530II Receipt Thermal Printer User Manual
Table of Contents
1 General..................................................................................................................... 6
1.1 Definitions ....................................................................................................................7
1.1.1 Standard Mode versus Page Mode.........................................................................7
1.1.2 Hex Dump Mode .....................................................................................................7
1.1.3 Explanation of Terms used throughout this manual ................................................9
1.2 Applications..................................................................................................................9
1.3 Standard Features .....................................................................................................10
1.4 Specifications.............................................................................................................11
1.5 Power Supply Requirements.....................................................................................11
1.5.1 Voltage: 24 VDC ±10% ........................................................................................11
1.5.2 Power Supply Option from Telpar .........................................................................11
1.5.3 3-Pin Hosiden Connector on Printer for Power Supply Connection ......................12
1.6 Telpar Roll Paper for MTP-1530II Series ...................................................................12
1.7 Sensor Locations and Functions..............................................................................13
2 Operator Instructions ........................................................................................... 15
2.1 Unpacking and Inspection.........................................................................................15
2.2 Paper Loading............................................................................................................15
2.2.1 Side-Loading Roll..................................................................................................15
2.2.2 Black Mark Sensors Load......................................................................................15
2.3 Paper Jam ..................................................................................................................17
2.3.1 Head Open Lever..................................................................................................17
3 Installation............................................................................................................. 18
3.1 Self Test Mode............................................................................................................18
4 Setup and Control of the Printer.......................................................................... 20
4.1 DIP Switch Settings and Memory Switch Settings...................................................20
4.2 LEDs and Error Indication.........................................................................................26
4.3 Control Codes and Control Sequences List.............................................................28
4.4 Control Codes and Control Sequences Definition...................................................31
4.4.1 General Usage Print Commands...........................................................................31
4.4.2 Status Commands.................................................................................................35
4.4.3 Bar Code Commands............................................................................................35
4.4.4 Counter Commands ..............................................................................................36
MTP-1530II User Manual (Rev.20120510)Page iii
Page 4

Telpar MTP-1530II Receipt Thermal Printer User Manual
4.4.5 Top of Form Commands .......................................................................................38
4.4.6 Page Mode Commands.........................................................................................38
4.4.7 NV Memory and Down Load Bit Images Commands ............................................41
4.4.8 Seldom Used Commands......................................................................................43
4.5 Descriptions of Commands.......................................................................................46
4.5.1 Set Print Mode.......................................................................................................46
4.5.2 Set Bit Image Mode...............................................................................................46
4.5.3 Set Raster Bit Image Mode ......................................Error! Bookmark not defined.
4.5.4 Set and Process Graphics Data............................................................................49
4.5.5 Status Commands.................................................................................................54
4.5.6 Enable/Disable Auto Status Back (ASB) mode.....................................................55
4.5.7 Status Bytes Transmitted......................................................................................55
4.5.8 Bar Code Command..............................................................................................56
4.5.9 GS k +m +n +d1∼dn [1D 6B +m +n (DATA)] .........................................................57
4.6 Serial (RS232C) Interface ..........................................................................................59
4.6.1 Serial (RS232C) Interface Specification................................................................59
4.6.2 Serial I/O Connector..............................................................................................59
4.6.3 Flow Control..........................................................................................................60
4.7 Centronics Parallel (IEEE-1284) Interface ................................................................62
4.7.1 Parallel I/O Connector...........................................................................................62
4.8 USB 2.0 Interface .......................................................................................................63
4.9 Ethernet Interface ......................................................................................................64
5 Drivers for the Printer........................................................................................... 69
6 Specifications........................................................................................................ 70
6.1 General Specifications ..............................................................................................70
6.2 Character Sets ...........................................................................................................71
6.2.1 Overview ...............................................................................................................71
PC437 U.S.A., Standard Europe Character Set.................................................................72
Katakana Character Set.....................................................................................................73
PC850 (Multilingual) Character Set....................................................................................74
PC860 (Portuguese) Character Set ...................................................................................75
PC863 Canadian French Character Set.............................................................................76
PC865 Nordic Character Set..............................................................................................77
WPC 1252 Character Set ..................................................................................................78
PC866 Cyrillic #2 Character Set.........................................................................................79
PC852 Latin 2 Character Set .............................................................................................80
MTP-1530II User Manual (Rev.20120510)Page iv
Page 5

Telpar MTP-1530II Receipt Thermal Printer User Manual
PC858 Euro Character Set ................................................................................................81
6.3 Dimensional Drawings of the MTP-1530II (80 mm)..................................................82
MTP-1530II User Manual (Rev.20120510)Page v
Page 6

Telpar MTP-1530II Receipt Thermal Printer User Manual
1 General
The MTP-1530II series of modular thermal printers is designed specifically for the high
performance, size and durability requirements of cut and drop applications. The
compact size and high performance characteristics, coupled with its rugged design also
make it ideal for the kiosk environment.
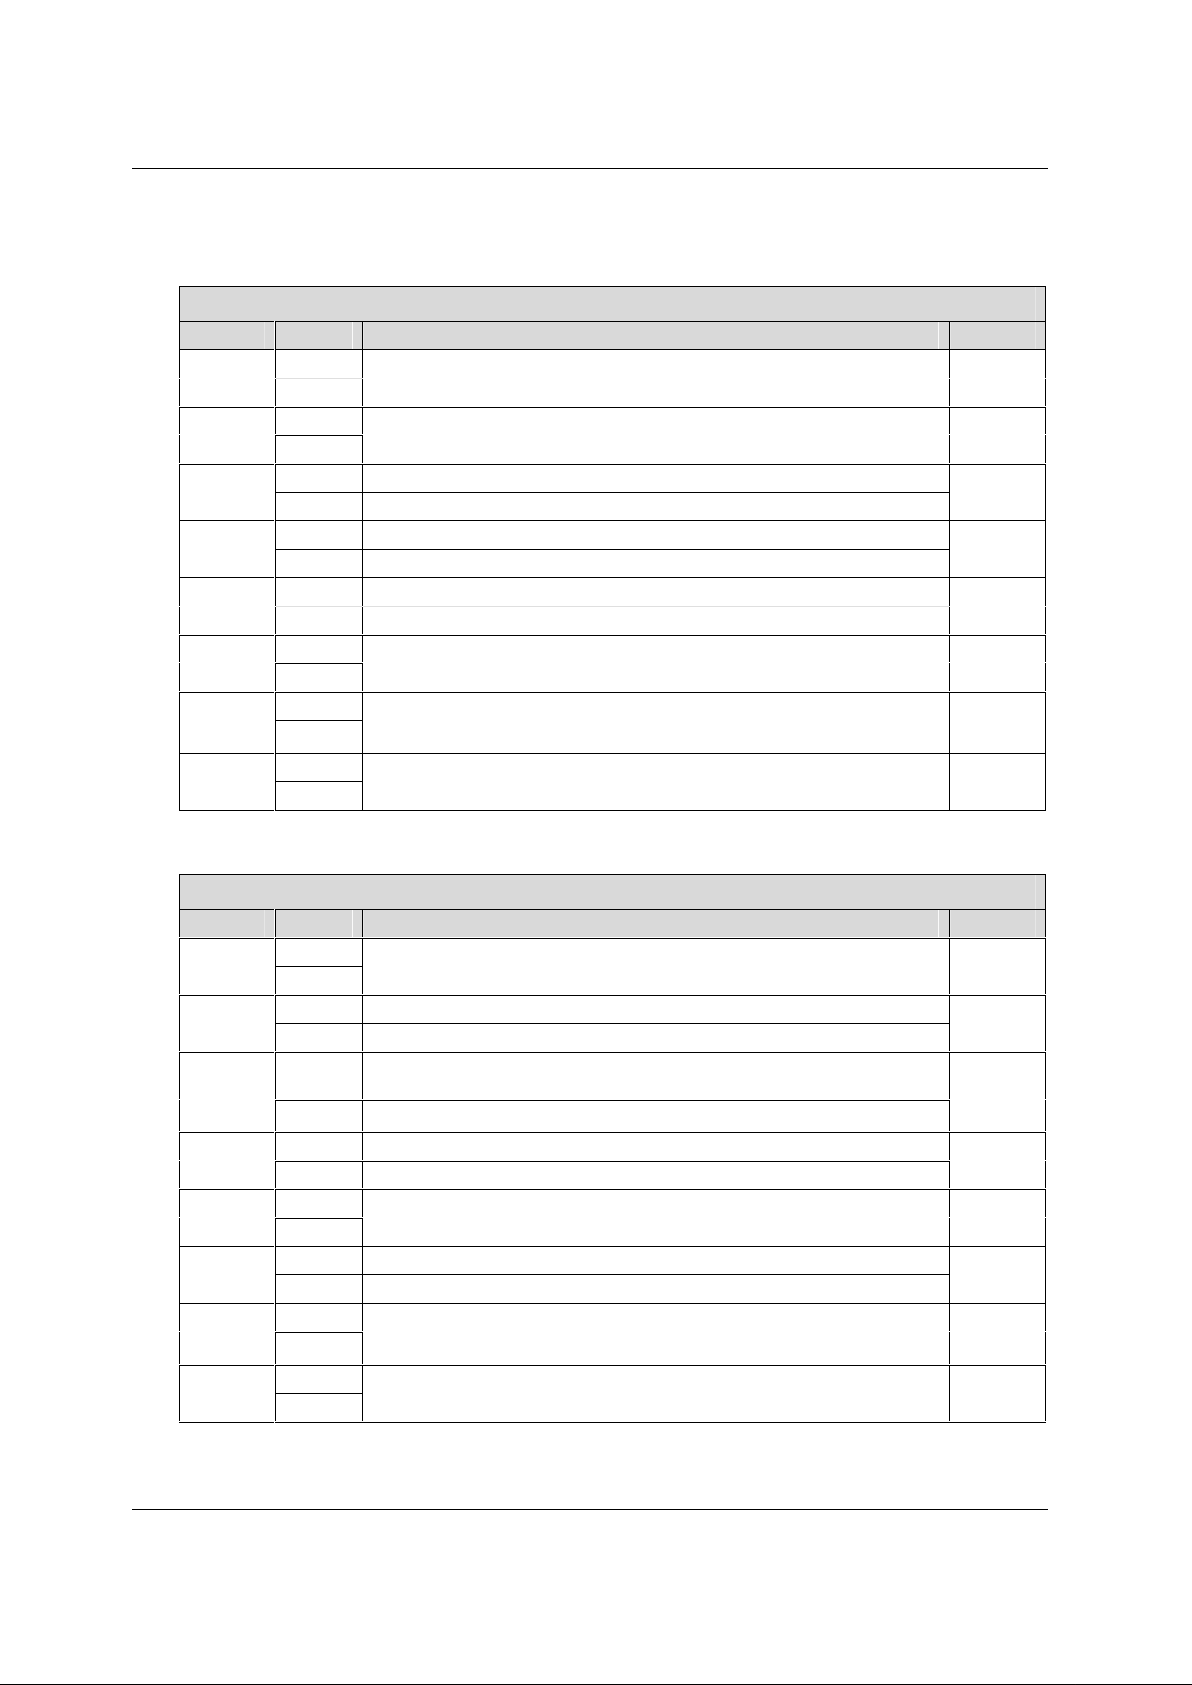
Here are some common options for the MTP-1530II Printer. Please note that all
the options listed below are for use with 80mm (3.15 inch) wide paper:
MTP-1530II Option Description Telpar Part Number
RS-232 Serial Communication, Full Cut Document 901033-0202
RS-232 Serial Communication, Partial Cut Document 901033-0212
Parallel Communication, Full Cut Document 901033-0203
Parallel Communication, Partial Document 901033-0213
USB Communication, Full Cut Document 901033-0201
USB Communication, Partial Cut Document 901033-0211
Ethernet (network) Communication, Full Cut Document 901033-0204
Ethernet (network) Communication, Partial Cut Document 901033-0214
MTP-1530II User Manual (Rev.20120510) Page 6
Page 7

Telpar MTP-1530II Receipt Thermal Printer User Manual
1.1 Definitions
1.1.1 Standard Mode versus Page Mode
The printer operates in two print modes: standard mode and page mode.
In standard mode, the printer prints and feeds paper each time it
receives print data or paper feed commands. In page mode, all the
received print data and paper feed commands are processed in the
specified memory, and the printer executes no operations. All the data in
the memory is then printed collectively when an ESC FF or FF command
is received.
For example, when the printer receives the data "ABCDEF" <LF> in
standard mode, it prints "ABCDEF" and feeds the paper by one line. In
page mode, "ABCDEF" is written to the specified printing area in
memory, and the position in memory for the next print data is shifted by
one line.
The ESC L command puts the printer into page mode, and all
commands received thereafter are processed in page mode. Executing
an ESC FF command prints the received data collectively, and executing
an FF command restores the printer to standard mode after the received
data is printed collectively. Executing an ESC S command restores the
printer to standard mode without printing the received data in page
mode; the received data is cleared from memory instead.
1.1.2 Hex Dump Mode
This function is sometimes useful for diagnosis of application programs
when the printer does not perform as expected. In hex dump mode, the
printer prints the hexadecimal code for each character received rather
than processing the data as printable text and as control commands.
The exception is that DLE EOT (real time STATUS request) and DLE
ENQ (Real time request to printer) are executed as received even in hex
dump mode. The hexadecimal notation is printed at 10 characters per
line on the left side of the page and the printable characters (when
possible) are printed on the right side of the page. Control codes print as
periods on the right side section of the printout to help locate specific
areas of the message to see what codes were actually received by the
printer. After all data has been sent to the printer, pressing the paper
feed button will flush the buffer and print the last line of data received.
Hex dump mode is initiated in any of three ways:
1) Open the platen, hold the paper feed button down, turn on power,
then close the platen and release the paper feed button.
2) Set DIP switch DPSW2 position 5 ON and then turn on power.
MTP-1530II User Manual (Rev.20120510) Page 7
Page 8

Telpar MTP-1530II Receipt Thermal Printer User Manual
3) Send the appropriate GS ( A command. On entering hex dump
mode, the printer prints a 4 line header “Hexadecimal Dump”, a blank
line, “To terminate hexadecimal dump”, “press FEED three times.”
Hex dump mode is terminated by
1) pressing the paper feed button three times in quick succession or
2) by turning DIP switch DPSW2 position 5 OFF and turning power
back on.
Print Sample
Hexadecimal Dump
To terminate hexadecimal dump,
Press Feed button three times.
1B 21 00 1B 26 02 40 40 1B 69 . ! . . & . @ @ . I
1B 25 01 1B 63 34 00 1B 30 31 . % . . c 4 . . 0 1
41 42 43 44 45 46 47 48 49 4A A B C D E F G H I J
Hex Dump of Print Sample
*** COMPLETED ***
MTP-1530II User Manual (Rev.20120510) Page 8
Page 9

Telpar MTP-1530II Receipt Thermal Printer User Manual
1.1.3 Explanation of Terms used throughout this
manual
Receive buffer – Receives data from the host and stores the data
temporarily until it can be processed to the print buffer or
processed as otherwise required.
Print buffer – Stores the image data to be printed.
Start of line – There is no print data in the print buffer and the print
position is not specified by ESC $ or ESC \. Many
commands are effective only at the start of line.
Printable area – For both Standard Mode and Page Mode the length in
the horizontal direction is 72 mm (576 dots per line/8 dots
per mm) for an overall 80 mm paper width.
In page mode the length in the vertical direction is 92 mm
(738 dots per line/8 dots per mm) for an overall 80 mm
paper width version.
Printing area – Printing range set by command. The printing area must
be less than or equal to the printable area.
MBS – Most Significant Bit of a byte of data.
LBS – Least Significant Bit of a byte of data.
OFF LINE – There is no switch for setting the printer On Line or Off Line.
The printer automatically goes Off Line in the following
cases:
a. During power on (or reset through the I/O connector) until the
printer is ready to receive data.
b. During self test.
c. While feeding paper with the paper feed button.
d. When out of paper.
e. When the print platen is open.
f. During a macro execution and in standby status.
g. When an error occurs.
1.2 Applications for the MTP-1530II Printer
• Parking ticket dispensing
• Automated Teller Machines (ATMs)
• Gaming receipts
• Interactive media kiosks
MTP-1530II User Manual (Rev.20120510) Page 9
Page 10

Telpar MTP-1530II Receipt Thermal Printer User Manual
1.3 Standard Features
• Direct thermal printing
• Interfaces:
⇒ Serial (RS232),
⇒ Parallel (IEEE1284),
⇒ USB 2.0,
⇒ Ethernet (10BASE-T and 100BASE-TX )
• Paper widths -- 80 mm (3.15 in)
• Full or Partial Document Cutter – specified at time of order.
• All metal construction
• Paper low sensor
• Paper auto load function
1
• ESC/POS
distribution industry.
• Print Speed – 250 mm/s
• DIP switches accessible without removing cover.
• Paper capacity: 152 mm (6 in) diameter roll with 50 mm diameter core
• Overall size including 152 mm (6 inch) diameter roll of paper:
169.8 mm x 150.3 mm x 243.4 mm (6.68 in H x 5.92 in W x 9.58 in D)
• Inverted print mode
• Character code tables: PC437 (USA, default), Katakana, PC850 (Multilingual),
PC860 (Portuguese), PC863 (Canadian-French), PC865 (Nordic), WPC1252,
PC866 (Cyrillic2), PC852 (Latin2), PC858 (Euro), Space page.
The commands conform to ESC/POS, which is a standard in the
• International character set: Control Boards, have the following: U.S.A.,
France, Germany, England, Denmark (2 choices), Sweden, Italy, Spain (2
choices), Japan , Norway, Latin America, Korea.
• Barcode embedded symbologies: UPC-A, UPC-E, JAN(EAN) 13, JAN(EAN)8,
3 of 9, ITF, CODABAR, Code93, and Code128. Ladder Bar codes can be
printed when using Page Mode.
• Bit image mode
• Reverse video mode
• Underline printing
• Continuous roll paper
• Page Mode
• Two character font sizes. Each can be printed from 1 to 8 times normal width
and/or 1 to 8 times normal height.
• “Smoothing” command (see GS b) – applies only in Page mode.
• Black Mark sensing.
1
ESC/POS is a registered trademark of SEIKO EPSON Corp.
MTP-1530II User Manual (Rev.20120510) Page 10
Page 11

Telpar MTP-1530II Receipt Thermal Printer User Manual
1.4 Specifications
• Resolution: 8 dots/mm (203 dots/in).
• Paper thickness: 0.056 µm to 0.15 µm maximum (0.0022 in to 0.0059 in).
• Operating temperature: -20oC to 70oC (-4oF to 158oF).
• Operating humidity: 10-80% RH (non-condensing, 34°C {93.2°F} is assumed at
80%).
• Peak current for head drive is 6.7A at the moment that all dots are energized.
• Weight: Approx. 3.6lbs (1.6Kg)
• Expected life of mechanism: 15 million lines.
• Expected life of cutter: 1 million cuts.
1.5 Power Supply Requirements
1.5.1 Voltage: 24 VDC ±10%
Current Requirements
Peak Current (approximately)
Mean Current (approximately) 3.0 Amps
Stand-by 0.1 Amps
Table 1 Current Requirements
If the number of dots that are energized at the same time is increased, a
higher current will flow; therefore, the user should use power supplies
with a current capacity adequate for the corresponding print duty.
6.7 Amps
1.5.2 Power Supply Option from Telpar
(Telpar Part Number 103929-0200) Telpar offers a safety agency
approved 100 to 240 VAC (50/60Hz) input to 24VDC output power
supply suitable for most printing applications which use the MTP-1530II
Printer. Please ask the Telpar Sales Team for more information.
MTP-1530II User Manual (Rev.20120510) Page 11
Page 12

Telpar MTP-1530II Receipt Thermal Printer User Manual
1.5.3 3-Pin Hosiden Connector on Printer for Power
Supply Connection
3-Pin Hosiden Power Supply Connector
1.6 Telpar Roll Paper for the MTP-1530II Printer
Telpar Part Number 251103-8006. Thermal sensitive coating is on the “inside”
of the roll. 52 mm (6 in) outside diameter, 80 mm (3.15 in) wide, length 180 m
(590 ft). For use with the standard 44.5mm diameter (1.75 in diameter) MTP1530II printer spindles.
Specific to Thermal Printers: Telpar, does not warranty damages to the
thermal print head as a result of printing with thermal paper not specified or
approved by Telpar,
MTP-1530II User Manual (Rev.20120510) Page 12
Page 13

Telpar MTP-1530II Receipt Thermal Printer User Manual
1.7 Sensor Locations and Functions:
The MTP-1530II has six sensors that detect various changes in conditions relating to printer
operation which may alter the course of action the printer will take depending upon the change
detected. The six sensors are listed, described and shown below in this section:
1) Print-head Temperature Sensor: A thermistor sensor detects the temperature of the
printhead. The printer stops printing operation if the print-head Temperature is 75°C
(167°F) or higher. The printer resumes normal operation after the print-head cools off to
70°C (158°F) or lower. (No photo is available for this sensor.)
2) Paper Present Sensor (also know as the Paper End Sensor): This sensor detects
whether or not paper has been loaded into the printer. It triggers the automatic paper
feeding operation when paper is initially fed into the printer mechanism. It also detects
when paper has run out at which time the printer stops all printing operations until additional
paper has been successfully fed into the printer.
3) Platen Open Sensor: A small micro-switch detects whether or not the printer’s platen
(long, rubber roll) has been lowered away from the print-head mechanism (as shown in the
photo below). Printing operation will not be allowed while this sensor detects that the platen
is not locked in place against the print mechanism.
4) Paper Jam Sensor: This sensor, located near the platen (long, rubber roll) detects
whether or not paper has started to wrap around the platen which would result in a paper
jam. If this sensor detects that the paper is wrapping around the platen, all printing
operation will stop until the jam is cleared and the paper path is returned to normal. If a
paper jam does occur, turn the printer off, carefully remove the jammed paper, and then
turn the printer on again.
5) Paper Low Sensor: A small micro-switch mounted on the side of the chassis (see photo
below) detects the presence of a paper roll diameter that is approximately 2.8 to 2.9 inches
(mm) or greater. If the roll falls below this diameter, then the PAPER OUT LED (middle LED
on the printer’s control board – see section 4.1.1) lights to alert that the paper roll is getting
low. If Escape Command ESC c 4 has been sent to the printer prior to the paper low
condition and the paper level falls below the micro-switch sensor, then the printer will stop
printing operation immediately.
6) Black Mark Sensor (please reference section 2.2.2 for more information on Black Mark
detection): This sensor detects a black mark that has been pre-printed on the side of the
paper. Usually the black mark denotes the top or starting point of each individual receipt
contained in a continuous roll of pre-printed paper. If the paper you are using has black
marks pre-printed on it and you wish to have the printer detect the presence of these black
marks, you must have DIP Switch 1, position 1 set to the ON (or up) position (see section
4.1).
NOTE: Typically, the Black Mark sensor is located on the left-hand side of the printer as
looking from the front (see photo below). Therefore, this only detects the black mark on
that side of the paper. If the black mark is located on the other side of the paper, the Black
Mark sensor can be physically moved to its right-hand mounting position on the opposite
side of the mechanism (one small screw must be removed to remove the sensor).
MTP-1530II User Manual (Rev.20120510) Page 13
Page 14
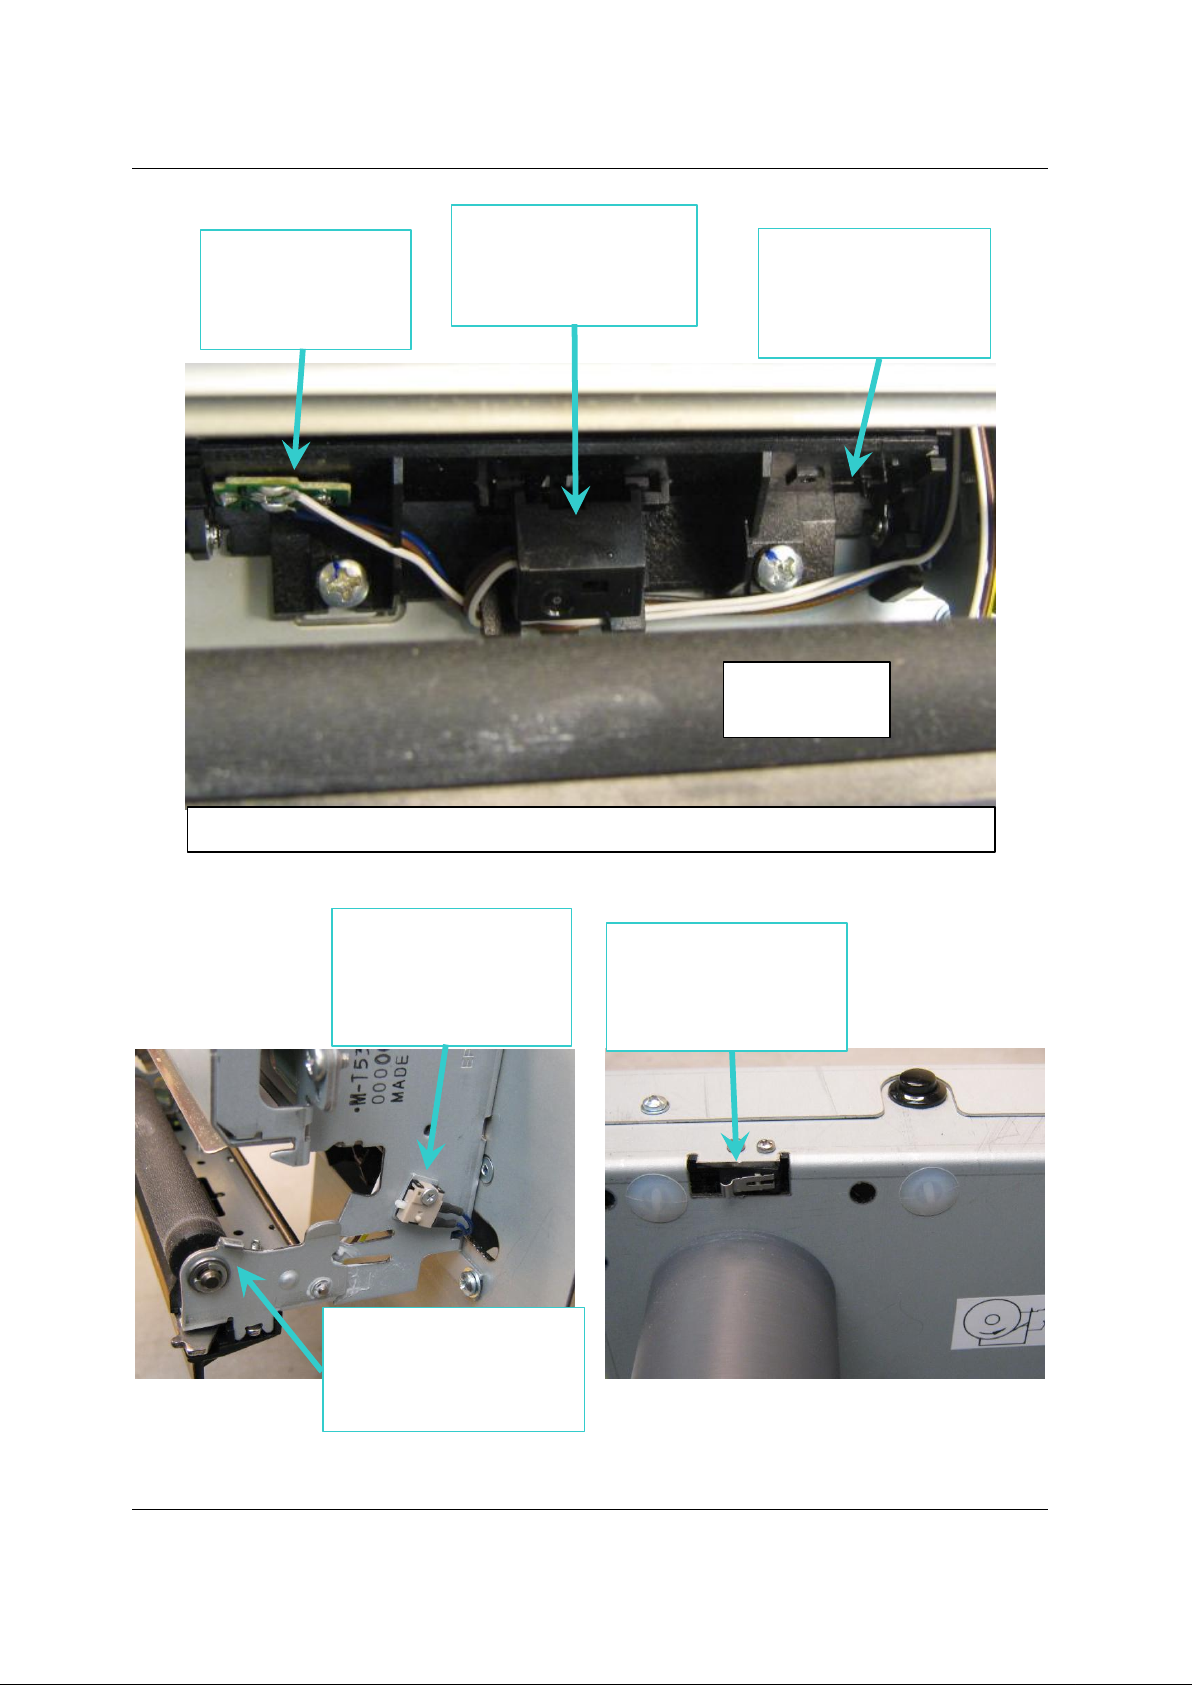
Telpar MTP-1530II Receipt Thermal Printer User Manual
Black Mark Sensor
location
(shown is the bottom
of the sensor)
Paper Present Sensor
location
(shown is the bottom of
the sensor encasement)
Alternate l(right-hand)
mounting location for
the Black Mark Sensor
on the opposite side of
the mechanism
Platen
(long, black
roll)
View of the Front of the printer mechanism with the platen in the down position
Platen Open Sensor
location
Photo shown with the
platen in the open
(down) position.
Paper Low Sensor
Location
Mounted just above the
paper roll spindle.
Paper Jam Sensor
location
(hidden under platen
roll)
MTP-1530II User Manual (Rev.20120510) Page 14
Page 15

Telpar MTP-1530II Receipt Thermal Printer User Manual
2 Operator Instructions
2.1 Unpacking and Inspection
Carefully unpack and inspect your MTP-1530II for any damage that may have
occurred in transit. Should any damage have occurred, notify Telpar, save the
shipping carton and packing materials, and file a damage claim with the carrier.
Specify the nature and the extent of the damage. Before installing or operating
the printer, check the following:
• Printer mechanism and paper path are clear of all packing materials
or other foreign matter.
• Paper is installed. DO NOT OPERATE the printer without paper.
Refer to Section 2.2 - Paper Loading page 15 for paper loading
instructions.
2.2 Paper Loading
2.2.1 Side-Loading Roll
The MTP-1530II series printer is configured as a side-loading printer.
Slide roll of paper over spindle with paper fed under the bottom toward
paper slot (front of unit).
To load paper, turn on the power and feed the straight edge of the paper
into the paper guide. AUTOLOAD will automatic load paper once it is fed
into the paper guide. Once paper has been initially loaded, the paper
feed button may be used. Ensure that the paper is installed correctly and
feeding properly with the thermal side facing up.
2.2.2 Black Mark Sensors Load
The MTP-1530II series printer may be used with the optional Black Mark
Sensor. This requires the use of a pre-printed Top of Form (TOF) Mark
or Black Mark on the form. Dip switch SW1 position 1 must be set to the
ON position to enable black mark operation.
If DIP switch DSW1 position 1 is turned on to enable the Black Mark
sensor when the printer is loaded with plain paper, at Power On the
printer will feed about 17.5 inches of paper looking for a Black Mark
and then go to an error mode since it did not find a Black Mark.
To load paper, turn on the power and feed the straight edge of the paper
into the paper guide. Ensure that the paper is installed correctly and
feeding properly with the thermal side facing up.
If using perforated paper, the perforation should be fed at least 1.27 mm
(0.05 in) past the cut line to avoid a jam at the cutter.
MTP-1530II User Manual (Rev.20120510) Page 15
Page 16
Telpar MTP-1530II Receipt Thermal Printer User Manual
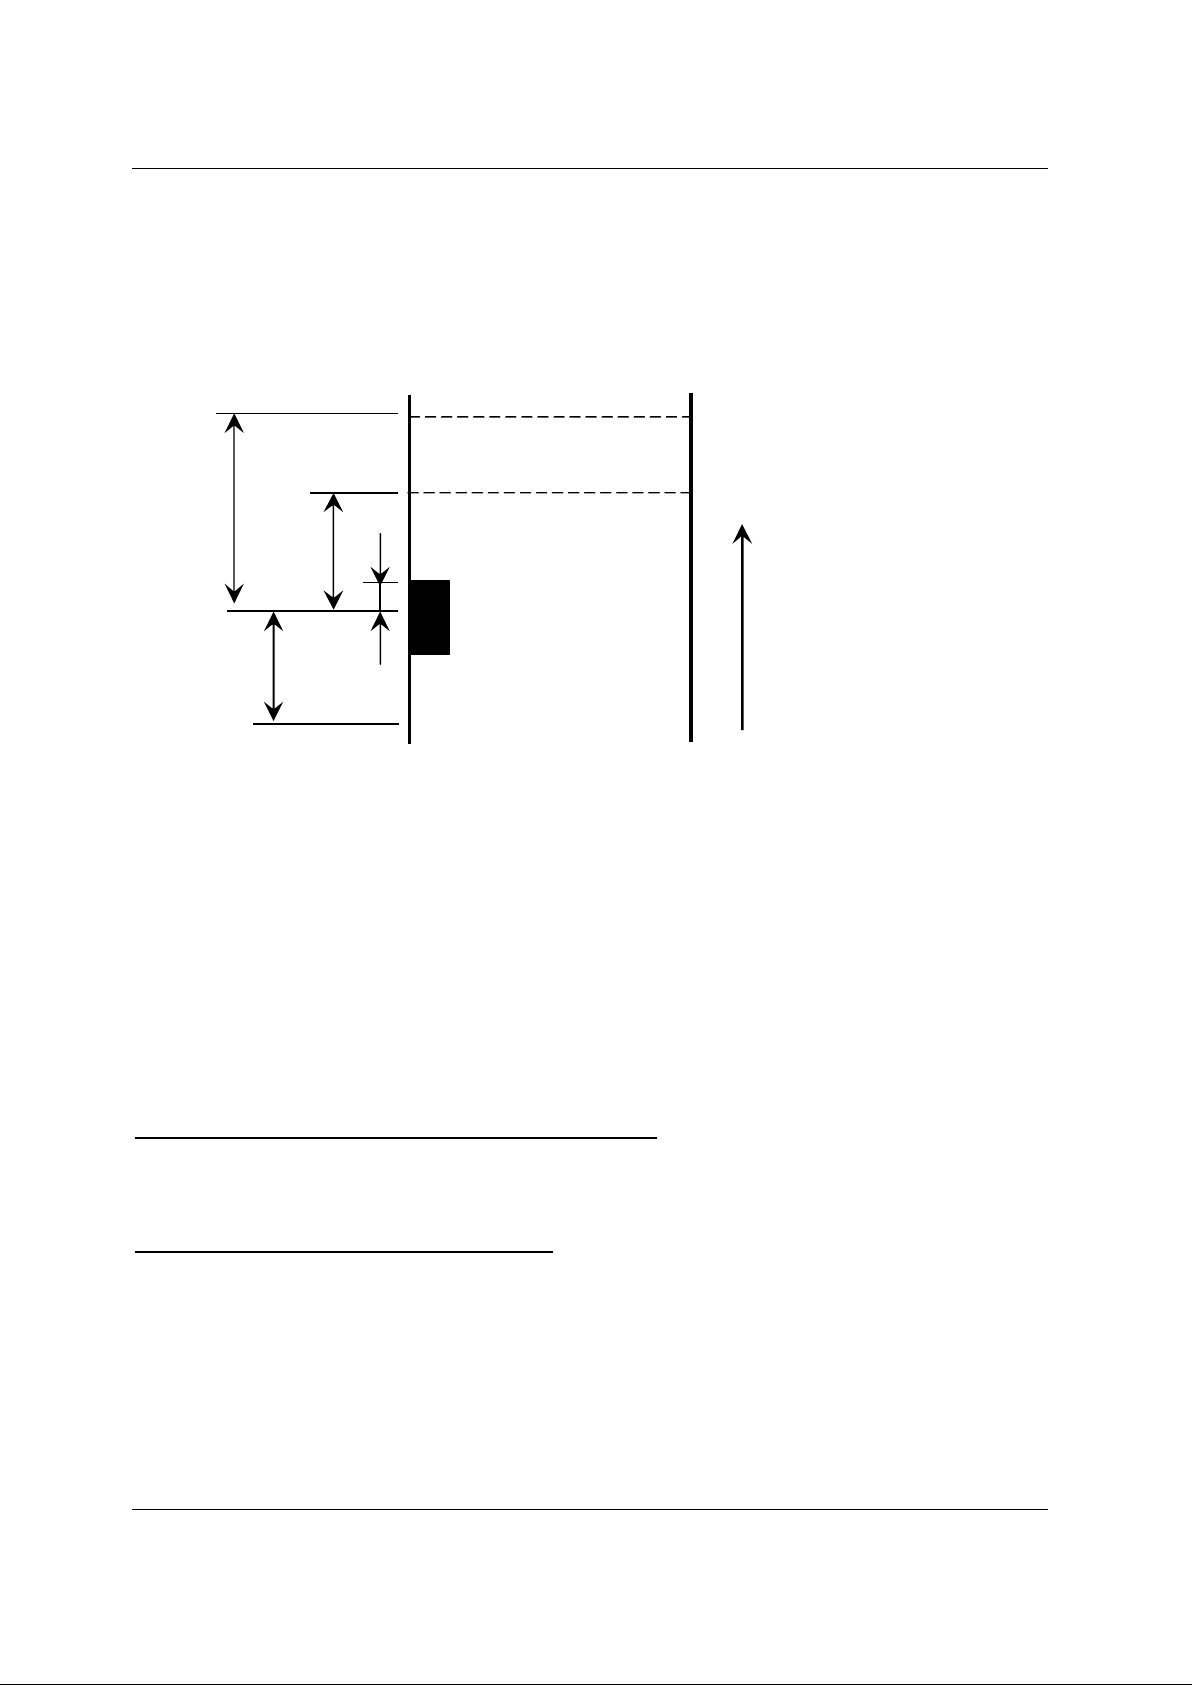
The BM is detected at the position which the top edge of the BM comes into
approximately 0.02 to 0.08in (0.5 to 2 mm) from the center of the BM sensor.
After detecting the BM, the BM is not detected for approximately 0.79in
(20mm).
Cutting Position
Print Starting Position
A
B
C
Paper
Feeding
Approx.0.8 Inch
Direction
(2cm)
Paper
The Figure above shows the BM Detection Position, Print Starting Position, and the Cutting Position
A: 1.32in (for straight paper-path model) 1.46in (for curled paper-path model)
33.6 mm (for straight paper-path model) 37.2 mm (for curled paper-path model)
B: 0.69in (for straight paper-path model) 0.83in (for curled paper-path model)
17.6 mm (for straight paper-path model) 21.2 mm (for curled paper-path model)
C: Approx. 0.02in to 0.08in
Approx. 0.5 to 2mm
Black Mark Print Starting Position and Cutting Position:
At the factory, the print starting position and the cutting position are set to the print head position and the
cutter position respectively when the BM sensor detects the BM.
The print starting position and the cutting position can be changed with the GS ( F command.
Acceptable Width and Interval of Black Mark:
The width and interval of BM for which the printer operation is guaranteed are as follows:
BM width: 3 to 20 mm {0.12in} to {0.79in}
BM interval: 50 to 300 mm {1.97in} to {11.81in}
MTP-1530II User Manual (Rev.20120510) Page 16
Page 17
Telpar MTP-1530II Receipt Thermal Printer User Manual
2.3 Paper Jam
In the event of a paper jam condition do not force paper into the unit, or try to
pry the paper out of the unit, this may damage the thermal print mechanism.
Caution should be exercised when working next to the cutter mechanism, the
blades are sharp and may cause serious injury.
To release paper:
• Turn off power to the printer.
• Push the Head Open lever to the down position.
• Paper can be removed at this time. Once paper is cleared from the
mechanism, return the Head Open lever to the up position.
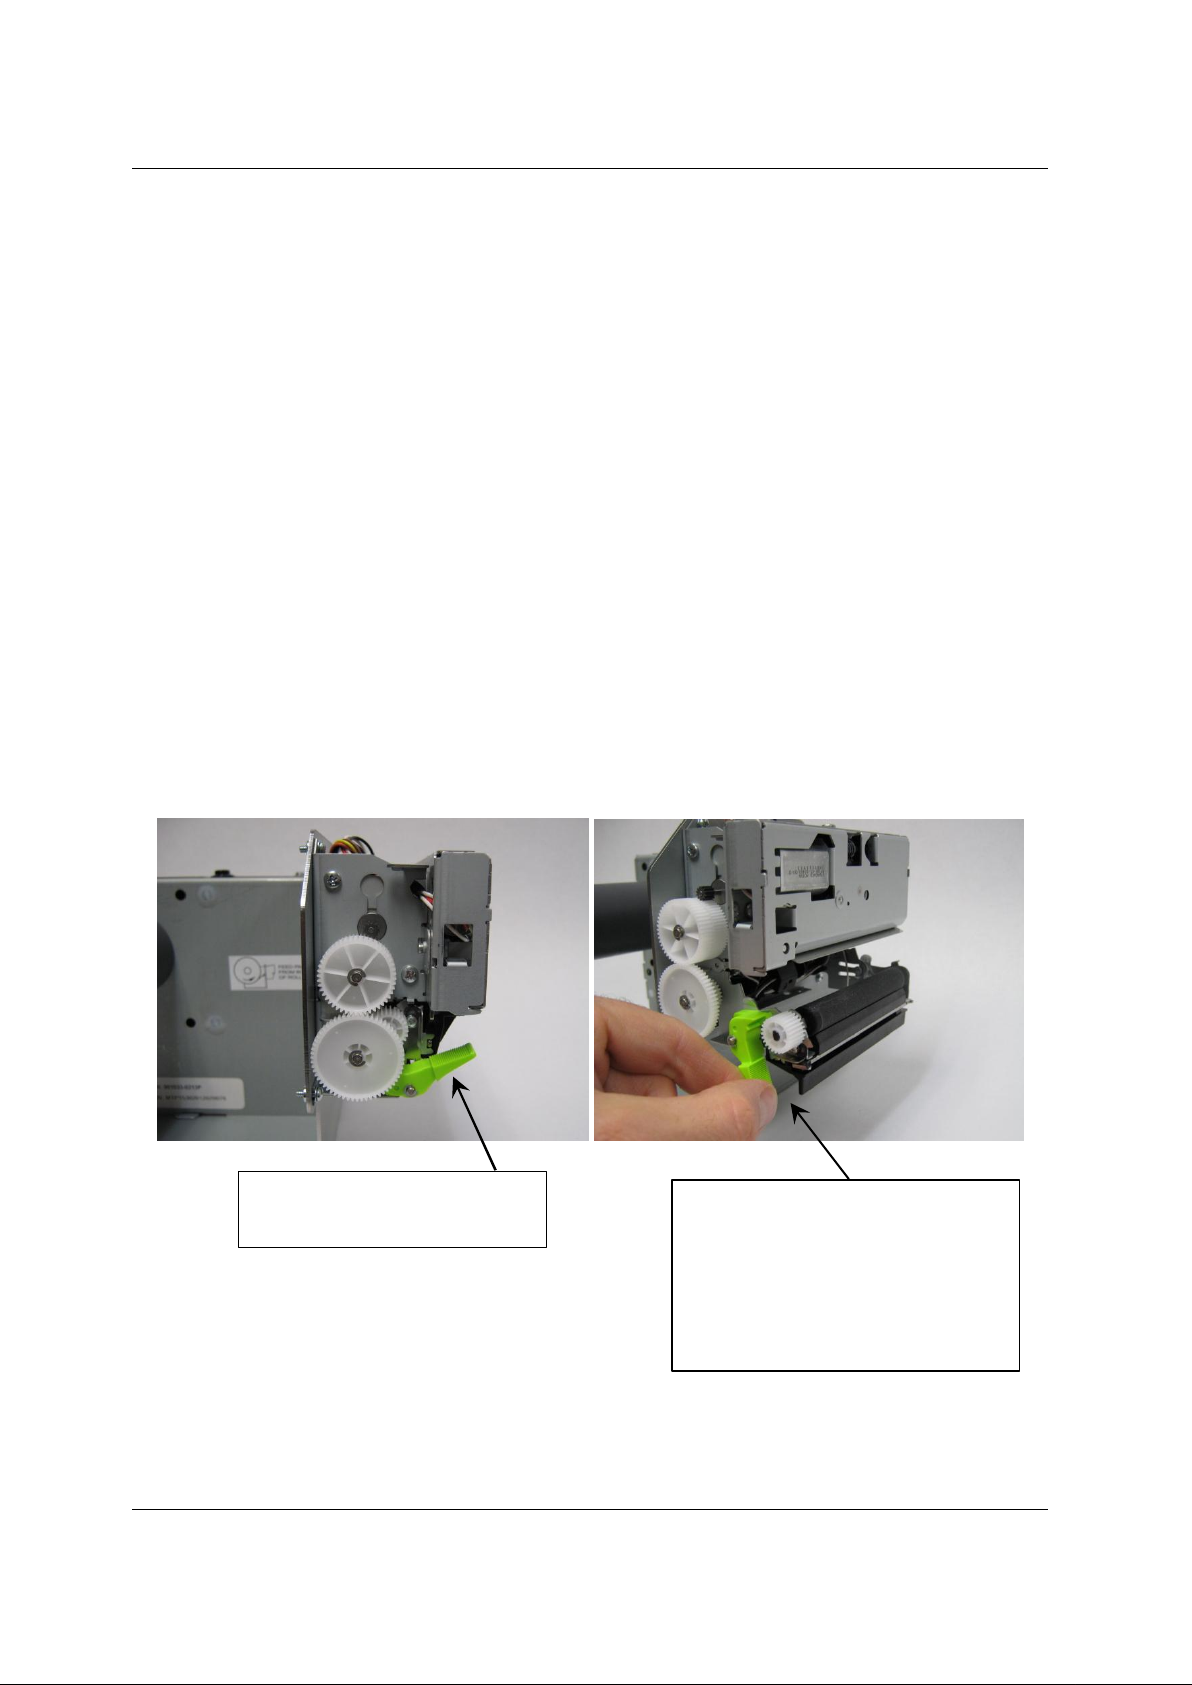
2.3.1 Head Open Lever
The Head Open lever (green) is located at the left front of the printer
mechanism as shown in the two pictures below. The up position is ready
to print. The down position lowers the platen roller away from the printhead for manually inserting paper or for clearing a paper jam. The down
(open) position signals the microprocessor that the head is open so that
no printing will occur.
Head Open Lever
(shown in its closed position)
position allows for jams near the
platen area to be cleared or for
MTP-1530II User Manual (Revision 20120510) Page 17
Head Open Lever
(shown in its open position)
Placing the lever in the down
loading paper manually.
Page 18
Telpar MTP-1530II Receipt Thermal Printer User Manual
3 Installation
3.1 Self Test Mode
The MTP-1530II has a self-test mode that will print and cut a sample ticket.
To place the unit into self-test mode, first turn power switch off, then press and
hold the FEED push button switch. Next, place the POWER switch in the ON
position to apply power to the printer. Release the FEED Button after printing
starts (within 5 seconds). See a sample of a Self Test Printout on the next
page.
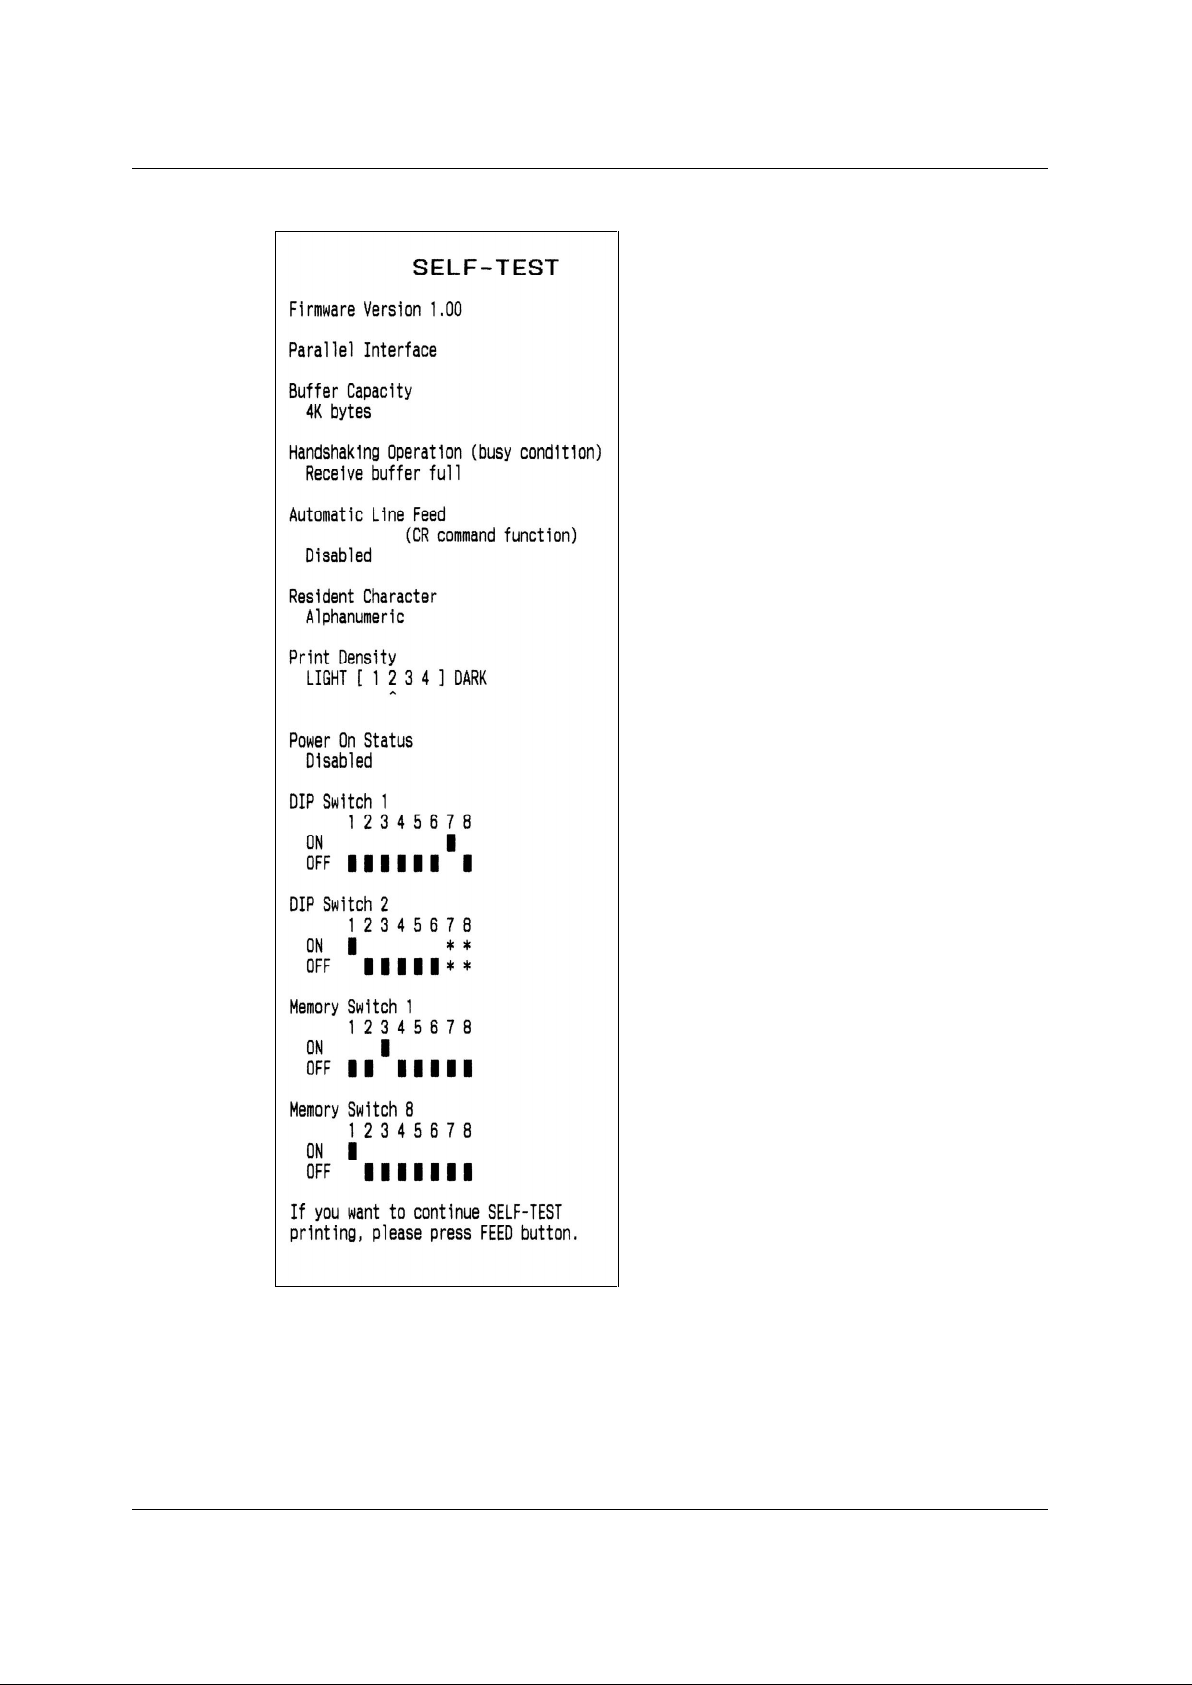
The first part of the self test message prints several fields showing how the
printer is configured. Following the first part of the self test, you have the option
of pressing the paper feed button once more to print a “barber pole” pattern
print test of ASCII Characters, or turning power off and back on to terminate the
self test The printer goes to the off-line (BUSY) state when self test starts and
remains off-line until self test is finished due two either of these actions. All
electrical/mechanical portions of the printer are exercised and checked by this
action, except for the host-to-printer communication interface components.
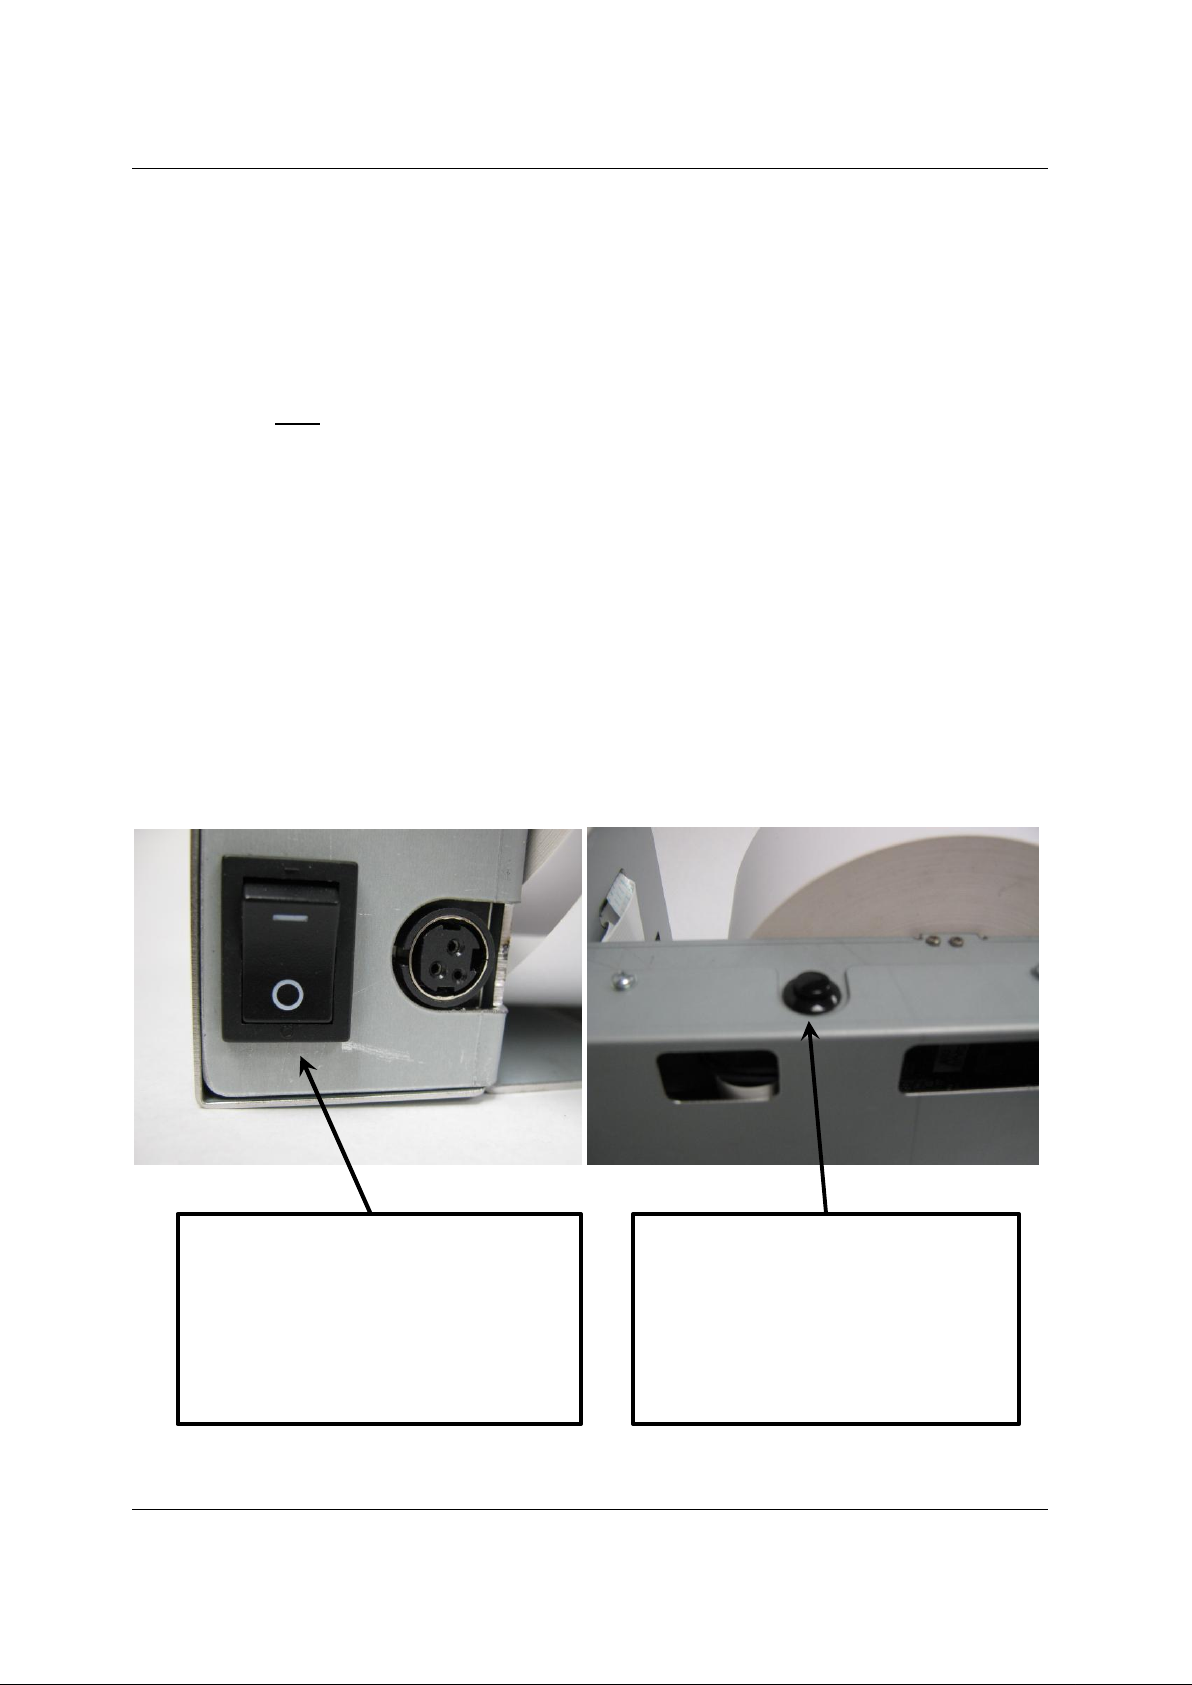
The Power Switch is located at the
rear of the printer next to the power
inlet connector. Pressing the “1”
position on the power switch applies
power to the printer, and pressing the
“0” position on the switch switches off
power from the printer.
MTP-1530II User Manual (Revision 20120510) Page 18
The Paper Feed Button is located
on the top, side chassis of the
printer. This button will feed paper
through the printer while it is
pressed, and the button is also used
together with the power button to
print a Self Test printout.
Page 19
Telpar MTP-1530II Receipt Thermal Printer User Manual
MTP-1530II Self Test Printout
MTP-1530II User Manual (Revision 20120510) Page 19
Page 20
Telpar MTP-1530II Receipt Thermal Printer User Manual
4 Setup and Control of the Printer:
4.1 DIP Switch Settings and Memory Switch Settings
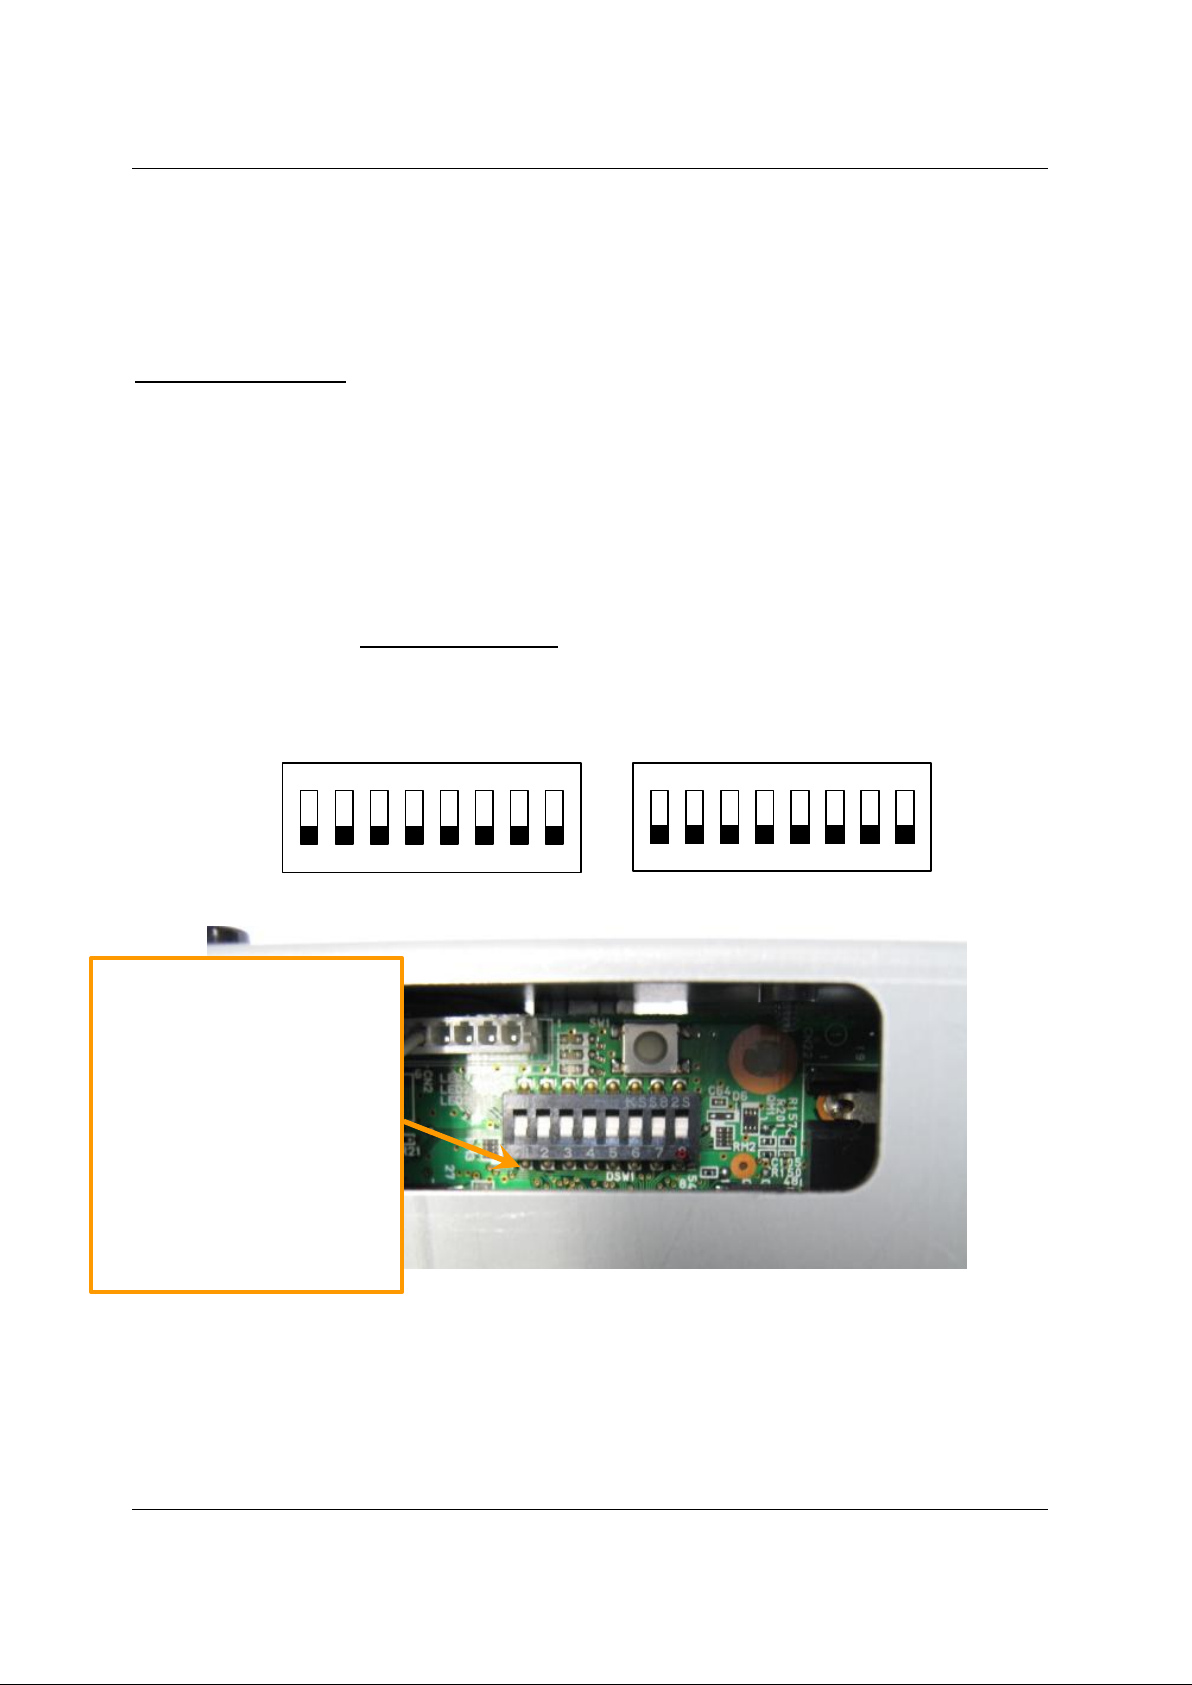
DIP Switch Settings: The MTP-1530II Parallel and Ethernet printers each have a single DIP
Switch located on the main circuit board (Labeled “DSW1”), while the Serial (RS-232) printer
has two DIP Switches located on the main circuit board (labeled “DSW1” and “DSW2”) The
DIP Switch contains a bank of eight individual switches, each of which controls some aspect of
the printer and are described in the tables below. The switches can slide up into the “ON”
position or down into the “OFF” position. A small tip screwdriver or even a pen tip may be
used to change the position of the switches.
The DIP Switch on each type of printer can be accessed through a cutout hole on the metal
circuit board cover (see picture below) Therefore, DIP Switch changes can be made without
removing the cover. IMPORTANT NOTE: If you make any changes to the DIP Switch
settings, you must first cycle power to the printer or reset the printer in order for the changes to
take place.
ON
1 2 3 4 5 6 7
DIP Switch Bank for a
Parallel Printer as looking
through the Chassis.
Note the numbering below
each switch position (1-8,
left to right), and “DSW1”
labeled on the board directly
below the switch. Each
individual switch is turned
“ON” by sliding it all the way
to its up position. Sliding a
switch down turns it “OFF”.
DSW1
ON
1 2 3 4 5 6 7
DSW2 (RS-232 Serial Printer Only)
MTP-1530II User Manual (Revision 20120510) Page 20
Page 21
Telpar MTP-1530II Receipt Thermal Printer User Manual
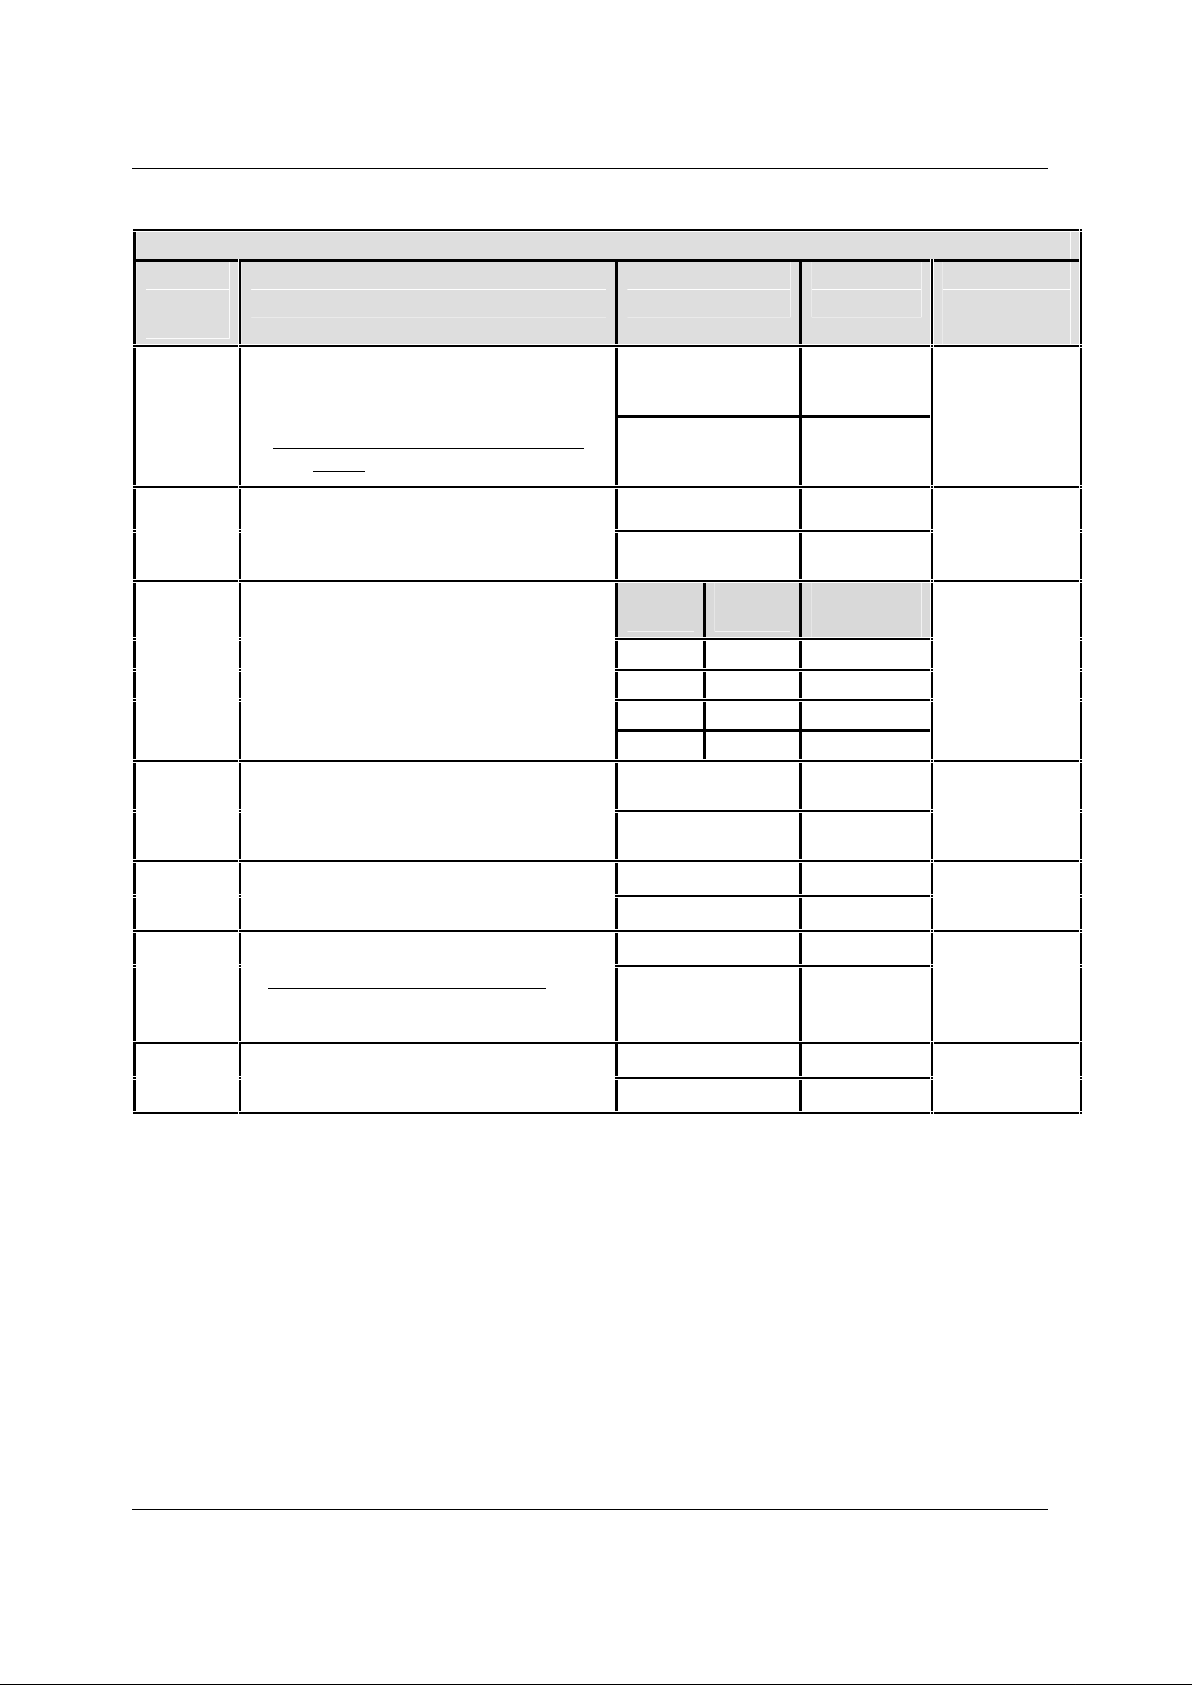
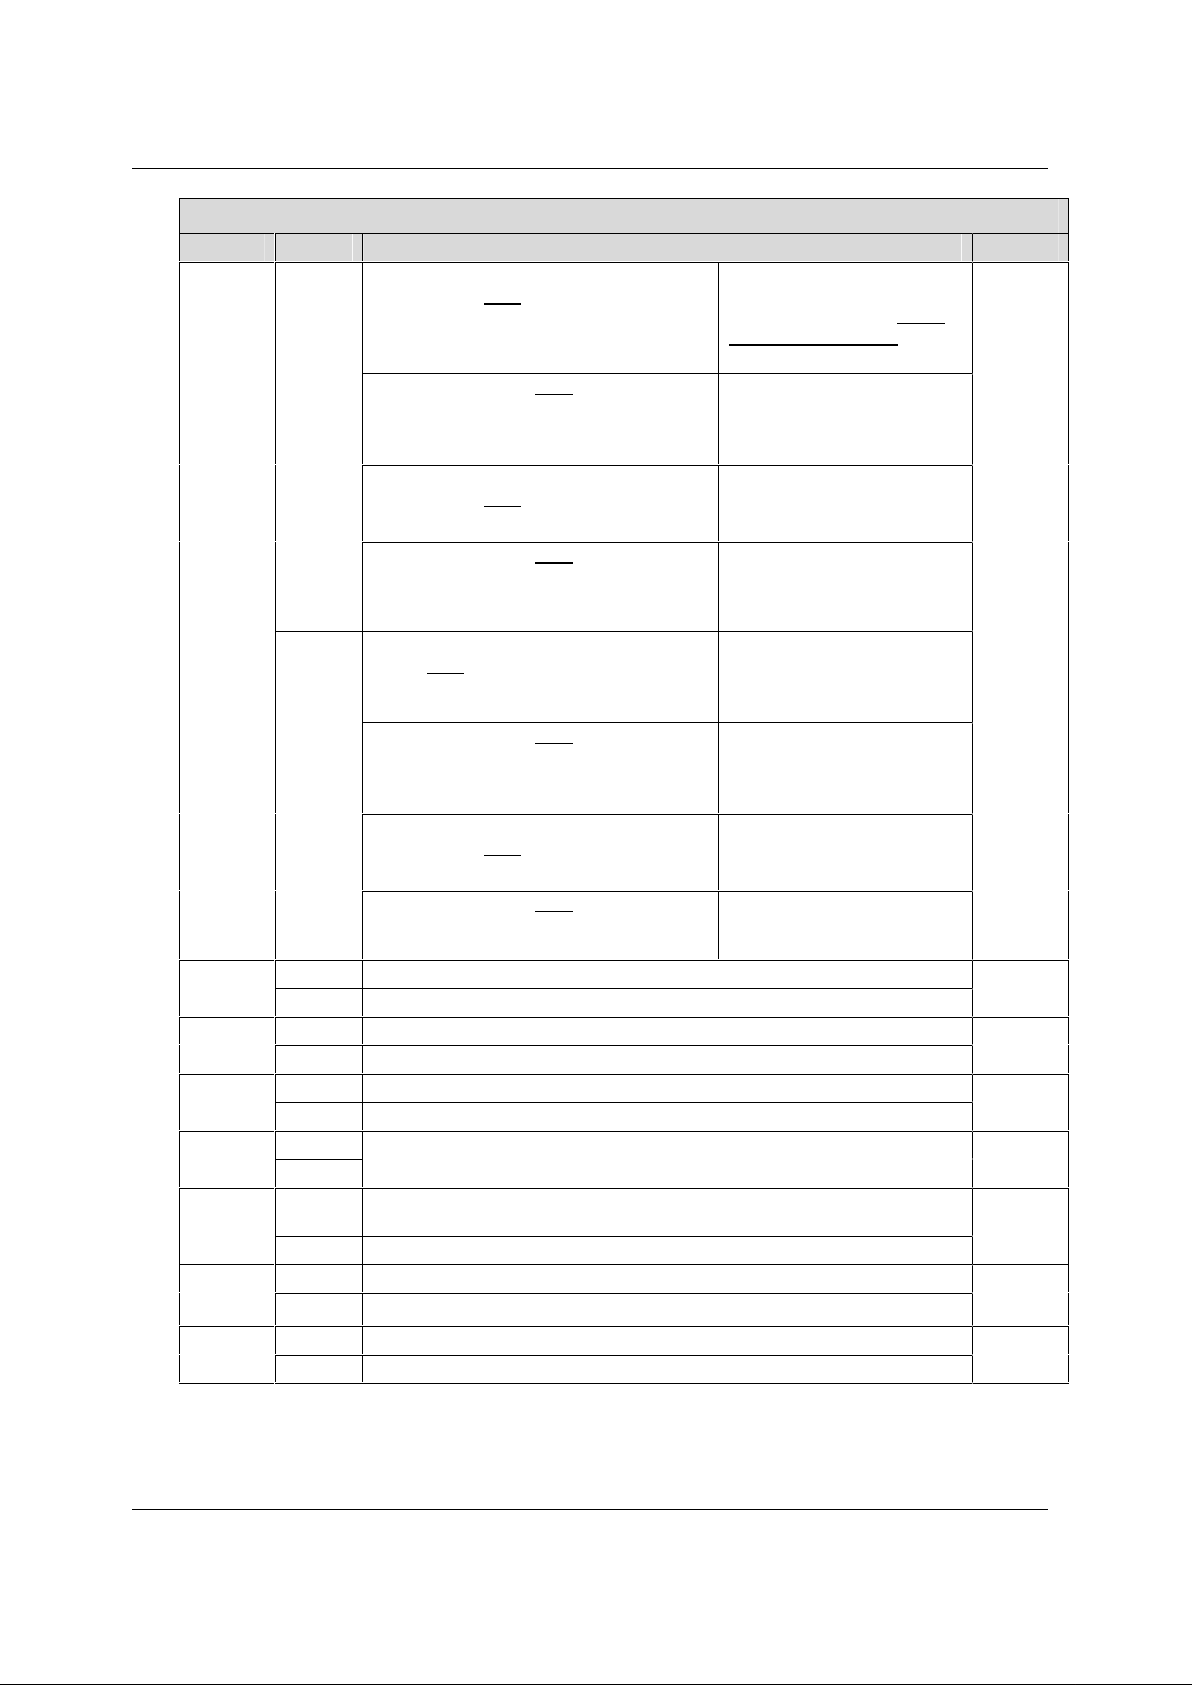
DIP Switch 1 (DSW1) Settings
Switch
Position
No.
Switch Function Description Switch Position Result Shipping
Black Mark Sensor (BM Sensor)
If this switch is set to the “ON” position,
you must use special black mark paper
or the printer will go into an error
mode! (see section 2.2.2)
Setting of Allowable Print Width
2
The MTP-1530II should always have this
switch set to the “ON” position.
Print Darkness Selection
3 and 4
To help achieve the maximum lifespan
of the print-head, it is recommended that
these switches be set to the lowest
intensity level available which still
adequately meets the desired print
darknessfor your printer application.
5 Operation Mode
6 Factory Setting
Fixed to “OFF”
7 Selection of Interface Class
Effective with the USB interface type
only. Reserved (fixed to
Off) with other interface types.
8 Reserved
Fixed to “OFF”
OFF
ON
OFF
ON
Switch3Switch
4
ON ON
OFF OFF
ON OFF
OFF ON
OFF
ON
NA NA
NA NA
OFF
ON
NA NA
NA NA
No black
mark
detection1
Detects black
marks on
paper
640 dots / line
576 dots /
line
Darkness
Setting
Slightly light
Medium
Slightly dark
Dark
Normal
Printing
Hexadecimal
Dumping
Vendor Class
Printer Class
Default
OFF
ON
Medium
(OFF and OFF)
OFF
OFF
OFF
OFF
DIP Switch 1 (DSW1) Settings
MTP-1530II User Manual (Revision 20120510) Page 21
Page 22
Switch
Position
No.
1
Telpar MTP-1530II Receipt Thermal Printer User Manual
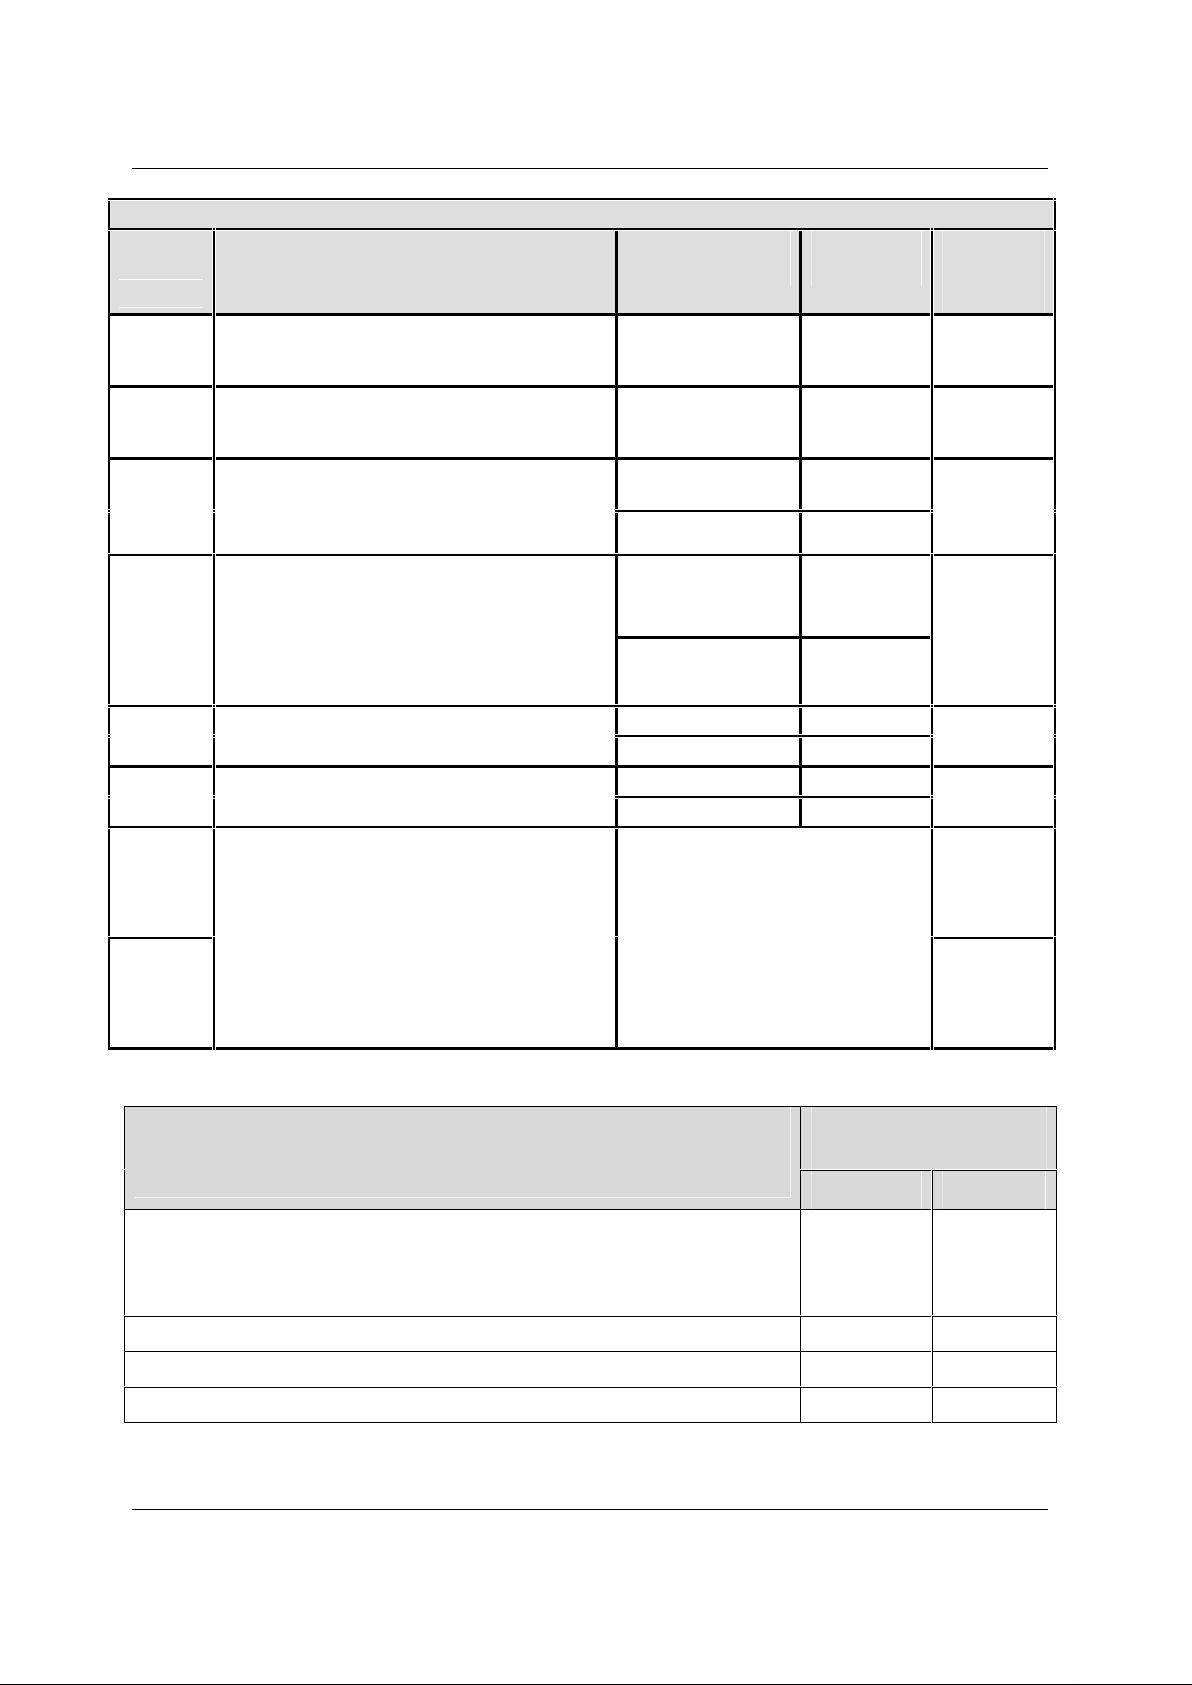
DIP Switch 2 (DSW2) Settings – For Serial (RS-232) Communications Only
Switch Function Description Switch Position Result Shipping
Default
RESERVED
Fixed to “OFF”
NA
NA
OFF
RESERVED
2
Fixed to “OFF”
DSR Reset
3
4 Handshaking
5 Parity Check
6 Parity ODD or EVEN
7
See
Table
Below
8
See
Table
Below
Transmission Speed (Baud Rate)
Switches 7 and 8 control the rate at which
the printer receives and transmits
information in bits per second (bps).
The default value for the RS-232 serial
printer is 19200 bits per second, 8 Data
Bits (fixed), 1 Stop Bit (fixed), No Parity
and Hardware Handshaking.
OFF
OFF
ON
OFF
ON
OFF
ON
OFF
ON
SEE THE TABLE BELOW TO
DETERMINE THE SWITCH
SETTINGS FOR POSITIONS 7 and
8 FOR THE VARIOUS BAUD
RATES AVAILABLE.
NA
Disabled
Enabled
HARDWARE:
DTR/DSR or
CTS/RTS
XON/XOFF
Disabled
Enabled
ODD
EVEN
OFF
OFF
OFF
OFF
OFF
ON
OFF
Transmission Speed (Baud Rate) in Bits per second (bps)
Pertains to DIP Switch 2 (DSW2) serial printer ONLY and relate
to the settings of switch positions 7 and 8.
Auto Detect
This setting automatically detects the transmission condition settings of the
serial interface (host). Available settings are 2400, 4800, 9600, 19200,
38400, 57600, and 115200.
9600 only
19200 only
38400 only
DIP Switch 2 (DSW2)
Switch Position
7 8
ON ON
OFF ON
ON OFF
OFF OFF
MTP-1530II User Manual (Revision 20120510) Page 22
Page 23
Telpar MTP-1530II Receipt Thermal Printer User Manual
There are 8 MEMORY Switches, only four are currently used
Memory Switch 1
Position State Function Default
ON
1
2
3
4
5
6
7
8
OFF
ON
OFF
ON
OFF
ON
OFF
ON
OFF
ON
OFF
ON
OFF
ON
OFF
BUSY condition when buffer is full
BUSY when buffer is full or when OFF-LINE
Receive error is ignored (serial interface only)
Receive error prints “?” (serial interface only)
Auto line feed enabled (Parallel interface only)
Auto line feed disabled
RESERVED
RESERVED
RESERVED
RESERVED
RESERVED
OFF (0)
OFF (0)
OFF (0)
OFF (0)
OFF (0)
OFF (0)
OFF (0)
OFF (0)
Memory Switch 5
Position State Function Default
ON
1
2
3
4
5
6
7
8
OFF
ON
OFF
ON
OFF
ON
OFF
ON
OFF
ON
OFF
ON
OFF
ON
OFF
Near Paper End Sensor Installed
Near Paper End Sensor NOT Installed
Printer can recover from a recoverable error after a paper jam has
occurred
Printer goes Offline after a paper jam has occurred
Enable Paper Jam Detection
Disable Paper Jam Detection
Disable the USB Power Saving Function
Enable the USB Power Saving Function
RESERVED
RESERVED
RESERVED
RESERVED
OFF (0)
ON (1)
OFF (0)
OFF (0)
OFF (0)
OFF (0)
OFF (0)
OFF (0)
MTP-1530II User Manual (Revision 20120510) Page 23
Page 24
Telpar MTP-1530II Receipt Thermal Printer User Manual
Memory Switch 6
Position State Function Default
ON
1
OFF
ON
2
3
4
5
6
7
8
OFF
ON
OFF
ON
OFF
ON
OFF
ON
OFF
ON
OFF
ON Disable selection of the operation by GS FF
OFF Enable selection of the operation by GS FF
Manual Load of paper (paper fed with
platen open) AND
If Black Mark Sensor enabled
Auto load of paper AND
If Black Mark Sensor enabled
Manual Load of paper (paper fed with
platen open) AND
If Black Mark Sensor disabled
Auto load of paper AND
If Black Mark Sensor disabled
Manual Load of (paper fed with platen
open) AND
If Black Mark Sensor enabled
Auto load of paper AND
If Black Mark Sensor enabled
Manual Load of paper (paper fed with
platen open) AND
If Black Mark Sensor disabled
Auto load of paper AND
If Black Mark Sensor disabled
Disable error signal output
Enable error signal output
Speed has priority over power consumption
Power consumption has priority over speed
Disable auto eject when a paper out is detected
Enable auto eject when a paper out is detected
RESERVED
Enable if using thick type paper (paper which has excellent keeping
quality)
Enable if using normal paper
Detect near end of paper roll by using the Black Mark sensor
Detect near end of paper roll by using the Near End sensor
After the platen is closed, the
printer feeds the paper
approx. 125mm (5 “) to the
Black Mark position, and
then cuts it.
After auto-loading the paper,
printer feeds paper to the
Black Mark position, and
then cuts it.
After the platen is closed,
printer does not feed or cut
paper.
After auto-loading the paper,
the printer feeds the paper
approx. 125mm (5 “), and
then cuts it.
After platen is closed, printer
feeds paper to the Black
Mark position, and then cuts
it.
After auto-loading the paper,
printer feeds paper to the
Black Mark position, and
then cuts it.
After the platen is closed,
printer does not feed or cut
the paper.
After auto-loading the paper,
the printer does not cut the
paper.
OFF (0)
OFF (0)
OFF (0)
OFF (0)
OFF (0)
OFF (0)
OFF (0)
OFF (0)
MTP-1530II User Manual (Revision 20120510) Page 24
Page 25

Telpar MTP-1530II Receipt Thermal Printer User Manual
Memory Switch 8
Position State Function Default
Non-divided energization mode
Two part energization mode
Four-part energization mode
Enable backwards paper feeding
Disable backwards paper feeding
Autocutter is NOT installed
Autocutter is installed
Discards receive data when printer is offline
Keeps receive data when printer is offline
Backwards paper feeding amount = 88 steps
Backwards paper feeding amount = 108 steps
Enable test print when paper is loaded
Disable test print when paper is loaded
Does NOT initialize for Black Mark position when power is turned on
Initializes for Black Mark position when power is turned on
Both
OFF (0)
OFF (0)
OFF (0)
OFF (0)
OFF (0)
OFF (0)
OFF (0)
1 and 2
3
4
5
6
7
8
Both
OFF
1 = ON
2 = OFF
1 = ON or
OFF
2 = ON
ON
OFF
ON
OFF
ON
OFF
ON
OFF
ON
OFF
ON
OFF
Note: Not all printer mechanisms allow reverse paper feeding. If reverse
feeding is allowed, after cutting the paper with a GS V command,
paper feeds backwards. The print starting position adjustment
with GS ( F can be set to the backward direction relative to the
cutting position. In this case, the maximum backward feed length
is 14 mm (112 * 0.125mm).
MTP-1530II User Manual (Revision 20120510) Page 25
Page 26

Telpar MTP-1530II Receipt Thermal Printer User Manual
4.2 LEDs and Error Indication
Three LEDs (LED1, LED2, and LED 3) are located below the cutout in
the side chassis (above the DIPSWITCH and next to the on-board paper
feed switch) as shown in the picture and figure below.
Location of
LED 1, LED2,
and LED 3
DIPSWITCH
Board Mounted
Paper Feed Switch
On-Board
Paper Feed
Switch
LED1 (power)
LED2 (paper out)
LED 3 (Error)
LED 1 POWER LED: ON means power is stable and the printer is ready
for operation. OFF means power in not stable.
LED 2 is a PAPER OUT LED, OFF means paper is installed and the
printer is ready for operation. ON means there is no paper
installed in the printer mechanism (or the paper low sensor if
selected). The PAPER OUT LED blinks steadily to specify that
self test has finished the first part of printing and that the user
can press the PAPER FEED button to print the “barber pole”
character print part of the self test. The PAPER OUT LED also
blinks steadily to specify that a MACRO is waiting for the user to
press the PAPER FEED button to continue it’s execution (macro
stand-by mode).
LED 3 is an ERROR LED. OFF means there are no errors and the
printer is ready for operation. ON indicates the printer is OFF
LINE (except during paper feeding using the FEED button, during
self-test printing, and in the error state). The ERROR LED blinks
a defined pattern every 5.12 seconds to notify the user of various
error conditions. When the LED is normally OFF and blinks ON,
an error is indicated which may be recoverable. . When the LED
is normally ON and blinks OFF, an error is indicated which in not
recoverable. For any error that is not recoverable, power should
be turned off as soon as possible.
MTP-1530II User Manual (Revision 20120510) Page 26
Page 27

Telpar MTP-1530II Receipt Thermal Printer User Manual
ERROR LED Blink Rate and Recovery Method Table (below):
Blink Rate Error Description Recovery method
Continuous
(no pauses)
1 blink ON then a paused OFF
condition before the cycle starts
again (each cycle is approx. 5
seconds long).
1 blink OFF then a paused ON
condition before the cycle starts
again (each cycle is approx. 5
seconds long).
2 blinks ON then a paused OFF
condition followed by another blink
ON and a shorter paused OFF
before the cycle starts again (each
cycle is approx. 5 seconds long).
1 blink OFF then a paused ON
condition followed by another blink
OFF before the cycle starts again
(each cycle is approx. 5 seconds
long).
2 blinks OFF then a paused ON
condition followed by another blink
OFF before the cycle starts again
(each cycle is approx. 5 seconds
long).
3 blinks OFF then a paused ON
condition followed by another blink
OFF before the cycle starts again
(each cycle is approx. 5 seconds
long).
4 blinks OFF then a paused ON
condition followed by another blink
OFF before the cycle starts again
(each cycle is approx. 5 seconds
long).
6 blinks ON then a paused OFF
condition beforethe cycle starts
again (each cycle is approx. 5
seconds long).
4 blinks ON then a paused OFF
condition beforethe cycle starts
again (each cycle is approx. 5
seconds long).
Print head
Temperature
too high error
Cutter error
PCB
connection
error
Black Mark
sensor
detection
error
Read/Write
error
High voltage
Low voltage
CPU error
Platen open
Paper Jam
Error
Print head
Temperature is
75°C (167°F) or
higher.
The cutter has
failed to complete
a cut
The printer
mechanism is not
connected or the
internal wiring is
incorrect.
No Black Mark was
detected (even
though the roll of
paper may be
marked correctly)
The CPU has
detected a memory
Read/Write error
The power supply
voltage is too high
The power supply
voltage is too low.
The CPU executes
an incorrect
address or the I/F
board is not
connected.
Print is not
performed due to
the platen being
open
A paper Jam has
occurred.
Automatic when the print head
cools off to 70°C (158°F) or
lower.
Recovers by DLE ENQ1 or DLE
ENQ2 after the cutter Jam has
been corrected.
NOT RECOVERABLE!Turn
power off and check
connections betweenthe printer
mechanism and the controller
board.
Recovers by DLE ENQ1 or DLE
ENQ2 when the paper with the
black mark is inserted correctly
again.
NOT RECOVERABLE!Cycle
power off and on to see if the
error goes away.
NOT RECOVERABLE!Turn
power OFF; correct the problem
before turning back on.
NOT RECOVERABLE!Turn
power OFF; correct the problem
before turning back on.
NOT RECOVERABLE!Cycle
power off and on to see if the
error goes away.
Recovers by DLE ENQ1 or DLE
ENQ2 after the platen is closed.
Open the platen and remove
the jammed paper. Recovers
by DLE ENQ1 or DLE ENQ2.
Printer operation when an error occurs:
The printer executes the following operations when detecting an error.
• Stops all printer operations for the selected paper section.
• Goes BUSY (When memory switch 1-3 is set to off to go BUSY during printer offline.).
• Flashes the ERROR LED.
MTP-1530II User Manual (Revision 20120510) Page 27
Page 28

Telpar MTP-1530II Receipt Thermal Printer User Manual
4.3 Control Codes and Control Sequences List
Location of
Definition
HT Horizontal tab General Execute Yes Yes
LF Print and line feed General Execute Yes Yes
PAGE MODE, print and
return to standard mode
Black Mark mode, print and
feed to print starting
position (Black Mark)
CR Print and carriage return General Execute Yes Yes
CAN Cancel print data PAGE Execute Ignored Yes
DLE
EOT
DLE
ENQ
ESC Escape sequence header --- --- --- --FS FS sequence header --- --- --- --GS GS sequence header --- --- --- --ESC FF Print data PAGE Execute Ignored Yes
ESC SP Set right side character
ESC ! Set print mode(s) General Setting Yes Yes
ESC$ Set absolute print position General, PAGE Execute Yes Yes
ESC % Select/cancel user-defined
ESC & Define user-defined
ESC * Select bit image mode General Execute Yes Yes
ESC - Turn underline on/off General Setting Yes Yes
ESC 2 Select default line spacing General Setting Yes Yes
ESC 3 Set line spacing General Setting Yes Yes
ESC ? Cancel user-defined
ESC @ Initialize printer General Execute,
ESC D Set horizontal tabs General Setting Yes Yes
ESC E Turn emphasized on/off General Setting Yes Yes
ESC G Turn double-strike on/off General Setting Yes Yes
ESC J Print and feed paper General Execute Yes Yes
ESC L Select PAGE MODE PAGE Execute Start line Ignore
ESC M Select character font General Setting Yes Yes
ESC R Select international
ESC S Select standard mode PAGE Execute Ignored Yes
ESC T Select print direction PAGE Setting Value Yes
ESC V Turn rotated print on/off General Setting Yes Value
ESC W Set printing area PAGE Setting Value Yes
ESC \ Set relative print position General, PAGE Execute Yes Yes
ESC a Select justification General Setting Start line Value
ESC c 3 Select paper sensors to
Real time status request STATUS Execute Yes Yes
Real time request to printer General Execute Yes Yes
spacing
character set
characters
characters
character set
output paper out signal
PAGE Execute Ignored YesFF
General, Top of
Form
General Setting Yes Yes
Seldom Setting Yes Yes
Seldom Setting Yes Yes
Seldom Setting Yes Yes
General Setting Yes Yes
General Setting Yes Yes
Class Standard
mode
Execute Yes Disabl
Yes Yes
Setting
Page
mode
ed
d
MTP-1530II User Manual (Revision 20120510) Page 28
Page 29

Telpar MTP-1530II Receipt Thermal Printer User Manual
ESC c 4 Select paper sensors to stop
printing
ESC c 5 Enable/disable panel
buttons
ESC d Print and feed n lines General Execute Yes Yes
ESC t Select character code table General Setting Yes Yes
ESC { Turn inverted print on/off General Setting Start line Value
FS p Print NV bit image
OBSOLETE – Use
GS (L<Function 69>
instead
FS q Define NV bit image
OBSOLETE – Use
GS (L<Function 67>
instead
GS FF Feed paper to Black Mark Top of Form Execute Yes Yes
GS ! Select character size General Setting Yes Yes
GS $ Set absolute vertical print
position
GS * Define download bit image NV & DL Setting Yes Yes
GS ( A Execute test print General Execute Yes Ignore
GS ( E User setup commands Seldom Execute,
GS ( F Set adjustment values Seldom Setting Yes Yes
GS ( M Customize printer control
values
GS / Print download bit image NV & DL Execute Empty Yes
GS : Start/end macro definition Seldom Execute,
GS B Set reverse video on/off General Setting Yes Yes
GS C 0 Select counter print mode Counter Setting Yes Yes
GS C 1 Select count mode (A) Counter Setting Yes Yes
GS C 2 Set counter Counter Setting Yes Yes
GS C ; Select count mode (B) Counter Setting Yes Yes
GS E Select head control method Seldom Setting Yes Yes
GS H Select printing position of
HRI characters
GS I Transmit printer ID Status Execute Yes Yes
GS L Set left margin General Setting Start line Value
GS T Set print position to
beginning of line
GS V Select cut mode and cut
paper
GS W Set printing area width General Setting Start line Value
GS \ Set relative vertical printing
position
GS ^ Execute macro Seldom Execute Yes Yes
GS a Enable/disable Auto Status
Back (ASB)
GS b Turn smoothing mode on/off Setting Yes Yes
GS c Print counter Counter Execute Yes Yes
GS f Select font for HRI
characters
GS h Set bar code height Bar Code Setting Yes Yes
GS k Print bar code Bar Code Execute Empty Yes
General Setting Yes Yes
General Setting Yes Yes
NV & DL Execute Yes Disabl
ed
NV & DL Setting Start line Disabl
ed
PAGE Execute Ignored Yes
d
Start line Disabl
Setting
Seldom Setting Start line Value
Yes Yes
Setting
Bar Code Setting Yes Yes
General Execute Yes Ignore
General Execute Start line Yes
PAGE Execute Ignored Yes
Status Execute,
Setting
Bar Code Setting Yes Yes
Yes Yes
ed
d
MTP-1530II User Manual (Revision 20120510) Page 29
Page 30

Telpar MTP-1530II Receipt Thermal Printer User Manual
GS r Transmit status Status Execute Yes Yes
GS v 0 Print raster bit image
OBSOLETE – Useinstead
GS (L<Function 112 + 50>
GS w Set bar code width Bar Code Setting Yes Yes
GS (L,
GS 8 L
Control Codes and Control Sequences
Specify graphic data Graphics Setting
General Execute Empty Disabl
ed
Yes Yes
and
execute
MTP-1530II User Manual (Revision 20120510) Page 30
Page 31

Telpar MTP-1530II Receipt Thermal Printer User Manual
List of Control Codes and Control Sequece Locations
Control Codes Control Sequences
Bar Code See 4.4.3 Bar Code Commands page 35
Counter See 4.4.4 Counter Commands page 36
General See 4.4.1 General Usage Print Commands page31
NV & DL See 4.4.7 NV Memory and Down Load Bit Images
Commands page 41
Page See 4.4.6 Page Mode Commands page 38
Seldom See 4.4.8 Seldom Used Commands page43
Status See4.4.2 Status Commands page 35
Top of Form See 4.4.5 Top of Form Commands page 38
Disabled Parameters will be processed as normal data.
Empty Enabled only when at the beginning of a line.
Ignored Command code and parameters are ignored.
Start line Enabled only when there is no data in the print buffer
Yes Function is enabled.
List of Control Codes and Control SequencesLocations
4.4 Control Codes and Control Sequences Definition
4.4.1 General Usage Print Commands
General Usage Print Commands
Name Command
ASCII
Tab HT 09 Move the print position to the next
Line feed LF 0A Print data and feed paper. Default line
Form feed FF 0C See Top of Forms Commands.
CR CR 0D If parallel interface is selected and
Real-time
request to
printer
ESC ESC 1B ESC SequenceHeader
FS FS 1C FS SequenceHeader.
GS GS 1D GS Sequence Header.
Set right side
character
spacing
DLE ENQ+n10 05 +n +n=01hex, Recover from error and
ESC (SP)+n1B 20 +n Set spacing to the right of each
Comman
d (hex)
+n = data
byte[hex]
Description
horizontal tab position. Default is a TAB
position every 8 columns. SeeESC D.
spacing = 3.75mm. See ESC 2 and ESC
3
See Page Mode Commands.
automatic line feed is is enabled
(Memory Switch 1-5) then CR is treated
as LF. SeeLF.
restart printing from the line where the
error occurred. +n=02hex, Recover from
an error after clearing the receive and
print buffers.
character to n x 0.125 mm (n x 0.0049”).
Doubled for Double Wide. Does not
affect the Kanji character set. Set values
independently in Page and Normal
modes.
MTP-1530II User Manual (Revision 20120510) Page 31
Page 32

Telpar MTP-1530II Receipt Thermal Printer User Manual
Set Print mode
Set absolute
print position
Select Bit
Image mode
Turn underline
mode on/off
Set default line
spacing
Set Line feed
pitch
Printer reset ESC @ 1B 40 Resets the printer to the mode it was in
Set Horizontal
Tab positions
Turn
emphasized
mode on/off
Turn doublestrike mode
on/off
ESC ! +n 1B 21 +n
ESC $ +n+m1B 24 n m Current print position is set to (n + m x
ESC +m
+n1 +n2
+d1∼dn
ESC - +n 1B 2D +n n=0 (00 or 30 hex) Turn underline off.
ESC 2 1B 32 Set 3.75 mm line spacing (30 dot lines).
ESC 3 +n 1B 33 +n
ESC D
+d1∼dn
NUL
ESC E +n 1b 45 +n LSB = 0 Turn emphasized mode off.
ESC G +n 1B 47 +n LSB = 0 Turn double strike mode off.
1B 2A +m
+n1 +n2
(data)
1B 44
(DATA) 00
Set Print mode. See Section 4.5.1 - Set
Print Mode. See ESC M, ESC E, ESC -,
GS!.
256) x 0.125 mm from the beginning of
the line. SeeESC \, GS $, GS\. See
Page mode.
Set Bit Image mode. See 4.5.2. - Set Bit
Image Mode
n=1 (01 or 31 hex) Turn on 1 dot line
high underline. n=2 (02 or 32 hex) Turn
on 2 dot line high underline. See ESC !.
See ESC 3.
Set single line spacing to n dot lines (n x
0.125mm). Set independently in Page
and Normal mode. Default = 30. See
ESC 2.
when power was turned on. Clears the
data in the print buffer but does not the
data in the receive buffer. The DIP
switches and MEMORY switches are not
rechecked. The MACRO definition is not
cleared.
Set from 1 to 32 tab positions. Data
values range from 1 to 255 in ascending
order. If a data value is less than the
previous data value, this command is
terminated. NUL terminates this
command when less than 32 TAB
positions are being set. ESC D NUL
clears all tab positions. Default is every
8 columns.
LSB = 1 Turn emphasized mode on. See
ESC !.
LSB = 1 Turn double strike mode on.
Printout is the same as emphasized.
See ESC E.
MTP-1530II User Manual (Revision 20120510) Page 32
Page 33

Telpar MTP-1530II Receipt Thermal Printer User Manual
Name Command
ASCII
Forward
paper feed
for n dot
lines
Select
character
font
Select
International
character
set
Rotate print
Set relative
print position
Select
justification
Select paper
sensors to
output paper
end status
Select paper
sensor to
stop printing
Panel
buttons
enable/disab
le
Forward line
feed for n
character
lines
Select
Character
code table
Set/Reset
Inverted
print
Select GS ! +n 1D 21 +n Characters can be printed in sizes from
ESC J +n 1B 4A +n
ESC M +n 1B 4D +n n=0 (00 or 30 hex) selects FontA
ESC R +n 1B 52 +n
ESC V +n 1B 56 +n n = 1 (01 or 31 hex) Rotate the print 90
ESC \ +n +m 1B 5C n
ESC a +n 1B 61 n n=0 (0 or 30 hex) Left justify. n=1 (01
ESC c 3 +n 1B 63 33+nBit 1 enables or disables the paper low
ESC c 4 +n 1B 63 34+nSetting bit 0 or bit 1 high causes the
ESC c 5 +n 1B 63 35+nLSB = 0 Paper feed button is enabled.
ESC d +n 1B 64 +n
ESC t +n 1B 74 +n
ESC {+n
Command
+n = data
byte[hex]
Print if needed then feed paper n dot
lines. Range = 0 to 255dec. If BM is
enabled, this command can feed paper
past the mark.
(12x24). n=1 (01 or 31 hex) selects
FontB (9x17). See ESC !
Select international character set. See
Section Error! Reference source not
found. – Error! Reference source not
found. +++ reprint section
degrees clockwise. n = 0 (00 or 30 hex)
Cancel the rotation. Rotated characters
do not get underlined. Double wide
becomes double high and double high
becomes double wide. Not Page mode.
See ESC ! and ESC -.
Set printing to current print position +
m
1B 7B +n LSB = 1, upside-down printing. LSB =
(n+(m*256)). Ignored if specified
setting exceeds the printable area. See
Page mode.
or 31 hex) Center justify. n=2 (02 or 32
hex) Right justify. Normal mode only,
must be received at the start of a line.
See HT, ESC $, and ESC \.
sensor. Bit 3 enables or disables the
paper out sensor. A value of 1 enables
and a value of 0 disables. Applies to
the parallel interface ONLY.
Paper Low sensor to be used as a
Paper Out sensor.
LSB = 1 Paper feed button is disabled.
During a macro instruction standby the
feed button is always enabled but will
not feed paper.
Print if needed then feed paper n
character lines. Range= 0 to 255dec.
Maximum amount of paper fed = 1016
mm (40”). Can feed past marks in BM
mode.
See section 6.2 - Character Sets
0, normal printing. This command must
be received at the start of a line to be in
effect for that line. Does not apply in
page mode.
Description
MTP-1530II User Manual (Revision 20120510) Page 33
Page 34

Telpar MTP-1530II Receipt Thermal Printer User Manual
character
size
Test print GS ( A 02hex
00hex +n +m
Reverse
video
Set left
margin
Set print
position to
the
beginning of
print line
Cut
command
Set Right
Margin
Print raster
bit image
General Usage Print Commands
GS B +n 1D 42 +n Bit 0 = 0 (default) turns off and bit 0 = 1
GS L +n +m 1D 4C +n+mSet the left margin to dot position m x
GS T +n 1G 54 +n n=0 (either 00 or 30hex) sets the print
GS V m 1D 56 +m+nIf m = 1 (either 01hex or 31hex) a cut is
GS W +n +m
GS v 0 +m
+x1 +x2 +y1
+y2 +data
1 to 8 times normal in either width or
height. Bits 0, 1, and 2 set the
character width multiplier. Bits 4, 5,
and 6 set the character height
multiplier. A value of 0 = Normal size.
Does not apply to HRI characters when
printing bar codes. See ESC !.
1D 28 41
02 00 +n
+m
10 57 +n+mSets the print width to m x 256 + n
1D 76 30
m x1 x2
y1 y2 data
n = 0 or 1 or 2 (00, 01, 02, 30, 31, or
32 hex). m=1 (01 or 31 hex) causes a
Hexadecimal dump print pattern. ).
m=2 (02 or 32 hex) causes a Printer
Status print pattern. m=3 (03 or 33 hex)
causes a “barber pole” print pattern.
Must be received at the start of a line.
A cut is performed following the print
test. The printer is reset following the
print test, even download characters or
bit image are erased.
turns on reversevideo printing. Does
not apply to bit image, user-defined bit
image, bar codes and the HRI part of
bar codes, or spaces skipped by HT,
ESC $, or ESC \ commands. Does not
affect the space between character
lines. Underline does not apply while
reversevideo is enabled.
256+n. Must bereceived at the start of
a line. Does not apply in Pase mode.
See GS W.
position to the start of the print line
after deleting data in the print buffer.
n=1 (either 01 or 31hex) sets the print
position to the start of the print line
after printing data in the print buffer.
performed and the +n byte must not be
sent. If m is a capital B (42hex) then
paper is fed for n dot lines and then a
cut is performed.
relative to the left margin. Must be
received at the start of a line. See GS
L.
Error! Reference source not found.
OBSOLETE – Use
GS (L,<Function 112 + 50> instead
MTP-1530II User Manual (Revision 20120510) Page 34
Page 35

Telpar MTP-1530II Receipt Thermal Printer User Manual
4.4.2 Status Commands
Because some of the bits in the status responses are fixed, the user can
confirm the command to which the status belongs and differentiate the
status responses from XON/XOF as shown:
Response to Status Commands
Response to Bit Pattern
GS r 0 x x 0 x x x x
XON 0 0 0 1 0 0 0 1
XOF 0 0 0 1 0 0 1 1
DLE EOT 0 x x 1 x x 1 0
ASB (1stbyte) 0 x x 1 x x 0 0
ASB 2nd-4
Response to Status Commands
th
The transmit buffer is 99 bytes long. If more than 99 bytes are stored up
without being transmitted, the status bytes that have no place to be
stored will be thrown away.
Status Commands
Name Command
ASCII
Real-time STATUS
request
Transmit printer ID GS I +n 1D 49 +n See section 4.4.5
Enable/disable
Automatic Status
Back (ASB)
Status Commands
DLE EOT+n10 04 +n See section 4.4.5
GS a +n 1D 61 +n See section 4.4.5
Command+n =
data byte[hex]
0 x x 0 x x x x
Description
4.4.3 Bar Code Commands
Bar Code Commands
Name Command
ASCII
Select print
position for HRI
characters
Select font for HRI GS f +n 1D 66 +n n = 0 (either 00hexor 30hex),
Set Bar code
GS H n 1D 48 +n n = 0 (either 00hex or 30hex),
GS h +n 1D 68 +n
Command
+n = data
byte[hex]
Description
no HRI printed. n = 1 (either
01hex or 31hex), HRI printed
above the bar code. . n = 2
(either 02hex or 32hex), HRI
printed below the bar code. n
= 3 (either 03hex or 33hex),
HRI printed both above and
below the bar code. The font
used is specified by GS f.
Default = 0.
print the HRI using FontA
(12x24). n = 1 (either 01hexor
31hex), print the HRI using
FontB (9x17). Default = 0.
Set the bar code height in
MTP-1530II User Manual (Revision 20120510) Page 35
Page 36

Telpar MTP-1530II Receipt Thermal Printer User Manual
height dots. Default = 162. Range= 1
Print bar code GS k +n
(data+ NUL
Set bar code width GS w +n 1D 77 +n n defines the width of lines
Bar Code Commands
1D 6B +n (data)00Selects the bar codetype and
4.4.4 Counter Commands
Counter Commands
Name Command
ASCII
Select
counter print
mode
Select count
mode (A)
Set counter GS C 2 +n1
GS C 0 +n
+m
GS C 1 +n1
+n2 +m1
+m2 +n +r
+n2
Command
+n = data
byte[hex]
1D 43 30 +n+mn = 00 hex, prints the actual digits
indicated by the number value. n =
01 hex through 05 hex sets the
number of digits to be printed. m=0
(either 00 hex or 30 hex), align right
with leading spaces. m=1 (either 01
hex or 31 hex), align right with
leading zero. m=2 (either 02 hex or
32 hex), align left with trailing
spaces. If n = 0 then m has no
meaning. Default is n=m=0.
1D 43 32 +n1
+n2 +m1
+m2 +n +r
1D 43 32 +n1
+n2
n1+n2*256 = start count.
m1+m2*256 = end count. n = step
amount. r = the repetition number
when the counter value is fixed.
Count up mode is set when
n1+n2*256 < m1+m2*256 and n and
r are not =0. Count down mode is set
when n1+n2*256 > m1+m2*256 and
n and r are not =0. Counting stops
when n1+n2*256 = m1+m2*256 and
n and r are not =0. n = the amount to
increment the count by. R = the
repetition number when counter
value is fixed.
n1+n2*256 sets the value of the
serial number counter. In count-up
mode; if the counter value goes
outside the counter operation range
set by GS C 1 or GS C ;, it is forced
to convert to the minimum value set
by GS c. In count-down mode; if the
counter value goes outside the
counter operation range set by GS C
to 255dec.
prints. See Section 4.5.8 - Bar
Code Command.
used for printing bar codes in
mm. For codes Code39, ITF,
and CODABAR: n=2, 0.250 &
0.625. n=3, 0.375 & 1.000.
n=4, 0.500 & 1.250. n=5,
0.625 & 1.625. n=6, 0.750 &
2.000. For codes UPC-A,
UPC-E, JAN13, JAN8,
Code93, and CODE128; the
smaller number listed above =
the Modulo Width. Default = 3.
Description
MTP-1530II User Manual (Revision 20120510) Page 36
Page 37

Telpar MTP-1530II Receipt Thermal Printer User Manual
1 or GS C ;, it is forced to convert to
the maximum value set by GS c.
Select count
mode (B)
Print counter GS c 1D 63 Sets the serial counter value in the
Counter Commands
GS C ; s1 ;
s2 ; s3 ; s4 ;
s5 ;
1D 43 3B s1
3B s2 3B s3
3B s4 3B s5
s1 through s5 are all character
strings made up of the ASCII
characters 0 through 9. s1 and s2
range from 0 to 65535 and s3
through s5 range from 0 to 255. s1
and s2 specify the counter range. s3
= the amount to increment the count
by. S4 = the repetition number when
the counter value is fixed. s5 = the
counter value. Count-up mode is
selected by s1 < s2 and s3 and s4
are not =0. . Count-down mode is
selected by s1 > s2 and s3 and s4
are not =0. Counting stops when s1
= s2 or s3 = 0 or s4 = 0.
print buffer and increments or
decrements the counter value based
on the count mode selected by GS C
0 and either GS C 1 or GS C ;. In
count up mode the counter value is
set to the minimum value if it goes
out of the range set by GS C 1 or GS
C ;. In count down mode the counter
value is set to the maximum value if
it goes out of the range set by GS C
1 or GS C ;.
MTP-1530II User Manual (Revision 20120510) Page 37
Page 38

Telpar MTP-1530II Receipt Thermal Printer User Manual
4.4.5 Top of Form Commands
Top of Form Commands
Name Command
ASCII
Form feed FF 0C Print if needed then feed paper to the
Feedto
Black Mark
Top of Form Commands
GS FF 1D 0C Feed paper to the next Black Mark
Command
+n = data
byte[hex]
Description
next Black Mark if the BM sensor is
enabled. See GS ( F, GS FF, and
DSW1 position 1).
position. Ignored unless enabled by
Dip SW 1 position 1. See GS ( F, FF)
and Dip Switch settings.
For additional information black mark sensing, see Section 2.2.2 Black
Mark Sensors Load.
4.4.6 Page Mode Commands
Bar Code Commands
Name Command
ASCII
Form feed FF 0C Print and return to standard mode.
CAN CAN 18 Cancel print data in page mode. See
Print data in
Page mode
Set absolute
print position
Select Page
mode
ESC FF 1B 0C Prints all buffered data in the printing
ESC $ +n +m 1B 24 n m In Page mode with the starting
ESC L 1B 4C Must be received at the start of a
Command
+n = data
byte[hex]
Description
Printed data is cleared from the data
buffer. The printing area set by ESC
W is reset to the default setting. See
ESC FF, ESC L, and ESC S
ESC L and ESC W.
area. Printed data is not cleared from
the data buffer. ESC T and ESC W
values are not cleared. See FF, ESC
L, and ESC S.
position (See ESC T) set to the top
left corner or the bottom right corner
this is a horizontal position but with
the starting position set to the top
right corner or the bottom left corner
this is a vertical position. See ESC \,
GS $, GS\.
line. Settings of ESC SP, ESC 2,
ESC 3 have independent values in
page mode and standard mode. ESC
V, ESC a, ESC {, GS L, and GS W
while in page mode makes the
settings for standard mode but have
no affect while in page mode. The
printer returns to standard mode at
power on, reset, or ESC @ received.
See FF, CAN, ESC FF, ESC S, ESC
T, ESC W, GS$, GS \.
MTP-1530II User Manual (Revision 20120510) Page 38
Page 39

Telpar MTP-1530II Receipt Thermal Printer User Manual
Select
standard
mode
Select print
direction
In page
mode, set
printing area
Set relative
print position
Page mode,
Set absolute
vertical print
position
Page mode,
set relative
vertical print
position
ESC S 1B 53 Data buffered in page mode is
cleared. The printing area set by
ESC W is initialized. Settings of ESC
SP, ESC 2, ESC 3 are switched to
the standard mode values. See FF,
ESC FF, ESC L.
ESC T +n 1B 54 +n Sets the position where data is
buffered within the printing area set
by ESC W. n=0 (either 00 hexor 30
hex) sets the starting position to the
upper left corner and printing goes
from left to right. n=1 (either 01 hex
or 31 hex) sets the starting position
to the lower left corner and printing
goes from bottom to top. n=2 (either
02 hex or 32 hex) sets the starting
position to the lower right corner and
printing goes from right to left. n=3
(either 03 hex or 33 hex) sets the
starting position to the upper right
corner and printing goes from top to
bottom.
ESC W +x1
+x2 +y1 +y2
+dx1 +dx2
+dy1 +dy2
ESC \ +n +m 1B 5C +n +m Set printing position to current
GS $ +n +m 1D 24 +n +m Sets the absolute vertical starting
GS \ +n +m 1D 5C +n +m Set printing position to current
1B 57 +x1
+x2 +y1 +y2
+dx1 +dx2
+dy1 +dy2
x1+x2*256 = horizontal starting
position. y1+y2*256 = vertical
starting position. dx1+dx2*256 =
printing area width. dy1+dy2*256 =
printing area height Defaults are
x1=x2=y1=y2=0, dx1=128 for 82.5
mm printer or 64 for 80 mm printer,
dx2=2, dy1=152 for 82.5 mm printer
or 226 for 80 mm printer, dy2=2.
position plus (n+m*256)*0.125 mm.
If the starting position is set (by ESC
T) to the upper left or lower right of
the printing area then the offset is in
the horizontal direction but if the
starting position is set to the upper
right or lower left of the printing area
then the offset is in the vertical
direction.
position to buffer character data to
(n+m*256)*0.125 mm referenced to
the starting posotopn defined by ESC
T. If the starting position is set (by
ESC T) to the upper left or lower
right of the printing area thenthe
position is in the vertical direction but
if the starting position is set to the
upper right or lower left of the
printing area then the position is in
the horizontal direction.
position plus (n+m*256)*0.125 mm
positive (down the page) or 65536(n+m*256)*0.125 mm negative (up
the page). If the starting position is
set (by ESC T) to the upper left or
lower right of the printing area then
the offset is in the vertical direction
MTP-1530II User Manual (Revision 20120510) Page 39
Page 40

Telpar MTP-1530II Receipt Thermal Printer User Manual
but if the starting position is set to
the upper right or lower left of the
printing area then the offset is in the
horizontal direction.
Turn
smoothing
mode on/off
Page Mode Commands
Here is an example of using page mode:
A typical procedure for transmitting commands in page mode is asfollows:
(1) Transmit ESC L to enter page mode.
(2) Specify the printable area using ESC W.
(3) Specify the printing direction using ESC T.
(4) Transmit the print data.
(5) Collectively print the data by sending an FF.
(6) After printing, the printer automatically returns to standard mode.
Example: Sample program in BASIC (assumes transmission to the printer is already possible with file #1
open)
GS b +n 1D 62 +n LSB = 0 turns smoothing off. LSB =
1 turns smoothing on. Smoothing
applies to built-in or user defined
characters when printed at any size
larger than the normal. See ESC !,
GS !.
100 PRINT #1,CHR$(&H1B);"L";
110 PRINT #1,CHR$(&H1B);"W";CHR$(0);CHR$(0);CHR$(0);CHR$(0);
120 PRINT #1,CHR$(200);CHR$(0);CHR$(144);CHR$(1);
130 PRINT #1,CHR$(&H1B);"T";CHR$(0);
140 PRINT #1,"Page mode lesson TEST 1"
150 PRINT #1,CHR$(&HC);
In the program, a printable area of 200 X 400 dots starting at (0,0) is set, and characters are printed on
the first line of the area as shown in the figure below. Note that a line feed was inserted between
"lesson" and "TEST 1". This line feed was inserted automatically because there was no room for the
blank " " following the word "lesson" within the horizontal range of the 200 ⋅ 400 printable area. The feed
amount here is that specified by ESC 3. Any number of printable areas can be specified before the FF is
executed. If any printable areas overlap, however, the logical sum of the data written to the overlapping
portions is used for the final printing.
(0,0)
200
Page mode lesson
TEST 1
Paper
400
Printable area
MTP-1530II User Manual (Revision 20120510) Page 40
Page 41

Telpar MTP-1530II Receipt Thermal Printer User Manual
4.4.7 NV Memory and Down Load Bit Images
Commands
A download bit image is stored in RAM and is cleared by a power cycle
or by the commands ESC @ or ESC &. A download bit image (GS *) and
user defined characters (ESC &) can not be defined simultaneously,
defining either will cancel the other. An NV bit image is stored in nonvolatile memory and is cleared only by redefining the NV bit image
message. Frequent writes may damage the NV memory. Maximum
recommended usage is 10 times per day.
Bar Code Commands
Name Command
Print NV
image
Define NV
image –
FS p +n +m 1C 70 +n +m Print the NV message +n defined by
FS q +n +x1
+x2 +y1 +y2
(data) 01 hex
through +x1
+x2 +y1 +y2
(data) n hex
ASCII
Command
+n = data
byte[hex]
1C 71 +n +x1
+x2 +y1 +y2
(data) 01 hex
through +x1
+x2 +y1 +y2
(data) n hex
Description
FS q in the resolution specified by
+m. m = 0 (either 00 hexor 30 hex =
203 by 203 density. m = 1 (either 01
hex or 31 hex = 203 V by 102 H
density. m = 2 (either 02 hex or
32hex = 102 V by 203 H density. m =
3 (either 03 hex or 33 hex = 102 V by
102 H density. Must be received
when the print buffer is empty. Is not
affected by print modes
(emphasized, double strike,
underline, character size, reverse
video. rotated, etc) but is affected by
upside-down printing mode. Data
which exceeds the allowable print
width of the printer is ignored. This
command is ignored in Page mode.
+n (1 through 255) defines the
number of NV bit images to be
stored in memory. For each NV bit
image (x1+x2*256)*8 = number of
dots being defined in the horizontal
direction and (y1+y2*256)*8 =
number of dots being defined in the
vertical direction. Each NV bit image
is terminated with a sequential
number n. x1 and y1 can range from
0 through 255, x2 can range from 1
through 3, y2 can range from 0
through 1, but x1+x2*256 can not be
less than 1 or greater than 1023 and
y1+y2*256 can not be less than 1 or
greater than 288. The amount of
data needed to complete this
command is
(x1+x2*256)*(y1+y2*256)*8 bytes.
Each bit image stored requires an
additional 4 bytes for header
information. A total of 192 Kbytes is
available for storage of all NV bit
images. This command clears all
previously stored NV bit images so to
write a new NV bit image requires
MTP-1530II User Manual (Revision 20120510) Page 41
Page 42

Telpar MTP-1530II Receipt Thermal Printer User Manual
reloading all NV bit images which are
to be stored. When this command is
completed, the printer performs a
hardware reset so all user-defined
characters, downloaded bit images,
and macros are cleared and all
functions are the same as if power
was turned off then back on. In
standard mode this command must
be received at the start of a line. This
command does nothing in page
mode.
Define
download bit
image
Print
downloaded
bit image
NV Memory Commands
GS * +x +y
(data)
GS /+m 1D 2F +m Print the downloaded bit image
1D 2A +x +y
(data)
+x (1 to 255dec) defines the
horizontal size as x times 8 dots. +y
(1 to 48dec) defines the vertical size
as y times 8 dots. x times y cannot
exceed 1536. The download bit
image is cleared by a power on
reset, ESC @, or ESC &, (a
download bit image (GS *) and user
defined characters (ESC &) can not
be defined simultaneously, defining
either will cancel the other).
defined by GS * in the resolution
specified by +m. m = 0 (either 00hex
or 30hex = 203 by 203 density. m = 1
(either 01hex or 31hex = 203 V by
102 H density. m = 2 (either 02hex or
32hex = 102 V by 203 H density. m =
3 (either 03hex or 33hex = 102 V by
102 H density. Must be received
when the print buffer is empty. Is not
affected by print modes
(emphasized, double strike,
underline, character size, reverse
video. rotated, etc) but is affected by
upside-down printing mode. If the
downloaded bit image exceeds the
printable area, the excess data is not
printed. If the margins have been set
by the GS L and/or GS W
commands, this command will
readjust the margins as required to
print as much of the data as possible
for the printer mechanism being
used. In Page mode, the terms
horizontal and vertical depend on the
print starting position defined by ESC
T.
MTP-1530II User Manual (Revision 20120510) Page 42
Page 43

Telpar MTP-1530II Receipt Thermal Printer User Manual
4.4.8 Seldom Used Commands
Seldom Used Commands
Name Command
ASCII
Set/cancel
user-defined
character
set
Define Userdefined
characters
Cancel userdefined
characters
User-defined
commands
ESC % +n 1B 25 n LSB of n = 0 (default) selects ROM
ESC & +y
+c1 +c2 (+x
+data)
ESC ? +n 1B 3F +n The previous user defined character
GS ( E +p1
+p2 +m
(data)
Command
+n = data
byte[hex]
1B 26 03 +c1
+c2 (data)
1D 28 45 +p1
+p2 +m
(data)
Description
character generator. LSB of n = 1
selects User Defined character
generator. See ESC & and ESC ?.
+y specifies 3 bytes per character in
the vertical direction. +c1 specifies
the first character to be downloaded
and +c2 specifies the last character
to be downloaded. +x specifies the
number of dots in the horizontal
direction. The value of +x is 12dec
for FontA or 09dec for FontB ). FontA
or FontB are selected by ESC ! or
ESC M. A download bit image (GS *)
and user defined characters (ESC &)
can not be defined simultaneously,
defining either will cancel the other.
pattern for character +n (20 hex
through 7E hex in either font selected
by ESC !) is cleared and the internal
character generator is used to print
the character n. See ESC & and ESC
%.
p1+p2*256 = the number of data
bytes to follow +m plus 1.
Function 1 enters the user defined
mode. +m=01 hex, p1=03 hex,
p2=00 hex, d1=49 hex, d2=4E hex.
The printer transmits 37 hex 20 hex,
00 hex.
Function 2 ends the user defined
mode. +m=02 hex, p1=04 hex,
p2=00 hex, d1=4F hex, d2=55 hex,
d3=54 hex. The printer performs a
software reset, m=2 is only effective
in the user defined mode.
Function 3 allows setting of the
memory switches. +m=03 hex,
p1+p2*256 can vary from 10 dec to
65530 dec. The data structure is a 1
followed by b8 through b1. a1 (01
hex through 08 hex) specifies the
memory switch to be changed. b8
represents position 8 of that memory
switch and so on through b1
represents position 1 of that memory
switch then another a followed by b8
through b1 can follow as specified by
MTP-1530II User Manual (Revision 20120510) Page 43
Page 44

Telpar MTP-1530II Receipt Thermal Printer User Manual
the values of p1 and p2. The values
for each b are 30 hex to set a switch
OFF, 31 hex to set a switch ON, or
32 hex to leave a switch unchanged.
32 hex should be sent for the
“reserved” switches. The switch
changes made become effective
after a reset or power cycle. Running
a self-test printout can check the
switch settings. Frequent writes may
damage the NV memory. Maximum
recommended usage is 10 times per
day.
Function 4 causes the printer to
transmit the settings of a memory
switch. +m=04 hex, p1=02 hex,
p2=00 hex. The data byte value is
from )1 hex through 08 hex to specify
which memory switch is being
checked. The eleven data bytes
transmitted are 37 hex, 21 hex, 8
data bytes representing the 8 switch
positions, and 00 hex. The 8 data
bytes are transmitted in the order of
switch position 8 through switch
position 1. For each switch position,
the data sent will be 30 hex (an
ASCII 0) if the switch is OFF or 31
hex (an ASCII 1) if the switch is ON.
Set
adjustment
values
GS ( F +p1
+p2 +a +m
+n1 +n2
1D 28 46 04
00 +a +m
+n1 +n2
Effective only when the BM sensor is
enabled. +a = 01 hex selects the
function for the position to start
printing when used by FF or GS FF
commands. +a = 02 hex selects the
function for the position to start
cutting when used by the GS V
command. +m = 0 (either 00 hex of
30 hex) specifies a forward paper
feed. +m = 1 (either 01 hex of 31
hex) specifies a reverse paper feed.
(n1+n2*256)*0.125 mm specifies
how much to feed. The default of all
adjustment values is 0.
Save or load
adjustment
values in NV
memory
GS ( M +p1
+p2 +n +m
1D 28 4D +p1
+p2 +n +m
Function 1 saves the settings made
by GS ( F in NV memory. +n = 1
(either 01 hex or 31 hex), +m = 1
(either 01 hex or 31 hex), +p1=02
hex, +p2=00 hex.
Function 2. +n = 2 (either 02 hexor
32 hex), +m = 0 (either 00 hex or 30
hex), setting made by GS ( F is set
as the default value or +m = any
value except either 00 hexor 30 hex,
setting values are stored in area m
of memory, +p1=02 hex, +p2=00
hex. Must be processed at the
beginning of a line. No effect in page
mode.
Function 3 set whether or not the
value saved in NV memory is the
MTP-1530II User Manual (Revision 20120510) Page 44
Page 45

Telpar MTP-1530II Receipt Thermal Printer User Manual
default to be used at power on. +n =
3 (either 03 hex or 33 hex). +m = 0
(either 00 hex or 30 hex), the printer
does not load the value from NV
memory at initialization. +m = any
value except either 00 hex or 30 hex,
the printer loads the value from NV
memory at initialization.
Frequent writes may damage the NV
memory. Maximum recommended
usage is 10 times per day.
Start/end
macro
definition
Select head
control
method
Execute
macro
Seldom Used Commands
GS : 1D 3A Macro definition starts when this
command is received during normal
operation and ends when this
command is received during macro
definition. ESC @ does not clear the
contents of the macro definition so
ESC @ can be included in the macro
definition. The contents of the macro
can not exceed 2048 bytes.
GS E +n 1D 45 +n +n=00 hex, Print speed 1 (150
mm/second). +n=10 hex, Print speed
2 (100 mm/second). +n=20 hex, Print
speed 3 (80 mm/second). +n=30
hex, Print speed 4 (50 mm/second).
When Memory switch 8 position 1 is
set to divided energy, the maximum
speed is 120 mm/second. Default is
speed 1.
GS ^ +n +m+o1D 5E +n +m+o+n (0 through 255) specifies the
number of times to execute the
macro. +m (0 through 255) specifies
how long to wait between executions
of the macro (m*100 milliseconds)
When the LSB on +o is 0, the macro
executes n times at the interval of
m*100 msec. When the LSB on +o is
1, the macro executes then after an
interval of m*100 msec the Paper
Out LED flashes and the printer
waits for the Paper Feed button to be
pressed as a signal to execute the
next sequence until the macro has
executed +n times
MTP-1530II User Manual (Revision 20120510) Page 45
Page 46

Telpar MTP-1530II Receipt Thermal Printer User Manual
4.5 Descriptions of Commands
4.5.1 Set Print Mode
ESC ! +n [1B 21 +n]
+n is defined as:
Print Mode Settings
Bit 7 0 = Underline OFF
1 = Underline ON.
Bit 6 Not used.
Bit 5 0 = Double wide print OFF.
1 = Double wide print ON.
Bit 4 0 = Double high print OFF.
1 = Double high print ON.
Bit 3 0 = Emphasized print OFF.
1 = Emphasized print ON.
Bit 2 Not used.
Bit 1 Not used.
Bit 0 0 = FontA (12x24).
1 = FontB (9x17).
Print Mode Settings
Both double wide and double high can be selected for any of the type
faces. When a printed line contains characters with different heights, the
characters are arranged so that bottoms of all characters line up. All
characters printed can be underlined except 90 degree-rotated
characters. The space caused by the tab command HT is not underlined.
The thickness of the underline is defined by ESC – regardless of the
character size. Default = 0hex (12 x 24 matrix)..
4.5.2 Set Bit Image Mode
ESC +m +n1 +n2 +d1∼dn [1B 2A +m +n1 +n2 (data)]
Specifies and prints bit image graphics.
+m Mode Vertical dot
00 hex 8 Single density 67.7 dpi 101.6 dpi n1+n2*256
01 hex 8 Double
density
20 hex 24 Single
density
21 hex 24 Double
density
Set Bit Image Mode
If +m is not one of the specified values, the rest of the ESC sequence is
ignored and all information starting with +n1 is treated as normal data.
In single density mode (+m=00 or 20), for each bit of data received the
printer prints two dots horizontally so the horizontal resolution is 101.6
dpi.
Set Bit Image Mode
Horizontal
density
67.7 dpi 203.2 dpi n1*n2*256
203.2 dpi 101.6 dpi (n1+n2*256)*3
203.2 dpi 203.2 dpi (n1+n2*256)
dot density
Number of
data bytes
MTP-1530II User Manual (Revision 20120510) Page 46
Page 47

Telpar MTP-1530II Receipt Thermal Printer User Manual
In double density mode (+m=01 or 21), for each bit of data received the
printer prints one dot horizontally so the horizontal resolution is 203.2
dpi.
In 8 dot mode (+m=00 or 01), for each data bit received the printer prints
three dots vertically so the vertical resolution is 67.7 dpi.
In 24 dot mode (+m=20 or 21), for each data bit received the printer
prints one dot vertically so the vertical resolution is 203.2 dpi.
+n1 and +n2 define the number of dots per line to be printed in the
horizontal direction. +n1 and +n2 cannot both have a value of 0. The
range of +n1 = 0 to 255 dec and the range of +n2 is 0 to 3 dec so a total
number of horizontal dot position which can be printed with one ESC
sequence can vary from 1 to 1023.. If +n1 or +n2 is outside this range,
the ESC sequence is ignored and all data following is treated as normal
data.
If the bit image data specified is more than what will fit on a line, the
excess data is ignored.
If the width of the printing area set by GS L and GS W is less than the
width required by the data sent with the ESC * command, the margins
are re-adjusted to print as much of the graphics data as possible. The
right margin is extended first and then if the data still will not fit then the
left margin is readjusted up to the point where the full width of the print
head is used for printing the graphics image.
When 8 dot bit image is selected, each byte of data represents 8 vertical
dots to be printed. The MSB is the top dot to be printed and the LSB is
the bottom dot to be printed. For each of the 8 bits within each data byte,
a “1” represents a dot position to be printed and a “0” represents a dot
position not to be printed.
When 24 dot bit image is selected, each series of three bytes of data
represent 24 vertical dots to be printed. The first byte represents the top
8 dots to be printed, the second byte represents the 8 dots to be printed
in the middle, and the trird byte represents the bottom 8 dots to be
printed. The MSB of each byte is the top dot to be printed and the LSB is
the bottom dot to be printed. For each of the 24 bits within each series of
three data bytes, a “1” represents a dot position to be printed and a “0”
represents a dot position not to be printed.
After printing a bit image, the printer returns to normal mode. The
graphics mode is not affected by print modes (emphasized, doublestrike, underline, character size, or reverse video) but is affected by the
inverted print mode.
MTP-1530II User Manual (Revision 20120510) Page 47
Page 48

Telpar MTP-1530II Receipt Thermal Printer User Manual
4.5.3 Set Raster Bit Image Mode
NOTE: Commands GS v 0, FS p and FS q pertaining to raster
graphics are now defined as obsolete commands in the
ESC/POS command system. This printer supports both
upward-compatible commands and obsolete commands.
However, the upward-compatible commands are
recommended to use because the obsolete commands
will not be supported in future products. Please use the
supported GS (L and GS 8 L commands instead to
perform graphics instead (described in Section 4.4.4).
GS v 0 +m +x1 +x2 +y1 +y2 +d1∼dk [1D 76 30 +m +x1 +x2 +y1 +y2 (data)]
Specifies and prints RASTER bit image graphics.
Set Raster Bit Image Mode
+m Mode Vertical dot
density
0 (00 or 30 hex) Normal 203.2 dpi 203.2 dpi
1 (01 or 31 hex) Double Wide 203.2 dpi 101.6 dpi
2 (01 or 32 hex) Double high 101.6 dpi 203.2 dpi
3 (03 or 33 hex) Quadruple 203.2 dpi 203.2 dpi
Table 2 Set Raster Bit Image Mode
The number of data bytes which must be sent to complete this command
= (x1+x2*256)*(y1+y2*256).
If +m is not one of the specified values, the rest of the ESC sequence is
ignored and all information starting with +n1 is treated as normal data.
The values of x1 and x2 select the number of data bytes (x1+x2*256) in
the horizontal direction. The value of x1 can be from 1 to 128 and the
value of x2 must be 00hex so the maximum number of dots which can
be specified is 1024 (128 bytes times 8 bits per byte). Any data specified
and received which exceeds the printing width of the printer is read in
and then discarded.
In standard mode, this command is effective only when there is no data
in the print buffer. The starting point of the printed image can be set by
the HT (Horizontal Tab), ESC $ (Set absolute print position), ESC \ (Set
relative print position), or GS L (Set left margin) command if that position
is a multiple of 8.
This command is not affected by print modes (character size,
emphasized print, double strike, inverted print, underline, reverse video,
etc.). ESC a (Select justification) is effective on raster bit images. If the
width of the printing area set by GS L and GS W is less than the
minimum width, the printing area is extended to the minimum width only
on the line in question. This minimum width is 1 dot in normal or double
high mode and is 2 in double wide or quadruple mode.
Each data byte represents 8 horizontal dots to be printed with the MSB
being to the left and the LSB being to the right. . For each of the 8 bits
Horizontal
dot density
MTP-1530II User Manual (Revision 20120510) Page 48
Page 49

Telpar MTP-1530II Receipt Thermal Printer User Manual
within each data byte, a “1” represents a dot position to be printed and a
“0” represents a dot position not to be printed. The first x1+x2*256 data
bytes are printed as the first raster line. The next x1+x2*256 data bytes
are printed as the second raster line. This sequence continues until all
y1+y2*256 dot lines defined have been printed. After printing the raster
bit image, the printer returns to normal mode.
4.5.4 Set and Process Graphics Data
GS (L pL pH m fn [parameter]
1D 28 4C pL pH m fn [parameters]
GS 8 L p1 p2 p3 p4 m fn [parameter]
1D 38 4C p1 p2 p3 p4 m fn [parameters]
In the description below, only the GS (L command is used for
explanation. Please note that GS (L and GS 8 L have the same
function, however, if the [parameters] in the Format column in the table
below exceed 65,533 bytes, then the GS 8 L command must be used.
Command Parameters Structure Maximum Value
GS (L pL, pH 2 bytes 65,535
GS 8 L P1, p2, p3, p4 4 bytes 4,294,967,295
Definitions:
• pL and pH specify (pL + pH X 256) as the number of bytes after
pH (m, fn, and [parameters])
• fn specifies the function
• [parameters] specify the process of each function
fn Format
0, 48 GS (L pL pH m fn 48
2, 50 GS (L pL pH m fn 50
3, 51 GS (L pL pH m fn 51
64 GS (L pL pH m fn d1 d2 64
65 GS (L pL pH m fn d1 d2 d3 65
66 GS (L pL pH m fn kc1 kc2 66
67 GS (L pL pH m fn a kc1 kc2 b
xL xH yL yH [c d1…dk]1…[c
d1…dk]b
69 GS (L pL pH m fn kc1 kc2 x y 69
112 GS (L pL pH m fn a bx by c
xL xH yL yH d1…dk
Function
No.
67
112
Function Name
Transmit the NV graphics memory capacity
Print graphics data in the print buffer
Transmit the remaining capacity of the NV graphics memory
Transmit the key code list for defined NV graphics
Delete all NV graphics data
Delete the specified NV graphics data
Define the NV graphics data (raster format)
Print the specified NV graphics data
Store the graphics data in the print buffer (raster format)
MTP-1530II User Manual (Revision 20120510) Page 49
Page 50

Telpar MTP-1530II Receipt Thermal Printer User Manual
Notes pertaining to GS (L and GS 8 L:
• Frequent write command executions by an NV memory write command may damage the NV
memory. Therefore, it is recommended to limit writing of the commands into the NV memory to
10 times or less a day.
• If the power is turned off or the printer is reset via an interface while this command is being
executed, the printer may go into an abnormal condition. Be careful not to turn the power off or
let the printer be reset via an interface while this command is being executed.
• While processing this command, the printer is BUSY while writing the data to the NV memory
and stops receiving data. Therefore, be sure not to transmit data from the host PC while the
printer is BUSY.
When <Function 48, 51, or 64> is transmitted, do not transmit the subsequent data until the status is
received. ESC/POS Handshaking Protocol procedures is required when using <Function 64>.
<Function 48> GS (L pL pH m fn (fn = 0, 48)
1D 28 4C pL pH m fn
Description: Transmits the entire capacity of the NV graphics area (number of bytes in the NV graphics
area).
Range:
• (pL + pH X 256) = 2 (pL = 2, pH = 0)
• m = 48
• fn = 0, 48
<Function 50> GS (L pL pH m fn (fn = 2, 50)
1D 28 4C pL pH m fn
Description: Prints the graphics data stored in the print buffer (by using GS (L<Function 112>)
Range:
• (pL + pH X 256) = 2 (pL = 2, pH = 0)
• m = 48
• fn = 2, 50
<Function 51> GS (L pL pH m fn (fn = 3, 51)
1D 28 4C pL pH m fn
Description: Transmit the number of bytes of remaining memory (unusedarea) in the NV graphics
area.
Range:
• (pL + pH X 256) = 2 (pL = 2, pH = 0)
• m = 48
• fn = 3, 51
<Function 64> GS (L pL pH m fn d1 d2 (fn = 64)
1D 28 4C pL pH m fn d1 d2
Description: Transmits the key code list for defined NV graphics.
Range:
• (pL + pH X 256) = 2 (pL = 4, pH = 0)
• m = 48
• fn = 64
• d1 = 75
• d2 = 67
MTP-1530II User Manual (Revision 20120510) Page 50
Page 51

Telpar MTP-1530II Receipt Thermal Printer User Manual
<Function 65> GS (L pL pH m fn d1 d2 d3 (fn = 65)
1D 28 4C pL pH m fn d1 d2 d3
Description: Deletes all NV graphics data.
Range:
• (pL + pH X 256) = 2 (pL = 5, pH = 0)
• m = 48
• fn = 65
• d1 = 67
• d2 = 76
• d3 = 82
<Function 66> GS (L pL pH m fn kc1 kc2 (fn = 66)
1D 28 4C pL pH m fn kc1 kc2
Description: Deletes the NV graphics data defined by key codes (kc1 and kc2).
Range:
• (pL + pH X 256) = 2 (pL = 4, pH = 0)
• m = 48
• fn = 66
• 32<=kc1<=126
• 32<=kc2<=126
<Function 67> GS (L pL pH m fn a kc1 kc2 b xL xH yL yH [c d1…dk]1…[c
d1…dk]b (fn = 67)
1D 28 4C pL pH m fn kc1 kc2
Description: Defines the NV graphics data (raster format) as a record specified by the key codes (kc1,
kc2) in the NV graphics area.
• b specifies the number of the color of the defined data.
• xL, xH specify the number of dots in the horizontal direction as (xL + xH X 256).
• yL, yH specify the number of dots in the vertical direction as (yL + yH X 256).
• c specifies the color of the defined data (color1 = 49).
• d specifies the defined data (raster format).
Range:
• For GS (L: 12<=(pL + pH X 256)<=65535; (0<=pL<=255, 0<=pH<=255)
For GS 8 L: 12<=(p1 + p2 X 256 + p3 X 65,536 + p4 X 16,777,216)<=4,294,967,295
(0<=p1<=255, 0<=p2<=255, 0<=p3<=255, 0<=p4<=255)
• m = 48
• fn = 67
• a = 48
• 32<=kc1<=126
• 32<=kc2<=126
• b = 1
• 1<=(xL + xH X 256)<=8192 (0<=xL<-255, 0<=xH<=32)
• 1<=(yL + yH X 256)<=2304 (0<=yL<-255, 0<=yH<=9)
• c = 49
• 0<=d<=255
• k = (int((xL + xH X 256) + 7)/8) X (yL + yH X 256); Maximum capacity size = 256KB.
MTP-1530II User Manual (Revision 20120510) Page 51
Page 52

Telpar MTP-1530II Receipt Thermal Printer User Manual
NOTES regarding <Function 67>:
• In cases where there is sufficient capacity is not available for storing NV graphics data specified
by (xL + xH ⋅ 256) and (yL + yH ⋅ 256), this function is ignored.
• The number of items of NV graphics registered should be within 50 to shorten the execution time
of this function. The execution time is 60 seconds or less when the number of items registeredis
within 50. The execution time for 100 items is 120 seconds or less.
• The [data value (k) + control information data value (24 bytes)] area of the NV graphics data
domain is used when this function is executed.
• NV graphics and NV bit image (FS q) cannot be defined simultaneously. When this function is
executed, all NV bit images are deleted.
<Function 69> GS (L pL pH m fn kc1 kc2 x y (fn = 69)
1D 28 4C pL pH m fn kc1 kc2 x y
Description: Prints the NV graphics data defined by key codes (kc1 and kc2).
Range:
• (pL + pH X 256) = 6 (pL = 6, pH = 0)
• m = 48
• fn = 69
• 32<=kc1<=126
• 32<=kc2<=126
• x = 1, 2
• y = 1, 2
x, y Vertical direction Horizontal direction
1 203 dpi 203 dpi
2 101 dpi 101 dpi
<Function 112> GS (L pL pH m fn a bx by c xL xH yL yH d1…dk (fn = 112)
1D 28 4C pL pH m fn a bx by c xL xH yL yH d1…dk
Description: Stores the graphics data (raster format) in the print buffer.
• b specifies the number of the color of the defined data.
• xL, xH specify the number of dots in the horizontal direction as (xL + xH X 256).
• yL, yH specify the number of dots in the vertical direction as (yL + yH X 256).
• c specifies the color of the defined data (color1 = 49).
• d specifies the defined data (raster format).
Range:
• For GS (L: 11<=(pL + pH X 256)<=65535; (0<=pL<=255, 0<=pH<=255)
For GS 8 L: 11<=(p1 + p2 X 256 + p3 X 65,536 + p4 X 16,777,216)<=4,294,967,295
(0<=p1<=255, 0<=p2<=255, 0<=p3<=255, 0<=p4<=255)
• m = 48
• fn = 112
• a = 48
• bx = 1, 2 (enlarges graphics data in the horizontal direction; 1 = 203dpi, 2 = 101 dpi)
• by = 1, 2 (enlarges graphics data in the vertical direction; 1 = 203dpi, 2 = 101 dpi)
• c = 49
• 1<=(xL + xH X 256)<=2047 (0<=xL<-255, 0<=xH<=7)
• 1<=(yL + yH X 256)<=1662 (0<=yL<-255, 0<=yH<=6) [when by = 1]
• 1<=(yL + yH X 256)<=831 (0<=yL<-255, 0<=yH<=3) [when by = 2]
MTP-1530II User Manual (Revision 20120510) Page 52
Page 53

Telpar MTP-1530II Receipt Thermal Printer User Manual
• 0<=d<=255
• k = (int((xL + xH X 256) + 7)/8) X (yL + yH X 256).
• xL, xH specify the number of dots in the horizontal direction as (xL + xH X 256).
• yL, yH specify the number of dots in the vertical direction as (yL + yH X 256).
EXAMPLE:
xL + xH X 256 = 64
(xL + xH X 256) X 8 dots = 512
1 2 3 …………. 62 63 64
65 66 67
7 6 5 4 3 2 1 0
………….
………….
………….
126 127 128
k-2 k-1 k
yL+yH X 256 dots
MSB
LSB
MTP-1530II User Manual (Revision 20120510) Page 53
Page 54

Telpar MTP-1530II Receipt Thermal Printer User Manual
4.5.5 Status Commands
Three commands pertain to status transmission: DLE EOT +n, GS I +n,
and GS a +n.
DLE EOT +n 10 04 +n
Real-time STATUS request
Status is transmitted immediately when this command is received without
verifying that the host is ready to receive data. This command is
executed even if the printer is off-line, the receive buffer is full, or there is
an error status with a serial interface controller. With a parallel interface
controller, this command cannot be executed when the printer is BUSY
but is executed when the printer is OFF-LINE or in an error state if
MEMORY switch 1-3 is on. Status will be transmitted even if a valid
command string is received while receiving data as part of another
command sequence (such a part of a bit image pattern).
This command must not be sent to the printer in the middle of any other
multi-byte command sequence or this command will be interpreted as
the remaining part of the multi byte command.
Status Commands
n = Action
01 hex Transmit Printer status.
02 hex Transmit Offline status.
03 hex Transmit Error status.
04 hex Transmit Paper roll status.
Status Commands
See section 0 - .
Status Bytes Transmitted
GS I +n 1D 49 +n
Transmit printer ID
+n=1 (01 or 31 hex) causes 24hex to be transmitted.
+n=2 (02 or 32 hex) causes Type ID to be transmitted.
Bit 2 = 1, BM sensor is enabled.
Bit 1 = 1, Autocutter is installed.
Bit 0 = 1, two-byte character code is supported.
Bit 0 = 0, two-byte character code is not supported.
+n=3 (03 or 33 hex) causes “Firmware Version” to be transmitted.
GS a +n [1D 61 +n}
MTP-1530II User Manual (Revision 20120510) Page 54
Page 55

Telpar MTP-1530II Receipt Thermal Printer User Manual
4.5.6 Enable/Disable Auto Status Back (ASB) mode
Causes the printer to transmit four status bytes on the XD line when this
command is processed out of the receive buffer and also sets the
conditions which will cause the printer to automatically transmit the
status bytes. If all conditions are disabled then the ASB function is also
disabled. The status bytes are transmitted without checking to see if the
host is ready to receive the data.
+n is defined as:
Enable/Disable Auto Status Back (ASB) mode
Bit Function
Bit 7 Not used.
Bit 6 Not used.
Bit 5 Not used.
Bit 4 Not used.
Bit 3 1 = enable ASB for paper out status
Bit 2 1 = enable ASB for an error condition
Bit 1 1 = enable ASB for Online/Offline.
Bit 0 Not used – set to 0.
Enable/Disable Auto Status Back (ASB) mode
See section 0 - .
Status Bytes Transmitted.
4.5.7 Status Bytes Transmitted
First Status Byte Transmitted
The first byte sent due to
ASB status= printer
information:
Bit 7 Not used – always OFF Not used – always OFF.
Bit 6 1 = PAPER FEED button. Not used
Bit 5 1 = Platen is open. Not used.
Bit 4 Not used – always ON. Not used – always ON.
Bit 3 1=OFF LINE, 0 = ON LINE. 1 = off-line, 0 = on-line.
Bit 2 Not used - always ON. Not used – always ON.
Bit 1 Not used - always OFF Not used – always ON
Bit 0 Not used - always OFF. Not used – always OFF
First Status Byte Transmitted
Second Status Byte Transmitted
The second byte sent due to
ASB status = printer
information:
Bit 7 Not used - always OFF Not used – always OFF
Bit 6 1 = An automatically recoverable
error has occurred (Print head
temperature or Platen open).
Bit 5 1 = An unrecoverable error has
occurred.
Bit 4 Not used - always OFF. Not used – always ON.
Bit 3 1 = CUTTER error. 1 = paper is being fed by the paper
Bit 2 Not used
Bit 1 Not used. 1 = Platen is open.
Bit 0 Not used. Not used – always ON.
Status byte sent when DLE EOT 01hex
is received
Status byte sent when DLE EOT
02 hex is received
1 = an error occurred, 0 = no errors.
1 = Printing is halted, 0 = not out of
paper.
feed button.
MTP-1530II User Manual (Revision 20120510) Page 55
Page 56

Telpar MTP-1530II Receipt Thermal Printer User Manual
Second Status Byte Transmitted
Third Status Byte Transmitted
The third byte sent due to
ASB status = paper sensor
information:
Bit 7 Not used - always OFF Not used – always OFF
Bit 6 Not used. 1 = an auto recoverable error has
Bit 5 Not used. 1 = an un recoverable error has
Bit 4 Not used - always OFF. Not used – always ON.
Bit 3 1 = PAPER OUT 1 = a cutter error has occurred.
Bit 2 1 = PAPER OUT 1 = a mechanical error has occurred.
Bit 1 1 = PAPER LOW. Not used – always ON.
Bit 0 1 = PAPER LOW Not used – always OFF
Third Status Byte Transmitted
Fourth Status Byte Transmitted
The fourth byte sent due to
ASB status = paper sensor
information:
Bit 7 Not used – always OFF Not used – always OFF
Bit 6 Not used. Bits 6 & 5 both 1 = paper out.
Bit 5 Not used. Bits 6 & 5 both 1 = paper out.
Bit 4 Not used – always OFF Not used – always ON.
Bit 3 Not used Bits 3 & 2 both 1 = Paper low.
Bit 2 Not used. Bits 3 & 2 both 1 = Paper low.
Bit 1 1 = MEMORY switch 1-3 is
ON
Bit 0 Not used. Not used – always OFF
Fourth Status Byte Transmitted
Status byte sent when DLE EOT
03 hex is received
occurred (print head temperature or
platen open).
occurred.
Status byte sent when DLE EOT
04 hex is received
Not used – always ON.
4.5.8 Bar Code Command
GS k +m +d1∼dn NUL [1D 6B +m (DATA) 00]
For +m = 00hex through 06hex, +m selects the bar code type
Bar Code Commands
+m Bar Code No. of data
bytes
00 hex UPC-A 11 or 12 0 - 9
01 hex UPC-E 11 or 12 0 - 9
02 hex JAN(EAN)13 12 or 13 0 - 9
03 hex JAN(EAN)8 7 or 8 0 - 9
04 hex CODE39 variable 0 - 9, A-Z,
05 hex I 2 of 5 even number 0 - 9
06 hex CODABAR variable 0 – 9, A,B,C,D,
Bar Code Commands
Notes:
Valid data
(ASCII)
space, $ % + - .
/
$ + - . / :
MTP-1530II User Manual (Revision 20120510) Page 56
Page 57

Telpar MTP-1530II Receipt Thermal Printer User Manual
1. For UPC-A or UPC-E, Printing starts after 12 data bytes are received.
2. For JAN13 (EAN13), Printing starts after 13 data bytes are received.
3. For JAN8 (EAN8), Printing starts after 8 data bytes are received.
4. For ITF, the number of data bytes must be an even number.
4.5.9 GS k +m +n +d1∼dn [1D 6B +m +n (DATA)]
For +m = 41hex through 49hex, +m selects the bar code type, +n =
number of data bytes to follow.
Bar Code Command Values
+m Bar Code +n(dec) = Valid data
41 hex UPC-A 11 or 12 0 - 9
42 hex UPC-E 11 or 12 0 – 9
43 hex JAN(EAN)13 12 or 13 0 - 9
44 hex JAN(EAN)8 7 or 8 0 - 9
45 hex CODE39 1 thru 255 0 - 9, A-Z,
space, $ % + -
. /
46hex I 2 of 5 even 1 thru 255 0 - 9
47hex CODABAR 1 thru 255 0 – 9, A,B,C,D,
$ + - . / :
48hex Code93 1 thru 255 00hex thru
7Fhex
49hex Code128 2 thru 255 00hex thru
7Fhex
Bar Code Command Values
Notes:
1. +n indicates the number of data bytes which follow.
2. If +n is outside the allowable range, the command aborts and following data is
treated as normal data.
Notes when CODE93 (+m=48hex) is used:
1. In the HRI fields, a small square is printed as the start character and as the
stop character before and after the HRI character string.
2. In the HRI field, a small solid block followed by alphabetic character is
printed when a control code is printed. The character printed after the block
for each control code is (nn in hex,alphe character): 00,U 01,A 02,B 03,C
04,D 05,E 06,F 07,G 08,H 09,I 0A,J 0B,K 0C,L 0D,M 0E,N 0F,O 10,P 11,Q
12,R 13,S 14,T 15,U 16,V 17,W 18,X 19,Y 1A,Z 1B,A 1C,B 1D,C 1E,D
1F,E 7F,T..
Notes when CODE128 (+m=49 hex) is used:
1. The first character of the bar code data string must be the code set
selection character (CodeA, CodeB, or CodeC) which selects the first code
set to use. Code setcharacters are specified by sending a two character
sequence, the first character is { (7B hex) and the second is a printable
ASCII character. CodeA = {A, CodeB = {B, CodeC = {C.
a. Code set A consists of the ASCII characters 00 hex through 5F hex,
FNC1 through FNC4, SHIFT, CodeB, and CodeC.
b. Code set B consists of the ASCII characters 20 hex through 7F hex,
FNC1 through FNC4, SHIFT, CodeA, and CodeC.
c. Code set C consists of 2-digit numeral characters using one character
(100 numerals from 00 dec through 99 dec or 00 hex through 63 hex),
FNC1, CodeA, and CodeB.
2. Special characters are specified by sending a two character sequence, the
first character is { (7B hex) and the second is a printable ASCII character.
MTP-1530II User Manual (Revision 20120510) Page 57
Page 58

Telpar MTP-1530II Receipt Thermal Printer User Manual
The special characters are SHIFT and the FUNCTION characters. SHIFT =
{S, FNC1 = {1, FNC2 = {2, FNC3 = {3, and FNC4 = {4. To specify the
character { send {{. The usage of FUNCTION characters depends on the
application program.
3. In code set A the character just after SHIFT is processed as a character for
code set B. In code set the character just after SHIFT is processed as a
character for code set C. In code set C the SHIFT is invalid.
4. HRI characters are not printed for the SHIFT characters or CODE SET
selection characters.
5. HRI for a Function character is a space.
6. HRI for a control code (00hex through 1Fhex, and 7Fhex) is a space.
7. Errors in the data cause the bar code processing to abort, data following is
treated as normal data.
a. The top of the data field is not a code set selection character.
b. If a sequence {+n is invalid.
c. Characters that can not be used in special code set.
Notes in standard Mode:
1. If any invalid data is received, the printer only feeds paper and the following
data is treated as normal data.
2. If the horizontal size exceeds the printing area, the printer only feeds paper.
3. This command only feeds enough paper to print the bar code regardless of ESC
2 and ESC 3 settings.
4. This command is valid only when there is no data in the print buffer. When
there is data in the print buffer, the data following +m is treated as normal data.
5. This command is not affected by print modes (emphasized, double-strike,
underline, character size, reverse video, or rotated print) but is affected by the
inverted print mode.
Notes in Page mode:
1. This command develops the bar code data in the print buffer. The print position
moves to the right side dot of the bar code.
2. If any invalid data is received, the printer stops command processing and the
following data is treated as normal data. The data buffer position does not
change.
3. If the bar code width exceeds the printing area, the bar code is not printed but
the data buffer position moves to the left side of the printing area.
MTP-1530II User Manual (Revision 20120510) Page 58
Page 59

Telpar MTP-1530II Receipt Thermal Printer User Manual
4.6 Serial (RS232C) Interface
4.6.1 Serial (RS232C) Interface Specification
Serial (RS232C) Interface Specification
Item Specification
Data receive
speed
Synchronizing
method
Hand shake CTS/RTS ,DTR/DSR signal or XON/XOFF (set by DIP switch)
Input output
level
Signal level
Data Bit
Length
Stop Bits Fixed to 1 on the printer side
Parity Setting Odd, Even, or None (set by DIP switch)
Connector on
Printer
4.6.2 Serial I/O Connector on the Serial (RS-232) Printer
Option (see diagram below) shows the connector pinout of the male D-Sub connector located on the
printer.
115200, 38400, 19200, 9600, 4800 bps (set by DIP switch)
Asynchronous, Full duplex
RS232C
Space (logic=0) +3 V ∼ +15 V
Mark (logic=1) -3 V ∼ -15 V
8 Data bits (fixed)
Male D-Sub 9 Pin (See Connector pin-out below)
Serial (RS232C) Interface Pin Assignments
Pin Name Direction Function
2 RD I RS232 received data.
3 XD O RS232 transmitted data.
4 DTR O Hardware handshake line.
5 GND - Logic ground.
6 DSR I High (“space”) = OK for the printer to
transmit data when requested. The state
of DSR is IGNORED for XON/XOF
handshaking if selected. Dip Switch SW2
position 7 ON reconnects this signal to be
a hardware RESET input signal (normal
connection to the DTR line from a
computer will hold the printer always
reset).
7 RTS O Same as DTR.
MTP-1530II User Manual (Revision 20120510) Page 59
Page 60

Telpar MTP-1530II Receipt Thermal Printer User Manual
Printer Side Signal Path (for a cable) Host Side
Printer Pin#
on D-Sub
Connector
Signal
Name
Signal
Name
1 (NC) DCD 1
2 RxD RxD 2
3 TxD TxD 3
4 DTR DTR 4
5 Ground Ground 5
6 DSR DSR 6
7 RTS RTS 7
8 CTS CTS 8
9 (NC) RI 9
Pin-out
specifically for a
Computer 9-Pin
D-Sub Connector
4.6.3 Flow Control
MEMORY switch 1 position 3 ON sets the BUSY condition when the
receive buffer is full. OFF sets the BUSY condition when the receive
buffer is full or when Off Line.
The MTP-1530II employs a 4 K byte data buffer to allow the host
computer to rapidly transfer data. Under some circumstances it may be
possible to completely fill the buffer. When the Receive Buffer is within
128 bytes of being full, the MTP-1530II signals the host computer to
pause until the receive buffer has room 256 bytes. The flow control
information is sent to the host using hardware or software protocols as
determined by the DIP switch settings.
The hardware protocol uses the DTR line of the serial interface. This pin
are asserted or negated as necessary to turn off and turn on the flow of
data. The software protocol uses the XON (11hex) and XOFF (13hex)
ASCII control codes which are sent back to the host to start and stop the
data stream. When XON/XOF handshaking is enabled, the XON and
XOF are transmitted without checking the state of the DSR line of the I/O
connector. Some host systems may not support one or both of these
protocols.
If memory switch 1 position 3 is set to OFF and DTR handshaking is
enabled, then the DTR line goes to the BUSY state whenever the printer
is OFF LINE (see section 1.1.3 add bookmark) or when the receive
buffer is full. If memory switch 1 position 3 is set to ON and DTR
handshaking is enabled, then the DTR line goes to the BUSY state from
the time power is turned on until the printer is ready to receive data,
MTP-1530II User Manual (Revision 20120510) Page 60
Page 61

Telpar MTP-1530II Receipt Thermal Printer User Manual
during self test, or when the receive buffer is full. If XON/XOF is enabled
then the DTR line goes to the BUSY state from the time power is turned
on until the printer is ready to receive data or during self test.
If XON/XOF handshaking is enabled the printer sends XON when
the printer goes On Line after a power on, when the receive buffer
becomes available following a buffer full condition, when the printer
switches from Off Line to On Line, or when the printer recovers from an
error using DLE ENQ 1 or DLE ENQ 2. The printer sends XOF when the
receive buffer becomes full or when the printer switches from On Line to
Off Line.
MTP-1530II User Manual (Revision 20120510) Page 61
Page 62

4.7 Centronics Parallel (IEEE-1284) Interface
Pin 18
(upper left corner)
Telpar MTP-1530II Receipt Thermal Printer User Manual
4.7.1 Parallel I/O Connector
Pin 1
(upper right corner)
Pin 36
(lower left corner)
Pin 19
(lower right corner)
Parallel Interface Pin Assignments
Pin Name Nibble & Byte
mode
1 /STB HostClk I Active Low Pulse to send data tp
2 DO DO I/O ASCII data bit 0 (LCB)
3 D1 D1 I/O ASCII data bit 1
4 D2 D2 I/O ASCII data bit 2
5 D3 D3 I/O ASCII data bit 3
6 D4 D4 I/O ASCII data bit 4
7 D5 D5 I/O ASCII data bit 5
8 D6 D6 I/O ASCII data bit 6
9 D7 D7 I/O ASCII data bit 7
10 /ACK PtrClk O Active low pulse when data is
11 BUSY PtrBusy O High level when printer cannot
12 PE AckDataReq O High level when printer is out of
13 SLCT Xflag O
14 /AFXT HostBusy I .
15 n/c ND 16 GND GND I Logic ground.
17 Fgnd FG - .
18 Logic-H Logic-H O
19
thru
30
31 /INIT /INIT I
32 /ERROR/DataAvail O
GND GND - Logic ground.
Direction Function
printer
accepted
accept data.
paper
33 GND ND 34 DKSTATND O
35 +5V ND O
36 /SLCTIN1284-Active I
MTP-1530II User Manual (Revision 20120510) Page 62
Page 63

Telpar MTP-1530II Receipt Thermal Printer User Manual
4.8 USB 2.0 Interface
General specifications:
§ Complies with USB 2.0.
§ Transmission speed: USB Full-speed mode (12 Mbps).
§ Communication method: USB bulk transfer
§ Power: USB self-powered function device
§ USB bus current consumption: 0 mA (All power is supplied from the BA-T500II.)
§ HUB: None
§ USB packet size: (in full-speed connection)
§ USB bulk OUT (TM) 64 bytes
§ USB bulk IN (TM) 64 bytes USB device class
§ USB device class: USB vendor-defined class and USB printer class
The setting value of DIP switch 1-7 specifies the class at power-on.
USB Descriptor Table:
Vendor ID
Product ID
String Descriptor
Manufacturer
Product
Serial Number
USB Vendor-defined class USB printer class
04B8h 04B8h
0202h 0E02h
EPSON
BA-T500II
Character string based on the
product serial number.
EPSON
BA-T500II
Character string based on the
product serial number
MTP-1530II User Manual (Revision 20120510) Page 63
Page 64

Telpar MTP-1530II Receipt Thermal Printer User Manual
4.8 Ethernet Interface
General Features:
10BASE-T and 100BASE-TX Ethernet communication, full/half duplex
(Auto-negotiation or manual setting)
• Complies with TCP/IP protocol (LP, LPR and socket communications)
• IP address setting with arp + ping
• Support to DHCP
• Support to APIPA
• Ping response
• Status printing function
• Setting initialization of this module with a push button
• Status monitoring with ENPC
• Status monitoring with SNMP
Circuit Board Push Button:
Setting Factory Defaults: Holding down the push button while turning on the printer power and continuing
to hold it on for five seconds or more causes all of the internal setting parameters to return to their
factory default values.
Status sheet printing: Holding down the push button for three seconds or more while the printer is
ready to print causes the module internal setting parameters to be printed out.
LED Communication Indicators:
The on-board green LED lights when a link to the Ethernet is established, while the yellow on-board
LED lights when the printer receives print data.
Basic Communications Protocols:
IP, ARP, ICMP, UDP, TCP
Printing Communications Protocols:
LP and LPR (transfers printing data):
• Name of remote printer: aux
• Printers simultaneously connectable: 10 maximum
• Number of connected printers that can print: 1 (other users must wait until the printing is
done.)
• Time out: 5 minutes
• Job deletion: Not supported
• Banner printing: Not supported
TCP Socket Port (Transfers printing data and printer status with direct socket communications):
• Port Type: TCP communications port for direct printing
• Port number: 9100
• Port communication direction: bi-directional
• Time out: 5 minutes
Protocols for obtaining and setting status (HTTP, SNMP, ENPC):
HTTP (Displays module status and makes setting with the web browser.):
• Port Number: 80
• User Name: Epson (Default)
• Password: “” (no password)
• Printers simultaneously connectable: 1 maximum
• HTTP version: HTTP/1.1
MTP-1530II User Manual (Revision 20120510) Page 64
Page 65

Telpar MTP-1530II Receipt Thermal Printer User Manual
SNMP (MIB = “Management Information Base”, PDU = “Protocol Data Unit”):
• SNMP Version: SNMP v1 (RFC1157) compliant (SNMP v2 not supported)
• Transport Protocol: UDP/IP
• Community (each item may be up to 16 ASCII characters):
Community Object Attribute Default
#1 Read only “public”
#2 Read/Write None
Trap #1 Read/Write None
Trap #2 Read/Write None
• Trap Destination: Up to two settable IP Addresses
• MIB Support: Part of MIB-II (RFC1213)
Part of Printer MIB
Part of Host Resource MIB
Part of Print Server MIB
Part of Printer MIB
• PDU Support: Get Request
Get Next Request
Set Response
Trap
• Server Port Number: 161
• Trap Sending Port Number: 162
ENCP:
• Protocol: UDP/IP
• UDP Port Number: 3289
• Compatible packet types: Probe, Initialize, Query, Setup, Notify
____________________________________________________________________________________
Automatic IP Address Protocols:
Automatic IP addressing is executed in the order shown in the table below. If DHCP is disabled or IP
addressing for DHCP fails, then IP addressing for the next protocol is executed.
If APIPA is disabled or IP address cannot be obtained, use the internal setting parameters.
Protocol Order Application
DHCP 1 Obtains IP address
APIPA 2 Assigns IP address
Manual setting 3 Uses the internal set parameters
IP Address obtainment with DHCP:
When a DHCP client boots up, it searches a DHCP server for an IP address, subnet mask, and other
possible DHCP options configured on the server, and they are temporarily assigned.
• Items to obtain: IP address, subnet mask, gateway address
• Number of DHCP Discover retry retries: 4 times
• DHCP Discover retry intervals: First try: 4 seconds after receiving the order for IP
address obtainment.
Second try: 7 seconds from the first try
Third try: 15 seconds from the first try
Fourth try: 32 secondsfrom the first try
• Number of DHCP request retries: 10 times
• DHCP Request retry interval: 15 seconds
MTP-1530II User Manual (Revision 20120510) Page 65
Page 66

Telpar MTP-1530II Receipt Thermal Printer User Manual
IP Address obtainment with APIPA:
• Items to obtain IP address
• IP address range 169.254.1.0 to 169.254.254.255
If the DHCP client is unable to find the information, it usesAPIPA to automatically configure itself with an
IP addressfrom above range. If an IP address is assigned by APIPA, it is not possible to communicate
through a router.
Manual Setting:
The BA-T500II operates in accordance with the IP address in the internal parameter settings (reference
the table on the next page).
MTP-1530II User Manual (Revision 20120510) Page 66
Page 67

Telpar MTP-1530II Receipt Thermal Printer User Manual
Internal Ethernet Parameter Settings:
Utility BrowserArticles Parameters Initial Values
Status
Sheet
Ref. Setting Ref. Setting
IP Address 192.168.192.168 Yes Yes Yes Yes Yes
Subnet Mask 255.255.255.0 Yes Yes Yes Yes Yes
Gateway Address 0.0.0.0 Yes Yes Yes Yes Yes
DHCP Enable/Disable Disable Yes Yes Yes Yes Yes
APIPA Enable/Disable Disable Yes Yes Yes Yes Yes
ARP+Ping Enable/Disable Enable Yes Yes Yes Yes No
Community name 1
(read only)
Community name 2
(read-write)
IP Trap 1 Enable Enable/Disable Disable Yes Yes Yes Yes No
IP Trap 2 Enable Enable/Disable Disable Yes Yes Yes Yes No
Community name
(IP Trap #1)
Community name
(IP Trap #2)
IP Trap #1 Address None Yes Yes Yes Yes No
IP Trap #2 Address None Yes Yes Yes Yes No
Password None No Yes Yes No No
Physical Layer Setting Auto Negotiation
Hardware Version --- --- Yes No Yes No Yes
Firmware Version --- --- Yes No Yes No Yes
MAC Address --- --- Yes No Yes No Yes
Max. 16 Chars. “public” Yes No Yes No Yes
Max. 16 Chars None Yes Yes Yes Yes Yes
Max. 16 Chars. None Yes Yes Yes Yes No
Max. 16 Chars. None Yes Yes Yes Yes No
Auto Negotiation Yes Yes Yes Yes Yes
/ 10Base-T Half
/ 10Base-T Full
/100Base-TX Half
/100Base-TX Full
Printing
MTP-1530II User Manual (Revision 20120510) Page 67
Page 68

Telpar MTP-1530II Receipt Thermal Printer User Manual
Notes pertaining to Ethernet Settings:
Changing internal parameter settings:
Internal parameter settings can be changed with the following methods:
• ENPC protocol
• HTTP browser
• arp and ping commands (Only IP address is settable.)
Setting with a dedicated utility:
Epson provides a dedicated utility that makes miscellaneous settings with the ENPC protocol.
Setting with a browser:
An HTTP browser can make setting when connected to the module. The new IP addresstakes effect
when the printer power is turned off and back on.
Setting the IP Address with arp + ping:
This function is available only when it has been enabled. The setting can be made only from a
host PC that supports both arp and ping commands and is in the same segment as the module.
The new IP address takes effect when the BA-T500IIE responds to the ping command.
Example1: When using Sun OS
arp –s 123.456.789.123 00:00:85:06:00:01 temp
ping 123.456.789.123
Example2: When using Windows OS
arp –s 123.456.789.123 00-00-85-06-00-01
ping 123.456.789.123
How to check the Mac Address:
The Mac address of the BA-T500IIE can be confirmed with the following methods:
• Printing the status sheet
• Label attached to the BA-T500IIE
• Using HTTP browser
• Printer self-test
Start up period:
To initialize the BA-T500IIE and network connection, there is start up period after the power of
printer is turned on or reset. The start up period depends on the IP address setting as follows:
When setting IP address manually: approximately 6 seconds
When setting IP address automatically: approximately 13 seconds (It may take some more time,
depending on the DHCP server response time.)
During this period, no network function works.
Setting the TM printer:
A Start up period is required after turning the printer power on (as described above).
To run a printer self-test, hold the FEED button down during this period.
MTP-1530II User Manual (Revision 20120510) Page 68
Page 69

Telpar MTP-1530II Receipt Thermal Printer User Manual
5 Drivers for the Printer
Printer drivers for the MTP-1530II may be downloaded through the Telpar website at
www.telpar.com under the “Drivers and Support” tab.
First select “Printer Drivers” from the “Drivers and Support” drop-down list.
Next, select the “MTP-1500 Printer Drivers” option.
Finally, select the “Windows Drivers for the MTP-1500…” zip file and download it to your
computer.
Note, the zip file includes driver installation instructions. Also, it is important to note that the
MTP-1530II uses the BA-T500II Control board. Therefore, you will be installing the driver for
the EPSON BA-T500II Receipt Printer in order to successfully operate your MTP-1530II printer
through the driver.
The downloaded zip file will contain two executable files(.exe files), a text file (.txt file)
and a pdf file:
• Double clicking on the pdf file contained in the downloaded zip file will open the driver
installation manual.
• The file that starts with “APD_” is the print driver installation program. By double
clicking this file, you will start the driver installation setup program. Follow the prompts
and the manual instructions to properly install the printer driver.
• By double clicking on the file that starts with “APDMAN” opens a program which allows
you to modify the current printer driver installation configuration.
• Double clicking the .txt file will open the “read me” text file which will provide technical
details about the printer driver software.
MTP-1530II User Manual (Revision 20120510) Page 69
Page 70

Telpar MTP-1530II Receipt Thermal Printer User Manual
6 Specifications
6.1 General Specifications
Specifications MTP-1530
Printing method Thermal-sensitive line dot method
Dot Structure 576 dots/line
Dot Density 0.125 mm (8 dot/mm)-Dot density
Effective printing area 72 mm
Paper type Thermal Sensitive paper
Paper width 79.5 +/- 0.5 mm
Paper thickness 56~150 µm (0.0022 – 0.0059”)
Cutting type Full or partial (Depends on printer mechanism)
Number of columns
(default)
Printing speed Approx. 9.84 in/s (250 mm/second)
Character composition, Number of
characters per line
CHARACTER SIZE (mm):
12x24 – 9x17 (normal size)
ReceiveBuffer 4 KB
Interface options: IEEE-1284(Centronics) Parallel
Dimensions of printer: See Section 6.3 for detailed dimension information.
Weight of printer (no paper roll): Approx. 3.6 lbs (1.6 Kg)
Power
Supply
Expected
Life
Environmental
condition
Detection
General Specifications
203dpi X 203 dpi (dpi = Dots per Inch)
48 columns/line
(12x24 dot font)
Approx. 66 lines per second --
--(Font A printing, line spacing = 30 dots)
Approx. 177 mm/s (4.61 in/s) for barcodes
NOTE: Print speed may beslower depending on
data transmission rate, control commands used,
environmental conditions, supply voltage, and print
density selected.
FontA = 12x24 dots
48 columns
FontB = 9x17 dots
64 columns
1.25 W by 3.0 H
0.88 W by 2.13 H
RS232C Serial
USB 2.0
Ethernet (10BASE-T and 100BASE-TX)
For head See Section 1.5 – Power Supply Requirements.
For motor DC 24V± 5%, 1 A typical while feeding paper
For cutter DC 24V± 5%, 0.9 A max. 0.11A typical
Mechanism 15 million lines (except print head & cutter)
Print head: 100 million pulses
Cutter 1 million cuts (750,000 when 30 degrees C or
above and 60% RH or above)
Operating temperature -20 to +60°C (-4F to 140F)
Operating humidity 10 to 85% RH (No condensation)
Storage temperature -25 to +70°C
Storage humidity 10 to 90% RH (No condensation) except for paper
Head temperature By thermistor (applied energy control, abnormal
temperature detection)
Paper present/out By photointerrupter
Platen open/ Paper low Micro switch
Black Mark (optional) Reflective photosensor
MTP-1530II User Manual (Revision 20120510) Page 70
Page 71

Telpar MTP-1530II Receipt Thermal Printer User Manual
6.2 Character Sets
6.2.1 Overview
Select character code table with command ESC t n
n
0 PC437 U.S.A., Standard Europe 72
1 Katakana 73
2 PC850 (Multilingual) 74
3 PC860 (Portuguese) 75
4 PC863 Canadian French 76
5 PC865 Nordic 77
16 WPC 1252 78
17 PC866 Cyrillic #2 79
18 PC852 Latin 2 80
19 PC858 Euro 81
Character Set Description
Overview of Character Sets
Page number
to see sample
MTP-1530II User Manual (Revision 20120510) Page 71
Page 72

Telpar MTP-1530II Receipt Thermal Printer User Manual
PC437 U.S.A., Standard Europe Character Set, n = 0
MTP-1530II User Manual (Revision 20120510) Page 72
Page 73

Telpar MTP-1530II Receipt Thermal Printer User Manual
Katakana Character Set, n = 1
MTP-1530II User Manual (Revision 20120510) Page 73
Page 74

Telpar MTP-1530II Receipt Thermal Printer User Manual
PC850 (Multilingual) Character Set, n = 2
MTP-1530II User Manual (Revision 20120510) Page 74
Page 75

Telpar MTP-1530II Receipt Thermal Printer User Manual
PC860 (Portuguese) Character Set, n = 3
MTP-1530II User Manual (Revision 20120510) Page 75
Page 76

Telpar MTP-1530II Receipt Thermal Printer User Manual
PC863 Canadian French Character Set, n = 4
MTP-1530II User Manual (Revision 20120510) Page 76
Page 77

Telpar MTP-1530II Receipt Thermal Printer User Manual
PC865 Nordic Character Set, n = 5
MTP-1530II User Manual (Revision 20120510) Page 77
Page 78

Telpar MTP-1530II Receipt Thermal Printer User Manual
WPC 1252 Character Set, n = 16
MTP-1530II User Manual (Revision 20120510) Page 78
Page 79

Telpar MTP-1530II Receipt Thermal Printer User Manual
PC866 Cyrillic #2 Character Set, n = 17
MTP-1530II User Manual (Revision 20120510) Page 79
Page 80

Telpar MTP-1530II Receipt Thermal Printer User Manual
PC852 Latin 2 Character Set, n = 18
MTP-1530II User Manual (Revision 20120510) Page 80
Page 81

Telpar MTP-1530II Receipt Thermal Printer User Manual
PC858 Euro Character Set, n = 19
MTP-1530II User Manual (Revision 20120510) Page 81
Page 82

6.3 Dimensional Drawings of MTP-1530II (80 mm)
Side view of Printer
(Paper Roll Loading
Side)
Telpar MTP-1530II Receipt Thermal Printer User Manual
Side View of Printer
(printer is shown upside
down, resting on its top.
The cutout in the side
chassis, which allow
access to the
DIPSWITCH and
Diagnostic LEDs, is
shown)
Bottom view of
Printer
MTP-1530II User Manual (Revision 20120510) Page 82
Page 83

Telpar MTP-1530II Receipt Thermal Printer User Manual
Dimensional Drawings of MTP-1532 (82.5 mm) Version
Back View of Printer
(Printer resting on
its side with Paper
spindle pointing up)
MTP-1530II User Manual (Revision 20120510) Page 83
 Loading...