

Page 1
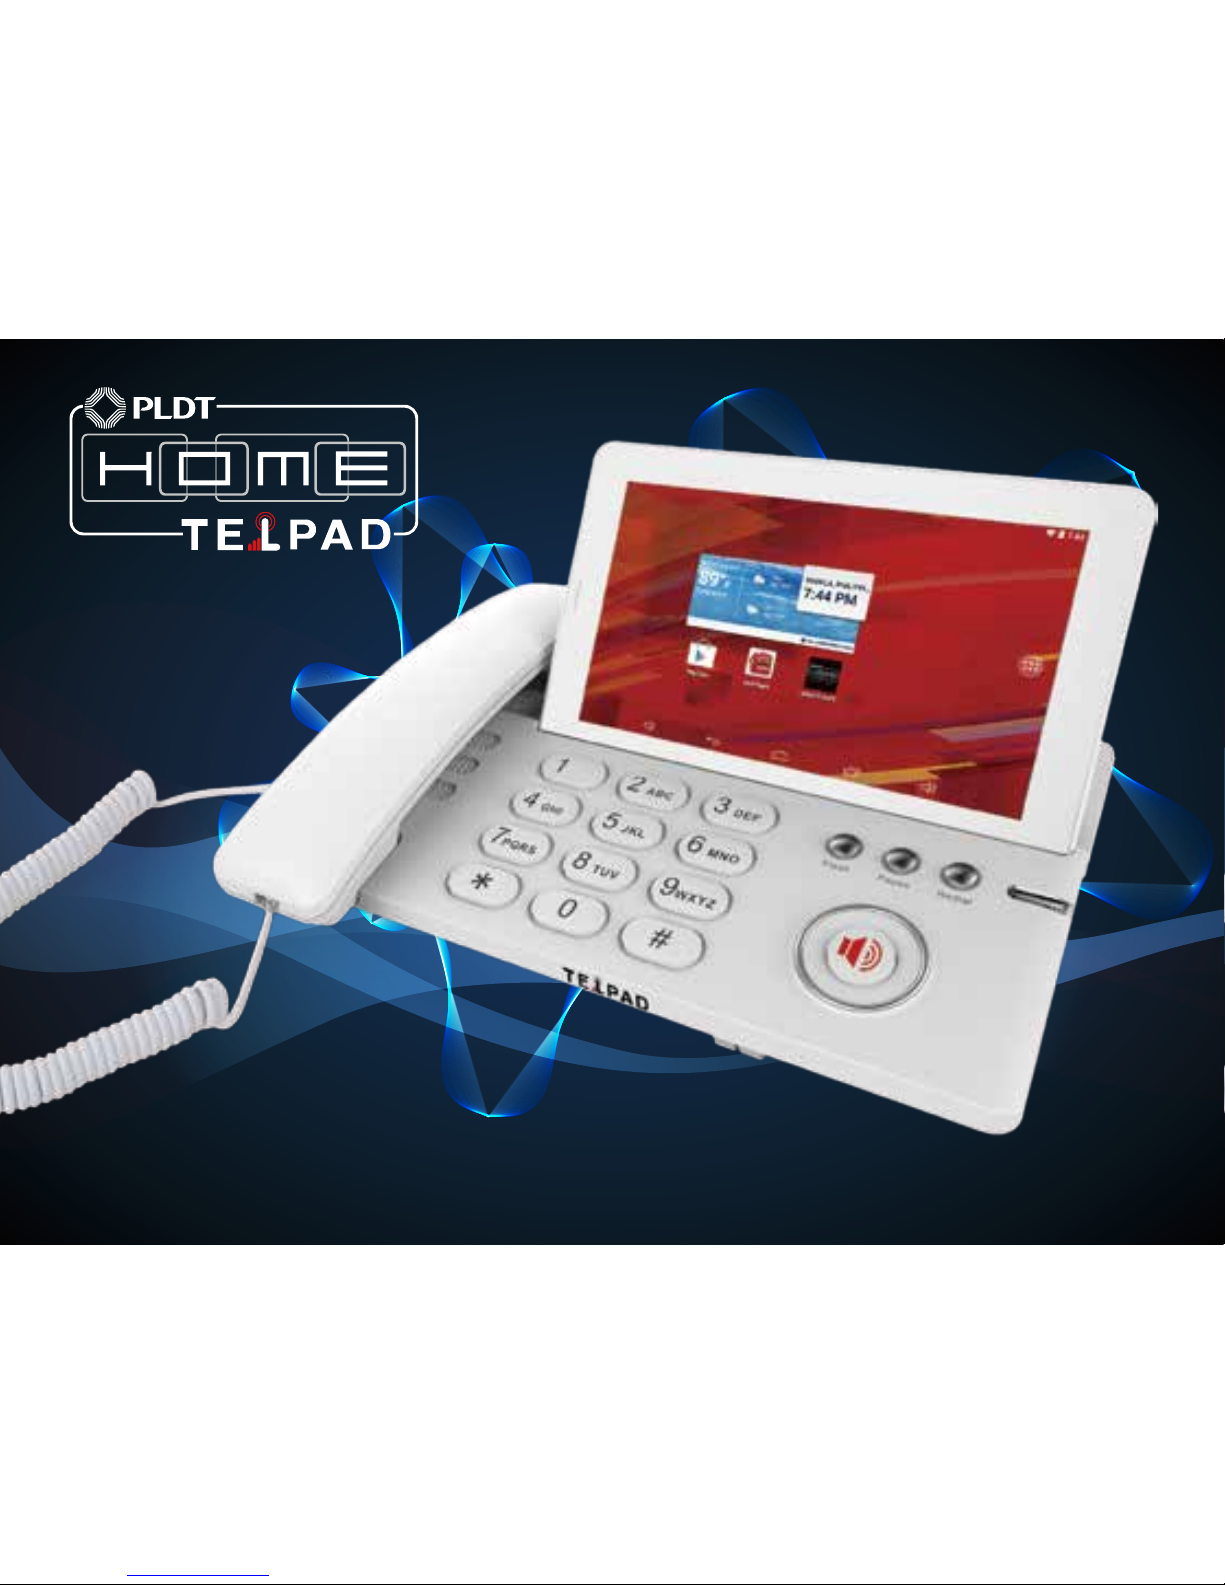
TELPAD MA7
Android 4.4 Jellybean | 1.6GHz Quad Core Processor | Infrared Function
Page 2

1
GETTING STARTED 01
1.1 About your TELPAD 02
2 TELPAD INTRODUCTION 03
2.1 Getting to know your TELPAD 04
2.2 Product Specication 07
2.3 Installation 09
2.3.1Basic Connection 09
2.3.2Installing the dock battery 10
2.3.3Docking and undocking the Tablet 10
3 TABLET FUNCTIONS 11
3.1
Turning the Tablet ON or OFF
12
3.1.1
Turning the Tablet ON
13
3.1.2
Turning the Tablet OFF
13
3.2 Charging the battery 14
3.2.1Charging the Tablet battery 14
3.2.2Charging the dock battery 14
3.3 Working with the keys 15
3.3.1
Using the physical keys
15
3.3.2 Working the touchscreen keys 15
3.4
Using the touch screen
16
3.5 Home screen 17
3.5.1Getting to know the Home screen 17
3.5.2Extended Home screens 18
3.5.3Customizing the Home screen 18
3.6 Locking and unlocking the screen 19
3.6.1Locking the screen 19
3.6.2Unlocking the screen 19
3.6.3Setting up a screen lock 19
3.6.4Setting a screen timeout period 19
3.7 Inputting text 20
3.7.1Entering text using the onscreen keyboard 20
3.7.2Cutting or copying text 21
Page 3

3.8 Opening and switching applications 22
3.9 Accessing the Settings 22
3.10 Languages & input method & account setting 23
3.11 Setting the date and time 24
3.11.1To automatically set date and time 24
3.11.2 To manually set date and time 24
3.12 Installing or removing the microSD card 25
3.13 Connecting or disconnecting from a computer using USB 26
3.14 Connecting the Tablet to a TV 27
3.15 Wireless networks 28
3.15.1 Opening Wi-Fi settings 28
3.15.2 Turning Wi-Fi on or o 28
3.15.3 Connecting to a Wi-Fi network 29
3.15.4 Turning open network notication on or o 29
3.15.5 Adding a Wi-Fi Network 29
3.15.6 Forgetting a Wi-Fi network 29
3.16 Bluetooth 30
3.16.1 Opening Bluetooth settings 30
3.16.2 Turning Bluetooth on or o 30
3.16.3 Changing the Bluetooth name of your Tablet 30
3.16.4 Connecting to Bluetooth devices 31
3.16.5 Disconnecting from or unpairing a Bluetooth device 31
3.17 Google Services 32
3.17.1 Creating a Google Account 32
3.17.2 Using Play Store 33
3.17.3 Searching for Applications 33
3.17.4 Installing an Application 33
3.17.5 Uninstalling an Application 34
3.17.6 Backing up and restoring apps and settings from a Google account 34
3.18 E-mail 34
3.18.1 Opening E-mail 34
3.18.2 Adding and deleting e-mail accounts 35
Page 4

3.19 Camera Instructions 37
3.20 Home control 40
3.20.1 IR Universal remote Initial Conguration 40
3.20.2 IR Learning 42
3.20.3 Reservation 43
3.20.4 Reservation Setup 44
3.20.5 Outside Home control 45
3.20.6 Motion detection 47
3.21 Home care 50
3.21.1
Bluetooth body scale User Guide
50
3.21.2
iFever Manage User Guide
54
3.22 Cast Screen Function Operation Guide 63
3.23 DLNA 68
3.23.1 DLNA introduction 68
3.23.2 DLNA functions 68
3.23.3 Control device discovery and connection 69
3.23.4 The brief introduction of interactions
72
4 THE CONNECTION BETWEEN DOCK PHONE AND TABLE 82
4.1 Voice call Services 83
4.1.1 Making a call 83
4.1.2 Answering a call 84
4.1.3 Ending a call 84
4.1.4 Selecting area code 84
4.1.5 Favorites 85
4.1.6 Memo 85
4.1.7 Importing/exporting contacts 85
4.1.8 Changing ringtones 86
4.1.9 Contacts 86
5 BASIC TROUBLESHOOTING FOR THE TELPAD 88
5.1 Tablet not powering up 89
5.2 No dial tone 89
5.3 Distorted audio on speaker 89
Page 5

5.4 Tablet Dialler cannot make a call 89
5.5 No audio response in the Handset 89
6 FAQs 90
7 WARNINGS AND PRECAUTIONS 96
8 PERSONAL INFORMATION AND DATA SECURITY 101
9 LEGAL NOTICE 103
10 DISCLAIMER OF WARRANTIES 105
11 INDEX 107
Page 6

1 GETTING STARTED
Page 7

1.1 About your TELPAD
The TELPAD is the world’s rst landline, broadband, and tablet in one—a device that not only gives you access to
basic communication services, but also brings to your home a world of productivity and entertainment. The TELPAD
is powered by Android, the world’s leader in smartphone technology. With its stunning 7 inch touchscreen display,
built-in camera & Wi-Fi, access to hundreds of thousands of free and paid Android Apps, as well as its infrared
remote controller and wi- smart appliance controller, the TELPAD is denitely the ideal control and communication
center of your home!
02
Page 8

2 TELPAD INTRODUCTION
Page 9

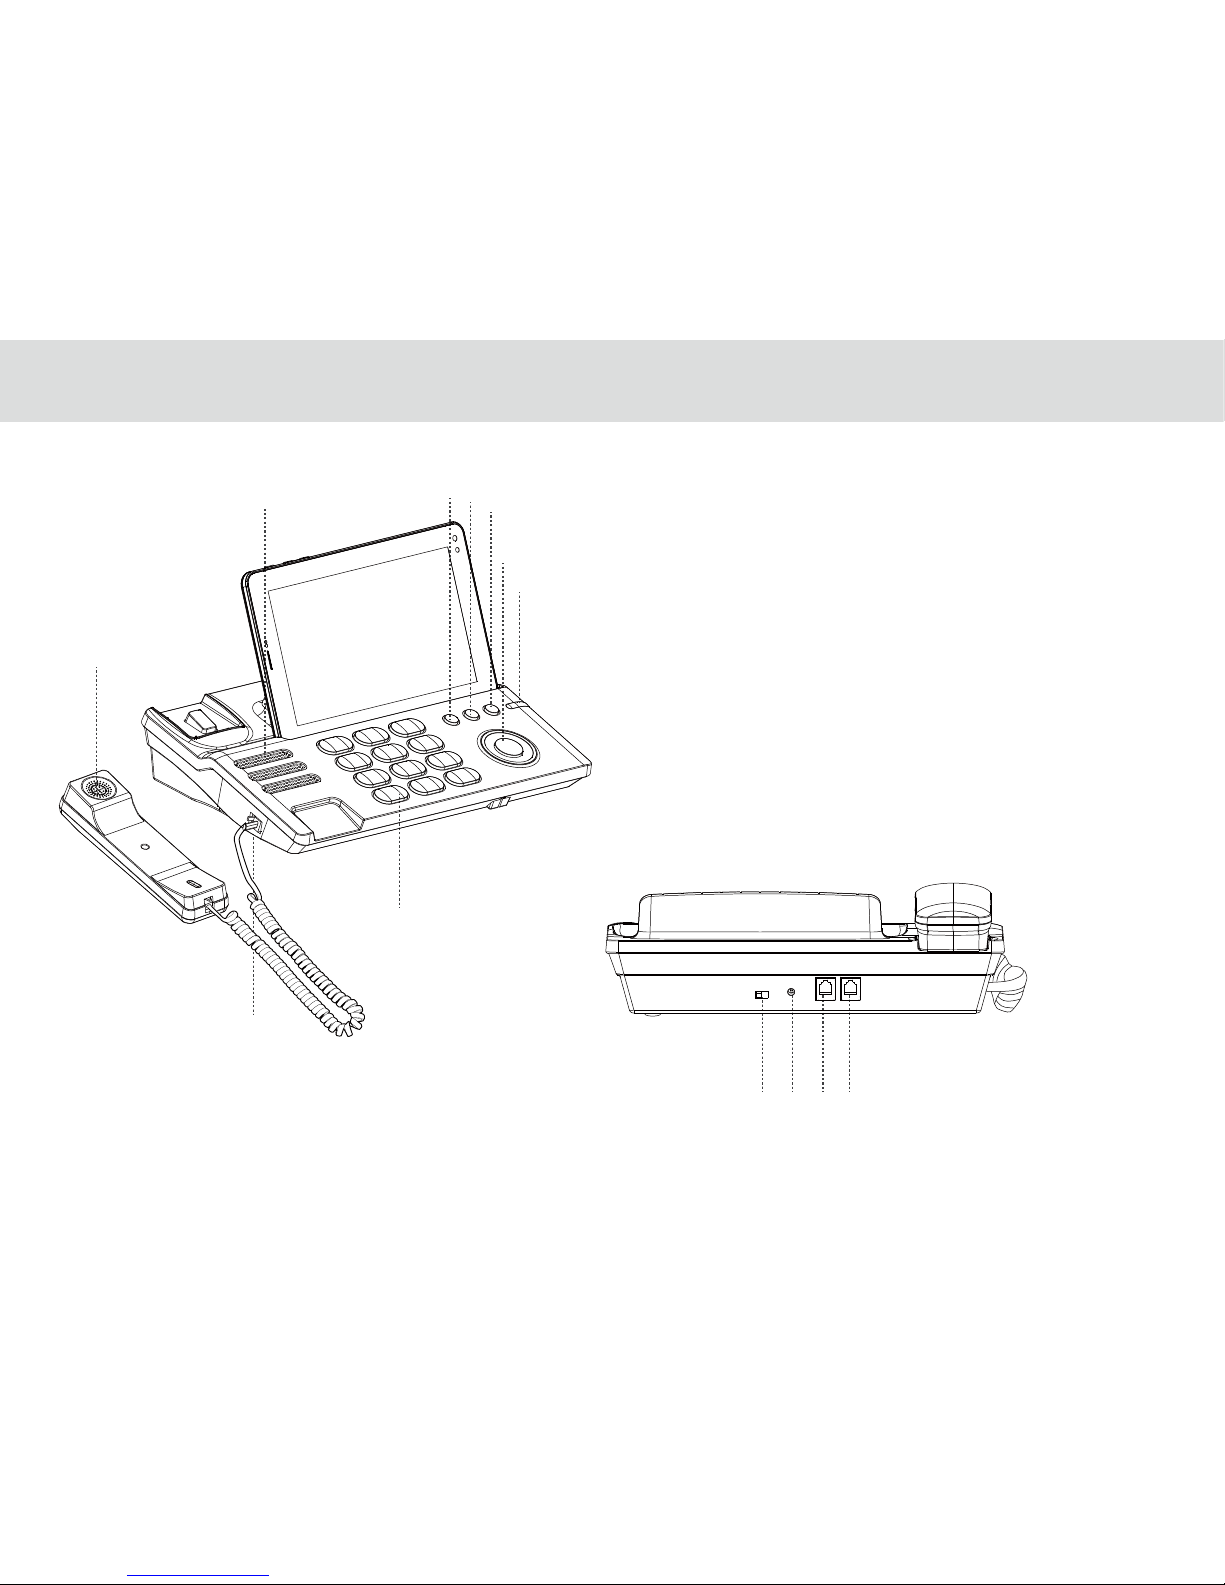
2.1 Getting to know your TELPAD
1.
2.
3.
4.
5.
6.
7.
8.
9.
10.
11.
12.
13.
14.
15.
16.
17.
18.
19.
04
4
5
6
7
11
12
13
14
15
16
17
18
19
8
9
10
Microphone(tablet)
Mini HDMI Port
USB Port
Earphone Jack
IR1(transmit)
IR2(transmit and receive)
IR3(transmit)
Rear Camera
Light sensor
Proximity sensor
Rear Camera Flash
Front Camera
Micro SD Card Slot
Dock Connection Interface
Power Button
Volume Down Button
Volume UP Button
Speakers(Tablet)
Tablet Receiver
Page 10
20.
21.
22.
23.
24.
25.
26.
27.
28.
29.
30.
31.
32.
05
20
27
28
29 30 3132
21
22
23
24
25
26
Telephone Receiver/Handset
Speaker(Phone Set)
Flash key
Pause key
Redial key
Hands Free key
Phone Cord Jack
Numeric keypad
Ringtones Volume
Direct Current Input Jack
Extension Cord Jack
Landline Jack
Indicator(Charging/Incoming Calls)
Page 11
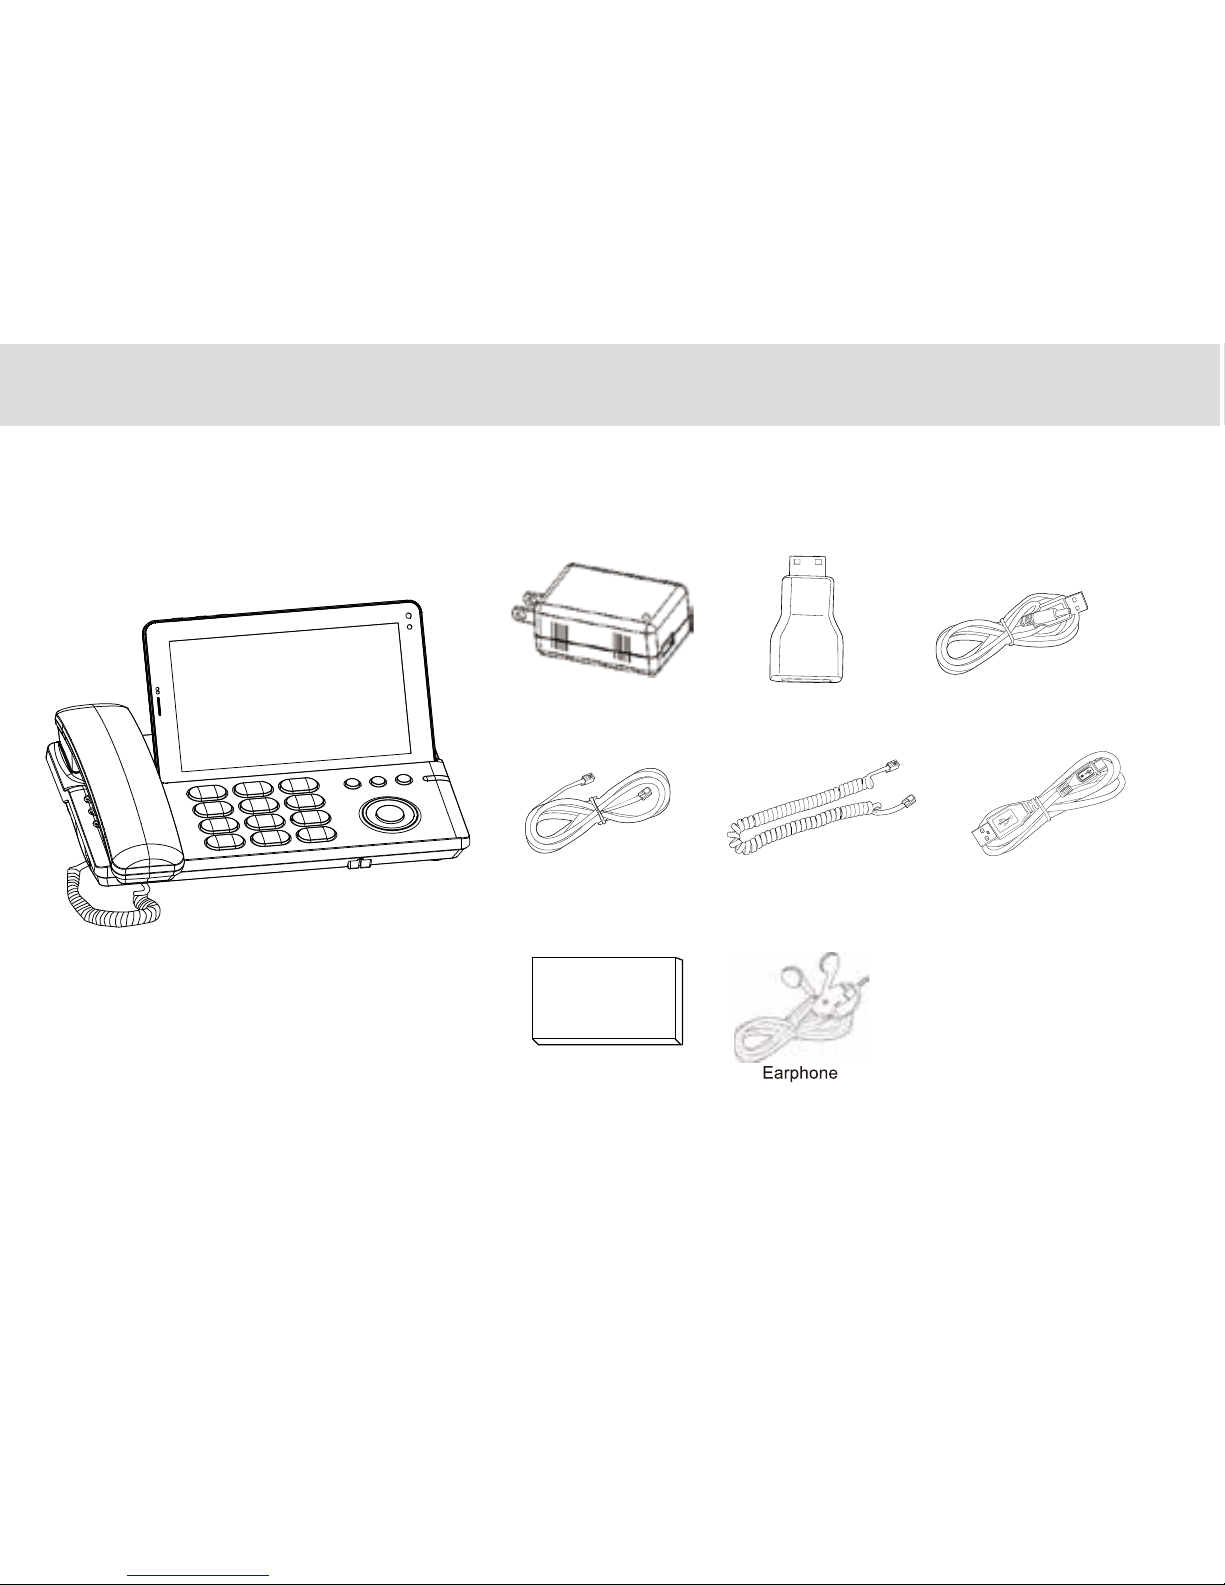
Accessories
USB Data Cable
Coiled Phone Cord
Phone Line
HDMI ConverterUSB Charger
USB Power Cable DC4.0
Battery
06
Page 12
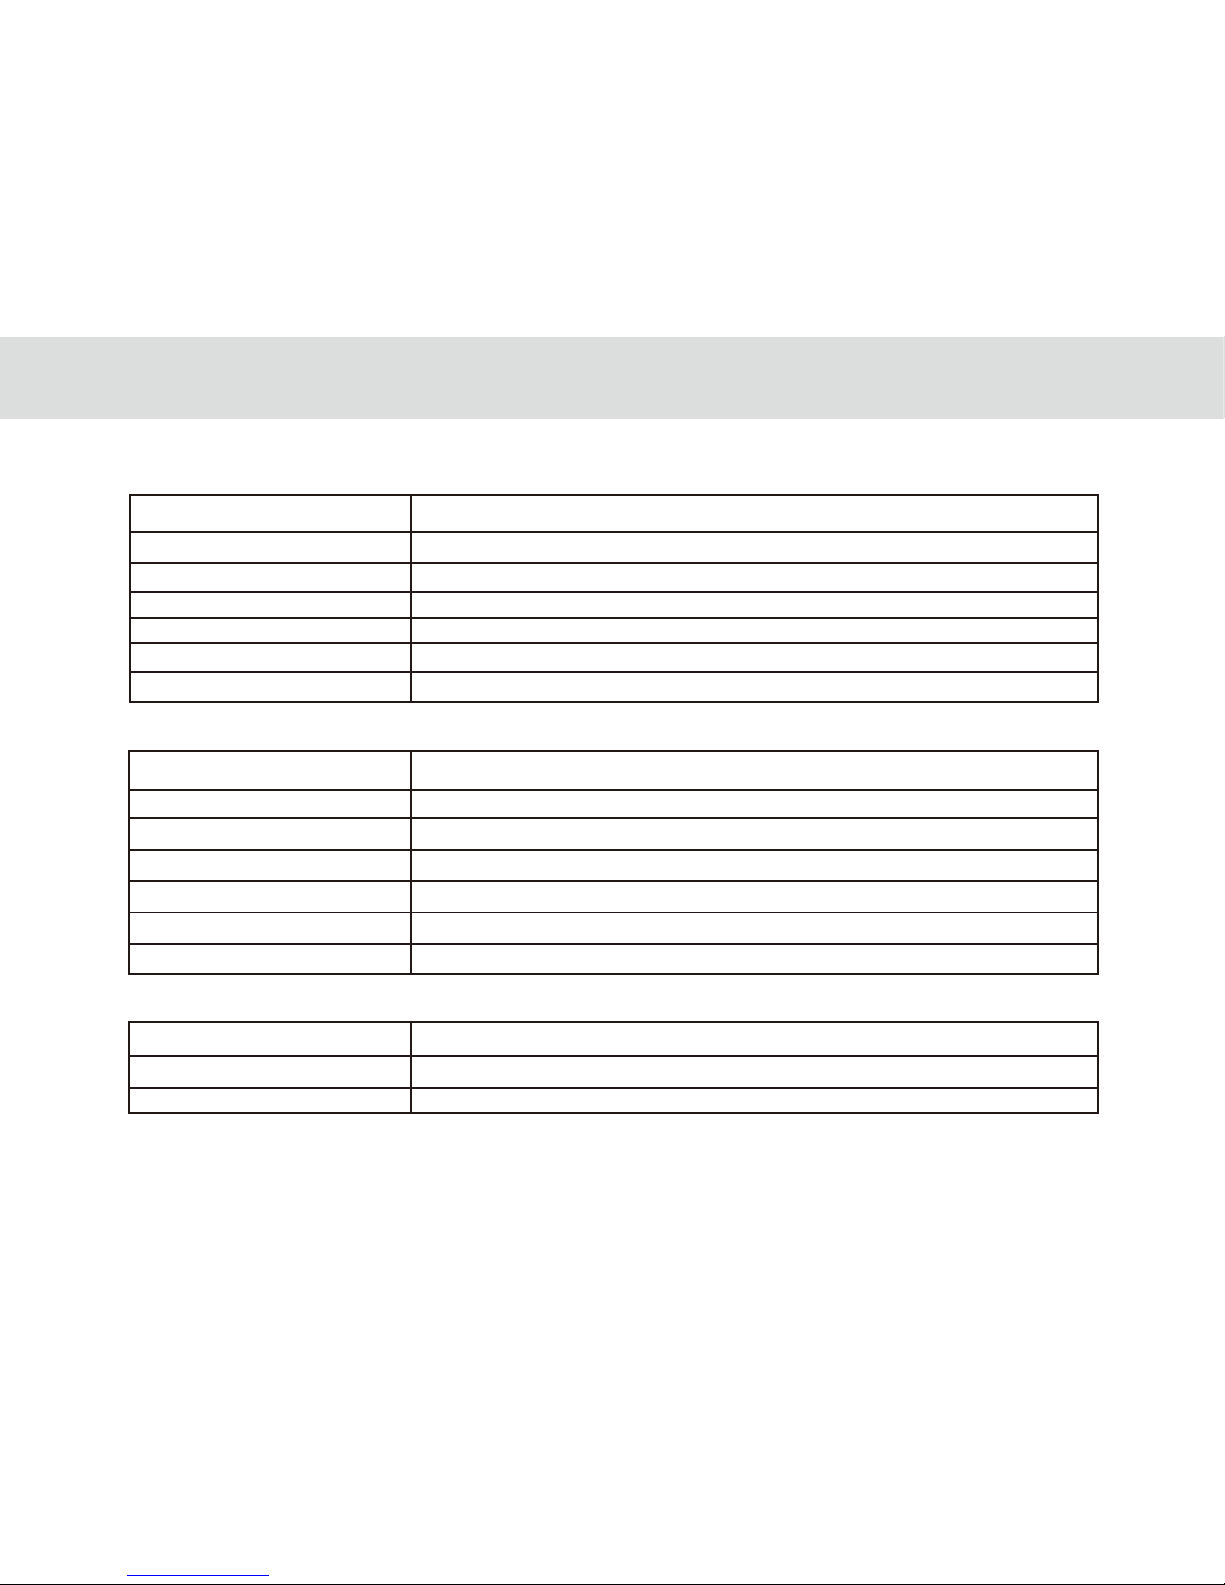
2.2 Product Speciciation
GENERAL SPECIFICATIONS AND DISPLAY
DIMENSION 189mm x 115 mm x 11 mm
7 Inch IPS (1024X600)DISPLAY AND RESOLUTION
Android™ 4.4.4 SYSTEM SOFTWARE
Wi-Fi - 802.11b/g/n
24-bit
AIR INTERFACE
Capacitive 5-Points-Touch MULTI-TOUCH PANEL
3 Standard Soft Keys: Home, Back, Recent Applications PRIMARY KEYPAD
DISPLAY COLOR DEPTH
CONNECTIVITY
BLUETOOTH Bluetooth 4.0 + EDR
Micro USB OTG x 1EA/USB Host x 1EA for MEP Dock USB
HDMI V 1.4/ Supports 3D outputDIGITAL TV OUT
1Watt x 1EA SPEAKER
Built-in-microphone MICROPHONE
3-Axis Accelerometer for UI Auto Rotate Ambient Light sensor SENSOR
Standard 3.5 mm headphone jack AUDIO OUT
HANDSET
PSTN Support (POTS) RJ9 (4P4C)
Built-in SPEAKER
Built-inMICROPHONE
07
Page 13
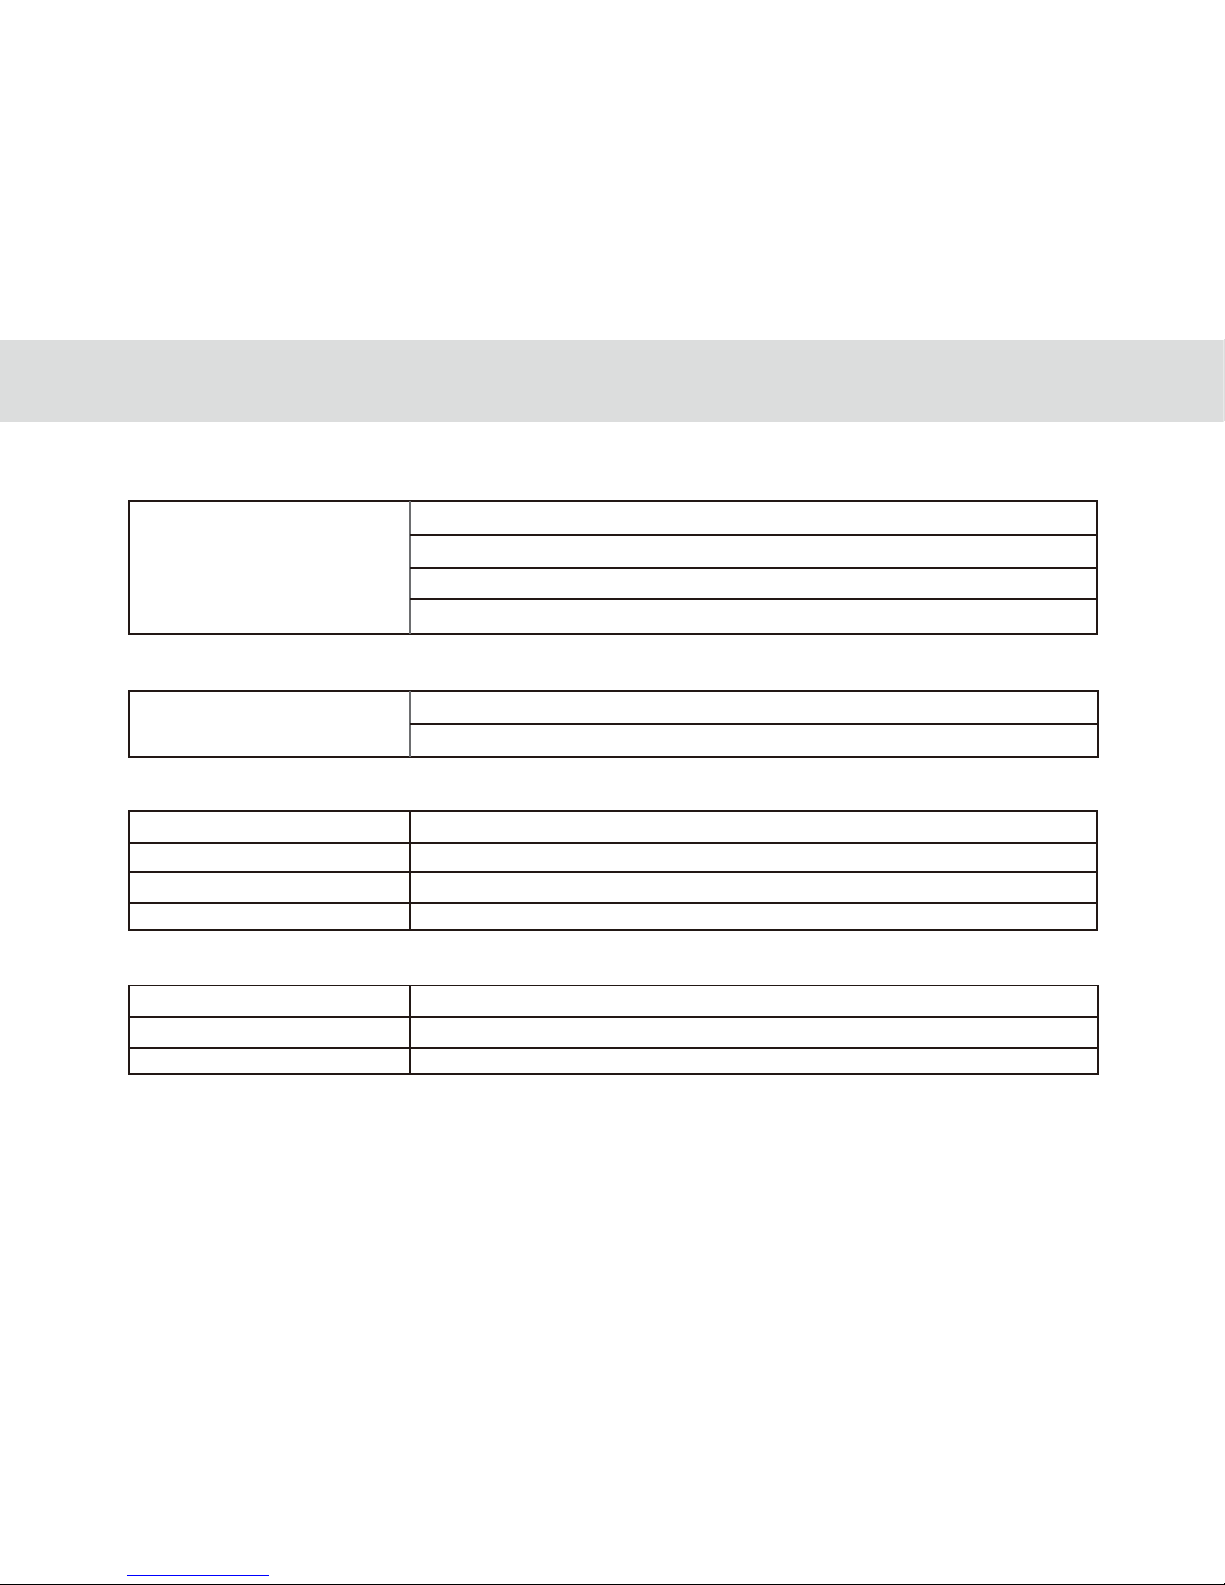
SMART DIALER
PSTN
Call Hold
Speed Dial
Speaker
Volume Adjustment
COMMUNICATION AND ORGANIZER
EMAIL
Protocols: SMTP, POP3 and IMAP4
Supports Exchange Calendar, Contacts synchronous
MEDIA PERFORMANCE
VIDEO DECODING
AUDIO DECODING
3GPP2, 3GPP, RMV, TS, 3GP, VOB, AVI, MP4, FLV, WMV, MKV
AAC, AMR, APE, FLAC, MID, MP3, OGG, WAV, WMA
PICTURE FORMATS
STREAMING MEDIA
JPEG, JPG, BMP, PNG
RTSP/HTTP, Support Download play, Progressive play
BATTERY AND POWER
TABLET BATTERY STD Lithium-Ion Polymer battery, 4100 mAh rechargeable
STD Lithium-Ion Polymer battery, 1000mAh rechargeable DOCK BATTERY
Input - 100 -240 Vac, Output – 5V DC/2.5A 12.5 W POWER ADAPTER
08
Page 14
09
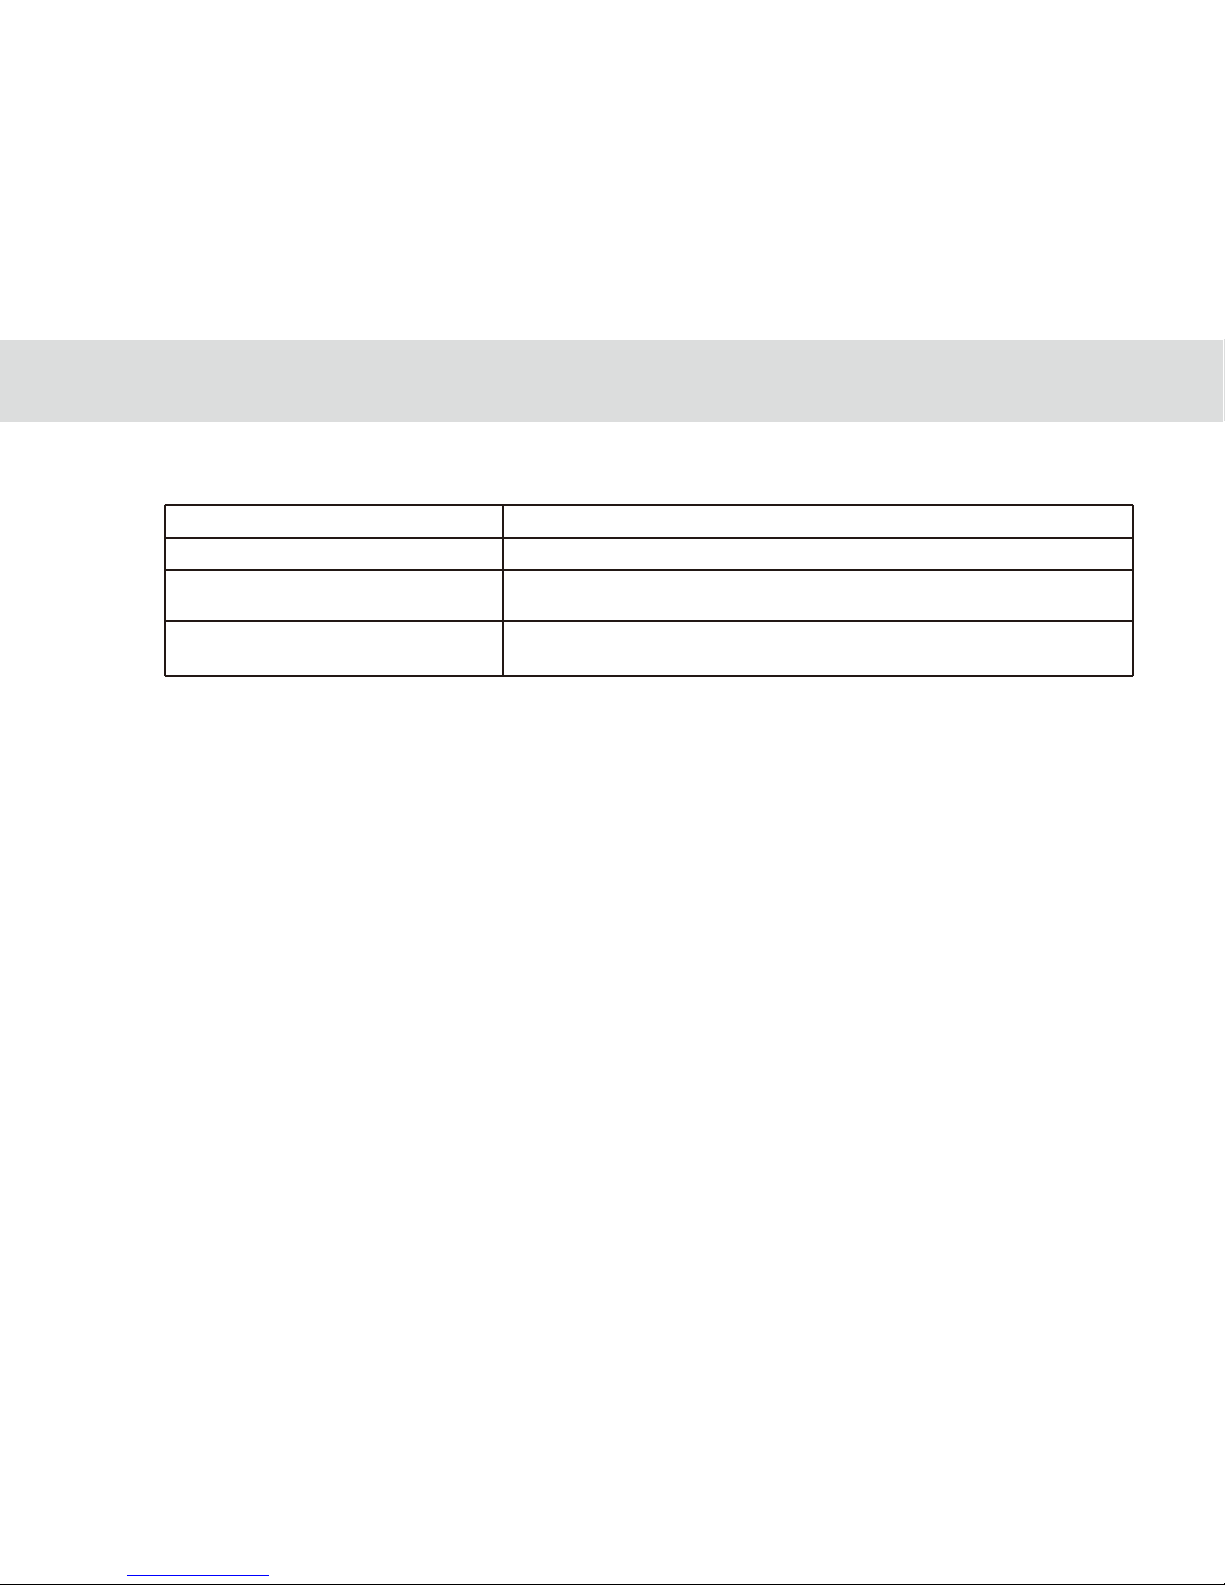
Cast Screen Built-in widisplay application
DLNA Built-in eHomeMediaCenter application
infrareduniversal remote,Reservation,
Outside Home Control, motion detection
Body Temperature Monitor,Family Temperature Manager,
Menstrual Cycle,Fertility State
HOME CONNECT AND CONTROL
Home control
Home Care
Page 15
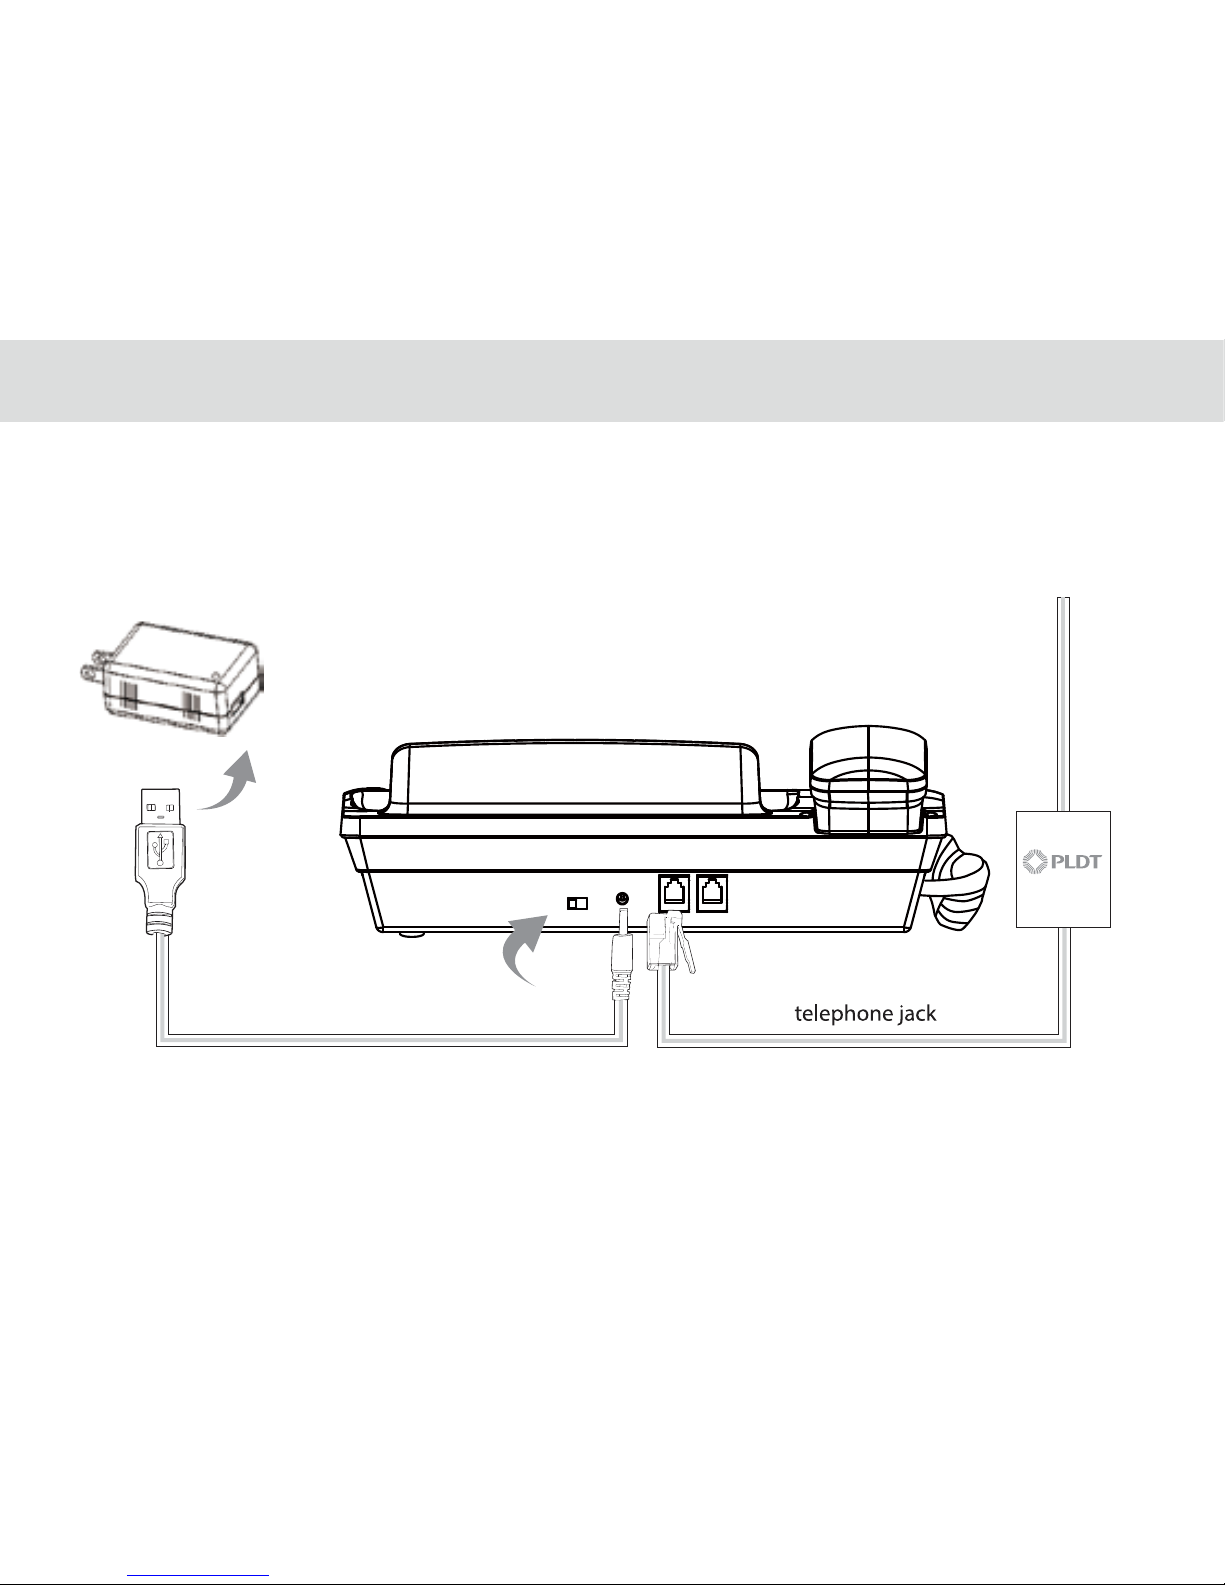
2.3 Installation
USB charger
2.3.1 Basic Installation
Before installing or removing the adapter, telephone line or the dock battery, ensure the tablet is o the dock.
10
USB Power Cable DC4.0
Page 16
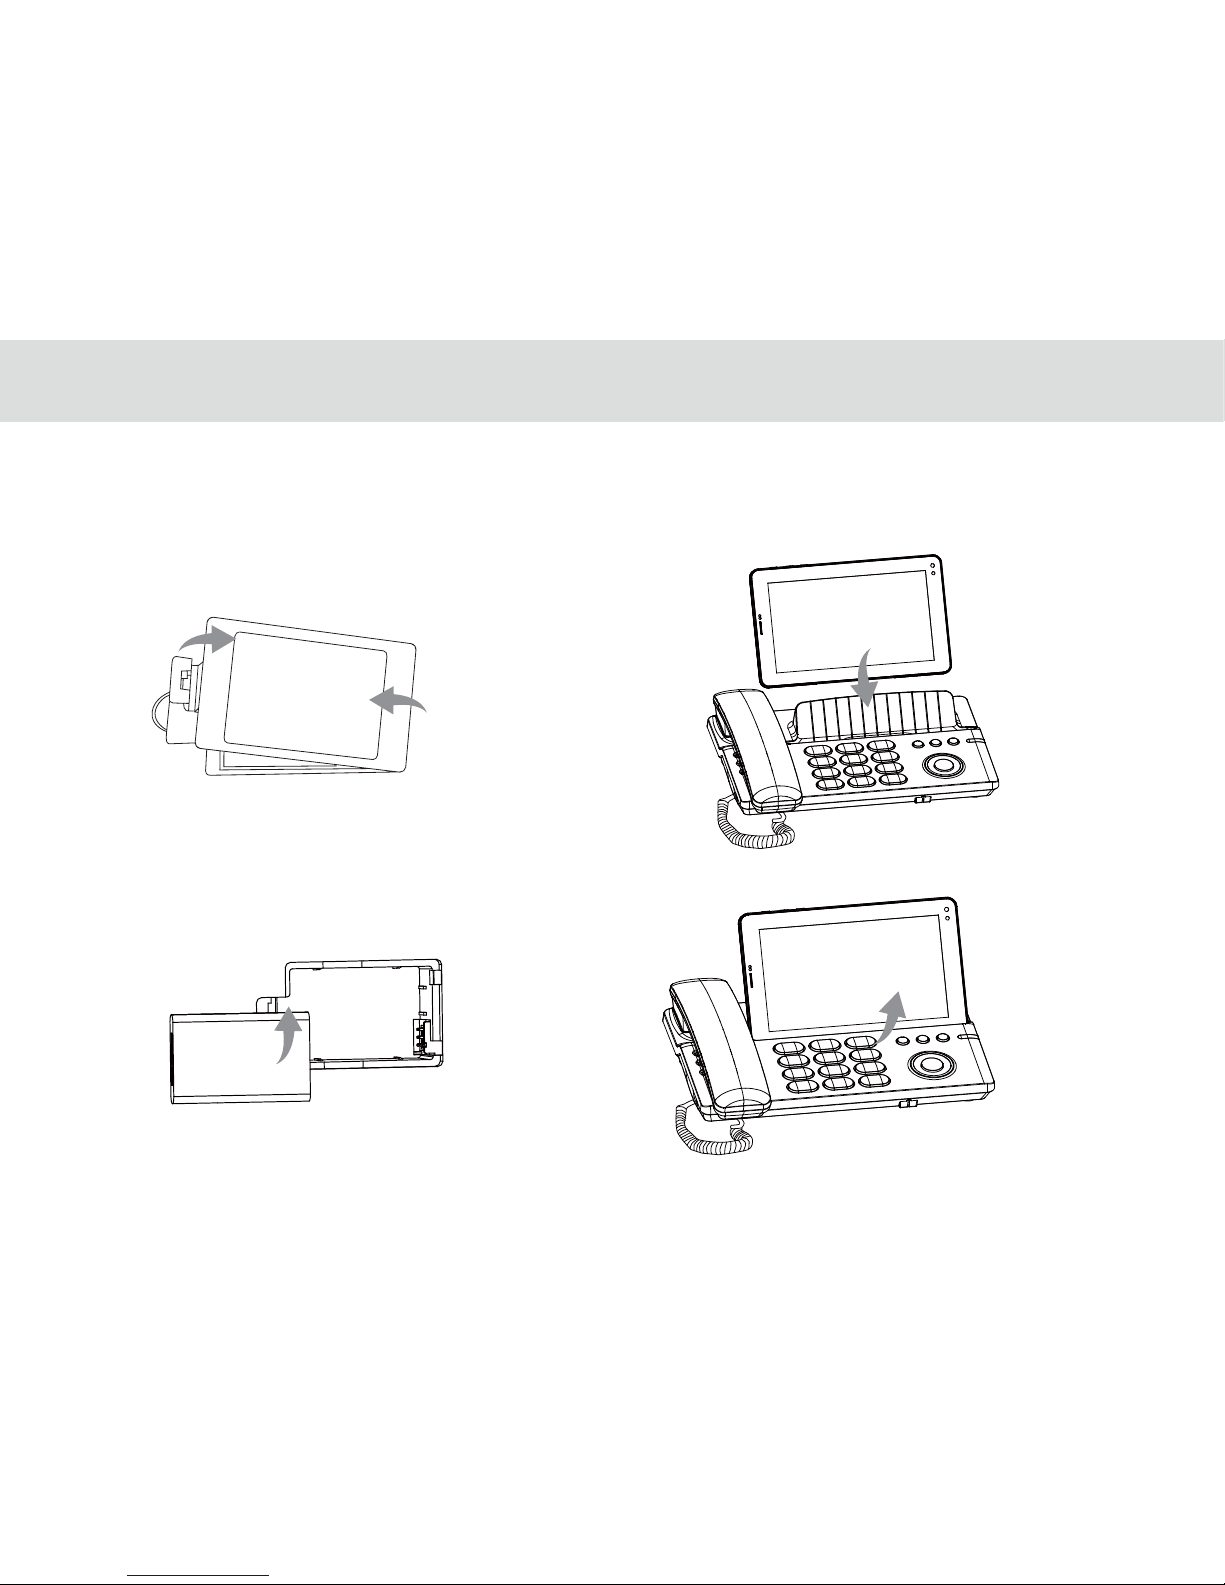
2.3.2 Installing the dock battery
2.3.3 Docking and undocking the Tablet
1. Removing the back cover
To remove the back cover,
refer to the following gure.
2. Installing the battery
To install the battery,
refer to the following gure.
1
2
To install the tablet on to the dock, refer to
the following gure.
To remove the tablet from the dock, do as shown
in this gure.
11
Page 17

3 TABLET FUNCTIONS
Page 18
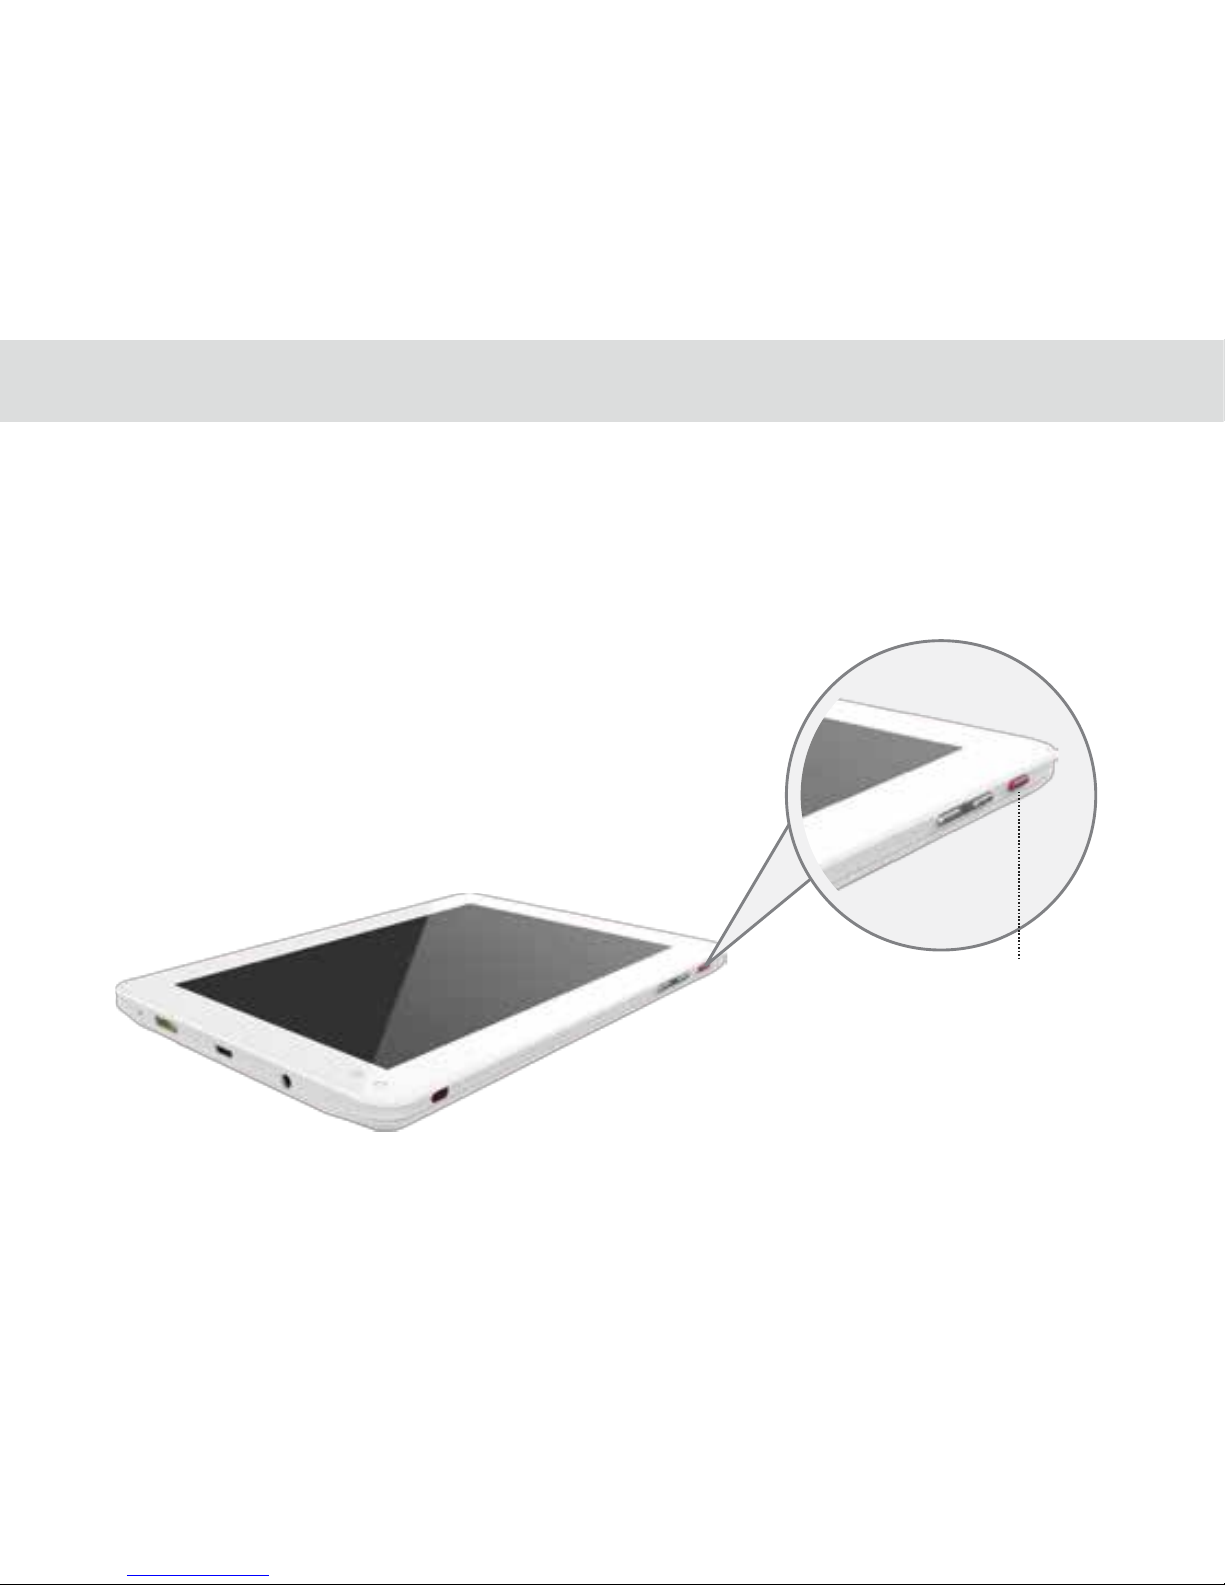
Power key
3.1.1 Turning the Tablet ON
Before you turn on your tablet. ensure that the battery is correctly installed or the Tablet is properly connected to the
power supply.
To turn on your tablet, press the Power key.
3.1.2 Turning the Tablet OFF
1. Press and hold Power key to open the Tablet options menu.
2. Choose Shut Down.
3. Touch OK to conrm shutdown.
3.1 Turning the Tablet ON or OFF
13
Page 19
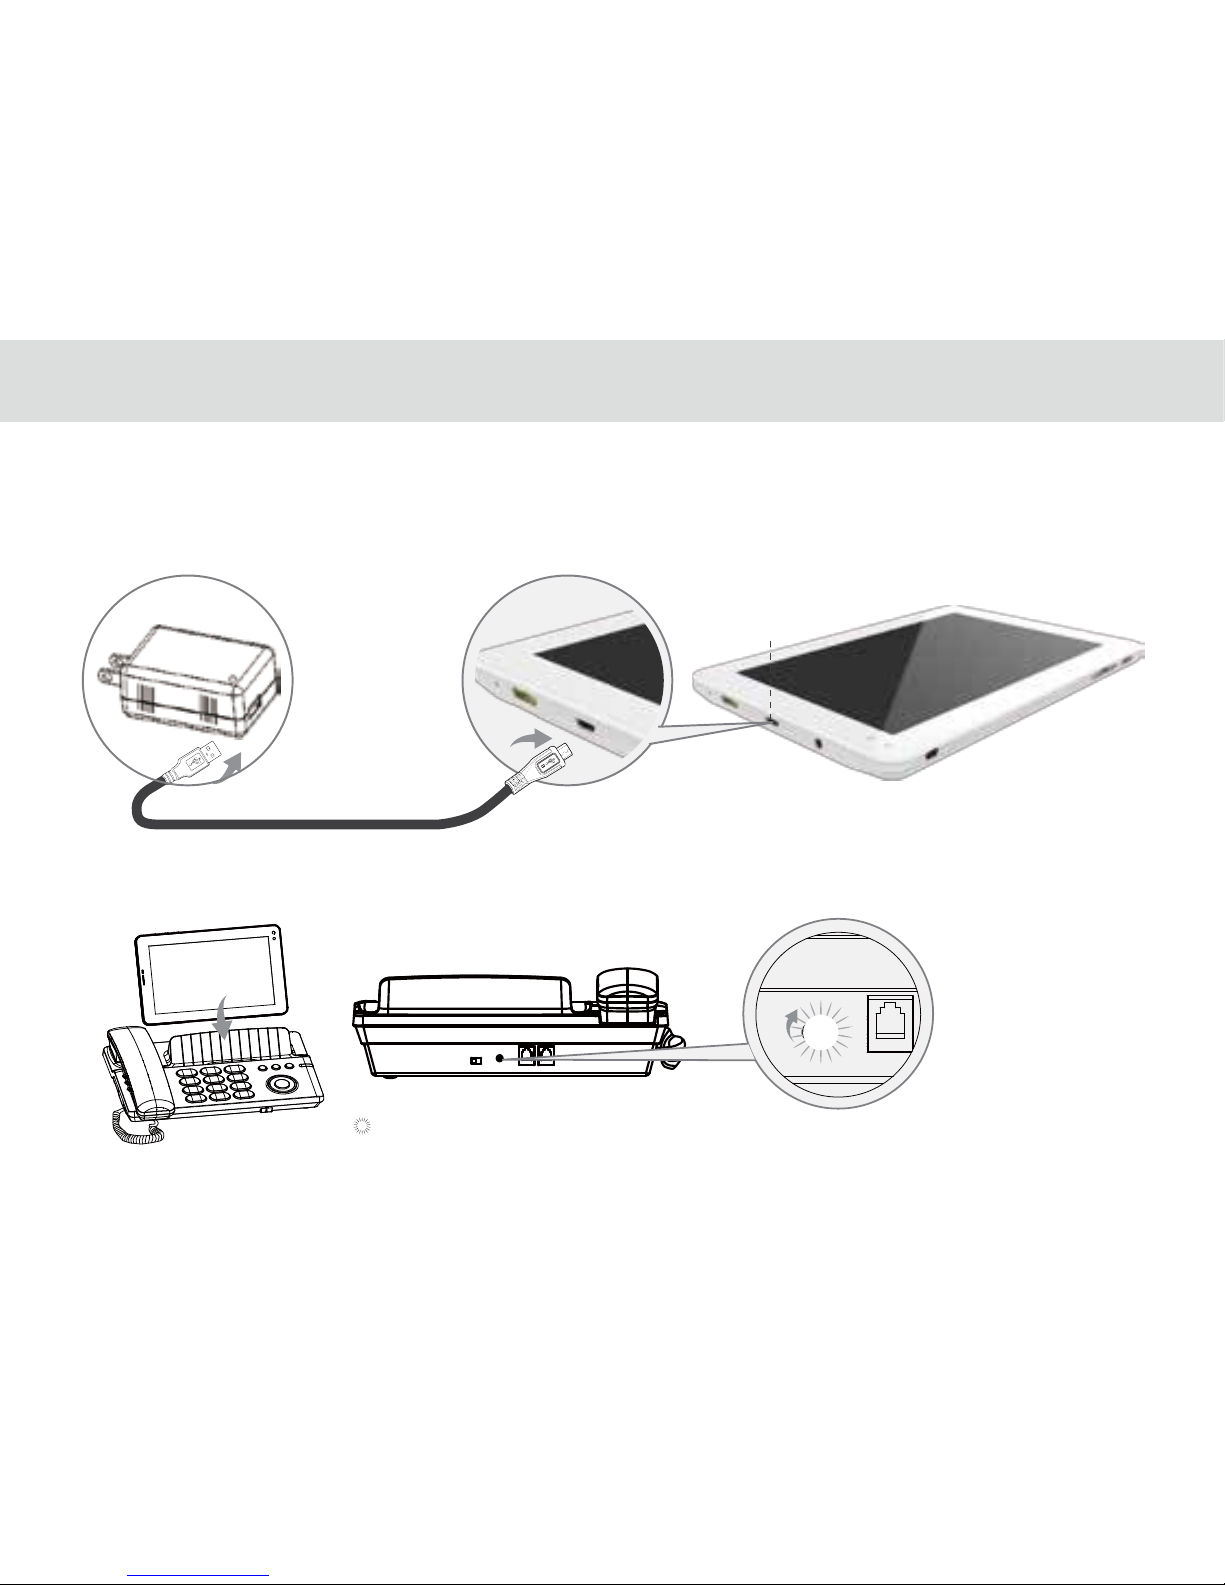
USB power cable
3.2.1 Charging the tablet battery
The Tablet is powered by a rechargeable Li-ion battery. There are two ways to charge the Tablet:
1. Place the Tablet on the dock with the power cord supplying power to the dock.
2. Turn the Tablet o, and connect the Tablet to adapter using a USB cable.
3.2.2 Charging the dock battery
Before charging the battery, ensure that the battery is properly installed in your dock.
Connect the dock to the power adapter, as shown in the following gure:
The Tablet also starts charging after being correctly installed on the Dock
USB Micro port
3.2 Charging the battery
14
Page 20
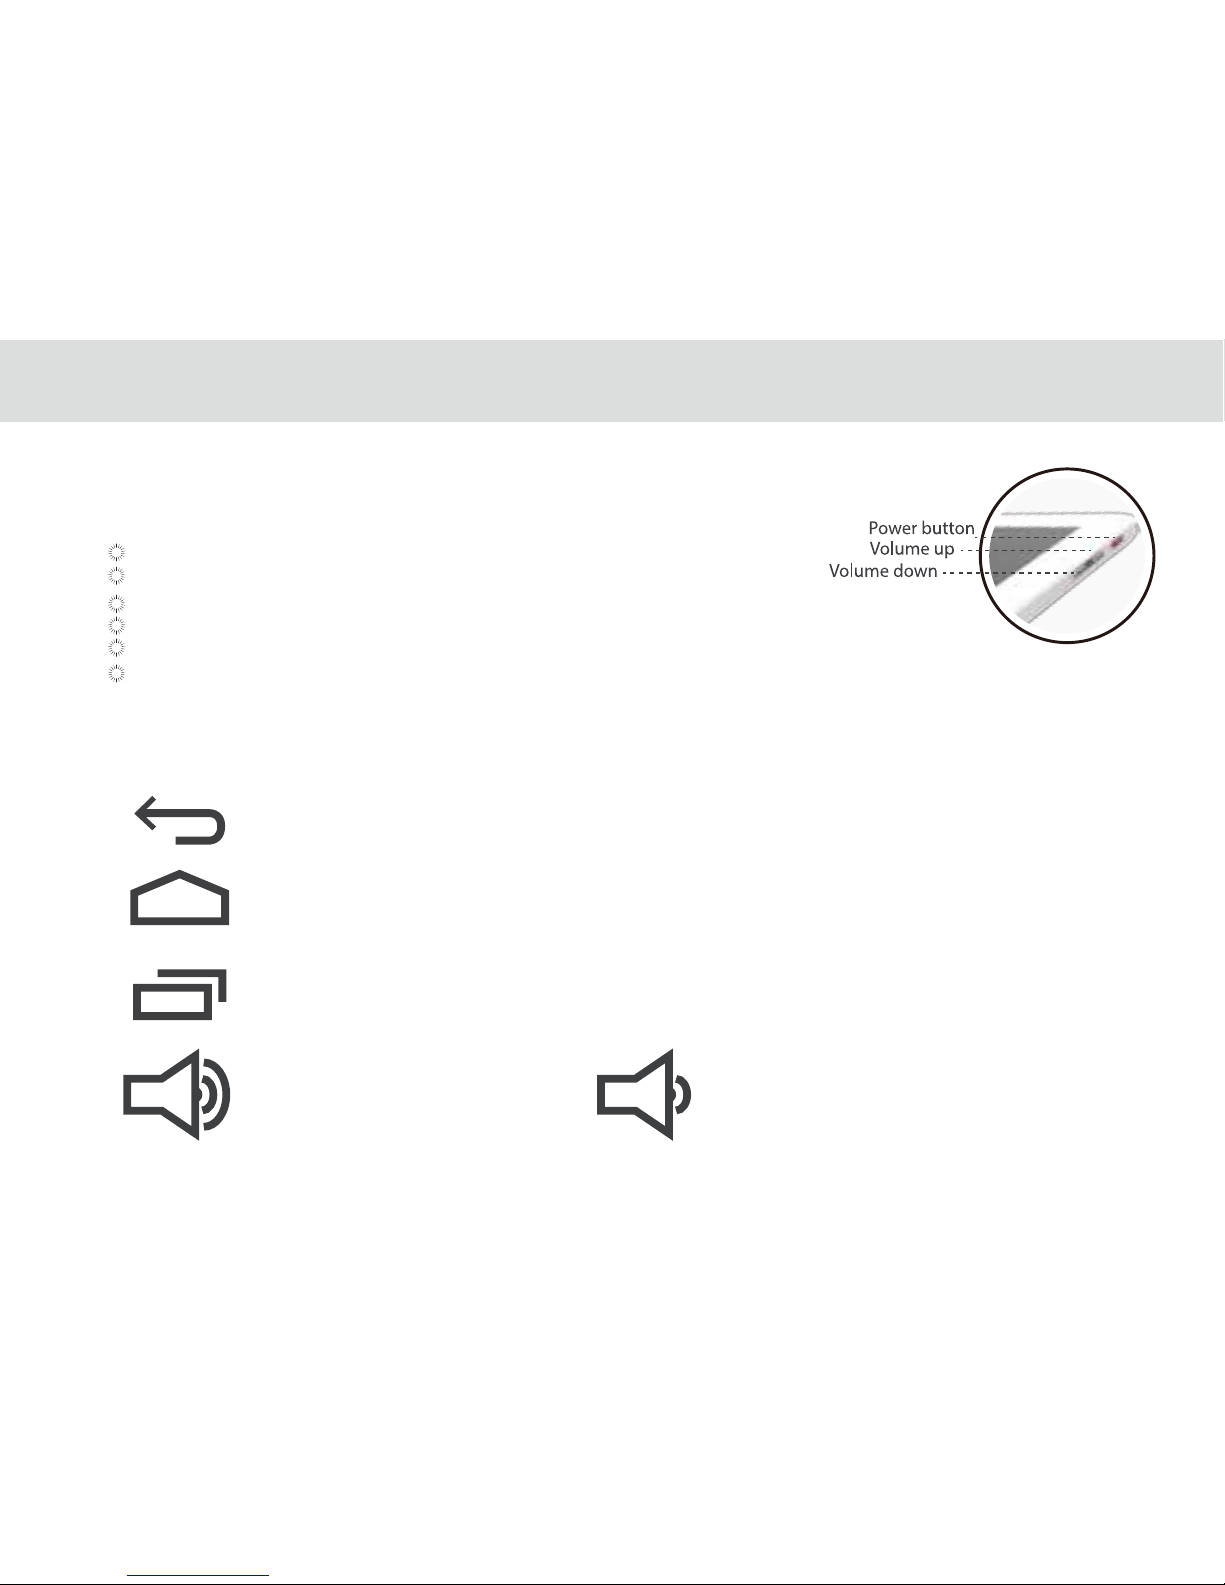
3.3.2 Working the touchscreen keys
Back
Touch to return to the previous screen.
Touch to exit from the running application.
If the on-screen keyboard is open, touch to close the keyboard.
Home
Touch to open the Home screen. It will bring you to the rst panel of the Home screen.
Navigation
Touch to open a list of thumbnail images displaying recently operated apps.
Touch the thumbnail image of the app to open it.
Touch and hold and ick o rightward to remove the app from the list.
Increase sound Decrease sound
Press to increase sound press to decrease sound
3.3.1 Using the physical keys
Power
Press and hold to power the Tablet on or o.
Press shortly to lock/unlock the screen.
When the Tablet is ringing, press any of the volume buttons if you want to mute the ringer.
On the Home screen, press to increase of decrease the ringtone volume, or set the Tablet to silent mode.
When using other applications, press to control the volume of music, spoken directions, and other audio sounds.
Press and hold to immediately adjust the ringtone volume to the maximum, or minimum.
3.3 Working with the keys
15
Page 21
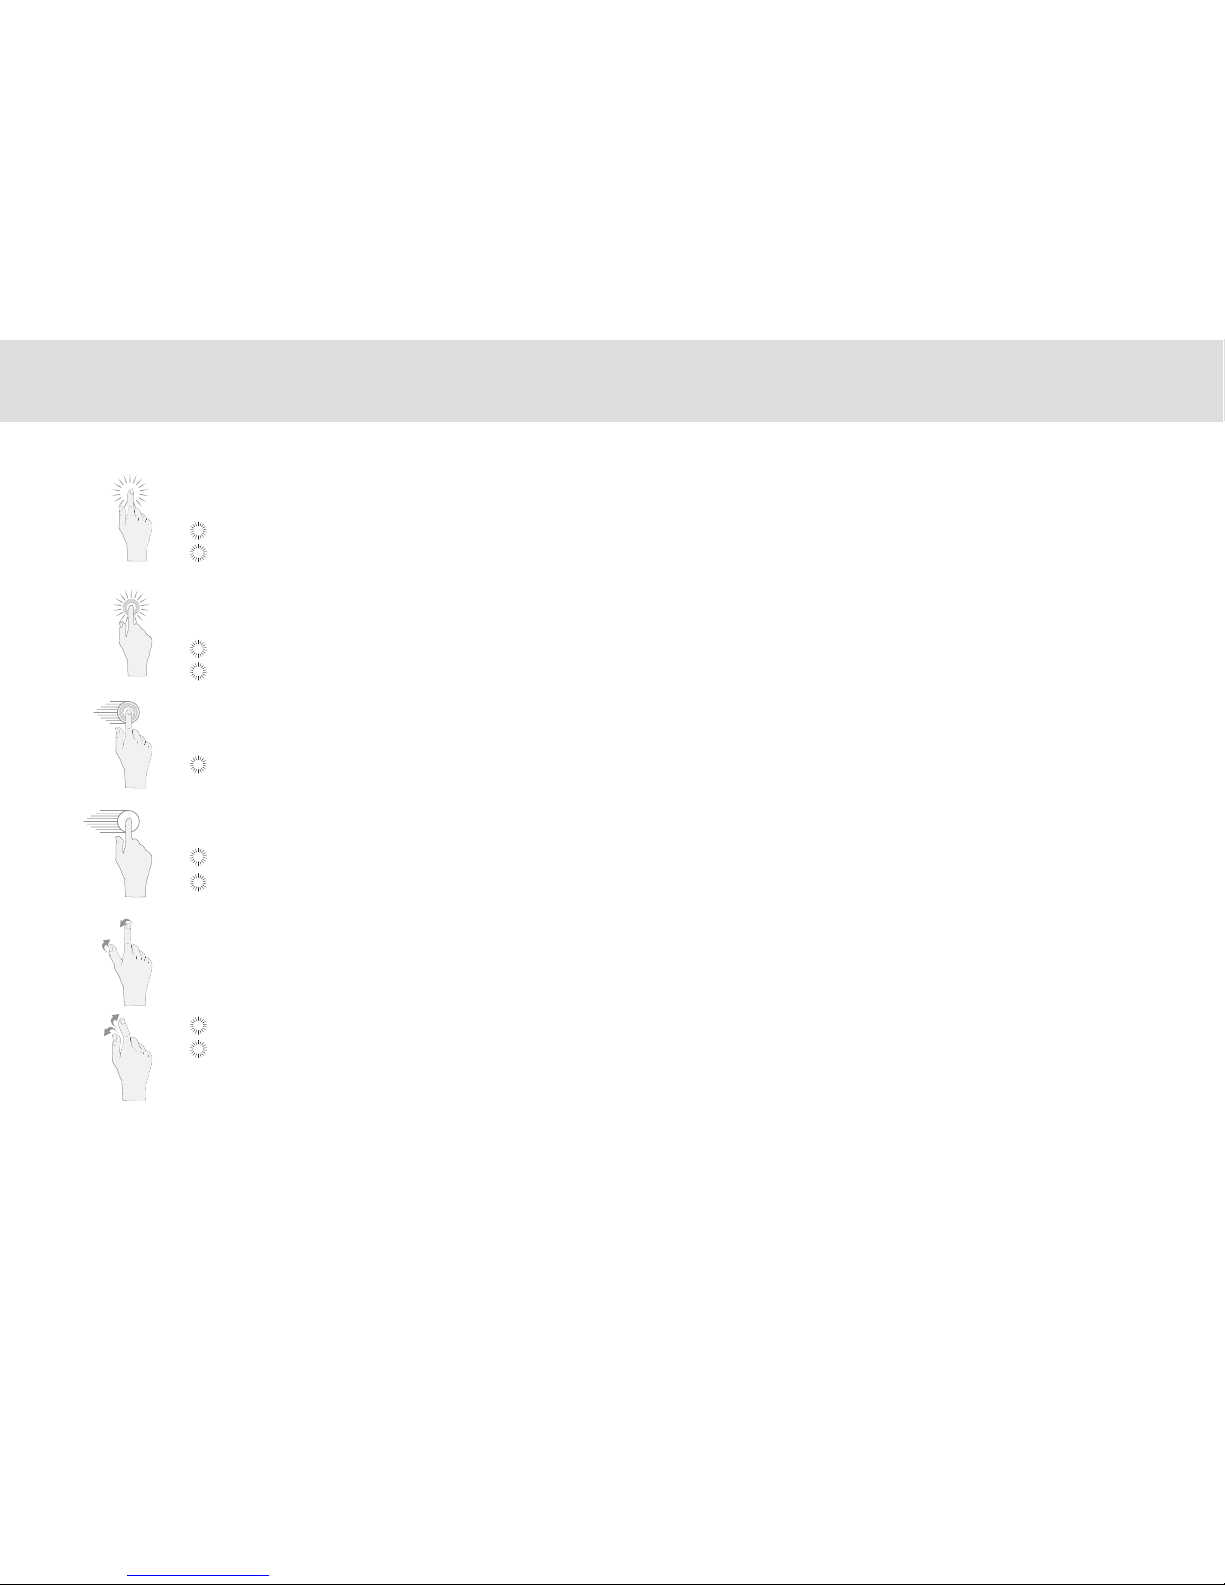
Touch
By touching an item, you can select the item or launch it. For example:
Touch the on-screen keyboard to insert text and/or characters.
Touch an application icon to launch it.
Touch and Hold
Touching and holding items will activate them. For example:
Touch and hold an application/widget to move it.
Touch and hold on a eld and a menu with options will pop up.
Drag
Touch and hold an item, move your nger on the screen to the target position.
Dragging a shortcut icon to the trash will delete it.
Flick, Slide, Swipe
Change screens by icking, sliding, and swiping your nger on the screen. For example:
Slide your nger to unlock the screen
Flick and/or swipe your nger to scroll the screen or menu, to move from screen to screen, or to view next object in
the gallery.
Pinch
Using two ngers (like your thumb and index nger), pinching inward will cause the screen to zoom out; pinching
outward will cause the screen to zoom in. For example:
Pinch outward to see zoomed in details of a photo in Gallery.
Pinch inward to zoom out and see the whole page of a browser.
3.4 Using the touch screen
16
Page 22
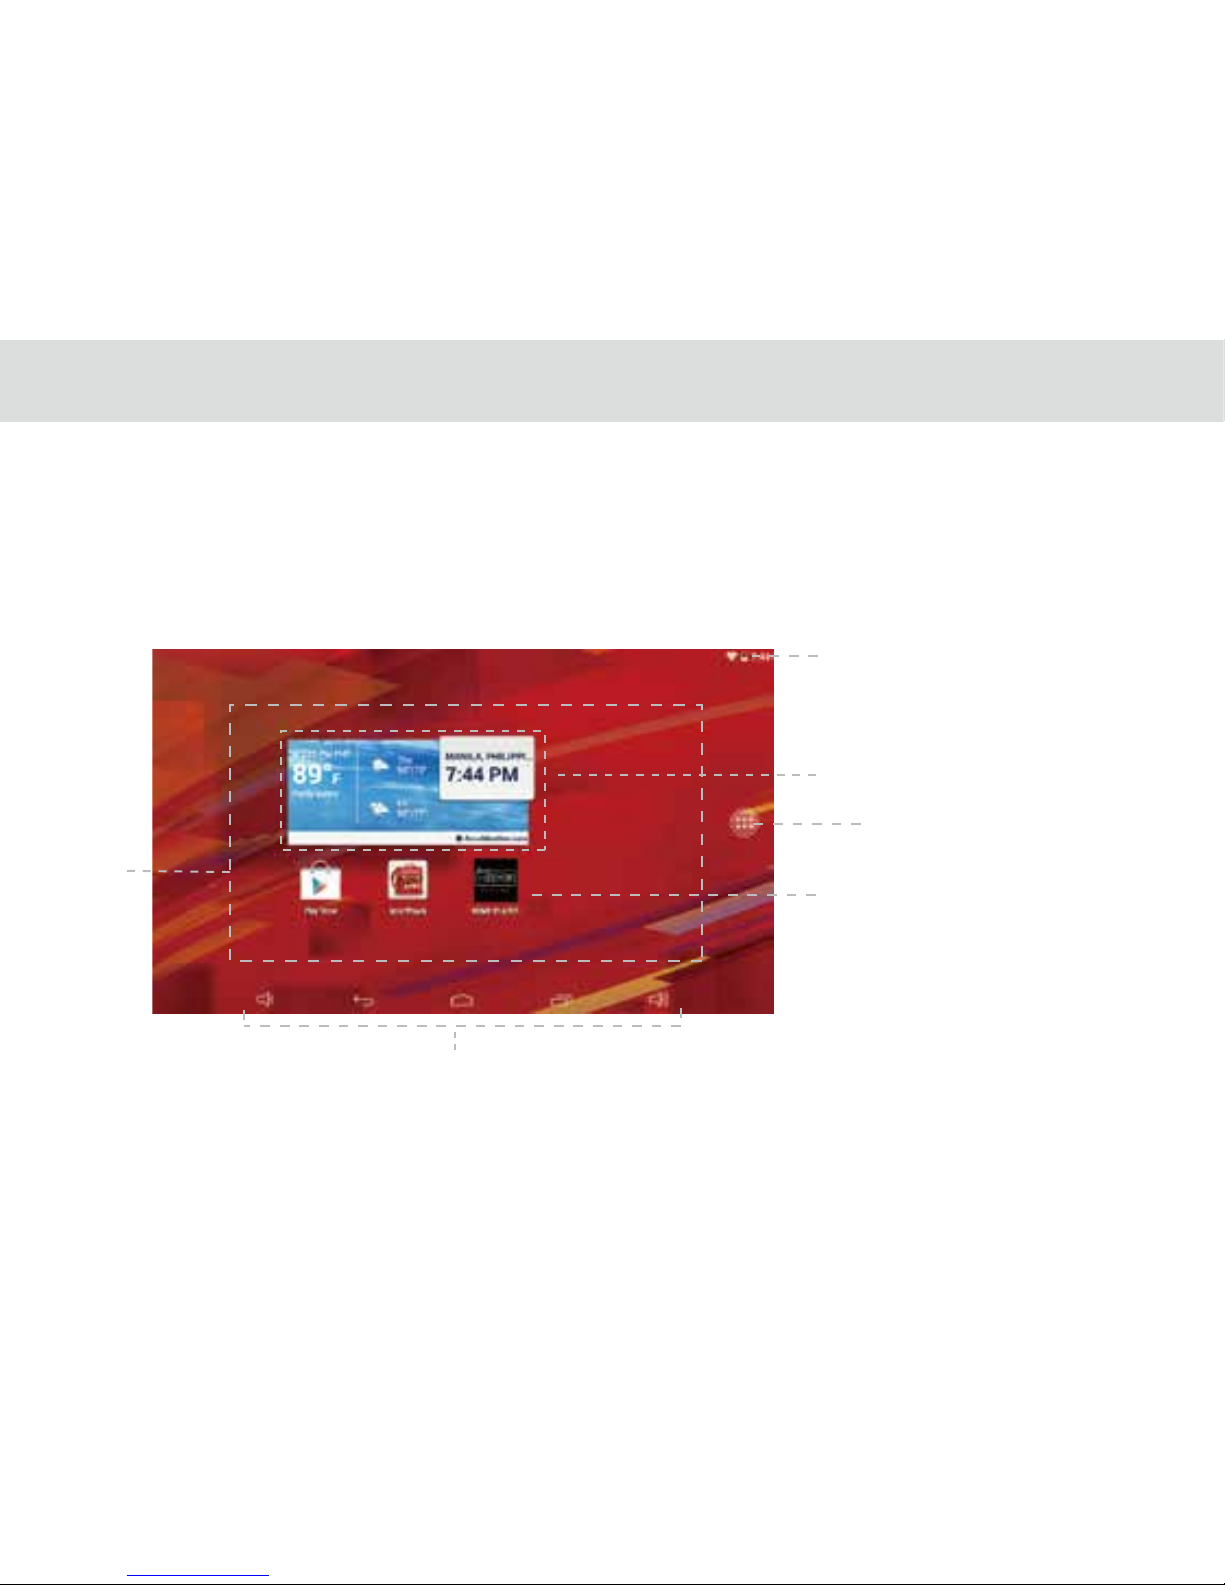
The Home screen is the starting point in using the Tablet
Touch the Home key to display the Home screen. You can customize the Home screen with various
wallpapers and create shortcuts for items you want to easily access.
3.5 Home screen
3.5.1 Getting to know the Home screen
1. Main display area
2. Weather &Clock Widgets
3. Short Cut Buttons
4. Touch Screen Keys
5. Status Bar
6. Application Button
6
1
4
2
3
5
17
Page 23
3.5.3 Customizing the Home screen
Slide your nger horizontally across to the left or the right of your main Home screen to see your additional home
screens. These screens provide more space for shortcuts or widgets. The small indicator shows the current position.
The Home touchscreen button brings the screen back to your main Home screen.
3.5.2 Home screen extensions
1
Main display area: This area displays application shortcuts, widgets, and other items that can
be easily accessed by touching them.
2
3
Weather Widgets: The weather widget informs you of the time, date, and weather in your location.
It can be customized based on your preference.
4
Short Cut Buttons: These are shortcuts for various applications. You may change and customize
these according to your needs.
5
6
Touch Screen Keys: Back, Home, Navigation, Volume Down, Volume Up
Status bar: It shows the status of the device such as Wi-Fi connection status, battery status, and
other information. You can touch to open a more detailed status menu.
Applications button: Touch to open the Applications screen, where you can view the applications
installed on the Tablet. Touch any application icon to run it.
To change your wallpaper:
1 On the Home screen, press the Menu key and touch Wallpaper on the bottom menu.
2 Choose one of the following steps from the pop-up menu.
Live wallpapers to select a wallpaper with animation.
Pictures to select one of your pictures and set it as the wallpaper.
Wallpaper gallery to select one of the pre-installed wallpapers.
Gallery to select one of your pictures and set it as the wallpaper.
18
Page 24
When the Tablet is powered on, press the Power key and the screen will turn o and lock.
When the Tablet is left idle for a specied time period that you have set, the screen will automatically turn o and
lock.
Always lock the screen to save the battery or prevent accidental taps when the Tablet is not in use.
3.6.1 Locking the screen
When the screen is o, press the Power key to turn it back on, and then unlock the screen
If you have not set a screen lock, the screen will just turn back on when you press the power button.
If you have set up a screen lock, you will be asked to input the relevant unlocking pattern, number, or password to unlock it.
3.6.2 Unlocking the screen
To set up a screen lock, touch the Applications key from the Home screen.
Go to Settings > Personal > Security
Touch Screen lock and choose from None, Slide, Pattern, PIN, or Password, and follow the instructions on the screen to set your
screen lock.
3.6.3 Setting up a screen lock
To set the time between the last screen touch or key touch and automatic screen lock,go to your the Home screen.
touch the Applications key, and touch Settings > Display >Sleep
3.6.4 Setting up a screen timeout period
3.6 Locking and unlocking the screen
19
Page 25
3.7 Inputting text
You can enter and edit text in text elds and use menu commands to cut, copy, and paste text within or across applications.
To open the onscreen keyboard, touch a text eld where you want to enter text.
To switch the input method, touch the icon located at the lower right corner of the keyboard.
The following section takes the Android™ keyboard as an example.
When you are typing, the characters you are entering will appear in a line above the keyboard, along with some
suggestions for the word you are typing. Press space or a punctuation mark to enter what you are typing, or touch the
suggestion you want to enter. You can touch and hold the leftmost word to save it to the dictionary.
To capitalize the letter you are about to type, touch the upward arrowhead key once. To capitalize all the letters,
touch the upward arrowhead key twice.
When you touch a key, a larger key will show up briey over the keyboard. Keys with alternate characters display an ellipsis
(...) below the character.
Touch and hold a vowel or the C, S, or Y key to open a small window where you can touch an accented vowel or other
alternate letters.
Touch and hold the Period key (.) to open a small window with a set of common symbol keys.
Touch the DEL key to delete a character to the left of the cursor. Touch and hold the key to delete all characters to
the left of the cursor.
Touch the Symbols key to switch to the numbers and symbols keyboard, and touch the alphabet key (ABC) to switch
back.
On the numbers and symbols keyboard, touch the ALT key to view additional symbols, and touch it again to return to the
rst numbers and symbols keyboard.
Touch and hold almost any of the number and symbol keys to open an array of additional symbols.
To edit the text you have entered, touch to move the cursor to the location where you want to add or delete text. The cursor
is a vertical bar that designates where the text you type or paste is inserted.
To close the keyboard when you are done typing, touch Go/Done button on the keyboard. Or touch the icon on the
lower left corner of the touchscreen.
3.7.1 Entering text using the onscreen keyboard
20
Page 26

To quickly cut or copy all the text in a text eld:
3.7.2.1 Touch and open the text eld that contains the text that you want to cut or copy.
3.7.2.2 Touch and hold the text eld to display the Edit text menu.
3.7.2.3 Touch Select all, Cut all, or Copy all.
3.7.2.4 Touch Cut or Copy to cut or copy the text
To cut or copy selected text in a text eld:
1. Touch and hold the text that you want to cut or copy. Once the text is highlighted, tabs will appear at the ends of the
text, as well as the editing command menu.
2. Drag the respective tabs left and/or right to select the full text you want to cut or copy. The text between the tabs will
appear highlighted.
3. Touch Cut or Copy to cut or copy the selected text.
The cut or copied text will be stored in a temporary area so you can paste it into another text eld.
In order to paste the text, you must have cut or copied the text at least once. Once you have cut or copied the text, you
can paste it multiple times.
To paste the most recent text that you have cut or copied into another text eld:
1. Touch the text eld where you want to paste the text.
2. Touch the location where you want to paste the text. A tab will show up.
3. Touch the tab and the Paste option will show up.
4. Touch Paste.
3.7.2 Cutting or copying text
21
Page 27
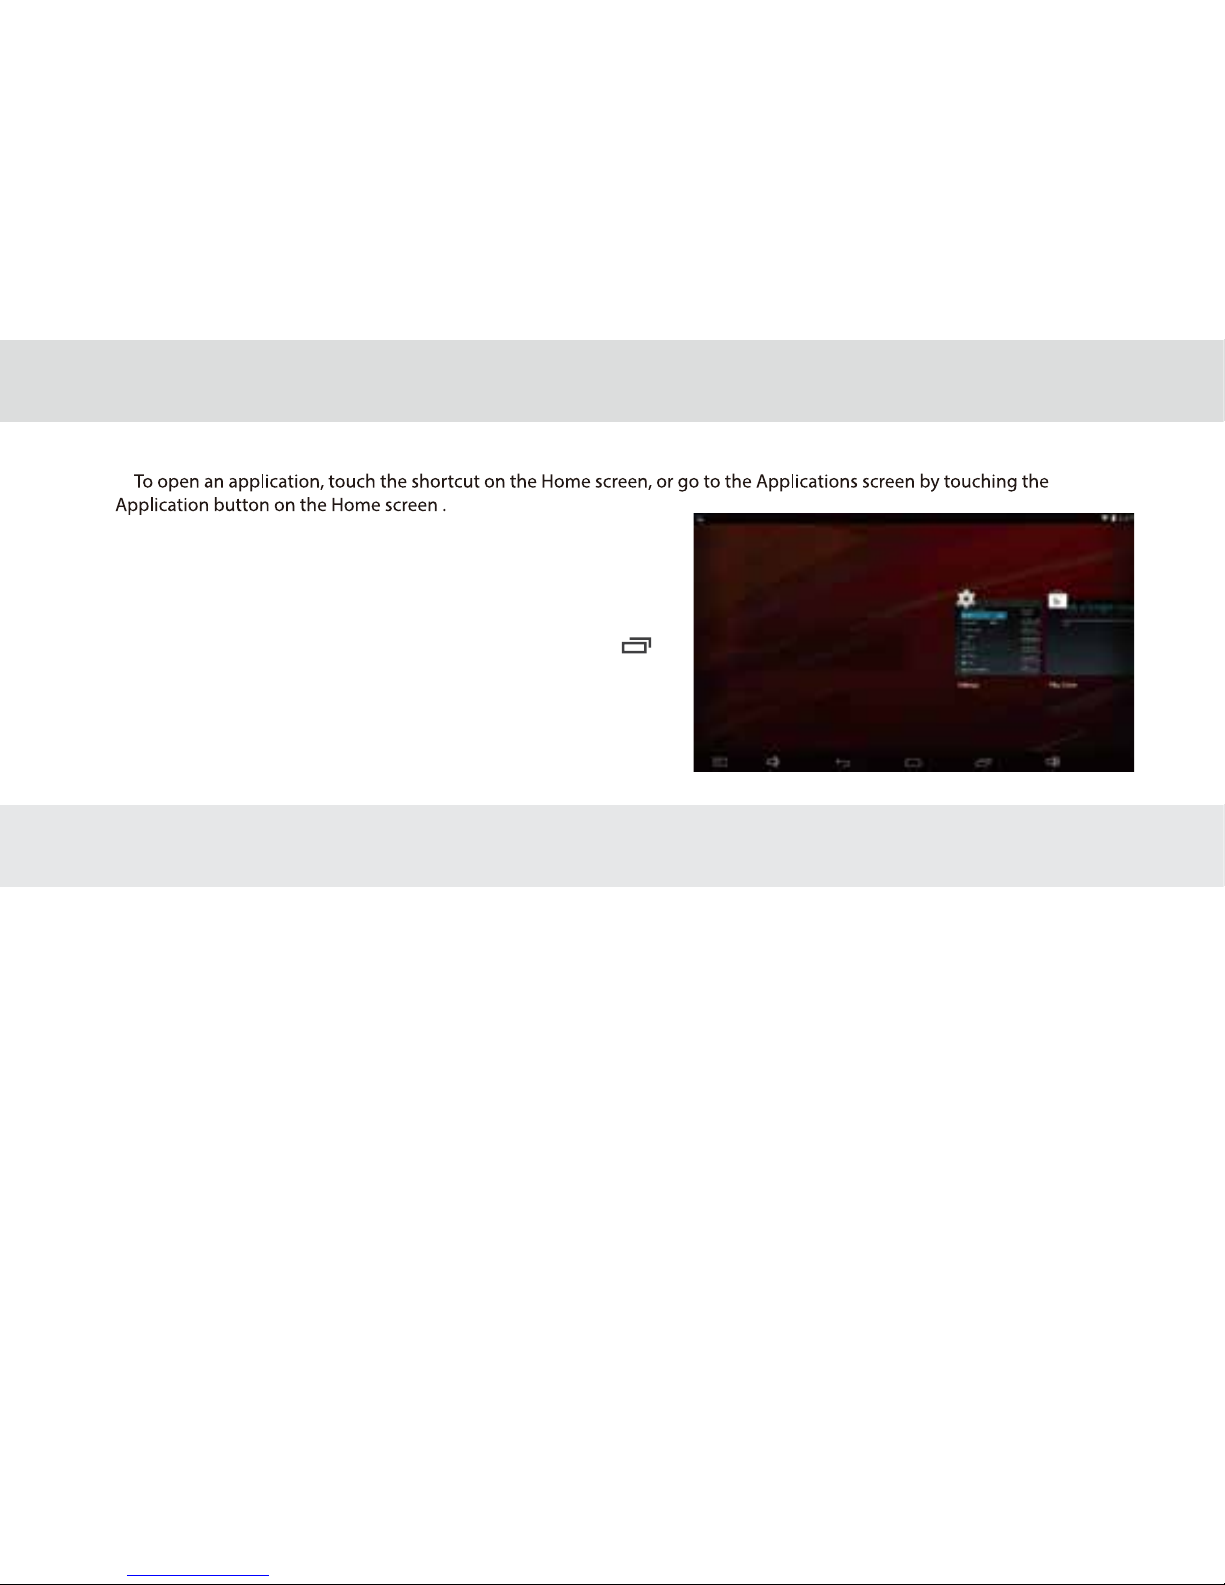
3.8 Opening and switching applications
To open an application, touch the shortcut on the Home screen, or
go to the Applications screen by touching the Application button on
the Home screen .
To open and switch to a recently used application, touch the key
at the lower left corner of the touchscreen.
The list will open on the left hand side. Touch the thumbnail of the
application you want to access.
3.9 Accessing the Tablet’s Settings
To access the Settings to view or change your wireless and cellular networks, sound and display, location and security,
applications, language and keyboard, date and time, and other settings:
3.9.1 From the Home screen, touch the Status Bar.touch menu key on the right corner of screen.
3.9.2 From the Home screen, touch the Application button and touch Settings shortcut.
3.9.3 If you recently have accessed the Settings, you can touch the Navigation key on the lower left corner of the
touchscreen to display the list, and touch Settings in the thumbnails list that opens.
22
Page 28
3.10.1Languages setting
1. Open setting list;
2 .Click languages & input;
3. Select language from the following scrolling list.
3.10.2Input method setting
1.Open setting list;
2.Click languages & input;
3.Click keyboard & input;
4. The default input method is English(United States)-android keyboard(AOSP).It will be added into the input method
list automatically when you have installed other input method.
5.You can open right side to select or cancel the relative input methods
3.10.3 Setting to add account
1.Open setting list;
2.Click Add Account;
3.Google,company,email will show in the popping up interface.
4.Click GOOGLE to register or log in Google account.
5.Click COMPANY & EMAIL to register or log in email accounts
3.10 Languages& Input method & Account setting
23
Page 29

3.11.1 Automatically set date and time
1. Open the Settings list.
2. Touch Date & time.
3. Check the box for Automatic date & time.
4. Touch Select time zone, then scroll down and select the correct time zone from the list.
5. Choose whether or not to set the time to display in 24-hour format, check or uncheck the box to enable or disable
this option.
6 .To choose your preferred date format, choose from the options provided.
3.11.2 To manually set date and time:
1. Open the Settings list.
2. Touch Date & time.
3. Touch Set date, then scroll down the roll to adjust the date, month, and year. Touch Done when nished
4. Touch Select time zone, scroll down and select the correct time zone from the list
5. Touch Set time, then scroll down to adjust the hour and minute,Touch done when nished.
6. To choose whether or not to set the time to display in 24-hour format, check to enable or uncheck to disable.
7. To choose your preferred date format, choose from the options provided.
3.11 Setting the date and time
When the time provided by the network is automatically used, you cannot set the date, time, and time zone
by yourself.
24
Page 30
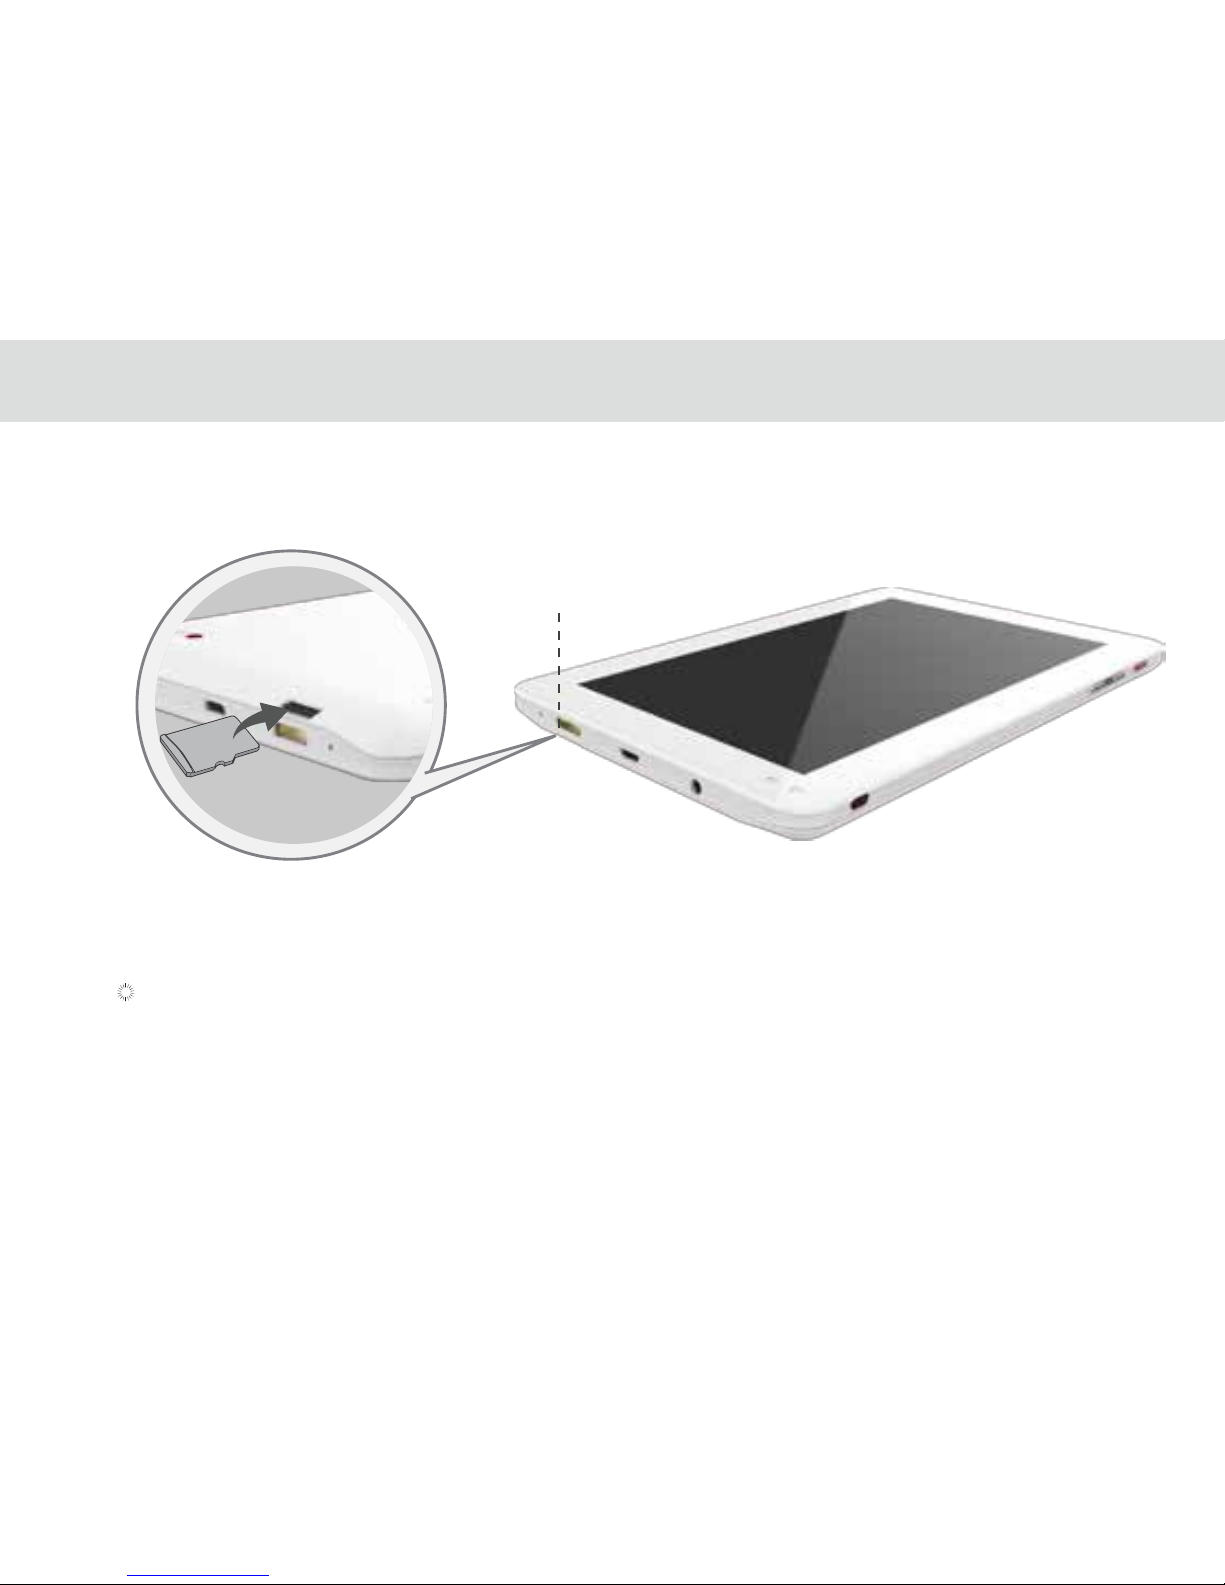
Insert your micro SD card into the micro SD card slot until it clicks into position as shown in the following gure.
3.12 Installing or removing the micro SD card
Remove the micro SD card by gently pushing the card further into the slot, and then release it. The card will eject from the
slot, and can be removed.
Micro SD card slot
25
Page 31
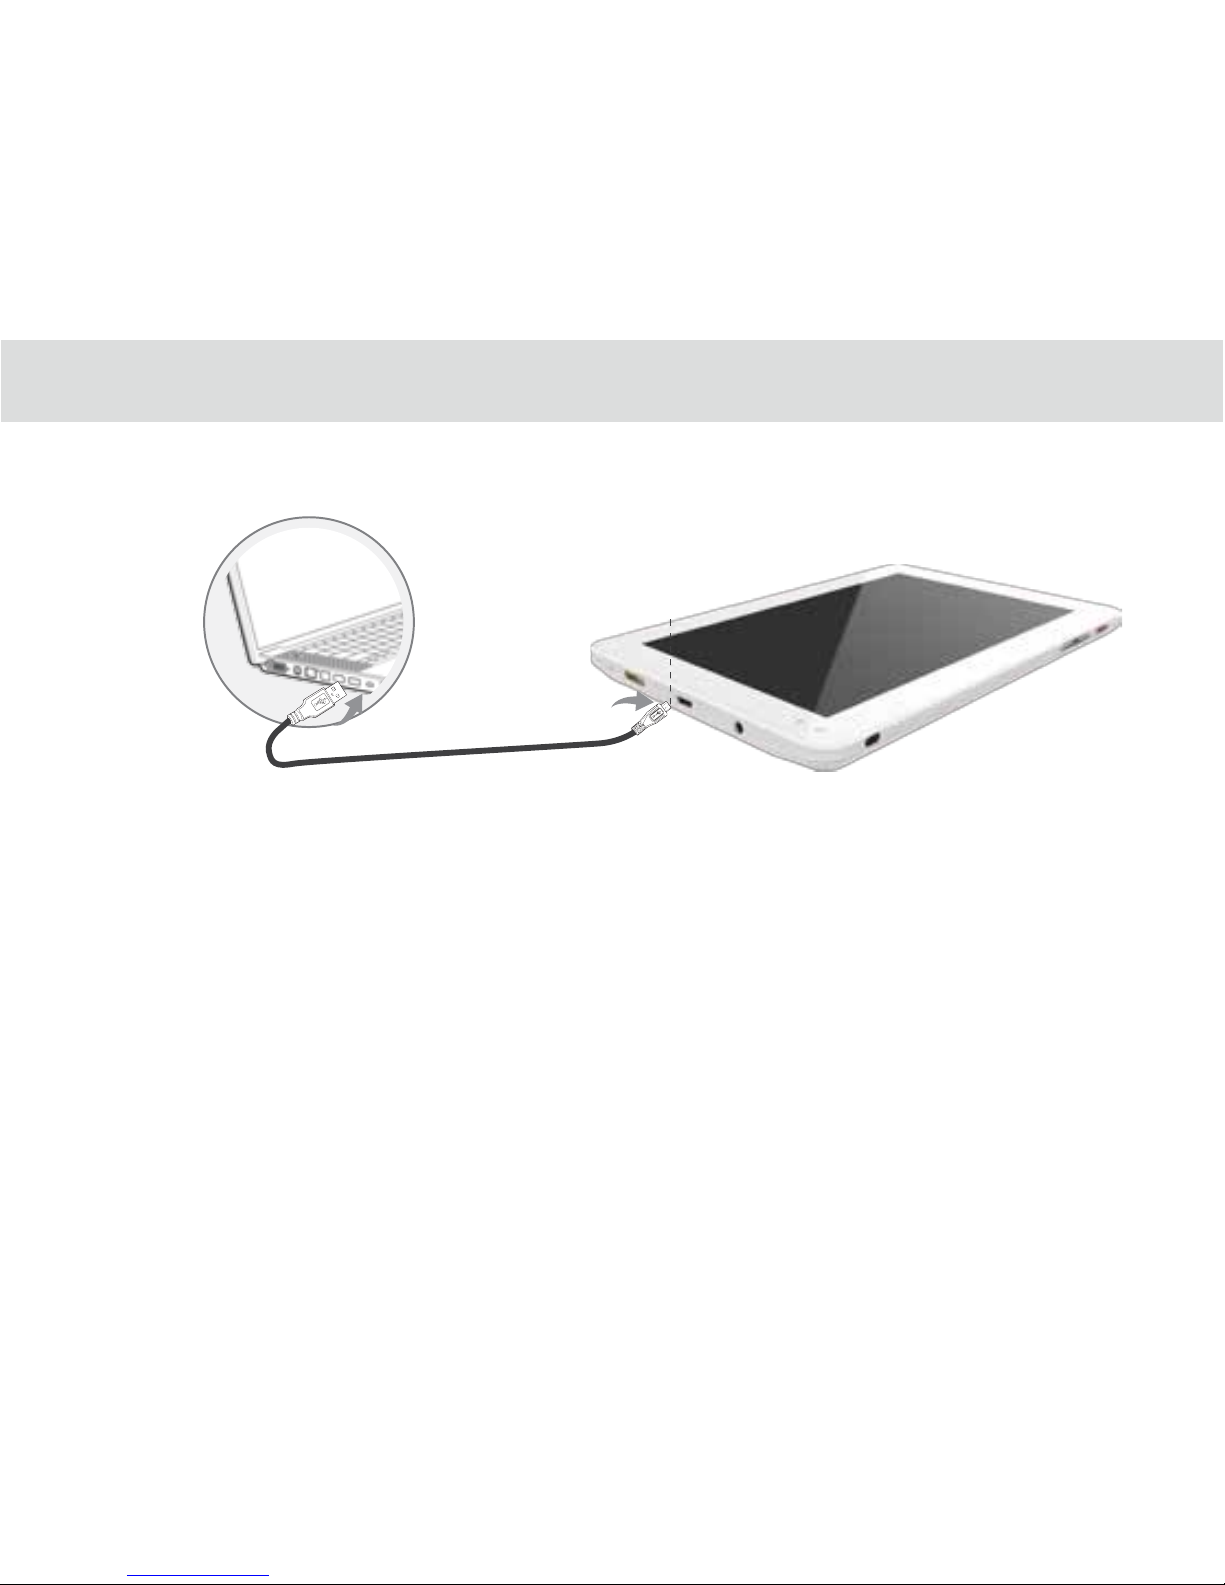
USB Micro port
3.13 Connecting to or disconnecting from computer using USB
3.13.1 Connecting the Tablet to a computer using USB cable:
USB power cable
1. Use the appropriate USB cable (micro USB connector) to connect the Tablet to a USB port on your computer. Once
it is properly connected, the Tablet displays a notication indicating that the USB is connected.
2. Touch the lower right corner to open the Status Bar and touch USB connected in the Notications list.
3. Touch Turn on USB storage to conrm transferring of music, pictures, and other les between the Tablet storage or
micro SD card storage and the computer.
3.13.2 To disconnect the Tablet from the computer safely and to avoid any loss of information, follow the computer operating
system’s instructions to disconnect USB devices, and additionally follow the steps below:
1. Open the Status Bar by touching the lower right corner.
2. Touch Turn o USB storage in the Notications list.
3. Touch Turn o USB storage in the dialogue that opens.
26
Page 32
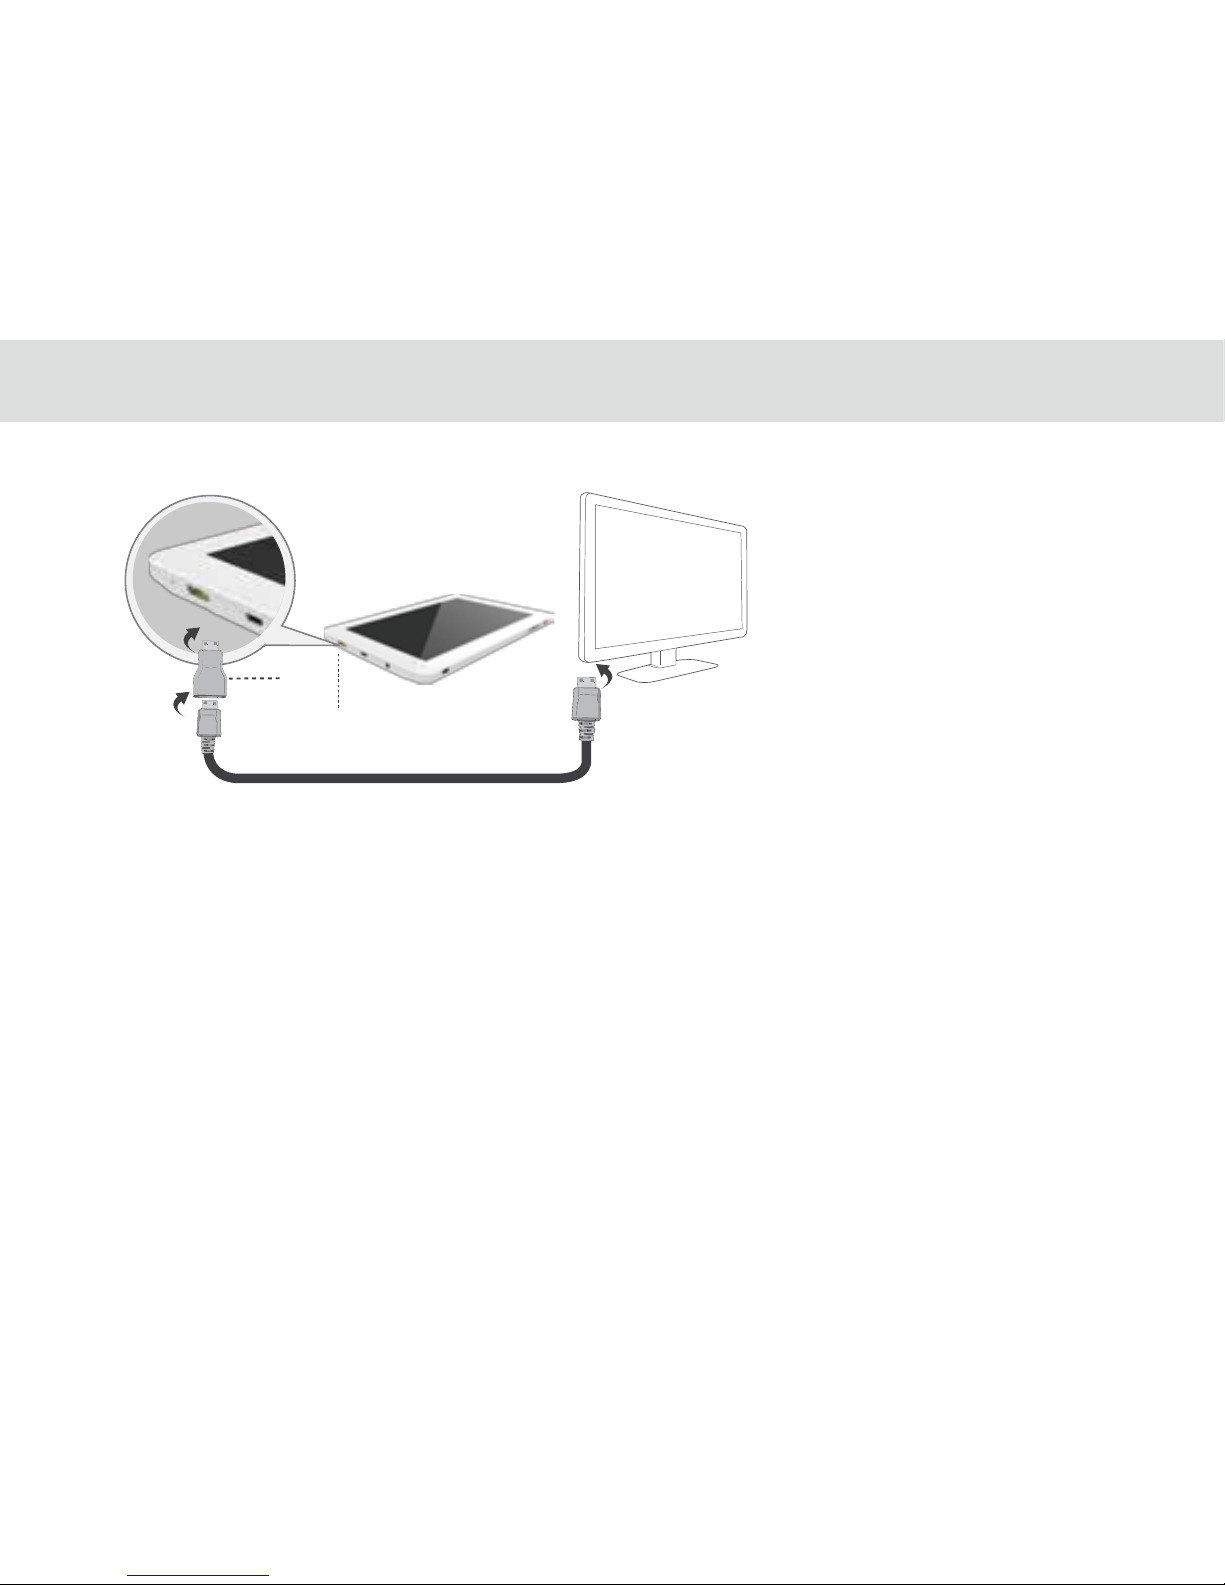
3.14 Connecting the Tablet to a TV
You can use the Tablet to play audio and
video les on a high-denition TV, using a
High-Denition Multimedia Interface
(HDMI) cable. The HDMI cable is an
optional accessory that’s not included
with your TELPAD.
When purchasing an HDMI cable, please
check the connector type of the cable.
You may purchase and use any Standard
HDMI Cable Version 1.0 ~ 1.4, but HDMI
cable version 1.4 is the most apt cable to
use for 3D functions.
Mini HDMI Port
HDMI
Converter
HDMI Cable
If there are problems with 3D using other version cables, please purchase the appropriate cable.
The Tablet supports various resolution output formats, so you can select the appropriate resolution option when
connecting the Tablet to the TV.
Note: Some TVs may not support HDMI resolution. Please refer to your TV manufacturer’s information for details on HDMI
support.
Connecting the Tablet to the TV:
1. Connect the HDMI cable and HDMI convertor together.
2. Plug the HDMI convertor to the Tablet’s HDMI port and connect the cable to the TV.
3. Select the appropriate program source on the TV for the HDMI interface.
27
Page 33
Wi-Fi
Wi-Fi is a wireless networking technology. Wi-Fi technology can provide wireless Internet connection over distances of
up to 100 meters, however the connectivity of the Wi-Fi depends on the Wi-Fi router, and the surrounding environment in
which it operates.
By accessing a wireless access point or "hotspot" the tablet can be connected to the internet. Some access points are
open and can be easily connected to, but others are hidden or have security protection such as authentication or
encryption, which will require conguration to gain access.
Wi-Fi settings allows you to turn Wi-Fi on or o, turn the open network notication on or o, connect to a Wi-Fi
network and add Wi-Fi networks.
Open the Settings list. (Through the shortcut on the Home Screen, Applications screen, or Status Bar.)
Touch Wireless & networks, and then touch Advanced.
The tablet is able to connect to various wireless networks and devices. Including Wi-Fi data networks, and Bluetooth
devices such as headsets for voice and data transmission.
3.15.1 Opening Wi-Fi settings
There are two ways to turn the Wi-Fi On of O.
Open Settings, locate the Wi-Fi tab
Touch the On/O button to turn on or o the Wi-Fi.
Open the Status Bar
Touch the Status window to lengthen the Status bar.
Touch Wi-Fi to access Wi-Fi settings
When not using the Wi-Fi, please turn it o in order to extend the battery life.
3.15.2 Turning Wi-Fi on or o
3.15 Wireless networks
28
Page 34
Tap Settings > Wi-Fi
Touch the network name you want to remove from the Wi-Fi networks list
Touch Forget in the menu that opens.
3.15.6 Forgetting a Wi-Fi network
When Wi-Fi is already on, touch Network notication to check or uncheck the box to turn the open network
notication on or o in the Wi-Fi settings list. The tablet will display or stop displaying notications in the status bar when
the device detects open networks in range.
3.15.4 Turning open network notication on or o
To add a Wi-Fi network, rstly follow the above steps to turn the Wi-Fi on, and then follow the steps listed below:
Under the Wi-Fi settings list, scroll down and touch Add Wi-Fi network.
Network SSID: Enter the name (SSID) of the network in the text eld.
Security: Select the security scheme in the menu that opens
Password: Enter any required security credentials.
Touch Save to nish adding the Wi-Fi network.
3.15.5 Adding a Wi-Fi network
When the Wi-Fi is turned on, the device searches for available networks accessible within range.
Inside Settings, when the Wi-Fi is turned on, the available networks will be listed on the side.
Select the network you would like to connect to.
If the network is open, it will automatically connect as soon as you select it.
If the network is secured, there will be a lock icon beside the name. Enter the correct password to connect.
To view detailed information about the network the tablet is connected to, touch the name of the network and the
information will show up such as IP address, speed, etc.
3.15.3 Connecting to a Wi-Fi network
29
Page 35
30
3.16 Bluetooth
Bluetooth is a wireless communications technology for exchanging information over short distances. The connectivity
between the Bluetooth devices may be aected by their surroundings and is altered or reduced by obstacles such as
walls or other electronic devices.
To congure the Bluetooth settings of the tablet in the Bluetooth settings list:
Touch and open the Settings from the Home screen or Applications screen
Touch Wireless & networks, and touch Bluetooth settings.
3.16.1 Opening Bluetooth settings
Open the Settings
Under Wireless & Network > Bluetooth
Touch the On/O button to activate or deactivate Bluetooth
To extend the battery life of the tablet, turn Bluetooth o when not in use.
3.16.2 Turning Bluetooth on or o
The Bluetooth name of your tablet is the identication of your device to other Bluetooth Devices.
Open the Settings.
Under Wireless & Network touch Bluetooth.
Touch the Menu button. at top right corner of screen.
Touch Rename tablet in the options given.
Type the new name in the window prompted.
Touch Rename to conrm change.
3.16.3 Changing the Bluetooth name of your Tablet
Page 36
Paired devices
Once a device is paired, the name of the newly paired device will show up under a separate category as Paired devices.
After a device has been paired, it stays paired unless the paring is disconnected manually.
To automatically disconnect your tablet from a paired device, simply turn o the tablet’s Bluetooth or the target device.
To manually disconnect your tablet from a paired device or to be unpaired from this device by erasing all the pairing
information;
Touch Unpair.
3.16.5 Disconnecting from or to be unpaired from a Bluetooth device
Pairing with a Bluetooth device
Search for a Bluetooth device, pair with it, and exchange information between devices.
Open the Settings
Under Wireless & Network touch Bluetooth.
Touch the name of your device to make it visible to nearby devices.
Touch Search for devices at top to begin or reinitiate search for other devices.
Touch the name of device that you want your device to pair up with.
Window will show up asking for conrmation, touch Pair to conrm.
3.16.4 Connecting to Bluetooth devices
31
Page 37
3.17 GOOGLE SERVICES
3.17.1 Creating a Google Account
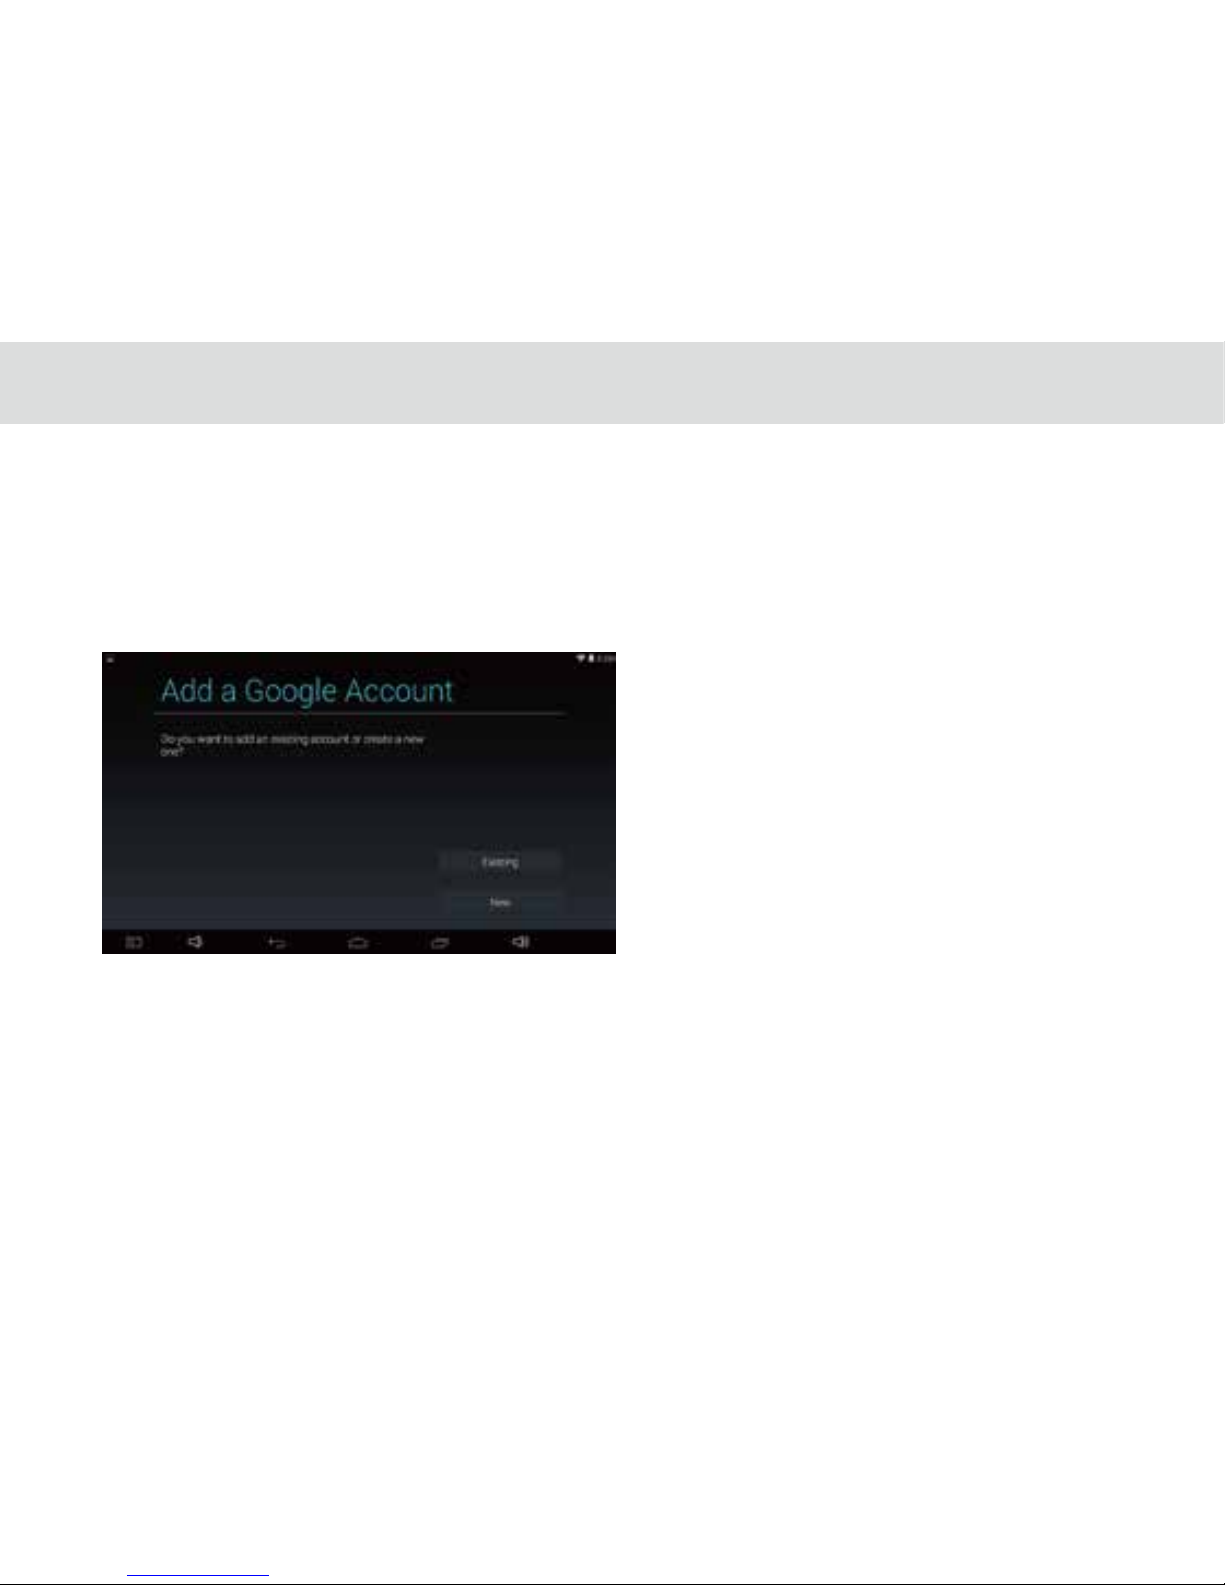
When accessing a Google service for the rst time with your device, you will be asked to sign in using your Google
account.
Make sure the Tablet is connected to a network to sign in or create a Google account.
If you already have a Google account, simply enter
your information and sign in.
If you do not have an account, to create a Google
account:
1. When asked if you have a Google account or not,
touch New.
2. Insert you last and rst name, touch Next.
3. Type in the e-mail address you would like to use,
and touch Next.
4. Insert the password, making sure that you
correctly type in the password twice when prompted.
5. Type in your Recovery e-mail address and set up
a security question to help you access your account in
case you forget your password.
6. Check the box that to agree to the Google Terms
of Service and additional privacy policies, and touch “I
accept”.
7. Input the authentication keys that appear. Your new Google account has been successfully created!
32
Page 38
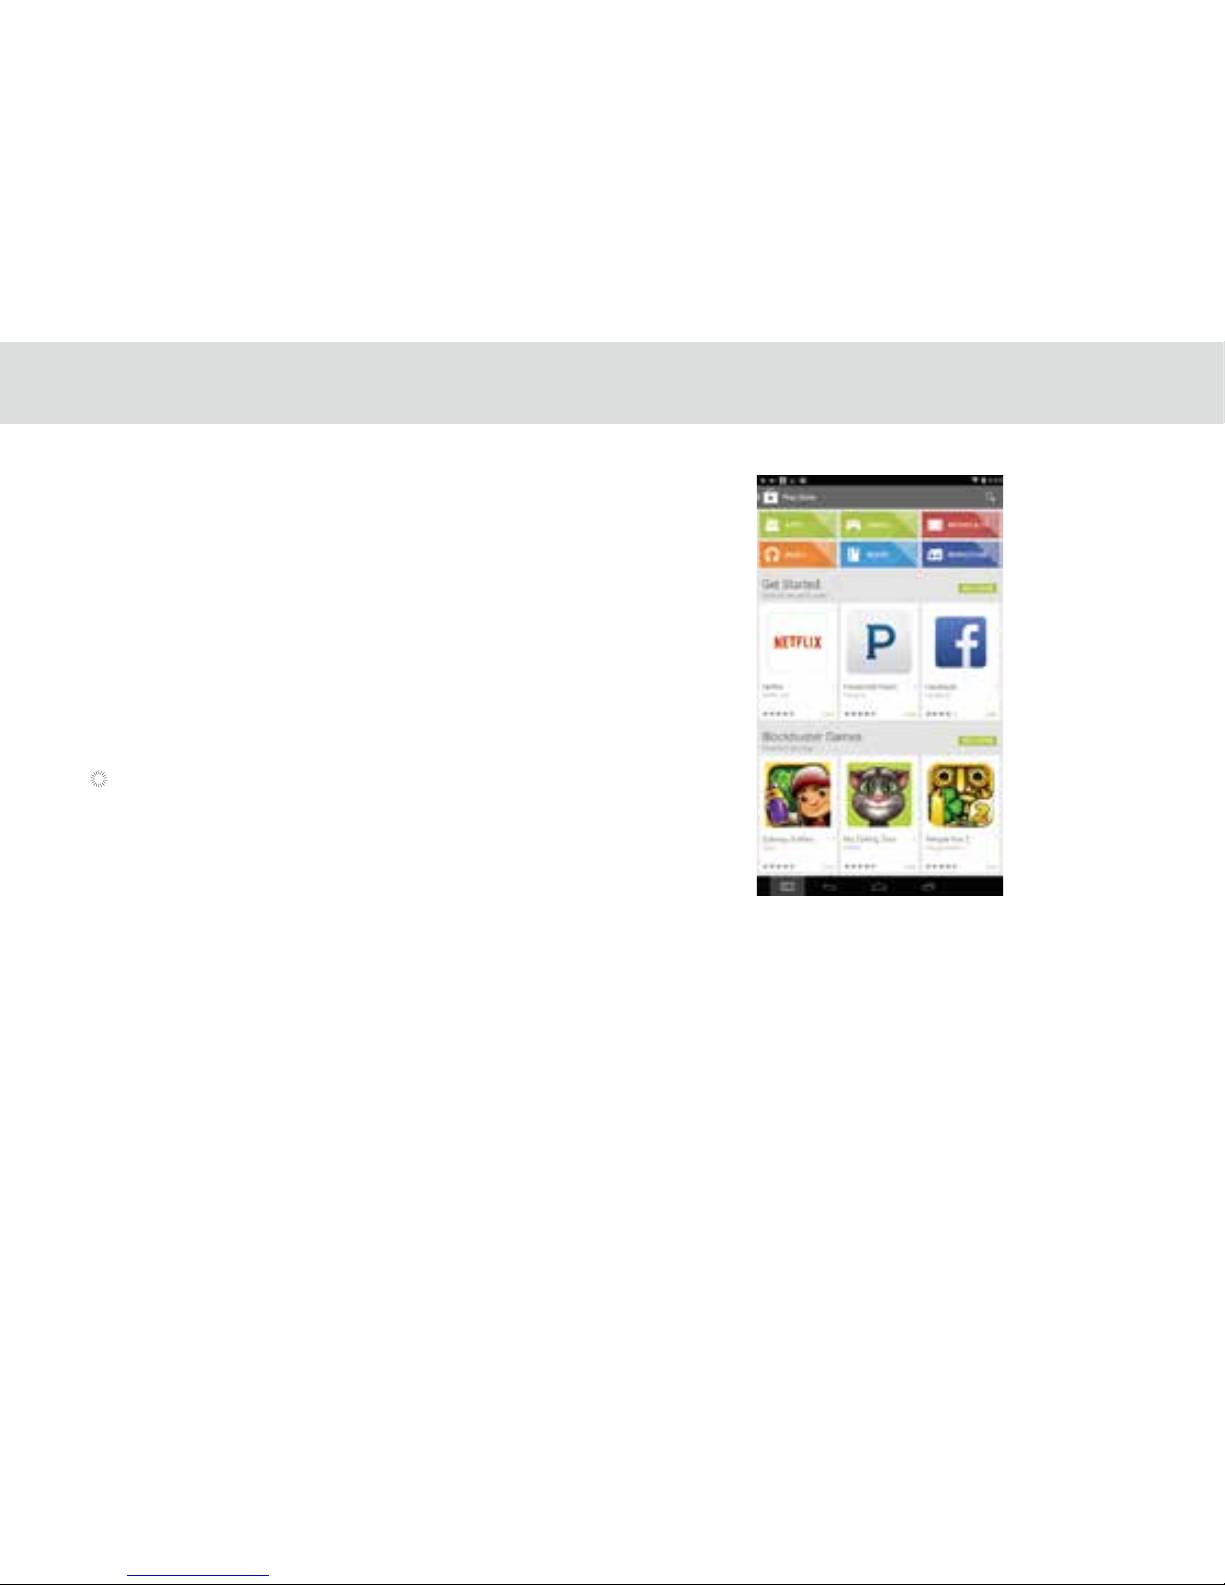
3.17.2 Using the Play Store
Within the each option, you can easily search for
applications by name or keyword.
You can access thousands of easily downloadable
applications and games for your Tablet via the Google Play
Store.
3.17.3 Searching for Applications
There are several ways to search for applications in the Play
Store, through:
1. Featured applications.
2. Categories
3. Search function.
3.17.4 Installing an Application
1. Go to Play Store from the Home screen or Applications screen.
2. Touch a category, and then touch the application you want to download.
3. To install, touch FREE (for free apps) or Buy (for paid apps) to begin download and installation.
4. Download progress can be checked from the notication panel.
Most applications will be downloaded within seconds.
5. After the application has been downloaded and installed on your Tablet, the content download icon appears in
the Status bar.
6. To download and install an application from sources other than the Play Store, touch Settings > Security, and check
the box for Unknown sources.
33
Page 39
3.17.6 Backing up and restoring apps and settings from a Google account
1. Access the Settings list from the Home screen or Application screen.
2. Scroll down the Personal section, and touch Backup & reset.
3. Check the box for Back up my data and Automatic restore.
3.18.1 Opening E-mail
1. Go to Play Store, touch the My apps button.
2. Touch the application to uninstall, and then touch Uninstall.
3. When asked for conrmation, touch OK to remove the application from your Tablet.
3.17.5 Uninstalling an Application
Touch E-mail on the Home screen or on the Applications screen to open E-mail.
3.18 E-MAIL
34
Page 40
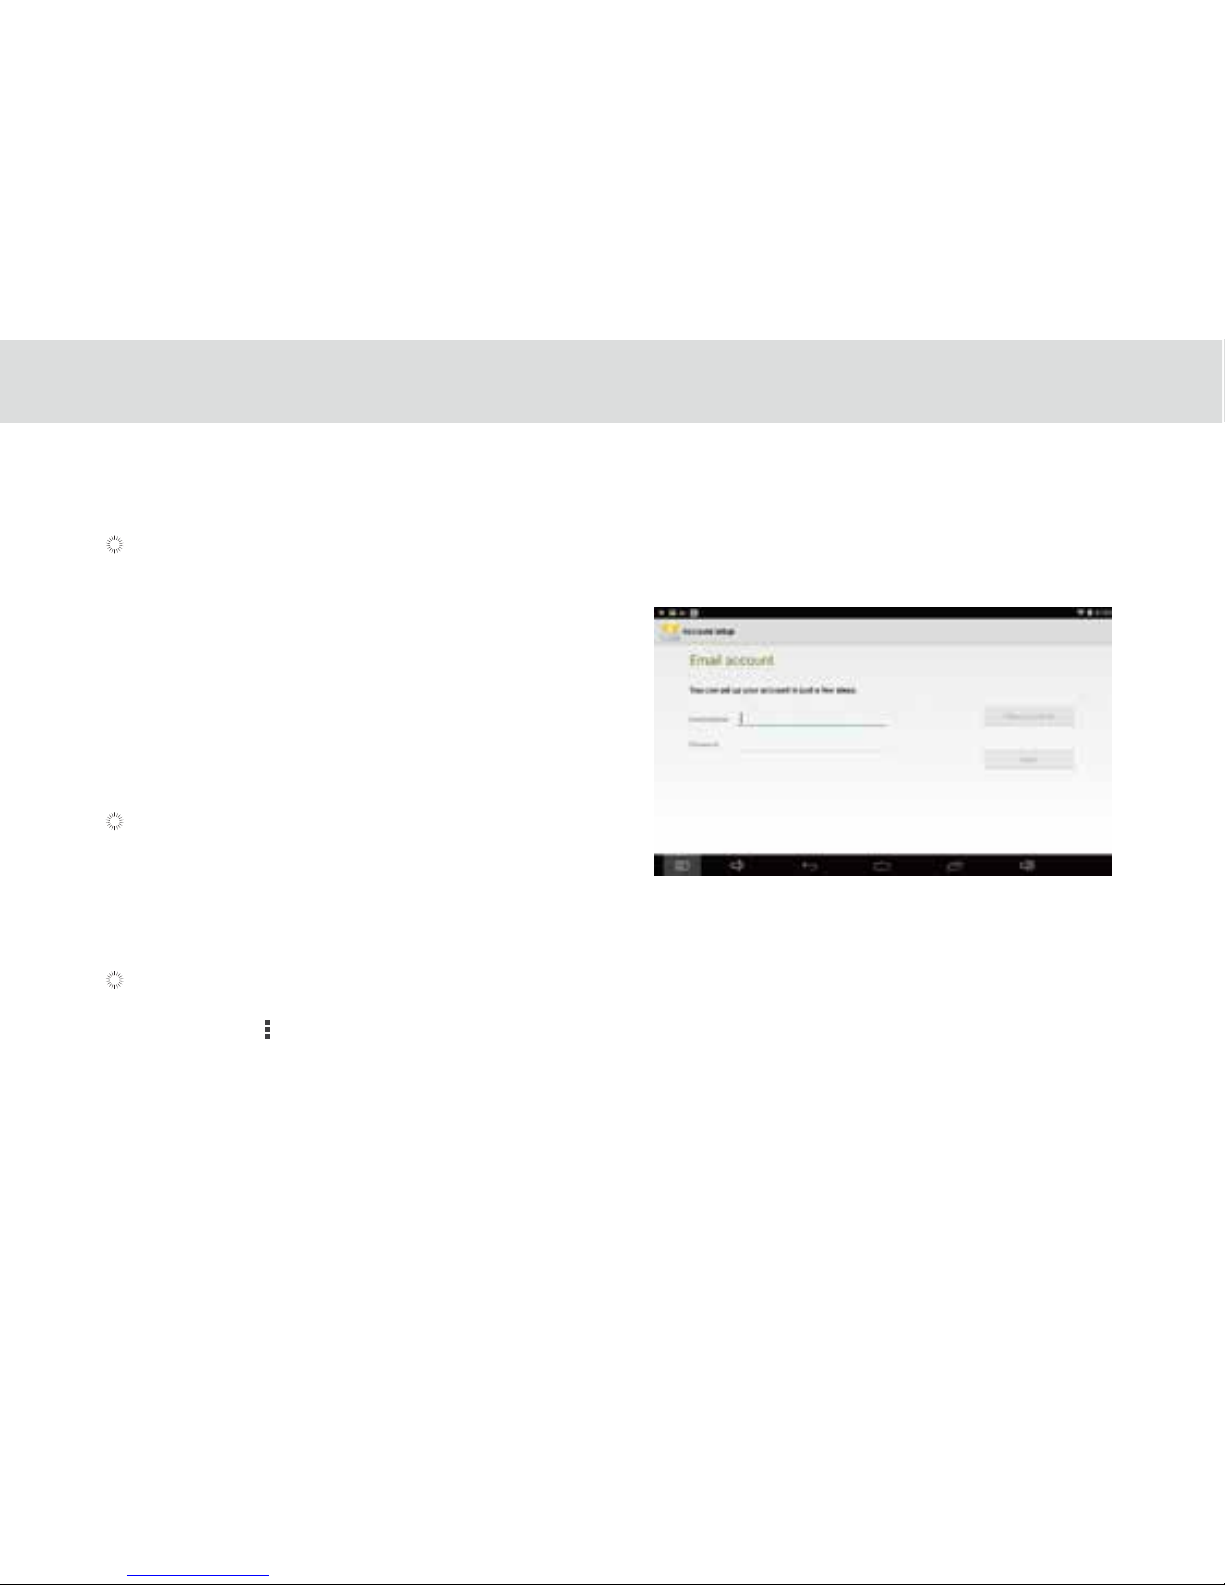
3.18.2 Adding and deleting e-mail accounts
Adding an e-mail account
1. Touch New account.
2. Enter your e-mail address and password, and touch Next.
3. Within Account settings, type in the name that will represent
the account that you would like to be displayed when you send
e-mails.
4. Touch Next to nish setting up your new e-mail address on
your device.
Manual setup
1. Touch New account.
2. Type in your e-mail address and password, and touch
Manual set up.
3. Select the type of e-mail account. (Check your e-mail provider for more information if necessary.)
4. Enter the correct account details, and touch Next when done.
The rst time you open E-mail, you are prompted to set up an e-mail account. If you have an existing e-mail account,
you can add this by touching Add account.
Automatic setup:
Deleting an e-mail account
1. Open the E-mail screen.
2. Touch Menu at the upper right corner. Touch Settings.
3. Scroll down and touch Remove Account.
4. Touch OK in the dialog to conrm your delete action.
35
Page 41
3.18.3 Gmail
Gmail is an e-mail service provided by Google. Gmail can be accessed from the Applications screen by touching the
Gmail icon.
To add a Gmail account:
1. After opening Gmail, touch Add existing.
2. Enter the e-mail address and password of your Gmail account.
3. Touch Sign In to complete the process.
To create a Gmail account
1. At the Gmail screen, touch New.
2. Insert you last and rst name, and touch Next.
3. Type in the e-mail address you would like to use, and touch Next.
4. Insert the password.
5. Type in your Recovery e-mail address and set up a security question to help you access your account in case you
forget your password.
6. Check the box that says “Agree to the Google Terms of Service and additional privacy policies”,and touch “I accept”.
7. Input the authentication keys that appear.
Your new Gmail account has been successfully created!
To remove a Gmail account
1. Open the Settings list from the Applications screen.
2. Under Personal, touch Accounts & sync.
3. Touch the e-mail account that you would like to remove.
4. Touch the Menu button at the top corner.
5. Touch Remove account from the menu and conrm.
36
Page 42
3.19 Camera Instructions
37
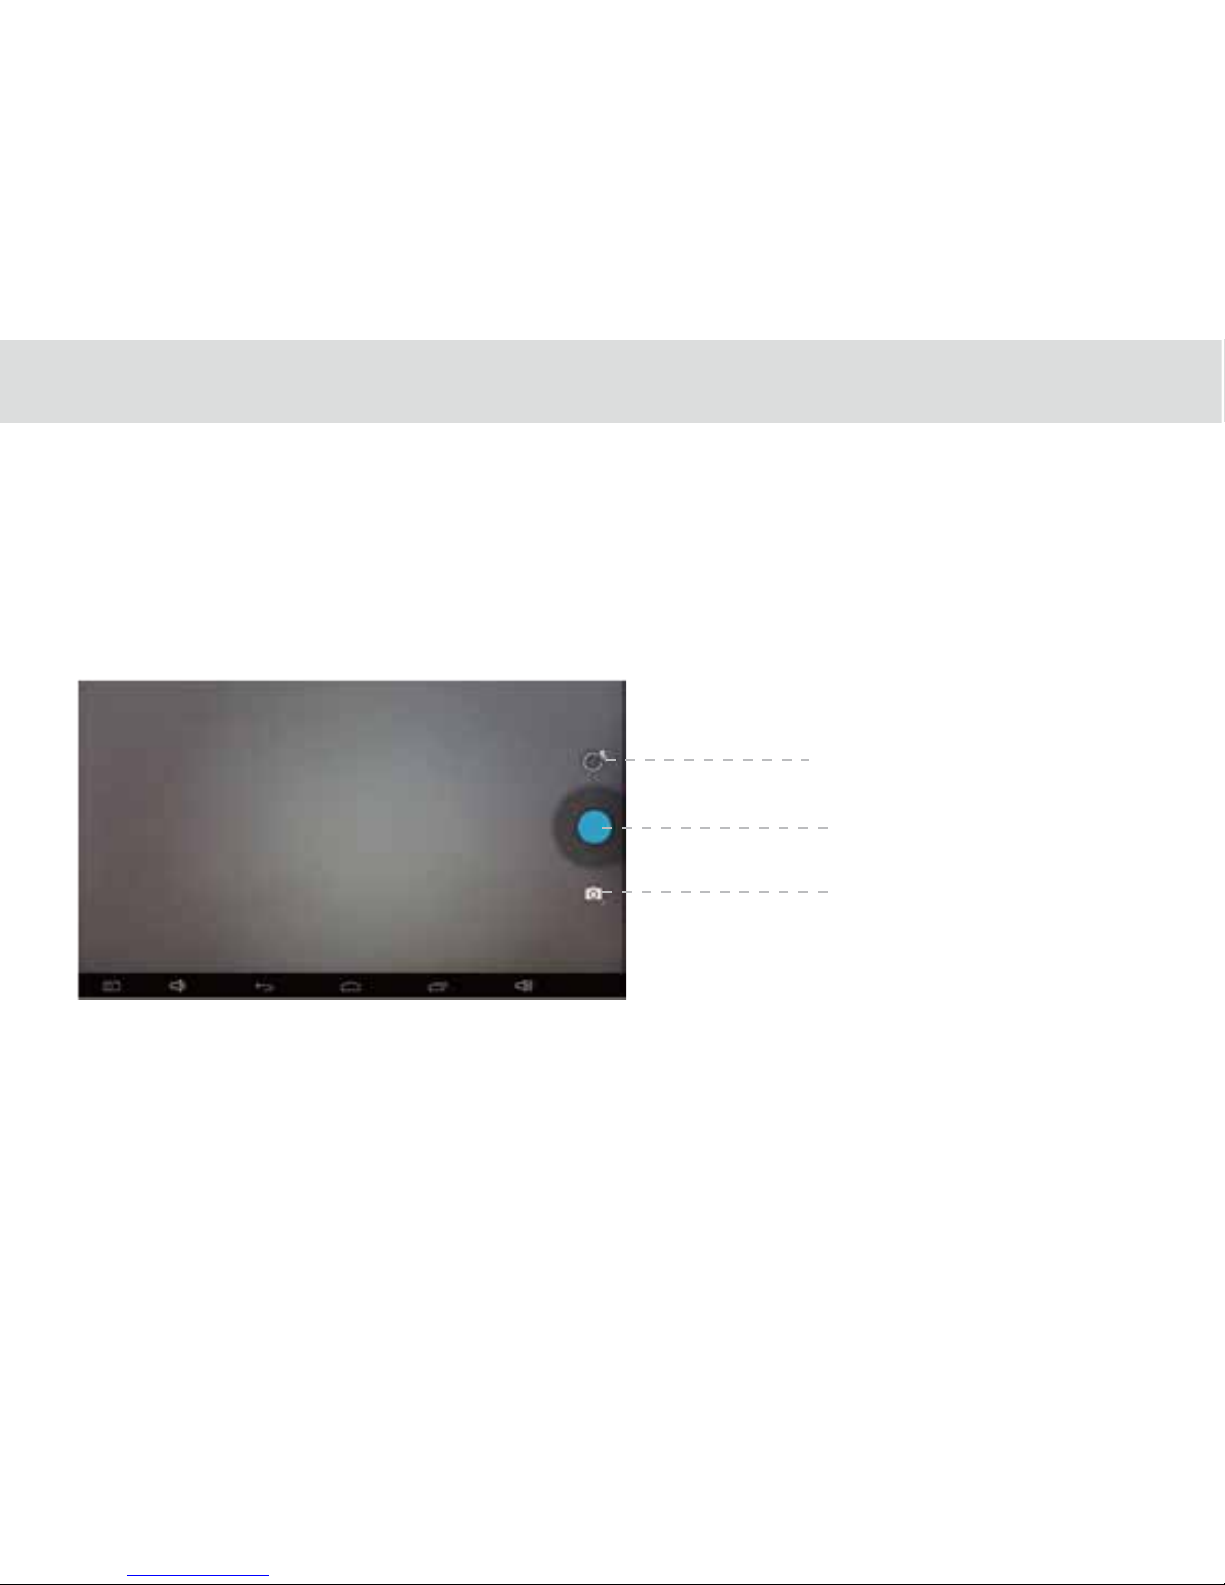
Take picture or make video: nd and tap “camera” icon on tablet, keep lens cap clean and rub it by a clean cloth before shooting, any
stain on it will cause photo bad exposure or blurring.
1. Launch camera in application program, tap blue button to capture picture, swipe left on the screen to view photo album, swipe
right on the screen to access photo taking mode.(Figure one);
Camera & Video Recording Switch
Press to take a picture.
Setting
Figure 1
Page 43
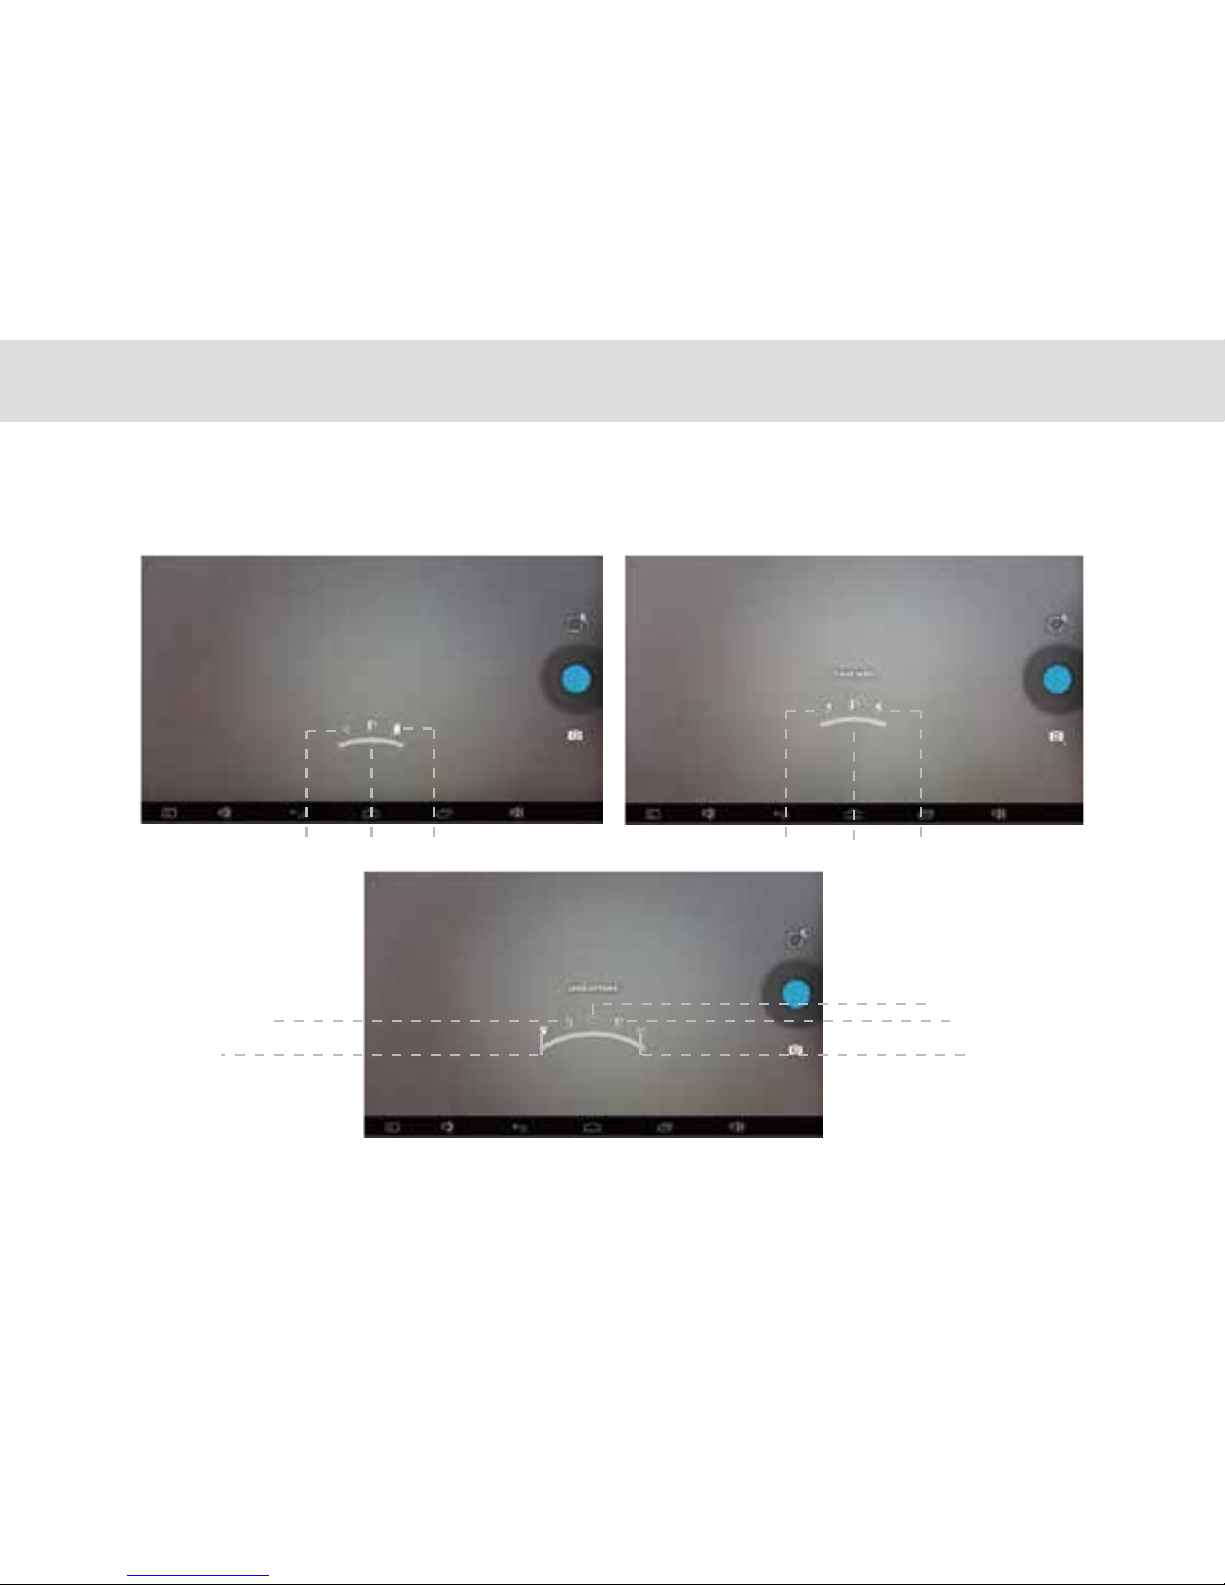
Picture size
Countdown timer
location
More options Switch to front cameraFlash mode
38
Framing mode
AW
Figure 2
Figure 3
Figure 4
2 . Tap the icon above blue button, there will display three icons on the screen. Their order from left to right respectively
are “more options” , “ash mode” and “front and rear camera switching mode”. “More options” includes settings of
“location”, “countdown timer”, “picture size”, “white balance”, “cloudy” and “scene mode”. (Figure 2,3 and 4)
Flash o Flash auto Flash on
Page 44
39
Figure 5
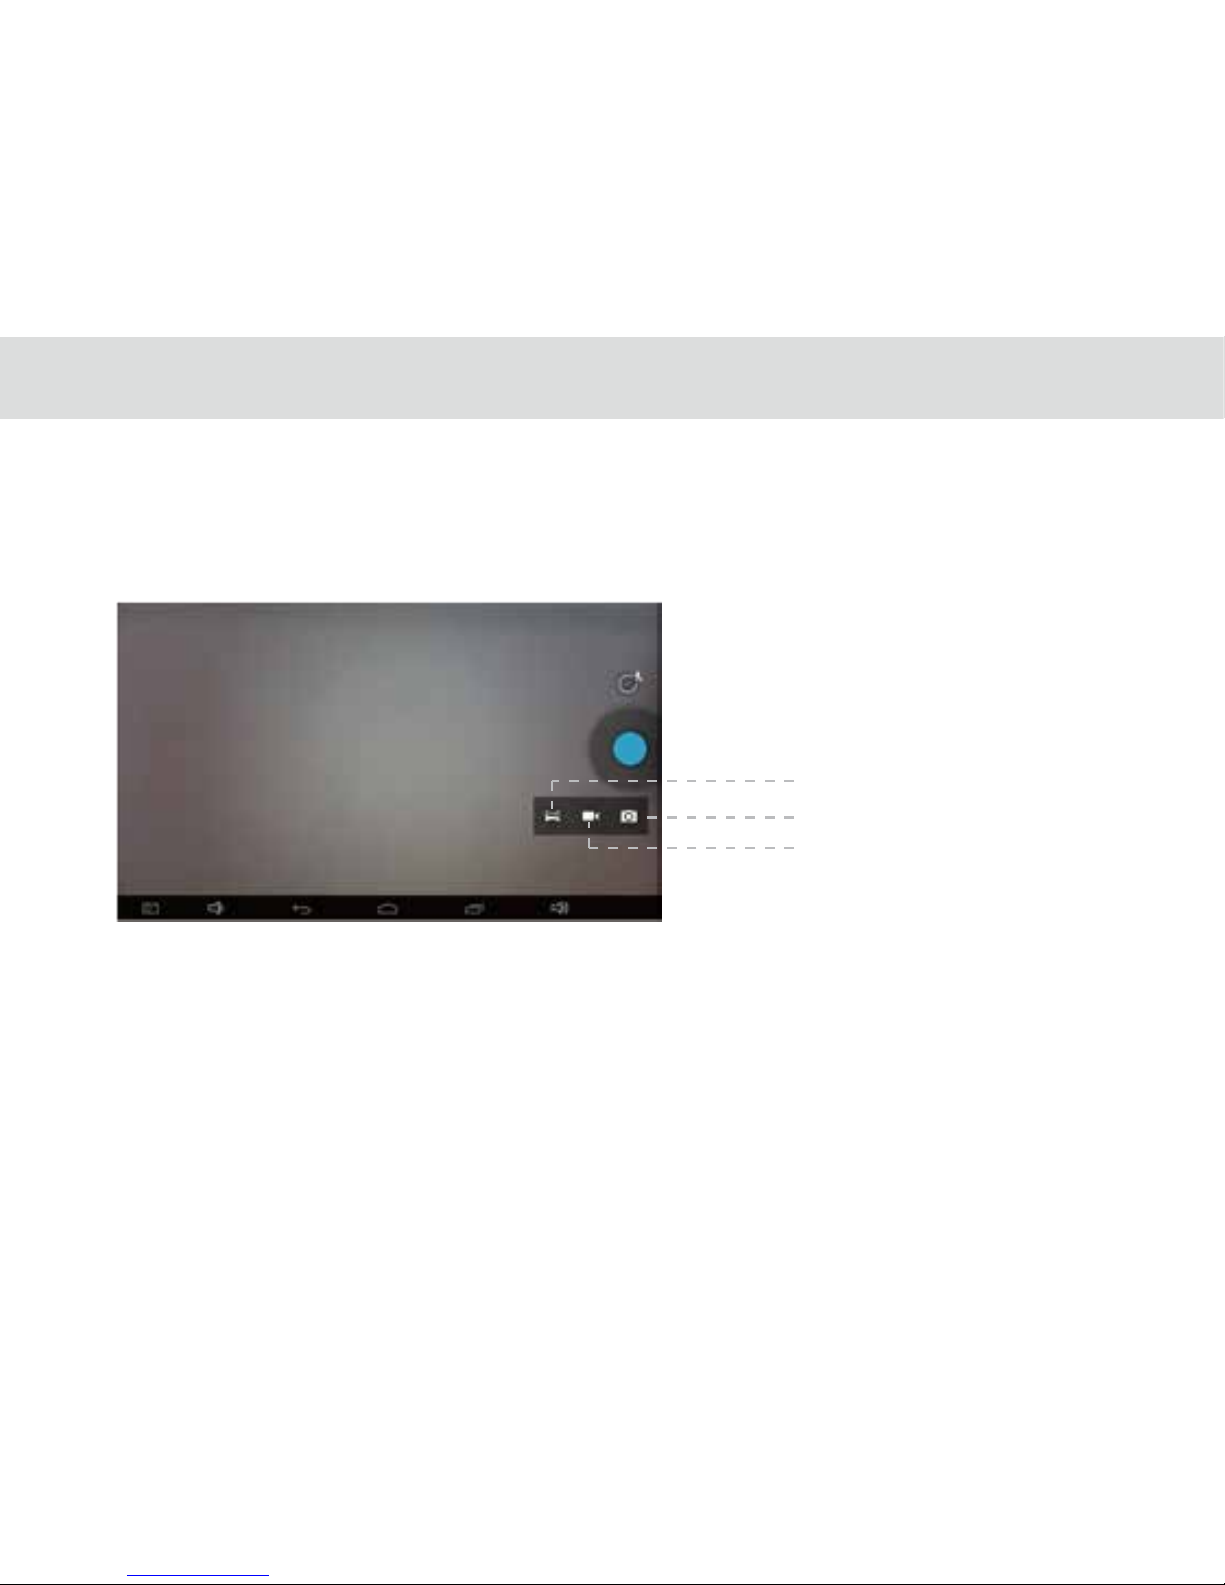
3 . Tap camera icon below blue button, there will display another three icons on the screen. Their order from left to right
respectively are “panoramic photo mode”, “video mode” and “photo mode”. (Figure 5)
Video
Panorama Mode
Photo mode
Page 45
3.20 Home control
40
Terms of Use
The Home Control app is a Home Automation System which is comprised of the following: IR remote controller, Reservation
(Timer)control, Camera motion detection and Outside-Home Control features which are integrated and provided for user's
convenience. User has to consider the hardware congurations like IR sensor direction, distance from TELPAD to target device,
Camera direction and power supply for the TELPAD. The power stability of TELPAD should be considered if TELPAD is used
continuously for a long time and also the user can set TELPAD in "stay awake mode" to keep the Home control running. User has
to verify the software conguration like IR signals, Internet connection, and personal use case. The Out-Home control function
may not work properly depending on the following factors: client mobile device, unstable network environment, network timing
or Internet Service provider. The Outside-Home Control works only on Android devices which are equipped with Google service.
The push message used for Outside-Home Control is provided by Google , GCM (Google Cloud Messaging) message do not
guarantee high percentage of delivery. User needs to retry if the message/request is not delivered successfully. For the service
implementation, only the latest image captured and remote controller status will be stored in the server with security code
algorithm. User has to carefully manage the connection between “Home Control Host” installed on the TELPAD (available in PLDT
KnAPPsack) and “Home Control Client” (available in PLDT knAPPsack) installed on the user's smartphones/android devices to
monitor/control TELPAD (to register client's device connect to TELPAD via bluetooth).
TM
Page 46
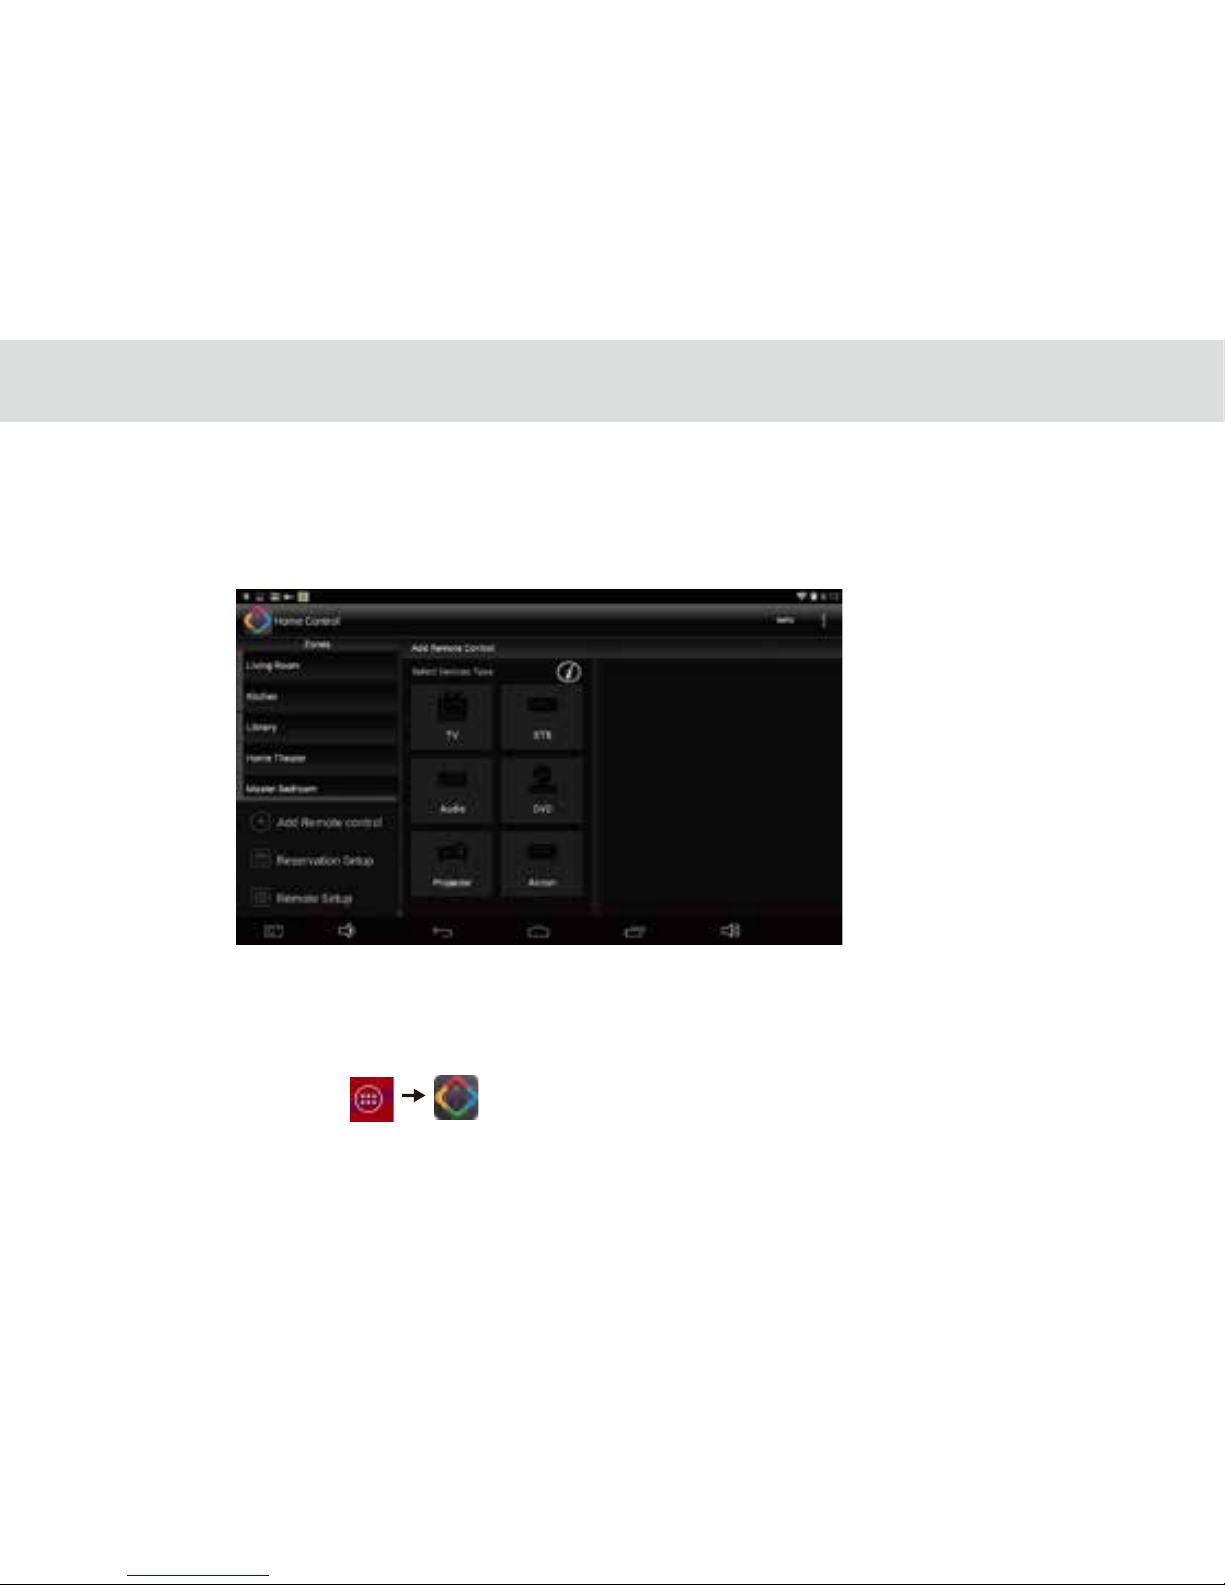
This section contains a description of Home Control application which includes (1) IR (infrared) universal remote, (2)
Reservation, (3) Out Home Control and (4) motion detection.
TELPAD Home control will work with the devices that are already in your home. It can control your TV, Cable Box,
Radio, DVD, DVR, VCR, Blu-Ray, CD, Audio, Air Con (A/C), Amplier and Satellite and much more.
3.20.1 IR Universal remote Initial Conguration
-From the Home screen, tap
NOTE:
The Home Control operates the same way as an ordinary remote control IR signals. Please be careful not to cover the IR
sensor marked with Red of the TELPAD when you use the IR Remote function. This function may not be supported
depending on the model, the manufacturer or service company.
41
Page 47
3.20.2 IR Learning
-If you want customized remote, please select “Customize” when selecting Brand.
-Once installed, it will show learning function interface. Each button have to be assigned a signal with IR Learning
process by touching it until tapping “Finish” button.
-From the main menu tap “add Remote control” Select Device Select Brand * Select Model Conrm if signal is
working** Save remote with “Remote Name ” Select Zone and tap save Tap selected Zone tap saved “Remote
Name” you can nd installed IR remote UI.
*If your device is made by top ranked brands, then check “Show most common models only” option. This will lter out
minor provider. There are two search methods available, standard and model search ow. Please use default standard
search ow if you are rst time to setup. If you want model search ,check “Model Search” option, you can search the code
with input model name.
- Standard search ow : Optimized and intelligent algorithm to nd the right code. User just tap the displayed button and
select “Correct” if it is works. If this process fails, it will automatically forward to Model search ow.
- Model search ow : User need to input at least 2 characters for model name of the device, and tap . User gets the
count of available codes (Interrelated device) for this brand . By using and preview command button, it will be able
to traverse all codes for user to identify the right code. If the model name is incorrect or leaved blank, it will show all
available code for the brand.
**When conrm signals, please point the Red part of TELPAD towards the device you are trying to control just like a
standard remote control.
42
Page 48
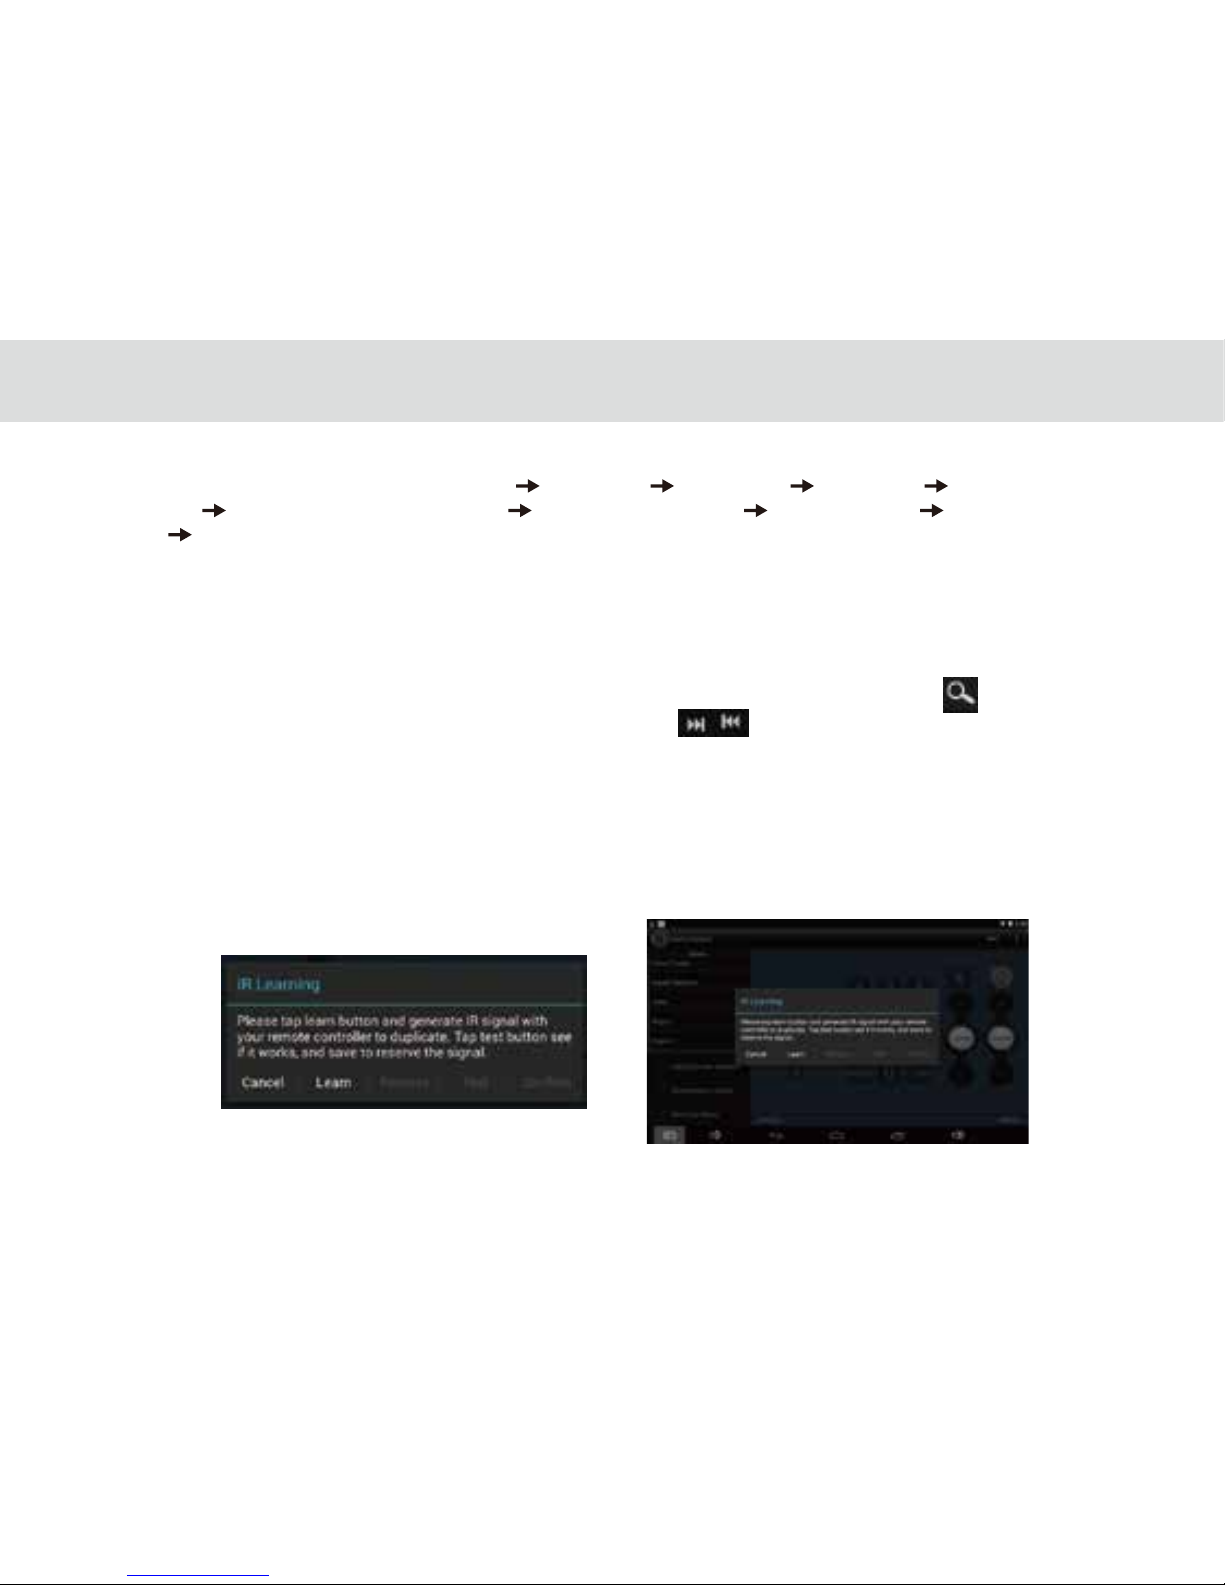
-Please point your original remote controller with the Red part of TELPAD like right picture. And follow on-screen
instructions to congure the device.
-Please check if your device is working just like original remote controller with “Test” button. If not, please tap “Learn”
button and repeat several times until it works. Tap “Conrm” to save the changes.
3.20.3 Reservation
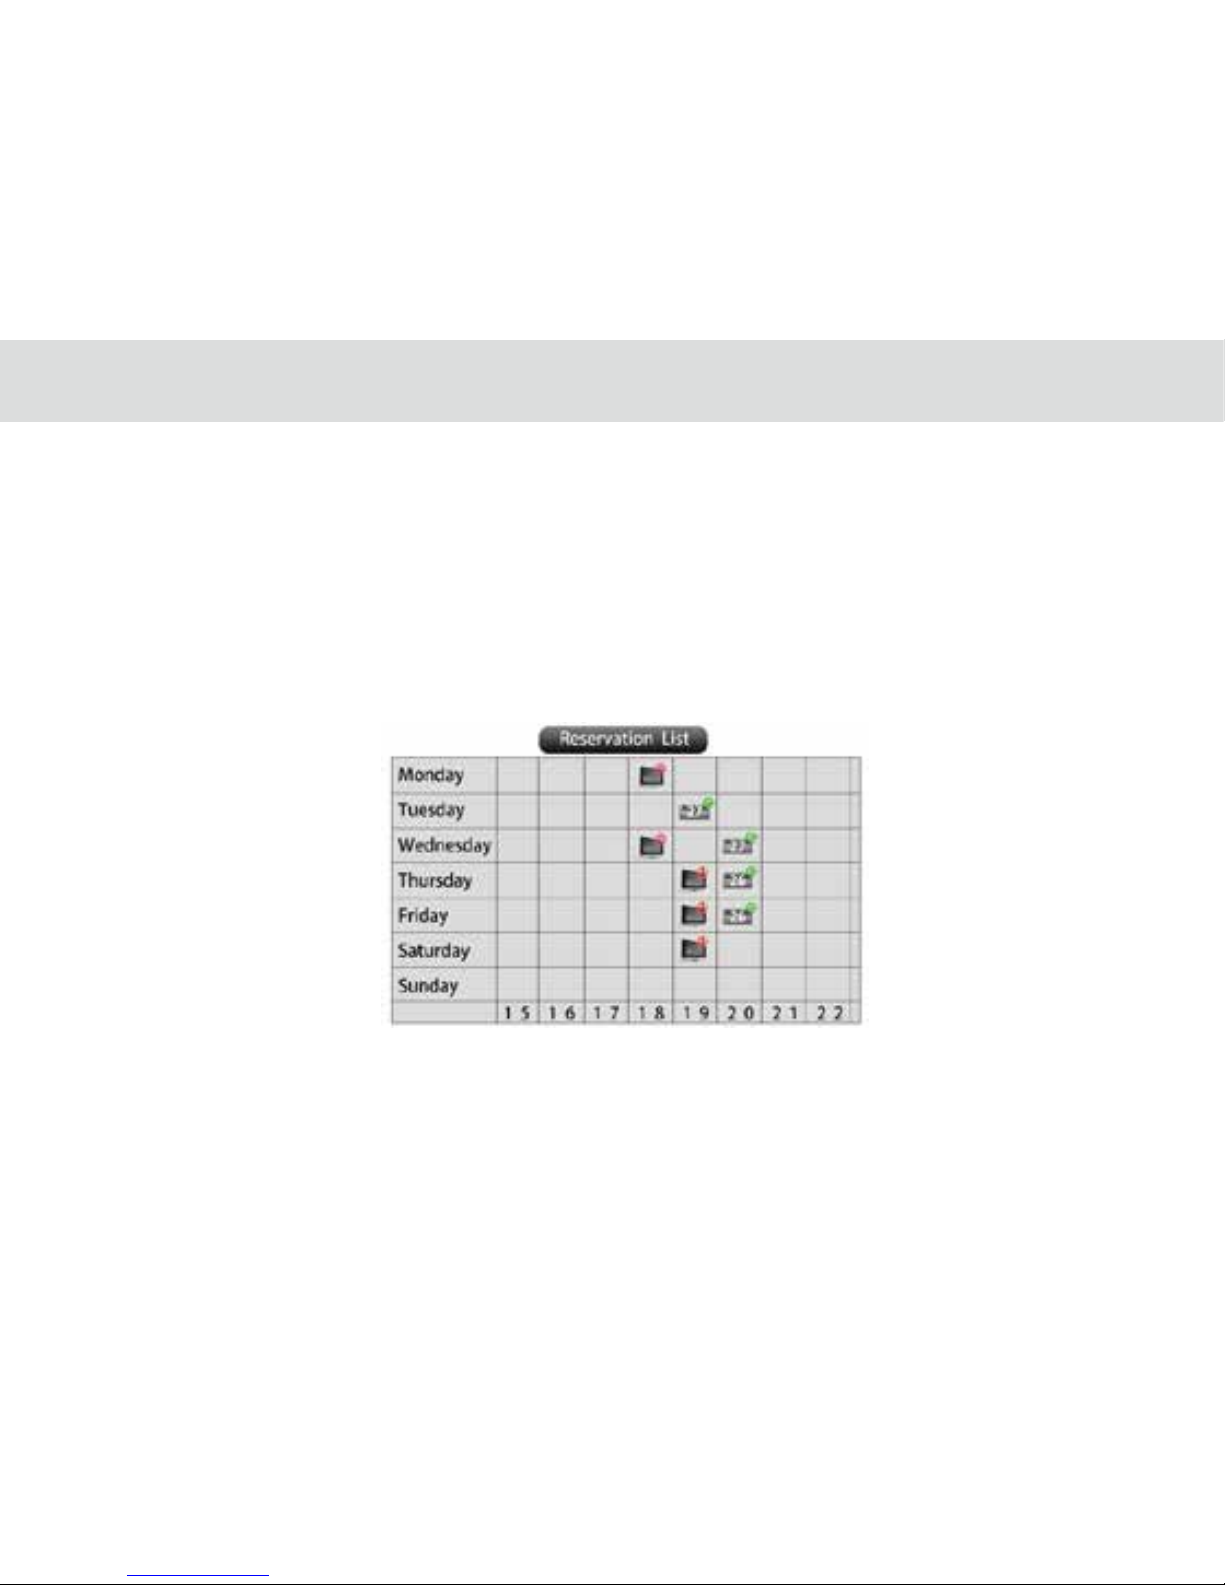
-You can schedule the time and date you want your device to turn ON/OFF. This allows you to generate an IR signal at a
specic time.
Concept diagram
43
Page 49
3.20.4 Reservation Setup
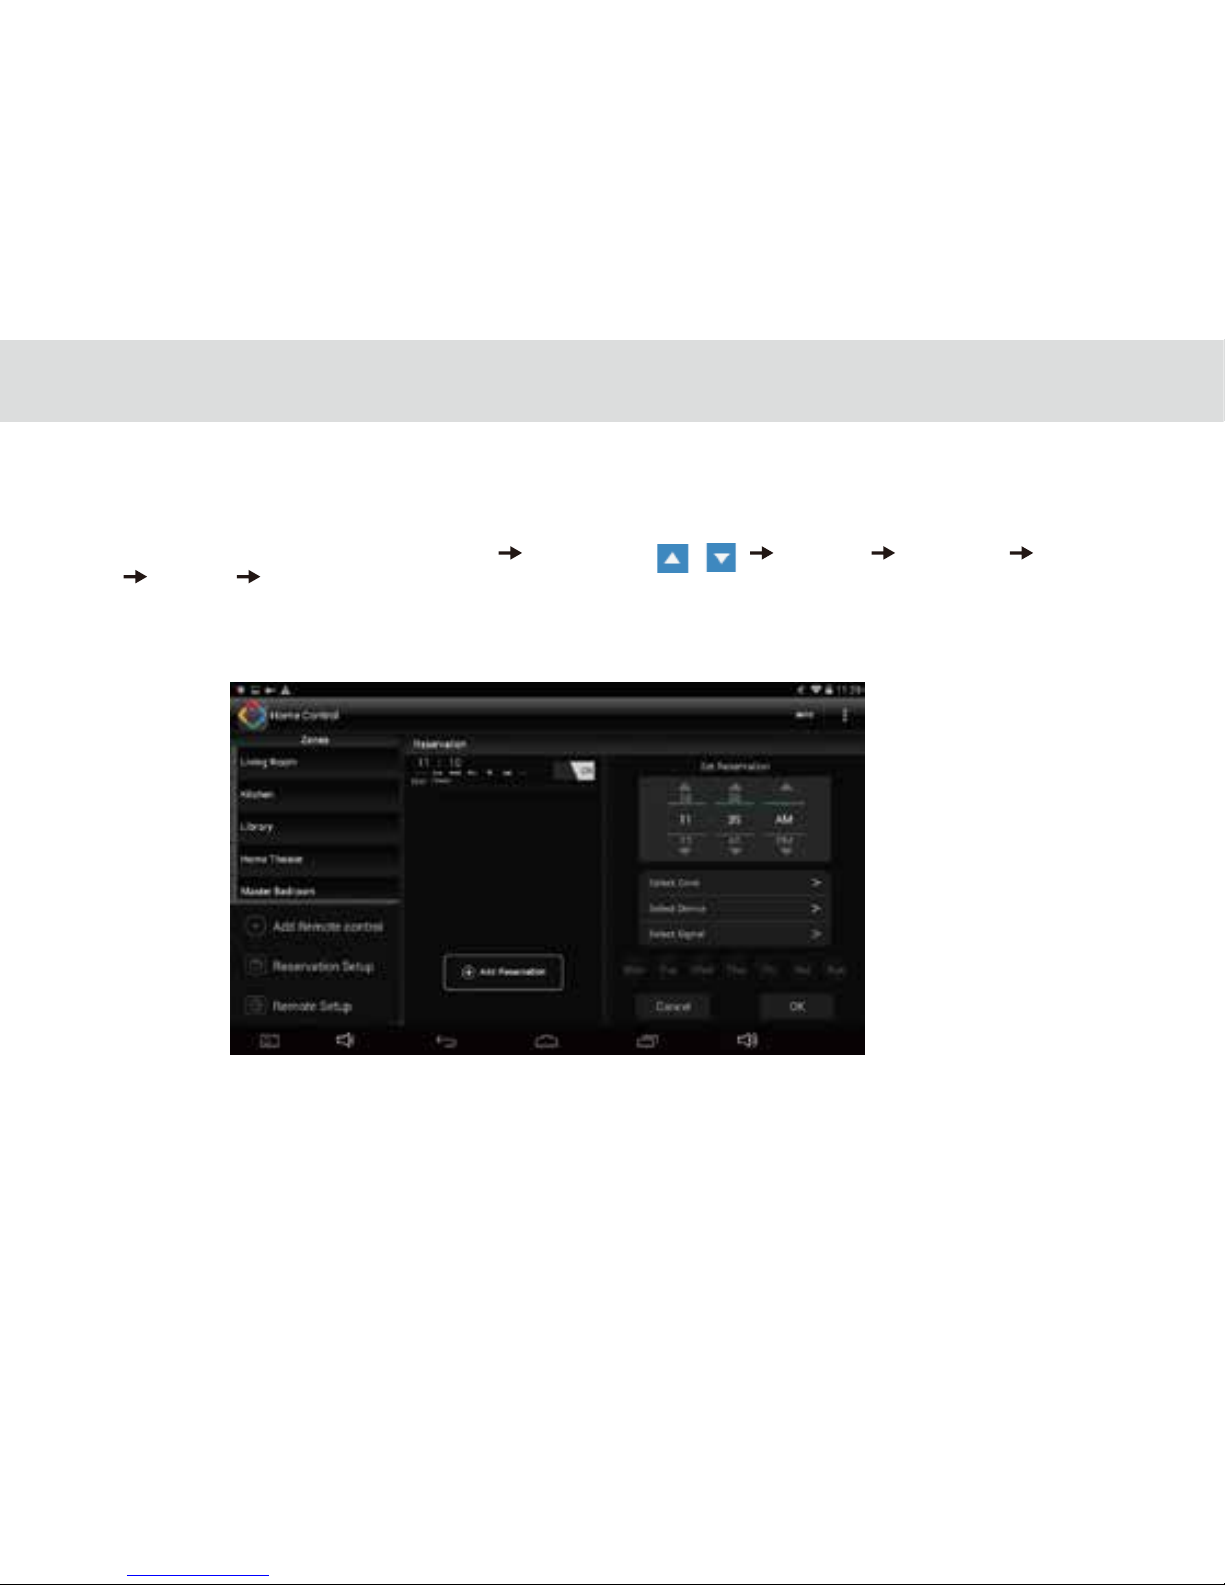
- Reservation is just like Alarm App. The dierence is we have to assign a IR signal rather than a melody. Please install required
IR signal with “IR Universal remote Initial Conguration” process before reservation setup.
- From the main menu tap “Reservation Setup” Select Time (tap , ) Select Zone Select Device Select Signal
Select Day Save reservation.
“Power On” signal make the device always on. “Power Toggle” signal is used to toggle power signal On and O.
- Please make sure “Mobile Client Setup “ process is done if you want receive notication on mobile.
44
Page 50
3.20.5 Outside Home control
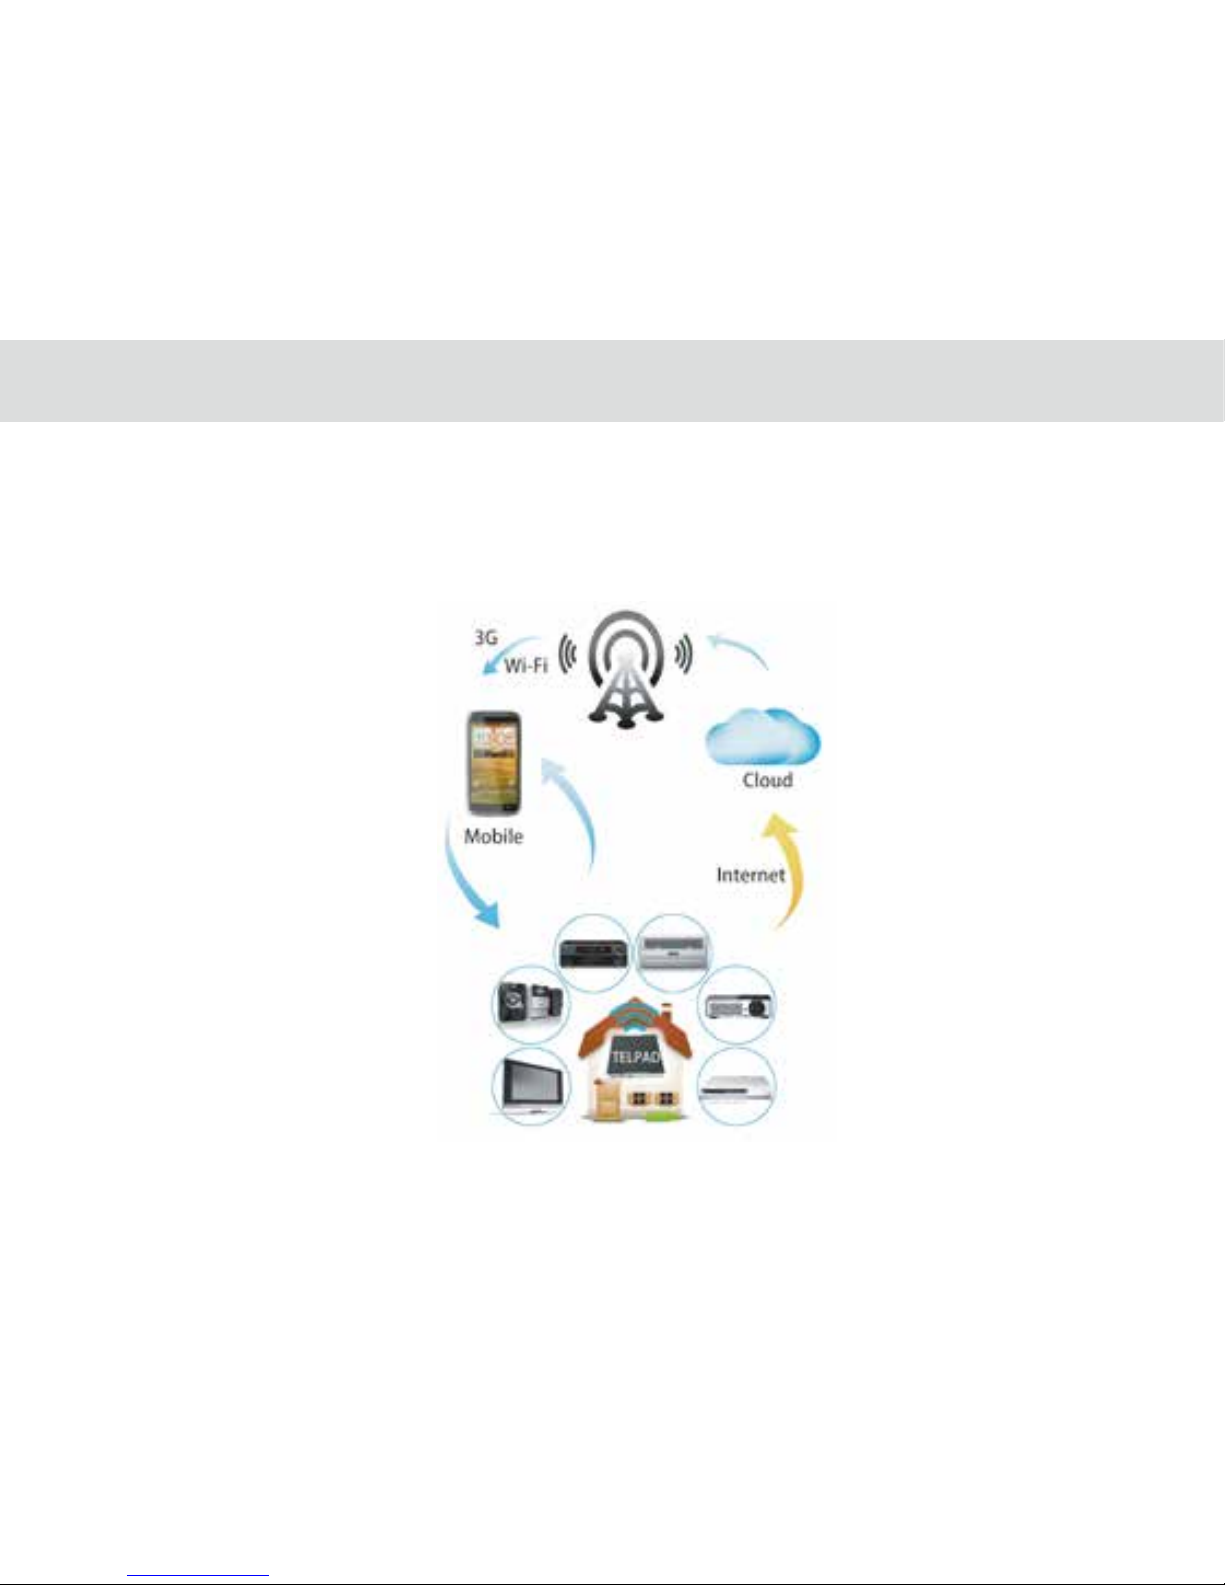
TELPAD provides Outside Home control feature. The user must pair his Smartphone to the TELPAD via Bluetooth.
You can control your home device like air-conditioner or IR controllable light system with your android mobile from
Anywhere with your 3G or WIFI connection. If you want check the result, TELPAD can be provided for remote
camera for home monitoring.
45
Page 51
Mobile Client Setup
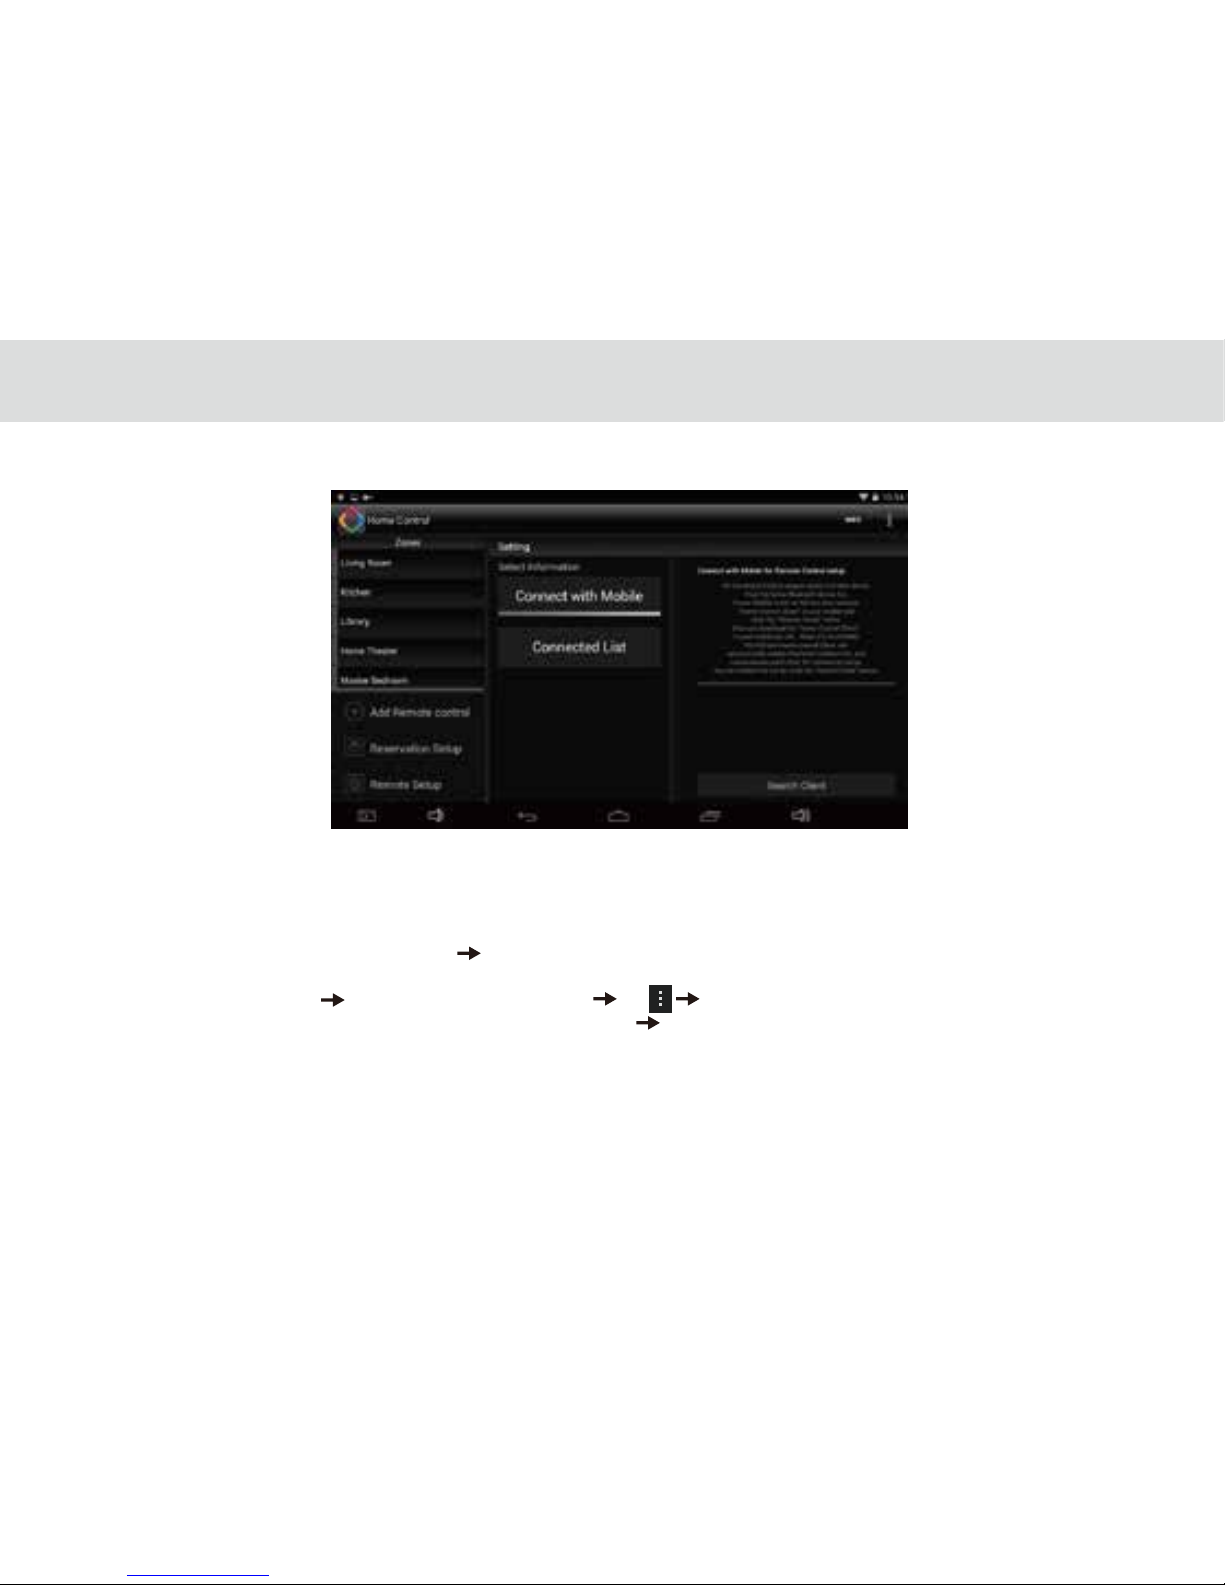
-“Mobile Client Setup “ is just like Bluetooth pairing process. It allows you to establish connection between TELPAD and
mobile device. TELPAD and “Home Control Client” in mobile device will automatically enable Bluetooth connectivity and
communicate each other for connection setup. Please follow on-screen instructions to connect the device.
-From the main menu tap “Remote Setup” tap “Connect with Mobile”
-Download & install “Home Control Client” in the mobile if not installed. (URL will be given in TELPAD on-screen instruction,
Input it in mobile Browser) Execute “Home Control Client” tap “Remote Setup” (in the Mobile, not TELPAD)
-Refresh the list by clicking the “Search Client” button in TELPAD Select the Mobile device in the list.
46
Page 52
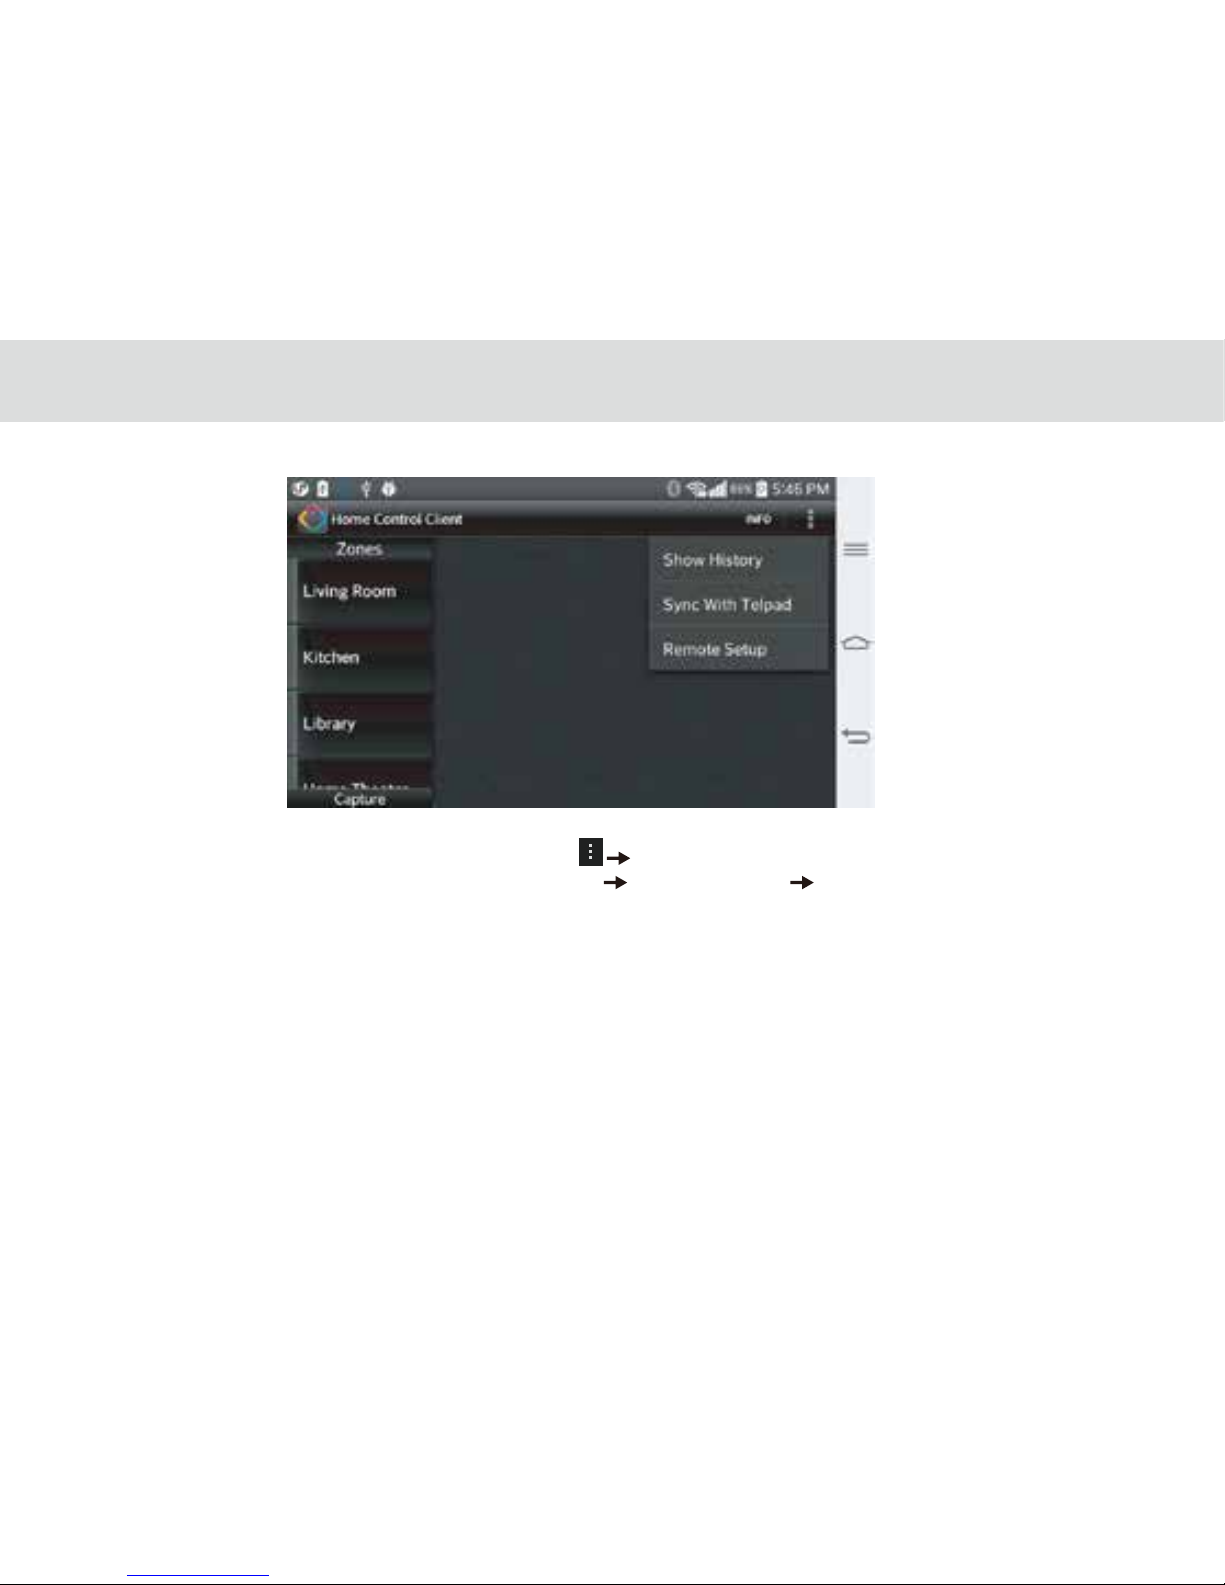
Outside Home control
-From the main menu in your “Home Control Client” tap “ tap “Sync With TELPAD”. Once downloaded, “Home Control
Client” can control TELPAD with IR Remote menu( Select Zone tap “Remote Name” tap required signal.
-From the main menu in your “Home Control Client” tap “Capture” for request TELPAD Camera still image.
-Please follow on-screen instructions and wait for seconds until a still image pop-up.
- See the image and Tap <Back> key to return to main menu.
-Only the latest captured image (It will automatically replace the previous captured image) will be stored in the server with
security code algorithm.
-Please provide TELPAD with continuous power supply for operation.
47
Page 53
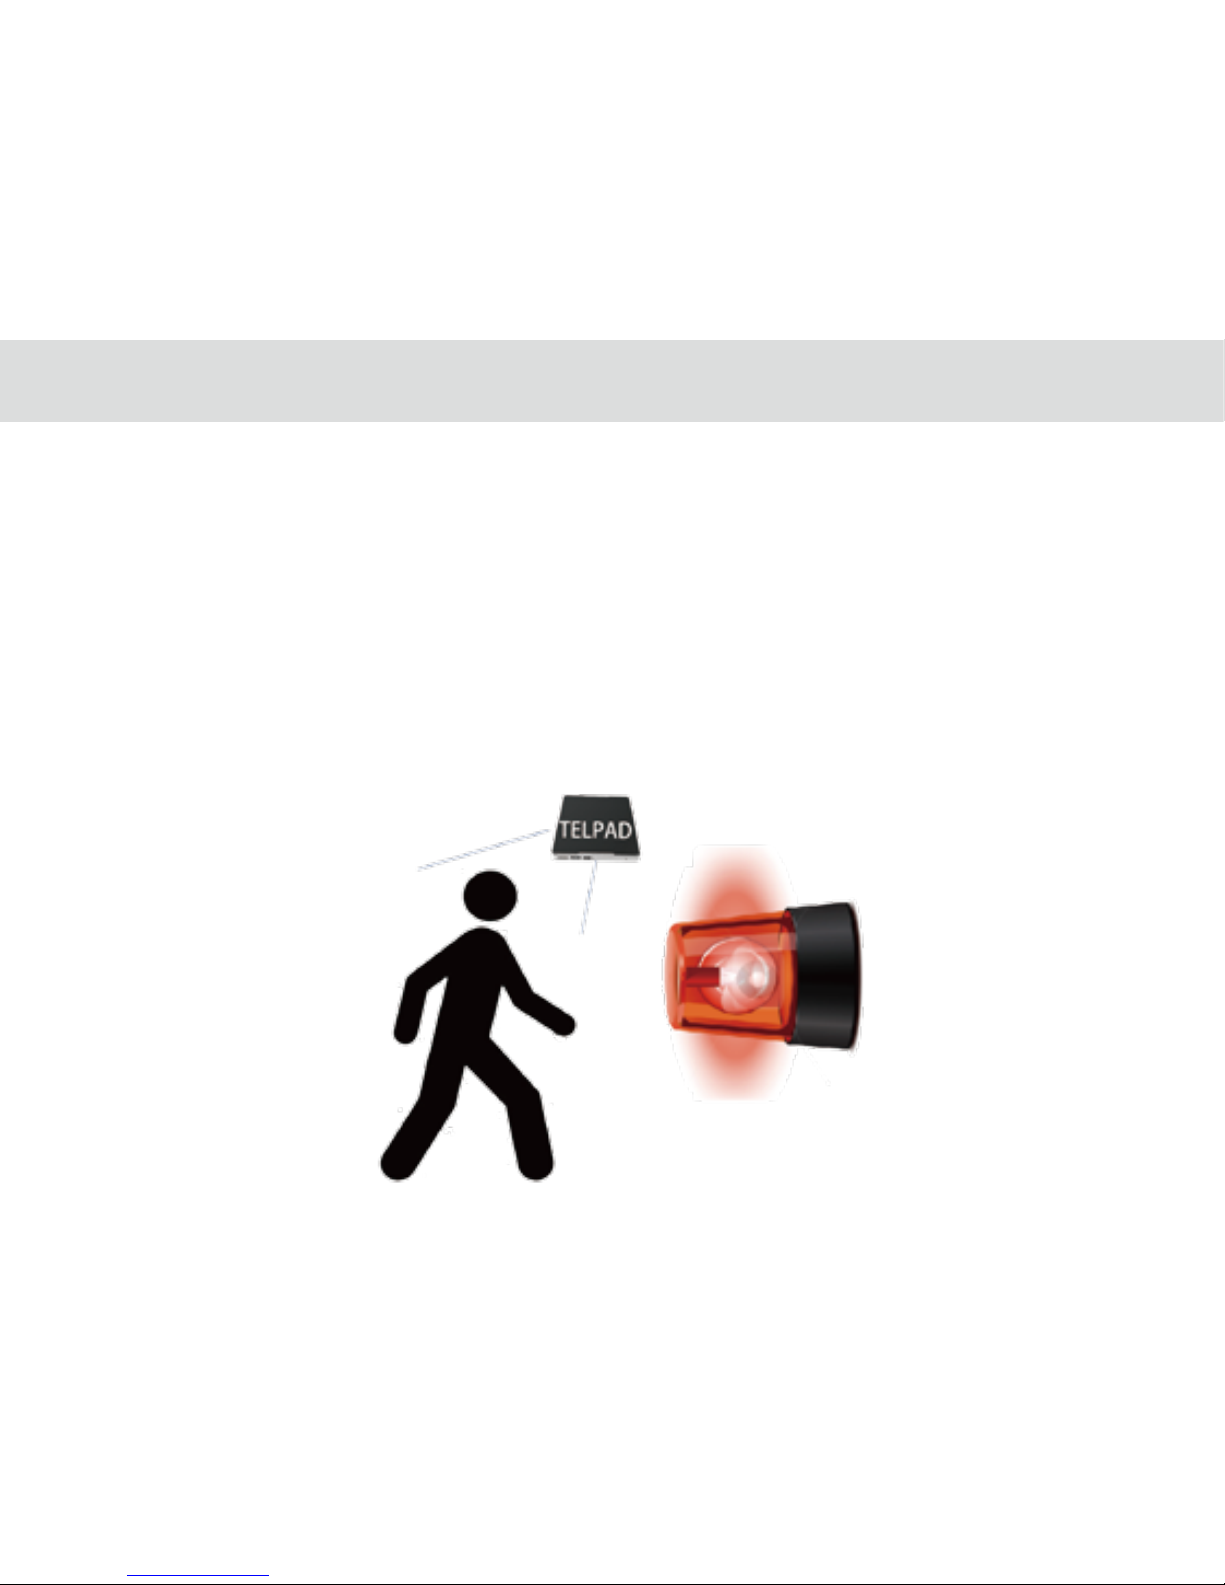
3.20.6 Motion detection
- The motion detection feature will send NOTIFICATIONS to user’s mobile devices(only registered/paired devices via
Bluetooth will receive notications).Once motion is detected by the TELPAD’s IR sensors, the TELPAD’s camera will take
photos, then send notications such: Motion has been detected! See images. The user must be connected to the internet to
receive these notications.
- You have to activate "stay awake" option, with this option the application will not go to sleep mode and keep running.
Click "Setting"on tablet, nd "Developer options" and select"Stay awake".
NOTE:
The Outside Home control may not be Function properly depending on the client mobile device, unstable network
environment, network timing or Internet service company. The Outside Home Control function works only on Android
device which equipped with Google service. The push message used for Outside Home Control is provided by Google™,
GCM message not guarantee high percentage of delivery. User needs to retry if the message is not delivered due to various
reasons. User has to carefully manage the connection between “Home Control Client App” and TELPAD.
48
Page 54
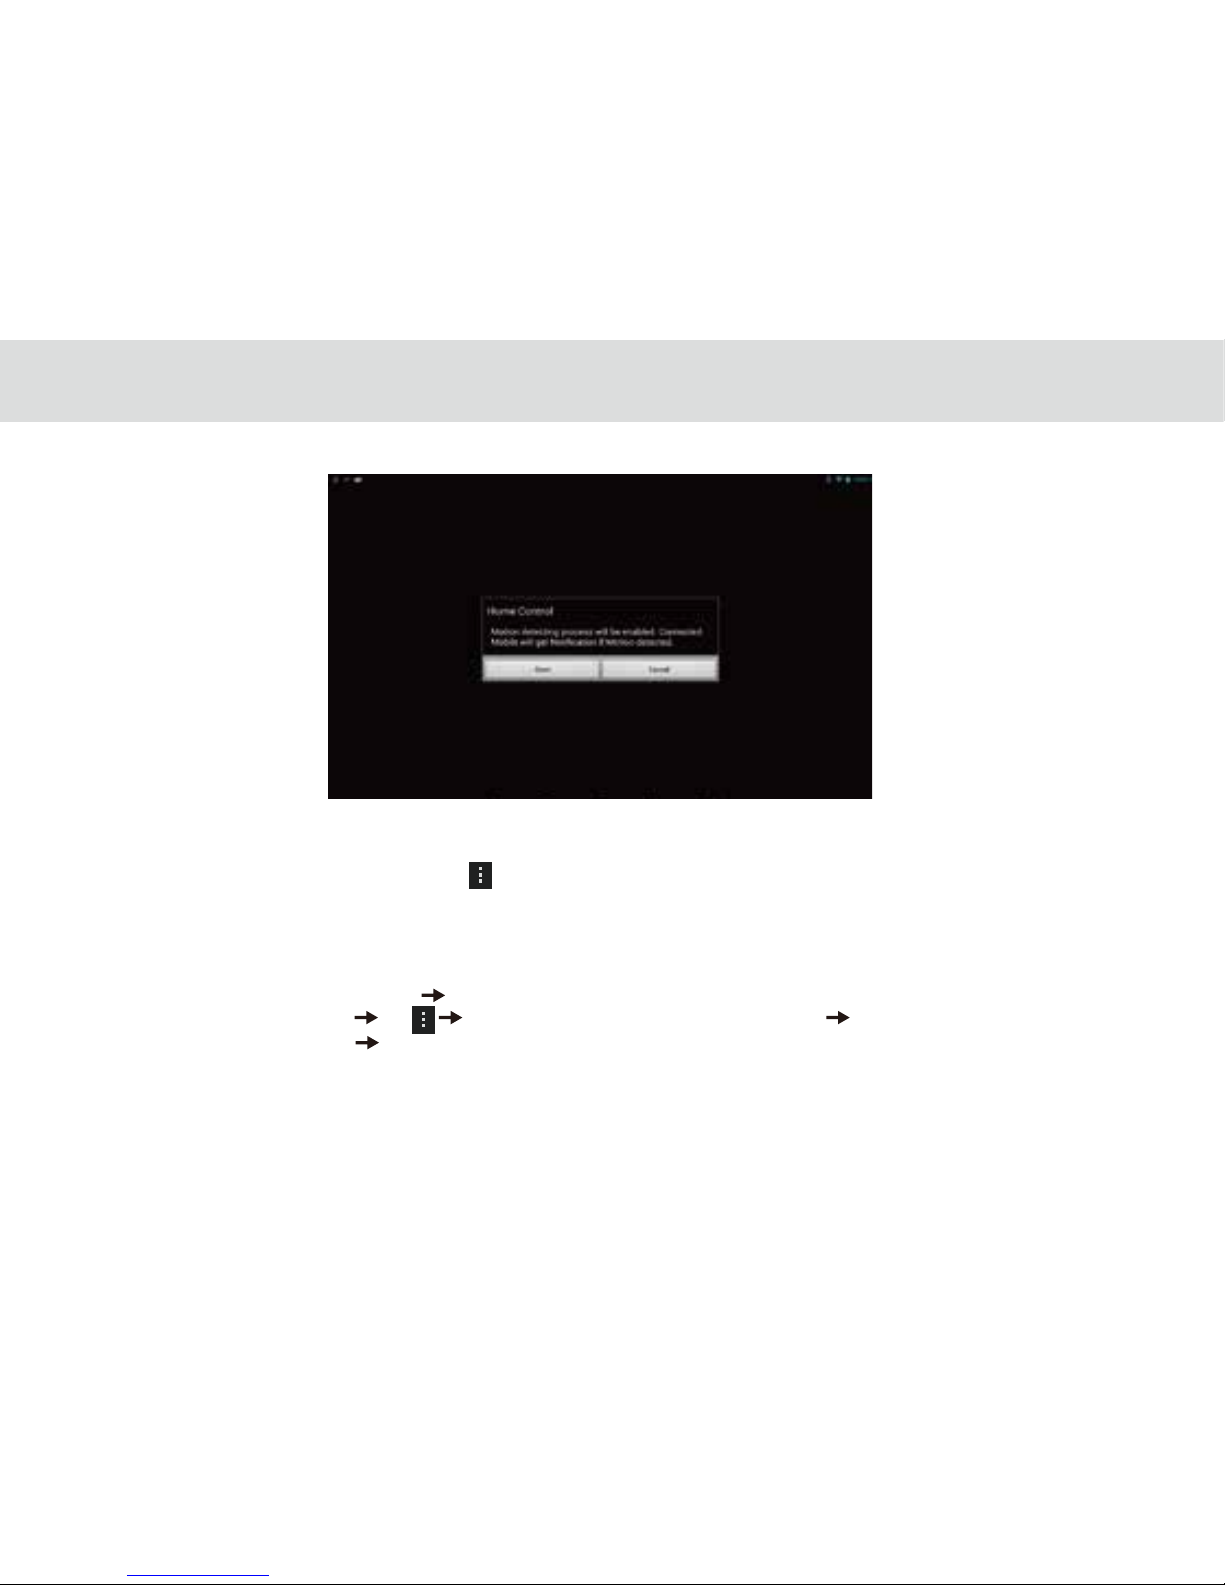
Motion detection
- Please make sure “Mobile Client Setup “ process is done if you want receive notication on mobile.
- From the main menu in TELPAD, please tap “Motion Detection” and follow on-screen instructions. The notication will
be forwarded to connected mobile once started. If TELPAD camera faces continuous change, it will not send all of the pictures.
(Send 1 notication per about 30 seconds).
- Please provide TELPAD with continuous power supply for operation. The camera is always on even though LCD is black.
Summary of Mobile Client Setup
From the main menu tap “Remote Setup” tap “Connect with Mobile”
Execute “Home Control Client” tap “Remote Setup” (in the Mobile, not TELPAD) Refresh the list by clicking the
“Search Client” button in TELPAD Select the Mobile device in the list.
49
Page 55
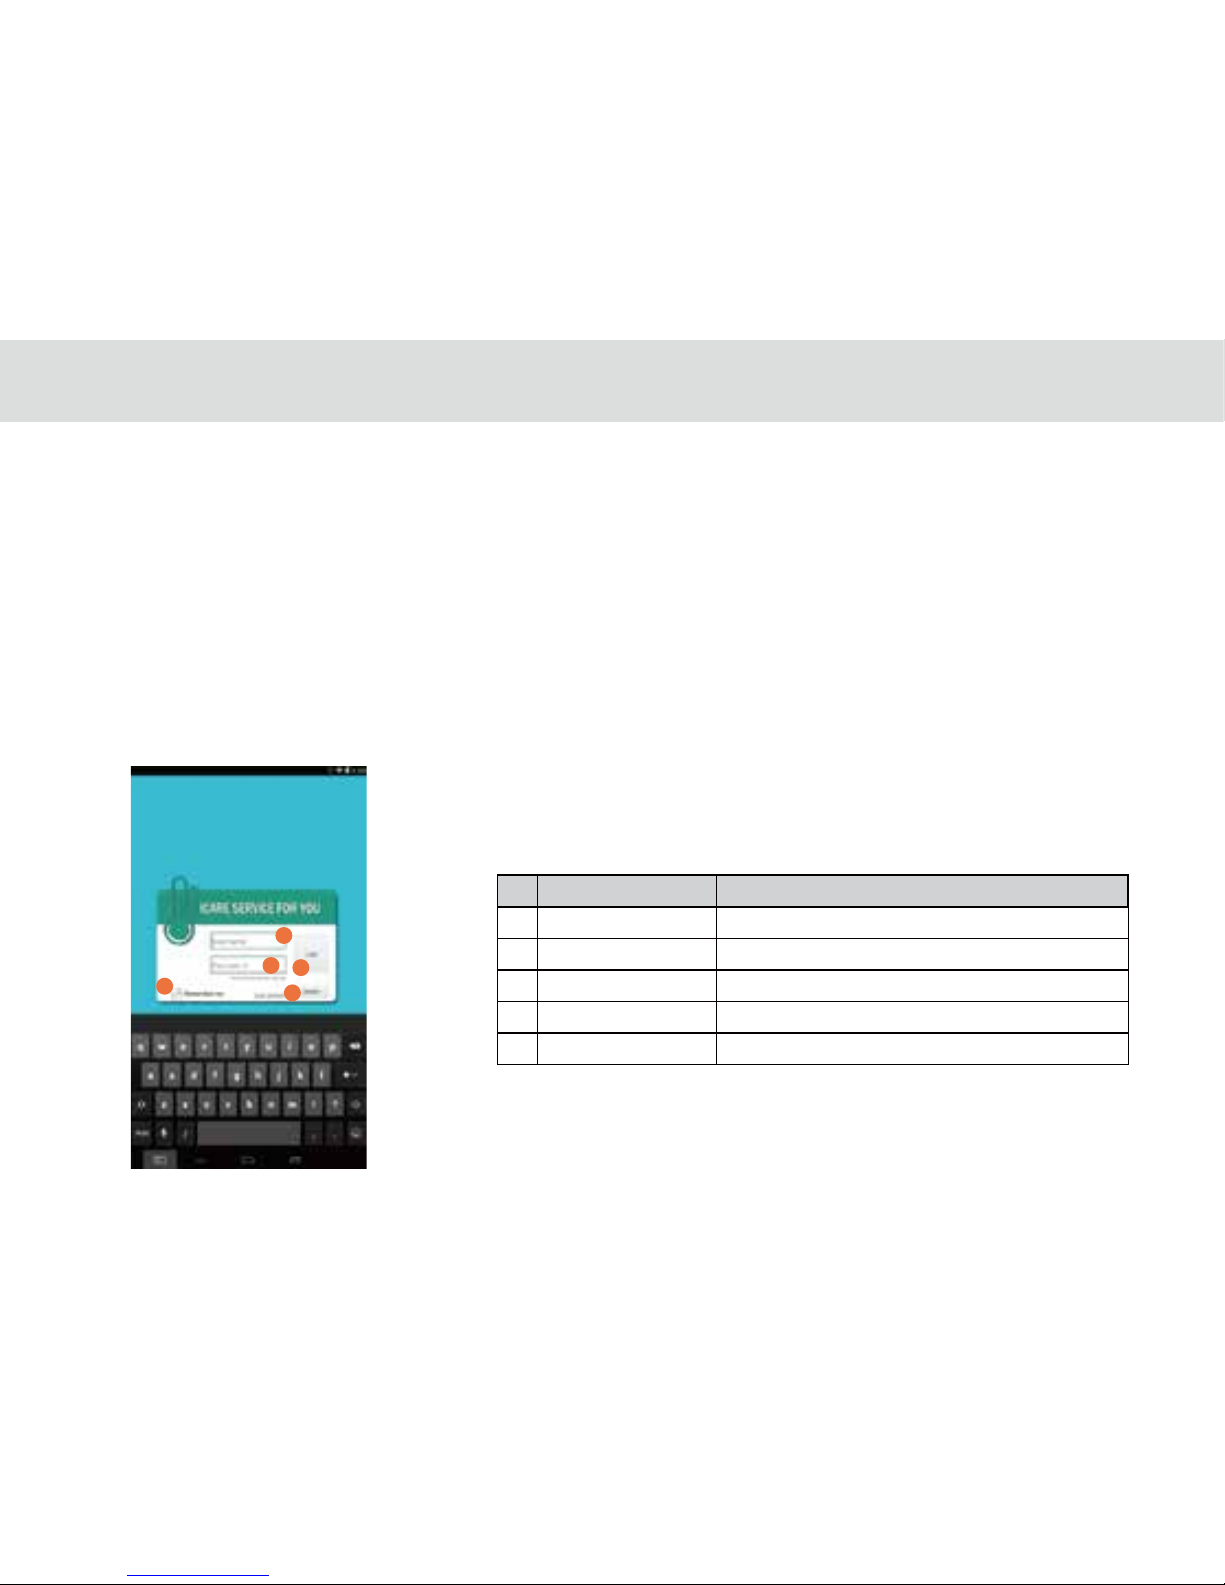
Appendix 1. Daily Graph
3.21 Home care
No ltem Description
1 ID Input User ID
2 password Input User password
3 Remember me Store Username & Password
4 Login Login button
5 Register Member register
50
Terms of Use
The Home Care apps utilize various health related date you enter. Your data are stored and accessed by TELPAD Home Care
only and are not transferred to or stored on any servers. The calculated forecasts of Home Care may not be accurate and should
not be used to prevent unwanted pregnancy. The forecast accuracy depends on a number of factors including how regular one’s
cycle length is, how many periods have been measured with the app. Anxiety, stress, age and other factors can also aect one’s
cycle from month to month. The measured temperature accuracy depends on the operating method of iFever Manager.
And your measured body index accuracy also depends on your operation method of Bluetooth body scale.
This App and devices is not for clinical or medical use.
3.21.1 Bluetooth body scale User Guide
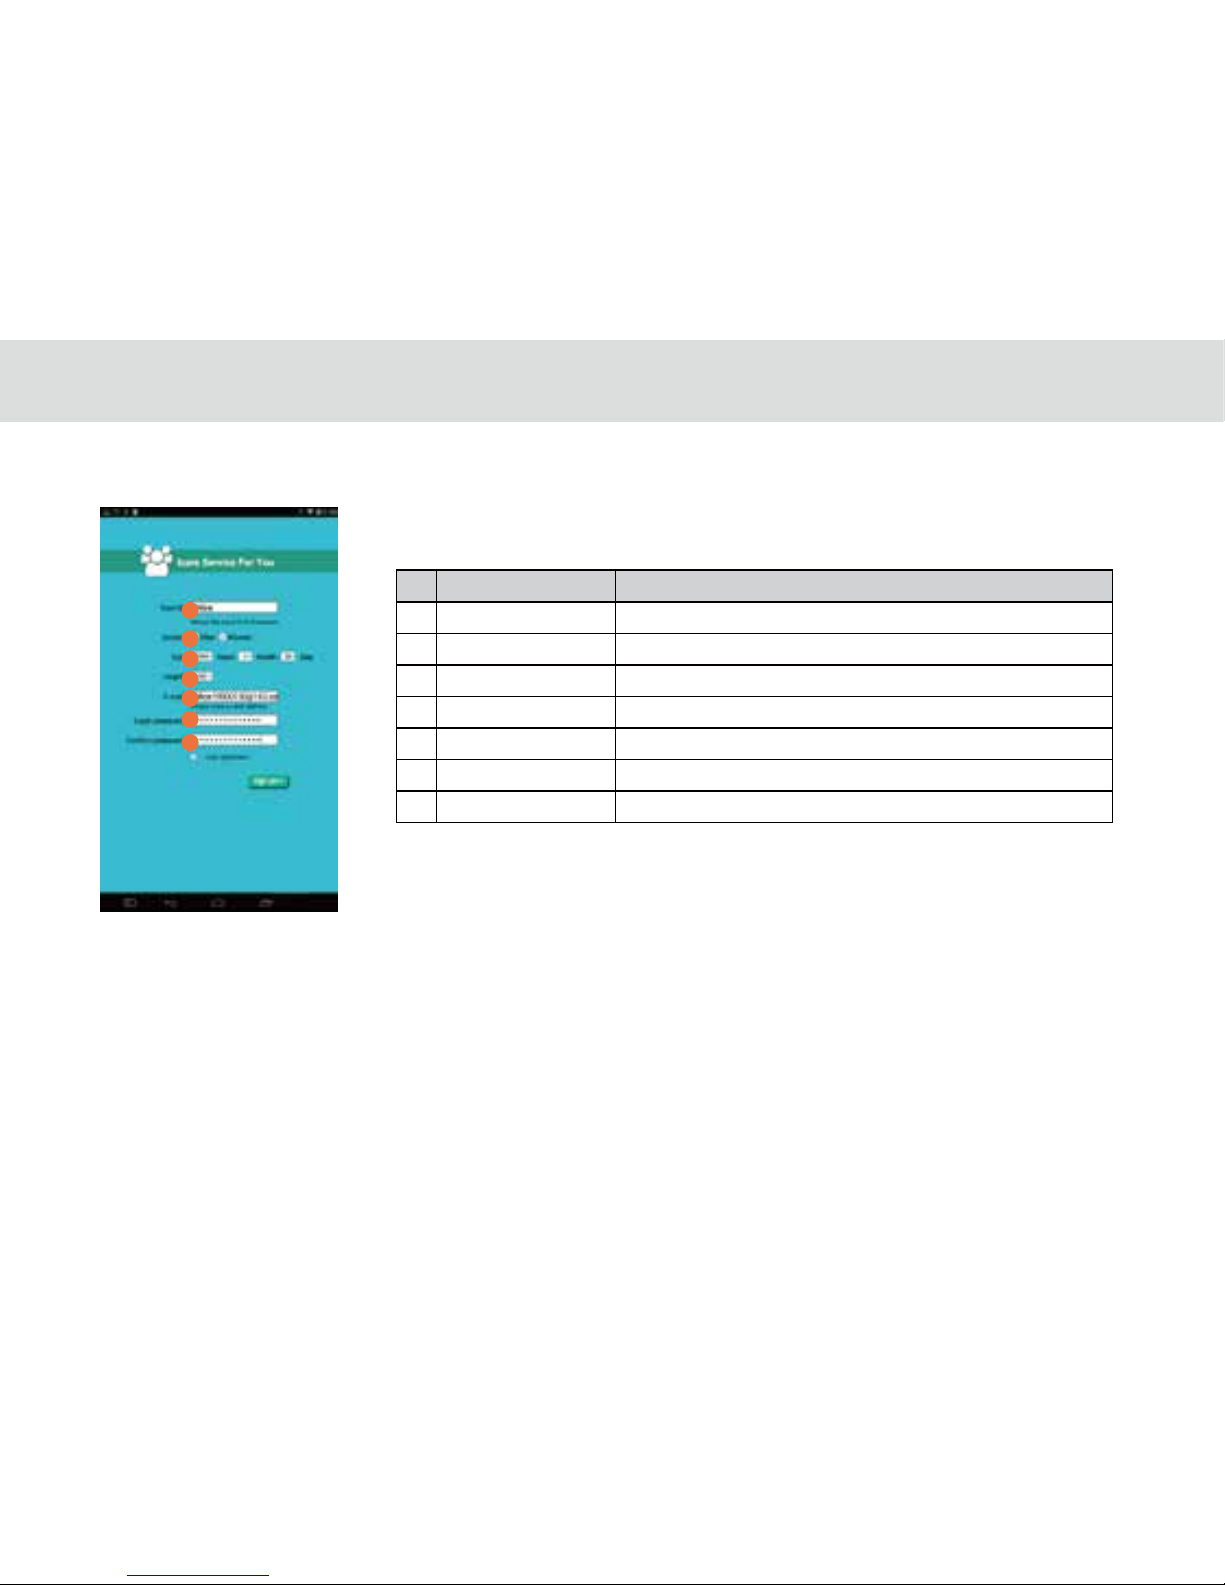
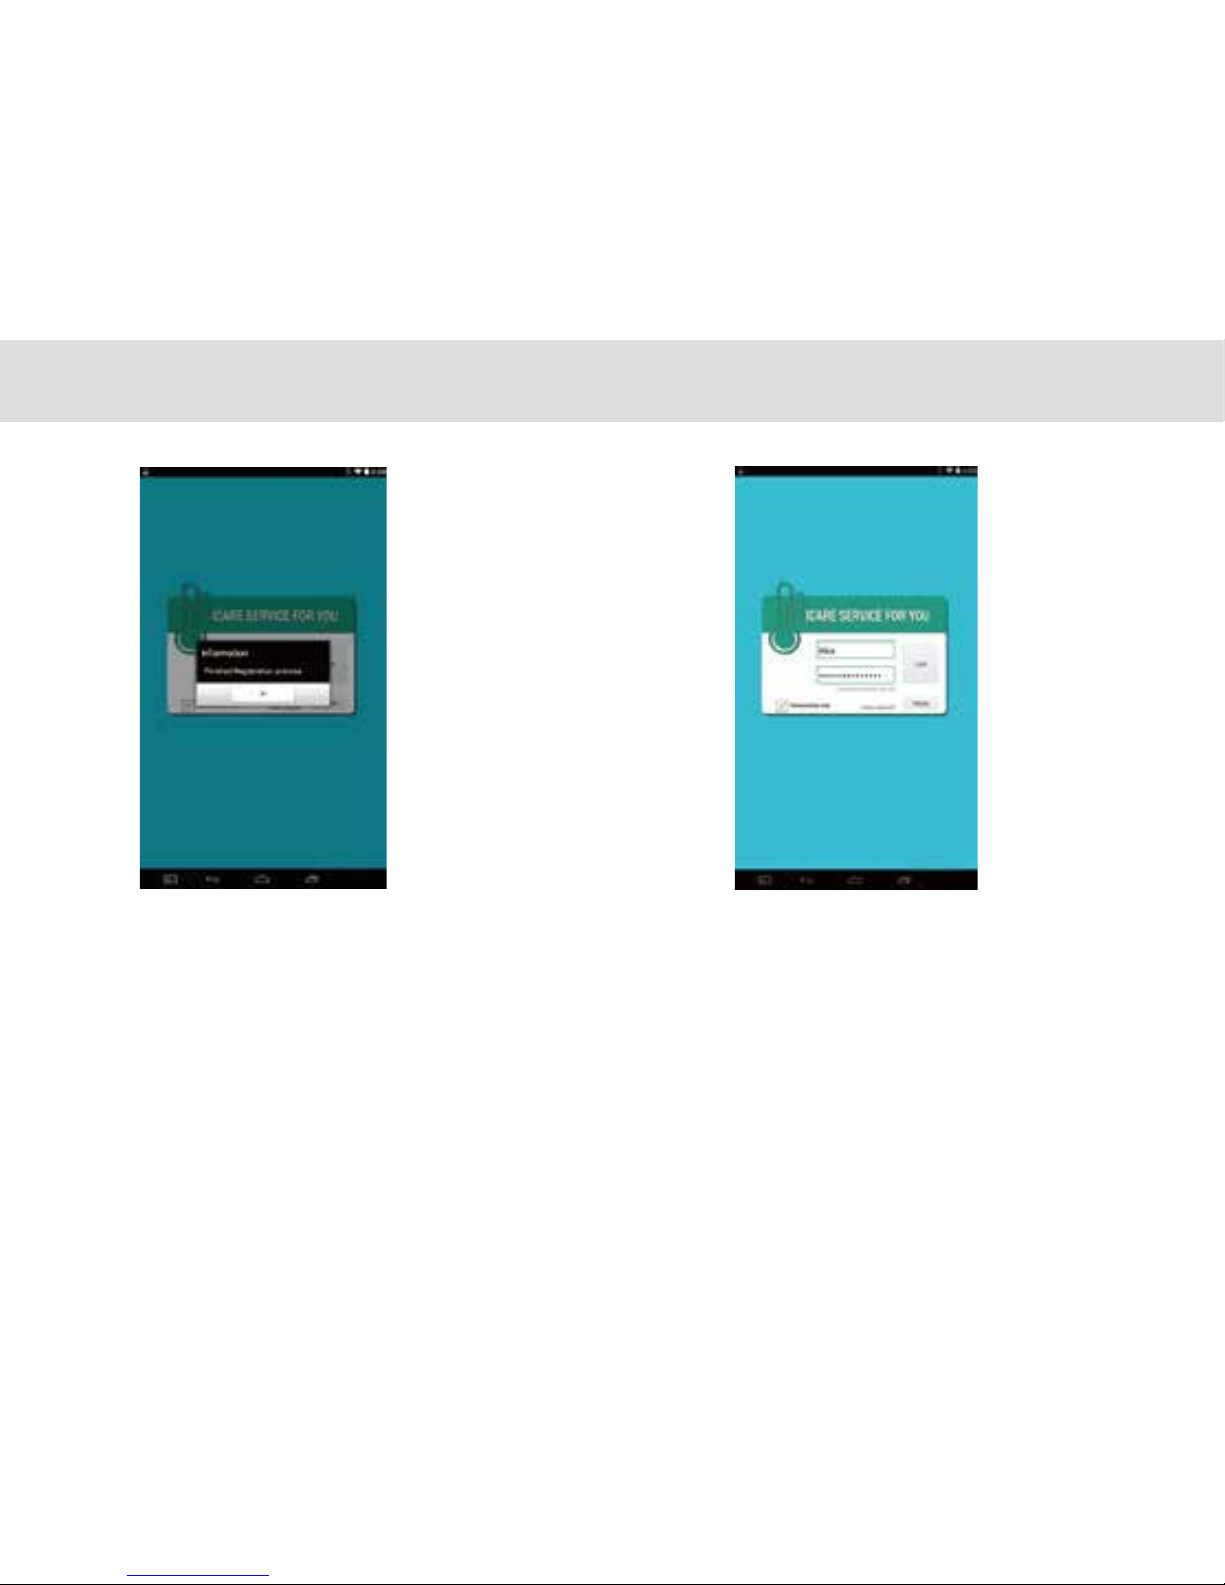
1.Tap “Home Care” and “register” your le to achieve an account, “Sign up” to nish registration.
Figure1
1
2
3
4
5
Page 56
51
Appendix 2. Register
No ltem Description
1 ID _Input Input User ID
6 password_Input Input User password
7 password_Check Input User password for conrmation
3 birthday_Input Input Birthday
4 Height Input height
2 Gender male/female
5 E-mail_Input Input E-mail
Figure2
1
2
3
4
5
6
7
Page 57
52
Figure3 Figure 4
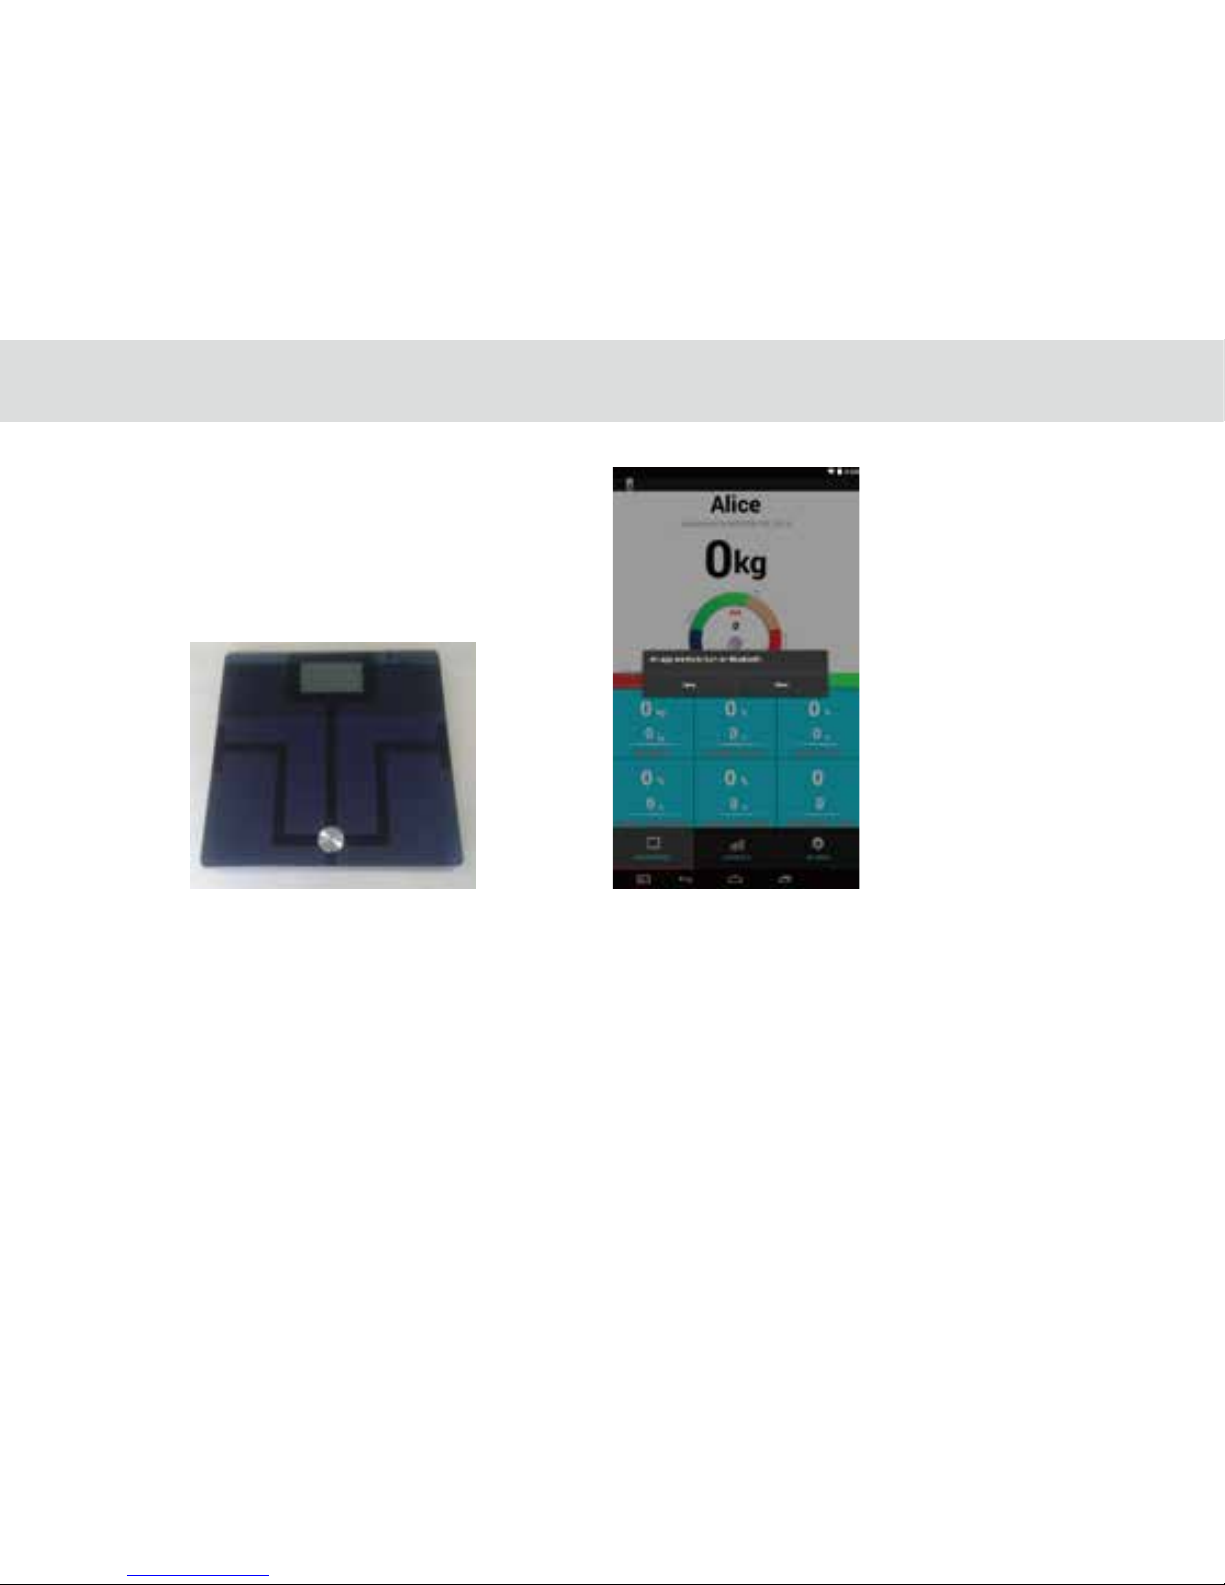
Turn on bluetooth body scale and bare your feet on the middle of it. At this moment, tablet will pop up a Bluetooth notice , select
“Allow” to start “Bluetooth” on tablet. (Figure5and6)
Page 58
53
gure5 gure6
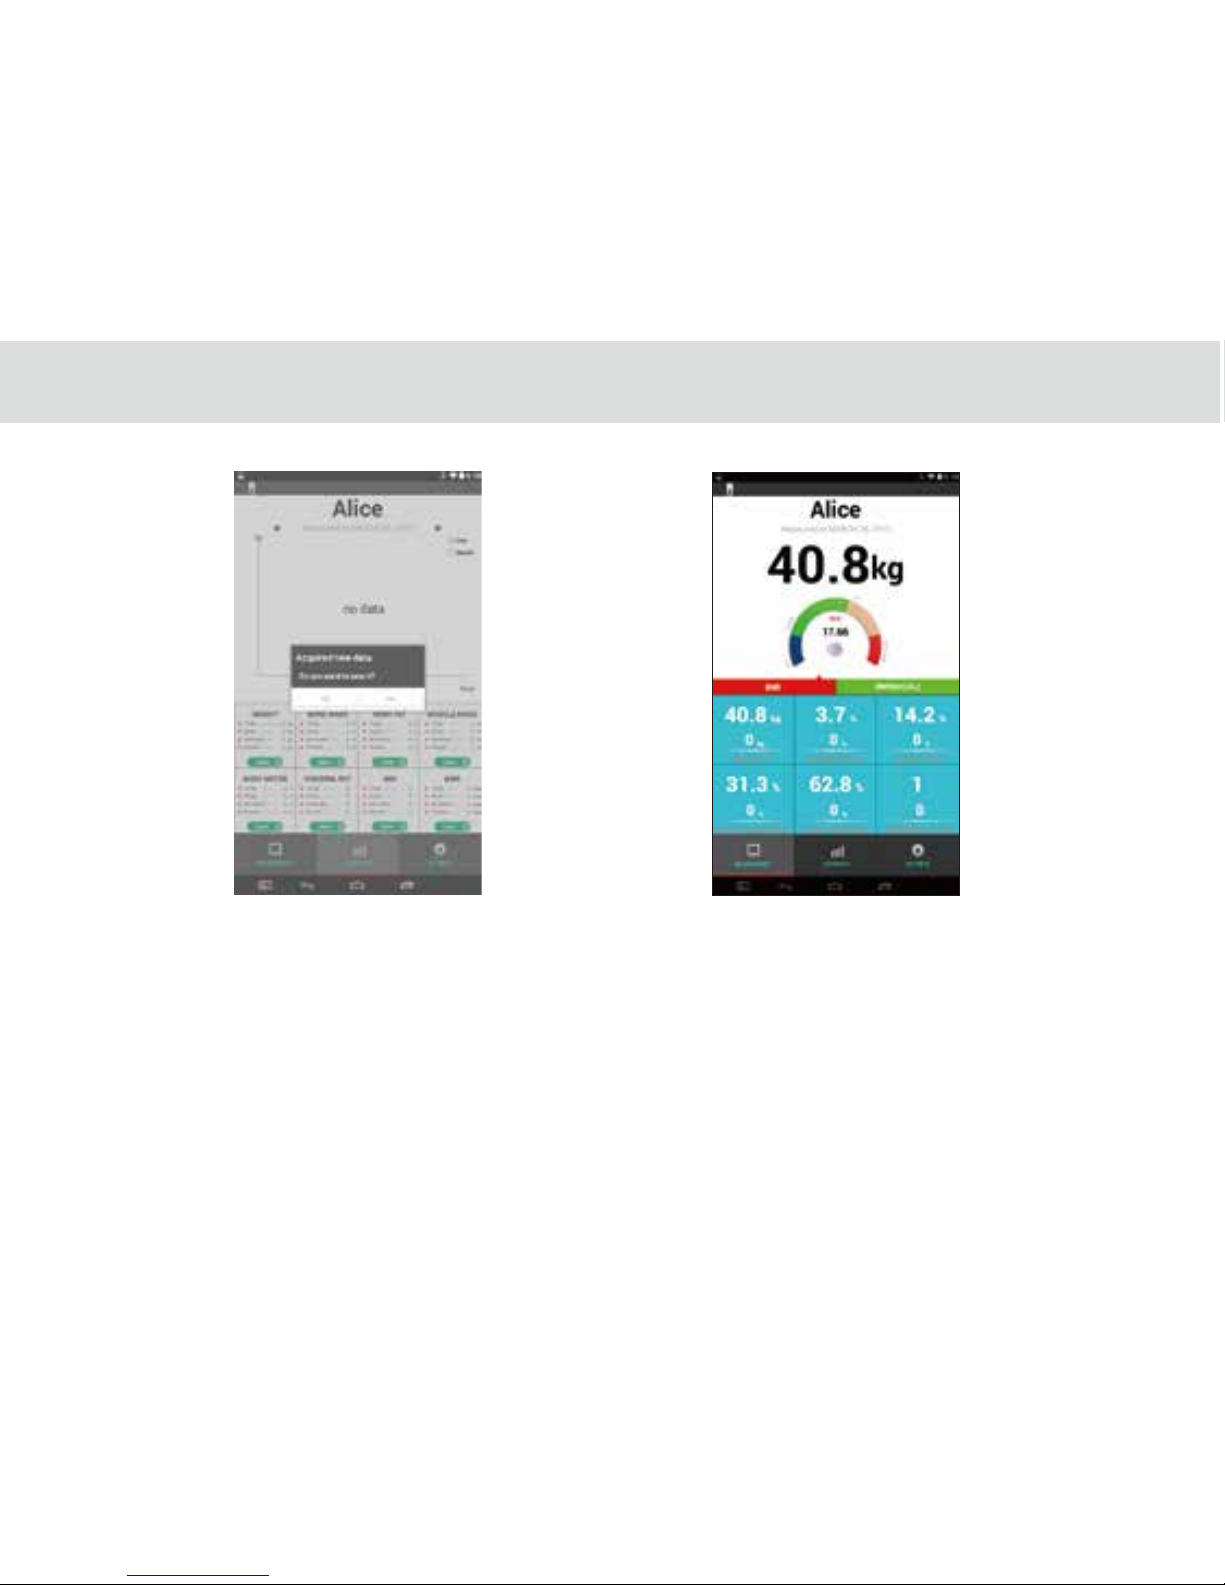
When Bluetooth body scale and tablet paired with each other successfully, there will have a screen message about “new data
save or not” on TELPAD. Tap “Yes” to review your body index and tap “No” to reject new body index data from Bluetooth body
scale. Those body index includes BMI, BMR, Weight, Bone Mass, Body Fat, Muscle Mass, Body Water and Visceral Fat.(Figure 7 and
8 )
Page 59
54
Figure7 Figure8
3.21.2 iFever Manage User Guide
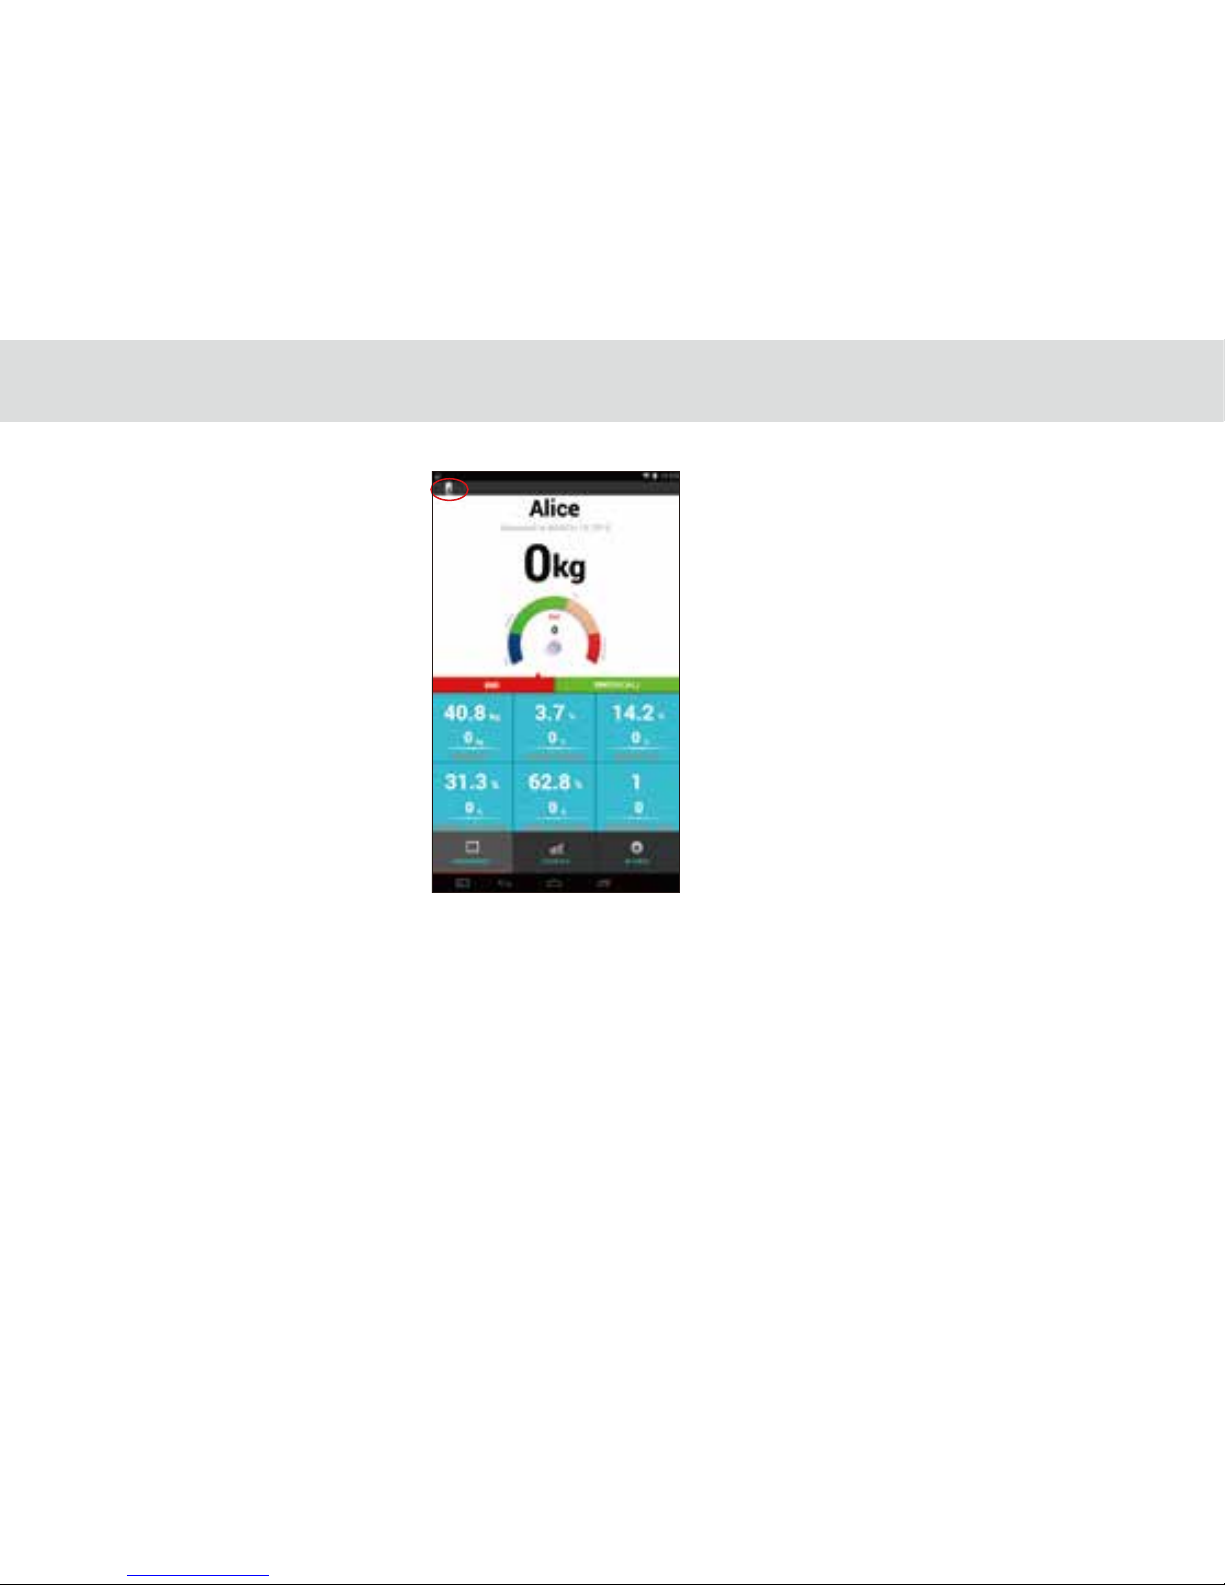
1. Click “ Switch thermometer “ on the top left corner in weight measurement interface, it will switch to temperature
measurement interface. (Figure9)
Page 60
This section contains a description of Home Care application which is working with ‘iFever manager” dongle. iFever
Manager enable your TELPAD for body temperature measurement. You can keep history of your family temperature for a long
time.
If your baby gets a fever, you can show doctor with the daily graph screenshot. (Show body temperature variation based
on time axis)
If you are woman, TELPAD monthly view can help you to keep track of your fertility/menstrual cycles. Just measure
temperature each morning per day, and then TELPAD does the rest.
55
Figure9
Page 61
56
With Monthly view, you can monitoring your average body temperature and keep your body healthy. Average body
temperature of a healthy adult is 36.50-36.80°C. But, average daytime body temperature of a healthy adult is above 37°C.
Cancer patients have low body temperature, usually less than 36°C.
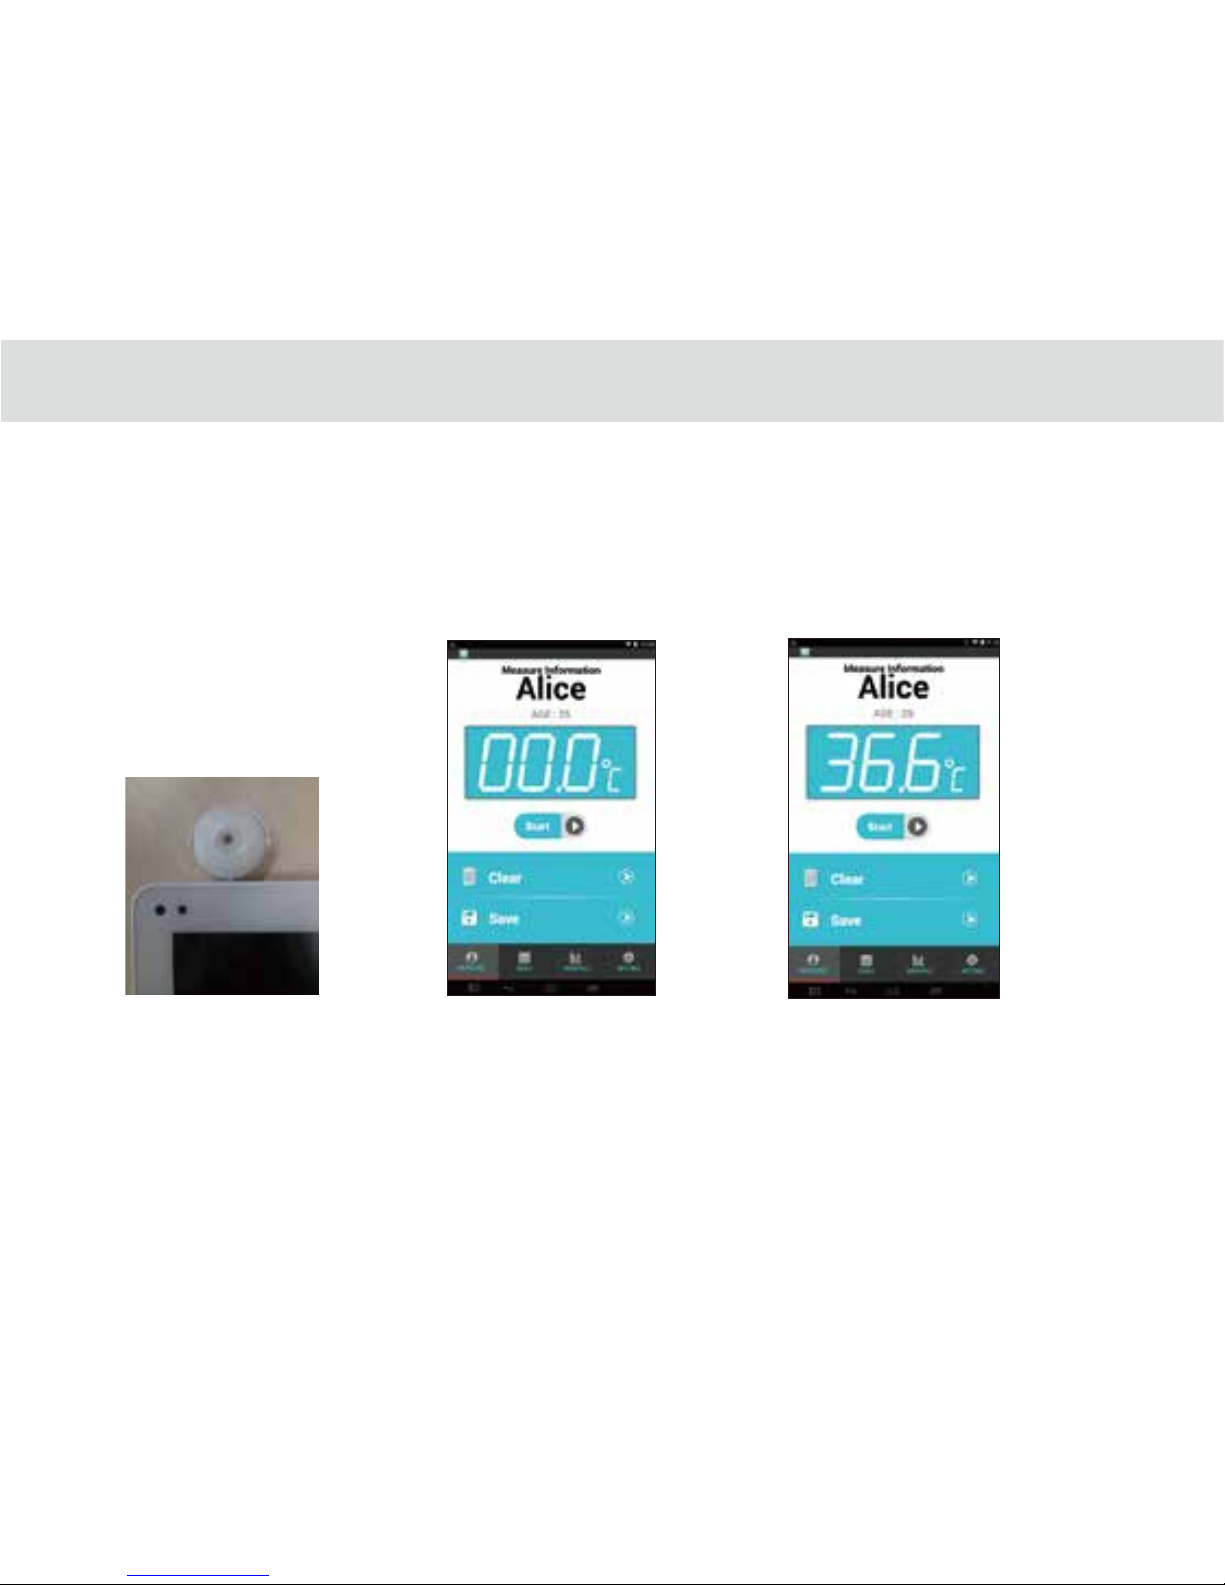
2. Insert your homecare hardware, iFeverManager dongle in Audio jack.
Figure10 Figure11 Figure12
Page 62
57
3. Tap the Start button or volume up hard key to begin temperature measurement.
4. Please move your iFever Manager sensor part to close your (or others) forehead position during three seconds. Measured
distance is within 1 cm.(Figure12)
5. Please see the measured value, and tap the save button to store the data. Tap Clear button to clear last measured value if
needed.
6. Supported body Temperature range is from 34.3° C to 43.1° C. It will not save the data if out of range occur.
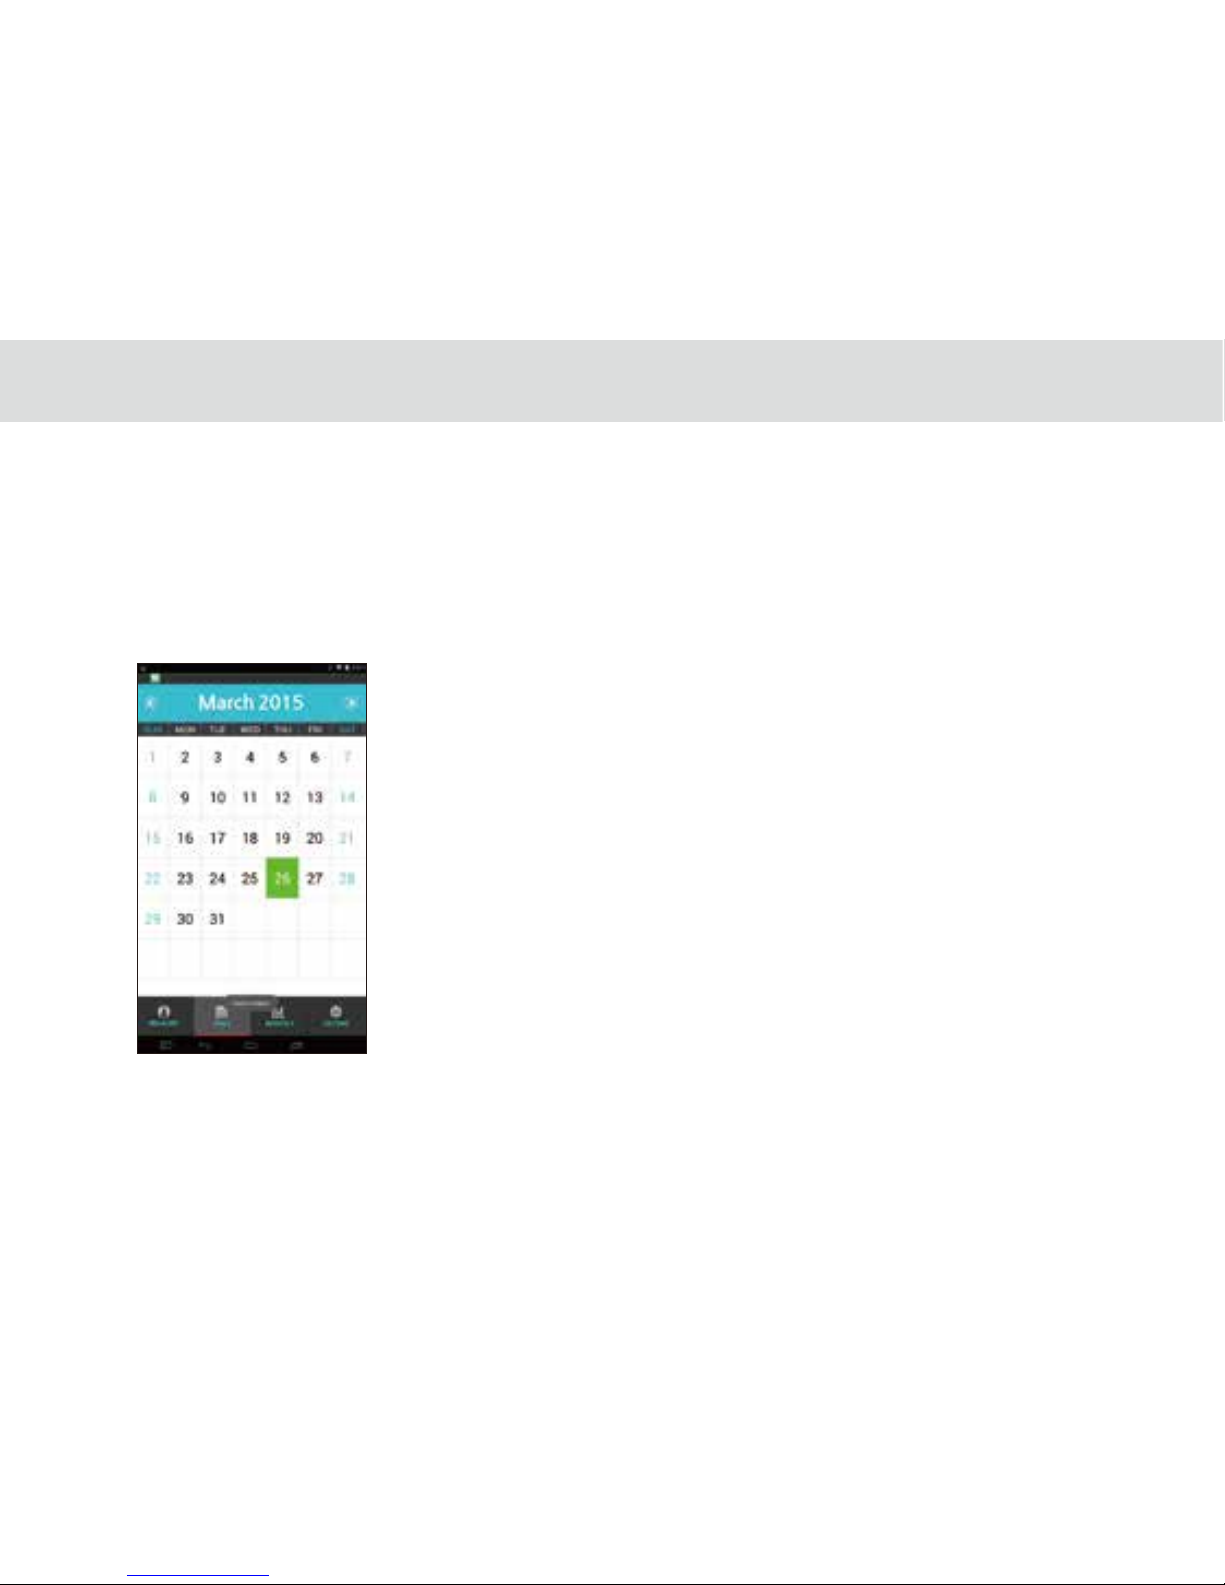
7. You can see the measured data, and time in Daily tab by press
the date. Monthly tab can show you a graph with your accumulated
data.
(See Appendix 3, 4, 5 and 6 for more description)
Figure13
Page 63
58
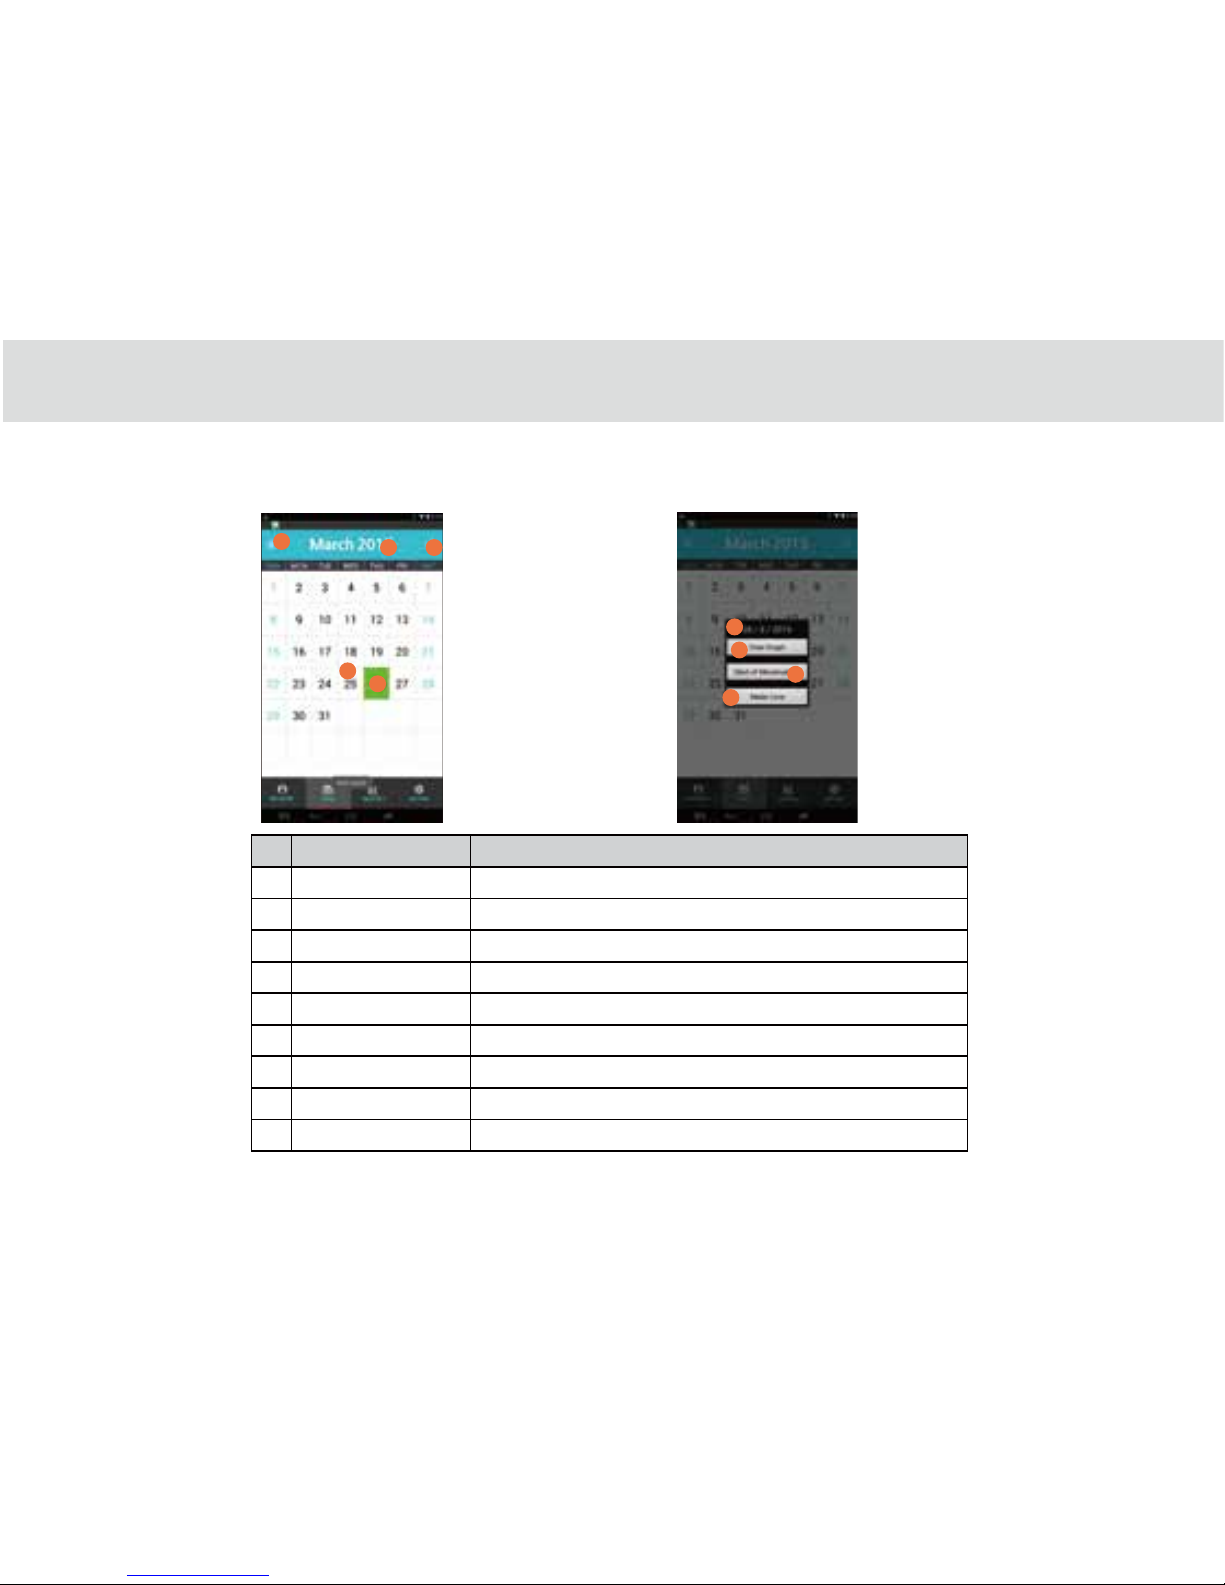
Appendix 3. Daily Graph
No ltem Description
1 Last month button Move to previous month
2 Calendar Display current date
3 Next month button Move to next month
4 No measured If no measured date, will be displayed with pale sky blue
5 Today Today is Green background
6 Selected date This date can be selected when user touched
7 View Graph Display temperature date with graph
8 Start of menstruation Mark as menstruation start date.On/O Start menstruation date
9 Made love On/O record for the event(For information only)
Figure14 Figure15
6
1
2 3
5
4
7
8
9
Page 64
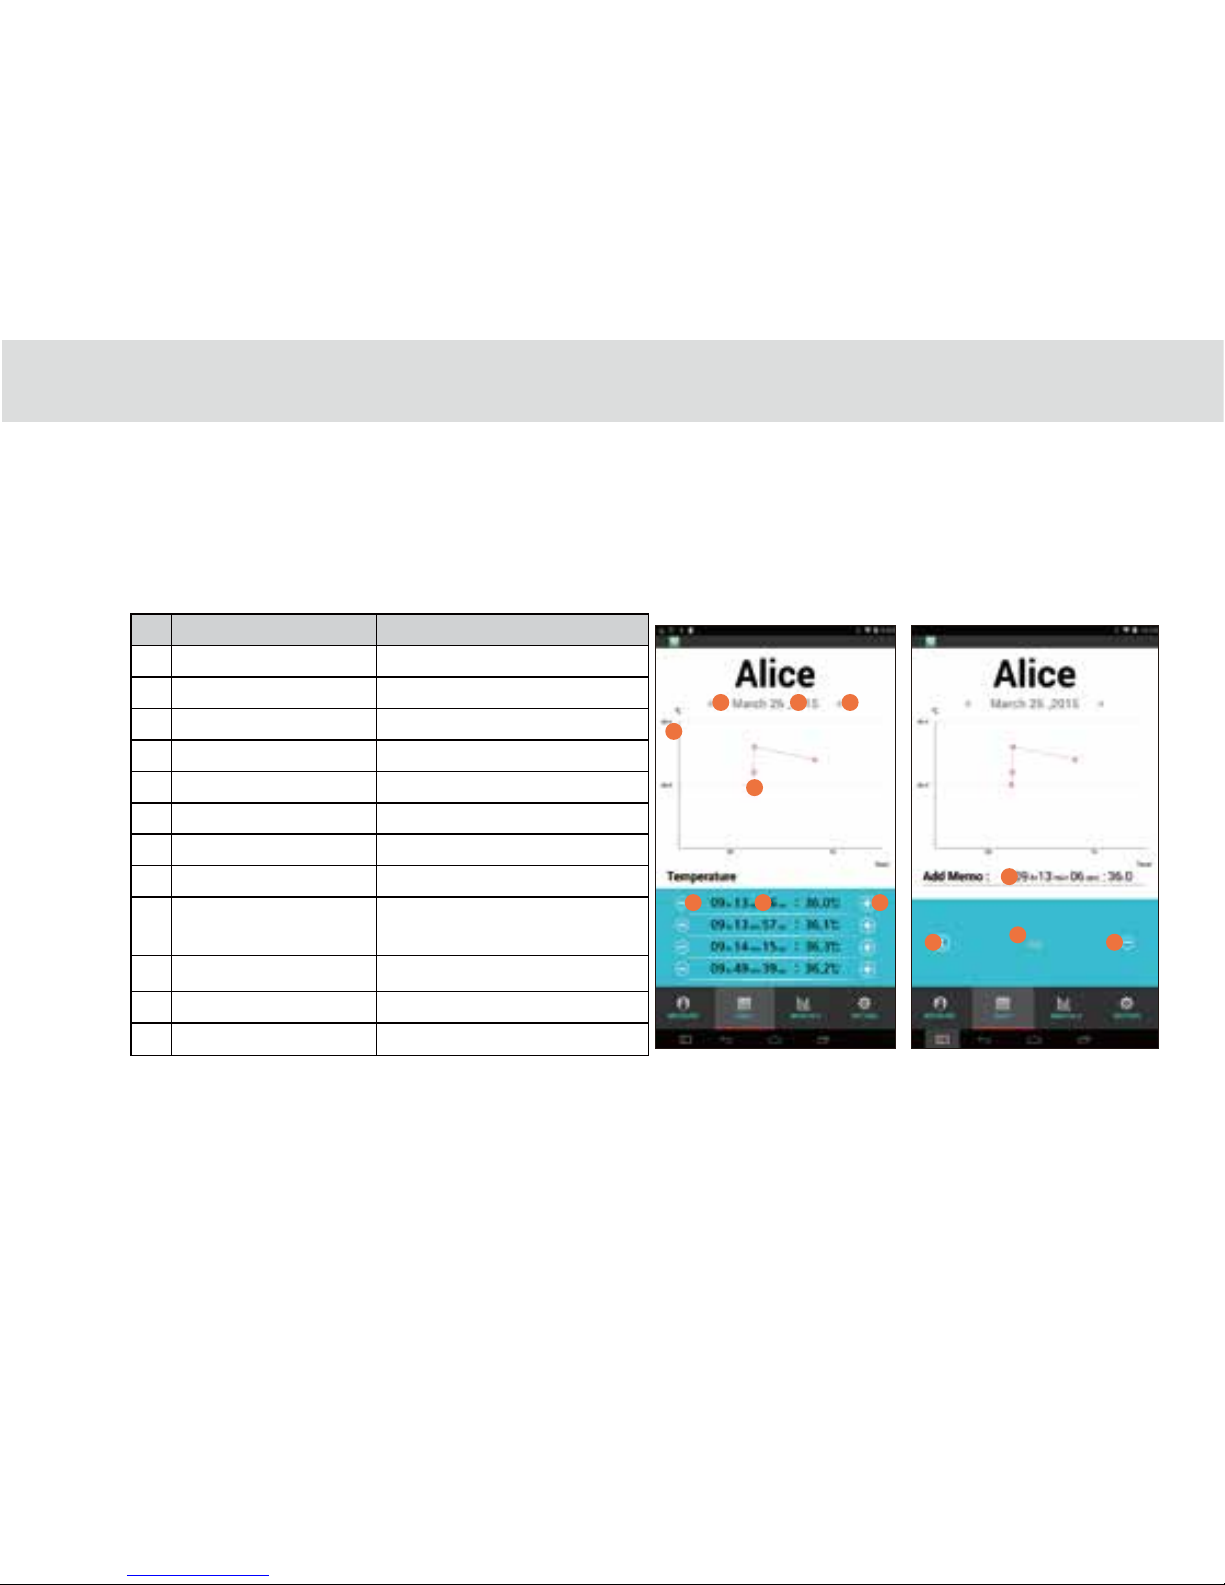
* If Basel body temperature option is not ON in the Setting menu, No 7, 8, 9 menus will not be displayed, and if user selects a
date it will show Graph View.
No ltem Description
1 Last month button Move to previous month
2 Calendar title Display current date
3 Next month button Move to next month
4 Measured range Measured temperature data range
5 Temperature graph Show the measured data with line
6 Temperature delete button Delete selected temperature data
7 Temperature time Show measured time and data
8 Add memo Move to Add memo window
9 Temperature value Show temperature and time
for adding memo
10 Back button Back to previous screen
11 Memo content Show Memo
12 Delete memo Delete Memo
59
Figure16 Figure17
1 2 3
4
5
6 7 8
9
10
11
12
Page 65
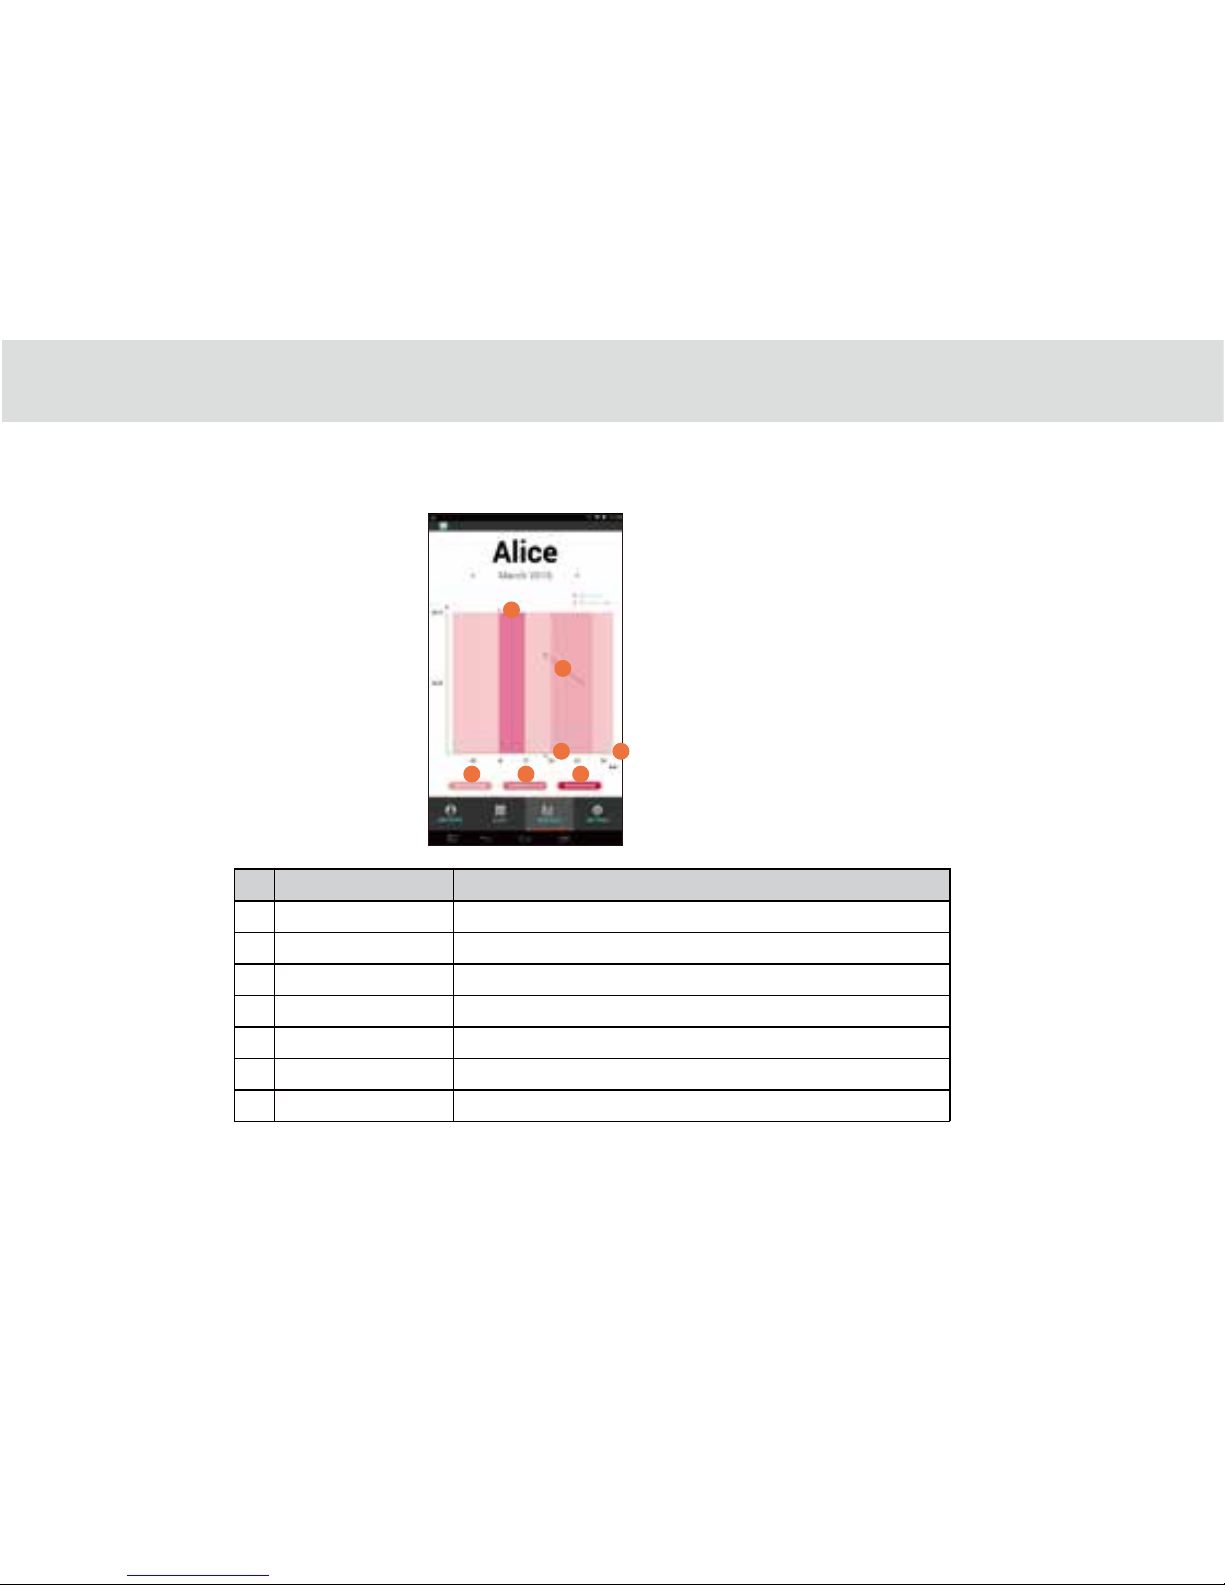
Appendix 4. Monthly Graph
No ltem Description
1 Start menstruation First day of menstruation (Marked in Daily graph)
2 Graph Show graph with temperature
3 Made love Made love date( Marked in Daily graph)
4 Y axis Date for the month
5 Non-Childbearing Indicate non Childbearing period
6 Childbearing period Indicate Childbearing period
7 Menstrual period Indicate Menstrual period
60
Figure18
5
3
2
1
6
7
4
Page 66
1
2
3
4
5
6
7
8
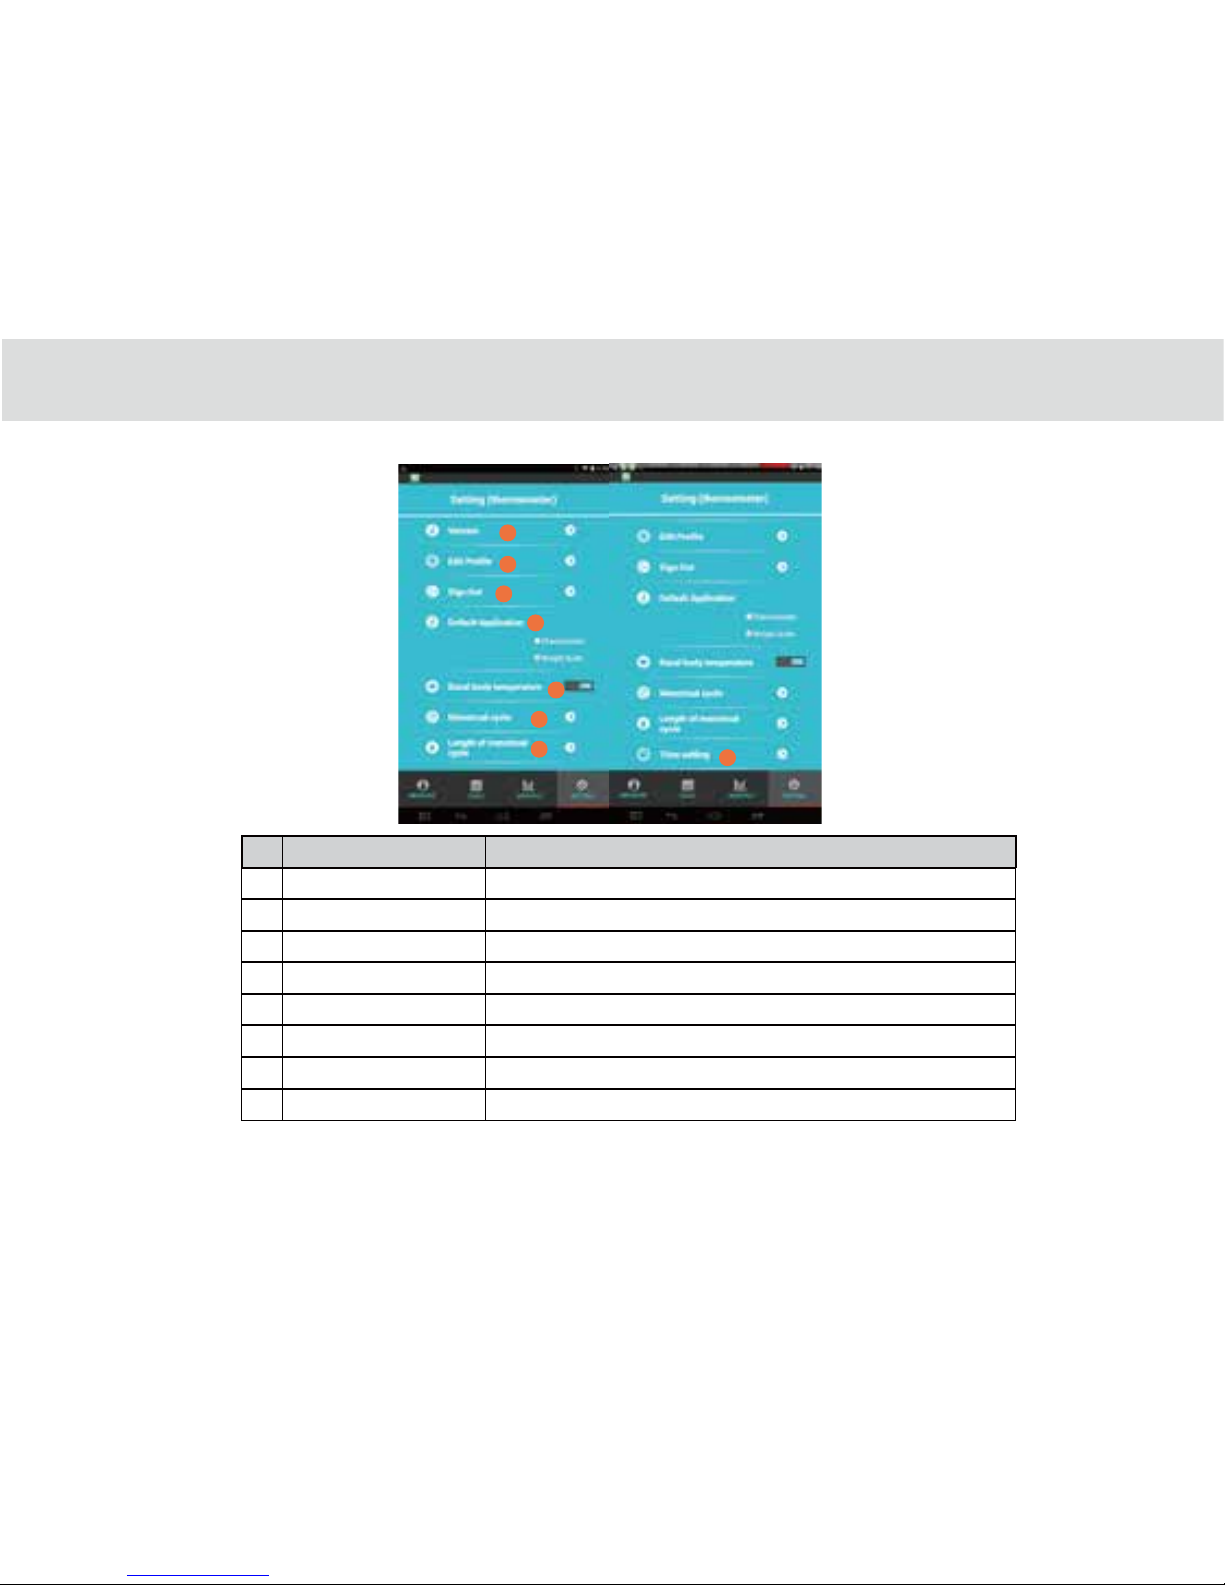
Appendix 5. Setting
No ltem Description
2 Edit Prole To edit your account les agai
1 Version Can check APK version;
3 Sign out To “keep” or “logout” current user;
4 Default Application Select and access default “Thermometer” or “Weight scale”;
5 Basal body temperature Select “on” or ”O ” to open or close this function
6 Menstrual cycle can be set in 20-40 days;
7 Length of menstrual cycle can be set in 1-7 days
8 Time setting can set “start time” and “End time”;
61
Figure18
Page 67
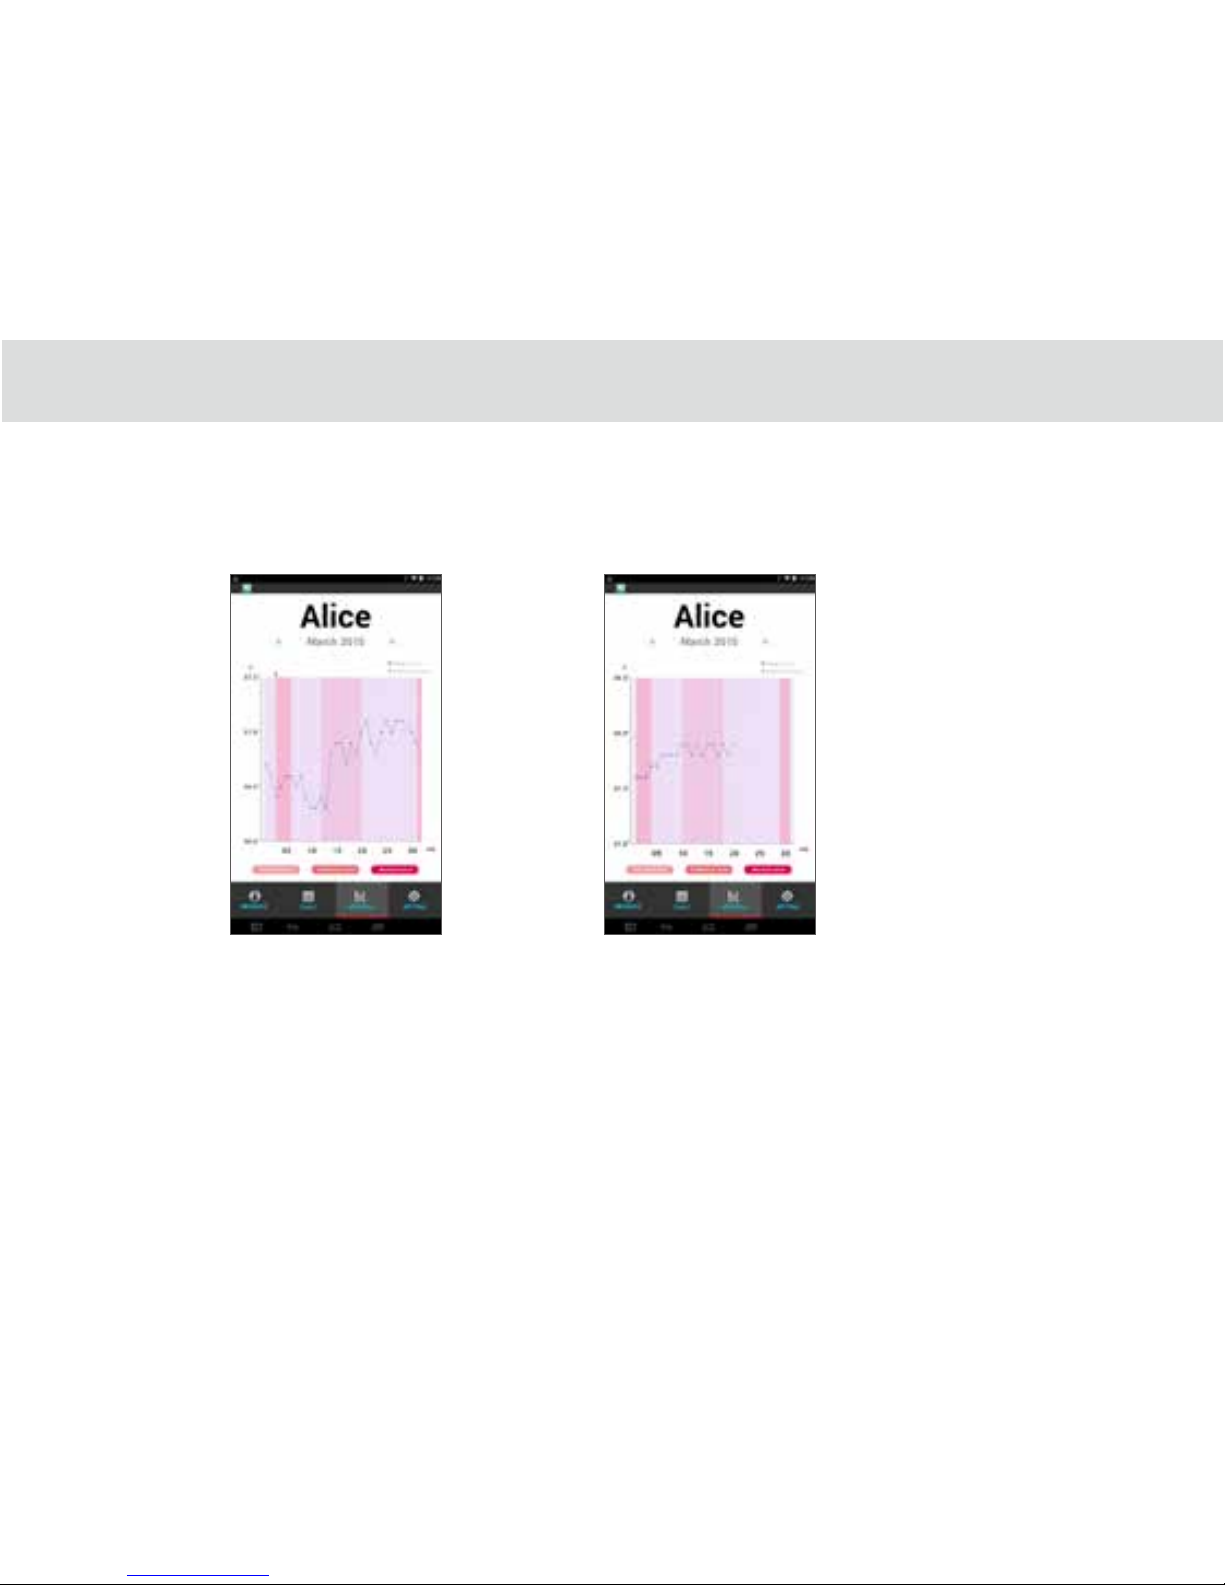
Basal body temperature (BBT) is our lowest temperature during rest, which is usually during the time we're sleeping. This
is the reason why BBT should be taken before getting out of bed for accurate fertility charting. Ovulation causes one half to
one-degree rise in BBT, so monitoring BBT helps provide information on the best time for conception.
Note
The calculated forecasts of Home Control may not be accurate and should not be used to prevent unwanted pregnancy.
The forecast accuracy depends on a number of factors including how regular one’s cycle length is, how many periods have
been measured with the app. Anxiety, stress, age and other factors can also aect one’s cycle from month to month.
Normal temperature pregnancy temperature
Appendix 6. Basal body temperature
62
Page 68
63
3.22 Cast Screen Function Operation Guide
1. Connect wireless transmission equipment ”HDMI Dongle” to the HDMI port of displayer or TV, and plug in 5V power supply.
2. Set displayer or TV in “ HDMI” mode and HDMI Dongle in mode of “Miracast” .
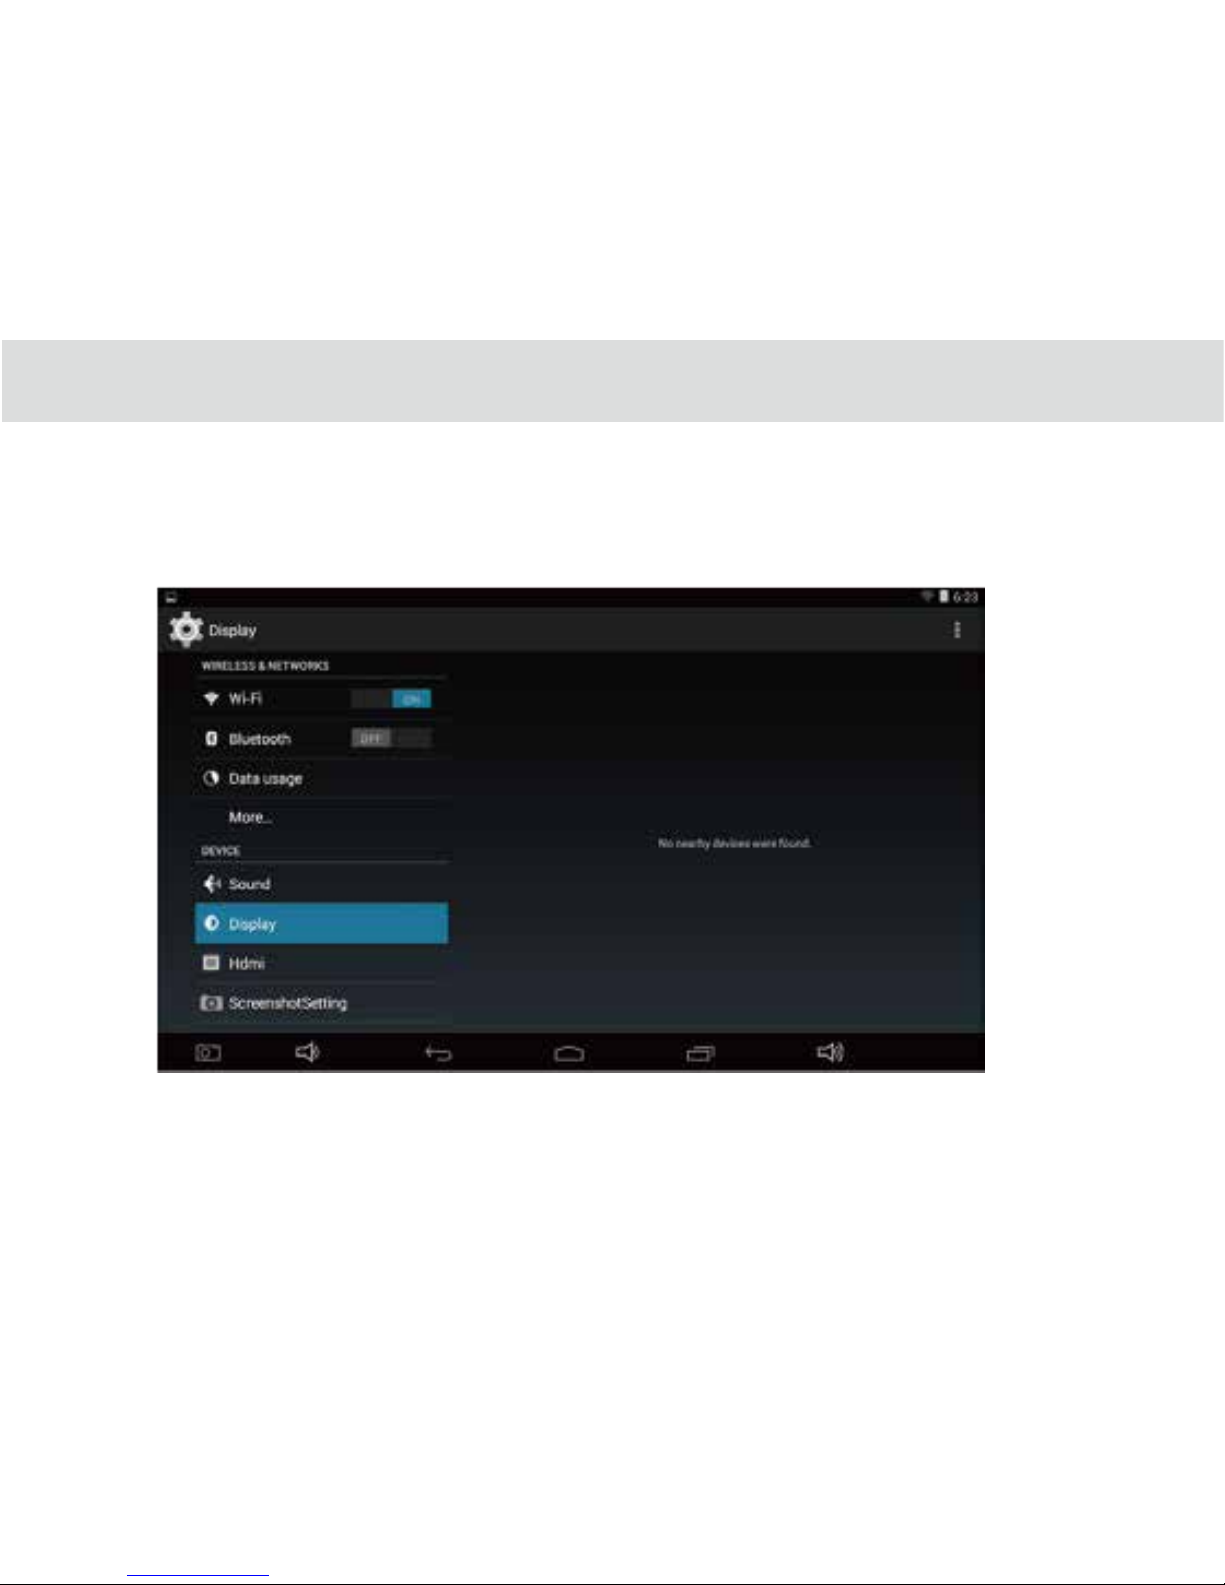
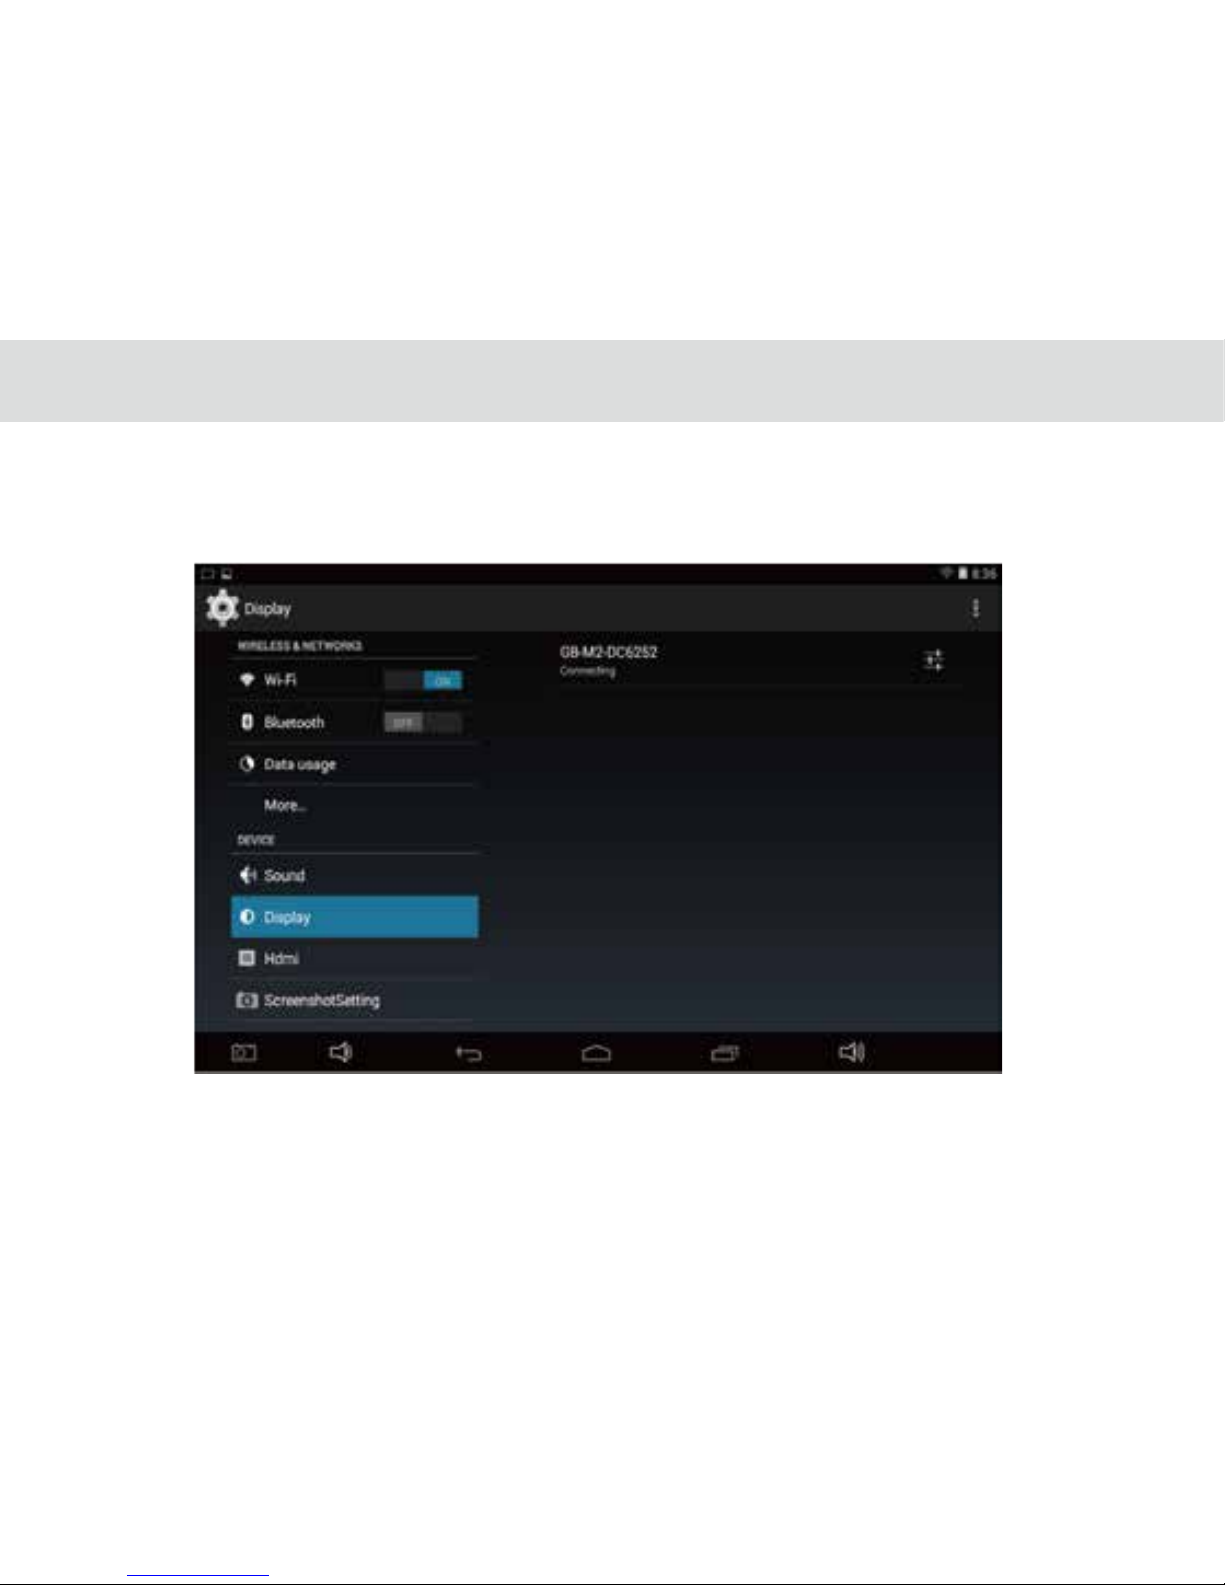
3. Make sure you have connected Wi-Fi of tablet PC rstly, access tablet “Setting” and tap “Display”. (Figure one)
Figure 1.1
Page 69
64
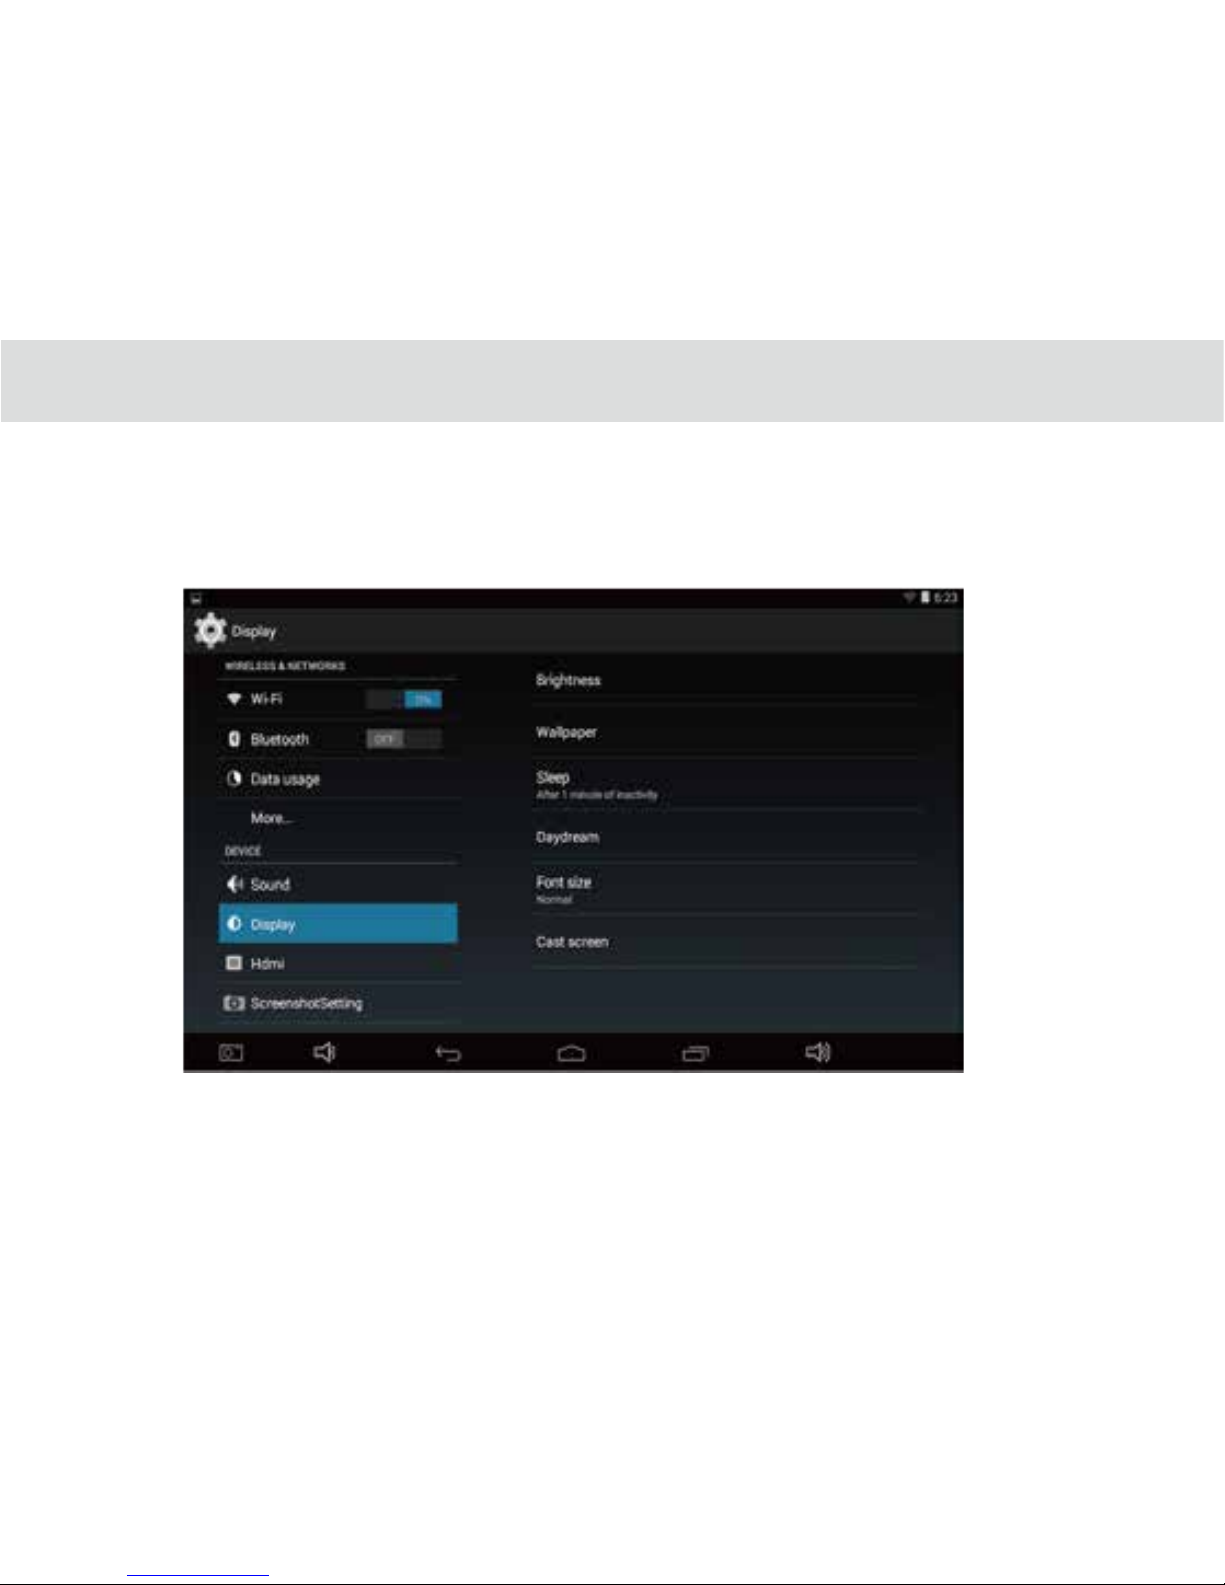
4. And then press “Cast screen” same as gure two below.
Figure 1. 2
Page 70
65
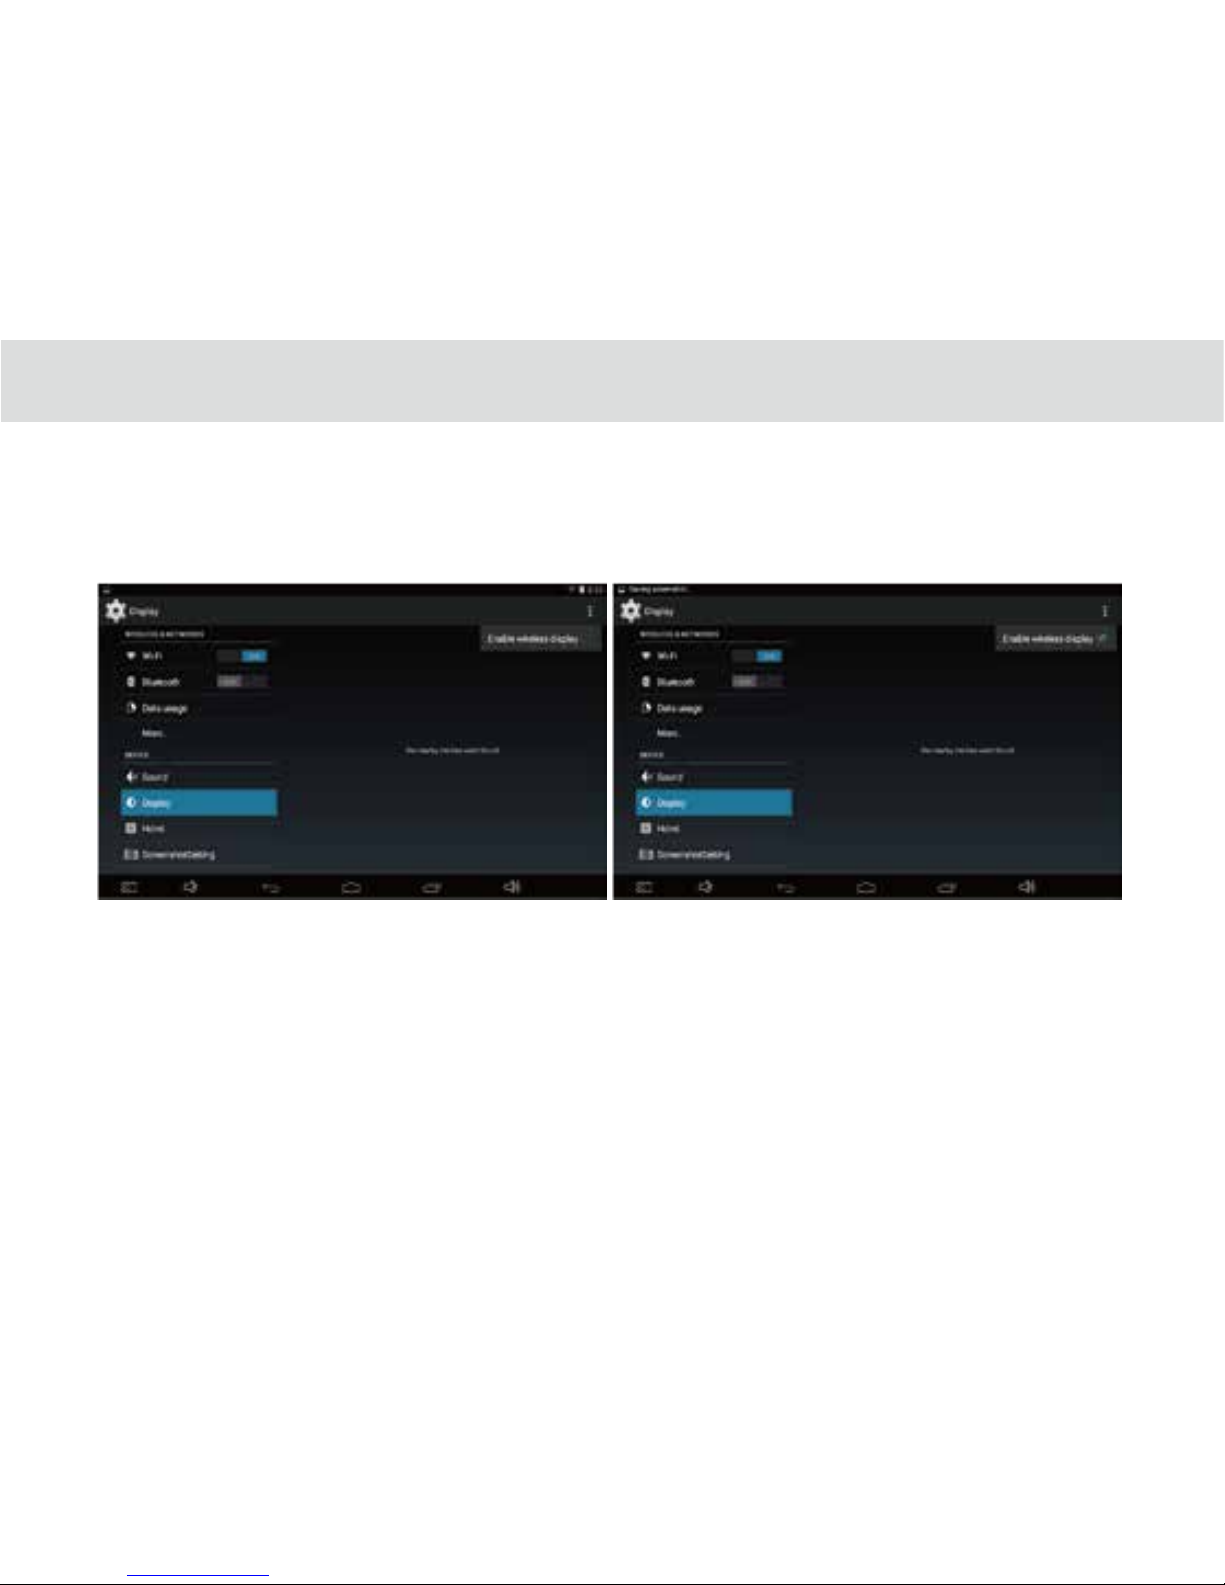
5. Select “Enable wireless display” in menu of top right corner;( Figure three and four)
Figure 1.3 Figure 1.4
Page 71
66
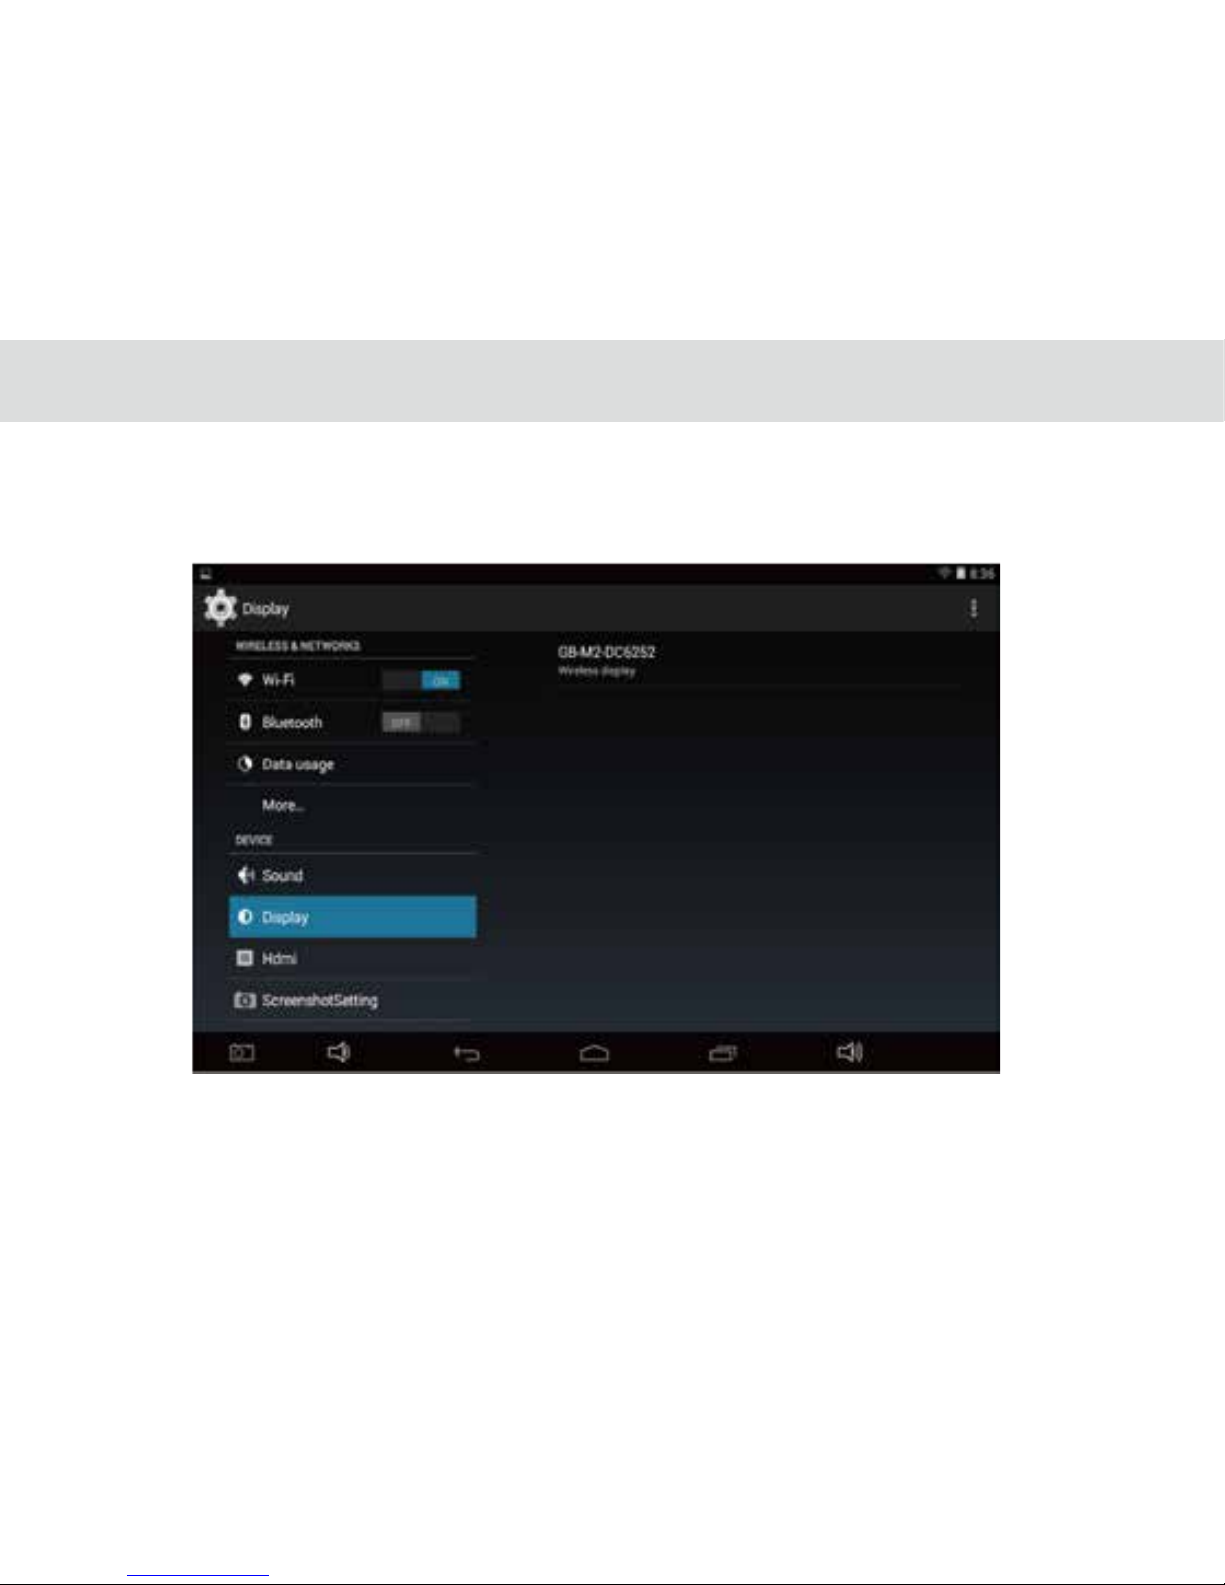
Figure 1.5
6. Tablet will search the accessible signal sources in range automatically;(Figure ve)
Page 72
67
Figure 1.5
7. Select the corresponding signal source and wireless connection shows successfully.(Figure 6)
Page 73
68
3.23 DLNA
3.23.1 DLNA introduction
The full name of DLNA is DIGITAL LIVING NETWORK ALLIANCE. The purpose is to enjoy your music, photos and videos
anywhere anytime. DLNA is initiated by SONY, Intel and Microsoft. It aims at resolving interconnection and interworking of
wireless and wired network for personal PC, consumer electronics, mobile devices. It’s possible for the unlimited sharing and
growth of digital media and content services and has reached more than 280 member companies at present.
DLNA doesn’t create technology but forms a kind of solution which we can comply with the norm. Therefore, the various
technologies and protocols chose are all wide range used currently.
3.23.2 DLNA functions
1. Exploration: to search non-congured devices in network and to calculate its provided family solution performance.
2. Browse: to browse the contents and to classify them through dierent ways
3. Search: to search the specic contents on the device
4. Distribution: to send multimedia content by whole network
5. Services: to inform address book by network
6. Print: To send contents to network attached printers
7. Control: To change the device status by using the network
8. Upload: to send contents to the server
9. Download: to receive and store contents
10. Automatic decoding: to change the resolution or contents’ format to ensure the equipments can translate correctly.
11. Service guarantee: to distinguish the priority of network trac, it will prefer to give up the weakest one if the network
overload.
Page 74
3.23.3 Control device discovery and connection
Our MA7 can support DLNA and you can operate as below:
Please use mobile phone as source port and ensure the version of the android must be 2.3 and above(because only version
2.3 of android can support miracast) such as Google device.
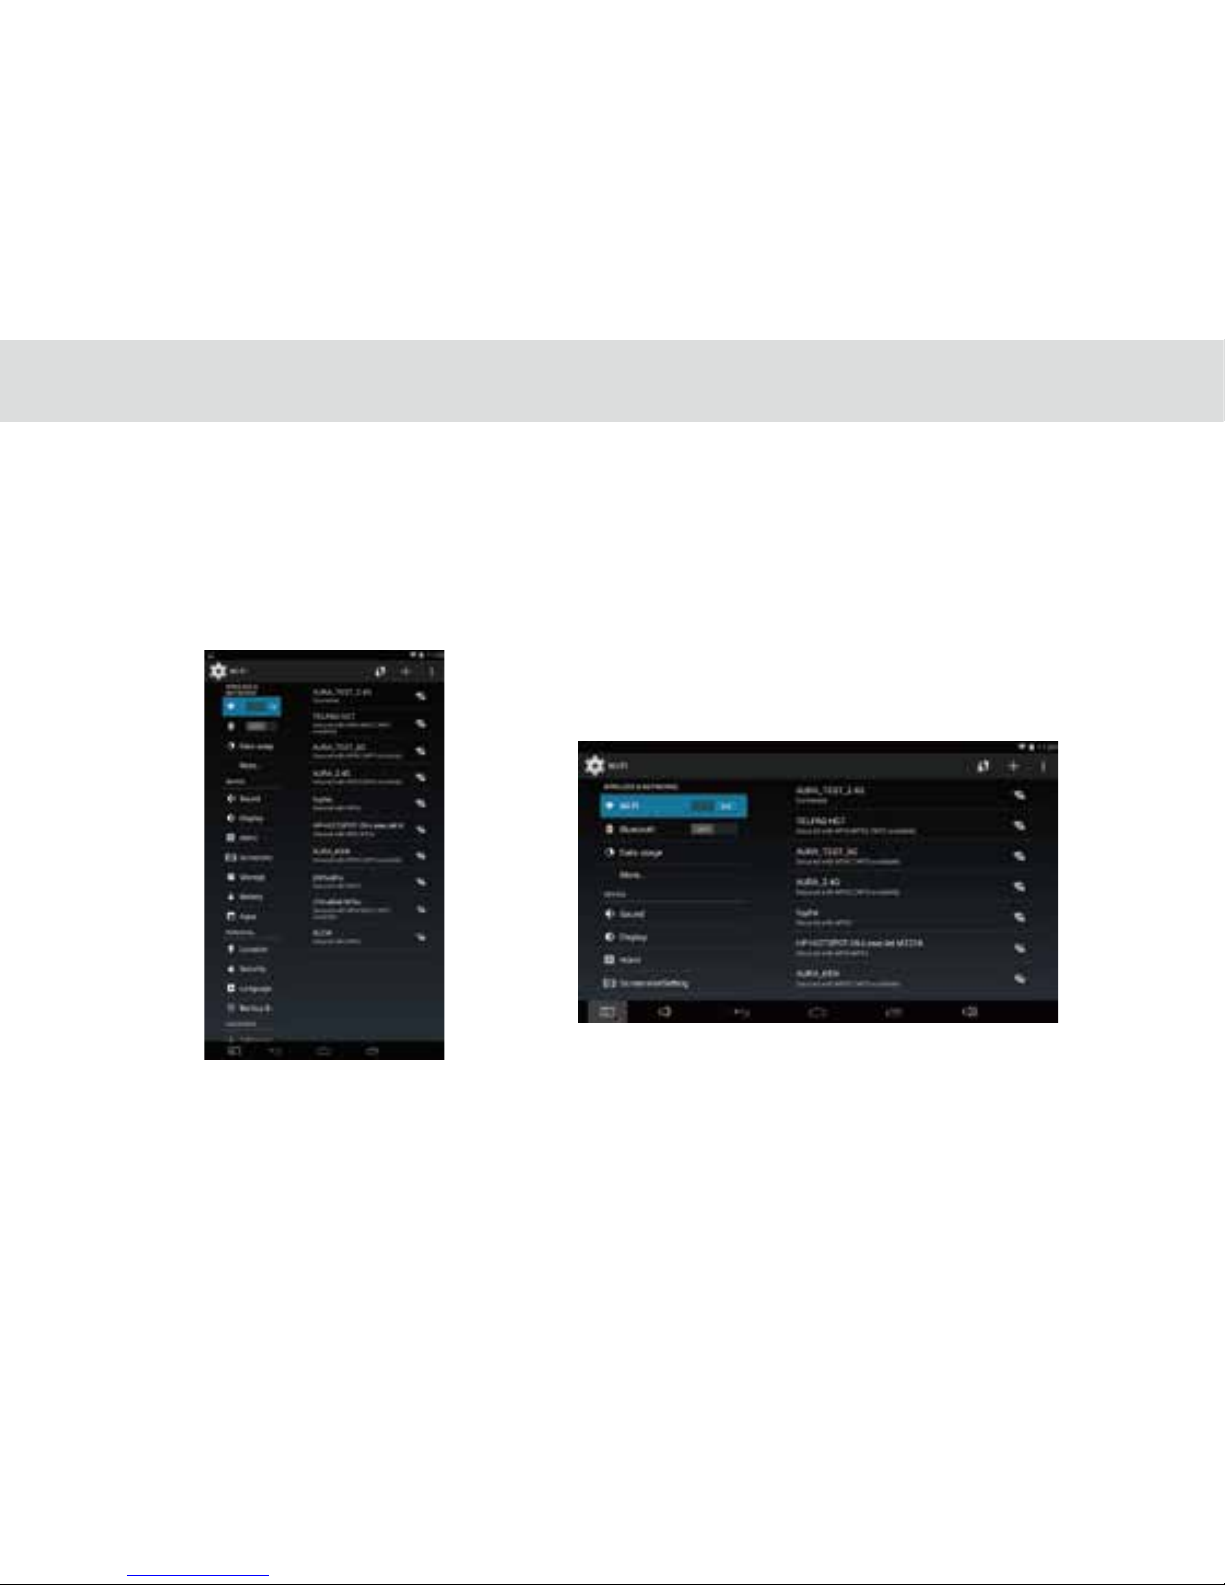
1. Wi-Fi connection
Please make sure two devices are in same Wi-Fi network, such as AURA_2.4g
Figure1.1 Google device has connected WIFI Figure1.2 MA7 tablet has connected WIFI
69
Page 75
2. Start Application
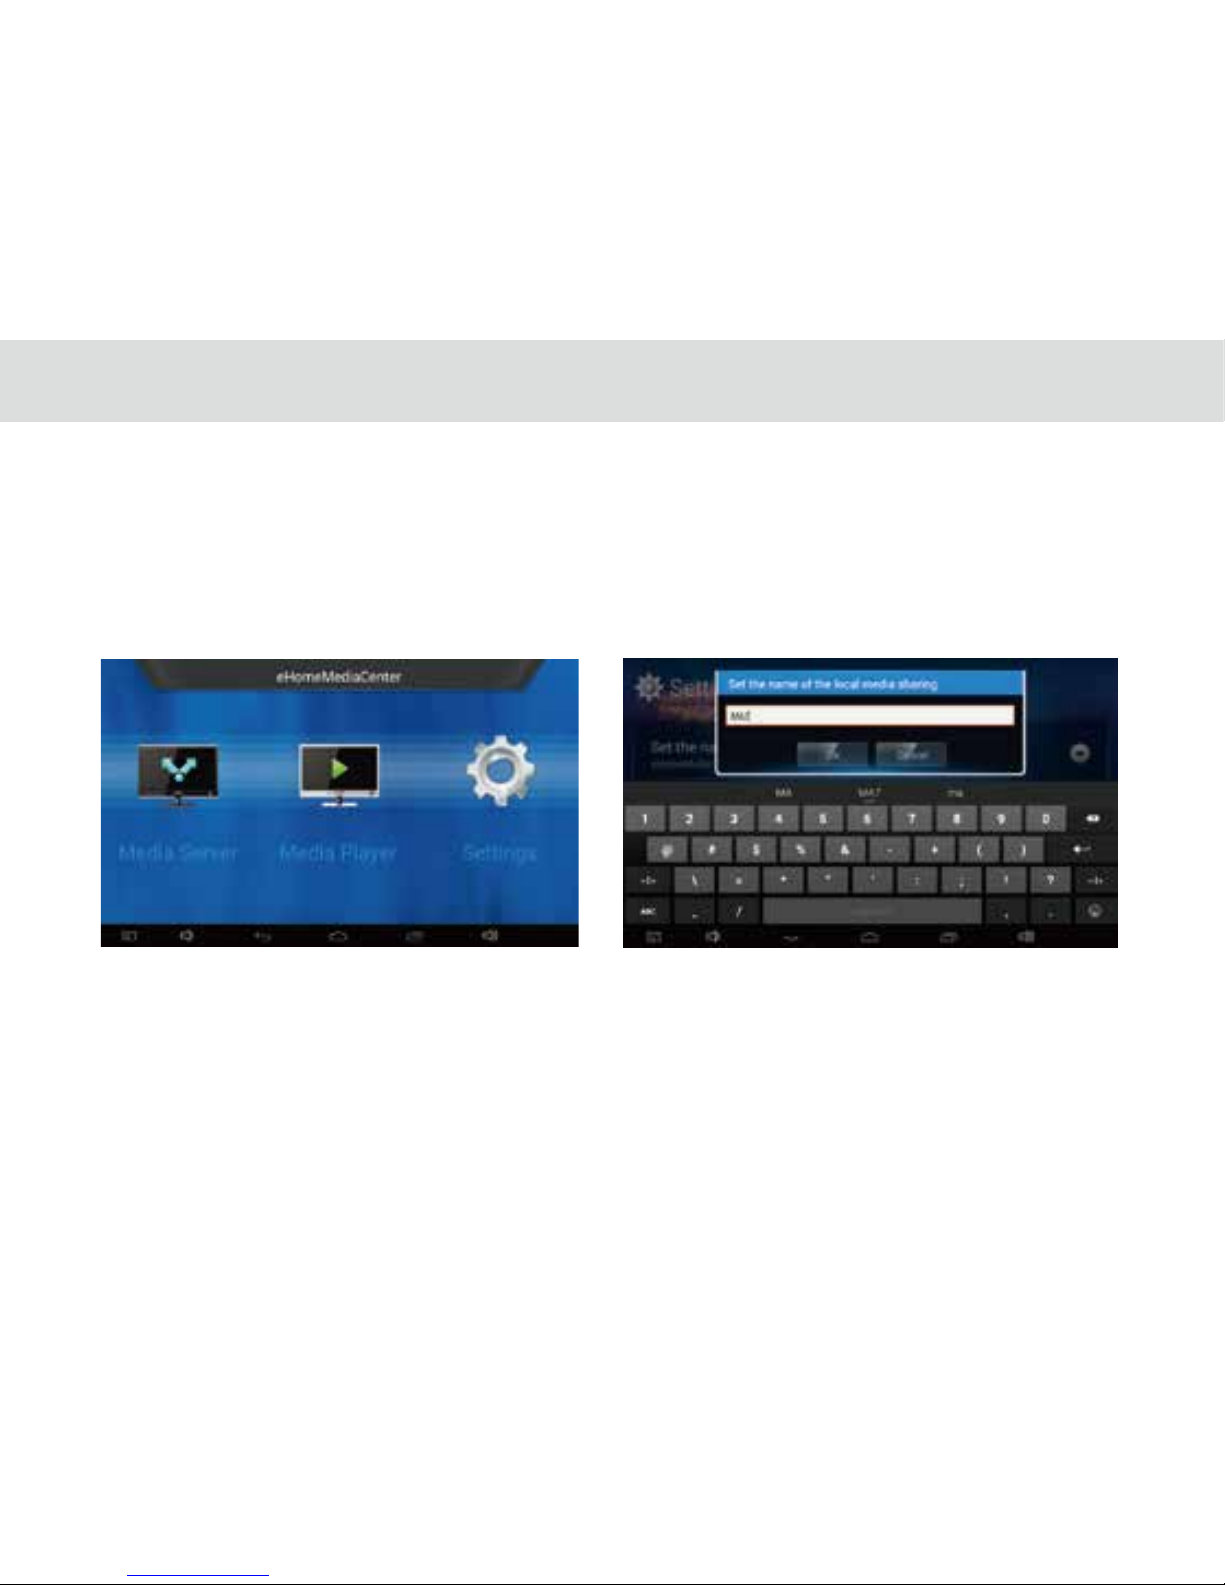
-Please start “eHomeMediaCenter” in MA7 tablet and click “Settings” to change your device name for easy identication . Such
as “ MA7”.
Figure1.3 click settings Figure1.4 Change device name
70
Page 76
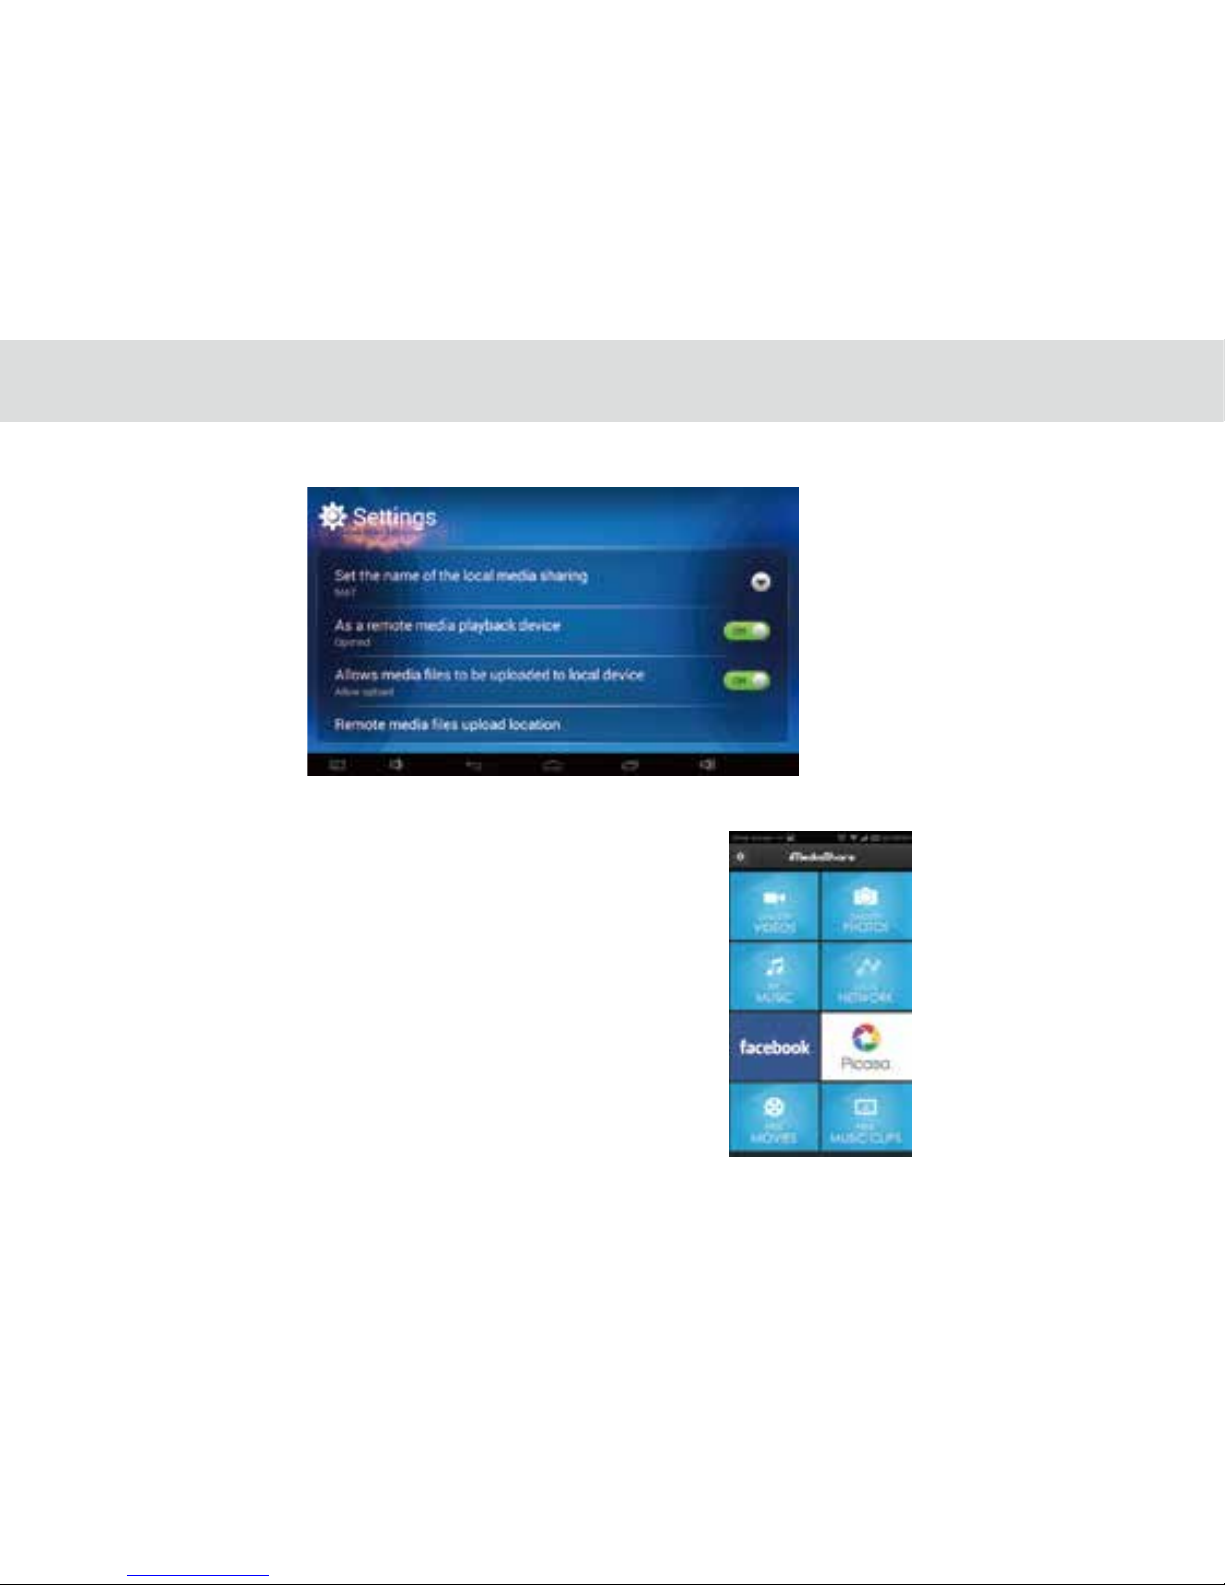
Figure1.5 nish
Figure1.6 apk-iMediaShare interface
- Please start “apk-iMediaShare” and the interface Figure1.6.
71
Page 77
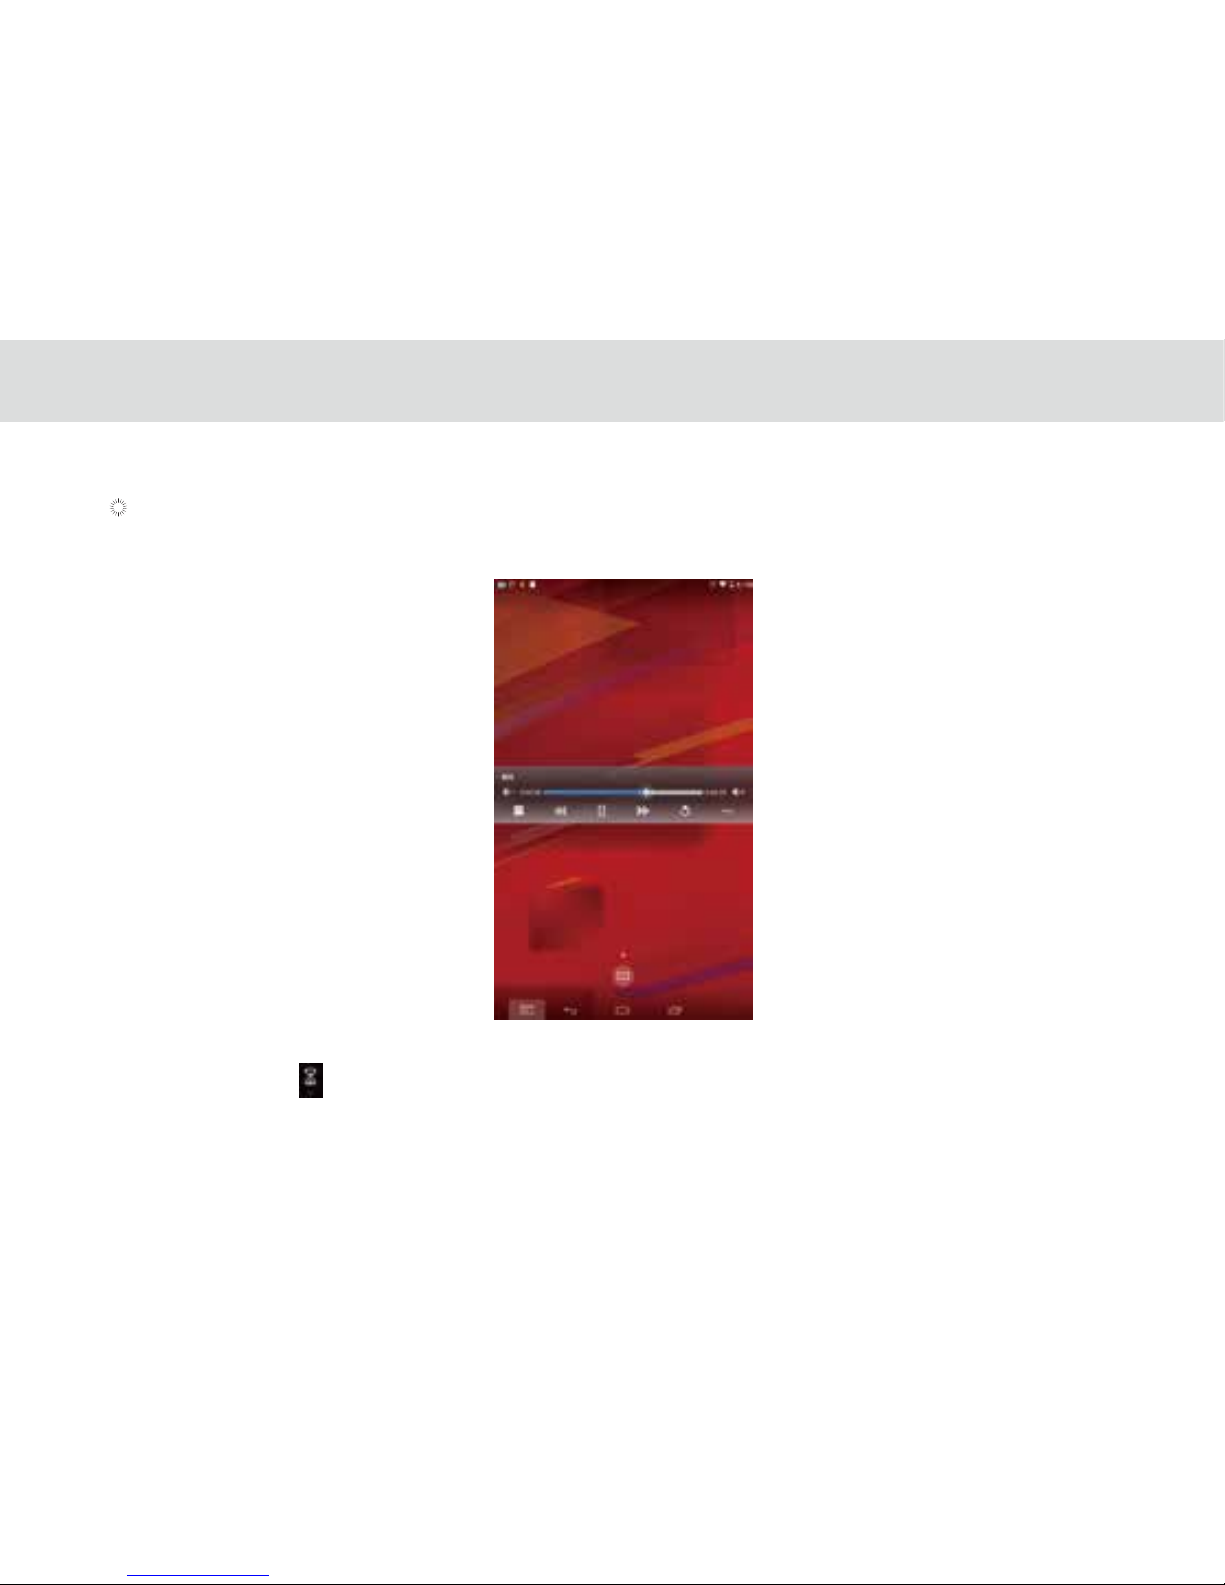
3.23.4 The brief introduction of interactions between tablet and mobile phone.
To push local video, music or photos on your mobile phone to display on tablet.
Please refer to picture 1.6 “GALLERY VIDEOS”、“GALLERY PHOTOS” and“GALLERY MUSIC”. For example, click “Gallery Music”
as the gure 1.7 below, you will see the local les on your mobile phone(the les in red box).
Click any le such as and you will enter the following gure
Figure 1.7 Enter the interface of“Gallery Music”showing local music les on your mobile phone.
72
Page 78
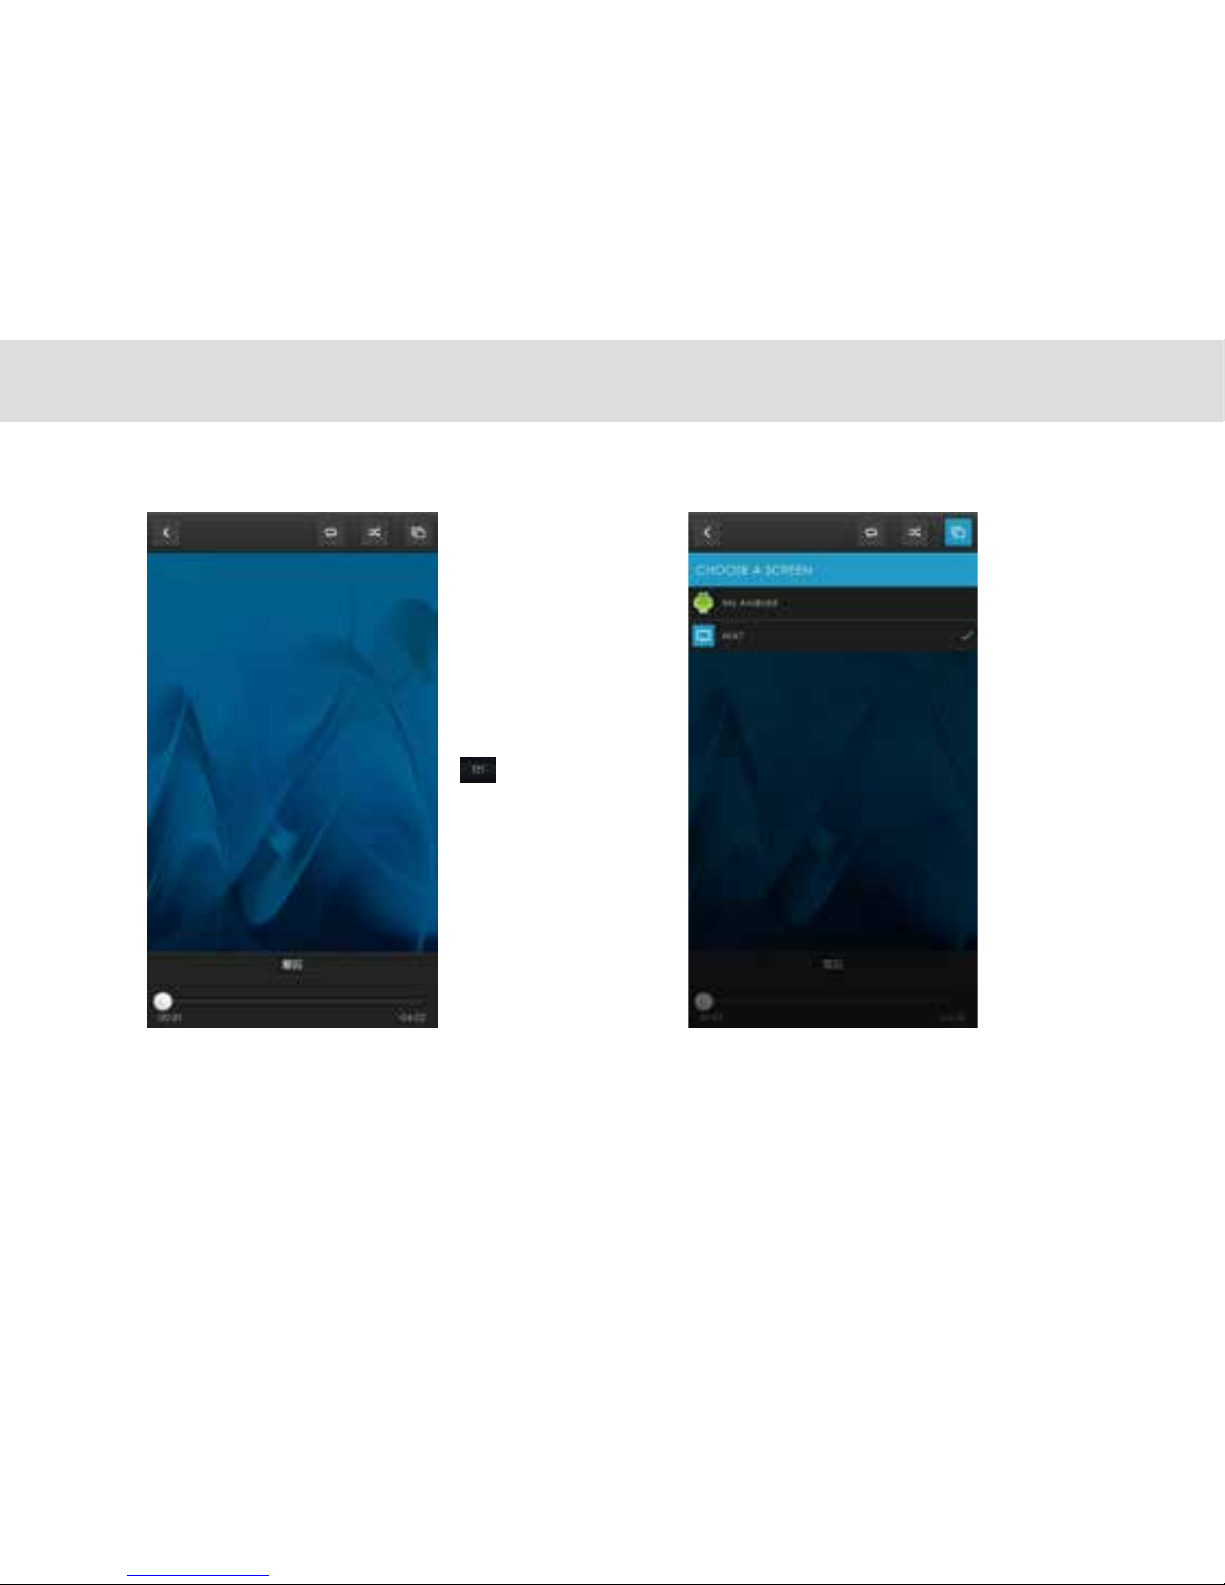
Figure 1.8 Music Playing Interface and click,
the following gure 1.9 will pop-up.
Figure 1.9 Open “choose a screen”
73
1.8 interface
Page 79
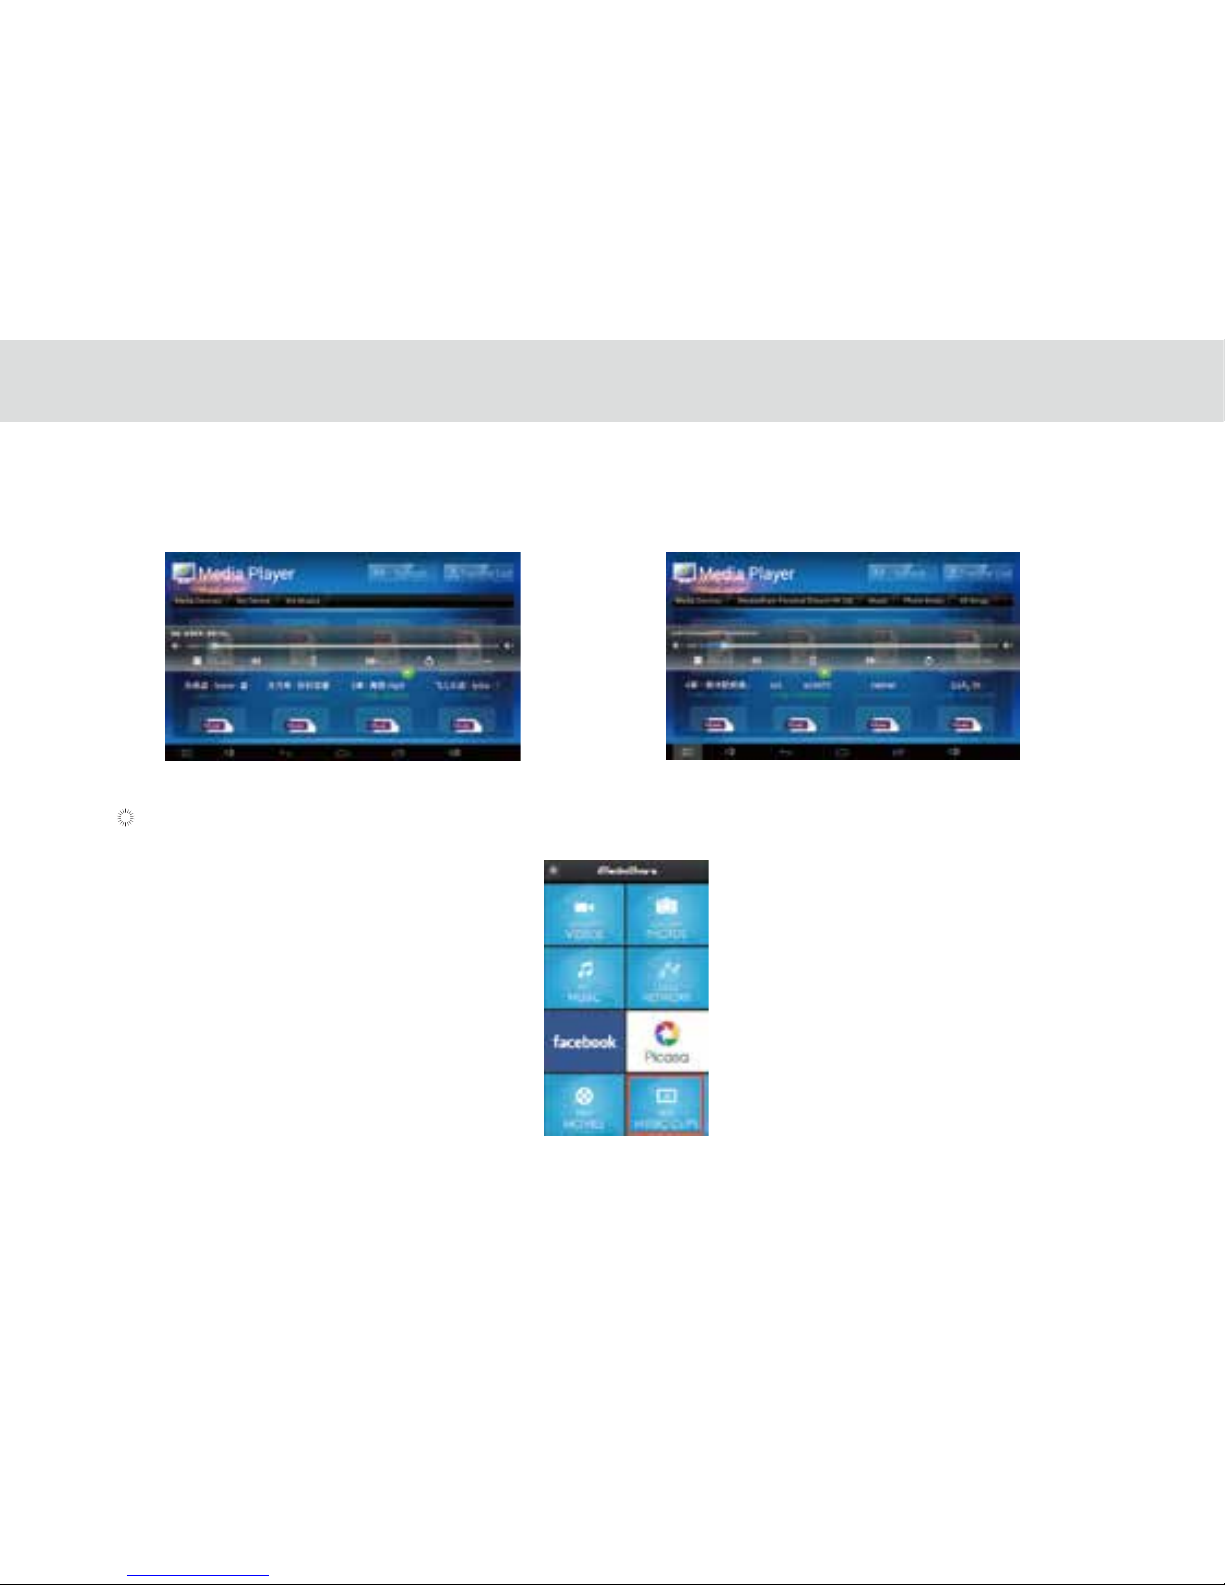
Please choose “ MA7” in above gure ,the music on both mobile phone and tablet will play at the same time. But only MA7
tablet have music voice and your mobile phone can return and operate other function once above operation nished.
Figure 1.10 Music Playing Interface on mobile phone Figure 1.11 Music Playing Interface on
MA7 tablet
To push the live video or music on your mobile phone to display on tablet.
Please refer to Picture 1.12 “FREE MOVIES” and “FREE MUSIC CLIPS”. “FREE MUSIC CLIPS” in below gure as an example.
Figure.1.12 apk-iMediaShare interface
74
Page 80
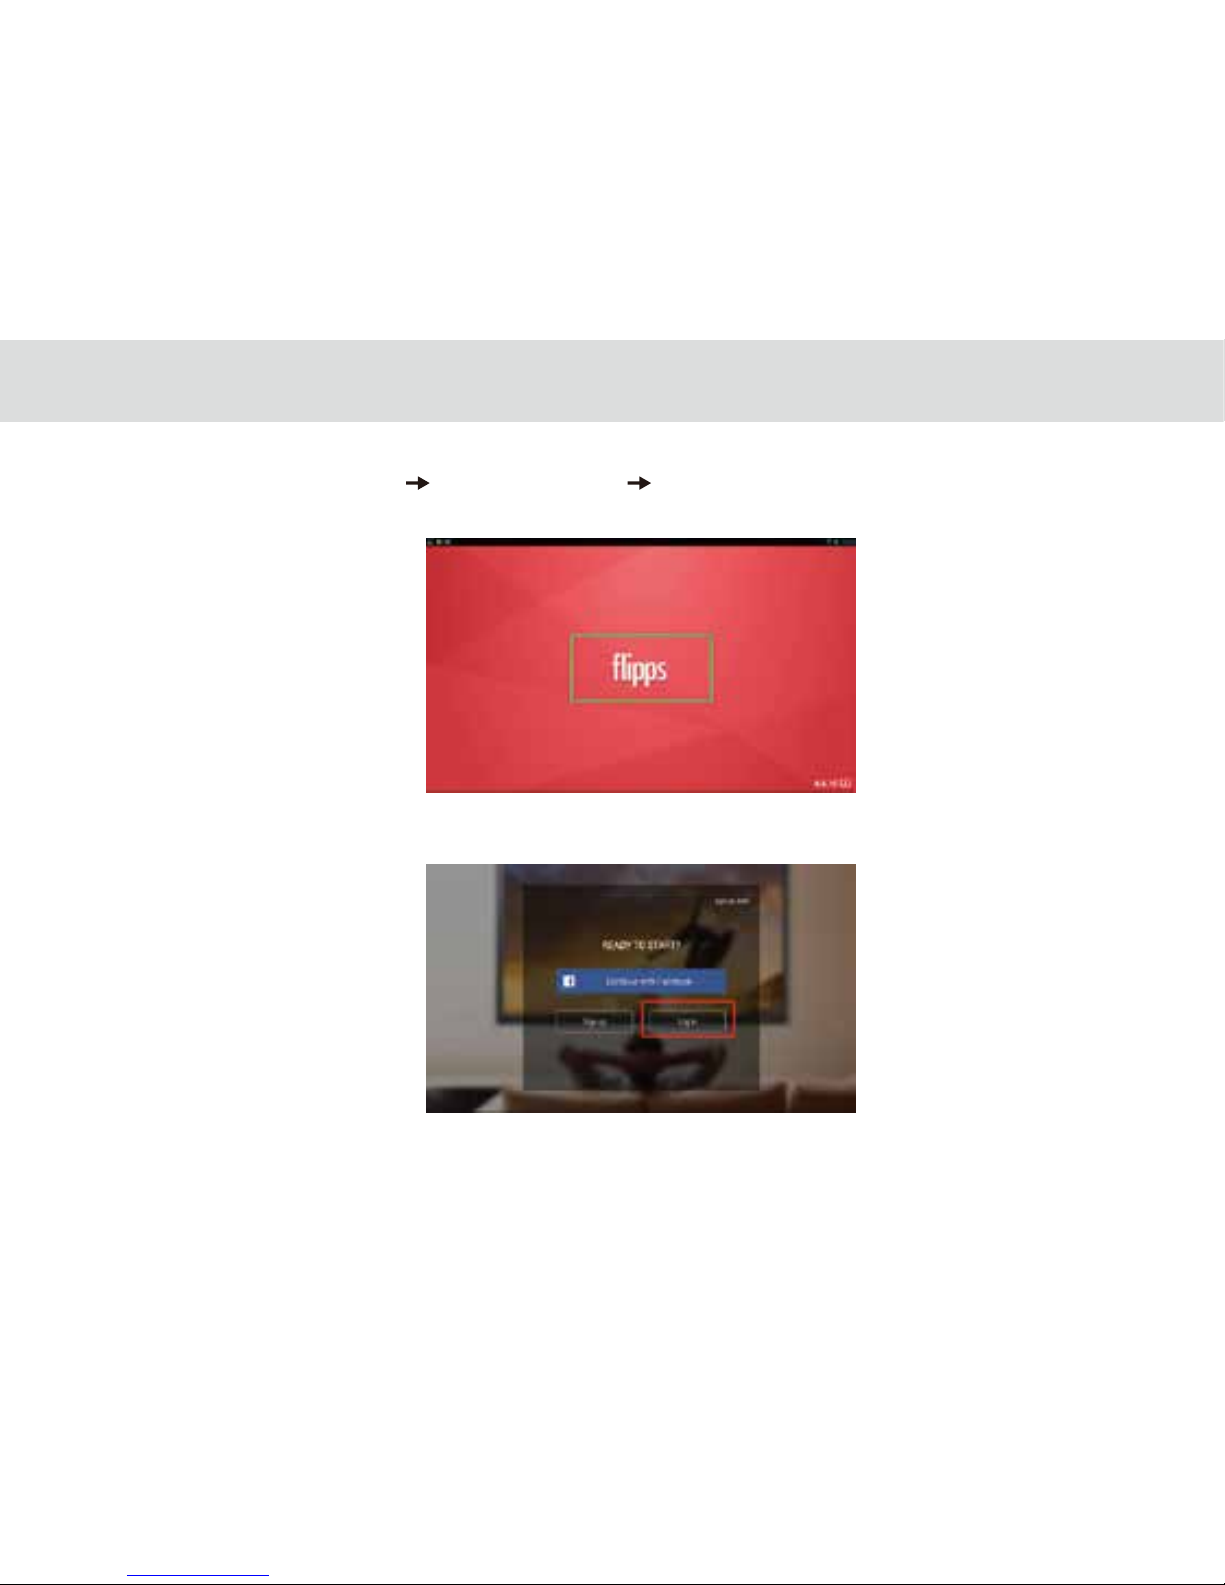
Figure1.12“iMediaShare”interface Click”FREEMUSICCLIPS” Access”ipps”interface. If it’s srt time for you to operate
and there is no ipps APP in your mobile phone, the “ipps” link will be given in the on-sreen interface and you can follow the
instructions to download and install.
Click “ipps” to access the following gure interface
75
Figure.1.13 ipps APP interface
Figure.1.14 To login ipps interface
Page 81
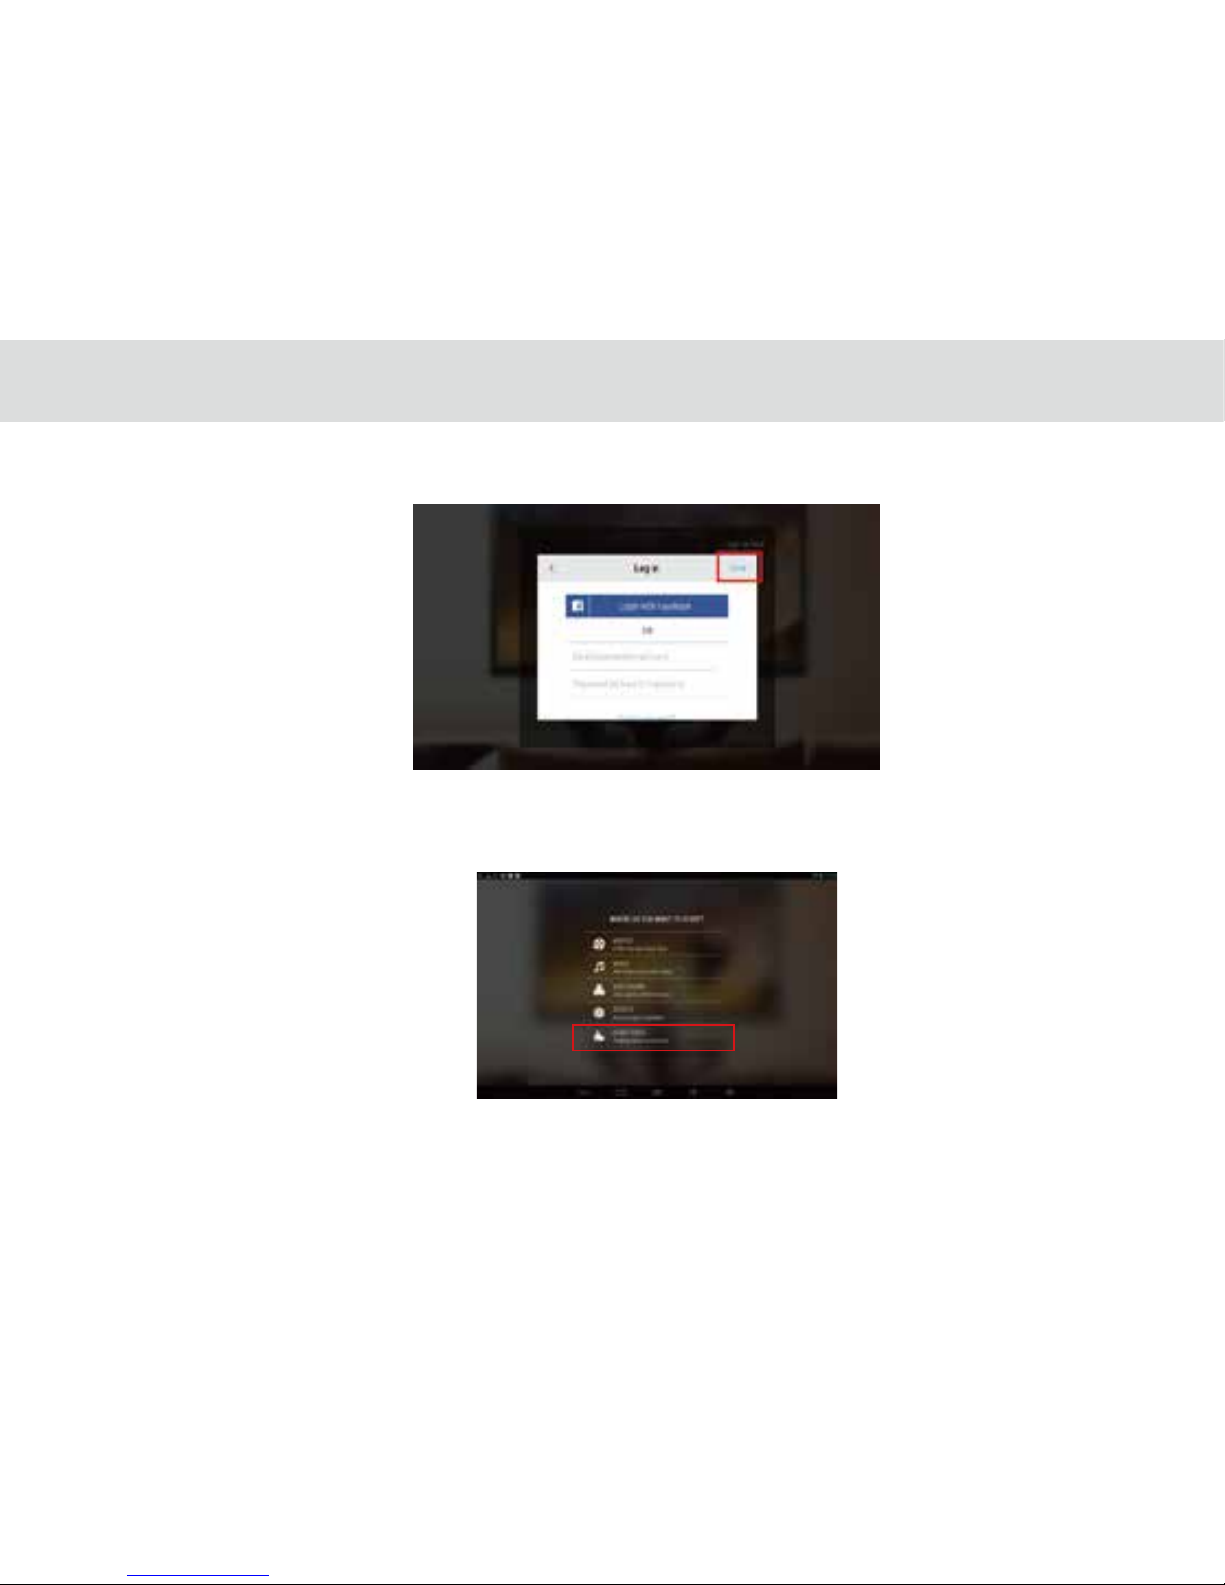
Click“Log in”as the following gure
You no need to login facebook account, click “done” on top right corner in the above gure, then click back key to access
the following gure interface.
76
Figure.1.15 account log in interface
Figure.1.16 ipps APP main menu interface
Page 82
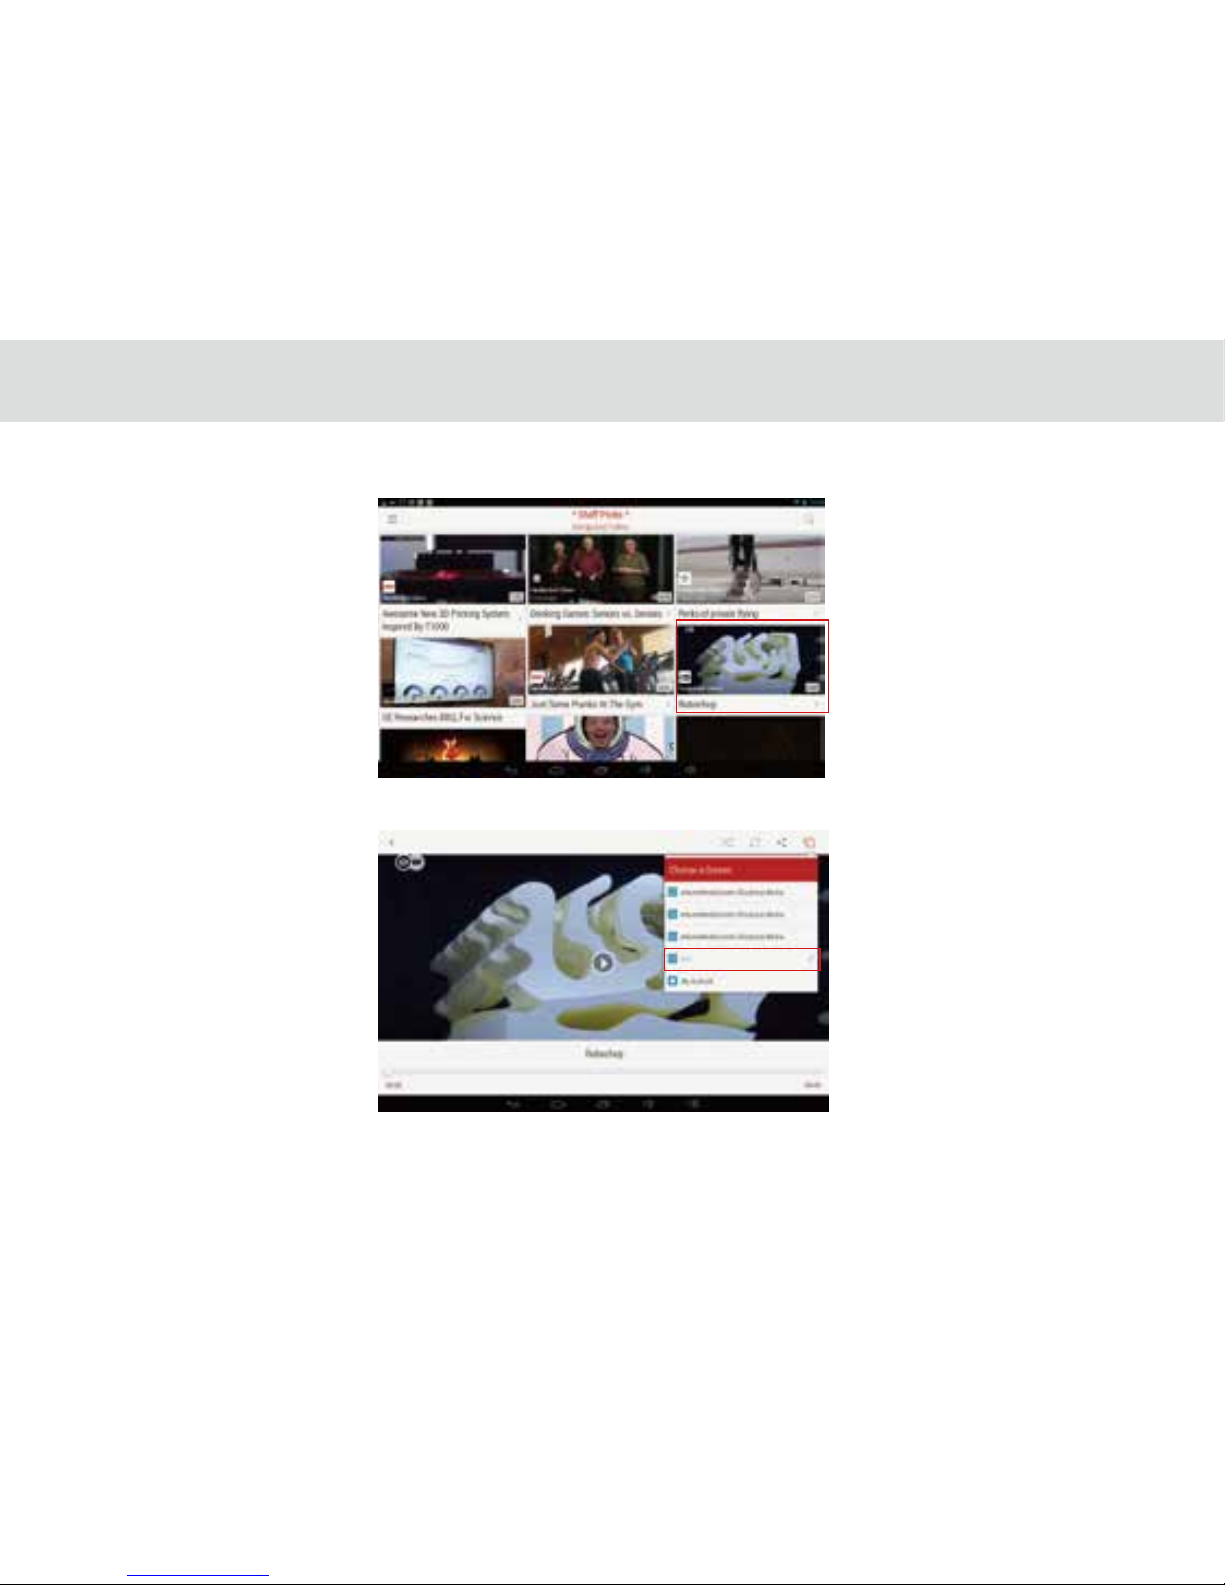
Choose and open any project in above gure, click “STAFF PICKS” as an example and gure below.
Choose and play any video in the above interface, “Robochop” as an example.
77
Figure.1.17 start“STAFF PICKS”
Figure.1.18 start “Robochop”
Page 83
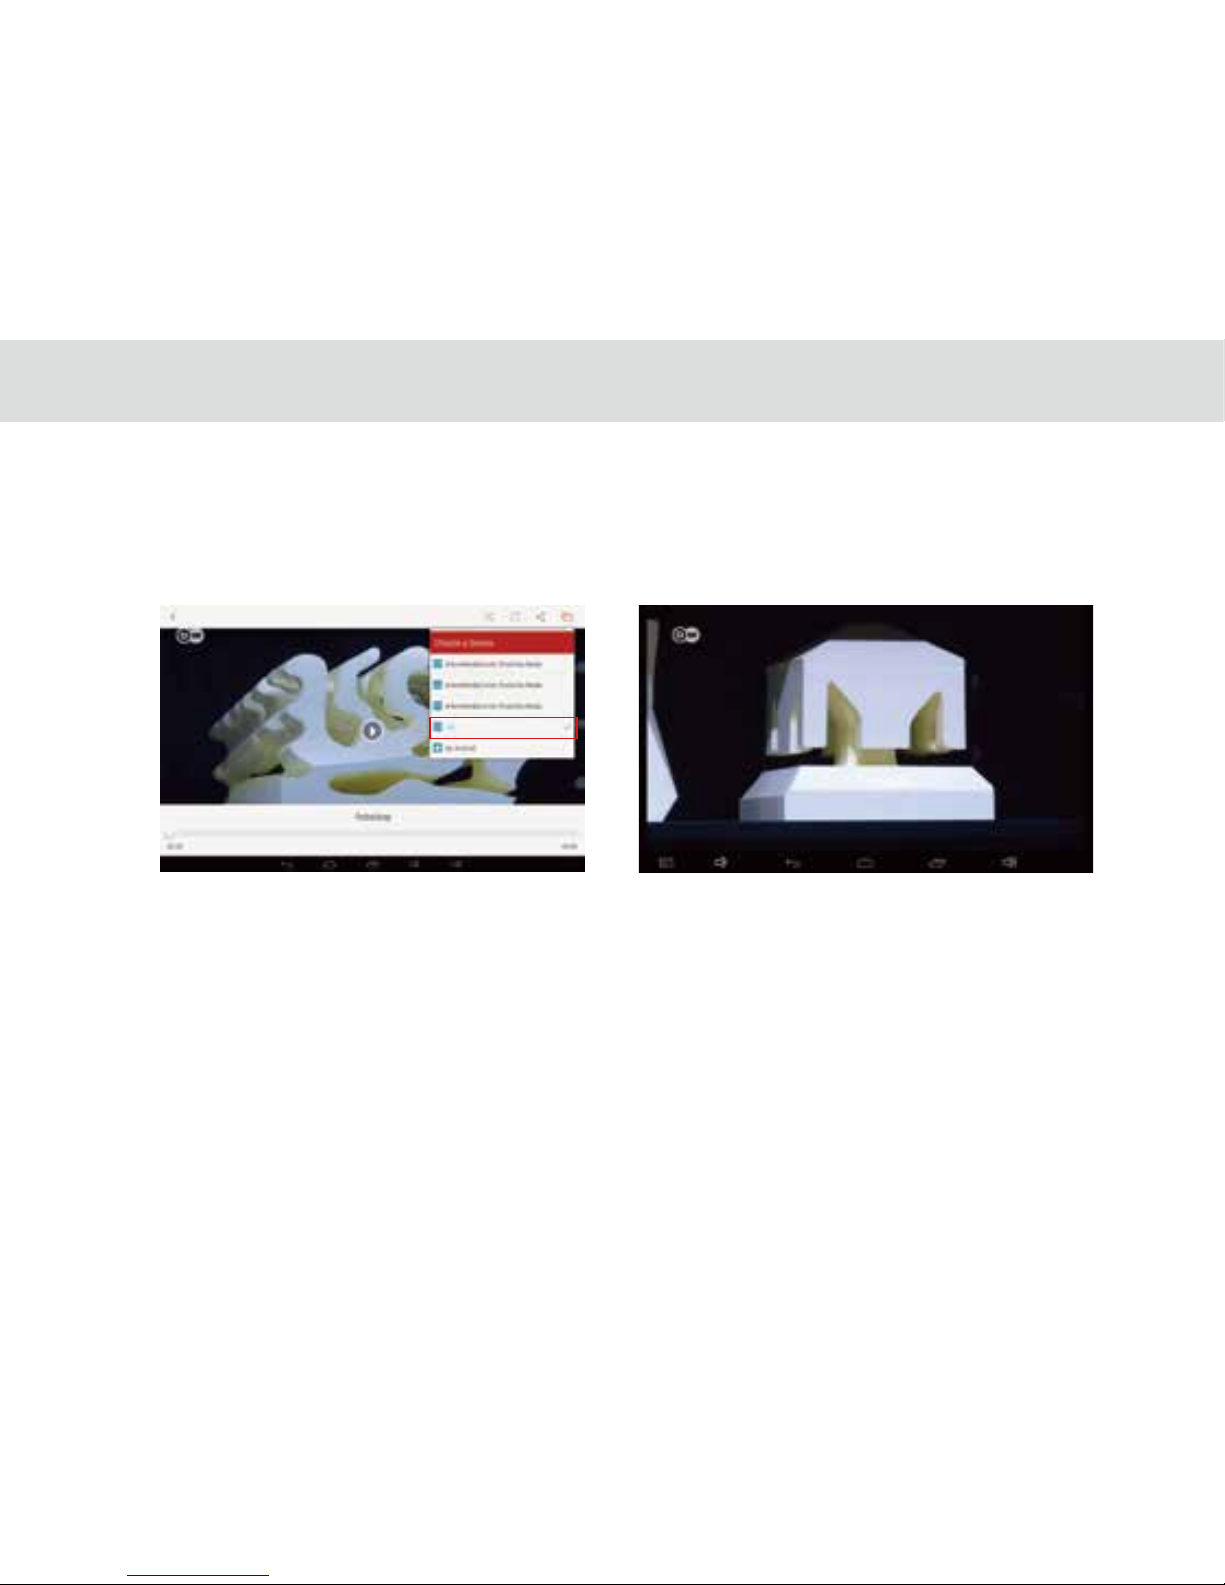
Click ”choose a screen” at top right corner in above gure and choose “ MA7”, the live video on mobile phone will be pushed
to play on
MA7 tablet.
Figure.1.20 Playing interface on
MA7 tabletFigure.1.19 Playing interface on mobile phone
78
Remark:
1 . Aboves are all for multimedia les in mobile phone sharing to tablet. Vice versa, multimedia les in tablet can also be
shared to your mobile phone.
2 . In order to guarantee the smooth playback of device, please operate above in good environment of network.
Page 84
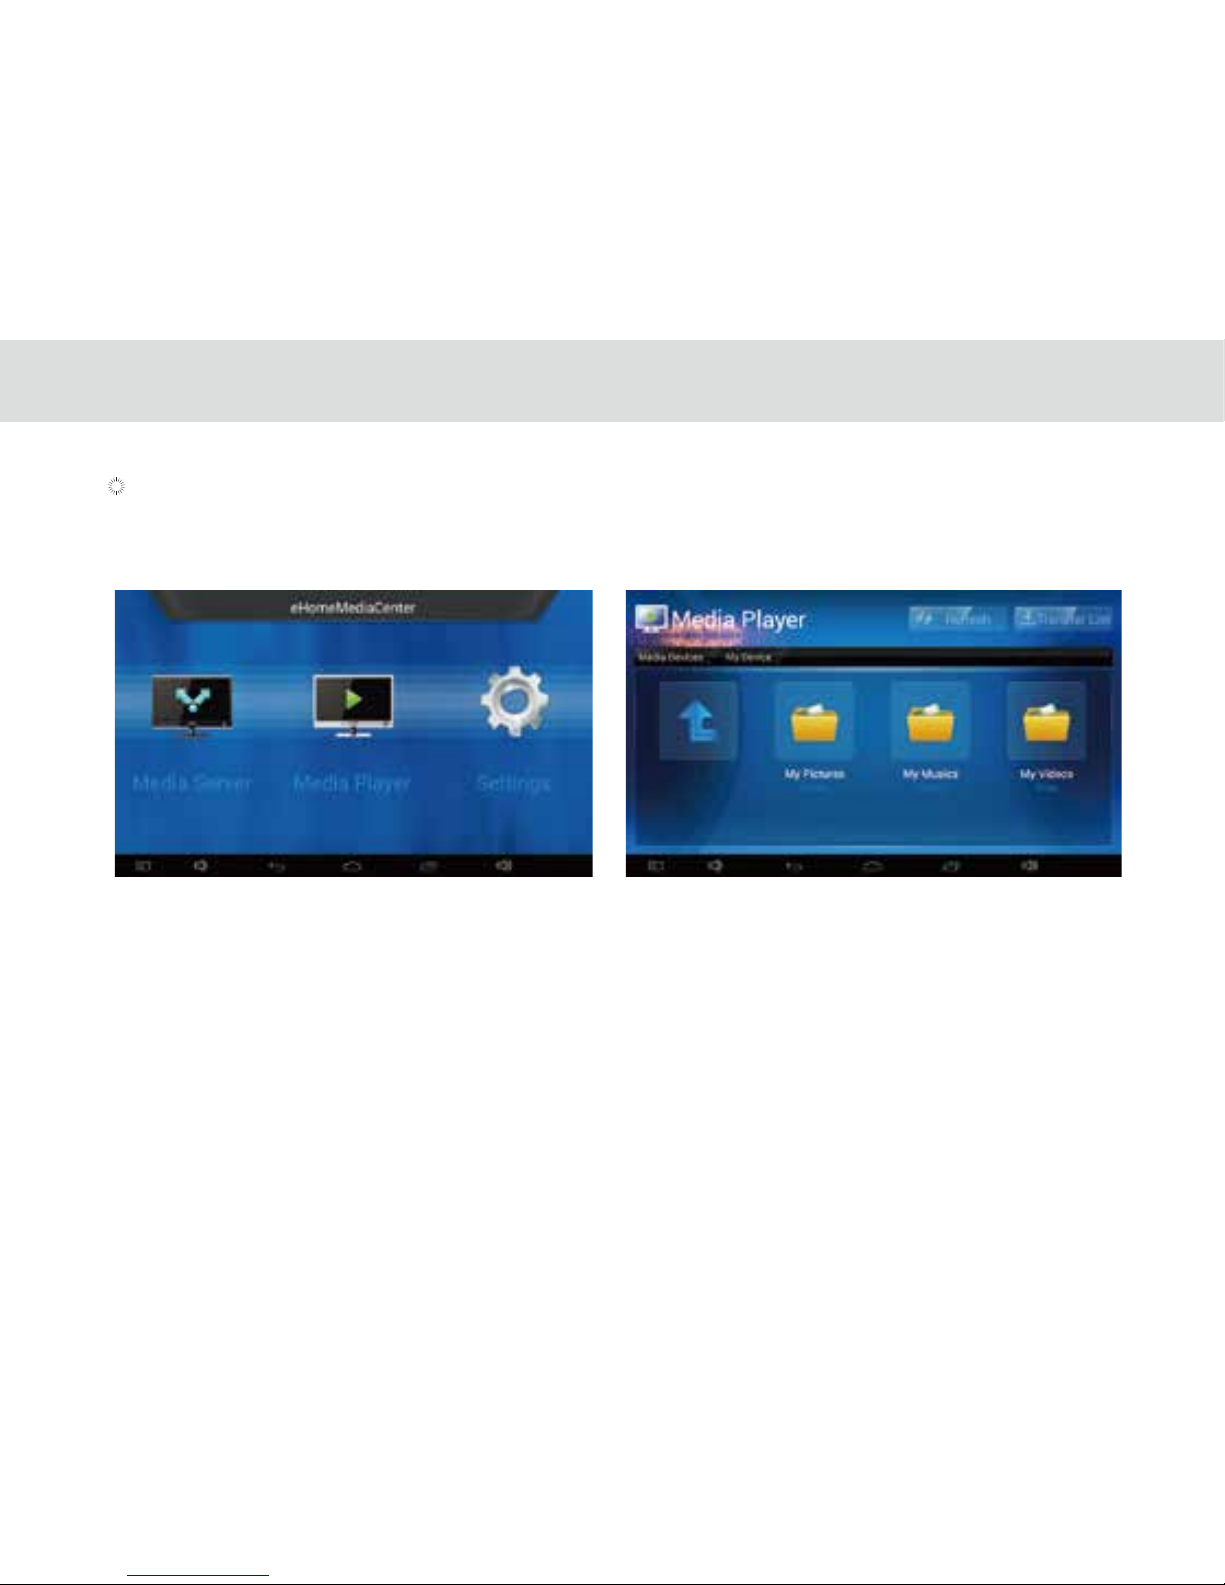
When you start “Media Player” and the interface will show shared music, video and photos. You can click the les which you
want to play.
Figure1.21 start Media
Figure1.22 start
Mobile phone can share the music and video on MA7 tablet.
Please start “apk-iMediaShare” on mobile phone, and start “eHomeMediaCenter”in MA7 tablet “Media Player”interface.
79
Page 85
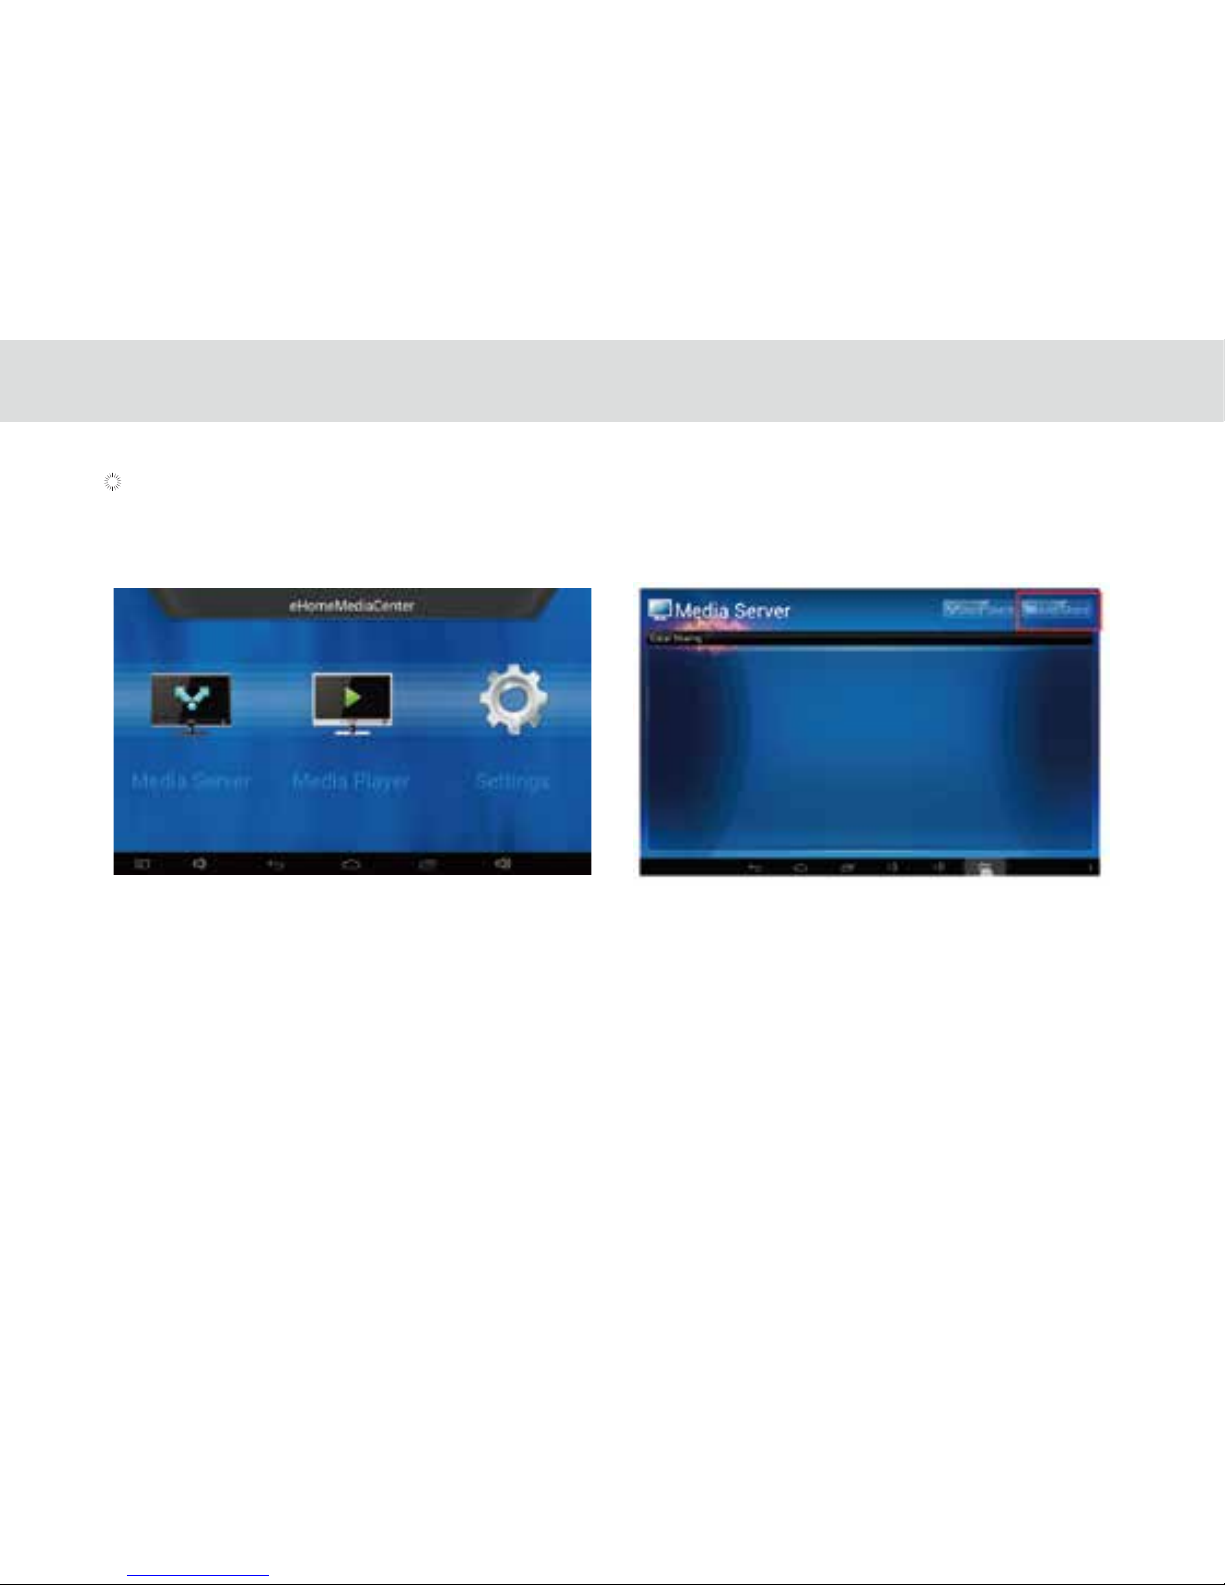
MA7 tablet can share local music, video or pictures to mobile phone.
Please start the “Media server” in “eHomeMediaCenter”interface on MA7 tablet when apk-iMediaShar is started on mobile
phone.
Figure1.23 Start Media server Figure1.24 click top corner “Add Share”
80
Page 86
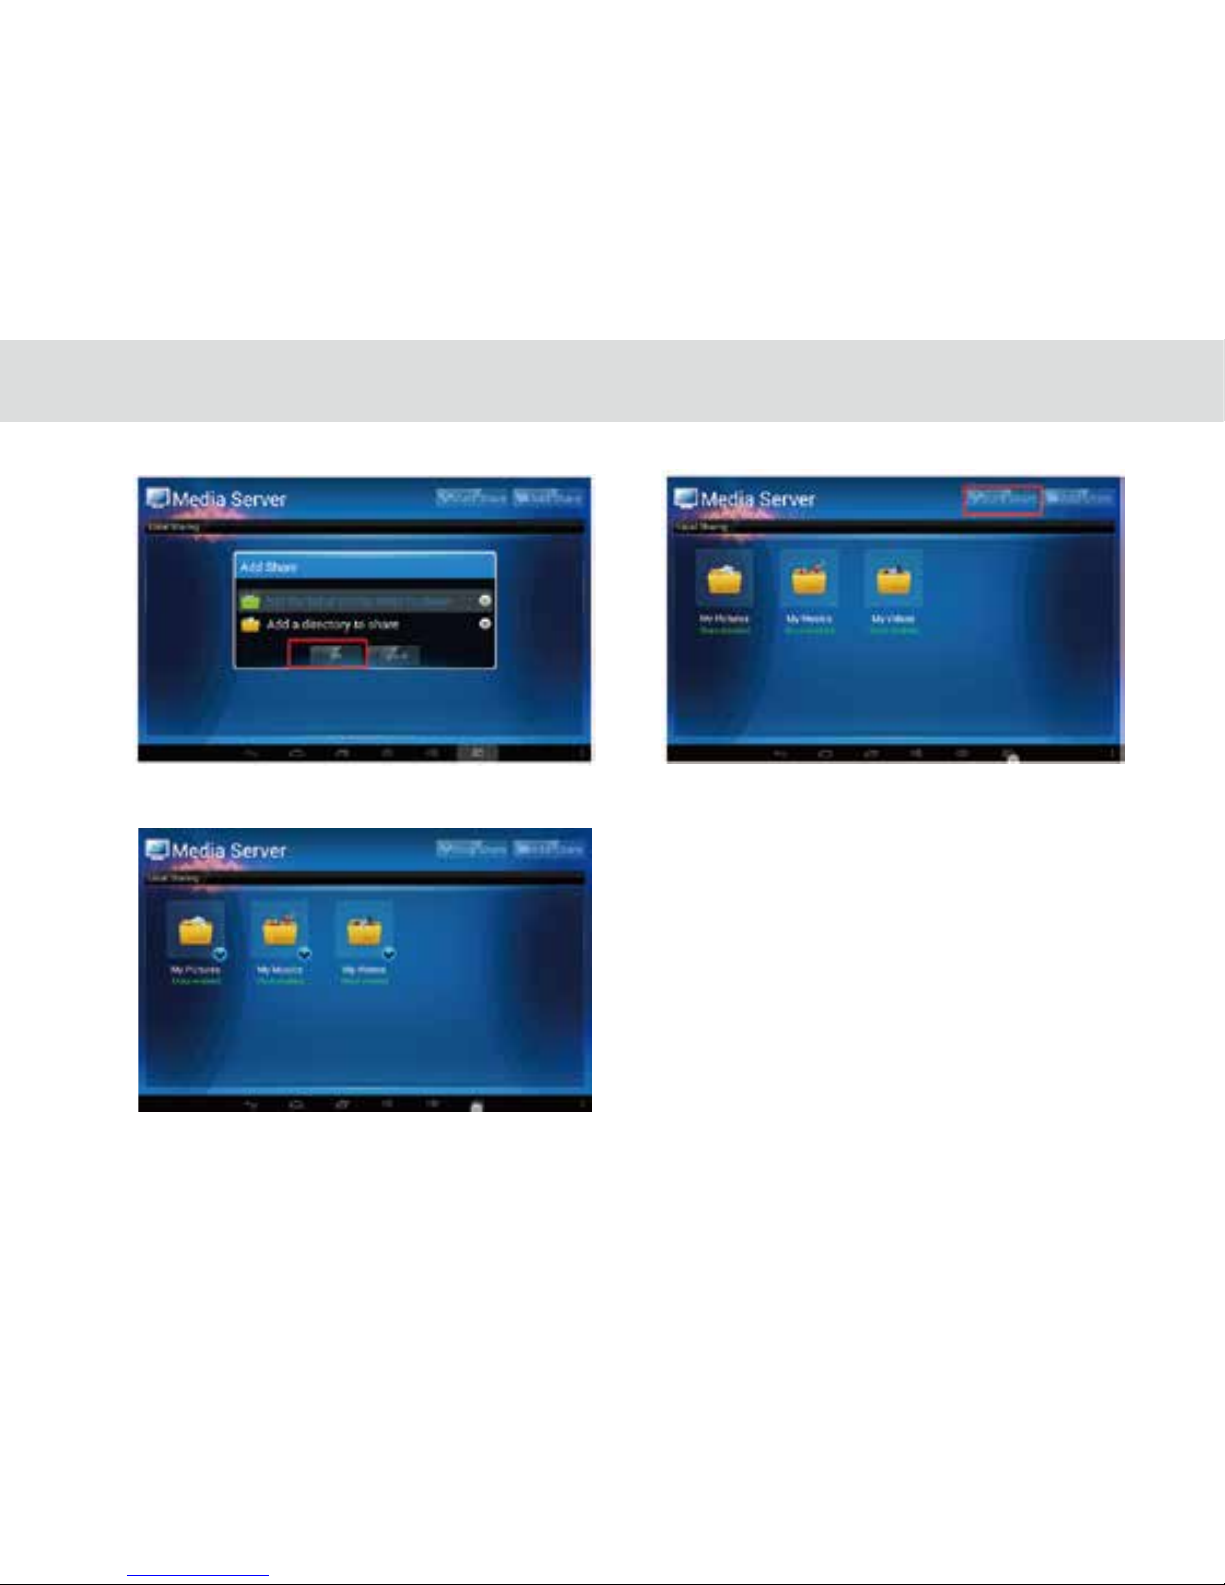
Figure1.25 click“OK”
Figure1.26 select top right corner“start
Figure1.27 the shared les from MA7 tablet
81
Page 87

4 THE CONNECTION BETWEEN DOCK PHONE AND TABLE
Page 88
The touchscreen Dialer can be accessed by touching the Dialer shortcut.
The Dialer is automatically launched when the Tablet is placed on the dock. When the Tablet’s dock interface comes into
contact with the dock connector, the keypad on the dock is automatically disabled.
With this set-up, you must use the Tablet dialer to make calls.
Please take note of the following when using the Dialer:
Line 1- Landline
Line 2- VoIP (requires network support)
When the Tablet is docked, the handset keypad and the speaker button are automatically disabled. The user must use
the Tablet for dialing.
The Tablet’s touchscreen Dialer is used as the primary phone. The handset provided serves as a secondary phone so users
can make calls if there is a power outage or when the Tablet is removed from the dock.
4.1.1.1 Making a call without the Tablet
You can use the handset base like an ordinary xed phone to make calls when the Tablet is removed from the dock.
4.1.1.2 Making a call using the onscreen Dialer
1. Lift the handset from the dock.
2. Dial the number using the onscreen dialer.
3. To end the call, return the handset to the dock.
4.1.1.3 Making a call on the speakerphone using the onscreen Dialer
1. Touch to enable the speakerphone.
2.Dial the number using the onscreen dialer.
3. Touch to end the call.
4.1.1 Making a call
4.1 VOICE SERVICES
83
Page 89
When the phone rings and displays the incoming call image:
Lift the handset to o from the dock to answer the call
Touch to answer the call.
Only one of the two modes will be active at a time.
To end a call, please make sure both the handset and Tablet is o-hook
4.1.1.4 Switching from handset to speakerphone and vice versa
1. Touch to switch from handset call to speakerphone.
2. To return to using the handset, lift the handset. The call will be continued via handset.
4.1.1.5 Making a call from the Contacts
1. Touch the Contacts tab above the onscreen dialer.
2. If there are already saved entries, simply touch the icon of the person you wish to call.
To clear the Call log, touch Clear call log.
To remove just one entry from the log, touch an entry.and then touch Remove from call log.
4.1.2 Answering a call
4.1.3 Ending a call
Place the handset down on the dock to end the call.
Touch to end the call.
4.1.4 Selecting area code
4.1.1.6 Making a call through the Call log
1. Touch Call log tab above the onscreen dialer.
2. Scroll to locate the contact you wish to call.
3. Press Dial icon.
84
Page 90
Within the Dialer, touch the Phone Settings tab.
Touch the Select Area Code on the list
Touch the Menu button at the top corner.
Touch Settings in the menu displayed.
The default preset area code will be Metro Manila (02).
Select your area from the list and the phone will now be set to the conrmed area code.
When the area you are in has been selected, the phone will automatically recognize the similar area code for all incoming
and outgoing calls, and will display the phone number without the area code. You will also be able to direct dial the phone
number within the same area.
4.1.5 Favorites
Touch Favorites tab above the onscreen dialer
If there are saved entries already, tap the icon of the person you wish to call. Touching the contact image will upload
the detailed information of the contact.
4.1.6 Memo
When you have an ongoing call, you may write notes through the Memo Pad. To create a memo during your phone
call, touch at the lower right corner.
4.1.7 Importing/exporting contacts
Access the Dialer, touch the Contacts tab
Touch the Menu button at the top corner.
Touch Import/export in the menu displayed.
Select from the list whether you would like to import or export or other actions.
85
Page 91
4.1.8 Changing ringtones
Within the Dialer, touch the Phone Setting tab.
Touch the Ringtones & Volume from the list
Touch the Menu button at the top corner.
Touch Settings in the menu displayed.
From the options that shows up touch Phone ringtone.
Select the ringtone you would like from the list provided.
4.1.9 CONTACTS
4.1.9.1 Opening Contacts
4.1.9.2 Creating a contact
1. Open the Contacts screen.
2. Touch new contact.
3. Enter the contact’s information:
Enter the contact name, and touch the picture frame to select a picture to display next to the name in the contacts
list and in other applications.
Touch a contact information category, such as phone numbers and e-mail addresses, to enter information about your
contact. Flick up and down to view all categories.
Touch the plus button to the right of a category to add more than one entry for that category. Touch the minus button
to the right of an entry to remove the entry.
Touch the label button to the left of the contact information items such as Phone and E-mail to open a menu with
preset labels for a phone number. You can touch to select a preset label or touch Custom in the menu to create your
own label.
You can open your contacts by touching Contacts on the Home screen or on the Applications screen. In the contact
tab pages, you can touch a contact image to open the contact details screen.
Contacts enables you to save and manage information such as phone numbers, e-mail addresses and chat addresses of
your contacts, and provides quick and easy access to communicate with the people you want.
86
Page 92

4.1.9.3 Searching for contacts
1. Open the Contacts screen.
2. Touch Search.
3. Enter the name of the contact you are searching for. As you type, contacts with matching names appear below
the search box.
4. Touch a matching contact in the list to open its Details screen.
4.1.9.4 Editing contacts
To change or add details for your contacts:
1. Open Contacts.
2. Touch the contact whose details you want to edit, and touch contact image in the menu that opens. You can
also touch Edit contact while viewing details of the contact.
3. Edit the contact information, using the same controls as when you create a contact.
Editing contact details
Deleting a contact
1. Open Contacts.
2. Touch and hold the contact you wish to delete, and touch Delete in the menu that opens. (You can also
touch Delete while viewing details of the contact.)
3. Touch OK to conrm that you want to delete the contact.
4. Once you have nished entering details, ick to the bottom of the page and touch Done to save the contact
details to your Tablet.
While viewing the Call log, touch and hold the call log list to show contact details. You can add numbers to the contacts
via the virtual screen.
87
Page 93

5 BASIC TROUBLESHOOTING FOR THE TELPAD
Page 94
5.1.1. Press Tablet power key and check whether the PLDT TELPAD logo appears upon initialization.
5.1.2. If the Android™ Tablet doesn’t launch, connect the Tablet to the power supply through the dock.
5.1.3. If the problem still exists, please contact the PLDT Business oce.
5.2.1. If there is an electronic device emitting radio frequencies near you, switch it o or put it away from the Tablet.
5.2.2. Remove any peripheral equipment such as DSL splitter or fax machine and connect your phone directly to the modular
box.
5.2.3. If the problem still exists, please contact the PLDT Business Oce.
5.2 No dial tone
5.3.1. If there is an electronic device emitting radio frequencies near you, switch it o or put it away from the Tablet.
5.3.2. Remove any peripheral equipment such as DSL splitter or fax machine and connect your phone directly to the modular
box.
5.3.3. If the problem still exists, please contact the PLDT Business Oce.
5.3 Distorted audio on speaker
5.4.1. Check if there is a dial tone. If there is none check your RJ11 connection and make sure it is properly connected.
5.4.2. Look at your screen and make sure that the Dialer is set to Line 1; otherwise, touch the Line 1 button. Make sure that the
screen shows the message “TELPAD is on the dock”.
5.4.3. If the problem still exists, please contact the PLDT Business Oce.
5.4 Tablet Dialer cannot make a call
5.5.1. Check if the RJ9 cable is properly connected.
5.5.2. Unplug and re-plug the coiled cable to eliminate the possibility of a loose RJ9 connector.
5.5.3. Try a dierent telephone unit, if possible, to check if it’s a line problem.
5.5.4. If the problem still exists, please contact the PLDT Business Oce.
5.5 No audio response in the Handset
89
5.1 Tablet not powering up
Page 95

6 FAQs
Page 96
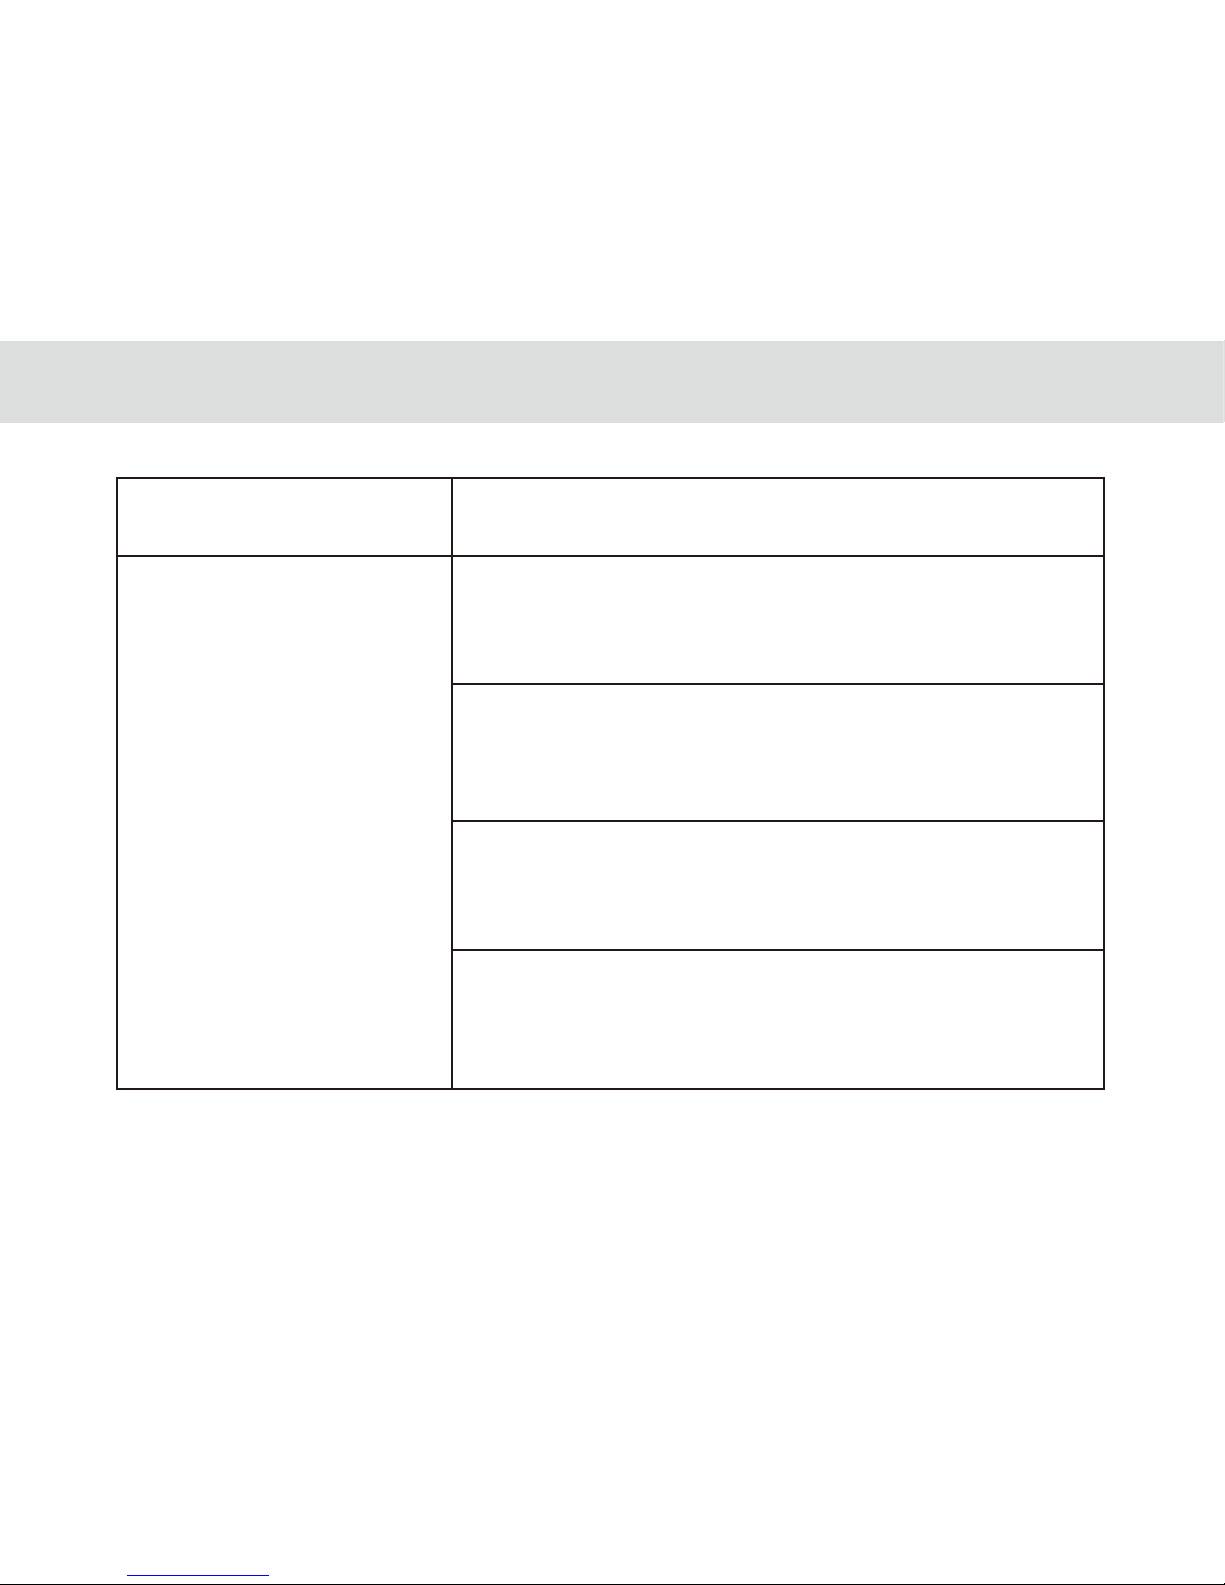
91
How will my device receive
notications from the TELPAD?
FAQs for DLNA Feature
Your device must be connected to the TELPAD via Bluetooth pairing.
Once connection is established ,TELPAD will send notications with attached
captured images (internet connection is required for both party).
1. How to congure connection between TELPAD and my device(Smartphones)
for successful DLNA display?
Solution: First ensure good internet connection for both devices(they must connect
to the same network).
Secondly, You must install imediashare(to access video/photos in your gallery) and
ipps TV(to access video streaming) applications available in Play store/App store.
2. The music, pictures or video les in MA7 tablet can’t be shared on Mobile phone
once DLNA connected.
Cause: The DLNA setting may not open le sharing.
Solution:
Please add and open le sharing for “Media server” in the “eHomeMediaCenter"
applications interface.
3. MA7 Tablet can't push the music and video les to mobile phones by
“eHomeMediaCenter”.
Cause: The "eHomeMediaCenter" application on MA7 tablet does not support push
function.
Solution:
Please download "Imedia share" application on your mobile phone.
4. The shared or pushed videos are in slow-moving when they are playing at receiving
end.
Cause: It may caused by the bad current network environment and the network
speed is very slow.
Solution:
It will be improved under good environment and can play more smoothly.
Page 97
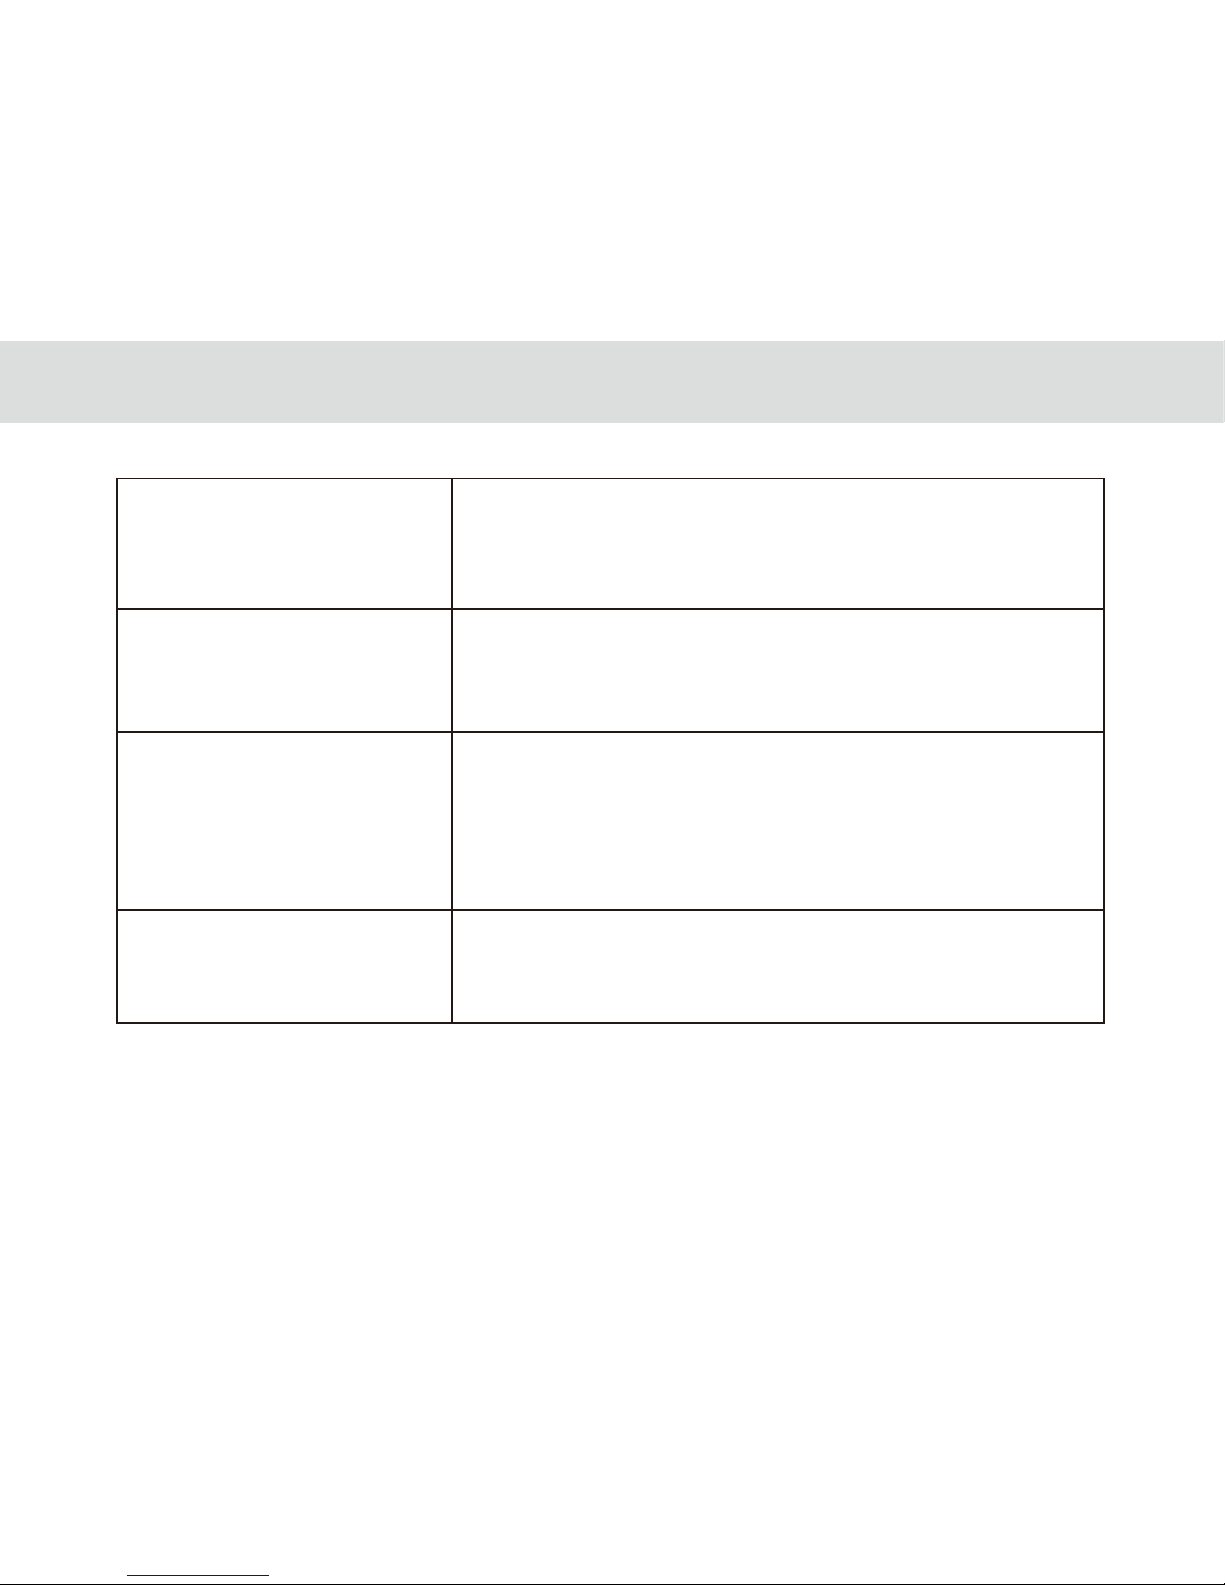
92
TELPAD can’t work when tablet
is inserted into dock phone.
There is no sign when tablet is
charged by adaptor.
Cause: It may be caused by the poor contact between Dock Phone and Tablet.
Solution:
First check if there is obvious obstruction/blockage then try cleaning the pins using
an clean cloth or brush to remove dust.
Solution:
-Check cable and adapter connections.
Inserted micro SD card is
unrecognizable
Cause: It may be the poor contact between SD card and tablet or SD card has
been damaged.
Solution:
- Please pull SD card out and re-plug it into tablet;
- Please change another good SD card;
- Please restart tablet and re-plug SD card.
The camera can’t capture photos.
Cause: It may be caused by the wrong conguration of cameras.
Solution:
- First check camera settings,Then close, the camera then restart.
Page 98
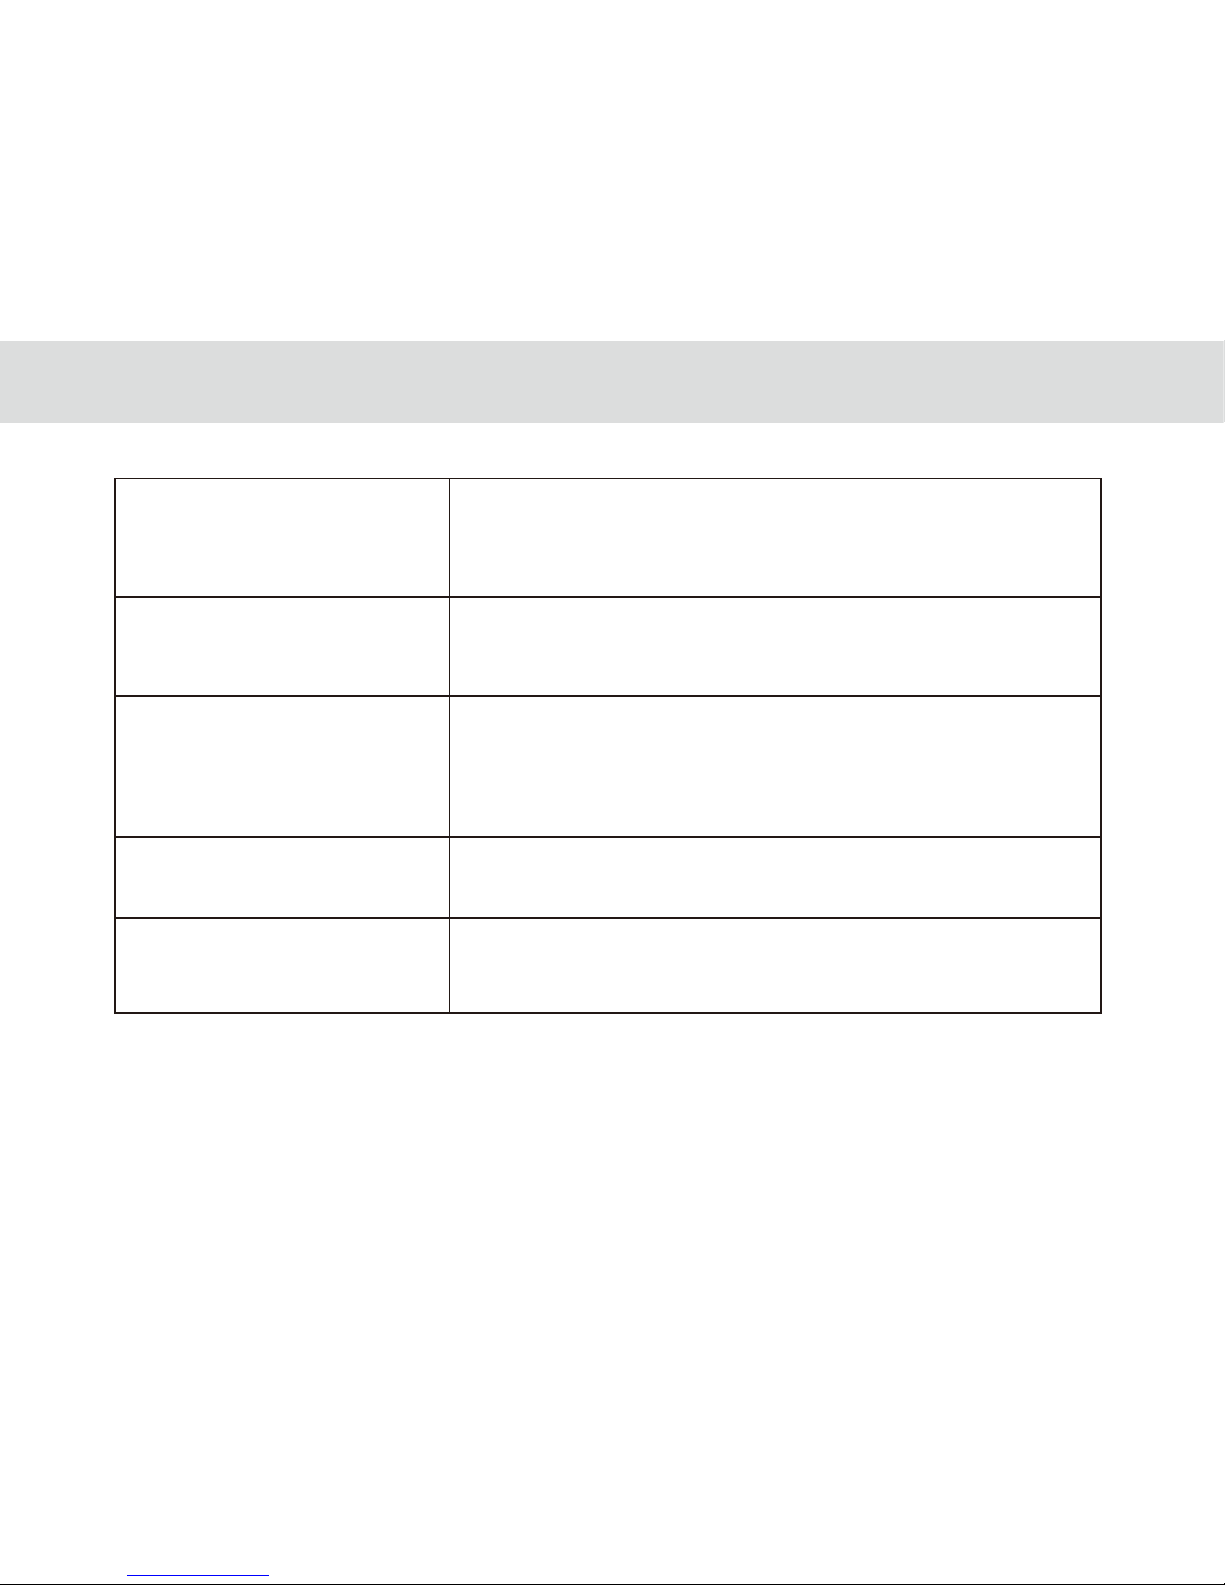
93
The TELPAD’S Bluetooth can’t be
paired with other devices.
Unresponsive TELPAD’s touch panel.
The tablet can’t be turned on
Cause: Bluetooth setting is incorrect or bluetooth is hidden.
Solution:
Check bluetooth settings;
Set the bluetooth of the device to “visible to other devices.”
Cause: TELPAD may be on standby mode or TELPAD is locked.
Solution:
Unlock the TELPAD in case is still unresponsive try to restart the TELPAD.
Cause: It may be caused by the low battery of tablet or the power key has
been damaged.
Solution:
Please check if power key has been damaged or not;
Please recharge tablet with adaptor rstly. And press power key once “in
recharge” remark is showing on tablet.
TELPAD can’t make calls
Cause: loosed phone line cable
Solution:
Check the phone line cable connection to the dock
TELPAD can’t answer incoming calls
Cause: It may be caused by the poor contact of phone line cable.
Solution:
Please check if phone line cable has been connected well or change another
good one.
Page 99
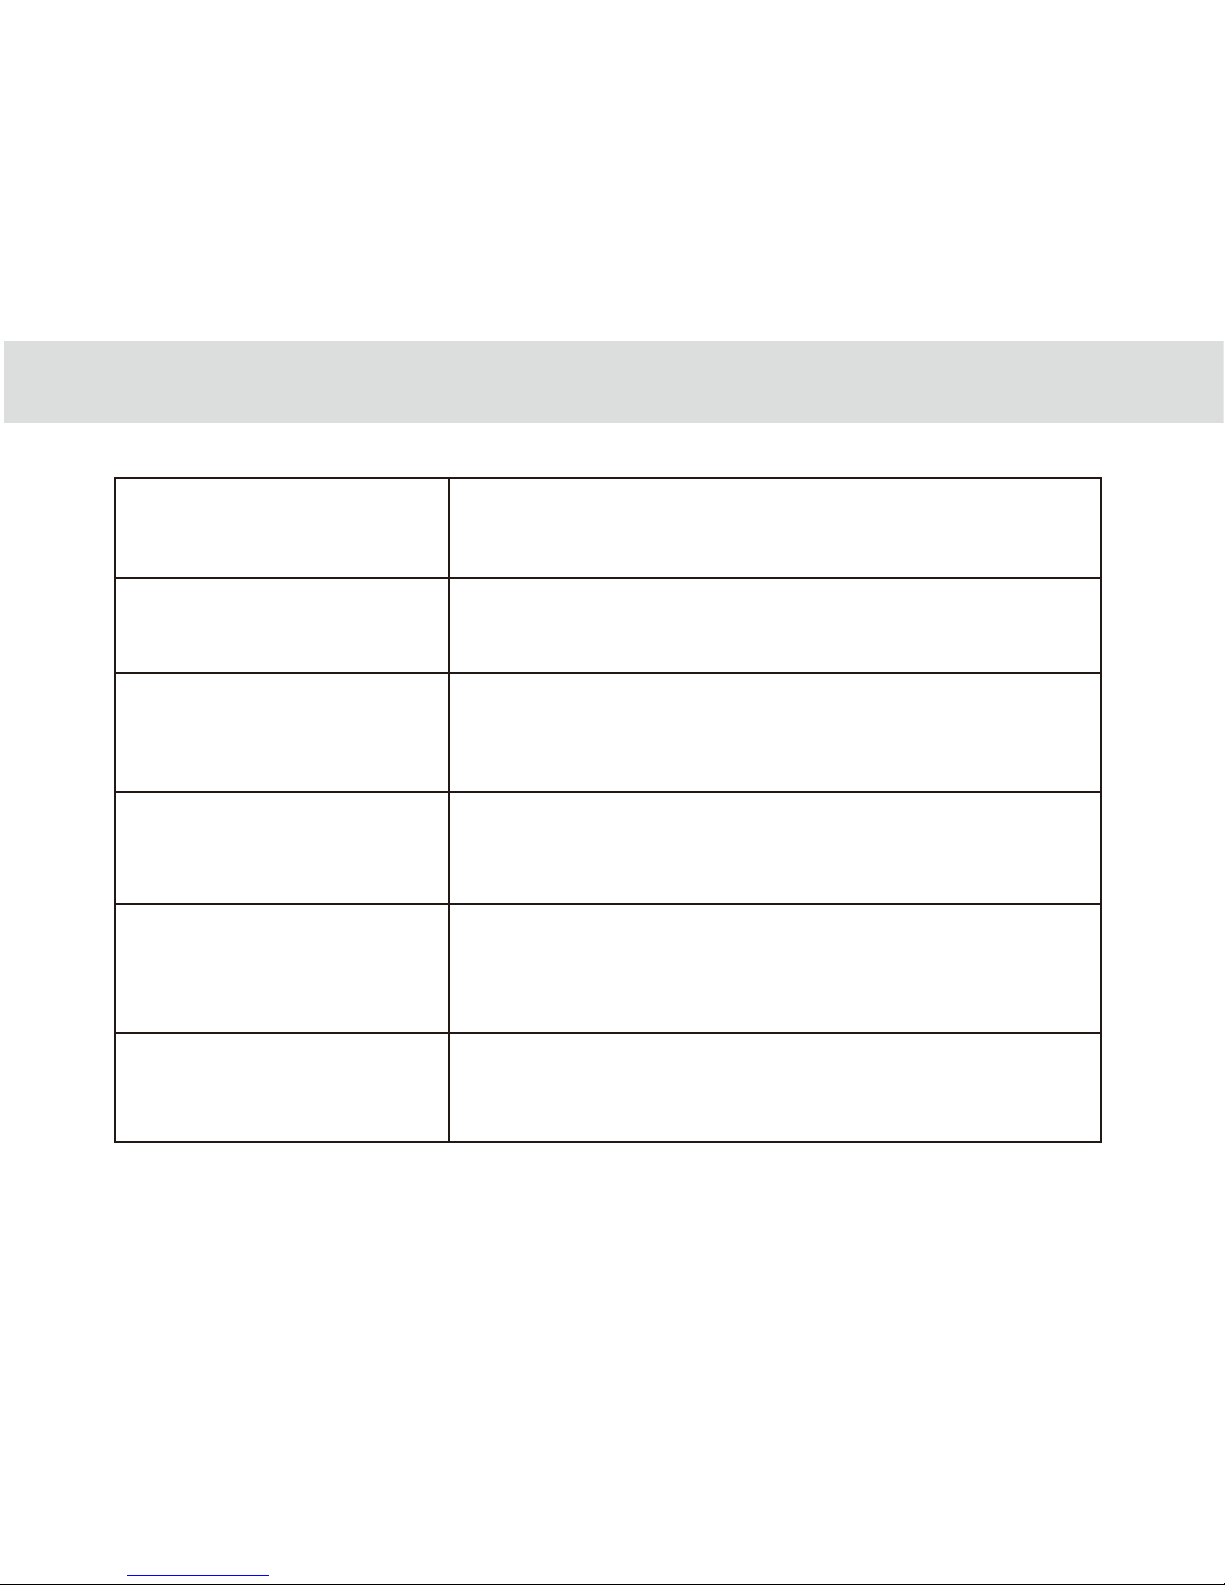
94
Dock’s battery is not installed
The adaptor charging is unstable
once connected.
Solution:
- check the battery if properly installed in the battery case.;
- Reinstall battery and clean metal terminals of batteryholder.
Cause: Loosed connection between DC cable and dock.
Solution:
-Check the connection and the cables if properly installed.
The dock phone can’t be placed
steady.
Cause: It may be caused by the unsteady silicone foot pad on the back of
dock phone.
Solution:
-Please check if the silicone foot pad on the back of dock phone is properly installed.
The speaker box of dock phone
can’t work.
Cause: Adaptor is not connected properly.
Solution:
- Check the adaptor connection;
- Check the power key function.
TF card in tablet(not dock) can’t be
played.
Cause: TF card is not properly installed in TF slot.
Solution:
- Check TF card slot and replay it in the tablet.
What does aect WiFi signal
strength?
- Physical barriers such as walls,doors partitions may signicantly reduced signal
strength or serve as source of signal interference.
Page 100
95
- The metal barrier which does not resist WiFi signal but also absorb electromagnetic
energy. Therefore, the biggest metal barrier in your family is those oors with bar-mat
reinforcement and the WiFi signal from this directionis impossible to penetrate. The
signal will be very weak even though it penetrated.
- The standard working frequency band for IEEE 802.11 b/g is 2.4GHz. However, many
industrial equipments are also working in such frequency band. Such as microwave oven,
Bluetooth equipment, cordless phone, refrigerator and etc.
The WiFi signal will be aected if it’s near to a very strong magnetic eld.
- It may be caused the problems of channel conict and WiFi signal crosstalk if there are
many WiFi equipments in WiFi environment.
- Those strong signal interference sources which are within 100 meters distance rom WiFi
devices and cable line may also have strong interference on WiFi signal and WiFi
equipments. Such as radio transmitting tower, electric welding machine, electric car, high
voltage power transformer and etc.
- The weather can also aect WiFi signal greatly. The WiFi signal will be very weak in thun
derstorm day or cloudy day. And the WiFi signal can be transmitted farther in sunny day.
- Please choose a best place for your Wireless AP. And the requirements for this place are
as follows:
a>The place should be a little higher which is good for WiFi signal downward radiates.
This can reduce the blocking from barriers and minimize signal blind area;
b>The position for wireless AP should let its signal to be penetrated wall as less as possible.
And the best positions for AP client and wireless AP are in both of their visual range.
- Please change frequency band to reduce wireless crosstalk. Please note that wireless
frequency band should be away from others’ frequency band more than 5 when you set
wireless signal.
- Please reduce interference from electric appliances in your family to guarantee good
signal. Please keep your wireless AP far away from those above mentioned equipments.
- You can change antennas of wireless AP to enhance wireless signal if the antennas is
removable.
How to improve the quality
of WiFi signal transmission?
 Loading...