

Telpad D7 User Manual


TELPAD D7
USER MANUAL
Shenzhen Livall Network Technology CO., Ltd.
Address: 9/F, Jiuzhou Electric Building, Southern No.12 Rd., High-Tech Industrial Park, Nanshan District, Shenzhen China
Website: www.livall.cn
E-mail: info@livall.cn
for Android™ Android™ is a trademark of Google Inc. Use of this trademark is subject to Google Permissions.
1 Getting started 1
1.1 About your Telpad 2
1.2 Getting to know your Telpad 2
1.3 Product Specification 5
1.4 Installation 7
1.4.1 Basic Connection 7
1.4.2 Installing the dock battery 8
1.4.3 Docking and undocking the Tablet 8
1.5 Turning the Tablet on or off 9
1.5.1 Turning the Tablet on 9
1.5.2 Turning the Tablet off 9
1.6 Charging the battery 10
1.6.1 Charging the Tablet battery 10
1.6.2 Charging the dock battery 10
1.7 Working with the keys 11
1.7.1 Working the physical keys 11
1.7.2 Working the touchscreen keys 11
1.8 Using the touchscreen 12
1.9 Home screen 13
1.9.1 Getting to know the Home screen 13
1.9.2 Extended Home screens 14
1.9.3 Customizing the Home screen 14
1.10 Locking and unlocking the screen 15
1.10.1 Locking the screen 15
1.10.2 Unlocking the screen 15
1.10.3 Setting up a screen lock 15
1.10.4 Setting a screen timeout period 15
1.11 Inputting text 16
1.11.1 Entering text using the onscreen keyboard 16
1.11.2 Cutting or copying text 17
1.12 Opening and switching applications 18
1.13 Accessing the Settings 18
1.14 Setting the date and time 19
1.15 Installing or removing the microSD card 20
1.16 Connecting or disconnecting from a computer using USB 21
1.17 Connecting the Tablet to a TV 22
2 Voice Calls 23
2.1 Making a call 24
2.1.1 Making a call without the Tablet 24
2.1.2 Making a call using the onscreen Dialler 24
2.1.3 Making a call on the speaker phone using the onscreen Dialler 24
2.1.4 Switching from handset to speaker phone and vice versa 25
2.1.5 Making a call from the Contacts 25
2.1.6 Making a call through the Call log 25
2.2 Answering a call 25
2.3 Ending a call 25
2.4 Selecting area code 26
2.5 Favorites 26
2.6 Memo 26
2.7 Importing/exporting contacts 27
2.8 Changing ringtones 27
3 Wireless networks 28
3.1 Wi-Fi 29
3.1.1 Opening Wi-Fi settings 29
3.1.2 Turning Wi-Fi on or off 29
3.1.3 Connecting to a Wi-Fi network 30
3.1.4 Turning open network notification on or off 30
3.1.5 Adding a Wi-Fi Network 30
3.1.6 Forgetting a Wi-Fi network 31
3.2 Bluetooth 32
3.2.1 Opening Bluetooth settings 32
3.2.2 Turning Bluetooth on or off 32
3.2.3 Changing the Bluetooth name of your Tablet 32
3.2.4 Connecting to Bluetooth devices 33
3.2.5 Disconnecting from or unpairing a Bluetooth device 33
4 Google Services 34
4.1 Creating a Google Account 35
4.2 Using Play Store 36
4.2.1 Searching for Applications 36
4.2.2 Installing an Application 36
4.2.3 Uninstalling an Application 37
4.3 Backing up and restoring apps and settings from a Google account 37
5 E-mail 38
5.1 Opening E-mail 39
5.2 Adding and deleting e-mail accounts 39
5.2.1 Adding an e-mail account 39
5.2.2 Deleting an e-mail account 39
5.3 Gmail deleting e-mail accounts 40
6 Contacts 41
6.1 Opening Contacts 42
6.2 Creating a contact 42
6.3 Searching for contacts 43
6.4 Editing contacts 43
6.4.1 Editing contact details 43
6.4.2 Deleting a contact 43
7 Using the Camera 44
8 Basic troubleshooting for the Telpad 46
8.1 Tablet not powering up 47
8.2 No dial tone 47
8.3 Distorted audio on speaker 47
8.4 Tablet Dialer cannot make a call 47
8.5 No audio response in the Handset 47
9 FAQs 48

10 Warnings and Precautions 55
11 Personal Information and Data Security 60
12 Legal Notice 62
13 Disclaimer of Warranties 64
14 Index 66

1 GETTING STARTED
1.1 About your TELPAD
The Telpad is the world’s first Tablet and landline in one, a device that brings to your home a world of productivity
and entertainment – powered by Android™, the world’s leader in smartphone technology. With its stunning 7 inch
touchscreen display, sleek design, built-in camera & Wi-Fi, and access to hundreds of thousands of free and paid
Android™ Apps, the Telpad is definitely a device you will want to become acquainted with to be able to maximize
its full set of features!
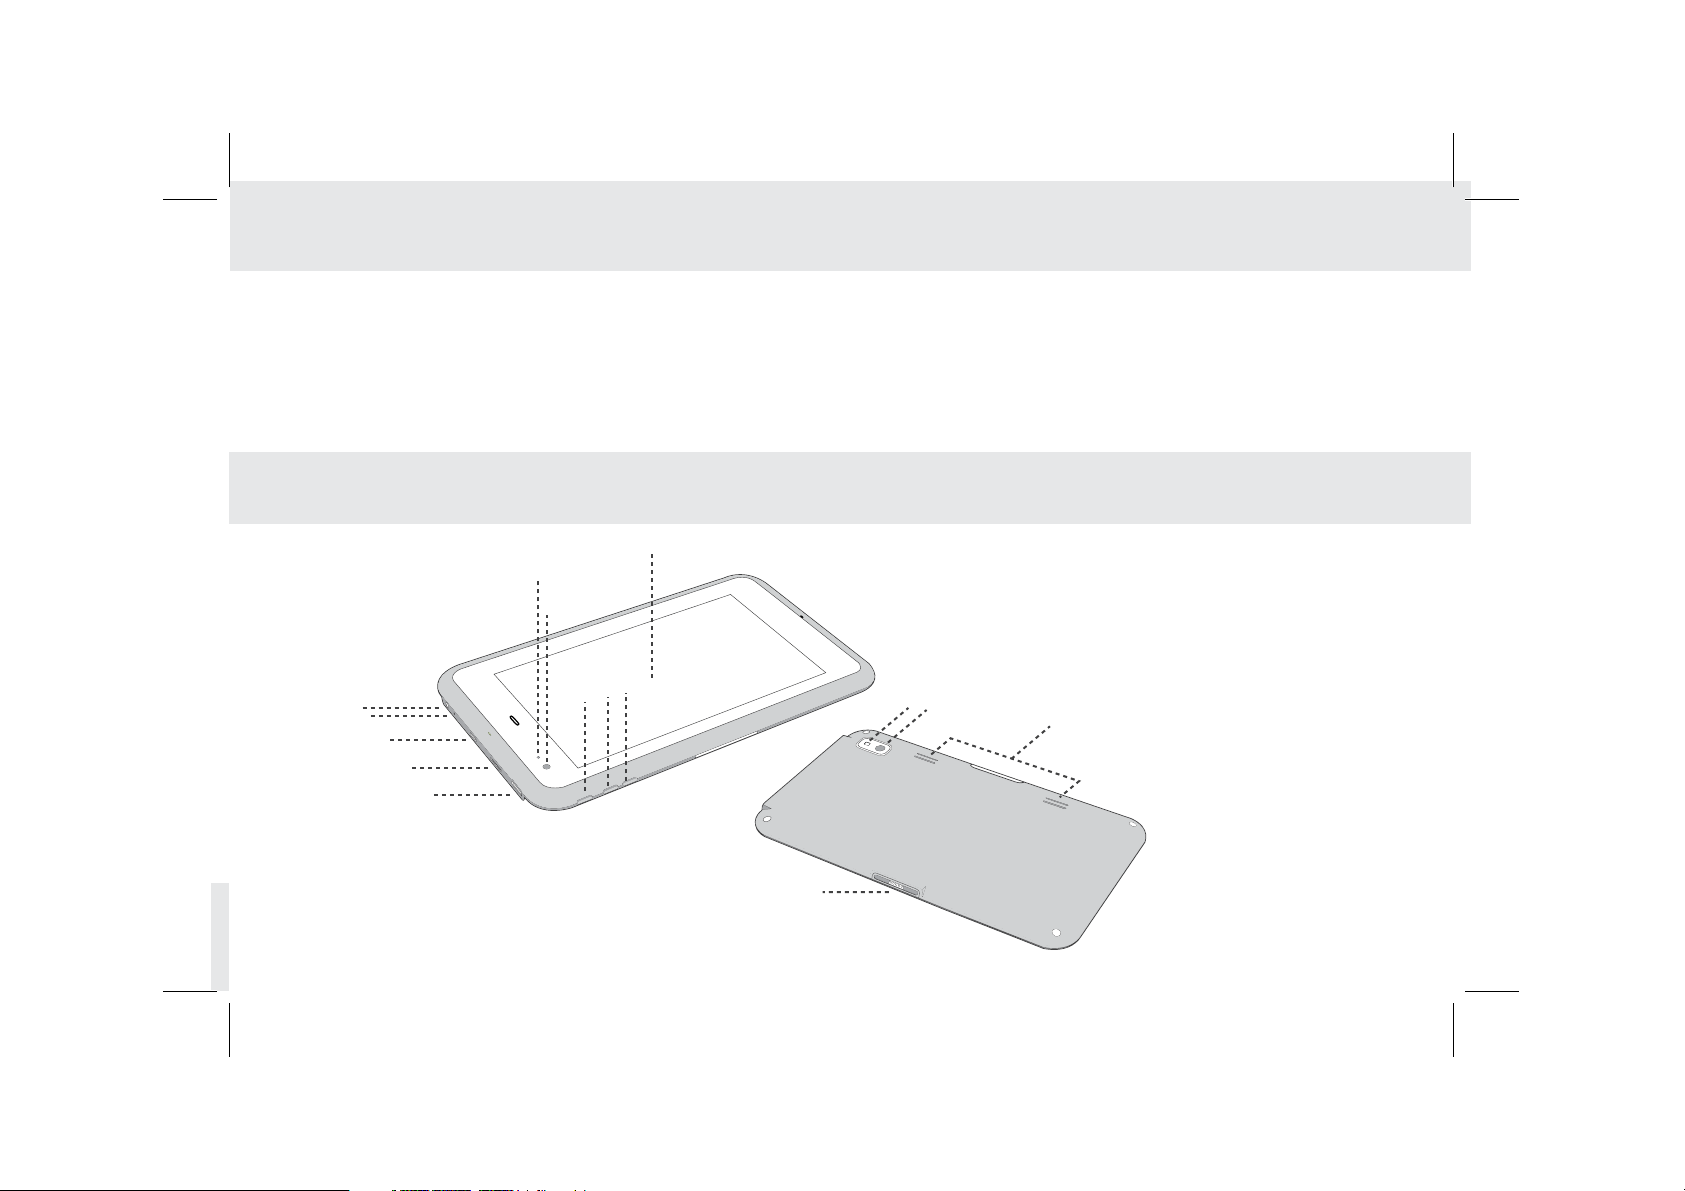
1.2 Getting to know your TELPAD
11
6
7
1. Headset jack
2. Force reset button
3. USB B-type slot
4. Micro SD card slot
5. HDMI interface
10
9
1
2
3
4
5
8
12
13
14
6. Ambient light sensor
7. Front camera
8. Power button
9. Volume up button
10. Volume down button
11. LCD screen
12. Camera flash
13. Rear camera
14. Speakers
15
15. Dock interface
2
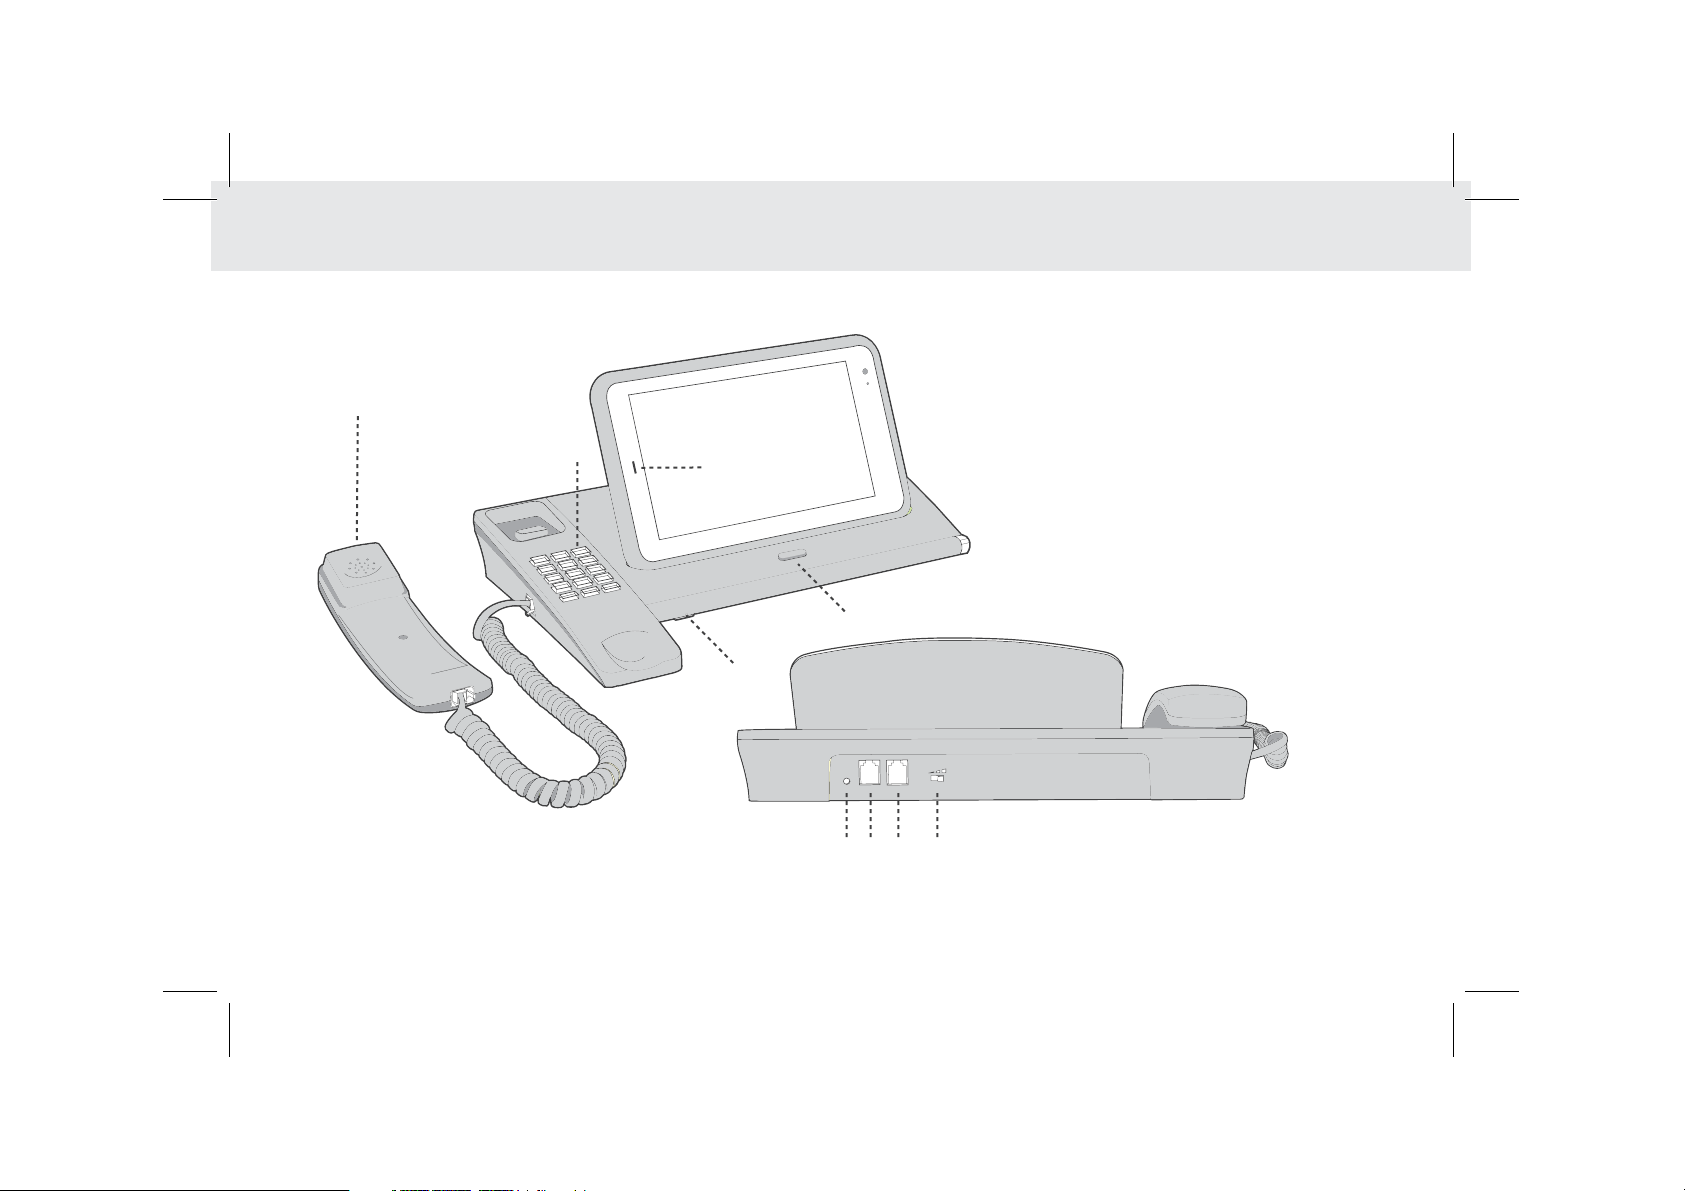
16. Handset
17. Numeric keypad
18. VoIP Phone Call
19. Microphone
16
20. Handsfree Key
21. Direct current input jack
17
18
22. Extension line
23. Landline jack
24. Ringer volume
20
19
21 22 23 24
3
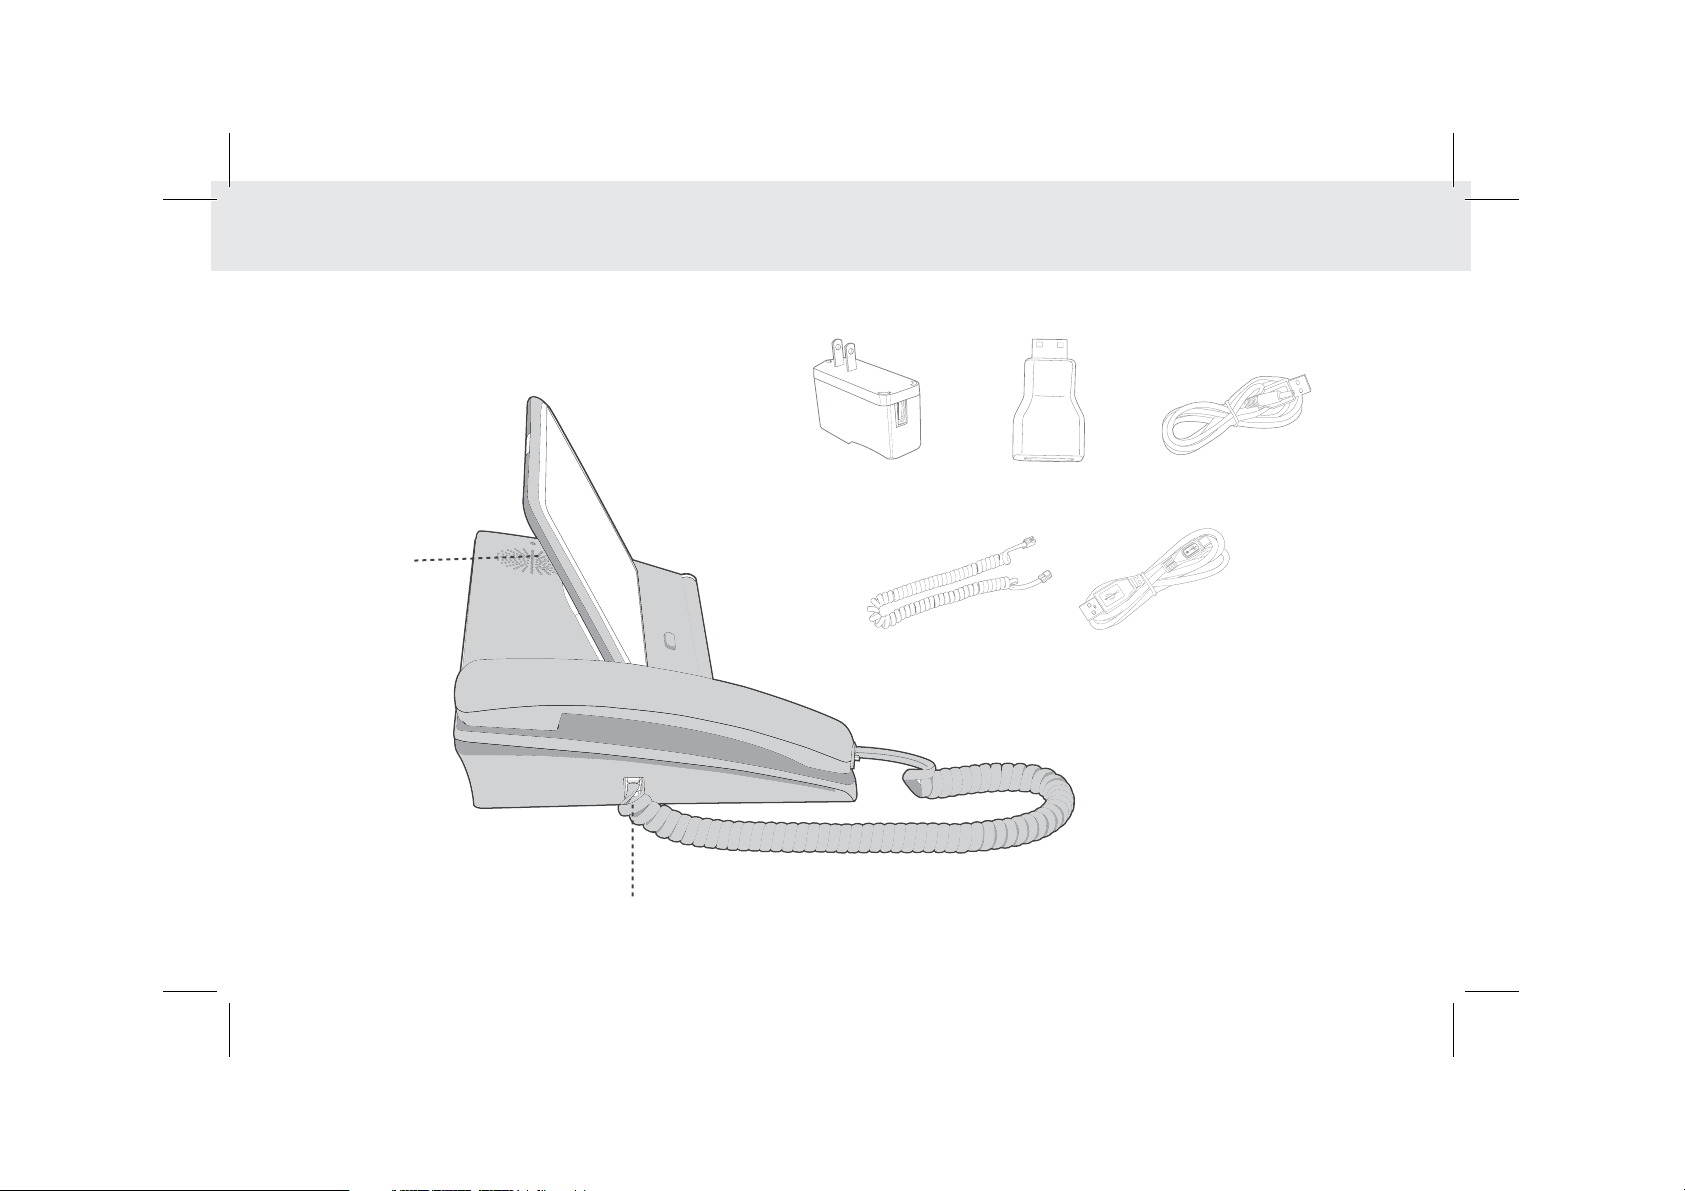
Accessories
25
26
USB Charger
Handset Cord
HDMI adaptor
Micro B-type USB cable
USB power cable
25. Loudspeaker
26. Phone cord
4
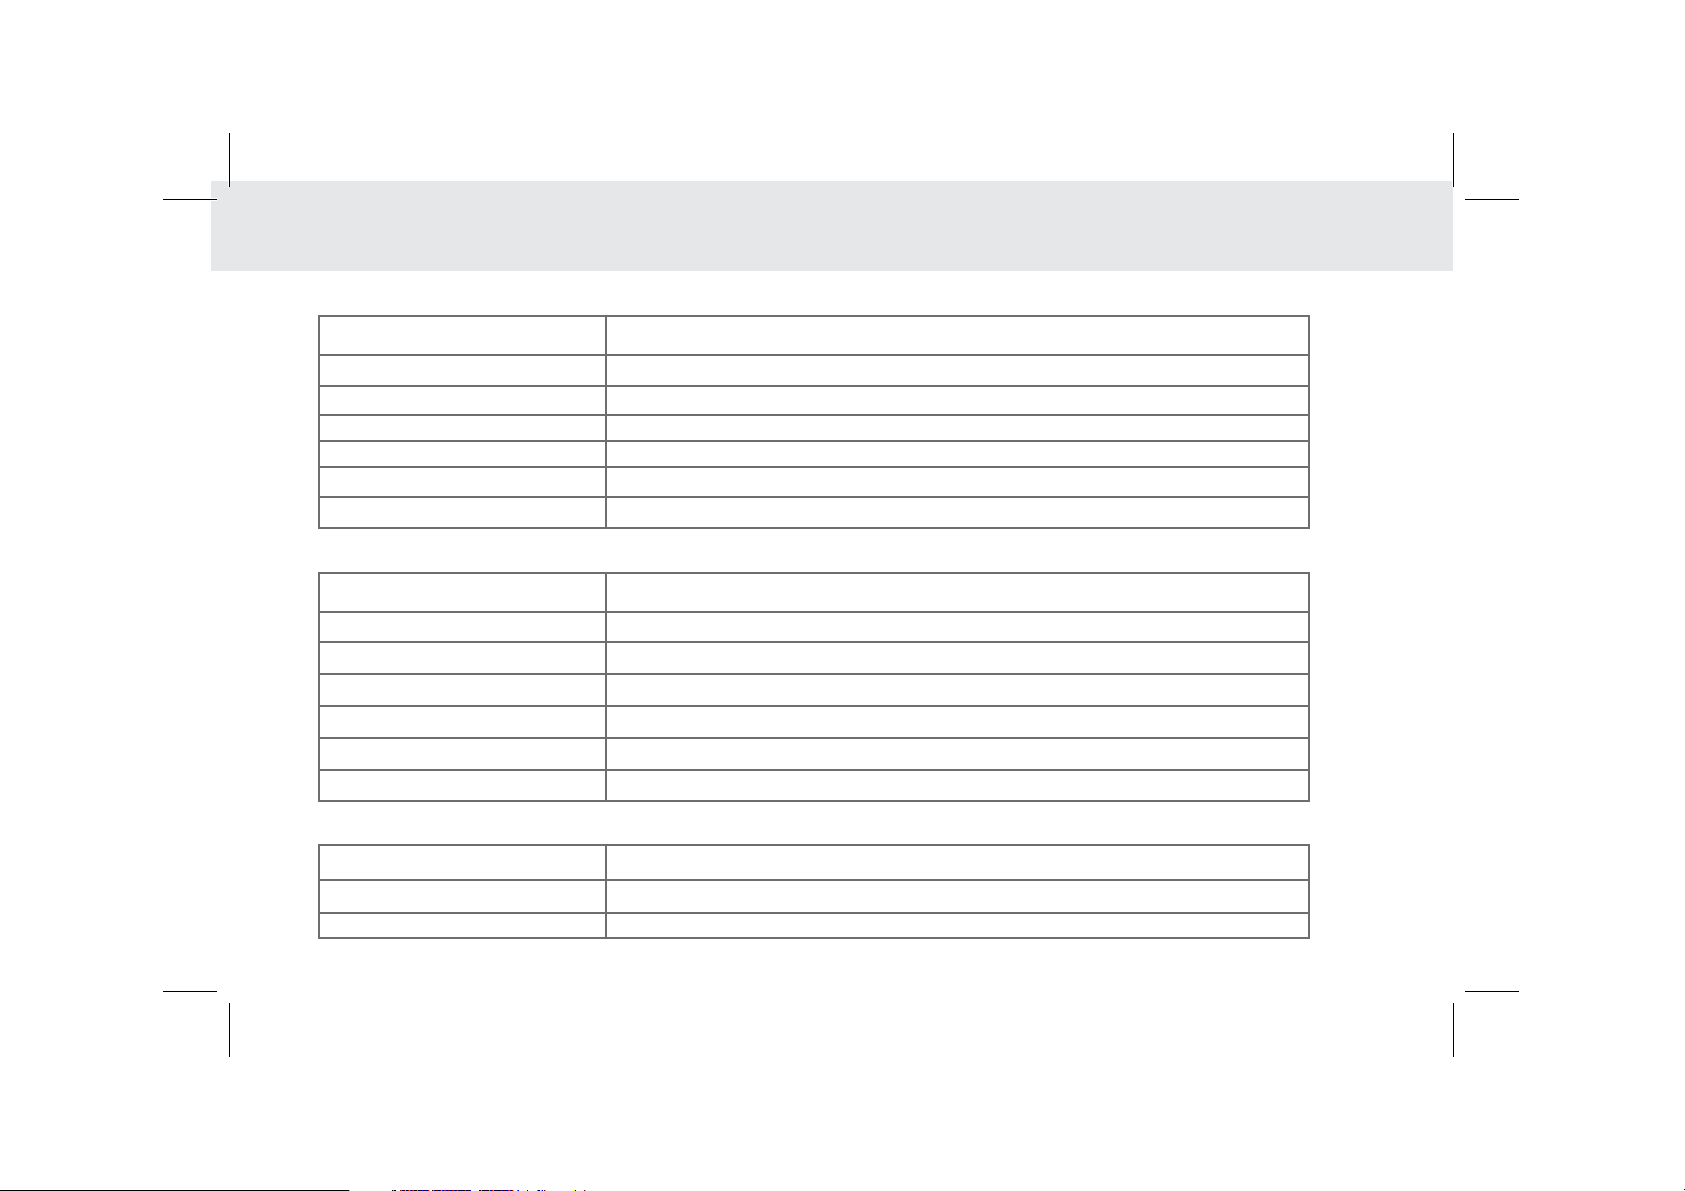
1.3 Product Specificiations
GENERAL SPECIFICATIONS AND DISPLAY
DIMENSION 212 mm x 128 mm x 10.8 mm
7 Inch (1024 x 600) 300 nitsDISPLAY AND RESOLUTION
Android™ 4.1.1 Jelly BeanSYSTEM SOFTWARE
Wi-Fi - 802.11b/g/n AIR INTERFACE
24-bitDISPLAY COLOR DEPTH
G2 Capacitive 5-Points-Touch MULTI-TOUCH PANEL
3 Standard Soft Keys: Home, Back, Recent Applications PRIMARY KEYPAD
CONNECTIVITY
BLUETOOTH Bluetooth 3.0 + EDR
Micro USB OTG & USB Host USB
HDMI V 1.4A (Support 3D) DIGITAL TV OUT
Built-in-speaker/Stereo SPEAKER
Built-in-microphone MICROPHONE
3-Axis Accelerometer for UI Auto Rotate Ambient Light sensor SENSOR
Standard 3.5 mm headphone jack AUDIO OUT
HANDSET
PSTN Support (POTS) RJ9 (4P4C)
Built-in SPEAKER
Built-inMICROPHONE
5
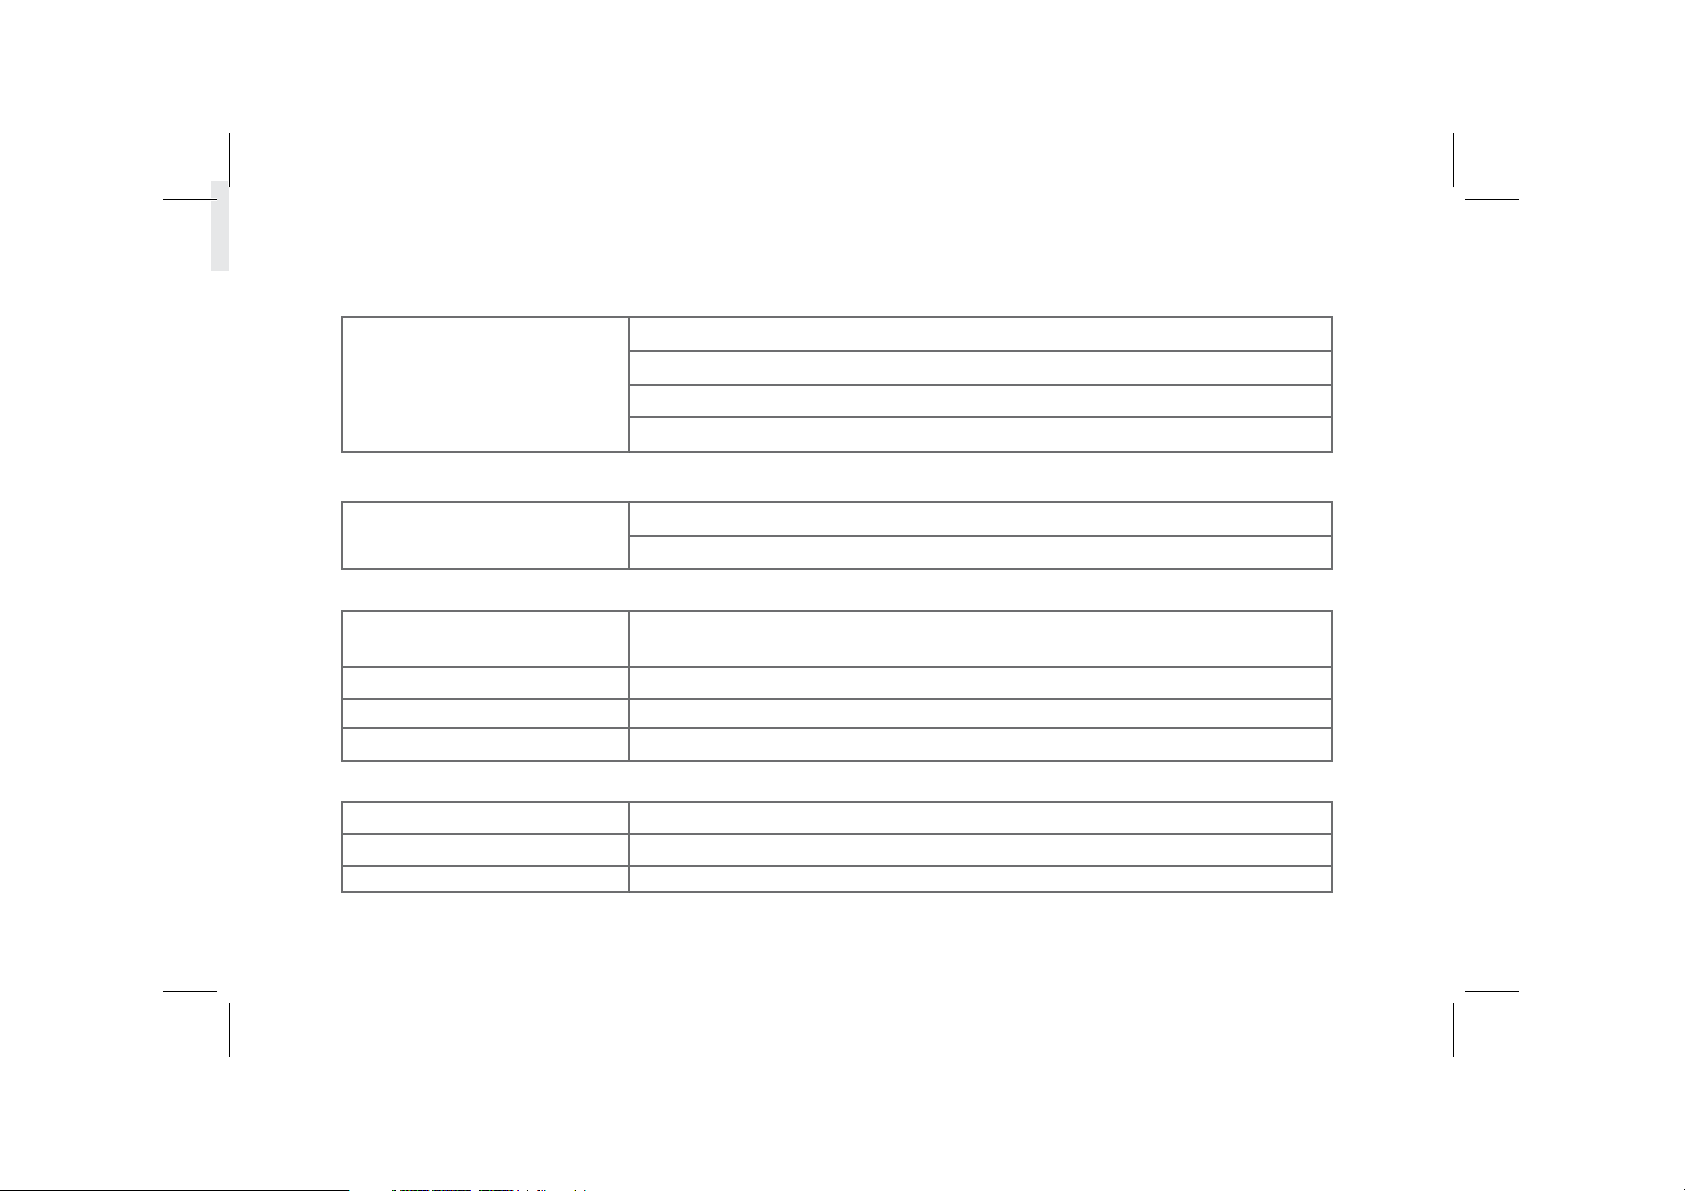
SMART DIALER
PSTN
COMMUNICATION AND ORGANIZER
Call Hold
Speed Dial
Speaker
Volume Adjustment
EMAIL
Protocols: SMTP, POP3 and IMAP4
Supports Exchange Calendar, Contacts synchronous
MEDIA PERFORMANCE
VIDEO DECODING
AUDIO DECODING
PICTURE FORMATS
STREAMING MEDIA
MPEG 1, MPEG 2, MPEG 4, H.263, H.264, VC-1, VP8, RealVideo 8/9/10, AVI,
WMV, MP4, MKV, RM, RMVB, FLV, MOV, 3GP, Up to 1080p60
MP3, WMA, AAC, AMR, FLAC, OGG, WAV, MIDI
BMP, PNG, JPEG, W BMP and GIF
RTSP/HTTP, Support Download play, Progressive play
BATTERY AND POWER
TABLET BATTERY STD Lithium-Ion Polymer battery, 3400mAh, rechargeable
STD Lithium-Ion Polymer battery, 1000 mAh rechargeable DOCK BATTERY
Input - 100 -240 Vac, Output – 5V DC/2A 10 W POWER ADAPTER
6
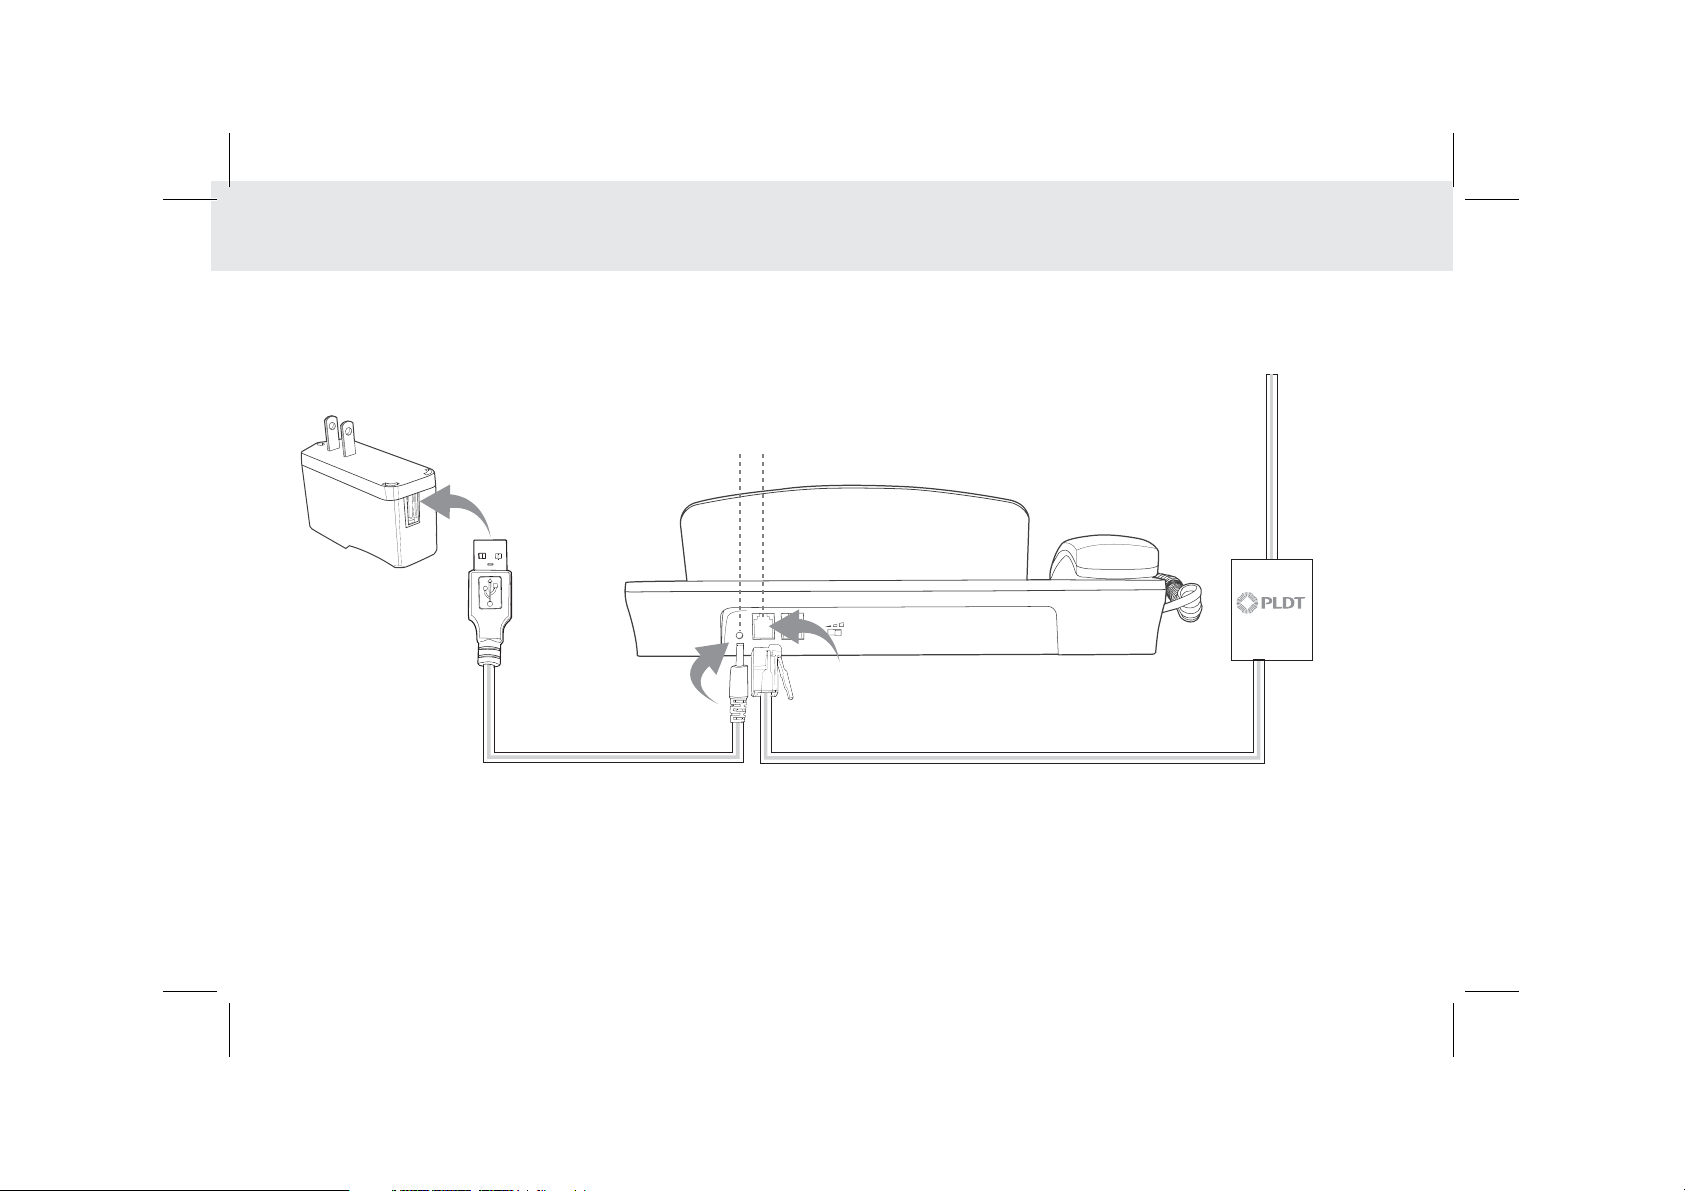
1.4 Installation
1.4.1 Basic Installation
Before plugging or unplugging the adapter, telephone line or the dock battery, ensure that the tablet is off the dock.
line 1
USB charger
DC power adapter
7
telephone jack
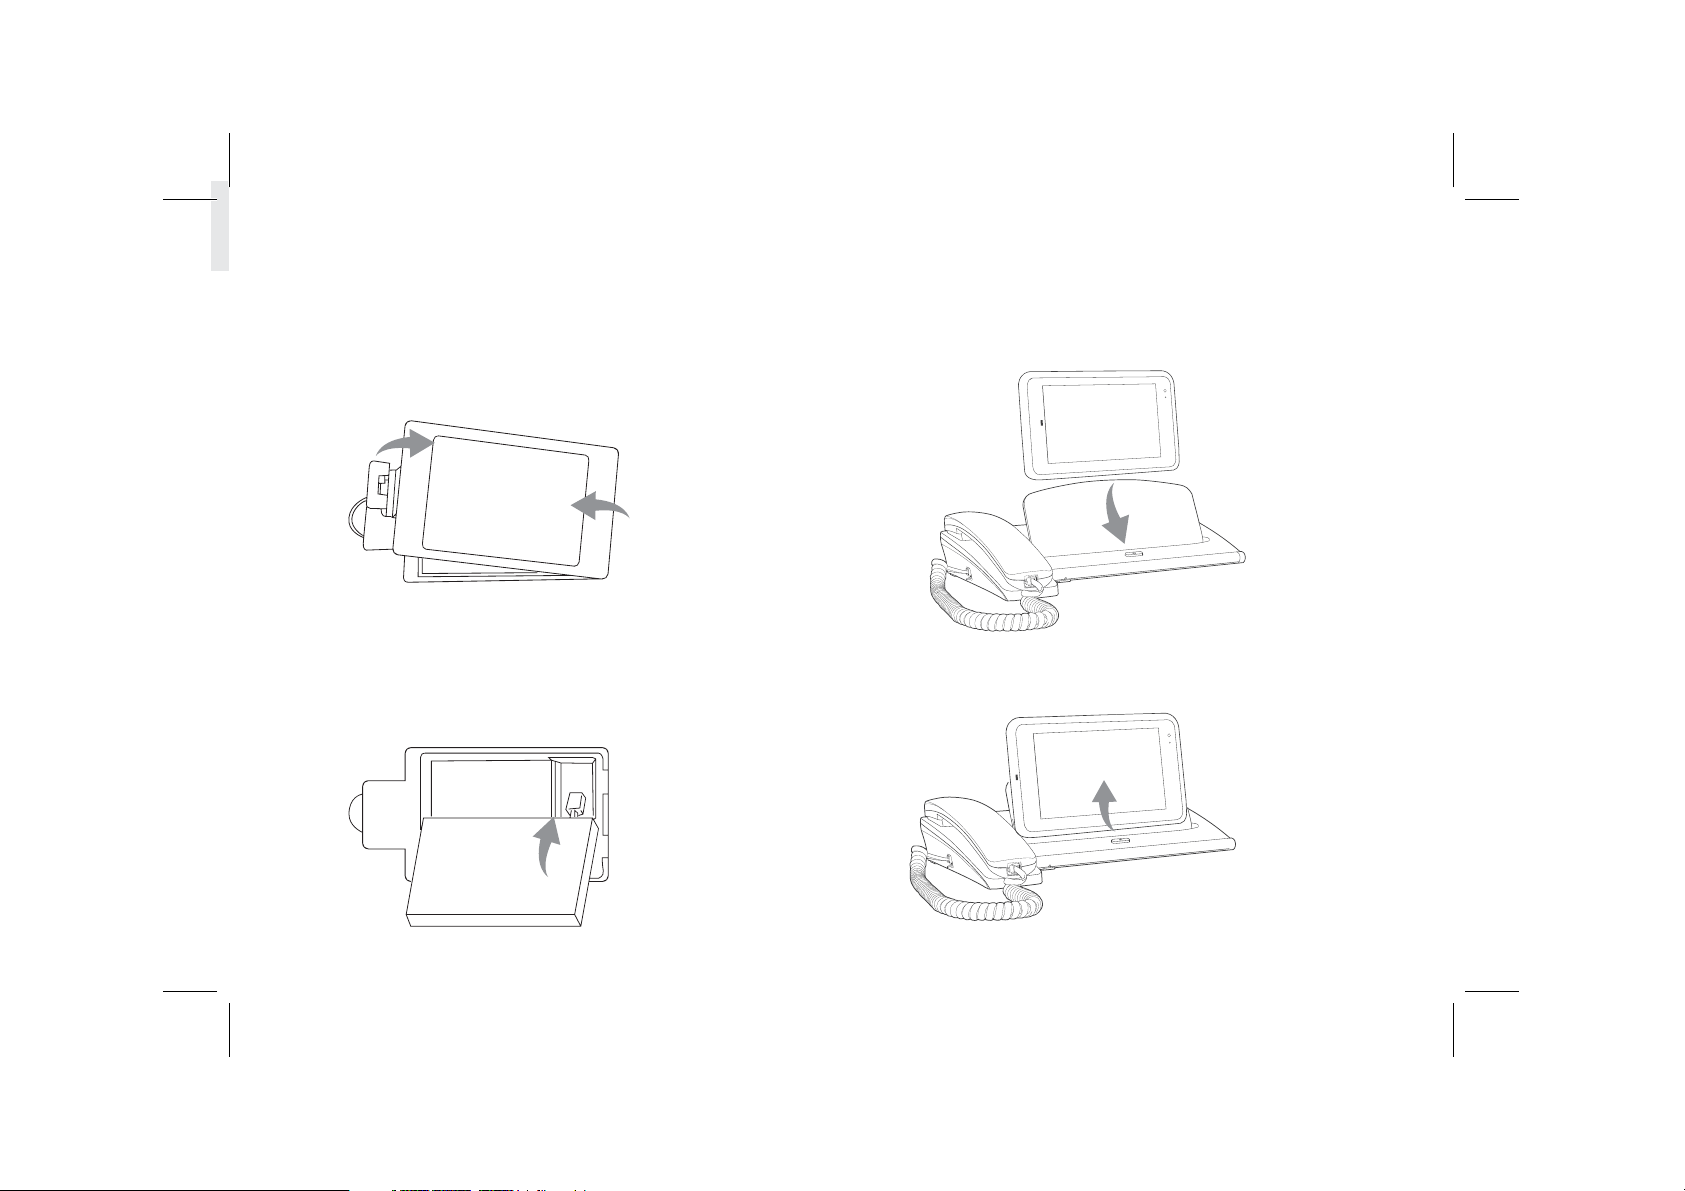
1.4.2 Installing the dock battery
1. Removing the back cover
To remove the back cover,
refer to the following figure.
1
2
1.4.3 Docking and undocking the Tablet
To place the tablet on to the dock,
refer to the following figure.
2. Inserting the battery
To insert the battery,
refer to the following figure.
To remove the tablet from the dock,
do as shown in this figure.
8
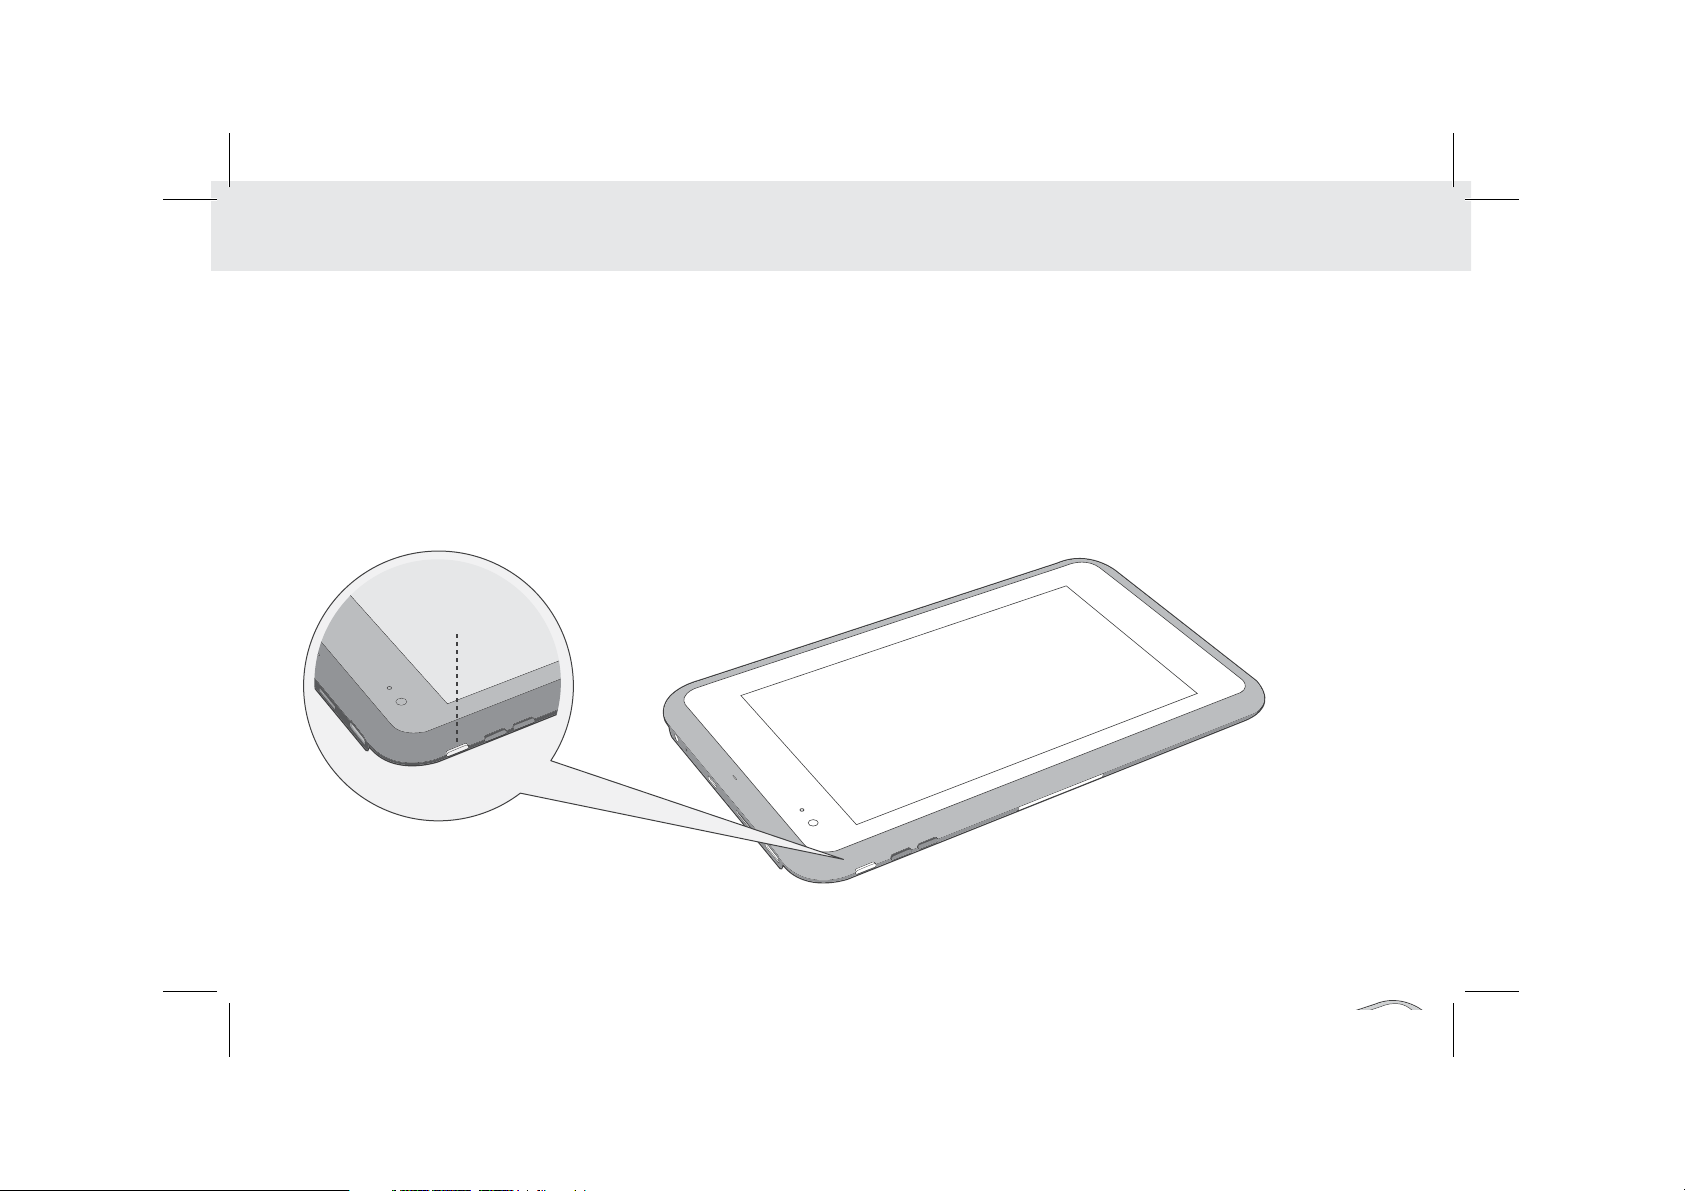
1.5 Turning the Tablet on or off
1.5.1 To turn on your Tablet
Before you turn on your tablet, ensure that the battery is correctly installed or the Tablet is properly connected to the
power supply.
To turn on your tablet, press the Power key.
1.5.2 To turn the Tablet off
1. Press and hold Power key to open the Tablet options menu.
2. Choose Shut Down.
3. Touch OK to confirm shutdown.
Power key
9
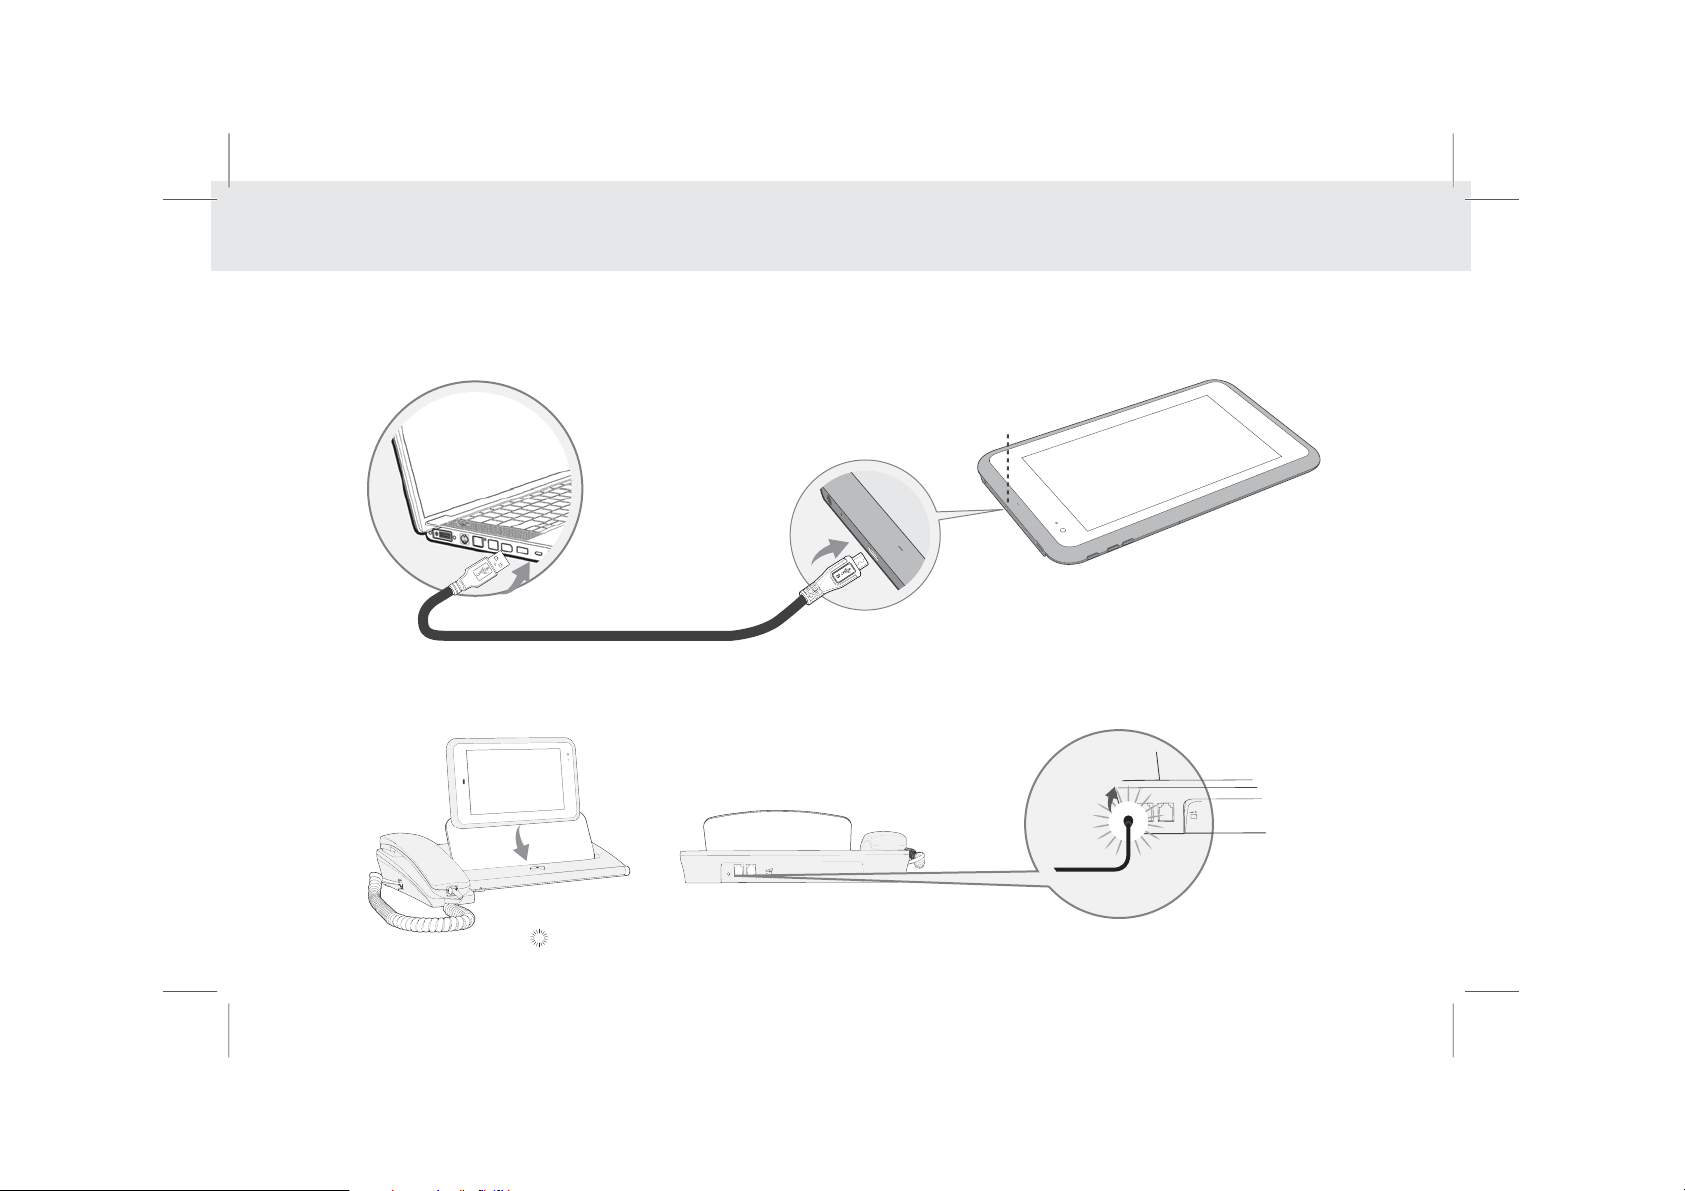
1.6 Charging the battery
1.6.1 Charging the tablet battery
The Tablet is powered by a rechargeable Li-ion battery. There are two ways to charge the Tablet:
1. Place the Tablet on the dock with the power cord supplying power to the dock.
2. Turn the Tablet off, and connect the Tablet to a computer using a USB cable.
USB B-type slot
USB power cable
1.6.2 Charging the dock battery
Before charging the battery, ensure that the battery is properly placed in your dock.
Connect the dock to the power adapter, as shown in the following figure:
The Tablet also starts charging after being correctly installed on the Dock.
10

1.7 Working with the keys
1.7.1 Using the physical keys
Power
Press firmly to power the Tablet on or off.
Press to lock/unlock the screen.
Press and hold to open a menu displaying options for Silent mode and Power off
Volume Up/Down
When the Tablet is ringing, press any of the volume buttons if you want to mute the ringer.
On the Home screen, press to increase or decrease the ringtone volume, or set the Tablet
to silent mode
When using other applications, press to control the volume of music, spoken directions, and other audio sounds.
Press and hold to immediately adjust the ringtone volume to the maximum, or minimum.
1.7.2 Working the touchscreen keys
Back
Touch to return to the previous screen.
Touch to exit from the running application.
If the on-screen keyboard is open, touch to close the keyboard.
Home
Touch to open the Home screen. It will bring you to the first panel of the Home screen.
Navigation
Touch to open a list of thumbnail images displaying recently operated apps.
Touch the thumbnail image of the app to open it.
Touch and hold and flick off rightward to remove the app from the list.
11
Volume up
Volume down
Power button
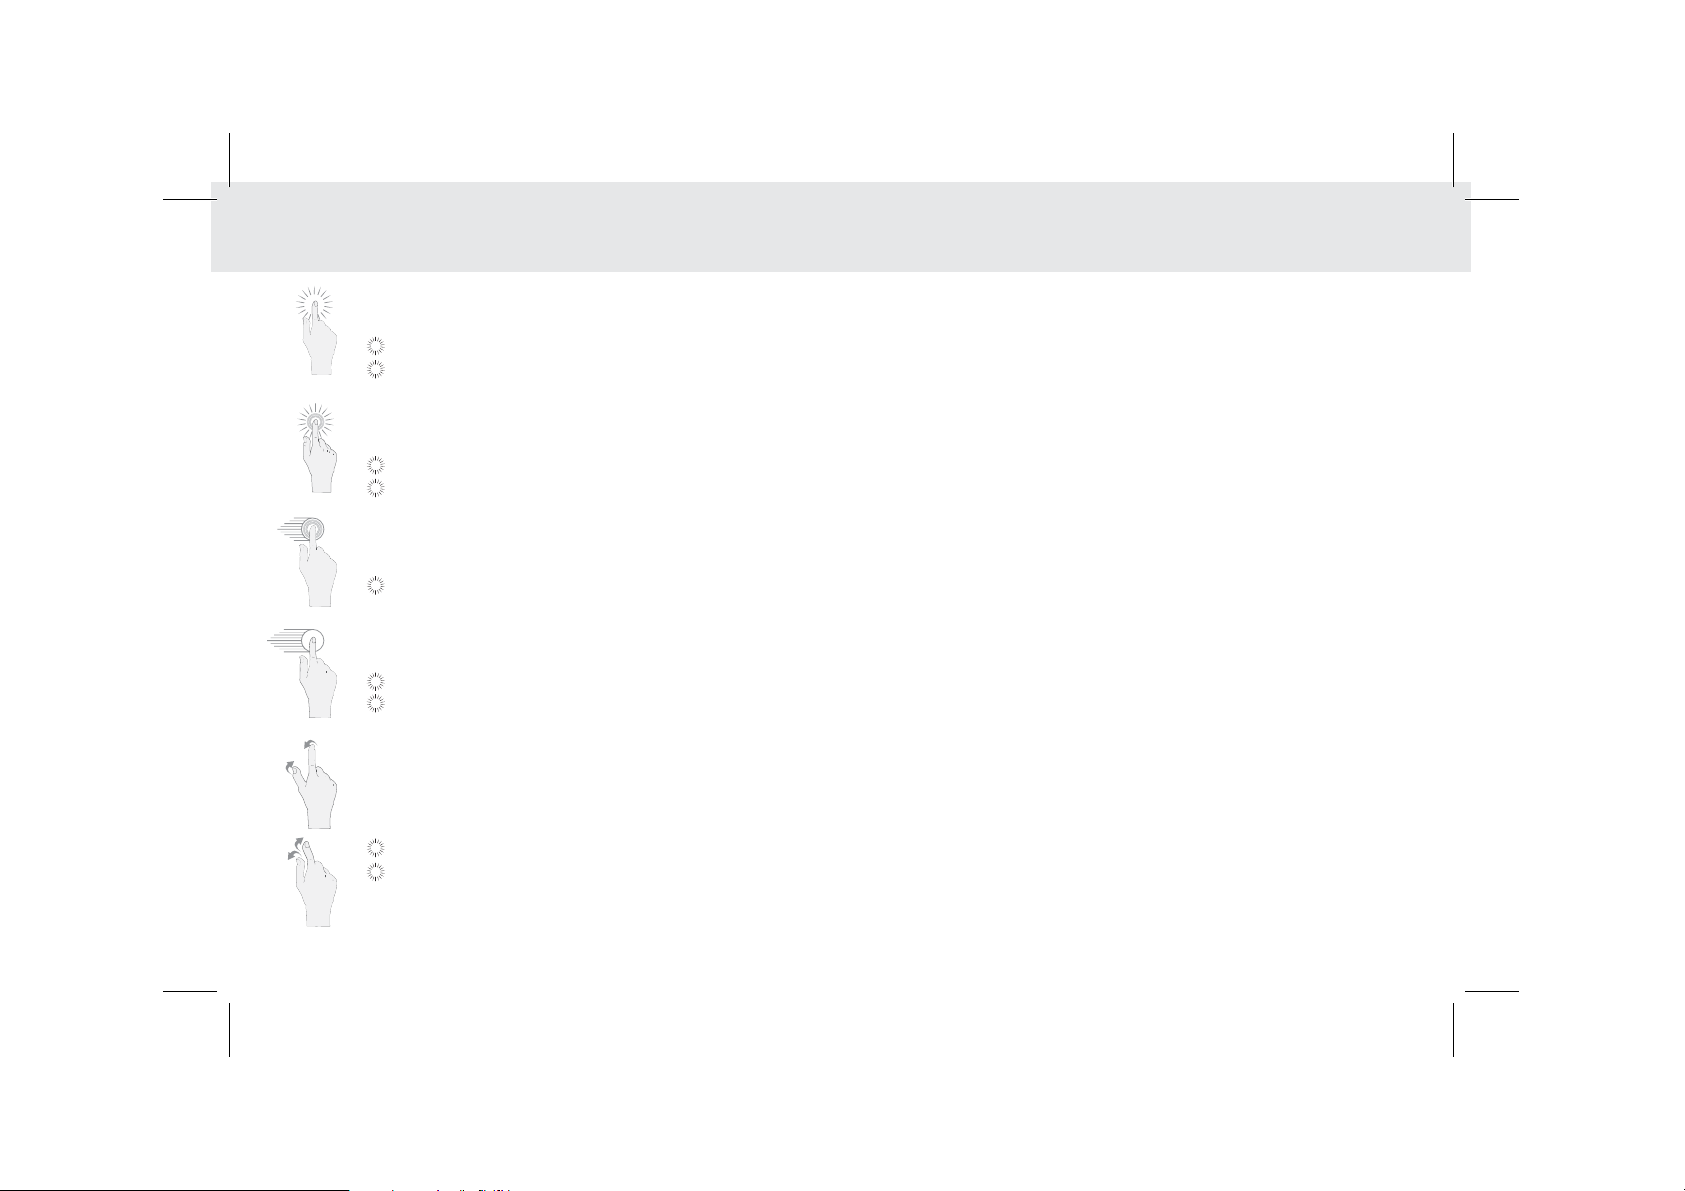
1.8 Using the touchscreen
Touch
By touching an item, you can select the item or launch it. For example:
Touch the on-screen keyboard to insert text and/or characters
Touch an application icon to launch it.
Touch and Hold
Touching and holding items will activate them. For example:
Touch and hold an application/widget to move it.
Touch and hold on a field and a menu with options will pop up.
Drag
Touch and hold an item, move your finger on the screen to the target position. For example:
Dragging a shortcut icon to the trash will delete it.
Flick, Slide, Swipe
Change screens by flicking, sliding, and swiping your finger on the screen. For example:
Slide your finger to unlock the screen
Flick and/or swipe your finger to scroll the screen or menu, to move from screen to screen, or to view next object
in the gallery.
Pinch
Using two fingers (like your thumb and index finger), pinching inward will cause the screen to zoom out; pinching
outward will cause the screen to zoom in. For example:
Pinch outward to see zoomed in details of a photo in Gallery.
Pinch inward to zoom out and see the whole page of a browser.
12
1.9 Home screen
The Home screen is the starting point in using the Tablet
Touch the Home key to display the Home screen. You can customize the Home screen with
various wallpapers and create shortcuts for items you want to easily access.
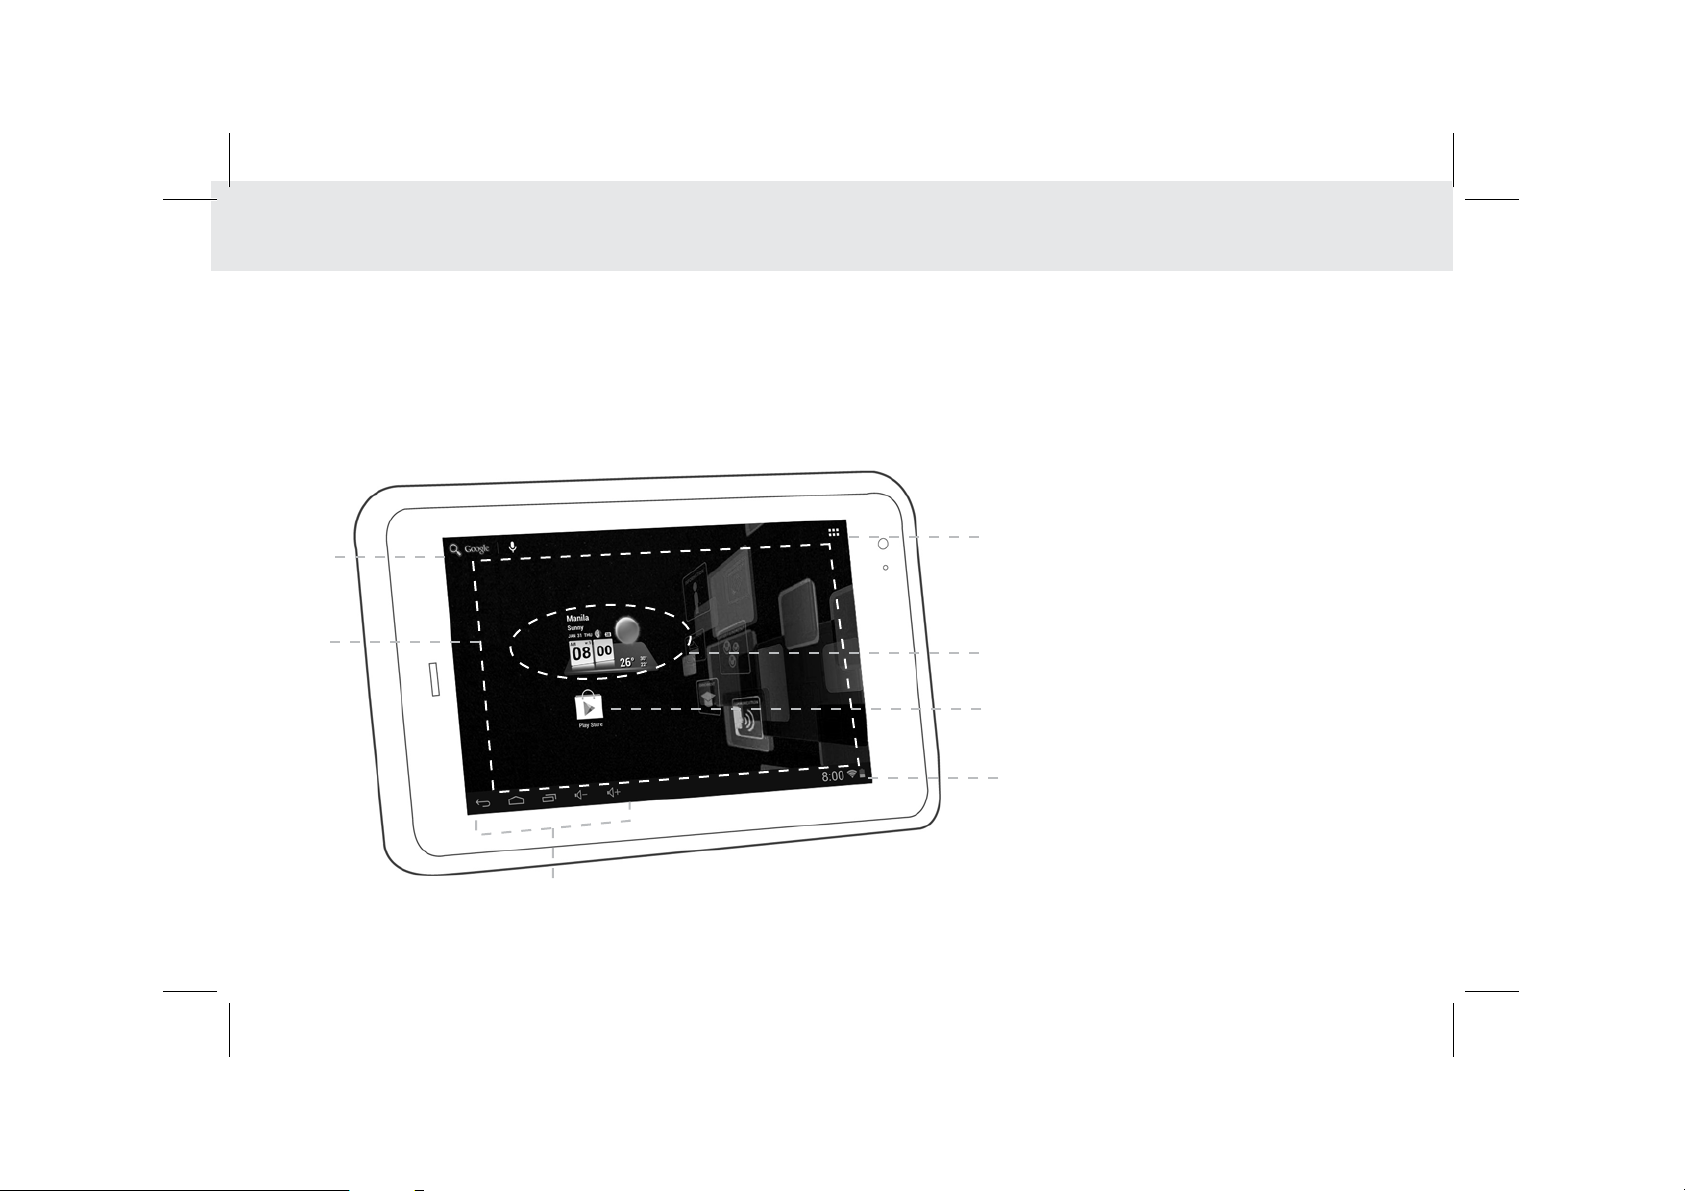
1.9.1 Getting to know the Home screen
13
2
7
1. Main display area
2. Google Search
1
3
4
3. Weather Widgets
4. Short Cut Buttons
5. Touch Screen Keys
6. Status Bar
7. Application Button
6
5
1
Main display area: This area displays application shortcuts, widgets, and other items that can
be easily accessed by touching them.
2
3
4
5
6
7
Google Search: Touch to search using Google, or touch the microphone to search
using your commands.
Weather Widgets: The weather widget informs you of the time, date, and weather in your location.
It can be customized based on your preference.
Short Cut Buttons: These are shortcuts for various applications. You may change and customize
these according to your needs.
Touch Screen Keys: Back, Home, Navigation, Volume Down, Volume Up
Status bar: It shows the status of the device such as Wi-Fi connection status, battery status, and
other information. You can touch to open a more detailed status menu.
Applications button: Touch to open the Applications screen, where you can view the applications
installed on the Tablet. Touch any application icon to run it.
1.9.2 Home screen extensions
Slide your finger horizontally across to the left or the right of your main Home screen to see your additional home
screens. These screens provide more space for shortcuts or widgets. The small indicator shows the current position.
The Home touchscreen button brings the screen back to your main Home screen.
1.9.3 Customizing the Home screen
To change your wallpaper:
1. On the Home screen, press the Menu key and touch Wallpaper on the bottom menu.
2. Choose one of the following options from the pop-up menu.
Live wallpapers to select a wallpaper with animation.
Pictures to select one of your pictures and set it as the wallpaper.
Wallpaper gallery to select one of the pre-installed wallpapers.
Gallery to select one of your pictures and set it as the wallpaper.
14
1.10 Locking and unlocking the screen
1.10.1 Locking the screen
When the Tablet is powered on, press the Power key and the screen will turn off and lock.
When the Tablet is left idle for a specified time period that you have set, the screen will automatically turn off
and lock.
Always lock the screen to save the battery or prevent accidental taps when the Tablet is not in use.
1.10.2 Unlocking the screen
When the screen is off, press the Power key to turn it back on, and then unlock the screen
If you have not set a screen lock, the screen will just turn back on when you press the power button.
If you have set up a screen lock, you will be asked to input the relevant unlocking pattern, number, or password to
unlock it.
1.10.3 Setting up a screen lock
1. To set up a screen lock, touch the Applications key from the Home screen.
2. Go to Settings > Personal > Security
3. Touch Screen lock and choose from None, Slide, Face Unlock, Pattern, PIN, or Password, and follow the instructions
on the screen to set your screen lock.
1.10.4 Setting up a screen timeout period
To set the time between the last screen touch or key touch and automatic screen lock, go to your the Home screen,
touch the Applications key, and touch Settings > Display > Sleep
15
1.11 Inputting text
You can enter and edit text in text fields and use menu commands to cut, copy, and paste text within or
across applications.
1.11.1 Entering text using the onscreen keyboard
To open the onscreen keyboard, touch a text field where you want to enter text.
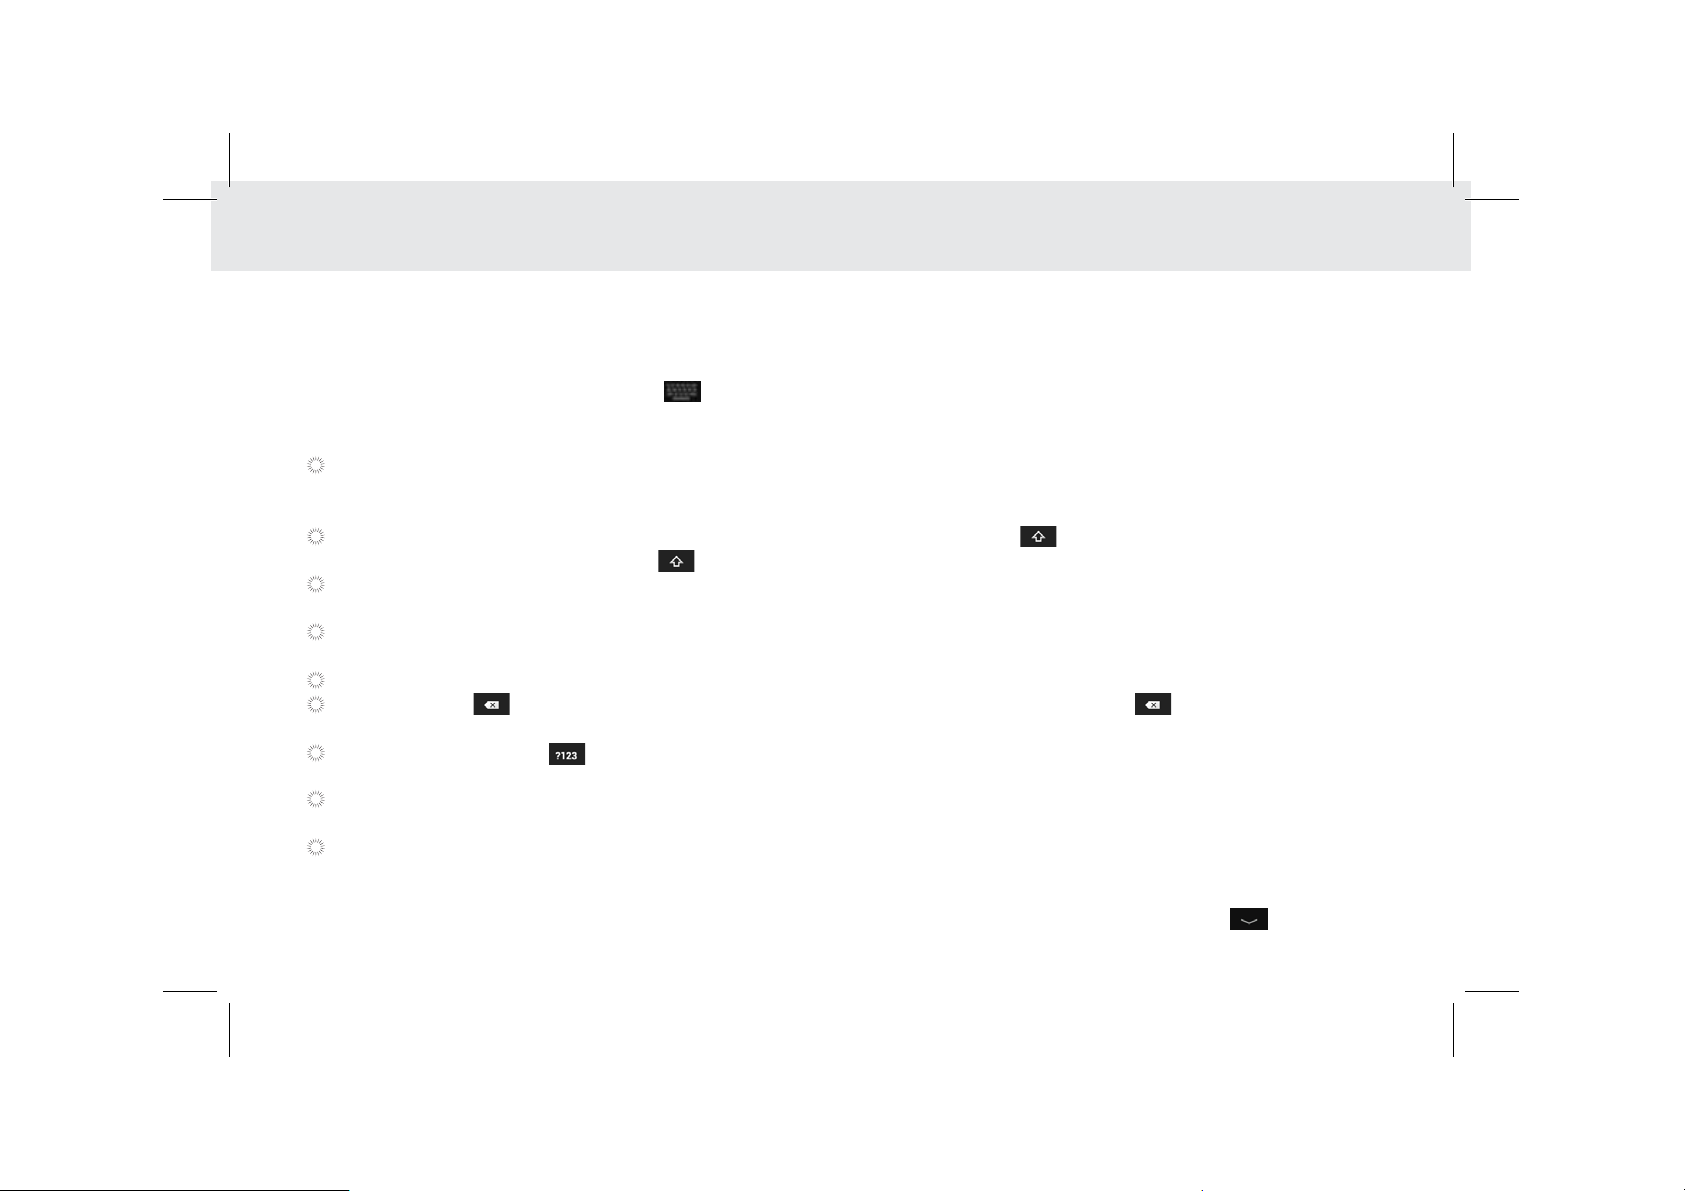
To switch the input method, touch the icon located at the lower right corner of the screen.
The following section takes the Android™ keyboard as an example.
When you are typing, the characters you are entering will appear in a line above the keyboard, along with some
suggestions for the word you are typing. Press space or a punctuation mark to enter what you are typing, or touch the
suggestion you want to enter. You can touch and hold the leftmost word to save it to the dictionary.
To capitalize the letter you are about to type, touch the upward arrowhead key once. To capitalize all the
letters, touch the upward arrowhead key twice.
When you touch a key, a larger key will show up briefly over the keyboard. Keys with alternate characters display an
ellipsis (...) below the character.
Touch and hold a vowel or the C, S, or Y key to open a small window where you can touch an accented vowel or other
alternate letters.
Touch and hold the Period key (.) to open a small window with a set of common symbol keys.
Touch the DEL key to delete a character to the left of the cursor. Touch and hold the key to delete all
characters to the left of the cursor.
Touch the Symbols key to switch to the numbers and symbols keyboard, and touch the alphabet key (ABC)
to switch back.
On the numbers and symbols keyboard, touch the ALT key to view additional symbols, and touch it again to return to
the first numbers and symbols keyboard.
Touch and hold almost any of the number and symbol keys to open an array of additional symbols.
3. To edit the text you have entered, touch to move the cursor to the location where you want to add or delete text.
The cursor is a vertical bar that designates where the text you type or paste is inserted.
4. To close the keyboard when you are done typing, touch Go/Done button on the keyboard. Or touch the icon
on the lower left corner of the touchscreen.
16

1.11.2 Cutting or copying text
To quickly cut or copy all the text in a text field:
1.Touch and open the text field which contains the text that you want to cut or copy.
2. Touch and hold the text field to display the Edit text menu.
3. Touch Select all, Cut all, or Copy all.
4. Touch Cut or Copy to cut or copy the text
To cut or copy selected text in a text field:
1. Touch and hold the text that you want to cut or copy. Once the text is highlighted, tabs will appear at the ends of the
text, as well as the editing command menu.
2. Drag the respective tabs left and/or right to select the full text you want to cut or copy. The text between the tabs
will appear highlighted.
3. Touch Cut or Copy to cut or copy the selected text.
The cut or copied text will be stored in a temporary area so you can paste it into another text field.
In order to paste the text, you must have cut or copied the text at least once. Once you have cut or copied the text,
you can paste it multiple times.
To paste the most recent text that you have cut or copied into another text field:
1. Touch the text field where you want to paste the text.
2. Touch the location where you want to paste the text. A tab will show up.
3. Touch the tab, and the Paste option will show up.
4. Touch Paste.
17
 Loading...