


Telo Systems TE580P User Manual

FCC ID: 2ANY6-TE580P
User Manual
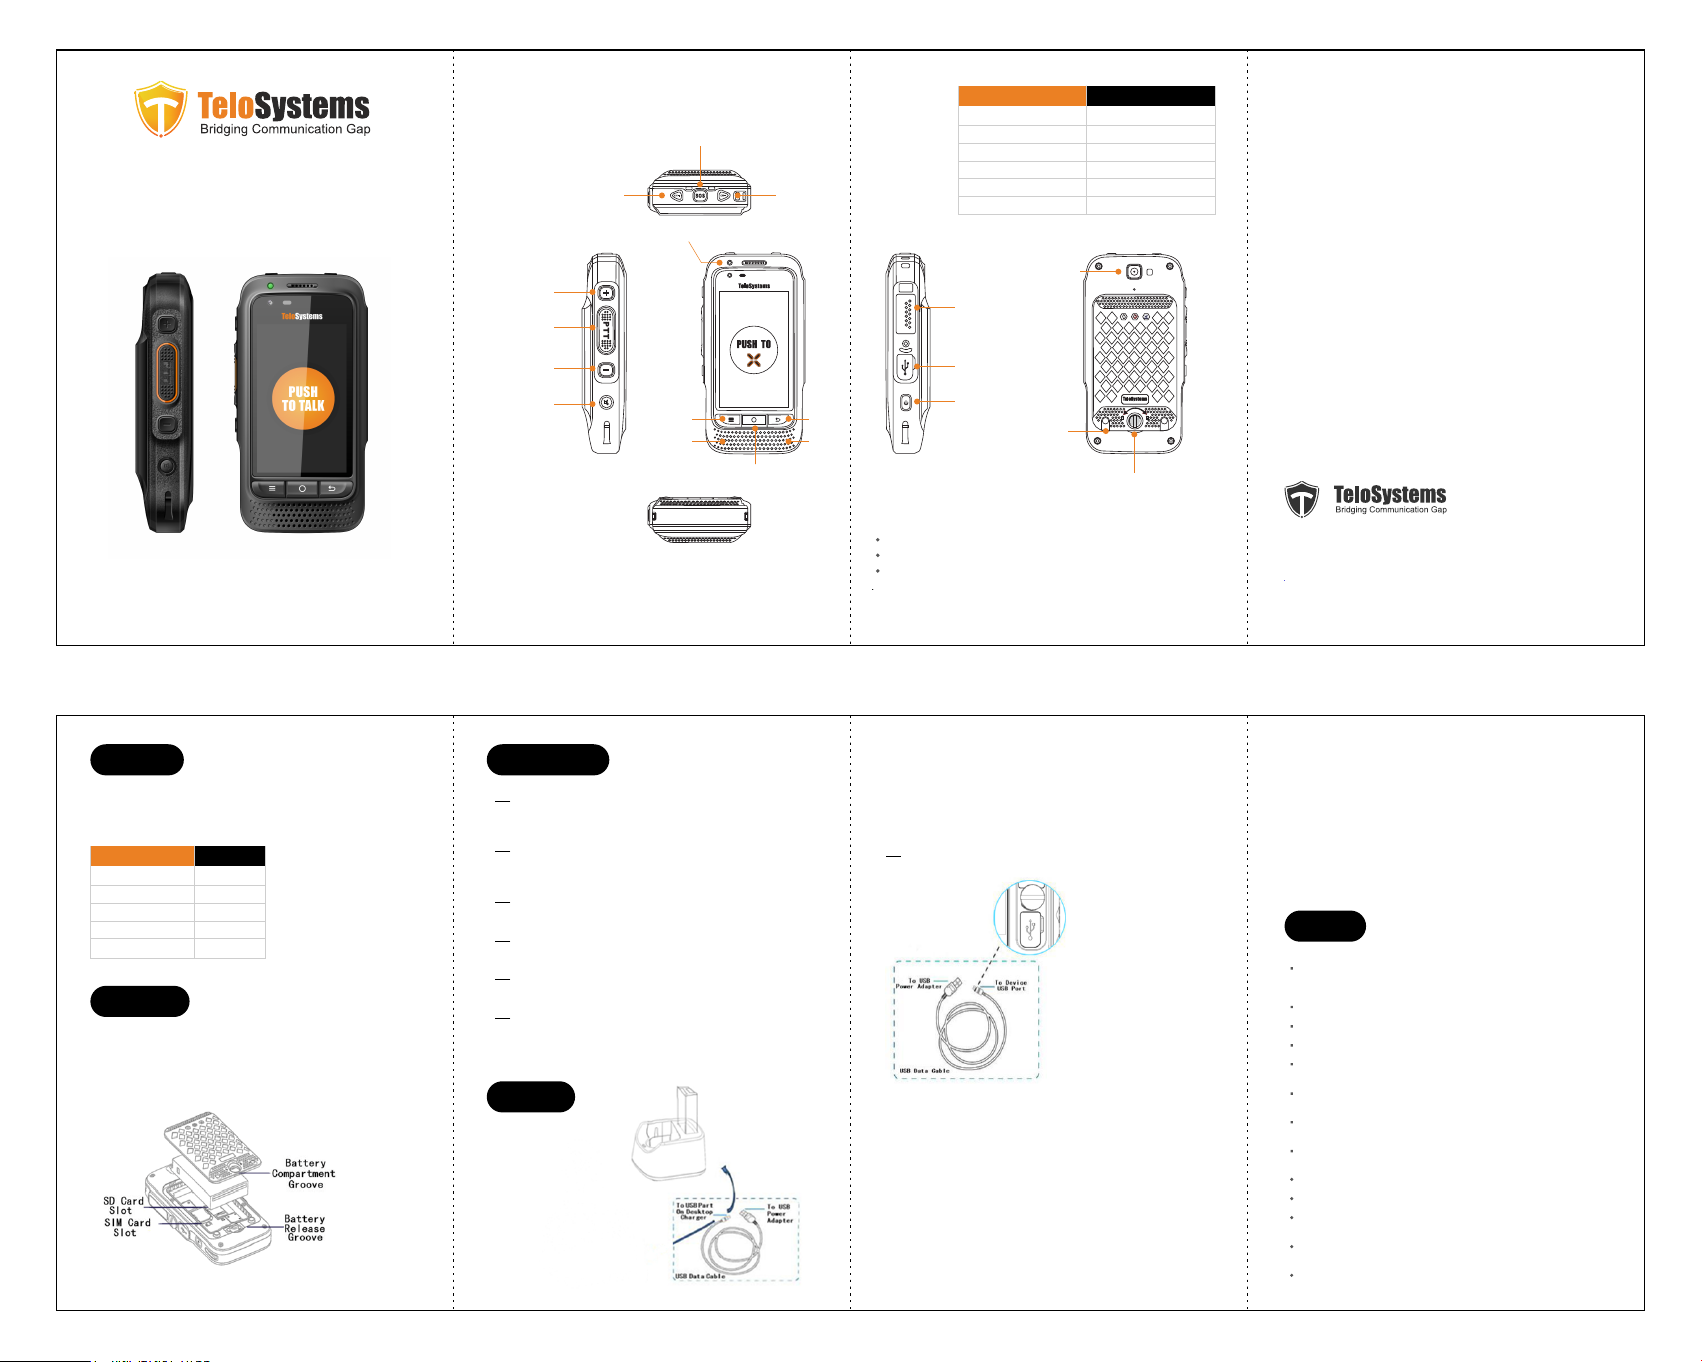
Smart Phone
TE580P
TE580P
Quick Start Guide
Product
introduction
Channel +
Volume +
PTT Button
Front
Camera
SOS Button
Channel -
Operating State Indication
Standby
Searching Network
Low Battery
Charging
PTT Transmitting
PTT Receiving
Green (Blinking)
Green (Fast Blinking)
Red (Blinking)
Red (Steady)
Red (Steady)
Green(Steady)
Rear Camera
M6 Interface
Thanks for choosing our product!
This Quick Start Guide Only applicable to: TE580P.
Before using the product, please read the Quick Start Guide to fully
benefit from it.
Check List
Please check the following accessories before you discard the
packing material. Please contact your local dealer immediately
if there is any missing or damage parts.
Accessories Quantity
TE580P
USB Data Cable
Battery
Charging Plug
Quick Start Guide
1
1
1
1
1
Before Use
1. Release the battery cover lock, move the battery cover away.
2. According to the indication, insert the SIM or SD card inside
the SIM or SD card slot.
3. Put the Battery into the slot.
4. Lock the battery cover.
Volume -
Mute
Menu Back
Speaker Mic
Basic Operation
Power On
Press the power on button for 3 seconds, Once the screen goes light up,
You will see the screen on, it indicates successful turn on
Power Off
Press the power off button for 3 seconds, Once the screen goes blank,
the smart terminal is fully shut down.
Home
Press home button to enter the home page
Menu
Press menu button to enter the setting page
Back
Press back button to return the last page
Unlock
- Press menu button then press back button to unlock
- Slide lock icon on the screen to unlock
Charging
Using Desktop Charger
Home
USB Port
Power
Desktop
Charging Points
Battery Cover
Switch
Note
Warranty period is 1 year for product from date of purchase.
Warranty period is half a year for accessories from date of purchase.
This product involves constant upgrading and/or improvement, our company reserves
the right to change the specifications of software and/or hardware mentioned in this
operating guide without any prior notice. The product specifications and information
mentioned in the operating guide are for reference only.
Connect the Desktop Charger and the Power Adapter with an
USB Data Cable.
Red light on the desktop charger indicates battery charging in
progress.
Green light on the desktop charger indicates fully charged.
Using USB Data Cable
Connect the LTE handheld and power adapter using the USB
Data Cable.
Red light on the LTE handheld indicates battery charging in
progress.
Green lights on indicates fully charged.
Notice:
Always use Telo Original batteries and chargers. The warranty does not cover
damage caused by `non-Telo batteries and/or chargers.
WARNING: DO NOT USE THE ABOVE TWO CHARGING METHODS SIMULTANEOUSLY.
TeloSystems
Tel: +86 755 86950766
E-mail: support@telosystems.com
Add: 4/F, Chuangye Building, Seven-Star Park,
Yu'an 2nd Road, Bao'an District, Shenzhen, China.
www.telosystems.com
Caution
Risk of explosion, fire or chemical burns if battery is disassembled, crushed,
stricken, trampled, short-circuited, incinerated or exposed to high
temperature over 60°C.
Don’t use damaged or weeping battery.
Keep the battery dry and out of Children’s reach.
Properly dispose of failure batteries in accordance with local regulations.
Although your device is quite sturdy, it is a complex piece of equipment
and can be broken. Avoid dropping, hitting or bending, or sitting on it.
Make sure the charger/USB port, microSD card/SIM card slot covers are
properly seated, with no foreign objects obstructing the seals.
Do not use the charger/USB port for charging, data transmission, etc. until
the phone is completely dry.
Do not store the device under any circumstance containing electronic
erosive material.
Avoid to pull the device up by holding the antenna or accessories.
Please power off and unload the battery before cleaning the device.
Using dry and clean lint-free cloth or hairbrush to keep the device and
charger docking port clean.
Avoid to use any chemical agent including detergent, alcohol, aerosol spray
or oil preparations as cleaning solution.
Dry your device completely after cleaning and before using it again.