

Page 1
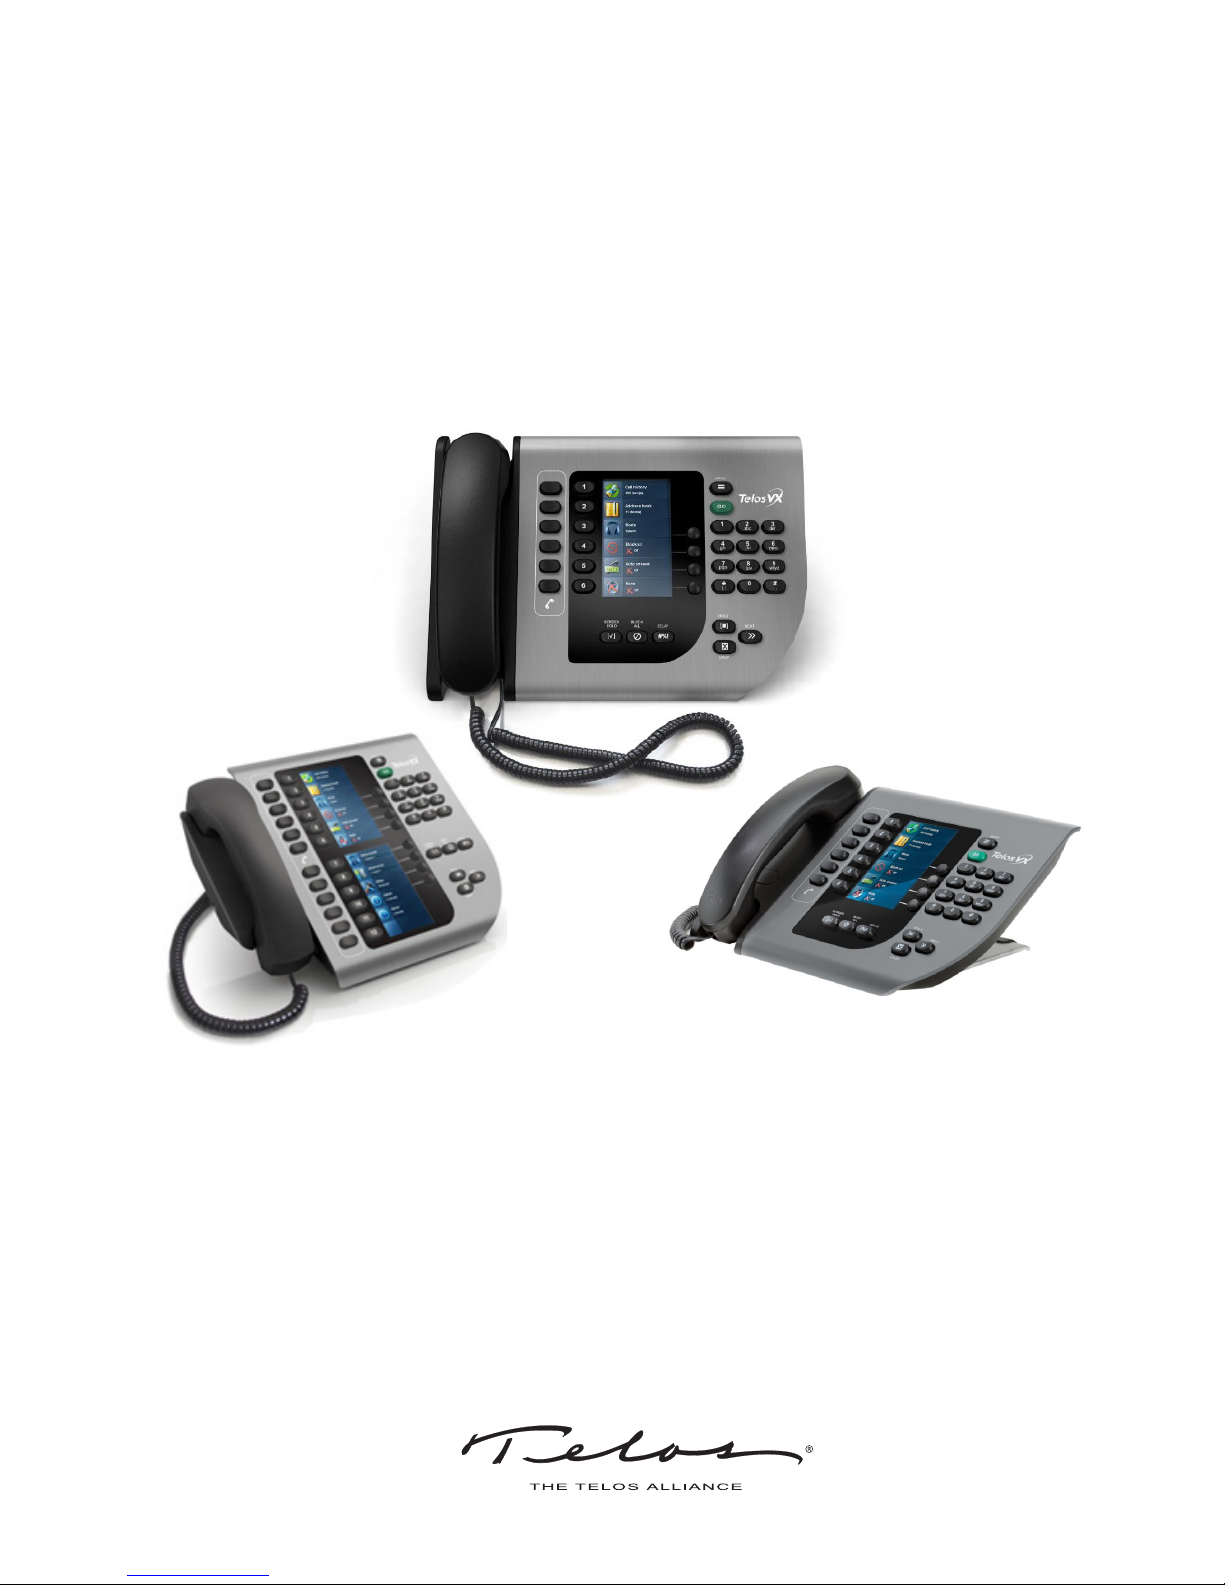
TELOS VSET
BROADCAST PHONESETS
For use with Telos VX, Hx and iQ6 Systems
USER MANUAL
Manual for VSet12 — Software: v1.2.0-r12198, VSet6 — Software: v1.2.0-r12198
For use with: VX Broadcast VoIP System, Telos Hx6 Six-Line Talkshow System, Telos iQ6 Six-Line Telco Gateway
VSet12 / VSet6 Phone Sets
Page 2

TELOS VSET BROADCAST PHONESETS MANUAL
Manual for Telos VSet12 and VSet6 Phone Sets
© 2011-2015 TLS Corporation. Published by Telos Alliance/TLS Corporation. All rights reserved.
Trademarks
Telos Alliance, the Telos logo, VX are trademarks of TLS Corporation. All other trademarks are the property of their
respective holders.
Notice
All versions, claims of compatibility, trademarks, etc. of hardware and software products not made by Telos mentioned in this
manual or accompanying material are informational only. Telos Alliance makes no endorsement of any particular product for
any purpose, nor claims any responsibility for operation or accuracy. We reserve the right to make improvements or changes in
the products described in this manual which may affect the product specifications, or to revise the manual without notice.
Warranty
This product is covered by a two year limited warranty, the full text of which is included in this manual.
Updates
The operation of the Telos VSet12 and VSet6 is determined by software. We routinely release new versions to add features and
fix bugs. Check the Telos web site for the latest version. We encourage you to sign-up for the email notification service offered
on the site.
Feedback
We welcome feedback on any aspect of the product, or this manual. In the past, many good ideas from users have made their
way into software revisions or new products. Please contact us with your comments.
| II
We support you...
By Phone / Fax:
You may reach our 24/7 Support Team anytime around the clock by calling +1-216-622-0247.
For billing questions or other non-emergency technical questions, call +1-216-241-7225 between 9:30 AM to 6:00 PM USA
Eastern Time, Monday through Friday.
Our fax is +1-216-241-4103.
By E-Mail:
Technical support is available at [email protected].
All other inquiries at [email protected].
Via World Wide Web:
The Telos Web site has a variety of information which may be useful for product selection and support.
The URL is TelosAlliance.com
10 9 8 7 6 5 4 3 2 1
Telos Alliance USA
Telos Alliance
1241 Superior Avenue E
Cleveland, OH 44114 USA
Page 3

TABLE OF CONTENTS | III
1 Introduction 1
2 VSet Anatomy 2
3 Installation 3
Before you begin . . . . . . . . . . . . . . . . . . . . . . . . . . . . . . 3
Connecting the VSet . . . . . . . . . . . . . . . . . . . . . . . . . . . . . 3
Assign IP address . . . . . . . . . . . . . . . . . . . . . . . . . . . . . . 4
Connect to Telos system . . . . . . . . . . . . . . . . . . . . . . . . . . . 4
Select Studio . . . . . . . . . . . . . . . . . . . . . . . . . . . . . . . . 5
Select Show . . . . . . . . . . . . . . . . . . . . . . . . . . . . . . . . 5
4 User Operation 6
Talent and Producer Modes . . . . . . . . . . . . . . . . . . . . . . . . . 6
Line Status Display . . . . . . . . . . . . . . . . . . . . . . . . . . . . . 6
Line Button Columns . . . . . . . . . . . . . . . . . . . . . . . . . . . . 8
Hold Button . . . . . . . . . . . . . . . . . . . . . . . . . . . . . . . . 9
Drop Button . . . . . . . . . . . . . . . . . . . . . . . . . . . . . . . . 9
Lock . . . . . . . . . . . . . . . . . . . . . . . . . . . . . . . . . . . . 9
Next Button . . . . . . . . . . . . . . . . . . . . . . . . . . . . . . . . 9
Block All Button. . . . . . . . . . . . . . . . . . . . . . . . . . . . . . . 9
Numeric Keypad and the GO Button . . . . . . . . . . . . . . . . . . . . . . 10
Operating with Hx6 and iQ6 . . . . . . . . . . . . . . . . . . . . . . .10
Operating with VX Engine . . . . . . . . . . . . . . . . . . . . . . . .10
5 Menu Button 12
Mode . . . . . . . . . . . . . . . . . . . . . . . . . . . . . . . . . . 12
Select Show. . . . . . . . . . . . . . . . . . . . . . . . . . . . . . . 12
Mute Ringer . . . . . . . . . . . . . . . . . . . . . . . . . . . . . .12
Setup Menu . . . . . . . . . . . . . . . . . . . . . . . . . . . . . . . .13
HTTP Server . . . . . . . . . . . . . . . . . . . . . . . . . . . . . . . 13
Telnet Server . . . . . . . . . . . . . . . . . . . . . . . . . . . . . . 13
Key Debounce . . . . . . . . . . . . . . . . . . . . . . . . . . . . . . 13
Reset to Factory Defaults . . . . . . . . . . . . . . . . . . . . . . . . . 13
Test Mode . . . . . . . . . . . . . . . . . . . . . . . . . . . . . . . . 13
Page 4

IV | TABLE OF CONTENTS
Engine Setup Menu . . . . . . . . . . . . . . . . . . . . . . . . . . . . . 14
Engine IP . . . . . . . . . . . . . . . . . . . . . . . . . . . . . . . . 14
VX Engine List . . . . . . . . . . . . . . . . . . . . . . . . . . . . . . 14
User and Password . . . . . . . . . . . . . . . . . . . . . . . . . . . . 14
Select Studio . . . . . . . . . . . . . . . . . . . . . . . . . . . . . . 14
Studio Line Shift. . . . . . . . . . . . . . . . . . . . . . . . . . . . . 14
User Preferences . . . . . . . . . . . . . . . . . . . . . . . . . . . . . .15
Auto Hold . . . . . . . . . . . . . . . . . . . . . . . . . . . . . . . . 15
Ringing Line Handset Preferences . . . . . . . . . . . . . . . . . . . . . 15
Two Fader Operation . . . . . . . . . . . . . . . . . . . . . . . . . . . 15
Lockless mode . . . . . . . . . . . . . . . . . . . . . . . . . . . . . . 15
Ignore Mute (Producer) . . . . . . . . . . . . . . . . . . . . . . . . .15
Auto Dial Timeout . . . . . . . . . . . . . . . . . . . . . . . . . . . . 16
Prompted Drop/Hold. . . . . . . . . . . . . . . . . . . . . . . . . . . 16
Ringer in Headset . . . . . . . . . . . . . . . . . . . . . . . . . . . . 16
Display Brightness . . . . . . . . . . . . . . . . . . . . . . . . . . . . 16
Volumes . . . . . . . . . . . . . . . . . . . . . . . . . . . . . . . .16
Address Book . . . . . . . . . . . . . . . . . . . . . . . . . . . . . . . . 17
Status and About . . . . . . . . . . . . . . . . . . . . . . . . . . . . . . 17
6 Web Interface 18
7 VX Producer 20
8 Troubleshooting 21
9 User Reference 22
Page 5

SECTION 1
| 1
1
Introduction
Through the years, phone systems have continued to evolve. We began in a world where there was no dialing
system. You lifted the receiver off the hook and instead of hearing dial tone you heard, “Number please…” You
would then answer with an exchange followed by a number (Chapel 1-7225) and the operator would connect you
manually with a patch cable. As networks got bigger and more and more people had telephones installed, there was
a need for a better system.
Enter the Plain Old Telephone Service, or POTS for short, which had complex analog dialing and switching
equipment in central offices to complete calls automatically. Using POTS lines, we became familiar with things
like dial, ring-back, busy, reorder, and off-hook tones. We moved on from pulse dialing with step by step switching
and rotary dials to digital switching systems with touch tone dialing with DTMF tones. As this system got more
and more complicated with even more people installing telephones and at some point, computers, we needed yet
another update.
Instead of forcing computers and other digital devices to operate over the analog POTS lines, ISDN lines were
implemented. ISDN allowed for multiple channels of digital information to be sent from one place to another
without having to convert the information to analog for switching, routing or transmission. Now, with the
increasing use of the Internet and further development of Internet Protocol (IP), ISDN is moving over for Voice
over Internet Protocol (VoIP) and Session Initiation Protocol (SIP) for telephony. In many cases, you don’t even
need a PBX in your building and you don’t even need to remember a phone number.
Just like the phone company, Telos has been making improvements throughout the years to make the equipment
better and easier to use. We know that top quality caller audio is important to your show, just as we also know that
you need an easy-to-use system to get callers or guests on the air without a hassle. As newer phone systems allow
us to do more and more, we also need to keep the experience of using the equipment easy and enjoyable, but also,
more powerful.
We have come a long way. The Mitel Superset paved the way for the Desktop Director and its handy Line Status
Symbols, dual mode operation, and flexibility within the 2101 system. The VSet is the latest in phone system
control. Designed like a VoIP hard phone, the VSet can be connected to a talkshow system through a LAN as well
as through a direct connection. It looks and acts like a phone set, but it’s really a computer disguised as a phone set.
This makes for a very powerful, but user friendly call controller. Upon set up, each VSet will be assigned its own
IP address and will talk to the system through the local network (if there is one) just like a computer, without a
Studio I/O. This means that you can control the equipment from anywhere in the building, just as long as there is a
network connection in the room.
Page 6
SECTION 2
| 2
2
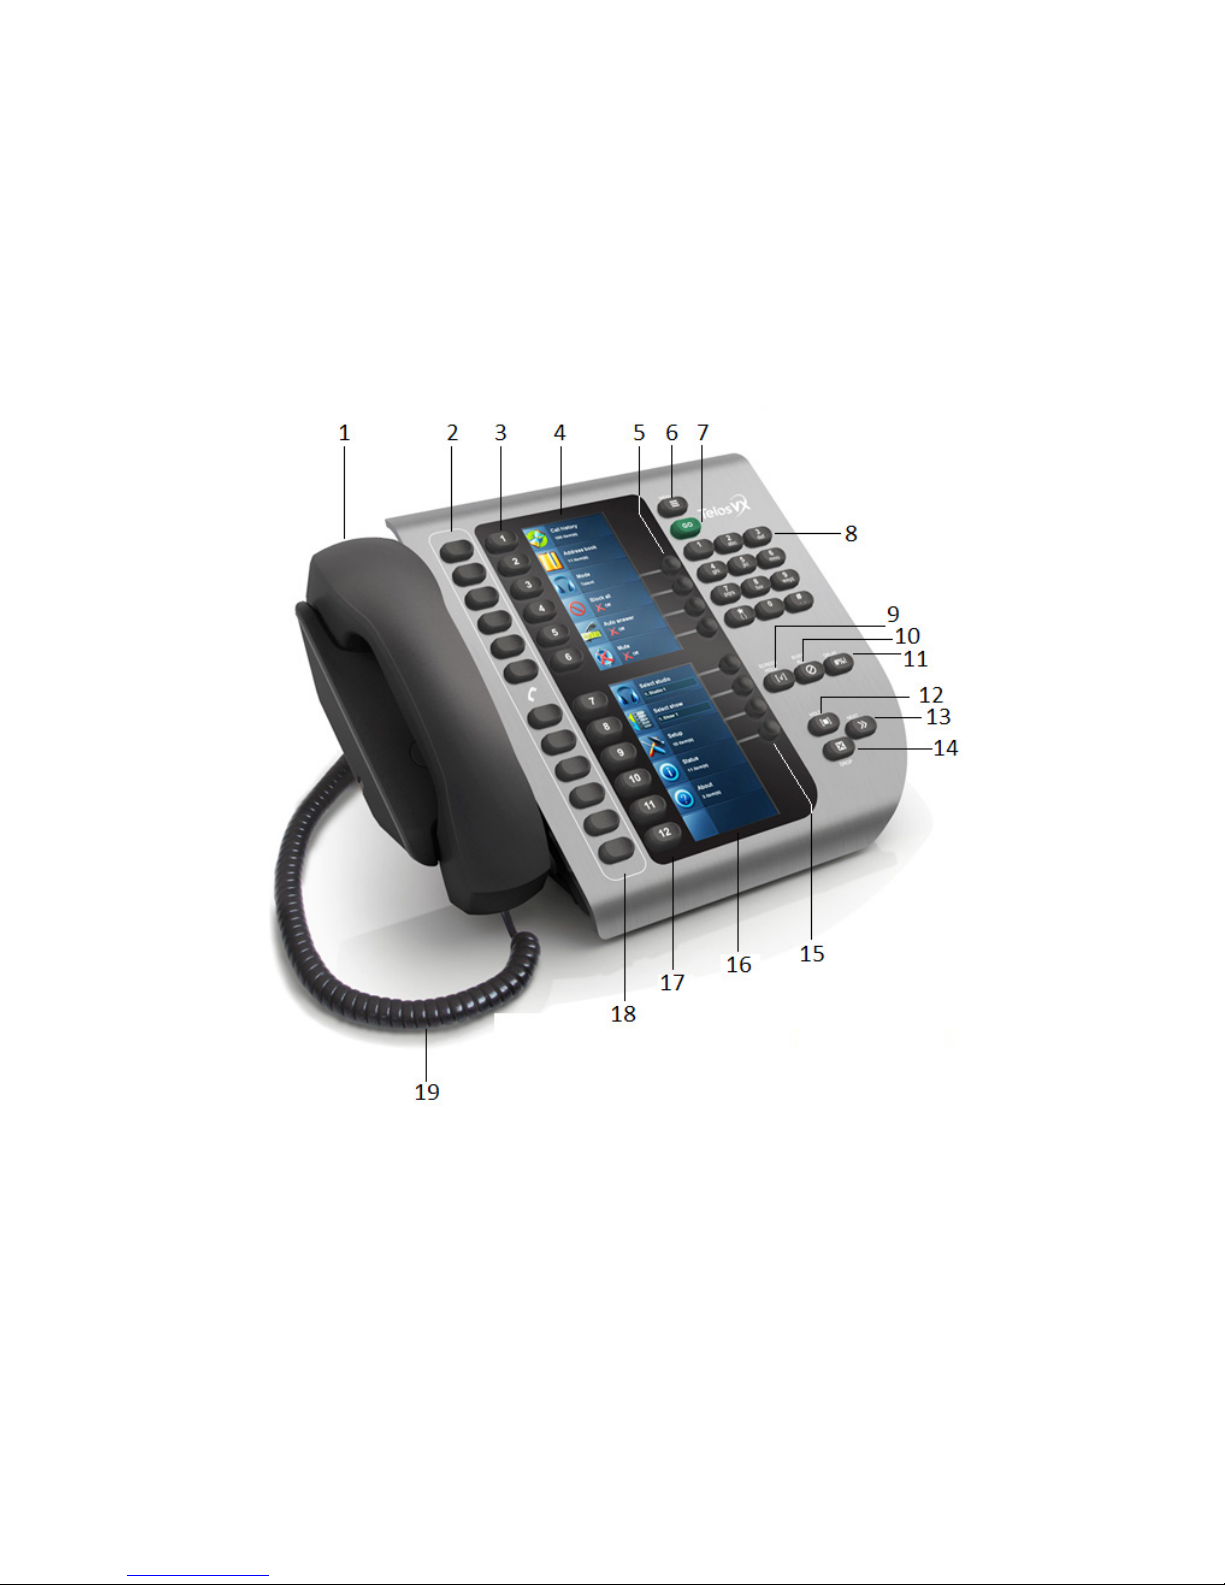
VSet Anatomy
1. Handset
2. Handset Line Buons 1-6
3. Air Line Buons 1-6
4. Upper Display
5. Upper So Keys
6. Menu buon
7. GO Buon
8. Number Keypad
9. Screen Hold Buon
10. Block All Buon
11. Delay Dump GPIO Buon
12. Hold Buon
13. Next Call Buon
14. Drop Buon
15. Lower So Keys (VSet 12 Only)
16. Lower Display (VSet 12 Only)
17. Air Line Buons 7-12 (VSet 12 Only)
18. Handset Line Buons 7-12 (VSet 12 Only)
19. Handset Cable
Page 7
SECTION 3
| 3
3
Installation
Before You Begin…
Your new Telos VSet phone is designed for fast, intuitive control of Telos VX Engine, iQ6, and Hx6 Talkshow Systems.
Please configure your Telos phone system according the instructions in the User Manual before connecting your VSet to
the network.
VSet phones receive 48-volt power through their Ethernet connection, allowing PoE (Power over Ethernet) to be
supplied by Ethernet switches equipped to provide it. Note that this uses 15.4 watts of your switch’s PoE power. If your
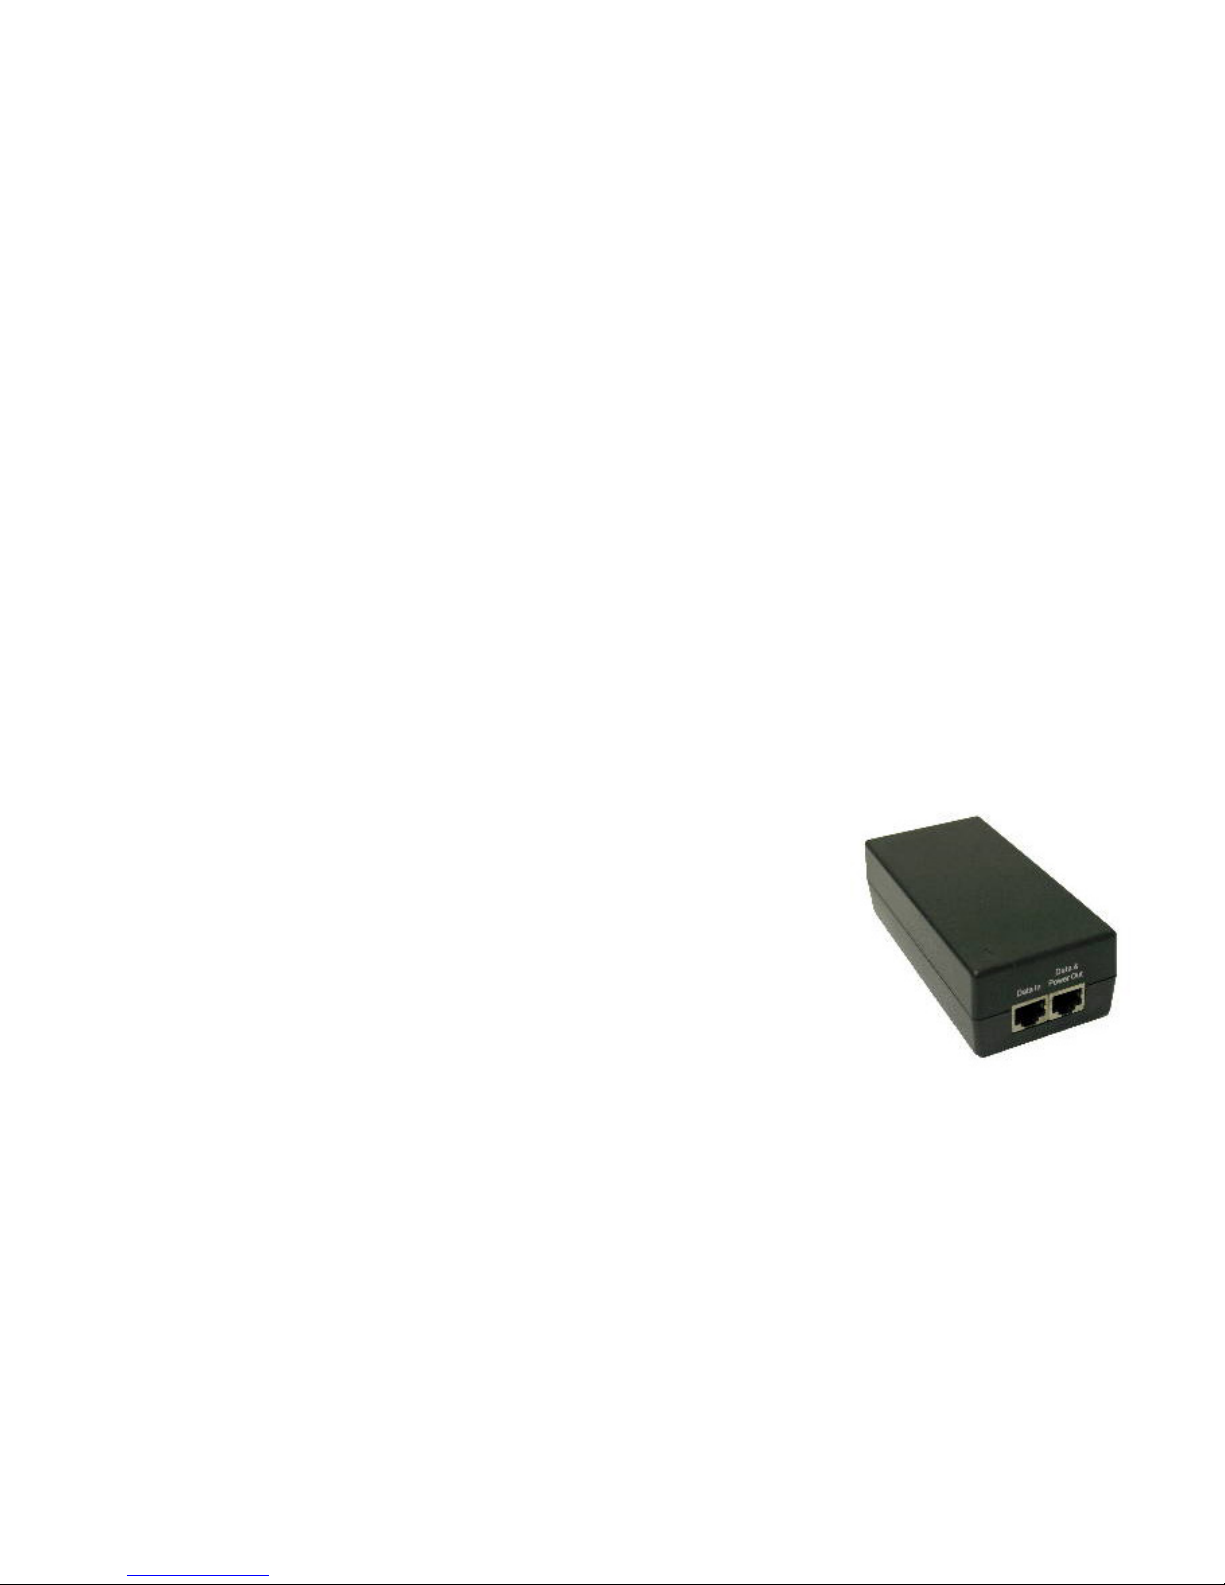
Ethernet switch does not have PoE capability, please use the PoE injector included with your VSet. The PoE injector is also
required for non-switched direct connections to the Hx6 Digital Talkshow System.
Connect Your VSet
First, determine whether your system’s Ethernet switch provides PoE. If so,
connect one end of the supplied Ethernet cable to one of your switch’s PoE-enabled ports, and the other to your VSet.
If your switch does not have PoE capability, connect the included PoE Injector to
the switch via the Data In jack. Connect your VSet to the Data & Power Out jack
and plug the injector into an AC power outlet.
A direct, non-switched connection between the Hx6 and a VSet is possible without use of a cross-over cable. Standard Ethernet cables from the HX6 between the
PoE power supply and both the Hx6 and VSet are acceptable.
The LED indicators near the VSet connection port should show solid green (good connection); the yellow LED should be
flashing, indicating data flow. After a few seconds, the VSet’s LCD screens will light. If they do not, check the connection
of the PoE Injector and / or Ethernet cable.
Page 8
INSTALLATION
Assign an IP Address
Note:
In factory default congurations, the IP addresses between a VSet and an Hx6 should default to
directly compatible settings.
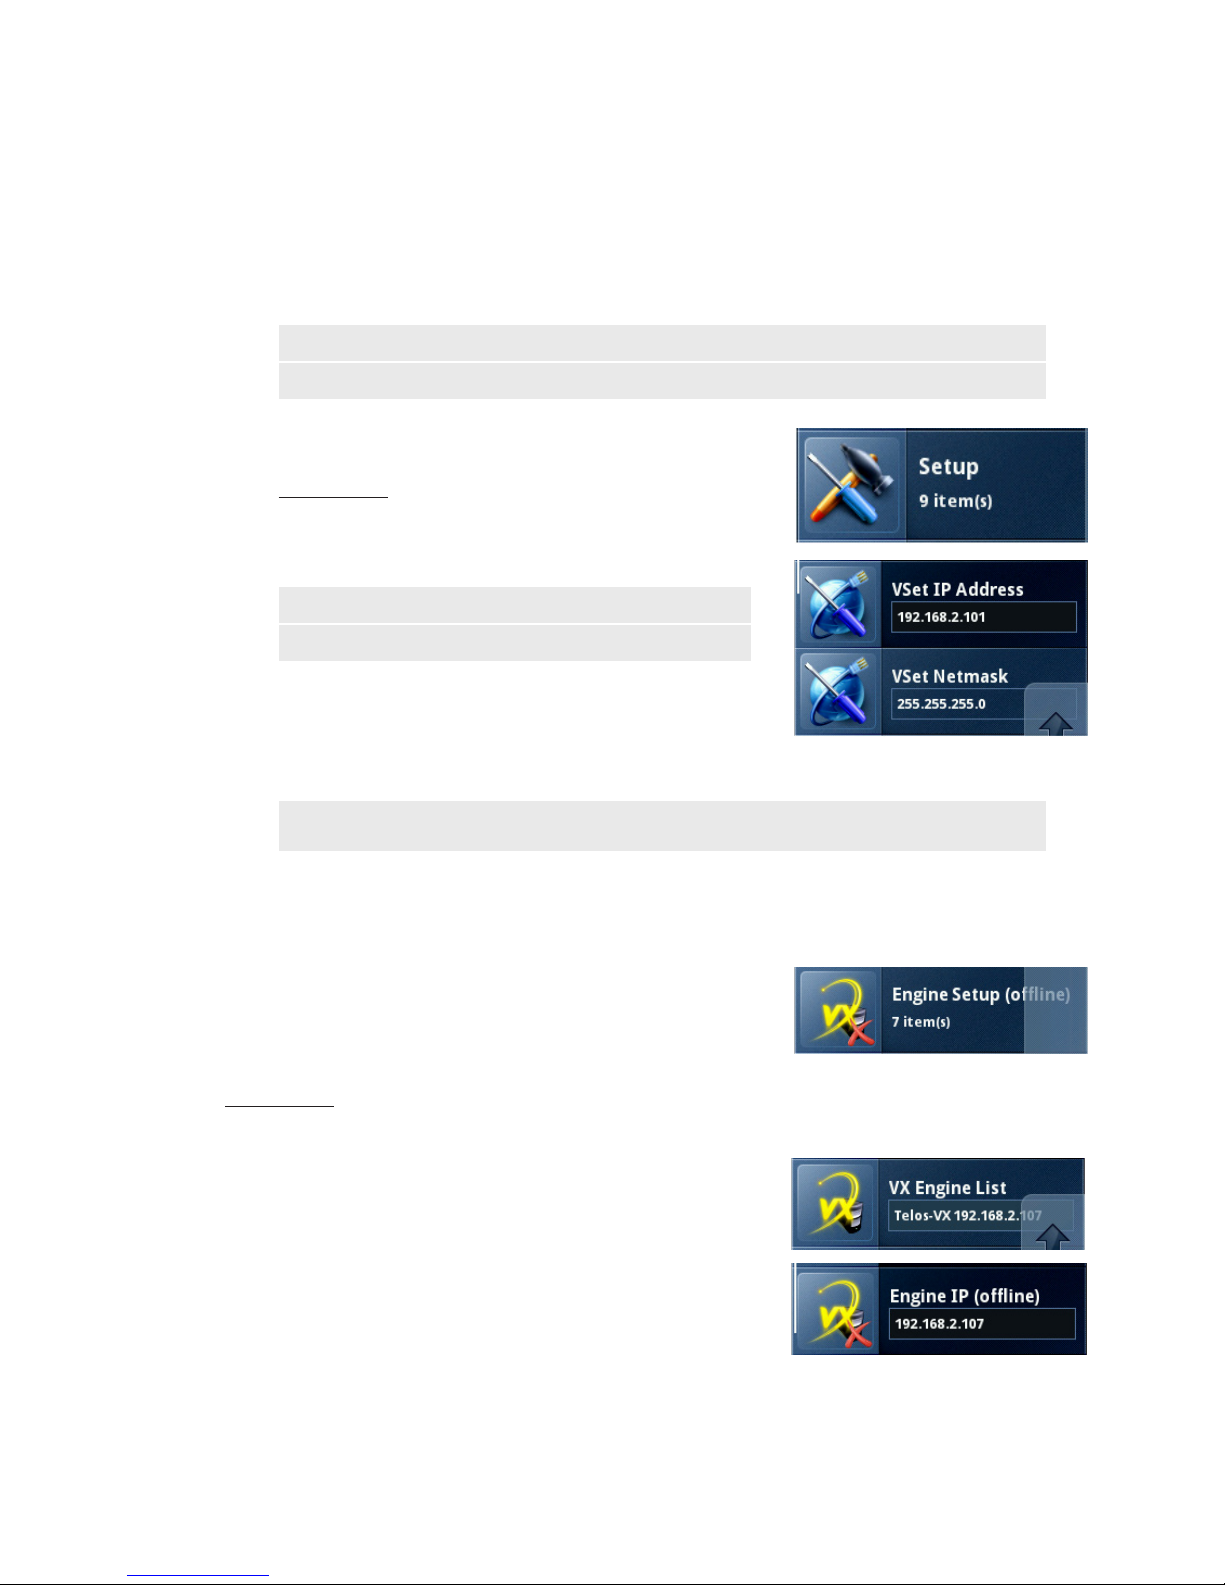
Press the Menu Button and find the Setup option. On the VSet 6, you will
need to scroll down using the soft keys or press the Line Button next to
More. Press and hold the Line button next to Setup for five(5) seconds and
release. No visible change will occur while holding this button. The longpress is needed or the Setup options will be disabled on the next screen.
IMPORTANT:
The Star (*) Key is used to enter a dot (.) and
the Pound (#) key is used to enter a Backspace.
Enter the IP address and netmask values that you wish to assign to the
phone. When the IP address is entered, press either the GO Button or the
Enter soft key to save the entry.
SECTION 3
| 4
Note:
Do not assign a Gateway address unless directed to do so by Telos Support
Press the Menu Button to save settings and exit.
Connect to the Telos System
Press the Menu Button and find the Engine Setup option. On the VSet 6,
you will need to scroll down with the soft keys or press the Line Button
next to More.
Press and hold the Line Button next to Engine Setup for five(5) seconds and release. No visible change will occur
while the button is being held. The long-press is needed to allow you to change the settings in the next screen.
Press the Line Button next to VX Engine List to select from the list of VX
Engines and/or talkshow systems installed on your network. OR using
the Engine IP box, manually key in the IP address of the VX Gateway or
other Telos hybrid or VX Engine you wish to connect to the VSet. The star
key is . and the # key is backspace. Press the GO Button or the Enter Soft
Key to save the entered IP. If the login information of the system has been
changed, enter it into the User and Password fields. Default is Username
is user and there is no password. Press the Menu Button to save settings
and exit.
Page 9
INSTALLATION
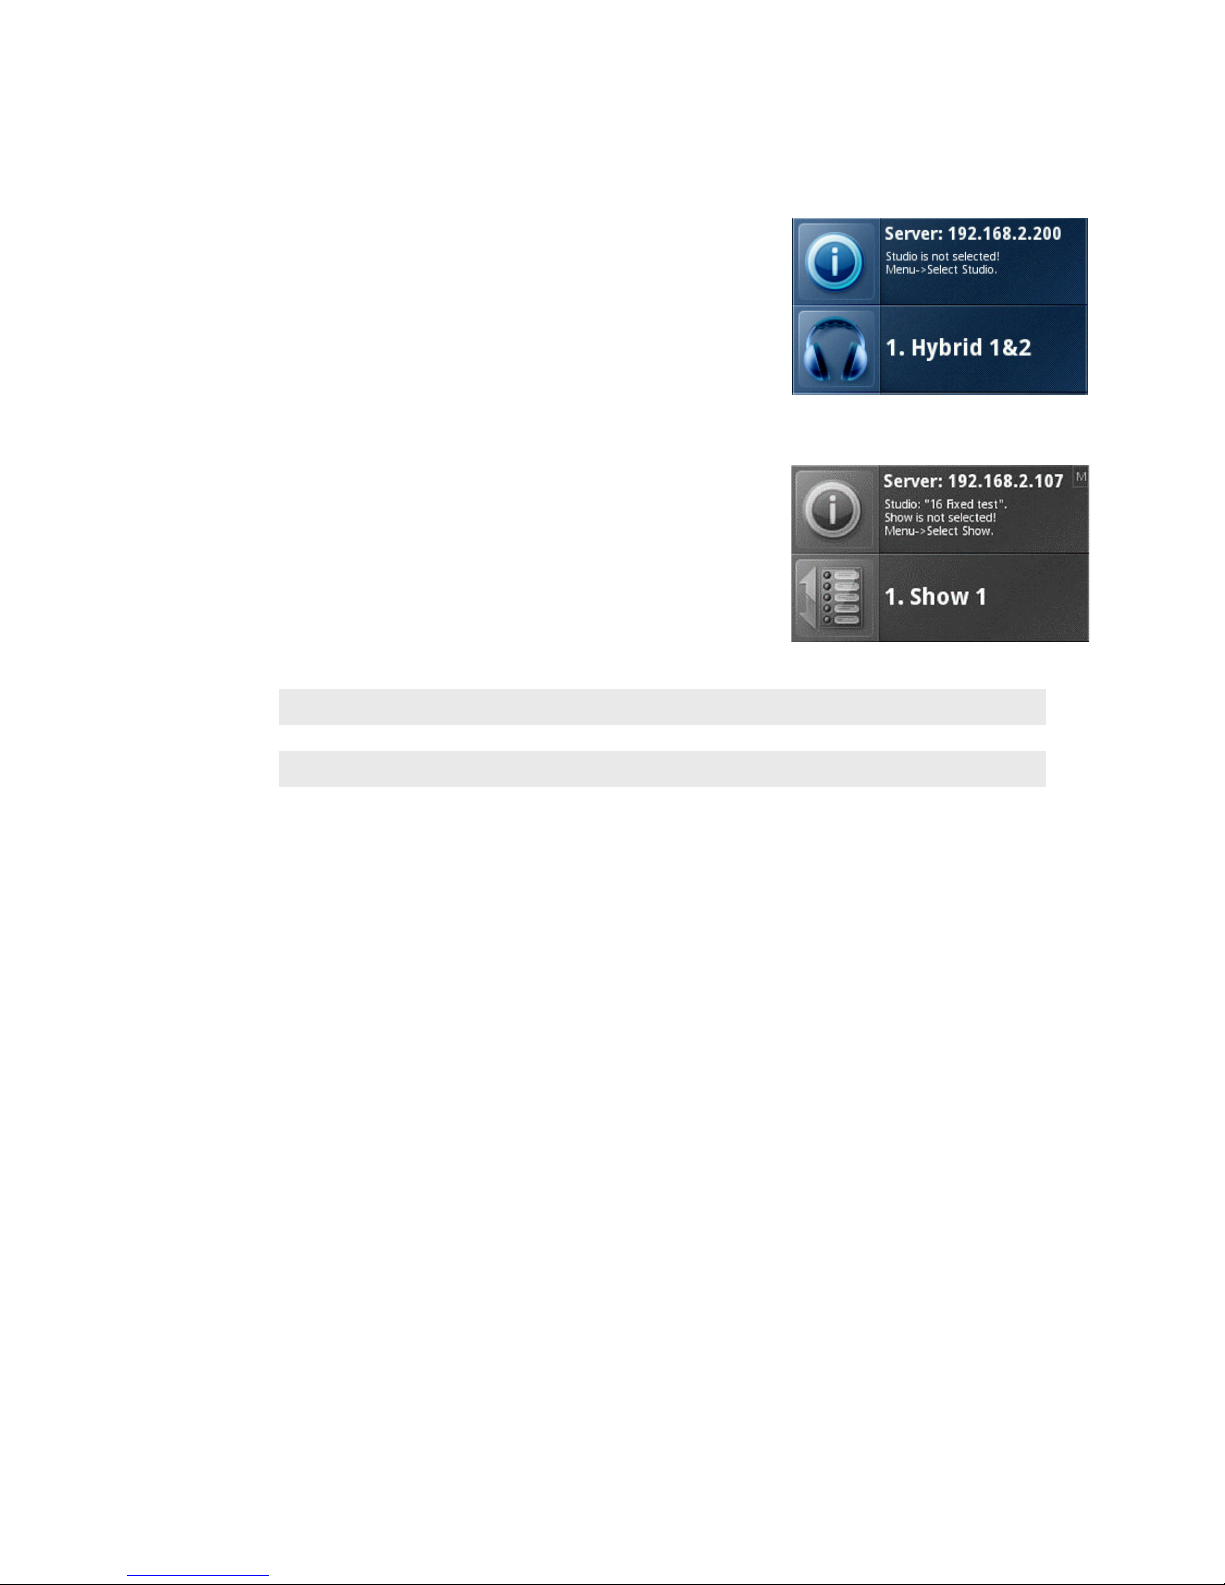
Select Studio
Select the correct Studio from the VX Engine or hybrid. Do this by
pressing on the corresponding Line number button. The available
Studios will be listed vertically.
Select Show
Once the Studio is selected, you will be prompted to select the Show.
Once the Show is selected, the available lines will show as available on
the VSet’s display(s).
After this step, your VSet is ready to control calls.
IMPORTANT:
Since certain functions work dierently in “Talent” verses “Producer” mode, it is important that your
sta understand that there are two modes, and how to switch between them. This is covered in the
beginning of the next section (User Operation) and again in the menu navigation section.
SECTION 3
| 5
Page 10
SECTION 4
| 6
4
User Operation
Talent and Producer Modes
The VSet can be set to either Producer or Talent Mode. This can be changed at any time independently for each
VSet on the network. Producer mode can be thought of as “call screener mode” while Talent Mode can be thought
of as “calls on-air” mode.
The VSet should be set to Talent mode when it is located in the studio and is used to put calls on the air. Producer
mode is for a VSet that is being used to screen calls. In Producer mode, calls cannot be put on-air and are protected
from being dropped.
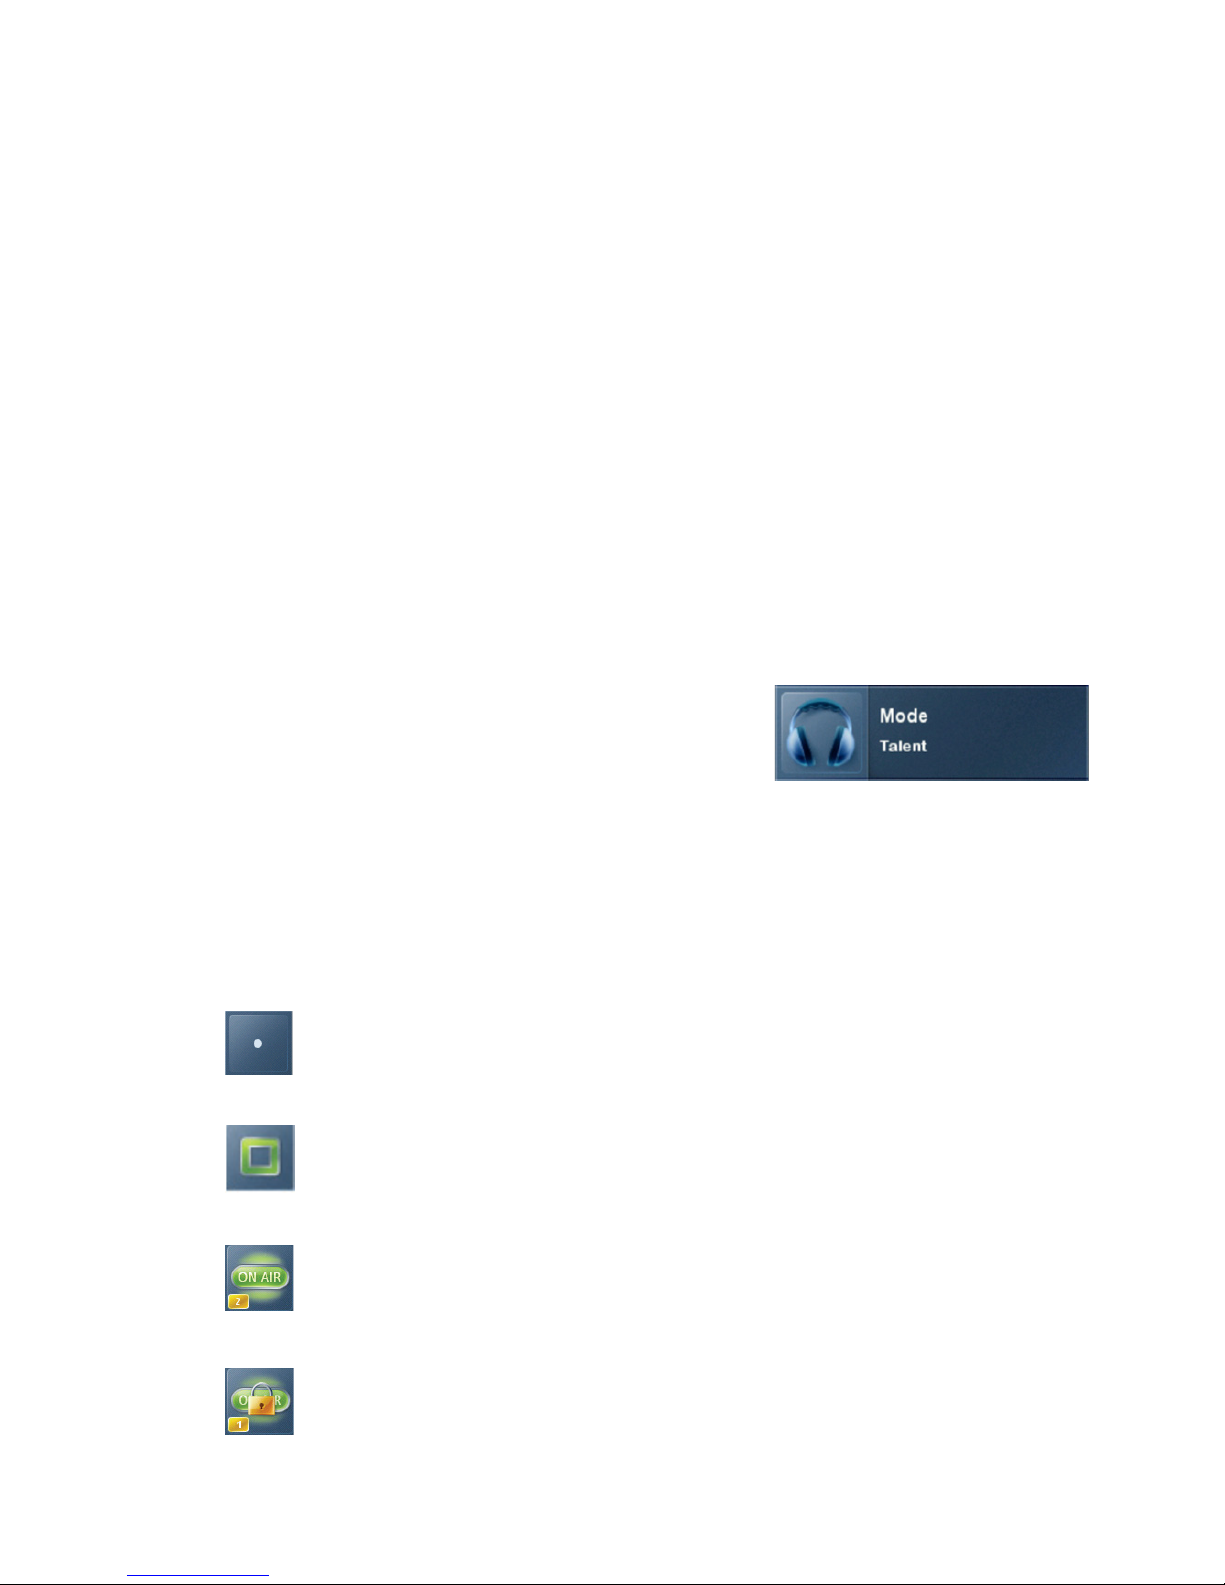
To change between Producer and Talent Mode, press the Menu button
to access the menu functions. The LCD will show the various items
that can be changed. Press the On-Air Line Button next to the Mode
Section, select Talent or Producer and then exit the menu functions by
pressing the Menu button.
The VSet will indicate when it is in Producer mode by placing a little letter ‘P’ in the upper left hand corner of the
Home Screen.
Line Status Display
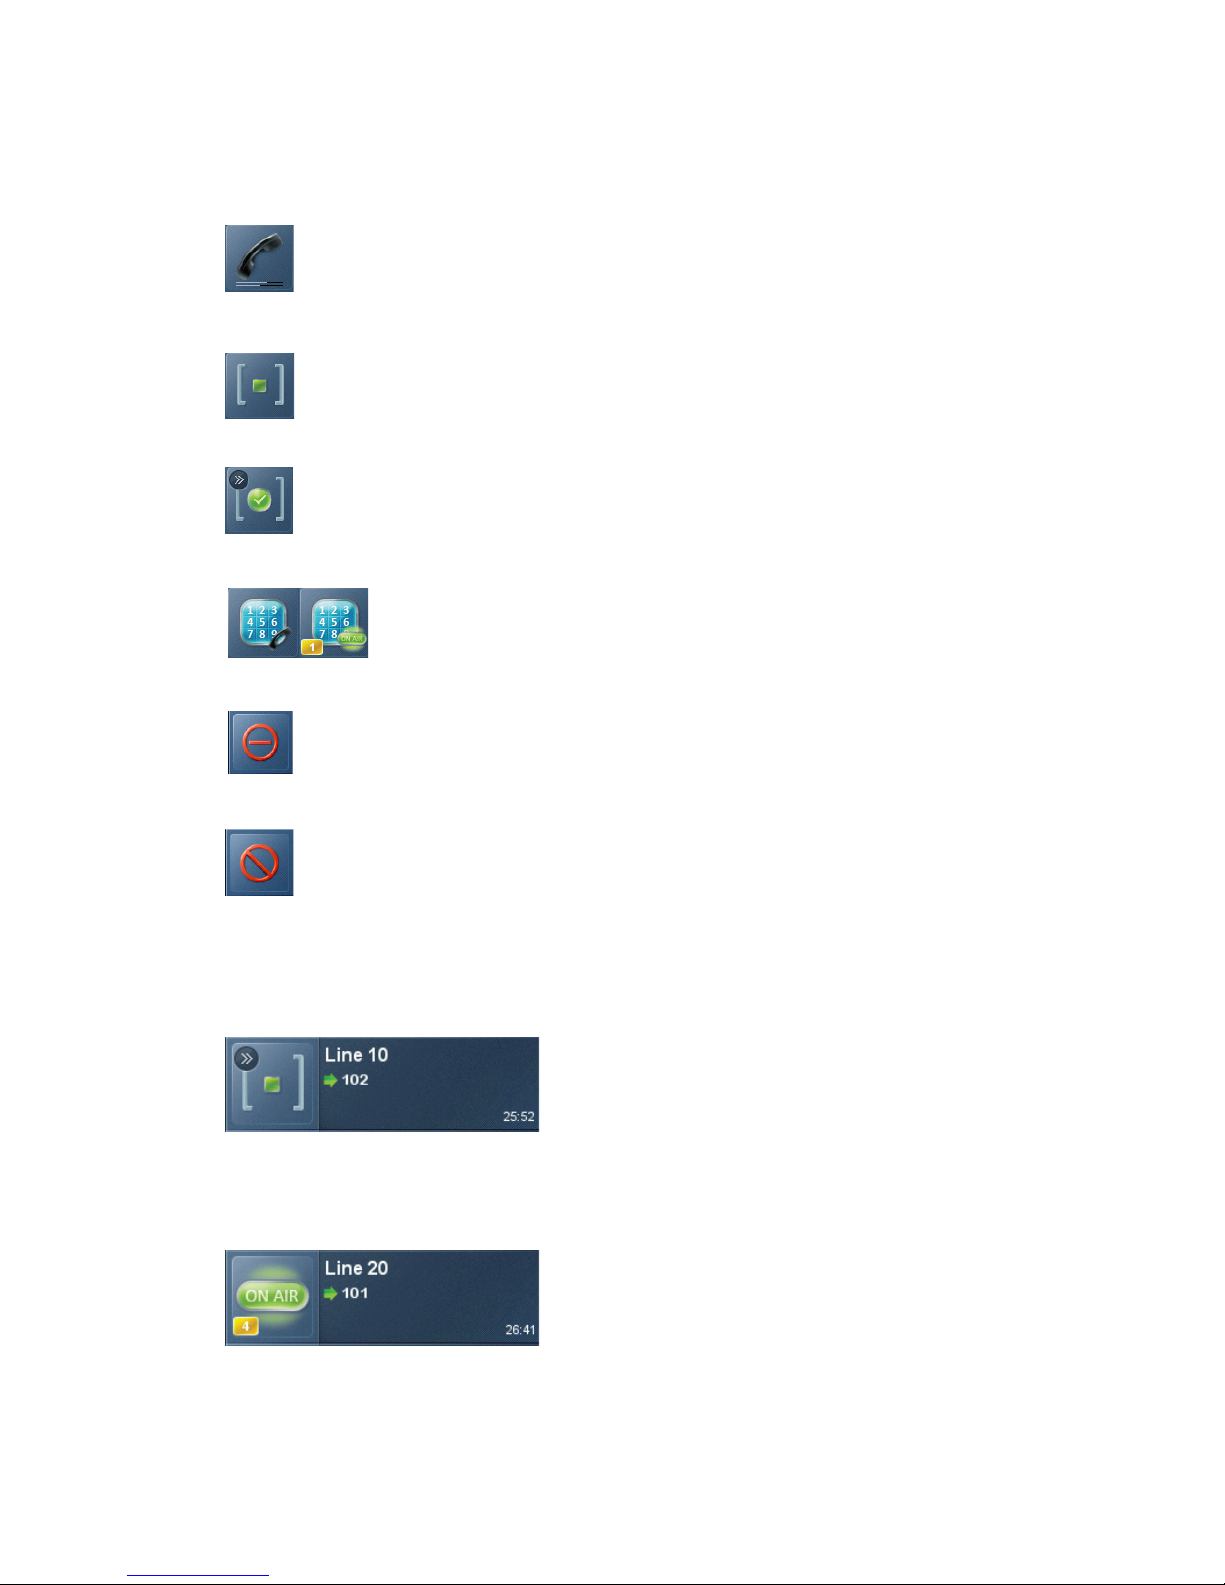
On the Home Screen, each phone line has a portion of the LCD display that shows symbols and info about the line
such as status and Caller ID:
The Line is ready for incoming or outgoing calls
The Line is ringing
The Line is On the Air
The Line is Locked On the Air
Page 11
USER OPERATION
The Line is assigned to the Handset
The Line is on Hold
The Line is on Screened Hold and will be seized when NEXT >> is pressed
The Line is ready for ENBLOC Dialing --- more on that later.
SECTION 4
| 7
The Line is in use elsewhere, perhaps in another studio. Shhhh…
The Line is Blocked
The Next Indicator
The ‘>>’ symbol marks the line that will be taken when the NEXT button is pressed.
Fader Number
The orange rectangle near the status icon a with number indicating which hybrid is handling the call.
Page 12

USER OPERATION
Fader Select (not depicted)
When a line is selected for Air, Hybrid 1 is automatically selected and you will see options appear next to the soft
keys. There will be one per hybrid. Pressing the soft keys next to these options will choose which hybrid handles
the call and on which console fader the call appears. You will see the Fader Number change depending on which
selection you make. When used with the VX Engine, backspace may be an option for ENBLOC dialing (more on
that later).
Line Name
This is the first line of text in the line row. This is defined using the VX Engine’s web GUI and is automatically
configured for POTS lines by the Hx6 or iQ6.
Caller ID
Caller ID will be displayed on incoming calls if it is available. Outgoing calls will show the number dialed. The
green arrow pointing to the right indicates an outgoing call while a blue arrow pointing to the left indicates an
incoming call. Calls that are blocked or that come in from lines without caller ID may display ‘anonymous’.
SECTION 4
| 8
Time
The length of time the call has been active, ringing in or on Hold.
Action Prompt (not depicted)
When PROMPTED HOLD/DROP mode is enabled, this icon shows what line will be affected by drop and hold.
Choose the line you want to drop or hold after pressing either of those two buttons. This is shown only when more
than one is possible; this step is not needed when only one line is possible, when the line would be dropped or held
immediately.
Line Button Columns
Each line has 2 associated buttons to the left of the LCD. Pressing a left column line button puts a held or ringing
caller on the handset. Press the right column button to put a line on air, dropping any other unlocked calls. If a
call is already on the air, pressing the right button locks the line, or if already locked, unlocks it. That is, it toggles
between the two states. Not to worry, we’ve made it difficult to accidentally drop a call. Call screeners or producers
should use the Ready Hold button (the one with the checkmark) to put lines in ready hold mode and assign
priority for the Next function. See “Next” Button and function.
Ready hold works like normal hold, except the line status icon has the checkmark to indicate to operators that a call
has been determined to be ready for air, normally by a producer/screener. The Vset must be in Producer mode in
order to use this key.
PRO TIP:
You can re-order the next priority queue at any time. Put lines in Ready Hold - even those already
on Ready Hold - in reverse order from the order you wish to air them. First, Screen hold the call to
be aired last, then the call to be aired second to last and so on. You would screen hold the call that
you want to be aired next, last. At rst blush, this may seem confusing, but it makes sense when you
remember that the call held the longest goes rst to air.
Page 13

USER OPERATION
Hold Button
Holds a call that is ringing, on the handset, or on-air. When PROMPTED HOLD / DROP mode is enabled and if
more than one line is active, there will be a small hold icon near the status icon on the lines that could be held. Press
the line that you want to hold. If PROMPTED HOLD / DROP mode is disabled, all unlocked active lines will be held.
When a call is on hold, the caller will be able to hear the Program On Hold that is sent to the POH input of the
system. Selecting that line for air or picking up the handset and selecting the line will take the call out of hold.
Drop Button
This button drops a call that is active in the handset, or unlocked on-air. When PROMPTED HOLD / DROP is
enabled, there will be a small drop icon next to the status icon on the lines that are unlocked and could be dropped.
If this mode is disabled, all unlocked active lines will be dropped.
Lock
Normally, taking a call to air causes any others on-air to be dropped. If you need to conference two or more calls,
you can use the lock function. Press an already on-air line button to lock it. The line status icon will change to
display the locked symbol. Pressing the button again unlocks the line and the lock icon goes away. Locked calls
remain on-air until they are unlocked. The Drop and Hold buttons have no effect on a locked line.
SECTION 4
| 9
Next Button
In Talent mode, this button puts the “next” call on the air. The Talent NEXT priority is as follows:
1. Longest waiting ready/screened hold
2. Longest waiting hold
3. Longest ringing-in
The Producer can manually override these and assign priority as desired. In Producer mode, this button takes the
“next” ringing call. So the Producer NEXT priority is the line that has been ringing in the longest. In Producer
mode, NEXT does not take any held lines.
Block All
Pressing this button will cause all inactive and ringing lines to be dropped and blocked from handling any calls.
Calls on-air, on the handset, on hold and the fixed lines will not be affected. The usual application for this function
is to let you prevent early callers from getting in on contests until after you’ve made the announcement and released
the lines to accept calls.
HOT TIP:
As you may know, there have been several lawsuits regarding the “fairness” of radio contests. By
consistently activating the Busy All feature before announcing a contest, your sta will reduce the
liability for the station.
Page 14

USER OPERATION
When block all mode is selected, as lines become available, they will automatically “go busy”.
Pressing Block All again will release the lines and allow incoming and outgoing calls.
When Block All is active, a small letter ‘B’ will appear in the upper right hand corner of the main screen.
Note:
Block All will aect any lines that are shared between studios. So if a you are seeing a blocked
line on a VSet that is not in Block All mode, odds are there is a studio in the building that has
Block All active.
Numeric Keypad and the GO Button
This section is used for dialing out either on the handset or on air. The VSet operates differently depending on
which system it is connected to.
PRO TIP:
The DTMF “Touch Tones” used by telephones can be easily decoded. When dialing on the air, do not
enter private numbers or passwords without rst turning o the hybrid’s audio on your console or
this private information will be broadcast.
SECTION 4
| 10
Hx6 & iQ6
When the VSet is used with the Hx6 or the iQ6, the VSet will operate like a normal POTS phone. When a line is
selected for air or the handset is lifted and a line selected, dial tone will be heard. When a number is dialed it will be
dialed in real time with DTMF tones.
When the last digit is entered, you will either hear ring-back, busy, or re-order tone (Or dead air followed by the
operator error message if you didn’t enter enough correct digits.) Hopefully, if you hear ring-back tone, it doesn’t
last for too long and the correct party answers. On with the show!
VX Engine
When the VSet is used with the VX Engine, the VSet will operate like a VoIP phone and ENBLOC dialing is used.
When a line is selected, no dial tone is heard and the line will not be seized until the call is executed.
While a number is being composed, the digits will appear in the line info field. During this time, the selected line
is blocked and all other VSets on the network will display the Line as ‘in-use’ to avoid glare and unwanted interruptions.
After a number is entered, the GO button initiates the connection, similar to a cell-phone. After pressing the GO
button, you will not hear any DTMF tones, just a short pause and your call will be completed, presuming you
entered the correct digits.
When the handset is used to make a call, dial tone and DTMF tones will be heard, but the call will not be executed
until the GO button is pressed.
Page 15

USER OPERATION
With ENBLOC dialing, you have the opportunity to correct any dialing mistakes by using the backspace soft key
and correcting the number before executing the call. The keypad works during an active call to generate DTMF
tones for use with voice mail, automated attendants, and being obnoxious on the air.
Take it Easy
We’ve built a lot of flexibility into the VX system to support all the sophisticated things you might want to do. But
you don’t have to use all the fancy-pants stuff when you don’t need it
and a simpler subset will do.
In the simplest case, when you are a talent supported by a producer, you could just use the NEXT and DROP
buttons. You press the NEXT button to take calls in the sequence determined by your producer and you press the
DROP button when you are finished with your last call and you want to stop taking more.
SECTION 4
CURIOSITY NOTE:
We don’t know why the condition of picking up a line which was about to ring and getting an
incoming call instead of dial tone is called “Glare.” Perhaps it’s because of the looks air sta give
engineers when this happens too often! If you nd out, be sure to let us know.
| 11
One step up would have you pressing the right column Line buttons to select the calls you want, one at a time.
Again, when you are finished taking calls, you would press DROP. You could use the left column Line buttons to talk
with callers on the handset.
At the next level, you would use either the Lock function or the fixed line capability to conference calls.
Page 16

SECTION 5
| 12
5
Menu Button
Pressing the Menu Button sends you to the main menu screen. This is where you will find all of the features and
functions that do not appear on the main screen because they will not be used as often. After pressing the Menu
Button, the menu screen will appear on the display with a set of soft key functions.
When selecting items from the Menu Screen, you can use the corresponding on-air Line
Buttons or you can navigate the menu using the soft keys.
If you are using the VSet 6, only half of this menu will be visible at a time. You can scroll
through the menu with the soft keys or select the “more” option next to its corresponding
Line Button.
Mode
This item toggles between Talent and Producer mode. When the VSet is in Producer mode, a small ‘P’ will appear
in the upper right hand corner of the Home screen. For more info on the Mode settings, please refer to the User
Operation Chapter of this manual.
Select Show
This item allows you to recall a show configuration that has been set up and stored within the VX Engine. Because
they are single show systems, there is no show preset function with the Hx6 and iQ6. For more info about setting
up a show, please consult the VX Engine Manual.
Mute Ringer (Master)
Enable this function if you do not want any ringers to sound when there is an incoming call on the line. It is recommended that this setting be enabled because VSets usually live in places where there may be live microphones, such
as studios, editing bays, etc.
When the master ringer is muted, there will be a small ‘M’ in the upper right hand corner of the Home Screen on all
VSets in the system.
Page 17
MENU BUTTON
Setup Menu
SECTION 5 | 13
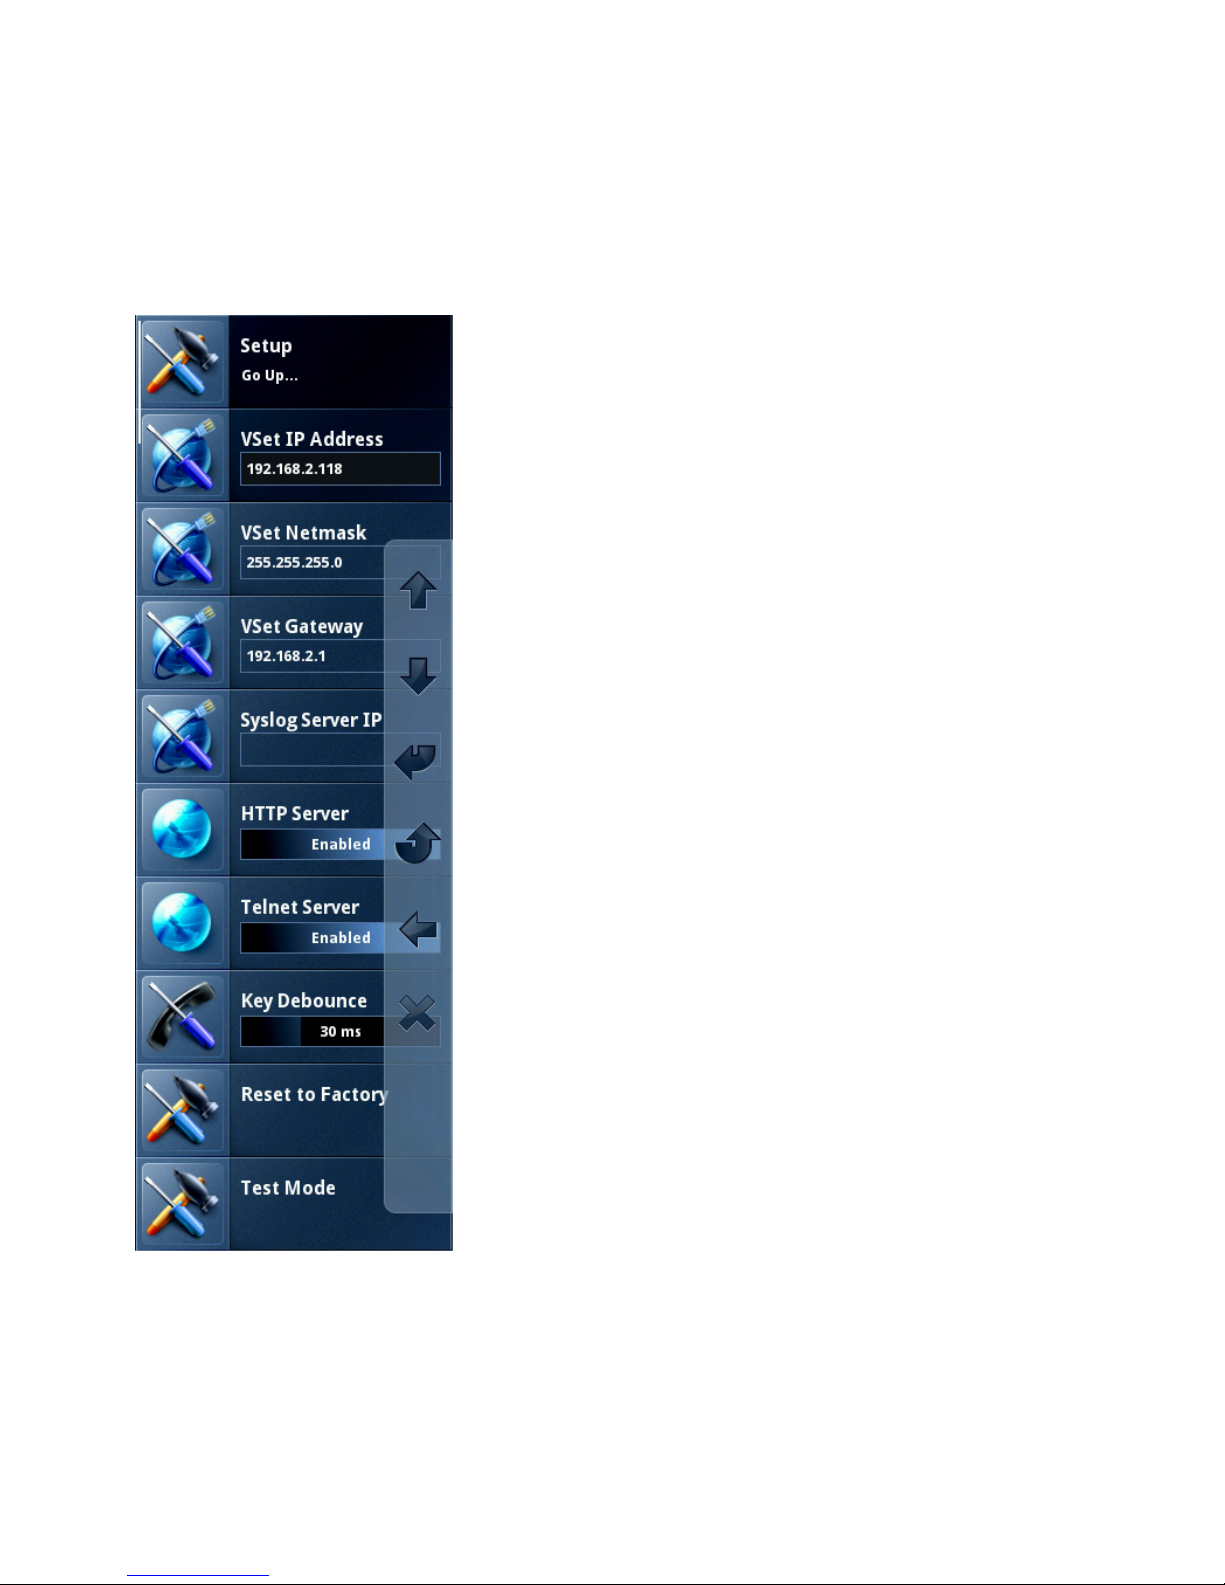
Here is where all of the network settings regarding the VSet reside. There is
a trick you need to know in order to change any of these settings. Within the
main menu, you must press and hold the On-Air line button next to Setup for 5
seconds and release.
If you don’t do this, the VSet will only allow you to read these parameters. We do
this so you can keep tinkerers out of the network setup and this keeps you (the
engineer) from having to reset them. So keep this a secret.
HTTP Server
Enabling the HTTP Server function allows you to access the VSet’s web GUI from
any computer connected to the network by typing the VSet’s IP address into a
web browser. If you don’t want to allow people to access the web GUI to make
changes, disable this function. More on this later.
Telnet Server
Enabling the Telnet Server function allows you to access the VSet using telnet
services such as Pathfinder or Putty for control and diagnostics. Disable this if
your Studio does not use Pathfinder for control automation.
Key Debounce
All small mechanical switches exhibit something called hysteresis. When this
happens, the VSet may sense multiple presses when a button is only pressed one
time. The Debounce function reduces hysteresis by ignoring input that happens
faster than the setting in the field, in this case, 30 milliseconds.
Reset to Factory
This does exactly what you think it might. Once you select this option, there is
no turning back. All parameters will have to be reset. Use this as a last resort.
Test Mode
This is an advanced diagnostic system for advanced users.
Page 18
MENU BUTTON
Engine Setup Menu
SECTION 5 | 14
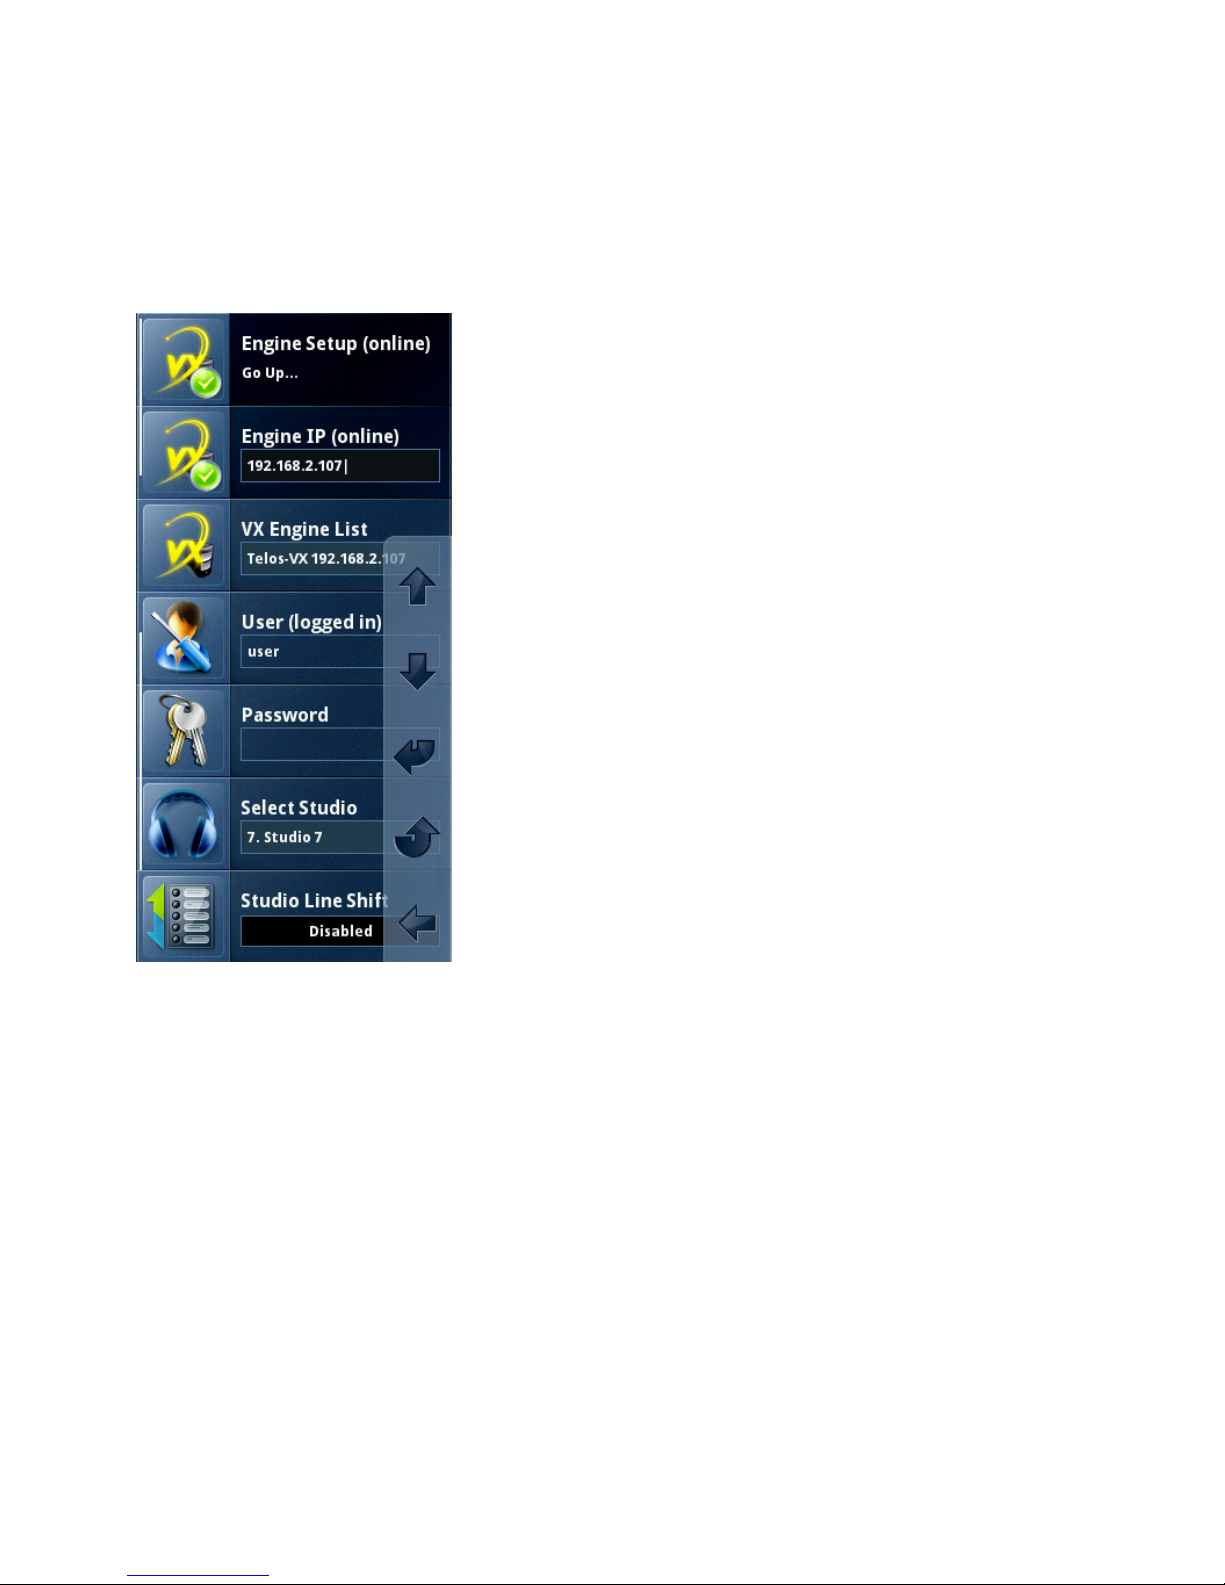
Here is where you will find all of the settings regarding the Telos system to which
you want the VSet to communicate. After initial setup, there will be very few
adjustments you may need to make to these settings and there is a trick you need
to know in order to change them. Within the main menu, you must press and
hold the On-Air line button next to Engine Setup for 5 seconds and release.
If you don’t do this, the VSet will only allow you to read these parameters. We
do this so you can keep tinkerers out of the engine setup and this keeps you (the
engineer) from having to reset them. So keep this a secret.
Engine IP
Use this input field to tell the VSet with which Telos system to work. If there
are multiple Talkshow Systems on the network (iQ6, Hx6, or VX Engine), you
can manually dial the IP for the system you want into this field. Once the IP is
entered, the GO button or the Enter soft key will commit this IP and you will see
the VSet react.
VX Engine List
If you just can’t remember the IP addresses of all the talkshow systems on your
network, not to worry. When this menu item is selected, the VSet will display all
of the compatible Talkshow Systems that are available on the network with their
IP addresses. Select a system by using the soft keys or by pressing the On-Air Line
Button next to the system to which you wish to connect.
User and Password
The VSet needs to log itself into the system in order to communicate. In these two fields you will enter the user
name and password for the Talkshow system to which you want the VSet to connect. The factory default is User:
user Password: <leave this blank> To change the user name and password, please refer to the manual for the
talkshow system with which you are working.
Select Studio
Use this item to select the Studio for the VSet. Hx6 and iQ6 is only capable of handling one Studio. For info on
setting up a Studio, please refer to the VX Engine Manual.
Studio Line Shift
If you have more lines available than you have Line Buttons on the VSet, you can offset the display by the number of
buttons available to allow access to those other lines.
Page 19
MENU BUTTON
User Preferences Menu
SECTION 5 | 15
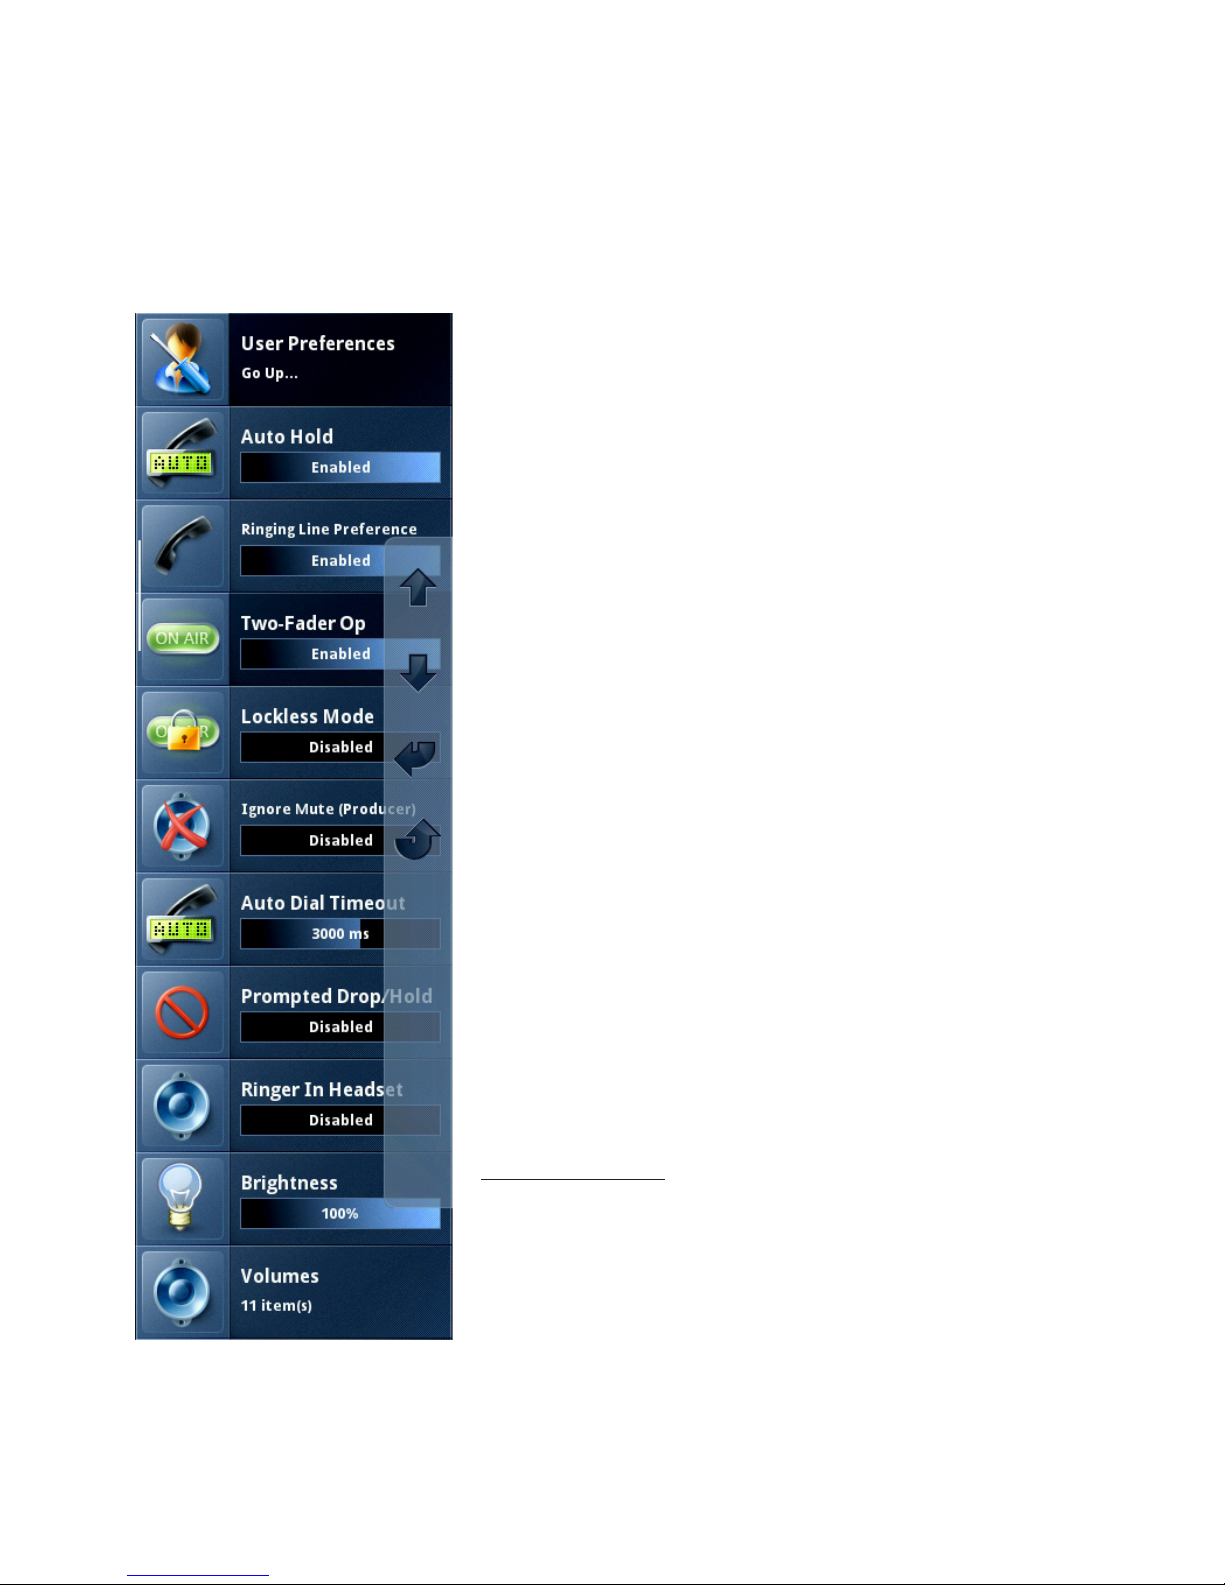
Within this menu you will find parameters that dictate how the VSet will
operate. There is no long pressing involved in being able to change settings
within this menu set.
Auto Hold
This menu item enables or disables the Auto Hold function on your hybrid.
When it is enabled, there will be a small “H” in the upper right hand corner of the
main display. A call will automatically be answered and placed on hold by the
hybrid. When a call comes in, the caller will hear POH until the call is picked up.
When Auto Hold is disabled, the incoming call will ring in as usual.
Ringing Line Preference
With this enabled, incoming calls will be automatically taken and sent to the
handset when the handset is lifted from the cradle. With this function disabled,
the VSet will wait for you to select a line from the handset Line column before
taking an incoming call.
Two Fader Op
This feature allows you to assign calls to Fader 1 or 2 from the line buttons in
addition to the soft keys. One push of an On-Air Line Button sends the call to
Fader 1. The second push sends the call to Fader 2. The Third push locks the call.
When this function is disabled, calls can only be switched from the soft keys.
Lockless Mode
This feature turns off the Call Lock function to allow the VSet’s On-Air Line
Buttons to operate more like an office phone. With this function enabled, you
will be able to seize and drop calls from the Line Buttons instead of using the
Drop button.
Be careful with this one!
With Two Fader Op and Lockless Mode disabled, an on-air call is locked with the
second push of the Line Button. With Lockless Mode enabled, an on-air call will
be dropped with the second push of the Line Button. So if you have On-Airs who
are used to office phones, use this feature. If you have On-Airs who are used to
the Telos Desktop Director, do not use this feature. You have been warned!
Ignore Mute (Producer)
Enable this function if you want the local VSet (the one in front of you) to ring. This will over-ride the Mute
Ringer function, if it is enabled, in producer mode only. The VSet will stay muted in Talent Mode, providing the
Mute Ringer function from the Main Menu is enabled.
Page 20

MENU BUTTON
Auto Dial Timeout
When dialing using ENBLOC (remember the GO Button), the number dialed will automatically dial after the
specified amount of time if the GO Button is not pressed. When this function is set to Disabled, the VSet will wait
until the GO button is pressed before executing a call. If you are using the VSet with an iQ6 or Hx6, you are not
using ENBLOC dialing and therefore this feature does not apply.
Prompted Drop/Hold
With this function enabled, the VSet will display an action prompt
when two or more calls are unlocked and the Drop or Hold button is
pressed. It will then wait for you to select the call with its corresponding Line Button before executing.
Disable this function if you want all unlocked calls to be affected at
once when the Drop or Hold button is pressed.
Ringer In Headset
Enable this function if you are using a headset with the VSet and you wish to hear an alert in the earpiece when a
call comes in.
SECTION 5 | 16
Brightness
This item allows you to control the brightness of the display. Use the + and – soft keys to adjust.
Volumes
This item takes you to the Volumes Menu where all of the volume controls for the VSet can be found.
Page 21
MENU BUTTON
Address Book
SECTION 5 | 17
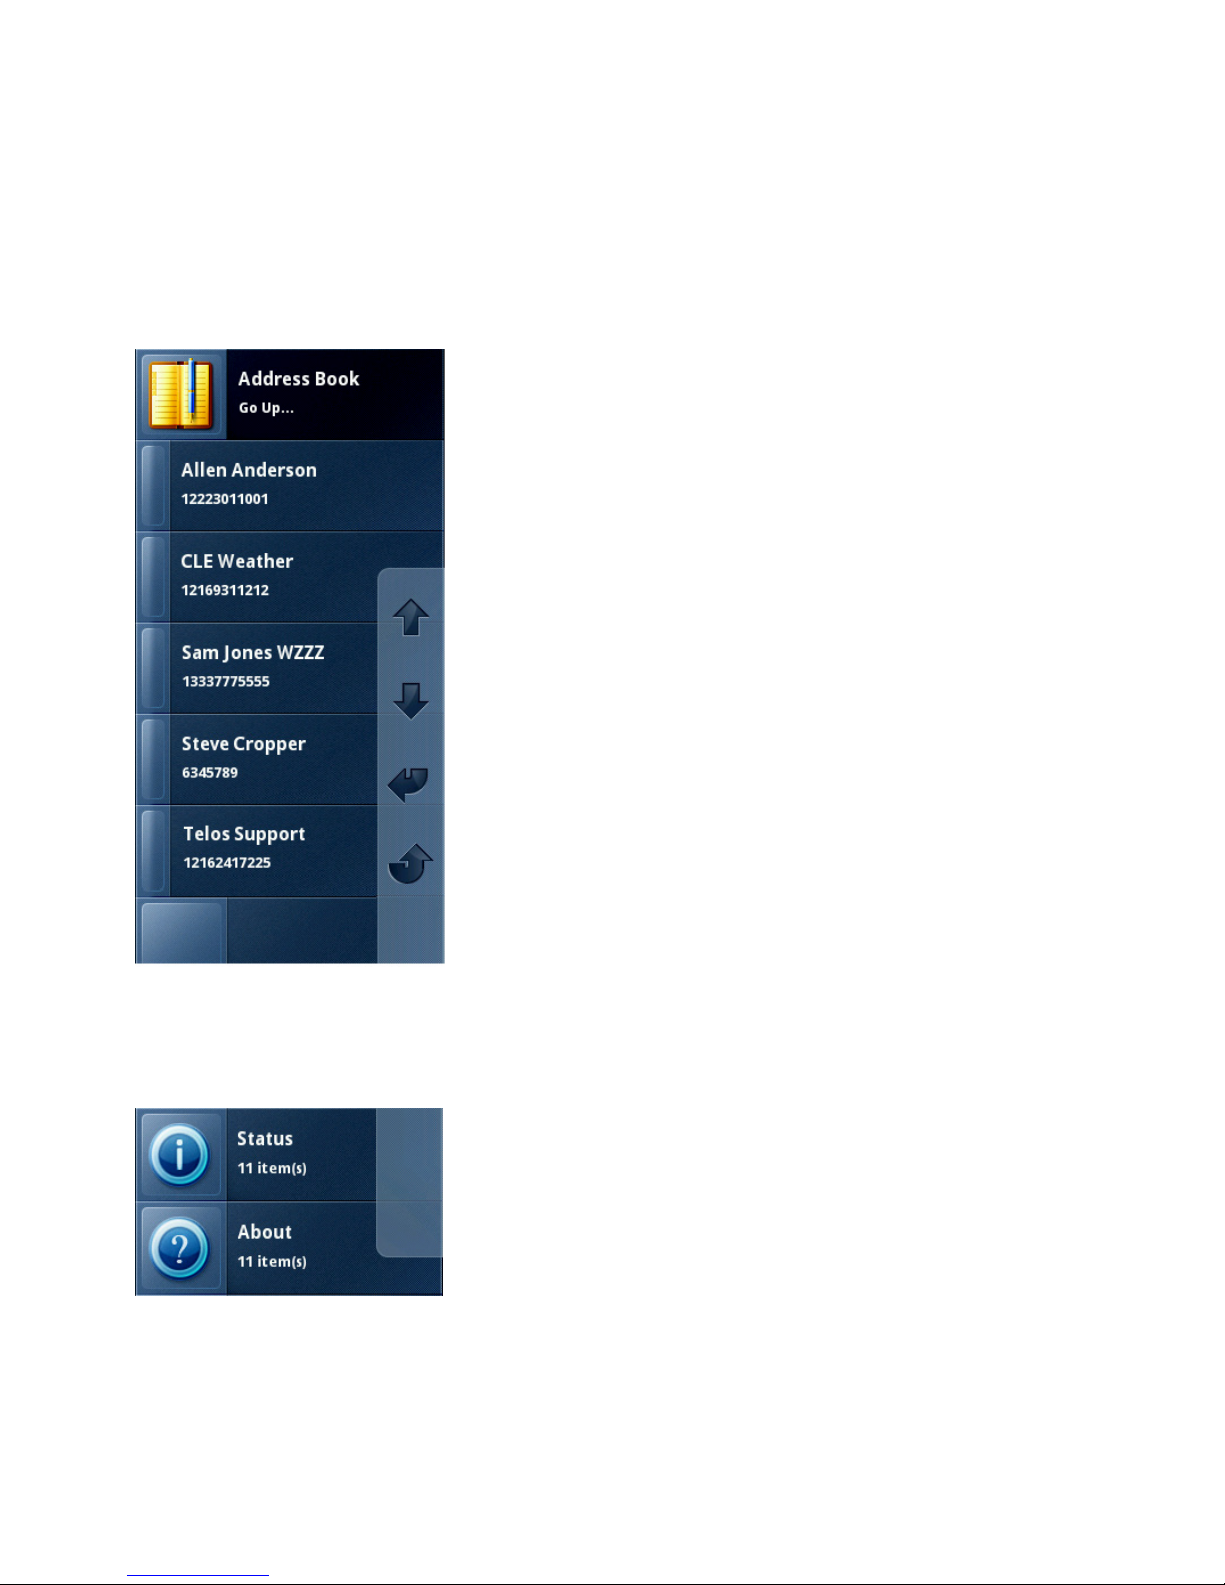
The Address Book menu in the VSet is pretty straight-forward. What you see is
what you get. If the Phone Book section of the hybrid /VX Engine is set up, you
will see a list of names along with their corresponding phone numbers.
If you want to dial a number from the Address Book, select the contact using the
soft keys and execute the call using the Enter soft key.
This can also be done by simply pressing the On-Air Line Button next to the
contact you wish to dial.
In Talent Mode, the selected contact will be sent to Air, while in Producer Mode,
the selected contact will be sent to the handset.
Adding and removing contacts is done on the talkshow system’s web GUI because
the Address Book database lives inside the hybrid / VX Engine. This is done so
that if you have to change a contact in the phone book, you will only have to do
it once and all VSets will stay up-to-date. Refer to the phone book section of the
manual to your hybrid / VX Engine for instructions on adding and removing
contacts.
Status and About
These two menu items will display information about the local VSet, that’s the one
in front of you.
The Status Screen will tell you things that are happening inside your VSet in real
time. This screen can be used for diagnostics and general information about your
VSet’s behavior on the network.
The About Screen is the about screen. It tells you about the VSet, software, Telos, etc.
Give it a look.
Page 22
SECTION 6
| 18
6
Web Graphical User Interface
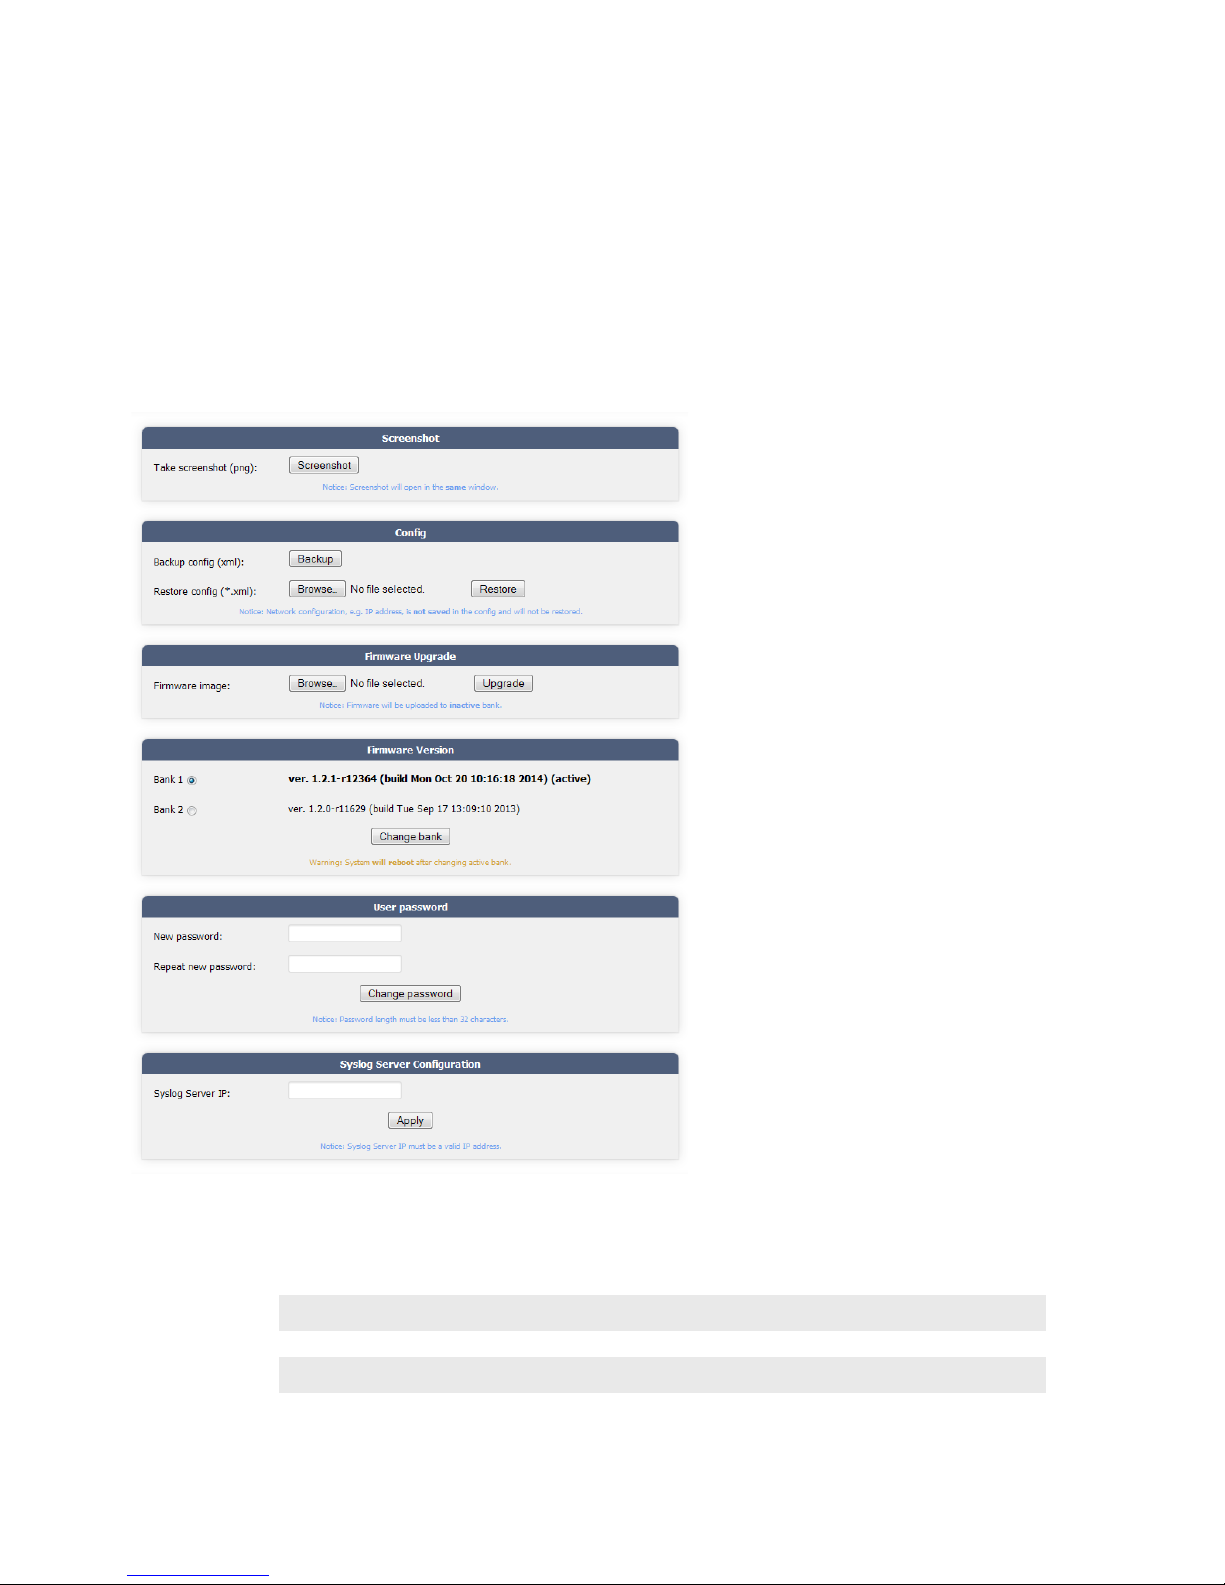
The Web GUI can be viewed with a browser on a
computer on the same network as the VSet and
its hybrid / VX Engine.
With HTTP Server enabled on the VSet, key the
IP address of the VSet into a web browser and you
will be asked to log into the VSet.
The Default login is:
User Name: user
Password:
Screenshot
This button will load the current VSet display
onto the browser for troubleshooting and
diagnostics. Just copy and paste.
Cong
Use this function to backup the configuration of
the VSet. This makes it easy to reload settings
into the VSet if it happens to forget what it’s
supposed to do, or if you replace the VSet.
Once the VSet is all set and ready to go, click
the Backup Button. This will allow you to save
an XML file to your computer. To load a configuration file, click the Browse button and select
the appropriate XML file. The file will display
in the config section to confirm. Once you have
confirmed the file, click Restore.
Note:
The network conguration, i.e. IP address and net mask, will not be saved in the cong le, therefore cannot be restored. You will have to enter those manually using the steps in the Installation
chapter of this manual.
Page 23

WEB GRAPHICAL USER INTERFACE
Firmware Upgrade and Version
The time may come to update the firmware inside the VSet. Firmware updates fix problems that may exist and
improve on functionality in general.
The first step is to get the new firmware onto your PC. This will usually de via a download from the Telos website or
an email attachment from Telos customer support. The file will have the extension *.vspk. When the firmware is
available on you PC, click the Browse Button to locate it, and then click Upgrade to load it into the inactive bank on
the VSet.
Once the software loads into the VSet, it is now necessary to reboot the VSet into the new firmware. To do this,
click on the inactive bank’s radio button in the Firmware Version section of the GUI, and after confirming that this
bank has the new firmware on it, click Change Bank.
The VSet will reboot and when it comes back to life, it will be running the new firmware. To verify, you can look at
the very top of the GUI and read the software version and build date. If you are still not convinced, you can press
the Menu Button on the VSet and navigate to the About Screen.
IMPORTANT:
DO NOT run the software on your computer. The software is meant to run on the VSet. So if you
have your browser set to automatically run downloaded les, turn it o for this process.
SECTION 6
| 19
User Password
Here is where you will enter and confirm a new password for the web GUI. The default is no password, blank. All
current Telos default passwords are blank. So if a new password is created, you must remember it, or else you will
not be able to log back into the GUI.
If the password is changed and forgotten, it can be reset to blank by resetting the VSet to factory defaults. To do
this navigate to Menu / Setup (hold for 5 seconds) / Reset to Factory. For more information on resetting factory
defaults, please refer to the Setup Menu section of this manual.
Syslog Server Conguration
The VSet will communicate to a network logging system or a Syslog. If your studio network has a Syslog server and
you want the VSet to appear in the logs, enter its IP address here.
Page 24
SECTION 7
| 20
7
VX Producer
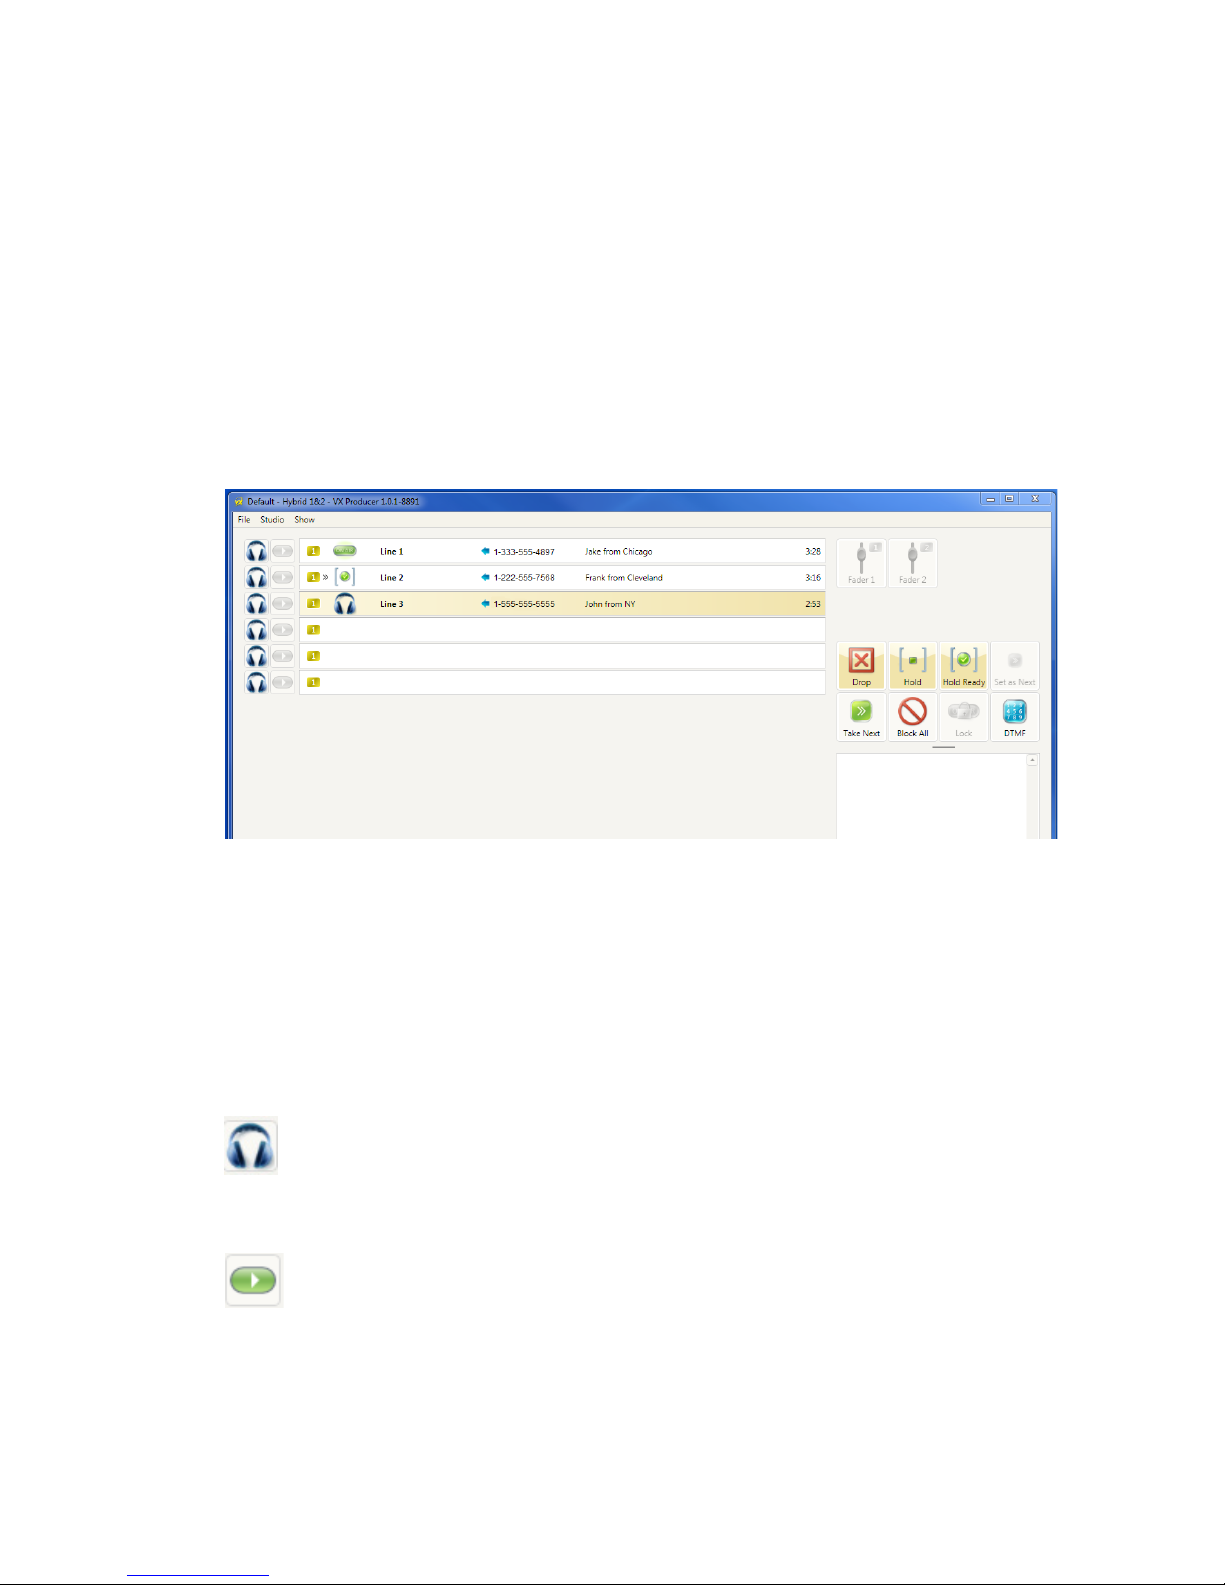
VX Producer can be downloaded from The Telos Alliance website and will turn your computer into a call screener
and a basic call controller. This is the perfect tool to compliment the VSet. Don’t those controls look familiar?
File / Connect will allow you to connect to any iQ6, Hx6, or VX Engine on the same network as the computer.
File / Settings allows you to select the Mode of VX Producer. The same rules apply to VX Producer as they do
to the VSet regarding Talent and Producer Modes. Also in this section, you will find the audio input and output
configuration tab.
VX Producer has all of the same call directing functions as the VSet plus a few more features that can be useful to a
call screener such as a comment input field. Double click in the area next to the phone number and you can key in a
short message that will be visible on the VSet. This is helpful if the host wants information about the caller before
taking the call. Other features include the ability to record, but we won’t be discussing that here.
Clicking the Headphone icon next to a line row will seize the corresponding line and send it to the output on your
computer chosen in the aforementioned settings dialog.
Clicking the Play icon (in Talent Mode) next to a line row will seize the corresponding line and send it to Air.
All the other basic call functions on the main screen are identical to the functions on the VSet so if you have read the
previous chapters, you should be fine.
Page 25

SECTION 8
| 21
8
It happens to everyone. Sometimes equipment just won’t behave. In some cases, the equipment might need to be sent
in for repair. In other cases, something else is amiss and is disguising itself as a malfunction. Here is a list of things to
consider before contacting Technical Support.
Problem: Remedy:
VSet is not responding.
Screen is dark and blank.
VSet is not responding.
Screen is on (white) and blank
I can’t change the VSet IP, network or Engine
congurations. The information is greyed out
and is inaccessible.
The VSet is on the network but won’t talk to the
Hybrid / VXEngine.
Some Lines are Blocked and Block All is not
active.
I can take and make calls from the Handset, but I
can’t put calls on the air.
I dialed a number and nothing happened. If you are using the VXEngine, calls are handled with ENBLOC Dialing. Press
Calls are being initiated before I can nish
dialing all the digits.
When I pick up the handset to take a call that is
on hold, a ringing line is picked up instead.
Calls are dropping instead of locking. Lockless Mode is enabled.
Troubleshooting…
Check that the VSet is connected to a network switch with PoE or that the
PoE injector is connected properly.
Power cycle the VSet and wait several minutes. If no change, then the
rmware is corrupt or the unit is bricked.
Contact Technical Support for repair.
Go back to the Main Menu and hold down the button for “Setup” or
“VXEngine Setup” for 5 seconds and release.
Check the condition of the hybrid/engine and conrm that both the VSet
and the Talkshow system are on the same subnet.
Also, make sure that the Engine / Hybrid IP is correct within the VSet
“VXEngine Setup”
Block All is active in another studio. Find a VSet on the network that is
in Block All (small ‘B’ in the upper left corner of the home screen) and
deactivate Block All.
The VSet is in Producer Mode. Switch the VSet to Talent Mode.
the GO button after the last digit is dialed.
--OR--
Set the Auto Dial Timeout in the Preferences Menu to a reasonable time.
Set the Auto Dial Timeout in the Preferences Menu to a longer duration.
Ringing line preference is enabled.
Go to Menu / Preferences / Ringing Line Preference and disable it.
Menu / Preferenes / Lockless Mode
Page 26
SECTION 9
| 22
9
User Reference
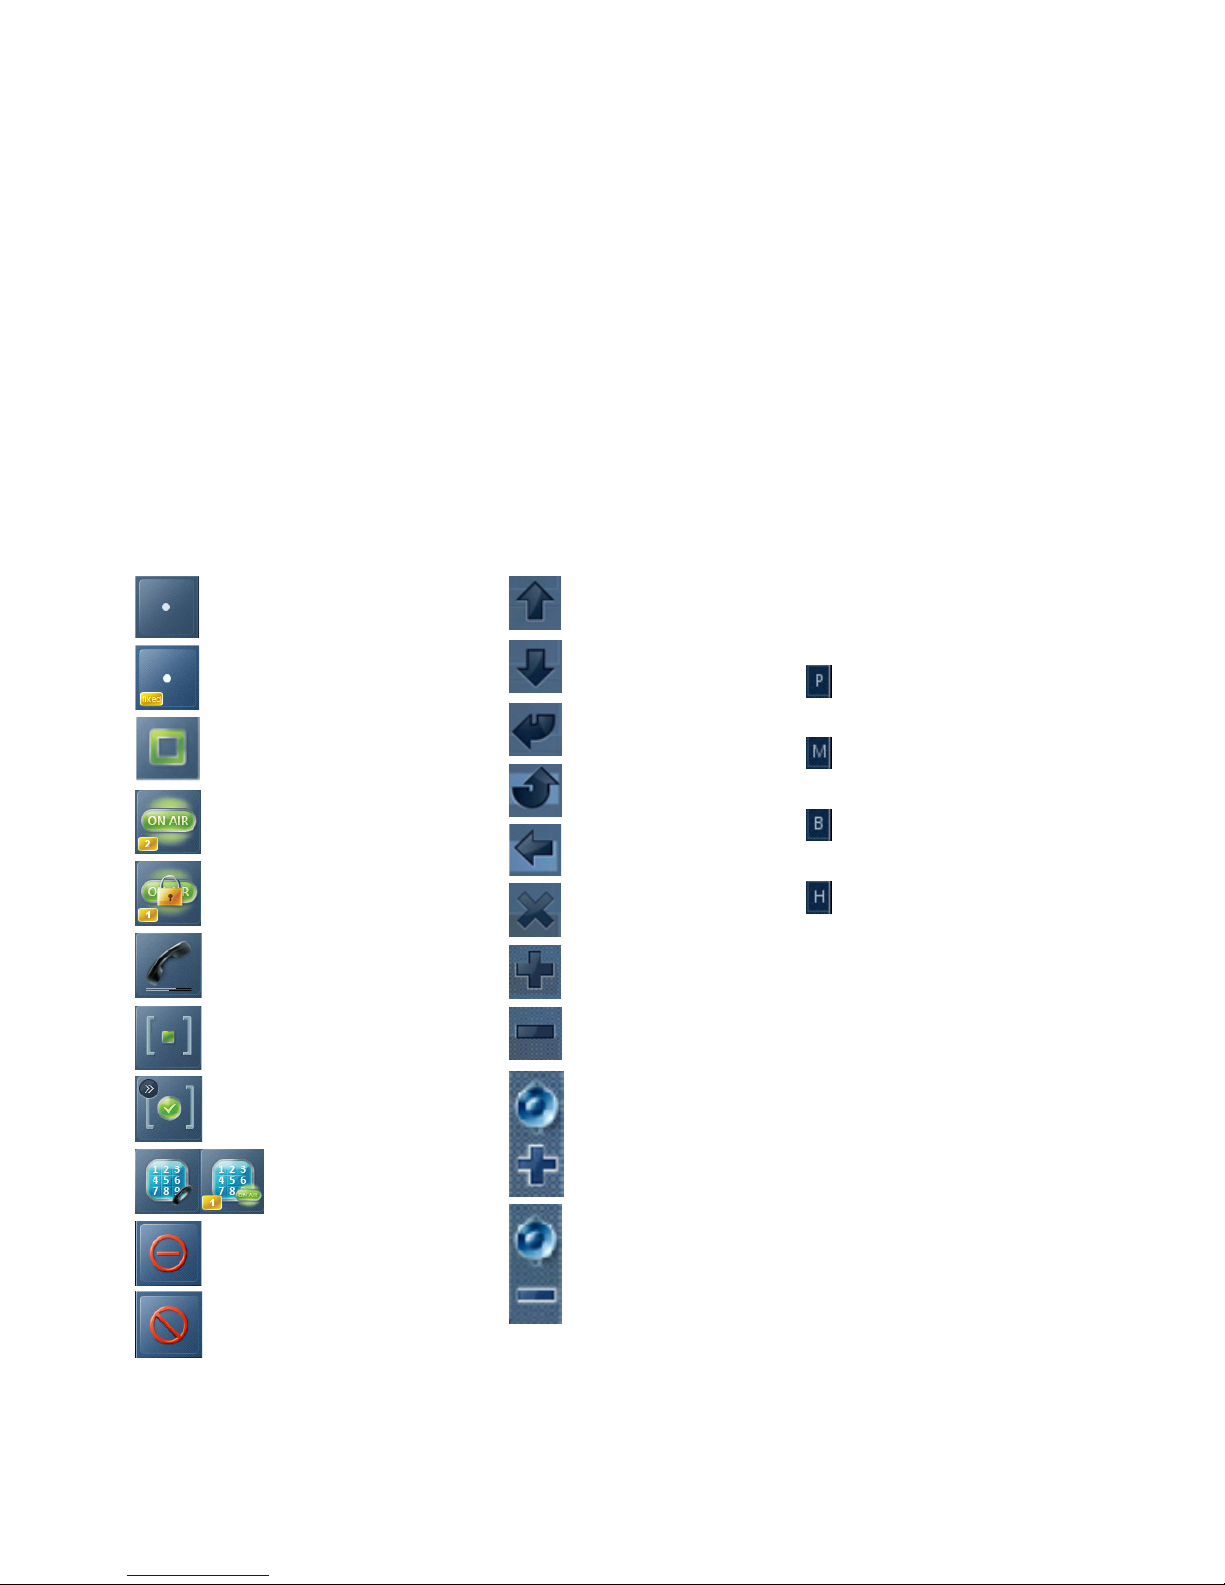
Legend of Symbols
Line Status Symbols
Ready
Ready & Fixed (line n to hybrid n)
Ringing
Line is On-Air (Fader #2)
Line is Locked On-Air (Fader #1)
Active in Handset
Soft Key Functions
Navigate Up
Navigate Down
Return / Enter
Go back one menu
Backspace
Delete
Adjust Up
VSet Status Symbols
These symbols will appear in the upper right
hand corner of the main screen of the VSet:
VSet is in Producer Mode
System Master Ringer Mute is On
Block All is active
System is in Auto Hold
Line is on Hold
On Screened Hold (Next in cue)
Ready for ENBLOC dialing
Line is active elsewhere
Line is Blocked (See Block All)
Adjust Down
Handset Volume Up
Handset Volume Down
Page 27

USER REFERENCE
System Specications
The VSet is designed to work with all VX products, the Hx6, and the iQ6. The VSet will NOT work with Nx family,
Telos One family, Telos Two family, 2101, Hx1 and Hx2.
Default IP Addresses:
VX Engine IP: 192.168.2.107
Hx6 IP: 192.168.2.200
iQ6: 192.168.2.200
Default Login:
User Name: user
Password:
These defaults can be changed within the VX Engine / Hybrid please refer to the manual for your system.
SECTION 9
| 23
VSet GUI Access
IP Address:
On the VSet, navigate to Menu / Setup and read the VSet IP address field.
Default Login:
User Name: user
Password:
VSet Ethernet Specications
Network Addresses and Subnet Mask
Readable on the VSet. Navagate to Menu / Setup.
TCP/IP port:
20514
PoE Power Consumption:
15.4 watts
Page 28

USER REFERENCE
SECTION 9
Use this page to list things like IP addresses, phone numbers, usernames, passwords, serial numbers, etc.
| 24
Page 29

Telos Alliance Limited Warranty
This Warranty covers “the Products,” which are defined as the various audio equipment, parts, software and accessories
manufactured, sold and/or distributed by or on behalf of TLS Corp. and its affiliated companies, collectively doing
business as The Telos Alliance (hereinafter “Telos”).
With the exception of software-only items, the Products are warranted to be free from defects in material and workmanship for a period of five (5) years from the date of receipt of such Product by the end-user (such date of receipt the
“Receipt Date”). Software-only items are warranted to be free from defects in material and workmanship for a period of
90 days from the Receipt Date. Telos will repair or replace (in its discretion) defective Products returned to Telos within
the warranty period, subject to the provisions and limitations set forth herein.
This warranty will be void if the Product: (i) has been subjected, directly or indirectly, to Acts of God, including (without
limitation) lightning strikes or resultant power surges; (ii) has been improperly installed or misused, including (without
limitation) the failure to use telephone and power line surge protection devices; (iii) has been damaged by accident or
neglect. As with all sensitive electronic equipment, to help prevent damage and or loss of data, we strongly recommend
the use of an uninterruptible power supply (UPS) with all of our Products. Telos products are to be used with registered
protective interface devices which satisfy regulatory requirements in their country of use.
This Warranty is void if the associated equipment was purchased or otherwise obtained through sales channels not
authorized by Telos.
WARRANTY
| 25
EXCEPT FOR THE ABOVE-STATED EXPRESS WARRANTY, TELOS MAKES NO WARRANTIES, EXPRESS OR
IMPLIED (INCLUDING IMPLIED WARRANTIES OF MERCHANTABILITY AND FITNESS FOR A PARTICULAR
PURPOSE).
In no event will Telos, its directors, officers, employees, agents, owners, consultants or advisors (its “Affiliates”), or
authorized dealers or their respective Affiliates, be liable for incidental or consequential damages, or for loss, damage, or
expense directly or indirectly arising from the use of any Product or the inability to use any Product either separately or in
combination with other equipment or materials, or from any other cause.
In order to invoke this Warranty, the Product must be registered via Telos’ website (found at: http://telosalliance.com/
legal/warranty) at time of receipt by end-user and notice of a warranty claim must be received by Telos within the above
stated warranty period and warranty coverage must be authorized by Telos. Contact may be made via email: support@
telosalliance.com or via telephone: (+1) 216-241-7225. If Telos authorizes the performance of warranty service, the
defective Product must be delivered to: Telos, 1241 Superior Avenue, Cleveland, Ohio 44114 or other company repair
center as may be specified by Telos at the time of claim.
Page 30

TELOS ALLIANCE LIMITED WARRANTY
Shipping Costs and Warranty Service:
If the date the customer’s notice of warranty claim is received by Telos (such date the “Warranty Claim Notice Date”)
is within the first 90 days following the Receipt Date, Telos will pay the costs of shipping such warranted Product to
and from the end user’s location, and the cost of repair or replacement of such warranted Product.
If the Warranty Claim Notice Date occurs after the first 90 days following the Receipt Date and before the end of
the second (2nd) year, the customer will pay the freight to return the warranted Product to Telos. Telos will then,
at its sole discretion, repair or replace the warranted Product and return it to the end user at Telos’ expense.
If the Warranty Claim Notice Date occurs between the end of the second (2nd) year following the Receipt Date
and the completion of the fifth (5th) year, the customer will pay the costs of shipping such warranted Product to
and from the end user’s location. Telos will then, in its sole discretion, repair or replace the warranted Product at
Telos’ expense. Telos also reserves the right, if it is not economically justifiable to repair the warranted Product, to
offer a replacement product of comparable performance and condition direct to the customer at a discounted price,
accepting the failed warranted Product as a trade-in.
The end user will in all cases be responsible for all duties and taxes associated with the shipment, return and
servicing of the warranted Product.
No distributor, dealer, or reseller of Telos products is authorized under any circumstances to extend, expand or
otherwise modify in any way the warranty provided by Telos, and any attempt to do so is null and void and shall not
be effective as against Telos or its Affiliates.
WARRANTY
| 26
Out of warranty units returned to the factory for repair may be subject to a $500 evaluation fee, which fee must be
prepaid prior to shipping the unit to Telos. If no repairs are required, the $500 fee will be retained by Telos as an
evaluation charge. If repairs are required, the $500 fee will be applied to the total cost of the repair.
Page 31

1241 Superior Ave. • Cleveland, Ohio, 44114, USA • +1.216.241.7225 • TelosAlliance.com
© 2015 TLS Corp., All Rights Reserved. C15/17006
 Loading...