

Page 1

Gator Watch
User Guide
www.telmenow.com
Page 2

1. Getting started...............................................................................................................1
1.1. Feature summary................................................................................................. 1
1.2. Activating your watch........................................................................................... 1
1.3. Charging the watch ............................................................................................. 2
1.4. Help and support ................................................................................................ 2
2. Watch controls.............................................................................................................. 3
2.1. Left edge button.................................................................................................... 3
2.2. Right edge buttons............................................................................................... 3
2.3. Analog clock display............................................................................................. 4
2.4. Digital clock display.............................................................................................. 4
3. How to use the watch....................................................................................................5
3.1. Install the app and register a new account .......................................................... 5
3.2. Register the watch in the app............................................................................... 6
3.3. Track and manage the watch with the app..........................................................7
3.3.1. Track the watch.......................................................................................... 7
3.3.2. Making Calls, Voice Monitor and Location History.................................... 8
3.4. Check alarm messages........................................................................................ 9
3.5. Manage settings................................................................................................. 10
3.5.1. Edit Profile................................................................................................ 11
3.5.2. Safe Zones............................................................................................... 12
3.5.3. Phone Numbers....................................................................................... 13
3.5.4. Voice Mail ............................................................................................... 13
3.5.5. System Setting......................................................................................... 14
Page 3

1
1. Getting started
1.1 Feature summary
The Gator Watch is UK’s coolest wearable mobile phone and tracker.
Features include:
• 2 way voice calls
• Calls to and from up to 10 predetermined numbers
• minute by minute location tracking using GPS, AGPS, LBS and Wifi
• SOS button which calls and alerts 3 emergency contacts
• safezone alarms
• water resistant body
• pedometer
• light weight at 40g
• watch functions
• USB charging and battery life of 4 days on standby
• Built in speaker and microphone
iOS and Android apps can be used to manage the watch settings, track its location and
communicate with the wearer. Please note that our app is currently listed under the name
Caref which is our software system. This will change to Gator soon.
1.2 Activating your watch
Before using your watch, you need to:
1. 1. Activate its data and voice communications by subscribing to a mobile service
plan (as you would with a mobile phone). You will be provided with a link to do this
when you receive your watch. Service activation will take up to 48 hours. You will
receive an email with a phone number for the Gator Watch once activated.
2. Charge the watch for at least 2 hours
3. Take the watch outdoors for a few minutes, where it can get the most accurate
initial GPS location.
Your watch comes with a SIM card which uses mobile coverage from 3 of the major
telecom companies (Vodafone, EE and O2) to minimize the ‘dead zones’. Your phone
can also be used abroad with free roaming in most of the EU.
Page 4
2
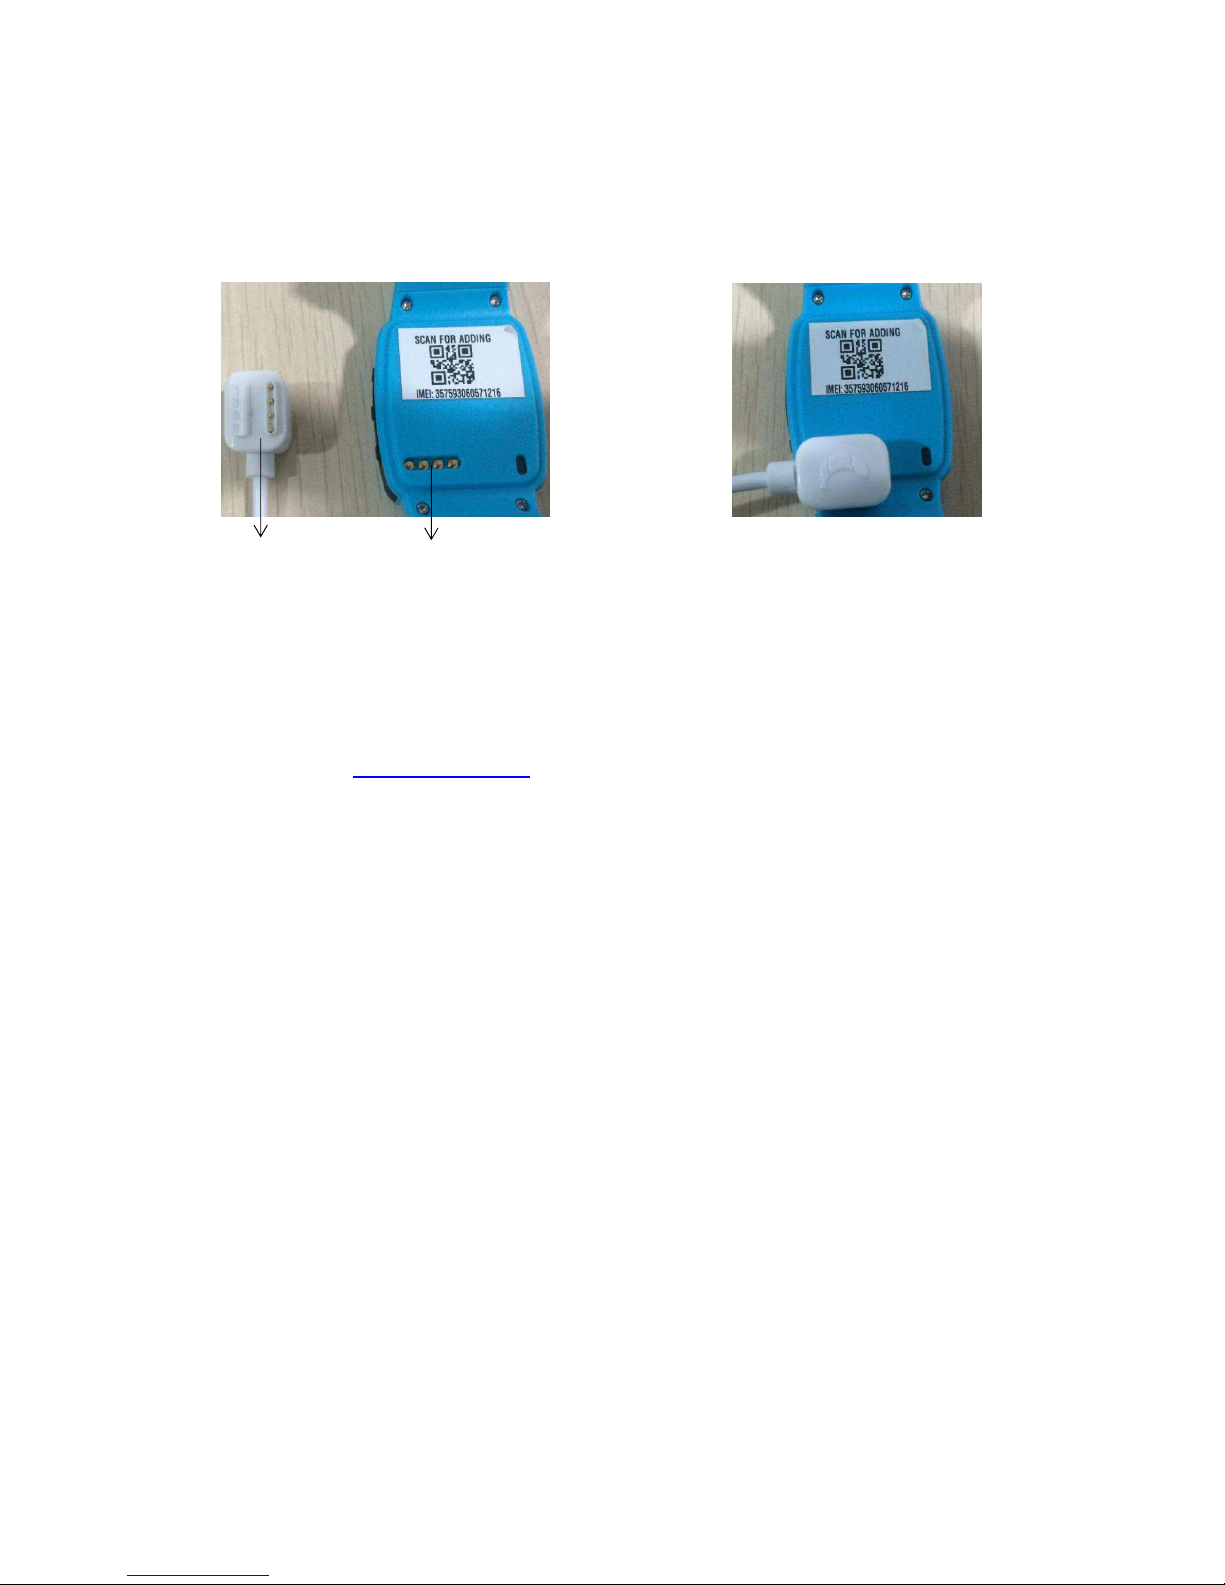
1.3 Charging the watch
Please use the magnetic charger included in the box to charge your Gator Watch.
Charging wire Charging port Charging
A full charge takes approx 2.5 hours. The charging icon showing the battery is fully charged
can only be seen when the watch is switched off.
1.4 Getting help
Please go to www.telmenow.com to find all the latest user guides and information.
You can also contact us by emailing [email protected], or by calling 0800 246 1939.
Page 5
3
2. Watch controls
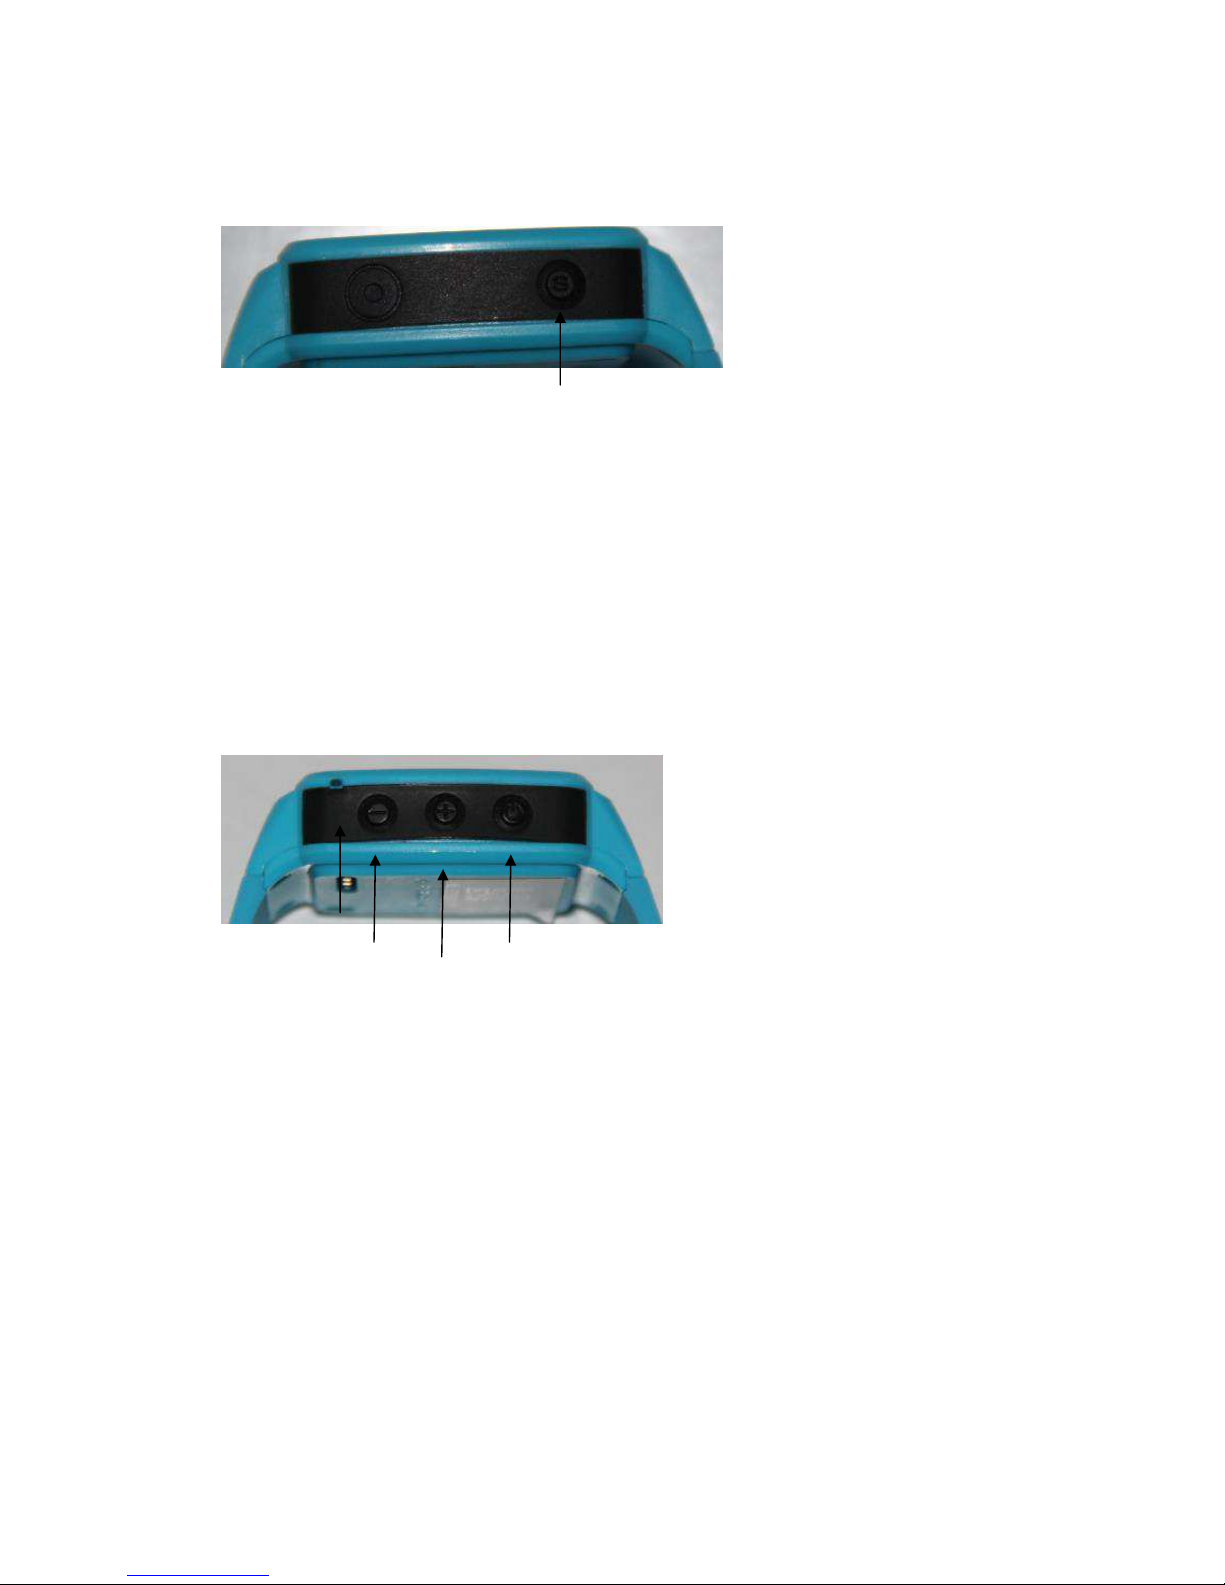
2.1 Left edge buttons
(1)
(1): SOS button
■ Short press to initiate the voice chat function. To record a voice message, press
the – button and release to send the voice message to the app.
■ Long press (for more than 3 seconds) to trigger the SOS emergency alarm. A red
“S” will be displayed on the watch screen to indicate that the alarm has been
activated. The watch then calls the 3 preset emergency numbers in turn, until
there is an answer. An alert will be shown on the app.
2.2 Right edge buttons
(1) (2) (3) (4)
(1) Microphone
(2) Volume (-)
■ Short press to answer an incoming call or decrease call volume
■ Long press to call to the second emergency phone number you have set in the app
(3) Volume (+)
■ Short press to answer an incoming call or increase call volume
■ Long press to call to the first emergency phone number you have set in the app
(4) ■ Short press to select the digital or analog clock display, name of the owner of the
watch or hang-up a phone call
■ Long press (for more than 3 seconds) to switch power on or off
Page 6
4
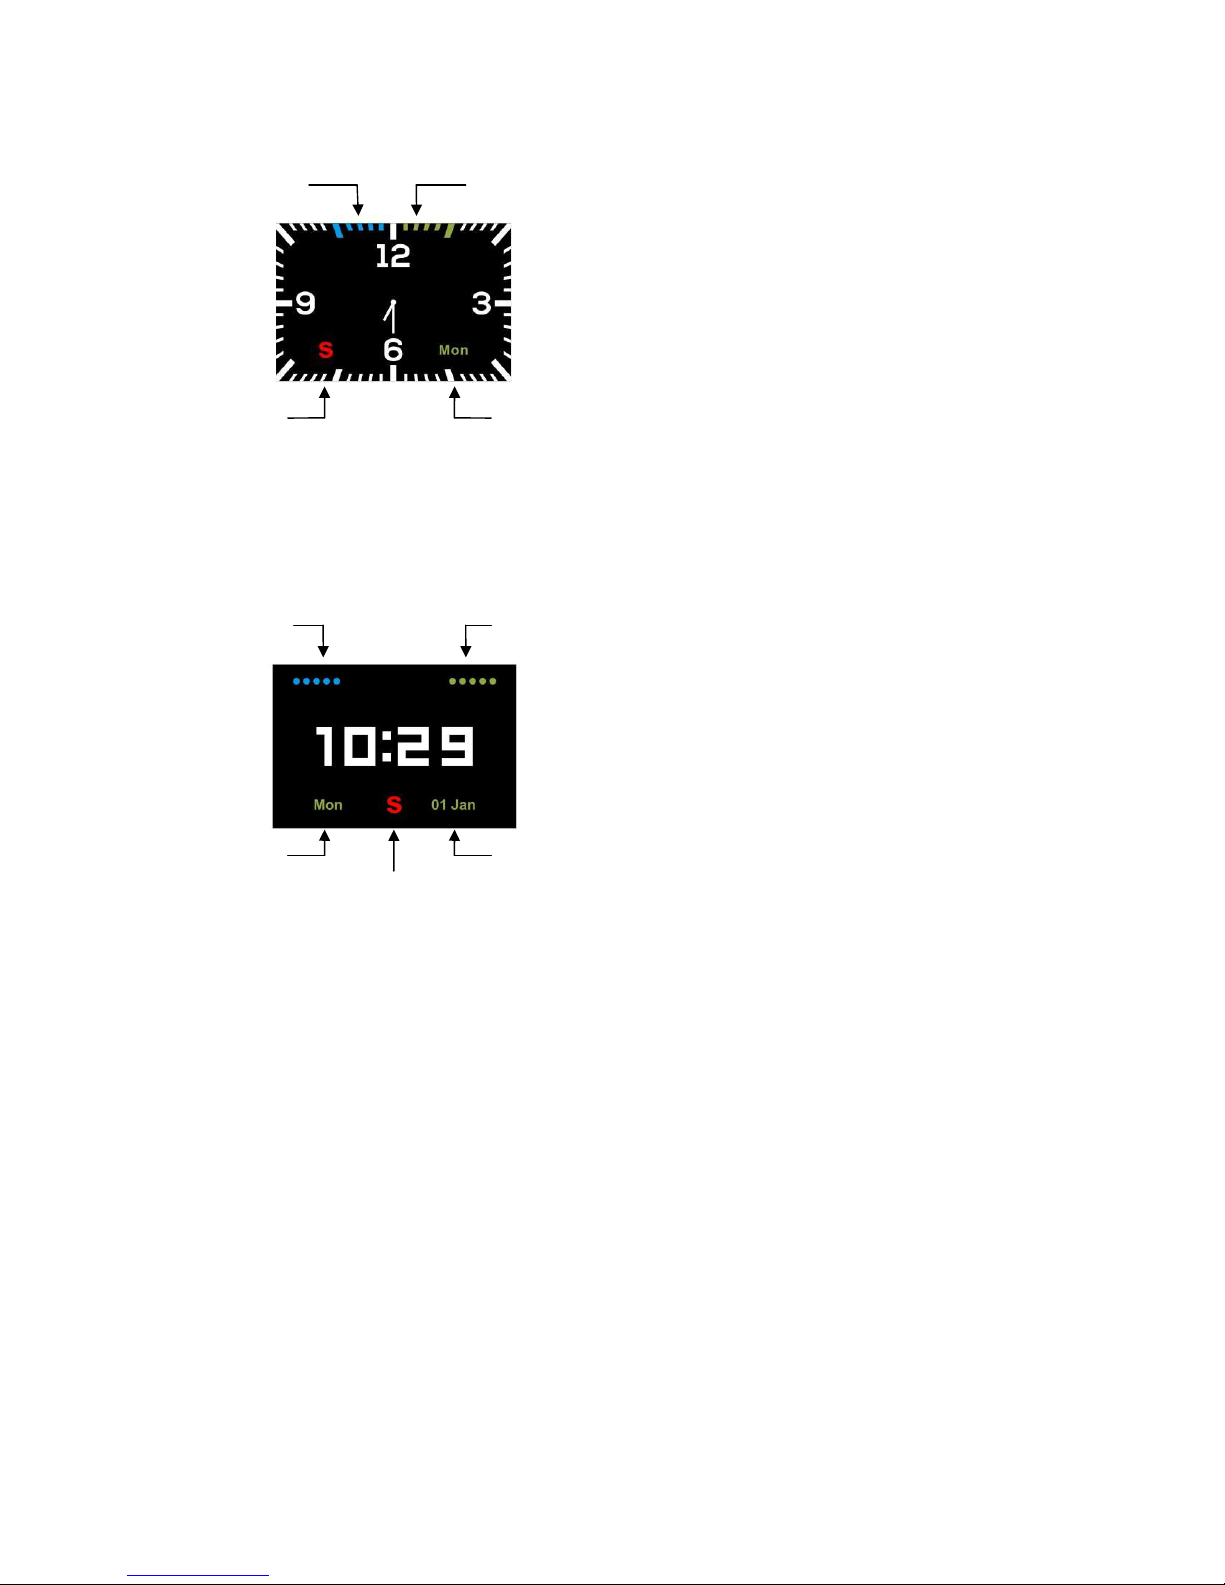
2.3 Analog clock display
(7) (8)
(9) (10)
(7) Mobile network signal indicator
(8) Battery power level indicator
(9) SOS emergency alarm activation indicator
(10) Day indicator
2.4 Digital clock display
(11) (12)
(13) (15)
(14)
(11) Mobile network signal indicator
(12) Battery power level indicator
(13) Day indicator
(14) SOS emergency alarm activation indicator
(15) Date indicator
Page 7
5
3. How to use the watch
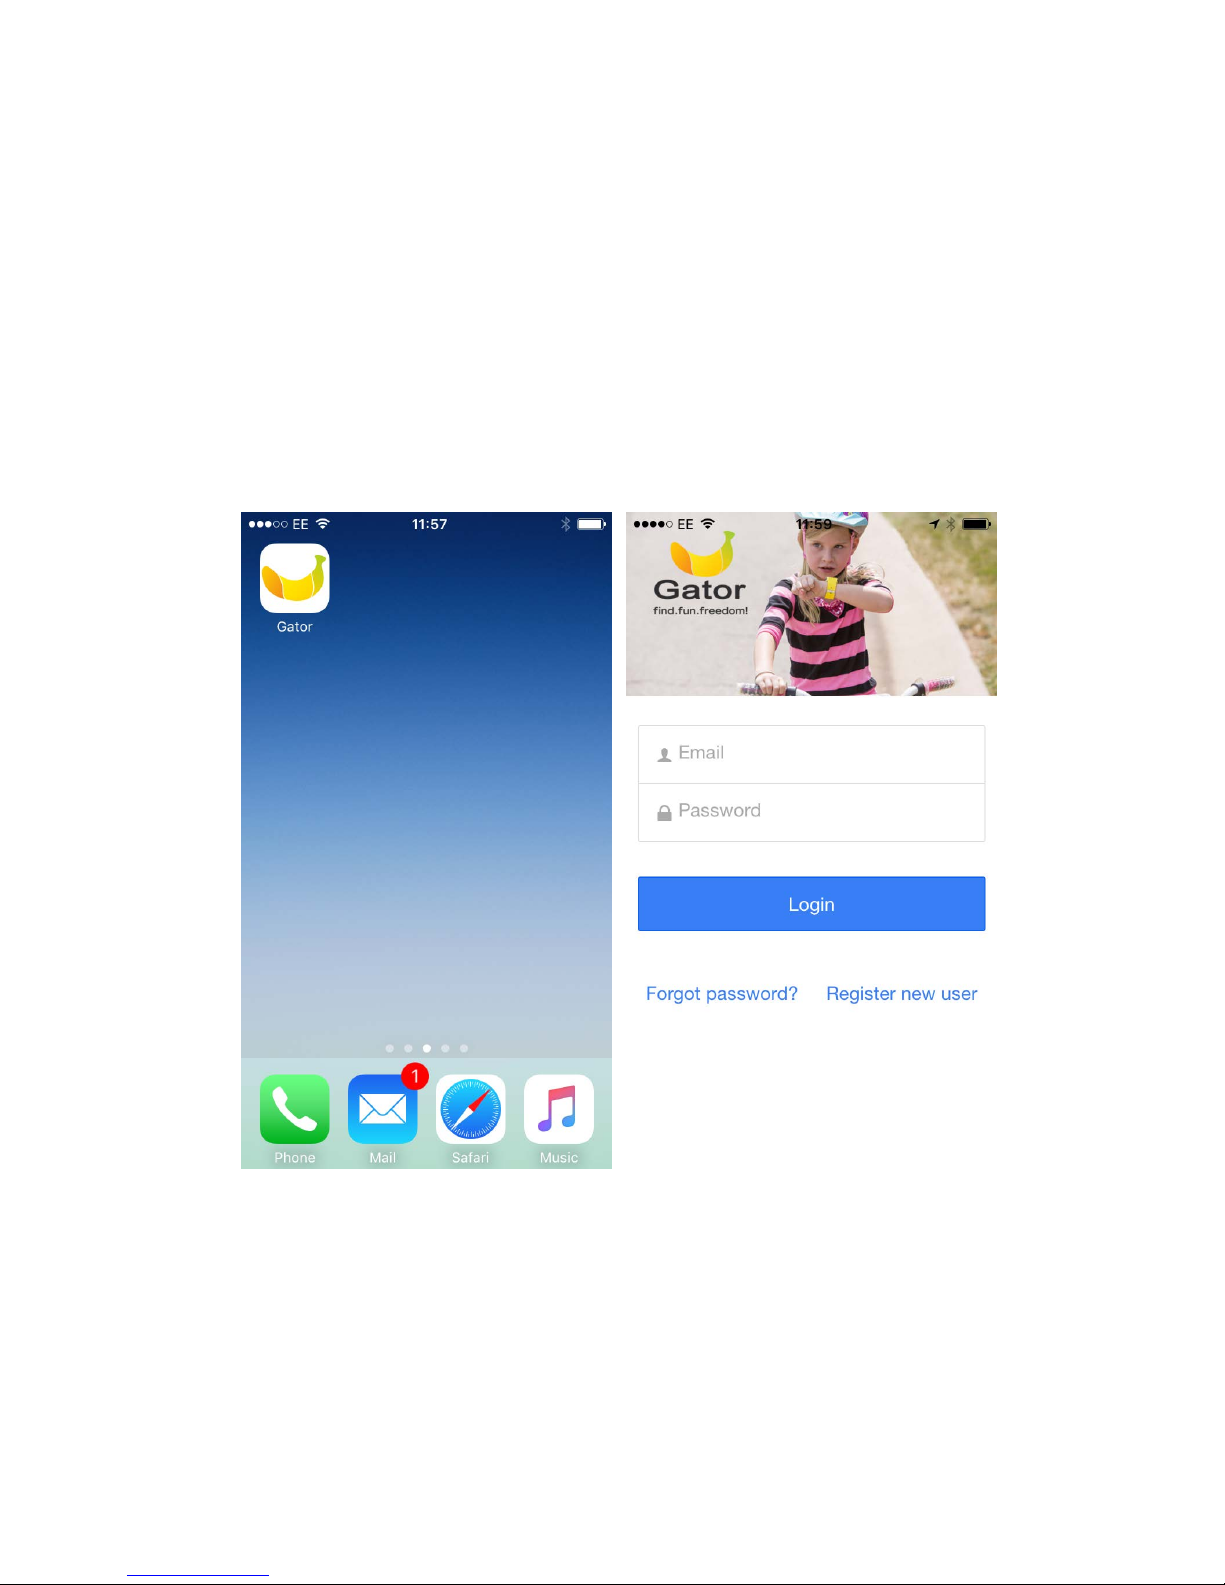
3.1 Install the Gator App and and register a new account.
Go to the Apple iPhone App store or the Google Play store on your phone and search for
“Gator app”. You need to install the Gator App published by Gator Group.
Once installed, use your email address to register as a new user from the login
page. Ensure you provide a valid email address as it will be used to recover
forgotten passwords.
Page 8
6
3.2 Register the watch in the app
After registering your new user account in the
app, login to the app and turn on the watch.
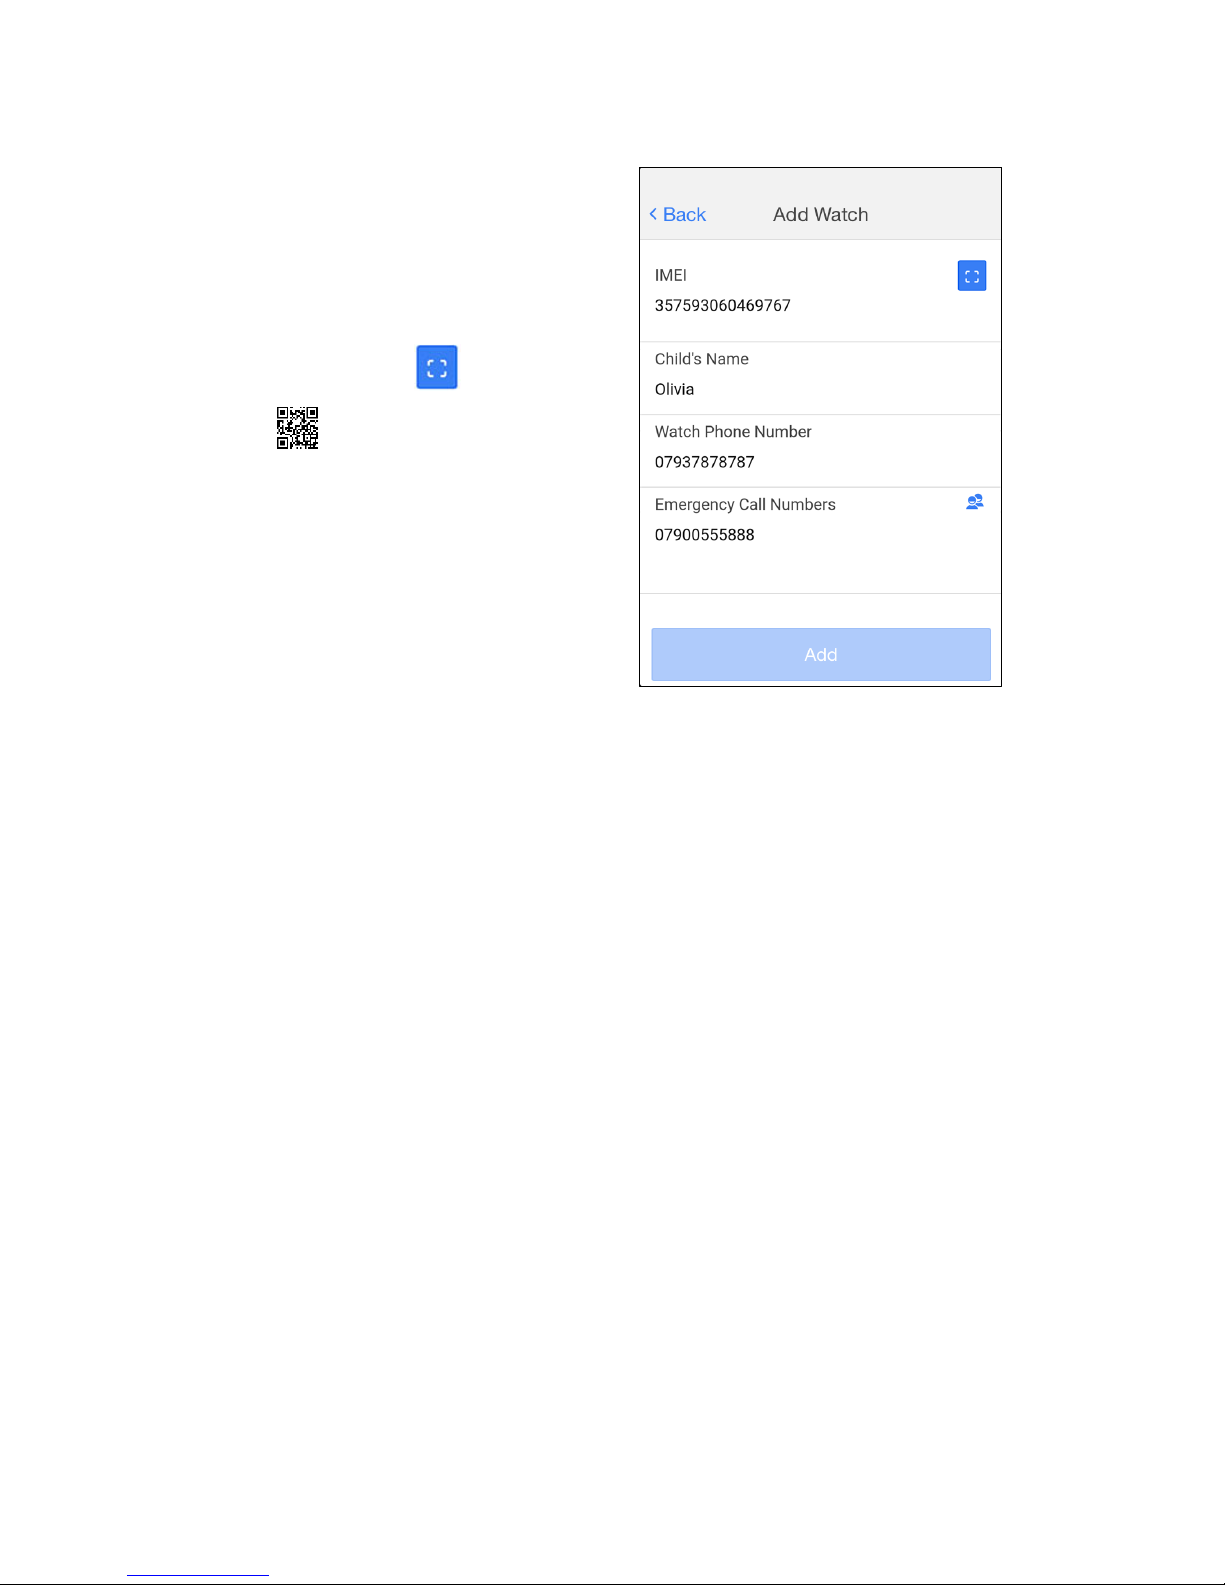
The app will display the watch registration
page.
To enter the IMEI (the unique ID of the watch)
click the scan button and scan the QR
code on back of the watch. This will
automatically populate the IMEI number.
Enter the name of the person who will be
wearing the watch.
Enter the phone number of the watch. You will
find this on the bottom of the watch box.
Enter one emergency contact number.
If you are using the watch outside the UK, whilst on holiday, you will need to update the
Emergency Call / Whitelist numbers to include the 44 country code and drop the first 0, eg.
447937878787. Remember to change these back to the “local” versions (starting with 0)
when you return to the UK.
If you wish to add additional watches to be tracked, expand the list of watch owner names
on the Home screen and select ‘Add watch’.
Page 9
7
3.3 Track and manage the watch with the app
3.3.1 Track the watch
After registering the watch, take it outdoors so it can obtain a good GPS signal. After a few
minutes the app will show the correct location.
By default, the watch will continue to upload its GPS location to the app every minute
while the watch is in motion and stay in sleep mode when it is stationary.
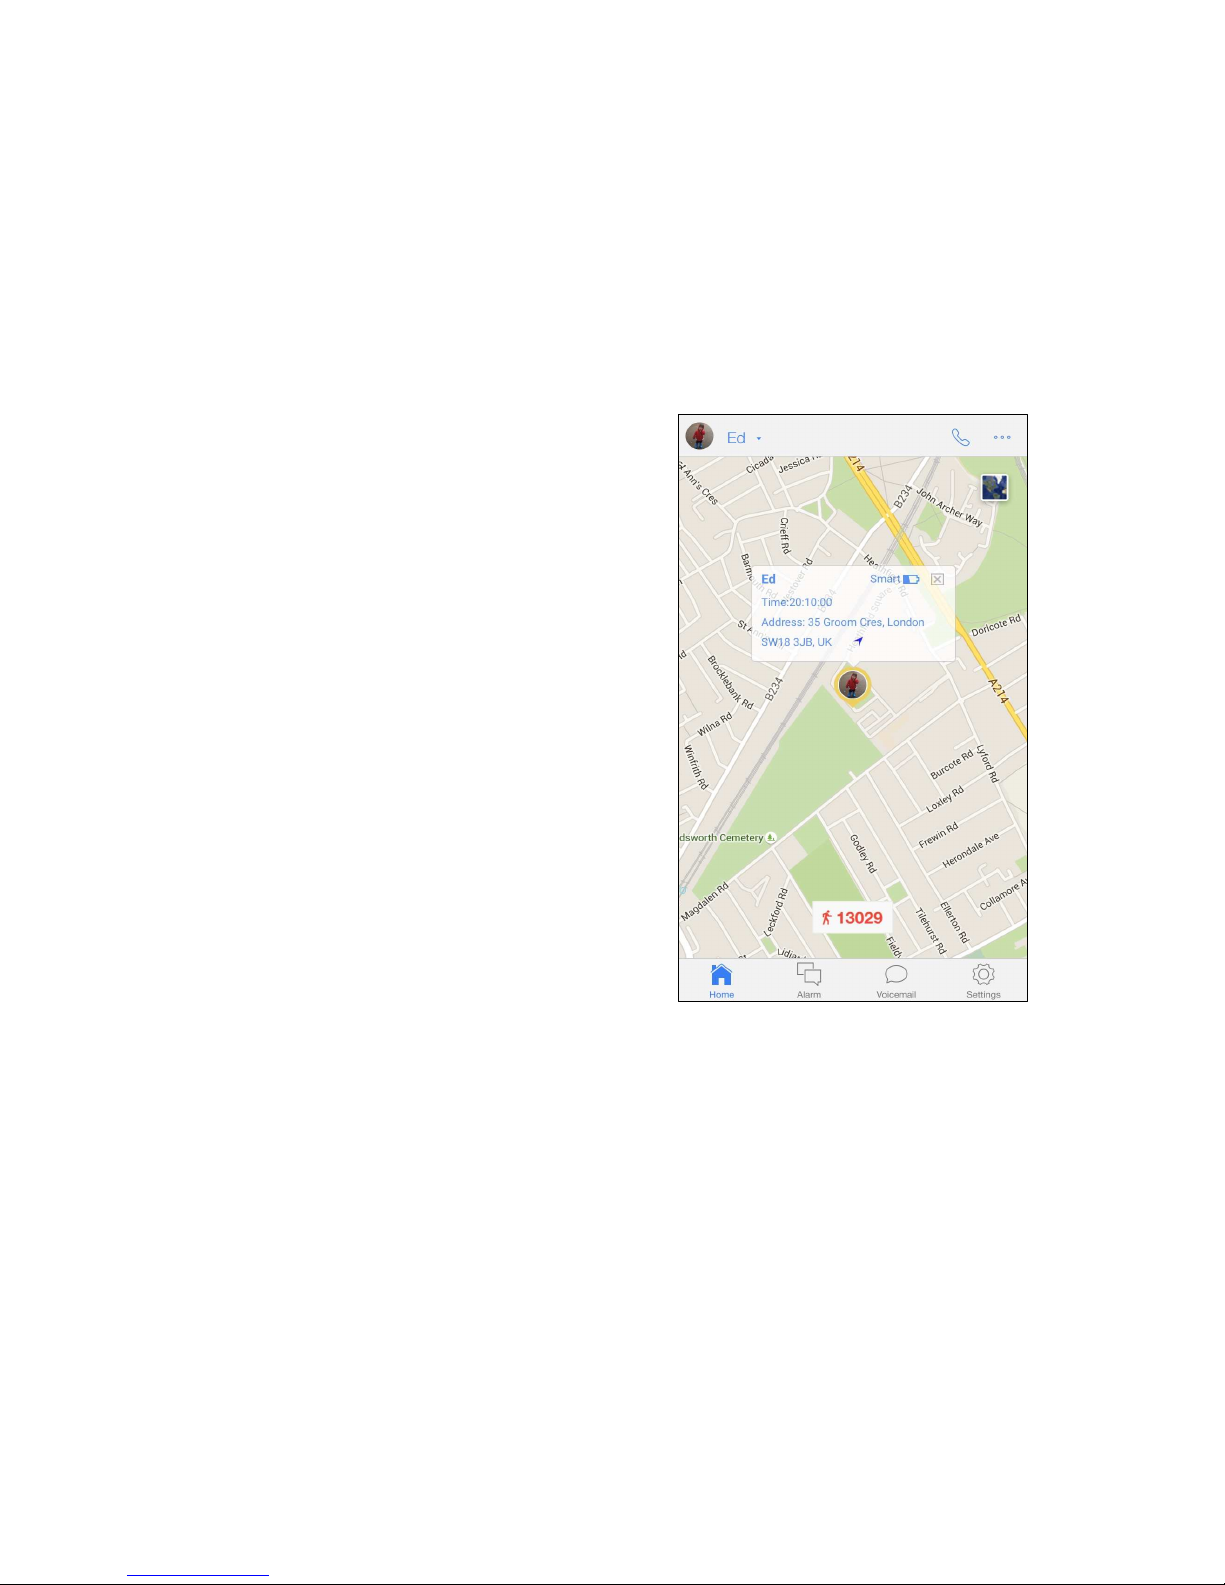
Tapping the photo representing the watch owner
will display location address details and watch
status.
Next to the indicator representing the remaining
battery level of the watch will be ‘GPS’, ‘Base
Station’, ‘WIFI’ or ‘Smart’ indicator.
‘GPS’ means that the location was obtained from
global satellite positioning system.
‘Base Station’ means that no GPS signal was
available so the location of the nearest mobile
network base station has been used to obtain an
approximate location. The accuracy of the location
is indicated by a light blue circle around the
location marker indicating the area that the exact
watch location lies within.
‘WIFI’ means it is tracking an indoor location which
has WIFI. No password is needed.
‘Smart’ is a blend of those 3 other tracking methods.
Page 10
8
3.3.2 Making Calls, Voice Monitor and Location History
Call the watch
Only the ‘Emergency Call Numbers’ and ‘Whitelist
Numbers’ specified in the ‘Phone Numbers’ lists in
‘Settings’ can call the watch. If the current phone
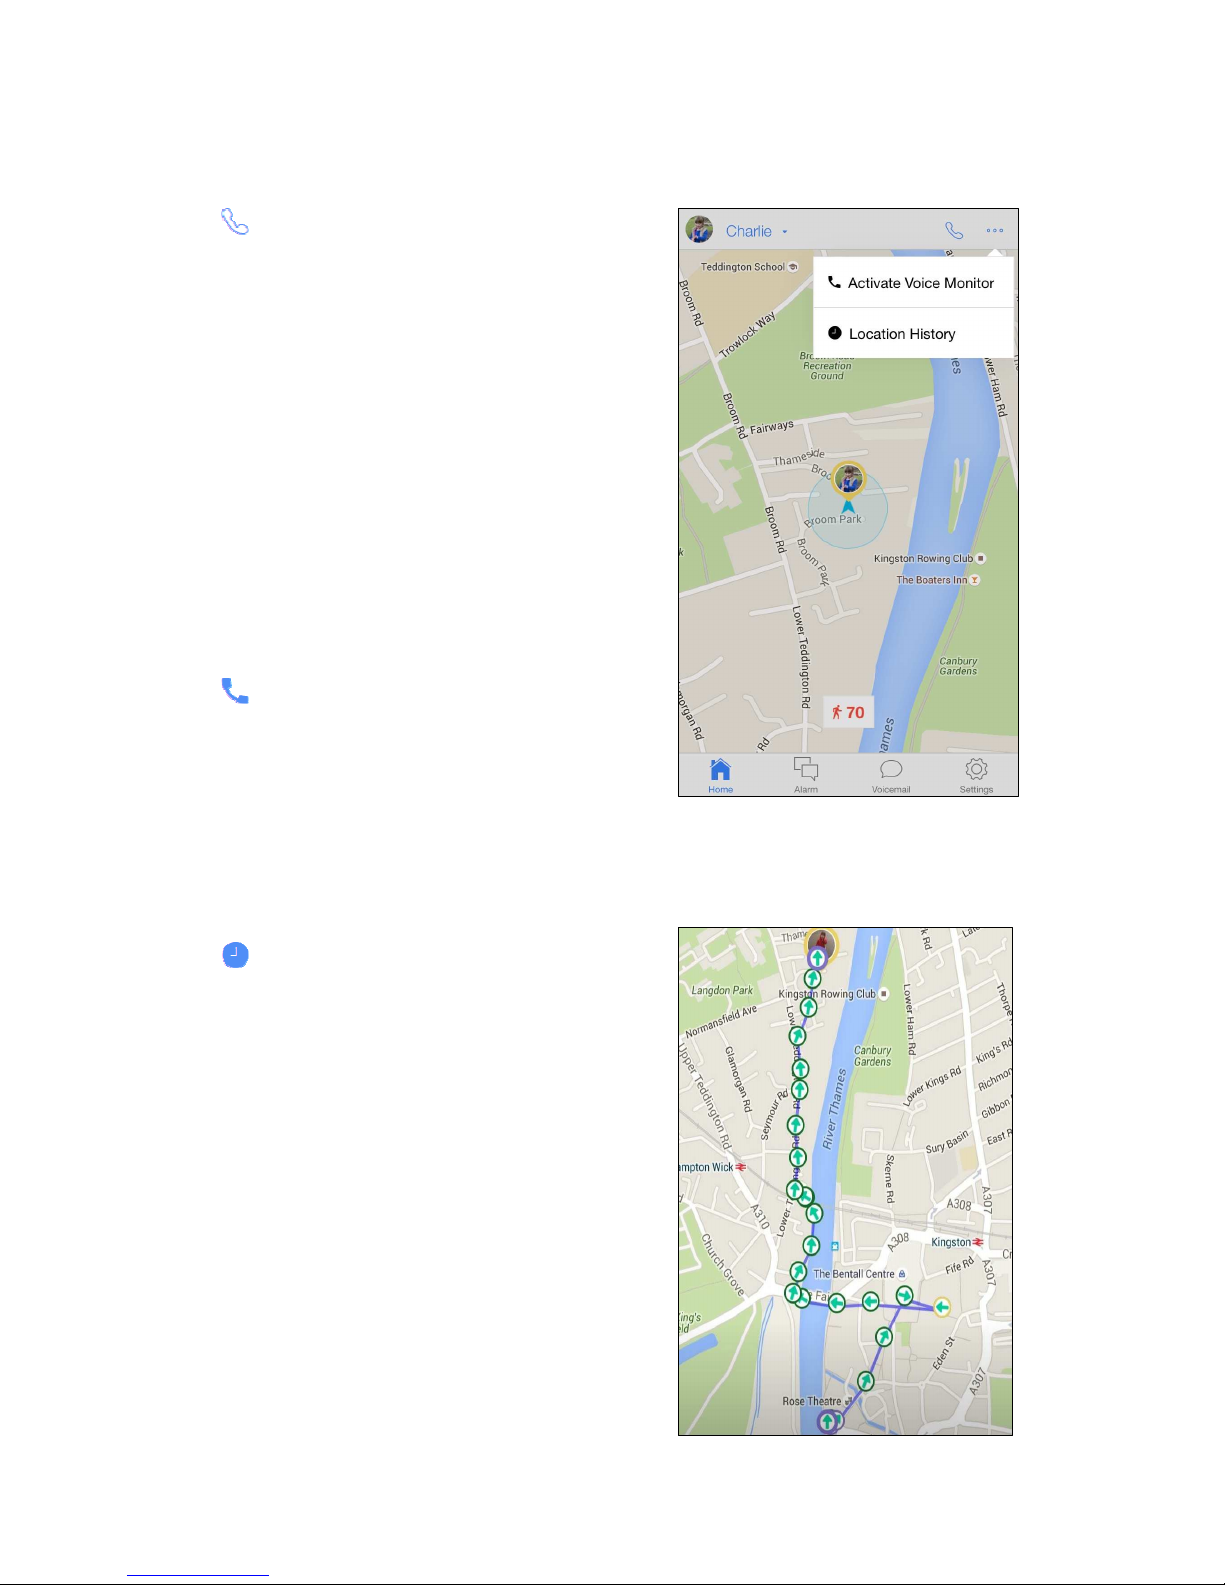
number is set, you can call the watch by tapping
the phone icon on the right side of home page title
bar. The call can be answered on the watch by
pressing either the Volume + or Volume - button.
The call can be ended on the watch by
short-pressing the Power On/Off button or by
hanging-up the call on your phone.
You can also call the watch directly from your own
phonebook if the number is saved.
Activate Voice Monitor
This function will instruct the watch to call the
number you enter in the display without alerting
the watch. You can then answer the call on your
phone to voice monitor the watch.
Location History
You can view all of the recorded locations of the
watch on a particular day with this function.
Once you have specified the date of interest, tap
“Search”. Click on Including Base Stations for
greater accuracy.
Pinch and zoom the map to see a more detailed
view of the locations recorded in that area, and tap
the markers to see address and time details.
Page 11
9
3.4 Check alarm messages
The watch raises alarms when:
• the SOS button is pressed on the
watch
• the watch strays outside of a ‘Safe
zone’
(as defined in ‘Safe zone’ in ‘Settings’)
or
• the battery in the watch is running
low
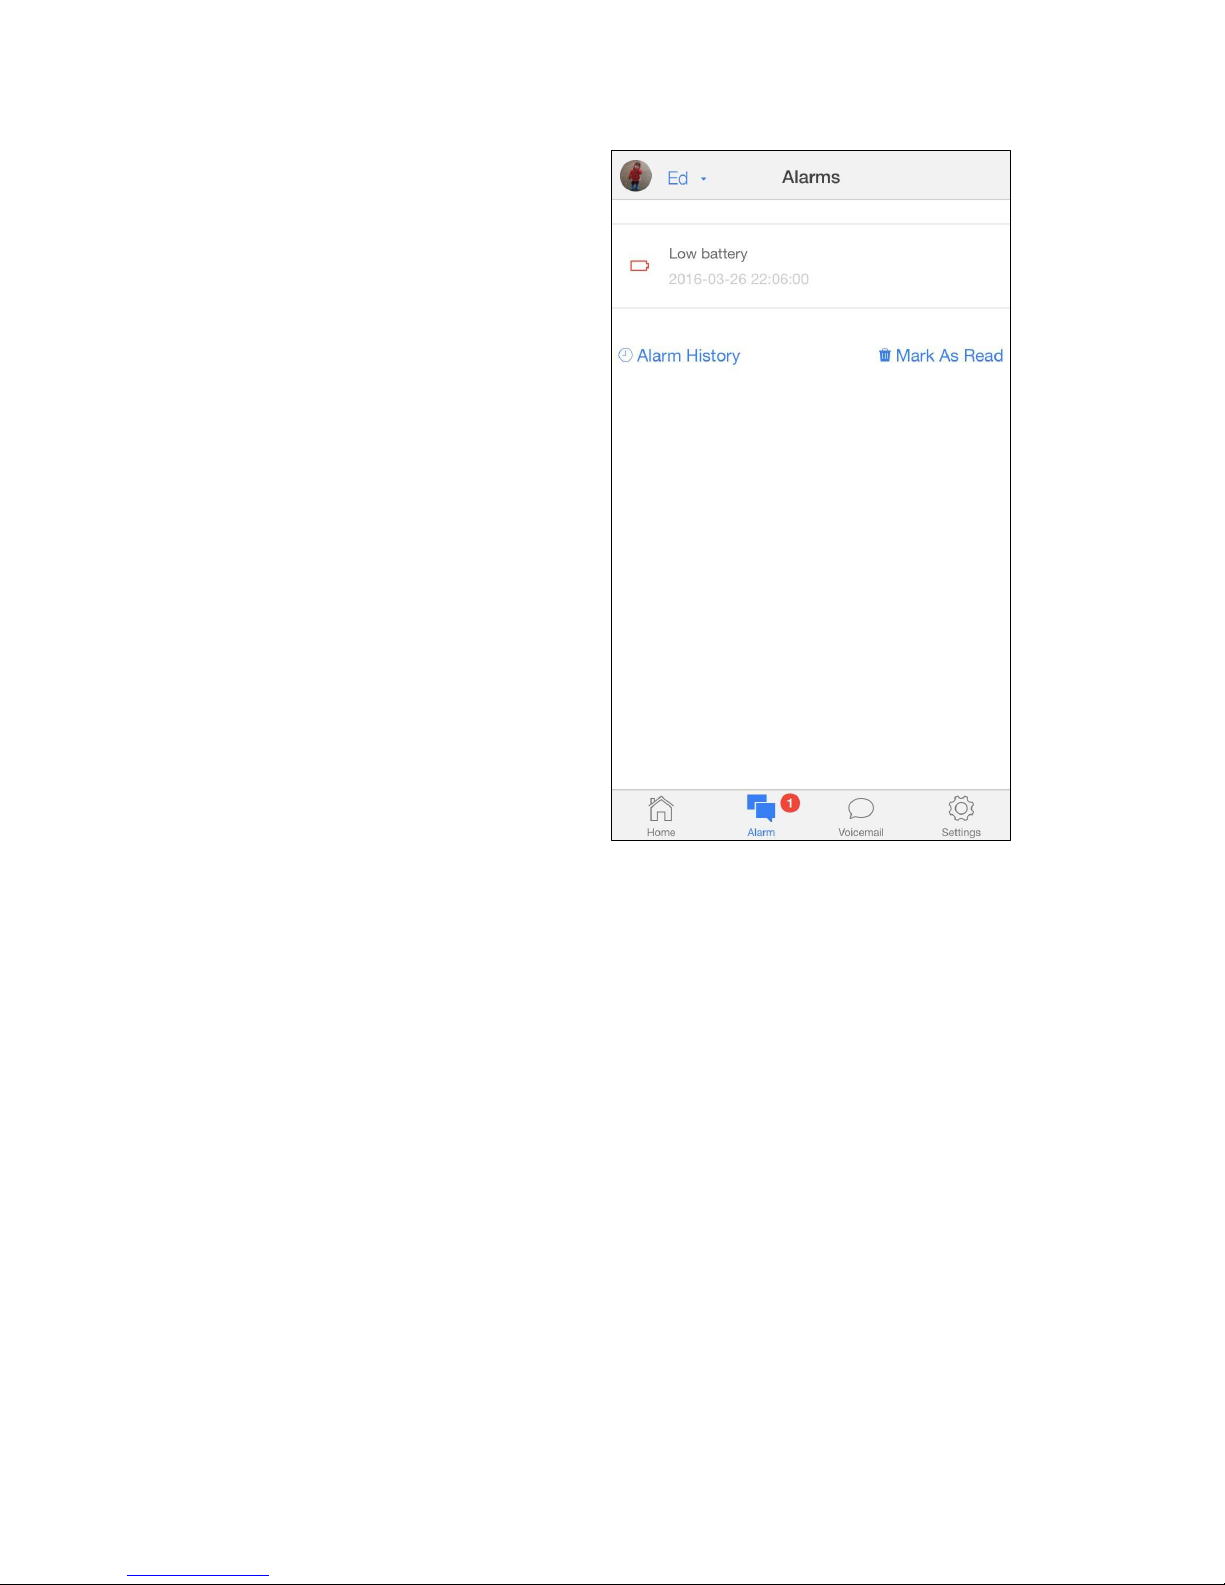
To view details of alarms, tap the ‘Alarm’
button at the bottom of the screen.
Page 12
10
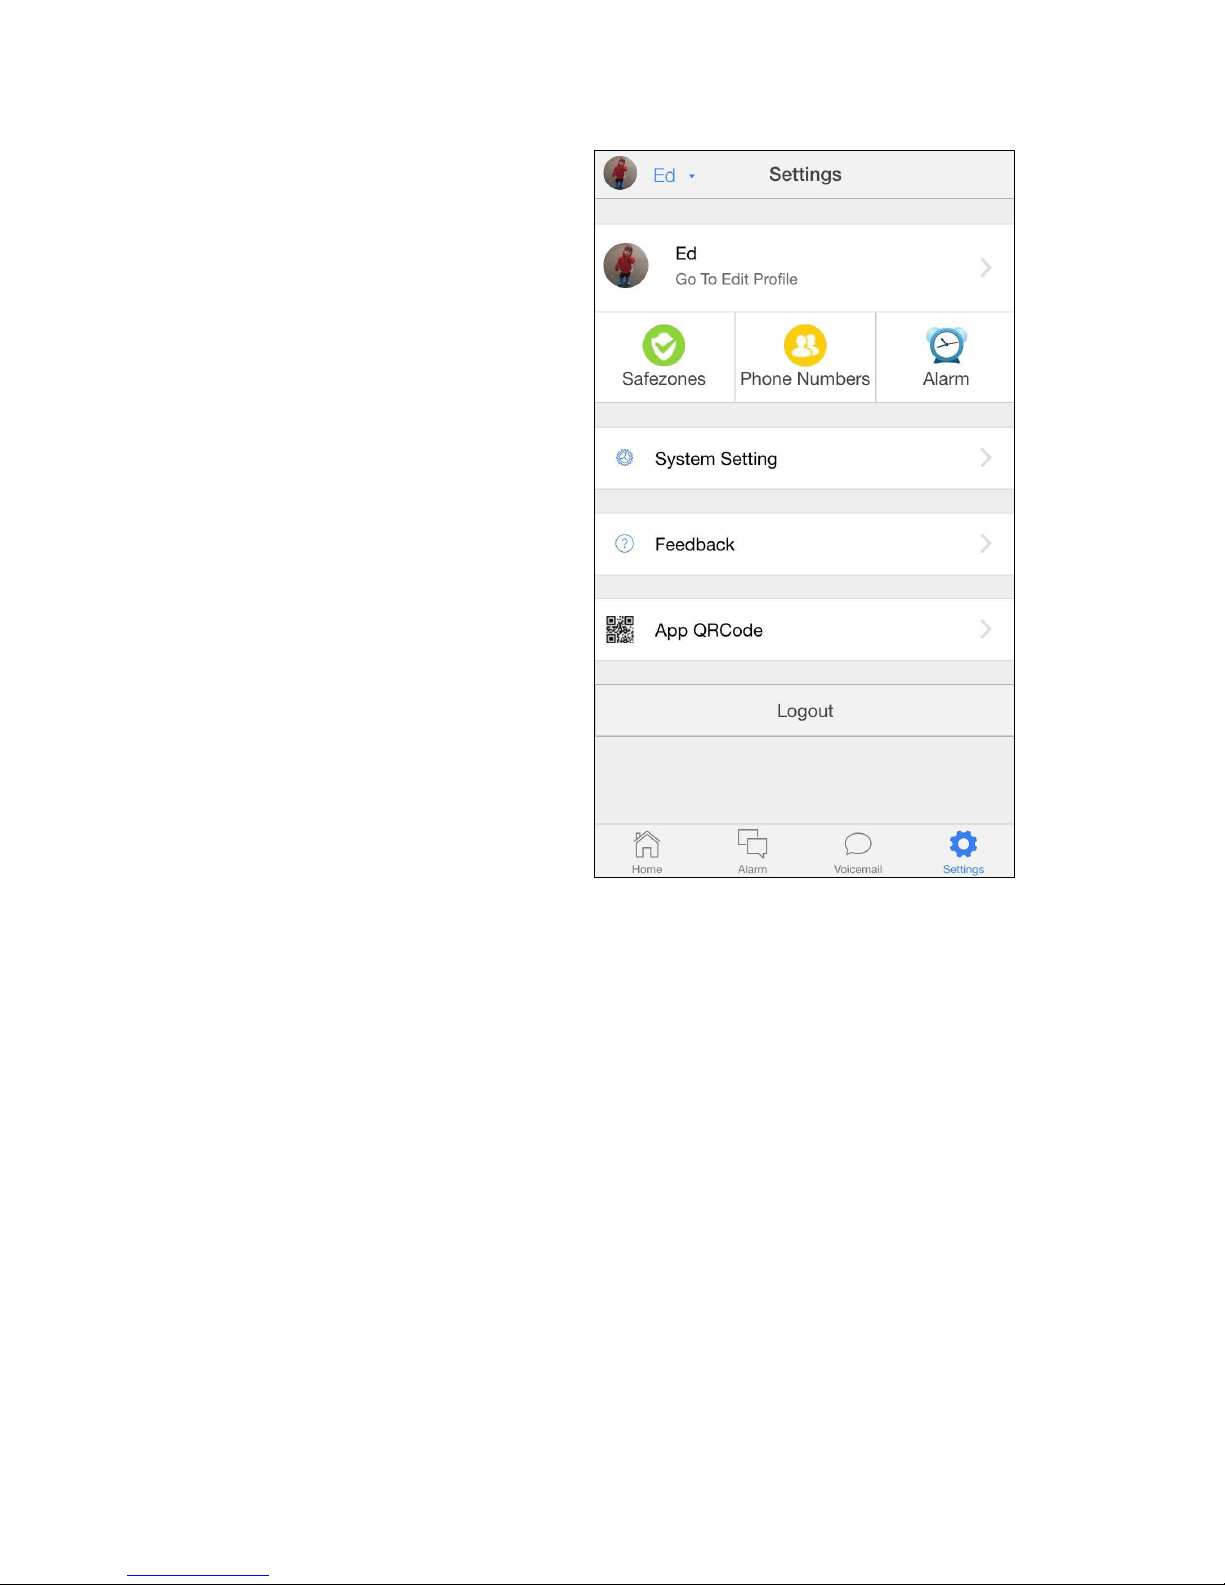
3.5 Manage settings
All watch and app settings are managed
through the ‘Settings’ section of the app.
Safezones, emergency and whitelisted
phone numbers, and alarm clock
settings are all managed through here.
Page 13
11
3.5.1 Edit Profile
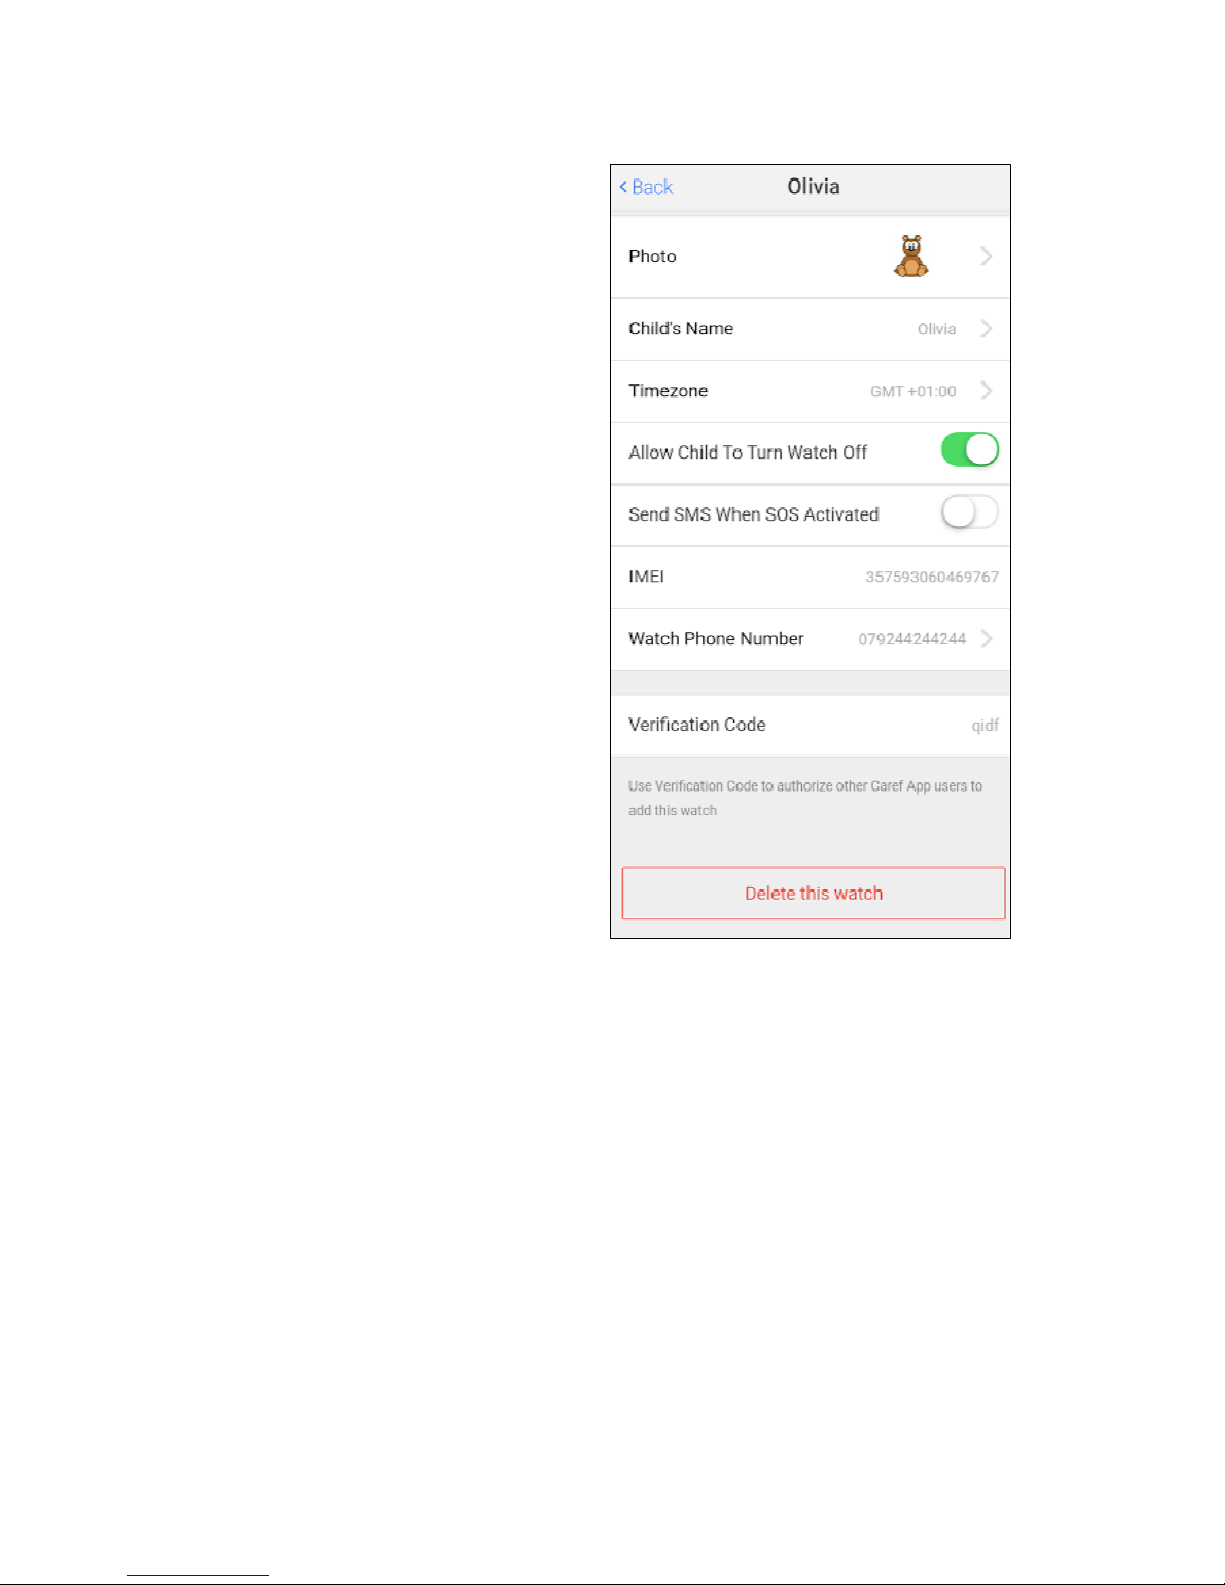
Tap ‘Go To Edit Profile’ below the name of
the watch user to amend the following
details: the name of the watch, the profile
photo of the watch (used on the map
location marker), the time zone setting and
phone number.
‘Allow Child to Turn Watch Off’ is used to
control whether the Power On/Off
button on the watch can be activated by
the wearer.
Send SMS when SOS Activated can
not be used on your watch. This is
inactive.
The ‘Verification code’ at the bottom of the
‘Edit Profile’ screen is required to
allow other app users to add the watch
to the app on their phone. For example,
if you have registered the watch initially
in the app on your phone, and your
husband or wife wants to add the same
watch to the app on their phone, you
will need to provide them with this
verification code that they can enter
during the ‘Add watch’ process.
‘Delete this watch’ will delete the watch
from your app, but settings will be retained on the server always.
Page 14
12
3.5.2 Safe Zones
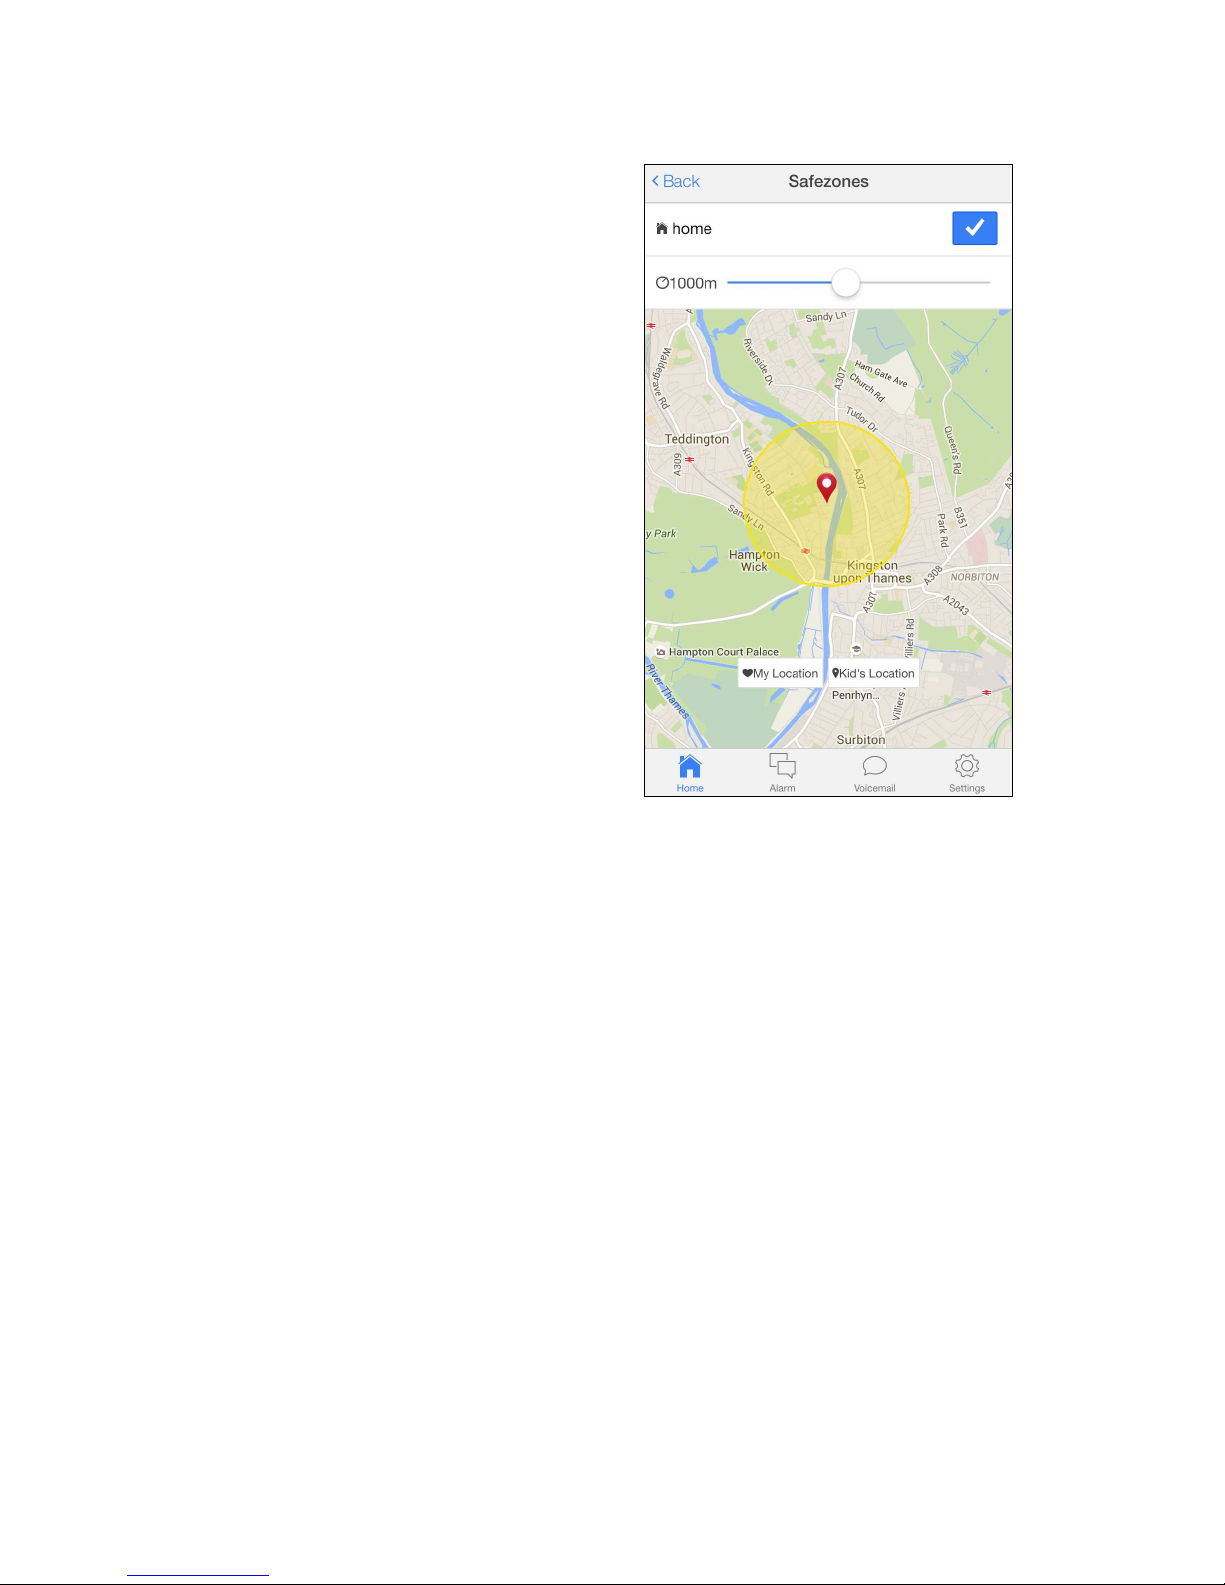
You can set up to 10 ‘safe zones’ for the watch
wearer each based on a circular area defined
by a maximum distance from a central point.
You can specify this distance from 200 metres
to 2000 metres.
To add a safe zone, tap add on the top right
corner of the safezones page. Set the
distance you wish to set then tap the tick
button to confirm this safe zone set-up.
To delete a safe zone, tap the trash can icon
next to the relevant safe zone name.
Page 15
13
3.5.3 Phone Numbers
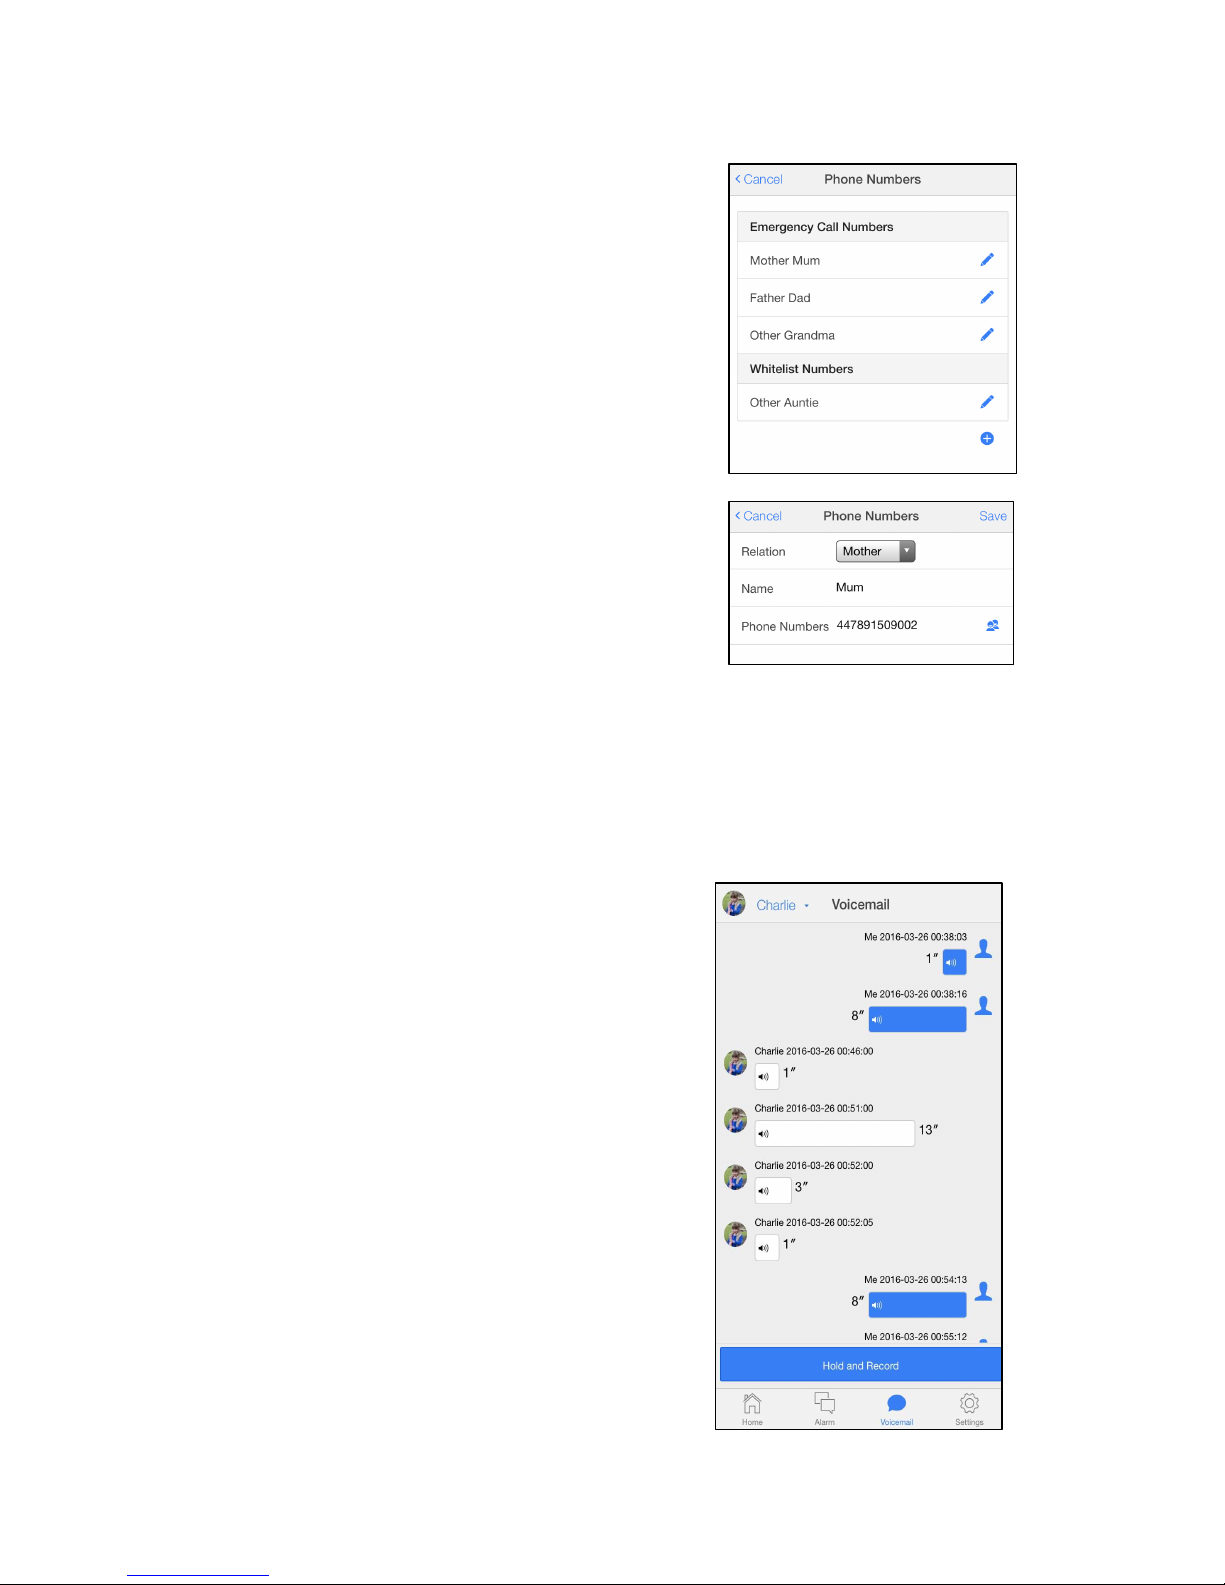
Only numbers that you set here are allowed to call the
watch.
The ‘Emergency Call Numbers’ are used to establish a
voice monitor when the SOS function on the watch is
triggered (by a long-press of the SOS button). The
watch will call the first number on the list, before trying
the second and third numbers in turn if the first and
second numbers do not answer.
The first or second ‘Emergency Call Numbers’ can also
be called at any time by long-pressing the ‘Volume +’ or
‘Volume –‘ watch buttons, respectively.
The ‘Whitelist Numbers’ are any other numbers that are
allowed to call the watch, in addition to the ‘Emergency
Call Numbers’.
Note that the ‘Name’ that you assign to a phone number is what the wearer will see on
the watch display when calling. For this reason, if the wearer is a child you may want to
use 'Mum' or 'Dad' instead of your first name.
3.5.4 Voicemail
.
This feature sends voice messages using the data
connection (much like WhatsApp voice memos) and
therefore saves on the voice minutes allowance with
your watch service plan.
In the app, go to the voicemail tab on the main screen.
Hold the ‘hold and record’ button to record and send a
voice message (of up to 10 seconds) to the watch. You
can send up to 6 voice messages at one time. Please
note: the messages can be played on the watch only
ONE TIME. Messages can not be replayed on the
watch.
On the watch, short press the S button to enter
voicemail mode. The voicemail icon will appear. Hold
the + button to record a message and release to send
the message to the app accounts linked with this watch.
Press the – button to listen to messages. Press the
power button to exit voicemail mode.
Page 16

14
3.5.5 System Settings
Alert Notification
The watch raises alarms when: the SOS button is pressed on the watch, the watch strays
outside of a ‘Safe zone’ (as defined in ‘Safe zone’ in ‘Settings’) or the battery in the watch
is running low. We strongly suggest you keep this turned on.
Modify Password
You can change your app password here.
Any questions? Ring us on
0800 246 1939, or visit
www.telmenow.com
 Loading...