

Page 1

Hydra Bluetooth Speaker
TLL161081
User Manual
Page 2
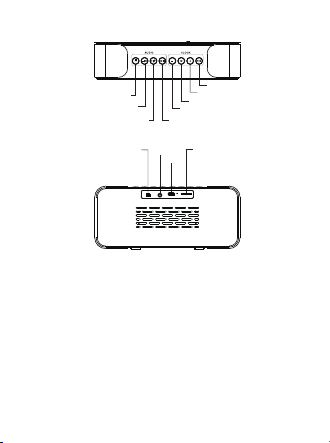
Components & Functions
Sonooze/dimming
AUX
Volume / Next
Charging
port
Micro USB
Increasing
Alarm clock mode
Reducing
SD card
Bluetooth ON/OFF
Volume/Previous
Play/Pause/Phone
ON/OFF
1. Bluetooth mode:
1.1 Bluetooth version: V4.2 Supports HSP, HFP, A2DP, AVRCP
protocol, English prompt tone, the Bluetooth pairing name
"Hydra".
1.2 Two ways for power ON:
Putting the slide switch to the “ON” position for power on, the
clock icon, battery icon, Alarm clock icon will light up.
1. Long press the ON button to enter Bluetooth mode with
indication voice. Long press ON button again to exist the
Bluetooth mode.
2. Long press the ON button for entering Bluetooth mode with
indication voice and the icon is flashing while waiting for
connection. Search for the pairing name: “Hydra” in your
Bluetooth device to connect successfully with corresponding
Page 3

indication voice (the password is 0000, if needed) You’ll find the
Bluetooth icon is flashing slowly while playing music. Automatic
connection tech, the speaker will automatically connect the
Bluetooth device which has once been connected.
2.TF CARD MODE
2.1 Turn on the speaker and insert the TF CARD, then it will
automatically enter in TF MODE.
2.2 The TF function is flashing slowly while playing music.
2.3 Removing TF card will automatically switch the speaker to
Bluetooth mode.
3. AUX
3.1 Insert the AUX cable to the line in mode and the AUX icon
lights up without flashing.
3.2 Pull out the AUX cable, the speaker will automatically enter
the Bluetooth mode.
4. FM mode:
4.1 Long press the play/pause button of the FM after entering
the Bluetooth mode, the speaker has a built in antenna. AUX
cable or USB cable could be used as antenna too.
4.2 Short press the play/pause button for searching channels
and the icon will be flashing while searching.
4.3 After complete searching channels, short press back/ fwd
button for switching channels, long press back/fwd for volume
up and down.
5. Charging:
5.1 Connect the USB cable for charging to the computer or
charger rated 5V.
5.2 The red indication is on while charging, it will go out after
fully charged.
5.3 The default volume starts at 10, maximum volume could be
increase up to 15.
5.4 When the battery level is lower than 15%, the icon will be
flashing. If the battery is very low, the speaker will remind you
Page 4

with an indication voice, then the speaker will shut down. Only
the clock function will continue to function, press any key for
time display with 3 seconds.
5.5 Memory function, the clock will keep working after the
speaker shuts down, and will show the right time when you turn
it on next time.
6. TIME CLOCK
6.1 When time clock is displayed, long press “M” till the hour
number flashes to enter in time clock settings.
6.2 Short press “M” to enter in hour, minute settings orderly,
then pressing “+/-“ to adjust number increasing or decreasing.
6.3 Two ways for time displayed, 12h and 24h
- 12h displays when AM or PM icon is shining, short press
“-“/”+” to switch while AM or PM flashes. Short press “M” again
to confirm current setting, long press “M” till your set
successfully and the icon doesn’t flash anymore.
- 24h display when icon shining, pressing “-“/”+” to adjust
while flashes. Short press M for confirming current setting
and automatically enter in the next set.
Long press M till you set successfully, and the icon doesn’t
flash anymore.
7. Alarm clock
7.1 Short press “M” for switch to Alarm clock 1 mode
7.2 Long press “M” for setting Alarm clock 1 and the hour
flashes. Short press “+” or “-“ to adjust.
7.3 Then short press M again to confirm the current setting and
it will enter automatically in the minutes setting, the alarm
song, the alarm clock circulation, and the alarm clock turning
on/off. Long press M will set successfully, and the icon doesn’t
flash anymore.
7. Alarm clock
7.1 Short press “M” for switch to Alarm clock 1 mode
7.2 Long press “M” for setting Alarm clock 1 and the hour
Page 5
flashes. Short press “+” or “-“ to adjust.
7.3 Then short press M again to confirm the current setting and
it will enter automatically in the minutes setting, the alarm
song, the alarm clock circulation, and the alarm clock turning
on/off. Long press M will the icon will not flash to confirm
successfully.
7.4 Alarm Clock 2 setting is same as Alarm clock 1
7.5 Alarm music
There are 7 songs that can be set as bell rings. There are 5 ring
tones that came with the speaker, but you can also choose the
first song of the TF card, or the last song listen on the radio.
Press “+” and “-“ to switch freely.
Short press M to confirm current settings and it automatically
enter in the next set.
7.6 On and off
ON means the alarm clock bell is working and icon is
shining
OFF means alarm clock bell is not working and the icon is not
light up
Press on the display “+”/ “-“ to choose ON or OFF
7.6 Circulation option
While flashes, press “-“/ “+” to choose circulation option
If the recycle icon lights up this means that the alarm clock is
working everyday
If the recycle icon goes out this means that the alarm clock is
only working on that day.
7.7 Snooze function
When the alarm bell rings, press any key to enter in snooze
mode and it will ring again after 10 minutes. Double click the
to cancel snooze mode.
The alarm bell will keep ringing for 2 minutes if you don’t press
any key to cancel it.
Page 6
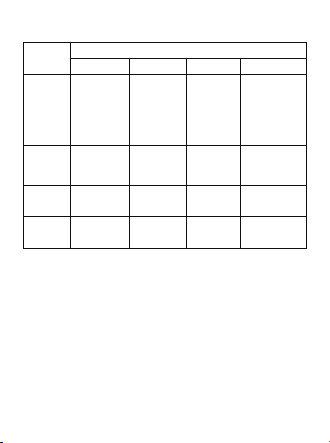
Volume down/
Previous track
Bluetooth
Short press for
Short press for mute
Short press for
volume down
Long press for
searching channels
TF Card
AUX
FM
Mode
Speaker ON/OFF
Long press for speaker
on/o,
Short press for
disconnecng
Bluetooth
Long press for speaker
on/ o
Long press for audio
on/o
Long press for speaker
on/o
Short press for
previous track,
Long press for
volume down
Short press for
previous track,
Long press for
volume down
previous track,
Long press for
volume down
previous track,
Long press for
Audio Buon
Mode/Pause/Calling Next track/Volume UP
Short press for
playing/ pausing/
answering/ hanging
up,
Short press for next
Long press for
track,
switching mode/
Long press for volume up
reject call.
Double click for
redial.
Short press for
playing/ pausing,
Short press for next song,
Long press for
Long press for volume up
switching to
dierent mode.
status,
Long press for volume up
Long press for
switching mode.
Short press for next
switching mode,
channels,
Short press for
Long press for volume up
Page 7
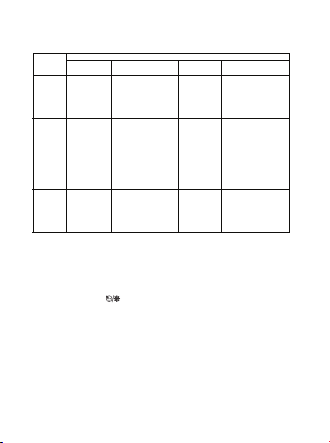
Clock buons
Down
M
Alarm 1
Clock mode
Short press for conrming or
entering next seng
Short press for
Clock
reducing
Long press for conrming
completely or exing
Up Snooze/dimming
Short press for dimming
Short press for
Long press for closing
increasing
showing
Short press for conrming or
entering next seng
ress for
Short p
Long press for conrming
reducing
completely or exing
Short press for conrming or
Short press for
Alarm 2
Remark:
- The button “+“ and “-“ are only working when setting
- Pressing any key could enter the snooze mode while bell is
ringing
- Double click on icon for cancelling snooze
entering next seng
reducing
Long press for conrming
completely or exing
Short press for
increasing
Short press for
increasing
Short press for dimming
Long press for closing
showing
Short press for dimming
Long press for closing
showing
Page 8
Disposal and recycling information
The crossed-out wheeled-bin symbol on your product, battery,
literature or packaging reminds you that all electronic products
and batteries must be taken to separate waste collection points
at the end of their working lives; they must not be disposed of in
the normal waste stream with household garbage.
It is the responsibility of the user to dispose of the equipment
using a designated collection point or service for separate
recycling of waste electrical and electronic equipment (WEEE)
and batteries according to local laws.
Proper collection and recycling of your equipment helps ensure
EEE waste is recycled in a manner that conserves valuable
materials and protects human health and the environment,
improper handling, accidental breakage, damage, and/or
improper recycling at the end of its life may be harmful for
health and environment.
 Loading...