

1
PAN11-1B/-2B/-3B/-5B/-8B
Smart energy plug in switch
P
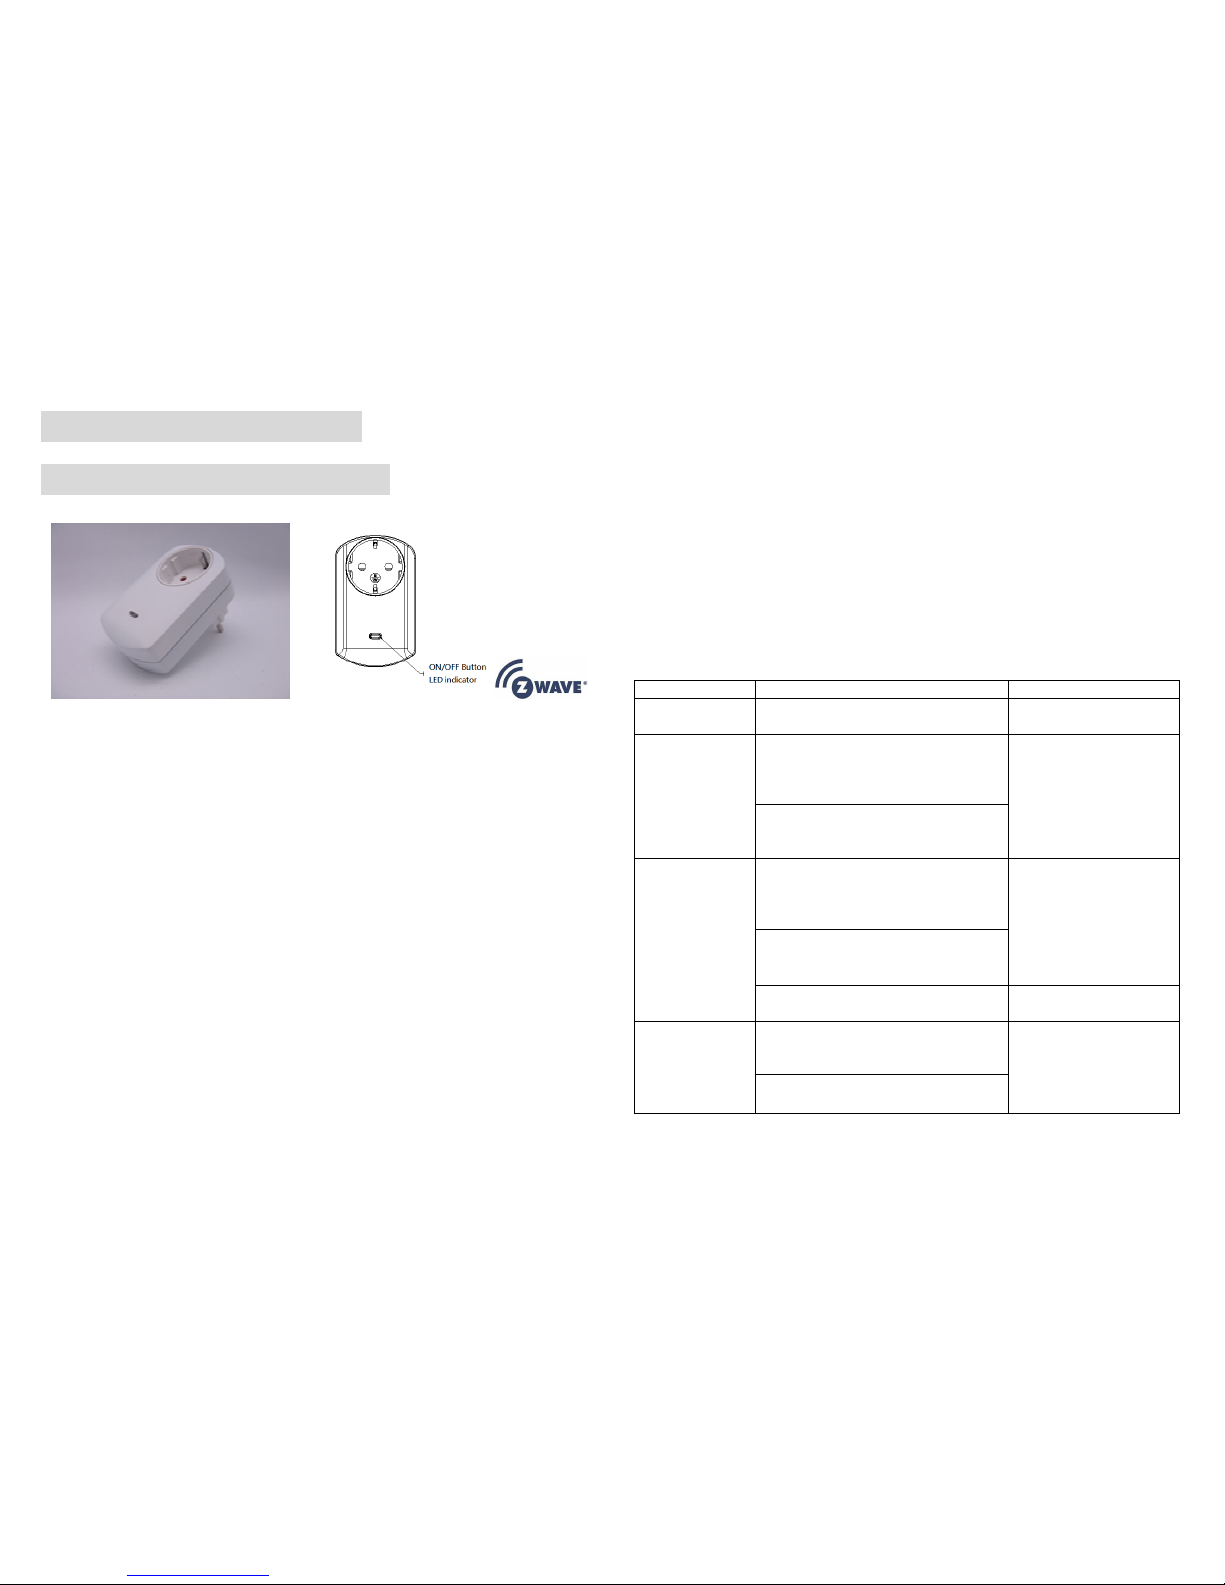
This plug-in ON/OFF switch PAN11 is a security enabled wireless switch, based on
Z-Wave Plus technology. Z-Wave PlusTM enabled devices displaying the Z-Wave
PlusTM logo can also be used with it regardless of the manufacturer, and can also be
used in other manufacturer’s Z-WaveTM enabled networks. Remote On/Off control of
the connected load is possible with other manufacturer’s wireless Controller. Each
switch is designed to act as a repeater. Repeaters will re-transmit the RF signal to
ensure that the signal is received by its intended destination by routing the signal
around obstacles and radio dead spots. Because PAN11 supports Security Command
Class, it can learn with Secured controller. Its functionality and supported command
classes is identical when included as a secure and non-secure device.
This plug-in ON/OFF switch is able to detect instance wattage (3000W/CE/CN,
1500W/UL/TW/JP) and overload current (14.5A) of connected lights or appliances.
When detecting overload state, the Switch will be disabled and its On/Off button will
be lockout of which LED will flash quickly. However, unplug and re-connect the
switch will reset its overload condition to normal status.
Adding to Z-WaveTM Network
In the front casing, there is an On/Off button with LED indicator which is used to toggle
switch on and off or carry out inclusion, exclusion, reset or association. When first
power is applied, its LED flashes on and off alternately and repeatedly at 0.5 second
intervals. It implies that it has not been assigned a node ID and start auto inclusion.
Auto Inclusion
The function of auto inclusion will be executed as long as the switch does not have
Node ID and just plug the switch into a wall outlet.
Note: Auto inclusion timeout is 2 minute during which the node information of explorer
frame will be emitted once several seconds. Unlike “inclusion” function as shown in
the table below, the execution of auto inclusion is free from pressing the On/Off button
on the Switch.
The table below lists an operation summary of basic Z-Wave functions. Please refer to
the instructions for your Z-WaveTM Certificated Primary Controller to access the Setup
function, and to include/exclude/associate devices
Function Description Annotation
No node ID The Z-Wave Controller does not allocate
a node ID to the Switch.
LED 2-second on,
2-second off
Inclusion 1. Put your Z-Wave controller into
inclusion mode by following the
instructions provided by the
controller manufacturer.
2. Pressing On/Off button three times
within 2 seconds will enter inclusion
mode.
Exclusion 1. Put your Z-Wave controller into
exclusion mode by following the
instructions provided by the
controller manufacturer.
2. Pressing On/Off button three times
within 2 seconds will enter exclusion
mode.
Node ID has been excluded. LED 0.5s On, 0.5s Off
(Enter auto inclusion)
Reset 1. Pressing On/Off button three times
within 2 seconds will enter inclusion
mode.
Use this procedure only in
the event that the primary
controller is lost or
otherwise inoperable.
2. Within 1 second, press On/Off
button again for 5 seconds.

2
3. IDs are excluded. LED 0.5s On, 0.5s Off
(Enter auto inclusion)
Association 1. The PAN11 is an always listening
Z-Wave device, so associations may
be added or removed by a controller
at any time.
Or If your controller requires to have
the PAN11 send a 'node information
frame' or NIF for associations, then
pressing the On/Off button three
times within 2 seconds will cause
the PAN11 to send its NIF.
2. There are only one group for the
switch
Including a node ID allocated by Z-Wave Controller means inclusion. Excluding a node
ID allocated by Z-Wave Controller means exclusion.
Failed or success in including/excluding the node ID can be viewed from the Z-Wave
Controller.
LED Indication
To distinguish what mode the switch is in, view from the LED for identification.
State Type LED Indication
Normal Under normal operation, toggle On/Off button between On and Off.
When pressing On, LED lights up, whereas Off, LED is off.
No node ID Under normal operation, when the Switch has not been allocated a
node ID, the LED flashes on and off alternately at 2-second
intervals. By pressing On/Off button, it will stop flashing
temporarily.
Learning When PAN11 is in learning mode, LED flashes on and off
alternately and repeatedly at 0.5 second intervals.
Overload When overload state occurs, the Switch is disabled of which LED
flashes on and off alternately at 0.2 second intervals. Overload
state can be cleared by unplugging and reconnecting the Switch to
the wall outlet.
Choosing a Suitable Location
1. Do not locate the Switch facing direct sunlight, humid or dusty place.
2. The suitable ambient temperature for the Switch is 0°C~40°C.
3. Do not locate the Switch where exists combustible substances or any source of
heat, e.g. fires, radiators, boiler etc.
4.
After putting it into use, the body of Switch will become a little bit hot of which
phenomenon is normal.
Installation
1. Plug this On/Off Switch into a wall outlet near the load to be controlled.
2. Plug the load into the Switch. Make sure the load to be controlled cannot exceed
13A.
3. Press the button or switch on the load to the ON position.
4. To manually turn ON the Switch, press and release the On/Off button. The LED
will turn ON, and the load plugged into the Switch will also turn ON.
5. To manually turn OFF the Switch, simply press and release the On/Off button.
The LED will turn OFF and the load plugged into the Switch will also turn OFF.
Programming
1. Basic Command Class / Binary Switch Command Class
The Switch will respond to BASIC and BINARY commands that are part of the
Z-Wave system.
1-1 BASIC_GET / BINARY_SWITCH_GET
Upon receipt of the following commands from a Z-Wave Controller, the Switch will
report its On/Off state to the node asked.
Basic Get Command: [Command Class Basic, Basic Get]
Basic Report Command:
Report OFF: [Command Class Basic, Basic Report, Value = 0(0x00)]
Report ON:[Command Class Basic, Basic Report, Value = 255(0xFF)]
Binary Switch Get Command:[Command Class Switch Binary, Switch
Binary Get]
Binary Switch Report Command:
Report OFF:[Command Class Switch Binary, Switch Binary Report, Value
=0(0x00)]

3
Report ON:[Command Class Switch Binary, Switch Binary Report, Value =
255(0xFF)]
1-2 BASIC_SET / SWITCH_BINARY_SET
Upon receipt of the following commands from a Z-Wave Controller, the load
attached to the Switch will turn on or off.
[Command Class Basic, Basic Set, Value = 1~99,255(0xFF)]: the load
attached to the Switch turns on.
[Command Class Basic, Basic Set, Value = 0(0x00)]: the load attached to
the Switch turns off.
[Command Class Switch Binary, Switch Binary Set, Value = 1~99,
(255)0xFF]: the load attached to the Switch turns on.
[Command Class Switch Binary, Switch Binary Set, Value = 0(0x00)]: the
load attached to the Switch turns off.
2. Z-Wave’s Groups (Association Command Class Version 2)
The Switch can be set to send reports to associated Z-Wave devices. It supports
one association group with one node support for Grouping 1. For group 1, the Switch
will report its latest status to Z-Wave Controller.
Grouping 1 includes, SWITCH_BINARY_REPORT, METER_REPORT,
ALARM_REPORT.
2-1 Auto report to Grouping 1 (Maximum Node 1)
2-1-1 On/Off Event Report
When “on” or “off ” state has been changed, it will send Binary Switch Report to the
node of Grouping 1.
Binary Switch Report
ON:[Command Class Switch Binary, Switch Binary Report, Value
=255(0xFF)]
OFF:[Command Class Switch Binary, Switch Binary Report, Value
=0(0x00)]
2-1-2 Instant Power Consumption vary over 5% report
When the power consumption of load vary over 5%, it will send Meter report to the
nodes of Grouping 1.
Meter Report Command:
[Command Class Meter,,,,Meter Report,,,,Rate Type = 0x01,,,,Meter Type =
0x01,,,,Precision = 1,,,,Scale = 0x02,,,,Size = 4,,,,Meter Value(W) ]
2-1-3 Overload alarm report
When PAN11 detects the current is more than 14.5A, it will send Alarm Report to
Group 1 node.
The content of Alarm Report
Alarm report command:
[Command_Class_Alarm, Alarm_Report, Alarm Type = 0x08, Alarm Level =
0xFF]
2-2 Response to Meter Get Command
The Switch will report its (1) instant Power Consumption (Watt) or (2)
accumulated power consumption(KWH) or (3) AC load Voltage (V) or (4) AC load
current ( I ) (5) load power factor (PF) to Z-Wave Controller after receive the
Meter Get Command from Z-Wave Controller.
2-2-1 Instant Power Consumption (Watt) of Switch
When receiving Meter Get Command, it will report Meter Report Command to the
node.
Meter Get Command: [Command Class Meter, Meter Get, Scale =0x02(W)]
Meter Report Command:
[Command Class Meter,,,,Meter Report,,,,Rate Type = 0x01,,,,Meter Type =
0x01,,,,Precision = 1,,,,Scale = 0x02,,,,Size = 4,,,,Meter Value(W) ]
Example:
Meter Value 1 = 0x00 (W)
Meter Value 2 = 0x00 (W)
Meter Value 3 = 0x03 (W)
Meter Value 4 = 0xEA (W)

4
Meter(W) = Meter Value 3 *256 + Meter Value 4 = 100.2W
2-2-2 Accumulated Power Consumption (KW/h)
When receiving Meter Get Command, it will report Meter Report Command to
the node.
Meter Get Command:
[Command Class Meter, Meter Get, Scale = 0x00 KW/h)]
Meter Report Command:
[Command Class Meter,,,,Meter Report,,,,Rate Type = 0x01,,,, Meter Type =
0x01,,,, Precision = 2,,,,Scale = 0x00,,,,Size = 4,,,,Meter Value (KWh)]
Example:
Scale = 0x00 (KWh)
Precision = 2
Size = 4 Bytes (KW/h)
Meter Value 1 = 0x00(KWh)
Meter Value 2 = 0x01(KWh)
Meter Value 3 = 0x38(KWh)
Meter Value 4 = 0xA3(KWh)
Accumulated power consumption (KW/h) = (Meter Value 2*65536) + (Meter
Value 3*256) + (Meter Value 4) = 800.35 (KW/h)
2-2-3 Clearing accumulated power consumption
Whenever re-start counting the accumulated power consumption is needed, you
can use Meter Reset Command to clear it.
Meter Reset Command: [Command Class Meter, Meter Reset]
2-2-4 AC load Voltage (V)
When receiving Meter Get Command, it will report Meter Report Command to the
node.
Meter Get Command: [Command Class Meter, Meter Get, Scale =0x04(V)]
Meter Report Command:
[Command Class Meter,,,,Meter Report,,,,Rate Type = 0x01,,,,Meter Type =
0x01,,,,Precision = 1,,,,Scale = 0x04,,,,Size = 2,,,, Meter Value(V)]
Example:
Scale = 0x04 (V)
Precision = 1
Size = 2 (2 Bytes of V)
Meter Value 1 = 0x09(V)
Meter Value 2 = 0x01(V)
AC load Voltage = (Meter Value 1*256) +(Meter Value 2)= 230.5 (V)
2-2-5 AC load current ( I )
When receiving Meter Get Command, it will report Meter Report Command to the
node.
Meter Get Command:
[Command Class Meter, Meter Get, Scale =0x05(I)]
Meter Report Command:
[Command Class Meter,,,,Meter Report,,,,Rate Type = 0x01,,,,Meter Type = 0x01,
,,
,
Precision = 2,,,,Scale = 0x05,,,,Size = 2,,,,Meter Value(I)]
Example:
Scale = 0x05 (I)
Precision = 2
Size = 2 (2 Bytes of I)
Meter Value 1 = 0x01(I)
Meter Value 2 = 0x21(I)
AC load current = (Meter Value 1*256) +(Meter Value 2)= 2.89 (A)
2-2-6 load power factor (PF)
When receiving Meter Get Command, it will report Meter Report Command to the
node.
Meter Get Command: [Command Class Meter, Meter Get, Scale =0x06(PF)]
5
Meter Report Command:
[Command Class Meter,,,,Meter Report,,,,Rate Type = 0x01,,,,Meter Type =
0x01,,,, Precision = 2,,,,Scale = 0x06,,,,Size = 1 Bytes,,,,Meter Value(PF)]
Example:
Scale = 0x06 (PF)
Precision = 2
Size = 1 (1 Byte of PF)
Meter Value 1 = 0x63(PF) (It means that the load power factor is 0.99)
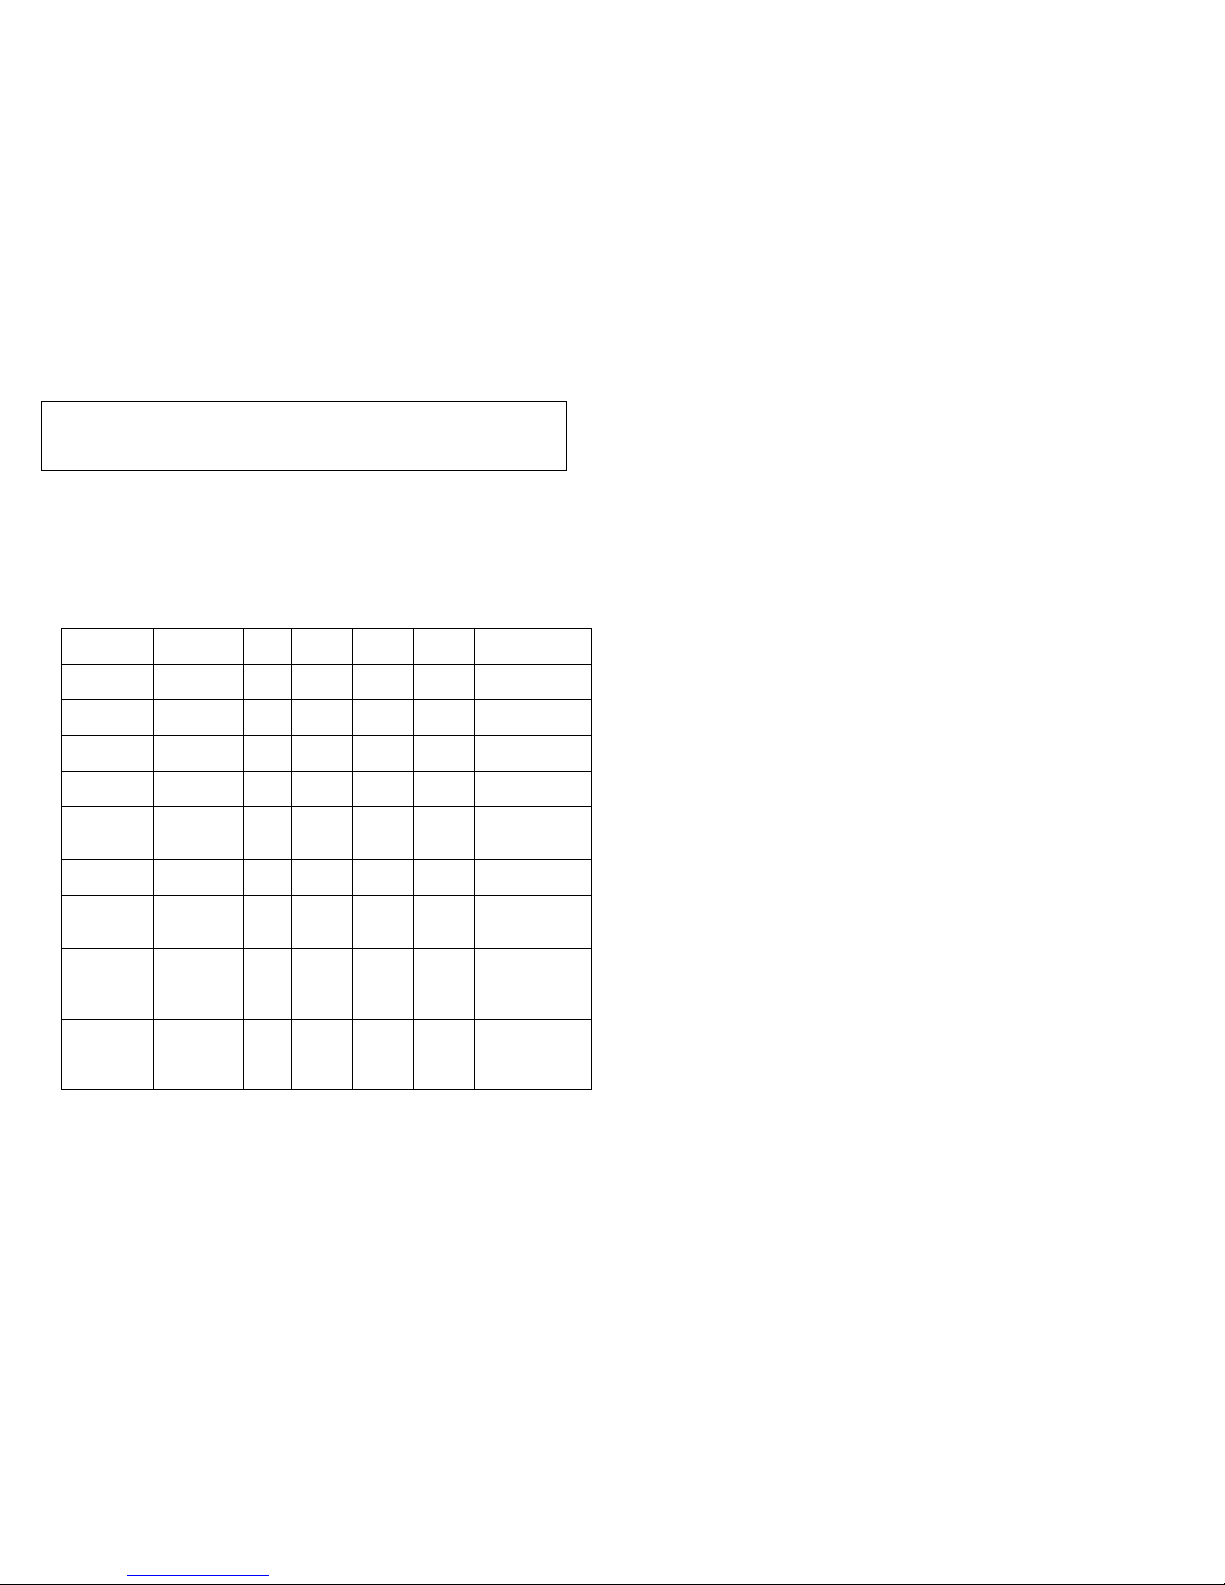
3. Z-Wave’s Configuration
Configuration
Parameter
Function Size
(Byte)
Value Unit Default Description
1 Watt Meter
Report Period
2 0x01-
0x7FFF
5s 720 720*5s=3600s=1 hour
2 KWH Meter
Report Period
2 0x01-
0x7FFF
10min 6 6*10min=1 hour
3
Threshold of
current for Load
caution
2 10-1300
0.01A
1300 1300*0.01A = 13A
4
Threshold of
KWh for Load
caution
2 1-10000
1KWh
10000
5
Restore switch
state mode
1 0-2
1 0 : Switch off
1 : Last switch state
2 : Switch on
6
Mode of Switch
Off function
1 0-1
1 0 : Disable
1 : Enable
7
LED indication
mode
1 1-3 1 1 : Show switch state
2 : Show night mode
3 : One flash mode
8
Auto off timer
2 0-0x7FFF
1s
0 0 : Disable auto off
function
1-0x7FFF : 1s ~
32767s
9
RF off
command mode
1 0-3 0 0 : Switch off
1 : Ignore
2 : Switch toggle
3 : Switch on
3-1
Watt
Meter Report Period:
If the setting is configured for 1hour (set value =720), the PAN11 will report its
instant power consumption every 1 hour to Group1 node. The maximum interval
to report its instant power consumption is 45 hours (5s*32767/3600=45hr).
3-2 KWH Meter Report Period:
If the setting is configured for 1hour (set value =6), the PAN11 will report its
Accumulated Power Consumption (KW/h) every 1 hour to Group1 node. The
maximum interval to report its Accumulated Power Consumption (KW/h) is 227.55
days (10min*32767/1440=227.55 days).
3-3 Threshold of current for Load Caution
This is a warning when the current of load over the preset threshold value, if the
setting value is 1300, when the load current of Relay1 over this value, PAN11
will send current meter report to warn the Group1 node, the Range of the setting
value is from 10 to 1300,and the default value is 1300.
3-4 Threshold of KWh for Load Caution
This is a warning when the KWh of load over the preset threshold value, If the
setting value is 10000, when the Accumulated Power Consumption of Relay1 over
this value, PAN11 will send KWH meter report to warn the Group1 node,
minimum value is 1KWh and default value is 10000 kWh.
3-5 Restore switch state mode :
Whenever the AC power return from lost, PAN11 will restore the switch state which
could be SWITCH OFF、LAST SWITCH STATE、SWITCH ON. The default setting
is LAST SWITCH STATE.
3-6 Mode of switch off function :
When the mode of switch On/Off is set to 0, any command of switch off will be
disabled and the On/Off function of include button will be disabled. The default
setting is enable mode. When manual On/Off function is disabled, the RF
command can only switch On but not Off. This is useful function for keeping the
device in switch on state.
3-7 LED indication mode :
3-7-1 Show Switch State:When switch is on, LED is on. When switch is off, LED is
off. The default setting is Show Switch State.
3-7-2 Show Night mode:When switch is on, LED is off. When switch is off, LED is
on.
3-7-3 One Flash mode:When the state of switch changes, LED will be on only one
second, then LED keeps off.
3-8 Auto off timer:

6
Whenever PAN11 switches to on, the auto off timer begin to count down. After the
timer decrease to zero, it will switch to off automatically. However if Auto off timer
is set as 0, the auto off function will be disabled. The default setting is 0.
3-9 RF off command mode
Whenever a switch off command, BASIC_SET 、 BINARY_SWITCH_SET、
SWITCH_ALL_OFF, is received, it could be interpreted as 4 variety of commands.
3-9-1 Switch Off:It switches to OFF state. The default setting is Switch Off.
3-9-2 Ignore:The switch off command will be ignored.
3-9-3 Switch Toggle:It switches to the inverse of current state.
3-9-4 Switch On:It switches to ON state.
4. Protection Command Classes
PAN11 supports Protection Command Class version 2, it can protect the switch
against unintentionally control by e.g. a child. And it can also protect the switch from
being turned off by setting it in “No RF Control” state.
After being set to “Protection by sequence” state, any intentional pressing of On/Off
button should be hold longer than 1 second, or the switch state will not change.
However, the operation of learn function does not change, because learning will not
be protected.
5. Firmware update over the air (OTA)
PAN11 is based on 500 series SoC and supports Firmware Update Command Class,
it can receives the updated firmware image sent by controller via the Z-wave RF
media. It is a helpful and convenient way to improve some function if needed.
6. Command Classes
The Switch supports Command Classes including…
* COMMAND_CLASS_ZWAVEPLUS_INFO
* COMMAND_CLASS_VERSION
* COMMAND_CLASS_MANUFACTURER_SPECIFIC_V2
* COMMAND_CLASS_SECURITY
* COMMAND_CLASS_DEVICE_RESET_LOCALLY
* COMMAND_CLASS_ASSOCIATION_V2
* COMMAND_CLASS_ASSOCIATION_GRP_INFO
* COMMAND_CLASS_POWERLEVEL
* COMMAND_CLASS_SWITCH_BINARY
* COMMAND_CLASS_BASIC
* COMMAND_CLASS_SWITCH_ALL
* COMMAND_CLASS_METER_V3
* COMMAND_CLASS_CONFIGURATION
* COMMAND_CLASS_ALARM
* COMMAND_CLASS_PROTECTION
* COMMAND_CLASS_FIRMWARE_UPDATE_MD_V2
Socket Type
Since the socket type for each country in Europe varies, refer to the outline for each
socket suited for each country as follows:
Germany type PAN11
-1B
France type PAN11-2B
UK type PAN11-3B

7
Note:
Please make sure that the intensity of the plug of the electrical device must be
16A and have same head as the enclosed plug before inserting to the socket.
Troubleshooting
Symptom
Cause of Failure
Recommendation
The Switch not working and
LED off
1. The Switch is not
plugged into the
electrical outlet
properly
2. The Switch break down
1. Check power connections
2. Don’t open up the Switch and
send it for repair.
The Switch LED
illuminating, but cannot
control the ON/OFF
Switch of the load attached
1.Check if the load
plugged into the Switch
has its own ON/OFF
switch
2. The switch is protected
1. Set the ON/OFF switch of the
load attached to ON
2. Unprotected the switch or follow
the instruction of protection.
The Switch LED
illuminating, but the
Detector cannot control
the Switch
1. Not carry out
association
2. Same frequency
interference
1. Carry out association
2. Wait for a while to re-try
LED keep flashing, but
cannot control
Overload occurs Remove the load attached or
check max. load cannot exceed
13.0A
Specification
Operating Voltage 230V/50Hz
Maximum Load 13A
Range Minimum 30 m in door 100m outdoor line of sight
Operating Temperature 0°C ~ 40°C
Frequency Range 868.40MHz & 869.85MHz/EU/CN(PAN11-1B/-2B/-3B/-8B),
908.40MHz & 916.00MHz/UL
922~927MHz/TW/JP(PAN11-5B)
** Specifications are subject to change and improvement without notice.
FCC ID : RHHPAN11
Warning:
1.Plug out to disconnect from power supply; Do not plug in line.
2. Do not exceed the max rating
Disposal
This marking indicates that this product should not be disposed with
other household wastes throughout the EU. To prevent possible harm to
the environment or human health from uncontrolled waste disposal,
recycle it responsibly to promote the sustainable reuse of material
resources. To return your used device, please use the return and
collection systems or contact the retailer where the product was
purchased. They can take this product for environmental safe recycling.
Company of License Holder:Philio Technology Corporation
Address of License Holder:8F.,No.653-2,Zhongzheng Rd., Xinzhuang Dist., New
Taipei City 24257,Taiwan(R.O.C)
FCC Interference Statement
FCC Interference StatementFCC Interference Statement
FCC Interference Statement
This equipment has been tested and found to comply with the limits for a Class B digital device,
pursuant to Part 15 of the FCC Rules.
These limits are designed to provide reasonable protection against harmful interference in a
China type PAN11-8B

8
residential installation.
This equipment generates, uses and can radiate radio frequency energy and, if not installed and
used in accordance with the instructions, may cause harmful interference to
radio communications.
However, there is no guarantee that interference will not occur in a particular installation.
If this equipment does cause harmful interference to radio or television reception, which
can be determined by turning the equipment off and on, the user is encouraged to try to correct
the interference by one of the following measures:
• Reorient or relocate the receiving antenna.
• Increase the separation between the equipment and receiver.
• Connect the equipment into an outlet on a circuit different from that to which the receiver is
connected.
• Consult the dealer or an experienced radio/TV technician for help.
This device complies with Part 15 of the FCC Rules. Operation is subject
to the following two conditions:
(1) This device may not cause harmful interference, and
(2) This device must accept any interference received, including interference that may cause
undesired operation.
FCC Caution: Any changes or modifications not expressly approved by the party responsible for
compliance could void the user's authority to operate this equipment.
This transmitter must not be co-located or operating in conjunction with any other antenna or
transmitter.
 Loading...