

Page 1

GSM easyAID Emergency call system
INSTALLATION AND APPLICATION MANUAL
for module version v2.07.0098 and higher
Document version: 1.52 30.08.2016
Page 2

2
Table of contents
1 Main functions of the easyAID emergency call system ............................................. 3
1.1 Functions and services.......................................................................................... 3
1.2 User warnings ....................................................................................................... 4
2 User’s guide .............................................................................................................. 5
2.1 Turning the unit on and off .................................................................................... 5
2.2 The easyAID unit’s layout ...................................................................................... 5
2.3 Digital display ........................................................................................................ 6
2.4 Configurable options in the easyAID unit .............................................................. 6
2.4.1 Setting the clock ............................................................................................ 6
2.4.2 Setting the phone numbers ............................................................................ 7
2.4.3 Setting the reminders ..................................................................................... 8
2.4.4 Starting an emergency call ............................................................................ 9
2.4.5 Confirming a visit ......................................................................................... 10
2.4.6 Speed dialing ............................................................................................... 11
2.4.7 Assigning the RF transmitter ....................................................................... 11
2.4.8 Erasing all RF transmitters .......................................................................... 11
2.4.9 Voice call settings ........................................................................................ 12
2.4.10 SMS forwarding ......................................................................................... 12
2.4.11 SMS restriction .......................................................................................... 12
3 Configuring the easyAID unit using the programming software .............................. 13
3.1 Configuration through USB connection ............................................................... 13
3.2 Configuration through modem connection........................................................... 14
3.3 Configuring the parameters ................................................................................. 14
3.3.1 Settings ........................................................................................................ 15
3.3.2 Custom events ............................................................................................. 17
3.3.3 Firmware ...................................................................................................... 19
3.4 Management of the settings ................................................................................ 20
3.5 Changing the module’s password ................................................................ ....... 20
3.6 Resetting the module .......................................................................................... 20
3.7 Module status monitoring .................................................................................... 21
3.7.1 Downloading the event list ........................................................................... 22
3.8 Software update .................................................................................................. 23
3.9 Voice messages, warnings .................................................................................. 24
4 Peripheries of the easyAID unit ............................................................................... 25
4.1 Device LED signals ............................................................................................. 25
4.2 RF transmitter LED signals ................................................................................. 25
4.3 SIM card socket .................................................................................................. 25
5 Installation guide ..................................................................................................... 26
5.1 Mounting and putting into operation .................................................................... 26
6 Technical information .............................................................................................. 27
6.1 Technical specification ........................................................................................ 27
6.2 Contents of the package ..................................................................................... 27
6.3 The manufacturer’s contact ................................................................................. 27
Page 3

3
1 Main functions of the easyAID emergency call system
Nowadays, there is a growing demand regarding the remote care of elder, sick
relatives, remote control devices and systems. The needy is always vulnerable. Often,
the delay of assistance can be fatal for someone who suffers in chronic and
helplessness disease having a sudden deterioration. These situations can be avoided
using the device proposed by our company. Mostly elder people live alone, or spend a
lot of time alone while the younger relatives are working and attending school.
But, everyone wants to take care of their loved relatives. The home signaling system is
much more useful and safe then a mobile phone, because it is easy to use in
emergency situations. The home signaling allows that the patients with disability, who
take care about themselves, live with the family or alone instead of living in a community
home. The signaling system assures immediate contact with the relatives, social worker,
neighbor etc.
The easyAID device makes possible the conversation with the user, thus can help in
discovering the point of the emergency call or perhaps the type of sick, and allows
reassuring the user remotely. The device has high-sensitivity microphone (grants good
sound quality remotely) and loud speaker. It can cause difficulties if the elder patient
cannot reach the device right when needed. Leaving the house without protection is a
disadvantage for the indoor mount devices and there is no possibility to use the device
in outdoor emergencies. The RF transmitter is an accessory used for such situations,
which makes possible to initiate emergency call and/or SMS message. After receiving
the call, the called party can act immediately and notify the doctor or the ambulance if
necessary.
1.1 Functions and services
Initiates emergency voice call up to 4 phone numbers
Speed dialing of 4 phone numbers
Status reporting (power loss, battery low/restore, etc.) in SMS up to 4 phone
numbers
Possibility for conversation through GSM call
Plays up to 4 recordable messages at preset times as daily reminders
4 multifunctional pushbuttons (function keys)
Pendant RF transmitter
Measures the environmental temperature and reports min/max limit exceedance
Digital display, clock
Page 4

4
1.2 User warnings
Please consider the following warnings while using the product:
The main unit and its accessories (GSM antenna, AC adapter, RF transmitter)
are not waterproof, nor splash-proof, therefore no they must not be exposed
to water. These accessories are not shock-resistant and must not be exposed
to high heat.
Do not move the GSM antenna mounted by the installer to its optimal place
and do not cover it, because this may cause weak signal which may make
impossible the usage of the device.
Attention! The RF transmitter is not expected to operate outside the range
determined by the installer. Do not keep pushing unreasonably the RF
transmitter’s button, because this reduces the lifetime of its battery.
Attention! The battery of the RF transmitter has to be replaced forthwith if
“RF transmitter battery low” event is received, as well as at least yearly,
independently of the reception of this event, in order to retain the operating
range of the transmitter! The range decreases if the battery weakens!
Attention! The device operates normally from AC adapter. Do not unplug the
AC adapter from the mains power, because continuous power supply is
necessary for safe operation. The device is able to operate from battery only
for limited time (0…2 hours), depending on the state of charge and the age of
the battery.
The easyAID is a signaling device which the manufacturer does not
recommend to be used in special, high-risk life situations such as supervision
of patients suffering of severe, life-threatening disease. The device does not
substitute the continuous personal supervision!
Page 5
5
2 User’s guide
2.1 Turning the unit on and off
The emergency call device comes from the manufacturer turned off (in sleep mode) to
avoid discharging of the built-in battery during transportation and storage. The module
can be turned on by connecting the power adapter.
If you wish to turn off (to sleep mode) the device because of transportation or storage,
follow the steps below:
Disconnect the power adapter from the module
If you have connected the device to USB, disconnect it
Press the Settings key continuously for at least 5 seconds, then “PASS” is
displayed on the digital display
Enter the user password using the 1-4 function keys (the password is: 1111)
Keep the Cancel key pressed and press once the Settings key
(“SLP” /sleep/ is displayed on the digital display, then the device turns off)
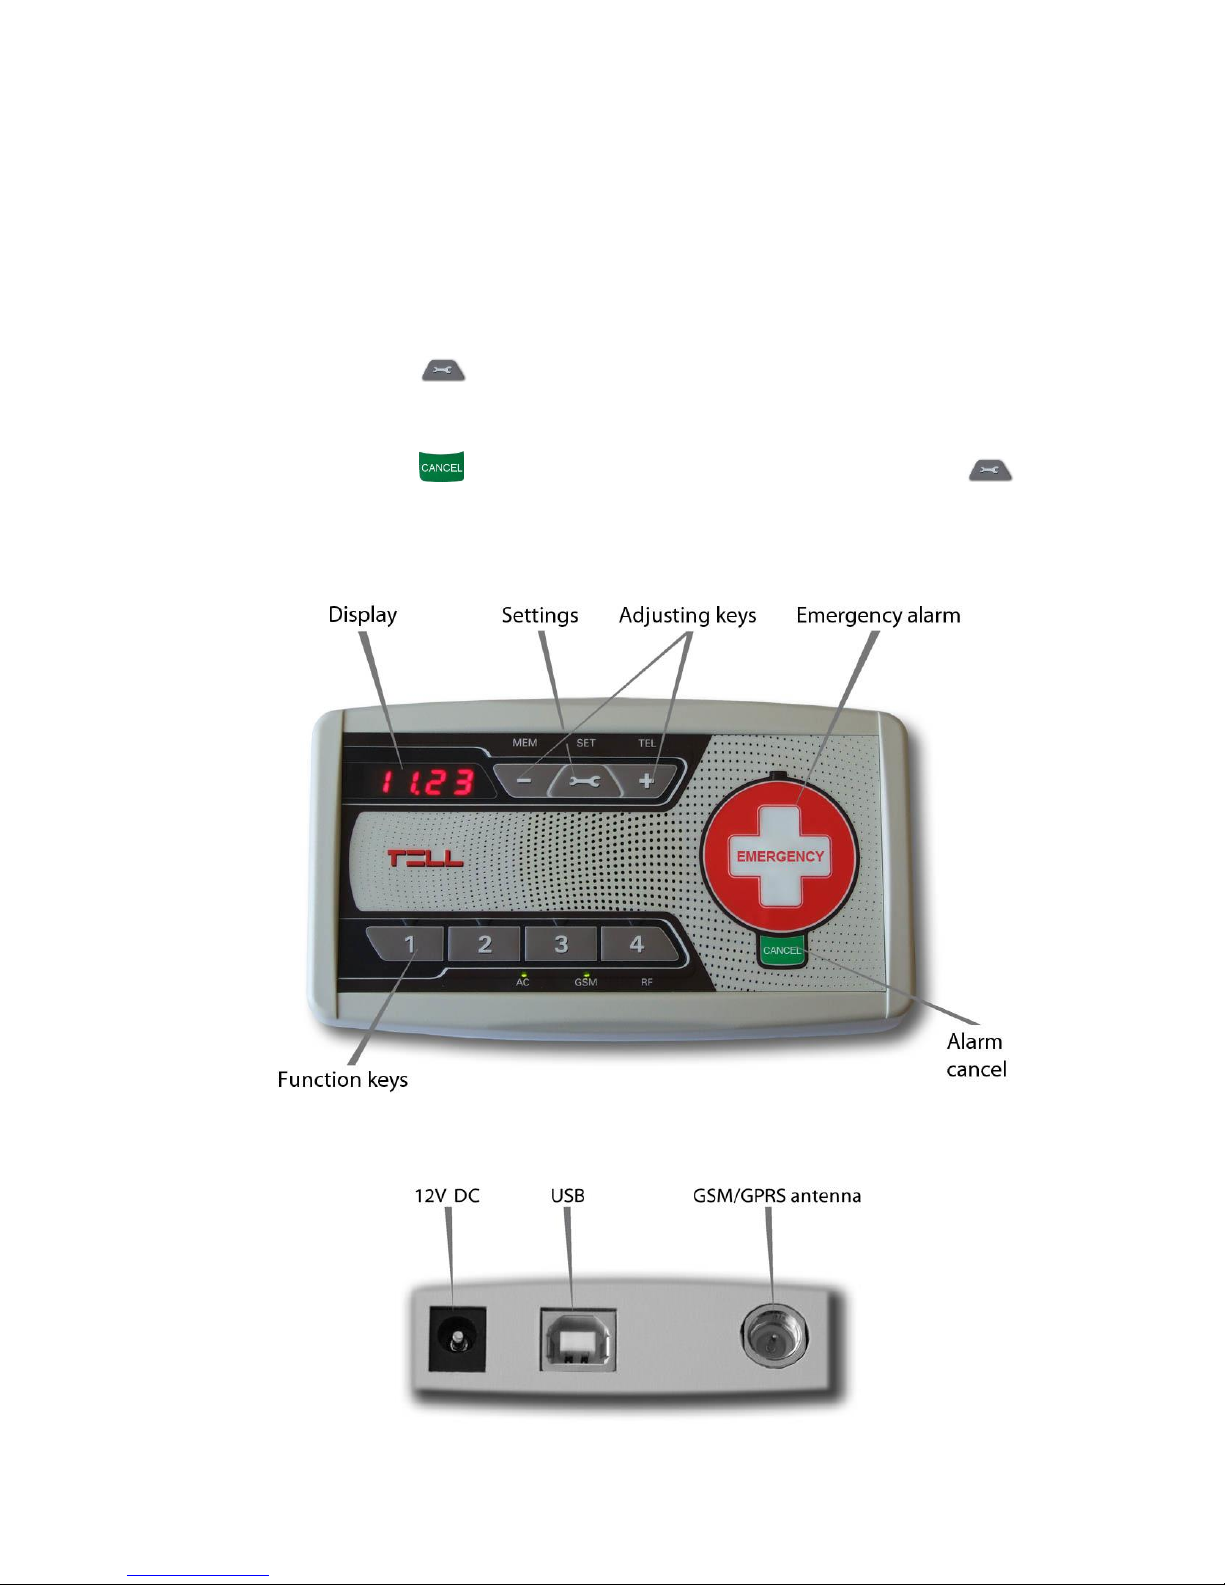
2.2 The easyAID unit’s layout
Module’s layout
Connectors
Page 6

6
2.3 Digital display
Normally the display shows the clock.
The device can display status information by pressing the Settings key shortly.
These status information are the following:
GSM signal: GS 0-99 (indicates the signal strength in percentage from 1 to 99)
SIM status: SI 0-1 (0=no SIM inserted, 1=SIM inserted)
You can switch between the status information with the Settings key. To return to
clock display, press Cancel key. If no key is pressed for more than 10 seconds, the
display returns automatically.
When there is a power loss and the device operates from its internal battery, the display
is automatically turned off with 30 seconds after power loss to minimize power
consumption. In this case the display can be turned on for 30 seconds by pressing
Cancel key.
2.4 Configurable options in the easyAID unit
The following options can be configured in the easyAID module:
Clock setting
Phone number setting
Reminder settings
2.4.1 Setting the clock
To set the clock, keep Settings key pressed continuously and adjust the hours and
minutes value by pressing the keys intermittently. The key increases the
hours while the key increases the minutes. Setting the date is not possible on the
unit’s interface, this can only be done using the programming software.
The date setting does not affect the operation of the device, it only affects the event list
records, which means if the date is not set, the date of the event records in the event list
will not be actual.
Attention! The device does not control daylight saving, therefore the clock has to be
adjusted in this period.
Page 7

7
2.4.2 Setting the phone numbers
1) Press the Settings key continuously for at least 5 seconds, then “PASS”
is displayed on the digital display
2) Enter the user password using the 1-4 function keys (the password is: 1111)
3) Press the Settings key intermittently in the settings mode, until the ”TEL”
LED becomes lit green
4) The LED found above the function key (1-4) is lit if there is already a phone
number stored in the given memory section
5) Keep pressed for 3 seconds the function key (1-4) to which memory section
you wish to add (or modify) a phone number, then “-“ is displayed on the
digital display if this section is empty, or the phone number stored here
previously. The LED above the given (1-4) key flashes green to indicate to
which section the setting is in progress, while the “TEL” LED is lit red
6) Enter the phone number digit by digit using the keys. You can shift
to the next digit by pressing the Settings key
7) After entering the phone number, keep the Settings key pressed
continuously for 3 seconds to save
8) To add new phone number, return to step 5
9) When finished, press Cancel key to exit the programming mode.
The ”TEL” LED is lit green continuously to indicate that there are phone
numbers set.
Erasing phone numbers:
1) Press the Settings key continuously for at least 5 seconds, then “PASS”
is displayed on the digital display
2) Enter the user password using the 1-4 function keys (the password is: 1111)
3) Press the Settings key intermittently in the settings mode, until the ”TEL”
LED becomes lit green
4) The LED found above the function key (1-4) is lit if there is already a phone
number stored in the given memory section
5) Keep pressed for at least 5 seconds the function key (1-4) from which memory
section you wish to erase a phone number. The LED found above the given
key turns off and the display indicates ”- - - -”
(To view the whole phone number, you can scroll the digits of the selected
phone number using the keys)
6) To erase further phone numbers, return to the previous step
7) When finished, press Cancel key to exit the programming mode. If you
have not erased all the phone numbers, the ”TEL” LED remains lit green
continuously to indicate that there are phone numbers set.
Page 8

8
2.4.3 Setting the reminders
Four voice messages can be recorded, each 10 seconds long, which are played at the
given times of day. The reminders can be configured to be played within the 0-24
interval, with daily repetition.
Recording a reminder
Steps of reminder recording:
1) Press the Settings key continuously for at least 5 seconds, then “PASS”
is displayed on the digital display
2) Enter the user password using the 1-4 function keys (the password is: 1111)
3) The “MEM” LED becomes lit
4) The reminders can be stored by assigning them to the 1-4 function keys.
The LED found above each function key is lit if there is already a reminder
assigned to the given key
5) Keep pressed for 3 seconds the function key (1-4) you wish to assign the
reminder to. The LED above the given (1-4) key flashes green to indicate to
which section the setting is in progress, while the “MEM” LED is lit red
6) Say the message after the beep, as close as possible to the front of the
device. After the next beep the module replays the recorded message
automatically
7) Keep the Settings key pressed for 3 seconds. The time of reminder
playing can be adjusted using the +/- keys, digit by digit. Switching
to the next digit can be done using the Settings key , e.g.: to set the time
to 12:30, do the following:
0._._._ 1x = 1_._._ 2x = 12._._ 3x =
12.3._ = 12.30
8) By pressing the Settings key again, the modifications are saved and
saving is confirmed by a voice message
9) If you wish to set further reminders, repeat the above process from step 5
10) When finished, press Cancel key to exit the programming mode. The
„MEM” LED remains lit continuously to indicate that there are reminders set.
If you wish to modify only the time of a reminder, then after step 3 press the 1-4 function
key to which the reminder to be modified is assigned. After this the device plays the
given reminder, then continue the setting from step 7. The LED above the given (1-4)
key flashes green to indicate to which section the setting is in progress.
Page 9

9
Playing a reminder
The recorded reminders can be replayed by pressing shortly the corresponding 1-4
function keys, provided that there has been assigned a reminder to the given key
previously.
Erasing a reminder
Steps of reminder erasing:
1) Press the Settings key continuously for at least 5 seconds, then “PASS”
is displayed on the digital display
2) Enter the user password using the 1-4 function keys (the password is: 1111)
3) The “MEM” LED becomes lit
4) The LED found above each 1-4 function key is lit if there is already a reminder
assigned to the given key
5) Keep pressed for at least 5 seconds the function key (1-4) assigned to the
reminder to be erased. The LED found above the key turns off and “- - - -” is
displayed on the digital display
6) If you wish to erase further reminders, repeat the previous step (5)
7) When finished, press Cancel key to exit the programming mode
8) If you have not deleted all the reminders, the "MEM" LED remains lit green
Confirming a reminder
The user can confirm the reminder by pressing the Cancel key while the reminder
is being played. If no confirmation is done, the message will be repeated in the
configured intervals (5 to 30 seconds). If the reminder is still not confirmed after being
repeated according to the configured number of repetition (1 to 10), the module
generates “Reminder unacknowledged” event which initiates SMS sending or call
according to the settings. The delay between reminder repetitions and the number of
repetitions can be configured using the programming software.
2.4.4 Starting an emergency call
Emergency calls can be initiated by pressing the Emergency key or by pressing the
button on the RF transmitter. In case of initiating an emergency alarm using the RF
transmitter, the transmitter’s LED indicator starts flashing with red light, thereby
indicating that signal transmission is in progress. The transmitter’s LED indicator turns
green for 1-2 seconds if the signal transmission towards the device was successful, i.e.
the device confirmed the reception. In case that the transmitter’s LED indicator keeps
flashing with red light, it means that for some reason the signal does not reach the
device, or the device’s confirmation does not reach the RF transmitter (i.e. the RF
transmitter is outside the operating range). At a single press of the RF transmitter’s
button the RF transmitter tries to send the signal towards the device once per second,
altogether 100 times, i.e. through 100 seconds. The operating range of the RF
transmitter depends on the local reception conditions, therefore it is the installer’s
responsibility to test the proper operation on the scene, as well as to mount the unit in
the most optimal place, where it will be able to receive the RF transmitter’s signals from
the desired distances, taking into account that the operating range of the RF transmitter
decreases when its battery weakens.
Page 10

10
The battery of the RF transmitter needs to be replaced forthwith if “RF transmitter
battery low” event is received, as well as at least yearly, independently of the reception
of this event, in order to retain the operating range of the transmitter! The user can
initiate emergency alarms by 5 seconds using the RF transmitter, while from the
easyAID unit this can be done at anytime.
To cancel or revoke an emergency call press the Cancel key while the countdown
is shown on the digital display. After an emergency alarm is initiated, the device waits 5
seconds before initiating the call and sending SMS message, which time is available to
cancel an alarm initiated by mistake.
When an emergency call is initiated, the device calls the 1-4 phone numbers in order,
and then sends the configured SMS messages. If any of the called numbers/party
received and confirmed the call, then the device does not initiate further calls to the next
phone numbers and does not send any SMS messages about this event.
ATTENTION! Disable voicemail service on the phone numbers to be dialed by the
device because in case that the given phone number is not available, this causes
significant delay to the calls and SMS messages to be initiated to the next phone
numbers! The outgoing calls which are received by voicemail are considered
successful by the device!
Confirming an emergency call
The called party can confirm the emergency call by pressing key on the phone. If the
called party receives the call and presses key on the phone, the device will not initiate
further calls to the next phone numbers, considers the emergency call process finished,
therefore will not send any configured SMS messages about this event.
2.4.5 Confirming a visit
The social worker can confirm the visit by entering a 4 digit individual password (nurse
code) consisting of digits 1,2,3 and 4, which has to be previously configured with the
programming software. If the password has been entered correctly, the module
generates “Nurse confirmation” event and initiates the calls and/or SMS sending
configured for this event.
Entering the confirmation password:
1) Keep the Cancel key pressed for at least 5 seconds
2) On digital display „- - - -” is displayed
3) Enter your 4 digit nurse code using the 1-4 function keys
4) If the password has been entered correctly „ok” is displayed
5) In case of wrong password „Err” is displayed
Page 11

11
2.4.6 Speed dialing
Speed dialing of the 1-4 phone numbers can be initiated by pressing the appropriate
1-4 key for at least 3 seconds. Key 1 stands for the first phone number, key 2 for the
second, key 3 for the third and key 4 for the forth phone number.
The call is initiated automatically in hands-free mode. The call in progress can be ended
by pressing Cancel key. If the called number is not available, is busy, or there is no
phone number stored in the given memory section, the device indicates this by playing
“Unsuccessful call” voice message.
2.4.7 Assigning the RF transmitter
The device supports usage of two RF transmitters. If you assign the RF transmitter to
the device, emergency call can be started with the assigned transmitter only. If no RF
transmitters are assigned to the device, it will work with any easyAID RF transmitter,
any easyAID RF transmitter can start emergency calls.
Steps of assigning a transmitter:
1) Press the Settings key continuously for at least 5 seconds, then “PASS”
is displayed on the digital display
2) Enter the user password using the 1-4 function keys (the password is: 1111).
The digital display shows “ok”, then “- - - -”.
3) Keep the Cancel key pressed and press once function key 1 or 2,
according to the number of the memory slot you wish to assign the given RF
transmitter to. The digital display will show the number of the selected memory
slot (“1” or “2”).
4) Press the button of the RF transmitter you wish to assign. If assigning was
successful, “ok” will be displayed on the digital display, then after emitting a
signal tone the module will exit the programming mode automatically. To
assign a new RF transmitter, repeat the above steps by selecting this time the
memory slot which is not in use yet.
2.4.8 Erasing all RF transmitters
If no RF transmitters are assigned to the device, or if you erase all RF transmitters, the
device will work with any easyAID RF transmitter, any easyAID RF transmitter can start
emergency calls.
Steps of erasing all transmitters:
1) Press the Settings key continuously for at least 5 seconds, then “PASS”
is displayed on the digital display
2) Enter the user password using the 1-4 function keys (the password is: 1111).
The digital display shows “ok”, then “- - - -”.
3) Keep the Cancel key pressed and press once function key 3. “Er” will be
displayed on the digital display, then after emitting a signal tone the module will
exit the programming mode automatically.
Page 12

12
2.4.9 Voice call settings
Incoming calls are accepted only from the preconfigured (up to 4) phone numbers.
Calls initiated from other phone numbers are rejected automatically.
In case of an incoming call the module answers the call automatically in hands-free
mode after the configured number of rings. The call can be terminated by pressing the
Cancel key, or by the caller. The call is also terminated if an emergency call is
initiated.
Due to the compact design of the device, its speaker and microphone are close to each
other. Therefore, due to the application of hands-free mode, it may happen that the
caller hears his own voice back through the phone during a conversation. This echo
phenomenon is normal while using the device, therefore it may not be the subject of a
quality complaint.
To reduce possible echo phenomenon, there is possibility to adjust the speaker volume
of the device during a conversation through DTMF commands using the keys of the
phone. By pressing intermittently key 3 on the phone the speaker volume can be
decreased, while pressing key 6 it can be increased.
2.4.10 SMS forwarding
The SMS messages received on the SIM card of the device are forwarded automatically
to the phone number set in memory section 1. (This can be used e.g. for forwarding
pre-pay card balance information messages received from the GSM service provider).
If no phone number is set in memory section 1, the device does not forward and deletes
incoming SMS messages.
2.4.11 SMS restriction
The device has built-in SMS restriction function, which allows sending of max. 50
messages per 12 hours (regarding to the sum of the forwarded and alarm messages).
Page 13
13
3 Configuring the easyAID unit using the programming software
The easyAID module’s parameters can be configured on PC through USB connection or
through GSM modem connection, using the programming software found on the CD
supplied with the product.
For modem connection a GSM modem is necessary (TELL GT64 is recommended) and
a USB / RS232 adapter cable equipped with FTDI chip, which can be purchased
separately.
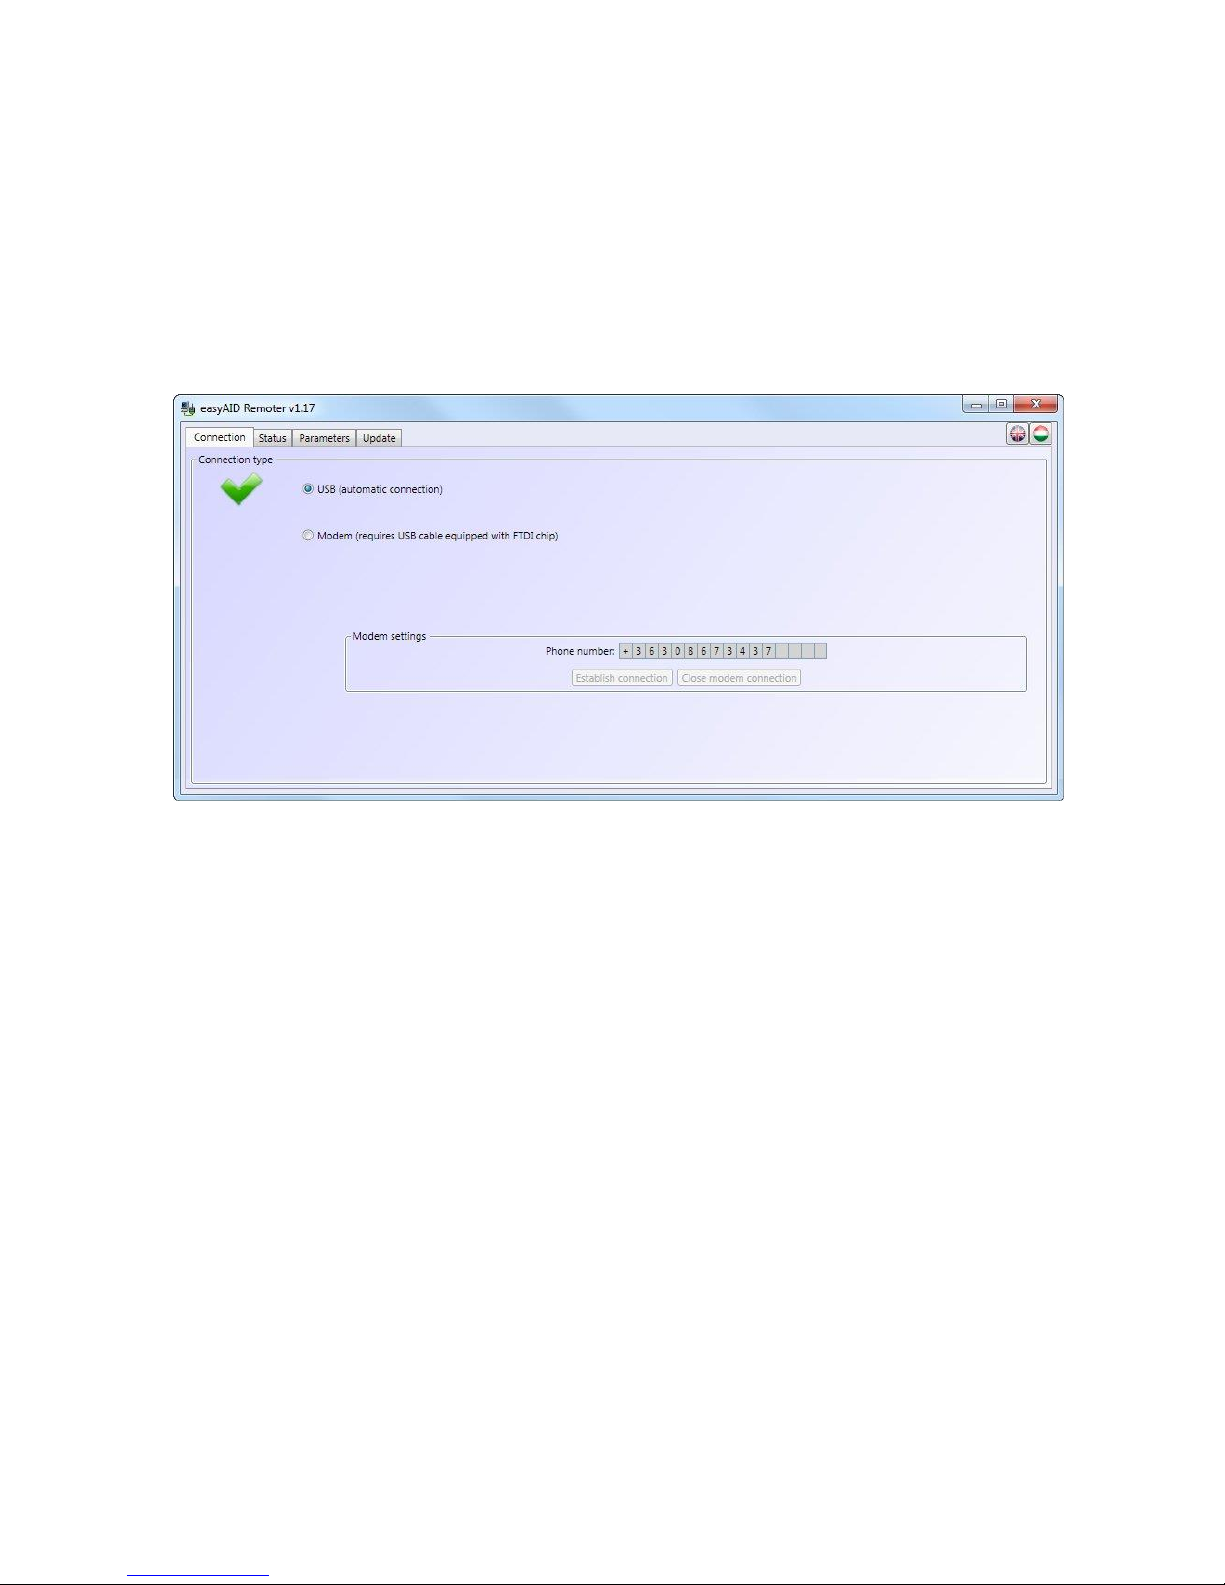
3.1 Configuration through USB connection
Start the “easyAID_GSM_Remoter” program
Choose the USB option in the “Connection” menu
Power up the easyAID module
Connect the module to the PC using USB cable
The programming software detects the connected device automatically
The software asks for the module’s password, if this is other than the default (1111)
If the connection is successful, a green tick is displayed
Perform the desired settings (help is available in the following chapters)
When programming is finished, disconnect the device from USB
Page 14

14
3.2 Configuration through modem connection
For this type of connection a GSM modem (TELL GT64 is recommended) and a
USB / RS232 adapter cable equipped with FTDI chip are necessary. The SIM cards
inserted in the modem and in the easyAID device must support GSM data call (CSD)
service and must be able to initiate and receive calls through this service.
Establishing the modem connection:
Start the “easyAID_GSM_Remoter” program
Choose the Modem option in the “Connection” menu
Power up the GSM modem, then connect it to the PC using the USB/RS232 adapter
cable equipped with FTDI chip
The programming software detects the connected device automatically
Enter the phone number of the easyAID module to be connected in the “Phone
number” field using international format
Start dialing by pressing “Establish connection” button
The software asks for the module’s password, if this is other than the default (1111)
If the connection is successful, a green tick is displayed
Perform the desired settings (help is available in the following chapters)
When programming is finished, close the connection by pressing “Close modem
connection” button
3.3 Configuring the parameters
To configure parameters choose the “Parameters” menu where you can edit the settings
in the submenus.
Page 15

15
3.3.1 Settings
The “Settings” menu makes possible the configuration of GSM call parameters, status
reporting and daily reminders.
State reports:
o Temperature min/max values: a minimum and a maximum temperature limit
can be configured between 0 and 50ºC. If the module’s environmental
temperature drops below the minimum value or increases above the maximum
value, the module generates the corresponding event and initiates call and/or
sends SMS according to the settings.
Attention! The device measures the temperature with approximate accuracy,
the measured value may differ with +/-5ºC from the real temperature.
o Test report frequency: it can be configured in hours between 1 and 168, how
often the module should send a periodic test report message, expediently in
SMS. This report serves for checking if the device operates.
o Test report time: the module sends the first periodic test report at the time of
day set here, thereafter with the configured frequency
Voice call settings:
o Phone numbers for incoming/outgoing calls: four phone numbers can be
configured from which the module accepts incoming calls and to which calls can
be initiated. When receiving a call, the module answers automatically in
hands-free mode after the configured number of rings, this way makes possible
the conversation with the person staying near the device. Outgoing call occurs
when an emergency alarm is initiated, and speed dialing of phone numbers 1-4
is also possible.
Page 16

16
Miscellaneous options:
o Low battery warning: if enabled, the device plays a warning voice message by
15 minutes when the battery voltage drops below 7.5V on power loss, until the
battery is discharged and the device turns off, or the power voltage restores.
o Number of rings: it is possible to specify, after how many rings (1 to 5) the
module should answer a call automatically.
o Ring volume for incoming calls: you can adjust the ringer volume for incoming
calls between 50% and 100%.
o RF transmitter supervision timeout: the RF transmitter supervision interval
can be set between 1 and 24 hours. If the device does not receive the test signal
from the RF transmitter within this interval, then it generates “RF supervision
fault” event.
Nurse code: a code consisting of digits 1,2,3 and 4 can be specified which can be
used by the social workers/nurses to confirm a visit. The preset code can be entered
on device using the 1-4 function keys. After the social worker/nurse enters the code,
the module generates “Nurse confirmation” event and initiates call and/or sends SMS
as configured.
Reminder settings: four daily reminders can be configured for diverse tasks, as
specified in the “User’s guide” chapter.
o Number of reminder repetitions: it can be configured between 1 and 10 how
many times the module should repeat the given reminder voice message.
o Delay between repetitions: it can be configured between 5 and 30 seconds,
how long the module should wait before repeating the given reminder voice
message.
o 1-4: the checkboxes can be used to enable the 1-4 reminders, and in the time
fields the time of day can be set when the module should play the given reminder
voice message.
Page 17

17
3.3.2 Custom events
The “Custom events” menu provides possibility to customize the module’s events. It can
be specified which event should initiate calls and/or SMS messages to which of the
4 phone numbers.
The alarming period (event lifetime) is 15 minutes for each event.
The alarming period is applied specifically for each custom event, which means the
module tries to report each event for 15 minutes using the configured reporting channels.
Attention! As the module is unable to report an event within its alarming period, the
reporting process of that event will be terminated when the 15 minutes period expires,
and that specific event will not be reported anymore.
Specification of the columns of the ”Custom events” menu:
No.: the event’s ordinal number in the list
Event name: the name of the event
Voice call 1…4: clicking in the checkboxes you can enable the given event to initiate
voice call to the configured (1-4) phone numbers
SMS 1…4: clicking in the checkboxes you can enable the given event to send SMS
message to the configured (1-4) phone numbers
SMS message: you can enter the text of the SMS message to be sent to the enabled
(1-4) phone numbers when the given event is generated. The maximum length of the
message should not exceed 80 characters, but any character can be used.
Page 18

18
Events:
o Panic button: this event occurs when the emergency key found on the module is
pressed
o RF transmitter panic: this event occurs when the emergency button of the RF
transmitter is pressed
o RF transmitter battery low: this event indicates that the battery voltage of the
RF transmitter is low. It occurs when the battery voltage drops below 2.2V.
If receiving this event, replace forthwith the battery of the RF transmitter.
o RF supervision fault: this event occurs when the easyAID module does not
receive the RF transmitter’s test report (the transmitter was moved too far from
the module or became unusable due to flat battery or other reason)
o RF supervision restore: this event indicates the restoration of the RF
transmitters test report. Is generated when any signal is received from the RF
transmitter after a supervision fault
o Battery fault: this event indicates that the module’s battery voltage is low.
It occurs when the battery voltage drops below the 6.5V level
o Battery restore: this event is generated when the battery voltage reaches the
normal 7.4V level after a battery fault
o Supply voltage fault: this event occurs when the module’s supply voltage drops
below the 9V level for at least 3 minutes
o Supply voltage restore: this event occurs when the supply voltage rises above
10V for at least 10 seconds after a supply voltage fault
o Test event: the periodic test report which is generated as configured in the
“Settings” menu / “State reports” section / “Test report frequency” and
“Test report time” options
o Low temperature: this event occurs when the environmental temperature of the
module drops below the configured minimum temperature value
o Low temperature restore: this event occurs when the environmental
temperature of the module restores above the configured minimum temperature
value after a low temperature event
o High temperature: this event occurs when the environmental temperature of the
module rises above the configured maximum temperature value
o High temperature restore: this event occurs when the environmental
temperature of the module restores below the configured maximum temperature
value after a high temperature event
o Reminder unacknowledged: this event occurs if the user does not confirm a
reminder
o Nurse confirmation: this event occurs when the social worker/nurse enters the
nurse code on the module when visiting the patient
Default: pressing this button, the whole event template can be restored to factory
default.
Page 19

19
3.3.3 Firmware
The “Firmware” menu provides possibility to upgrade the module’s firmware if necessary
and justified. The firmware (the module’s software) defines the operation and functions of
the device. Uploading incompatible or faulty firmware may cause damage to the easyAID
module!
Firmware update process:
Power up the easyAID module
Establish the connection between the programming software and the easyAID
module
Select the corresponding firmware file after pressing “Browse” button
To start the upgrade press “Upload firmware file” button
The progress bar found at the bottom of the program window indicates the uploading
status
When uploading is completed, the module restarts automatically. After this load your
settings to the module, then check the operation.
Page 20

20
3.4 Management of the settings
You can easily manage and archive your settings with the seven buttons found on the
upper section of the „Parameters” menu.
The functions of the seven buttons, from left to right: Read parameters from file, Save
parameters to file, Save parameters to file in printable format, Read parameters
from module, Upload parameters to module, Compare parameters with the module
and Change module password.
After you have finished configuring the parameters, upload the settings to the module by
pressing the upload button. The upload/download progress is indicated on the progress
bar found at the bottom of the software window. The new settings are activated only after
the upload is successfully completed.
3.5 Changing the module’s password
To change the module’s password, click on the “lock” button, then fill out the text
fields and click on OK button.
Attention! The module’s password is different from the password used to enter the user
settings. The module’s password protects the software settings against unauthorized
access. The user password does not change by changing the module’s password, it
always remains the default 1111, and it serves only for preventing the user from entering
the settings menu accidentally.
In case you forgot the module’s password, you cannot change it, therefore you have to
reset the module to its default state, which operation will also reset the password to the
default 1111.
Warning! In case you reset the module, all previously configured parameters will
be reset to default values, which means all the settings and recorded reminders
will be erased.
3.6 Resetting the module
To restore factory default settings, do the following:
Switch the module to SLEEP mode according to the instructions found in chapter 2.1
Keep pressed the Settings and Cancel keys at the same time
Power up the module (connect the power adapter)
Release the keys kept pressed
“rES.” Is displayed for 2 seconds on the digital display, then the settings are erased.
Page 21

21
3.7 Module status monitoring
The easyAID module’s actual status details (firmware version, date/time settings,
temperature, supply voltage, charging status, GPRS connection and GSM module
status, GSM signal strength, SIM card registration status) are available in the “Status”
menu, and the actual list of events and module’s messages are also displayed here.
Elements and available functions of the “Status” menu:
easyAID Module section:
- Firmware version: version of the module’s firmware and its issue date
- Internal clock: the time setting of the connected module
- Temperature: the measured actual environmental temperature
- Supply voltage: the value of module’s input voltage
- Battery voltage: the terminal voltage of the 7.4V built-in battery
- Charging: On: battery charging in progress
Off: battery charging is off
GSM Module section:
- Status: Active: registered on the GSM network
Inactive: no connection with the GSM network
- GSM signal: actual GSM signal strength
- Network: accessed GSM network name
Page 22

22
Event list section:
The event list contains the module’s events in the order of their occurrence. The list is
refreshed automatically by 1 second.
o Index: the event’s ordinal number
o Event: the event’s name
o T1 … T4: the event’s 16 character Contact-ID code
o S1 … S4: reporting to monitoring station phone numbers 1 and 2
o Date/Time: date and time of event generation
Signs displayed in columns T1-T4 and S1-S4:
o ? - event processing/reporting in progress
o * - reporting completed successfully
o ! - reporting failed
o S - the event and further reporting has been stopped
o T - reporting timeout, reporting was unsuccessful within the alarming period
“Stop alarm” button: all events/reports in progress can be stopped by pressing this
button when connected to the module
State messages section:
This section shows the module’s recent messages with date and time of generation.
It is possible to select which messages to be displayed by enabling/disabling the
“easyAID messages”, “GSM module messages”, “DTMF messages” and “Event
messages” options.
The content of the message window can be saved to text file by pressing “Export
message window” button, or can be deleted using “Clear message window” button.
3.7.1 Downloading the event list
A longer event list can be downloaded after pressing “Detailed event list” button in the
“Status” menu. The module is capable to store the latest 1000 events.
Number of list items: this number of events will be displayed among the latest ones
Download: press to start downloading the events from the module
Save list: the content of the downloaded list can be saved to Excel file by pressing
this button
Page 23

23
Columns of the event list:
o Index: the event’s ordinal number
o Event: the event’s name
o T1 … T4: the event’s 16 character Contact-ID code
o S1 … S4: reporting to monitoring station phone numbers 1 and 2
o Date/Time: date and time of event generation
Signs displayed in columns T1-T4 and S1-S4:
o ? - event processing/reporting in progress
o * - reporting completed successfully
o ! - reporting failed
o S - the event and further reporting has been stopped
o T - reporting timeout, reporting was unsuccessful within the alarming period
3.8 Software update
The “Update” menu makes possible to select the programming software’s update mode.
Update: if “Automatic update” option is selected, the program searches for new version
on the internet by 20 minutes. If “Manual update” is selected, searching for updates can
be initiated by pressing “Search for program updates” button. To update the program,
internet connection is necessary.
Enable automatic updating: if this option is enabled, the program performs the update
without asking for the user’s confirmation, then closes and restarts automatically with the
new version. If disabled, the program asks for the user’s confirmation.
Search for program updates: by pressing the button, searching for updates is started.
Page 24

24
3.9 Voice messages, warnings
Some of the events are also indicated by voice messages as follows:
”Emergency call in progress” – when the module’s emergency key or the RF
transmitter’s emergency button is pressed
”Emergency call cancelled” – when an emergency call is cancelled by pressing the
Cancel key
”Calling” – when speed dialing is initiated using the 1-4 keys
”Unsuccessful call” – if the number called with speed dialing is busy, unavailable, or
there is no phone number stored in the given memory section
”Settings saved” – after modifying settings on the module’s user interface
”Say the reminder message after the beep” – when recording a reminder
”First reminder” – when pressing function key 1, if the first reminder’s time is set, but
no message is recorded
”Second reminder” – when pressing function key 2, if the second reminder’s time is
set, but no message is recorded
”Third reminder” – when pressing function key 3, if the third reminder’s time is set, but
no message is recorded
”Fourth reminder” – when pressing function key 4, if the fourth reminder’s time is set,
but no message is recorded
”The battery is low. Please connect the device to the charger” – if the supply voltage is
lost (AC failure) and the unit’s battery has discharged below 7.5V. This warning
message is played by 15 minutes until the battery becomes fully discharged and the
device turn off, or the supply voltage restores.
Page 25

25
4 Peripheries of the easyAID unit
4.1 Device LED signals
AC LED
Continuous green: supply voltage is OK and the battery is charged.
Pulsing green: supply voltage is OK and the battery is charging.
Pulsing red: there is no supply voltage, the module operates from its
battery.
GSM LED
Continuous red: the GSM module cannot be initialized. This may
happen if the SIM card is not detected or if other hardware failure
occurs.
Slowly pulsing red: the GSM module is being initialized.
Fast pulsing red: the GSM module is initialized, registering to GSM
network is in progress.
Continuous green: the GSM module has registered to GSM network
and is ready for operation.
Pulsing green: an outgoing call is in progress on the GSM module.
RF LED
Pulsing green: the RF transmitter was activated (RF panic in
progress).
SET LED
Not in use.
MEM LED
When in programming mode, is lit green if the reminder settings are
selected. Still in programming is lit red if the reminder functions are
being programmed.
In normal operation mode is lit green if there are reminders set.
TEL LED
When in programming mode, is lit green if the phone number settings
are selected. Still in programming is lit red if the phone numbers are
being programmed.
In normal operation mode is lit green if there are phone numbers
stored.
EMERGENCY
LED
Fast pulsing red: 5 seconds delay in progress after pressing the
emergency key.
Continuous red: reporting an emergency alarm is in progress and
waiting for callback.
Slowly pulsing red: waiting for nurse confirmation after an
emergency alarm.
4.2 RF transmitter LED signals
LED indicator
Pulsing red: signal transmission in progress.
Green: successful transmission, the device confirmed the reception.
4.3 SIM card socket
The SIM card socket is placed on the back part of the electronic panel. Insert the SIM
card here. To access the panel, the module’s plastic casing has to be removed. The SIM
card necessary for the module’s operation can be procured from any GSM service
provider. Necessary services: GSM voice communication and SMS sending.
The easyAID module is unlocked, it can be used with SIM cards from any GSM
service provider.
Page 26

26
5 Installation guide
5.1 Mounting and putting into operation
Disable PIN code request, voicemail and “notification on missed calls”
services on the SIM card placed into the module.
Enable caller identification and caller ID sending services on the SIM card at
the GSM service provider (a few types of SIM cards do not have these services
enabled by default).
Inserting the SIM card:
Unscrew the four screws on the back of the module using an appropriate
screwdriver. When unscrewing, hold the front cover and back cover together so as
not to fall apart, as this may damage the connecting cables.
Take apart carefully the front cover from the back cover. Take care not to strain the
connecting cables. The circuit board is fixed to the back cover.
The SIM card should be inserted in the SIM slot found on the middle of the circuit
board, near the display unit:
1. pull back (away from the display unit) the metal security lock of the SIM slot until
it clicks
2. reach under the metal security lock with your fingernail and open the slot
3. slide the SIM card into the opened part with the contacts facing down, as shown
in the figure above
Close back the opened part together with the SIM card
Press down carefully and pull forward (towards the display unit) the metal security
lock, until it clicks
Assemble the front and back cover so that the connecting cables (except the
flexible flat cable) should not lay under the speaker’s magnet
Hold the front and back cover together and screw back the four screws, but do not
overtighten them.
Test the GSM signal strength with your mobile phone. It may happen that the signal
strength is not sufficient in the desired mounting place. In this case the planned
installation place can be changed before mounting the device.
Do not mount the unit in places where it can be affected by strong electromagnetic
disturbances (e.g. in the vicinity of electric motors, etc.).
Do not mount the unit in wet places or places with high degree of humidity.
For appropriate RF range, the device should be mounted horizontally in
upright position, on the wall or other suitable surface, at least at 1 meter from
the ground level.
Avoid mounting the device in the close proximity of metal surfaces, because
these greatly reduce the RF transmitter’s operating range!
Page 27

27
Connecting the GSM antenna: the antenna can be connected to the FME connector.
The antenna supplied with the module provides good transmission under normal
reception circumstances. In case of occasionally occurring signal strength problems
or/and wave interference (fading), use another type of antenna with higher gain or
find a more suitable place for the module. Place the GSM antenna as far as possible
from the device, as high as possible, in vertical position.
Power up the AC adaptor, then connect it to the module.
After putting into operation, check the GSM signal strength using the programming
software. In case of low signal, achieve better signal by relocating the GSM antenna.
6 Technical information
6.1 Technical specification
Supply voltage: 9-30VDC
Nominal current consumption: 180mA /12VDC
Maximal current consumption: 500mA /12VDC
Operating time from battery: ≈2 hours
Operating temperature: 0ºC – +70ºC
Transmission frequency: GSM 900/1800 MHz, 850/1900 MHz
GSM phone type: Simcom SIM900
RF transmitter battery type: 2pcs CR2016 Li-Mn 3V
Dimensions: 176 x 100 x 30 mm
Nett weight: 300g
Gross weight (packed): 950g
6.2 Contents of the package
easyAID device
GSM antenna
AC adapter
Fixing board, Velcro, 4 wall plugs, 4 screws
CD, manual, warranty card
6.3 The manufacturer’s contact
T.E.L.L. Software Hungária Kft
4034 Debrecen, Vágóhíd u. 2.
Hungary
Tel.: +36-52-530-130
Fax.: +36-52-530-131
Web: www.tell.hu
 Loading...